

Page 1
Pro Pack Solutions, Inc. 770-554-1187
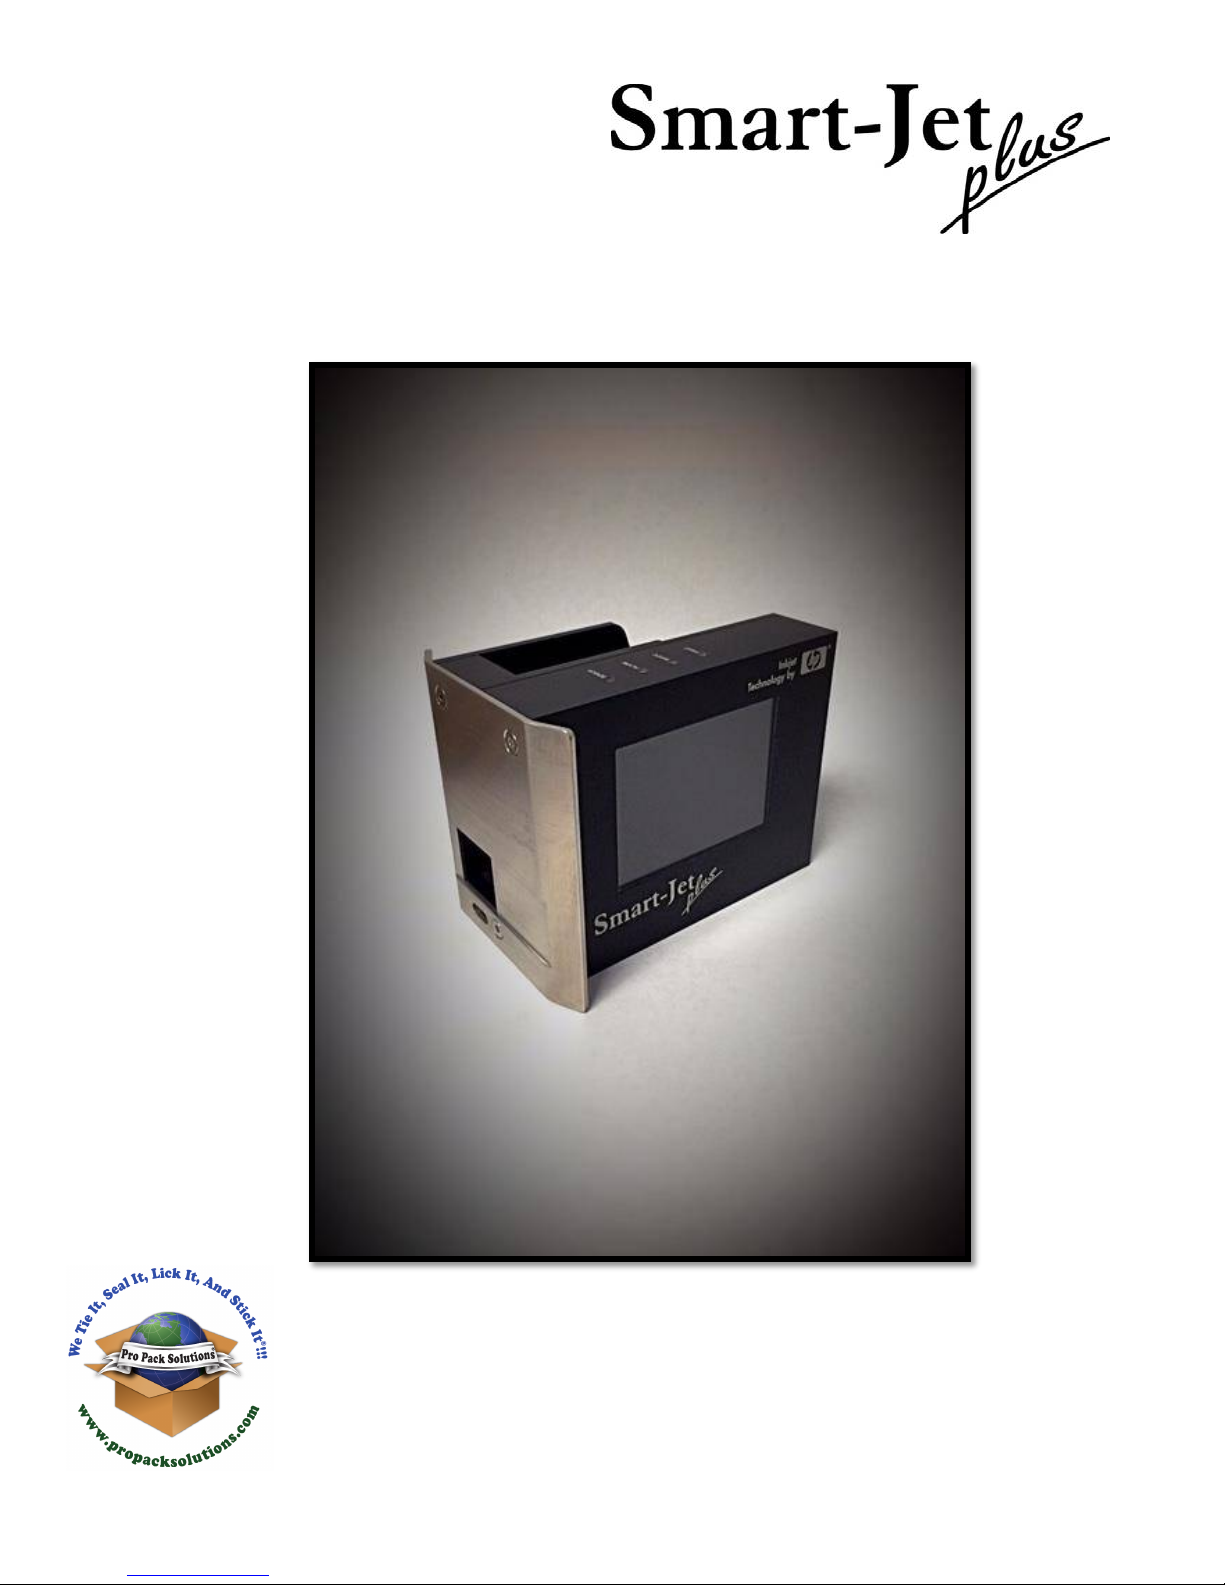
USER MANUAL
www.ProPackSolutions.com
Page 2

Contents
Contents ................................................................................................................................................... 2
ABOUT SMART-JET PLUS .......................................................................................................... 4
TECHNICAL SPECIFICATIONS ............................................................................................................... 4
FEATURE MENU ..................................................................................................................................... 5
WIRELESS KEYBOARD DEFINITION ...................................................................................................... 8
INSTALLATION PROCEDURES .................................................................................................. 8
MOUNTING THE BRACKETS .................................................................................................................. 8
MOUNTING OPTIONS ........................................................................................................................... 10
EXTERNAL DEVICE CONNECTION ......................................................................................... 12
EXTERNAL SENSOR ............................................................................................................................. 12
ENCODER ..............................................................................................................................................
OUTPUT................................................................................................................................................... 13
RS485 PROTOCOL ............................................................................................................................... 14
QUICK STARTUP................................................................................................................................... 16
OPERATIONAL CHART ......................................................................................................................... 14
SMART-JET PLUS OPERATION
OPERATION WITH WIRELESS KEYBOARD
Compatible Wireless Keyboards
............................................................................................... 19
.........................................................................................
............................................................................................... 19
13
17
Connect to Keyboard ................................................................................................................ 19
Procedure in Details ................................................................................................................. 19
Message .................................................................................................................................................
Operation
Settings...................................................................................................................................................
OPERATION WITH WI-FI VIA MOBILE DEVICES
ONNECT TO WI-FI ................................................................................................................ 32
C
................................................................................................................................................
..................................................................................
19
26
27
32
PROCEDURE IN DETAIL
OPERATION WITH PC
...........................................................................................................................
MINIMUM PC REQUIREMENTS ............................................................................................ 3
CONNECT SMART-JET PLUS TO PC
Install Smart-Jet Plus software on your PC- Contact: [email protected] ............................................
Install Drive for Smart-Jet Plus Printer Controller on PC .........................................................................
Smart‐Jet Plus Manual v04 | 2015‐07‐30 | by MSSC, LLC
....................................................................................................... 33
33
3
..................................................................................... 34
34
36
2
Page 3

Install Driver
1 Plug printer into computer with USB cord that was provided with the unit.
2. Power on the printer, go to operate, and “Connect PC.”
3. You should hear a beep and computer will search for driver. ........................................................
Uses of Smart-Jet Plus Controller Interface ............................................................................................
Create new message .............................................................................................................................
Install Smart-Jet Plus Convert Logo (create logo under .hex format) (Contact: [email protected])
Using Smart-Jet Plus Convert Logo ........................................................................................................
............................................................................................................................................
......................................
.................................................................
.....
38
38
38
38
41
46
55
57
PRODUCT WARRANTY ............................................................................................................ 59
APPENDIX ................................................................................................................................. 60
INK CARTRIDGE MAINTENANCE
.........................................................................................................
60
Print head cleaning: .................................................................................................................. 60
Wiping ...................................................................................................................................... 60
Purging ..................................................................................................................................... 61
INK CARTRIDGE STORAGE PROCEDURE: .........................................................................................
62
For short term storing (less than one day): ............................................................................... 62
For long term storing (more than one day): .............................................................................. 62
Smart-Jet Plus FAQ ................................................................................................................................
UPDATE FIRMWARE INSTRUCTIONS .................................................................................................
Wireless Device, Apple (iOS)
Smart-Jet Plus Replacement Parts .........................................................................................................
..................................................................................................................
63
65
68
70
Smart‐Jet Plus Manual v04 | 2015‐07‐30 | by MSSC, LLC
3
Page 4

ABOUT SMART-JET PLUS
Item
No.
Description
Specifications
1.
Model
Smart-Jet Plus
2.
Display
LCD 2.8” automatic rotation
3.
Dimensions (LxWxH)
106x53x83mm / 4.17x2.09x3.27in
4.
Weight
450g 1.00lb
5.
Power supply
AC 100V – 240V, 50/60Hz, 1.4A
6.
Maximum power consumption
48W
7.
Maximum printing resolution
300x300dpi
8.
Print speed
76m/min@300x300dpi
9.
Optical density
5 levels
10.
Operation selection
PC, Wireless keyboard, Wi-Fi
11.
Message memory
100 messages
12.
Ink solution
Aqueous and Solvent
13.
Menu language
Multiple / selectable
14.
Printable characters
Windows true fonts with PC connection
15.
No. of lines
Maximum 6 lines
16.
Character height
Maximum 12.7mm / 0.5”
17.
Printability
Alphanumeric, logos, date/time, expiry date, Julian date,
shift code, data and barcodes
18.
Operating temperature
5°C – 50°C 41-122°F
19.
External connections
External sensor, encoder, etc…
Thank you for purchasing the Smart-Jet Plus Thermal Inkjet Coder, a product of MSSC, LLC. This
printer is designed for packaging printing applications powered by HP Thermal Inkjet Technology.
The Smart-Jet Plus is capable of being controlled via PC connection to print variable data and
barcodes, Wi-Fi connection via mobile devices running on iOS operating systems, and wireless
keyboards. Each option provides a full set of applications.
Smart-Jet Plus produces crisp text, logos, variable data and barcodes on porous and non-porous media
by automatically recognizing aqueous or solvent inks and applying the appropriate printing
parameters.
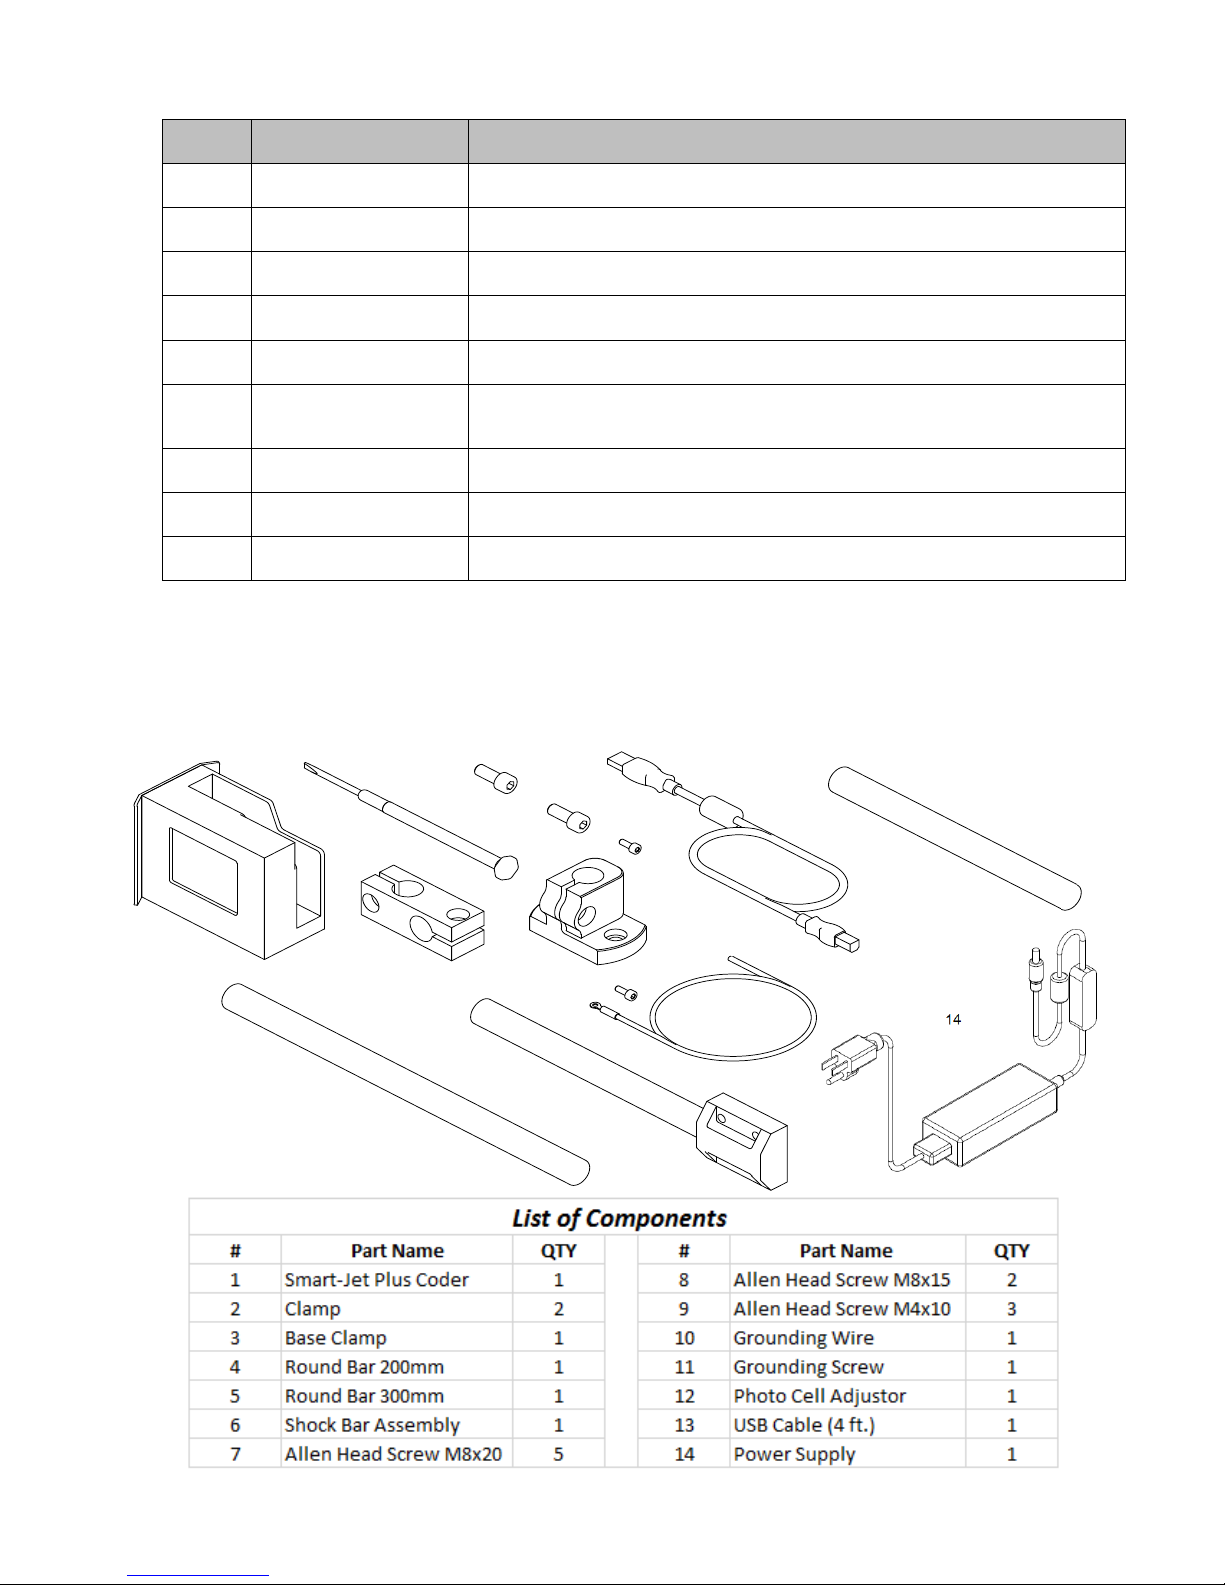
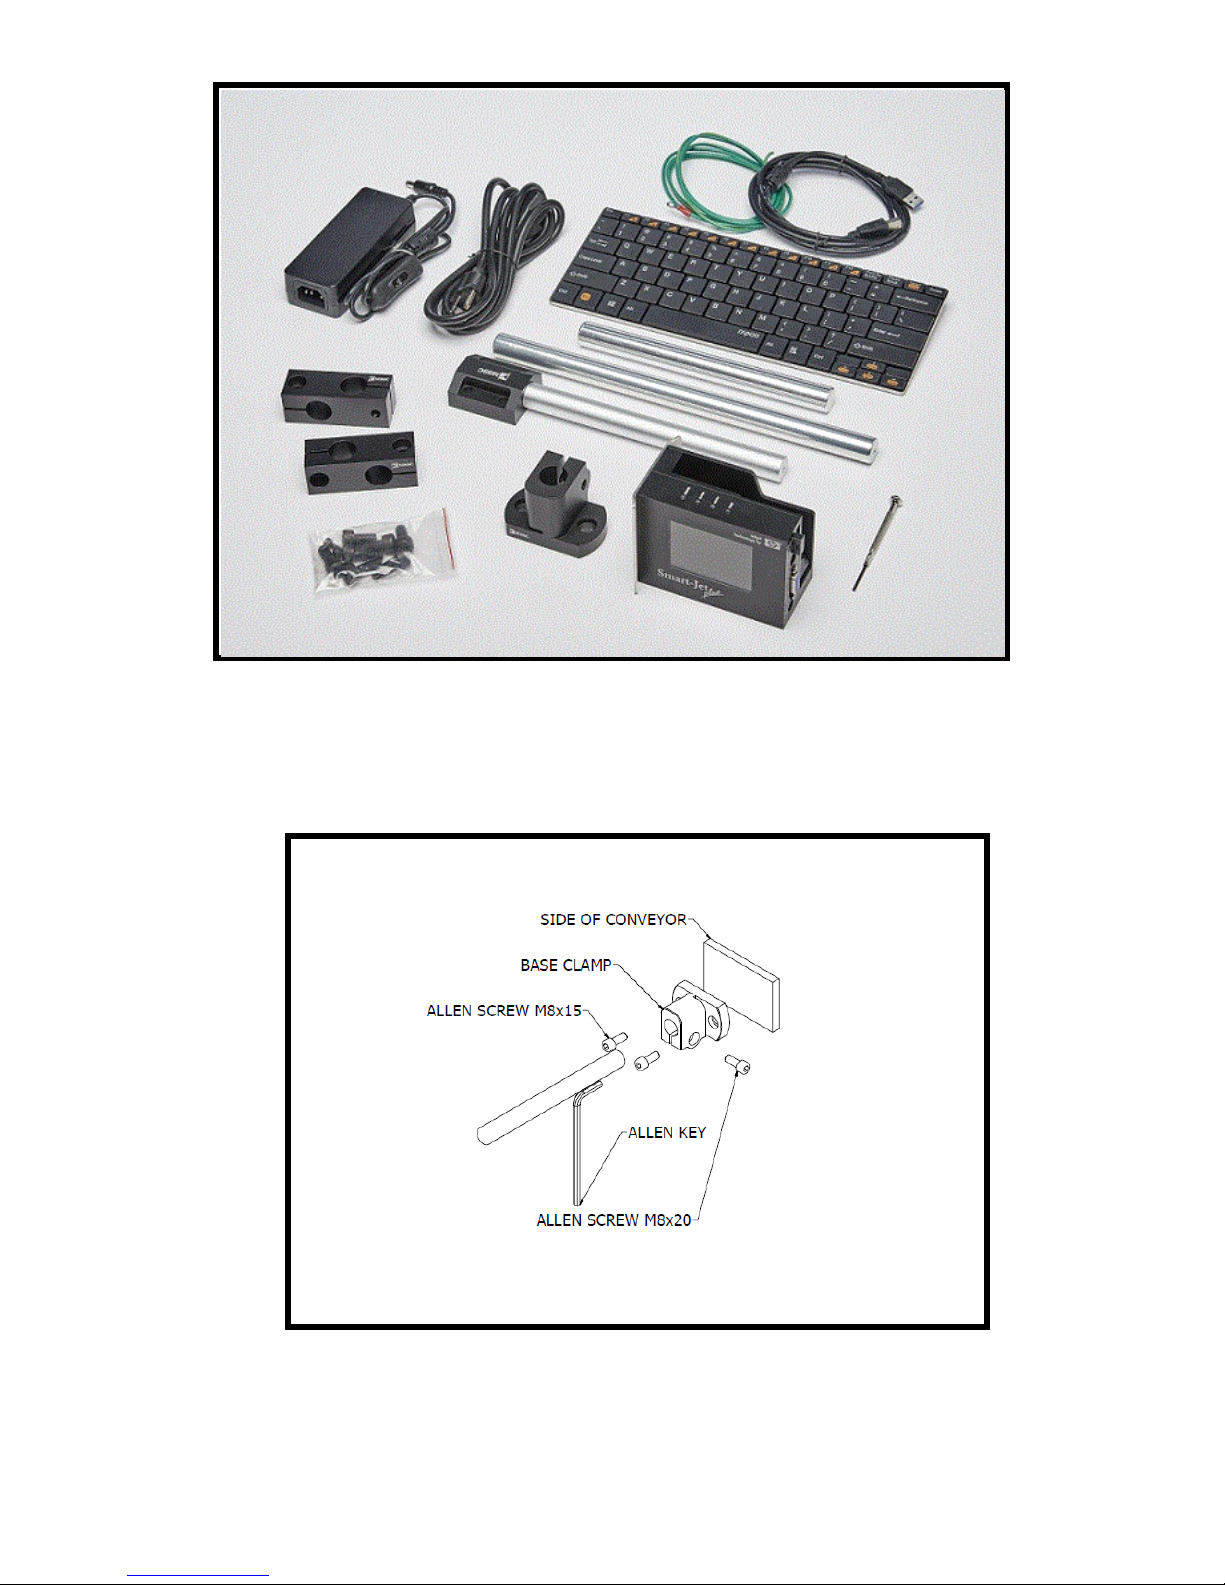
The complete system includes one Smart-Jet Plus printer, power supply with On/Off switch,
wireless keyboard, mounting brackets.
TECHNICAL SPECIFICATIONS
Smart‐Jet Plus Manual v04 | 2015‐07‐30 | by MSSC, LLC
4
Page 5
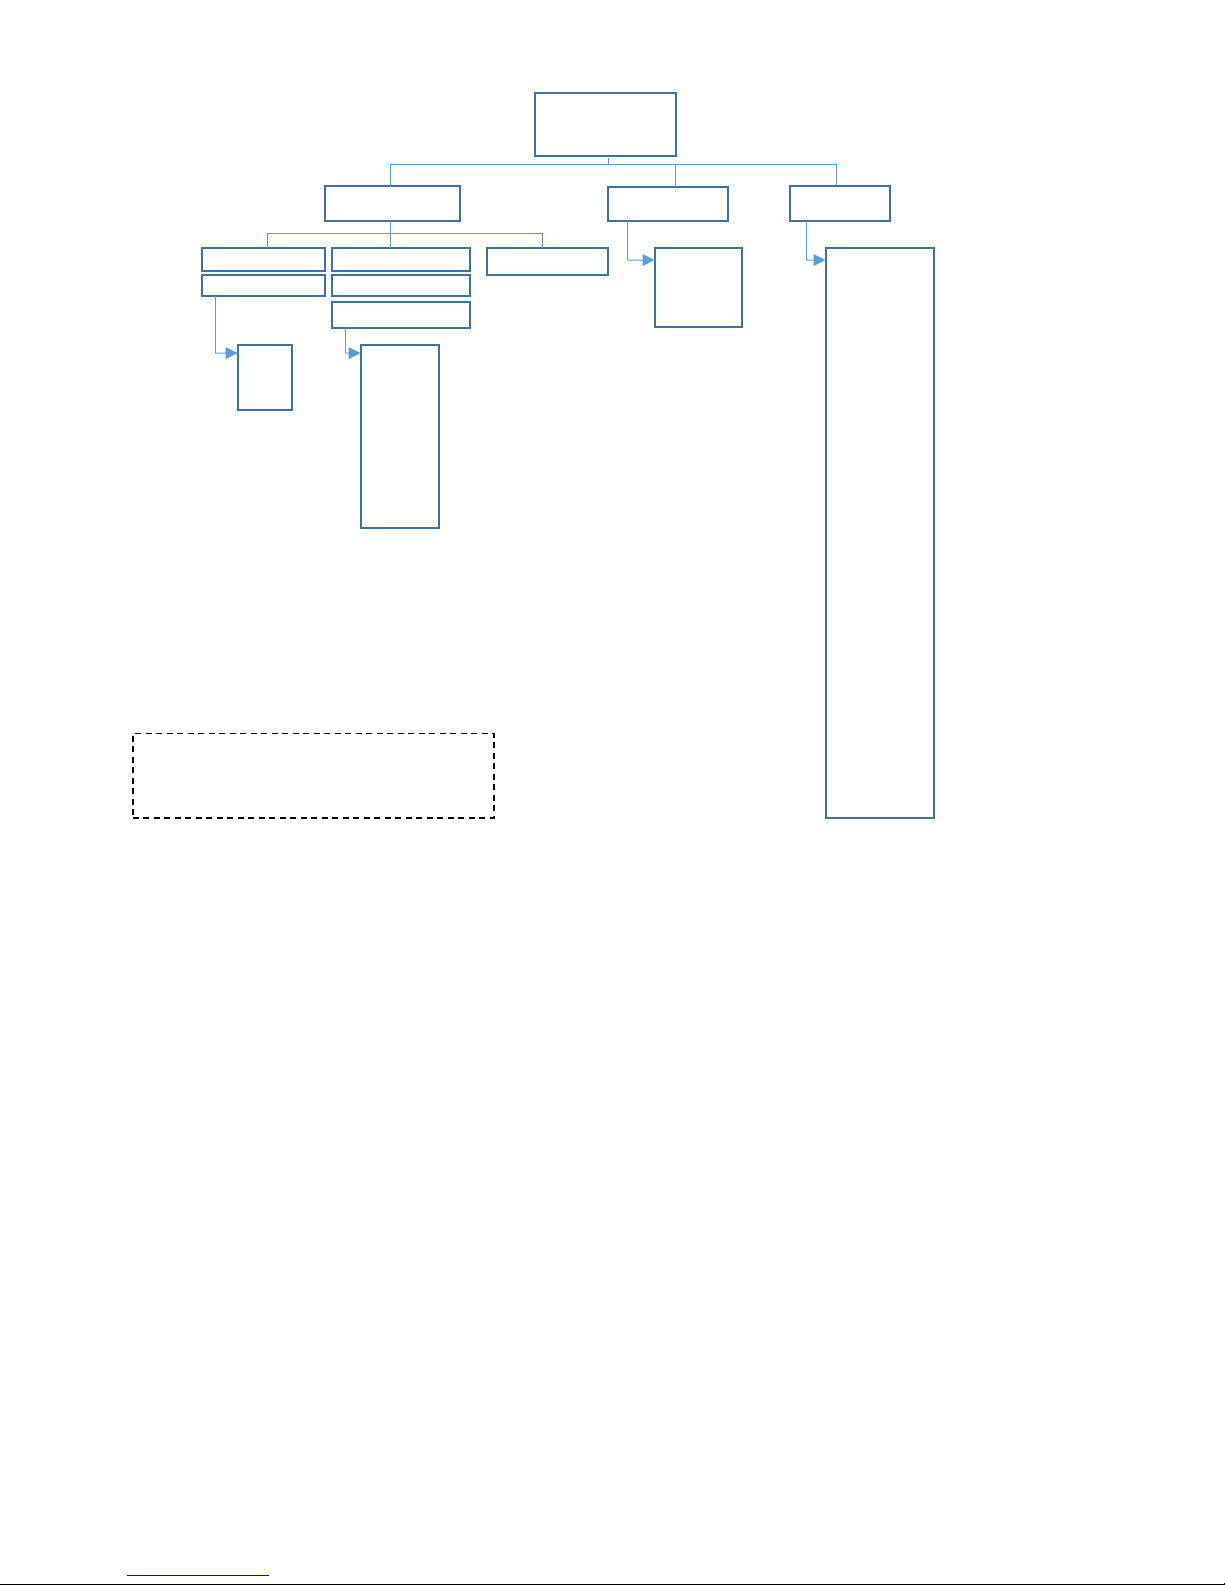
FEATURE MENU
Press Insert to insert fields into
messages.
Main Menu
Message Operation Settings
Open Create New Information Purge Speed
Message List Select Font Start Resolution
Type Message Connect PC Density
Delay
Use Symbol Cartridge
Edit Logo Update Logo
Delete Counter String
Date Random Jet
Expired Print Side
Time Sensor
String Direction
Barcode Print Mode
Shiftcode Unit
Wi-Fi
Update Font
Rollover
System Clock
Rotate
Password
Default
Language
IO Signals
Custom String
Coder Name
RS485
LCD Backlight
Reset
About
From the main screen of Smart-Jet Plus, use the , ,, arrow keys to move the cursor to the desired object.
Press Enter to save and apply settings. Otherwise, press ESC.
Message: Insert Fields into your message:
Create: Create new message
Open: Open existing messages on the printer memory
Use: Use existing message
Edit: Edit existing message
Delete: Delete message
Information: Displays setting information
Symbol: Insert symbols
Logo: Insert logo or image from your printer memory
Counter: Insert product counter
Date: Insert current date
Expired: Insert expired date
Time: Insert current time
String: Insert string
Barcode: Insert barcodes
Shiftcode: Insert shift code
Smart‐Jet Plus Manual v04 | 2015‐07‐30 | by MSSC, LLC
5
Page 6

Operation
Start: Start printing
Stop: Stop printing
Purge: Clean the print head
Connect PC / Disconnect PC: Connect and disconnect Smart-Jet Plus with PC
Settings
Speed: Set print speed for the Smart-Jet Plus
Resolution: Set your desired resolution
Density: Set optical density of the print
Delay: Set the distance since the sensor receives signal to the start of printing
Cartridge: Display the current level of ink in the cartridge
Update Logo: Update logo or image from USB to the printer memory
String: Set the chain of data to insert into the print
Random Jet: Prevents the print head from clogging due to the extended down time between prints
Print Side: Select nozzle side Odd, Even, or Auto Switch
Sensor: Select External or Internal sensor
Directions: Set print direction: : left right, : right left, :reverse left right, : reverse
right left.
Print Mode: Select your print mode: Sensor mode and Continuous mode
Unit: Select your desired measurement inch/mm
Wi-Fi: Connect Wi-Fi to control Smart-Jet Plus by mobile devices
Update Fonts: Update different font sizes for Smart-Jet Plus
Rollover: Set different date depending on specific production hour
System Clock: Set time and date for your system clock
Rotate: Select your screen modes: Auto-rotate or Lock rotate
Password: Set to authorize different level of users, or to protect the printer from unauthorized users.
Default: Reset Smart-Jet Plus to factory defaults
Language: Select your interface language
IO Signals: The extend button to re-start machine
Custom String: Where a commonly used string of data can be entered for inserting into a message
Coder Name: The name given to the printer
RS485: Port to connect with external devices such as PC or PLC for advanced function
LCD Backlight: Edi t timer for backlight shut off
Reset: This brings the printer back to distributor settings
About: See current firmware on Smart-Jet Plus and update firmware
Smart‐Jet Plus Manual v04 | 2015‐07‐30 | by MSSC, LLC
6
Page 7
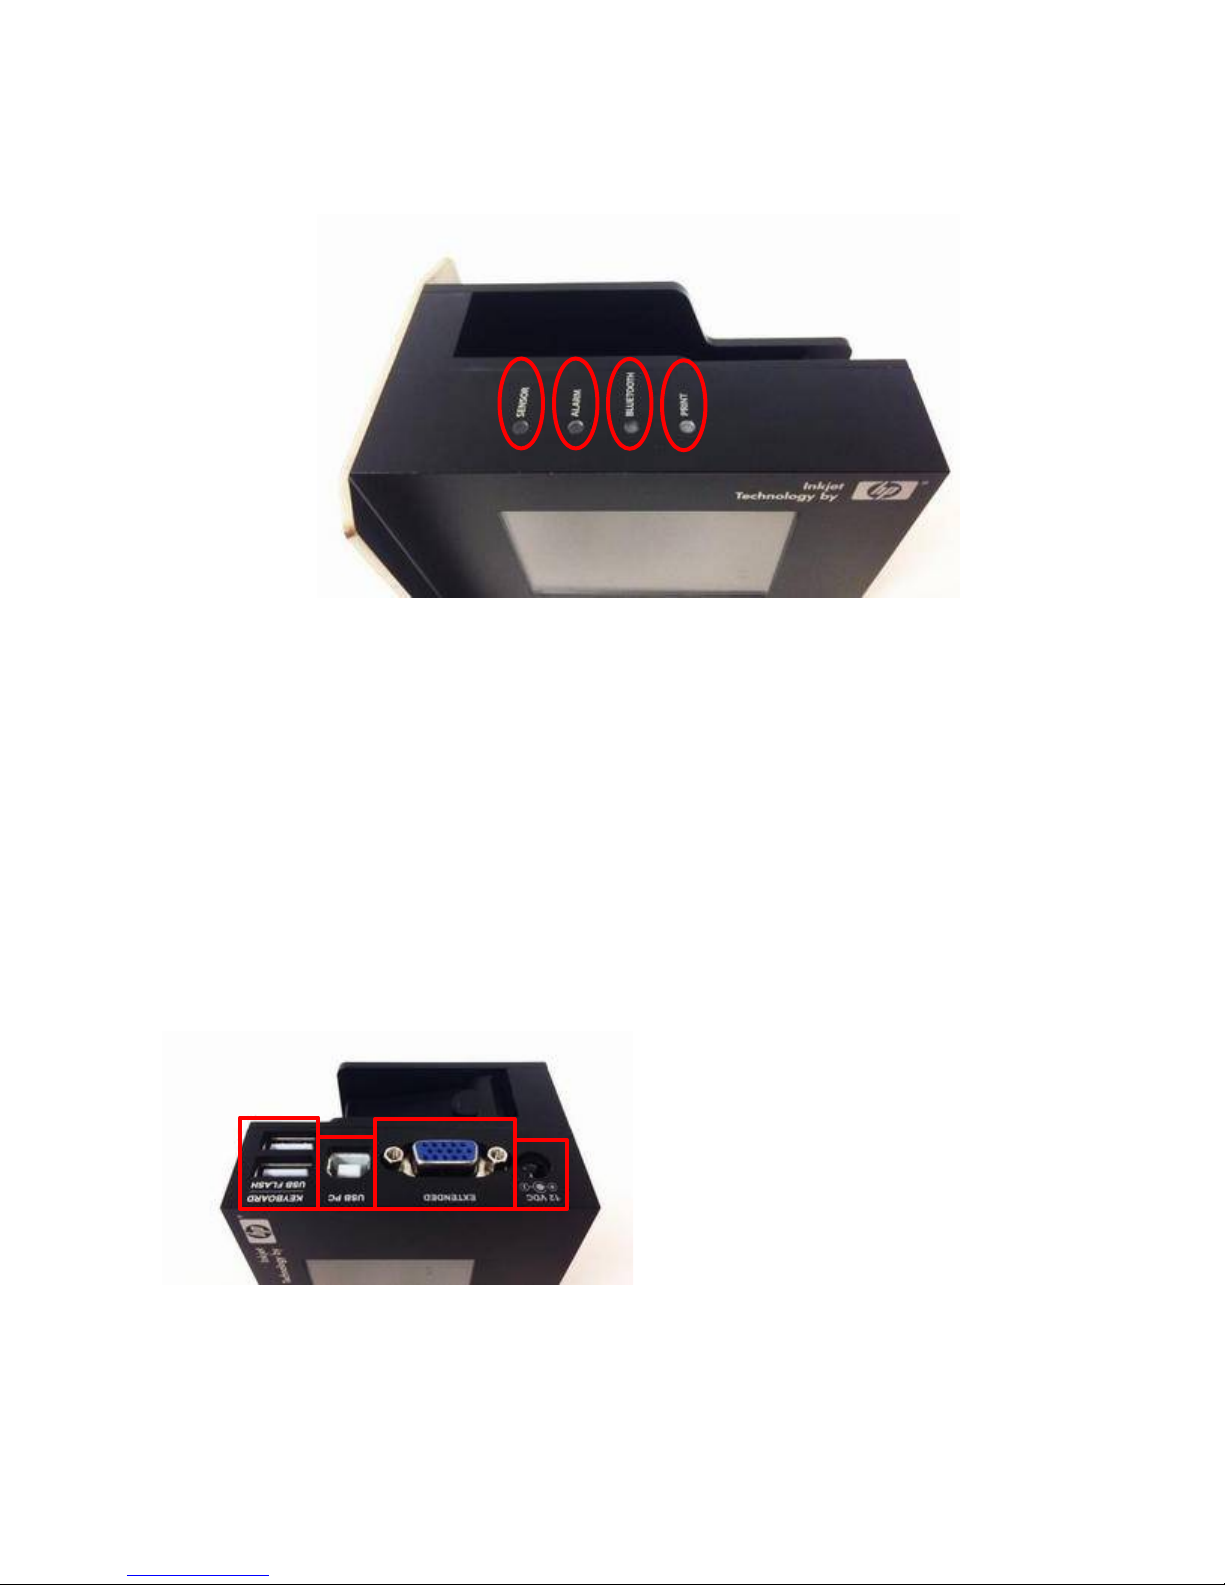
1 2 3 4
1,2 3 4 5
KEY LAYOUT
Light indicators
1. Sensor:
- Set default with black conveyor.
- Internal sensor: Red light; External sensor: Green light.
- Sensor is activated when receives signals.
2. Alarm: Reports errors during operation
3. Wi-Fi/PC: Remains ON when being connected
4. Print: Remains ON when it’s on printing mode
Main ports
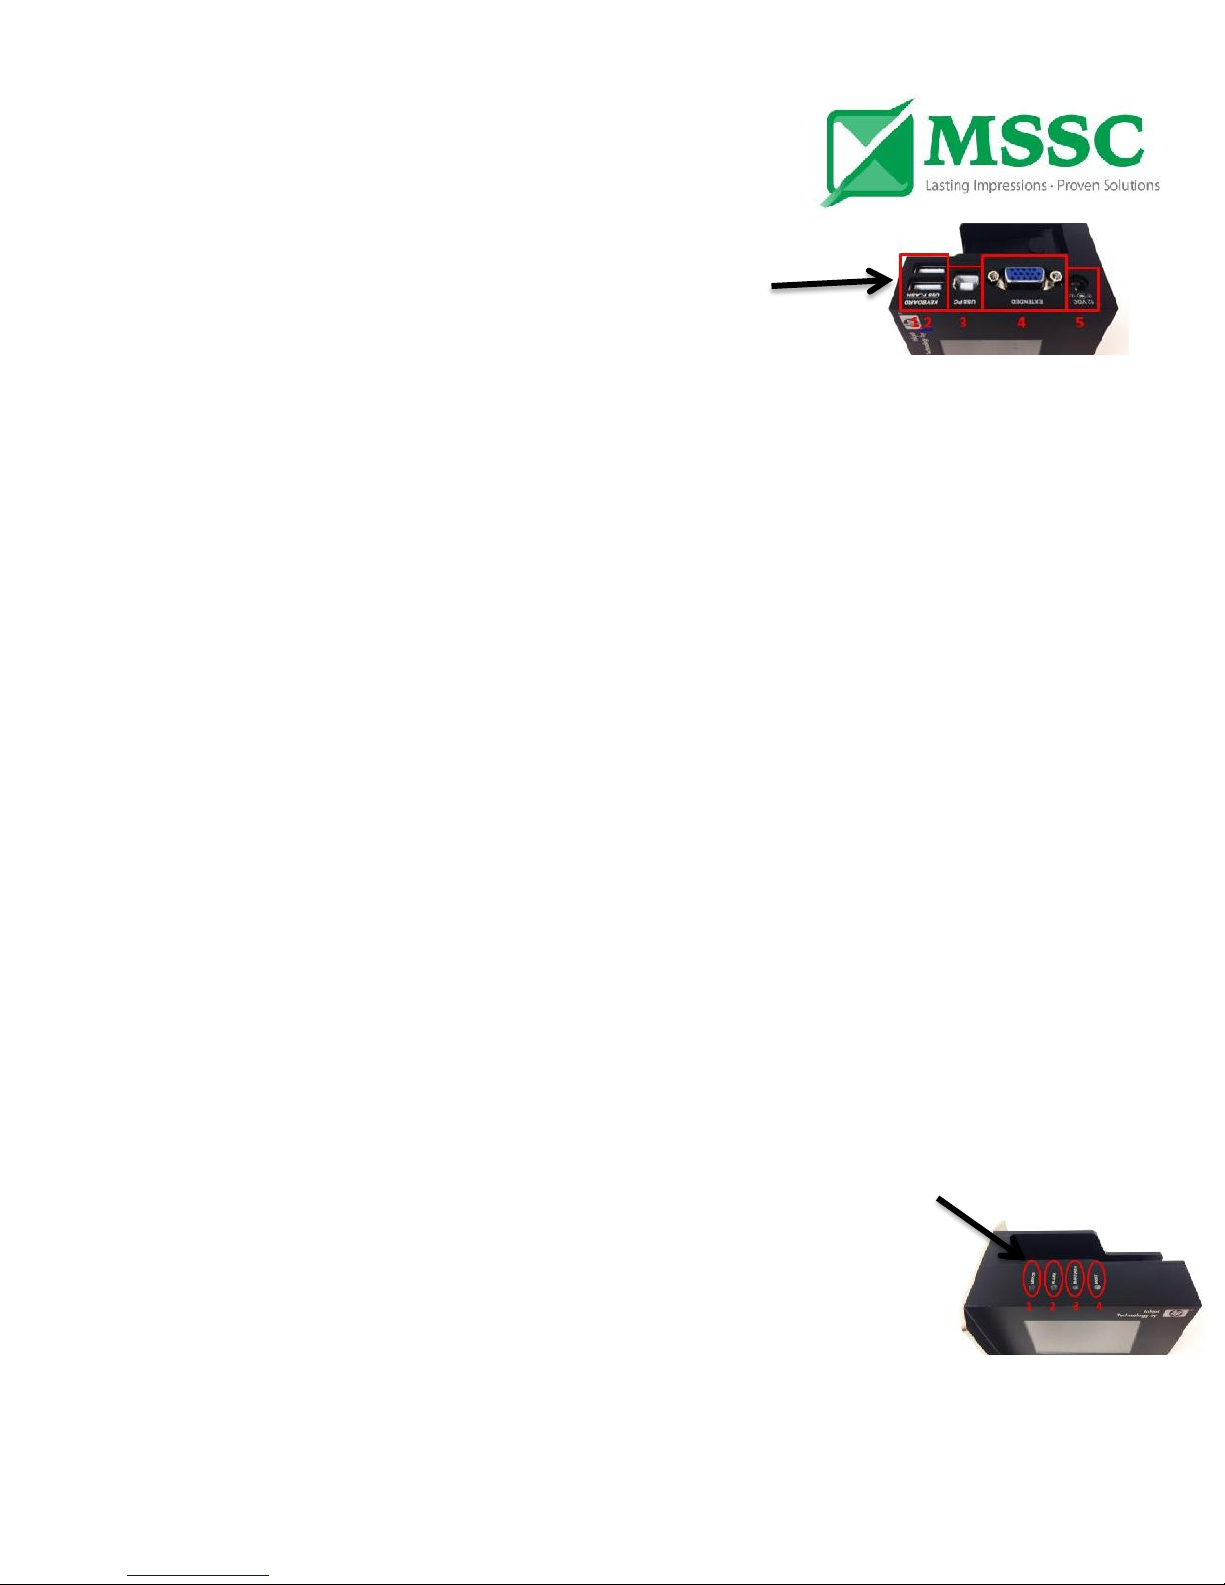
1. USB flash port for updating firmware, fonts and logo
2. For Wireless Keyboard receiver
3. For PC Connection
4. For External sensor, Encoder, etc…
5. Power supply
Smart‐Jet Plus Manual v04 | 2015‐07‐30 | by MSSC, LLC
7
Page 8
WIRELESS KEYBOARD DEFINITION
No.
Key
Uses
1 Enter
Confirm, save or apply
2 ESC
Go to previous session
3
/
Move your cursor to left/right
4
/
Move your cursor up/down
5 Shift
Press and hold “Shift” to input capitalized characters
6
Insert
Press “Insert” to insert Symbol, Logo, Counter, Date, Expired,
Time, String, Barcode, and Shift into the message
7 Backspace
Delete your message from right to left
8 Tab
Move your cursor faster
9 Home/End
Move your cursor to Home/End
1
2
3
4
5
6
7
8
9
10
11
12
13
INSTALLATION PROCEDURES
MOUNTING THE BRACKETS
Smart‐Jet Plus Manual v04 | 2015‐07‐30 | by MSSC, LLC
8
Page 9
Step 1: Installing the clamps to the side of the conveyor
Smart‐Jet Plus Manual v04 | 2015‐07‐30 | by MSSC, LLC
9
Page 10
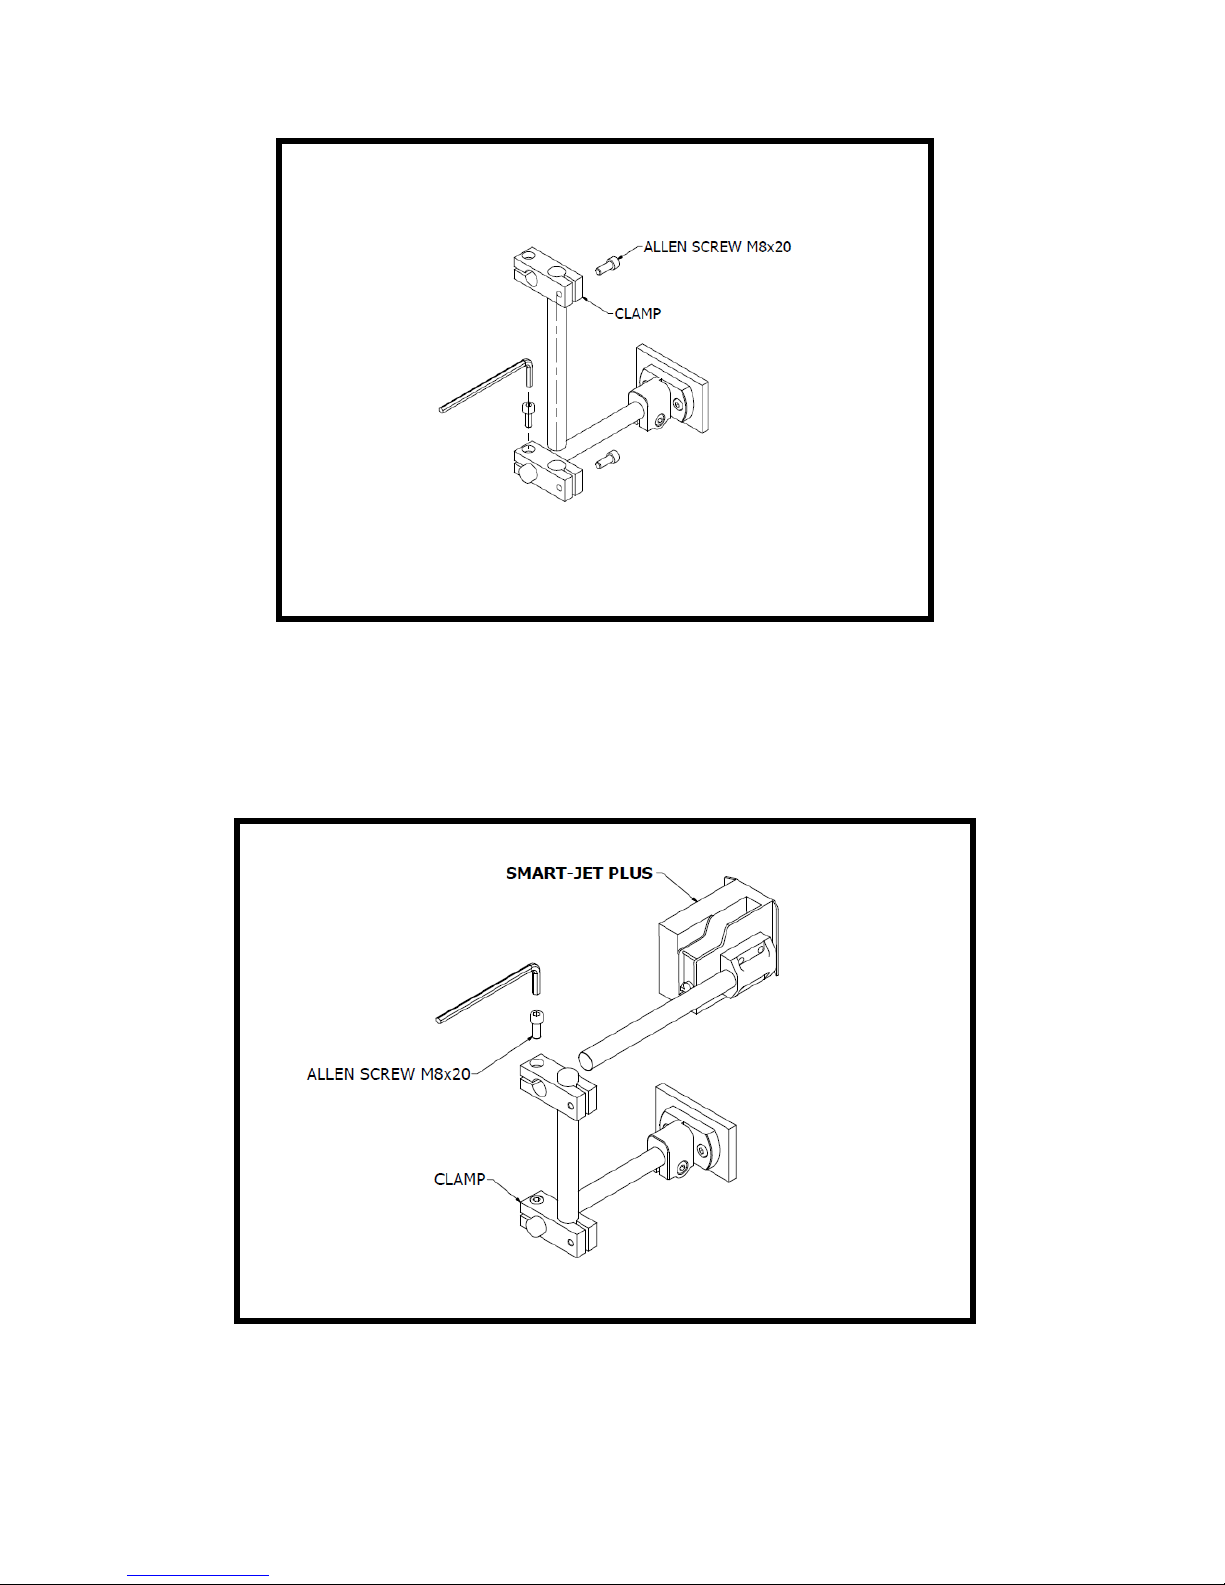
Step 2: Installing the clamps to the round bar
MOUNTING OPTIONS
Select the suitable bar length
Horizontal setup
Smart‐Jet Plus Manual v04 | 2015‐07‐30 | by MSSC, LLC
10
Page 11
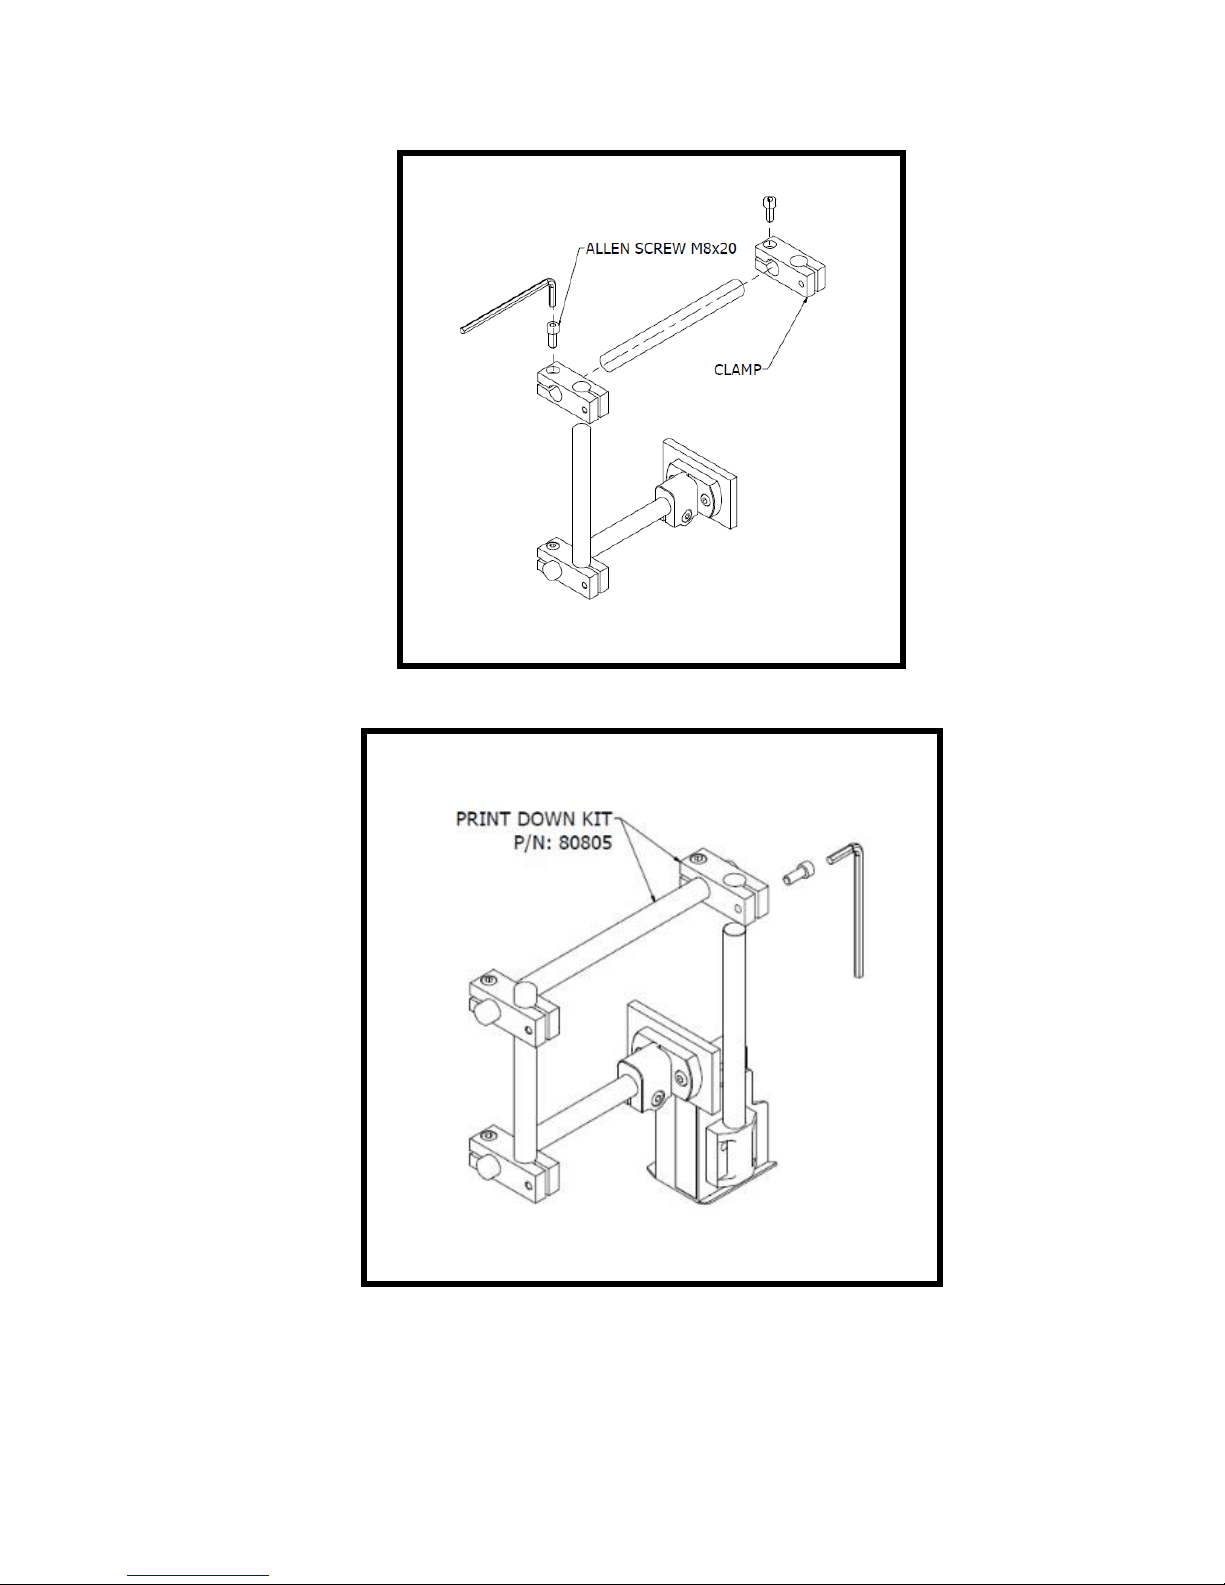
Vertical setup
Step 1:
Step 2:
NOTES:
Make sure the brackets are mounted firmly to avoid vibration and sway of the print head. This
will affect the print quality.
Smart‐Jet Plus Manual v04 | 2015‐07‐30 | by MSSC, LLC
11
Page 12
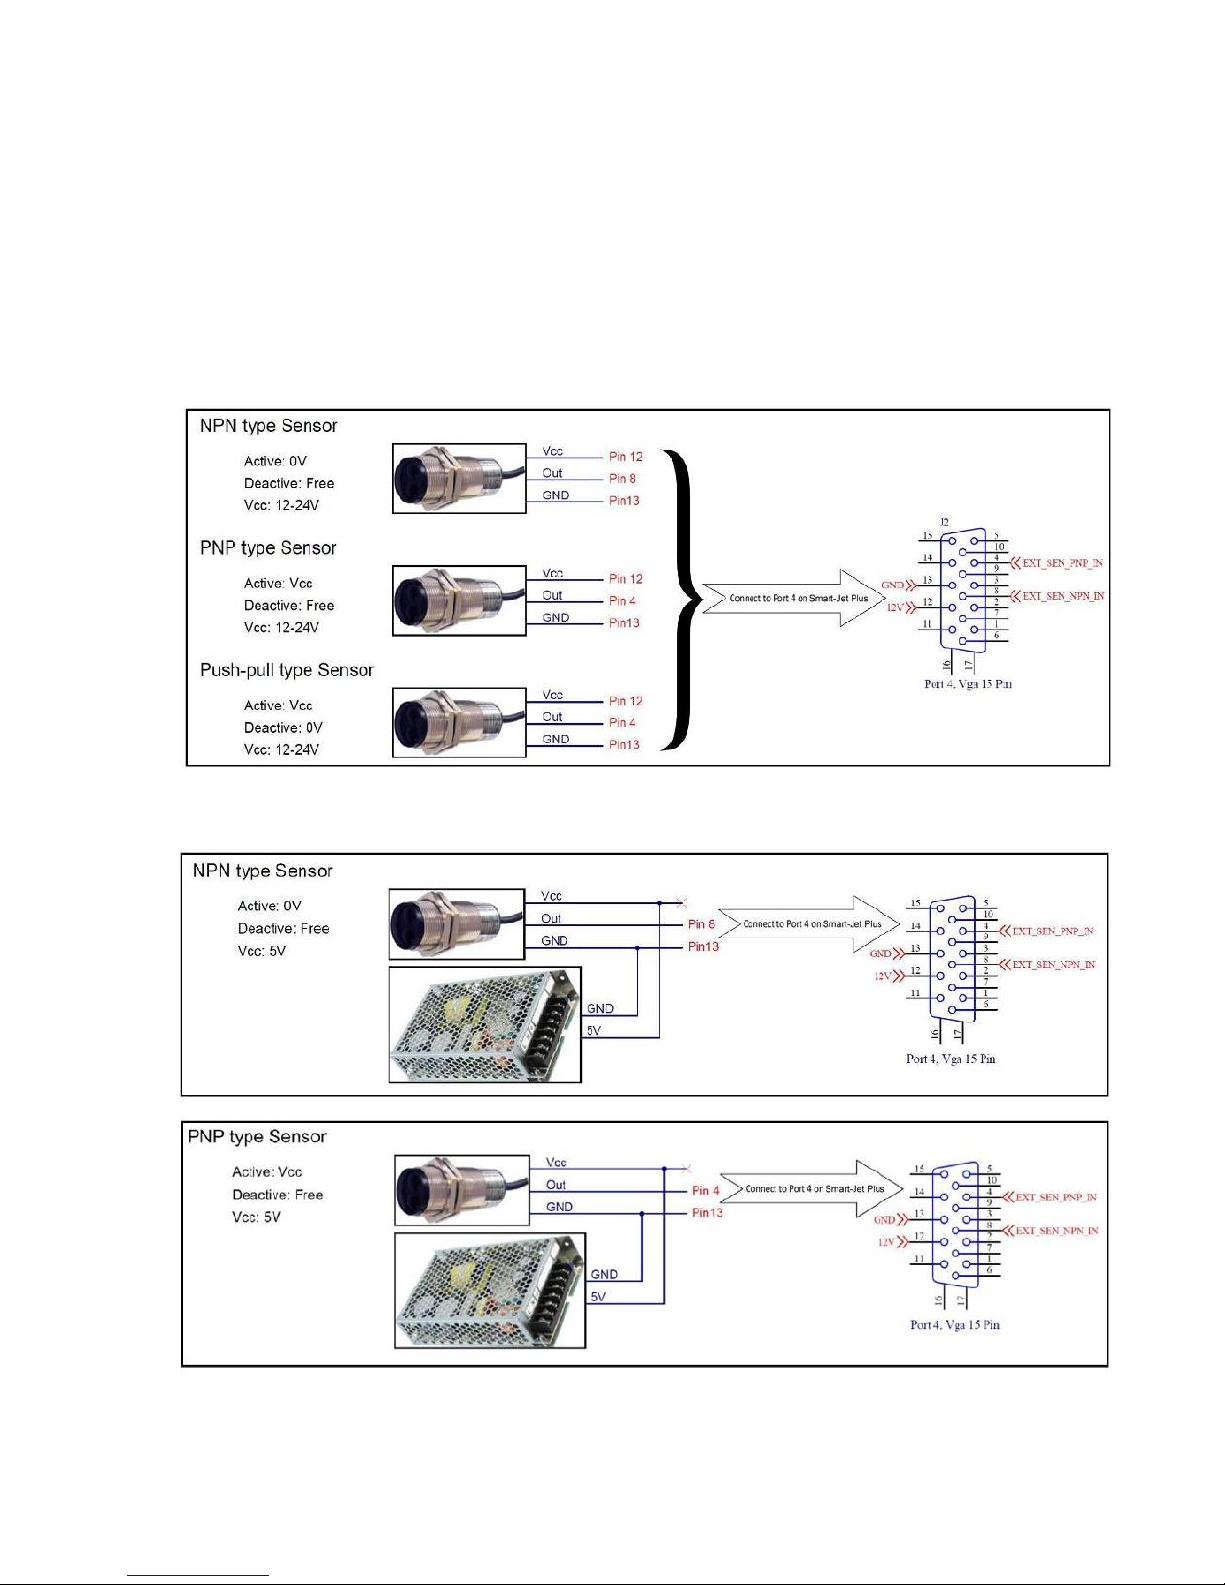
EXTERNAL DEVICE CONNECTION
NOTES:
-
Smart-Jet Plus is able to operate with External Sensor, and Encoder. Consult your supplier
for further support on the settings and connections.
-
To connect Smart-Jet Plus with External Sensor, Encoder, etc…, an additional connector DB15
(male) will be required. (Maximum DB15 output via pin #12 is 12V and 3A)
EXTERNAL SENSOR
Smart-Jet Plus supports NPN, PNP and Push-pull sensor types.
Connect sensor using power supply on Smart-Jet Plus
Connect sensor to Smart-Jet Plus using external power supply. Below demonstration is for
external power supply of 5V
Smart‐Jet Plus Manual v04 | 2015‐07‐30 | by MSSC, LLC
12
Page 13
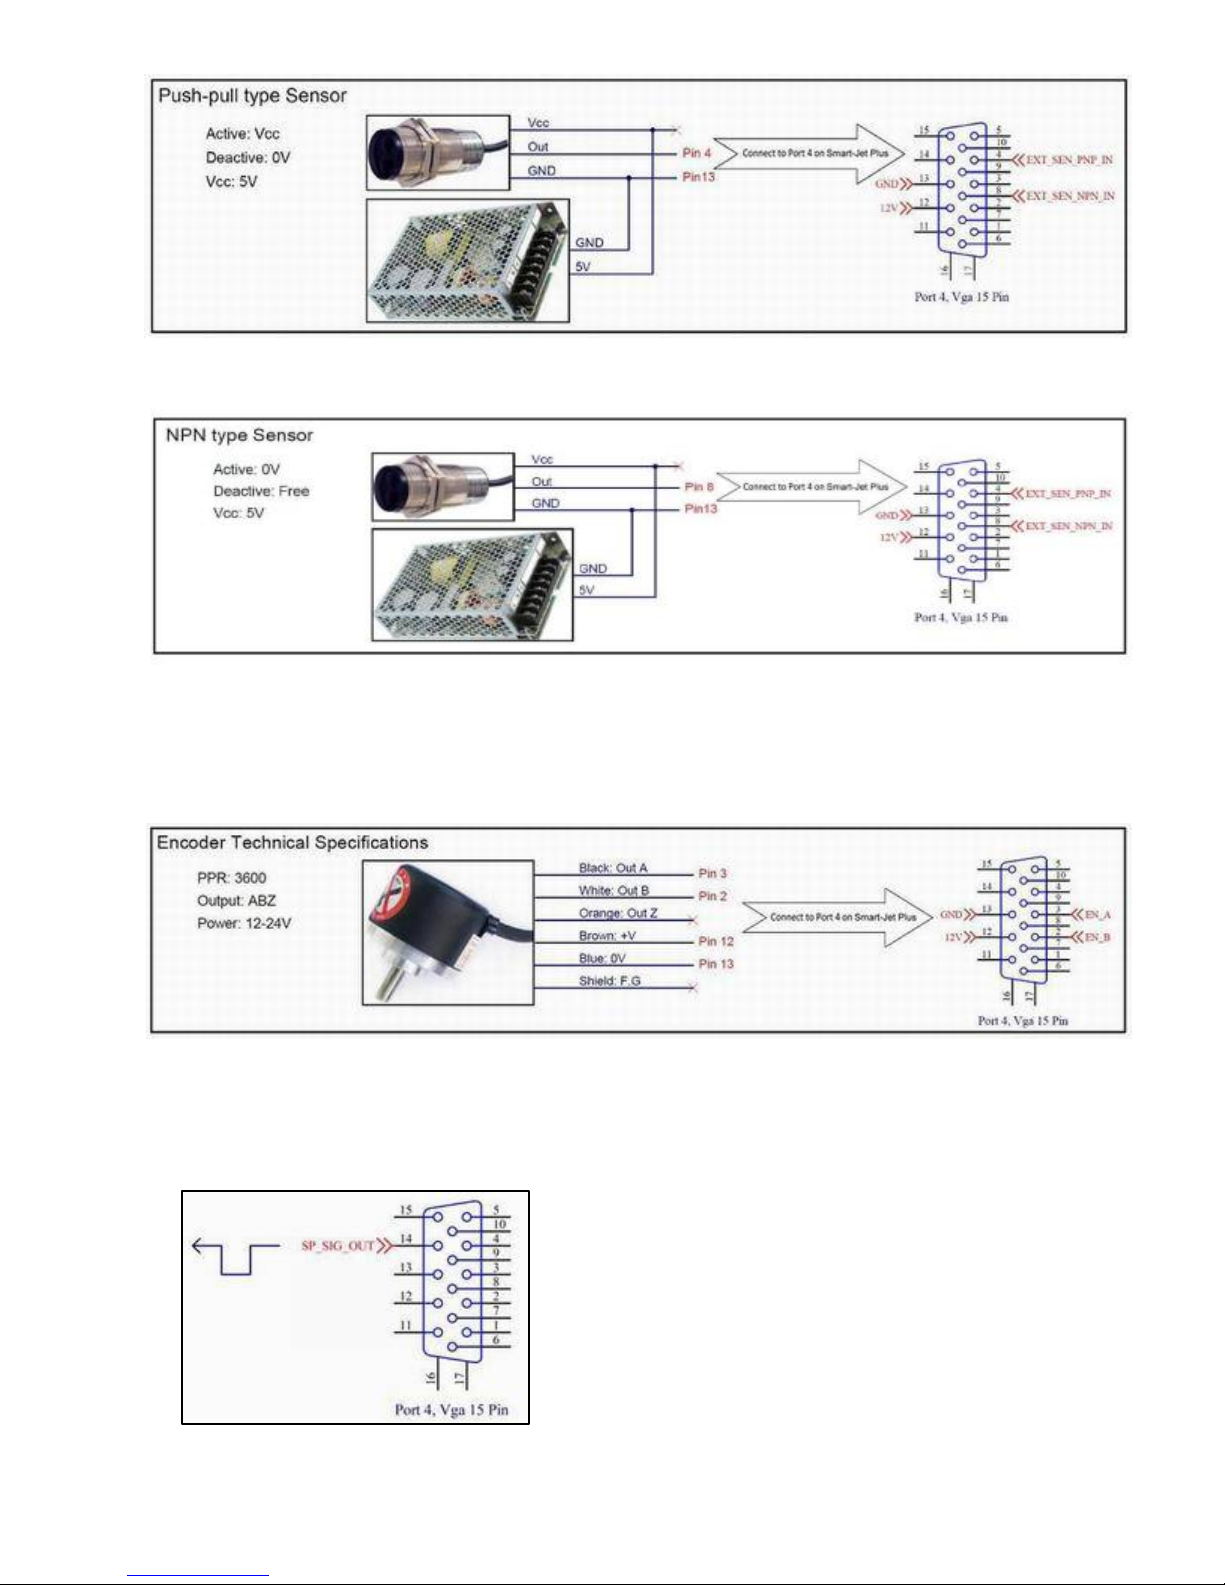
Connect Dry - Contact Switch to Smart-Jet Plus using external power supply.
ENCODER
An encoder is recommended to ensure the best print quality regardless the inconsistent speed of
conveyor.
OUTPUT
Output: active at 0V
Output 14 is available for additional device installation with Smart-Jet Plus.
Smart‐Jet Plus Manual v04 | 2015‐07‐30 | by MSSC, LLC
13
Page 14
RS485 PROTOCOL
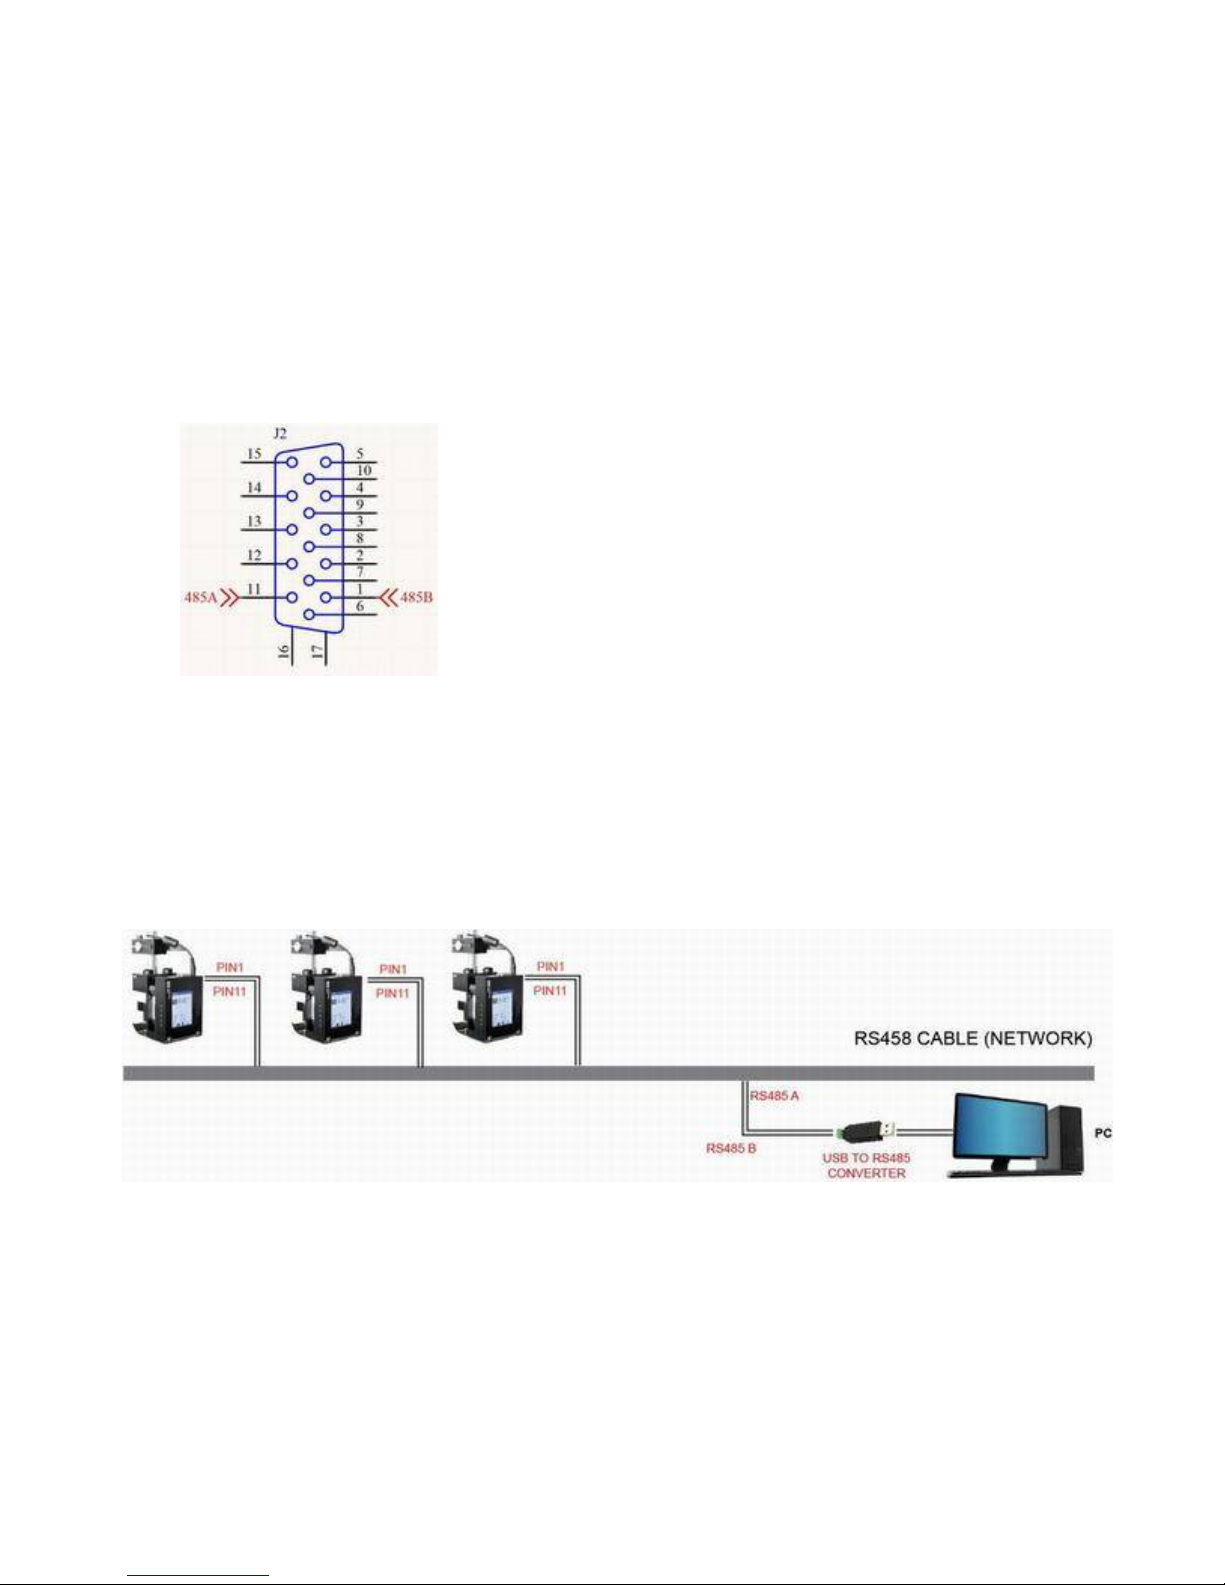
Allow control machine via RS485 network from other devices like: PLC, PC…
Before the use of this protocol you need to set parameters on machine as below:
Step 1
Connect PIN 1 (RS485B) and PIN 11 (RS485A) to RS485 network as picture below.
Machine extended port detail:
The Diagram connects some machines to RS485 network with PCL and PC to control the printer. The
PC needs to use some converters to support RS485 protocol.
CASE A: use the PC as MASTER with USB to RS485 converter.
Smart‐Jet Plus Manual v04 | 2015‐07‐30 | by MSSC, LLC
14
Page 15
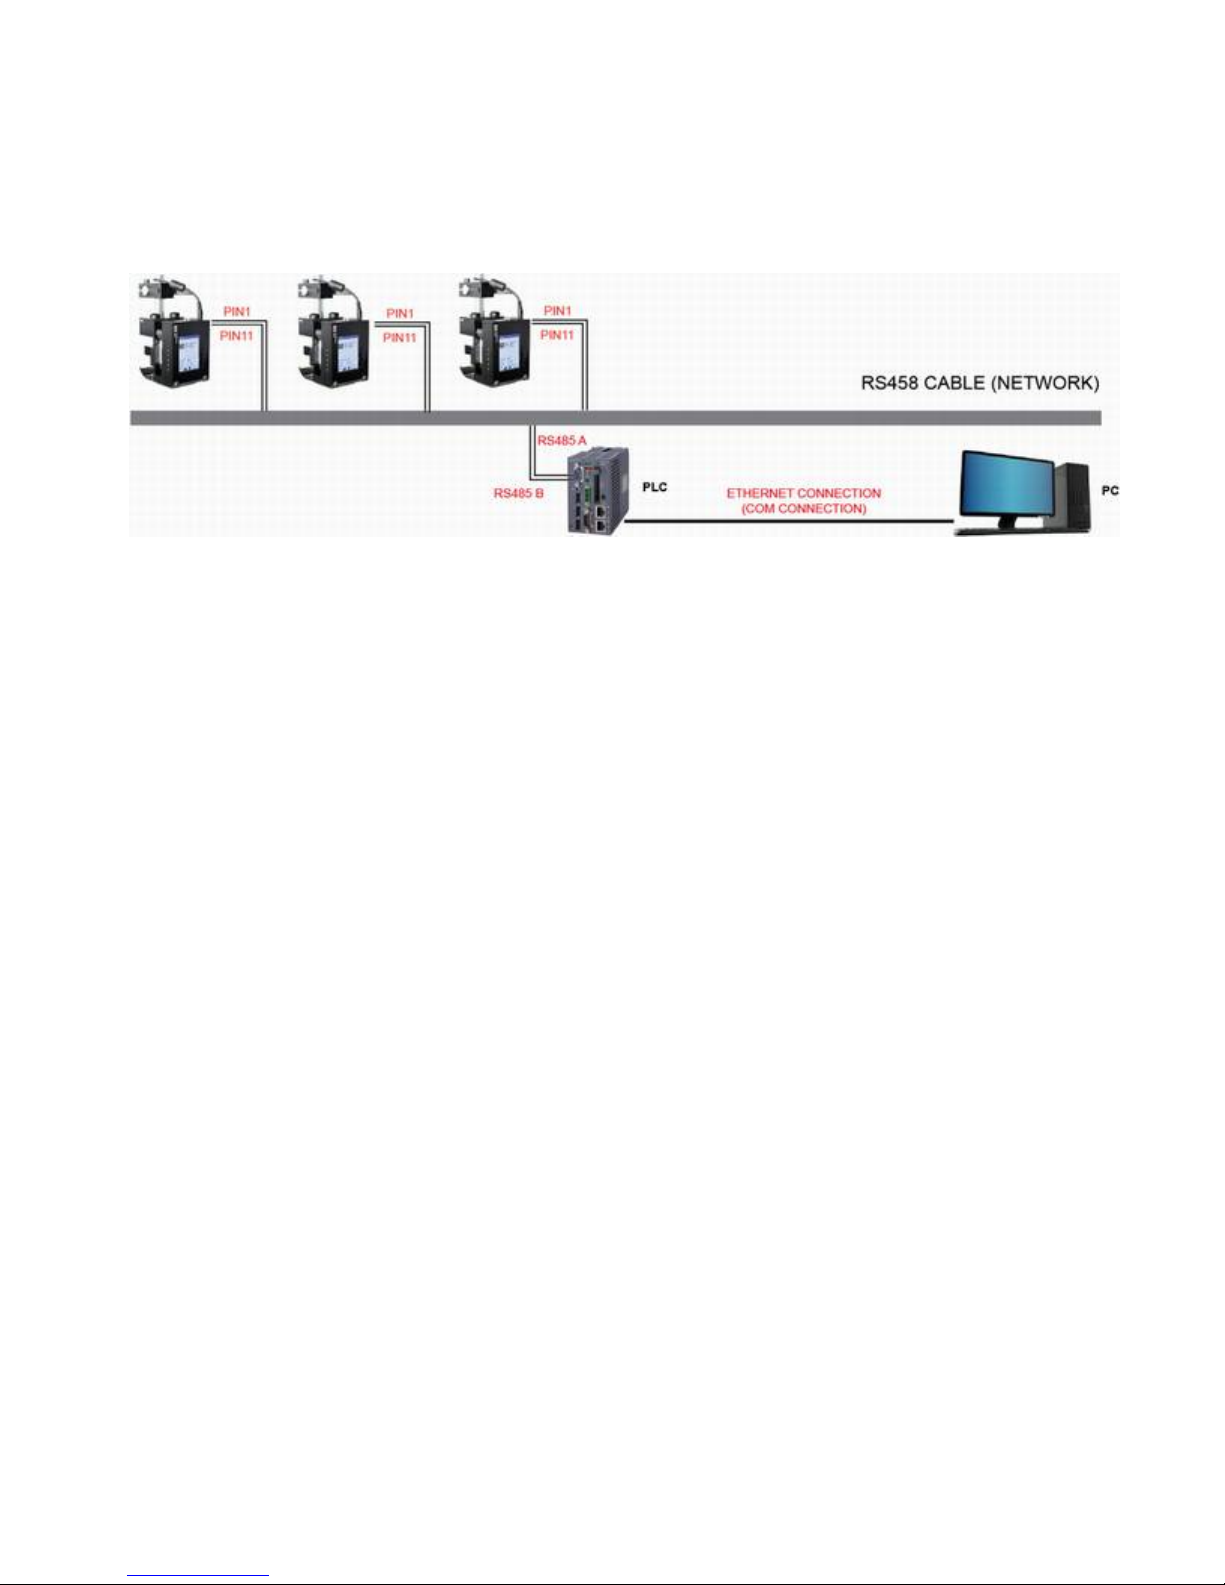
CASE B: use the PLC as MASTER. Then connect PLC to a PC.
Step 2
On machine, go to Setting RS485 Enter.
Status: set to ENABLE.
Address: identification of machine on RS485 network. Value from 0-255.
Baud rate: select value from 4800-115200
Parity: checksum of protocol. Select ODD or EVEN. Otherwise select NONE.
Data bits: length of data. Select 8 or 9.
Stop bits: length of STOP BITS. Select 1 or 2.
Step 3
Build a PLC/PC application (NOTE: You need developer to do this) use our RS485 commands detail.
Then send command to machines.
Please ask us to get this commands detail.
Smart‐Jet Plus Manual v04 | 2015‐07‐30 | by MSSC, LLC
15
Page 16
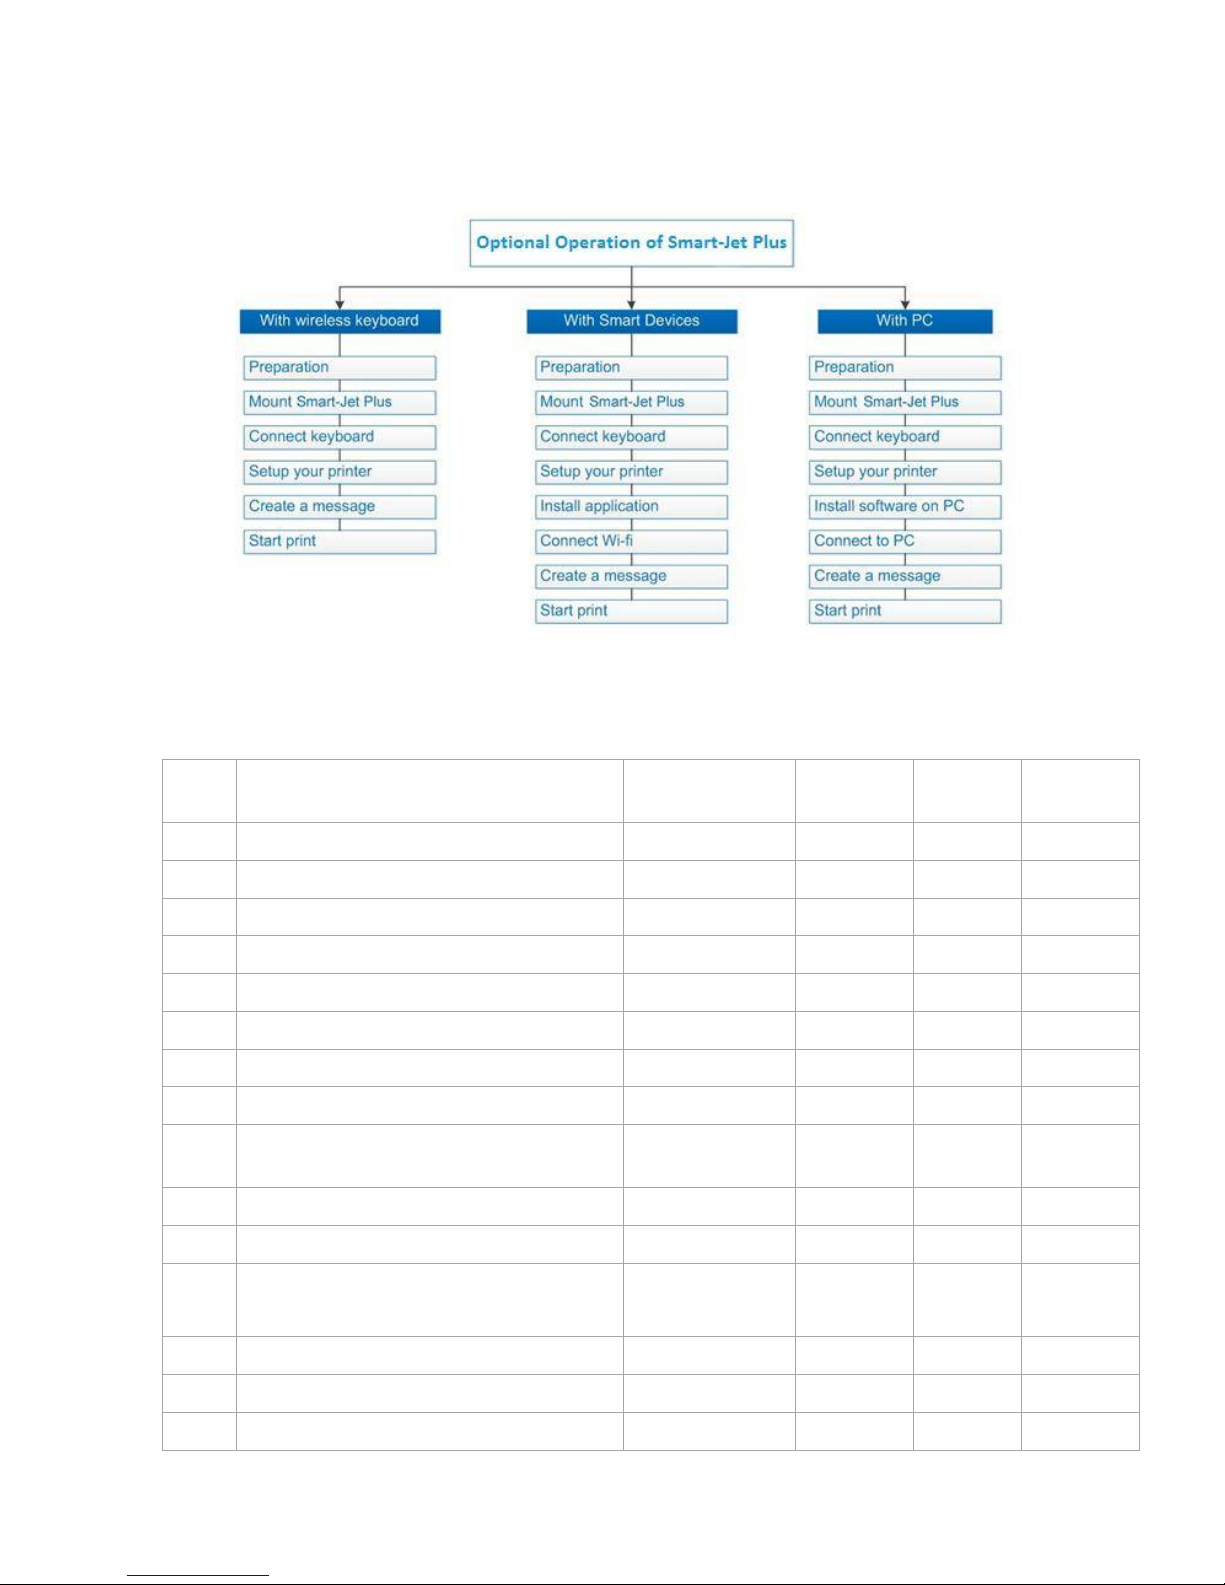
QUICK STARTUP
No.
Basic Components
With Wireless
Keyboard
With
Mobile
With PC
Optional
1.
Smart-Jet Plus Coder
2.
Wireless Keyboard
3.
Power Supply
4.
Mounting Brackets
5.
USB
6.
Ink Cartridge
7.
Wi-Fi router
8.
Smart Devices
9.
Smart-Jet Plus Application
10.
PC
11.
PC Connection Cable
12.
Smart-Jet Plus Software
Email: [email protected]
13.
Driver
14.
Encoder (P/N: 80865)
15.
External Sensor (P/N: 80870)
OPERATIONAL CHART
REQUIRED COMPONENTS TO OPERATE THE SMART-JET PLUS
Smart‐Jet Plus Manual v04 | 2015‐07‐30 | by MSSC, LLC
16
Page 17
Setup Smart-Jet Plus
Mount Smart-Jet Plus on your conveyor according to the installation instructions
Set print direction and appropriate throw distance to obtain best print quality (23mm).
Insert ink cartridge.
Plug the power cord into an appropriate power source to start up the Smart-Jet Plus.
NOTES: The Smart-Jet Plus will function with WATER and SOLVENT ink from MSSC
only. Trying to use unapproved cartridges may damage the printer and void the
warranty.
Connect Smart-Jet Plus to wireless keyboard
Connect wireless keyboard USB port (port 2) on Smart-Jet Plus
Remove sticker in battery port on keyboard.
Turn on the keyboard to begin operating Smart-Jet Plus
Connect Smart-Jet Plus to Wi-Fi network
Install the wireless router that meets the parameters on the COMPATIBLE WI-FI
ROUTERS chart located on page (28). Check to make sure the router is putting out a
usable signal, usually indicated by this symbol.
On Smart-Jet Plus printer’s main menu screen, go to Settings > WI-FI > ON. The printer
will then begin searching for available wireless networks to connect to. Once the
preferred network appears on the screen arrow down and press enter. Then follow the
next steps that include security (password) which only support WPA or WPA2 (NOT
WEP), and confirming the connection between the printer and router. All of these menu
screens can be navigated by using the arrow and the Enter key.
On the wireless device, the user will first have to install the MSSC Printer app, available
on the App Store. (Quick Access QR Codes)
ANDROID: APPLE:
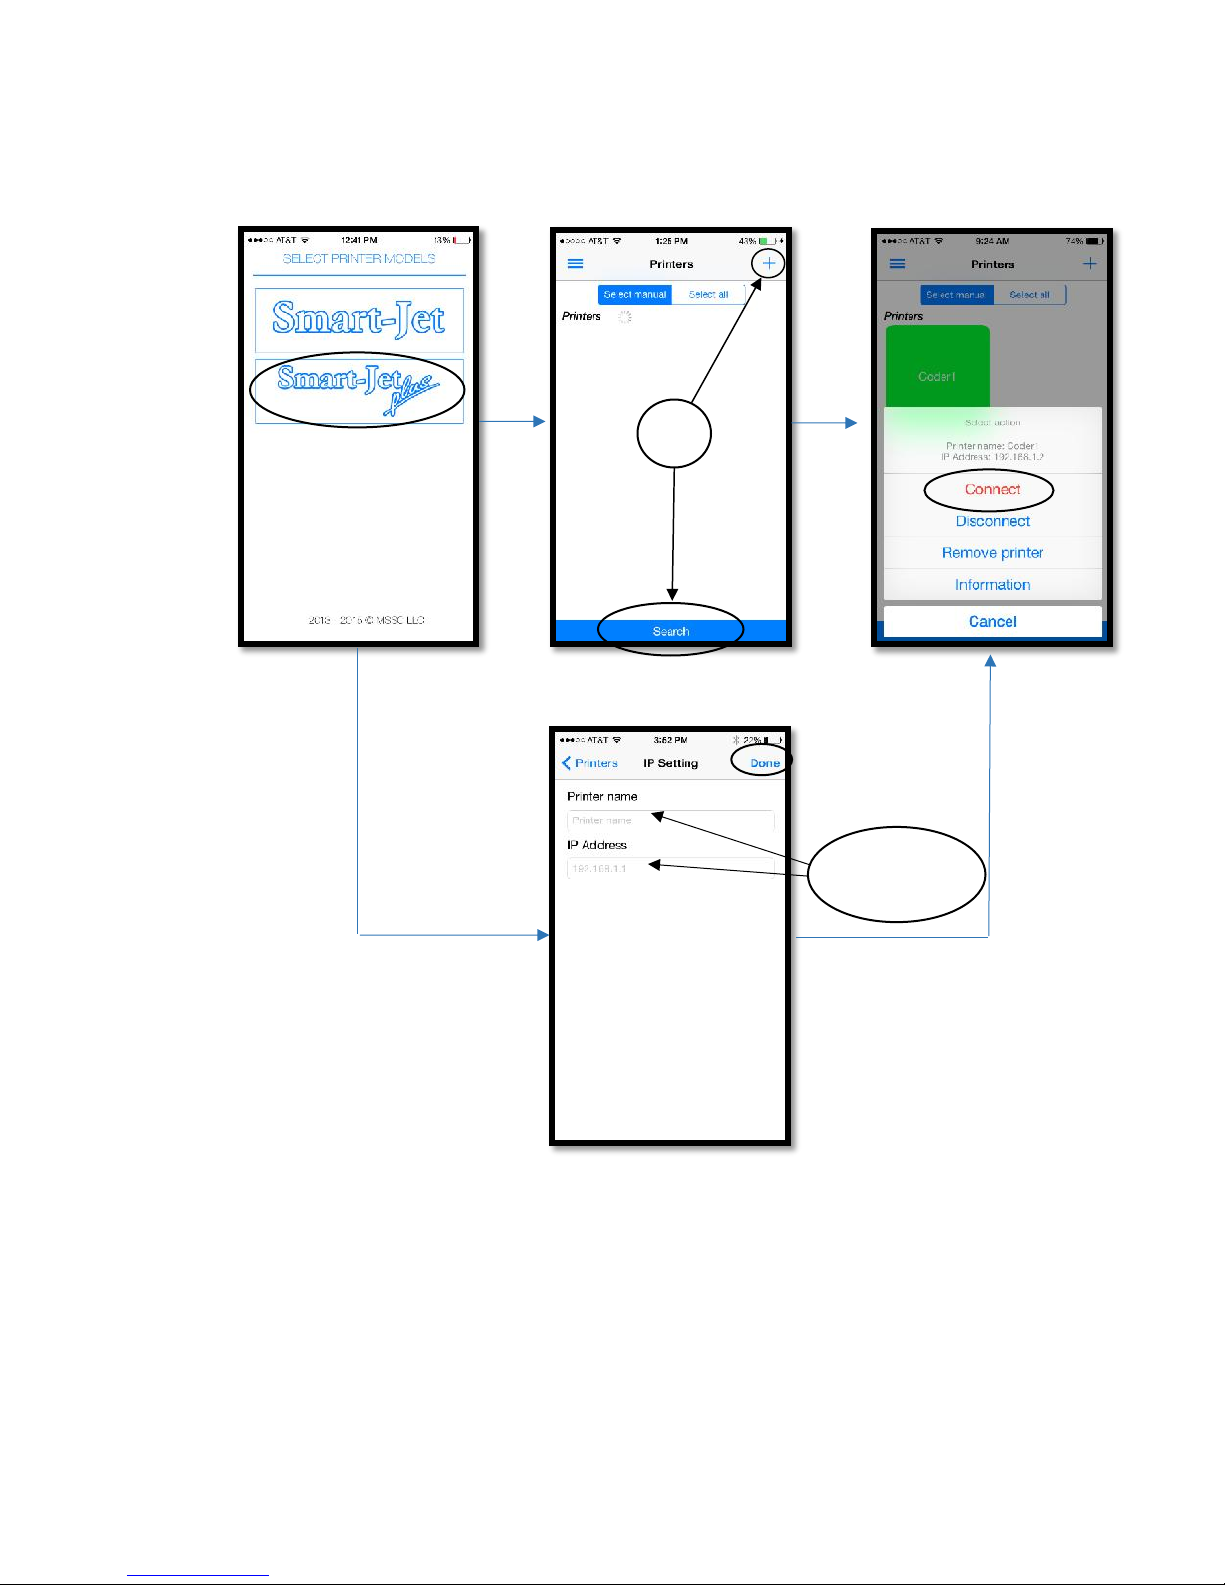
The device will also have to be connected to the same network as the printer to make a
connection. Once the application is downloaded, the user can open the application and begin
the connection process. First type in the username: Administrator, and
password: mssc@smartjet. The Smart-Jet Plus icon should be selected, then go to
the Printers tab on the main menu and select the blue Search bar on the bottom of the
screen. Once the printer appears, the icon can be selected and the user should select the red
Connect tab on the top of the menu to end the connection process. In the case that the printer
does not show up after the automatic search, a manual connection can be done by selecting
the Plus sign (+) in the upper right-hand corner of the screen. After selecting the plus sign, the
user can type in the Printer Name and IP address of the printer that was given when it was
connected to the router. When the information has been entered, the user can press done in
the upper right-hand corner to find the printer and continue to finish the connection process.
17
Smart‐Jet Plus Manual v04 | 2015‐07‐30 | by MSSC, LLC
Page 18
Insert
Information
OR
Connect Smart-Jet Plus to PC
Be sure you have a PC plugged in connected with Smart-Jet Plus via a USB A-B
cable.
Install Smart-Jet Plus Printer Controller and Driver Smart-Jet Plus on your PC
From the main screen of Smart-Jet Plus, go to Operation and select Connect to
PC to connect Smart-Jet Plus with PC
Turn on Smart-Jet Plus Printer Controller on your PC to begin creating a message
Smart‐Jet Plus Manual v04 | 2015‐07‐30 | by MSSC, LLC
18
Page 19

Setup External Devices (If required)
Install external sensor
Install encoder
Create Message and Print
Create a message from your PC, Smart-Jet Plus screen, or mobile devices
Setup necessary parameters to achieve your desired print on the products
Press Start Print to print your message
SMART-JET PLUS OPERATION
OPERATION WITH WIRELESS KEYBOARD
Compatible Wireless Keyboards
The Smart-Jet Plus is currently compatible with all wireless 2.0 keyboards available on
the market.
Connect to Keyboard
Insert the receiver of wireless keyboard to USB port (port 2) on Smart-Jet Plus,
remove the interleave paper in the battery slot and turn on the button at the back of
the keyboard to begin operating Smart-Jet Plus with wireless keyboard.
From the main screen of Smart-Jet Plus, use , , , arrow keys to move the
cursor to Settings and begin implementing initial setups for the machine. Press Enter
to save and apply settings. Otherwise, press ESC.
Procedure in Details
From the main screen, use and arrow keys to select the desired menu: Message,
Operation, or Settings. Press Enter to select. Press ESC to go back to the main screen.
Message
Create new or open existing messages on the printer
memory. NOTES: While doing this, please be sure you stop
printing
Go to Create new to select your desired fonts Normal or Uppercase
Create new:
Select Normal font to create your message with lower and uppercase fonts. Then select
your desired font size, number of line and insert fields into message. Otherwise, go to
Uppercase font to print in all capital letters.
Smart‐Jet Plus Manual v04 | 2015‐07‐30 | by MSSC, LLC
19
Page 20
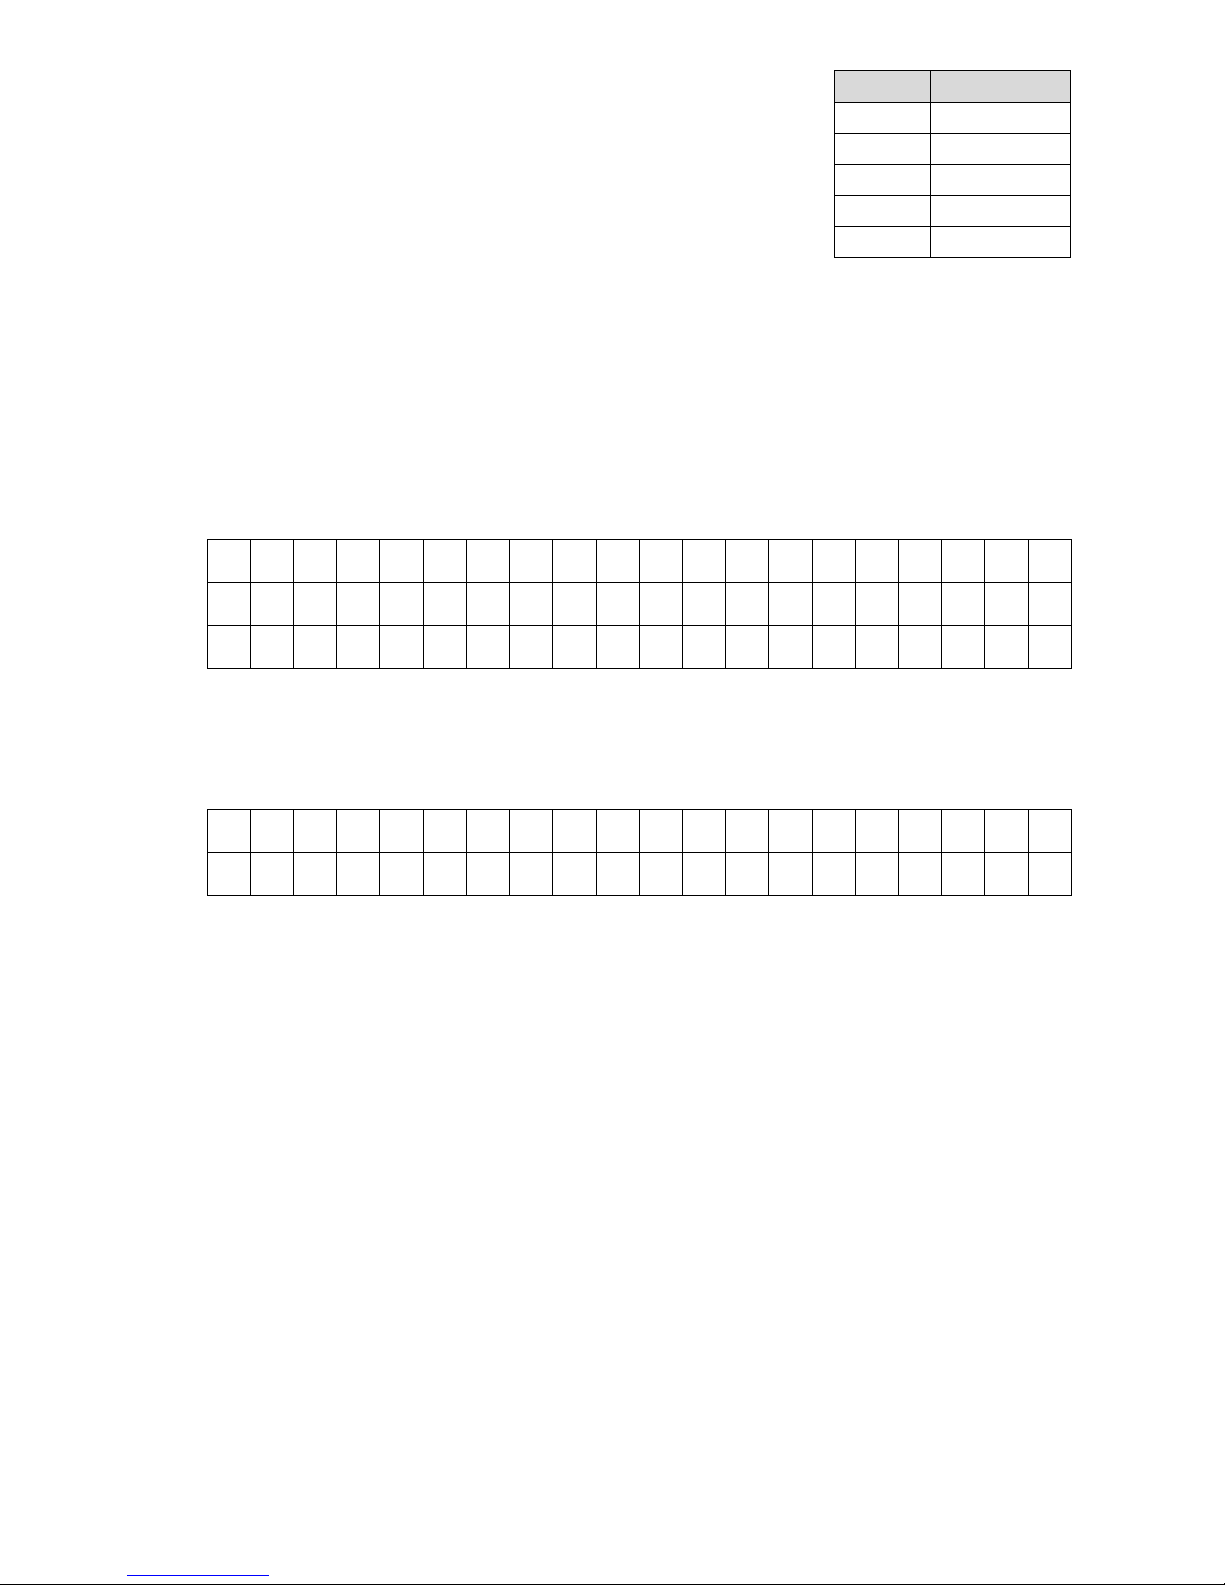
Available fonts and sizes include:
€ ‚ ƒ „ … † ‡ ˆ ‰ ‹ ‘ ’ “ ” • – — ˜ ™ ›
¡ ¢ £ ¤ ¥ ¦ § ¨ © ª « ¬ - ® ¯ ° ± ² ³ ´
µ ¶ · ¸ ¹ º » ¼ ½ ¾ ¿ × Ø Þ
!
“ # $ % ‘ ( ) * + , - . / : ; < = > ?
@ [ \ ] ^ _ ` { | } ~
Lines
Arial
1
12.7mm
2
5.93mm
3
3.89mm
4
2.54mm
6
1.69mm
Input message by using the following keys:
-
Arrow keys , , , : move the cursor
-
Enter
-
Backspace
-
ESC
While creating message, press Insert on the wireless keyboard to insert your desired
fields
Symbol: Insert the following symbols into the message (extended ASCII).
: go to the next line
: delete characters
: escape and save/unsave messages
In the input section on Smart-Jet Plus, press Insert and use or arrow keys to move the
cursor to Symbol and press Enter. Use the arrow keys to move your cursor to the desired
object and press Enter to insert the symbols into message.
Below symbols are required be inserted from your wireless keyboard:
Logo: Insert logo or image from Smart-Jet Plus into
message your logo should be updated or setup in the
Settings menu
In the input section, press Insert and use or arrow keys to move your cursor to Logo
and press Enter. Move your cursor to the desired Logo and press Enter.
NOTES:
-
Insert logo first, then input message if you need to print a logo at the beginning of
the message.
-
Input message, then insert logo if you need to print a logo at the end of the message.
-
Logo should be inserted in the last line of your message if you are printing
multiple lines to ensure it is fully printed.
Counter: Insert product counter into the message. There are Single and Box/Lot
In the input section, press Insert and use or arrow keys to move the cursor to
Counter
and press Enter. Select your desired object and press Enter.
Smart‐Jet Plus Manual v04 | 2015‐07‐30 | by MSSC, LLC
20
Page 21
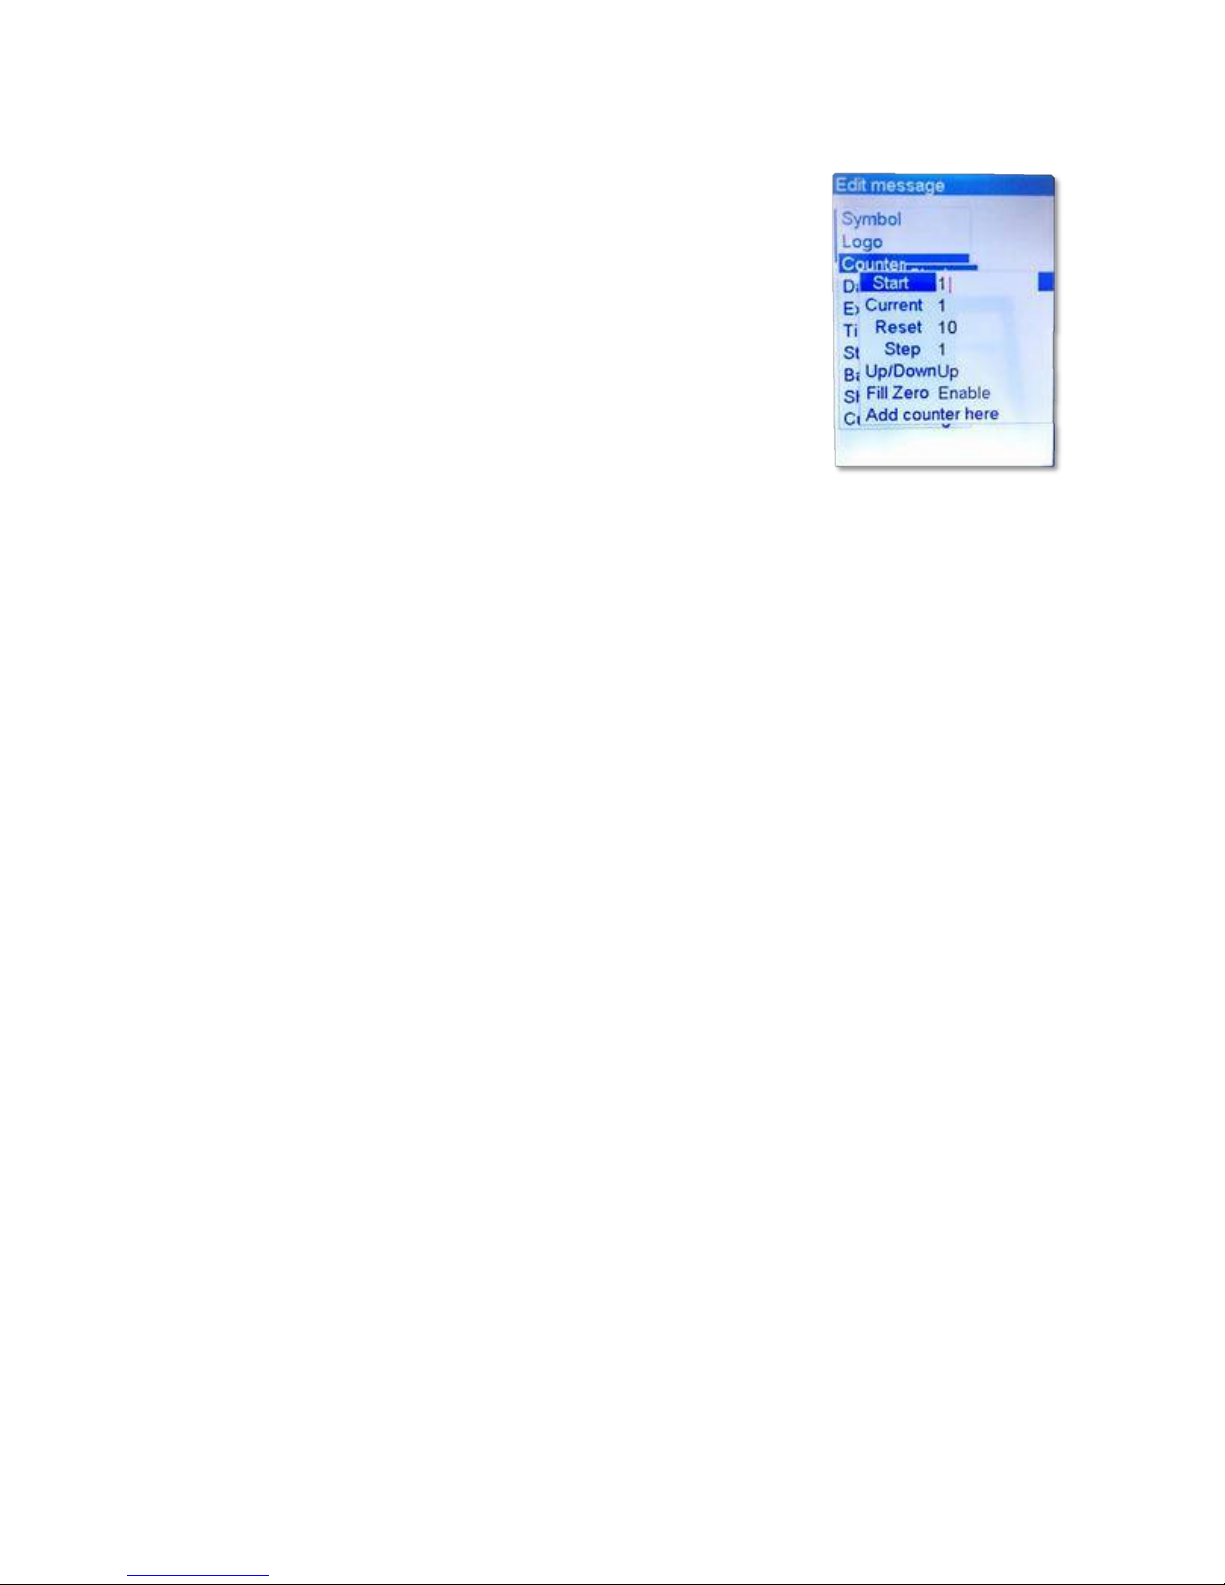
Single is an independent counter. This is used to count the products printed, can be a
product or a box.
Move the cursor to each object and input the value. After
all values are set, move the cursor to Add counter here
and press Enter to insert the counter into the message.
Start: start value
Current: current
value Reset: end
value Step: count
step
Up/Down: count up/down
Fill zero: insert 0 before counter
Add counter here: insert counter into the message
Example: To print the following counter on each object:
001, 003, 005….101, 001, 003, 005 … set:
Start: 1
Current: 1
Reset: 101
Step: 2
Up/Down: Up
Fill zero: Enable
NOTES: Users can insert up to 6 independent counters in one message.
Box/Lot is a dual counter. This is used to count the box and the products in the box.
Move the cursor to each object and input a value. Begin with Counter 1 and Add
counter here and press enter, then apply the same steps to Counter 2.
Counter 1:
Start: start value
Current: current value
Reset: end value
Step: count step
Up/Down: count up/down
Fill zero: insert 0 before counter
Add counter here: insert counter into the
message
Counter 2:
Start: start value
Current: current value
Reset: end value
Step: count step
Up/Down: count up/down
Fill zero: insert 0 before counter
Add counter here: insert counter into the
message
Example:
Printing on certain package a chain of digits, the first 3 digits are the number of the box
containing the package; the last 3 digits are the order of the package within the box, let’s
Smart‐Jet Plus Manual v04 | 2015‐07‐30 | by MSSC, LLC
21
Page 22
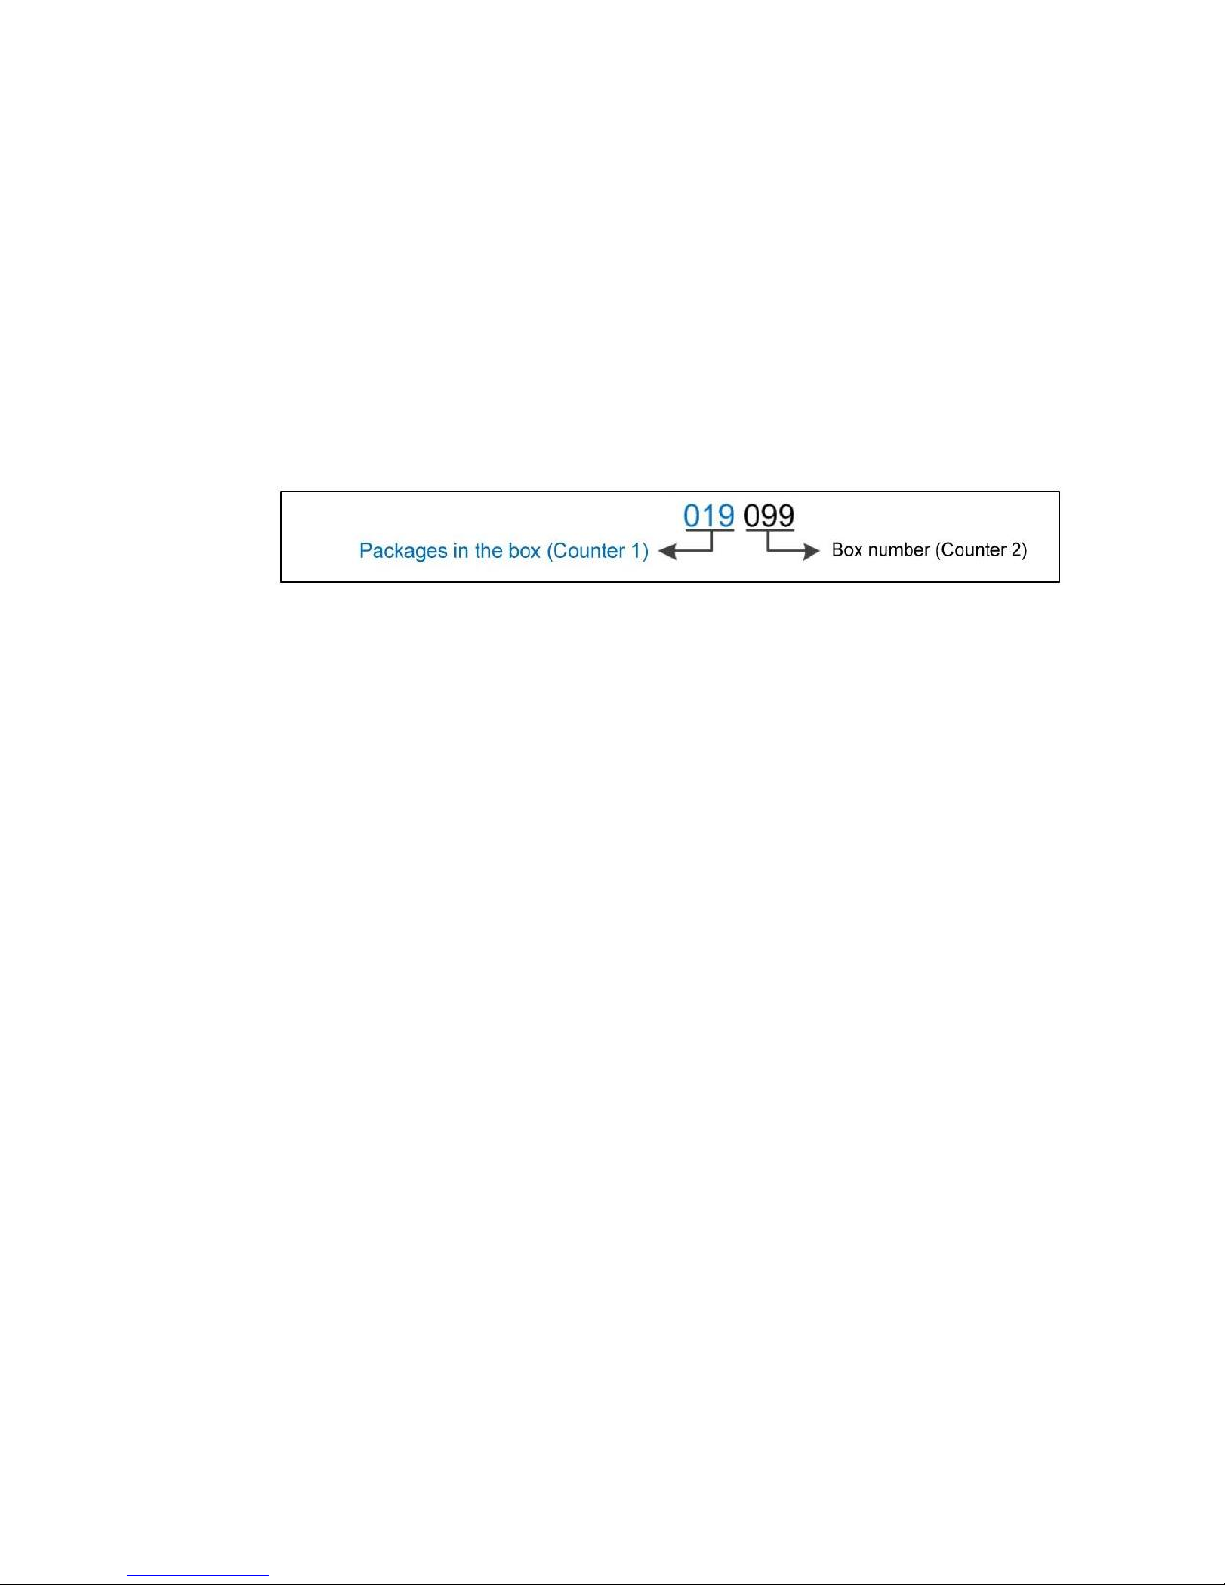
say there are 20 packages in the box. Follow below steps to set counter:
Step 1: Setup Counter 1 first and insert
into the message
Counter 1:
Start: 0
Current: 0
Reset: 20
Step: 1
Up/Down: Up
Fill zero: Enable
The two counters will be printed as below:
NOTES:
Press Enter to apply each setting
Setup Counter 1, then Counter 2
Step 2: Then setup Counter 2 and insert
into the same message
Counter 2:
Start: 0
Current: 0
Reset: 100
Step: 1
Up/Down: Up
Fill zero: Enable
Smart‐Jet Plus Manual v04 | 2015‐07‐30 | by MSSC, LLC
22
Page 23

Maximum value of Reset is up to 2,000,000,000
Maximum value of Step is 250
Counter will be backup and continue in case of power failure
Date: Insert current date into message
In the input section, press Insert, then use or arrow keys to move the cursor to Date and
press Enter.
-
Input date format at Format
-
Press Enter to insert into message
Format: Select your desired format below to input into the Format section. Otherwise, date
will not be displayed in the message.
Day: d or dd
Month: M, MM or MMM
Year: yy or yyyy
Julian date: JJJ
Example:
- 03/09/2013
- 3/9/13
- 3/Sep/13
To insert the current date within a year (365 days), input Format JJJ. In this case, if your
: dd/MM/yyyy
: d/M/yy
: d/MMM/yy
current date is 03/09/2013, date displayed on your message will be 215.
NOTES:
Lower case or Upper case is acceptable
Available separators include Slash (/), Dash (-), Dot (.), Space ( ) and No separator
Expired: Insert expired date into the message
In the input section, press Insert and use or arrow keys to move the cursor to Expired
and press Enter.
-
Input format of expired date at Format (similar format with the current date)
-
Move the cursor to Expired and input the date that your product will be expired
-
Press Enter to confirm settings and insert into the message
Example:
If your manufacture date is 03/09/2013 and your product will be expired in 1 year, you are
required to input 365 at Expired. Smart-Jet Plus will automatically calculate the expired
date and insert into the message.
Time: Insert current time into the message
Current time must be setup in System clock while in the Settings menu.
In the input section, press Insert, then use or arrow keys to move the cursor to Time
and press Enter. Select and input your desired format and press Enter to insert into
message.
Smart‐Jet Plus Manual v04 | 2015‐07‐30 | by MSSC, LLC
23
Page 24

-
Second: s, ss
-
Minute: m, mm
-
Hour: h, hh
-
AM or PM: tt
String: Insert a string of data as setup in the Settings.
From the input section of new message, move the cursor to the position where a string will be
inserted and press Insert. Then use or arrow keys to move the cursor to String and
press Enter. Select your desired string and press Enter to insert into the message.
Barcode: Insert barcodes into message
From the input section, use the arrow keys to move the cursor to the end of the final line of
your message. Press Insert, then use or arrow keys to move the cursor to Barcode and
press Enter. Select Static or Dynamic and press Enter.
Static: Insert static barcodes into message
Type: select your desired barcode type
Code 39
Code 2/5
Code 128
Code 93
UPC-A
EAN
Codabar
Code 11
Width: Input width for barcode (value varies from 1 to 4)
Height: Input height for barcode (value varies from 1 to 4)
Text: Select Enable to display barcode value, otherwise select Disable.
Value: Input value for your barcode
Use or arrow keys to move to the cursor to your desired object and change the value.
Press Enter after each value change to save and apply settings.
Dynamic: Insert dynamic barcode into message
Type: select your desired Barcode
Code 39
Code 215
Code 128
Code 93
UPC-A
EAN
Codabar
Code 11
Smart‐Jet Plus Manual v04 | 2015‐07‐30 | by MSSC, LLC
24
Page 25

Width: Input width for Barcode (value varies from 1 to 4)
Height: Input height for Barcode (value varies from 1 to 4)
Text: Select Enable to display barcode value, otherwise select Disable.
Prefix: Input repeat value before barcode
Counter: setup values for your counter or dynamic data (like the Single counter)
Suffix: Input repeat data after barcode
Use or arrow keys to move to the cursor to your desired object and change the value.
Press Enter after each value change to save and apply settings.
Notes: Counter can be placed at the following positions of the barcode
-
At the beginning: Prefix = 0
-
In the middle : Input both Prefix and Suffix
-
At the end : Suffix = 0
Shiftcode: Insert shiftcode into the message
From the designing section, use the arrow keys to move the cursor to your desired position in
the message and press Insert. Then use or arrow keys to move to Shiftcode and press
Enter.
-
Code: input shiftcode. Max 2 characters (letter or number, or both)
-
Time: input start time of each shift
Code of each specific shift will be displayed according to each period of time of the shift.
Press Enter to save settings and press ESC to go back to the main menu.
Open
Open existing messages to Use/Edit/Delete. From the main screen of Smart-Jet Plus, select
Message, go to Open and press Enter to go to message storage. Select your desired message
and press Enter. Use or arrow keys to Use/Edit/Delete
Use: select existing message to print
Edit: select existing message to edit (see Create New)
Delete: select message to delete
Press ESC to go back to the main screen. Confirm Yes to save message.
Information
Display settings and status of the printer. From the main screen of Smart-Jet Plus, select
Message and use arrow keys to go to Information and press Enter.
-
Ink level : Current ink in the cartridge (mL)
-
Speed
-
Density
-
Resolution
: Current print speed (m/min)
: Current density
: Current resolution
-
Delay
-
Print Mode : Current print mode
Smart‐Jet Plus Manual v04 | 2015‐07‐30 | by MSSC, LLC
: Current delay time
25
Page 26
-
Repeat
-
Minimum
resolution
Operation
Start: Start printing
: Number of prints repeated on the same object
: Number of prints left based on the current ink level, density and
Select Start to print. Your message content along with other setting parameters will be
displayed while printing.
-
Prints
-
Speed
: Number of prints that have been printed
: Current speed (m/min)
Smart‐Jet Plus Manual v04 | 2015‐07‐30 | by MSSC, LLC
26
Page 27

-
Ink levels : current amount of ink in the cartridge (mL)
-
Resolution : current resolutions (dpi)
Stop: Stop printing
To stop printing, press ESC to go back to the main screen. Use or arrow keys to go to
Operation, select Stop to stop printing.
NOTES: Smart-Jet Plus should be stopped before doing other settings.
Purge: Press Purge to jet the ink and clean the print head
Connect / Disconnect PC: Select to connect or disconnect Smart-Jet Plus with PC
Settings
From the Settings menu, use the arrow keys to move the cursor to your desired setting, press
Enter to select and begin setting.
Press Enter to save and apply new settings. Press ESC to go to the main menu.
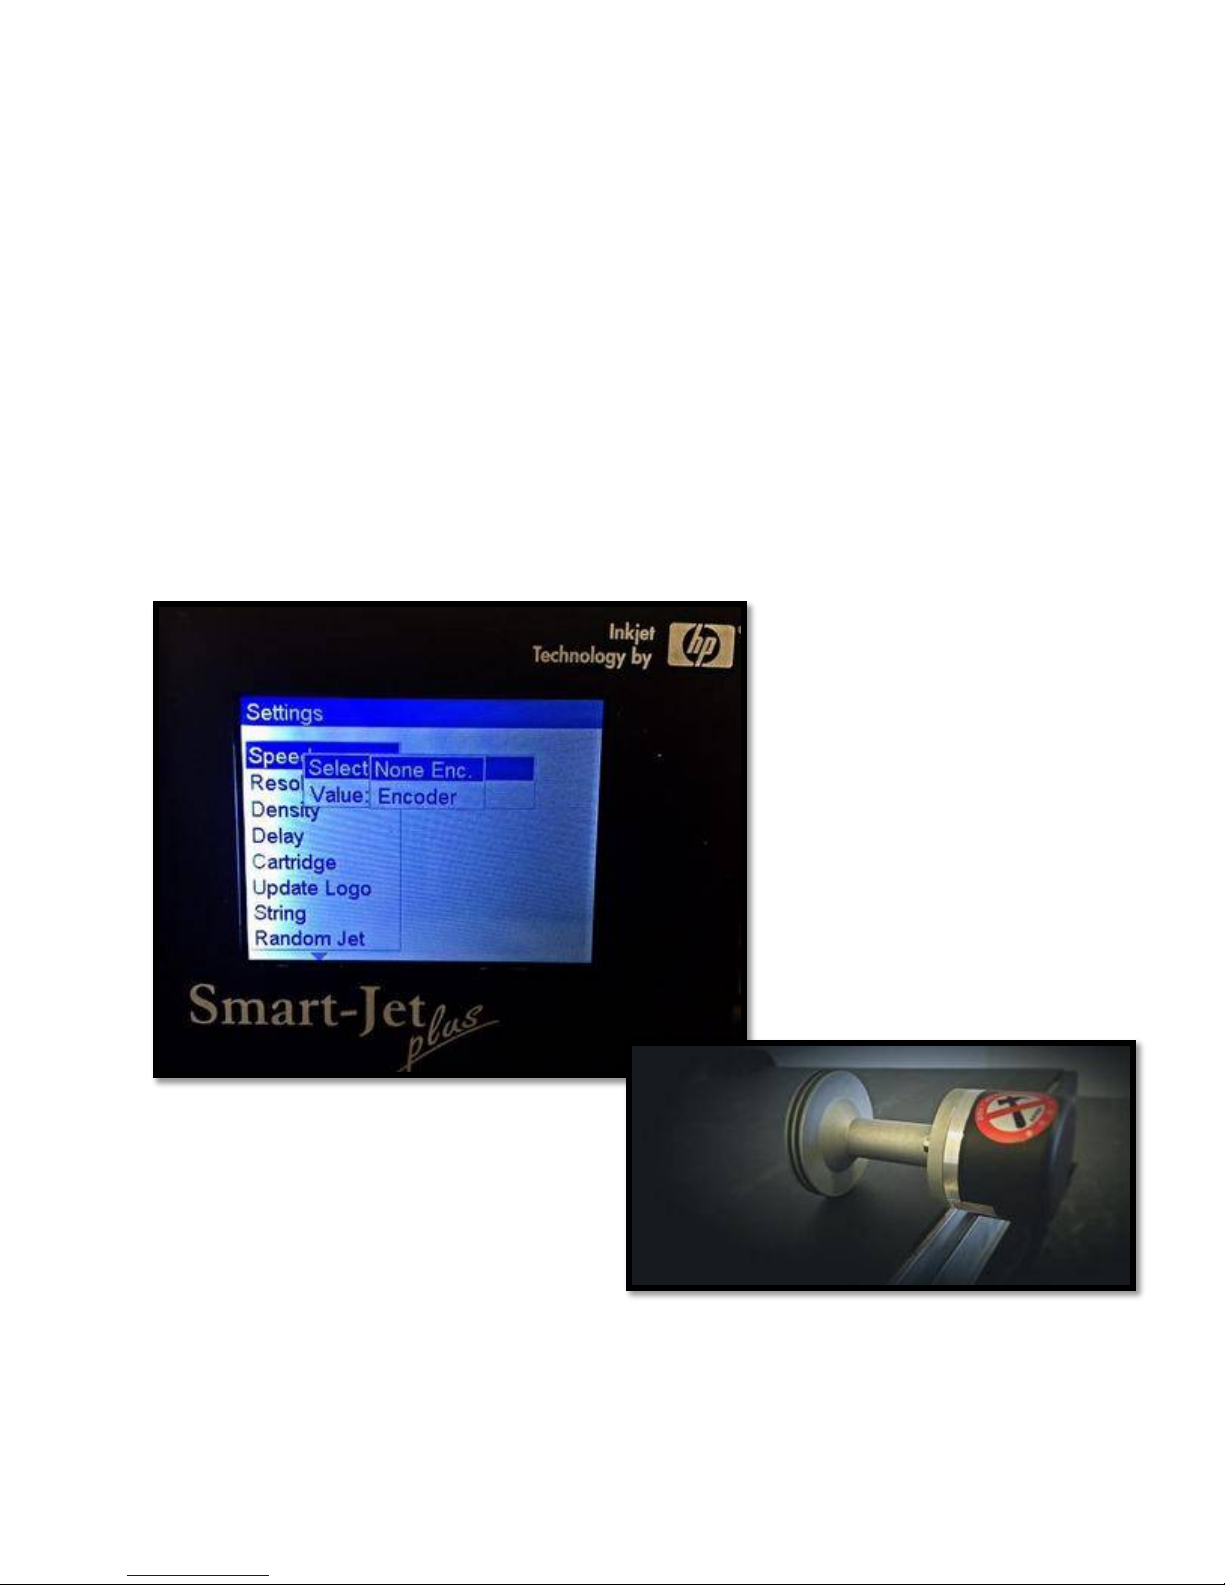
Speed: Set print speed with 2 print modes: None Enc. and Encoder
None Enc.: Operating Smart-Jet Plus without encoder. Under this mode, print speed must
be set to synchronize with conveyor speed to print good quality message (input value at
Value).
Encoder: Encoder is recommended where speed of the conveyor is varied. Under this
mode, print speed of Smart-Jet Plus will be synchronized with conveyor speed to ensure
the best print quality.
Ensure you have an encoder installed with Smart-Jet Plus via the DB15 connector in port
(#4).
There are 3 Speed options for the Smart-Jet Plus while utilizing the Encoder feature:
Fast: This makes the characters print closer together.
Real: This makes the characters print in correct spacing and size.
Slow: This makes the characters print farther apart.
NOTES:
-
Minimum speed: 1m/min
-
Maximum speed: 228m/min
-
When max speed is exceeded while using an encoder, the printer will continue
printing with an error message, but the quality of print decreases. At this point,
resolution should be changed to compensate for speed increase.
From the Settings menu, use or arrow keys to move the cursor to Speed, press
Enter. Press Enter again at Select to choose None Enc. or Encoder mode. Encoder
mode has 3 speed ratio options that include Fast (2:1), Real (1:1), and Slow (1:2). Press
Enter to apply
Resolution:
Set the amount of ink drops on an inch. From the Settings menu, use or arrow keys to
go to Resolution, press Enter. Select your desired resolution and press Enter.
Optional resolutions:
300x300 dpi
300x150 dpi
Smart‐Jet Plus Manual v04 | 2015‐07‐30 | by MSSC, LLC
27
Page 28
300x100 dpi
Density
Resolution
1
2
3
4
5
300x300
76
38
25
19
15
300x150
152
76
50
38
30
300x100
228
114
76
57
45
Density: Set the optical density of the print.
There
are 5 levels of Density to apply
From the Settings menu, use or arrow keys to move the cursor to Density, press Enter.
Move the cursor to your desired density and press Enter to apply.
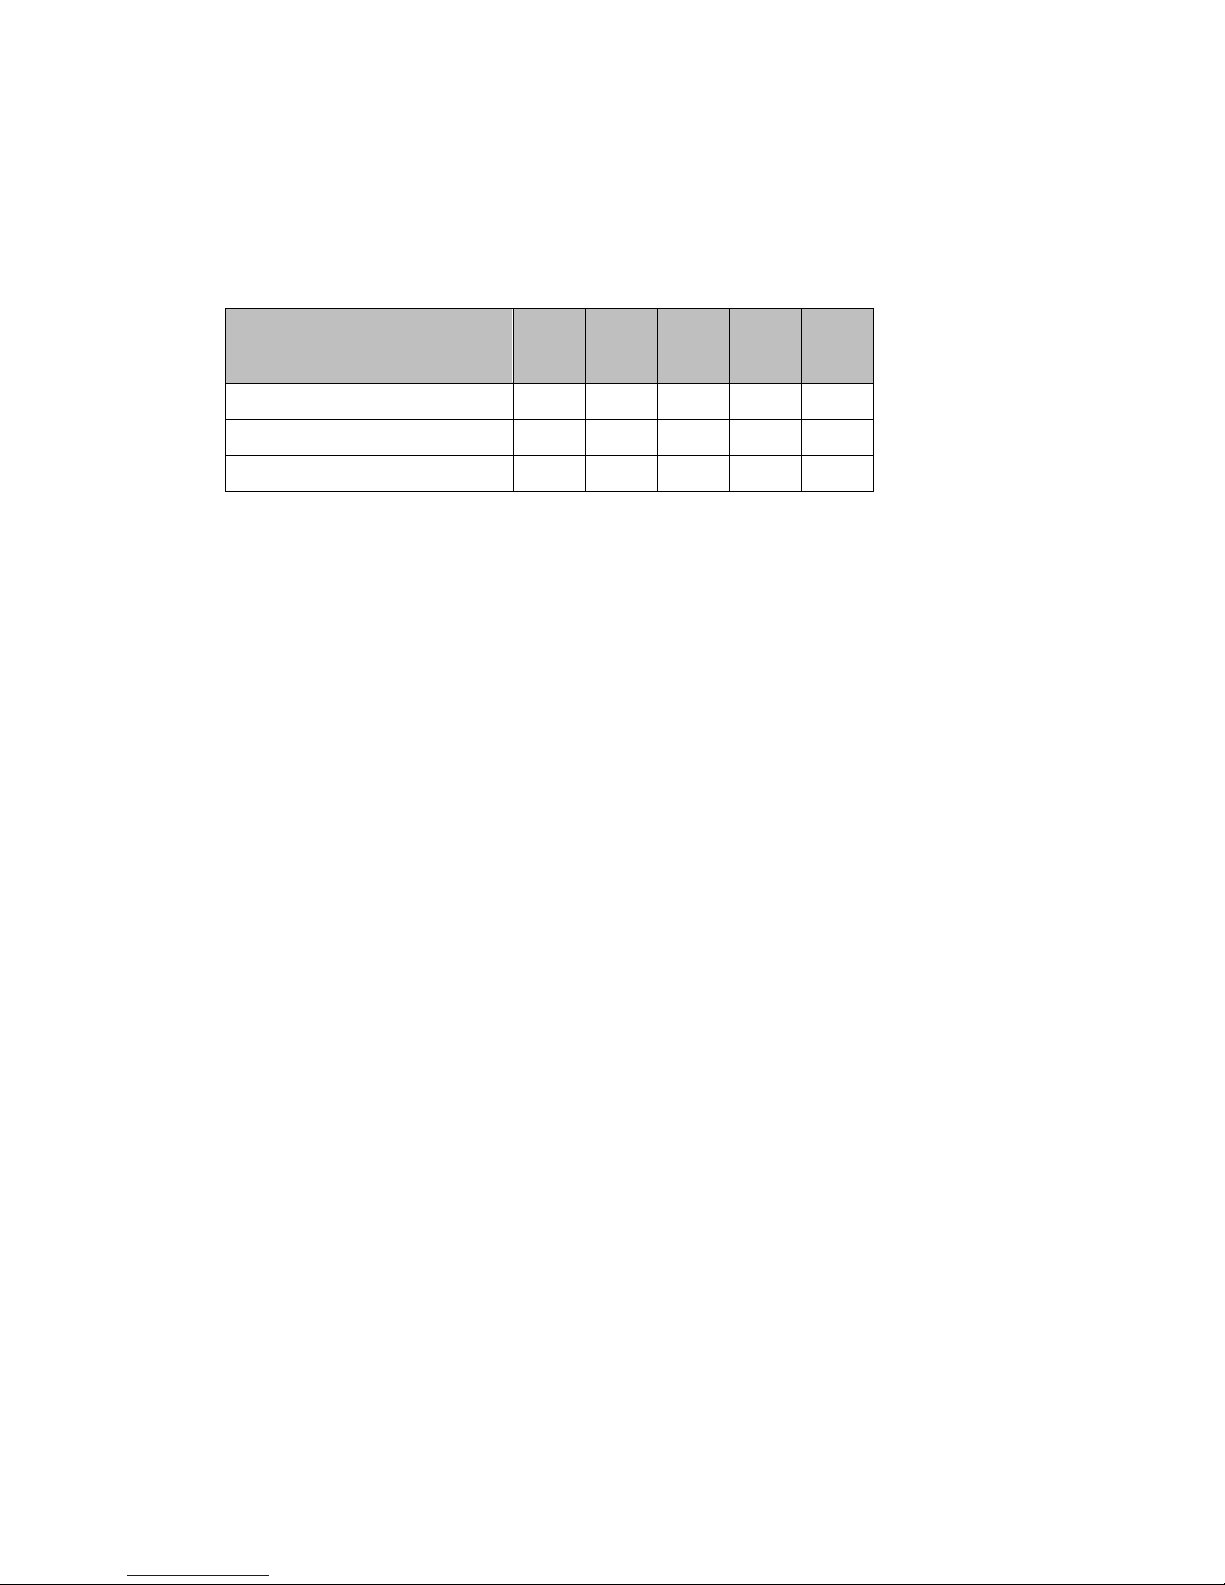
NOTES: Print speed will be varied according to the resolution and the optical density.
Speed chart in m/min:
Delay: Delay Before Print and Delay After Print (mm)
Delay Before Print: Set the distance since the sensor receives signal to the start of
printing. Input value at Value, press Enter to apply settings.
Delay After Print: Set the distance that the print head will delay after it finished the
previous print and the next print. Input value at Value, press Enter to apply settings.
NOTES:
Delay before print varies from 1 to 500 mm
Delay after print varies from 1 to 500 mm
Cartridge: User required to input the current amount of ink in the cartridge after inserting
new cartridge into the printer and display the current level of ink in the cartridge while
printing.
From the Settings menu, use the arrow keys to go to Cartridge and press Enter.
NOTES:
-
Alarm is triggered when there is 5ml left in the cartridge.
-
If the same cartridge is used on a different printer, record the ink level from the current
printer and input it on the new printer.
Update Logo:
Update logos or images from USB flash to the printer memory. Be sure your new logos are
available on your USB flash.
28
Smart‐Jet Plus Manual v04 | 2015‐07‐30 | by MSSC, LLC
Page 29
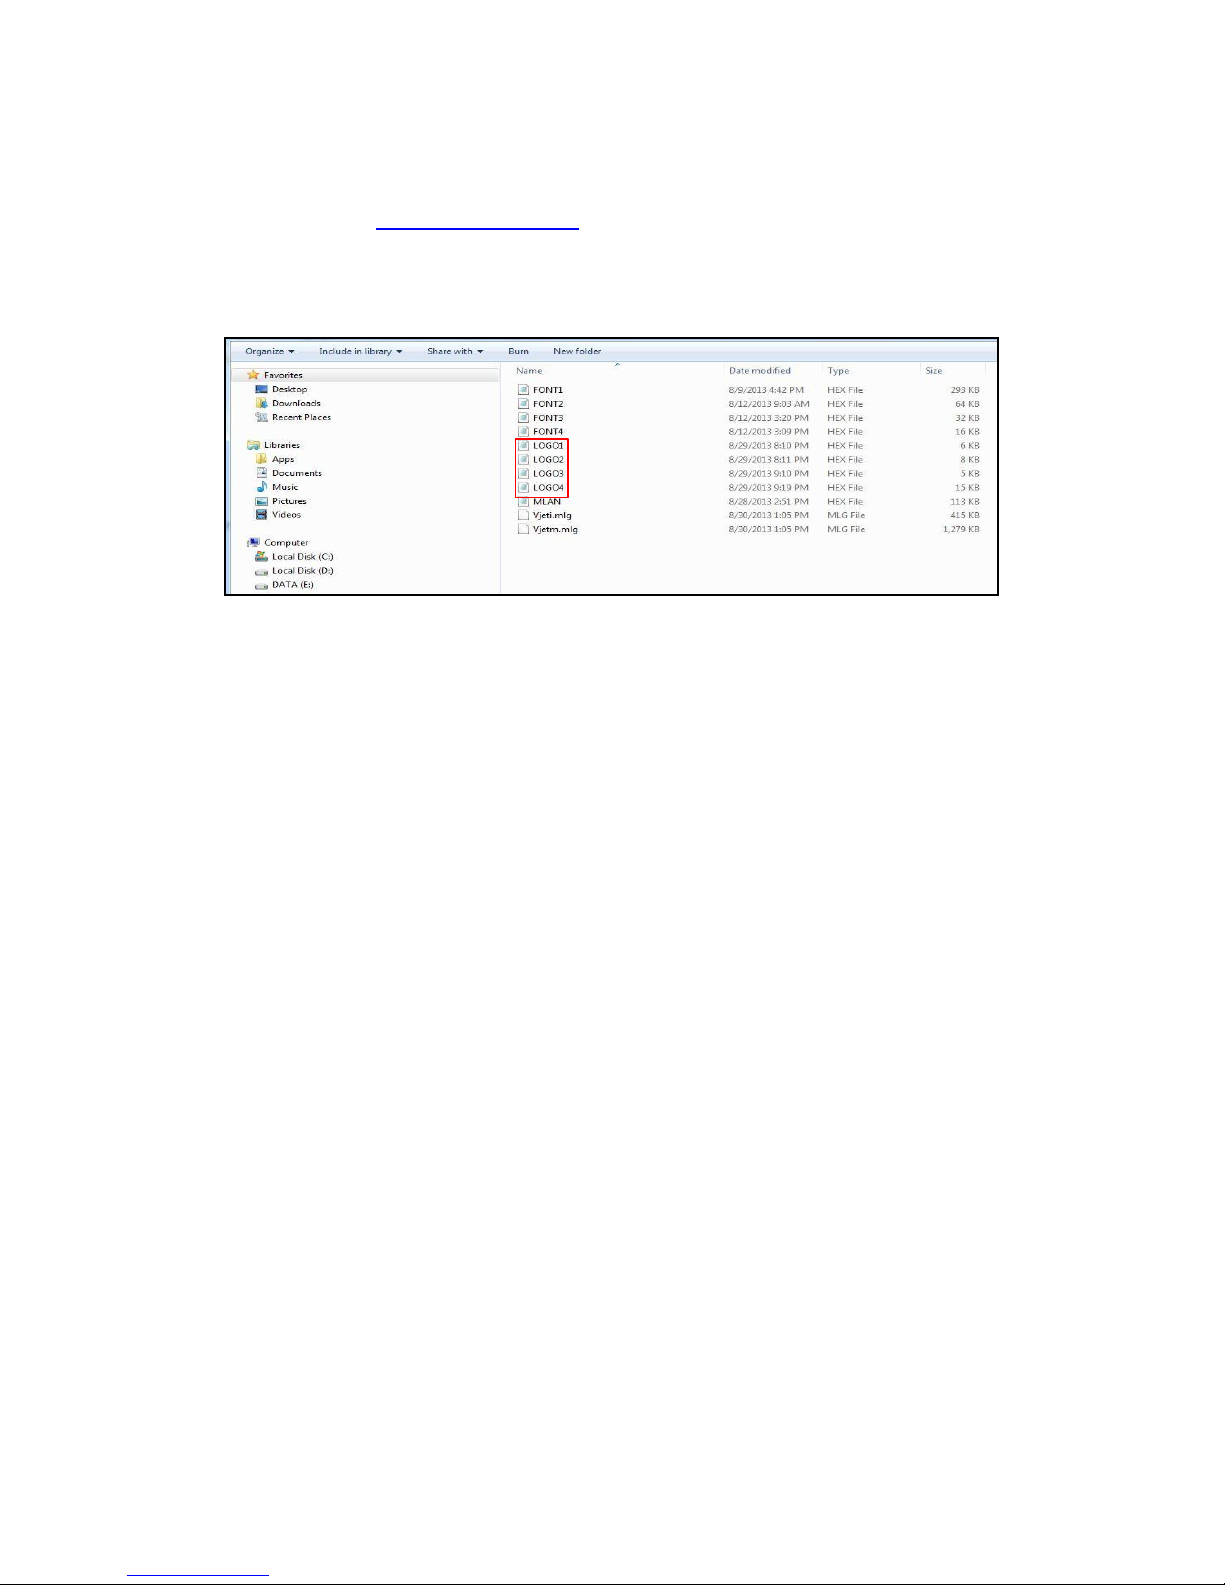
Logos stored on your USB flash must be processed by our Smart-Jet Plus_ConvertLogo
application. Smart-Jet Plus accepts logo with .hex format only. All logos must be named in order
as LOGO1, LOGO2, LOGO3, and LOGO4 as showed below.
To receive this program:
-
Input S/N to download
-
Contact: [email protected]
Instructions to store logos on USB:
To update or change new logos on your printer memory, do the following steps:
Insert USB flash into Smart-Jet Plus (USB port 2)
From the Settings menu, go to Update Logo and press Enter
Select your desired logo (1 to 4) and press Enter to begin updating. Be sure you name
them correctly. LOGO1 on your USB will replace LOGO1 on the printer memory and
the same for other logos.
String: Insert a string of data into messages.
From the Settings menu, use the arrow keys to go to String and press Enter. Input your
strings into the input section. Press ESC to apply and go back to the main menu.
NOTES:
-
Strings are used to insert words or phrases commonly used, to eliminate typing them
every new message.
-
Maximum length of each string is 50 characters.
-
Smart-Jet Plus allows maximum 5 strings on the printer memory.
Random Jet: Schedule automatic jetting to clean the print head
From the Settings menu, use arrow keys to select Random Jet and press Enter. Select
Status and press Enter.
-
Select Enable and input a time for jetting in (seconds (s)) at Time.
-
Select Disable to disable random jetting.
Print Side: Set nozzles on 2 modes Manual and Auto
From the Settings menu, use the arrow keys to go to Print Side and press Enter. Select
Manual or Auto by pressing Enter at Select
-
Manual: Press Enter at Value to select Odd or Even. This is applied in case one of
Smart‐Jet Plus Manual v04 | 2015‐07‐30 | by MSSC, LLC
29
Page 30

your nozzle side is not working. Press Enter to apply.
-
Auto: Input the number that the nozzles will switch after certain prints. To automatically
switch nozzles after every print, input 1. To switch nozzles after every 25 prints, input 25.
NOTES:
-
Operation with wireless keyboard: Odd or Even (max 300x300dpi)
-
Operation with smart devices: Odd or Even (max 300x300dpi)
Sensor: Select External or Internal sensor.
From the Settings menu, use the arrow keys to go to Sensor and press Enter. Move to your
desired mode and press Enter to confirm.
Directions:
Set print direction correlating the direction of the conveyor. Smart-Jet Plus supports 4
directions:
: left right, : right left, : reverse left right, : reverse right left.
From the Settings menu, use the arrow keys to go to Directions and press Enter. Move to
your desired direction and press Enter to confirm.
Print Mode: Sensor mode and Continue mode.
From the Settings menu, use the arrow keys to go to Print Mode and press Enter. Select
Mode and press Enter to select Sensor or Continue mode.
Sensor mode: Smart-Jet Plus is triggered by sensor to prints.
Go to Mode and press Enter to select Sensor mode and use arrow keys to move to other
settings.
Input value at Repeat to set the number of prints to be repeated on the same object. Press
Enter to confirm and go to the next setting. Valid values vary from 0 to 100.
Input value at Delay to set distance between the prints. Valid values vary from 10mm to
10,000mm. Invalid values results in error.
Continue mode
Go to Mode and press Enter to select Continue mode and use arrow keys to move to
other settings.
Input value at Delay to set distance between the prints. Valid values vary from 10 to
10,000. Invalid values results in error.
Unit: Select your desired measurement units inch or mm
From the Settings menu, use the arrow keys to go to Unit and press Enter. Move to your
desired measurement, press Enter to select.
Wi-Fi: Connect Smart-Jet Plus to Wi-Fi network
From the Settings menu, use the arrow keys to go to Wi-Fi, press Enter. Use and arrow
keys to turn ON or turn OFF Wi-Fi (see Quick Startup pg.15).
Update Fonts: Update different fonts and character sizes for Smart-Jet Plus. There is one font
at a time on Smart-Jet Plus.
Smart-Jet Plus supports the following fonts while working with wireless keyboard.
Smart‐Jet Plus Manual v04 | 2015‐07‐30 | by MSSC, LLC
30
Page 31
Lines
Arial
1
12.7mm
2
5.93mm
3
3.89mm
4
2.54mm
6
1.69mm
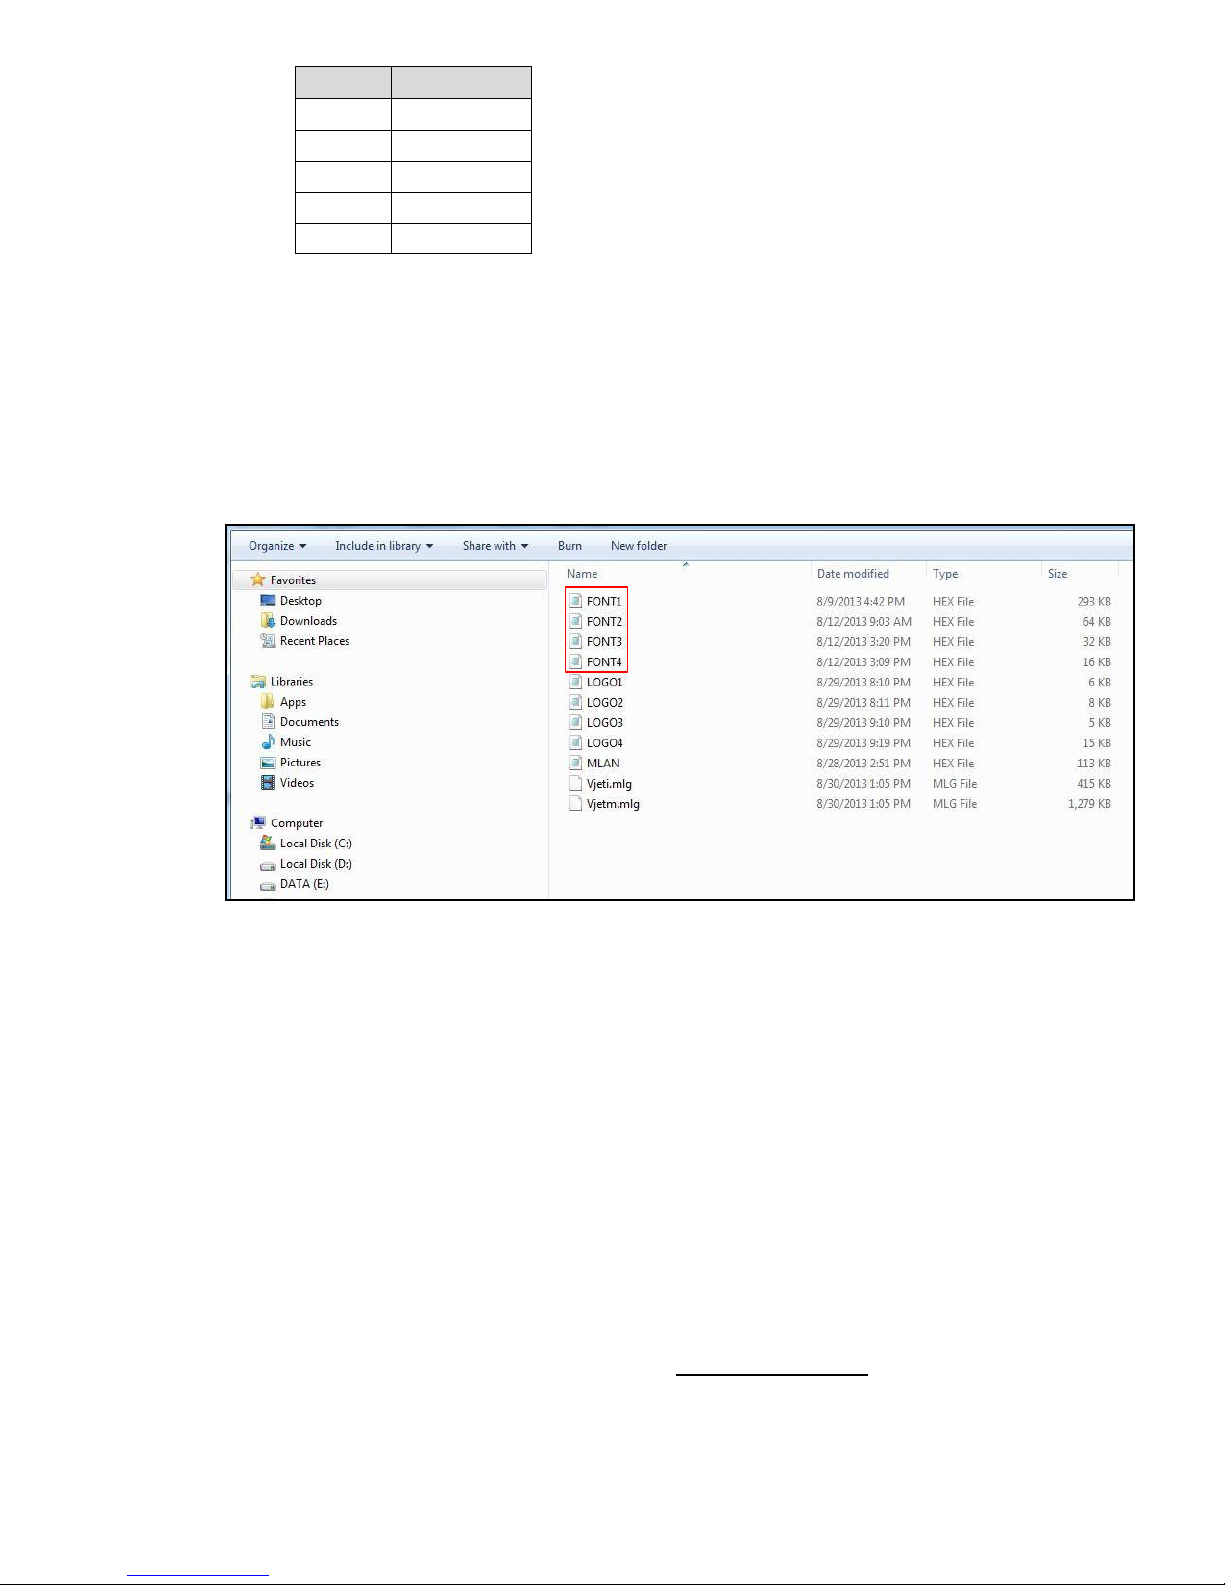
Steps to update different font/size:
Insert USB flash into USB port 1 on Smart-Jet Plus
From the Settings menu, go to Update Font and press Enter
Select your desired font/sizes (1 to 5) and press Enter to begin updating. FONT1 on
your USB will replace FONT1 on the printer memory and the same with other fonts.
Smart-Jet Plus accepts font/sizes with .hex format only. All font/sizes must be named as showed
below.
NOTES:
-
Fonts being updated will replace the existing ones on the printer memory.
-
Smart-Jet Plus prints true fonts while working with PC
Rollover: Set different date depending on the shift schedules of your production
From the Settings menu, use the arrow keys to move to Rollover and press Enter
Go to Set and press Enter. Enable this function and input value at Time. Press Enter
to apply (default value is 00h:00). Otherwise select Disable and press Enter to apply.
System Clock: Set time and date for your system clock
From the Settings menu, use arrow keys to go to System clock and press Enter
Go to Date, use and arrow keys to change date value and press Enter to apply.
Go to Time, use and arrow keys to change time value and press Enter to apply.
Note: Date must be set as DD/MM/YYYY, NOT MM/DD/YYYY
Rotate: Select your display modes: Auto or Lock rotate
Smart‐Jet Plus Manual v04 | 2015‐07‐30 | by MSSC, LLC
31
Page 32

From the Settings menu, use the arrow keys to go to Rotate and press Enter
Select Auto or Lock rotate, press Enter to apply.
Screen will rotate according to the direction of the machine when Auto is selected
Screen will be locked at the direction when Lock rotate is selected
Password: Set to protect the printer from unauthorized
Smart-Jet Plus is defaulted as no password.
To activate password protection, from the Settings menu use arrow keys to go to Password
and press Enter. Then go to Active and select Enable to set password.
Enter old password (1234567890), then enter your new password and retype to confirm.
Maximum characters allowed for password is 10 including letters and numbers.
users
Default: Reset your printer settings to the factory defaults. This can be used after updating
firmware or reset Smart-Jet Plus in case errors occur during operation.
From the Settings menu, select Default and press Enter. A confirmation box will appear.
Select Yes to continue. Otherwise, select No.
Language: Select your interface language (see pg. 58)
From the Settings menu, select Language and press Enter. Use the arrow keys to move to
your desired language and press Enter to apply. Otherwise, select ESC.
-Must have USB with Firmware plugged in. (Contact: [email protected])
About: including 2 items
See information of the current firmware
Update a different firmware
OPERATION WITH WI-FI VIA MOBILE DEVICES
CONNECT TO WI-FI
Control Smart-Jet Plus printer via Wi-Fi connection by using mobile devices such as iPhone
and iPad.
From the Settings menu on Smart-Jet Plus, use arrow keys to go to Wi-Fi and press Enter.
Use and arrow keys to turn ON Wi-Fi.
Smart-Jet Plus will automatically search available networks and display. Use and arrow
keys to move to your desired network. Press Enter to select.
Go to Security and press Enter to select security type. Press Enter to apply. Otherwise
select None and press Enter.
Input password if required and press Enter to apply.
In case your desired network is not found, select Other to begin searching other networks.
Input network name and press Enter to confirm
Press ECS to return to the Settings menu. Your password will be remembered for next setup.
Smart‐Jet Plus Manual v04 | 2015‐07‐30 | by MSSC, LLC
32
Page 33

NOTES:
-
If your desired Wi-Fi network is not shown, please turn OFF Wi-Fi and turn ON again for
new searching process.
-
Contact your network administrator if supports is needed
PROCEDURE IN DETAIL
After connecting Smart-Jet Plus to Wi-Fi network successfully, install the
application on smart devices to control the Smart-Jet Plus.
With iOS devices (iPhone and iPad):
Go to App Store (Key words: smart-jet, MSSC), or scan QR code.
iTunes:
iPhone link: https://itunes.apple.com/vn/app/smart-jet/id582523668?mt=8
iPad link: https://itunes.apple.com/vn/app/smart-jet-for-ipad/id582548354?mt=8
OPERATION WITH PC
MINIMUM PC
REQUIREMENTS
Cpu: Core 2 Duo 2x2.0 GHz
Ram: 2GB
Hard disk space : 50 MB
Operating System : Windows 7, Windows 8 (32,64 bit)
(Microsoft .NET Framework 4)
Smart‐Jet Plus Manual v04 | 2015‐07‐30 | by MSSC, LLC
33
Page 34
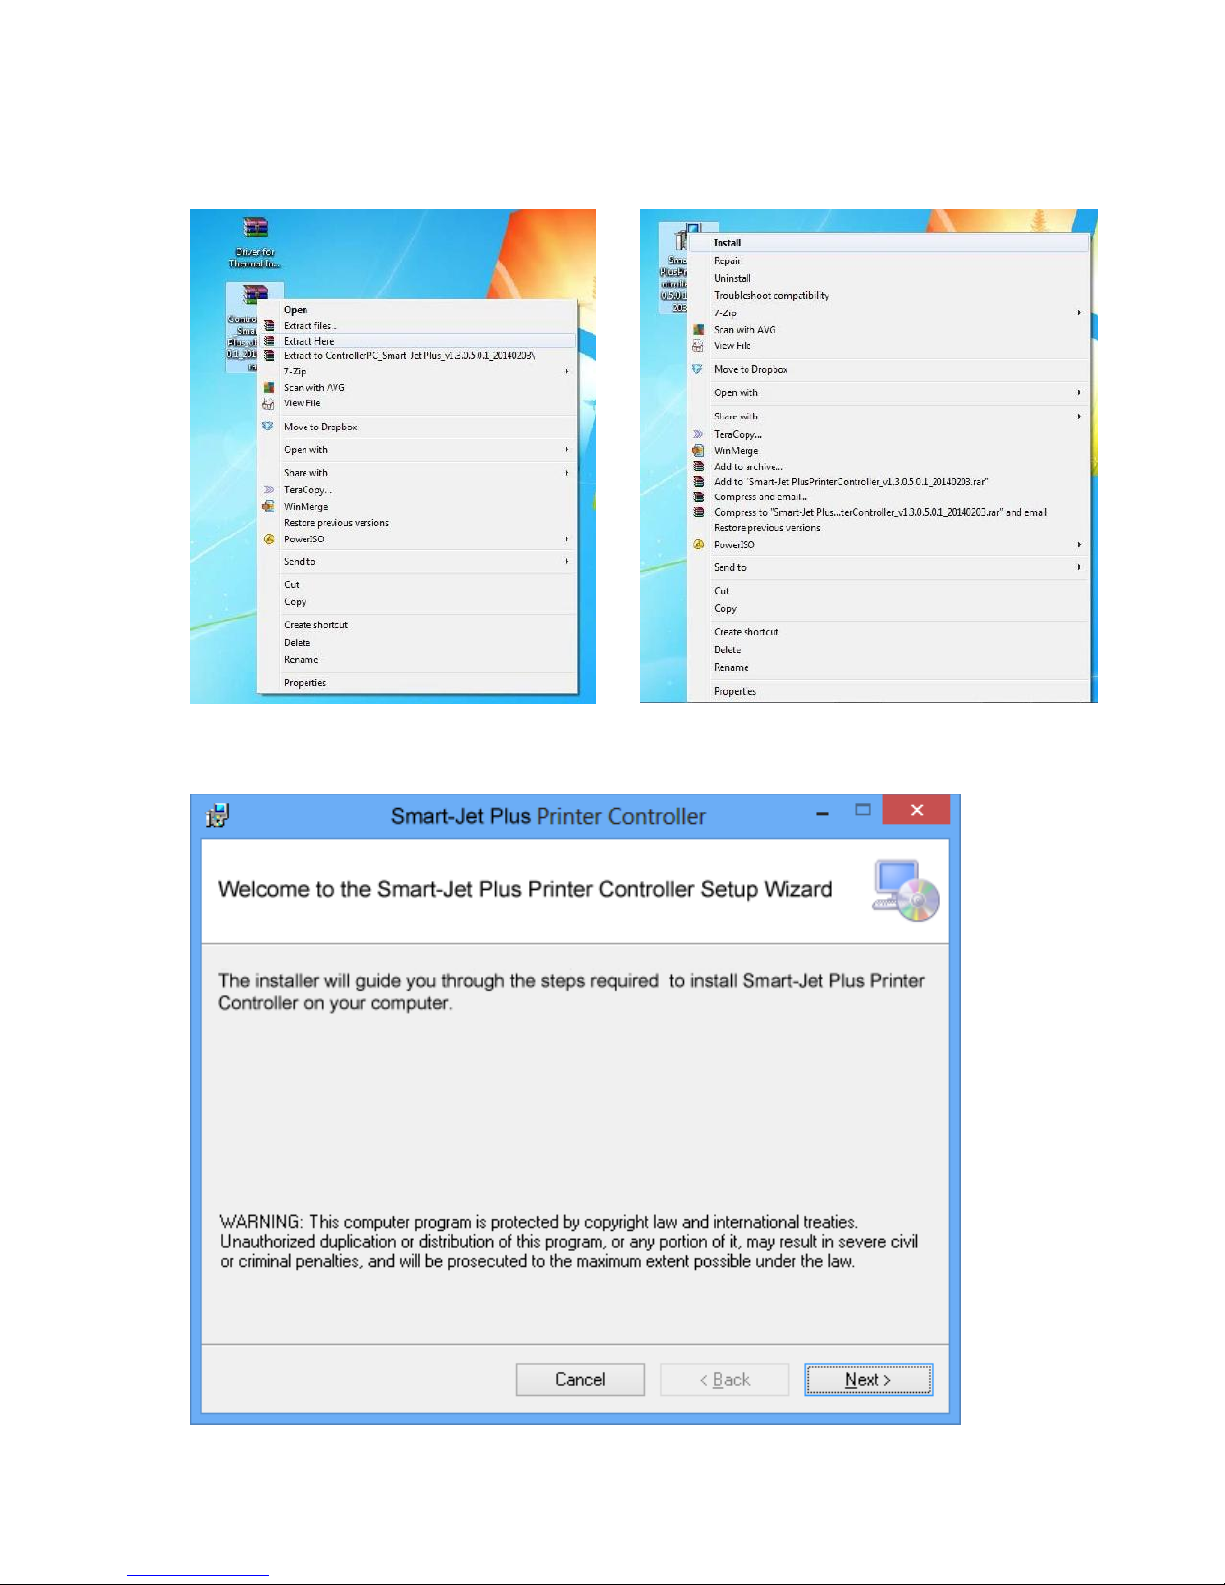
CONNECT SMART-JET PLUS TO PC
Install Smart-Jet Plus software on your PC- Contact: [email protected]
1: Extract Smart-JetPlusSetup.rar 2: Install Smart-JetPlusController.msi
3: Select Next
Smart‐Jet Plus Manual v04 | 2015‐07‐30 | by MSSC, LLC
34
Page 35
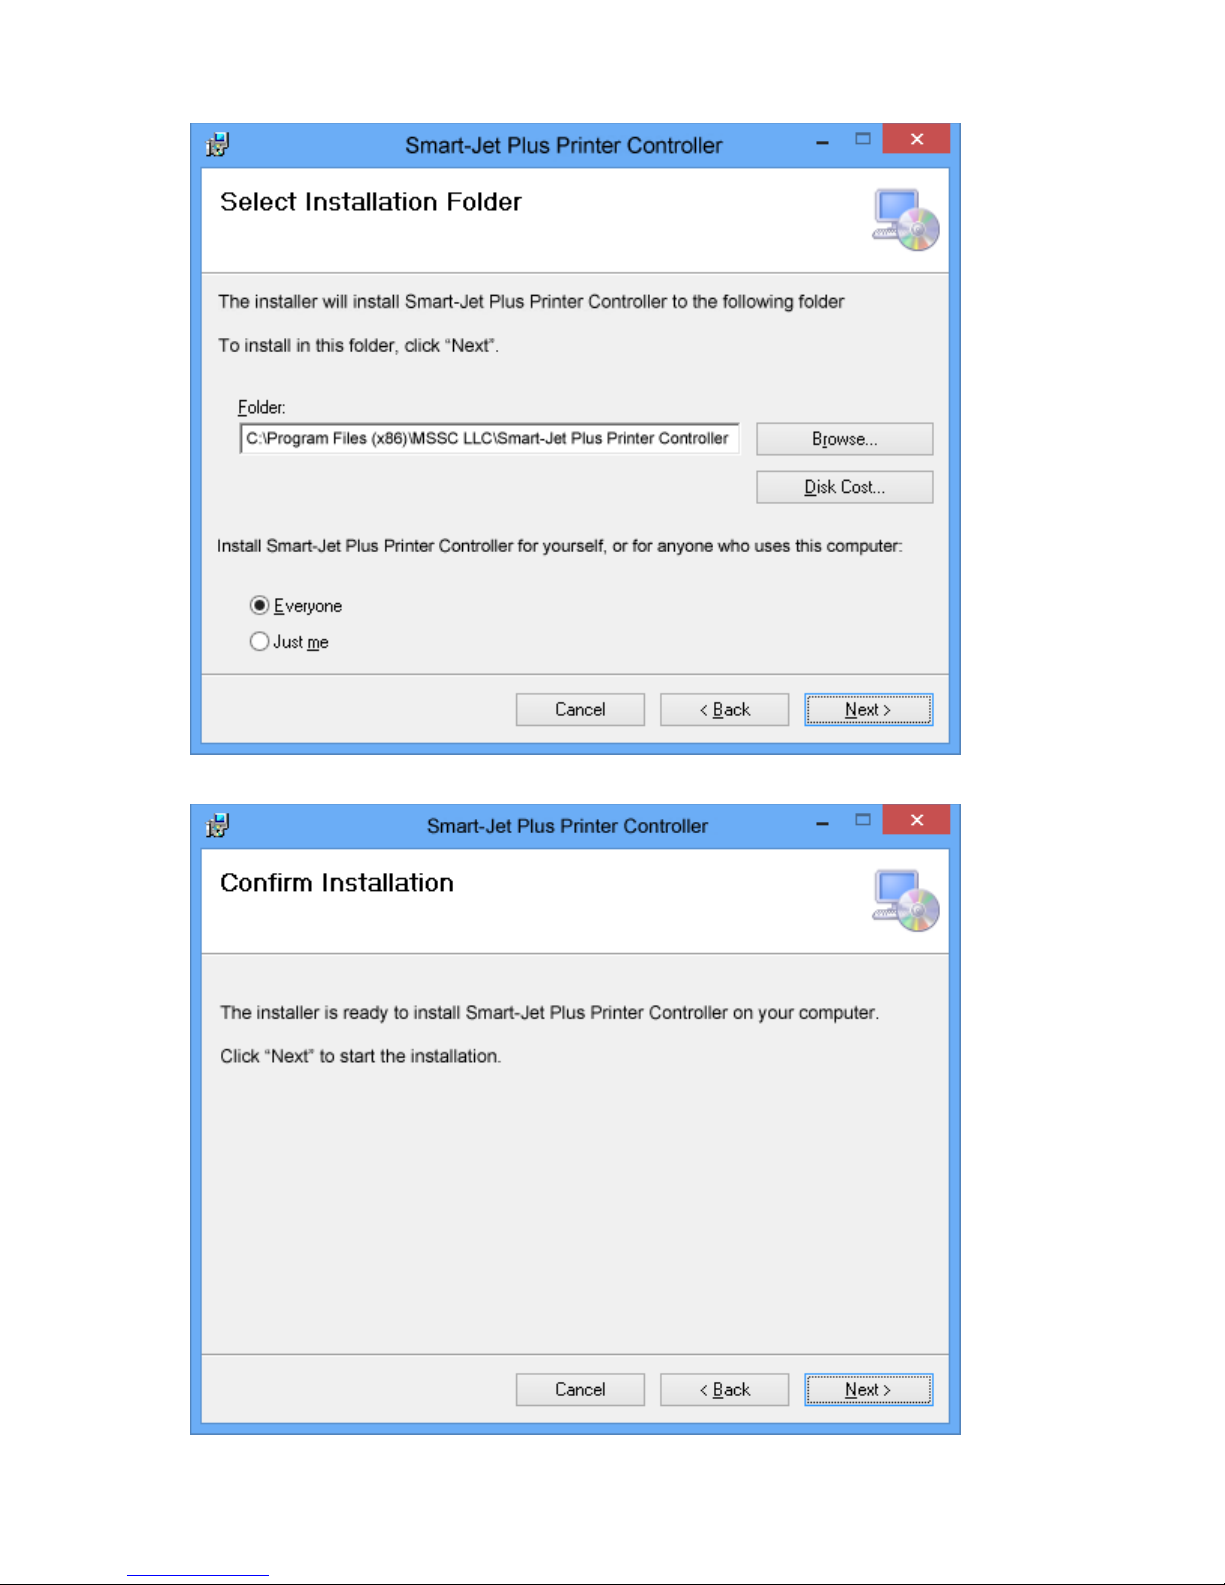
4: Browser to allocate your source store. Select Next
5: Select Next
Smart-Jet Plus Manual v04 ǀ 2015-07-30 ǀ by MSSC, LLC
35
Page 36
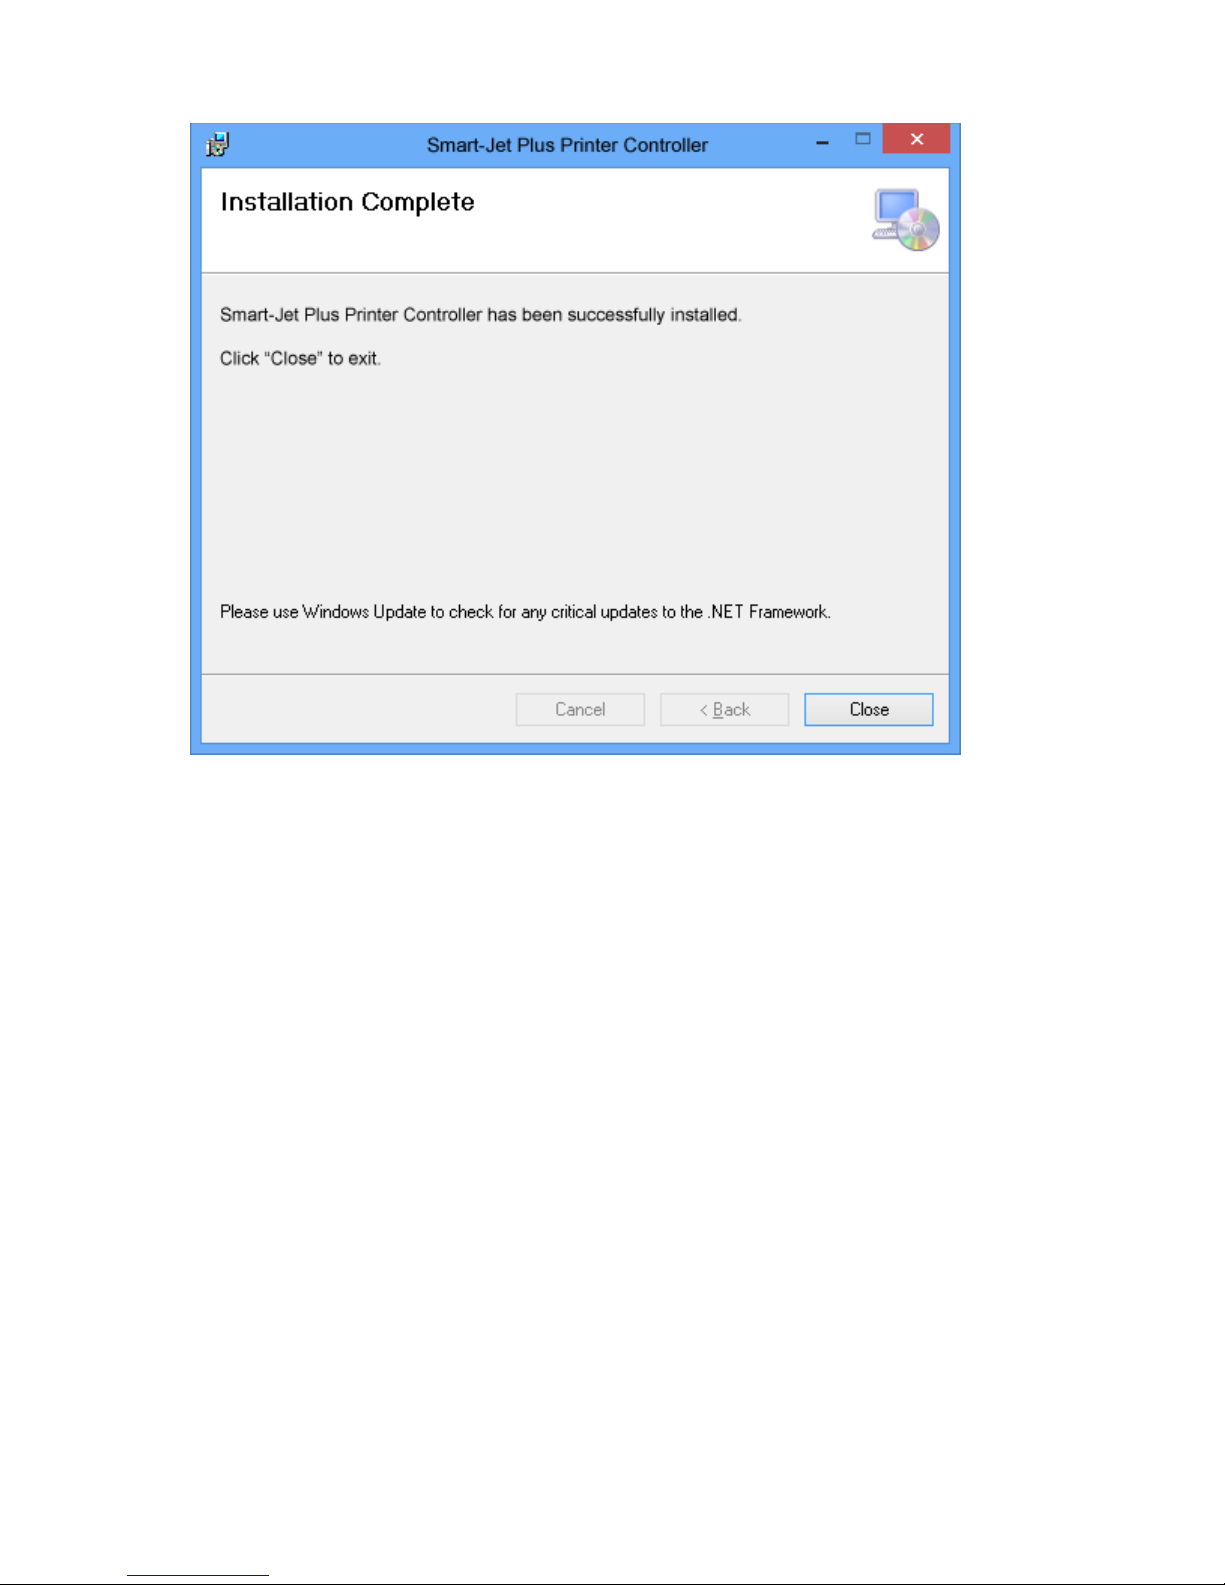
6: Wait for installation to complete
Smart-Jet Plus Manual v04 ǀ 2015-07-30 ǀ by MSSC, LLC
36
Page 37
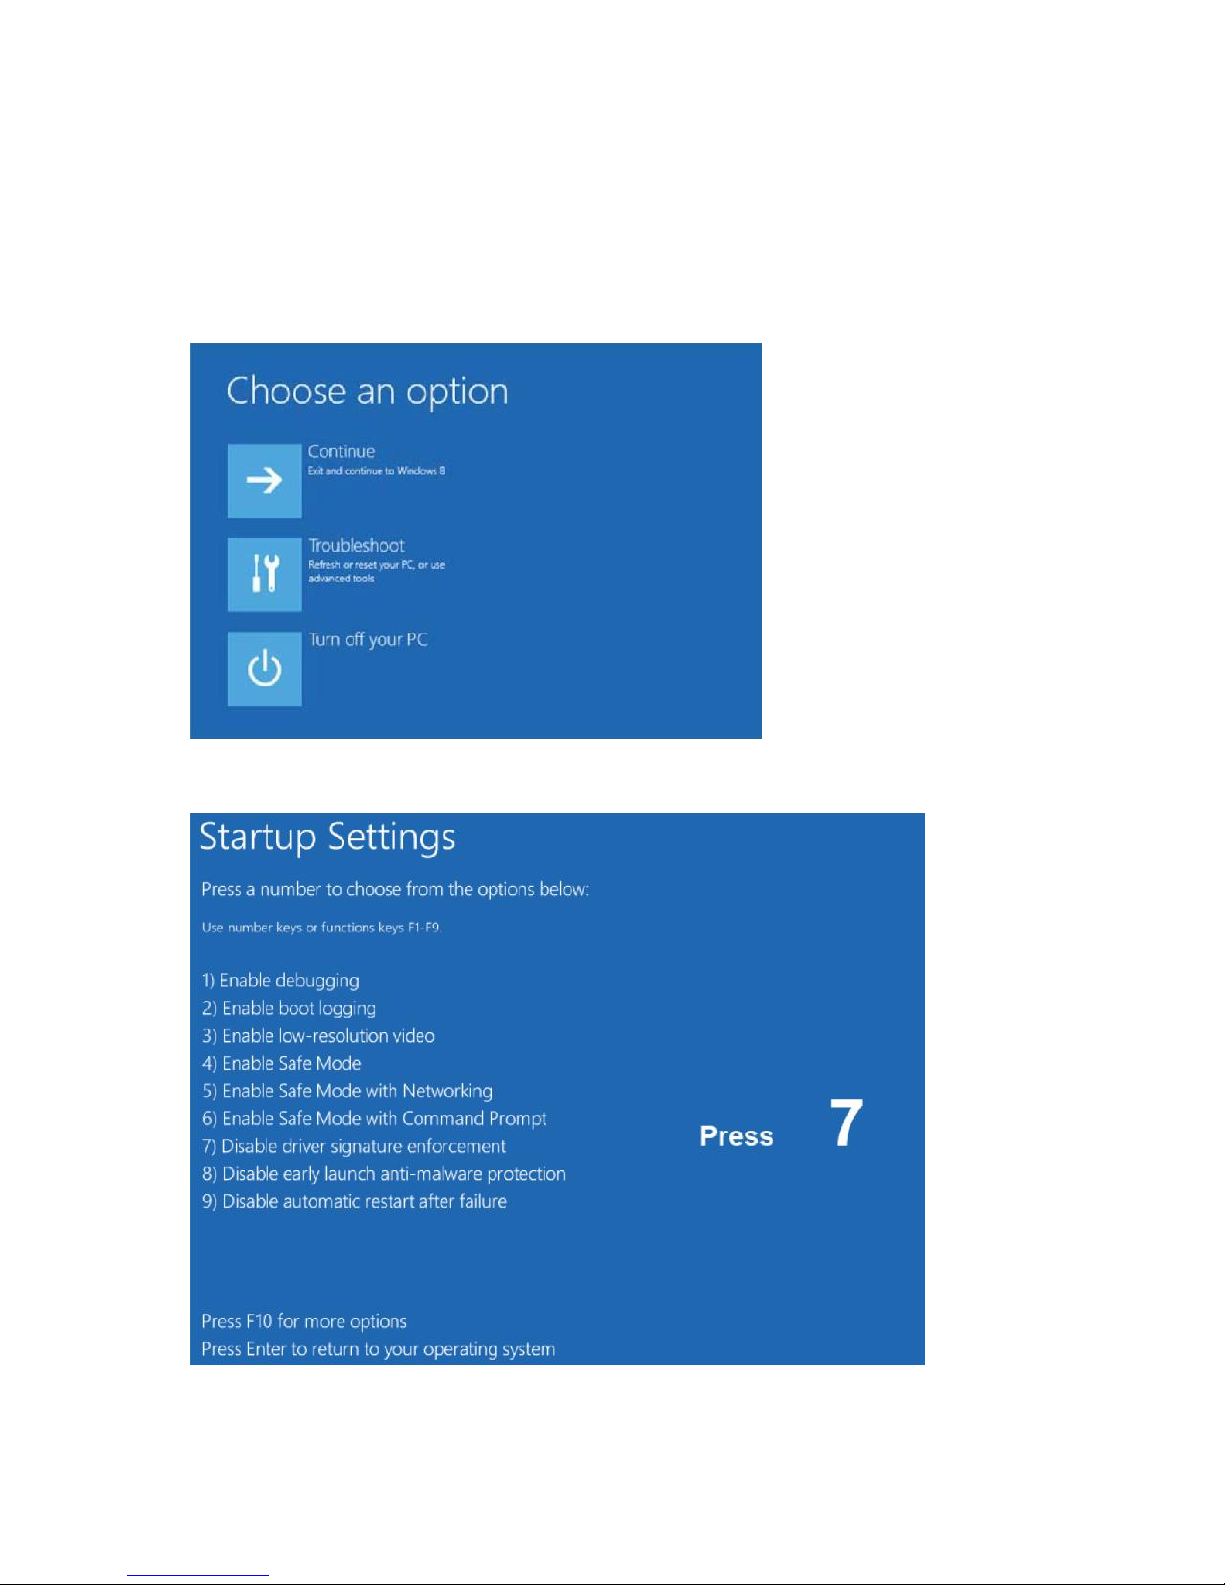
Install Drive for Smart-Jet Plus Printer Controller on PC
NOTES: If your PC uses Window 8 64bits, please do one more step: Disable signature
enforcement before you install Driver.
*Disable driver signature enforcement
1.
Press Ctrl + Alt + Delete, then keep Shift key and click Restart to start setting mode.
2.
Input Startup Setting by link: Troubleshoot / Advance options / Startup settings / Restart.
3.
From Startup Setting screen, press 7 to Disable driver signature enforcement. Wait for the
operating system to complete.
Smart-Jet Plus Manual v04 ǀ 2015-07-30 ǀ by MSSC, LLC
37
Page 38
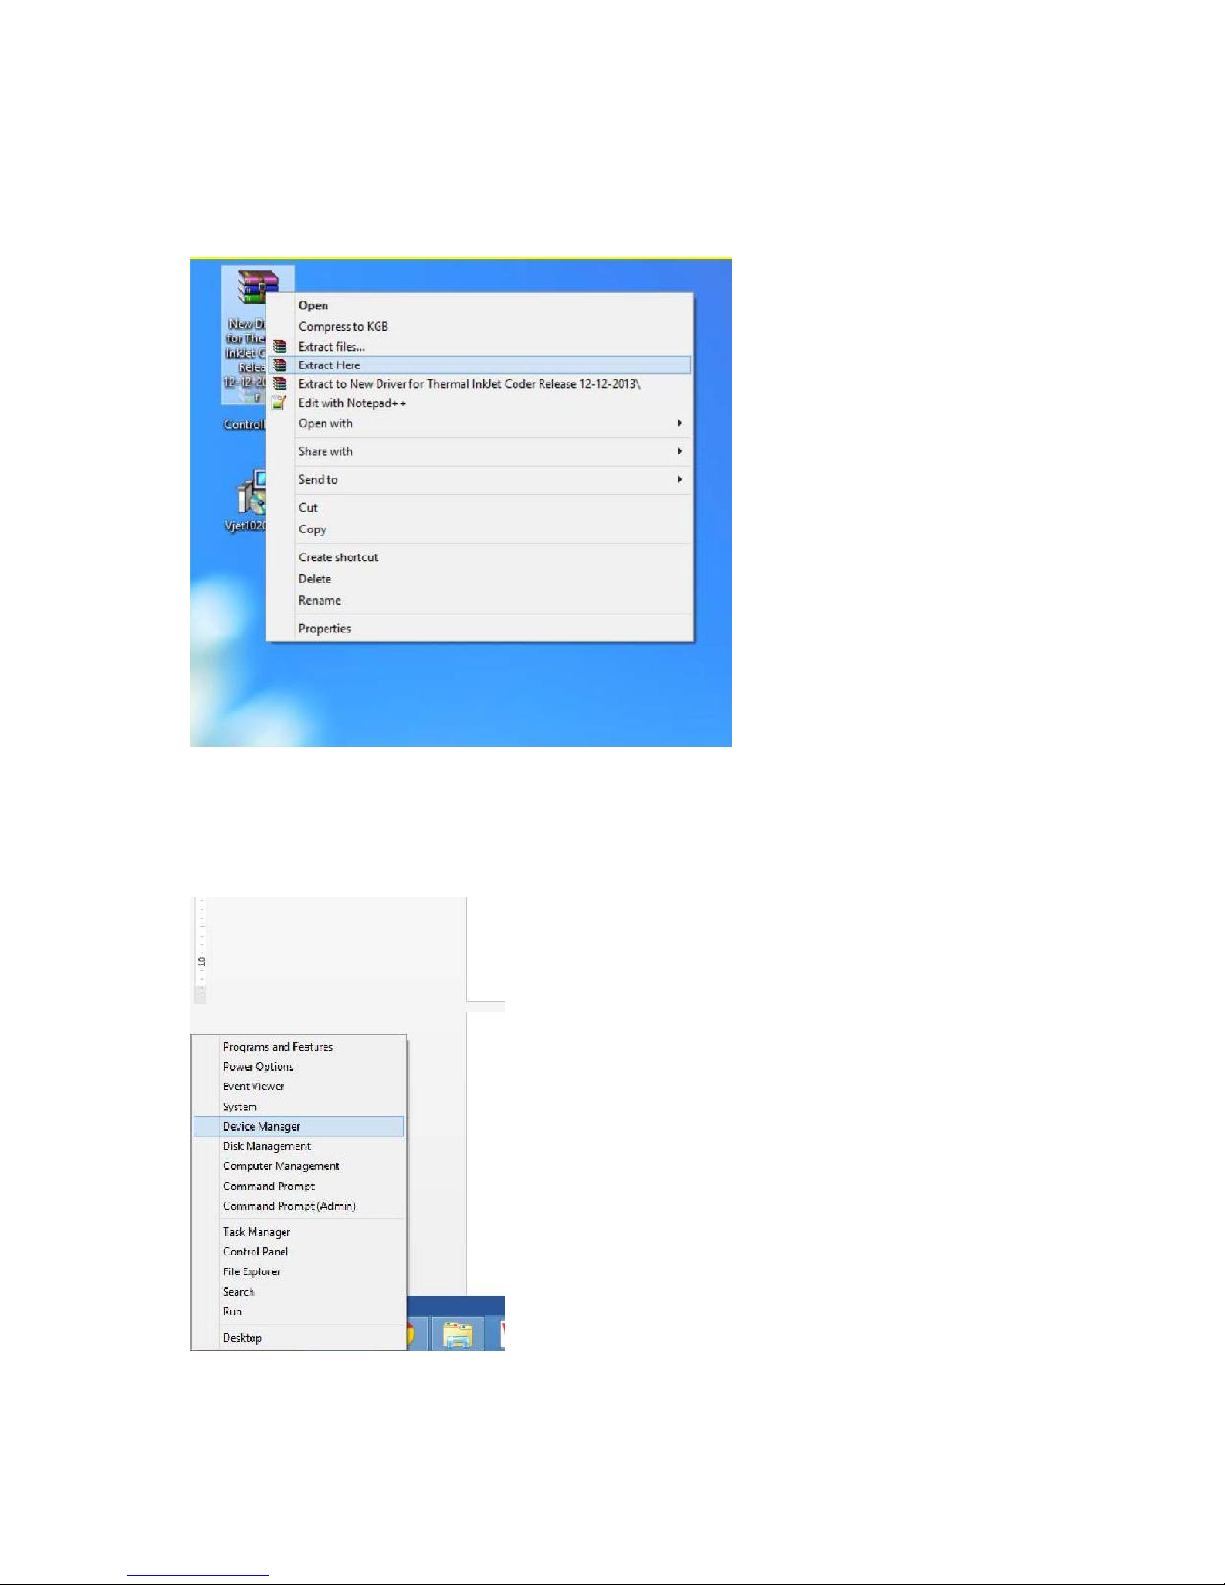
Install Driver
1. Plug printer into computer with USB cord that was provided with the unit.
2. Power on the printer, go to operate, and “Connect PC.”
3. You should hear a beep and computer will search for driver.
4. Extract Driver for Smart-Jet Plus.rar
5. Install Driver.
From your desktop, right click at the bottom left corner of the screen, select Device
Manager.
Smart-Jet Plus Manual v04 ǀ 2015-07-30 ǀ by MSSC, LLC
38
Page 39
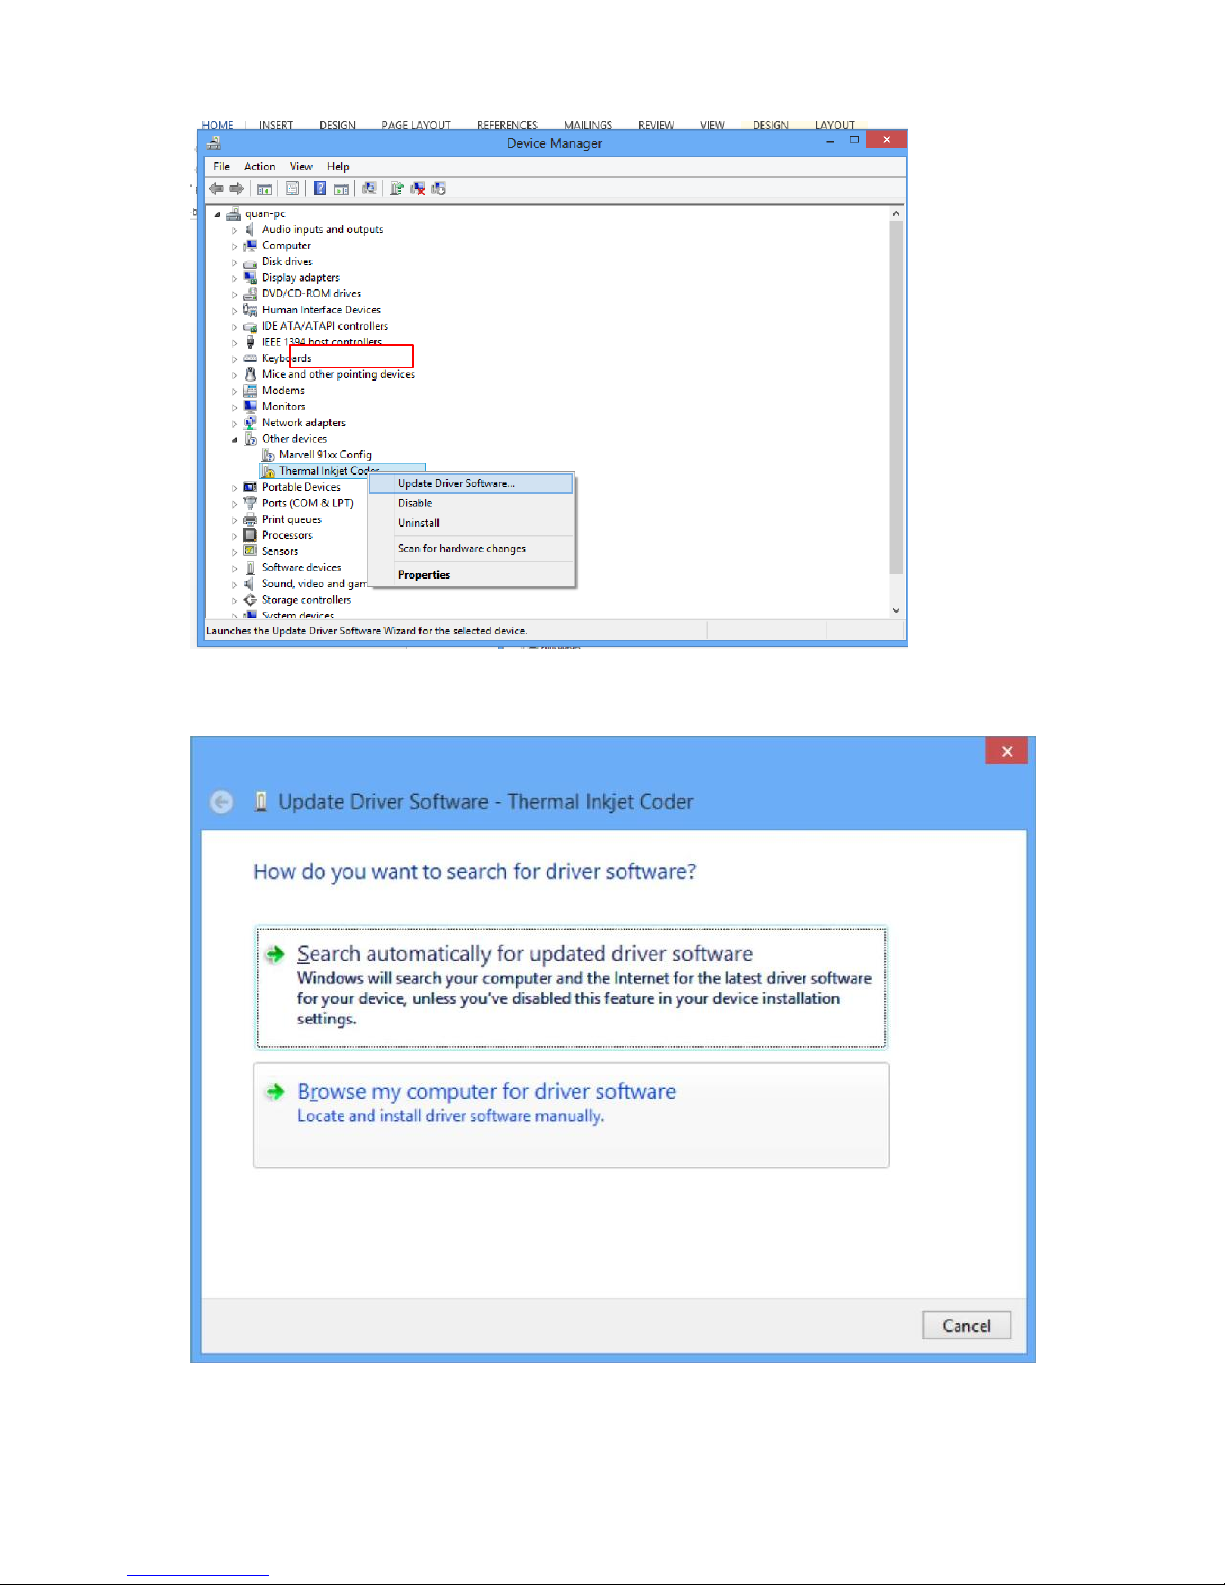
6. Right click on Thermal Inkjet Coder devices, select Update Driver
7. From Update Driver Software window, select Browse my computer for driver software
Smart-Jet Plus Manual v04 ǀ 2015-07-30 ǀ by MSSC, LLC
39
Page 40
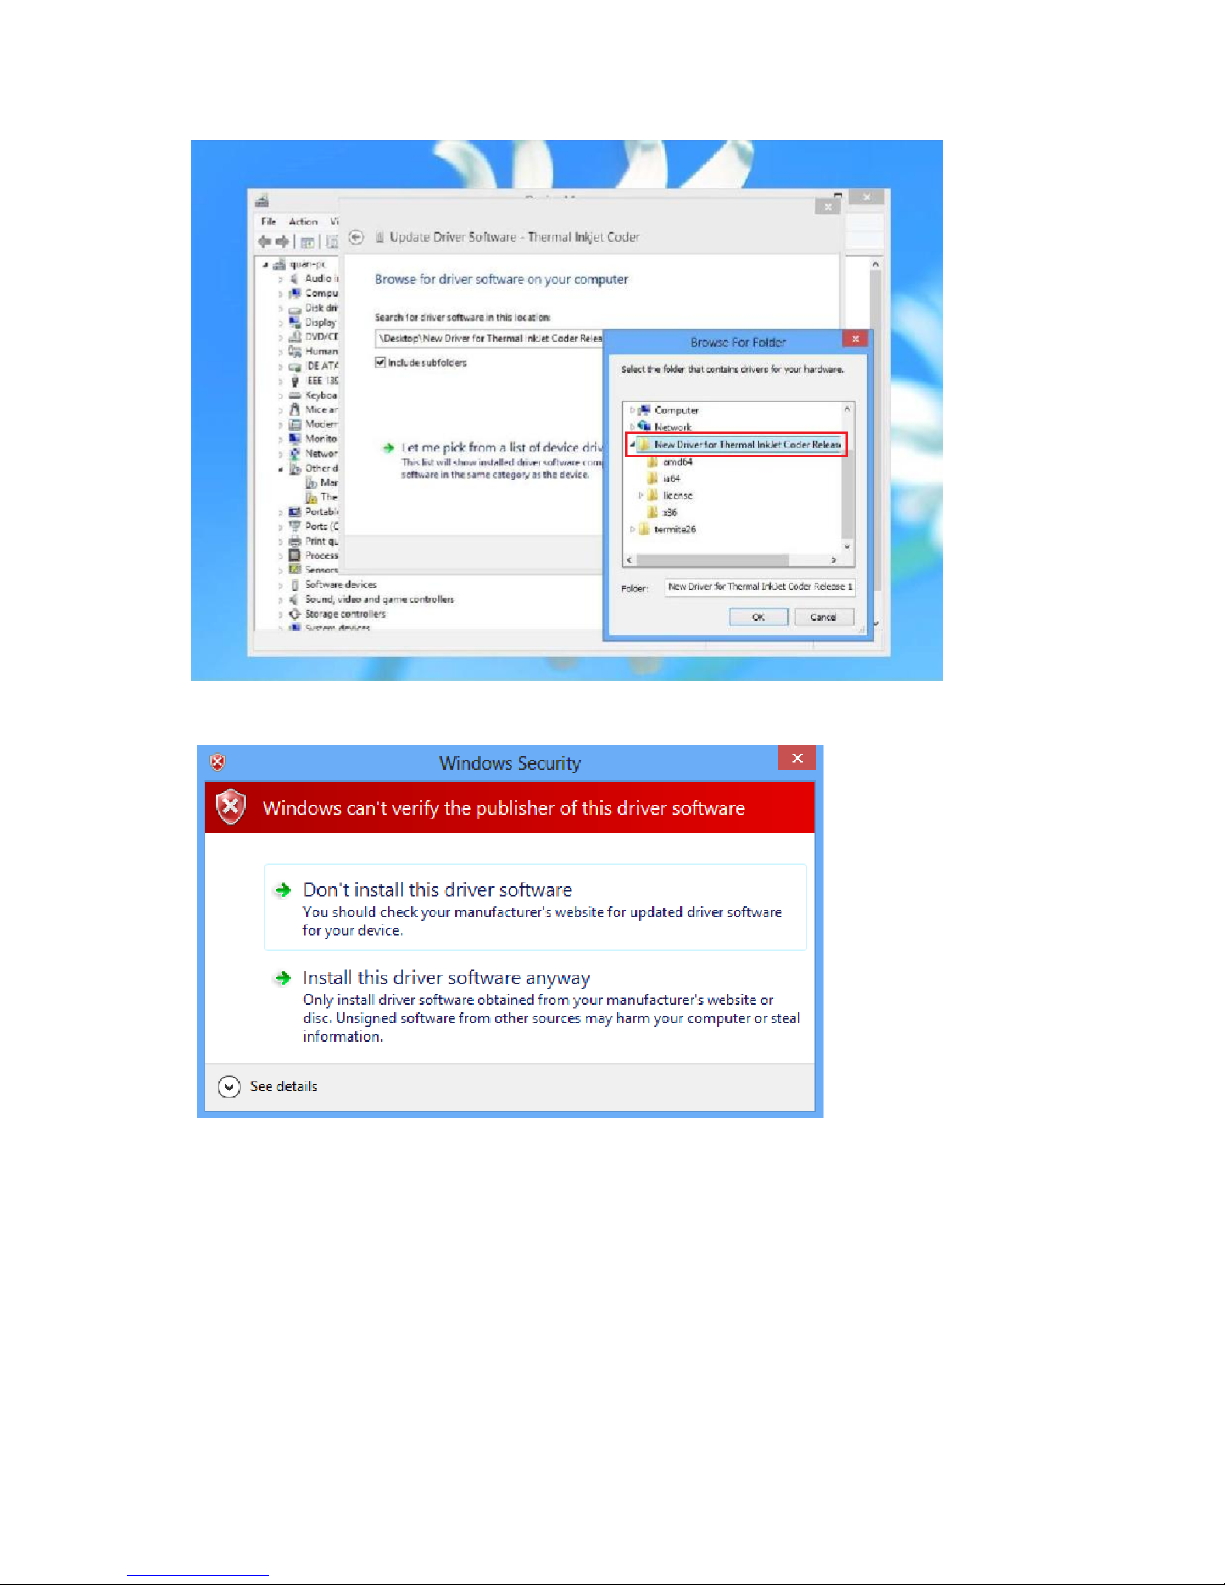
8. Browse to driver for Smart-Jet Plus, select Next
9. Select Install this driver software anyway to install. Wait for installation to complete
Smart-Jet Plus Manual v04 ǀ 2015-07-30 ǀ by MSSC, LLC
40
Page 41
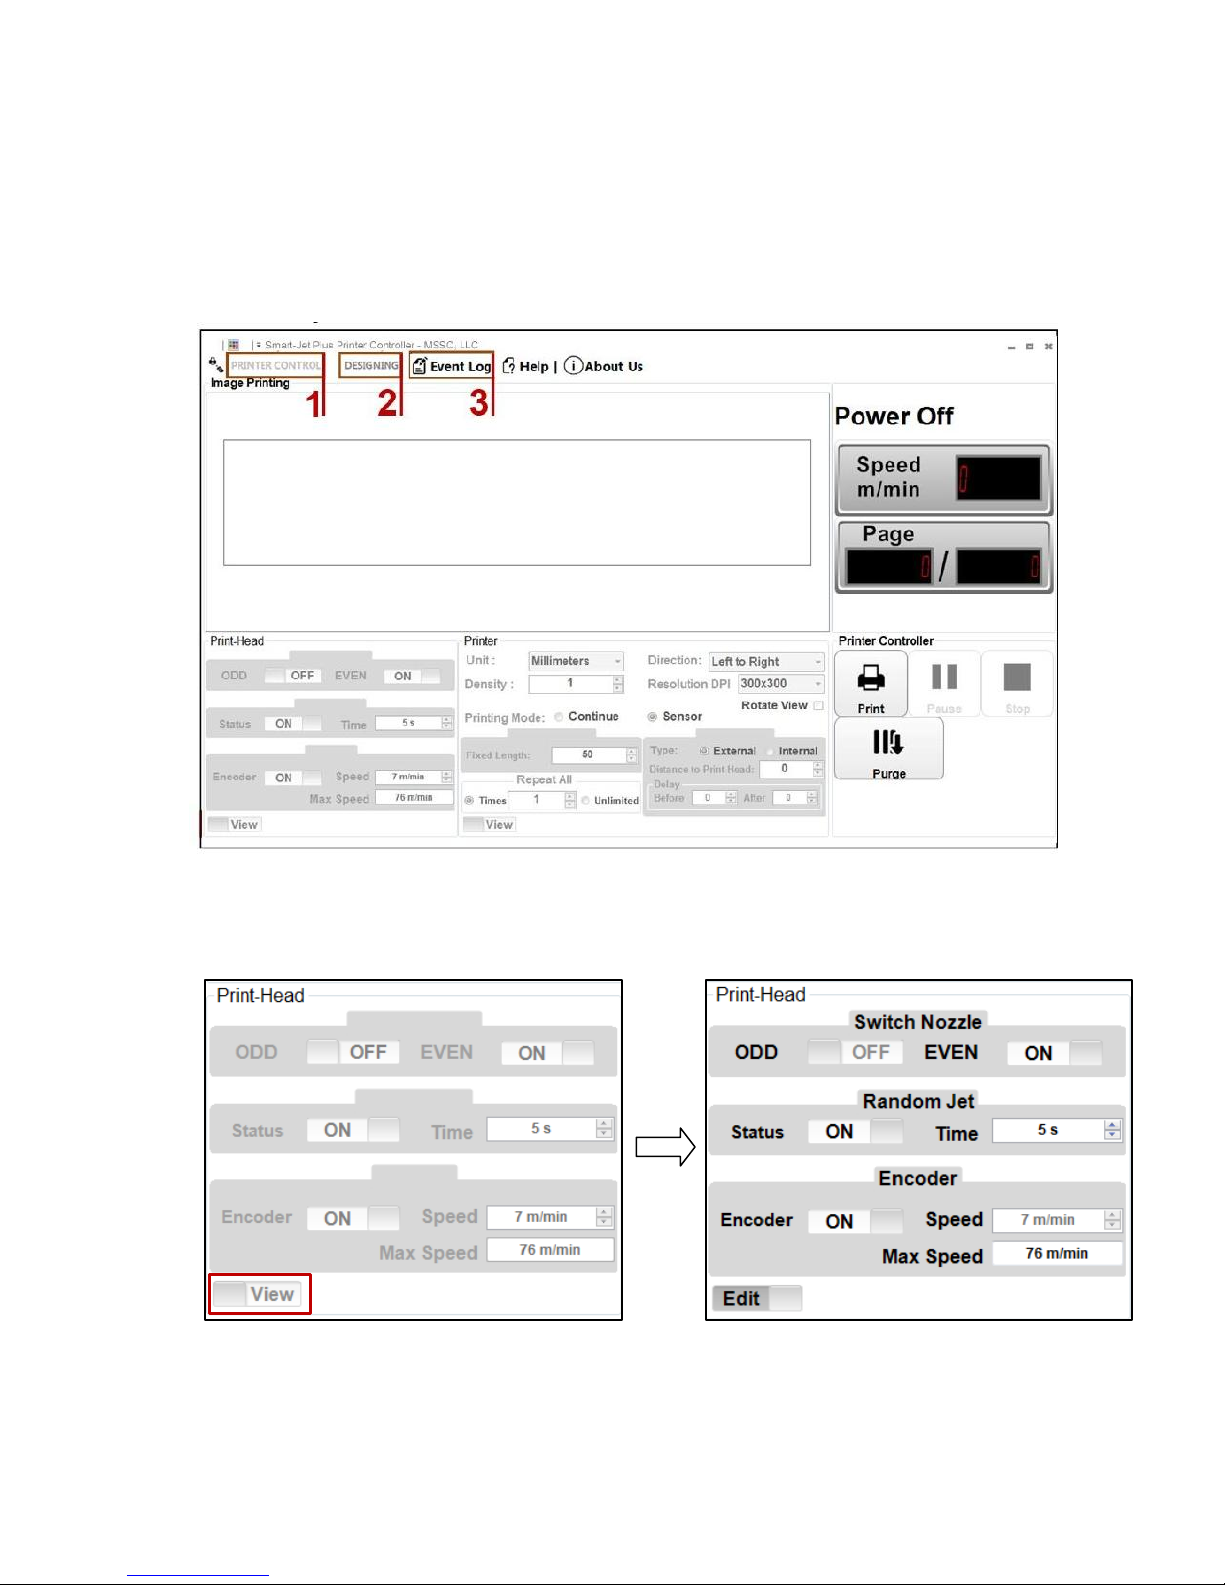
OPERATE SMART-JET PLUS CONTROLLER
Plug in Smart-Jet Plus and connect it to your PC via a USB A-B cable.
From the main screen of Smart-Jet Plus, use the arrow keys to move to Operation and press
Enter. Then go to Connect to PC and press Enter. If Disconnect to PC is displayed, your
Smart-Jet Plus and PC are connected.
Click to open Smart-Jet Plus Printer Controller
Uses of Smart-Jet Plus Controller Interface
1.
PRINTER CONTROL: Setting all printing parameters for the message before start printing.
Be sure to stop the printing mode before setting the parameters.
PRINT HEAD
Click View to enable and begin setting the parameters.
Switch Nozzle: Select nozzle sides, ODD or EVEN
Smart-Jet Plus Manual v04 ǀ 2015-07-30 ǀ by MSSC, LLC
41
Page 42
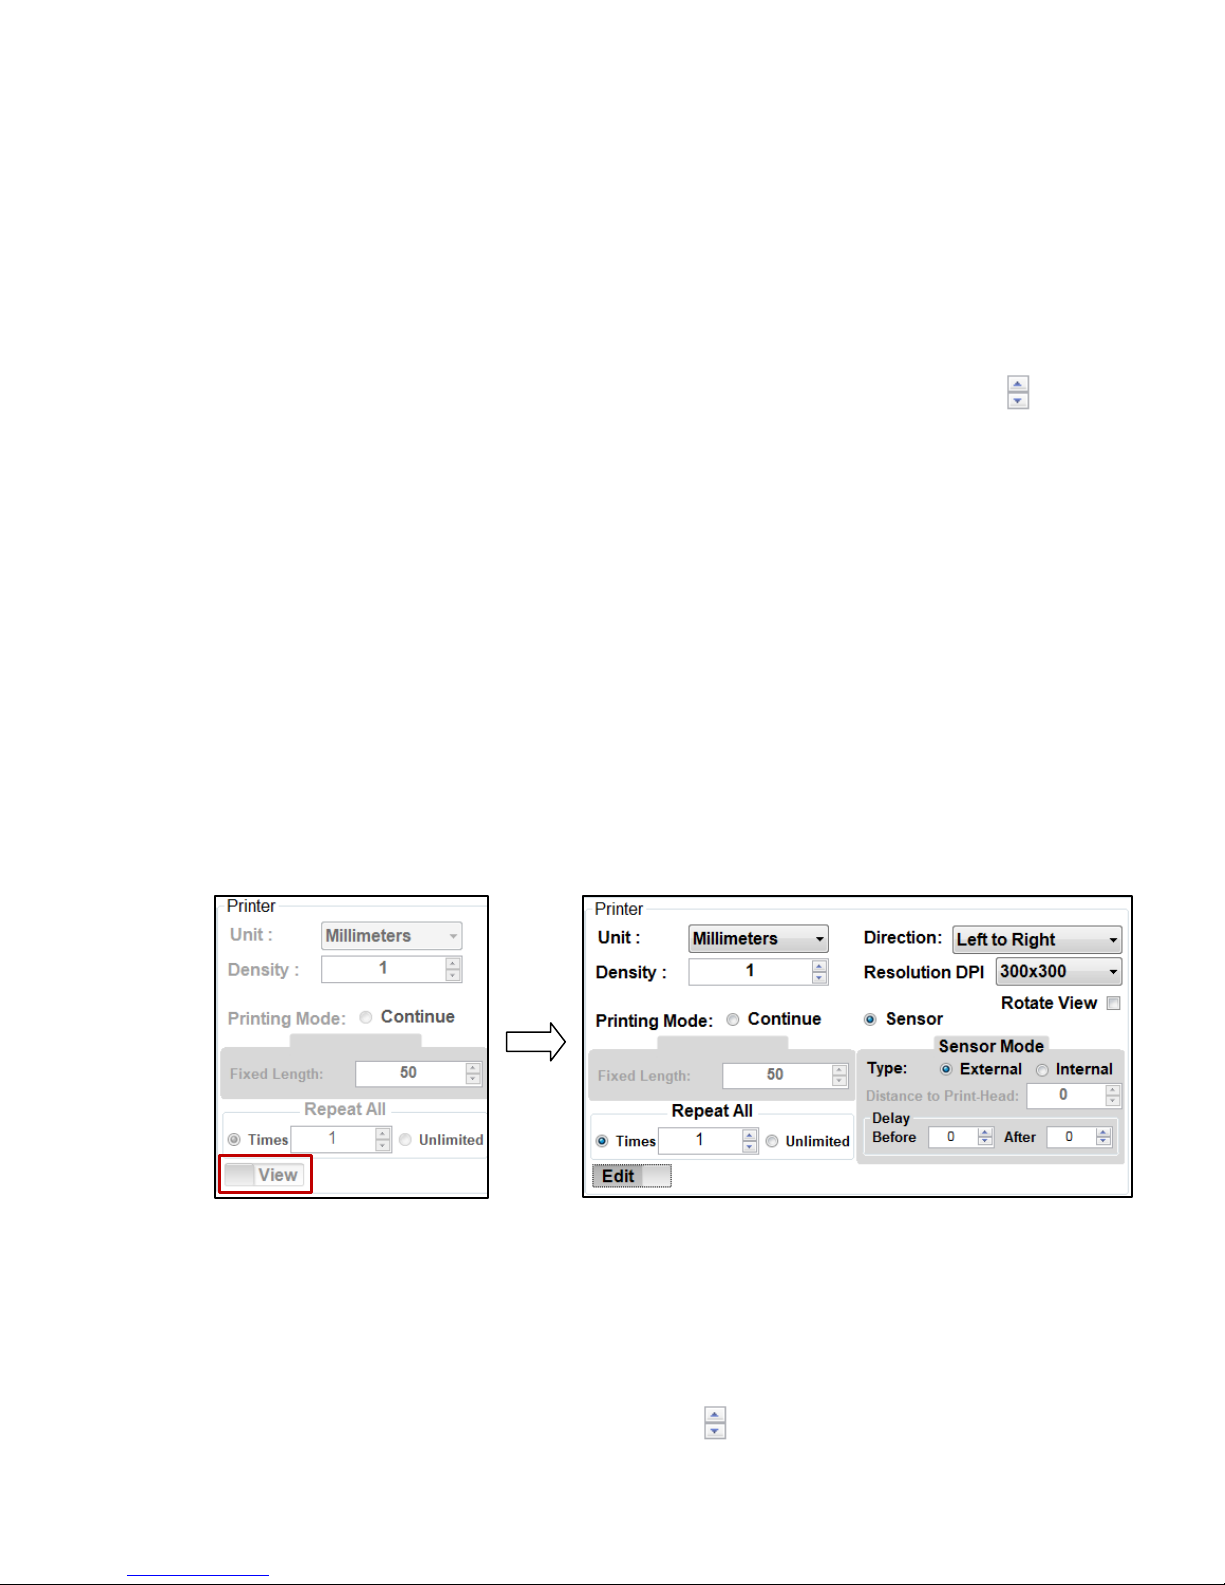
Auto Switch Nozzle: select ON for automatically changing nozzles between ODD and EVEN.
And then select the number of changing. Otherwise, select OFF.
Turn on ODD to print on the odd side (300x300dpi)
Turn on EVEN to print on the even side (300x300dpi)
To achieve maximum resolution, select 600x600dpi at Resolution DPI in the Printer section.
To print on the ODD or EVEN side, select 300x300dpi.
Note: An encoder MUST be used to achieve 600x600.
Random Jet: Periodically purge to clean the print head.
Turn ON Status and set the time for purging in the Time by click up or down at or input
the desired value.
This value is adjustable from 5s to 1,000s
Encoder: Encoder is recommended to optimize maximum print quality.
Turn ON Encoder to operate Smart-Jet Plus with encoder. Print speed of Smart-Jet Plus will
be automatically synchronized with conveyor speed. This can be controlled by selecting one
of the 3 encoder options: Fast, Real, and Slow.
Turn OFF Encoder to disable encoder. Input your desired speed at Speed to synchronize
with the speed of the conveyor.
Max Speed: shows the maximum speed you can achieve with the current resolution and
density.
NOTES:
-
Ensure your encoder is working if it is ON and can detect the objects
-
To make a test print without conveyor, turn OFF encoder.
PRINTER
Click View to enable and begin setting the parameters.
Unit: Select your measurement Inches or Millimeters
Direction: Select your print direction Left to Right or Right to Left.
Select Rotate View to print upside down
Rotate View: Upside down the current design of your message
Density: Select your desired optical density. There are 5 levels to select.
Change the value of density by click up or down at or input your desired value.
42
Smart-Jet Plus Manual v04 ǀ 2015-07-30 ǀ by MSSC, LLC
Page 43
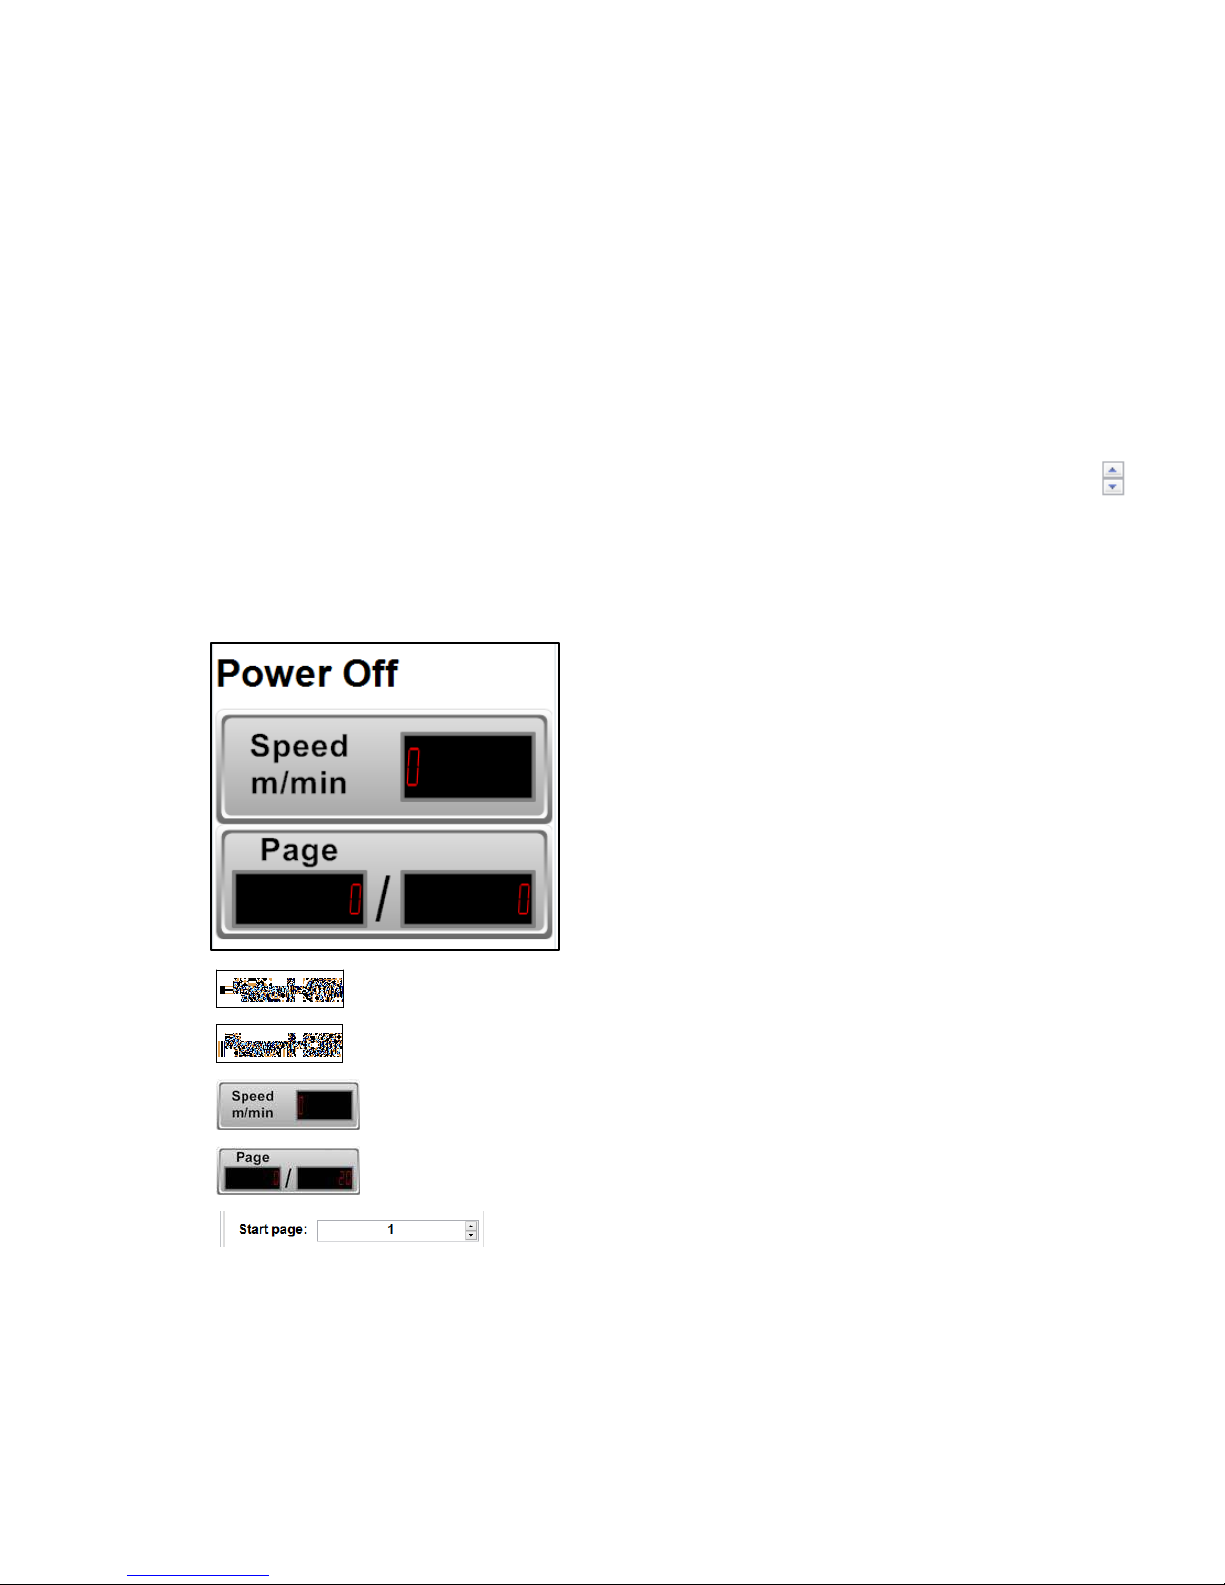
Resolution DPI: Select your desired resolution
Printing Mode: Select your printing mode: Continue or Sensor
Sensor: Smart-Jet Plus prints when sensor is triggered.
-
Select Internal to print with a built-in sensor on Smart-Jet Plus.
Set Delay Before and After print to have your message printed at the desired position.
-
Select External to print with external sensor
Input distance from external sensor to the print head, the set Delay Before and After
print to have your message printed at the desired position.
Continue: Smart-Jet Plus will print continuously when a sensor is triggered for the first time.
When Continue mode is applied, distance between the messages on the same object
should to be set.
-
Go to Fixed Length to input the value or select the value by click up or down at .
-
Go to Repeat All and select Times to input how many prints to be repeated.
Otherwise, select Unlimited.
PRINTING STATUS
Smart-Jet Plus is connected to PC
Smart-Jet Plus is disconnected to PC
Displays the current speed of conveyor synchronized by encoder
Displays the number of pages printed (left) per the total pages to print (right)
Select page to start printing, apply for counter, barcode, data
field. The data will continue to run according start page, this can help you troubleshooting the
issue without any other assistance.
43
Smart-Jet Plus Manual v04 ǀ 2015-07-30 ǀ by MSSC, LLC
Page 44
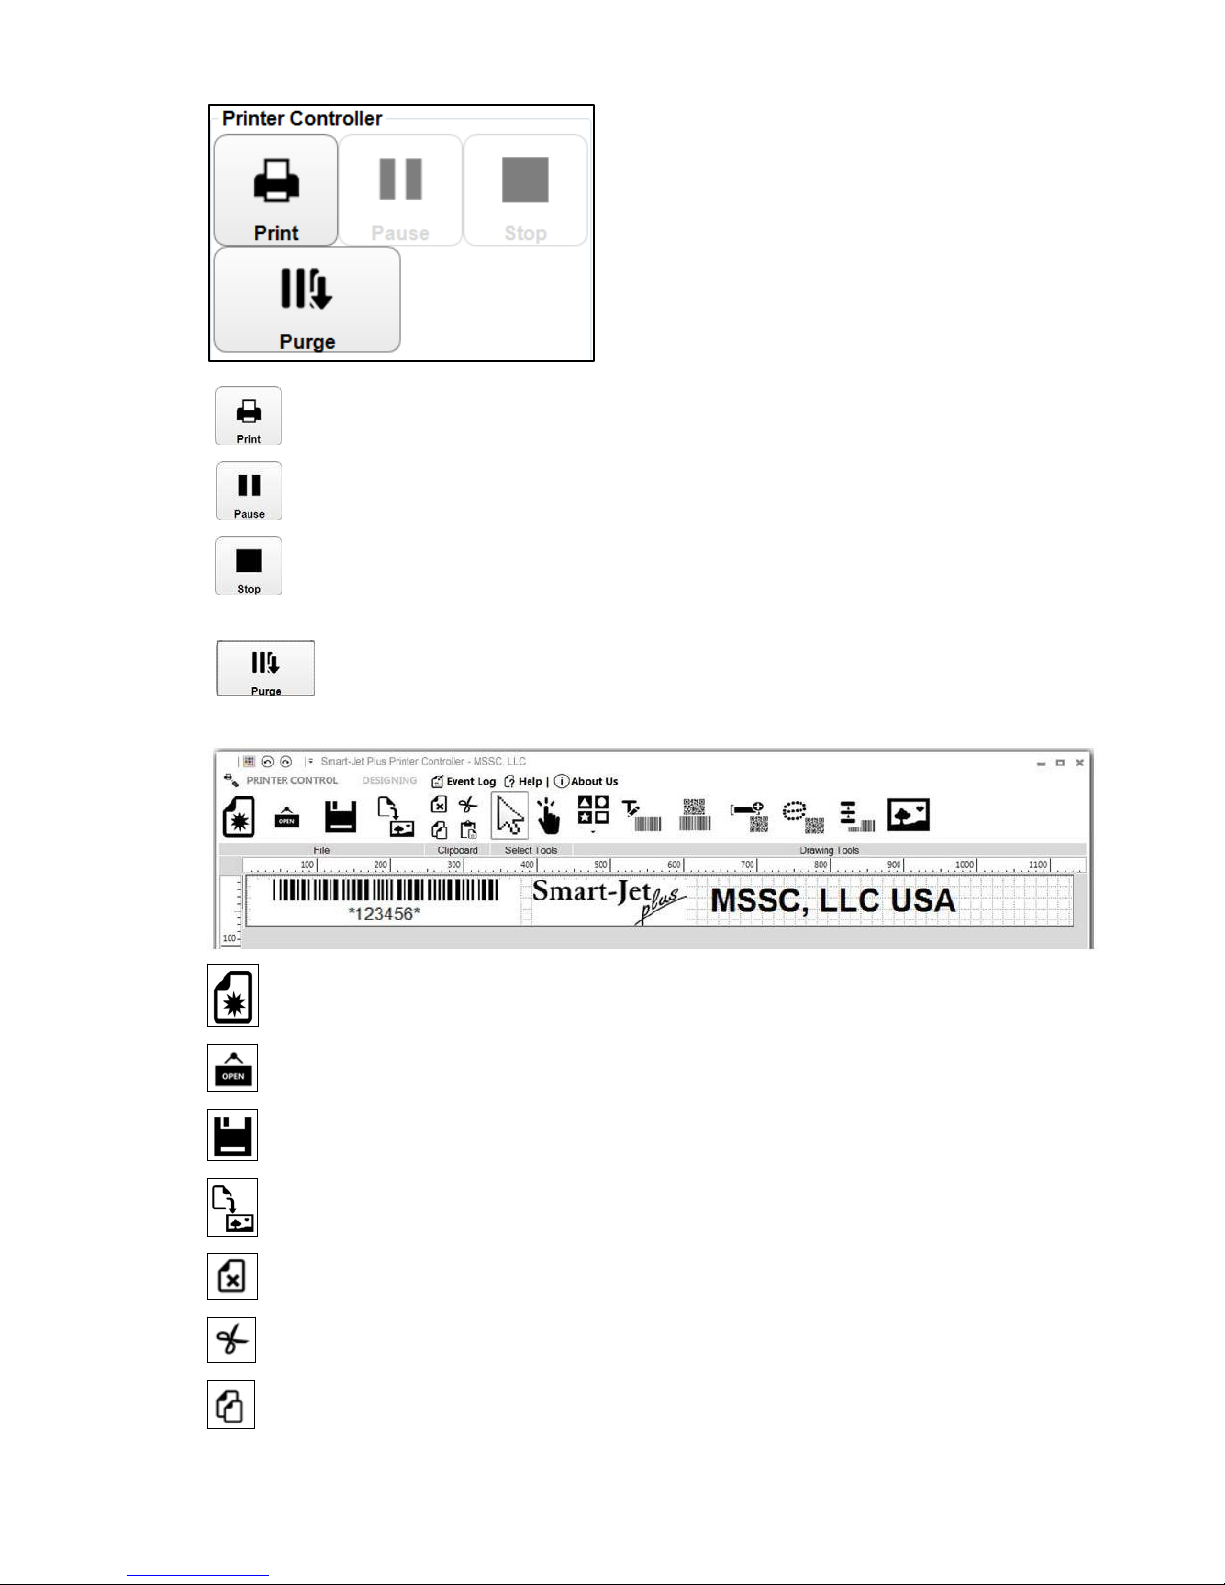
OPERATING
Print: Select to print
Pause: Select to temporary stop printing
Stop: Select to stop printing. This must be applied before adjusting parameters or
editing the message.
Purge: Select to purge
2.
DESIGNING: Design your message
New template: Create new message
Open: Open message from PC
Save template: Save message to PC
Export to .tiff files: Export message in Tiff format.
Delete: Delete object
Cut: Cut object
Copy: Copy object
Smart-Jet Plus Manual v04 ǀ 2015-07-30 ǀ by MSSC, LLC
44
Page 45
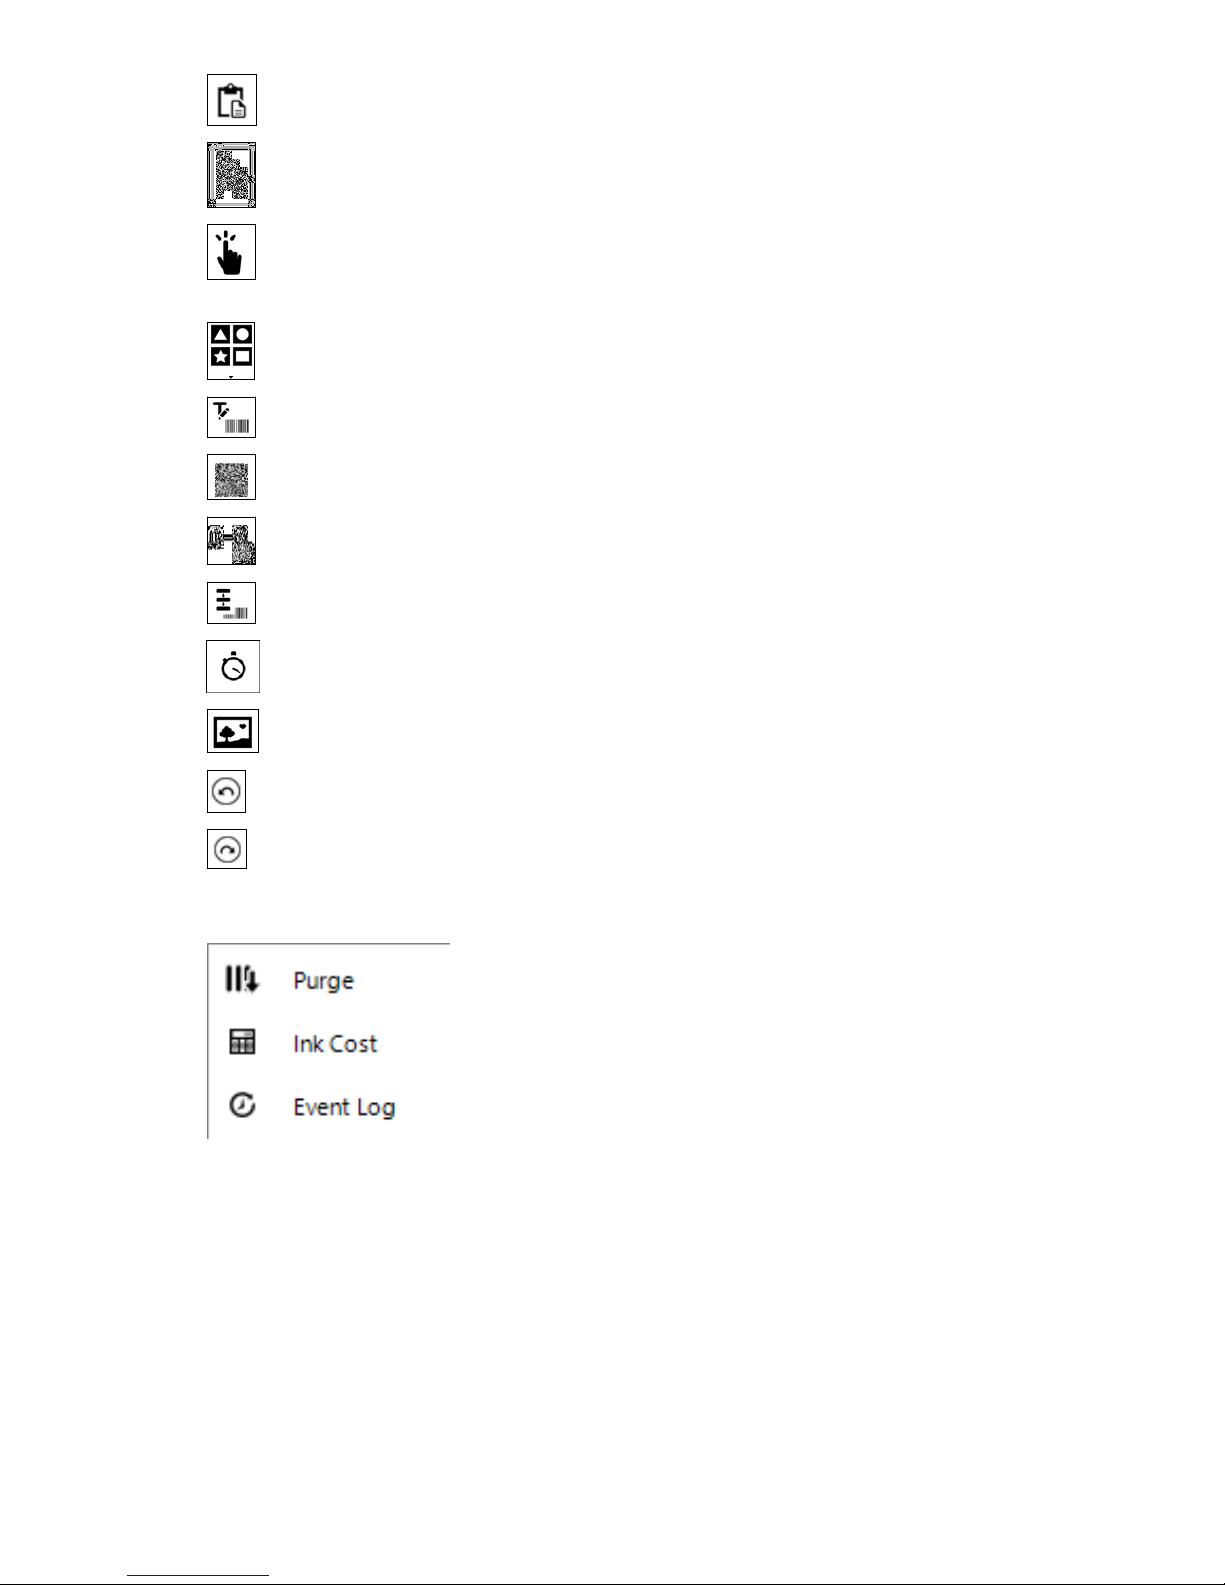
Paste: Paste object
Select Tool: Select to function and edit each object on the message
Hand Pan: Move designing area to right/left to function on the hidden area in case your
message is not fully displayed on the screen.
Shapes: Select image to insert into message: Line, Rectangle, Square, Circle and Oval
Static Text: Insert characters and barcodes
Barcode: Insert barcode
Data Fields: Insert data
Serial Number: Insert counter
Shift Code: Insert shift code
Image: Insert image or logo
Undo: Recover previous actions
Redo: Recover last actions
3.
TOOLS: See operation history of Smart-Jet Plus
Purge: Jet the ink and clean the print head
Ink Cost: Calculate ink cost
Event Log: View using firmware history
Smart-Jet Plus Manual v04 ǀ 2015-07-30 ǀ by MSSC, LLC
45
Page 46
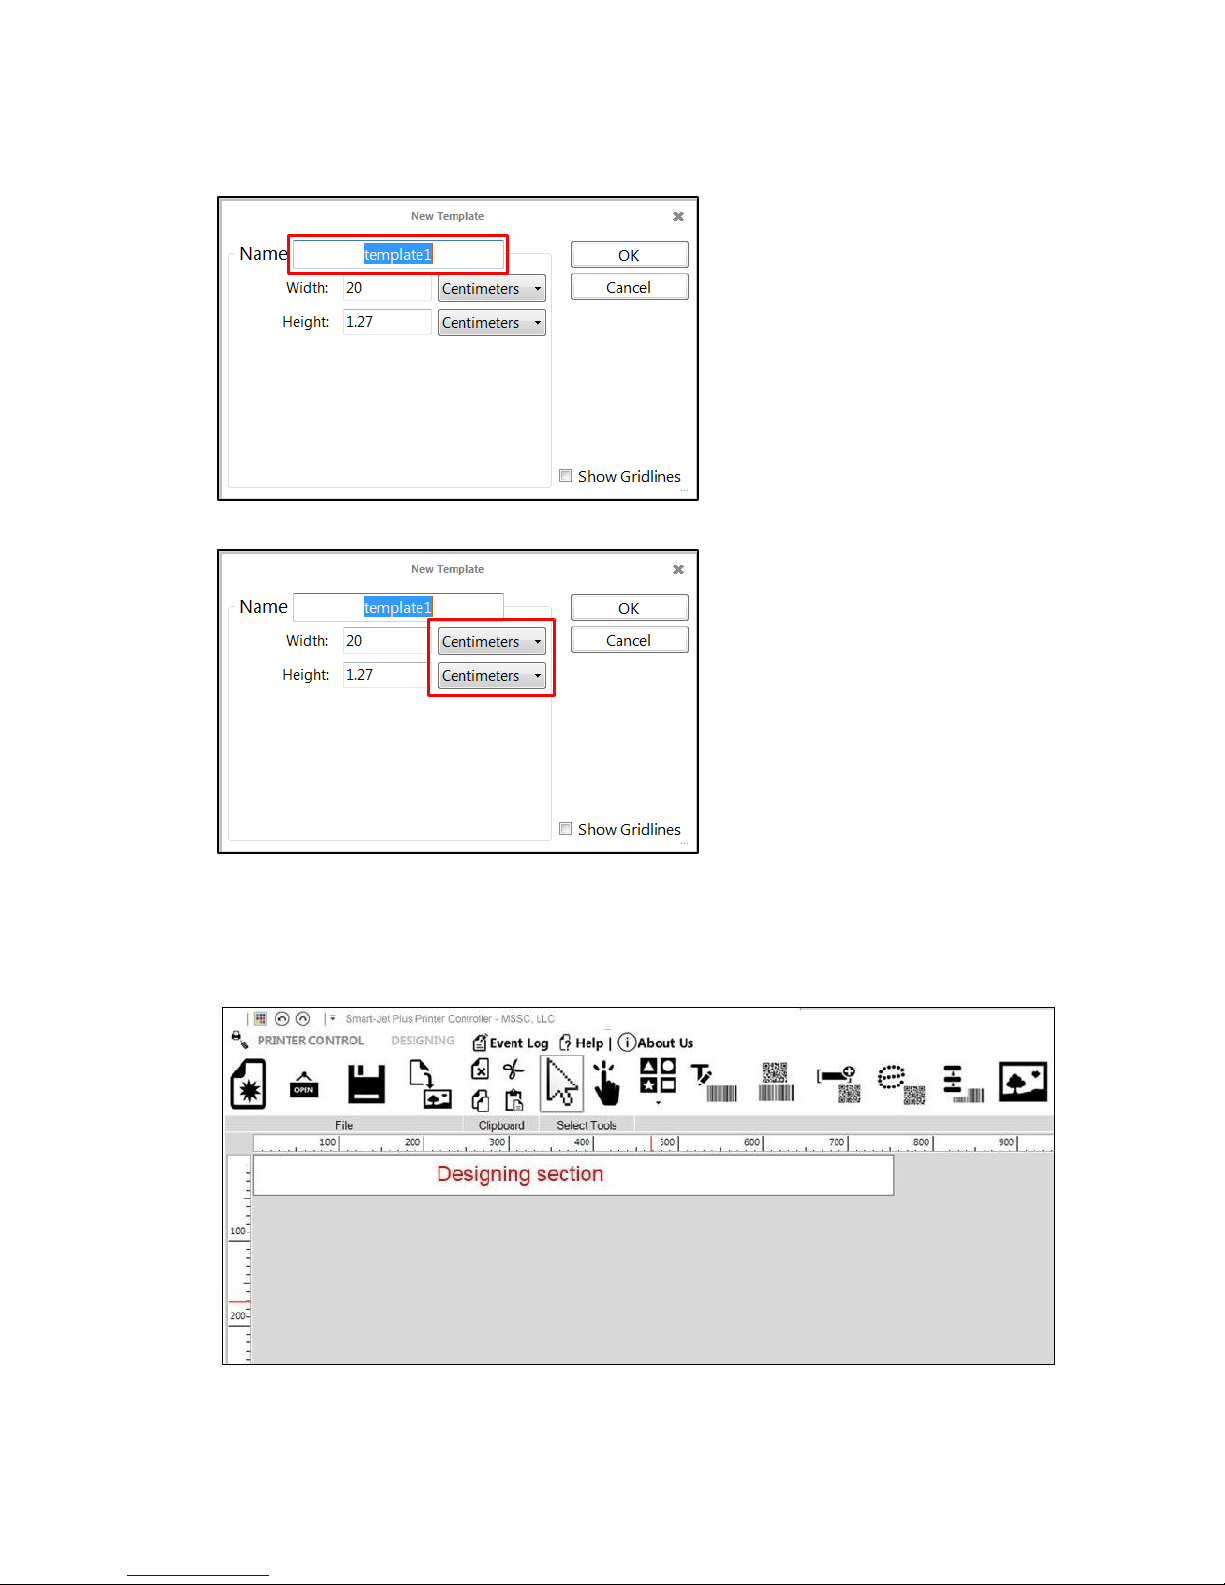
Create new message
From the designing section, select New Template. A new window pops up.
Name your message at Name
Select measurement.
Input Width of your message.
Height of the message is default at 12.7mm, this is the maximum height.
Select OK to save settings and begin designing message.
NOTES: Be sure the objects are completely located in the template. Any parts projected out of
this section will not be printed.
Smart-Jet Plus Manual v04 ǀ 2015-07-30 ǀ by MSSC, LLC
46
Page 47
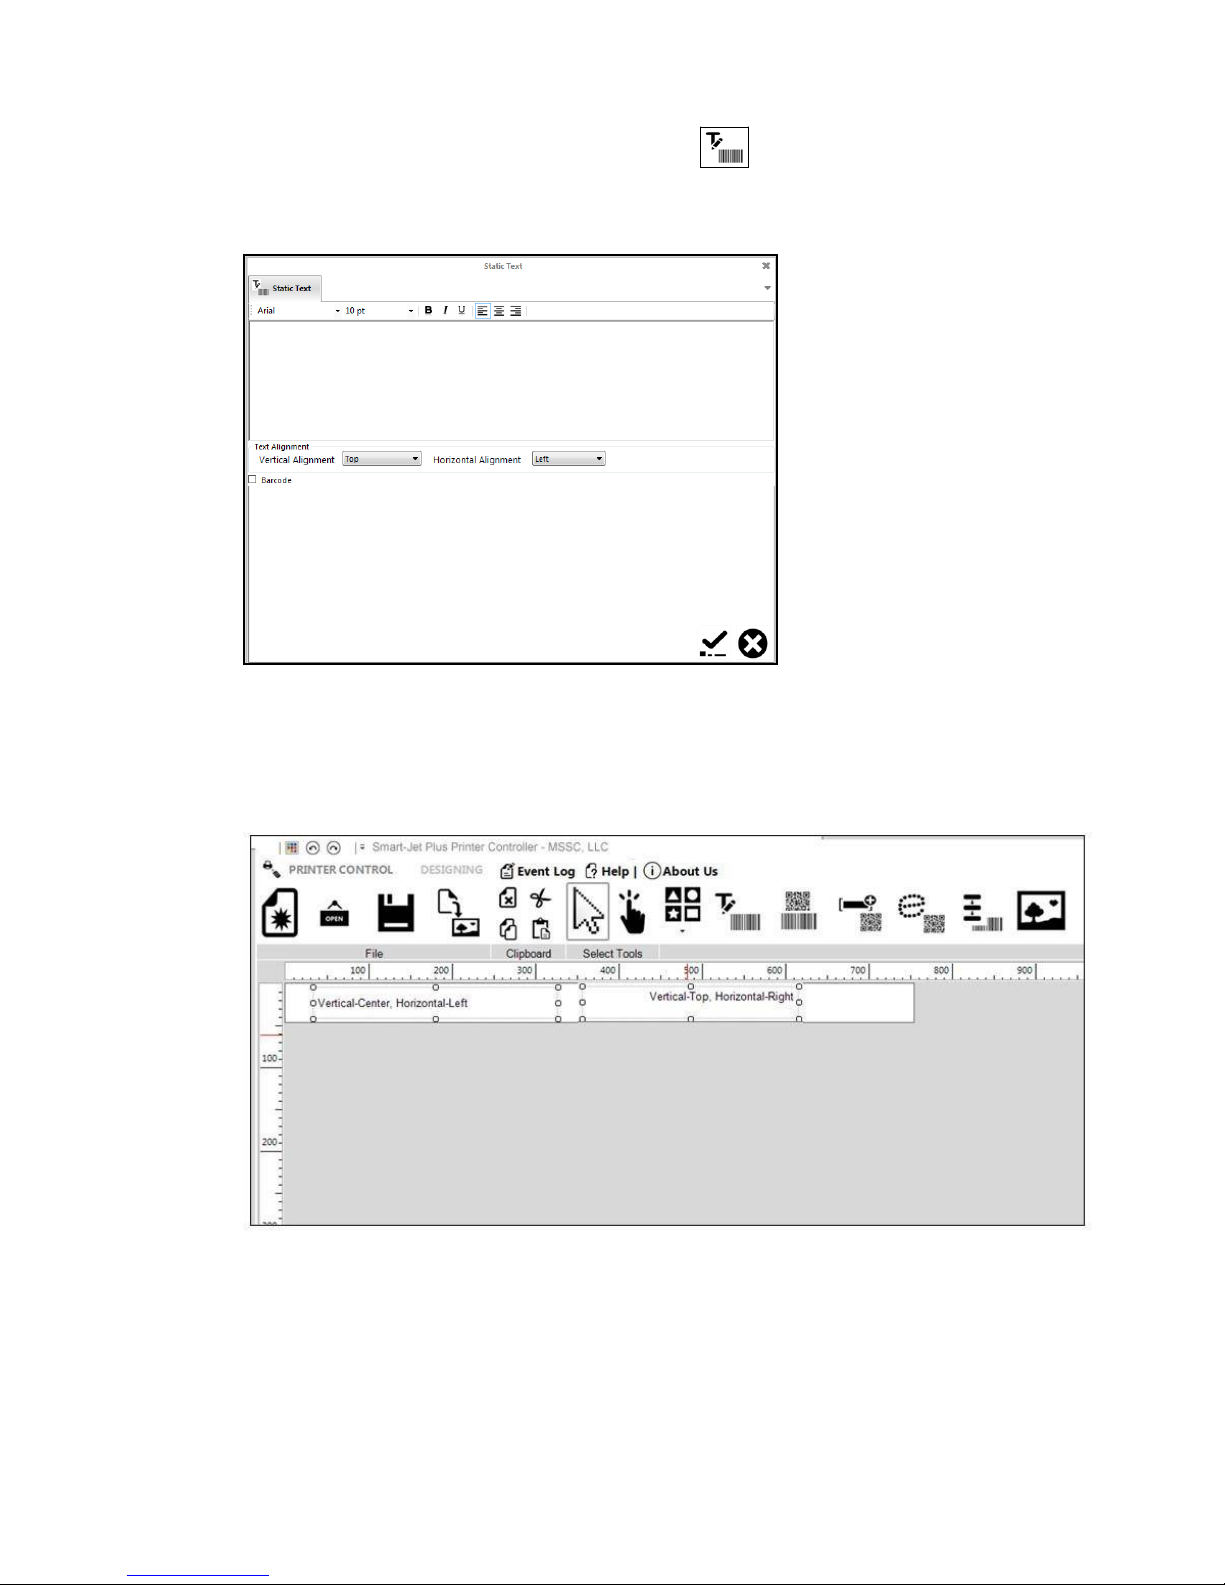
Use of Static Text
From the Designing Section, select Static Text
Click on the designing section. A window will pop up.
Input content from your keyboard.
Designing section
Format your content just like you are functioning on Microsoft Word, including font, size,
bold, italic, underline, left, center and right align.
Position of the text can be aligned in 2 directions: Vertical Alignment and Horizontal
Alignment
Vertical Alignment: Top, Center, and Bottom
Horizontal Alignment: Left, Center, Right
Smart-Jet Plus Manual v04 ǀ 2015-07-30 ǀ by MSSC, LLC
47
Page 48
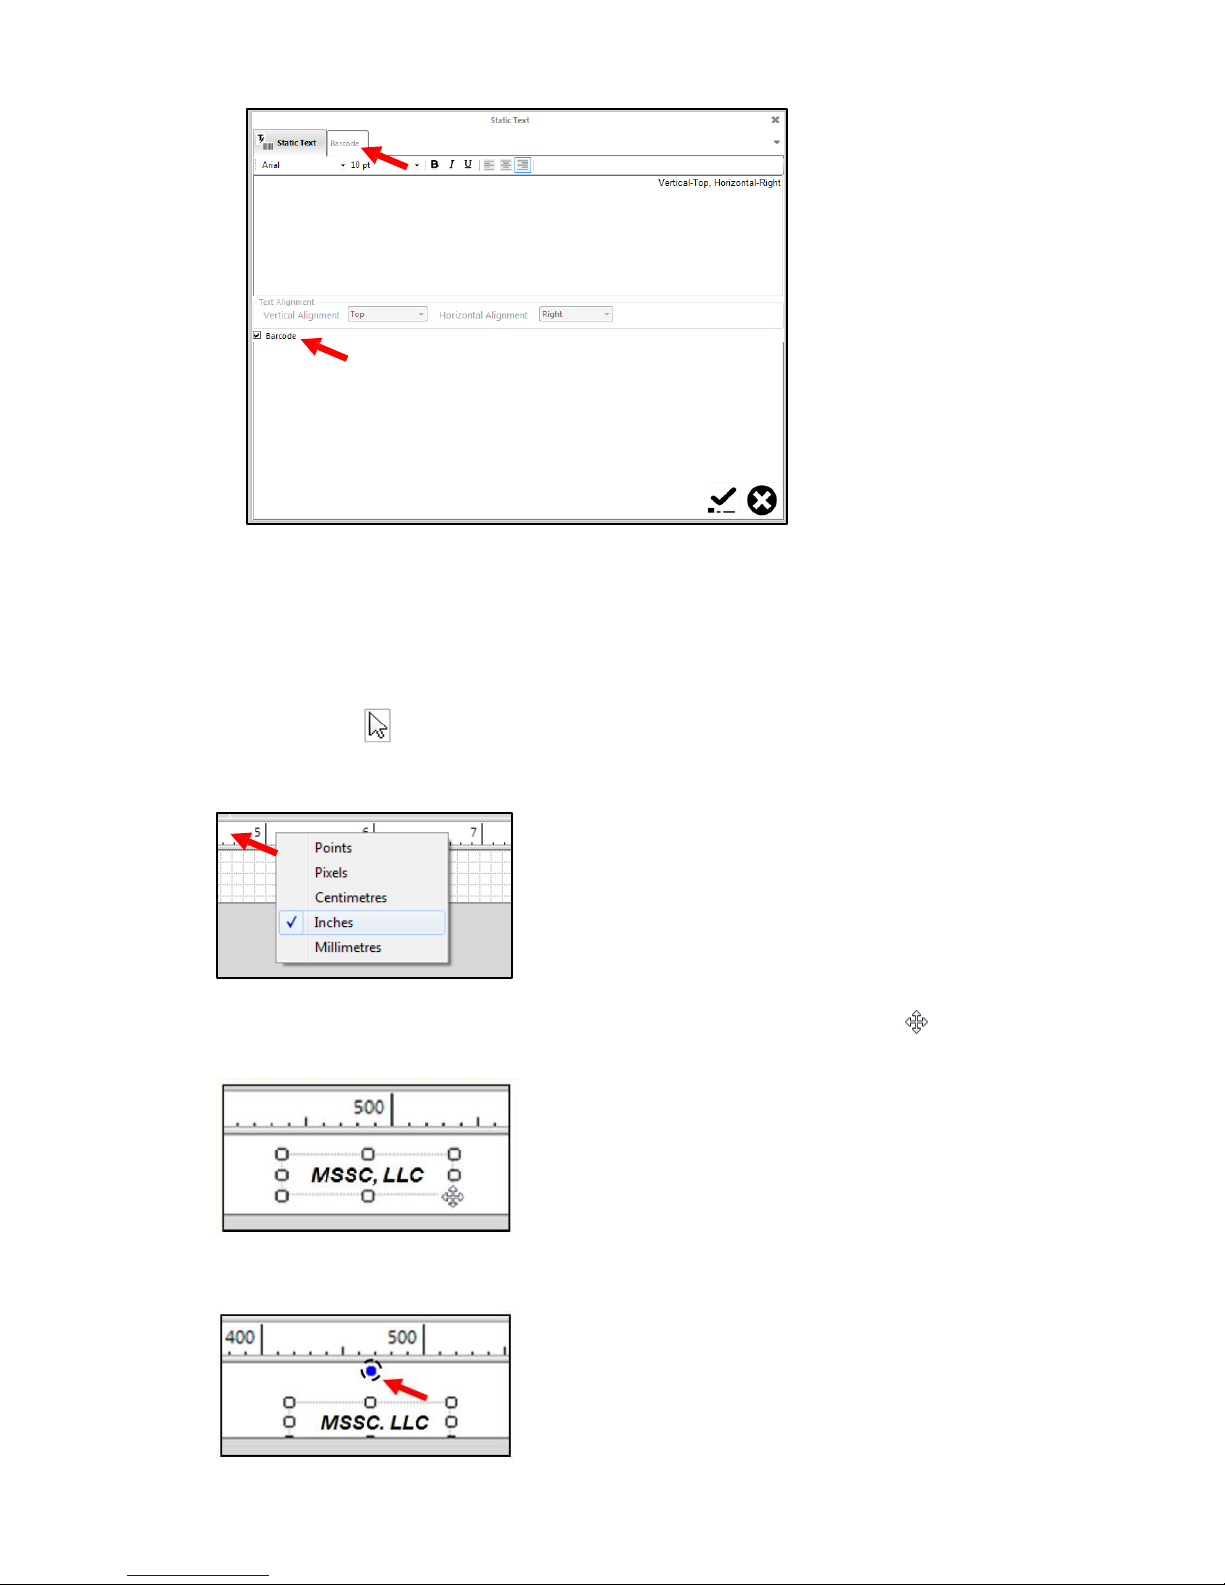
Select Barcode to create if barcode is needed
Press OK
Place your object into the designing section. The followings functions can be used to move,
rotate, or zoom in/out (see instructions at designing section)
Uses of tools in the designing section:
Click Select Tool to begin functioning
Measurement: From the designing section, right click on the ruler and select your desired
measurement.
Moving Objects: Place the cursor on the object until this icon appears , then drag to move
the object to the desired position.
Rotate Object: Click to select the object. Then move the cursor to the blue dot on top of the
object. Hold and begin rotating. You might need to move the object a bit to see the blue dot.
Smart-Jet Plus Manual v04 ǀ 2015-07-30 ǀ by MSSC, LLC
48
Page 49
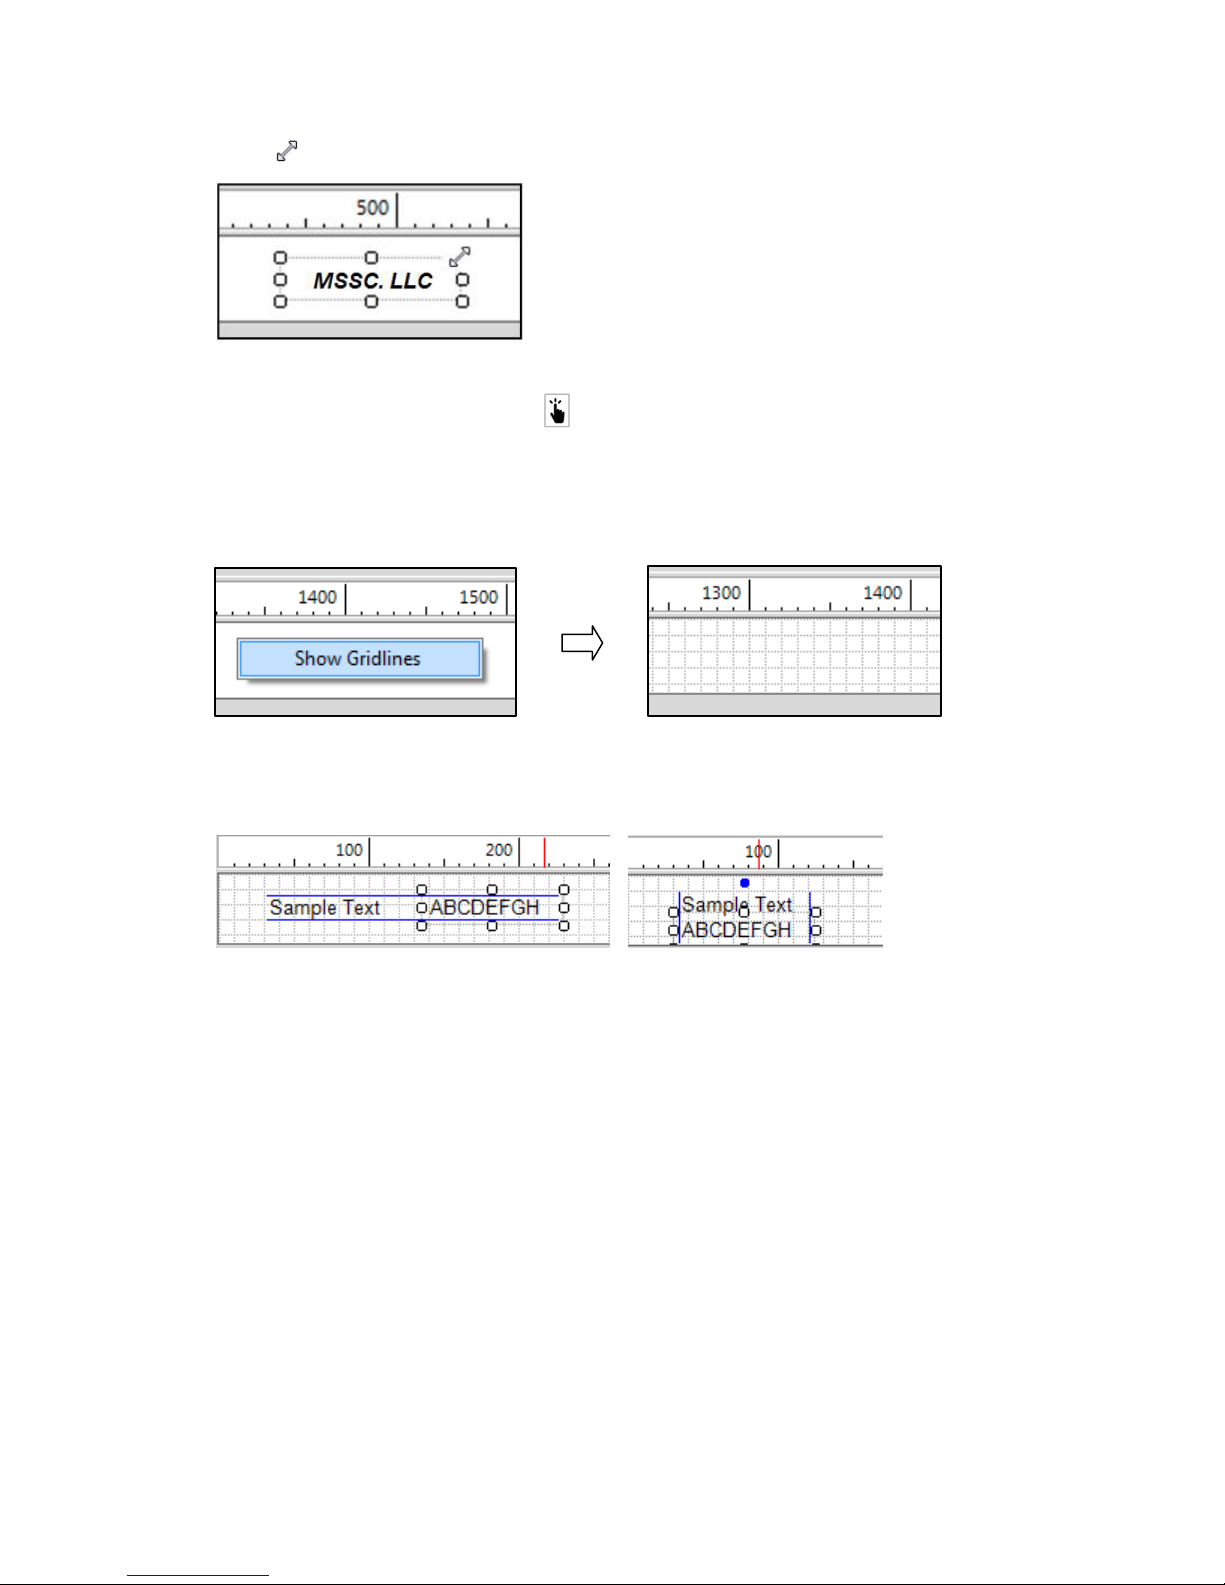
Zoom In/Out Object: Click to select the object. Move the cursor to the dots until the
arrow appears, click and drag to zoom in / zoom out.
Move Designing Section: Select then click on the designing section to drag to the area
covered by the desktop screen.
Show Gridlines: Right click on the designing section, then select to show gridlines. This will
help to organize your design.
Gridlines: To make sure all objects in the designing section in line, click on the object and
drag. A blue line will appear as you are dragging the objects.
Smart-Jet Plus Manual v04 ǀ 2015-07-30 ǀ by MSSC, LLC
49
Page 50
Creating Barcode
Barcode can be created from Static Text, Barcode, and Data Fields
Static Text (for static barcodes)
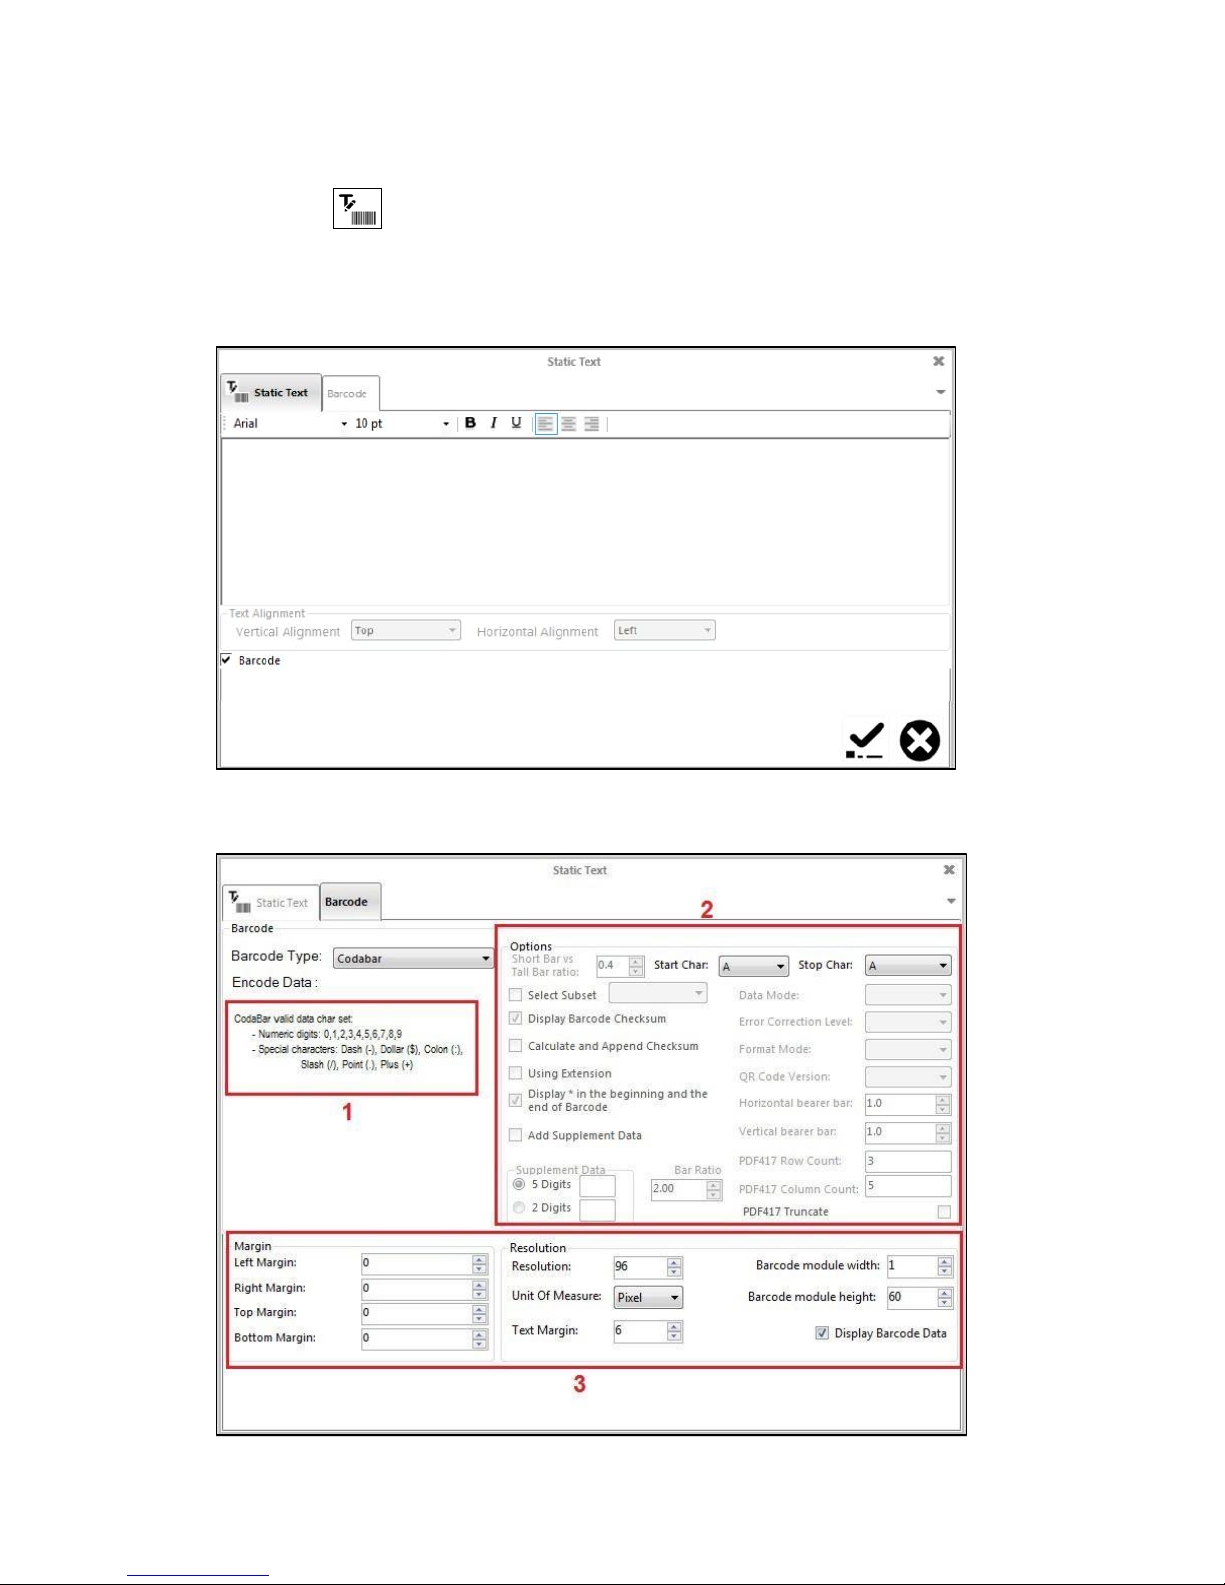
Select Static Text and click on the designing section. Static Text window will appear.
Click to select Barcode. Then click on tab Barcode. A new window will appear, select to set
the parameters on the barcode.
1.
Select your desired barcode type at Barcode Type. See references at Encode Data to create
your barcode.
Smart-Jet Plus Manual v04 ǀ 2015-07-30 ǀ by MSSC, LLC
50
Page 51
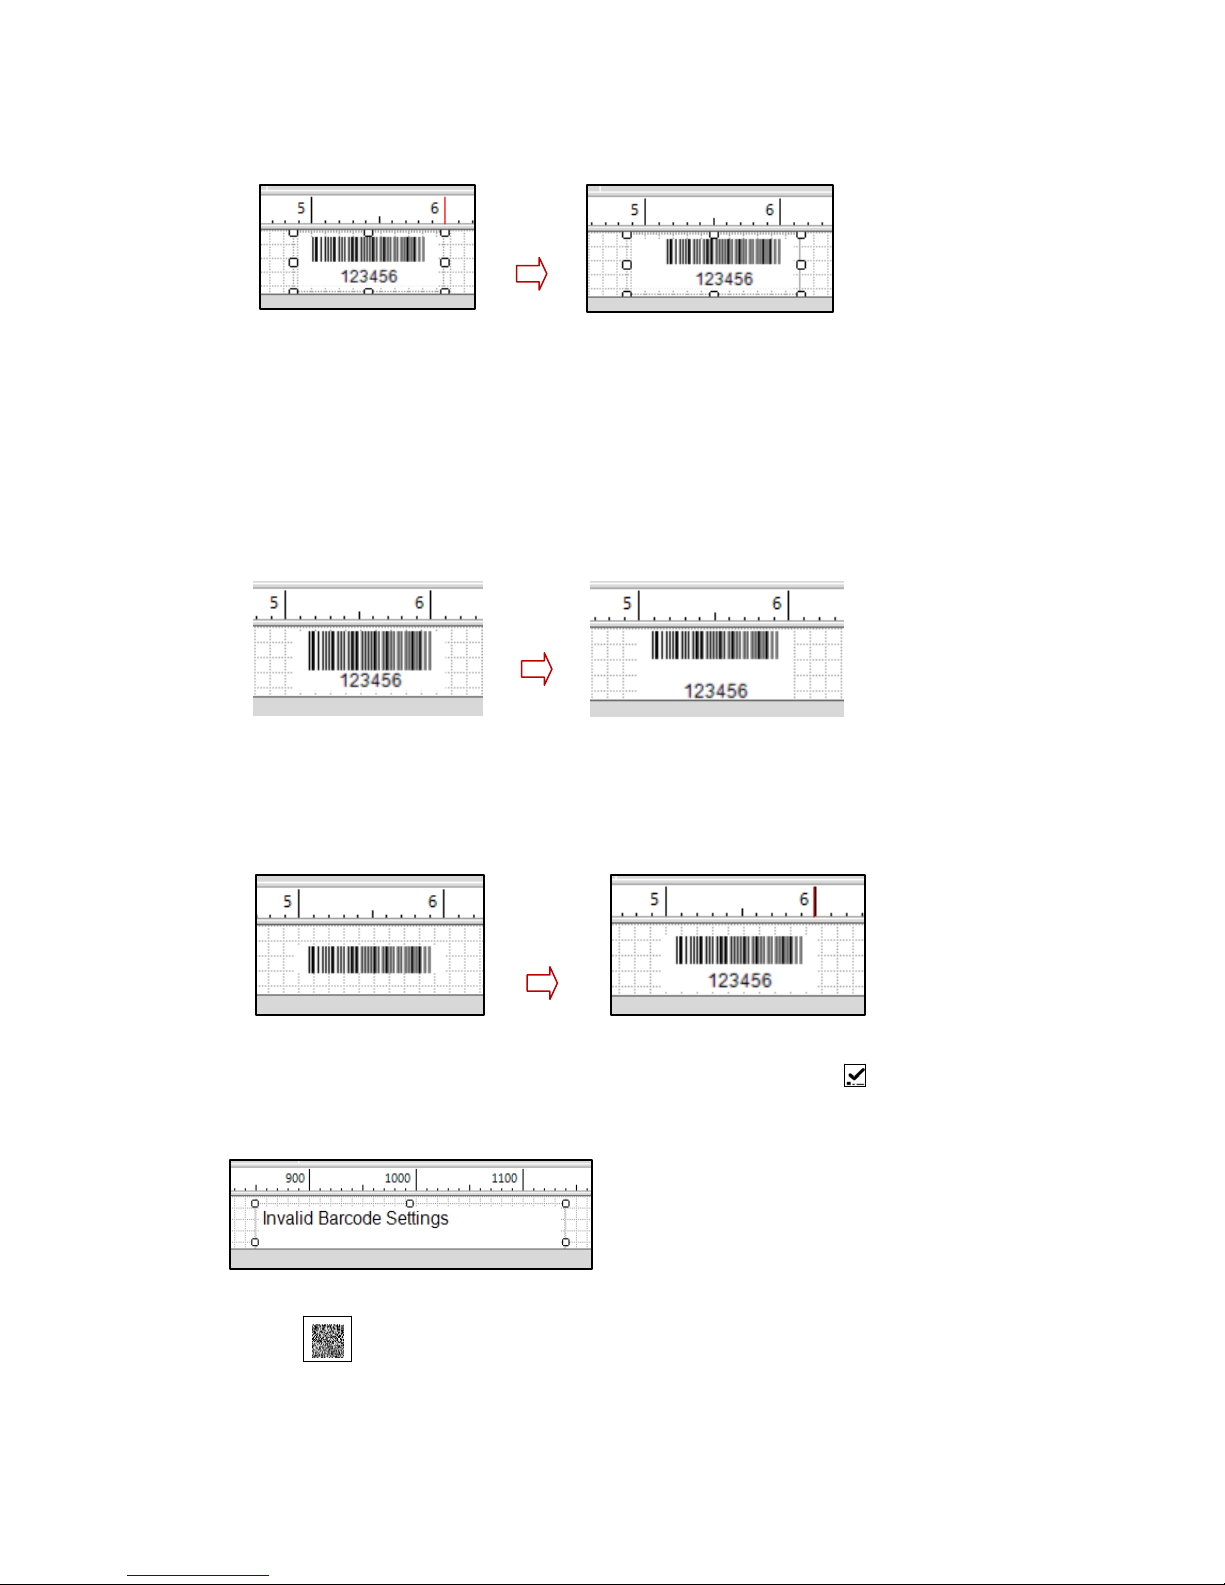
2.
Go to Options to set parameters according to your specific requirements for each barcode.
3.
Place your barcode within the Margin and set Resolution
Left Margin: Align barcode from the left
Align to left
Right Margin: Align barcode from the right
Top Margin: Align barcode from top
Bottom Margin: Align barcode from bottom
Resolution: Set resolution for your barcode
Unit of Measure: Unit of resolution
Text Margin: Set distance from the text (barcode data) to the bottom edge of barcode.
Set
Barcode module width: Adjust width of barcode
Barcode module height: Adjust height of barcode
Display Barcode data: Show/hide barcode data
Hide text Show text
When all parameters are set, go back to Static Barcode, select to confirm and apply
settings.
No barcode will be generated if the data input is incorrect.
Barcode
: Creating a barcode by repeating the same steps from Static Text. Variable
barcode can also be created from this section.
Smart-Jet Plus Manual v04 ǀ 2015-07-30 ǀ by MSSC, LLC
51
Page 52
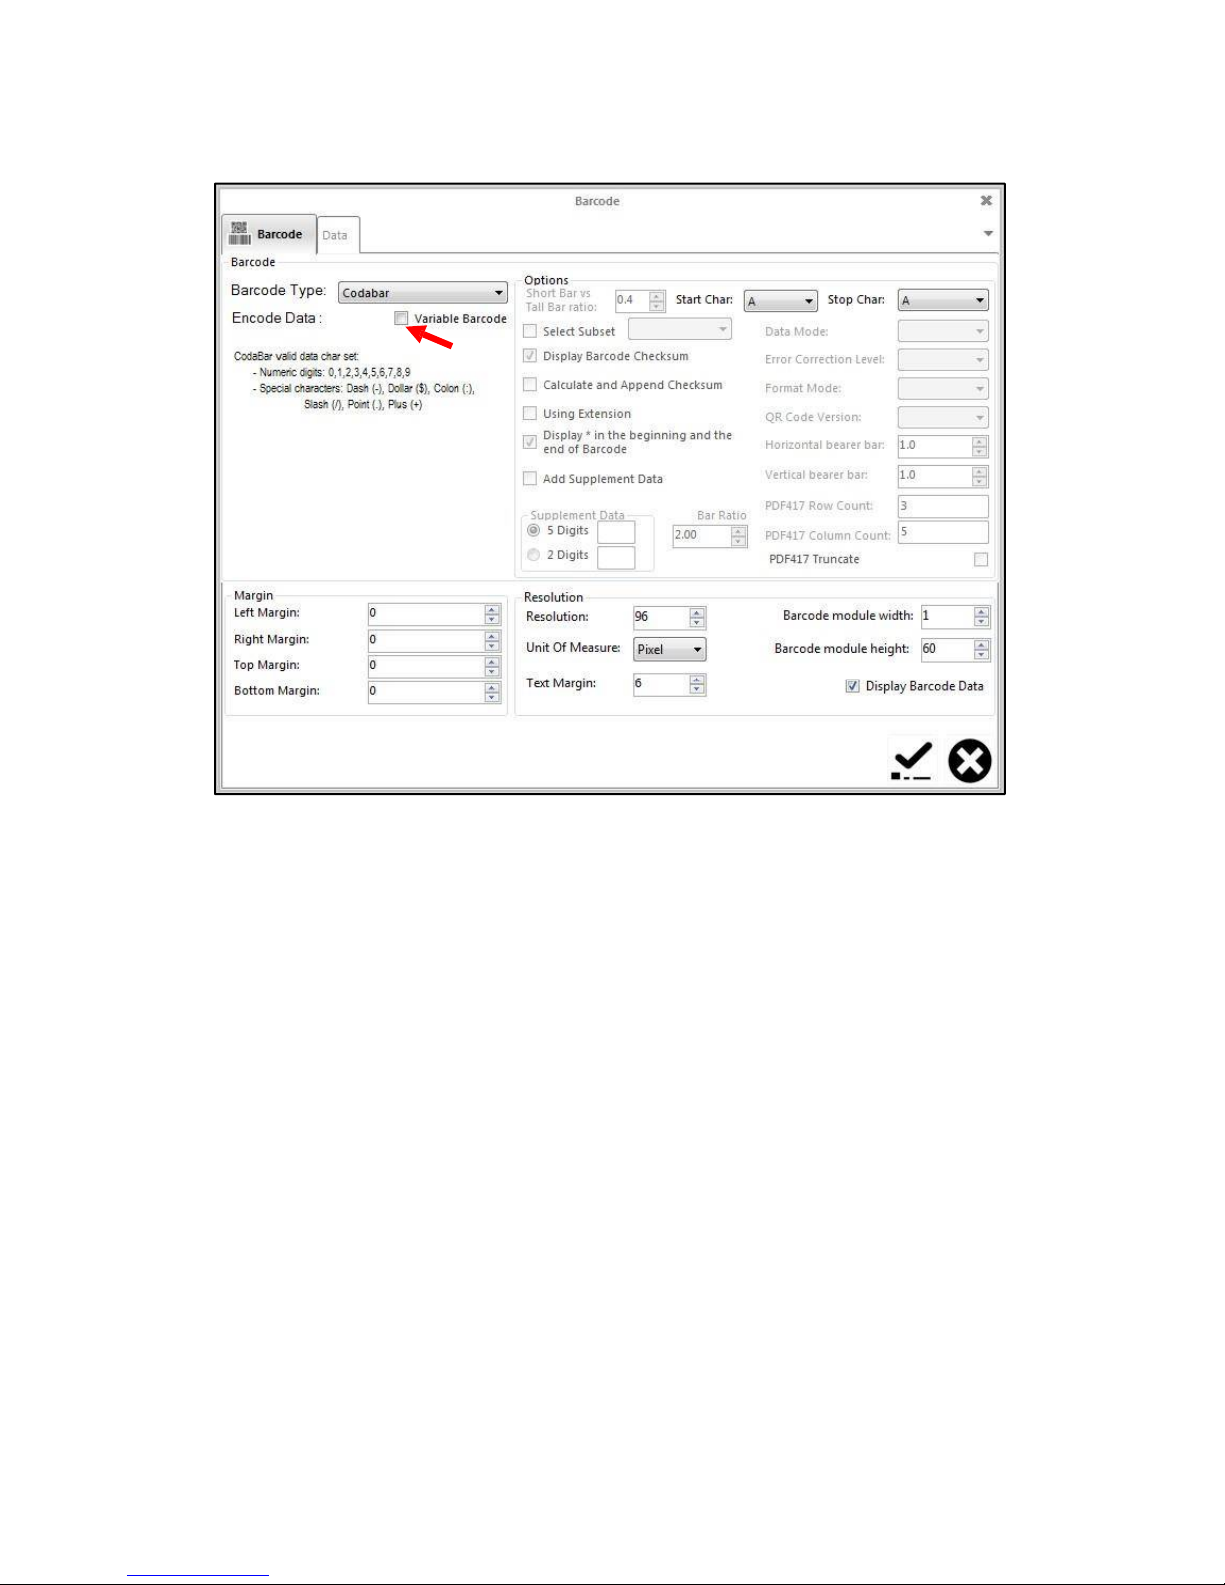
CREATING A VARIABLE BARCODE:
Select Barcode and click on the designing section, the window below will appear to set
parameters for the barcode.
To create a variable barcode, select tab Variable Barcode. Otherwise, select Data to create a
static barcode.
Smart-Jet Plus Manual v04 ǀ 2015-07-30 ǀ by MSSC, LLC
52
Page 53
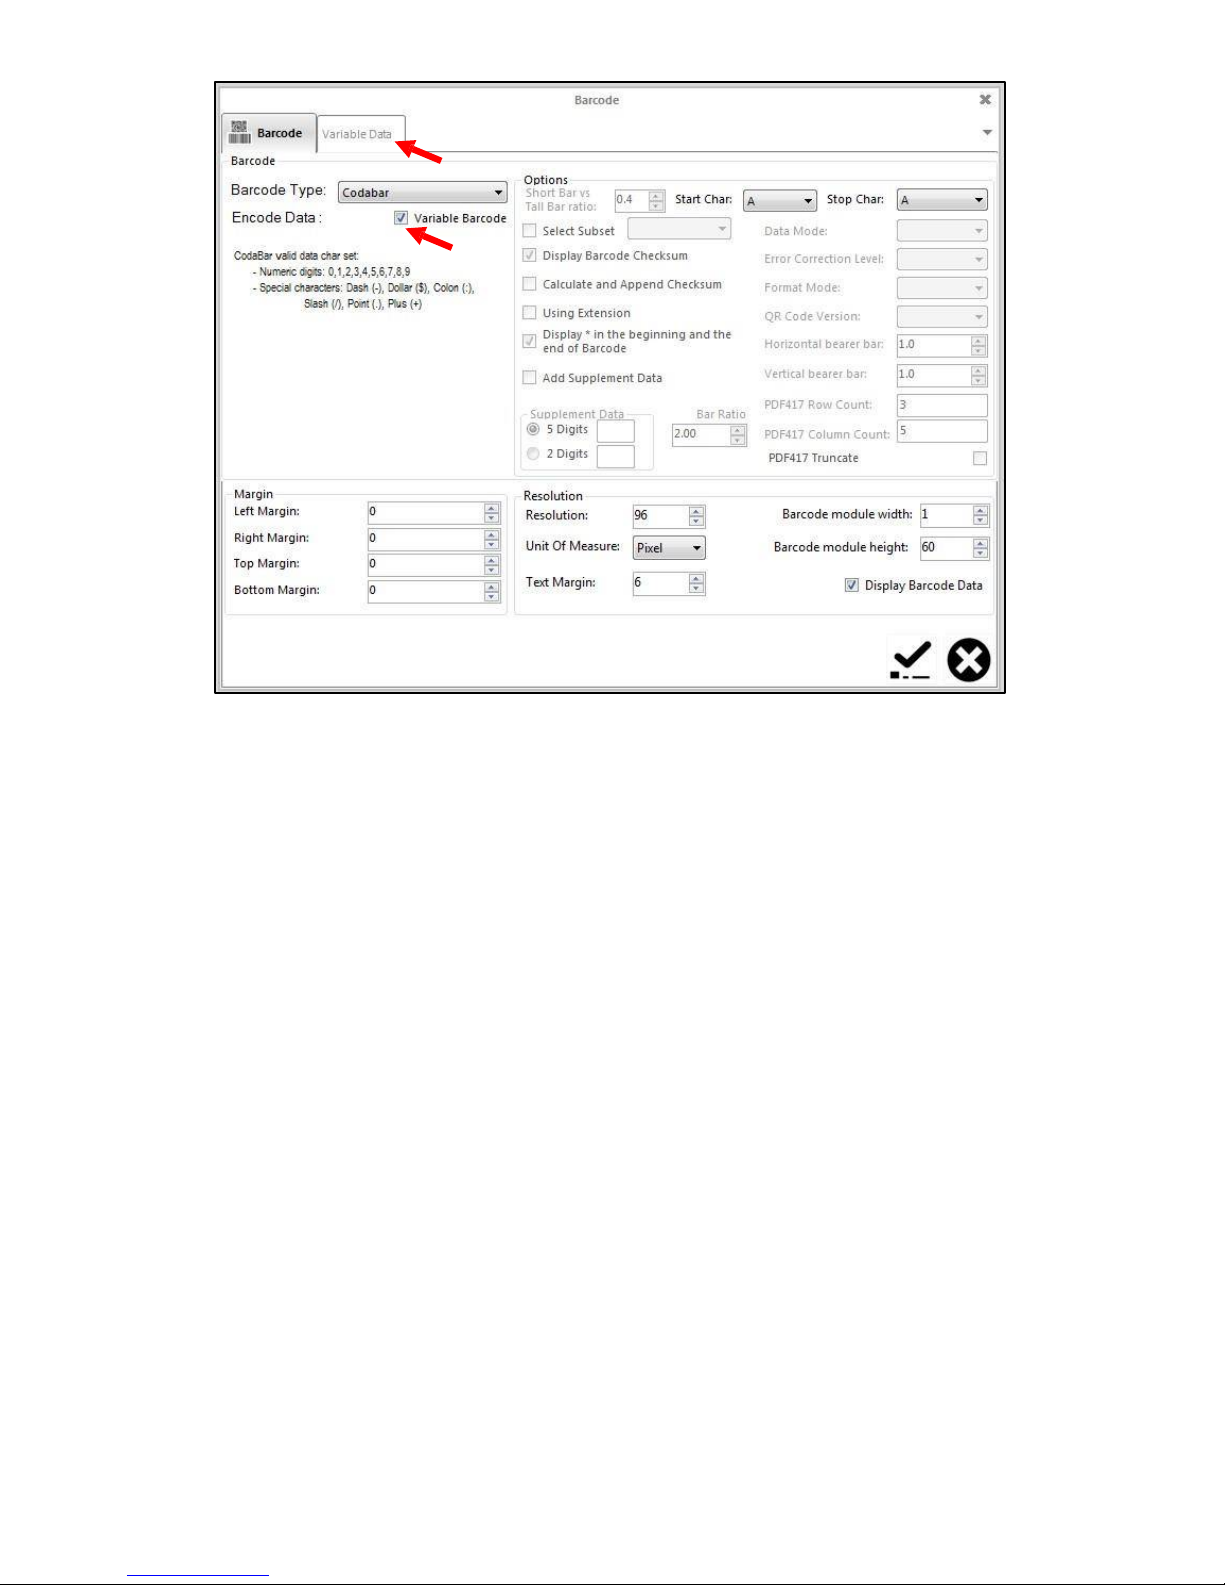
Smart-Jet Plus Manual v04 ǀ 2015-07-30 ǀ by MSSC, LLC
53
Page 54
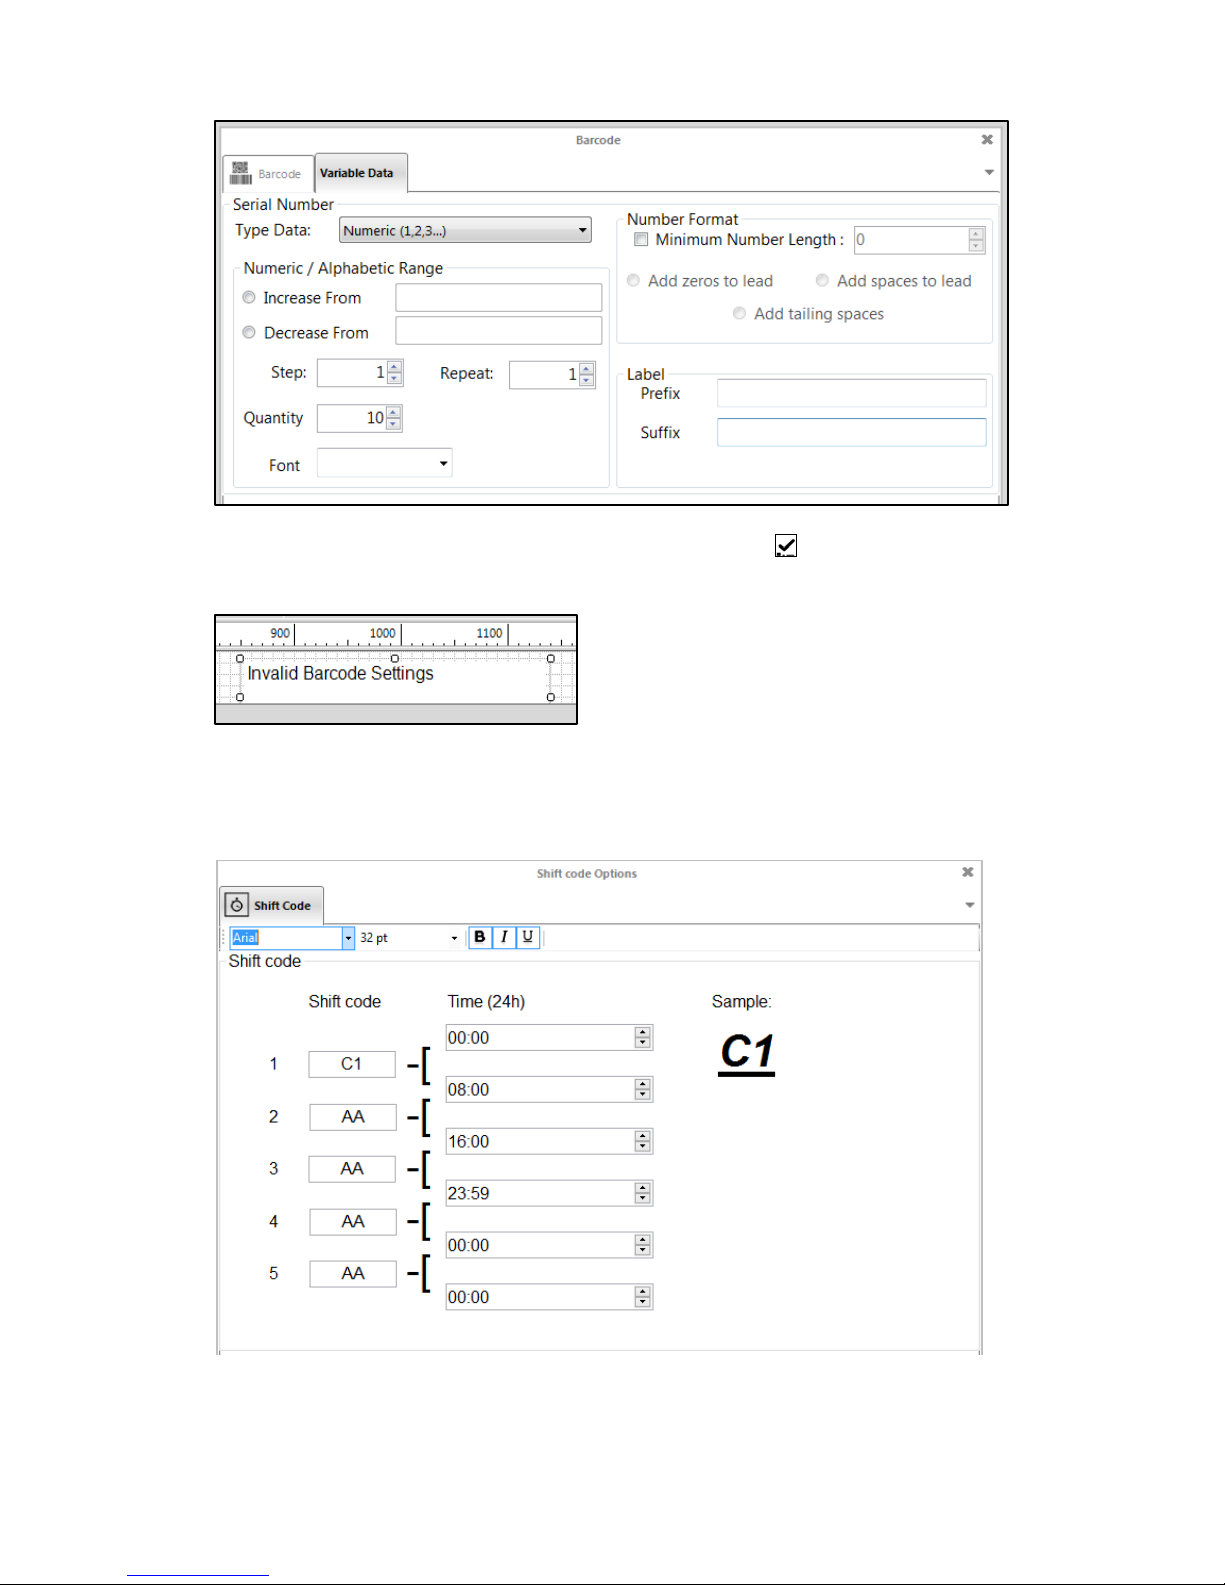
Input data for variable Barcode
When all parameters are set, go back to Barcode, select to confirm and apply settings.
No barcode will be generated if the data input is incorrect.
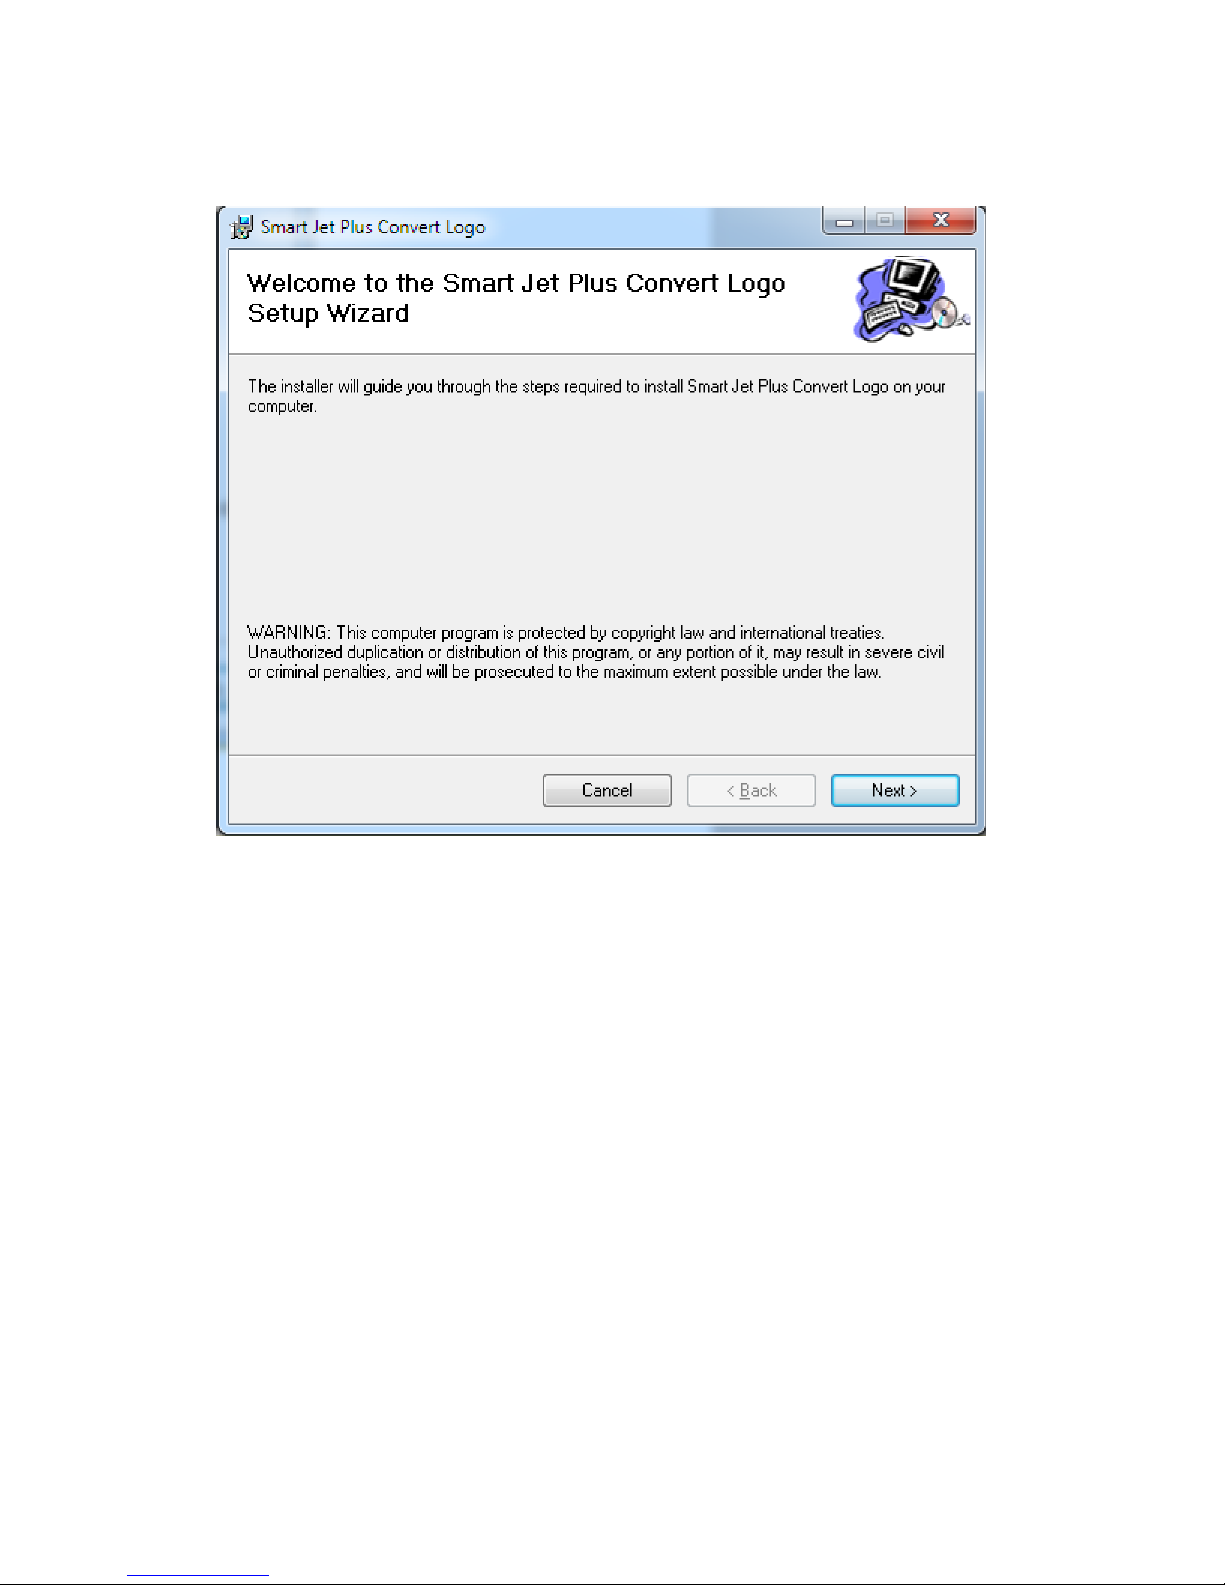
CREATING SHIFT CODE
The firmware supports to create up to 5 shift codes. To create each shift code with any two
digits: number, letter or symbol. Select font, size and then select time to display shift code.
Smart-Jet Plus Manual v04 ǀ 2015-07-30 ǀ by MSSC, LLC
54
Page 55
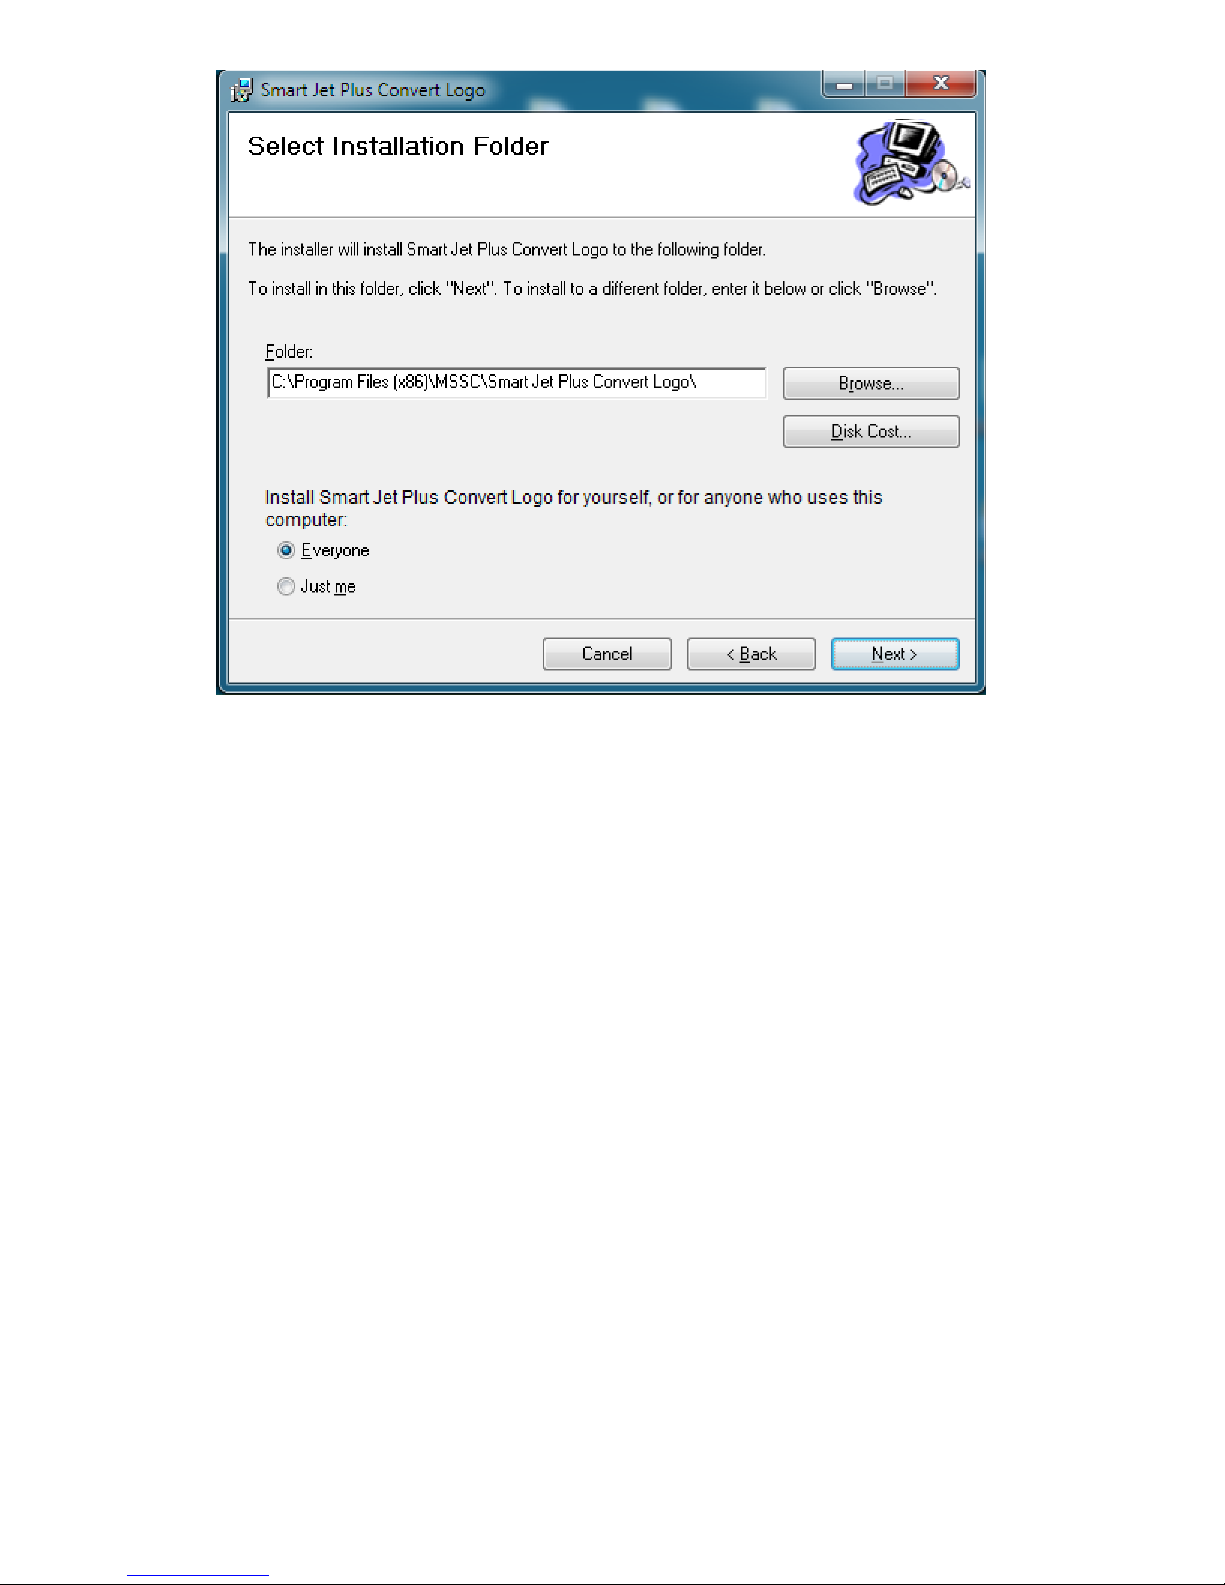
Install Smart-Jet Plus Convert Logo (create logo under .hex format)
(Contact: [email protected])
Step 1: Extract Smart-JetPlusConvertLogo.rar provided by your supplier. Double click to begin
installing.
Step 2: Browse to save, click Next
Smart-Jet Plus Manual v04 ǀ 2015-07-30 ǀ by MSSC, LLC
55
Page 56
Smart-Jet Plus Manual v04 ǀ 2015-07-30 ǀ by MSSC, LLC
56
Page 57
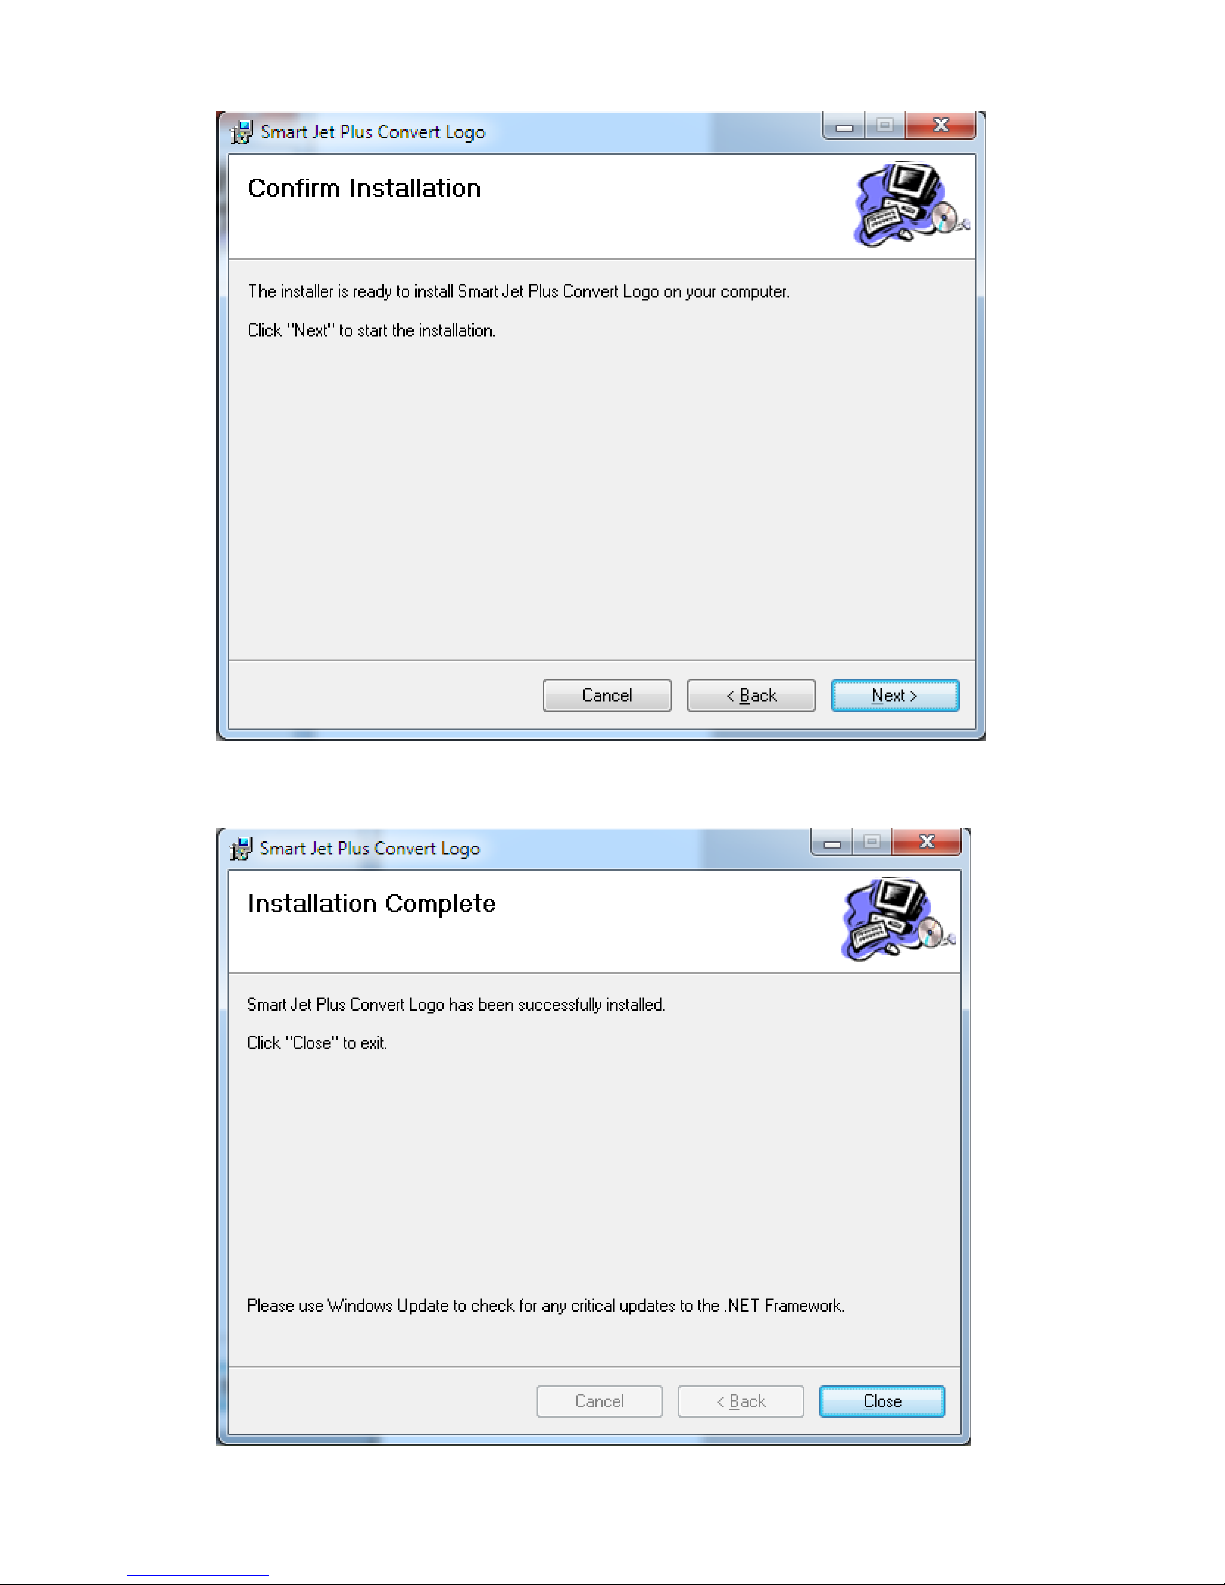
Step 3: Click Next and wait for installation to complete
Step 4: Installation complete. Click to close
Smart-Jet Plus Manual v04 ǀ 2015-07-30 ǀ by MSSC, LLC
57
Page 58
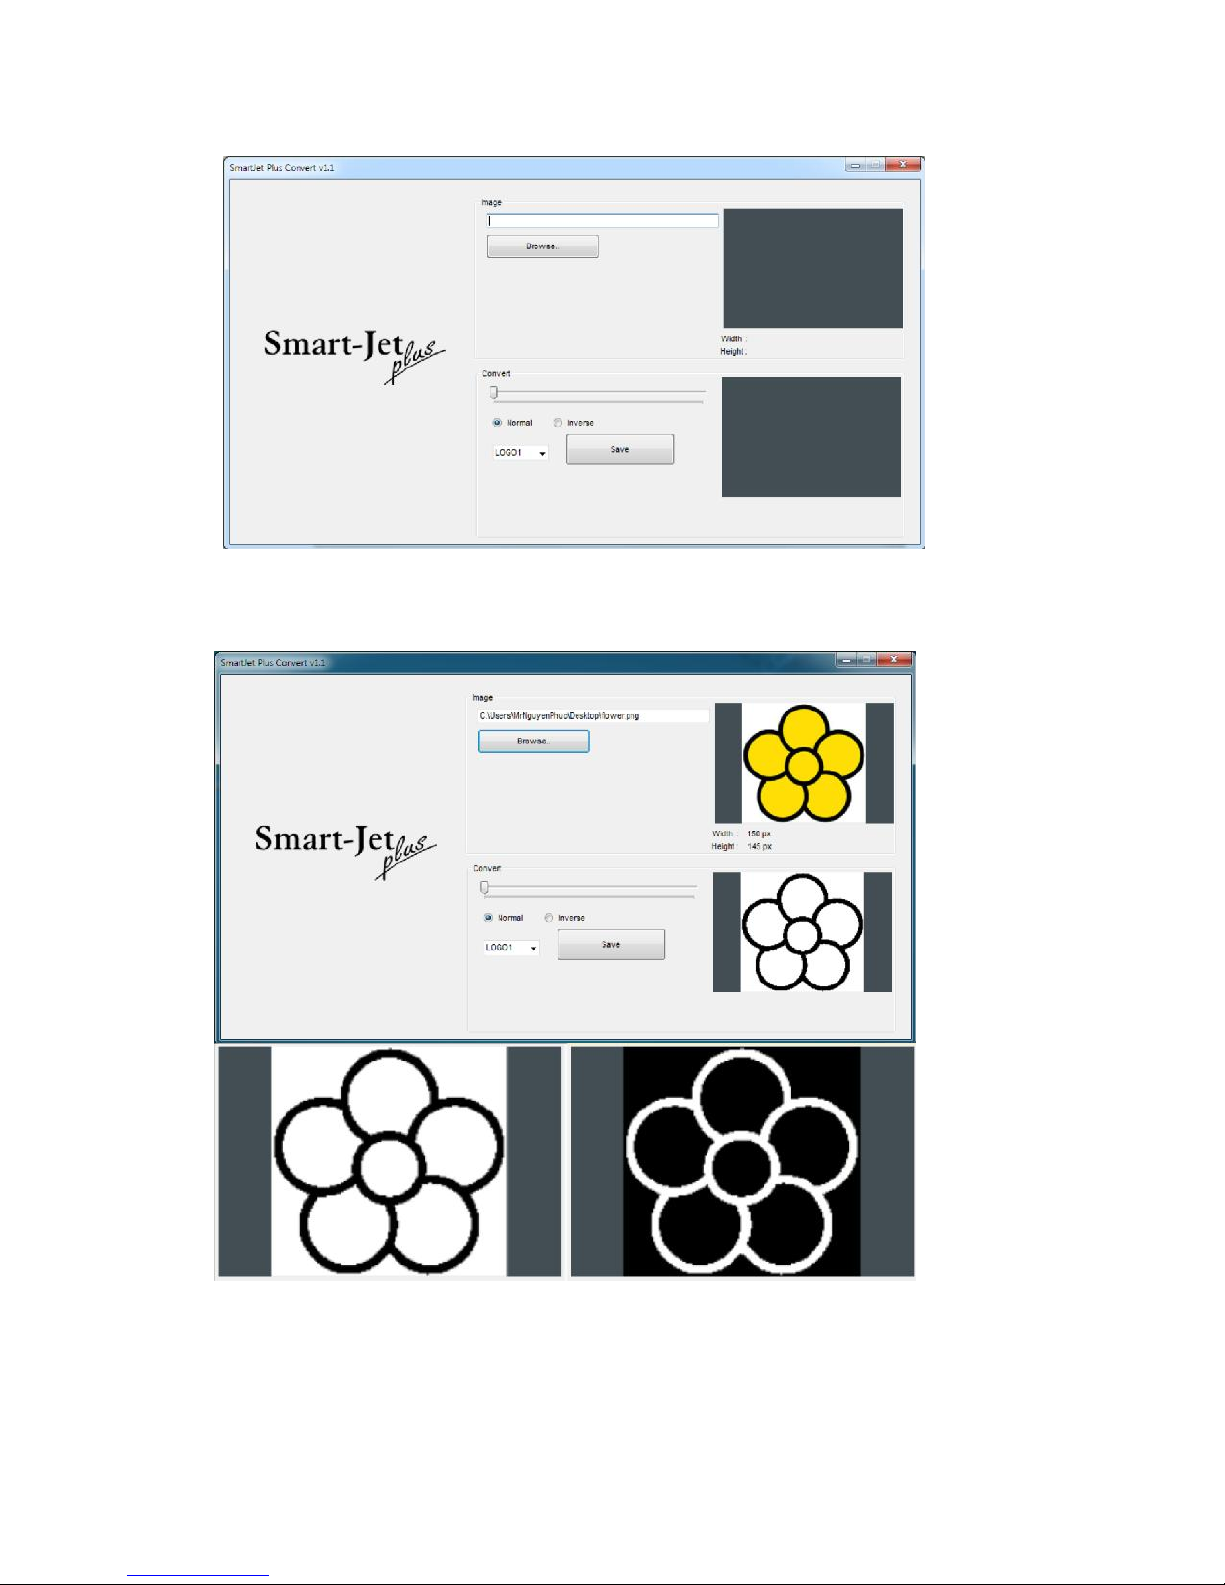
Using Smart-Jet Plus Convert Logo
Double click Smart Jet Plus Convert Logo shortcut to open the application.
Go to Browse to select your desired Logo Adjust logo
size and release
Normal
Smart-Jet Plus Manual v04 ǀ 2015-07-30 ǀ by MSSC, LLC
Inverse
58
Page 59
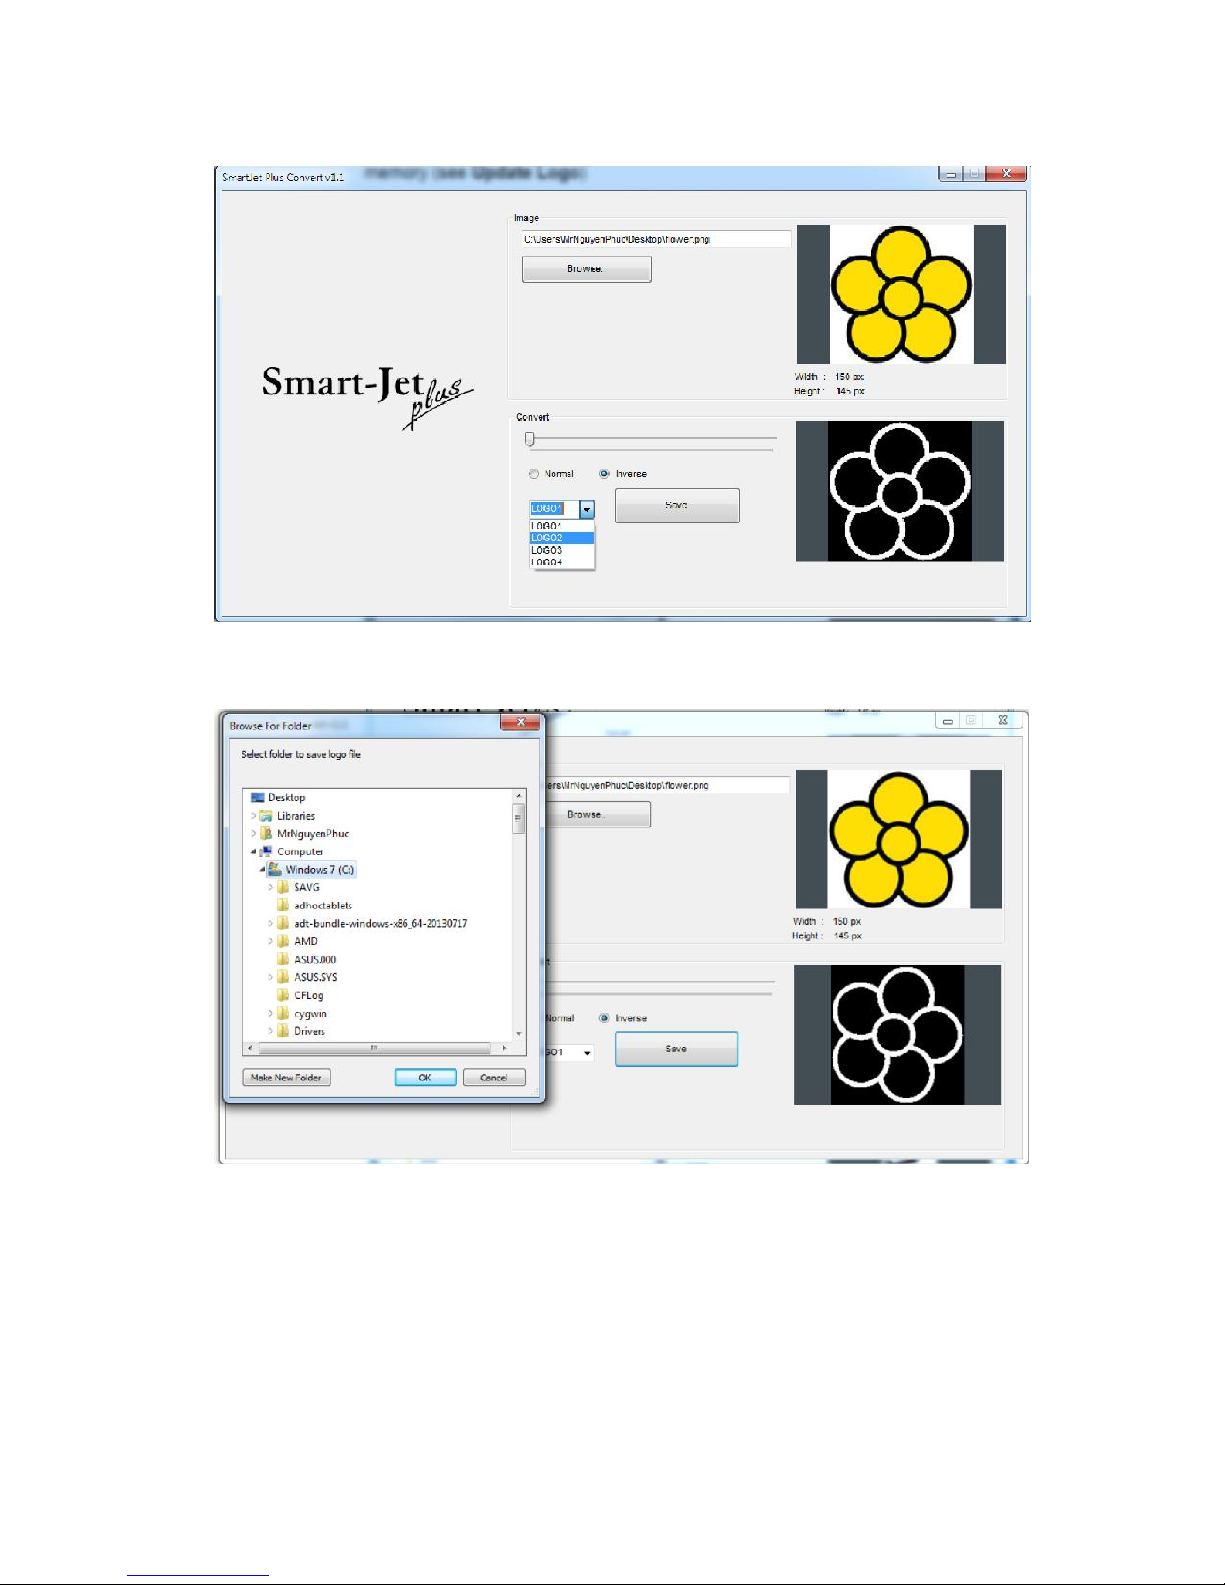
Select to name your logo (LOGO1, LOGO2, LOGO3, and LOGO4) and update to your printer
memory (see Update Logo)
Click to save your logo. Click OK to finish converting.
PRODUCT WARRANTY
The Product Warranty for the Smart-Jet Plus is effective for 12 months from delivery date.
Brackets, keyboard, power supply, and anti-shock mechanism are excluded from the warranty.
The warranty is VOID if:
1.
Any non-original parts and unapproved OEM inks are used.
2.
The product has been altered or modified without approval of MSSC.
Smart-Jet Plus Manual v04 ǀ 2015-07-30 ǀ by MSSC, LLC
59
Page 60

3.
Print head damage is a result of improper installation.
4.
Damage occurs from an accident, such as but not limited to, being dropped, being sprayed
with water or other liquids, caused by a natural disaster, caused by stocking or shipping
conditions.
5.
Unapproved, wrong or unstable power supply is used.
APPENDIX
INK CARTRIDGE MAINTENANCE
Print head cleaning:
While the Smart-Jet Plus is working, (If the print quality is degraded), please check on the
ink level in the cartridge:
If the cartridge is out of ink, change the new cartridge.
If the cartridge isn’t out of ink, the degraded print quality may be caused by the ink-spray,
dust, or paper fiber being collected and built up on the surface of the nozzles plate. To
maintain the print quality of the cartridge follow these wiping and purging tips.
Wiping
1.
Materials needed: a lint-free, soft cloth, and de-ionized water/ ethanol.
2.
Moisten the cloth with de-ionized water for water based cartridges. Tap water also works but deionized water is recommended since the tap water contains impurities that can damage the printhead.
For Solvent based cartridges, use a light alcohol instead of deionized water.
3.
Wipe slowly across the long-axis with the cartridge facing down as shown.
4.
There are two lines of ink on the moistened cloth after wiping.
Note: (Do Not use MEK Solvent)
Smart-Jet Plus Manual v04 ǀ 2015-07-30 ǀ by MSSC, LLC
60
Page 61
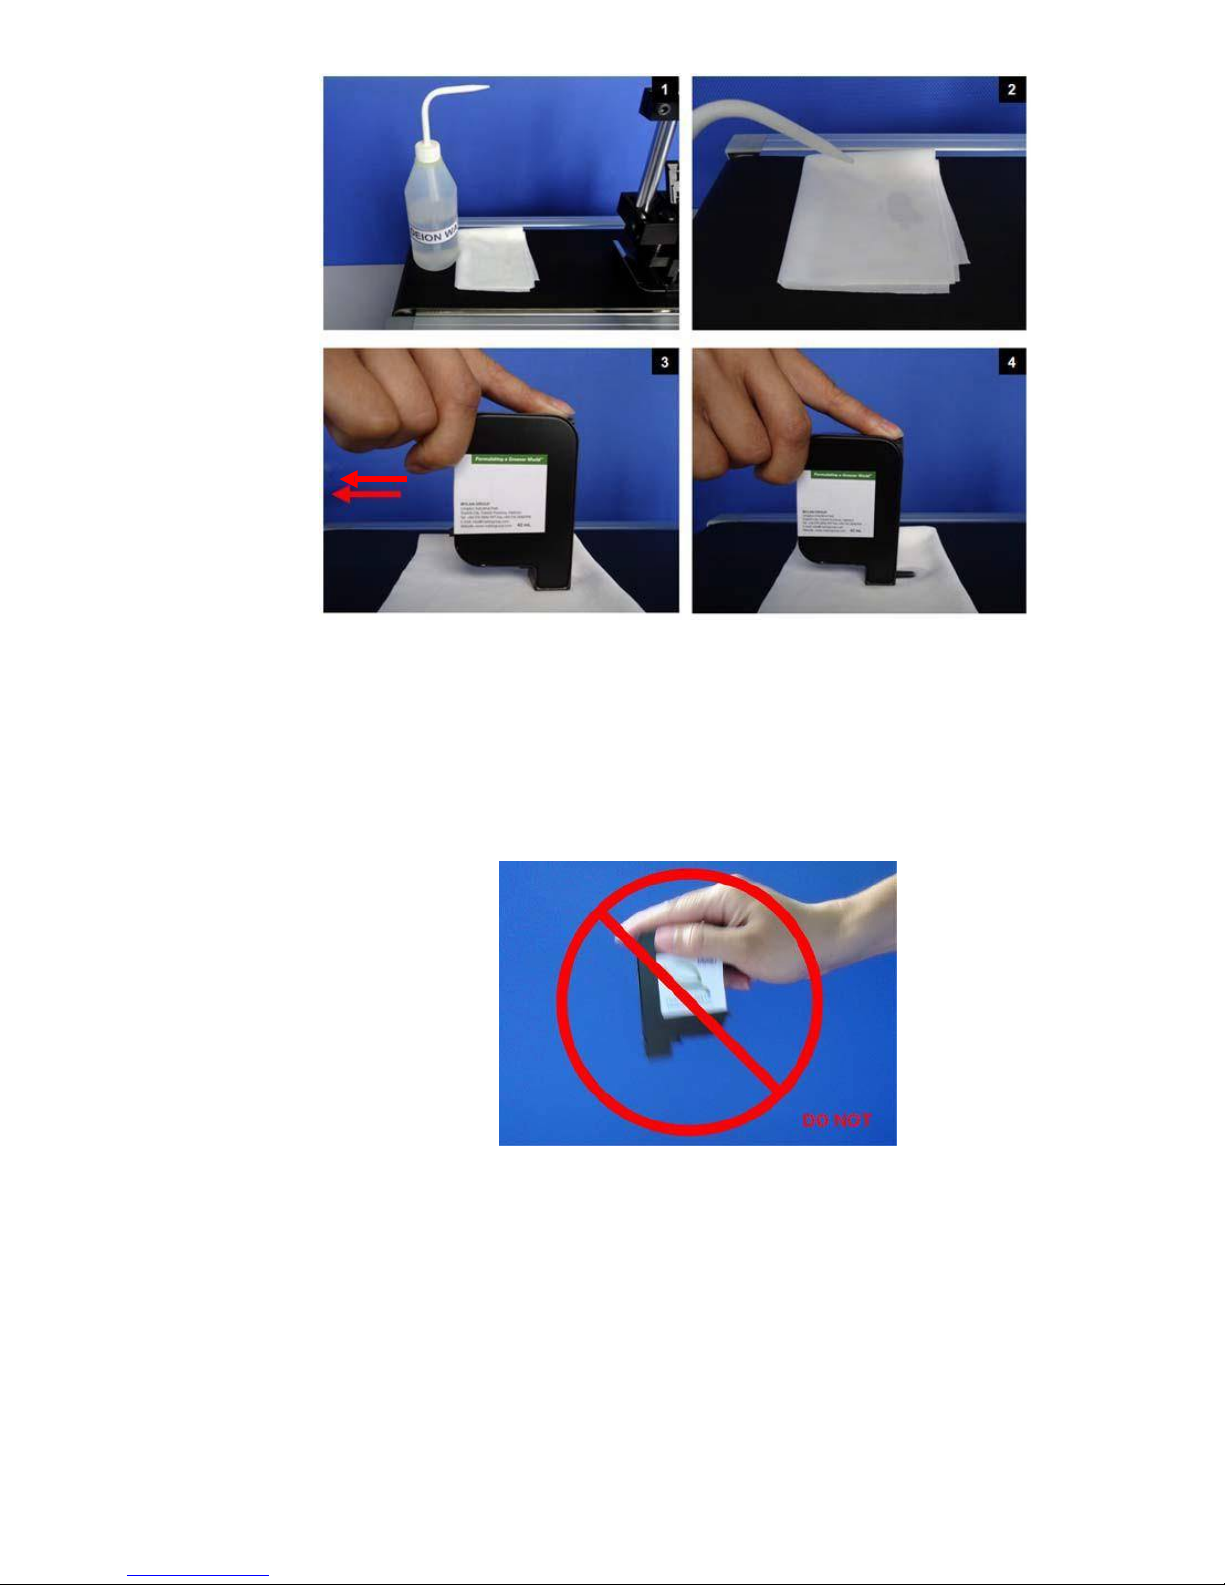
Important notes:
To avoid scratching the orifice plate, do not apply excessive force or use a dry or abrasive cloth
To avoid clogging the nozzles, make certain that the lint free cloth and de-ionized water used
do not have a high percentage of suspended particles.
Do not shake the cartridge as ink pressure will damage the nozzles.
Purging
1.
If the cartridge sits inactive and uncapped for a period of time, the ink may dry and form a
viscous plug at the nozzles. The dried ink plug can cause misdirected drops and eventually
block the nozzles. White streaks may be visible in the printed text or graphic. To fix this
problem, purge the ink plug out of the nozzles. Printing alone may be insufficient in removing
ink plugs from the nozzles. See the description above about how to run the Purge function in
the printer.
Smart-Jet Plus Manual v04 ǀ 2015-07-30 ǀ by MSSC, LLC
61
Page 62
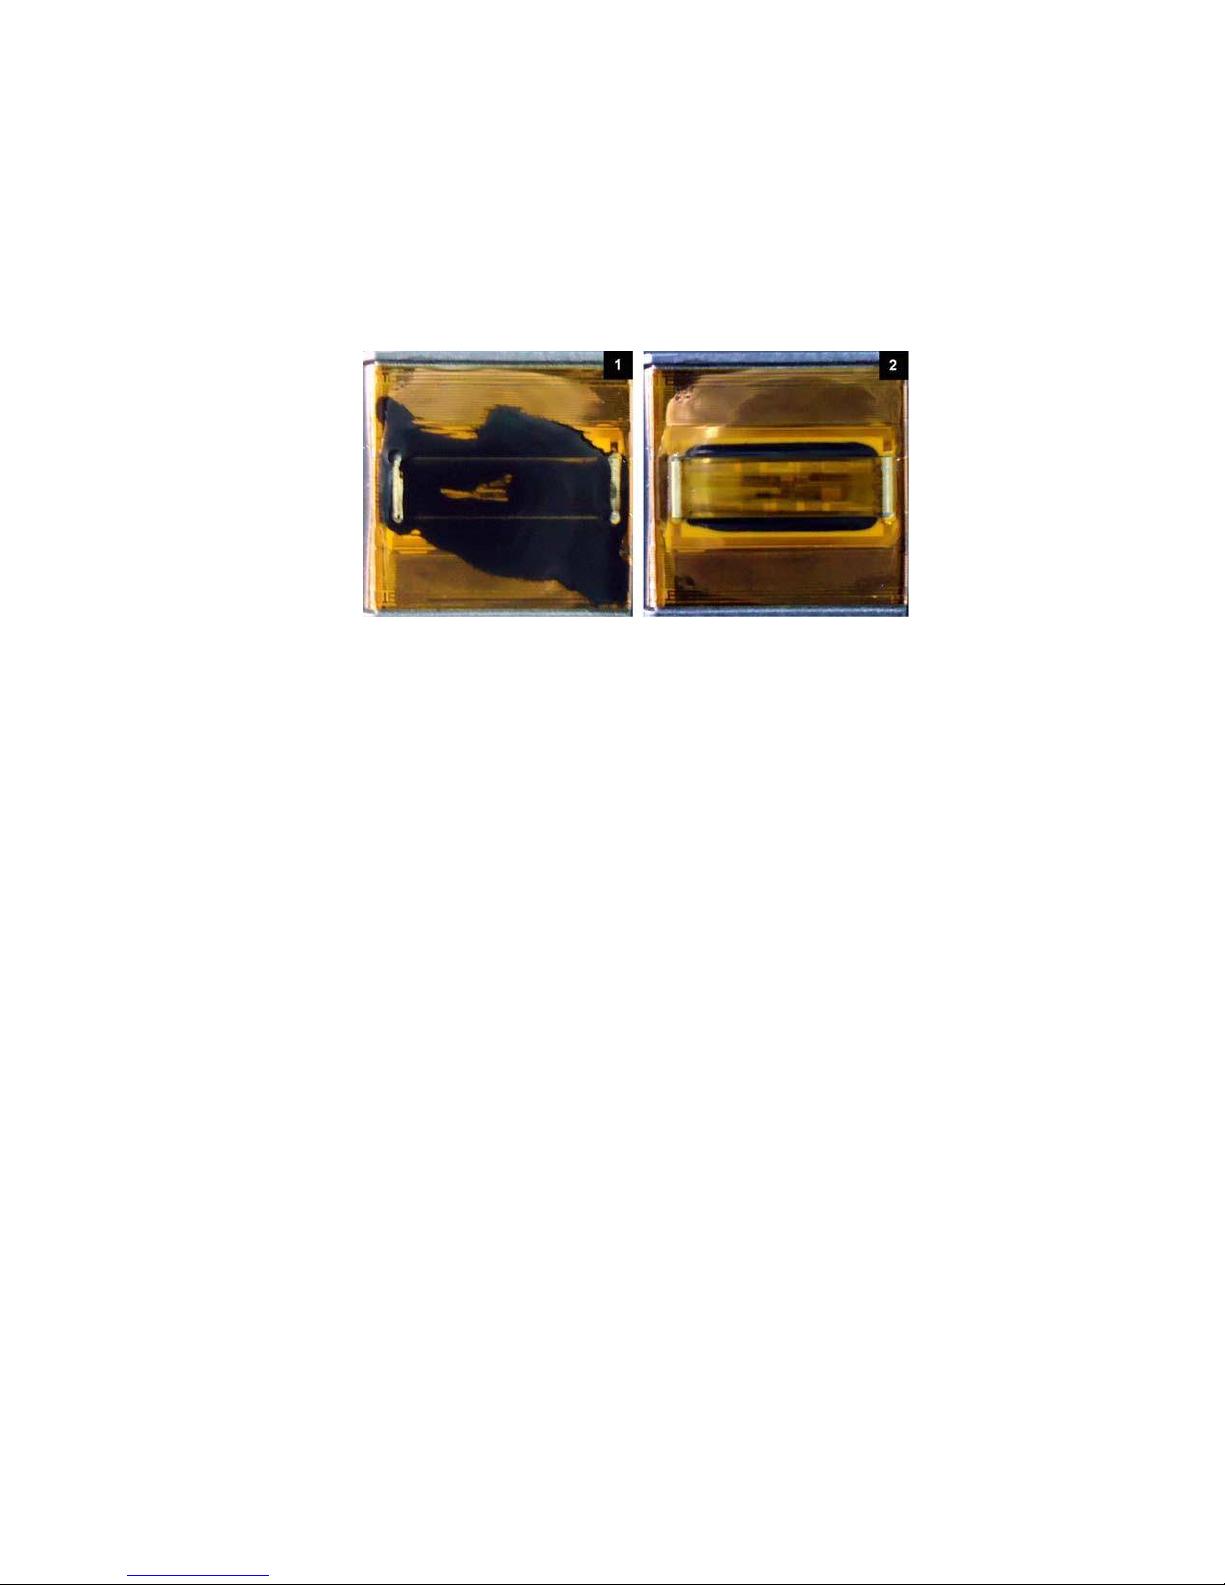
2.
Wipe the cartridge with a moist, lint-free cloth to remove the excess ink on the surface of nozzle
plate.
3.
Print a few lines of text or graphics at high resolution, (300x300) density 3 or higher, to utilize
more nozzles and push more ink out.
4.
Check the printed image. If the print quality can’t be recovered, repeat this procedure several
times. If it still doesn’t work, change the print cartridge.
The cartridge before [1] and after [2] cleaning:
INK CARTRIDGE STORAGE PROCEDURE:
For short term storing (less than one day):
Leave the cartridge in the printer, capped. Capping cartridge is always recommended to
prevent the nozzles from drying out or becoming clogged due to ink’s solvent evaporation or
dusting.
Wipe and/ or purge the cartridge next time it is used until good print quality is achieved.
For long term storing (more than one day):
Remove the cartridge from the printer
Remember that all inkjet print cartridges produce a small amount of ink residue that may build
up on the cartridge nozzles during printing. We need to wipe the cartridge to remove these ink
residues from the nozzles plate.
Tightly cap the printer cartridge by sealing tape.
Leave the cartridge uncapped and place it in an airtight container with moist, dust- free cloth
or sponge to prevent cartridge’s nozzles from drying out or becoming clogged. Close the
container tightly.
Wipe and/ or purge the printer cartridge next time it is used until getting the good print quality
is achieved.
Smart-Jet Plus Manual v04 ǀ 2015-07-30 ǀ by MSSC, LLC
62
Page 63
Smart-Jet Plus FAQ
Setting up the printer:
1. My keyboard will not work
a. Make sure the keyboard is plugged into the correct usb port on
the back of the printer
b. Make sure you power on the keyboard, this is on the back of the keyboard near the top center
c. If the keyboard worked before, and now it does not, unplug it and power off the machine, then
plug it back in, power on the machine. If the keyboard still does not work, it may have been
zapped by high voltage and needs to be replaced. P/N: 80878
2. Can I use an encoder?
a. Yes, P/N: 80865
3. Can I have an encoder and use an external photo sensor at the same time?
a. Yes, P/N: 80875
4. How far away can it print?
a. 2-4mm
5. How many font sizes can I get?
a. 5, You can print 1 line of 12.7mm (1/2”), up to 2 lines of 5.9mm (1/4”), up to 3 lines of 3.9mm
(1/6”), up to 4 lines of 2.5mm (1/10”), and up to 6 lines of 1.7mm (1/14”)
6. Can I change font styles?
a. Yes, using the PC software
7. Can I print logos?
a. Yes, you can print up to 4 logos
8. The printer will not print anything, even after I made sure I went to operate start, and the
cartridge is in the printer securely
a. Does the red LED light on top of the printer turn on when you put the product 1” in front of
the printer, making sure it passes the internal sensor under the print head of the cartridge?
i. Yes – the red light turns on. If the internal photo sensor can see the product, and when
you pass something in front of the printer nothing prints, make
sure you are within 2-4mm of the product.
1. Try to purge the printer, if it can purge, there may be a
problem with the “print delay before” setting, turn to
10mm and try again. See Page 26 of Owner’s Manual
2. If it cannot purge, then there may a software conflict.
Go to msscllc.com and download the newest software
version. Then update according to proper procedures as prescribed in the
owner’s manual.
Smart-Jet Plus Manual v04 ǀ 2015-07-30 ǀ by MSSC, LLC
63
Page 64

ii. No – You need to adjust the internal sensor sensitivity. This is located inside the
printer, near the base of the latch. Put the screwdriver that came with the printer in
the slot and twist clockwise gently, it increases the sensitivity of the sensor, and you
can now see black and clear. If this still does not work, you may need the external
photo sensor, P/N: 80870
9. Does the printer software have any foreign languages?
a. Yes, the Smart-Jet Plus comes default with English, Spanish, French, German, Chinese,
Portuguese, and Swedish. See the settings in the printer for “Language”
10. Will any HP Ink cartridge work in the Smart-Jet Plus printer?
a. No, you must use MSSC ink, or an “Invalid Cartridge” error will display, and the unit will not
print. This ink is uniquely formulated to work in industrial applications in the Smart-Jet, and
Smart-Jet Plus printers.
Wi-Fi connection
11. How do I set up the Wi-Fi feature?
a. MSSC requires the E1200 Linksys Router to work properly. There are multiple steps:
i. Turn on the router and plug it into the wall. Do NOT use the Ethernet cable and do
NOT connect it to the internet. This is a Local Area Network (LAN)
ii. Download the MSSC Printer Application in the Apple store or Google Play store
1. If there is a username and password, they are: Administrator and
mssc@smartjet
iii. Using your phone/tablet, connect to the new Wi-Fi and note the SSID (name of the
router signal)
1. The router must use either no security, or WPA/WPA2
iv. Go to the Smart-Jet Plus printer now and then Settings Wi-Fi Connect
1. If there is a password, insert it
v. Press enter and the printer will now try to connect to the Router
1. The printer will assign an IP Address (192.168.1.2, etc.)
2. Copy the IP Address down
vi. Go back to the App on your phone/tablet and click the three blue bars stacked on each
other in the top left.
1. Click it, then select Printers
2. Now at the bottom should be a blue bar with the word “search” on it
a. Select it
3. Your printer name should pop up
a. Press and hold on it until a new menu pops up
i. Press Connect
vii. You should now be connected
12. My printer did not get an IP address
a. Double check your security settings. If you require security, it MUST be WPA/WPA2. Try to turn
off security and see if it works.
b. Turn off the printer and turn it back on.
c. If using a different type of router, it is possible the Smart-Jet Plus Printer will not be able to
recognize it. For best results, you must use the Linksys E1200 router.
Smart-Jet Plus Manual v04 ǀ 2015-07-30 ǀ by MSSC, LLC
64
Page 65

13. My printer was given an IP address, I typed that information into the app, and the app is still not
communicating with the printer, why?
a. Double check that your phone/tablet is on the same Wi-Fi network as the printer. Sometimes
tablets and phones will switch back to the default Wi-Fi. For example, if you have a “work”
router with internet, and you named your Smart-Jet Plus router “Sj,” double check that your
phone/tablet did not switch back to “work”, when you had it on “Sj” earlier. This happens
occasionally.
Operating the printer:
1. Why is my print blurry?
a. Make sure the product being printed on is within 2-4mm from the printhead. If you get too far
away from the product, the print may get blurry. The printer has a spring loaded head design
so the product can kiss the printer skid plate. This position will get the best print quality.
2. Can I print facing up towards the ceiling?
a. No, we do not recommend printing up!
3. Can the printer print down towards the ground?
a. Yes, you can purchase the print down kit, P/N: 80805, which allows you to print down. The
print down kit is an extra bar and crossover block
4. Can I connect a computer to run the printer?
a. Yes, contact MSSC to obtain this software
5. Can I remove the cartridge with the power on?
a. Yes, the Smart-Jet Plus is Hot Swap enabled
6. Can I name a message?
a. You can name messages on your app, but not on the printer
7. How many messages can the Smart-Jet Plus store?
a. 100 on the unit
b. Unlimited on the phone/tablet
8. How many characters per line of print can I get?
a. 150
9. How do I create a message with an automatic variable (date, time, shift code, expire date, etc.)
a. When editing or creating a message, press insert to enter variable data such as date, time,
shift code, barcodes, and expiration date. See page 17-18 of the Owner’s Manual
Smart-Jet Plus Manual v04 ǀ 2015-07-30 ǀ by MSSC, LLC
65
Page 66
UPDATE FIRMWARE INSTRUCTIONS
NOTES:
-
Remove encoder/ external connections when updating
-
Be sure there is no power failure while firmware is being updated
-
All data and settings will be lost while updating new firmware
-
Cartridge should be removed from the printer to avoid failure
1.
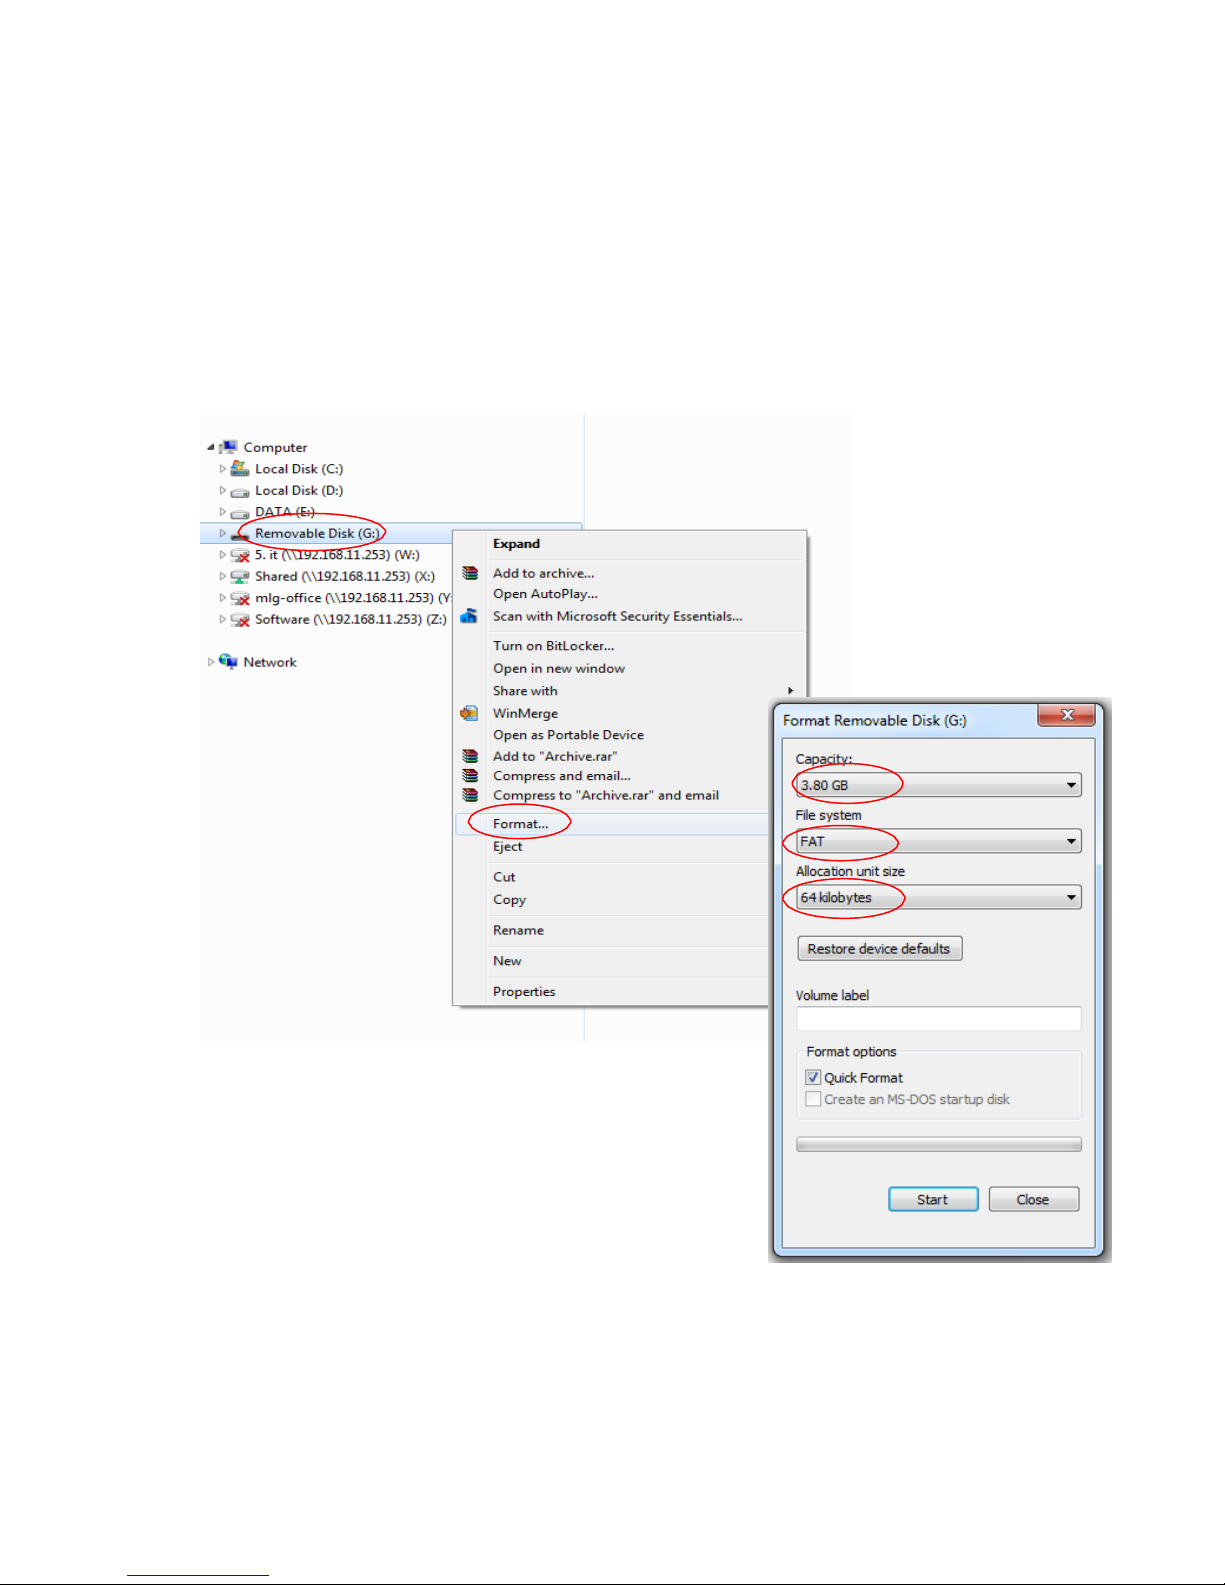
USB flash disk:
-
Prepare USB flash disk less than 4GB.
-
Format USB flash disk with file system FAT and allocation unit size 64 Kbytes. See photo
below
Smart-Jet Plus Manual v04 ǀ 2015-07-30 ǀ by MSSC, LLC
66
Page 67
-
-
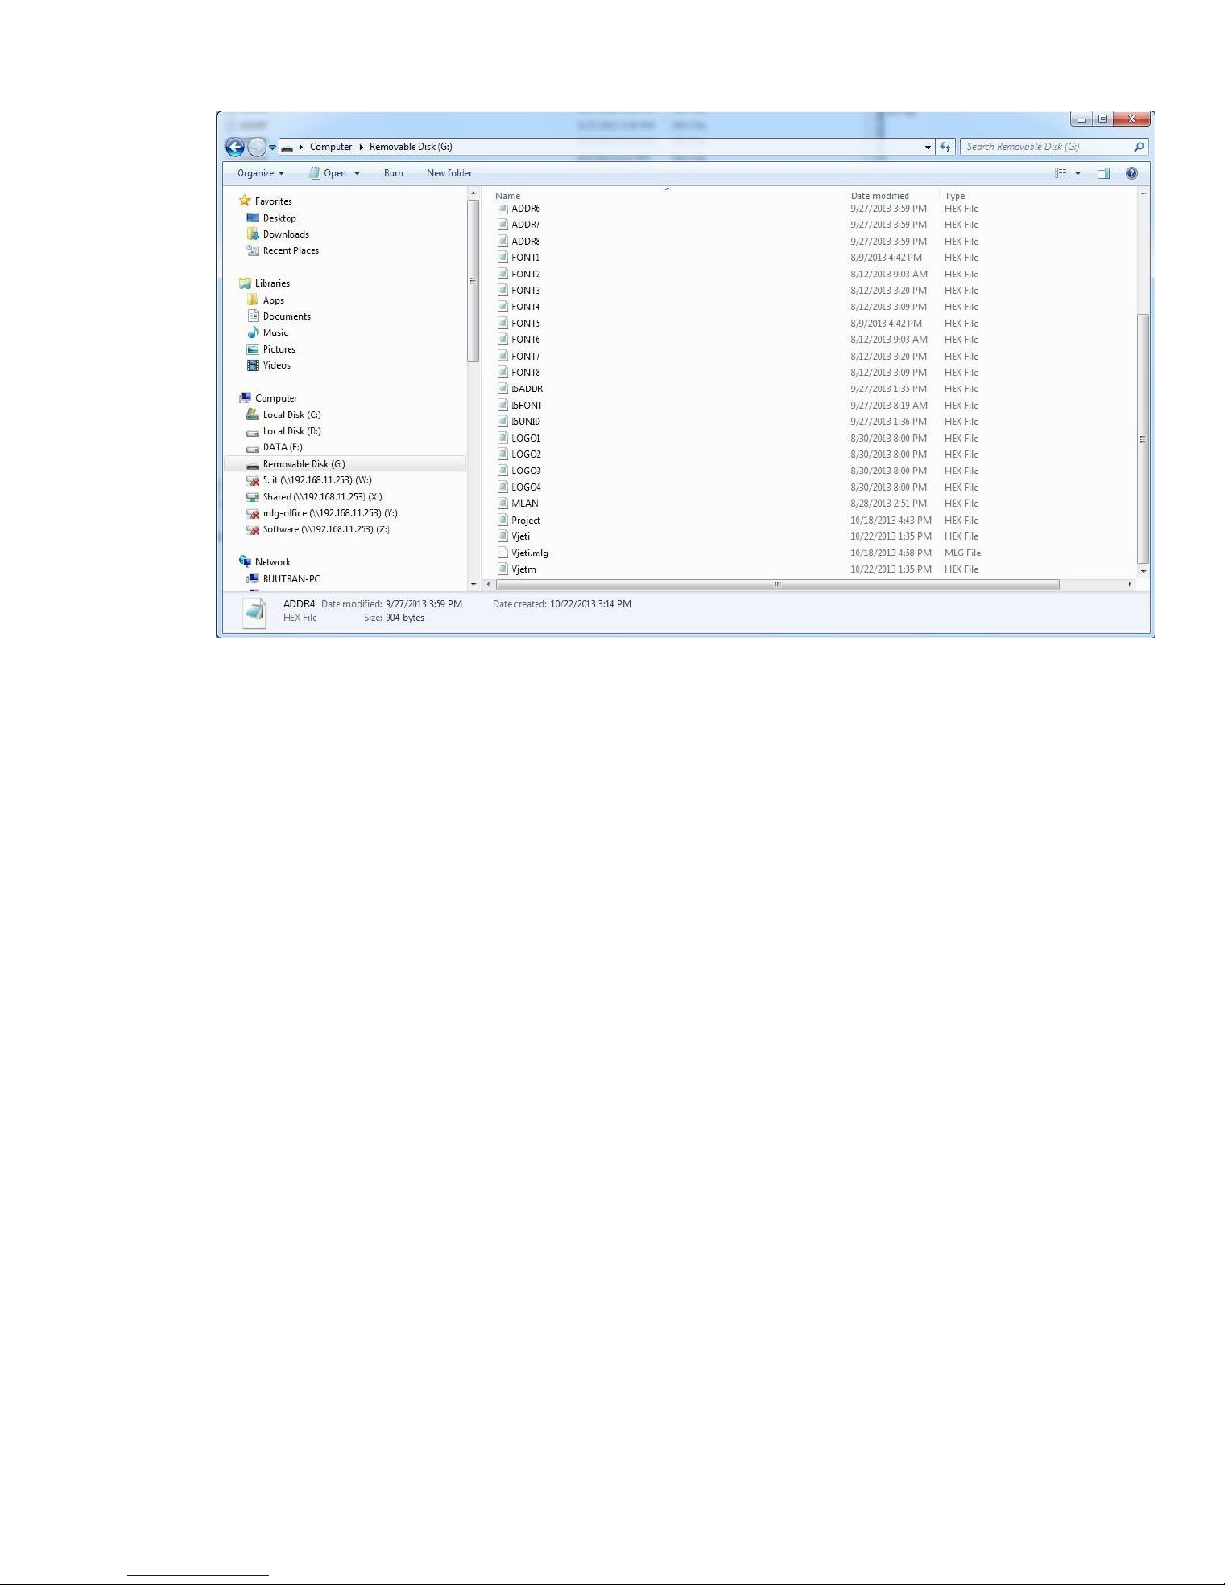
Insert USB flash disk into the Smart-Jet Plus printer.
2.
Update firmware:
-
From the main menu, use the arrow keys to go to Settings About Update firmware
Yes
-
This process will take 10 minutes.
-
When update is complete, go back to the Main Menu and press F12
3.
When update is complete, go to Settings and do the following updates:
Update your own logo, if any:
-
Update Logo Logo 1
-
Update Logo Logo 2
-
Update Logo Logo 3
-
Update Logo Logo 4
Update your font size. This process will take 2 - 3 minutes.
-
Update Font Font 12.7 mm
-
Update Font Font 5.93 mm
-
Update Font Font 3.89 mm
-
Update Font Font 2.54 mm
-
Update Font Font 1.69 mm
Set your printer to factory defaults
-
Default Yes
Repeat 3. if you need to update your own logos.
4.
Update Interface Language (this step is required if you are updating interface language)
-
Go to Settings Language Select your desired language
-
Go back to the Main Menu and press F12 (waiting for the data transferring)
Update firmware is complete.
67
Smart-Jet Plus Manual v04 ǀ 2015-07-30 ǀ by MSSC, LLC
Page 68
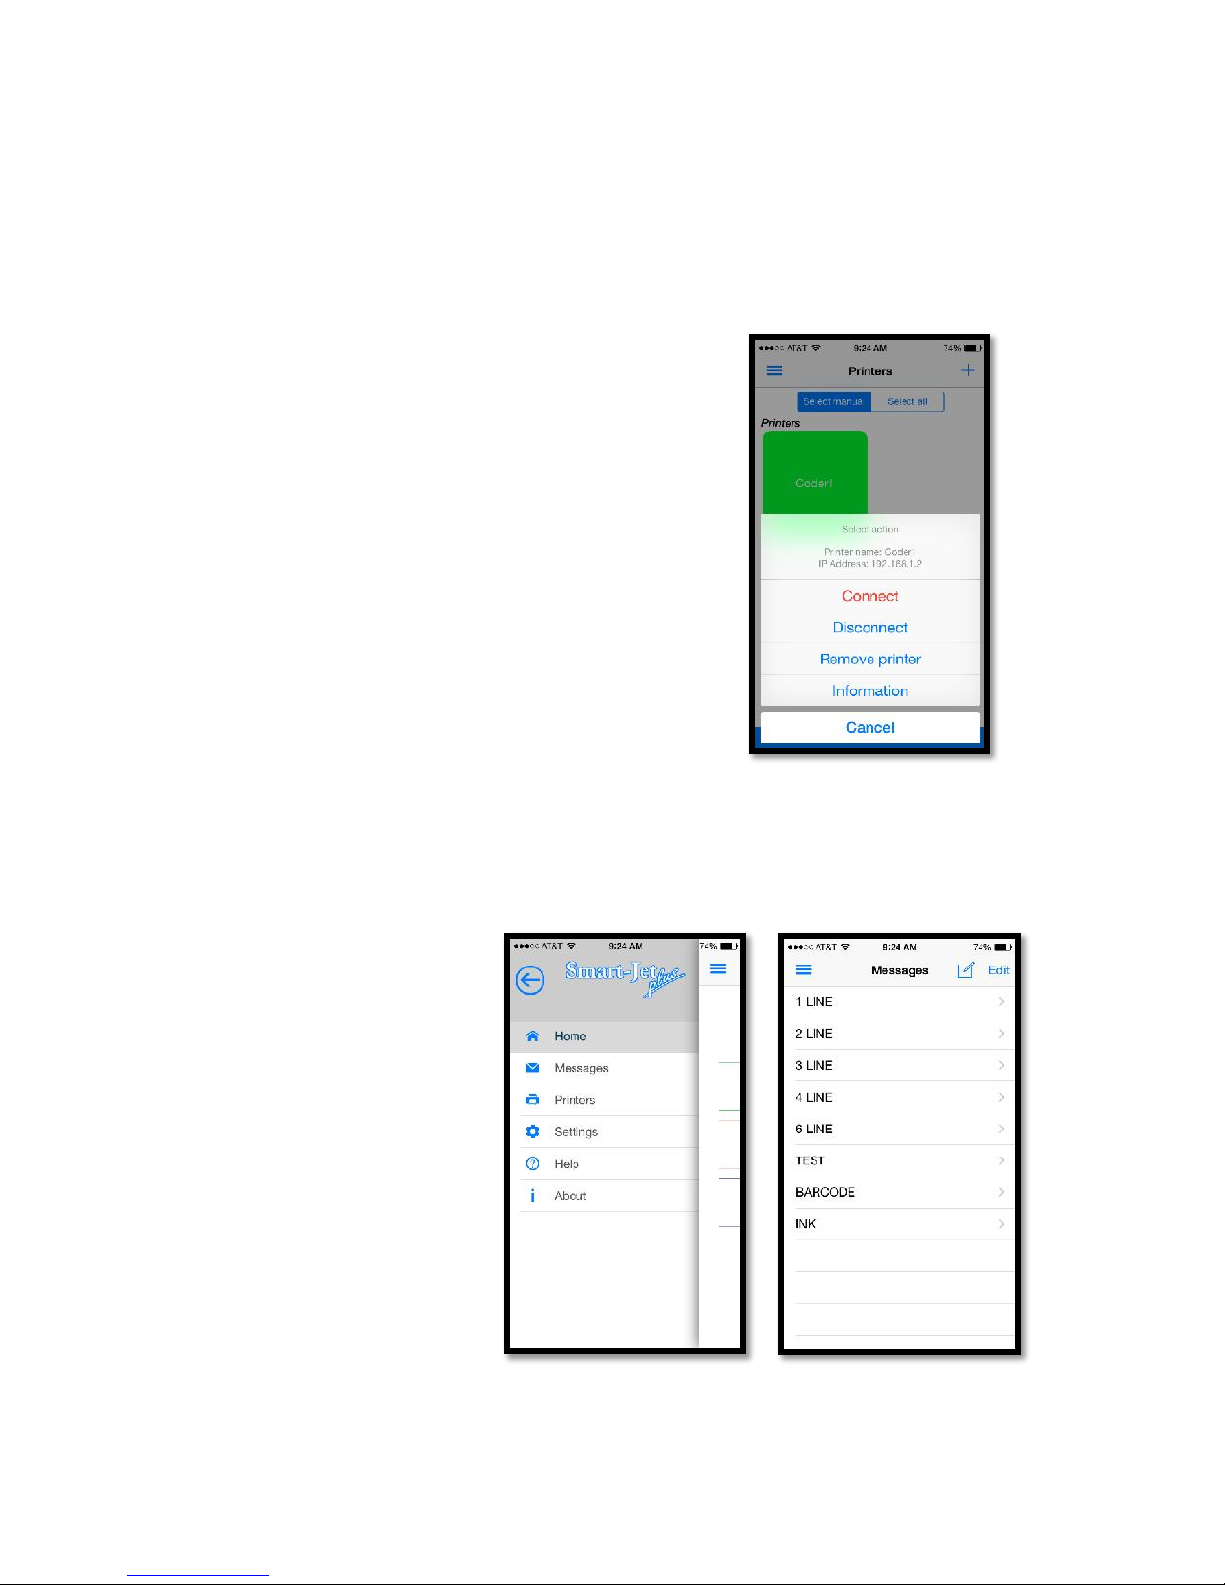
Wireless Device, Apple (iOS)
Connecting to WI-FI
In settings on the wireless device, connect to the specified WI-FI router that
is designated for the printer.
Connecting the Printer to the Device
After opening the MSSC app, go to the Printers tab and select Search on
the bottom blue bar on the screen.
A printer should appear on the screen as a blue
box with a name, select this box and a menu of
options should appear.
In this menu, select the red Connect and begin
using the printer.
This is also the location where the printer can be:
-
Disconnect: Disconnects printer from the
remote settings, further editing - would be
done by wireless keyboard.
-
Remove Printer: This removes the
printer from this device.
-
Information: The printer’s current update
and system information.
Creating a Message
In the main menu, select the Message tab.
This should bring up the
screen as shown. Click
on the blue pencil and
square icon in the upper
right hand corner.
Then select the
message type that is
most suitable for the
application.
This will bring up the
message creation
screen. This is where
the user can enter text and insert Logos, Barcodes, Counters, etc.
Finally after the message is finished the message can be named and saved
to the Message screen as shown in the picture.
68
Smart-Jet Plus Manual v04 ǀ 2015-07-30 ǀ by MSSC, LLC
Page 69
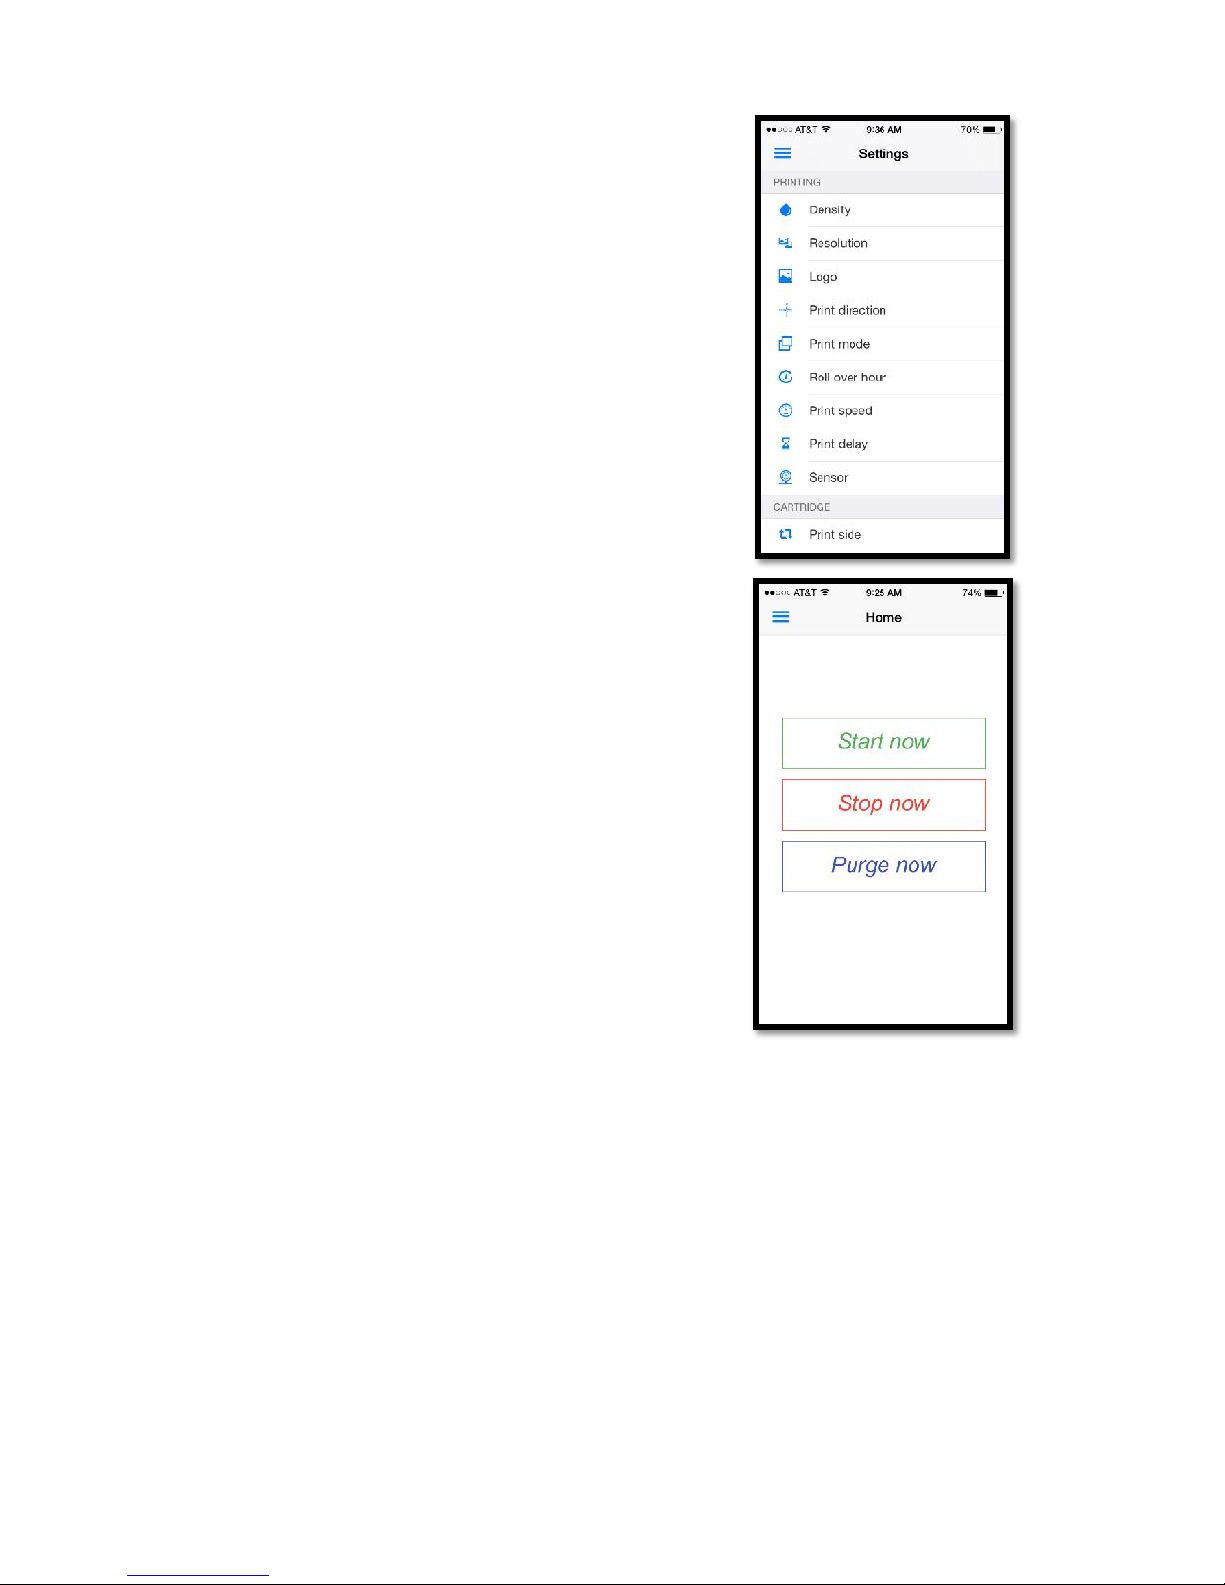
Settings
Select the Settings tab in the main menu to open
the screen as shown.
This screen functions similarly as the one on the
display of the actual printer.
It is recommended to stop printing before making
any adjustments within the printing menu.
Printing Controls
This screen resembles the same display screen
in the Operation tab on the actual printer display.
Printing head of the Smart-Jet Plus can be
controlled from this screen. The print head can
be started and stopped by using the following
tabs:
-
Start now
-
Stop now
The print head can also be cleaned by manually
clicking on the Purge now tab.
Printers
The Smart-Jet Plus allows the user to have
multiple printers saved within the Printers tab. This feature allows for easy
connecting and editing of printer settings wirelessly.
About
This screen can be used to see what updated version of firmware is
installed into the printer.
Customer service contact information is also on this page for questions on
setup difficulty on the Smart-Jet Plus.
Further Difficulties with App Installation
Refer to pages 27-28 for the connecting of compatible WI-FI routers and
app installation information.
69
Smart-Jet Plus Manual v04 ǀ 2015-07-30 ǀ by MSSC, LLC
Page 70
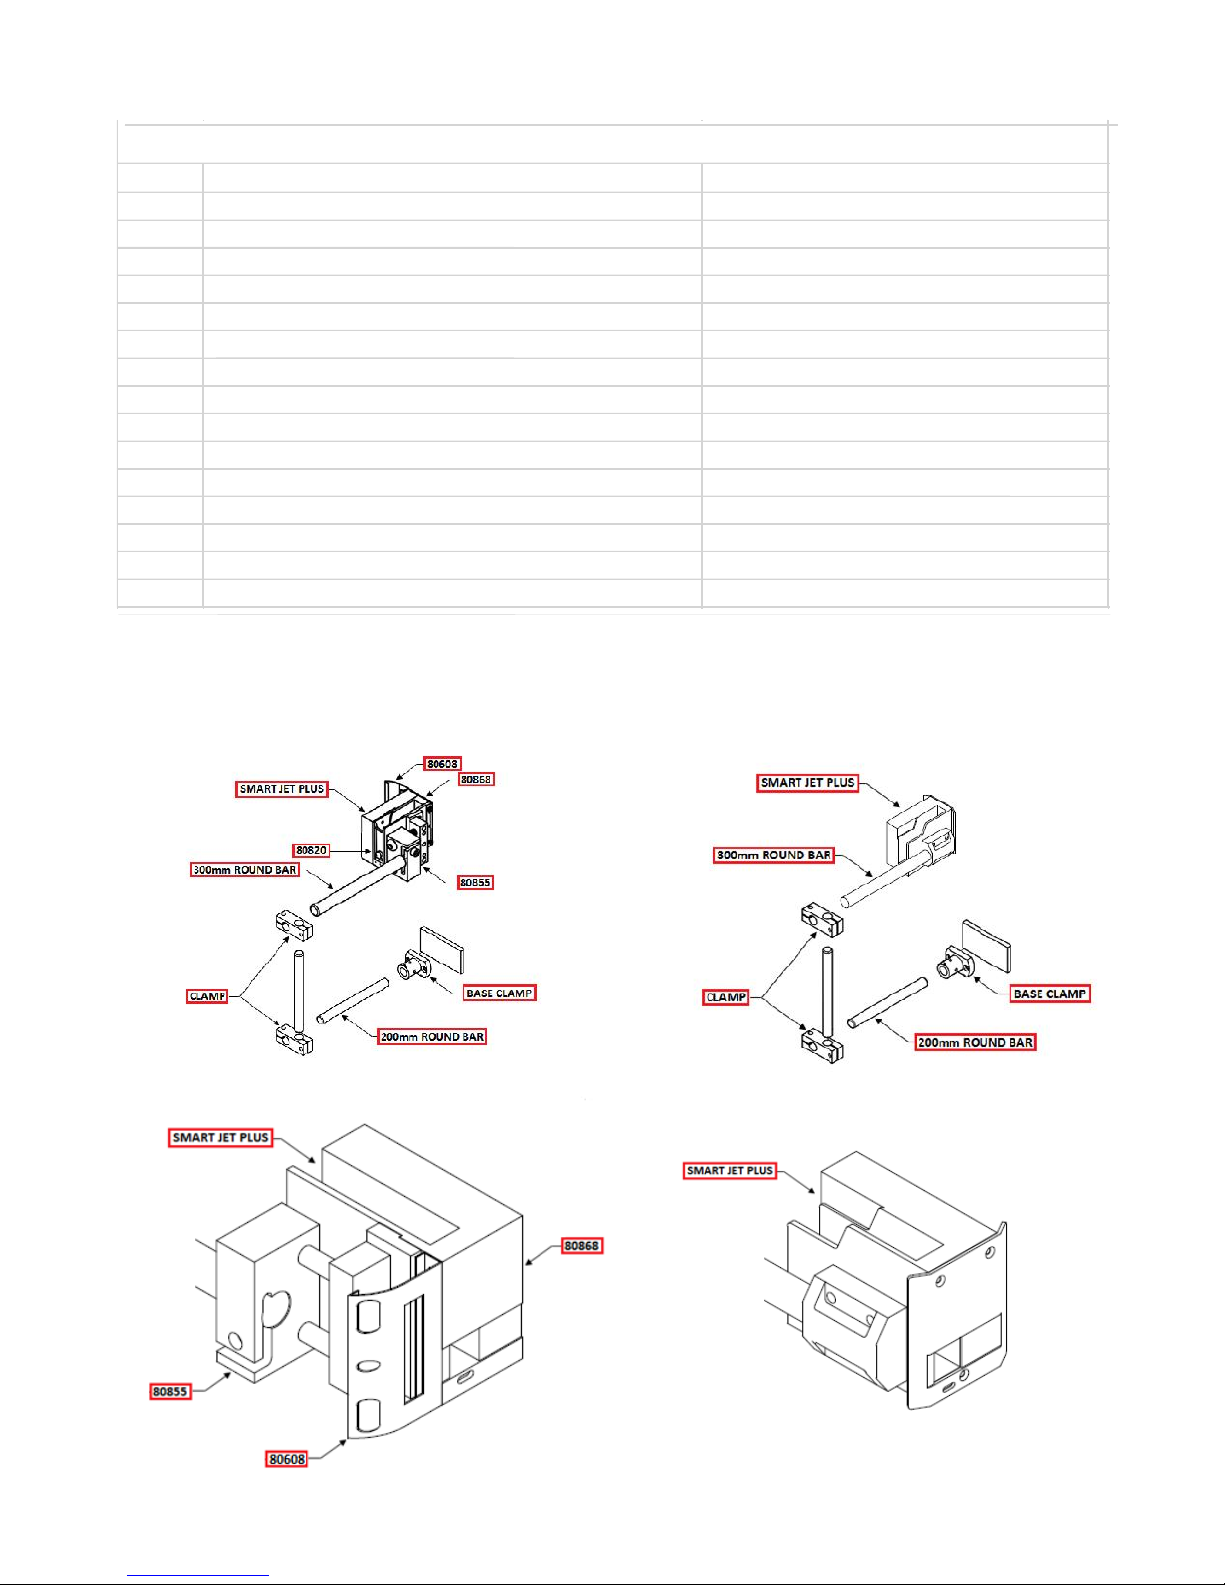
Smart-Jet Plus Replacement Parts
P/N:
Description
Included Items
80608
Smart-Jet, Skid Plate With Photo Cell Opening
Plate With External Sensor Mounting Holes
80805
Smart-Jet Print Down Bracket Kit and Fasteners
300mm Bar, Clamp, and Hardware
80815
Skid Plate and Hardware
Skid Plate and Hardware
80820
Smart-Jet Latch and Pin
Cartridge Latch and Pin Assembly
80825
Smart-Jet Conveyor Mount Bracketry Kit Complete
Complete Bracket Kit
80830
Smart-Jet Spring, Spring Loaded Mounting Assembly
Spring Loaded Mechanism
80855
Smart-Jet Spring, Slide Mechanism
Spring Loaded Printer Slider
80868
Smart-Jet Plus, Front Cover Plate
Cover Plate and Hardware
80870
Smart-Jet Plus, External Photo Cell
Externally Mounted Photo Cell
80873
Smart-Jet Plus, Power Supply
Cord with US End
80878
Smart-Jet Plus, Wireless Keyboard
Keyboard and USB
80883
Smart-Jet Plus, Main Board
Internal Main Circuit Board
80888
Smart-Jet Plus, Display Board
Internal Circuit Board With Display Screen
80955
Smart-Jet Plus, Bulk Ink Restraint
Ink Tray
80893
Smart-Jet Plus, Pen Driver Board
Internal Cartridge Board
RP Parts List
Smart Jet Plus: Current Housing Smart Jet Plus: New Housing
(S/N: SJP15261001 and Newer)
Smart-Jet Plus Manual v04 ǀ 2015-07-30 ǀ by MSSC, LLC
70
 Loading...