

Page 1
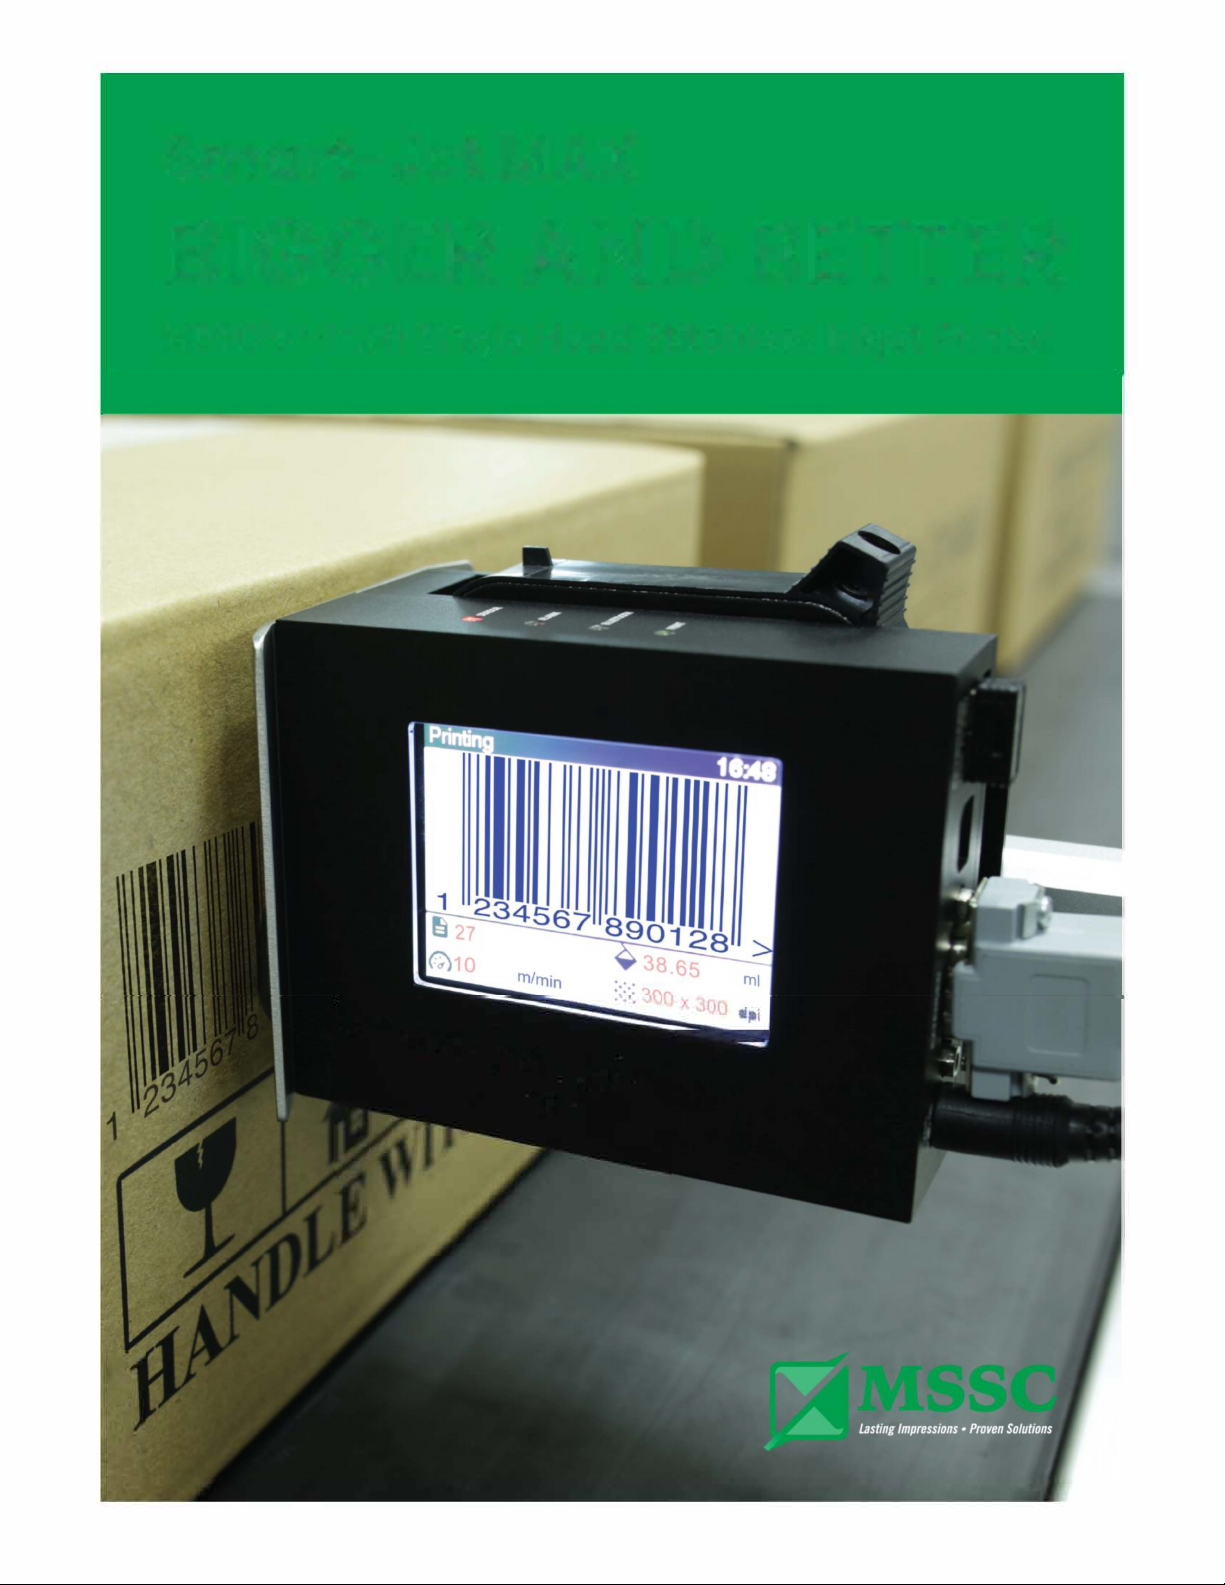
Smart-Jet MAX
BLUETOOTH TIJ INKJET PRINTER
Bluetooth Technology,
1" Tall Seamless Print Area
·
�.,
�,.
• I
S
a
r
t
-
J
e
t
•
•
�
Page 2

SAFETY INFORMATION ................................................................................................................................................................ 4
EMERGENCY CASE ....................................................................................................................................................................... 5
ENVIRONMENT PROTECTION ..................................................................................................................................................... 5
PRODUCT WARRANTY................................................................................................................................................................. 5
ABOUT MACHINE ......................................................................................................................................................................... 6
TECHNICAL SPECIFICATIONS .......................................................................................................................................................... 7
Machine details ............................................................................................................................................................................ 7
Keyboard ........................................................................................................................................................................................ 7
MACHINE OVERVIEW ....................................................................................................................................................................... 8
Indicator LED ................................................................................................................................................................................. 8
Connecting Port ........................................................................................................................................................................... 8
Keyboard ........................................................................................................................................................................................ 9
Operation menu on machine .................................................................................................................................................. 9
INSTALLATION PROCEDURES ................................................................................................................................................... 12
GETTING STARTED ...................................................................................................................................................................... 12
EXTERNAL DEVICES CONNECTIONS ...................................................................................................................................... 12
EXTERNAL SENSOR ........................................................................................................................................................................... 12
ENCODER .......................................................................................................................................................................................... 13
COMBINE EXTERNAL SENSOR AND ENCODER ......................................................................................................................... 14
ALARM ............................................................................................................................................................................................... 15
INPUT AND OUTPUT ......................................................................................................................................................................... 16
QUICK START UP ........................................................................................................................................................................ 16
REQUIRED COMPONENTS ............................................................................................................................................................. 16
Setup machine ........................................................................................................................................................................... 16
Keyboard setup .......................................................................................................................................................................... 17
Setup external devices (Optional) ........................................................................................................................................ 17
Create first messages ................................................................................................................................................................ 17
FIRMWARE INTRODUCTION ..................................................................................................................................................... 18
MESSAGE.............................................................................................................................................................................................. 18
OPERATION .......................................................................................................................................................................................... 25
SETTINGS ............................................................................................................................................................................................... 26
UPDATE FIRMWARE INSTRUCTIONS ....................................................................................................................................... 33
Prepare USB flash ....................................................................................................................................................................... 33
Update firmware ........................................................................................................................................................................ 34
Page 3

Update logo ................................................................................................................................................................................ 34
Update font Latin ....................................................................................................................................................................... 35
Update font Chinese................................................................................................................................................................. 35
Machine default ........................................................................................................................................................................ 35
Page 4

SAFETY INFORMATION
You must STOP the machine before inserting / removing the cartridge.
Avoid using with high voltage, this can cause damage to the coder.
Limit exposing the coder to dusty working environments.
The working temperature of the coder is 5°C – 50°C (41°F - 122°F).
Turn off printer before plugging in or unplugging any cable (ENCODER / SENSOR / IO).
Be careful using other external devices such as: ENCODER / SENSOR / ALARM
BEACON / POWER SUPPLY.
Do not use other cartridges that are not supplied by MSSC.
Be careful updating firmware and software.
Use gloves to avoid the sharp corners from the mounting brackets.
Recommend the use of a mask and glasses to avoid ink fling in the air.
Do not cover the ventilation.
Do not expose to excessive heat sources, sunshine, fire or the like.
For indoor use only. The apparatus shall not be exposed to moisture.
The socket-outlet shall be installed near the equipment and shall be easily accessible.
There are no user replaceable parts inside, refer servicing to manufacturer specified
agency or qualified service personnel.
Only use accessories or battery specified by the manufacturer.
Disposal: all electrical and electronic products including batteries should be disposed
of separately from the municipal waste stream via designated collection facilities
appointed by the government or the local authorities.
Use only the power supply listed in the user instructions. Power supply adapter
manufacturer: MEAN WELL ENTERPRISES CO., LTD., MODEL NO.: GS60A12-P1J or
EDACPOWER ELECTRONICS CO., LTD., MODEL NO.: EA10681N-120
USER MANUAL V2.2 | October 10, 2019 4
Page 5
EMERGENCY
IN THE OCCURANCE OF SMOKE, FIRE, EXPLOSIVE SOUND,
CONTINUOUS PRINTING OUT OF CONTROL, ETC.
PLEASE REMOVE THE POWER SUPPLY IMMEDIATELY!
ENVIRONMENT PROTECTION
DO NOT THROW PRINTER/
INK INTO RECYCLE BIN
PRODUCT WARRANTY
Limited warranty. The housing and circuit board for each printer is warranted to be free
from defects in materials and workmanship for a period of twelve (12) months from the
bill of lading date. This limited warranty does not apply to spare parts, authorized inks, or
cartridges, or to housings and circuit boards that experience problems resulting from
misuse, tampering or improper storage.
The warranty is VOID if:
Any non-original parts and unapproved OEM inks are used.
The product has been altered or modified without approval from us.
Print head damage is a result of improper installation.
Damage occurs from an accident, such as but not limited to, being dropped, being
sprayed with water or other liquids, caused by a natural disaster, caused by stocking
or shipping conditions.
Unapproved, wrong or unstable power supply is used.
USER MANUAL V2.2 | October 10, 2019 5
Page 6

ABOUT MACHINE
Thank you for purchasing the SMART JET MAX Thermal Inkjet Coder, a product of
MSSC, USA. This printer is designed for package printing applications powered by
Thermal Inkjet Technology.
This machine produces crisp text, logos, variable data and barcodes on porous and
non-porous media by automatically recognizing aqueous and solvent inks and
applies the appropriate printing parameters. The complete system includes one
machine, power supply with On/Off switch, wireless keyboard, mounting brackets for
operation.
USER MANUAL V2.2 | October 10, 2019 6
Page 7
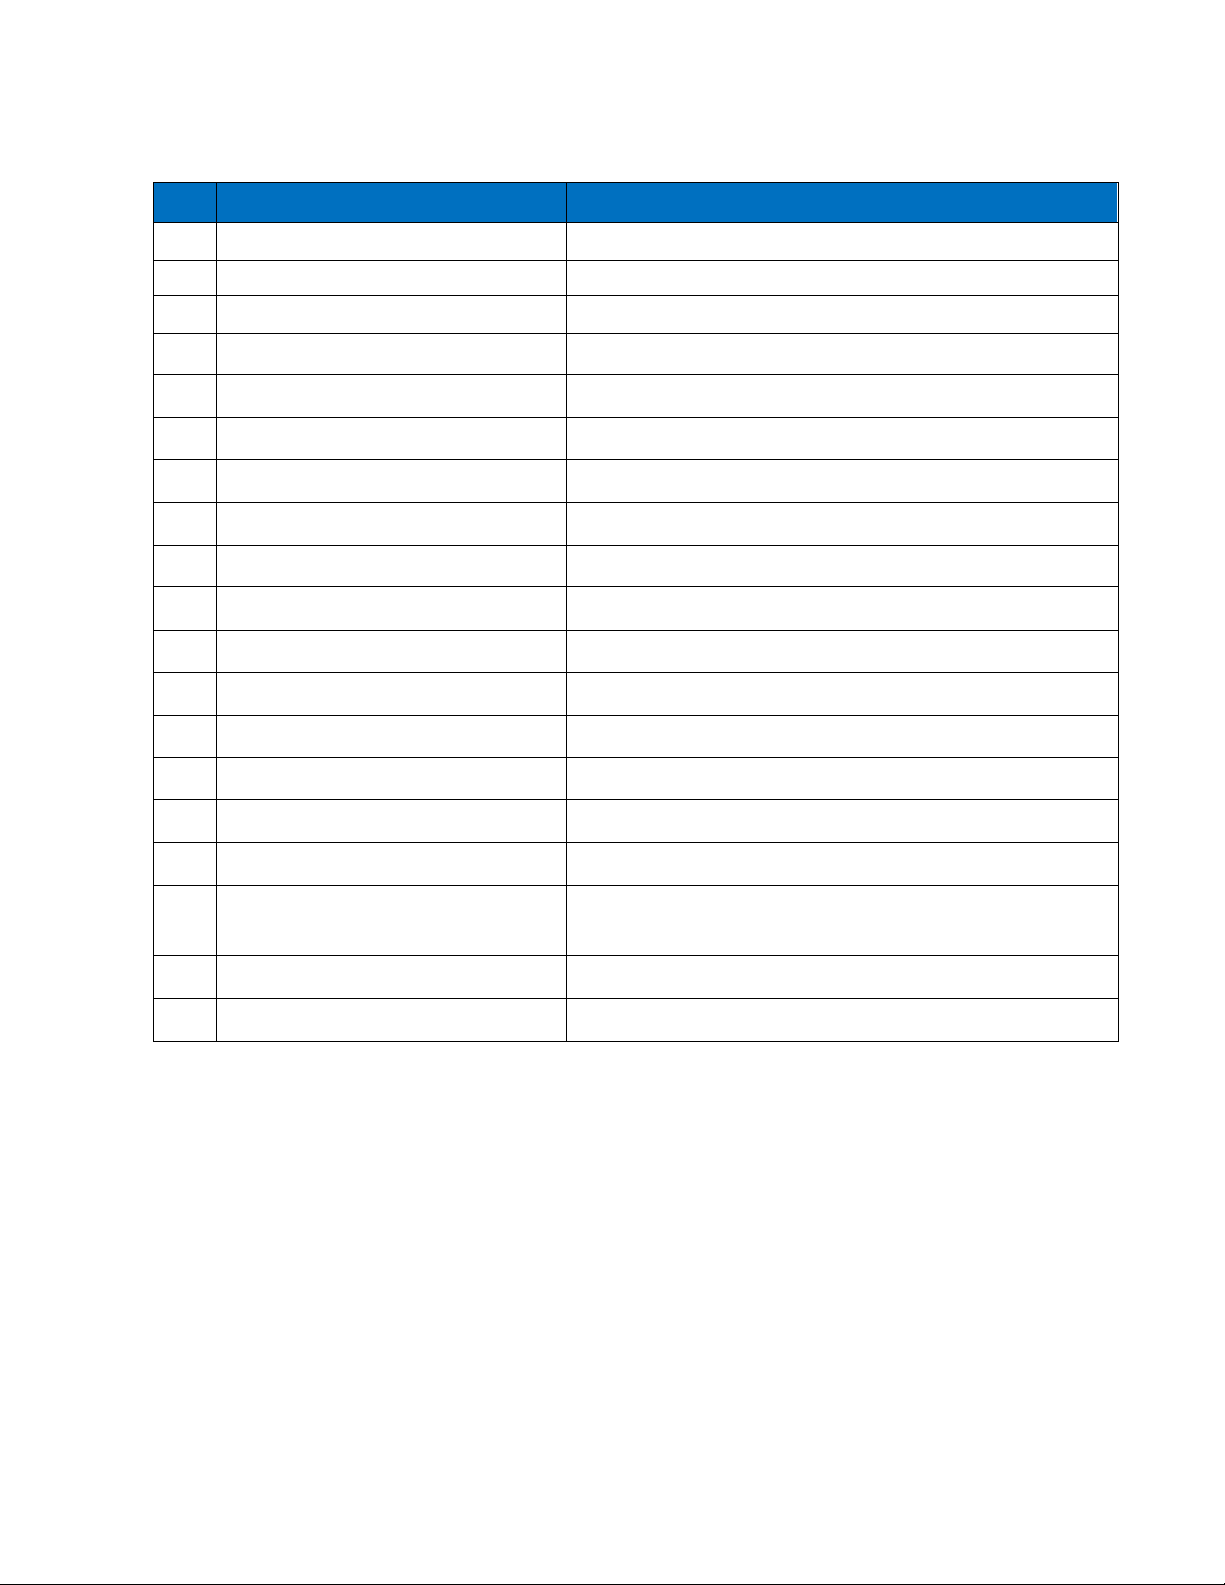
TECHNICAL SPECIFICATIONS
NO
DESCRIPTION
SPECIFICATIONS
1
Model
SMART JET MAX
2
Display
LCD 2.8” automatic rotation
3
Dimensions (LxWxH)
110 x 74.5 x 92.5 mm / 4.33 x 2.93 x 3.64 inches
4
Weight
5
Power supply
12V DC - 5A
6
Maximum power consumption
60W
7
Maximum printing resolution
300x300 dpi
8
Print speed
76m/min @ 300x300 dpi
9
Optical density
5 levels
10
Operation selection
Wireless keyboard
11
Message memory
100 messages
12
Ink solution
Aqueous and Solvent
13
Menu language
Multiple / selectable
14
Printable characters
Windows true fonts
15
No. of lines
Maximum 8 lines
16
Character height
Maximum 25.4 mm / 1 inches
17
Printability
Alphanumeric, logos, date, time, expiry date,
Julian date, shift code, database and barcodes
18
Operating temperature
19
External connections
External sensor, encoder, alarm kit, etc…
Machine details
405g (~1 lb.)
Keyboard
The Machine is currently compatible with all wireless 2.0 keyboards available on
the market.
USER MANUAL V2.2 | October 10, 2019 7
50C – 500C (410F - 1220F)
Page 8

MACHINE OVERVIEW
ITEMS
DETAIL
[1] SENSORS
[2] ALARM
Remains ON to indicate error
[3] BLUETOOTH/PC
Remains ON when being connected
[4] PRINT
Indicator LED
Connecting Port
Default does not recognize black conveyor
Internal sensor: Red light
External sensor: Green light
Sensor light is activated when it receives a signal
Remains ON when in printing mode
USER MANUAL V2.2 | October 10, 2019 8
Page 9
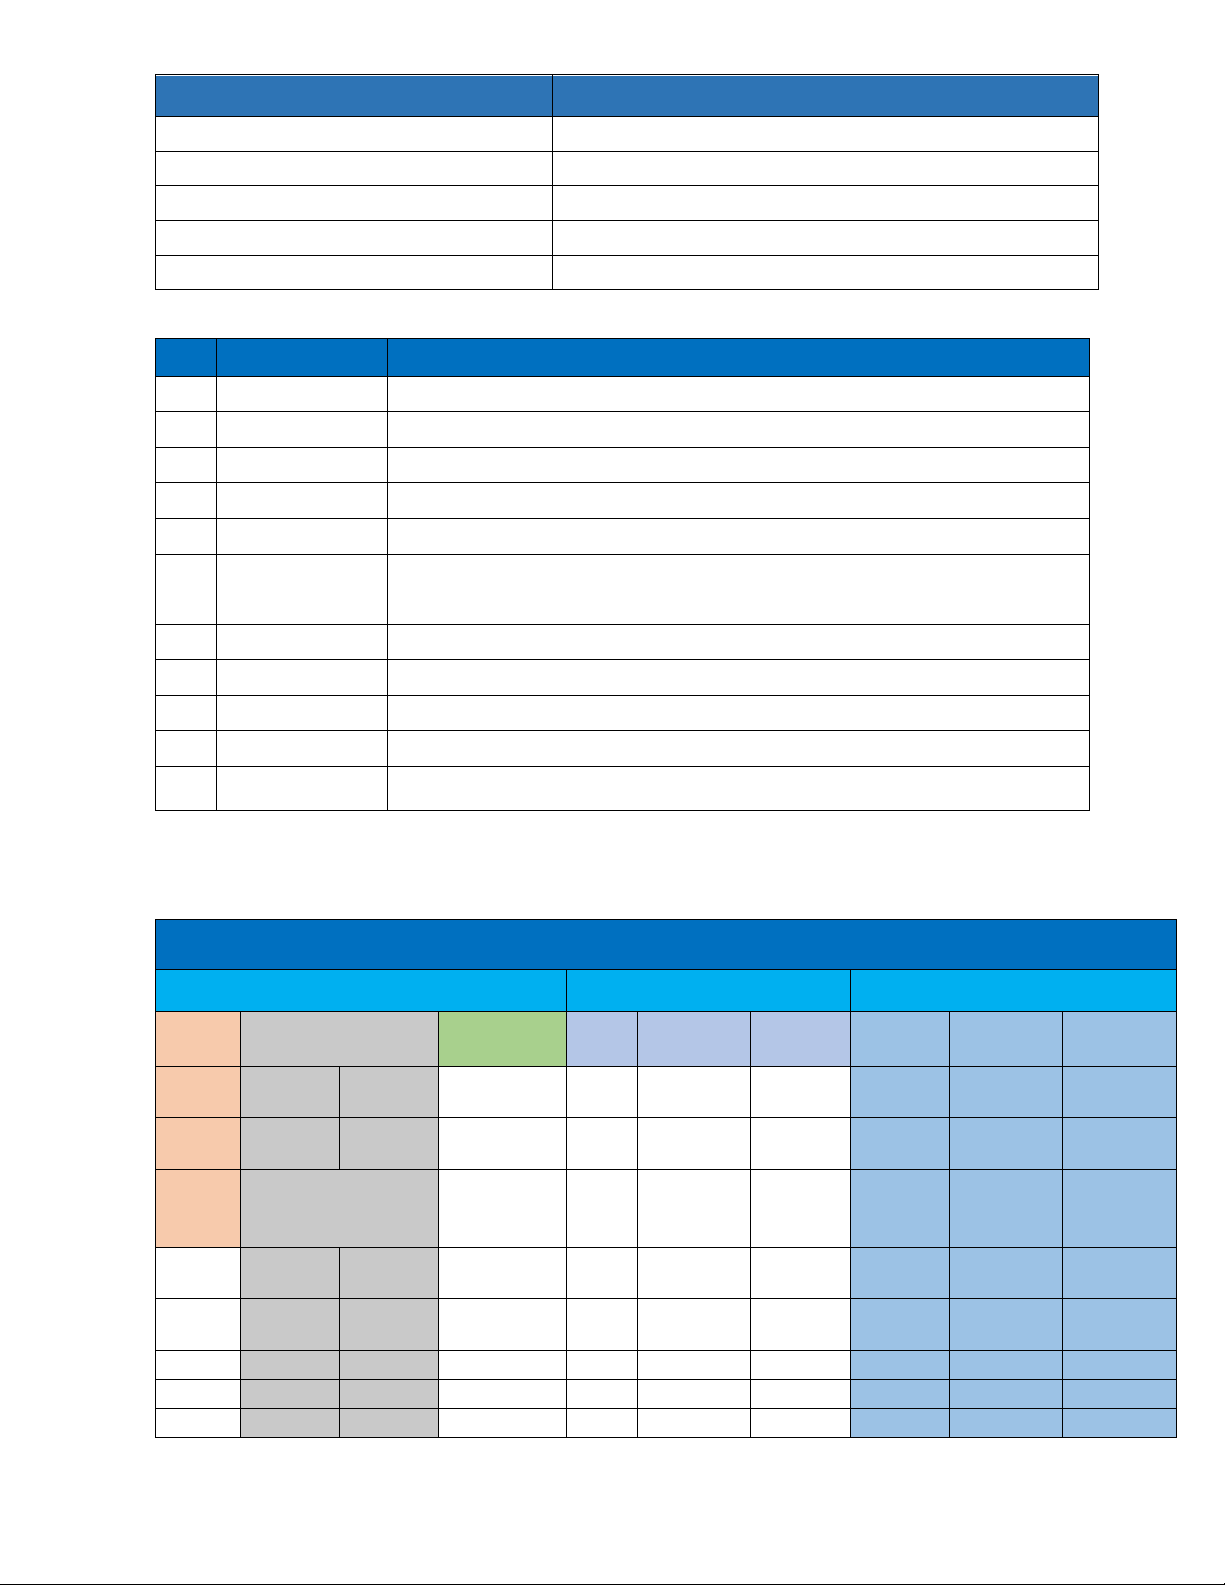
ITEMS
DETAIL
[1] USB FLASH
USB 2.0 flash for updating firmware, fonts and logo
[2] USB KEYBOARD
For USB 2.0 wireless keyboard receiver
[3] USB PC
For PC connection with USB 2.0 cable A-B
[4] DB15 EXTENDED
Extend port for external sensor, encoder, alarm, etc…
[5] 12VDC
Power supply
Keyboard
NO
KEY
USE
1
Enter
Confirm, save or apply
2
ESC
3
/
Move your cursor to left/right
4
/
Move your cursor up/down
5
Shift
Press and hold “Shift” to input capitalized characters
6
Insert
Press “Insert” to insert Symbol, Logo, Counter, Date, Expired,
Time, String, Barcode and Shiftcode into the message
7
Backspace
Delete your message from the left
8
Tab
Move your cursor faster
9
Home/End
Move your cursor to Home/End
10
Caps lock
Uppercase font
11
F4
Insert suomi symbol
Main Menu
Message
Operation
Setting
Open
Create new
Information
Purge
Start/Stop
Connect
PC
Encoder
Resolution
Density
Use
Latin
Chinese
Delay
Cartridge
Update
Logo
Edit
Select
font
Select
size
String
Auto Jet
Sensor
Delete
Insert Menu
(Popup menu when
press Insert)
Direction
Print Mode
Unit
Symbol
Logo
Bluetooth
Update
Font
Rollover
Counter
Date
System
time
Rotate
Password
Expired
Time
Default
Advance
Language
String
Barcode
IO Signals
Reset
Backup
Shiftcode
Restore
About
Go to previous screen
Operation menu on machine
From the main screen of machine, use arrow keys to move the cursor to the desired
object. Press Enter to save and apply settings. Otherwise, press ESC.
USER MANUAL V2.2 | October 10, 2019 9
Page 10
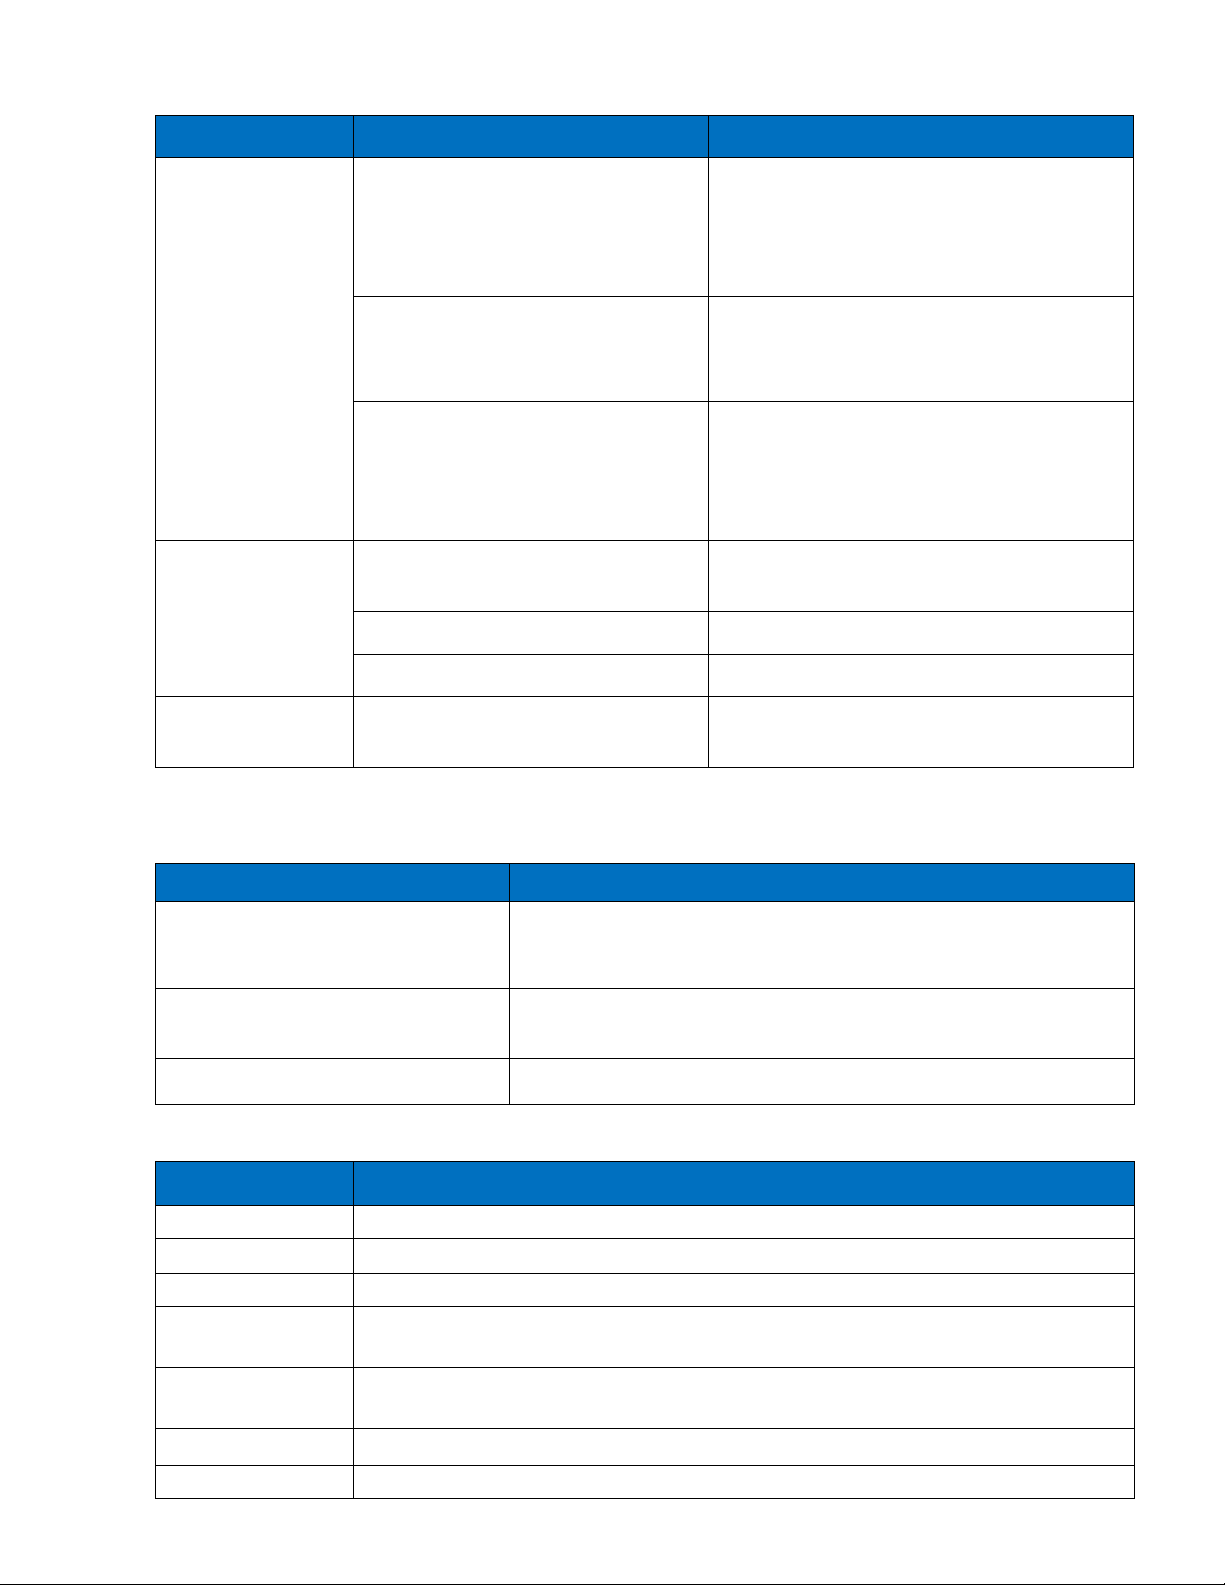
Message
MENU
SUB MENU
DESCRIPTION
Create new
Latin / Chinese
Select font
Select size
Insert menu (Symbol, Logo,
Counter, Date, Expired, Time,
String, Barcode and Shift
code)
Insert some needed component to
your messages.
Open
Use
Use the existing messages on the
machine memory for printing.
Edit
Edit the existing message.
Delete
Delete existing messages.
Information
Show all information needed to
monitor your printing process.
MENU
DESCRIPTION
Start / Stop
Start or Stop printing job. Combine and press CTRL +
SHIFT + ENTER on keyboard to fast Start / Stop print.
Purge
Connect PC / Disconnect PC
Coming soon!
MENU
DESCRIPTION
Encoder
Resolution
Set your desired resolution
Density
Set optical density of the print
Delay
Cartridge
Update Logo
Update logo from USB to the machine memory
String
Select type of font you need to use
in messages. Supports two kinds of
font: Uppercase font and Normal
font.
Select size of characters: supports up
to 6 sizes with Latin font and 5 sizes
with Chinese font.
Operation
Settings
All of nozzles on the cartridge will push out ink. After
purging you will see 1 vertical line of ink on substrate.
Set a fixed print speed for the machine or enable external encoder
Set the distance from when the sensor receives signal to the start of
printing and the delay distance after the printer completes a print.
Display the current level of ink in the cartridge and the current
type of cartridge in the machine.
Set a repeated string of data to insert into the message
USER MANUAL V2.2 | October 10, 2019 10
Page 11
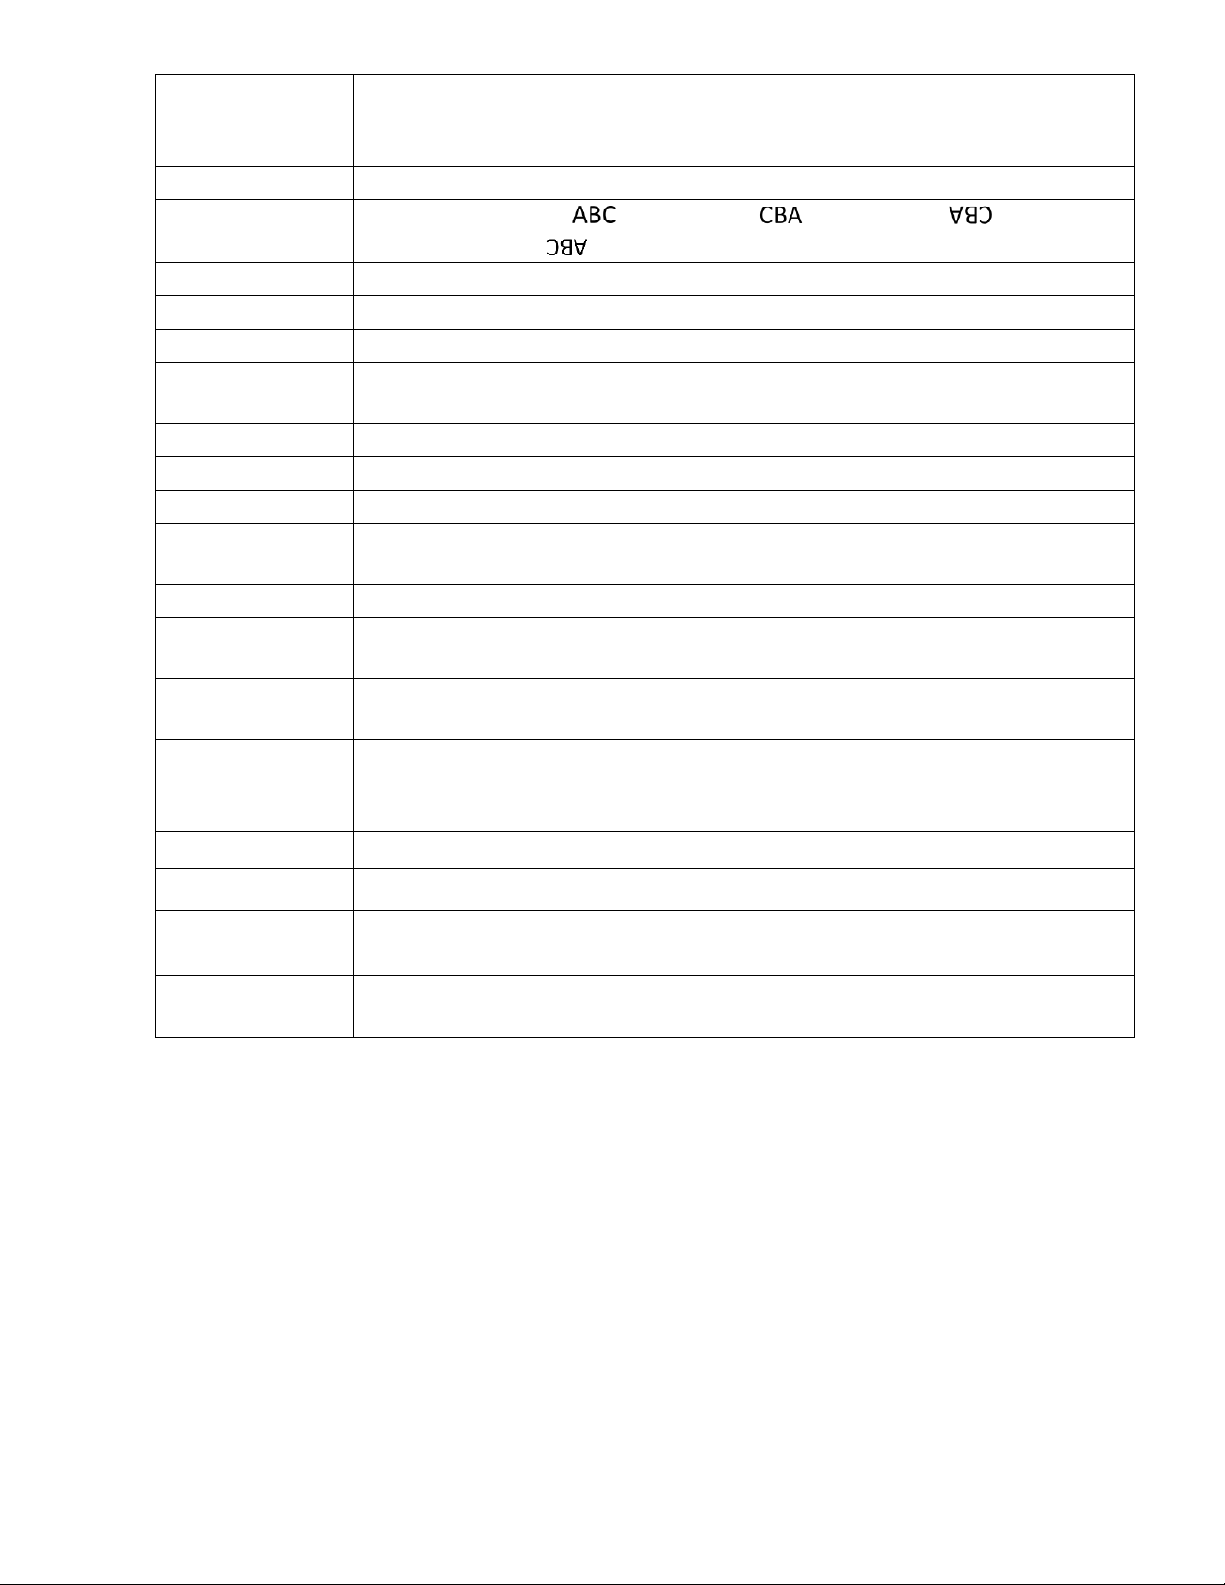
Auto Jet
Prevents the print head from clogging due to the extended down
Sensor
Select External or Internal sensor
Direction
Set print direction: : left to right, : right to left, : reverse
left to right and : reverse right to left
Print Mode
Unit
Select desired measurement Inch/Millimeter
Bluetooth
Coming soon!
Update Font
Roll over
Set different date depending on specific production hour
System time
Set time and date for your system clock
Rotate
Select your screen modes: Auto-rotate or Lock rotate
Password
Set to authorize different level of users or to protect the machine from
unauthorized users. Default is 1234567890
Default
Reset machine to factory default
Language
IO signals
Reset
Backup
Restore
Calibrate
voltage
About
time between prints. This will be useful when you print with solvent
base ink with shorter decap time
Select printing mode: Sensor mode and Continuous mode
Update different font styles for machine via USB flash loaded with all
firmware files
Select your interface language and add new language from USB
flash
The extend button is to re-start the machine. This will help in some
special applications
Reset the value of the counter variable in a message. The memory
of the counter will save the current value of counter when print is
stopped or the machine is turned off
Export font, logo, languages and settings files to usb flash
Import font, logo, languages and settings files from usb flash
Calibrate the firing voltage and its pulse width within allowed range
Display current firmware version on the printer and allow you to
update new firmware onto the machine
USER MANUAL V2.2 | October 10, 2019 11
Page 12
INSTALLATION PROCEDURES
See QUICK GUIDE.
GETTING STARTED
Install the machine on your conveyor according to the installation instructions. See the Quick
Guide for more information.
Set print direction and appropriate throw distance to obtain best print quality (1-3 mm).
Insert ink cartridge.
Plug the power cord into an appropriate power source to start up the machine.
Insert keyboard receiver to keyboard port, turn on wireless keyboard.
EXTERNAL DEVICES CONNECTIONS
NOTES:
Machine is able to operate with External Sensor, Encoder,
your supplier for further support on the settings and connections.
To connect machine with External Sensor, Encoder, Alarm, etc…, additional connector
DB15 (male) will be required.
or
Alarm at a
ny
time. Consult
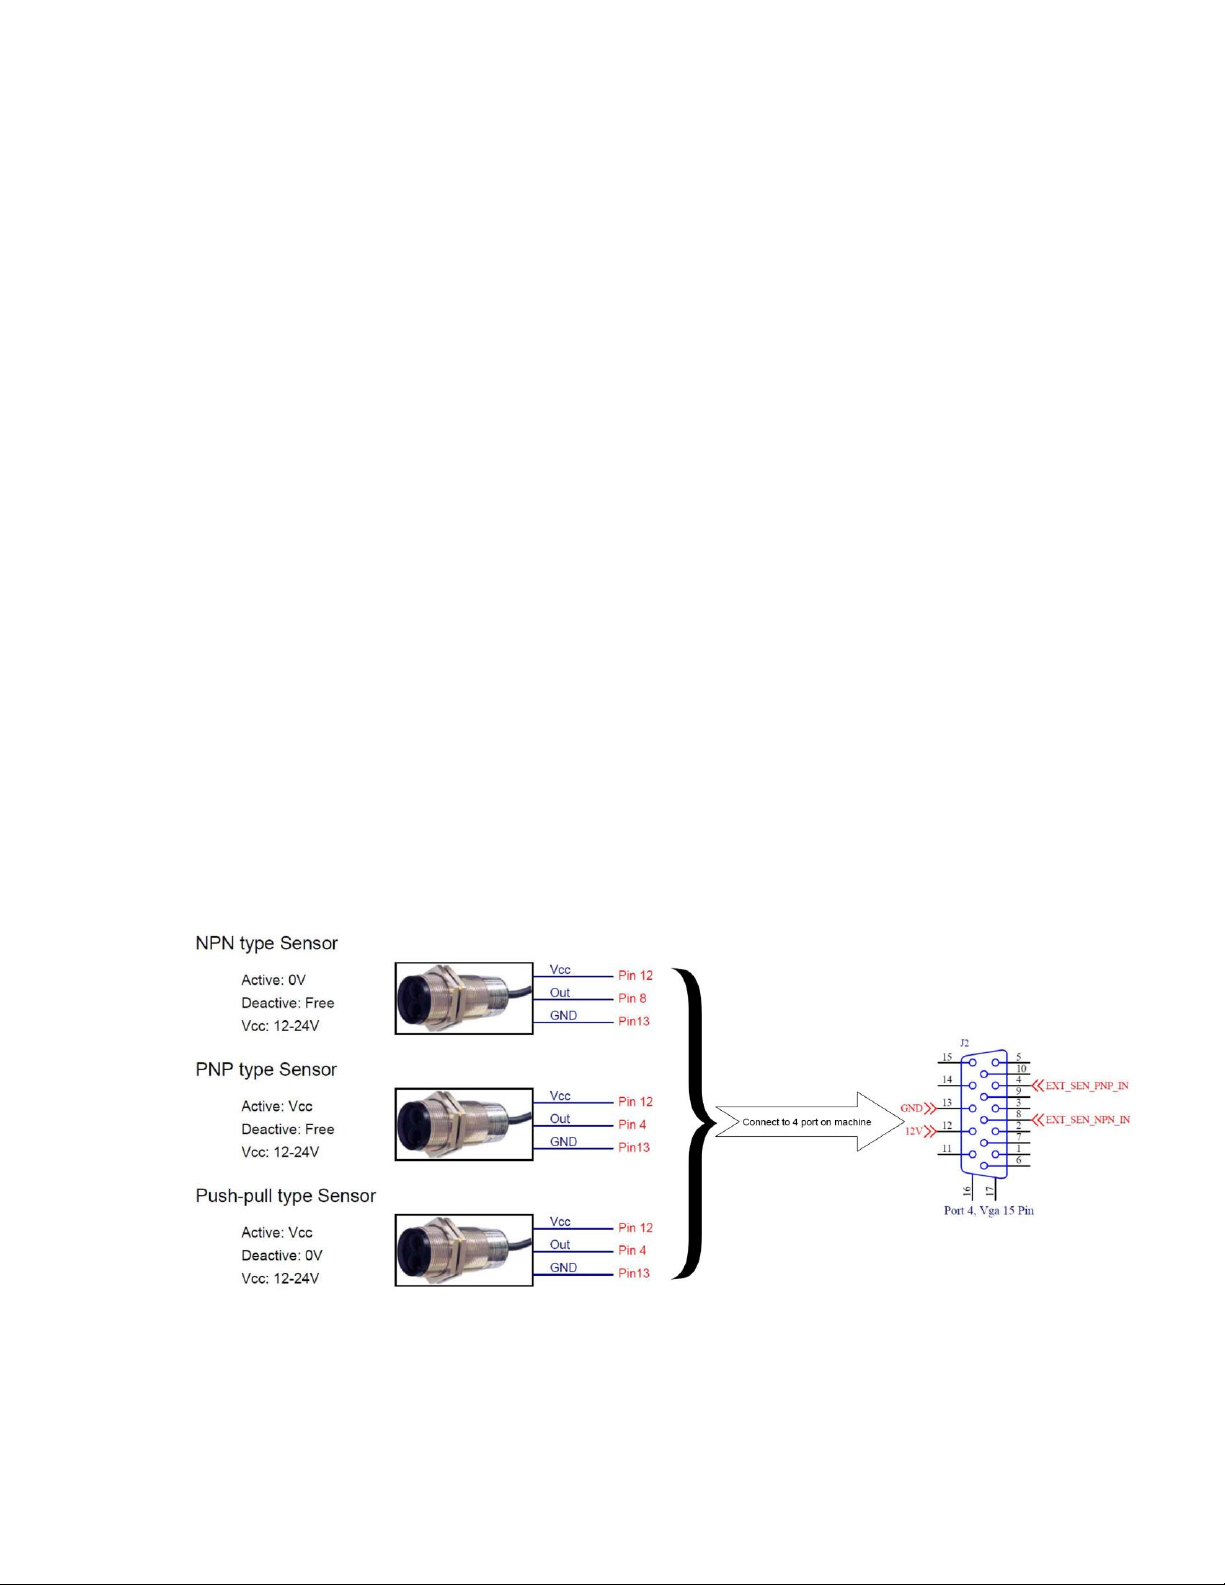
EXTERNAL SENSOR
Machine supports NPN, PNP and Push-pull sensor types.
Connect sensor using power supply on machine.
Connect sensor to machine using external power supply. The demonstration below
is for an external power supply of 5V.
USER MANUAL V2.2 | October 10, 2019 12
Page 13
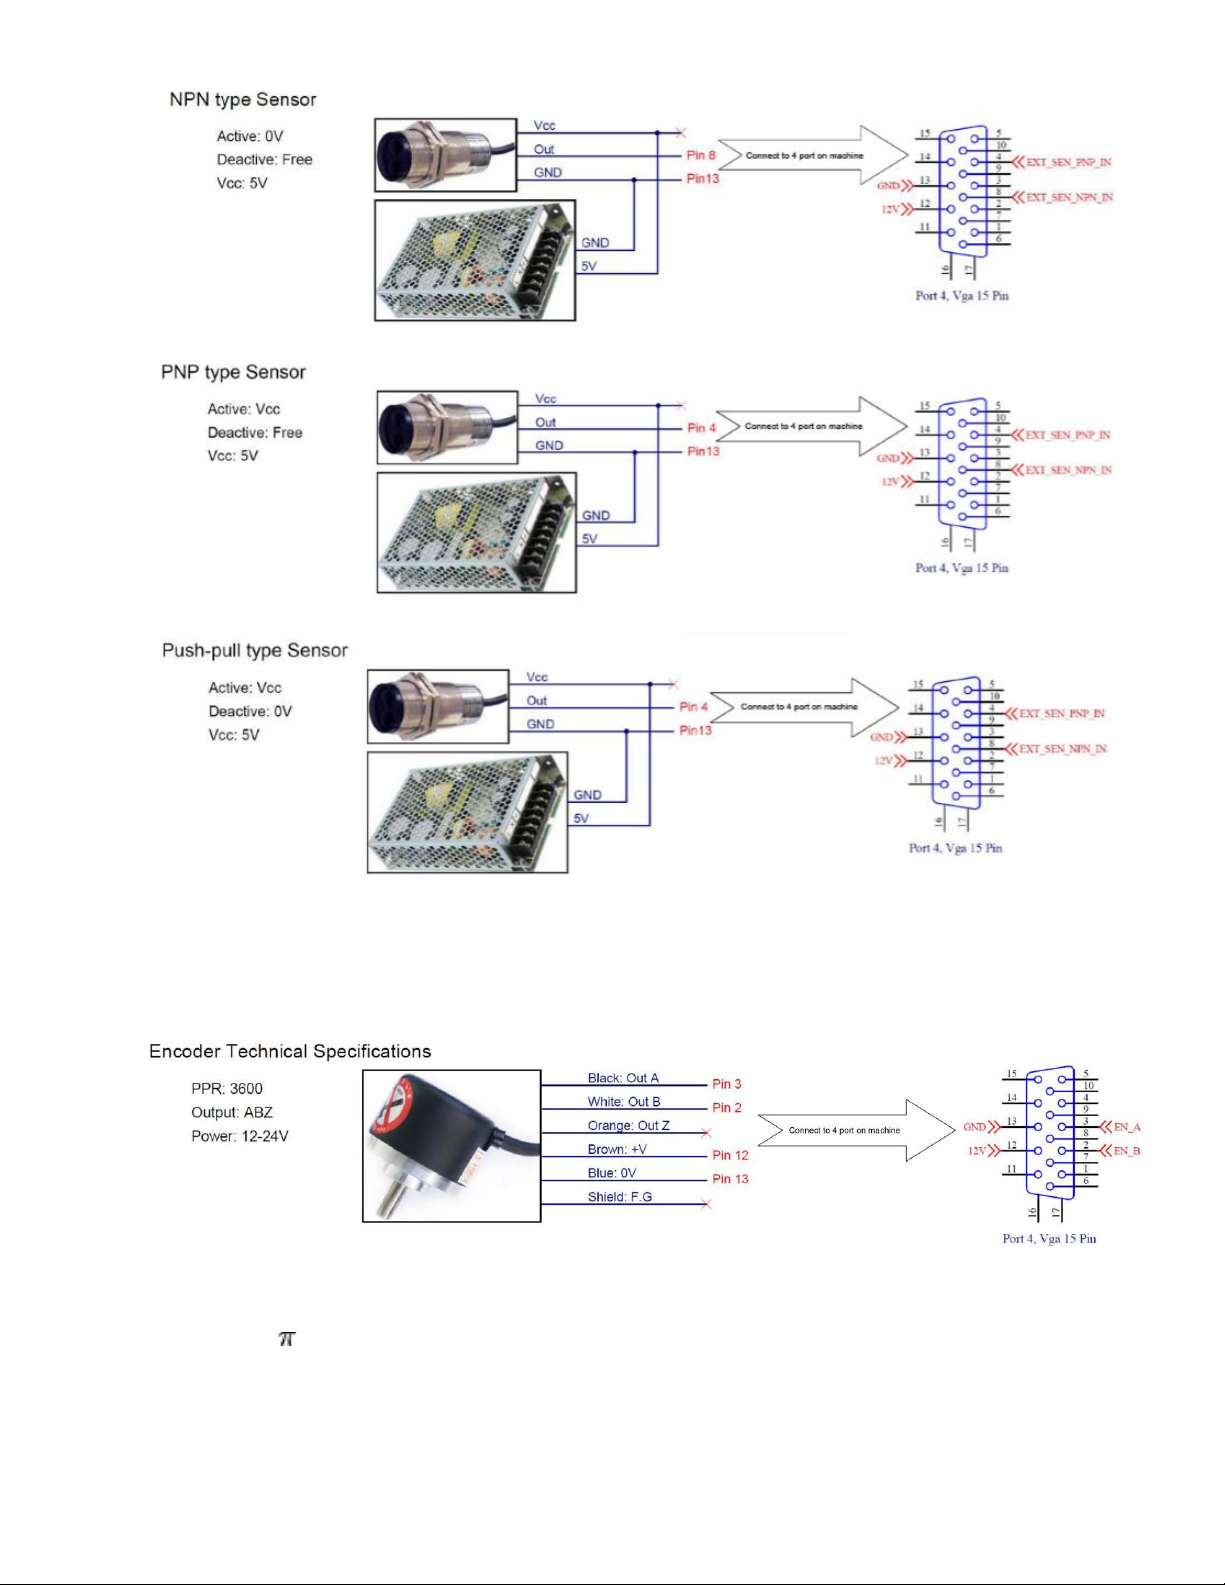
ENCODER
An encoder is recommended to ensure the best print quality if a conveyor has any speed
variations.
To calculate wheel diameter (D) depend on resolution (R) is:
D = R/( x 600) (inches).
Example: Encoder has R = 3600 (PPR),
D = 1.90985 inches ~ 48.5 mm.
USER MANUAL V2.2 | October 10, 2019 13
Page 14
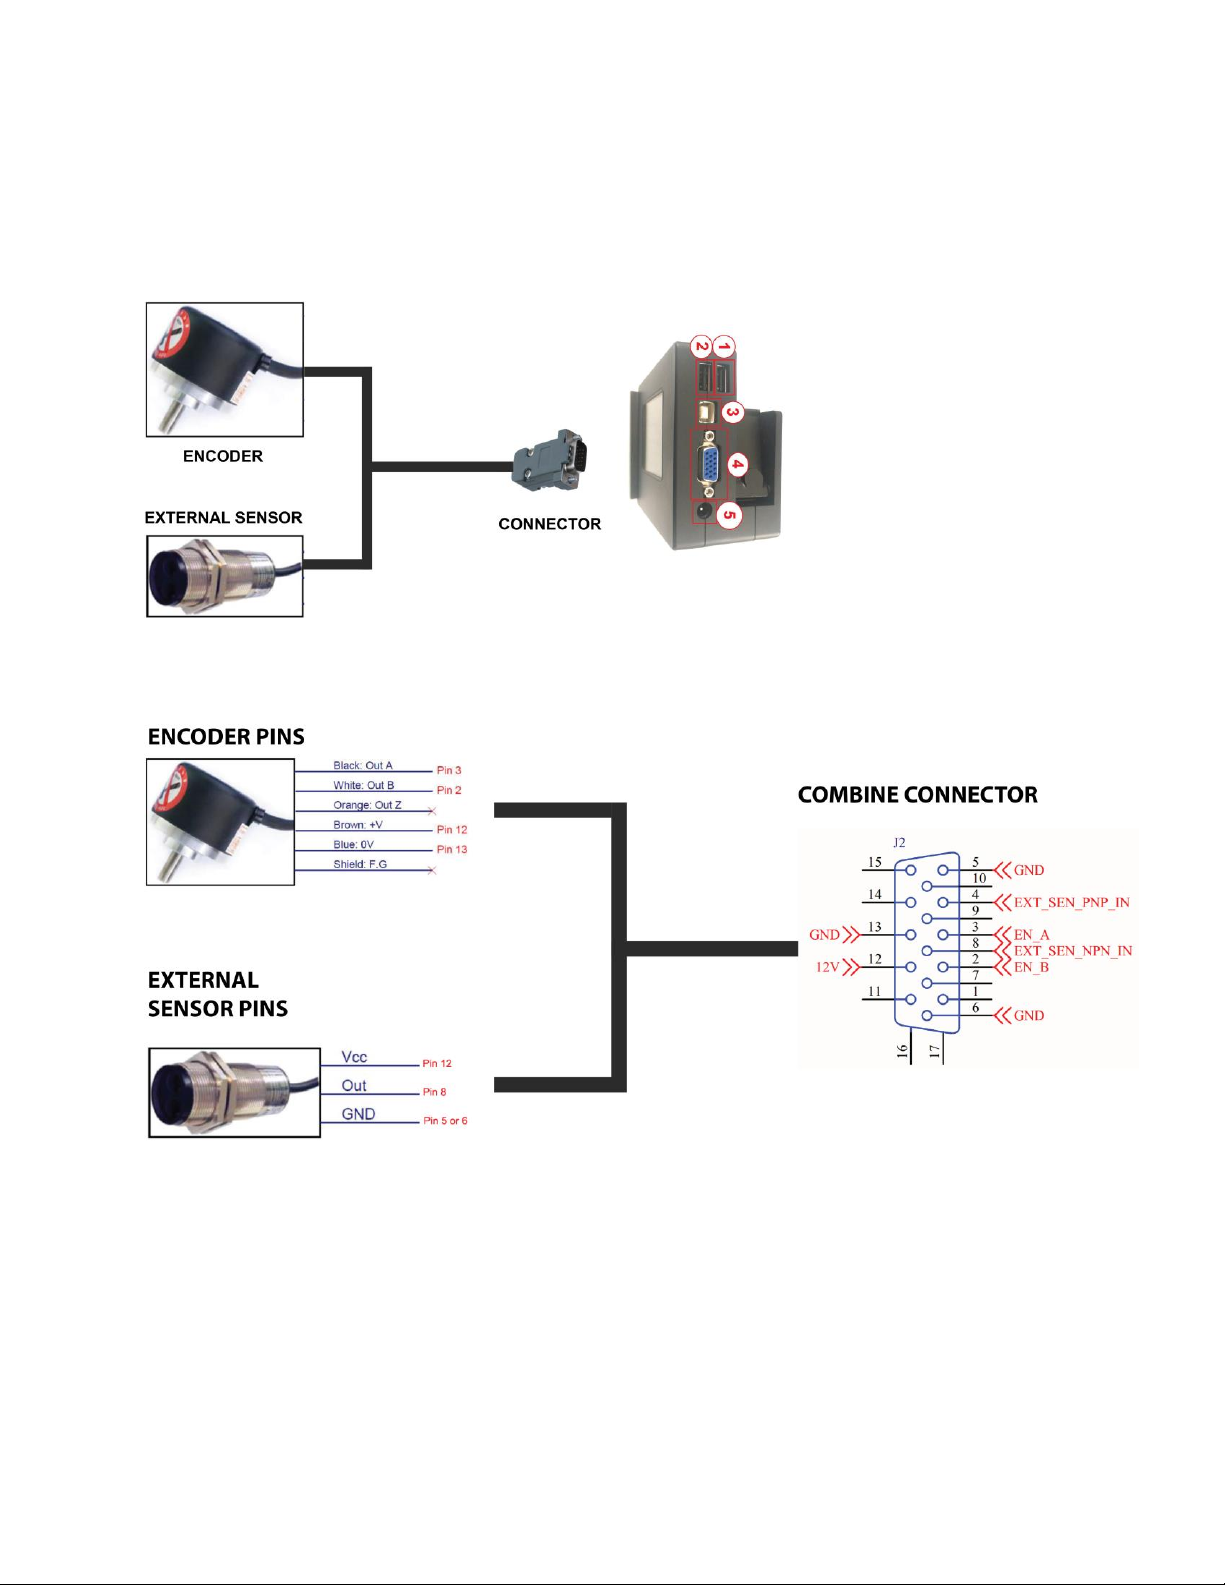
COMBINE EXTERNAL SENSOR AND ENCODER
In some cases you may need to use an external sensor and encoder to get perfect printing
results but the machine only has one extended port. Please connect per the following
instructions to make external sensor and encoder work together with machine.
See picture for this situation.
See this picture for connection pins.
NOTES:
PIN12 (12V) use for both Encoder and External sensor.
USER MANUAL V2.2 | October 10, 2019 14
Page 15
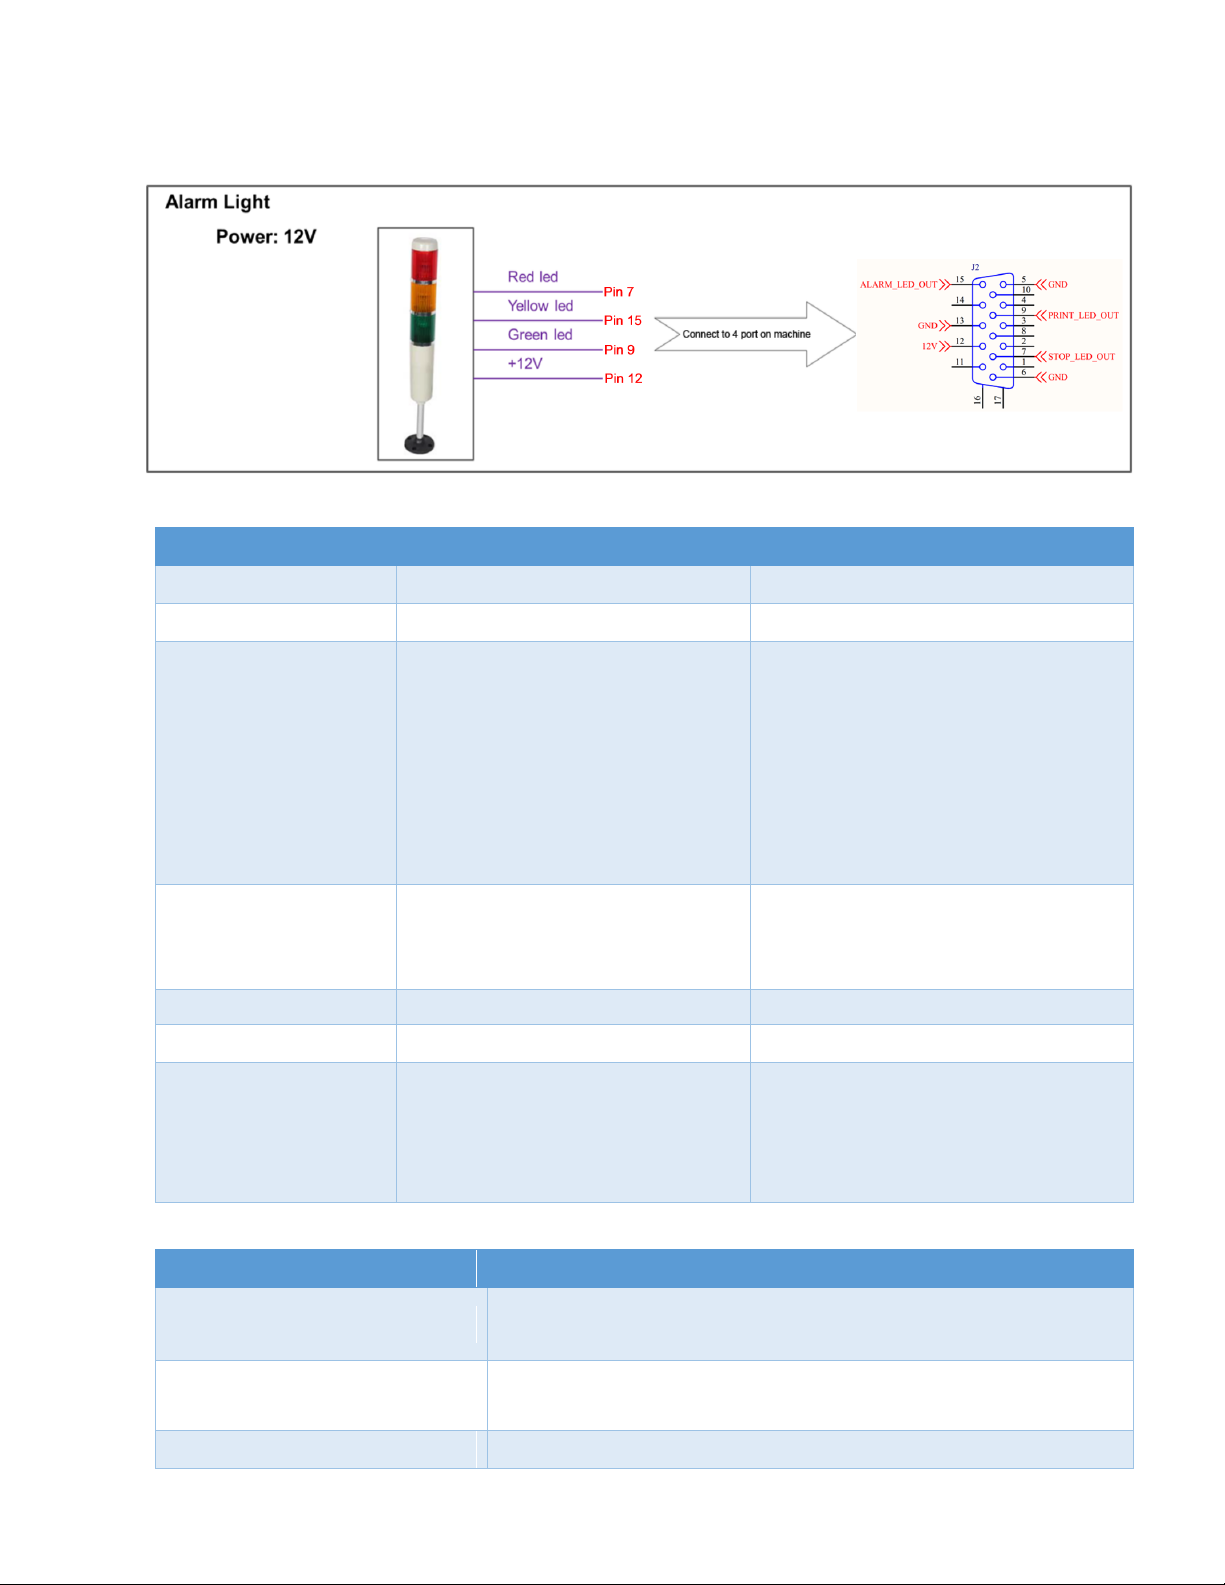
ALARM
PIN ON DB15 PORT
VALUE
DESCRIPTION
5
GND
6
GND
7
STOP_LED_OUT (0V)
STOP STATUS (RED LED)
9
PRINT_LED_OUT (0V)
PRINT STATUS (GREEN LED)
12
12V
13
GND
15
ALARM_LED_OUTPUT (0V)
ALARM STATUS (YELLOW LED)
1. Ink low
ERROR
DESCRIPTION
Stop print (Normal event)
Red light will turn on.
Invalid Cartridge
No Cartridge
Allow users to monitor operation of Machine from distance via the light signals from the Alarm.
This table below will show details of each pin on DB15 port that the alarm beacon will use:
The printer may Stop print
Error Description
because of the reasons below:
1. Printer is on but will not
enable printing.
2. "No cartridge" error.
3. "Invalid cartridge" error.
4. Out of ink.
User selects the Start print menu.
The printer is in printing mode
without any issue.
The printer has an issue and
displays a warning to operator but
is still able to print.
User selects Stop print from menu. Printing will be stopped.
Cartridges are plugged into the printer that were not
provided from your supplier.
No cartridge is plugged into the printer.
USER MANUAL V2.2 | October 10, 2019 15
Page 16
Ink Low
The value of Ink Level (Setting Cartridge Ink Level)
Ink Out
No
Basic Components
With keyboard
Optional
1
Machine
2
Wireless keyboard
3
Power supply
4
Mounting brackets
5
USB flash
6
Ink cartridge
14
Encoder
15
Alarm
16
External Sensor
on machine is lower than 5.0 ml.
The smart card was implemented onto each cartridge
to allow the printer and software to recognize the
current ink volume inside each cartridge.
The value of Ink Level on machine is lower 0.4 ml.
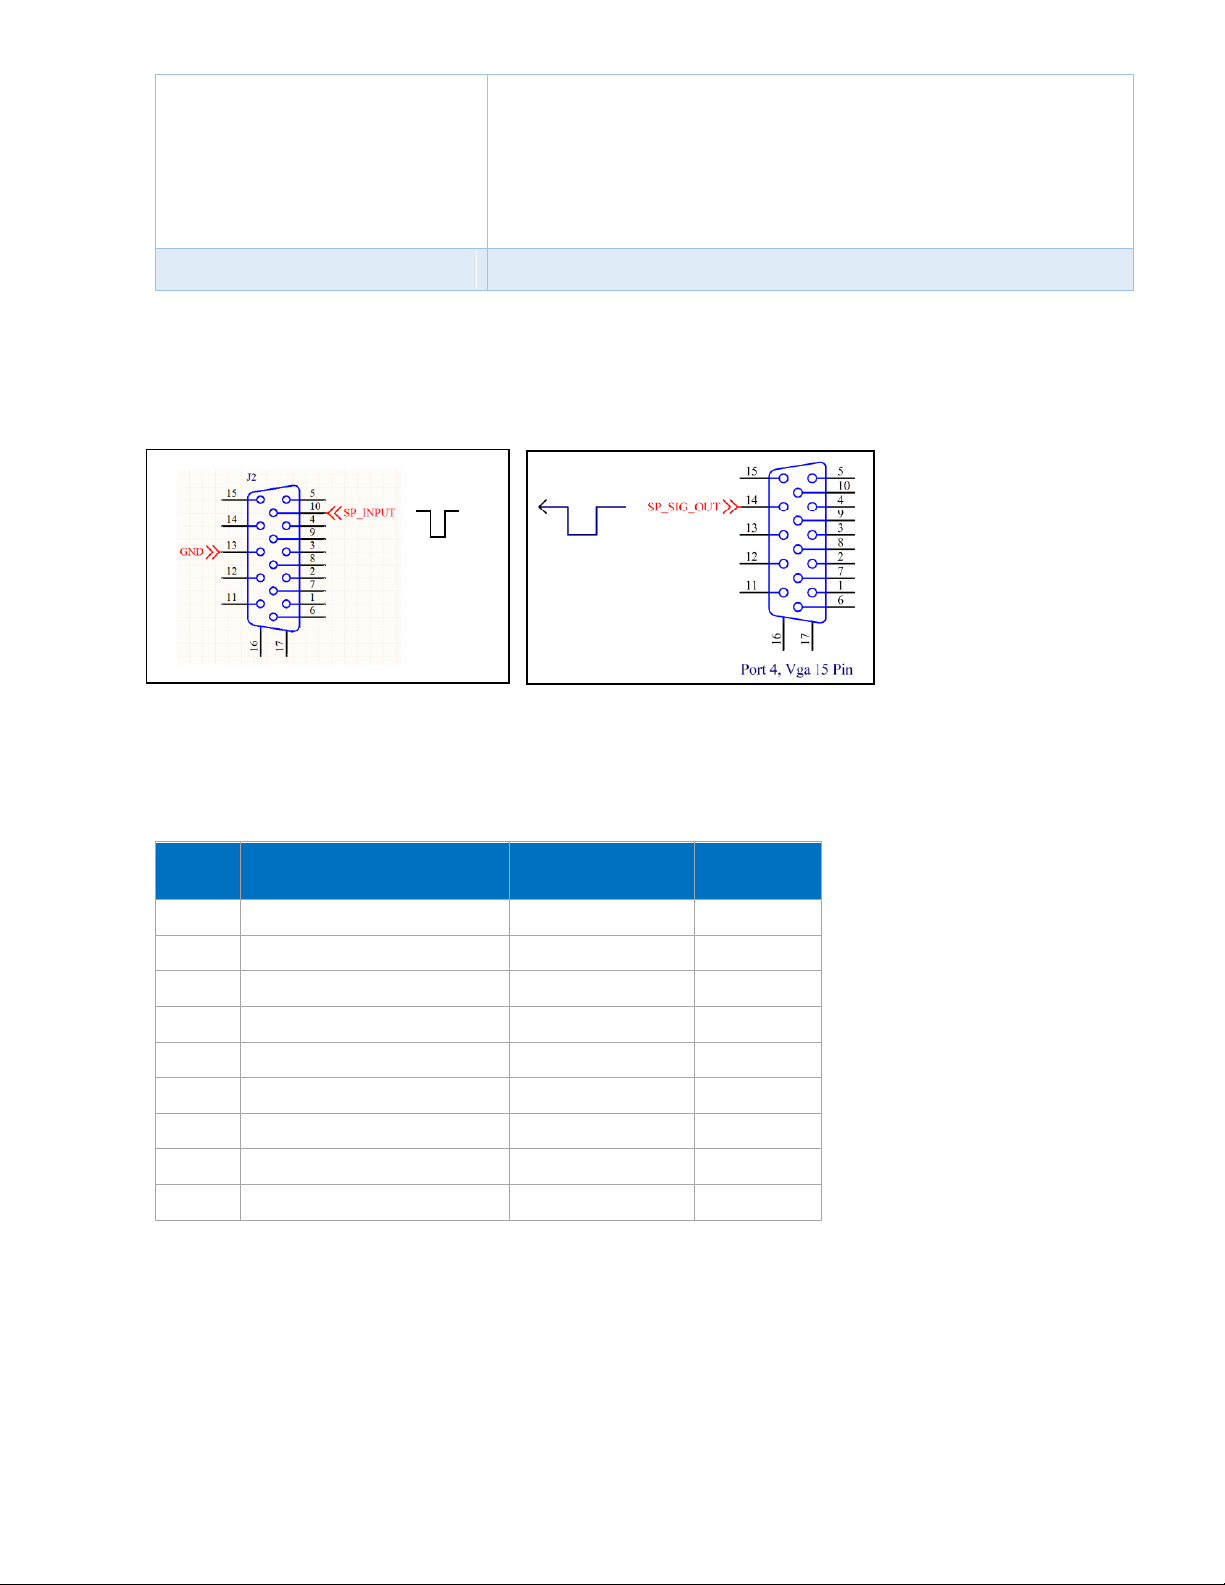
INPUT AND OUTPUT
Input: Start / Stop feature. Accept NPN or dry contact.
Output: NPN signal. Active each time a print is made.
QUICK START UP
REQUIRED COMPONENTS
Setup machine
See Getting Started.
NOTES:
The machine will function with Water and Solvent base ink
use unapproved cartridges may damage the machine and void the warranty.
s from printer supplier
USER MANUAL V2.2 | October 10, 2019 16
. Trying to
Page 17
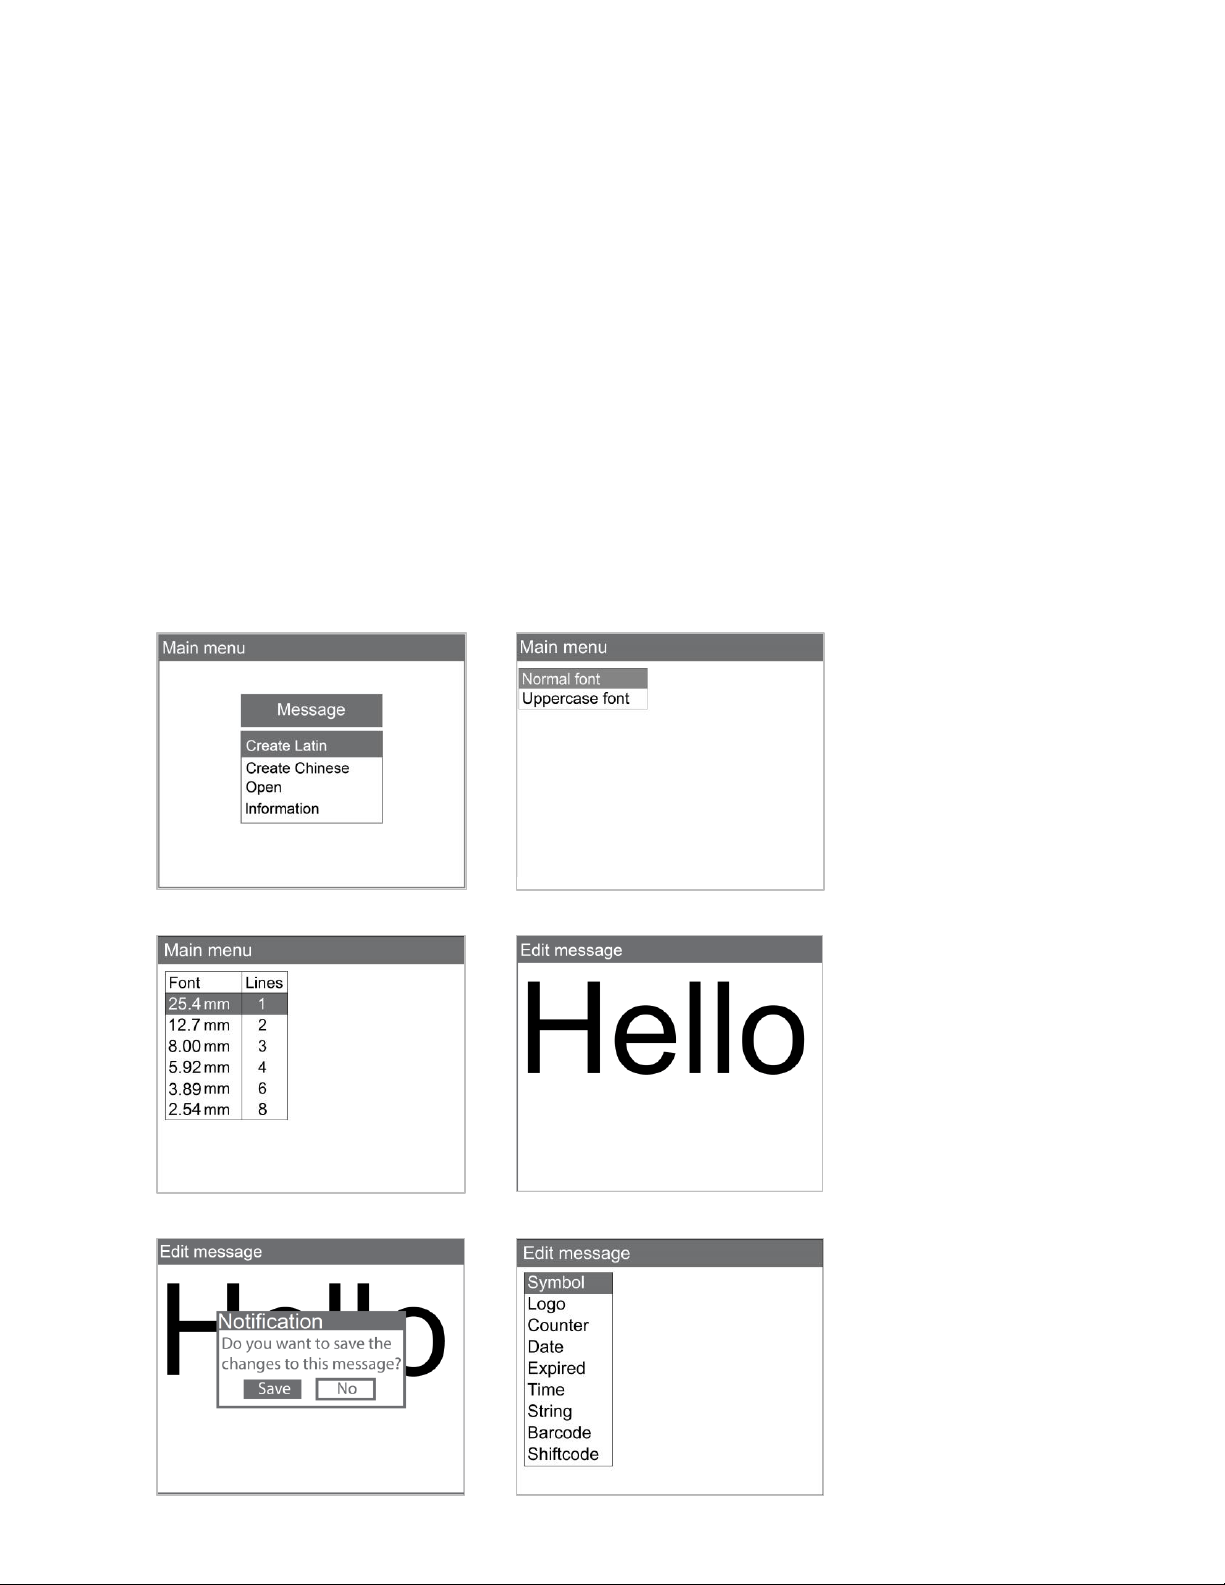
Keyboard setup
Select Create Latin
Select Normal/Uppercase font
Select font size
Input “Hello”
Insert the receiver of wireless keyboard to USB port (port 2) on machine, remove the
protected stamp in the battery slot and turn on the button on the back of the keyboard to
begin operating the machine with a wireless keyboard.
From the main screen of machine, use arrow keys to move the cursor to Settings
and begin implementing initial setups for the machine. Press Enter to save and apply
settings; otherwise, press the ESC key.
Setup external devices (Optional)
See details at External device connection.
Install external sensor.
Install encoder.
Install alarm kit.
Create first messages
Create Latin message - On machine with keyboard
USER MANUAL V2.2 | October 10, 2019 17
Page 18
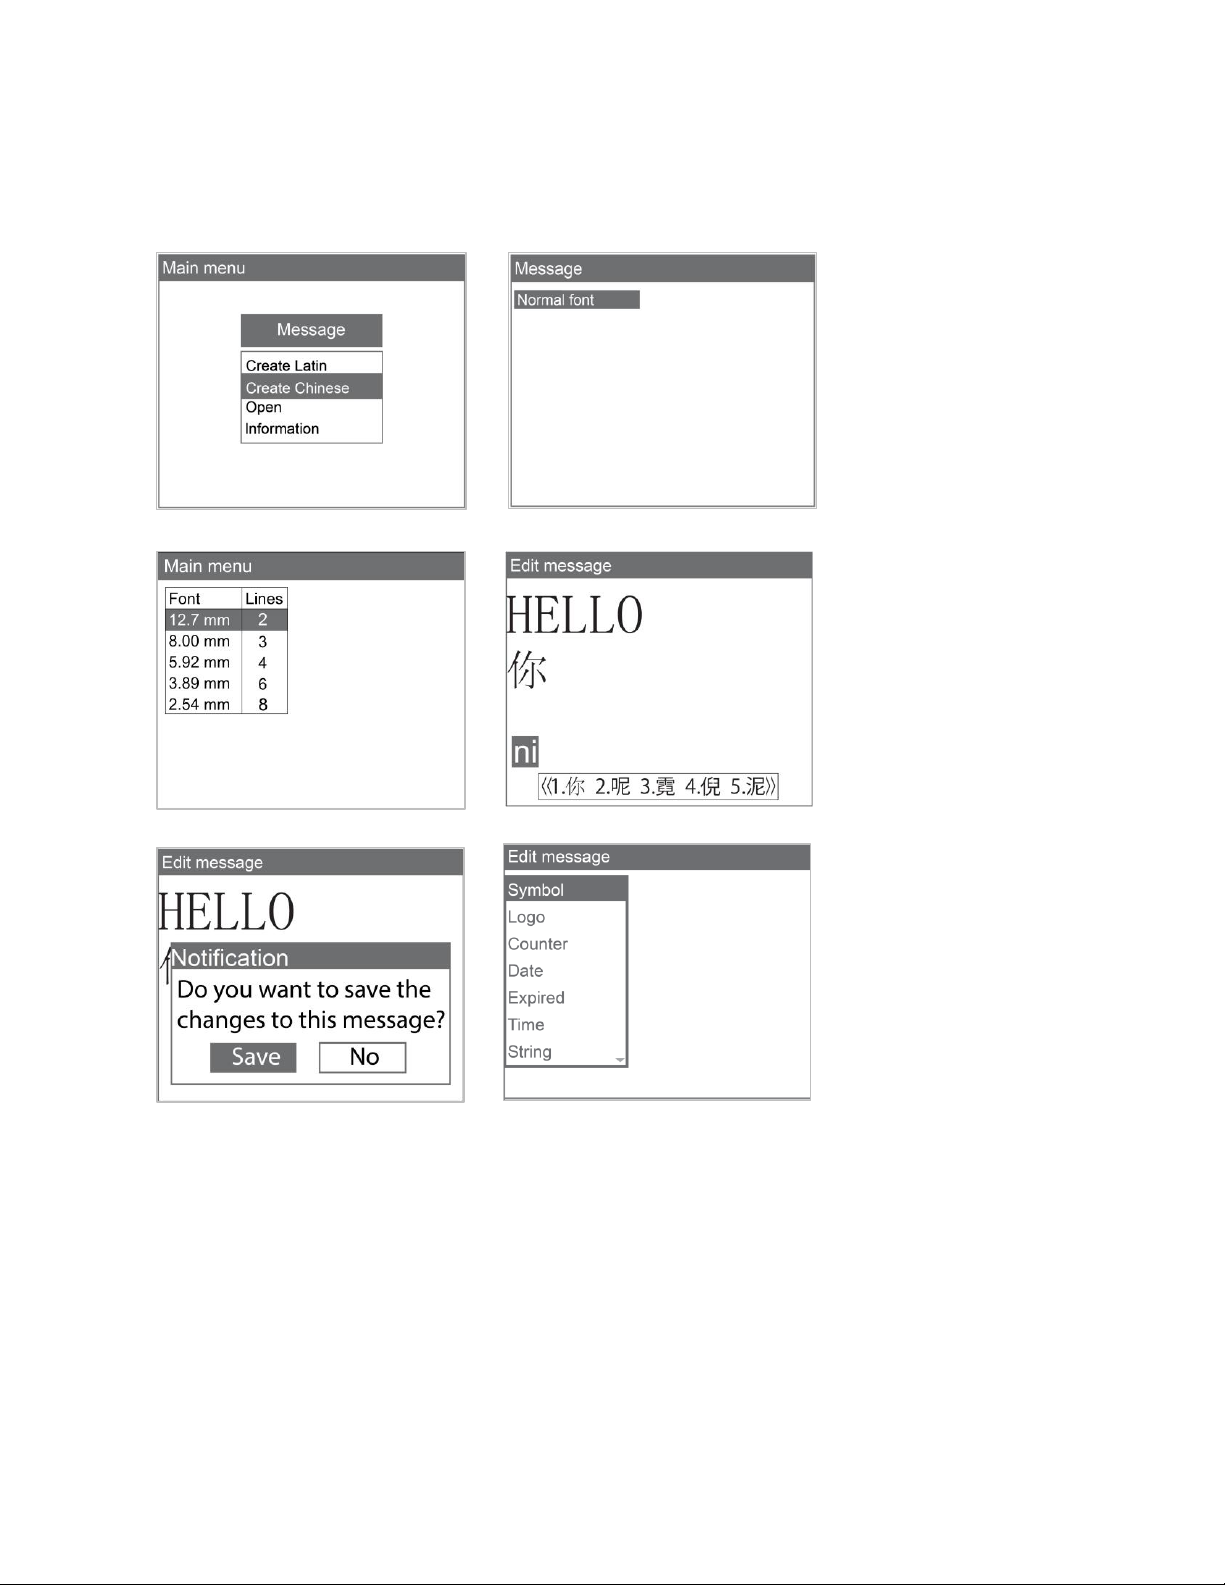
Press “ESC” to exit. Select
“Save” and input name to
save your messages
Press “Insert” to insert more data,
variable, barcode, logo, …
2. Create Chinese message
Select Create Chinese
Select font size and lines
Press “ESC” to exit. Select
“Save” and input name to
save your messages
Select Normal/Custom font
Input "ni". Press 1 - 5 to select
Press “Insert” to insert more
data, variable, barcode,
logo, …
FIRMWARE INTRODUCTION
From the main screen, use and arrow keys to select the desired menu: Message,
Operation or Settings. Press Enter to select. Press ESC to go back to the main screen.
Message
Create new or open existing messages on the machine memory.
NOTES:
USER MANUAL V2.2 | October 10, 2019 18
Page 19
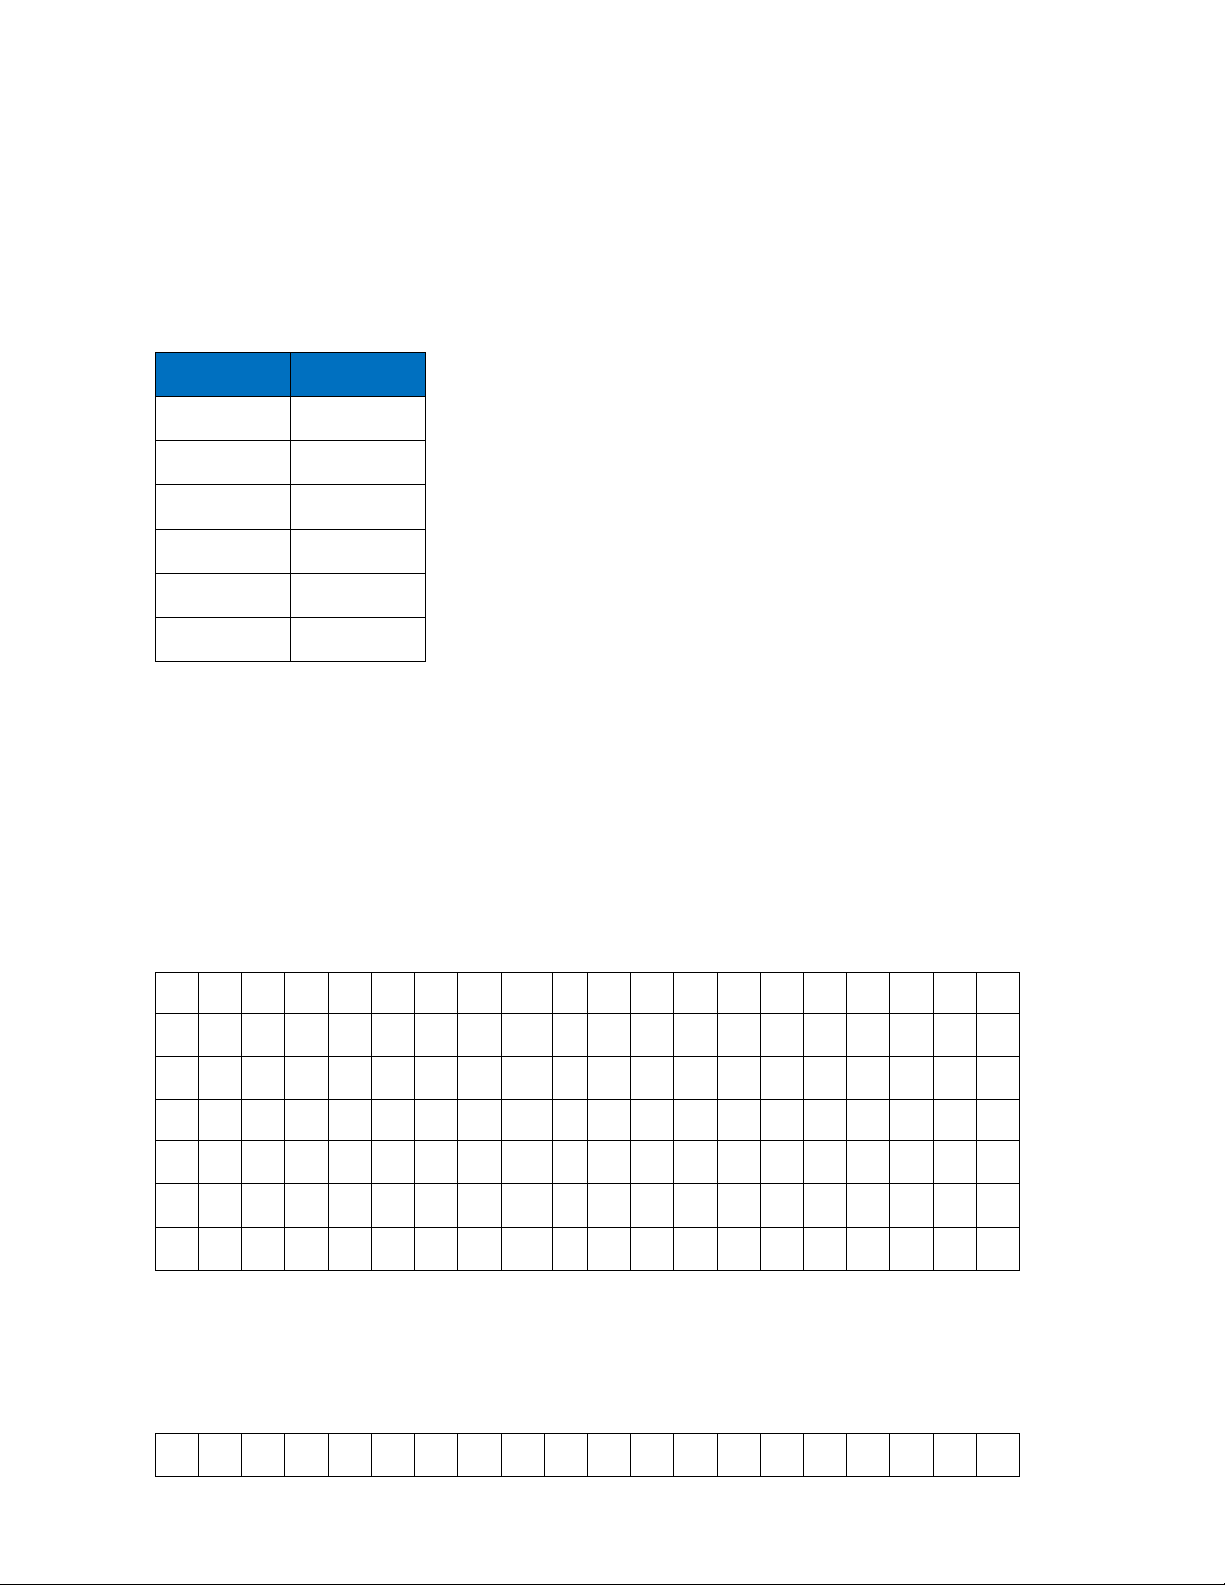
While doing this, please be sure printing
Lines
Font
25.4 mm
1
12.7 mm
2
8.00 mm
3
5.92 mm
4
3.89 mm
6
2.54 mm
8
€ ‚ ƒ „ … † ‡ ˆ ‰ ‹ ‘ ’ “ ” • – — ˜ ™
›
¡ ¢ £ ¤ ¥ ¦ § ¨ © ª « ¬ ® ¯ ° ± ² ³ ' µ ¶ · ¸
¹ º » ¼ ½ ¾ ¿ × Ø Þ ÷ ø þ
á é í ó ú ü ñ
à À Á ã à ç Ç ê Ó Ú Ü ä å æ ë ö ß ÿ Ä Å Æ Ö â è î ï ô œ ù û Â Ô Œ Ù Û
Ÿ
! “ # $ % ‘ ( ) * + , - . / : ; < = >
?
has been stopped
.
Create new messages
Go to Create Latin to select your desired fonts: Normal font or Uppercase font.
Select Normal font to create your message with lower and uppercase characters. Then
select your desired font size, number of lines and insert fields into message. Otherwise,
go to Uppercase font to create your message with uppercase characters only.
Available fonts and sizes include:
Input message by using the following keys:
Arrow keys : move the cursor.
Enter : go to the next line.
Backspace : delete characters.
ESC : escape and save / unsaved messages.
While creating message, press Insert on the keyboard to insert your desired fields.
Symbol
Insert the following symbols into the message (extended ASCII).
In the input section on machine, press Insert and use or arrow keys to move the cursor
to Symbol and press Enter. Use the arrow keys to move your cursor to the desired object
and press Enter to insert the symbol into message.
The symbols below are required to be inserted from your wireless keyboard:
USER MANUAL V2.2 | October 10, 2019 19
Page 20

@ [ \ ] ^ _ ` { | } ~
Logo
Insert logo or image from Machine into message.
Your logo should be updated or setup in the Settings menu.
In the input section, press Insert and use or arrow keys to move your cursor to Logo and
press Enter. Move your cursor to the desired Logo and press Enter.
NOTES:
Insert logo first, then input message if you need to print a logo at the beginning of the
message.
Input message, then insert logo if you need to print a logo at the end of the message.
Logo should be inserted in the
lines to ensure it is fully printed.
Counter
Insert product counter into the message. There are Single and Box/Lot.
In the input section, press Insert and use or arrow keys to move the cursor to Counter
and press Enter. Select your desired object and press Enter.
Single
Is an independent counter. This is used to count the products printed, this can be a product
or a box.
Move the cursor to the each object and input the value. After all values are set, move the
cursor to Add counter here and press Enter to insert the counter into the message.
Start: start number of counter.
Current: current number that you would like to print immediately.
Reset: end number of counter.
Step: count step of counter.
Repeat: Repeat count of counter.
bottom
line of your message if you are printing multiple
Up/Down: direction of counter. Up for increase number, down for decrease number.
Fill zero: add 0 before each number like 09, 009, 0009…
Add counter here: insert counter into the message.
USER MANUAL V2.2 | October 10, 2019 20
Page 21

Example
COUNTER 1
COUNTER 2
Start: start number
Current: current number
Reset: end number
Step: count step
Repeat: Repeat count of counter
Up/Down: increase or decrease
Fill zero: add 0 before each number
Add counter here: insert counter
Start: start number
Current: current number
Reset: end number
Step: count step
Repeat: Repeat count of counter
Up/Down: increase or decrease
Fill zero: add 0 before each number
Add counter here: insert counter
Step 1 Setup Counter 1 first and insert into
the message
Counter 1
Step 2 Then setup Counter 2 and insert into
the same message
Counter 2
Start: 0
Current: 0
Reset: 200
Step: 1
Repeat: 1
Start: 0
Current: 0
Reset: 100
Step: 1
Repeat: 1
To print the following counter on each object:
001, 003, 005….101, 001, 003, 005 …
Start: 1
Current: 1
Reset: 101
Step: 2
Repeat: 1
Up/Down: Up
Fill zero: Enable
Add counter here
NOTES:
User can insert up to 6 independent counters in one message.
Box/Lot
Is a dual counter. This is used to count the box and the products in the box.
Move the cursor to the each object and input value. After completing the settings for all
objects, move to Add counter here and press Enter to insert the counter into the message.
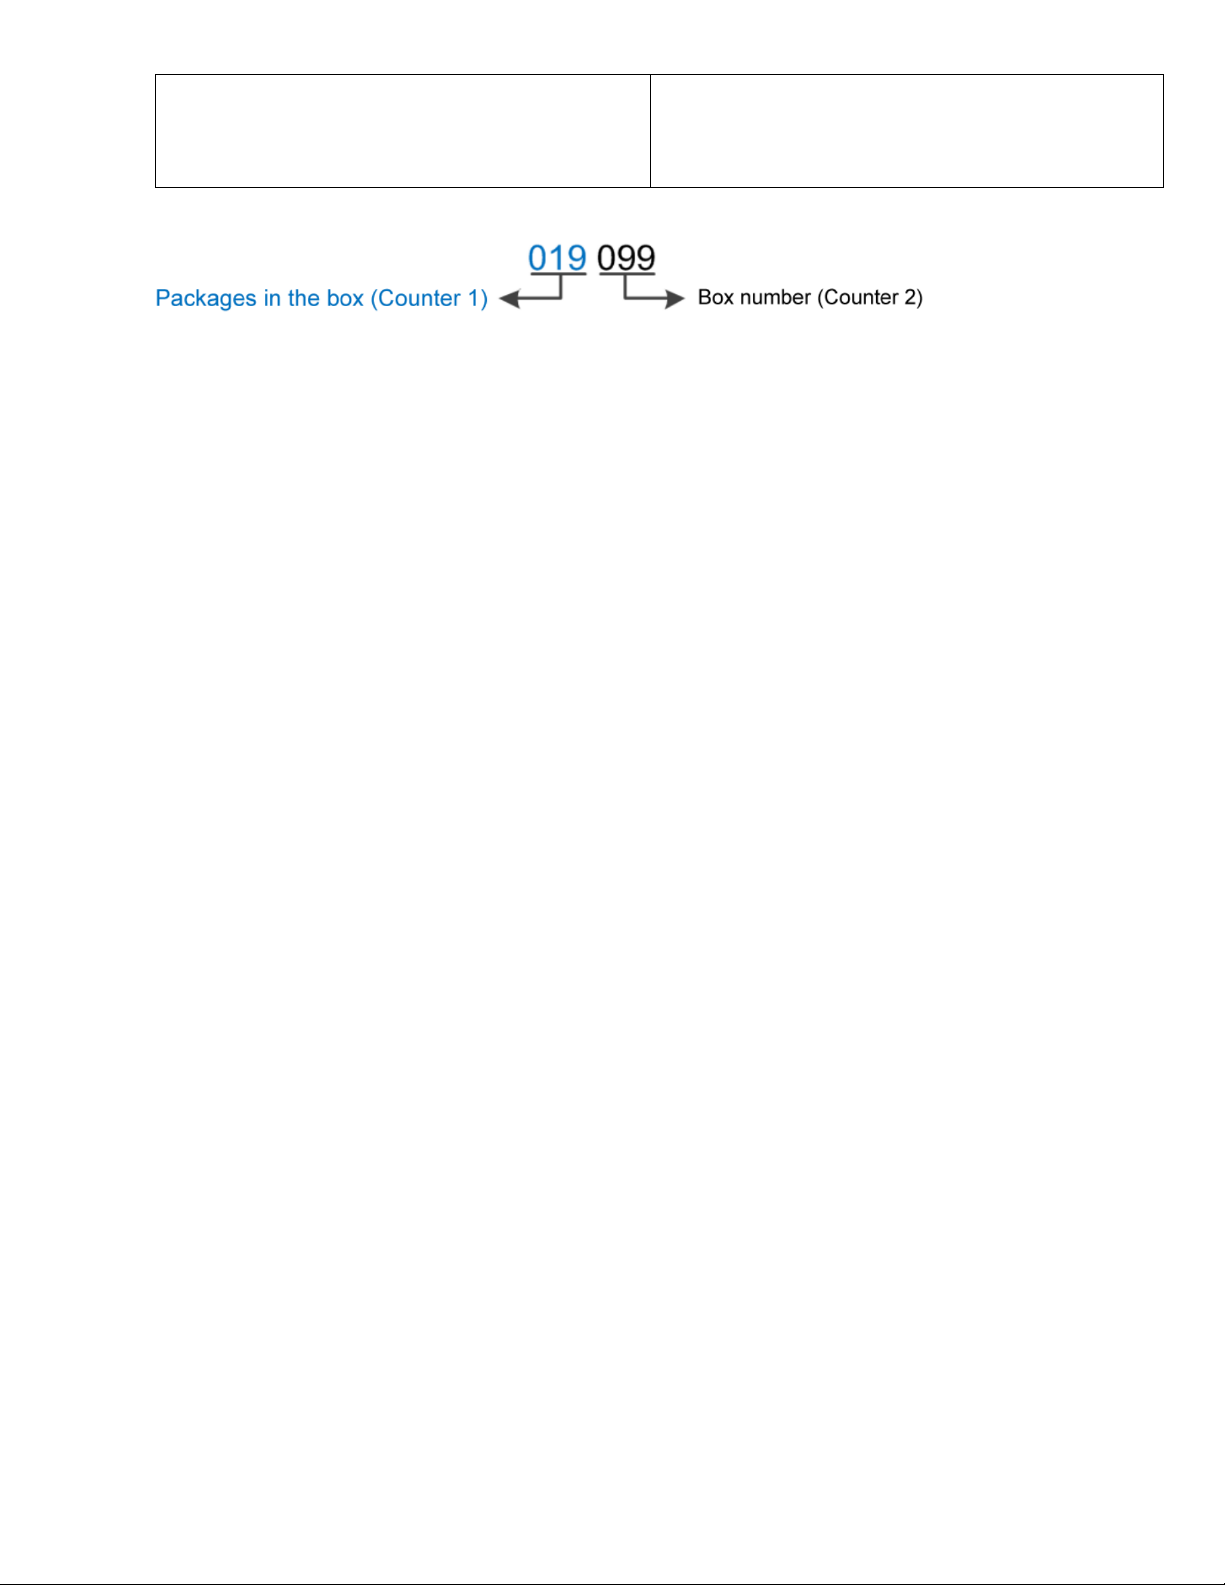
Example
Printing a chain of digits on packages, the first 3 digits are the number of the box
containing the packages; the last 3 digits are the order of the packages within the box,
let’s say there are 200 packages in the box.
Follow below steps to set counter:
USER MANUAL V2.2 | October 10, 2019 21
Page 22
Up/Down: Up
Fill zero: Enable
Add counter here
Up/Down: Up
Fill zero: Enable
Add counter here
The two counters will be printed as below:
NOTES:
Press Enter to apply each setting.
Setup Counter 1, then Counter 2.
Maximum value of Reset is up to 2,000,000,000.
Maximum value of Step is 250.
Counter will be backup and continue in case of power failure.
Date
Insert current date into message.
In the input section of Edit Messages, press Insert, then use or arrow keys to move the
cursor to Date and press Enter.
Input date format at Format.
Press Enter to insert into message.
Format
Select your desired format below to input into the Format section. Otherwise, date will not be
displayed in the message.
Day: d or dd.
Month: M, MM or MMM.
Year: yy or yyyy.
Julian date: JJJ.
Example: 03/04/2019
03/04/2019 : dd/MM/yyyy
3/4/19 : d/M/yy
3/APR/19 : d/MMM/yy
To insert the current date within a year (365 days), input Format JJJ. In this case, if your
current date is 03/04/2019, date displayed on your message will be 093 for perpetual year
and will be 094 for leap year (leap year the February have 29 days).
NOTES:
Support up to 2 date formats in 1 message.
Lower case or Upper case
characters are
acceptable.
Available separators include Slash (/), Dash (-), Dot (.), Space ( ) and No separator.
Expired
Insert expired date into the message.
USER MANUAL V2.2 | October 10, 2019 22
Page 23

In the input section of Edit Messages, press Insert and use or arrow keys to move the cursor
to Expired and press Enter.
Input the format of the expired date in Format (similar format as the current date).
Move the cursor to Expired and input the date that your product will be expired.
Press Enter to confirm settings and insert into the message.
Example
If your manufacture date is 03/04/2019 and your product will be expired in 1 year, you
are required to input 365 at Expired. Machine will automatically calculate the expired date
and insert into the message.
NOTES:
Supports up to 2 expired date formats in 1 message.
Time
Insert current time into the messages.
Current time must be setup in System clock in the Settings menu.
In the input section, press Insert, then use or arrow keys to move the cursor to Time
and press Enter. Select and input your desired format and press Enter to insert into message.
Second: s, ss.
Minute: m, mm.
Hour: h, hh (format 12h). H, HH (format 24h).
AM or PM: tt.
String
Insert a string of data as entered in Settings.
From the input section of new message, move the cursor to the position where a string will be
inserted and press Insert.
Then use or arrow keys to move the cursor to String and press Enter. Select your
desired string and press Enter to insert into the message.
Define these Strings in Settings String. This is the shortcut that will help you not repeat the
same data for one string like: company name, company address, email, phone number…
Barcode 1D
Insert barcodes into message.
From the input section, use the arrow keys to move the cursor to the end of the final line
of your message. Press Insert, then use or arrow keys to move the cursor to Barcode
and press Enter. Select Static or dynamic and press Enter.
Static barcode
Insert static 1D barcodes into your messages. We support 8 types of barcodes
Type: select your desired barcode type (Code 39, Code 2/5, Code 128, Code 93,
UPC-A, EAN13, Coda bar and Code 11).
Width: Input width for barcode (value varies from 1 to 4).
Height: Input height for barcode (value varies from 1 to 3).
USER MANUAL V2.2 | October 10, 2019 23
Page 24

Text: Select Enable to display barcode value, otherwise select Disable.
First print
Second print
Third print
N-print, …
First print
Second print
Third print
Four print
Value: Input value for your barcode.
Use or arrow keys to move to the cursor to your desired object and change the
value. Press Enter after each value change to save and apply settings.
Sample prints:
NOTES:
If you would like to print a static 2D barcode
barcode as image, use smartphone or application on PC to load it onto
Use PC: see Use Convert Logo (Coming soon).
Dynamic barcode
Insert dynamic barcode into your messages.
Type: select your desired barcode (Code 39, Code 2/5, Code 128, Code 93, UPC-A,
EAN13, Codabar and Code 11).
Width: Input width for Barcode (value varies from 1 to 4).
Height: Input height for Barcode (value varies from 1 to 3).
Text: Select Enable to display barcode value, otherwise select Disable.
Prefix: Input repeat value before barcode.
Counter: setup values for your counter or dynamic data (like the Single counter).
Suffix: Input repeat data after barcode.
Use or arrow keys to move to the cursor to your desired object and change the value.
Press Enter after each value change to save and apply settings.
NOTES:
, p
lease use update logo
feature
the
machine.
. Create 2D
Counter can be placed at the following positions of the barcode
At the beginning : Prefix = 0 (not entered here).
In the middle : Input both Prefix and Suffix.
At the end : Suffix = 0 (not enter
Sample prints:
ed
here).
USER MANUAL V2.2 | October 10, 2019 24
Page 25
Shiftcode
ITEMS
DETAIL
Ink level
Current ink in the cartridge (ml)
Speed
Current print speed (m/min or ft. /min)
Density
Current density
Resolution
Current resolution
Delay
Current delay time
Print mode
Current print mode
Repeat
Number of prints repeated on the same object
Delay
Distance between 2 prints
Maximum
Number of prints left based on the current ink level, density and resolution
Insert a Shiftcode into the message.
From the designing section, use the arrow keys to move the cursor to your desired position
in the message and press Insert. Then use or arrow keys to move to Shiftcode and
press Enter.
Code: input name of Shiftcode. Maximum 2 characters (letter, number or both).
Time: input start time of each shift in hour: minute.
The Code of each specific shift will be displayed according to each period of time in the
shift. Press Enter to save settings and press ESC to go back to the main menu.
Open storage messages
Open existing messages to Use / Edit / Delete.
From the main screen of machine, select Message, go to Open and press Enter to
access message storage. Select your desired message and press Enter. Use or arrow
keys to Use / Edit / Delete.
Use: select existing message to print.
Edit: select existing message to edit (see Create New).
Delete: select message to delete.
Press ESC to go back to the main screen. Confirm “Yes” and input name for message, after
complete press Enter.
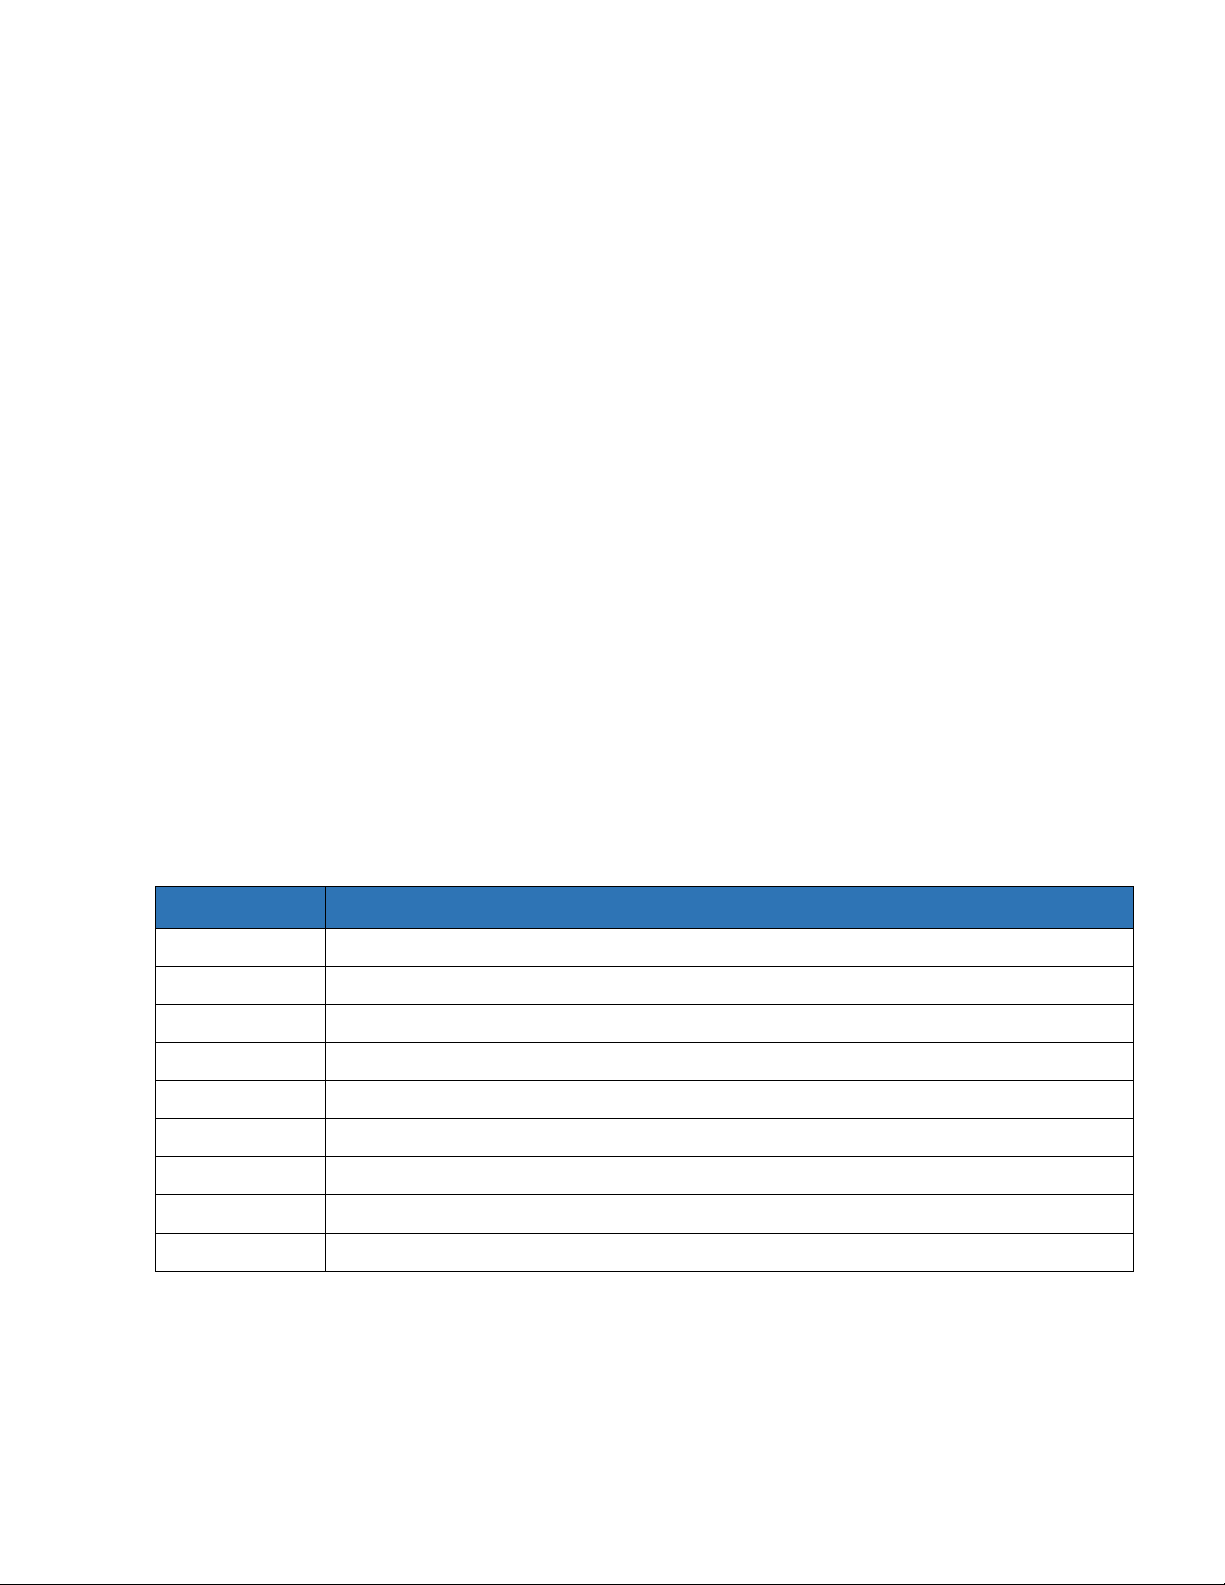
Status machine
Displays settings and the status of the machine. From the main screen of the machine, select
Message and use the down arrow key to go to Information and press Enter.
Operation
Start
Change status of machine from stopped to start print.
Select Operation Start to begin printing. Your message content along with other
setting parameters will be displayed while printing.
USER MANUAL V2.2 | October 10, 2019 25
Page 26

ITEMS
DETAIL
Prints
Number of prints that have been made
Ink levels
Current amount of ink in the cartridge (ml)
Speed
Current speed (m/min)
Resolution
Current resolution (dpi)
Stop
Change the status of machine from start printing to stop.
To stop print, press ESC to go back to the main screen. Use or arrow keys to go
to Operation, select Stop to stop printing.
NOTES:
Machine should be stopped before
Shortcut key to Start / Stop: CTRL + SHIFT + ENTER.
changing
other settings.
Purge
Select Operation Purge to jet the ink out from all nozzles, this will help clean the print head.
Connect / Disconnect PC (Coming soon)
Settings
From main menu select Settings to access settings menu.
From the Settings menu, use the arrow keys to move the cursor to your desired setting, press
Enter to select and begin editing.
NOTES:
Press Enter to save. Press ESC to go to main menu and apply new settings.
Speed
Set print speed by selecting the correct mode: None Enc. and Encoder.
None Encoder
Operating machine without encoder. Under this mode, print speed must be set to
synchronize with the current conveyor speed for quality prints (input value at Value).
Encoder
Encoder is recommended where speed of the conveyor varies. Under this mode, print speed
of machine will be synchronized with conveyor speed in real time to ensure the best print
quality. Ensure you have an encoder installed with machine via the DB15 connector.
NOTES:
Minimum speed: 1m/min
Maximum speed: 228m/min at 300x100 dpi
From the Settings menu, use or arrow keys to move the cursor to Speed, press Enter.
Press Enter again at Select to choose None Enc or Encoder mode. Press Enter to apply
settings.
USER MANUAL V2.2 | October 10, 2019 26
Page 27
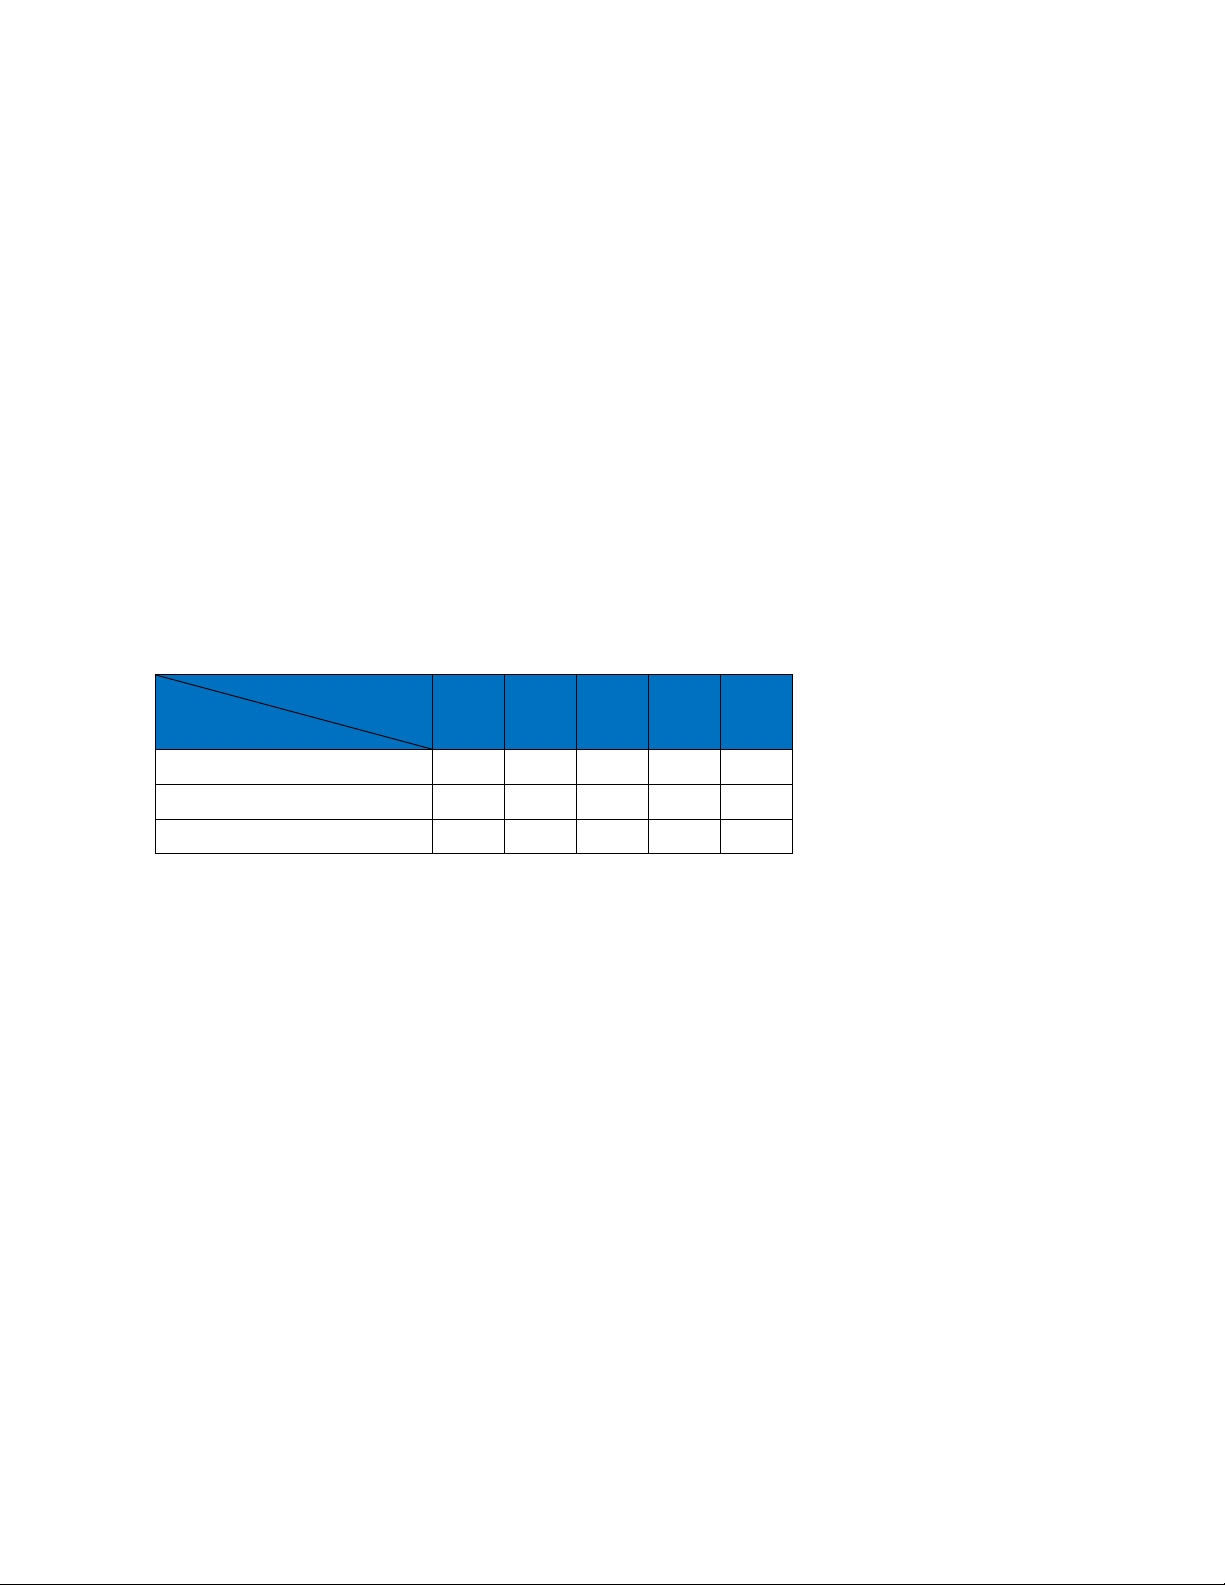
Resolution
Density
Resolution
1 2 3 4 5
300x300
76
38
25
19
15
300x150
152
76
50
38
30
300x100
228
114
76
57
45
Set the amount of ink drops per inch. From the Settings menu, use or arrow keys to go
to Resolution, press Enter. Select your desired resolution and press Enter.
Optional resolutions with standalone mode:
300x300 dpi.
300x150 dpi.
300x100 dpi.
Optional resolutions with PC mode (Coming soon)
Density
Set the optical density of the print.
There are 5 levels of Density to apply.
From the Settings menu, use or arrow keys to move the cursor to Density, press Enter.
Move the cursor to your desired density and press Enter to apply.
NOTES:
Maximum p
rint speed will be varied according to the resolution and the optical density.
Table below is used to explain the relationship between: Speed, Resolution and Density.
Delay
Delay before print and Delay after print (mm).
Delay before print: set the distance from when the sensor receives a signal to the start of
printing. Input value at Value, press Enter to apply settings.
Delay after print: set the distance that the print head will delay after it finishes the previous
print to accepting a new signal/trigger. Input value at Value, press Enter to apply settings.
NOTES:
,
Delay before print varies from 1 to 10
000 mm.
Delay after print varies from 1 to 10,000 mm.
Cartridge
Display the current level of ink in the cartridge (using smartcard).
From the Settings menu, use the arrow keys to go to Cartridge and press Enter.
NOTES:
Alarm is triggered when there is 5ml left in the cartridge.
Printer will stop print when
displaying "
warning out of ink
" error message
.
Update Logo
USER MANUAL V2.2 | October 10, 2019 27
Page 28
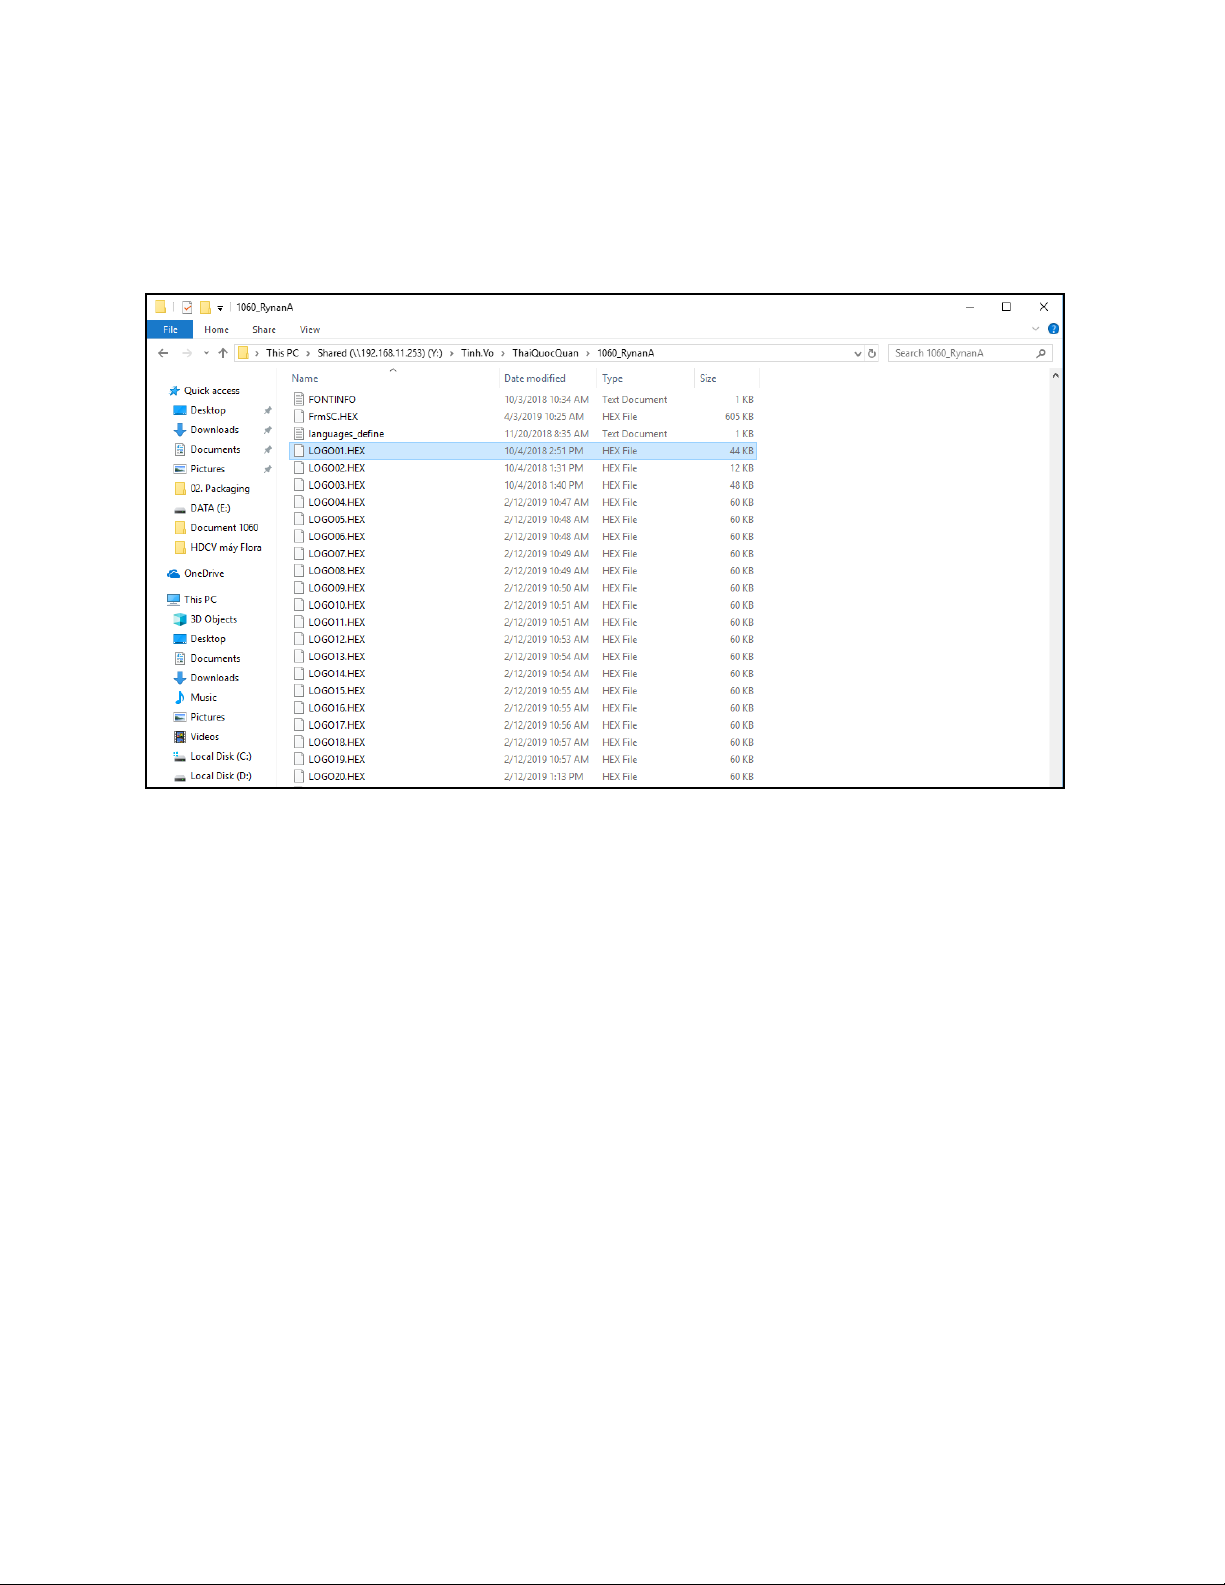
Update logos or images from USB flash to the machine memory. Be sure your new logos are
available on your USB flash.
Logos stored on your USB flash must be processed by our application (See Convert logo).
Machine accepts logo with .hex format only. All logos must be named in order as LOGO1,
LOGO2, LOGO3, LOGO4…. LOGO20 as shown below.
Update logo via USB flash
To update or change new logos on your machine memory, perform the following steps:
Insert USB flash into Machine (USB port 1)
From the Settings menu, go to Update Logo and press Enter.
Select your desired logo (1, 2, 3…20) and press Enter to begin updating. Be sure you
name the files correctly. Example: LOGO1 on your USB will replace LOGO1 on the
machine memory.
Update logo via smart phone (Coming soon!)
String
Insert a string of data into messages.
From the Settings menu, use the arrow keys to go to String and press Enter. Input your strings
into the input section. Press ESC to apply and go back to the main menu.
NOTES:
Maximum length of each string is 50 characters.
Machine allows maximum 5 strings on the machine memory.
Auto Jet
Schedule automatic jetting to clean the print head.
From the Settings menu, use arrow keys to select Auto Jet and press Enter. Select Status
and press Enter.
Select Enable and input the frequency of jetting in second (s) at Time.
USER MANUAL V2.2 | October 10, 2019 28
Page 29

Select Disable to disable random jetting.
NOTES:
Time for jetting varies from 10 to 60,000 seconds.
This function is useful for Solvent base inks. We recommend any user enable this function
with
an approximate
Sensor
Select External or Internal sensor.
From the Settings menu, use the arrow keys to go to Sensor and press Enter. Move to your
desired mode and press Enter to confirm.
Direction
Set print direction correlating with the direction of the conveyor. Machine supports 4 directions:
: left right, : right left, : reverse left right, : reverse right left.
From the Settings menu, use the arrow keys to go to Direction and press Enter. Move to your
desired direction and press Enter to confirm.
Print Mode
Sensor mode and Continue mode.
time
of
15-30 seconds to help printing quality
when using solvent inks
.
From the Settings menu, use the arrow key to go to Print Mode and press Enter. Select Mode and
press Enter to select Sensor or Continue mode.
Sensor mode
Machine is triggered by a sensor to print.
Go to Mode and press Enter to select Sensor mode and use arrow keys to move to other
settings. Input a value at Repeat to set the number of prints to be repeated on the same
object. Press Enter to confirm and go to the next setting. Valid values vary from 0 to 99,999.
Input a value at Delay to set distance between the prints. Valid values vary from 10 to
10,000mm. Invalid values results in error.
Continue mode
Go to Mode and press Enter to select Continue mode and use arrow keys to move to
other settings.
Input value at Fix length to set distance between the prints. Valid values vary from 5 to
10,000mm.
Immediate: print continue without sensor signal.
Level: print continue with sensor signal.
Invalid values results in error.
Unit
Se
lect your desired measurement units inches or mm.
From the Settings menu, use the arrow keys to go to Unit and press Enter. Move to your
desired measurement units and press Enter to select.
Update Font
USER MANUAL V2.2 | October 10, 2019 29
Page 30
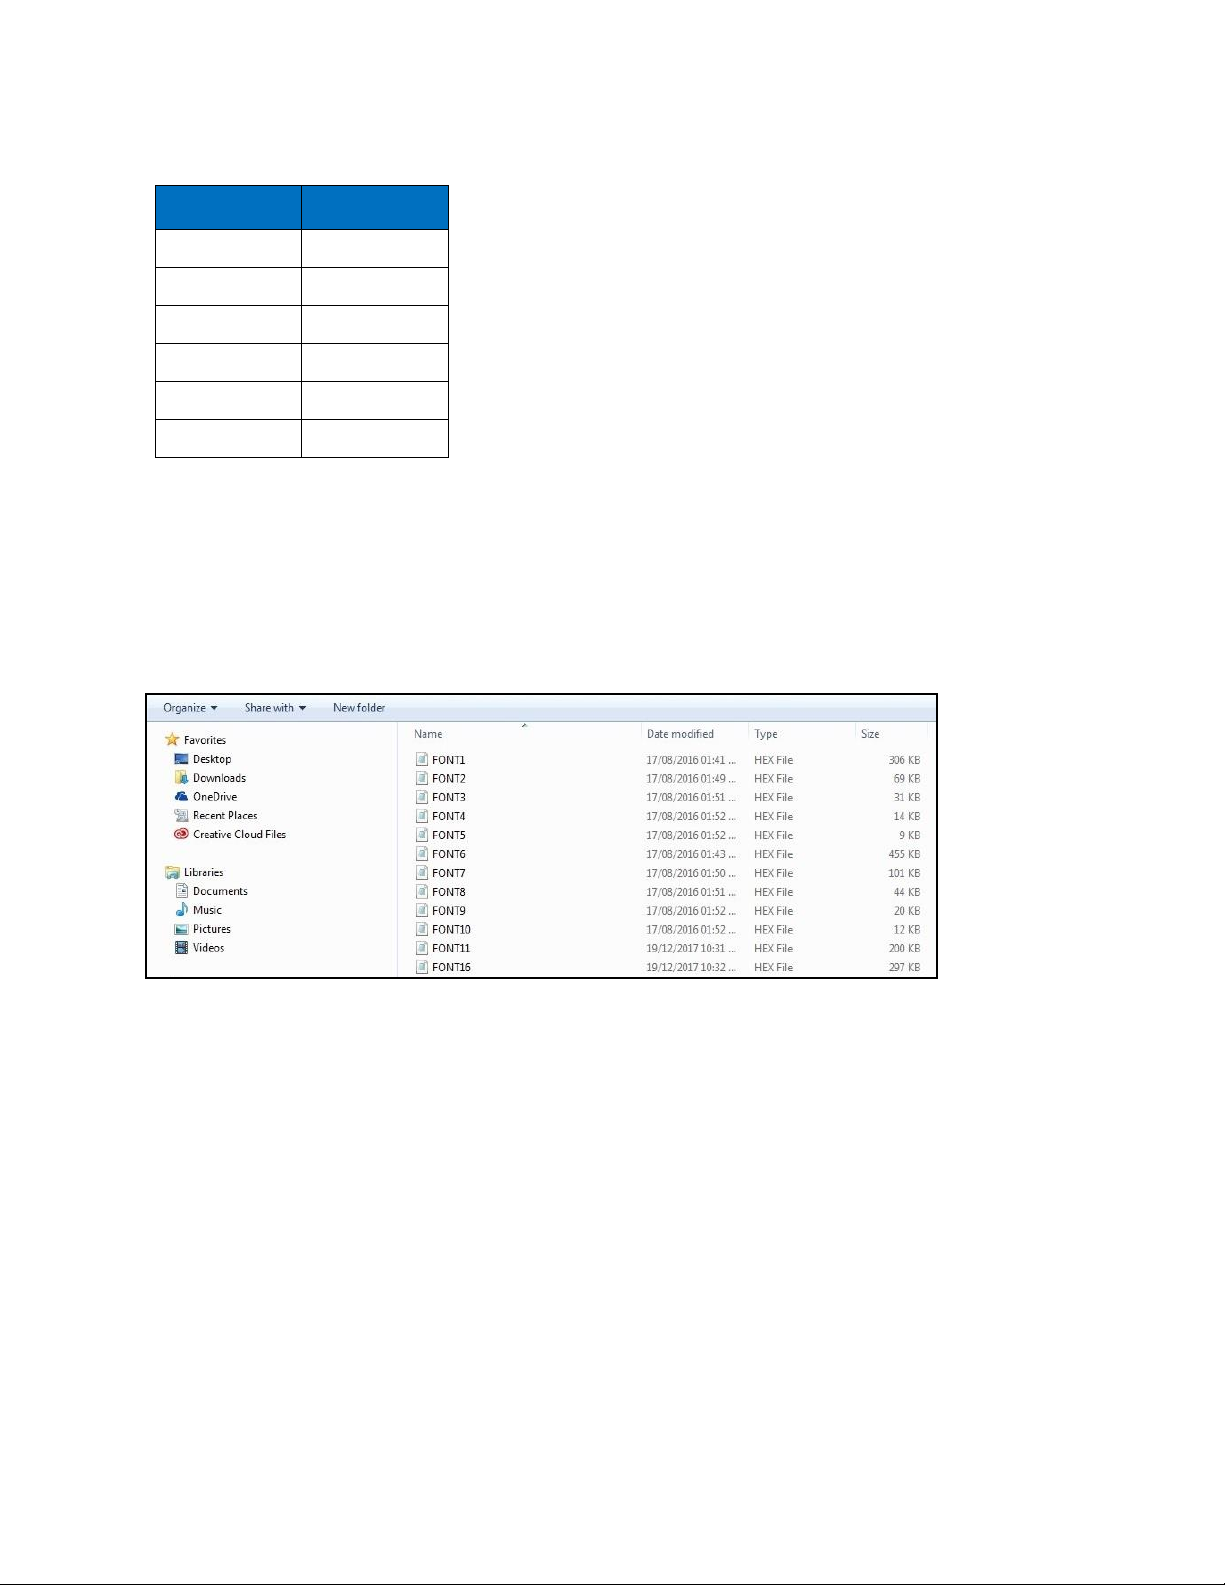
Update different fonts and character sizes for Machine. There can be one font style on
Font
Lines
25.4 mm
1
12.7 mm
2
8.00 mm
3
5.92 mm
4
3.89 mm
6
2.54 mm
8
the machine at a time.
Machine supports the following fonts while working with wireless keyboard.
Steps to update different font/size:
Insert USB flash into USB port 1 on Machine.
From the Settings menu, go to Update Font and press Enter.
Select your desired font/sizes (1 to 6) and press Enter to begin updating. Example: FONT1 on
your USB will replace FONT1 on the machine memory.
Machine accepts font/sizes with .hex format only. All font/sizes must be named as showed below.
NOTES:
Fonts being updated will replace the existing ones on the machine memory.
The m
Font
Font
Roll over
Set a different date depending on the shift schedules of your production.
From the Settings menu, use the arrow keys to move to Rollover and press Enter.
Go to Set and press Enter. Enable this function and input a value at Time. Press Enter to
apply (default value is 00h:00). Otherwise select Disable and press Enter to apply.
NOTES:
Value input varies from 0 to 23.
System time
achine prints true fonts while
files 1 files 6 -
5 and 11
10 and 16
are
Normal font.
are
Uppercase font.
USER MANUAL V2.2 | October 10, 2019 30
connected to a
PC.
Page 31

Set time and date for your system clock.
From the Settings menu, use arrow keys to go to System clock and press Enter.
Go to Date, use and arrow keys to change date value and press Enter to apply.
Go to Time, use and arrow keys to change time value and press Enter to apply.
Rotate
This function will allow you control the direction of the menu interface, this will make it easier
to see the screen and operate.
A rotate sensor inside the machine will automatically adjust the interface to match with
current direction of machine. From the Settings menu, use the arrow keys to go to Rotate
and press Enter. Select Auto or Lock rotate, press Enter to apply. The screen will rotate
according to the direction of the machine when Auto is selected. The screen will be locked
at the current direction when Lock rotate is selected. Otherwise select others.
Password
Set password to protect the machine from unauthorized users.
The machine is defaulted to use with no password. To activate password protection, from
the Settings menu use arrow keys to go to Password and press Enter. Then go to Active and
select Enable to set password. Enter old password (1234567890), then enter your new
password and retype to confirm. Maximum characters allowed for password is 10 including
letters and numbers.
Default - Important setting
Reset your machine settings to the factory defaults. This can be used after updating firmware
or reset machine in case errors occur during operation.
From the Settings menu, select Default and press Enter. A confirmation box will appear.
Select Yes to continue. Otherwise, select No.
Language
Select your interface language. The machine can support the following languages:
English (Default), Chinese, Korean, French, Deutsch,
Spanish, Finnish, Polish, Russian, Portuguese, Vietnamese, Italian, Indonesian,
Turkish, Dutch and Czech.
From the Settings menu, select Language and press Enter. Use the arrow keys to move to
your desired language and press Enter to apply. Otherwise, select ESC.
NOTES:
The machine will display
language
Add optional language interface
For example, a user needs to change the machine interface to Korean. They will need to do
the following:
in the
menu but i
6 languages in Setting Language. If you don’t see your desired
s included in
USER MANUAL V2.2 | October 10, 2019 31
our supported languages, please
follow instructions:
Page 32

Step 1
Languages
File name
Index Update
00SC.txt
Finnish
01SC.txt
Spanish
02SC.txt
German
03SC.txt
French
04SC.txt
Russian
05SC.txt
Vietnamese
06SC.txt
Chinese
07SC.txt
Korean
08SC.txt
Portuguese
09SC.txt
Polish
10SC.txt
Dutch
11SC.txt
Italia
12SC.txt
Turkish
13SC.txt
Czech
14SC.txt
Indonesia
15SC.txt
Copy all file of the machine’s firmware to the ROOT FOLDER of USB flash. See table below
for more information.
Step 2
After copying all files to a USB, locate file 00SC.txt (Index update). Open and edit this
file content to “08” (this means the Index update will become Korean – 08SC.txt). Save
and closed this file.
Step 3
Insert USB flash into the machine. Go to the Settings menu. Press F12. Please wait a
moment for machine to update the new Index of languages.
Step 4
Go to Settings Language Enter. You will see “Korean” will appear at the bottom of
menu language.
Select “Korean”, press Enter.
Press F12 to complete operation. Please wait a moment, the machine will read file
08SC.txt and update the memory.
The machine will exit the Settings menu and return to the Main menu with the new
Korean language interface.
NOTES:
You need do exactly 4 steps above and also press F12
both
times.
USER MANUAL V2.2 | October 10, 2019 32
Page 33

IO signals
Select to start/ stop the coder from a button.
From the Settings menu, select IO signals and press Enter. Then select input to activate
Start/ Stop.
Reset
Reset the memory of the Counter variable within the machine. The memory of the Counter
will help you save the current value of Counter even if you stop print or the machine is
turned off. From the Settings menu, select Reset. Press Enter to erase memory of counter
(printer will print from started number).
Backup
All settings on printer: Message, Logo, Settings, Custom string will export to a file and
save on usb.
From the Settings menu, select Backup. Please insert usb flash before choosing Backup.
Restore
All settings on printer: Message, Logo, Settings, Custom string will import from files on the
usb.
From the Settings menu, select Restore. Please insert usb flash before choosing Restore.
NOTES:
The b
ackup file only restores on another printer with same Model and firmware version.
Calibrate voltage
See information and edit the Voltage, Pulse width and Ink volume.
About
See information of the current firmware.
Update to a different firmware (see UPDATE FIRMWARE INSTRUCTIONS).
UPDATE FIRMWARE INSTRUCTIONS
NOTES:
Be sure there is no power failure while firmware is
All data and settings will be lost while updating new firmware.
Cartridge should be removed from the machine.
Everything connected to the machine (exclud
from the machine.
Prepare USB flash
updating
ing the
.
keyboard) should be removed
Prepare USB flash disk less than 32GB.
Format USB flash disk with file system FAT / FAT32 and allocation unit size 64 kilobytes.
See photo below:
USER MANUAL V2.2 | October 10, 2019 33
Page 34
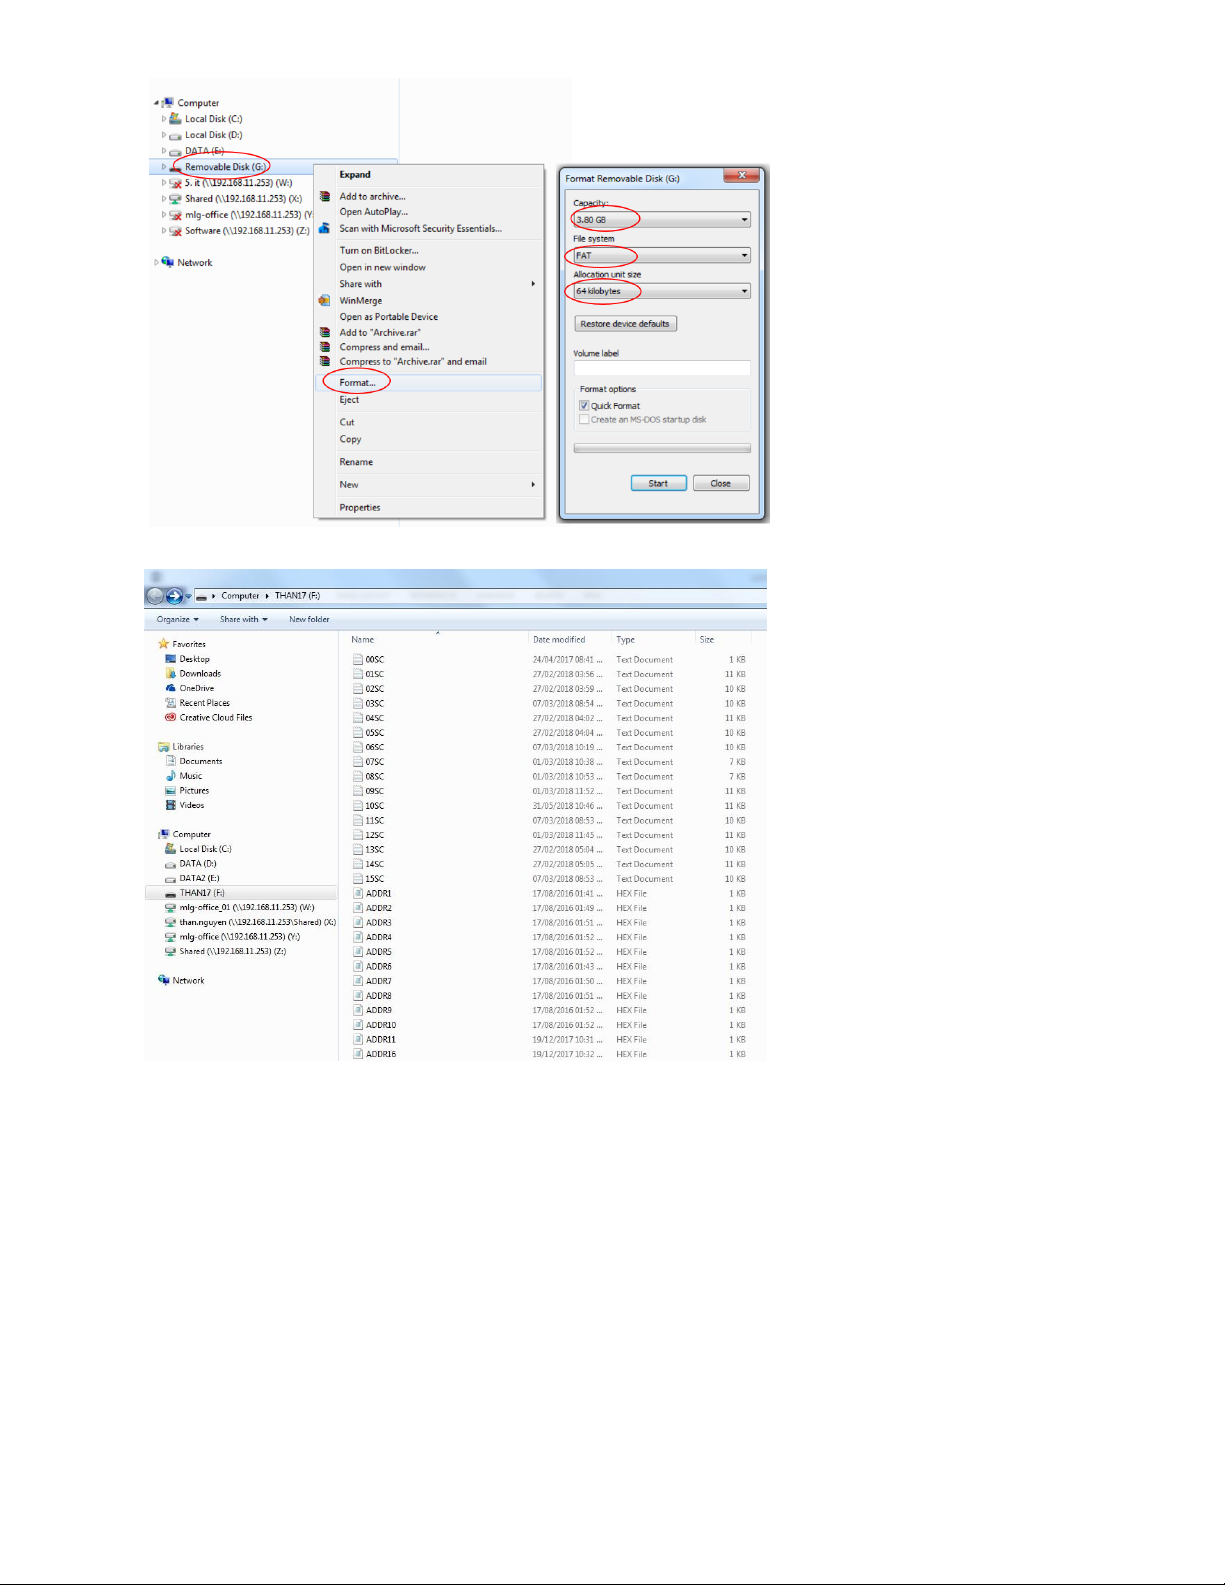
Extract firmware folder (.RAR file) to ROOT folder of USB flash disk.
Insert USB flash disk into USB port 1 on machine.
Update firmware
From the main menu, use the arrow keys to go to Settings About Update Firmware
Yes.
This process will take 3 minutes.
When update is complete, use the arrow keys to go to Settings Default Yes.
After default complete, go to the Main Menu and press F12.
Press/combine Ctrl + Shift + Alt + K to update startup logo.
Update logo
When update is complete, go to Settings Update logo and do the following updates:
Update Logo Logo 1.
USER MANUAL V2.2 | October 10, 2019 34
Page 35

Update Logo Logo 2.
Update Logo Logo 3.
……
Update Logo Logo 20.
Select All to update all logo.
You can skip this step if it is not need for you.
Update font Latin
This process will take 10 - 15 minutes. Go to Settings Update Font
Latin.
Update Font Font 25.4 mm.
Update Font Font 12.7 mm.
Update Font Font 8.00 mm.
Update Font Font 5.92 mm.
Update Font Font 3.89 mm.
Update Font Font 2.54 mm.
Select All to update all Font.
NOTES:
This step must be updated to
ensure
Edit Messages
works well.
Update font Chinese
This Process will take 100 – 120 minutes.
Goto Settings Update Font Chinese.
Update Font
Update Font Font 8.00 mm.
Update Font Font 5.92 mm.
Update Font Font 3.89 mm.
Update Font Font 2.54 mm.
Update Font Pinyin table.
Select All to update all Font.
Wait until update font show finish.
NOTES:
This step must be updated to
Font 12.7 mm.
ensure
Edit Messages works well.
Machine default
To set your machine to factory defaults, go to Settings Default Yes.
NOTES:
This step must be executed to make sure all new functions on
no updating errors occurred
.
THANK
USER MANUAL V2.2 | October 10, 2019
YOU
FOR READING!
the
machine work well and
35
 Loading...