

Page 1
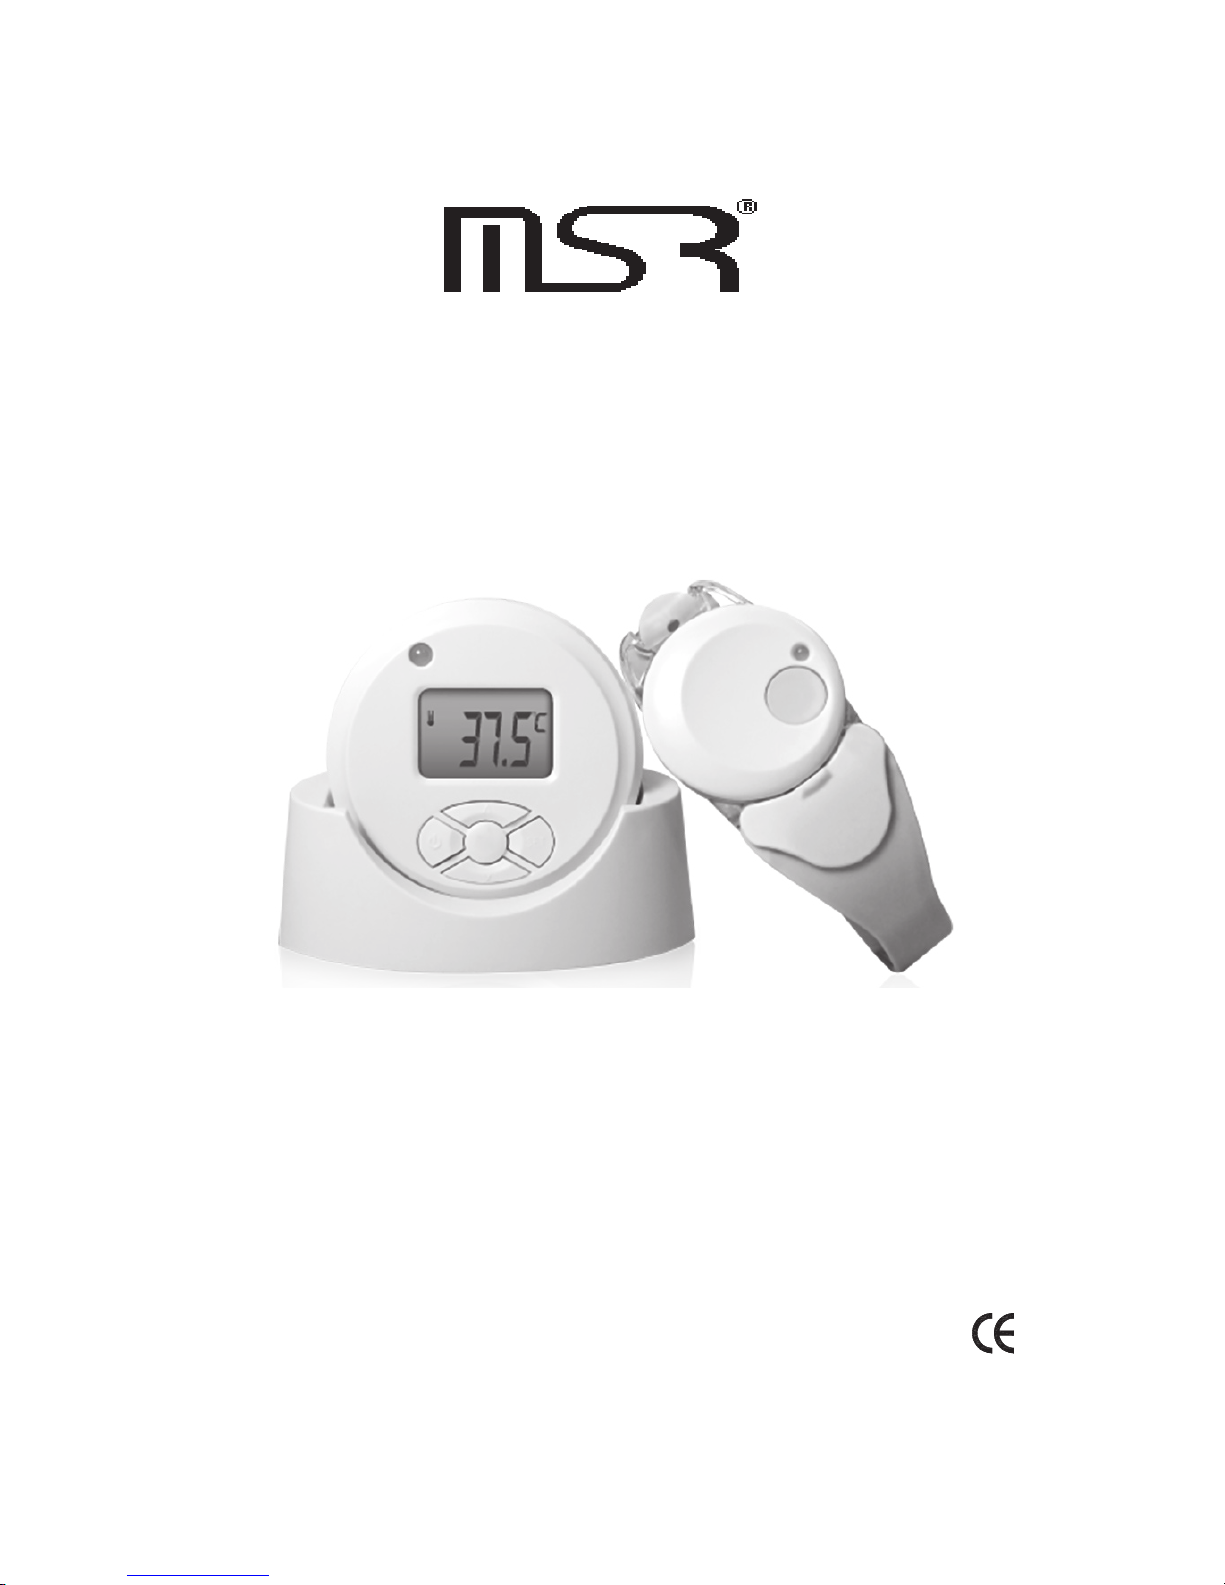
Wireless Temperature Monitor
Model No.: ST323
Operation Manual
Please Read Carefully Before Using
0434
Page 2

Page 3

Thank you for purchasing MSR Wireless Temperature Monitor . Before
you start using this unit, please read this operation manual thoroughly.
Contents
Introduction ............................................................................................... 2
Specications ............................................................................................ 3
Safety Notes .............................................................................................. 4
Components .............................................................................................. 5
Product Descriptions ................................................................................. 6
Icon Idex ................................................................................................... 8
Preparation Before Using .......................................................................... 9
Operation
:
Temperature Monitor ....................................................................... 11
Ambient Temperature Indicator ....................................................... 14
Clock ................................................................................................ 15
Responding to Temperature Alarm ........................................................... 16
Important Signal / Light Indicator ............................................................ 17
Battery Replacement ................................................................................. 18
Care and Storage ....................................................................................... 19
Warranty .................................................................................................... 20
1.
2.
3.
- 1 -
Page 4

【Introduction】
Congratulations! on the purchase of your new MSR Wireless Temperature
Monitor. You may now “Rest Assured” of your loved one’s temperature
either up close or from a distance, even from another room! “Why Wake
your Sleeping Angel up”?
Your new “Wireless Temperature Monitor” is a Technologically advanced
medical device intended for remote monitoring of body temperature for
up to 100 hours of continuous use. It is intended for patients 3 years old to
adult. The device consists of two parts: the transmitter and the receiver.
The transmitter monitors body temperature (via the underarm sensor) then
automatically transmits the measured temperature reading to the remote
receiver.
The following are key features:
• Clinically Accurate: Meets or exceeds ASTM and CE accuracy
standards.
• Accuracy Assurance Function – temperature reading transmits every
15 seconds!
• Fever alarm and fever receding points setting --- Hi, Lo.
• Memory Function - tracks previous readings every 30 minutes.
• Alarm Function – Alarm sounds when temperature deviates from
personalized pre-set parameters.
• Additional Alarm Function – Alarm sounds should sensor become
disconnected.
• Clock Function.
• Room Temperature Function – Scans and reads ambient temperature.
• Backlit for easy night reading when any button on the control panel
is touched.
• FCC approved transmission frequency – 433.92MHz.
• Measures in Centigrade and Fahrenheit.
Trademark and patent Pending
- 2 -
- 3 -
Page 5

【Specifications】
Size: Transmitter: 2.24 x 1.60 x .72 in.
Receiver: 2.85 x 2.85 x .90 in.
Weight: Transmitter: approx. 36g (1.21 oz)(without battery)
Receiver: approx. 44.2g (1.49 oz) (without battery)
Product Material: Transmitter: ABS
Receiver: ABS
Type of Batteries: Transmitter: 3V x 1 (CR2032)
Receiver: AAA / 1.5V x 2
Life of Batteries: Transmitter: Approx. > 500hrs
Receiver: Approx. > 200hrs
Backlight: Backlight will be ON for 5 sec. when you press any button
Effective Distance for Transmission and Reception:
160 feet distance (approx.50M) in an open space. If there are objects in that
space, the transmission distance will be affected.
Range of Temperature Settings: 10.0℃ ~ 43.0℃ (50.0
℉
~ 109.4
℉
)
Temperature Accuracy: ±0.1℃ / 0.2℉ between 32℃ ~ 43.0℃ (89.6℉ ~
109.4℉)
±0.5
℃
/ 1.0
℉
beyond above range
Storage environment: Transmitter / Receiver
Ambient temperature: -10.0℃ ~ 60.0
℃
(14.0
℉
~
140.0℉)
Humidity: 30% -80% RH
Temperature Measurement Interval: Transmitter measures body
temperature once every 15
seconds.
Transmitting Signal: When transmitter detects body temperatures
exceeding the High-Low range three (3) times in
a row, it transmits a signal to the receiver to sound
an alarm.
Sound of Receiver Alarm: Low: Long BiBiBi
High: Short BiBiBi
Frequency of Transmission: 433.92 MHz
Memory Function: 200 sets
- 3 -
Page 6

【Safety Notes】
Warning
Before you start using this unit, please read this operation manual
thoroughly for the correct operation procedures.
This device is not waterproof and must never be submersed in any
liquid.
Do not drop or disassemble the unit.
Avoid exposing the thermometer to direct sunlight, high temperature,
moisture or dirt.
If the unit will not be used for a long time, it is recommended that the
battery is removed and stored from the reach of children.
If the unit becomes contaminated, clean it with a damp cloth.
Changes or modications to this unit not expressly approved by the party
responsible for compliance could void the user authority to operate the
equipment.
This device complies with Part 15 of the FCC Rules. Operation is subject
to the following two conditions:
(1) This device may not cause harmful interference, and
(2) This device must accept any interference received, including interference
that may cause undesired operation.
The user manual or instruction manual for an intentional or unintentional
radiator shall caution the user that changes or modications not expressly
approved by the party responsible for compliance could void the user’s
authority to operate the equipment.
1.
2.
3.
4.
5.
6.
- 4 -
- 5 -
Page 7
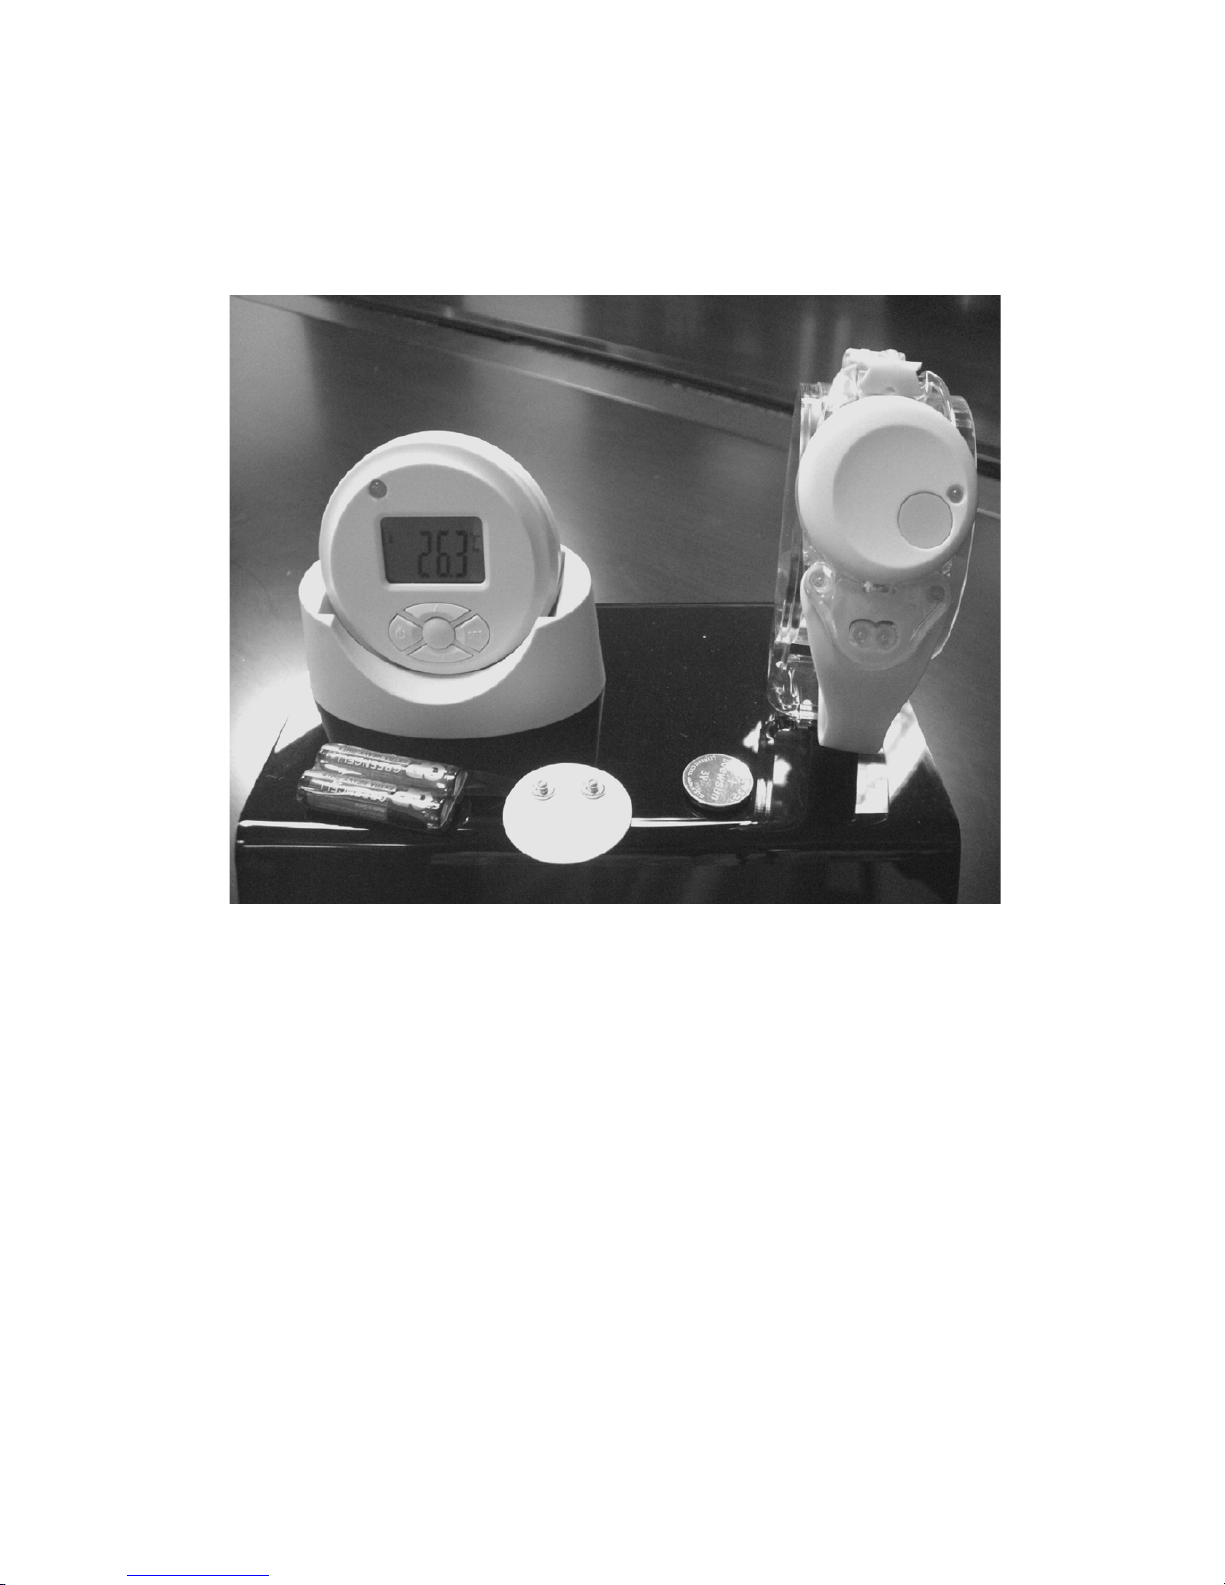
【Components】
Receiver
Transmitter
Battery for receiver
Sensor patch
Battery for Transmitter
- 5 -
Page 8
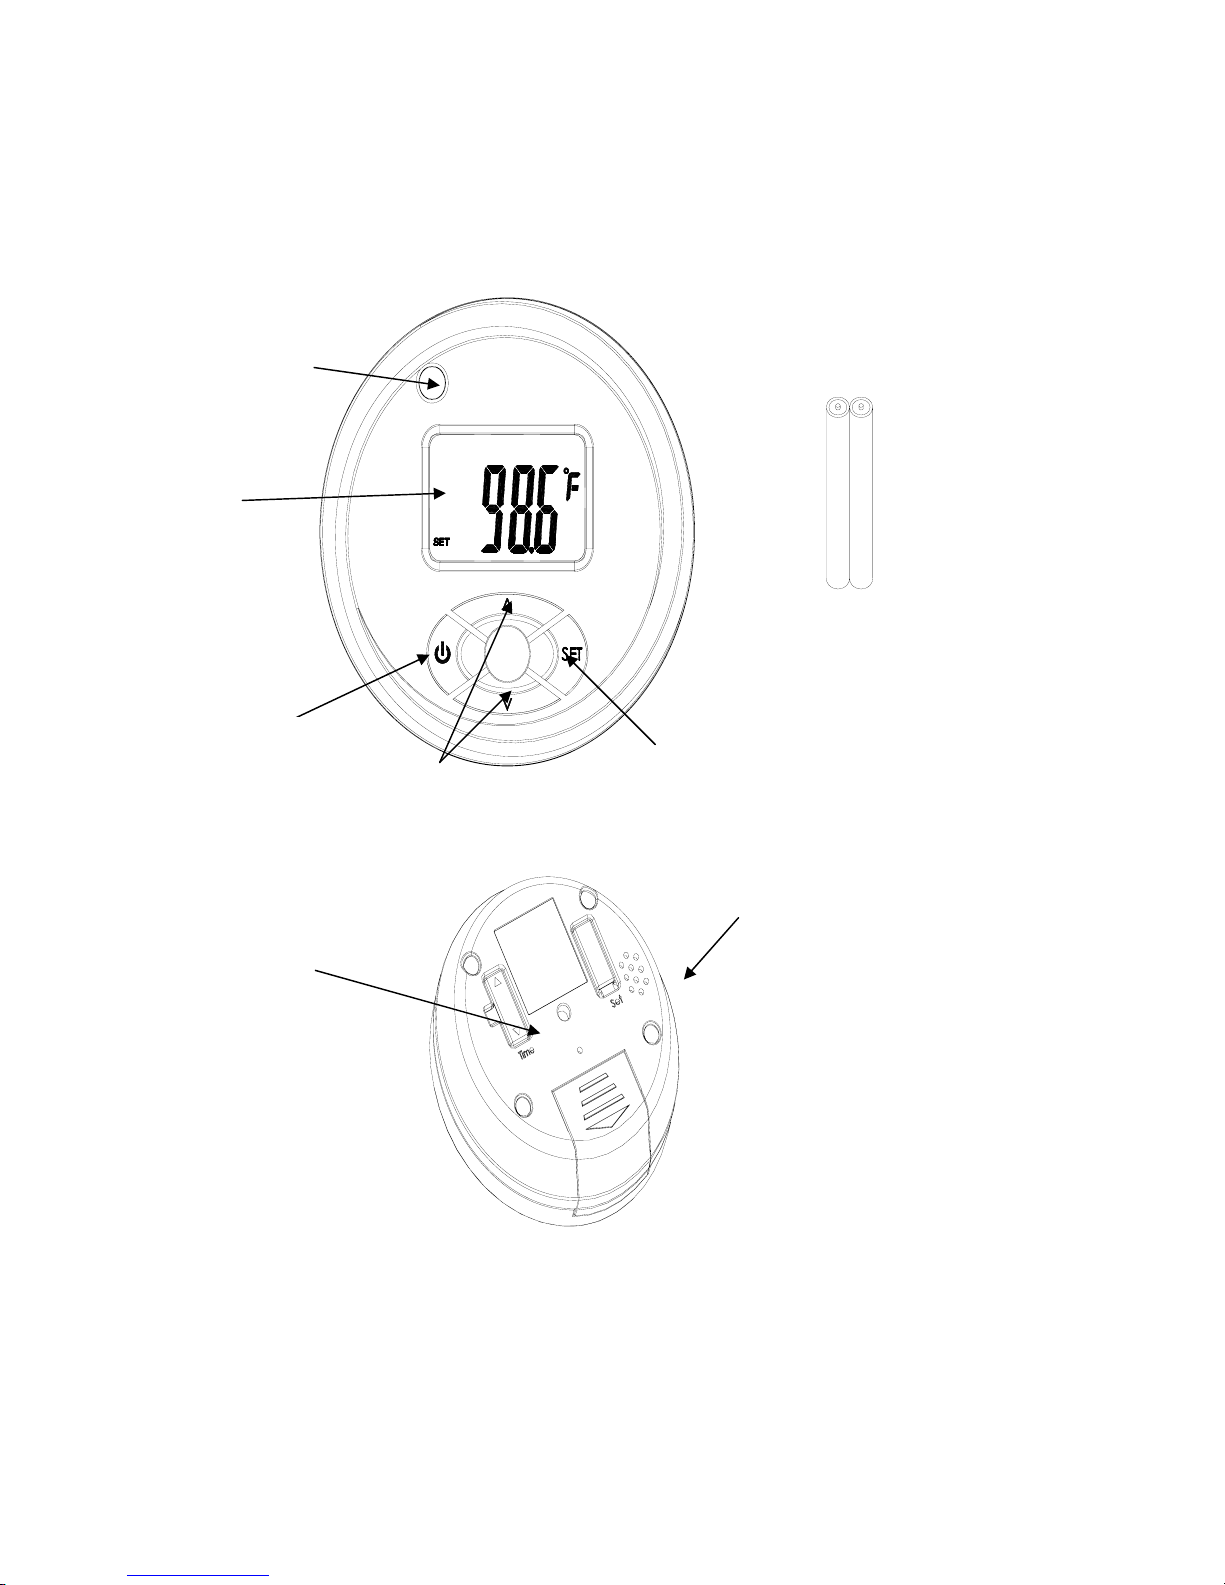
μProduct Descriptionsν
Receiver group:
【Product Descriptions】
Receiver group:
Light Indicator
LCD
Power Key
Selection button
Selection button
Battery for Receiver
Setting key
Setting Key
For Year/Month/Date/Time
- 6 -
- 7 -
Page 9
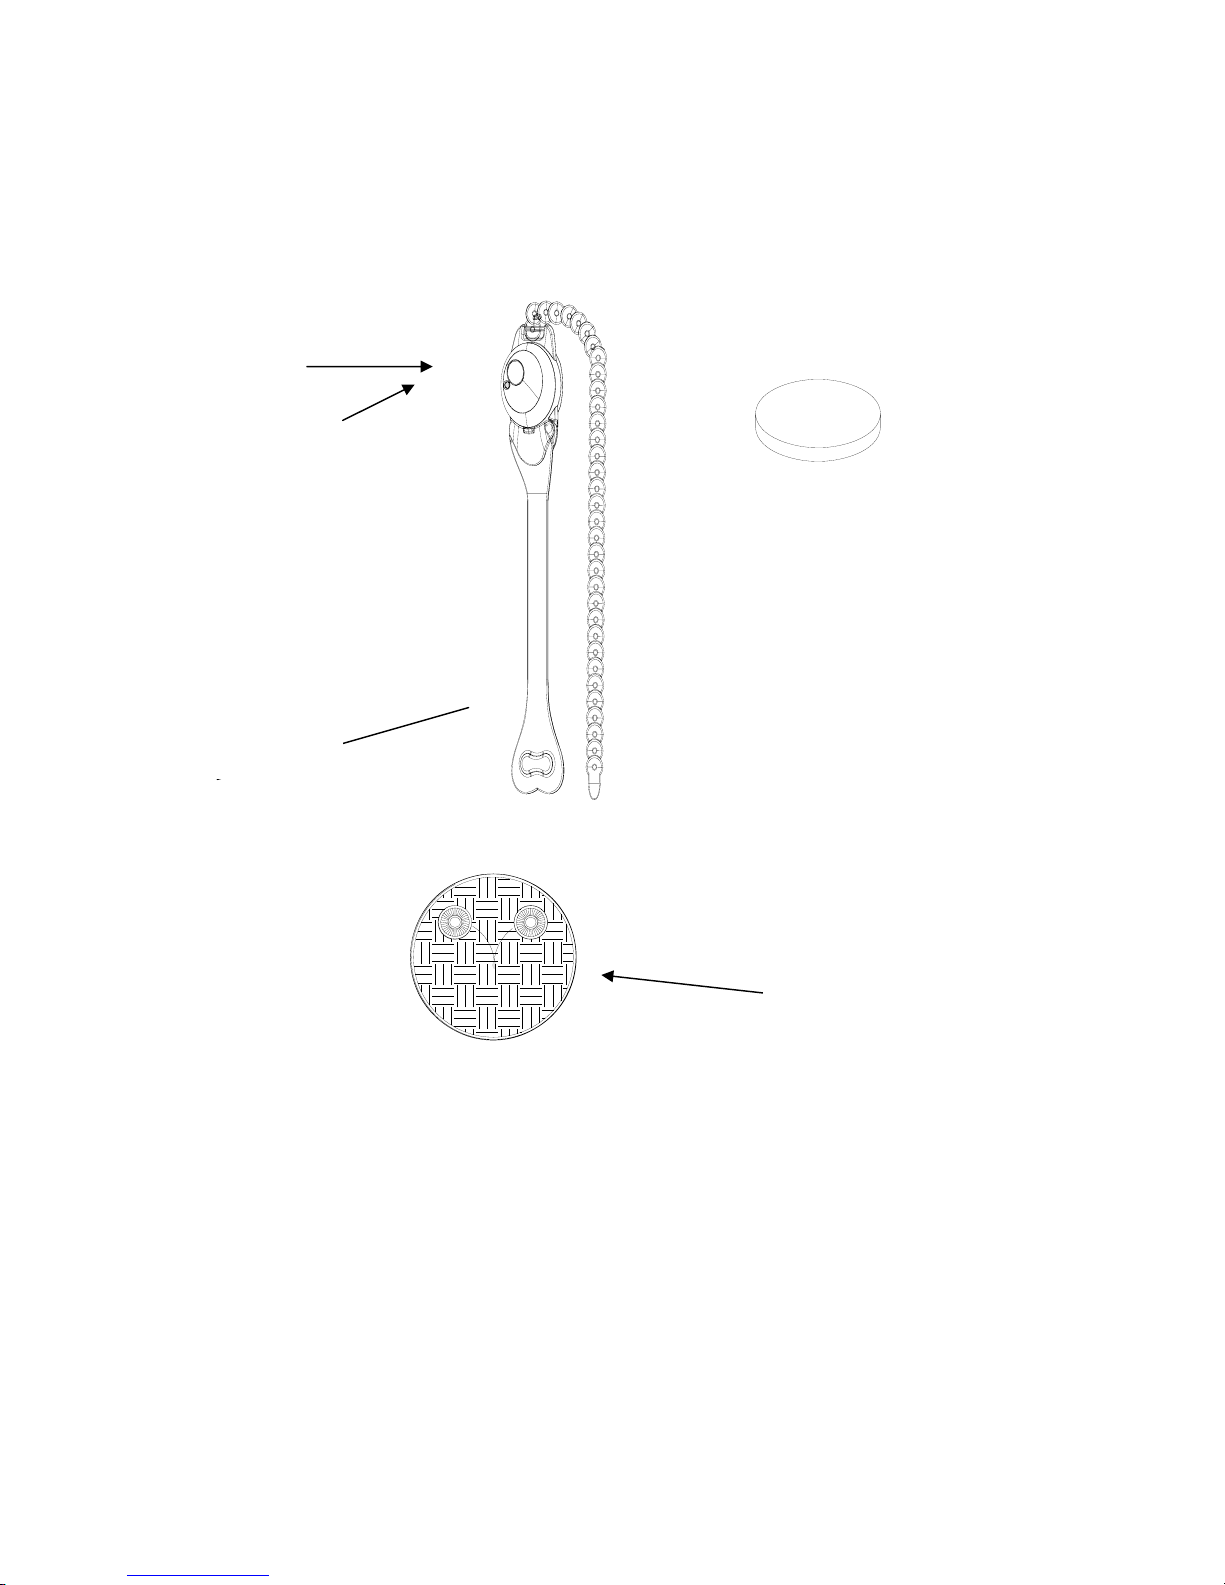
Transmitter group:
CR2032
Receiver group:
Power Key
Light indicator
Sensor Band
Battery for Transmitter
Arm Band
Sensor patch
- 7 -
Page 10
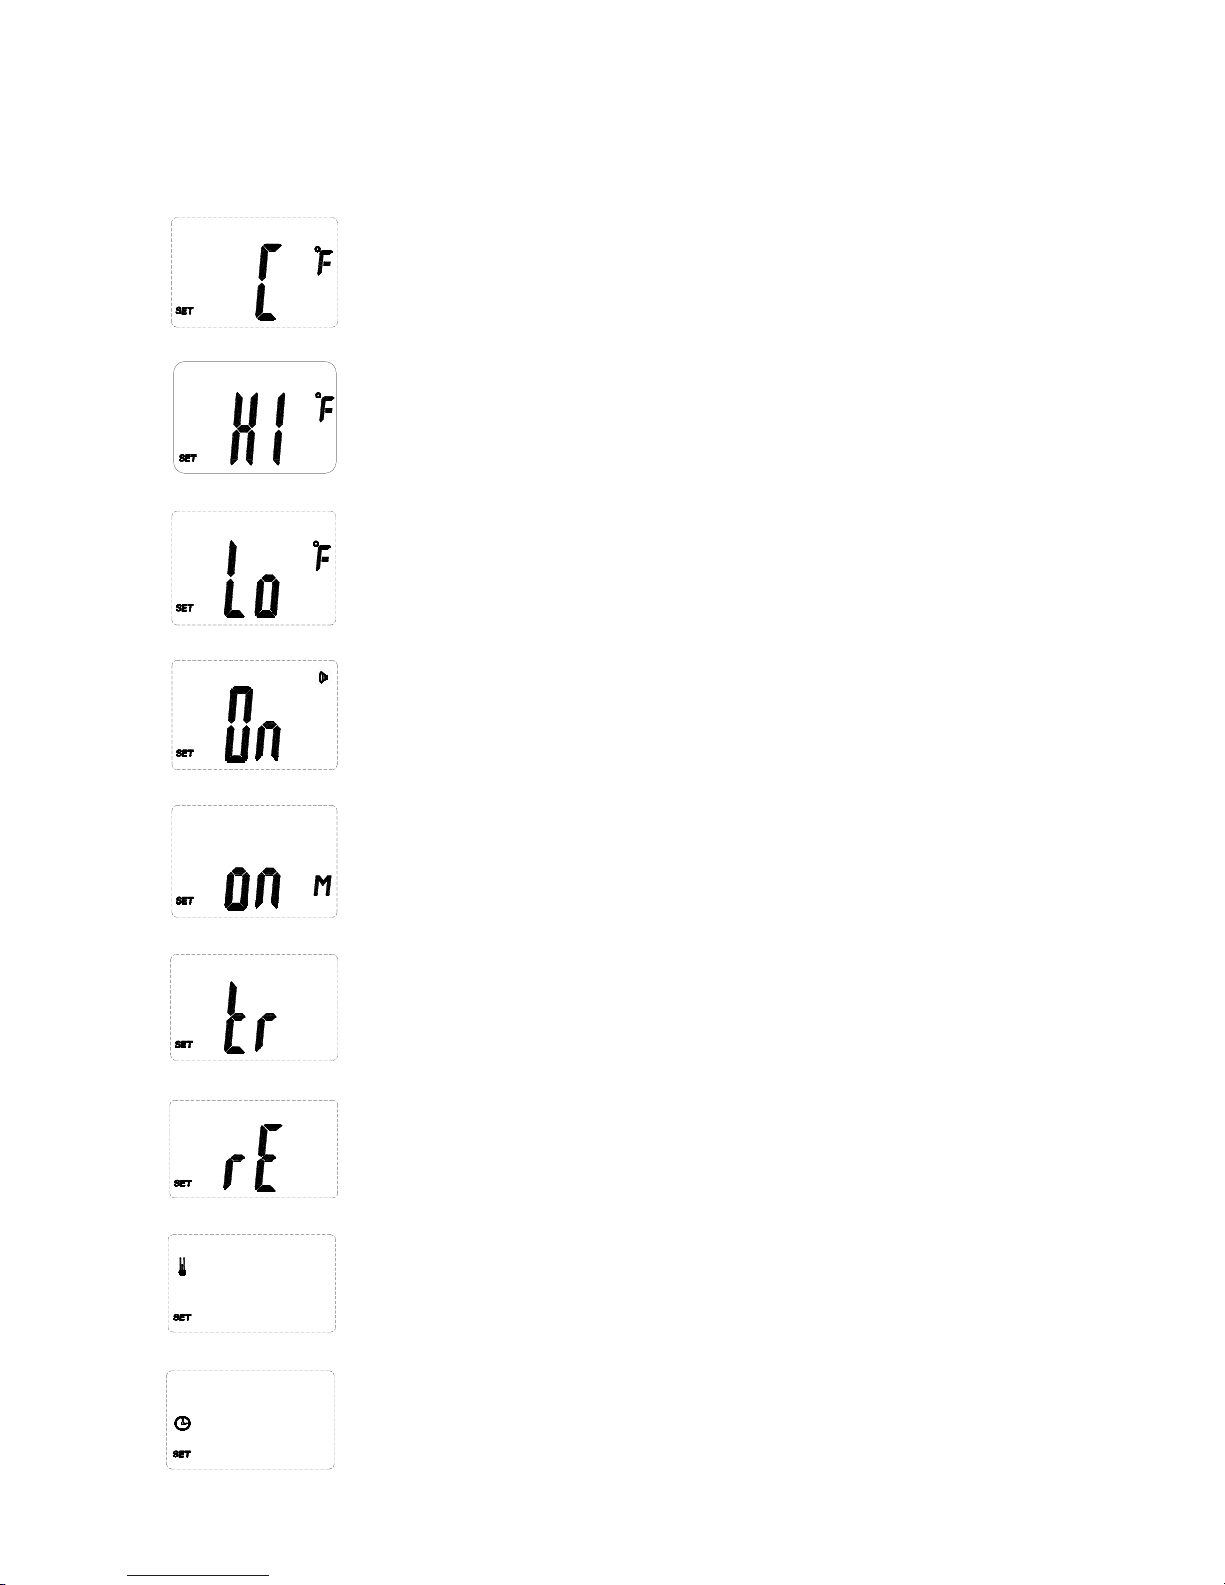
【Icon Idex】
When you see this Icon on the display, press “<” or “<”
button to switch ℃ to ℉ or ℉ to ℃.
When you see this Icon on the display, press “<” or “<”
button to set high temperature (fever alarm point).
When you see this Icon on the display, press “<” or
“<” button to set low temperature limit (fever receding
point).
When you see this Icon on the display, this unit is on
“alarm’ status, press “<” or “<” button to select buzzer
on or off.
When you see this Icon on the display, this unit is on
“memory’ function, press “<” or “<” button to clear
memory function.
When you see this Icon on the display, this unit is on
“wireless temperature monitor’ mode.
When you see this Icon on the display, this unit is on
“ambient temperature monitor’ mode.
When you see this Icon on the display, this unit is on
temperature setting mode.
When you see this Icon on the display, this unit is on
clock setting mode.
μ Icon Idex ν
When you see this Icon on the display, press “” or “”
button to switch к to лʳʳлʳʳкˁ
μ Icon Idex ν
When you see this Icon on the display, press “” or “”
button to switch к to лʳʳлʳʳкˁ
When you see this Icon on the display, press “” or “”
button to set high temperature (fever alarm point).
μ Icon Idex ν
When you see this Icon on the display, press “” or “”
button to switch к to лʳʳлʳʳкˁ
When you see this Icon on the display, press “” or “”
button to set high temperature (fever alarm point).
When you see this Icon on the display, press “” or “”
button to set low temperature limit (fever receding point).
μ Icon Idex ν
When you see this Icon on the display, press “” or “”
button to switch к to лʳʳлʳʳкˁ
When you see this Icon on the display, press “” or “”
button to set high temperature (fever alarm point).
When you see this Icon on the display, press “” or “”
button to set low temperature limit (fever receding point).
When you see this Icon on the display, this unit is on
“alarm’ status, press “” or “” button to select buzzer is
on or off.
μ Icon Idex ν
When you see this Icon on the display, press “” or “”
button to switch к to лʳʳлʳʳкˁ
When you see this Icon on the display, press “” or “”
button to set high temperature (fever alarm point).
When you see this Icon on the display, press “” or “”
button to set low temperature limit (fever receding point).
When you see this Icon on the display, this unit is on
“alarm’ status, press “” or “” button to select buzzer is
on or off.
When you see this Icon on the display, this unit is on
“memory’ function, press “” or “” button to clea
r
μ Icon Idex ν
When you see this Icon on the display, press “” or “”
button to switch к to лʳʳлʳʳкˁ
When you see this Icon on the display, press “” or “”
button to set high temperature (fever alarm point).
When you see this Icon on the display, press “” or “”
button to set low temperature limit (fever receding point).
When you see this Icon on the display, this unit is on
“alarm’ status, press “” or “” button to select buzzer is
on or off.
When you see this Icon on the display, this unit is on
“memory’ function, press “” or “” button to clea
r
When you see this Icon on the display, this unit is on
“wireless temperature monitor’ mode
μ Icon Idex ν
When you see this Icon on the display, press “” or “”
button to switch к to лʳʳлʳʳкˁ
When you see this Icon on the display, press “” or “”
button to set high temperature (fever alarm point).
When you see this Icon on the display, press “” or “”
button to set low temperature limit (fever receding point).
When you see this Icon on the display, this unit is on
“alarm’ status, press “” or “” button to select buzzer is
on or off.
When you see this Icon on the display, this unit is on
“ambient temperature monitor’ mode
When you see this Icon on the display, this unit is on
“memory’ function, press “” or “” button to clea
r
When you see this Icon on the display, this unit is on
“wireless temperature monitor’ mode
μ Icon Idex ν
When you see this Icon on the display, press “” or “”
button to switch к to лʳʳлʳʳкˁ
When you see this Icon on the display, press “” or “”
button to set high temperature (fever alarm point).
When you see this Icon on the display, press “” or “”
button to set low temperature limit (fever receding point).
When you see this Icon on the display, this unit is on
“alarm’ status, press “” or “” button to select buzzer is
on or off.
When you see this Icon on the display, this unit is on
“ambient temperature monitor’ mode
When you see this Icon on the display, this unit is on
temperature setting mode
When you see this Icon on the display, this unit is on
“memory’ function, press “” or “” button to clea
r
When you see this Icon on the display, this unit is on
“wireless temperature monitor’ mode
μ Icon Idex ν
When you see this Icon on the display, press “” or “”
button to switch к to лʳʳлʳʳкˁ
When you see this Icon on the display, press “” or “”
button to set high temperature (fever alarm point).
When you see this Icon on the display, press “” or “”
button to set low temperature limit (fever receding point).
When you see this Icon on the display, this unit is on
“alarm’ status, press “” or “” button to select buzzer is
on or off.
When you see this Icon on the display, this unit is on
“ambient temperature monitor’ mode
When you see this Icon on the display, this unit is on
temperature setting mode
When you see this Icon on the display, this unit is on cloc
k
setting mode
When you see this Icon on the display, this unit is on
“memory’ function, press “” or “” button to clea
r
When you see this Icon on the display, this unit is on
“wireless temperature monitor’ mode
- 8 -
- 9 -
Page 11
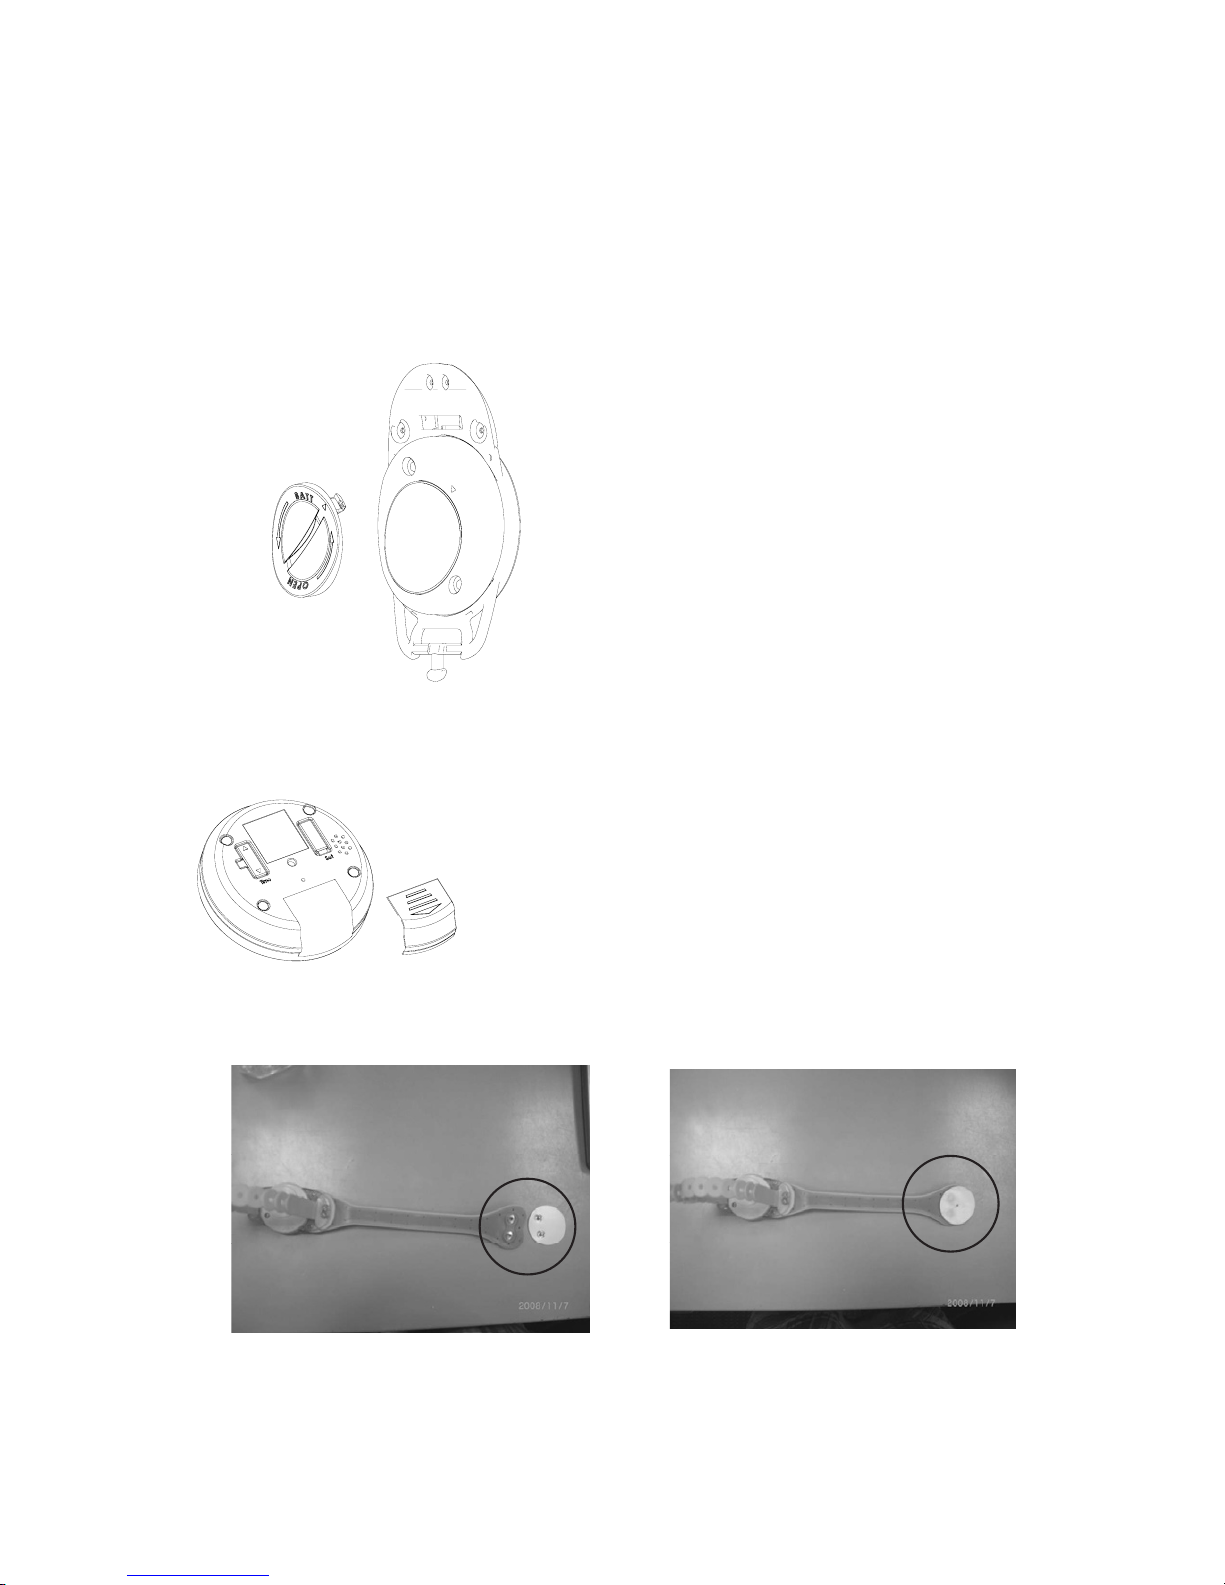
μPreparation Before Usingν
Step one: Install battery
CR2032
One CR2032 (3 volt) battery
z Use a coin or a screw driver to open the battery
cover by turning counter-clockwise.
z Insert one battery in the battery compartment.
The positive (+) side should be faced up.
z Turn clockwise to close the battery cover.
μPreparation Before Usingν
Step one: Install battery
CR2032
One CR2032 (3 volt) battery
z Use a coin or a screw driver to open the battery
cover by turning counter-clockwise.
z Insert one battery in the battery compartment.
The positive (+) side should be faced up.
z Turn clockwise to close the battery cover.
Two AAA (1.5V) batteries
z Remove the battery compartment cover.
z Insert two batteries in the battery compartment
as indicated.
z Put the battery cover back on.
μPreparation Before Usingν
Step one: Install battery
CR2032
Step two:
One CR2032 (3 volt) battery
z Use a coin or a screw driver to open the battery
cover by turning counter-clockwise.
z Insert one battery in the battery compartment.
The positive (+) side should be faced up.
z Turn clockwise to close the battery cover.
Two AAA (1.5V) batteries
z Remove the battery compartment cover.
z Insert two batteries in the battery compartment
as indicated.
z Put the battery cover back on.
【Preparation Before Using】
Step one: Install battery
One CR2032 (3 volt) battery
●
Use a coin or a screw driver to open
the battery cover by turning counterclockwise.
●
Ins e rt one bat t ery in th e b a tte r y
compartment. The positive (+) side
should be faced up.
●
Turn clockwise to close the battery
cover.
Two AAA (1.5V) batteries
●
Remove the battery compartment cover.
●
Insert two batteries in the battery
compartment as indicated.
●
Put the battery cover back on.
Step two:
Press the button of the sensor patch to the sensor band
- 9 -
Page 12
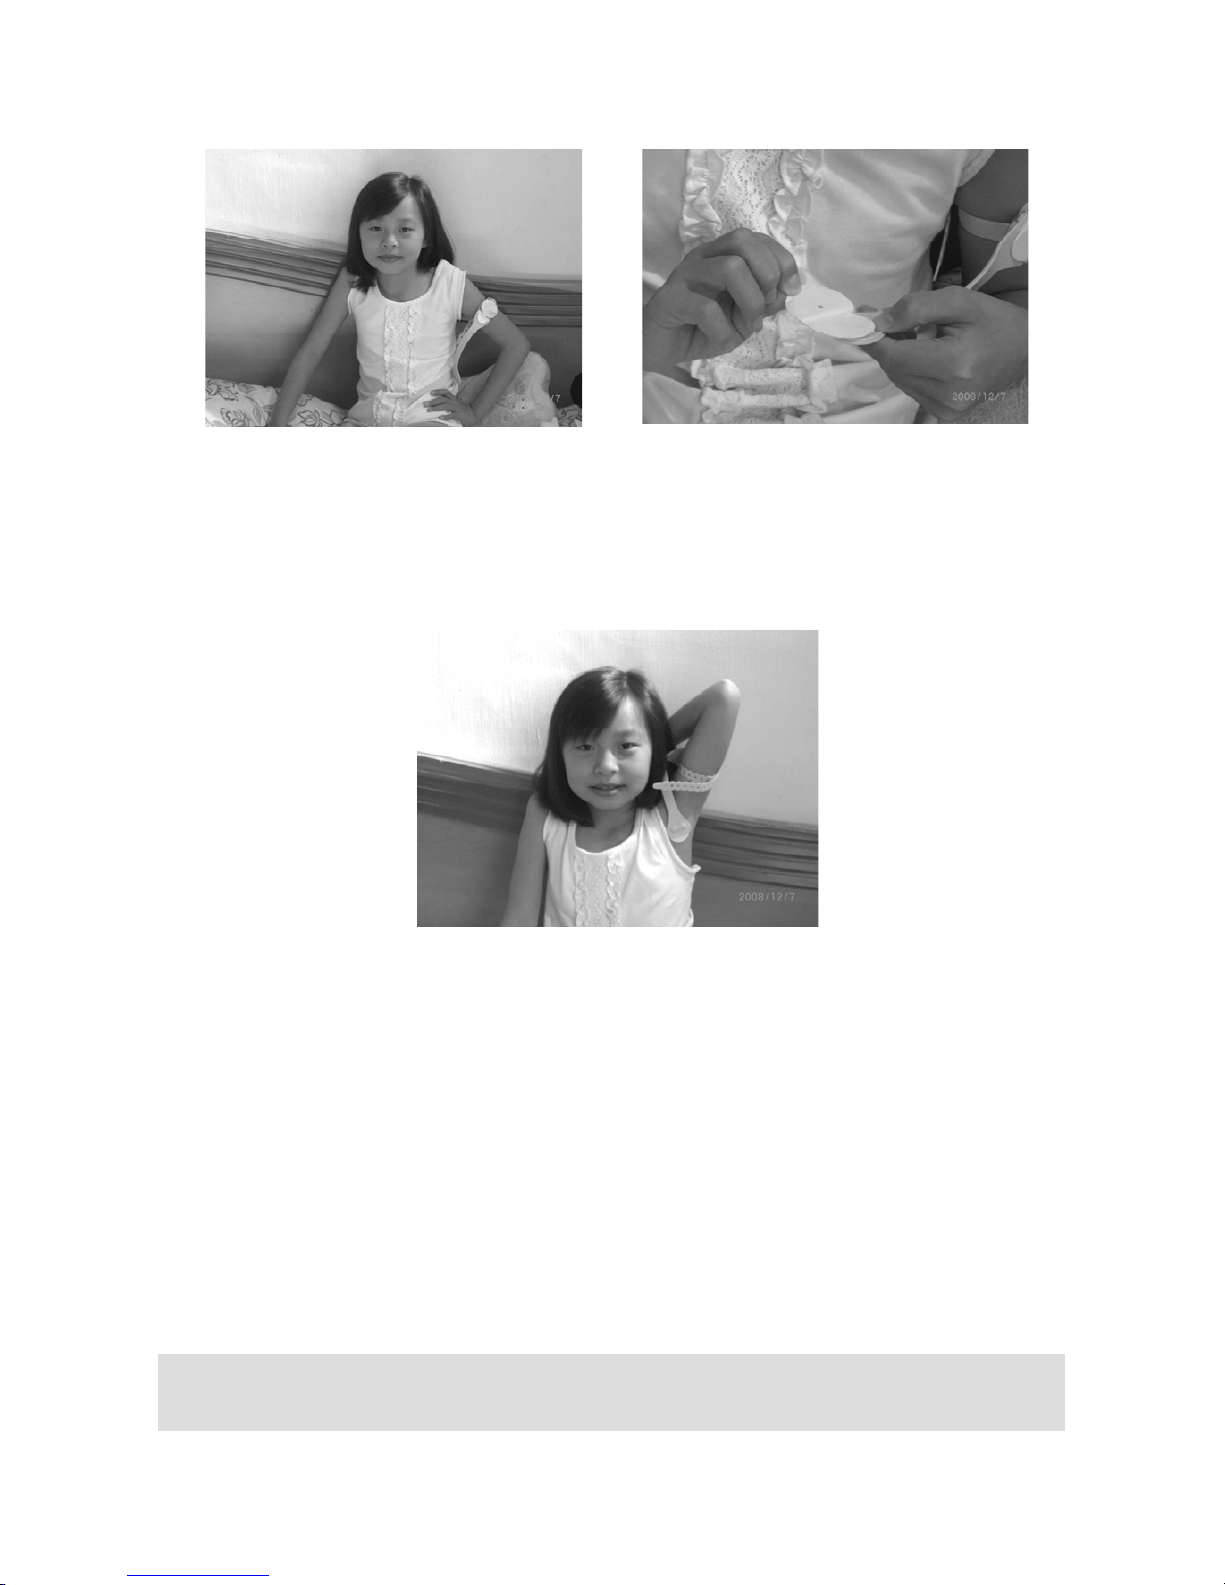
Step three: Fasten the arm band
Step three: Fasten the arm band
Step three: Fasten the arm band
Step 1
Put the armband on the upper arm and
adjust armband to the proper tightness.
Step 2
Peel off the cover from the sensor
p
Step 1
Put the armband on the upper
arm and adjust armband to the
proper tightness
Step 2
Peel off the cover from the
sensor patch.
Step 3
Afx the sensor patch under the
armpit
Remark:
** The sensor patch is one-time use, when you use up the attached 3
sensor patches, you can buy it from your nearby distributor.
** If oil or similar substance gets on the surface of the adhesive patch,
it will not stick as well and will not last as long.
Note: The receiver should be kept with the caretaker remotely.
- 10 -
- 11 -
Page 13
【
Operation
】
Temperature Monitor
*
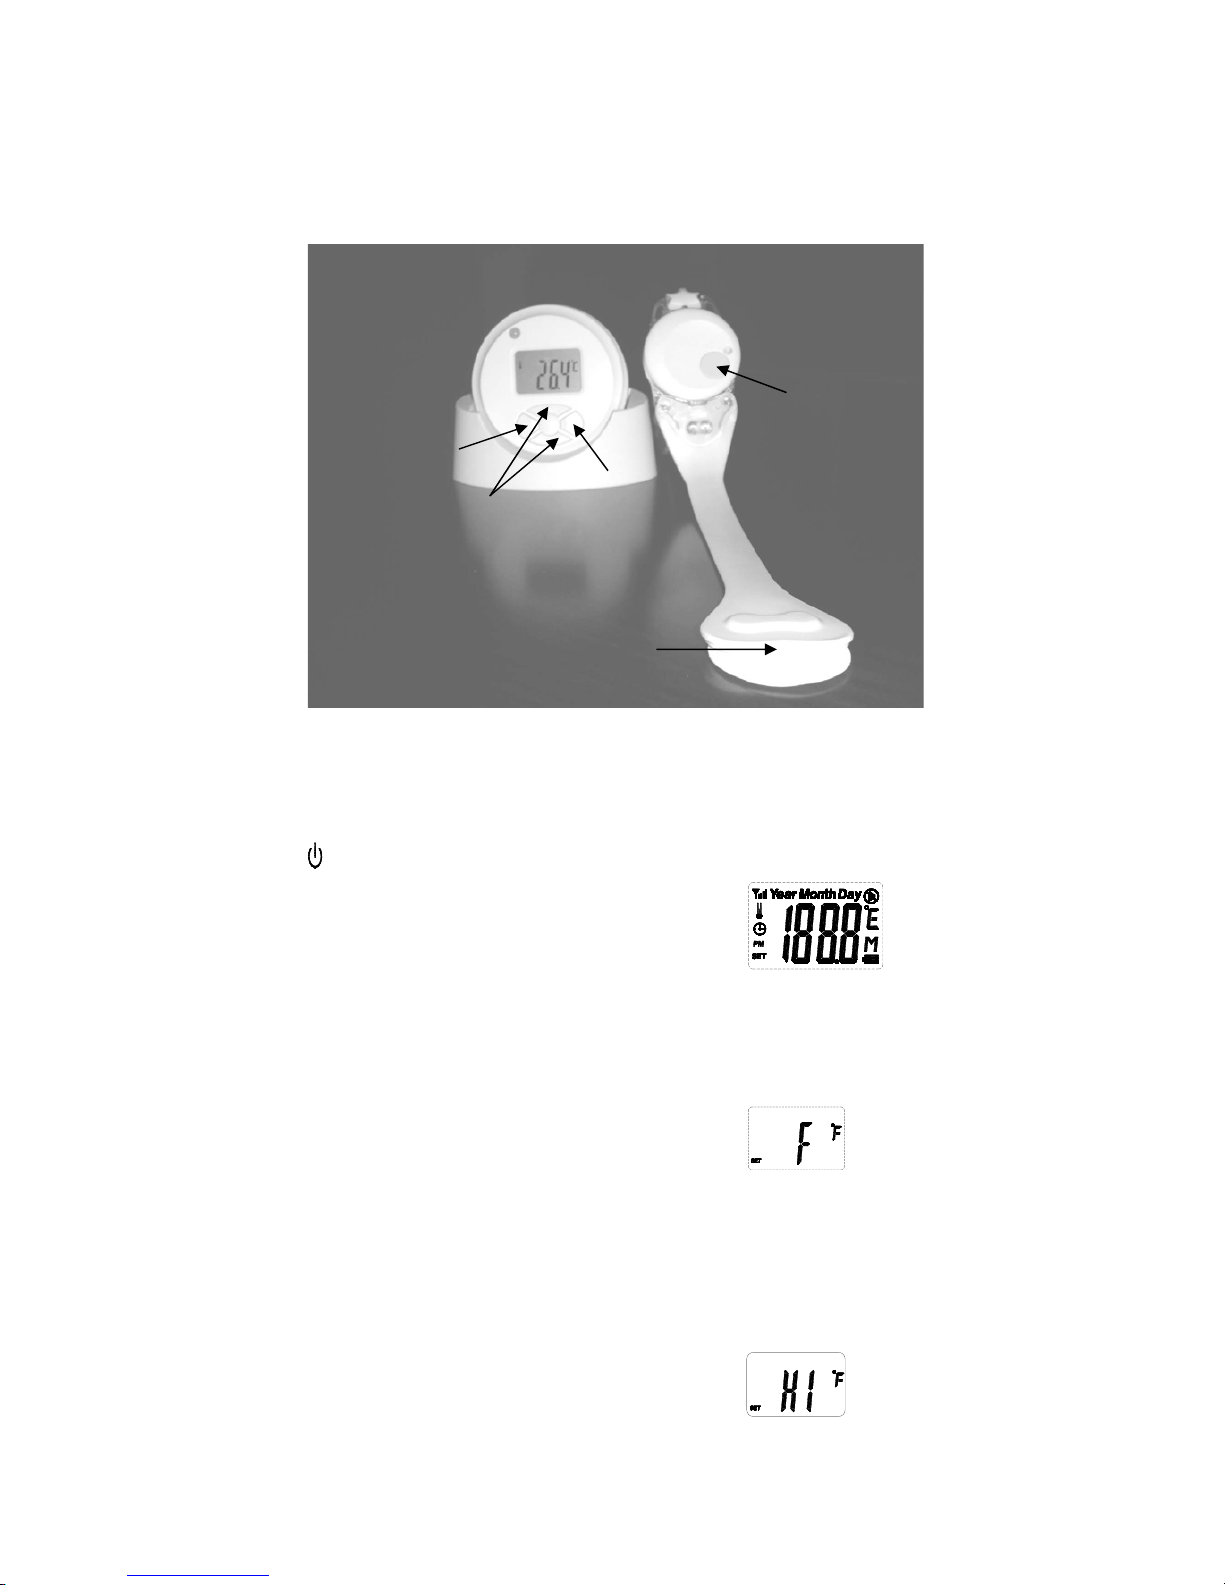
To activate the I/O button
Press the
μOperationν
Clock
button for approximately 3 seconds to activate this device.
The LCD will show all segments temporarily.
*
To switch between
℉/℃
When the device is activated, click “set” button until “C or F” appears
on the display, Press “<” or “<” for switching between ℉ and ℃, then
press “set ” button once again.
*
To set “Hi ”(fever alarm point) temperature limit:
Following
℉/℃
setting, “Hi” will appear on the display, press “<” or
“<” to set high temperature then press “set” button once again.
(Temperature setting will change in increments of 0.1
℃
(or 0.1
℉
)
μOperationν
Temperature Monitor
μOperationν
Temperature Monitor
μOperationν
Temperature Monitor
Receiver
Transmitter
On/Off button
Selection Button
Set button
On/Off button
Sensor patch
- 11 -
Page 14
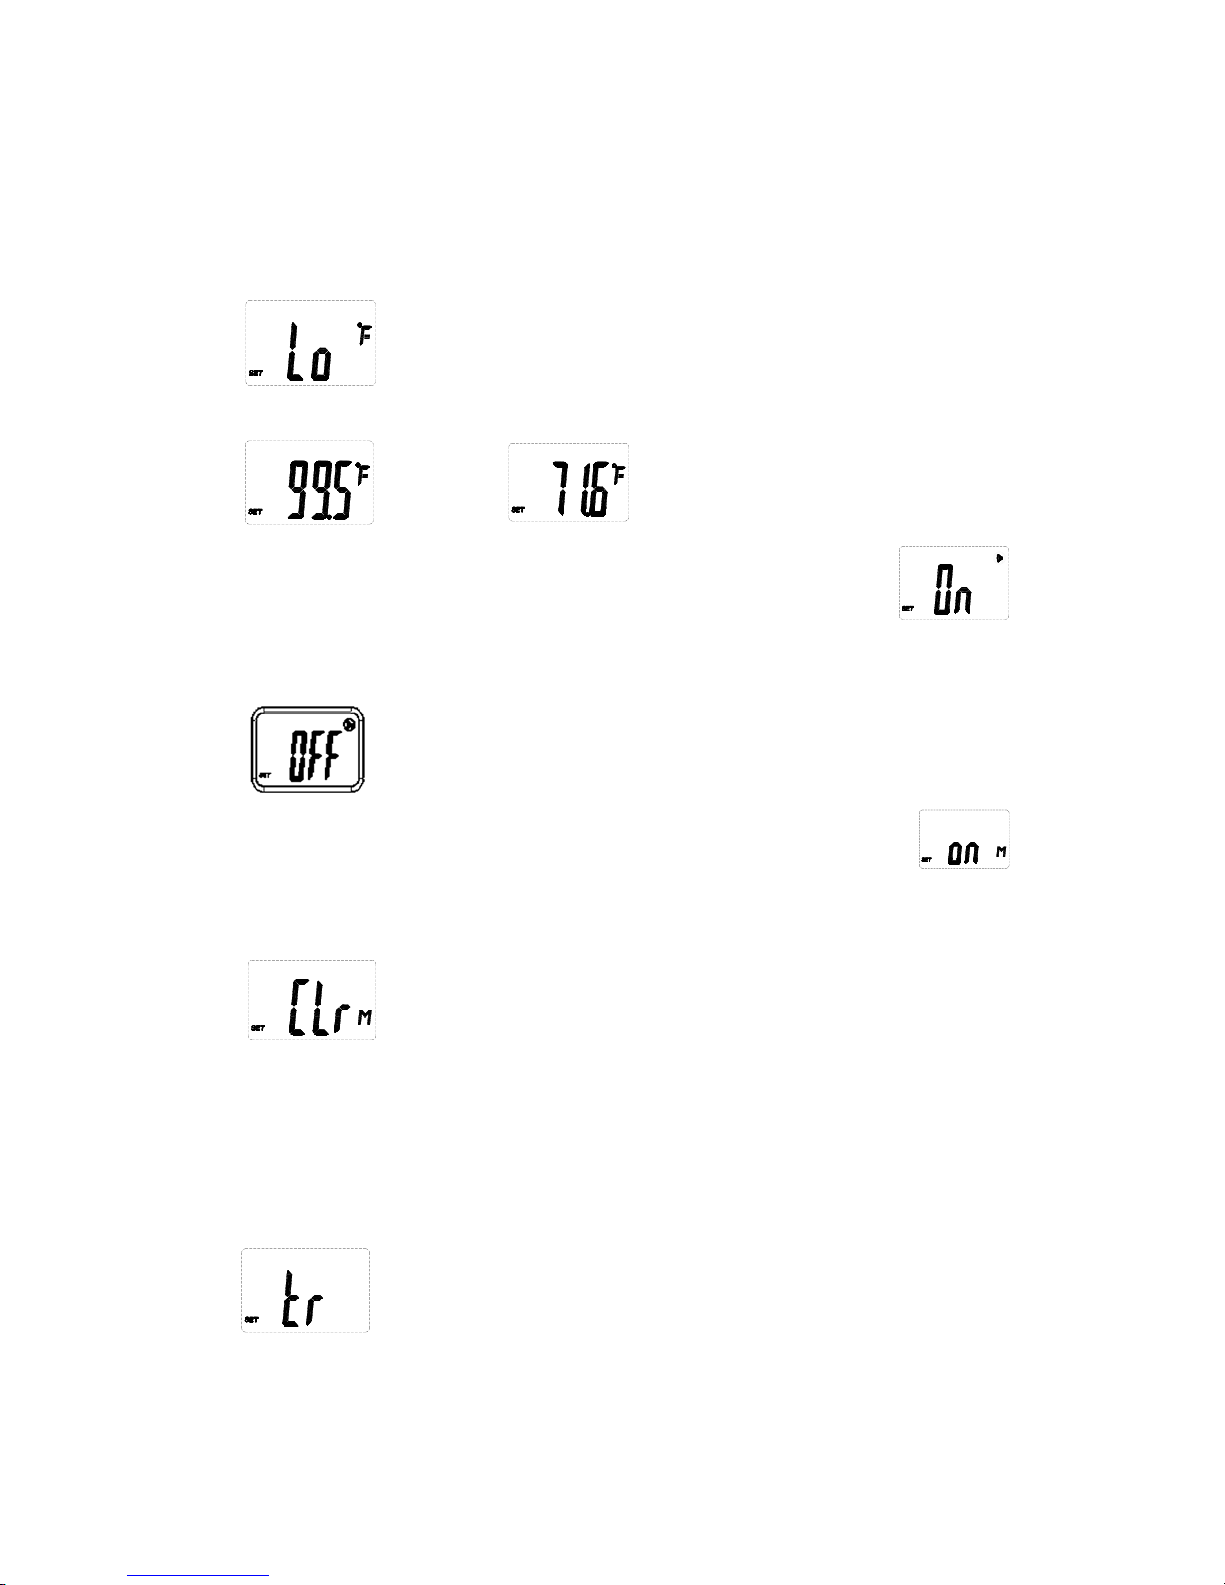
*
To set “Lo (fever receding point)” temperature limit:
Following “Hi” temperature setting, “Lo” will appear on the display,
press “<” or “<” to set low temperature then press “set” button once
again.
(Temperature setting will change in increments of 0.1
℃
(or 0.1
℉
)
Pre-set temperature for Hi and Lo:
*
To set Mute mode
The default is in sound mode. To use mute mode, when icon
is on the display, press “<” or “<” to see below icon on the display and
press “set” button once again.
*
To clear memory
The default is in memory mode. To clear memory, when icon
is on the display, press “<” or “<” to see below icon on the display and
press “set” button once again.
*
To set temperature monitor mode
Following memory mode setting, you will see “tr “ on the display,
press “set” button twice to begin the temperature monitor.
At the same time, make sure the sensor patch is under the armpit of the
patient.
**” tr” stands for transmitting, under this mode, you can monitor
temperature.
Following “Hi” temperature setting, “Lo” will appear on the display,
press “” or “” to set low temperature then press “set” button once again.
(Temperature setting will change in increments of 0.1к (or 0.1л)
Ϡʳ To set “Lo (fever receding point)” temperature limit:
Following “Hi” temperature setting, “Lo” will appear on the display,
press “” or “” to set low temperature then press “set” button once again.
(Temperature setting will change in increments of 0.1к (or 0.1л)
Pre-set temperature for Hi and Lo:
- 12 -
- 13 -
Page 15

*
Memory Retrieval
In temperature monitor mode, press “
<
” or “<” to retrieve the
temperature and press the “set” button to retrieve the date / time.
Continue the same procedure to retrieve more sets of data from previous
monitor.
Remark: If the thermometer measures the temperature to be over the “Hi”
temperature or below the “Lo” temperature you have set, the
receiver will sound continuously (bi-bi-bi) and indicator light
ashes red.
- 13 -
Page 16
μOperation ν
Ambient Temperature Indicator
Ambient Temperature Measurement
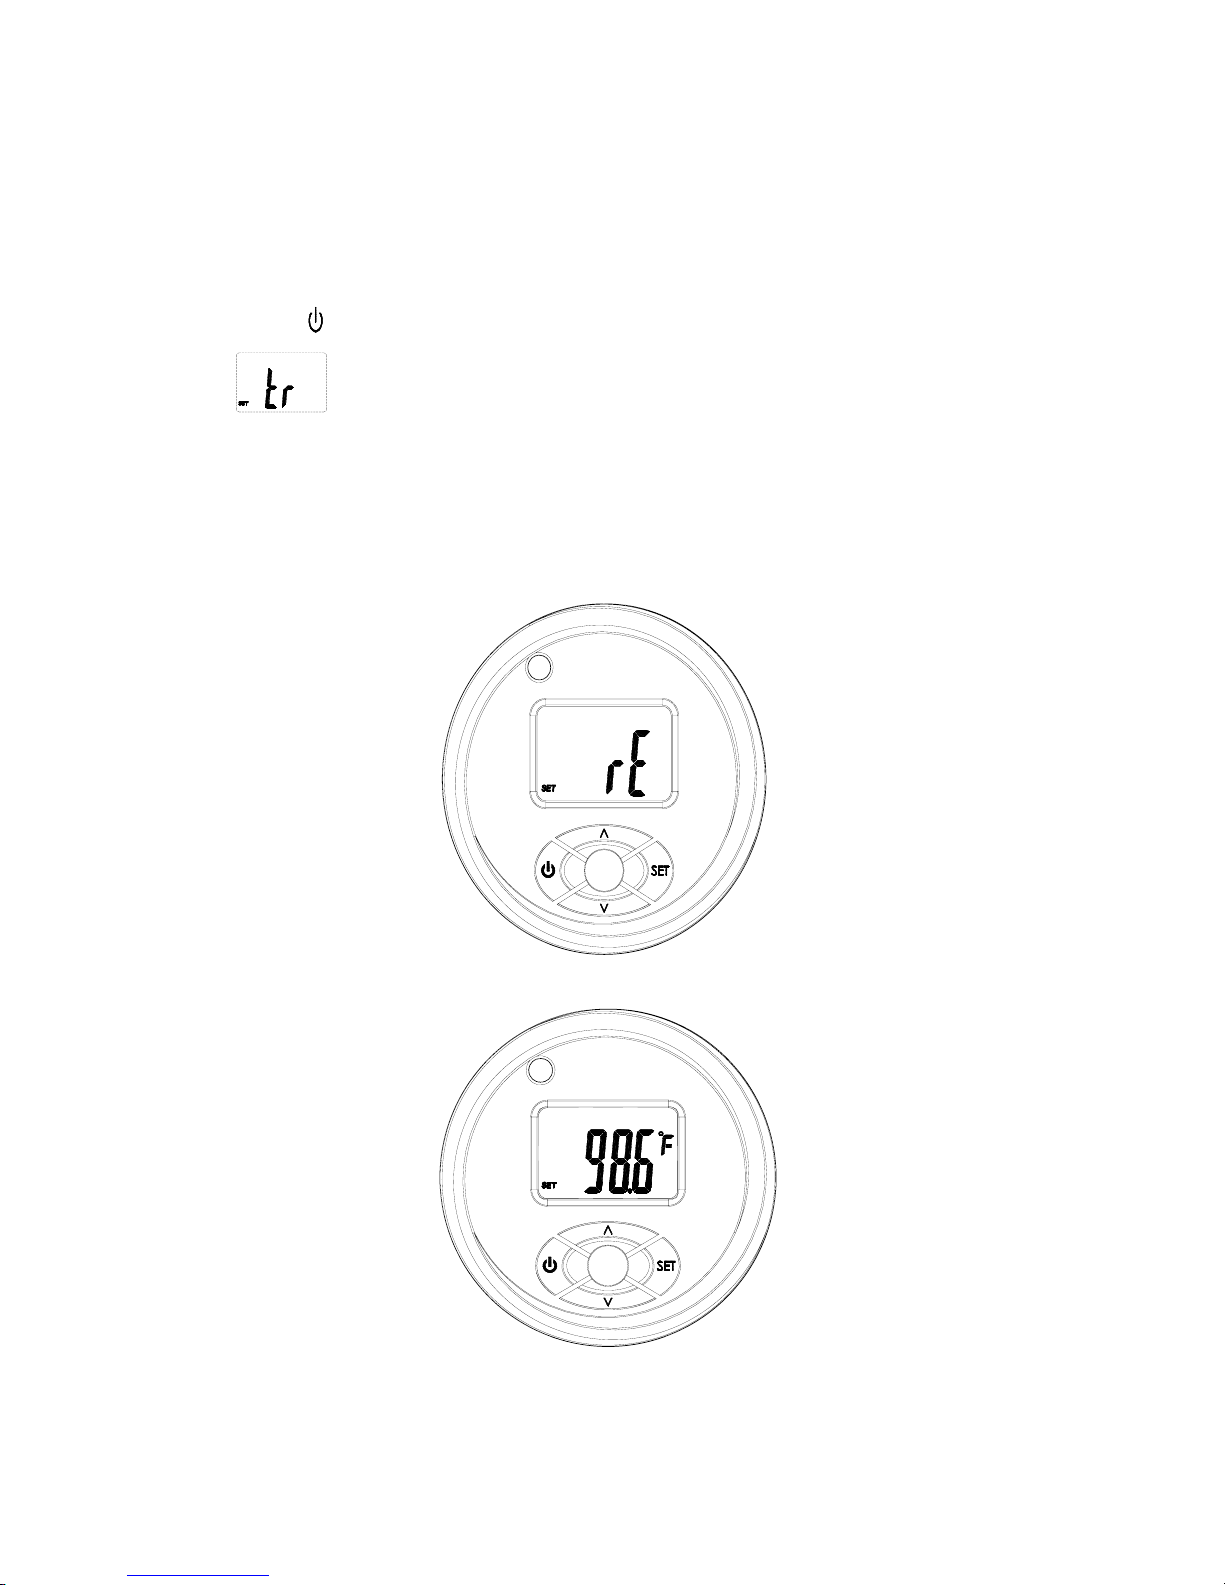
Press the button to activate this unit, click “set” button continuously to see
on the display. Press ““” or “” when “rE” as below picture is on the
display, press ”set” button twice to begin for ambient temperature measurement.
Remark: “rE” stands for “Receiver”
【Operation】
Ambient Temperature Indicator
Ambient Temperature Measurement
Press the
μOperationν
Clock
button to activate this unit, click “set” button continuously to
see
μOperation ν
Ambient Temperature Indicator
on the display. Press ““” or “” when “rE” as below picture is on the
on the display. Press “<” or “<” when “rE” as below
picture is on the display, press ”set” button twice to begin for ambient
temperature measurement.
Remark: “rE” stands for “Receiver”
- 14 -
- 15 -
Page 17
【Operation】
Clock
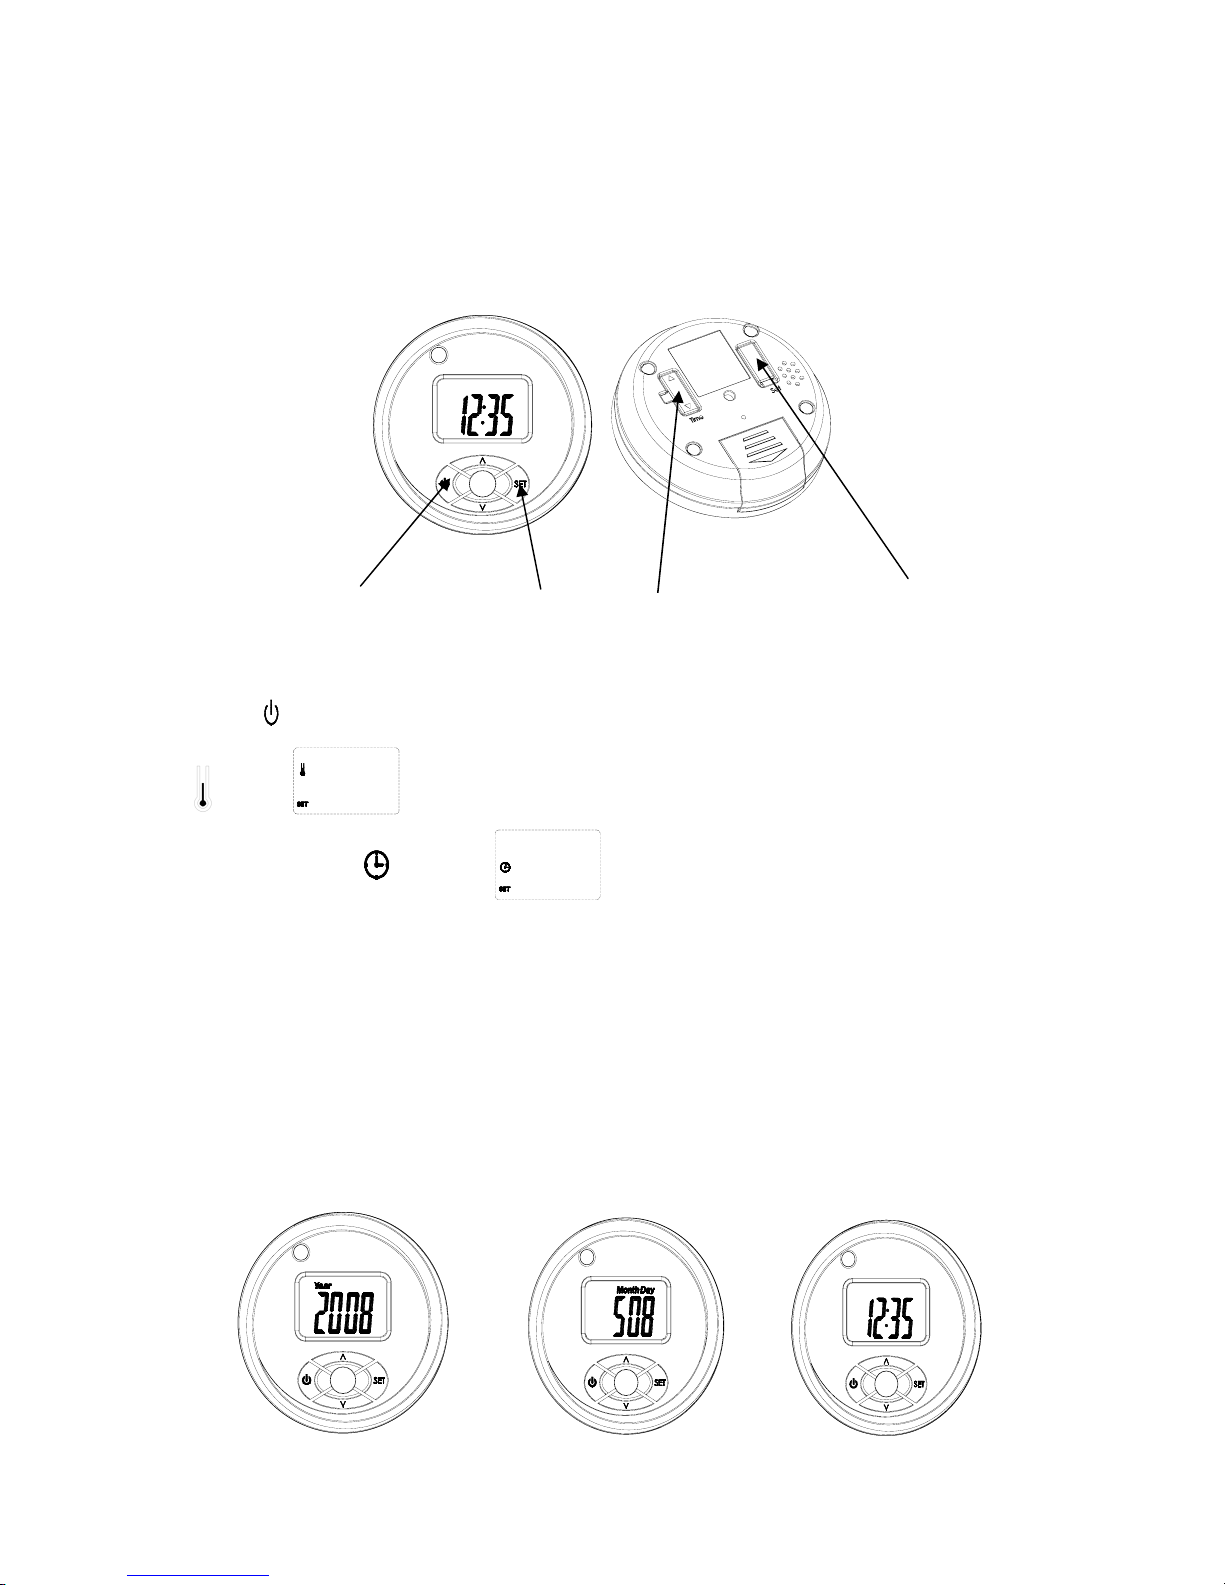
The Receiver can be used as clock alone.
*
To set year/month/ date / time
Press
μOperationν
Clock
to activate this unit, click the “set” button continuously until the icon is
to activate this unit, click the “set” button continuously until the
icon (
)is shown on the left side of the display, press “<” or
“<” to selelct
icon is (
) shown on the left side of the display.
When the clock signal on the display, press ”set” button (on the back of
receiver) twice, you can set year / month/ date time in turn.
Remark: 1). “Time” button is to adjust year / date / time.
Whenever you finish year setting or date or time setting in
order, do not forget to press “set” button once.
2). After setting, press on/off button twice, it will be in table clock
display.
μOperationν
Clock
The Receiver can be used as clock alone.
Ϡʳ To set year/month/ date / time
Press to activate this unit, click the “set” button continuously until the icon is
shown on the left side of the display , press “” or “” to selelct icon
is shown on the left side of the display .
When the clock signal on the display, press ”set” button (on the back of receiver)
twice, you can set year / month/ date time in turn.
Remark: 1). “Time” button is to adjust year / date / time.
Whenever you finish year setting or date or time setting in order, do not
forget to press “set” button once.
2). After setting, press on/off button twice, it will be in table clock display.
μOperationν
Clock
On/Off button “Set” button
Time button
(adjust year/ date/ time)
“Set” button
- 15 -
Page 18

【Responding to Temperature Alarm】
After the receiver sounds the alarm, it will continue to ring unless the
receiver is switched off manually (alarm can be temporarily turned off by
pressing any key on the receiver )
Caution: It is dangerous to automatically switch off the receiver alarm
without nding out why it sounded in the rst place. Doing so makes the
caretaker forget the importance of taking immediate action for the patient.
The correct procedure is:
1. Hear the receiver alarm sounds.
2. Turn off the “alarm” by pressing any button on the receiver.
3. Go to the patient immediately.
4. Provide proper care to the patient.
5. Reset or turn off the receiver if necessary.
Alarm Display on LCD Status
BiBi- BiBi– BiBi
NorF and weak antenna
signal
W h e n th e re c e i v e r
doesn’t receive signal
from transmitter
Bi - Bi
When the receiver doesn’t
receive signal from
transmitter
Short circuit of Sensor or
sensor patch disconnect from
Sensor band .
When the receiver doesn’t
receive signal from
transmitter
Short circuit of Sensor or
sensor patch disconnect from
Sensor band .
Sensor patch disconnect from
the armpit of patient
Short circuit of sensor
or sens or patch disconnect from sensor
band.
Sensor patch disconnect
from t h e ar m p i t of
patient
Short Bi-Bi-Bi
Temperature is higher
than the fever alarm
point (Hi) you set
Long Bi-Bi-Bi
Temperature is lower
than the fever receding
point (Lo) you set
- 16 -
- 17 -
Page 19
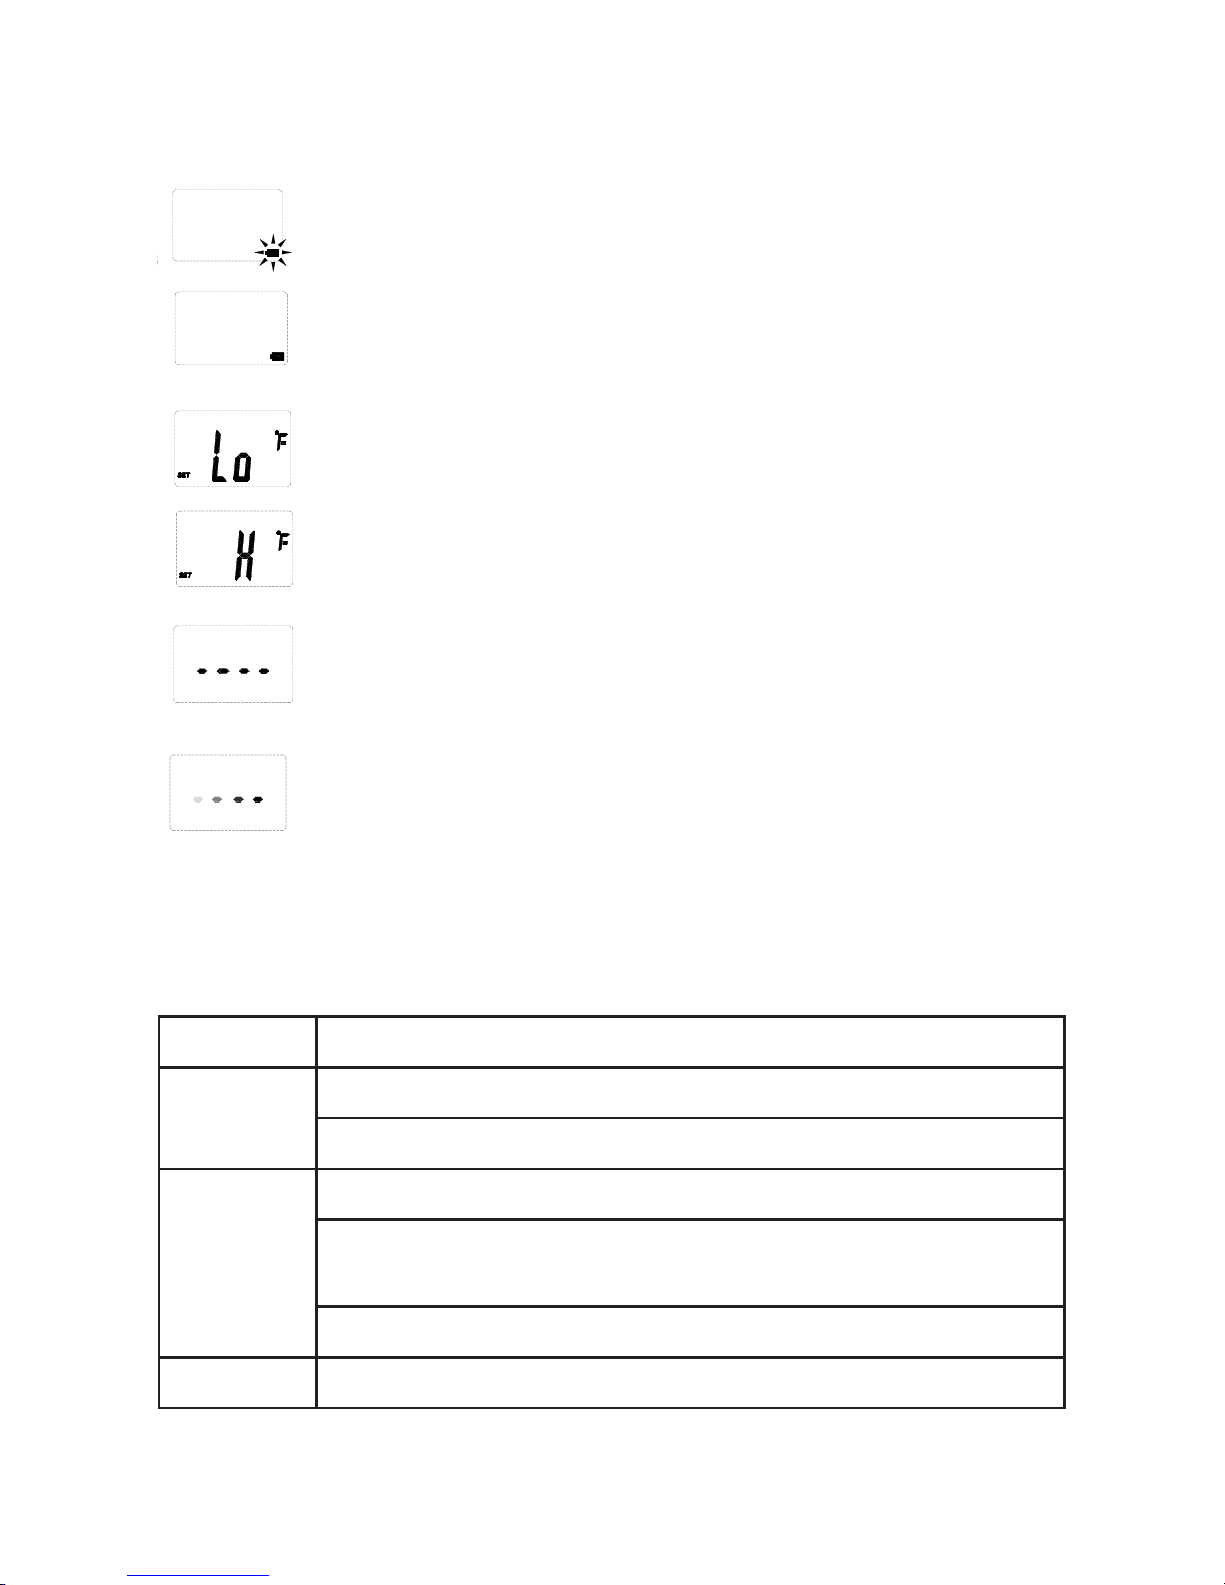
【Important Signal】
Indicates low battery on the transmitter when the LCD shows
a ashing battery signal.
Indicates low battery on the receiver when the LCD shows a
battery signal.
If the reading of the patient is less than 32.0℃ (89.6℉) , the
LCD will display “ Lo”.
If the reading of the patient is greater than 43.0
℃
(109.4
℉
) ,
the LCD will display “H ”.
Short circuit of Sensor or sensor patch disconnect from sensor
band.
Sensor patch disconnect from the armpit of patient.
【Light Indicator】
Light Status
Green
●
Power On
●
Receiving signal
Red
●
Alarm
●
Short circuit of Sensor or sensor patch disconnect from
sensor band
●
Sensor patch disconnect from the armpit of patient
Orange
●
Low battery
Remark: The light indicator is off in clock mode.
μImportant Signalν
Indicates low battery on the transmitter when the LCD shows a flashing
Indicates low battery on the receiver when the LCD shows a battery signal
If the reading of the patient is less than 32.0кʳʻˋˌˁˉлʼʳʿʳthe LCD will
isplay “ Lo”.
If the reading of the patient is greater than 43.0к (109.4л) , the LCD will
display “H ”.
Short circuit of Sensor or sensor patch disconnect from sensor band.
Sensor patch disconnect from the armpit of patient
- 17 -
Page 20
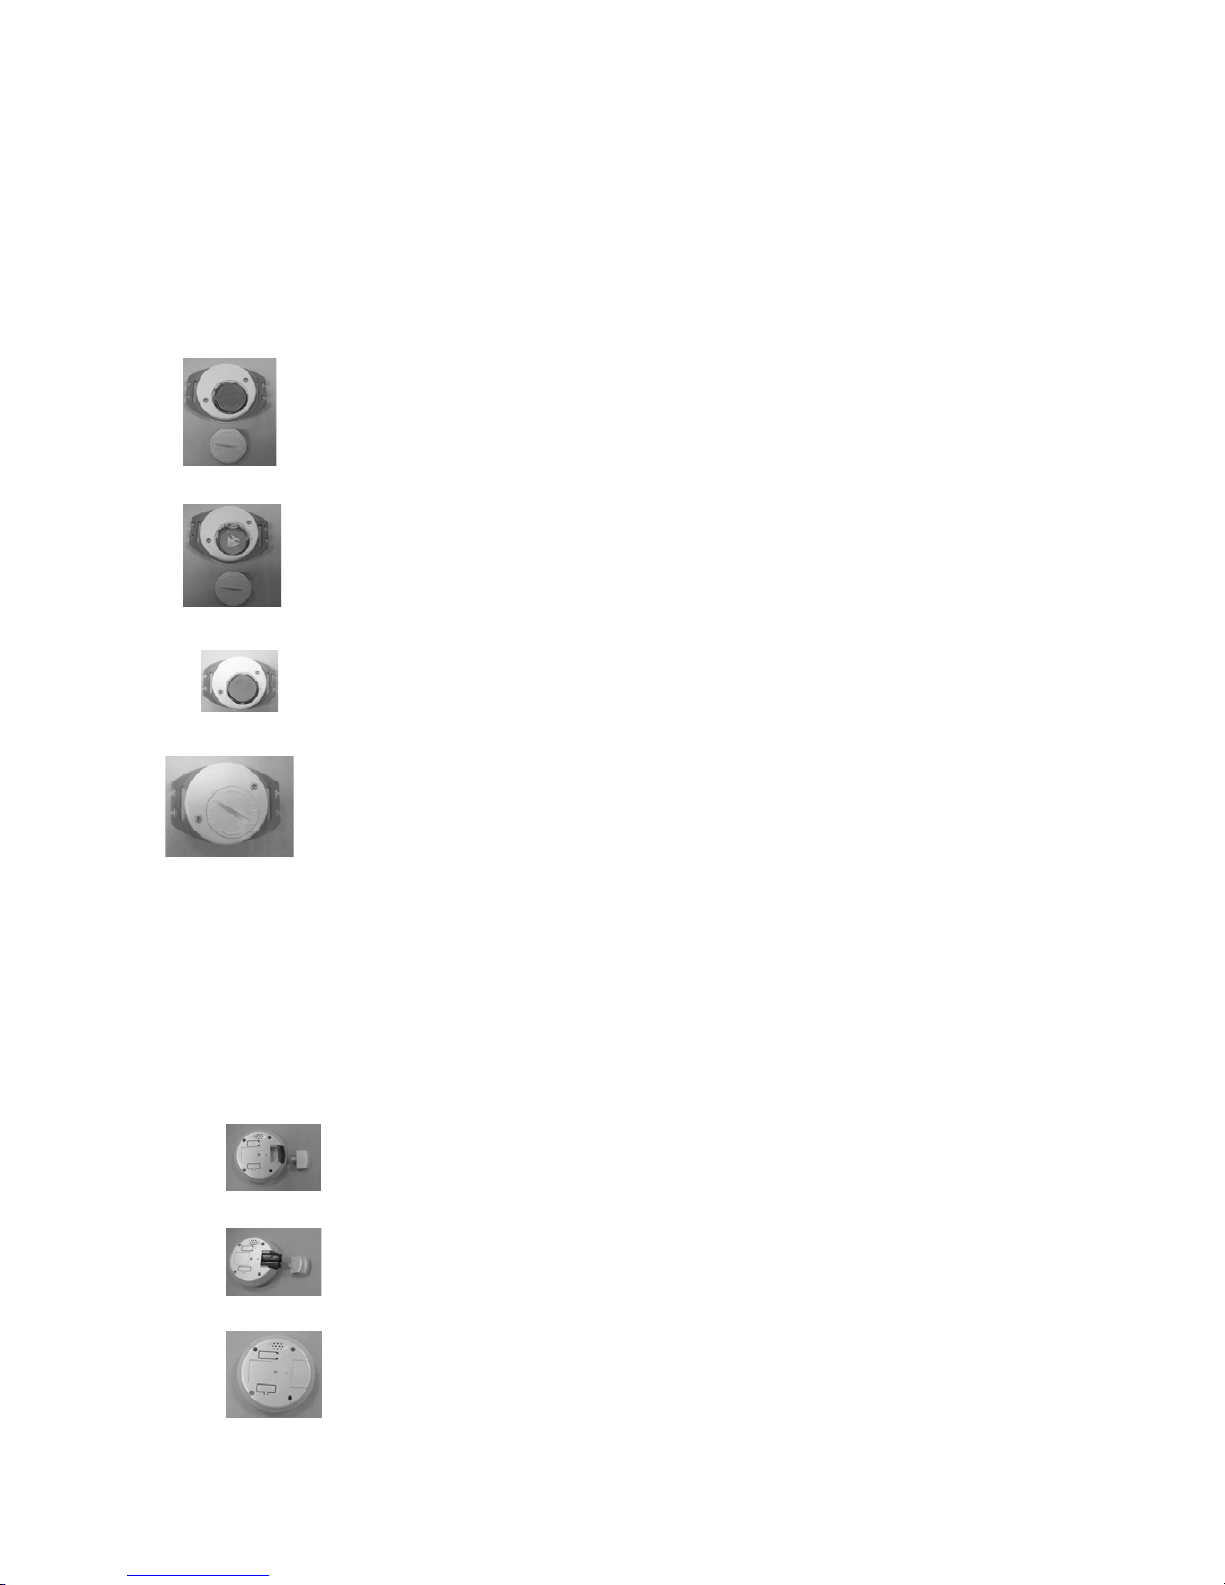
【Battery Replacement】
Transmitter:
When a battery sign appears in the transmitter LCD display, it means the
battery is low and should be replaced as described below:
Removed the battery compartment cover from the bottom of
the transmitter.
Take out the battery
Insert new battery securely in place, with words facing up.
Put the battery compartment cover back on.
Important Note: Clock mode needs to be reset after batteries replaced.
Receiver:
When Red LED light of receiver blinks, it indicates low battery condition.
To replace batteries, follow the procedures described below in order to
avoid causing damage.
Remove the battery compartment cover. Take out the
batteries.
Insert new batteries.
Put the battery compartment cover back on
μBattery Replacementν
Transmitter:
When a battery sign appears in the transmitter LCD display, it means the battery is low and
should be replaced as described below:
Removed the battery compartment cover from the bottom of the
transmitter.
Take out the battery
Insert new battery securely in place, with words facing up.
Put the battery compartment cover back on.
μBattery Replacementν
Transmitter:
When a battery sign appears in the transmitter LCD display, it means the battery is low and
should be replaced as described below:
Removed the battery compartment cover from the bottom of the
transmitter.
Take out the battery
Insert new battery securely in place, with words facing up.
Put the battery compartment cover back on.
Important Note: ˖˿˶˾ʳ˷˸ʳ˸˸˷ʳʳ˵˸ reset after batteries replaced.
Receiver:
When Red LED light of receiver blinks, it indicates low battery condition. To replace
batteries, follow the procedures described below in order to avoid causing damage.
Remove the battery compartment cover. Take out the batteries.
Insert new batteries.
Put the battery compartment cover back on
- 18 -
- 19 -
Page 21

【Care and Storage】
Environment of Use:
When used in an environment with obstacles, the effective distance of
transmission will be reduced. The effective distance of reception will also
be reduced when the power is low.
Storage Condition:
When the receiver is not in use, the product should be stored inside the
house.
Do not expose it to sunlight or place next to high temperature stove. Heat
can negatively impact functioning of the batteries and electric circuit.
Removing batteries:
If the receiver is not in use, the batteries should be removed in order to
conserve battery life.
- 19 -
Page 22

【Warranty】
This temperature monitor carries a 2 year warranty from the date of
shipment. The distributor reserves the right to repair or replace free of
charge for changing necessary parts to correct defects in the material or
workmanship.
The warranty does not apply to damage resulting in failure due to the
following: accidents, abuse, disassembly by unauthorized individuals.
- 20 -
- 21 -
Page 23

- 21 -
Page 24
μWarrantyν
This temperature monitor carries a 2 year warranty from the date of shipment. The distributor
reserves the right to repair or replace free of charge for changing necessary parts to correct
defects in the material or workmanship.
The warranty does not apply to damage resulting in failure due to the following: accidents,
abuse, disassembly by unauthorized individuals.
0434
Mesure Technology Co., Ltd.
7F., No. 86 & 88 , Sec. 1, Kwang Fu Road
San Chung City, Taipei Hsien
Taiwan, R.O.C.
Read the instructions in this manual carefully.
2008.12.31
Version: 323-1
 Loading...