

MSI X52 Quick Installation Manual
CD-RW/DVD Combo Drive
Multi-language Quick Installation Guide
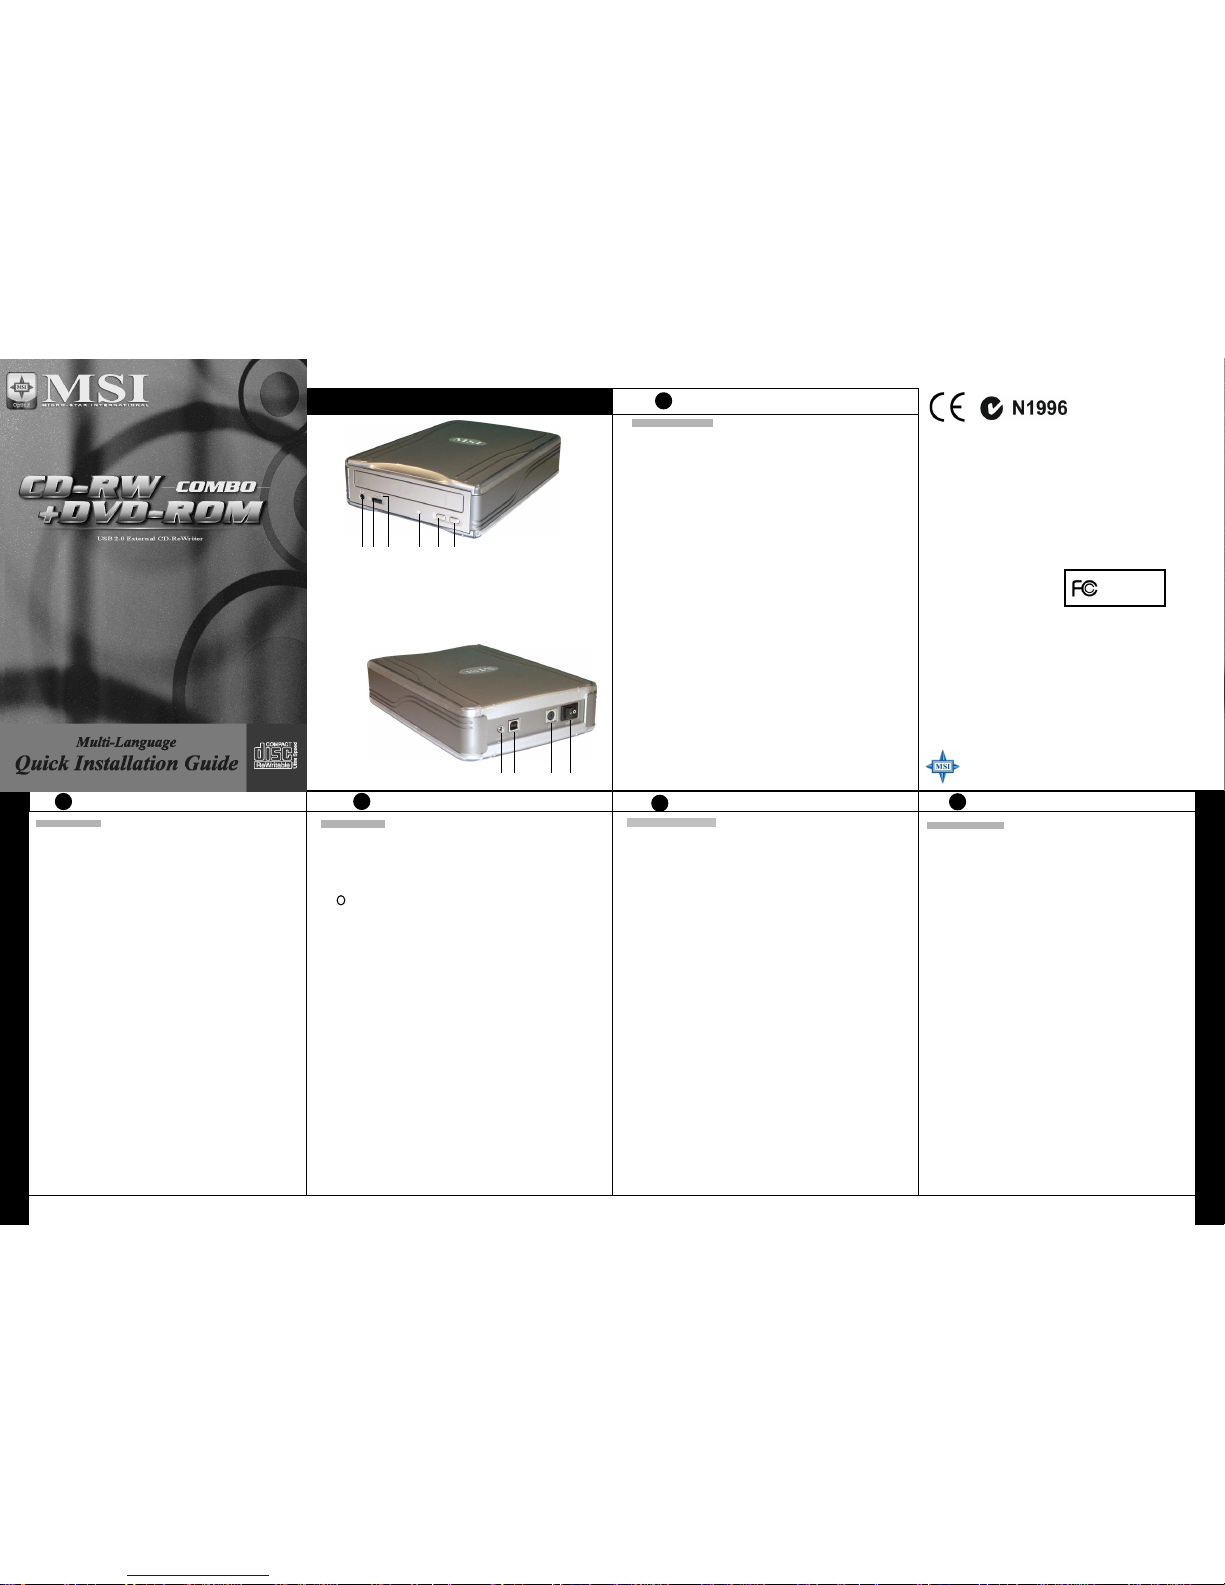
Layout
F RENCH
Hardw are Installation
1. Start your computer. Wait for the operating system to load.
2. Connect the power supply and cable to the drive.
3. Turn on the power on rear panel of the device. The green power indicator on the drive will
be on at this time.
4. Connect the Hi-Speed USB 2.0 cable B Type plug to the drive, and A Type plug to the USB
port on your computer.
5. Once you finish th e above ste ps, the syste m will autom atically dete ct the install ation of the
device. (NOTE: if this is the first time you install the USB device to your Windows 98 OS,
you will need to install the USB driver for Win98. Please follow the instructions on the
screen to install the USB driver properly. If your system still cann ot identify the U SB 2.0
device connection, please refer to the documentation of your USB 2.0 card. If you do not
have a USB 2.0 adaptor card installed, you can still connect th e device to a standard U SB
connection.)
A. Connect the included audio cable to the rear audio port of the device.
B. Connect the other end of the audio cable to the Audio-In port of your computer.
C. Insert an Audio CD; press the play button of the device for Audio CD playback.
If your DVD Combo cannot be detected automatically, please do as follows:
a. Restart your computer, and then Click on the “control panel” icon under “m
y
computer.”
b. Dou ble-click on the “add new hardware” ic on, then, click “next” and “yes” at the
dialog boxes.
c. Allow Windows to search for your new external DVD Combo drive automatically,
and load s the driver so ftware to com plete the installation.
Emergency Eject Hole: When the tray cannot be opened automatically for any reasons, please
insert an eject barÆa straightened paper clip with diameter of 1.2mm can be used as an
eject-bar, press it inside of emergency eject hole, then, eject the tray manually. Make sure to
turn off the power before doing this action.
Installation matérielle
1. Démarrez votre ordinateur. Attendre que votre système d’exploitation soit chargé.
2. Connecter le câble d’alimentation ainsi que le câble de liaison de votre graveur externe.
3. A l’arrière du graveur, commuter le bouton sur “on”. Une lumière verte s’allumera alors sur l
a
façade du graveur.
4. Connecter le câble USB 2.0 de type B sur le lecteur et le type A sur votre ordinateur.
5. Une fois ces opérations terminées, votre ordinateur détectera automatiquement ce nouveau
périphérique. (NOTE: Si vous installez pour la première fois un périphérique USB sous
Windows 98, vous aurez besoin d’installer par la même occasion les drivers USB nécessaire
s
pour Windows 98. Si votre ordinateur ne reconnaît toujours pas votre périphérique USB 2.0,
veuillez vous référer à la documentation de votre carte USB 2.0. Si vous n’avez pas de carte
additionnelle USB 2.0, vous pouvez quand même vous connecter au port USB 1.0 traditionnel.
)
A.
Connecter le câble audio fourni à l’arrière de votre graveur sur la sortie “audio out”.
B.
Connecter l’autre bout de ce même câble sur “audio in” de votre carte son.
C.
Insérer un CD audio et appuyer sur le bouton “play” de votre graveur externe pour jouer
le CD préalablement inséré.
Si votre graveur n’est pas reconu automatiquement , procéder comme indiqué ci-dessous:
a. Redémarrer votre ordinateur, et cliquer sur “panneau de configuration” du menu
démarrer
b. Double cliqué sur “ajout/ supression” de matériel, puis sur “suivant” et “oui”.
c. Laisser Windows rechercher votre graveur externe automatiquement et charger les
pilotes nécessaires.
Ejection du CD en cas d’urgence:
Lorsque le tiroir de votre graveur ne peut s’ouvrir normalement,
insérer dans le petit trou situé sur la face avant du lecteur, une pointe de 1.2 mm de diamètre. En
enfonçant cette pointe, le tiroir s’ouvrira alors automatiquement. Veillez à ce que le graveur soit hors
tension lors de cette manipulation d’urgence.
Installaz ione de ll’Hardwa re
1. Accendete il computer e attendete che il sistema sia correttamente caricato.
2. Collegate il cavo e l’adattatore al masterizzatore.
3. Accendete il masterizzatore, l’indicatore sul drive dovrebbe a questo punto essere
acceso di verde.
4. Collegate l’estremità B del cavo Hi-Speed USB 2.0 al drive e l’estremità A dello stesso
cavo a lla porta US B del vos tro PC.
5. Una volta giunti a questo punto, il sistema automaticamente rivelerà l’installazione del
masterizzatore. (NO TA: se questa è la pr ima volta che installate sul vos tro sistema
operativo Windows 98 un dispositivo USB, dovrete prima assicurarvi di aver installato
correttamente il driver USB. Per fare ciò vi basterà seguire attentamente le istruzioni che
appariranno sullo schermo. Se il vostro sistema operativo continua a non riconoscere la
connessione del dispositivo USB 2.0 visionate e rileggete la guida del vostro adattatore
USB 2.0. Se non avete installato un adattatore USB 2.0 potrete sempre utilizzare la
connessione USB standard).
A. Collegate il cavo audio che troverete incluso al connettore audio che trovate sul
retro del masterizzatore.
B. Collegate l’altra estremità del cavo audio alla porta Audio-In del vostro computer.
C. Inserite un CD Audio e attivate il masterizzatore selezionando il tasto play.
Se il vostro masterizzatore DVD Combo non viene automaticamente identificato
seguite queste istruzioni:
a R iavviate il vostro computer e cliccate sull’icona
“control panel”
che si trova nella
sezione
“my computer”.
b. Fate doppio click sull’icona
“add new hardware”
, poi cliccate
“next”
e
“yes”
nelle finestre di dialogo che vi appariranno.
c. Consentite al vostro sistema operativo Windows di ricercare automaticamente la
nuova periferica hardware installata, il masterizzatore, e caricate i driver software
che si richiederanno necessari per completare l’installazione.
Eject Hole d’emergenza:
quando il cassettino del DVD Combo, per qualsiasi ragione, non si
apre autonomamente inserite un dispositivo che agevoli l’operazione => una graffetta aperta
di 1,2mm di diametro può ad esempio essere usata a tale scopo, spingetela all’interno
dell’Hole d’emergenza e poi estraete manualmente il cassettino. Assicuratevi di spegnere il
masterizzatore prima di compiere questa operazione.
For the best performance and disc compatibility, please check MSI home page at www.msi.com.tw for the latest firmware update.
Hardware-Installation
1. St arten Sie Ihren Computer und war ten Sie bis das System vollstän dig geladen ist.
2. Verbinden Sie das DVD Combo-Laufwerk mit der Stromzufuhr.
3. Schalten Sie das Laufwerk an der Gerät erückseite an. Nach dem Einsc halten leuchtet die grüne
Power-LED.
4. Verbinden Sie das USB 2.0-Kabel (B Typ) mit dem Laufwerk und verbinden Sie das andere
Kabelende (A Typ) mit dem USB-Anschluss Ih res Computers.
5. Das System wird das Laufwerk anschließend automatisch erkennen und installieren. (Hinweis:
wenn Sie das G erät zum ersten ma l auf Ihrem Win9 8-System installie ren, müssen Sie den
Win98-USB-Treiber in stallieren. Bitte folg en Sie den Installation sanweisungen auf Ih rem Bildschirm.
Falls Ihr System das USB-Laufwerk nicht erkennt, konsultieren Sie bitte das Handbuch Ihrer USB
2.0-Karte. Ist kei ne USB 2.0-Karte installier t, so können Sie das Laufwer k auch an eine Standard
USB-Schnittstelle anschließen.)
A.
Verbinden Sie das en thaltene Audio-Kabe l mit dem Audio-Ansc hluss Ihres Gerätes.
B.
Verbinden Sie das andere Ende des Audio-Kabels mit dem Audio-In-Anschluss Ihres
Computers.
C.
Legen Sie eine Audio-CD in das Laufwerk ein und betätigen Sie den Play-Schalter des
Laufwerks um den Abspielvorgang zu starten.
Falls Ihr DVD Combo-Laufwerk nicht automatisch erkannt we rden kann, gehen Sie bitte wie folgt
vor:
a. Führen Sie einen Neustart aus und klicken Sie anschließend auf Start und
Systemsteuerung
.
b. Führen Sie einen Doppelklick auf
Hardware
aus. Bestätigen S ie die weiteren Fra gen mit
weiter
und ja.
c. Lassen Sie Win dows nach Ihrem neue n externen DVDComb o-Laufwerk suchen un d die
entsprechende Sof tware installieren.
Notauswurfsöffnung:
Falls die Laufwerkslade nicht automatisch geöffnet werden kann, führen Sie
einen dünnen Metallstift, z.B. eine gerade gebogene Büroklammer (Durchmesser ca 1.2mm) in die
Notauswurföffnung an der Gerätevorderseite ein. Damit wird die CD-Lade manuell geöffnet. Schalten
Sie das Gerät zuvor au s.
1. Headphone Jack: Output analog
audio by plugging in speaker or
headphone connector.
2. Volume Knob: Allow adjusting
volume manually.
3. Emergency Eject Hole: Insert
0.5 mm diameter pin to force
tray out in case function failure.
4. Power On / Busy LED
5. Play Button: Play or seek audio
track and output via headphone
jack.
6. Eject Button: Tray out disc.
78 9 10
7. Audio Out
8. USB Connector
9. Power Supply Connector
10. Power Off / On Switch
12 3 4 5 6
FCC-B Radio Frequency Interference Statement
This equipment has been tested and found to comply with the limits for a class B digital device, pursuant to
part 15 of the FCC rules. These limits are designed to provide reasonable protection against harmful inter-
ference when the equipment is operated in a commercial environment. This equipment generates, uses and
can radiate radio frequency energy and, if not installed and used in accordance with the instruction manual,
may cause harmful interference to radio communications. Operation of this equipment in a residential area
is likely to cause harmful interference, in which case the user will be required to correct the interference at
his own expense.
Notice 1
The changes or modifications not expressly approved by the party responsible for compliance could void the
user’s authority to operate the equipment.
Notice 2
Shielded interface cables and A.C. power cord, if any, must be used in order to comply with the emission
limits.
VOIR LA NOT ICE D’INSTALLATION AVANT
DE RACCORDER AU RESEAU.
This device complies with Part 15 of the FCC Rules. Operation is subject to the following two conditions:
(1) this device may not cause harmful interference, and
(2) this device must accept any interference received, including interference that may cause undesired
operation.
Copyright Notice
The material in this document is the intellectual property of MICRO-STAR INTERNATIONAL. We take
every care in the preparation of this document, but no guarantee is given as to the correctness of its contents.
Our products are under continual improvement and we reserve the right to make changes without notice.
Trademarks
All trademarks used in this manual are the property of their respective owners.
Pentium is a registered trademark of Intel Corporation.
Windows is a registered trademark of Microsoft Corporation.
Part No.: G52-O8452E1
Micro Star International
MS-8452E
E NGLISH
G ERMAN
S PANISH
Instalación del Hardware
1. Encienda la computadora. Espere a que cargue el sistema operativo.
2. Conecte el adaptador de corriente y el cable al dispositivo.
3. Encienda el dispositivo en el panel de atrás. Se encenderá una luz verde indicadora
de corriente.
4. Conecte el cable USB 2.0 de alta velocidad, con el conector Tipo B en el dispositivo y
el conector Tipo A en el puerto USB de su computadora.
5. Una vez efectuados los pasos anteriores, el sistema detectará automáticamente la
instalación del dispositivo. (NOTA: Si es la primera vez que instala un dispositivo USB
a su sistema operativo Windows 98, deberá instalar el driver de USB para Win98.
Siga las instrucciones en la pantalla para instalar el driver de USB correctamente. Si
su sistema todavía no puede identificar la conexión al dispositivo USB 2.0, refiérase a
la documentación de su tarjeta USB 2.0. Si no tiene una tarjeta adaptadora USB 2.0
instalada, aún puede conectar el dispositivo a una conexión USB estándar).
A. Conecte el cable de sonido incluido al puerto de sonido en la parte posterior
del dispositivo.
B. Conecte la otra punta del cable de sonido al puerto Audio-In de su
computadora.
C. Inserte un CD de sonido; presione el botón de “play” del dispositivo para
escuchar el CD.
Si su DVD Combo no se detecta automáticamente, haga lo siguiente:
a. Vuelva a encender la computadora y haga clic en el ícono de
“control panel”
bajo
“my computer.”
b. Haga doble-clic en el ícono de
“add new hardware”
, luego clic en
“next”
y
“yes”
en las cajas de diálogo.
c. Permita que Windows busque su nuevo dispositivo DVD Combo externo
automáticamente y cargue el software del driver para completar la instalación.
Orificio de Expulsión de Emergencia:
Si la bandeja no puede abrirse automáticamente
por cualquier motivo, asegúrese de que no haya un CD girando en su interior y que la
corriente esté apagada antes de efectuar ninguna acción. Luego inserte una barrita de
expulsión ÆUn sujetador de papel estirado (de 1.2mm de diámetro) puede ser utilizado
como barra de expulsión. Introdúzcalo en el orificio de expulsión de emergencia y abra la
bandeja manualmente.
I TALIAN
J APANESE
P ORTUGUESE
R USSIAN
T URKISH
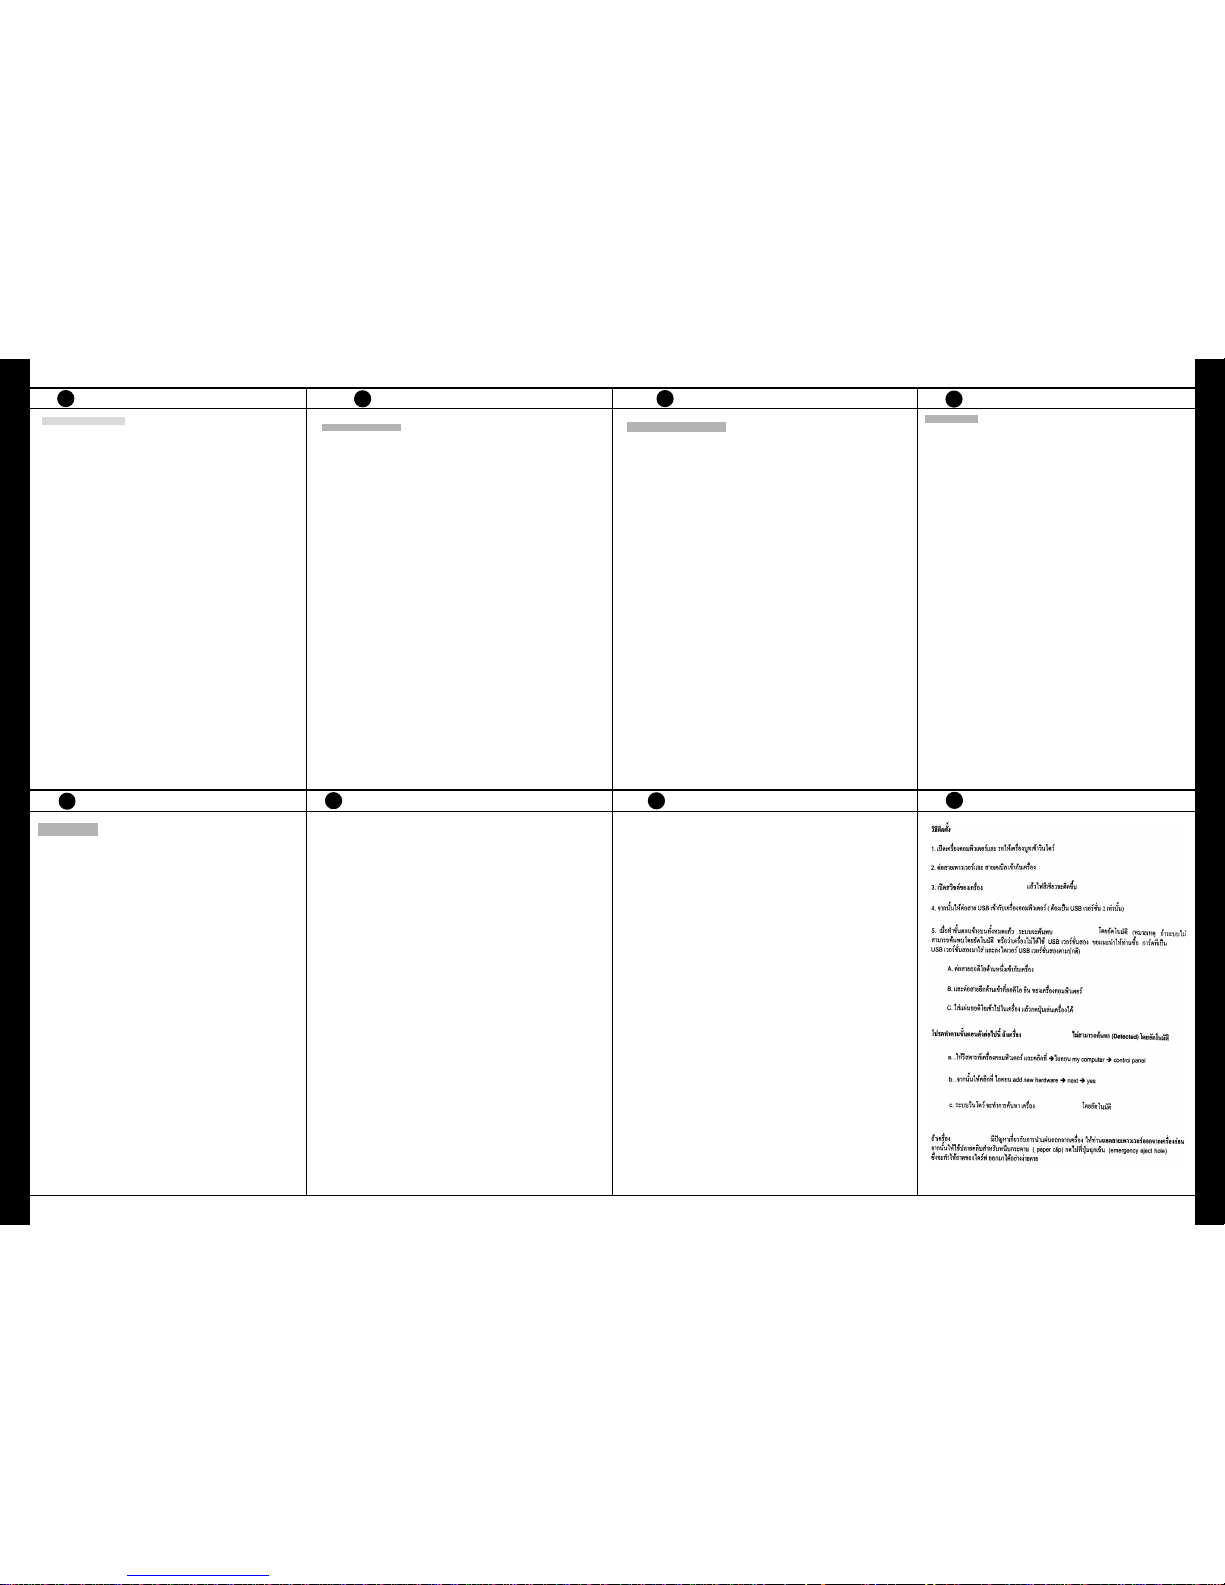
T HAI
Reliable Design! Ultimate Stability!
CD-RW/DVD Combo Drive
ハードウェアのインストール
1. コンピューターを起動し、システムが起動するまで待ちます。
2. 電源アダプタに電源ケーブルを接続し、それぞれ DVD Co mbo ドライブ(以下 ドライ
ブ)本体とコンセントに接続します。
3.
ドライブの背面にある電源スイッチをオンにす ると、フロントパネルの
LED
が緑色に
点灯します。
4. USB2.0 対応ケーブル(A-B 仕様)を用意し、ドライブとコンピューターを接続します。
5. OS側が、ドライブを自動認識します。
(注意:Windows98 で USB2.0 をお使いになる場合は、予め USB2.0デバイスドライ
バーをインストールしておく必要があります。ドライブが正常に認識 されない場合は
コンピューター側の USB2.0ポートが正常に動作で きる状態かどうかを確認してくだ
さい。本機は、USB1.1 ポートに接続しても使用することができますが、データ転送
速度が低下するなどの症状が出ます。)
6. CD-Audioをアナログ接続で楽しむ場合は 、以下の接続を行って下さい。
A.
付属のオーディオケーブルをドライブ背面のオーディオポートに接続します
B. オーディオケーブルのもう一方をコンピュータの Line-In ポートに接続しま
す。
C. オーディオ CD を挿入し、デバイスの再生ボタンを押して、オーディオ CD
を再生します。
DVD Comboが自動的に検出されない場合は、次の手順を実行してください。
a. コンピューターを再起動し、[マイコンピュータ]にある[コントロールパネル]
アイコンをクリックします。
b. [ハードウェアの追加]アイコンをダブルクリック した後、[次へ]をクリックし
ダイアログボックスで[はい]を選択します。
c. Windowsは 新しい DVD Combo ドライ ブを自動的に検索し、ドライバソフト
ウェアを読み込んでインストールを完了します 。
非常時用イジェクトホール:
何らかの原因でトレイを電動で開くことができ なくなった場合、直径
1.2mm
程度の針金
やクリップをまっすぐに伸ばしたものを挿入す ることで、手動でトレ イを排出させること
ができます。なお、この操作は、必ず電源を切 った状態で行って下さい。
Instalação do Hardware
1. Ligue o com putador. Espere até que se carregue o sistema operativo.
2. Conecte o ad aptador de energia e o cabo ao dispositivo.
3. Ligue o dispositivo no painel traseiro. Uma luz verde indicadora de energia, se
acederá.
4. Conecte o cabo USB 2.0 de alta velocidade, com o conector Tipo B no dispositivo e o
conector Tipo A na porta USB de se u computador.
5. Um a vez efetuados os passos anteriores, o sistema detectará automaticamente a
instalação do dispositivo. (NOTA: Se é a primeira vez que instala um dispositivo USB
em seu sistema ope rativo Windows 98, deverá instalar o driver de USB para Win98.
Siga as instruções na tela para instalar correta mente o driver de USB. Se m esmo
assim, seu sistema não pode identificar a conexão ao dispositivo USB 2.0, refira -se à
documentação de sua placa USB 2.0. Se não tem uma placa adaptadora U SB 2.0
instalada, você ainda pode conectar o dispositivo a uma conexão U SB estandard).
A. Conecte o cab o de som incluído ao porto de som na parte posterior do
dispositivo.
B. C onecte a outra ponta do cabo de som à porta Audio-In de seu computador.
C. Inserte um CD de som; pressione o botão de “play” do dispositivo para escutar
o CD.
Se seu DVD Combo não se detecta automaticamente, faça o seguinte:
a. Volte a ligar seu computador e clique no ícone de “control panel” sob “my
computer.”
b. Doble-clique no ícone de
“add new hardware”
, depois clique em
“next”
e
“yes”
nas caixas de diálogo.
c. Perm ita que Windows encontre seu novo dispositivo DVD Com bo externo
automaticam ente e carregue o software do driver para completar a instalação.
Orifício de Expulsão de Emergência:
Se a bandeija não se abrir automaticamente por
qualquer motivo, assegúre-se de que não haja um CD girando em seu interior e que a
eletricidade esteja desliga da antes de efetuar qualquer ação. Em seguida inserte um a
barrinha de expulsão ÆUm clipe de papel aberto (de 1.2mm de diâmetro) pode ser
utilizad o como barra d e expulsã o. Introduz a-o no orifíc io de expu lsão de em ergênc ia e
abra a bandeija manualmente.
Установка оборудования
1. Вк лючите компьютер. Дождитесь загрузки операц ионной системы.
2. По дключит е кабель питания к устройству.
3. Вк лючите питание на задней панели устройства. В это время долже
н
загореться зеленый индикатор питания.
4. По дключит е кабель USB 2.0 (разъе м типа B – к устройст ву, а разъем типа A –
к
компьютеру).
5. По сле этог о система автоматически определит но вое устройст во. (ВНИМАНИ
Е
Если вы впервые инсталлируете USB устройс тво под ОС Windows 98,
необходимо установить USB драйвер для Win98. Сле дуя инструкциям н
а
экране, правильно уста новите USB драйвер. Ес ли ваша система н
е
определяет уст ройство USB 2.0, обратитесь к докумен тации к вашей USB 2.
0
карте. Если вы не инсталлировали контроллер USB 2.0, накопитель следуе
т
подключать, как стандартное устройс тво USB.)
A. Подк лючите звуковой кабель к аудио разъемам на задней панели
устройс тва.
B. Подк лючите другой конец кабеля к аудио разъему (Line-In) компьютера.
C. Вст авьте звуковой компакт-диск в накопи тель; нажмите кнопку “Play”
(Проиграть) для воспроизведения аудио компакт-диска.
Если накопитель DVD Combo не определился автоматически, следуйте
нижеприведенной инструкции:
a. Перезагрузите компьютер и затем кликните на ик онку “contr ol panel”
(Панель управления) в окне “my computer” ( Мой компьютер).
b. Дв ажды кликните на иконке “add new hardware” (Добавить ново
е
устройс тво), затем нажмите “next” (Далее) и “yes” (ОК) в диалогово
м
окне.
c. Позвольте ОС Windows автоматически найти новый накопитель DV
D
Combo и установить драйве ры для завершения инсталляции.
Механизм аварийного извлечения диска:
Если лоток для диск а автоматически н
е
выдвигается (по любым пр ичинам), вставьте выпрямленную скрепку для бума
г
диаметром не более 1.2 мм в отверстие аварийного извлечения диска, нажмите,
приведя в действие механизм извлечения, и вручную выньте диск. Не забудьт
е
выключить питание перед проведением этой операции.
Donanım Montajı
1. Bilgisayarınızı çalıştırın. İşletim sisteminin yüklenmesini bekleyin.
2. Güç adaptörünü ve kabloyu cihaza bağlayın.
3. Cihazın arka panelindeki güç düğmesini açın. Cihaz üzerindeki yeşil güç göstergesi
yanacaktır.
4. Hi-Speed USB 2.0 kablosunu B Tipi cihaza bağla ve bilgisayarınızdaki USB porta
A
Tipi bağla.
5. Yukarıdaki basamakları bitirdikten sonra sistem cihazın montajını otomatik olara
k
saptayacaktır. (N OT: Eğer Windows 98’inize ilk kez USB cihaz montajı yapıyorsan ı
z
Win98 için USB sürücüsüne ihtiyacınız olacaktır. Lütfen USB sürücünüzü doğru bi
r
şekilde yüklemek için ekrandaki talimatlara uyunuz. Eğer sisteminiz hala USB 2.0 cihaz
bağlantınızı tanımlayamıyorsa USB 2.0 kartınızın dökümanından faydalanınız. Eğe
r
USB 2.0 adaptör kartınız monte edilmediyse cihazınızı yine de standart USB
bağlantısına bağlayabilirsniz.)
A. Ses kablosunu cihazınızın arka ses portuna bağlayınız.
B. Ses kablosunun diğer ucunu bilgisayarınızın Audio-In portuna bağlayınız.
C.
Bir CD koyunuz ve Sesli CD çalması için cihazınızın play tuşuna basınız.
Eğer DVD Combo’ınız otomatik olarak tanımlanamadıysa aşağıdaki yolu izleyiniz:
a. Bilgisayarınızı yeniden çalıştırınız ve sonra
“bilgisayarım”
altındaki
“denetim
masası”
ikonuna basınız.
b. Double-click on the
“yeni donanım ekle”
ikonuna çift klik yapınız, sonra dialog
kutusunda
“devam”
ve
“evet”
tuşlarına basınız.
c. W indows’unuzun yeni harici DVD Combo sürücünüzü otomatik olarak aramasına
ve montajı tamamlamak için sürücüyü yüklemesine izin veriniz.
Acil Çıkarma Deliği: Herhangi bir şekilde otomatik açılma çalışmadığı zaman eject bara
1.2mm çapında düz bir kağıt sokunuz, Acil Çıkarma Deliği (emergency eject hole)’ne
bastırınız ve sonra tablayı elinizle çıkarınız. Bu işlemi yapmadan once elektriği
kestiğinizden emin olunuz.
T RADITIONAL CHINESE
1.
開啟您的電腦,等待操作系統設定完成。
2.
將燒錄機接上變壓器與電線。
3.
打開燒錄機後端的開關,燒錄機的指示燈將會亮起來。
4. 連接USB2.0
纜線的B型插頭至燒錄機上,並將A型插頭接到您的電腦上。
5.
當您完成上述步驟後,您的系統會自動偵測到您的 機器並自動安裝。(請注意:如果這是您
第
一次在您的
Windows 98
操作介面下安裝通用序列埠介面的機器,您需要為
Win 98安裝US
B
驅動程式,請按照操作指示妥善地安裝
USB
驅動程式,如果您的系統仍然不能安裝
USB 2.
0
機器,請參考您的
USB 2.0
介面卡說明書,如果您沒有安裝
USB2.0
介面卡,您仍可以將
機
器安裝在一般
USB (USB 1.1)
介面上。
)
A.
將附贈的音源線接在機器後面的音源輸出孔。
B.
將音源線的另一頭接在您電腦的音源輸入孔上。
C.
將音樂片放入您的光碟機中,並按下您機器上的撥放鍵即可撥放音樂。
如遇到
Windows
無法自動辨識
DVD Combo
光碟機時請按照下列方式安裝驅動程式
1.
按下我的電腦, 選擇
”
控制台
”
然後按下。
2.
在
”
控制台
”
中, 選擇
”
加入新的硬體
”
之選項, 再按下對話框內的
”
下一步
”以及”是”
。
3.
依照視窗上的指示操作, 讓
Win do ws
系統自動搜尋新的
DVD Combo
光碟機, 並安
裝
最適當的驅動程式軟體。
緊急退片孔:如遇托盤無法自動退出時,
請以退出棒Æ或以直徑約
1.2mm
拉直迴紋針插入
,並
以
手動方式退出,且確認已關閉電源。
1. 开启您的计算机,等待操作系统设定完成。
2. 将烧录机接上变压器与电线。
3. 打开烧录机后端的开关,烧录机的指示灯将会亮起来。
4. 连接 USB2.0 缆线的 B 型插头至烧录机上,并将 A 型插头接到您的计算机上。
5. 当您完成上述步骤后,您的系统会自动侦测到您的机器并自动安装。(请注意:如
果
这是您第一次在您的 Win dows 98 操作 接口下安装通用串行端口接口的机器,您需
要
为
Win98安装USB
驱动程序,请按照操作指示妥善地安装
USB
驱动程序,如果您
的
系统仍然不能安装
USB 2.0
机器,请参考您的
USB 2.0
适配卡说明书,如果您没有
安
装
USB2.0
适配卡,您仍可以将机器安装在一般
USB (USB 1.1)
接口上。
)
A.
将附赠的音源线接在机器后面的音源输出孔。
B.
将音源线的另一头接在您计算机的音源输入孔上。
C.
将音乐片放入您的光驱中,并按下您机器上的拨放键即可拨放音乐。
如遇到
Windows
无法自动辨识
DVD Combo
光驱时请按照下列方式安装驱动程序
1.
按下我的计算机, 选择
”
控制台
”
然后按下。
2. 在”
控制台
”中, 选择”
加入新的硬件
”
之选项,再按下对话框内的
”
下一步
”
以
及
”
是
” 。
3.
依照窗口上的指示操作,让
Wind ows
系统自动搜寻新的
DVD Combo
光驱,
并安装最适当的驱动程序软件。
紧急退片孔: 如遇托盘无法自动退出时,
请以退出棒Æ或以直径约
1.2mm
拉直回纹针插入
,
并以手动方式退出,且确认已关闭电源。
S IMPLIFIED CHINESE
DVD Combo
DVD Combo
DVD Combo
DVD Combo
DVD Combo
DVD Combo
DVD Combo
K OREAN
하드웨어 설치 안내
1.
컴퓨터를 부팅한 후, 운영체제가 완전히 부팅될 때까지 기다리십시오.
2.
전원 어댑터와 케이블을 드라이브에 연결하십시오.
3.
드라이버 앞면 패널의 전원 스위치를 켜십시오. 녹색의 전원 표시등이 켜질 것입니다 .
4.
드라이브에 하이 스피드 USB2 . 0 B타입 플러그를 연결하고, A타입 플러그는 컴퓨터의
USB 포트에 연결하십시오.
5.
위의 과정이 모두 끝나면, 시스템은 자동으로 드라이브를 인식할 것입니다. (NOT E :
윈도우98을 사용하고 US B 장치를 처음으로 사용한다면 윈도우 98용 US
B
드라이버를 설치해야 합니다. 화면상의 설명에 따라 올바르게 설치하시 기 바랍니다.
만약 시스템이 USB2.0 장치를 계속 인식하지 못한다면 US B2.0 카드의 설명
을
참조하시기 바랍니다. USB 2.0어댑터 카드를 설치하지 않았다면 표준 US B 연결
을
사용해야 합니다.)
A.
부속품인 오디오 케이블을 드라이브의 앞면 오디오 포트에 연결하십시오.
B.
오디오 케이블의 반대편은 컴퓨터의 오디오 입력 포트에 연결하십시오.
C.
오디오 CD를 재생할 경우, 오디오 CD 를 넣고 드라이브의 플레이 버튼
을
누르십시오.
DVD Combo가 자동으로 인식되지 않을 경우, 아래와 같이 하십시오 :
a.
컴퓨터를 재부팅한 후 “제어판”을 여십시오.
b. “새
하드웨어 추가”를 더블 클릭한 후, 대화상자에서 “다음”과 “예
”
를
클릭하십시오
.
c.
윈도우가 자동으로 외장형 DVD Co mbo 를 검색할 것입니다. 검색이 완료되
면
필요한 드라이버를 설치한 후 정상적으로 설치과정이 완료될 것입니다.
비상구멍(Eme rge ncy Eject Hole) : 디스크 서랍이 자동으로 열리지 않을 경우, 지름
1.2m m 의 가늘고 긴 핀을 사용하여 비상구멍 안을 누르면 디스크 서랍이 수동 으로
열립니다. 디스크 서랍을 수동으로 열기 전에 전원이 꺼져 있는지 확인하시기 바랍니다 .
 Loading...