

Page 1
MSI Features
5
MSI Features
6
MICRO-STAR INT'L
MS-V161
* All trademarks used in this manual are the sole property of their respective owners.
VGA is a trademark of International Business Machines Corporation.
R R
Pentium is a registered trademark of Intel Corporation.
R R
Windows is a registered trademark of Microsoft Corporation.
CAUTION!!
Do not force the GPU
cooler against the
fragile GPU to avoid
!
damage to the GPU.
Under the European Union ("EU") Directive on Waste Electrical
and Electronic Equipment, Directive 2002/96/EC, which takes
effect on August 13, 2005, products of "electrical and electronic
equipment" cannot be discarded as municipal waste anymore
and manufacturers of covered electronic equipment will be
obligated to take back such products at the end of their useful
life.
n
I
t
e
r
r
a
n
t
a
S
-
o
r
c
i
M
t
i
TEL. 886-2-32345599
o
n
a
FAX. 886-2-32345488
l
http://www.msi.com.tw
WARNING!!
DO NOT touch the
cooling system since
it may produce a
certain heat while
processing tasks.
G52-V1612X1
September 2008
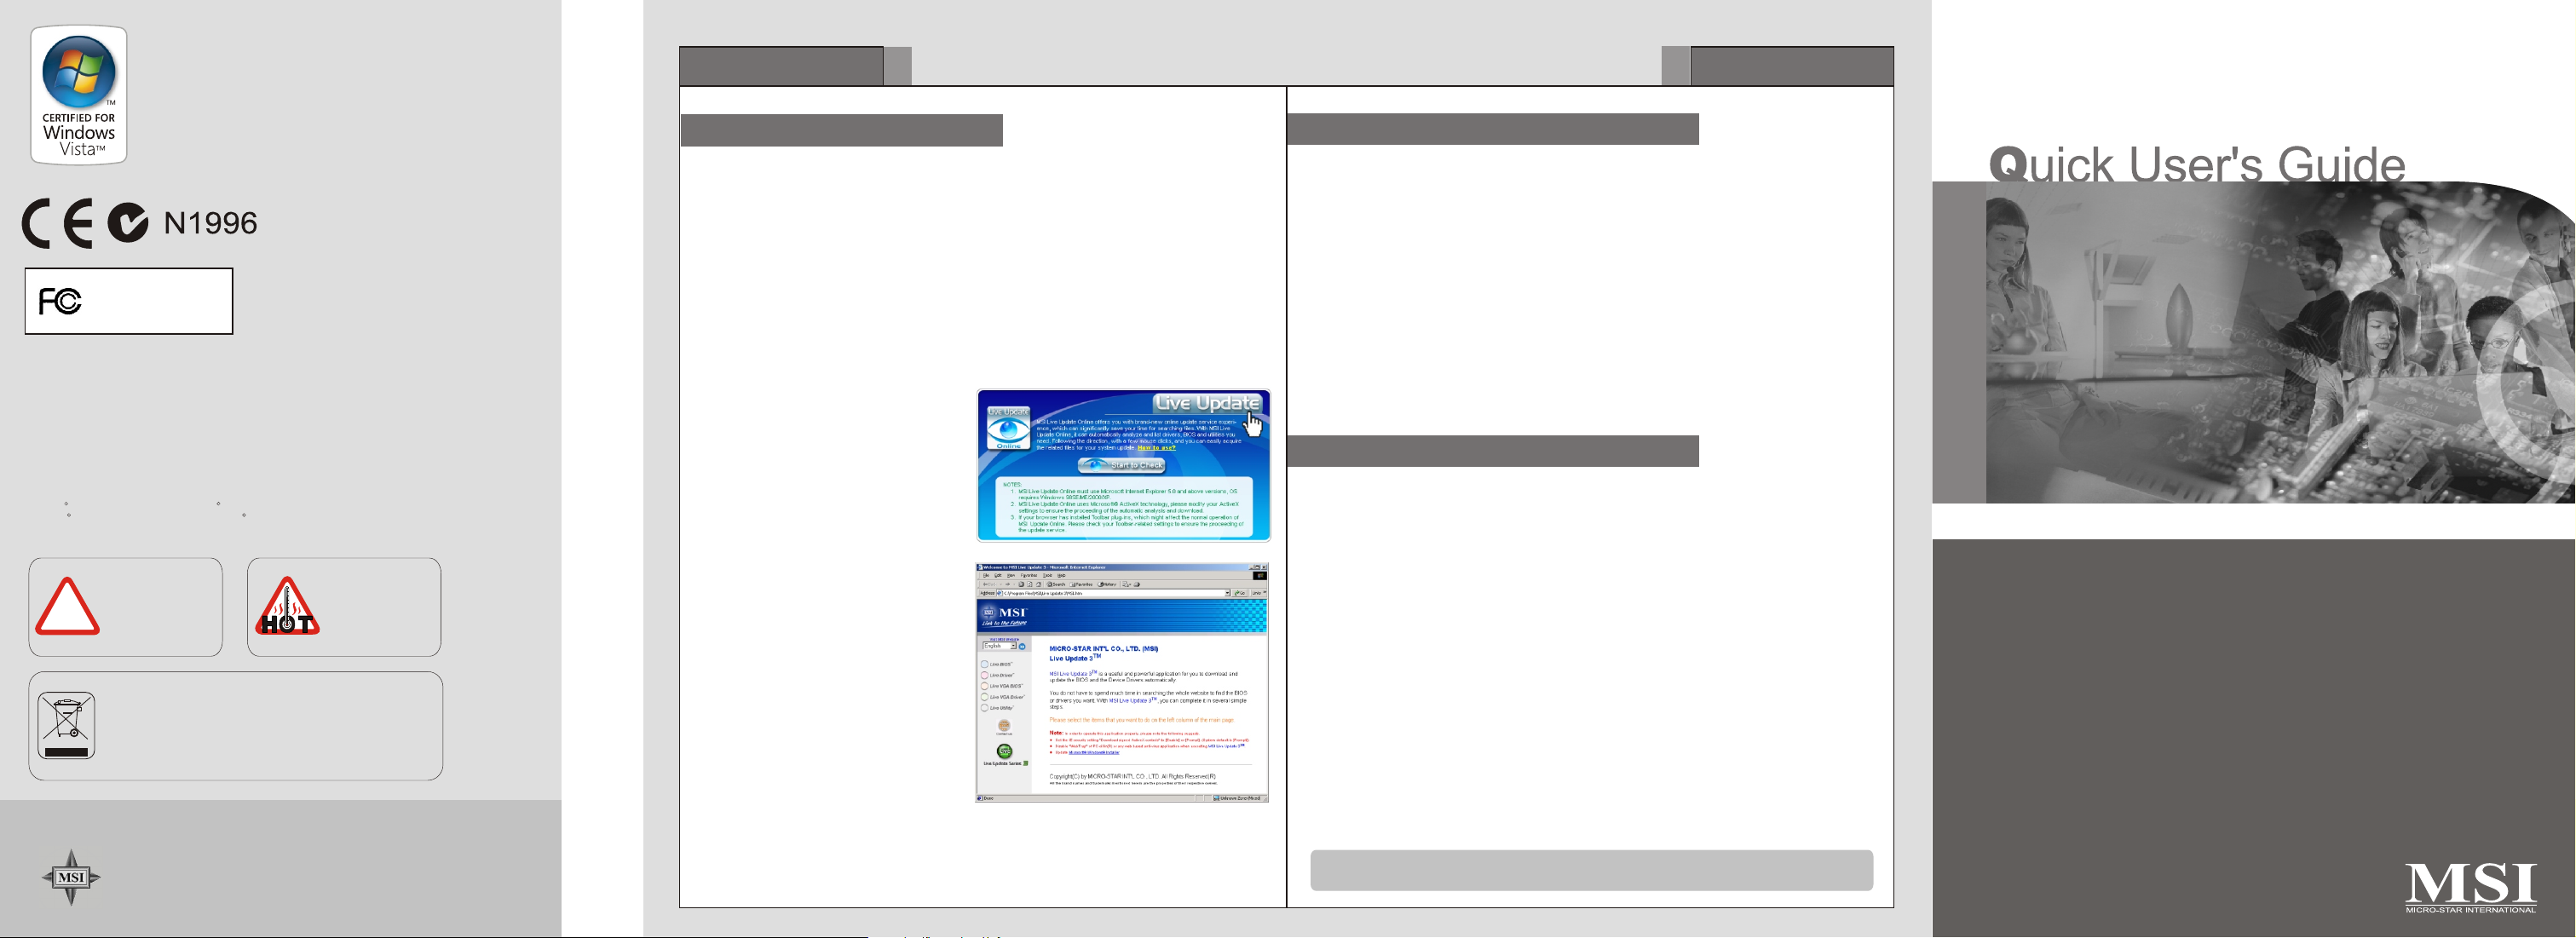
Installing MSI Live Update
MSI Live Update offers you with brand-new update service experience, which can
significantly save your time while searching files. MSI Live Update is capable to
automatically analyze and list drivers, BIOS, and utilities you need. With the easy-touse updating approaches, you can increase the performance of your system easily and
quickly. Follow the instructions below, with a few mouse clicks, you can acquire the
related files for the system updating.
Installing from the Disk
1. Insert the supplied disk into the CD-ROM drive, and start the Setup program.
2. Click the Utility tab on the setup screen.
3. Click the MSI Live Update. Follow the on-screen instructions to complete the
installation.
Installing from the MSI Web Site
1. Link to MSI's website at
http://www.msi.com.tw
2. Find and click Live Update Online
on the left side of the web page to
enter MSI Download Center.
3. Click Start to Check to download
the Live Update application.
4. Click Install the continue.
5. Follow the on-screen instructions to
complete the installation.
6. Launch MSI Live Update and to
enter the main page of this utility
as shown here.
Using MSI Live VGA Driver Update
This service enables you to update the latest VGA driver for your VGA card.
1. To update the MSI Live VGA Driver , click Live VGA Driver item on the left
column of the main page.
2. This utility will start checking your platform and the information on the VGA card, and
display the information in a list.
3. Click the graph button on the bottom to connect MSI Live Update Series Server.
Then, it will automatically connect the Internet and compare the version of the driver
in the database.
4. It may take several minutes to detect the required drivers. Please wait while
proceeding detection.
5. Click the InstallShield Wizard button on the right side of the table to download and
update the driver. All actions will proceed automatically.
6. Follow the on-screen instructions to complete the updating procedure.
TM TM TM
Using MSI Live VGA BIOS Update
This service enables you to update the latest VGA BIOS for your VGA card.
1. To update your VGA BIOS, click Live VGA BIOS item on the left column of the main page.
2. If your VGA card does not support the Live VGA BIOS function, you will receive a warning
message on the screen.
3. If your VGA card do support the Live VGA BIOS function, please pay attention to the message
shown on the screen telling you that in what circumstance flashing BIOS may fail to reboot.
4. Click Yes if you would like to try it at your own risk or No to return to the main page with
everything unchanged.
5. If you click Yes to continue, it will check the information and BIOS version of your VGA card,
and list them in a table.
6. Click the graph button at the bottom to connect the MSI Live Update 3 Server.
7. The MSI Live VGA BIOS will automatically connect the Internet and search the supported
8. If it has found one (or several) supported BIOS for your VGA card, click the InstallShield
9. Follow the on-screen instructions to complete the updating procedure.
Note that the SDK of OD5 or OD5+ is not available for BIOS live updating currently.
The latest news and Live Update function will be released on MSI web site.
TM TM
BIOS in the database of MSI .
Wizard button on the right side of the table to have the new BIOS downloaded and updated
automatically.
TM
TM
TM
TM
TM TM
R4350 series
Page 2
Overview
1
MSIMSI
**
Refer to the section of Enabling
HDMI Output to enable the HDMI
function.
Note: The VGA card shown here may vary from the actual card.
For further information, please visit MSI website at www.msi.com.tw
1G DDR2 memory or
512MB DDR2 memory or
256MB DDR2 memory or
128MB DDR2 memory
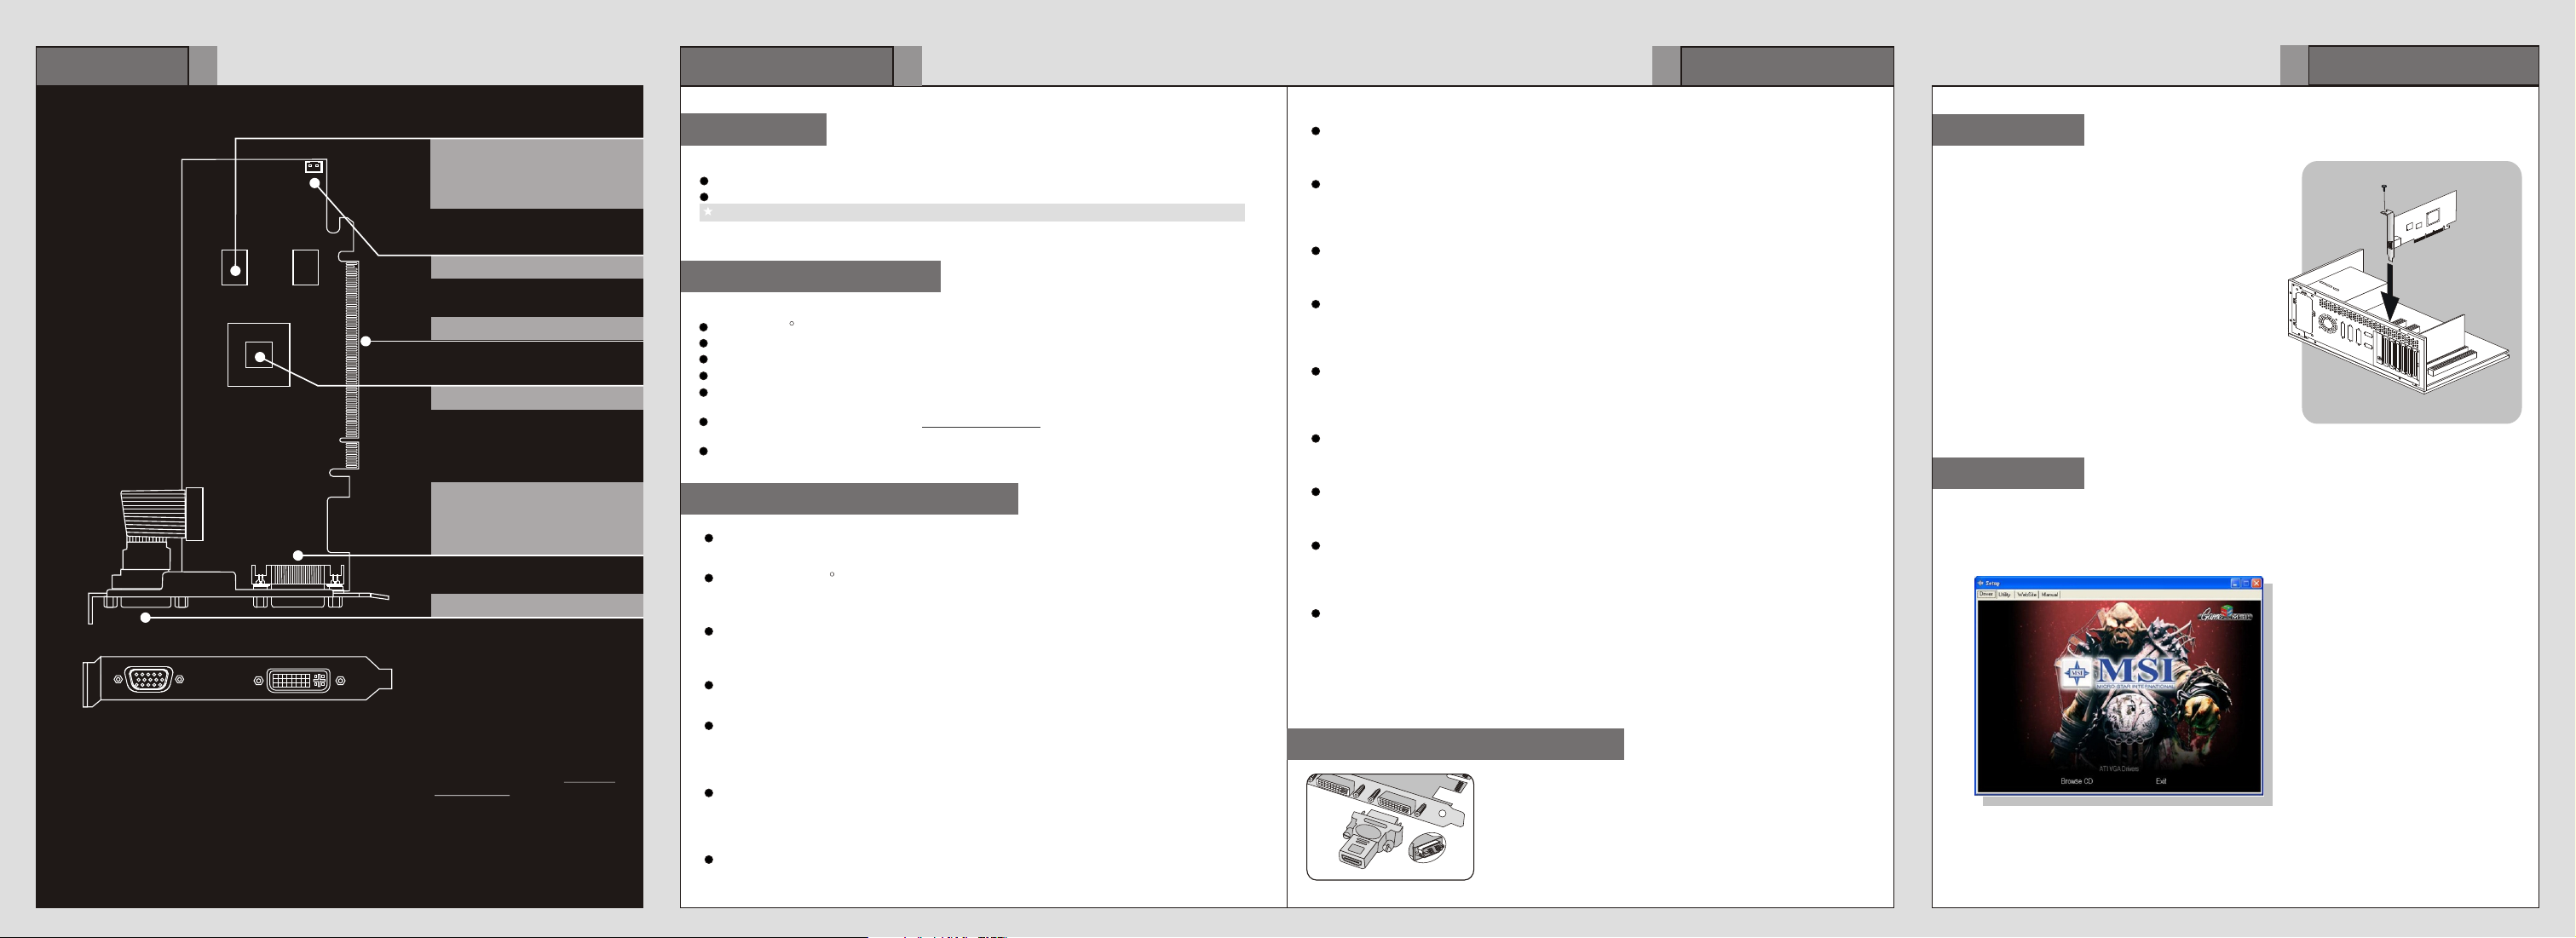
Fan Connector
PCI Express Interface
ATI Radeon HD4350
DVI-I Port
- HDMI supported**
- Dual-Link DVI output
supported
D-Sub Port
Getting Started
2
Unpacking
Please check out the following items to make sure that you get the complete product:
VGA card
Disk: Drivers, documentation, and applications
Consult your dealer immediately if anything is missing or damaged.
System Requirements
To install the VGA card, your computer system needs to meet the following requirements:
PCI Express based PC is required with one X16 lane graphics slot available on the motherboard
1G of system memory
Installation software requires CD-ROM drive
DVD /
300 Watt or greater power supply (350 Watt for ATI CrossFireX technology in dual mode) is
recommended
For DVI-HDMI adapter, please visit http://ati.amd.com/ to get the compatible mainboard
information.
Visiting MSI website for further information of operating system support
Card Features
80 Stream Processing Units
Enough power to tackle demanding games and applications.
Microsoft DirectX 10.1
Play today while preparing for tomorrow with state-of-the-art DirectX 10.1 graphics
capabilities.
Enhanced Anti-Aliasing (AA) & Anisotropic Filtering (AF)
High performance anisotropic filtering and anti-aliasing (4X AA) smooth jagged edges and
create true-to- life graphics, for everything from grass to facial features.
ATI CrossFireX Technology
Dual mode ATI CrossFireX technology offers superior scalability.
Unified Video Decoder 2 (UVD 2)
UVD 2 frees up your CPU for other tasks so you get The Ultimate Visual Experience for
the most processing-intensive content. You can also take full advantage of Blu-ray
functionality with dual-stream, picture in picture capabilities.
Enhanced DVD Upscaling
Watch standard DVD movies in near high-definition quality with DVD upscaling.2 The GPU
uses post processing algorithms to enhance standard and low resolution videos and movies
on your HD display.
PCI Express 2.0
Support for PCI Express 2.0 will prepare you for bandwidth-hungry games and 3D
applications.
R
TM
Blu-rayX / HD DVD playback requires DVD / Blu-ray / HD DVD drive
For reference only
R
TM
TM
TM
TM
Getting Started
3
Upscale Beyond 1080p
Watch the hottest Blu-ray movies or other HD content at full 1080p display resolution and
beyond.
HDMI Supported
Enjoy the latest audio technologies using HDMI with 7.1 digital surround sound support
delivering 8-channel audio. Also, xvYCC support allows the user to enjoy a wider range of
colors when connected to a capable HDTV.
Integrated DisplayPort technology3 with audio
DisplayPort is an innovative digital solution that supports the latest graphics and LCD
technologies.
Consumes less than 25 watts under full load
The ATI Radeon HD 4350 graphics card consumes less than 25 watts under full load,
making it the ideal choice for implementation across a large diverse install base of desktop
PCs.
Dynamic Power Management
ATI Radeon HD 4350 graphics card features ATI PowerPlay technology, delivering high
performance when needed and conserving power when the demand on the graphics
processor is low.
Energy Efficient Manufacturing Process
Second generation 55nm chip uses the industry's most energy efficient manufacturing
process.
Stability & Reliability
AMD's award-winning ATI Catalyst graphics software and drivers deliver unprecedented
graphics stability and reliability.
Industry Leading Technical Support
Owners of ATI Radeon Certified graphics products have free access to a comprehensive
online knowledge base and technical support (some conditions may apply, check
http://support.ati.com for more details).
ATI Avivo HD video and display technology
ATI Avivo HD is a technology platform that includes a broad set of capabilities offered by
certain ATI Radeon HD GPUs. Not all products have all features and full enablement of
some ATI Avivo HD capabilities may require complementary products.
TM
TM
TM
TM
TM
TM
TM
TM
Enabling HDMI Output
Follow the steps to enable HDMI Output function:
1. Find the DVI-to-HDMI adapter that comes with the package,
if provided.
is not provided.
2. Attach the
3. Ensure that the adapter is firmly installed.
below
Consult your dealer to purchase the adapter if it
DVI-to-HDMI adapter to the DVI connector.
Quick Installation
4
Hardware
CD
below
expansion
R
TM TM
please follow the steps below:
Tip : If, on your computer, the
Autorun program does not execute
automatically, please 1) enable the
CD-ROM drive Auto-detect function
from Control Panel; or 2) find and
run the setup.exe file manually from
the CD.
Follow the steps to install the VGA card:
1. Remove the computer case.
2. Locate the expansion slot on your mainboard.
Warning: Inserting the VGA card into a wrong
slot may damage your card (refer to your
mainboard manual for more Information).
3. Put the card directly over the slot and
press one end of the card into the slot first.
Gently but firmly press the other end until the
card is fully seated in the slot.
4. Secure the card with a bracket screw.
5. Install all other cards and devices and connect
all the cables, and then install the case.
6. Connect the monitor. Now, you are ready to
install the software on your computer.
Software
To install the driver of the VGA card to your computer,
1. Turn on the computer.
2. Insert the into the CD-ROM drive. The Autorun program will start the Setup
program, and show the setup screen as follows:
Installing MSI Live Update 3
3. Click ATI VGA Drivers. Follow the on-screen instructions to complete the installation.
4. After finishing the installation, restart the computer as instructed.
 Loading...