

Page 1

G52-B0791X3
Nightblade Z97
Nightblade B85
Page 2

ii
Contents
Copyright Notice ������������������������������������������������������������������������������������������������������iii
Trademarks ������������������������������������������������������������������������������������������������������������� iii
Revision ������������������������������������������������������������������������������������������������������������������iii
Upgrade and Warranty ��������������������������������������������������������������������������������������������iv
Acquisition of Replaceable Parts ����������������������������������������������������������������������������iv
Technical Support ���������������������������������������������������������������������������������������������������iv
Green Product Features ������������������������������������������������������������������������������������������iv
Environmental Policy �������������������������������������������������������������������������������������������� v
Chemical Substances Information �������������������������������������������������������������������������� v
Battery Information �������������������������������������������������������������������������������������������������� v
Safety Instructions ���������������������������������������������������������������������������������������������������vi
CE Conformity ������������������������������������������������������������������������������������������������������� viii
FCC-B Radio Frequency Interference Statement ������������������������������������������������� viii
WEEE Statement �������������������������������������������������������������������������������������������������� viii
Overview ���������������������������������������������������������������� 1-1
Nightblade Z97 Overview ������������������������������������������������������������������������������������� 1-2
Nightblade B85 Overview ������������������������������������������������������������������������������������ 1-3
Packing Contents ������������������������������������������������������������������������������������������������� 1-4
Optional Accessories ������������������������������������������������������������������������������������������� 1-4
OC Genie Button (Nightblade Z97) ���������������������������������������������������������������������� 1-5
LED Light Button (Nightblade B85) ���������������������������������������������������������������������� 1-5
BIOS and Driver Updates ������������������������������������������������������������������������������������� 1-5
Cleaning the Dust Container �������������������������������������������������������������������������������� 1-6
System Operations ������������������������������������������������� 2-1
Power Management ��������������������������������������������������������������������������������������������� 2-2
Network Connection (Windows 8�x) ��������������������������������������������������������������������� 2-4
System Recovery (Windows 8�x) ������������������������������������������������������������������������� 2-7
Page 3

Preface
iii
Copyright Notice
The material in this document is the intellectual property of MICRO-STAR
INTERNATIONAL� We take every care in the preparation of this document, but no
guarantee is given as to the correctness of its contents� Our products are under continual
improvement and we reserve the right to make changes without notice�
Trademarks
All trademarks are the properties of their respective owners�
Revision
Revision Date
V3�0 2014/06
Page 4
iv
Upgrade and Warranty
Please note that certain components preinstalled in the product may be upgradable
or replaceable by user’s request� For any further information about the product users
purchased, please contact the local dealer� Do not attempt to upgrade or replace any
component of the product if you are not an authorized dealer or service center, since it
may cause the warranty void� It is strongly recommended that you contact the authorized
dealer or service center for any upgrade or replace service�
Acquisition of Replaceable Parts
Please be noticed that the acquisition of replaceable parts (or compatible ones) of
the product users purchased in certain countries or territories may be fullled by the
manufacturer within 5 years at most since the product has been discontinued, depending
on the ocial regulations declared at the time.
Please contact the manufacturer via
http://support�msi�com/ for the detailed information
about the acquisition of spare parts�
Technical Support
If a problem arises with your system and no solution can be obtained from the user’s
manual, please contact your place of purchase or local distributor� Alternatively, please
try the following help resources for further guidance�
◙ Visit the MSI website for technical guide, BIOS updates, driver updates and
other information via http://www�msi�com/service/download/
◙ Contact our technical sta via http://support�msi�com/
Green Product Features
◙ Reduced energy consumption during use and stand-by
◙ Limited use of substances harmful to the environment and health
◙ Easily dismantled and recycled
◙ Reduced use of natural resources by encouraging recycling
◙ Extended product lifetime through easy upgrades
◙ Reduced solid waste production through take-back policy
Page 5
Preface
v
Environmental Policy
◙ The product has been designed to enable proper reuse of parts
and recycling and should not be thrown away at its end of life�
◙ Users should contact the local authorized point of collection for
recycling and disposing of their end-of-life products�
◙ Visit the MSI website and locate a nearby distributor for further recycling
information�
◙ Users may also reach us at gpcontdev@msi�com for information regarding
proper Disposal, Take-back, Recycling, and Disassembly of MSI products�
Chemical Substances Information
In compliance with chemical substances regulations, such as the EU REACH Regulation
(Regulation EC No� 1907/2006 of the European Parliament and the Council), MSI
provides the information of chemical substances in products at:
http://www�msi�com/html/popup/csr/evmtprtt_pcm�html
Battery Information
European Union:
Batteries, battery packs, and accumulators should not be
disposed of as unsorted household waste� Please use the
public collection system to return, recycle, or treat them in
compliance with the local regulations�
Taiwan:
For better environmental protection, waste batteries should
be collected separately for recycling or special disposal�
California, USA:
The button cell battery may contain perchlorate material and requires special
handling when recycled or disposed of in California�
For further information please visit:
http://www�dtsc�ca�gov/hazardouswaste/perchlorate/
Danger of explosion if battery is incorrectly replaced� Replace only with the
same or equivalent type recommended by the manufacturer�
Page 6
vi
Safety Instructions
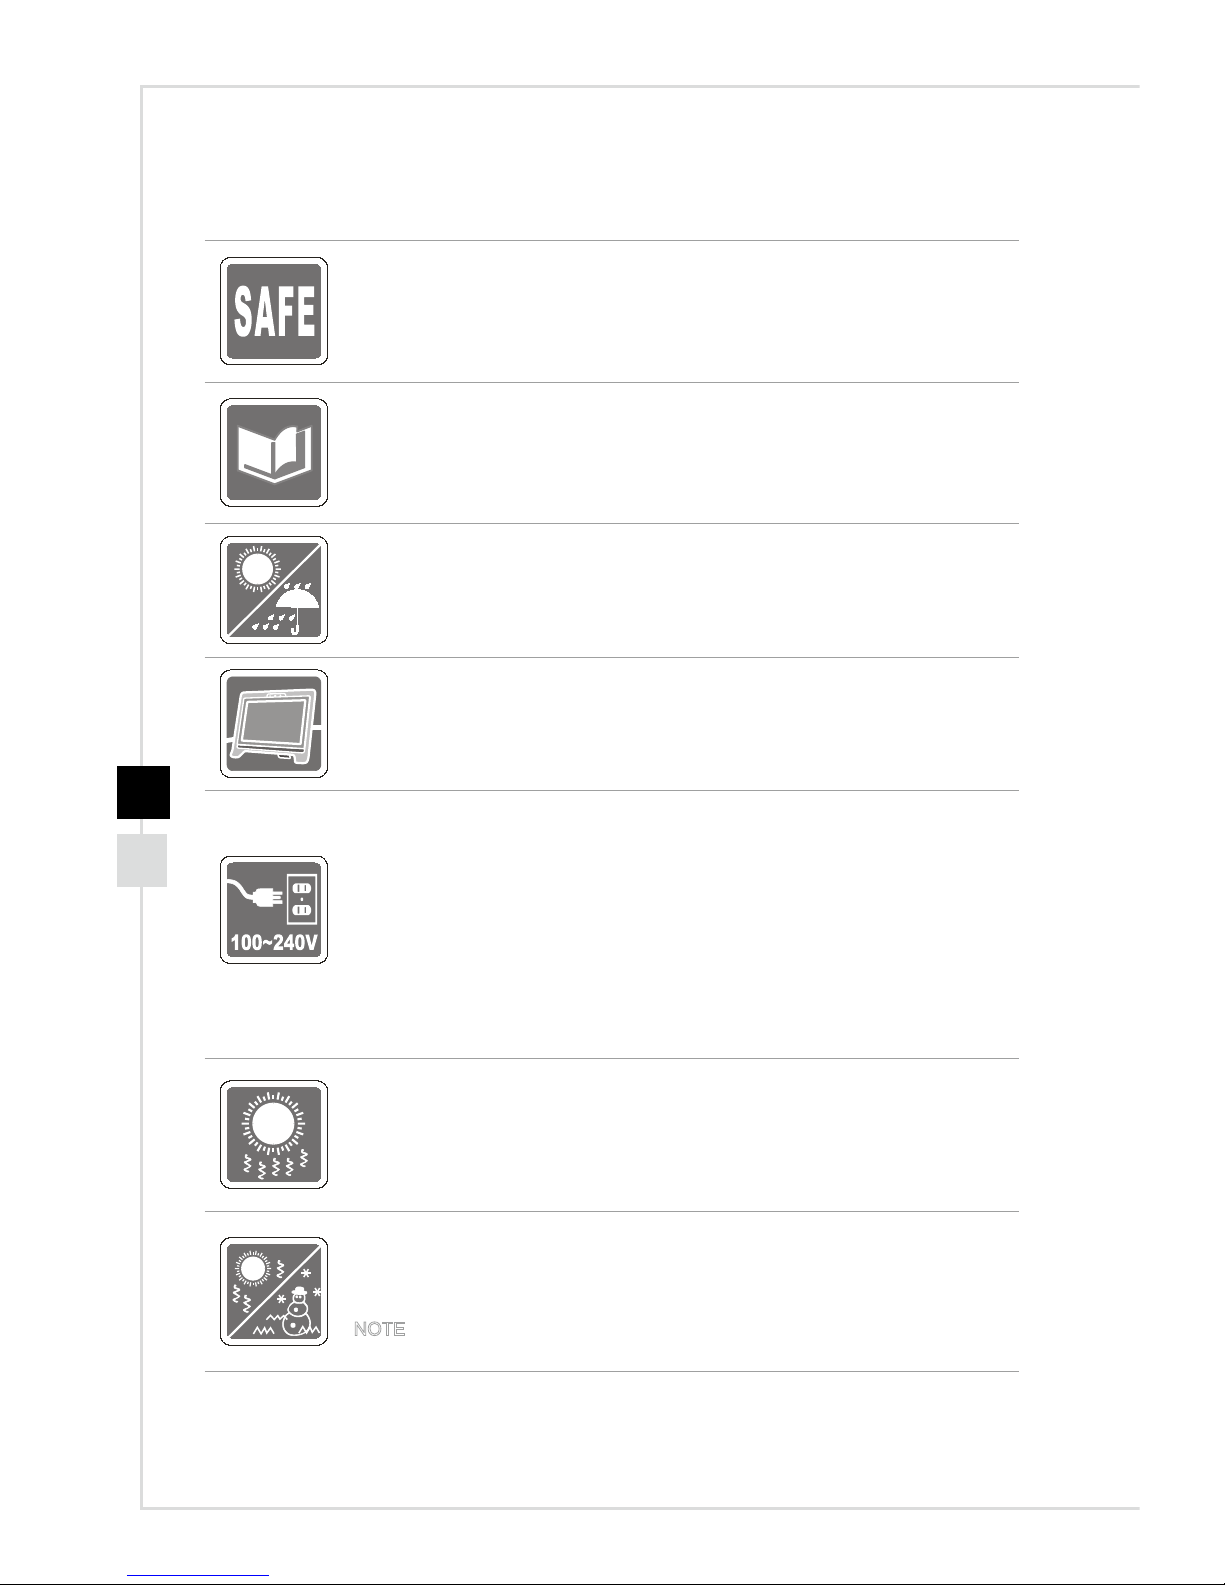
◙ Read the safety instructions carefully and thoroughly�
◙ All cautions and warnings on the equipment or user’s manual should be
noted�
Keep the User’s Guide that comes with the package for future reference�
Keep this equipment away from humidity and high temperature�
Lay this equipment on a reliable at surface before setting it up.
◙ Make sure that the power voltage is within its safety range and has been
adjusted properly to the value of 100~240V before connecting the equipment
to the power outlet� Do not disable the protective earth pin from the plug�
The equipment must be connected to an earthed mains socket-outlet�
◙ Always unplug the AC power cord before installing any add-on card or
module to the equipment�
◙ Always disconnect the AC power cord or switch the wall socket o if the
equipment would be left unused for a certain time to achieve zero energy
consumption�
The ventilator on the enclosure is used for air convection and to prevent the
equipment from overheating� Do not cover the ventilator�
Do not leave the equipment in an unconditioned environment with a storage
temperature above 60OC (140OF) or below 0OC (32OF), which may damage the
equipment�
NOTE: The maximum operating temperature is around 40OC�
Page 7
Preface
vii
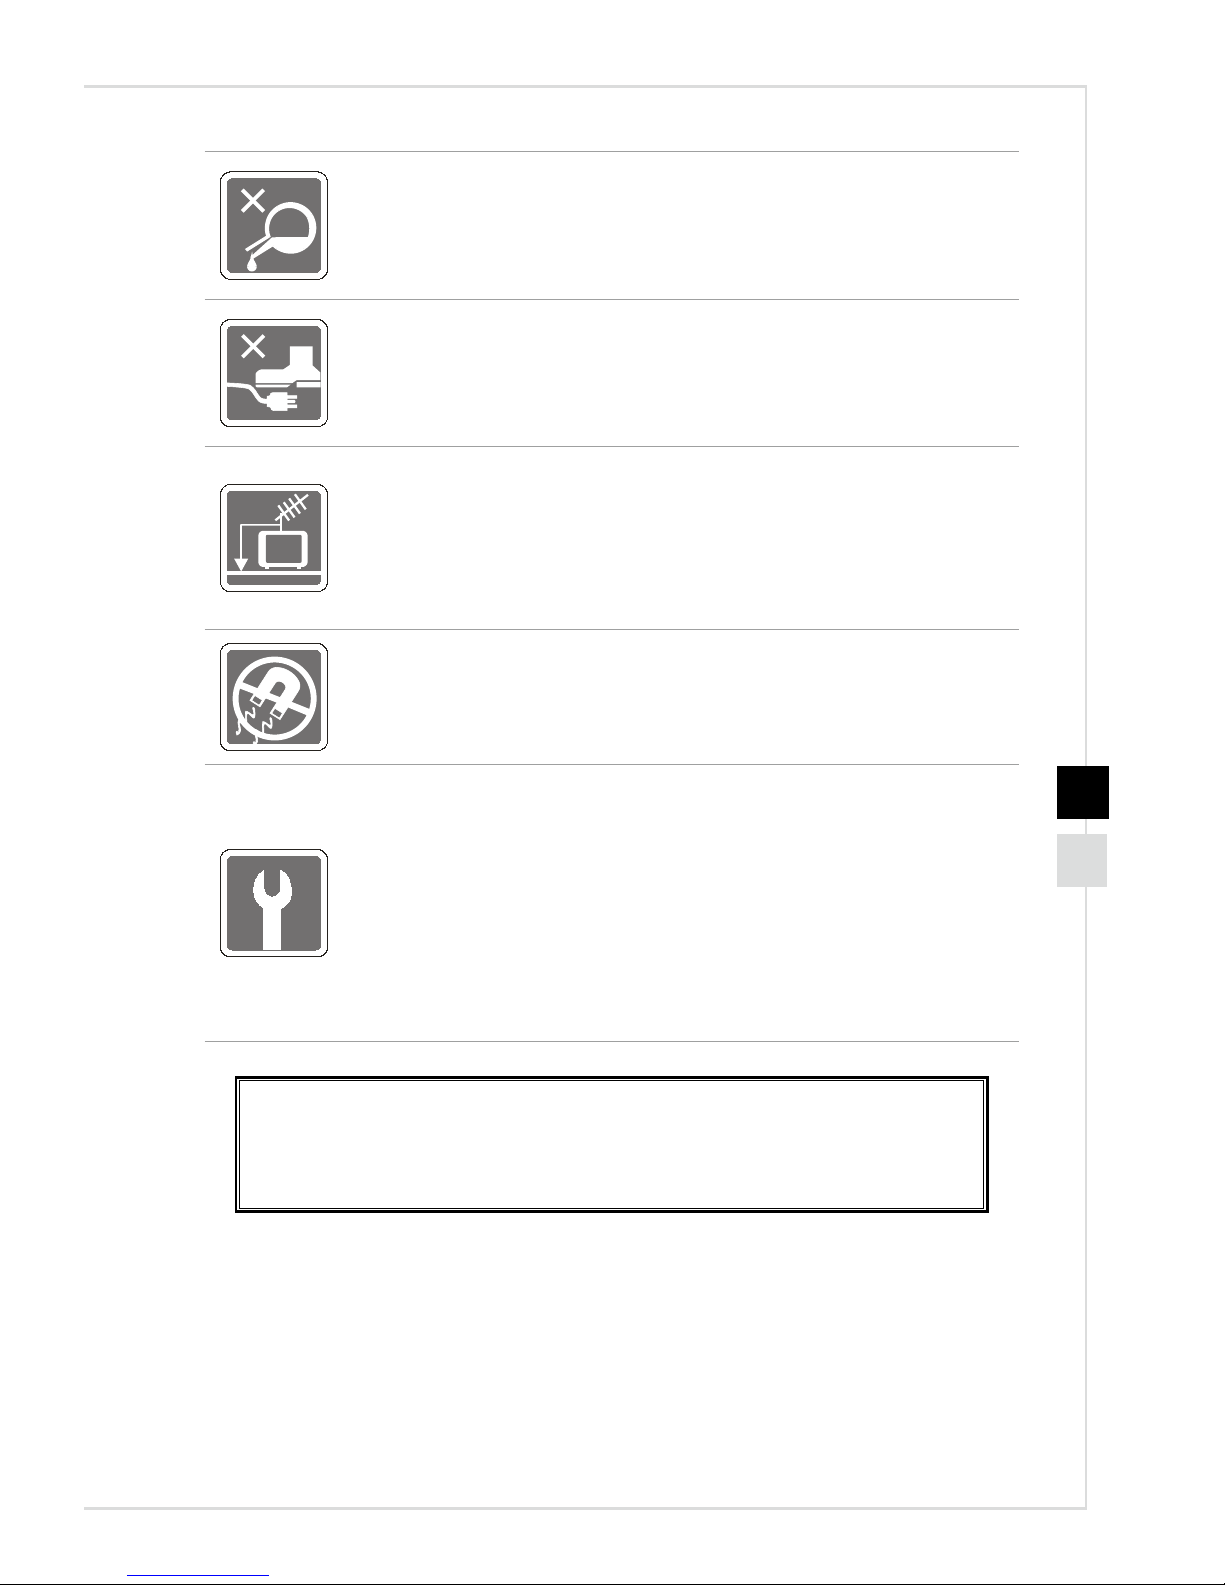
Never pour any liquid into the opening that could damage or cause electrical
shock�
Place the power cord in a way that people are unlikely to step on it� Do not place
anything on the power cord�
◙ When installing the coaxial cable to the TV Tuner, it is necessary to ensure
that the metal shield is reliably connected to protective earthing system of
the building�
◙ Cable distribution system should be grounded (earthed) in accordance with
ANSI/NFPA 70, the National Electrical Code (NEC), in particular Section
820�93, Grounding of Outer Conductive Shield of a Coaxial Cable�
Always keep the strong magnetic or electrical objects away from the
equipment�
If any of the following situations arises, get the equipment checked by service
personnel:
◙ The power cord or plug is damaged�
◙ Liquid has penetrated into the equipment�
◙ The equipment has been exposed to moisture�
◙ The equipment does not work well or you can not get it work according to
user’s manual�
◙ The equipment has dropped and damaged�
◙ The equipment has obvious sign of breakage�
1� The optical storage devices are classied as CLASS 1 LASER PRODUCT. Use of
controls or adjustments or performance of procedures other than those specied
is prohibited�
2� Do not touch the lens inside the drive�
Page 8
viii
CE Conformity
Hereby, Micro-Star International CO�, LTD declares that this device is
in compliance with the essential safety requirements and other relevant
provisions set out in the European Directive�
FCC-B Radio Frequency Interference
Statement
This equipment has been tested and found to comply with the limits for
a Class B digital device, pursuant to Part 15 of the FCC Rules� These
limits are designed to provide reasonable protection against harmful
interference in a residential installation� This equipment generates,
uses and can radiate radio frequency energy and, if not installed and
used in accordance with the instruction manual, may cause harmful interference to
radio communications� However, there is no guarantee that interference will not occur
in a particular installation� If this equipment does cause harmful interference to radio or
television reception, which can be determined by turning the equipment o and on, the
user is encouraged to try to correct the interference by one or more of the measures
listed below:
■ Reorient or relocate the receiving antenna�
■ Increase the separation between the equipment and receiver�
■ Connect the equipment into an outlet on a circuit dierent from that to which
the receiver is connected�
■ Consult the dealer or an experienced radio/television technician for help�
Notice 1
The changes or modications not expressly approved by the party responsible for
compliance could void the user’s authority to operate the equipment�
Notice 2
Shielded interface cables and AC power cord, if any, must be used in order to comply
with the emission limits�
VOIR LA NOTICE D’INSTALLATION AVANT DE RACCORDER AU RESEAU�
This device complies with Part 15 of the FCC Rules� Operation is subject to the following
two conditions:
1� this device may not cause harmful interference, and
2� this device must accept any interference received, including interference that may
cause undesired operation�
WEEE Statement
Under the European Union (“EU”) Directive on Waste Electrical and
Electronic Equipment, Directive 2002/96/EC, which takes eect on August
13, 2005, products of “electrical and electronic equipment” cannot be
discarded as municipal waste anymore and manufacturers of covered
electronic equipment will be obligated to take back such products at the end
of their useful life�
Page 9

1
Overview
Page 10
1-2
L-In
mic
L-Out
RS-OutCS-OutSS-Out
DISPLAY PORT
HDMI
S/PDIF
HDMI
eSATA
CLEAR
CMOS
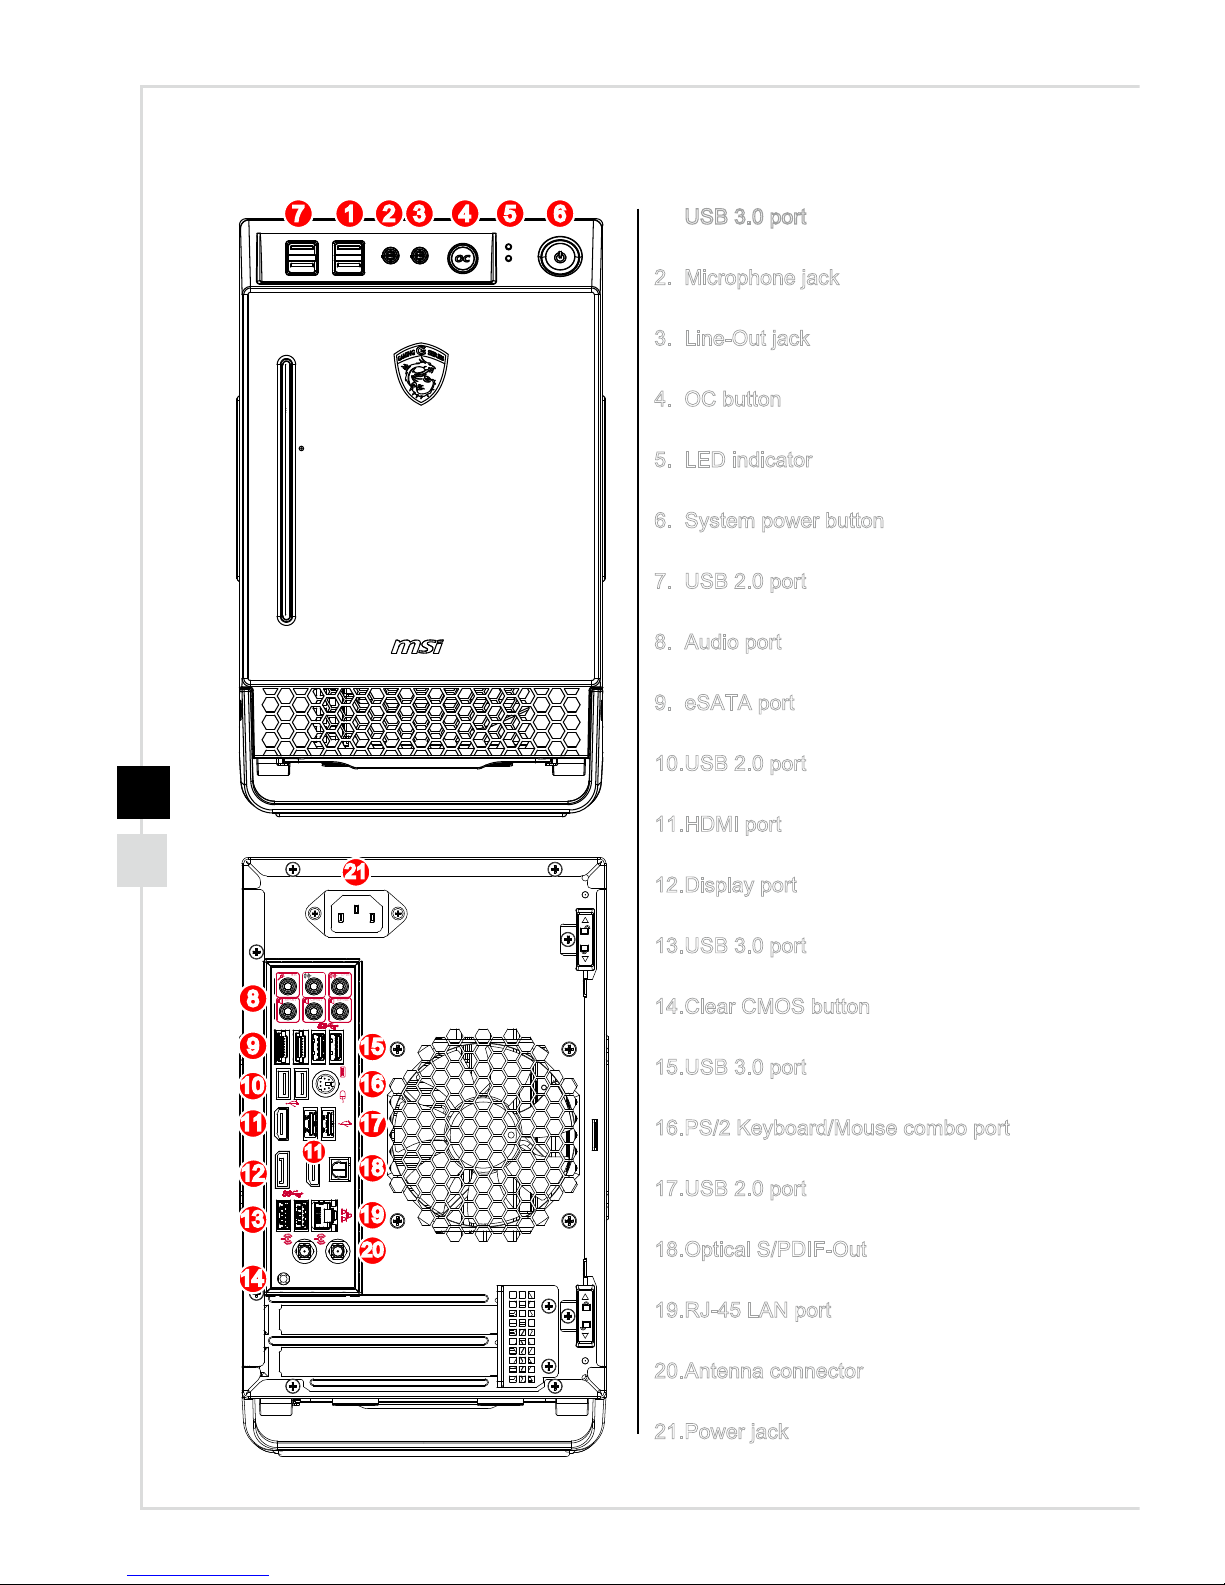
1� USB 3�0 port
2� Microphone jack
3� Line-Out jack
4� OC button
5� LED indicator
6� System power button
7� USB 2�0 port
8� Audio port
9� eSATA port
10� USB 2�0 port
11� HDMI port
12� Display port
13� USB 3�0 port
14� Clear CMOS button
15� USB 3�0 port
16� PS/2 Keyboard/Mouse combo port
17� USB 2�0 port
18� Optical S/PDIF-Out
19� RJ-45 LAN port
20� Antenna connector
21� Power jack
10
1 2 3 4 657
8
9
11
12
13
14
15
16
17
18
19
Nightblade Z97 Overview
11
20
21
Page 11
Overview
1-3
L-In
L-Out
mic
RS-OutCS-OutSS-Out
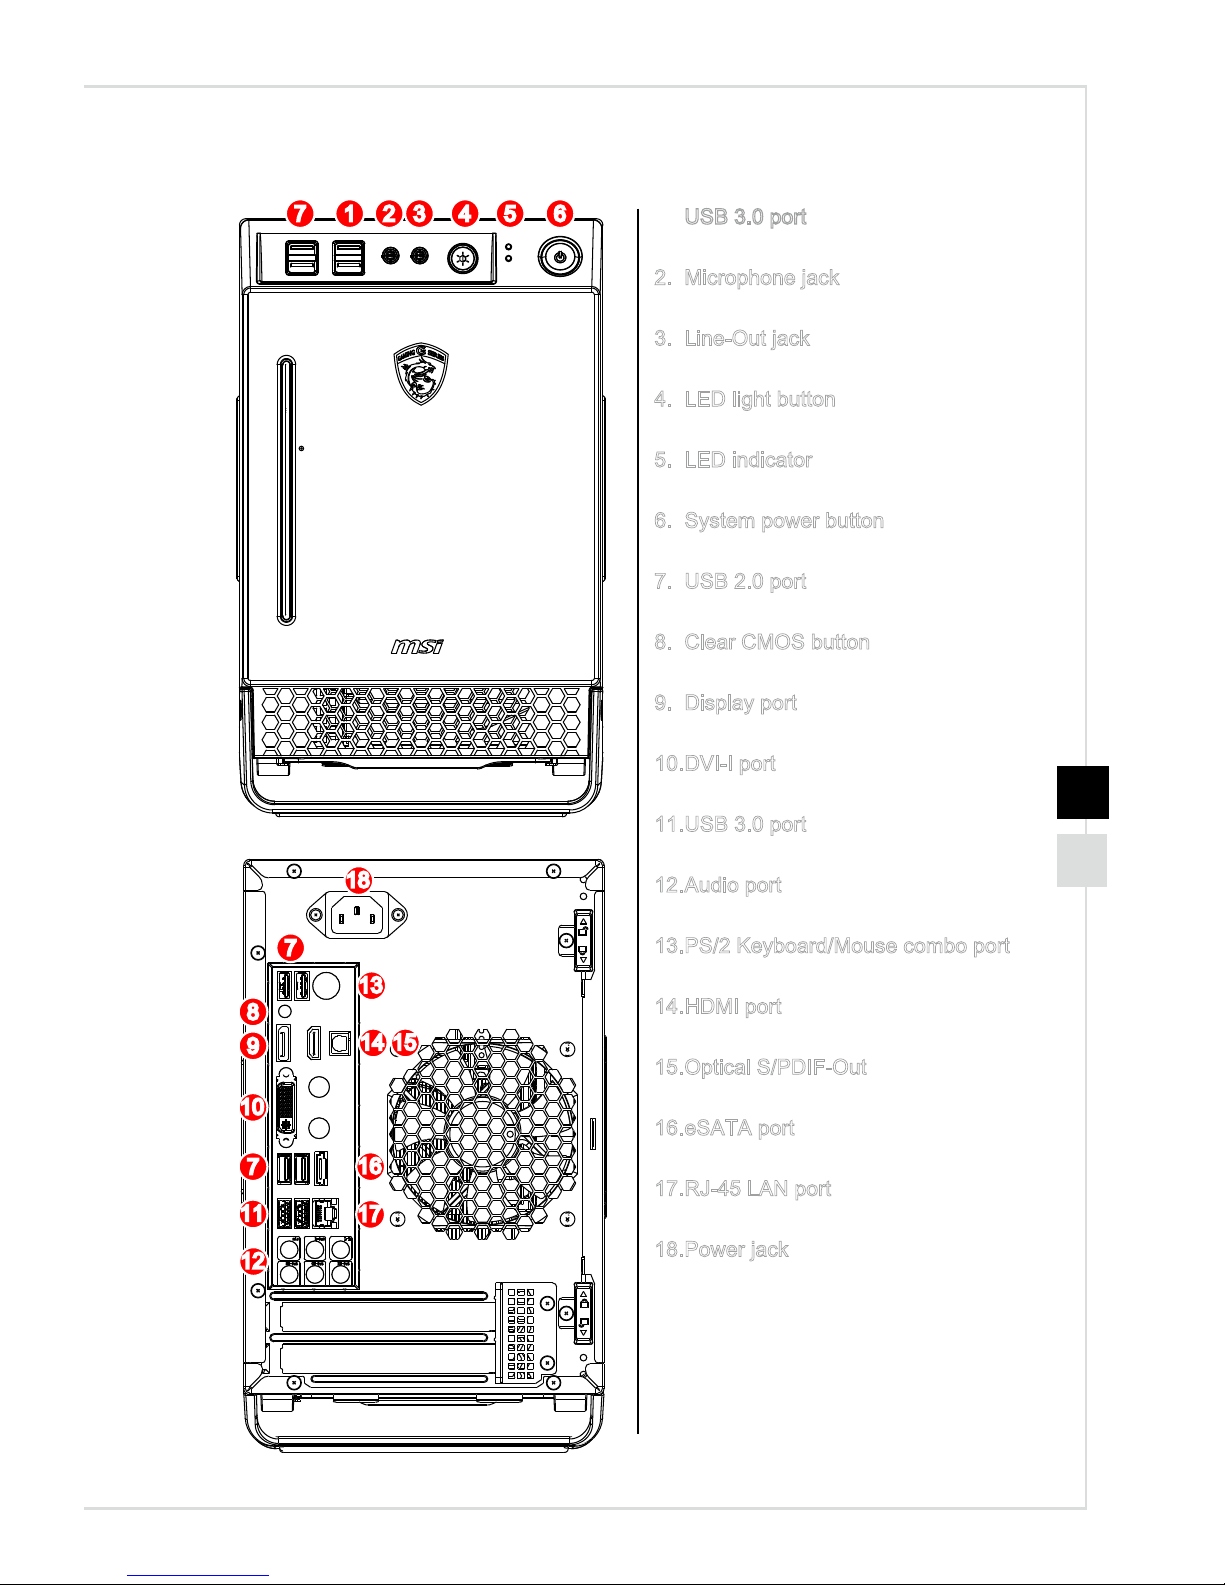
1� USB 3�0 port
2� Microphone jack
3� Line-Out jack
4� LED light button
5� LED indicator
6� System power button
7� USB 2�0 port
8� Clear CMOS button
9� Display port
10� DVI-I port
11� USB 3�0 port
12� Audio port
13� PS/2 Keyboard/Mouse combo port
14� HDMI port
15� Optical S/PDIF-Out
16� eSATA port
17� RJ-45 LAN port
18� Power jack
10
1 2 3 4 65
7
8
9
11
12
13
14 15
16
17
18
7
Nightblade B85 Overview
7
Page 12
1-4
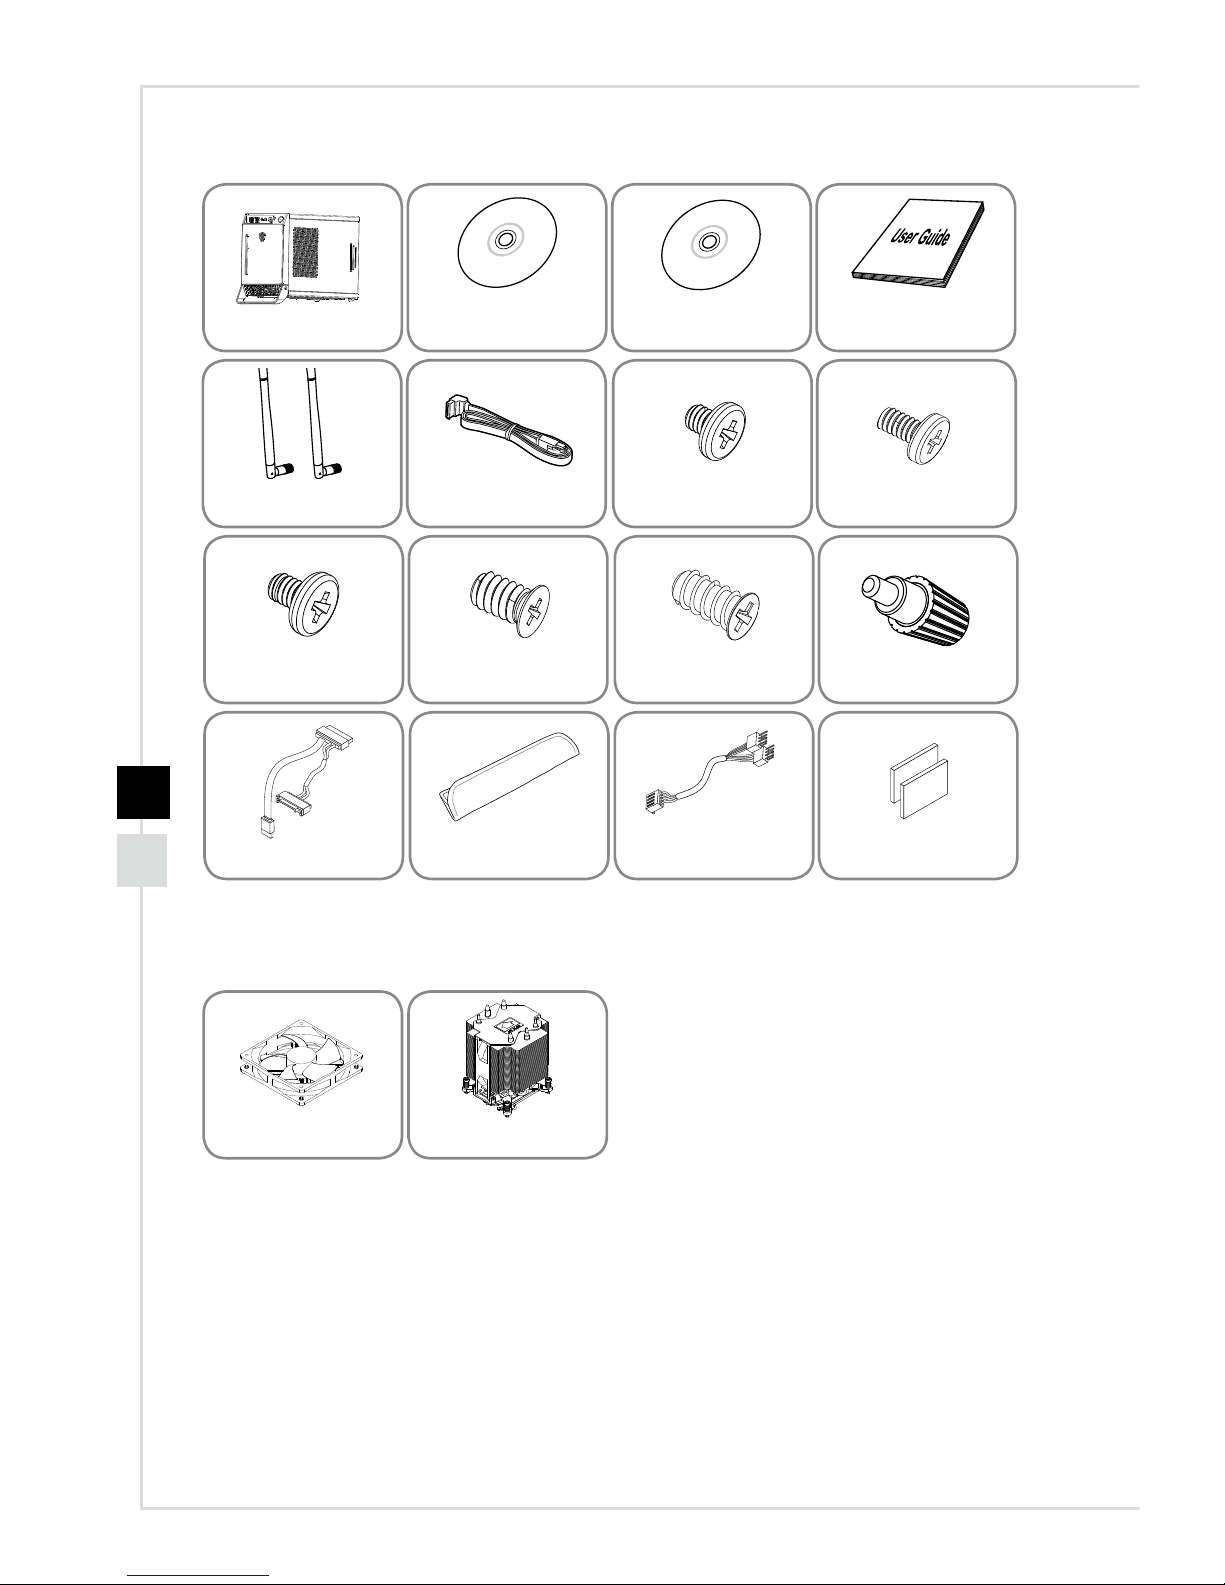
Packing Contents
* Please contact us immediately if any of the items is damaged or missing�
* The illustrations are for reference only and your packing contents may slightly vary
depending on the model you purchased�
Optional Accessories
Drivers Disc
User Guide
Nightblade
System Fan
Antenna x 2
(Optional)
M3 Screw
M2 ScrewSATA Cable
Thumber Screw
#6-32 Flat Screw
CPU Cooler
#6-32 Sunk Screw
T5 Screw
VGA Sponge
Slim ODD Cable
Handle Sleeve
Utilities Disc
Fan Power Cable
(Optional)
Page 13
Overview
1-5
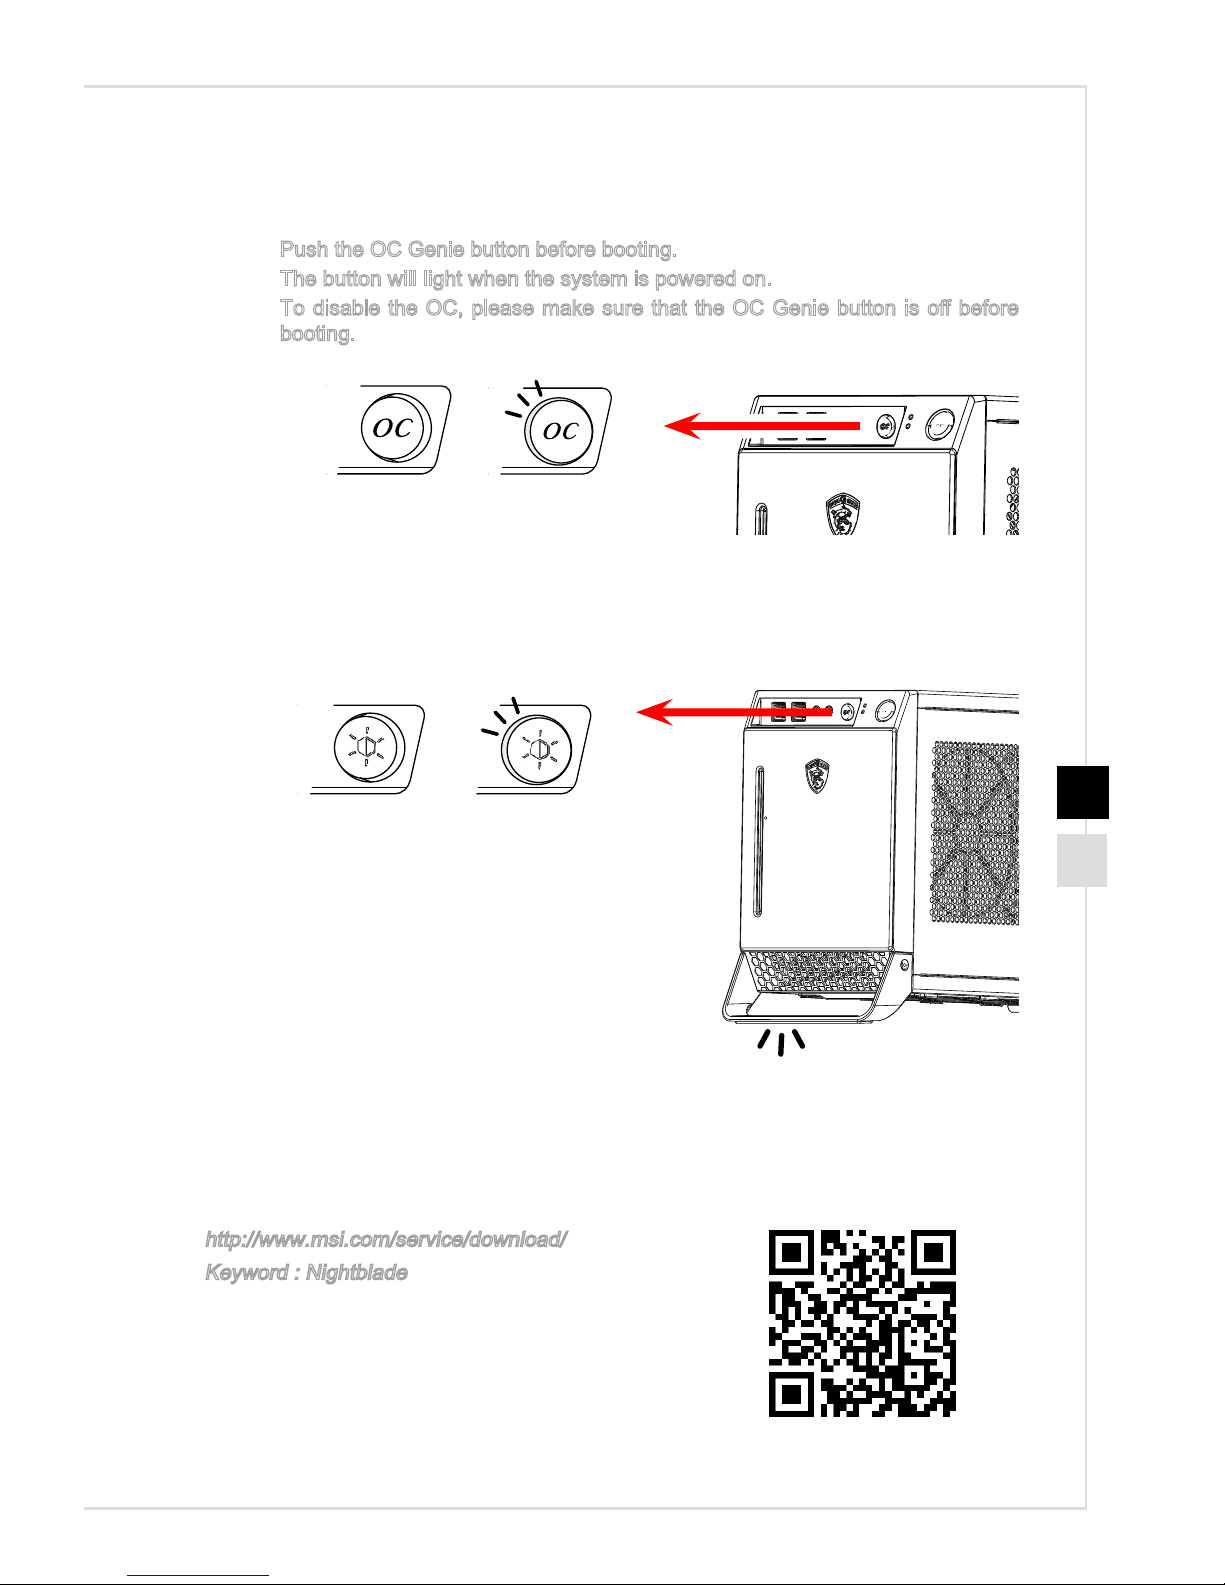
OC Genie Button (Nightblade Z97)
OC Genie button can help to gain the better perfomance while playing 3D games�
■
Push the OC Genie button before booting�
■
The button will light when the system is powered on�
■
To disable the OC, please make sure that the OC Genie button is o before
booting�
LED Light Button (Nightblade B85)
Push the LED light button to turn on or o the LED on the bottom of the chassis.
BIOS and Driver Updates
Visit the MSI website for technical guide, BIOS updates, driver updates, and other
information�
http://www�msi�com/service/download/
Keyword : Nightblade
OC Genie OFF OC Genie ON
LED OFF LED ON
Page 14
1-6
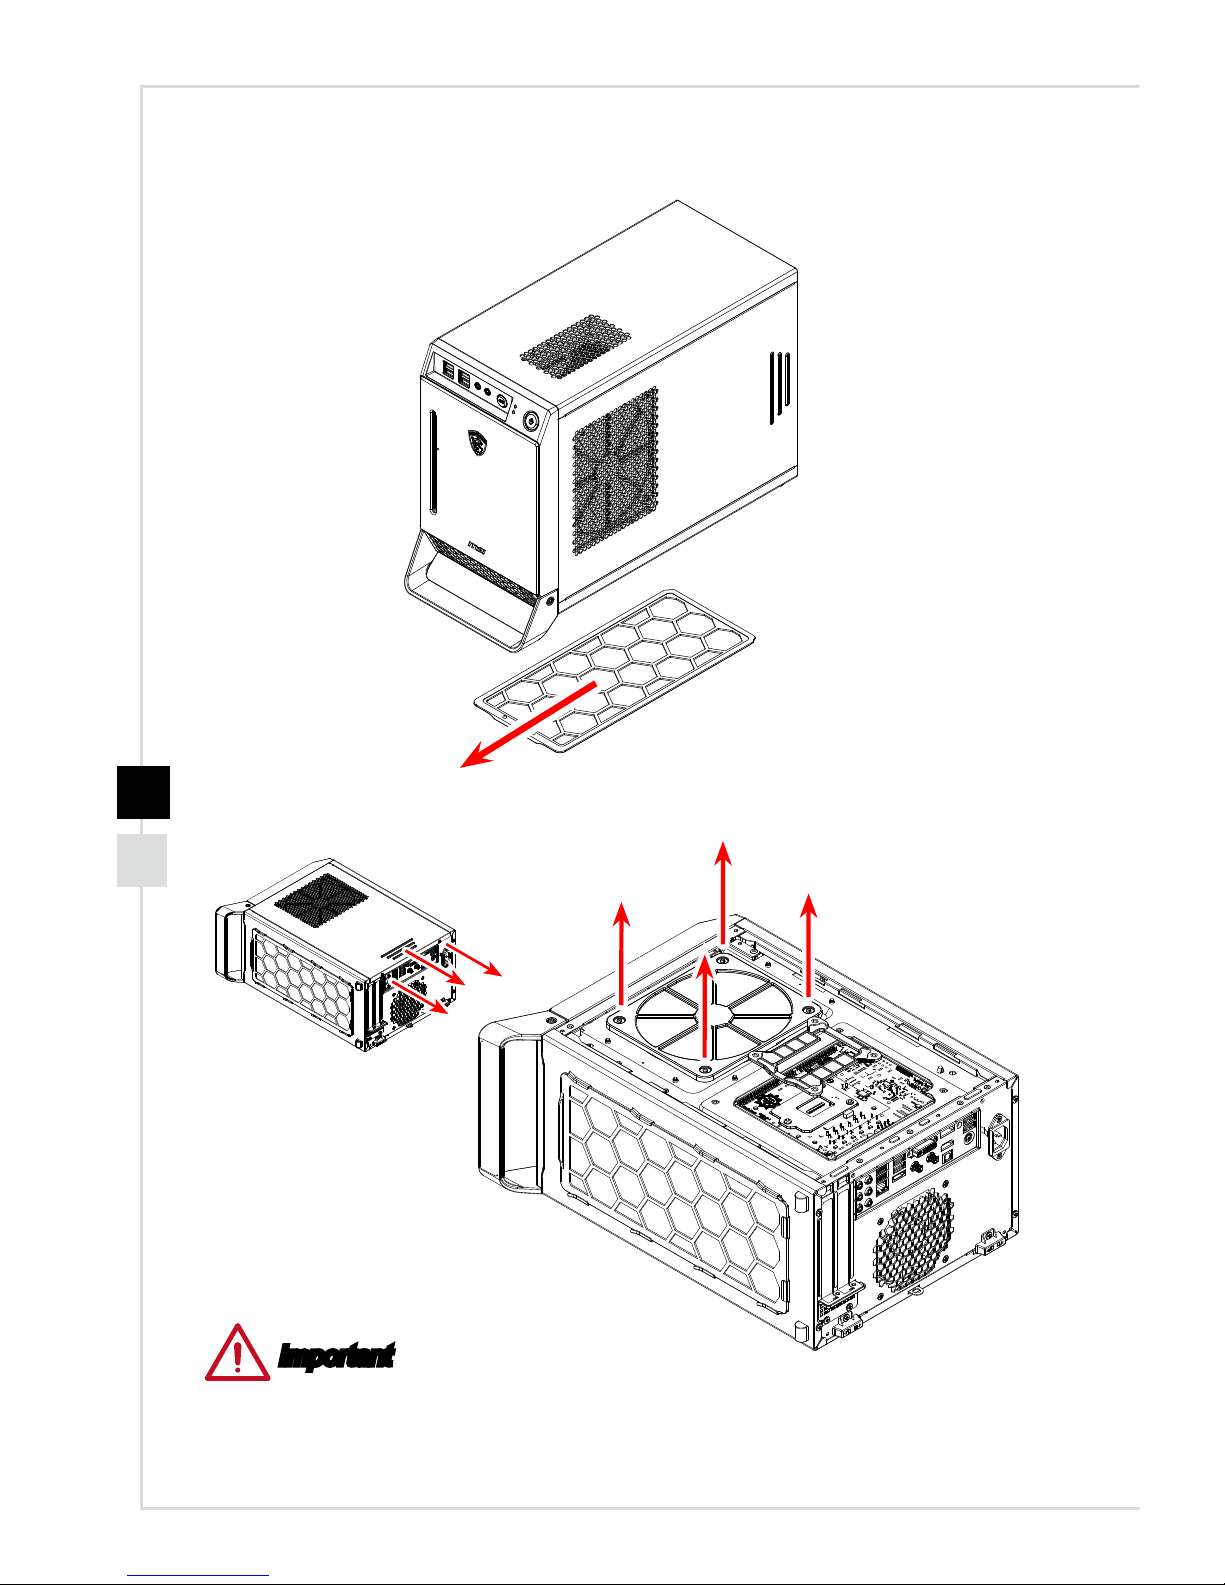
Cleaning the Dust Container
Important
Regularly cleaning the dust container could keep the system well-ventilated� Clean the
dust container with clean water and dry it before replacing it to the system�
Page 15

2
System Operations
This chapter provides you with essential information on system operations�
Important
All information is subject to change without prior notice�
Page 16
2-2
Power Management
Power management of personal computers (PCs) and monitors has the potential to
save signicant amounts of electricity as well as deliver environmental benets.
To be energy ecient, turn o your display or set your PC to sleep mode after a period
of user inactivity�
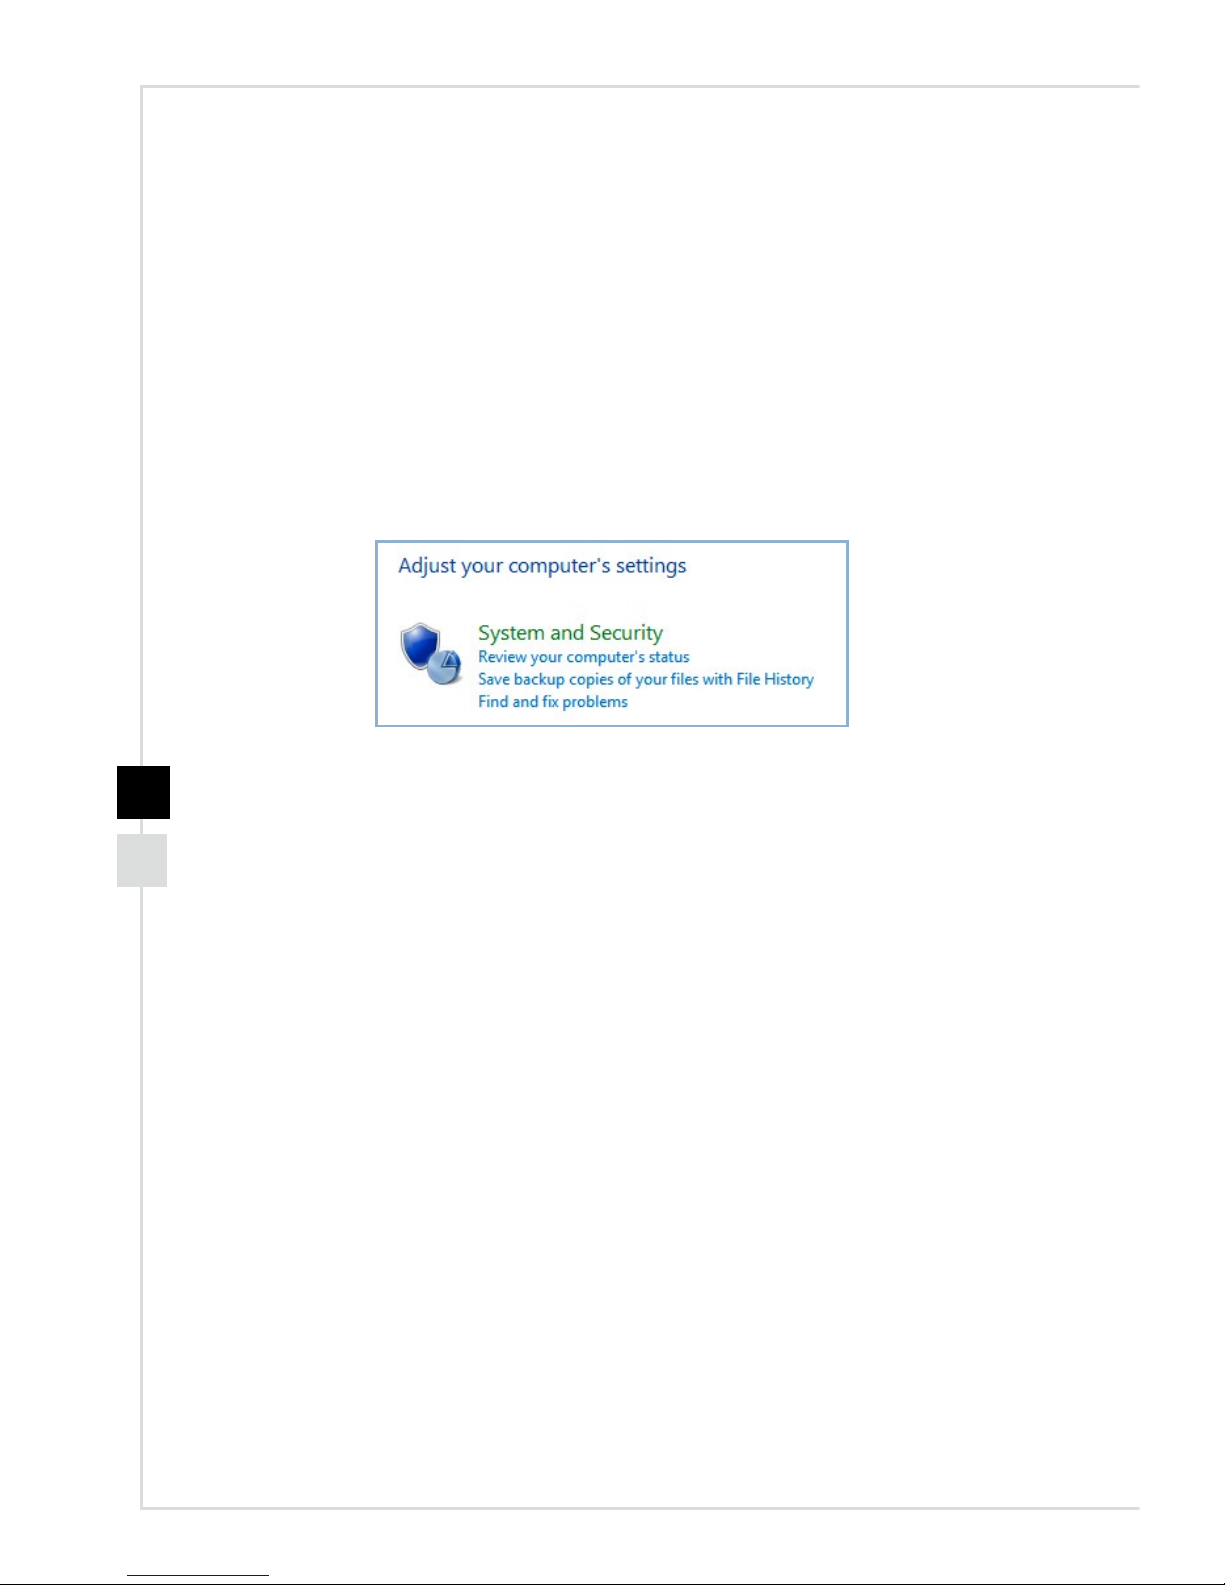
h Power Management in Windows 8�x
■ [Power Options] in Windows OS allow you to control the power management
features of your display, hard drive, and battery� Go to [Start] > [Control Panel]
> [System and Security]�
Then click on the [Power Options] link�
Select a power plan that suits your personal needs. You may also ne-tune the
settings by clicking [Change plan settings]�
■ The Shut Down Computer menu presents the options of Sleep (S3/S4) & Shut
Down (S5) for rapid and easy management of your system power�
h Power Management through ENERGY STAR
qualied monitors
The power management feature allows the computer to initiate a low-power or “Sleep”
mode after a period of user inactivity� When used with an external ENERGY STAR
qualied monitor, this feature also supports similar power management features of the
monitor� To take advantage of these potential energy savings, the power management
feature has been preset to behave in the following ways when the system is operating
on AC power:
■ Turn o the display after 15 minutes
■ Initiate Sleep after 30 minutes
h Waking the System Up
The computer shall be able to wake up from power saving mode in response to a
command from any of the following:
■ the power button,
■ the network (Wake On LAN),
Page 17
System Operations
2-3
■ the mouse,
■ the keyboard�
Energy Saving Tips:
■ Turn o the monitor by pressing the monitor power button
after a period of user inactivity�
■ Tune the settings in Power Options under Windows OS to
optimize your PC’s power management�
■ Install power saving software to manage your PC’s energy
consumption�
■ Always disconnect the AC power cord or switch the wall socket o if your PC
would be left unused for a certain time to achieve zero energy consumption�
Page 18
2-4
Network Connection (Windows 8�x)
h Wired LAN
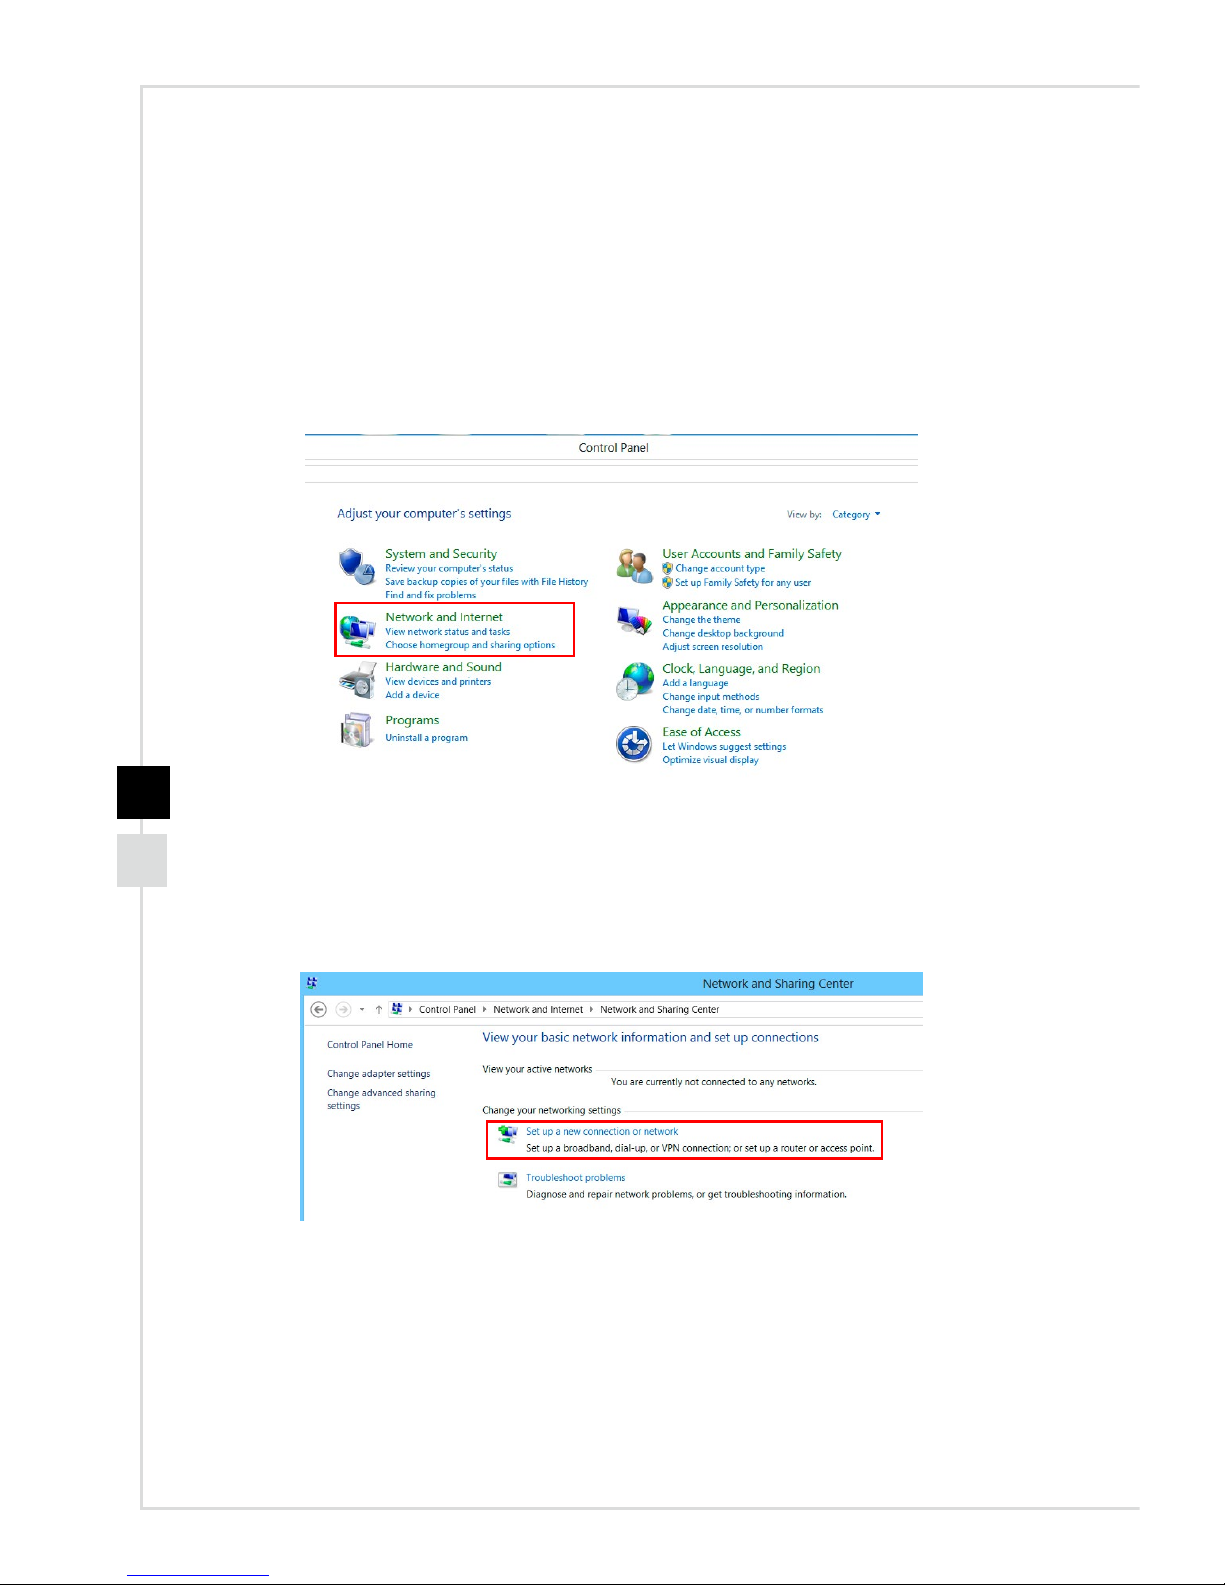
1� Go to [Start] > [Control Panel]�
2� Select [View network status and tasks] under [Network and Internet]�
3� To establish a new connection, select [Network and Sharing Center]�
4� Select [Set up a new connection or network]�
Page 19
System Operations
2-5
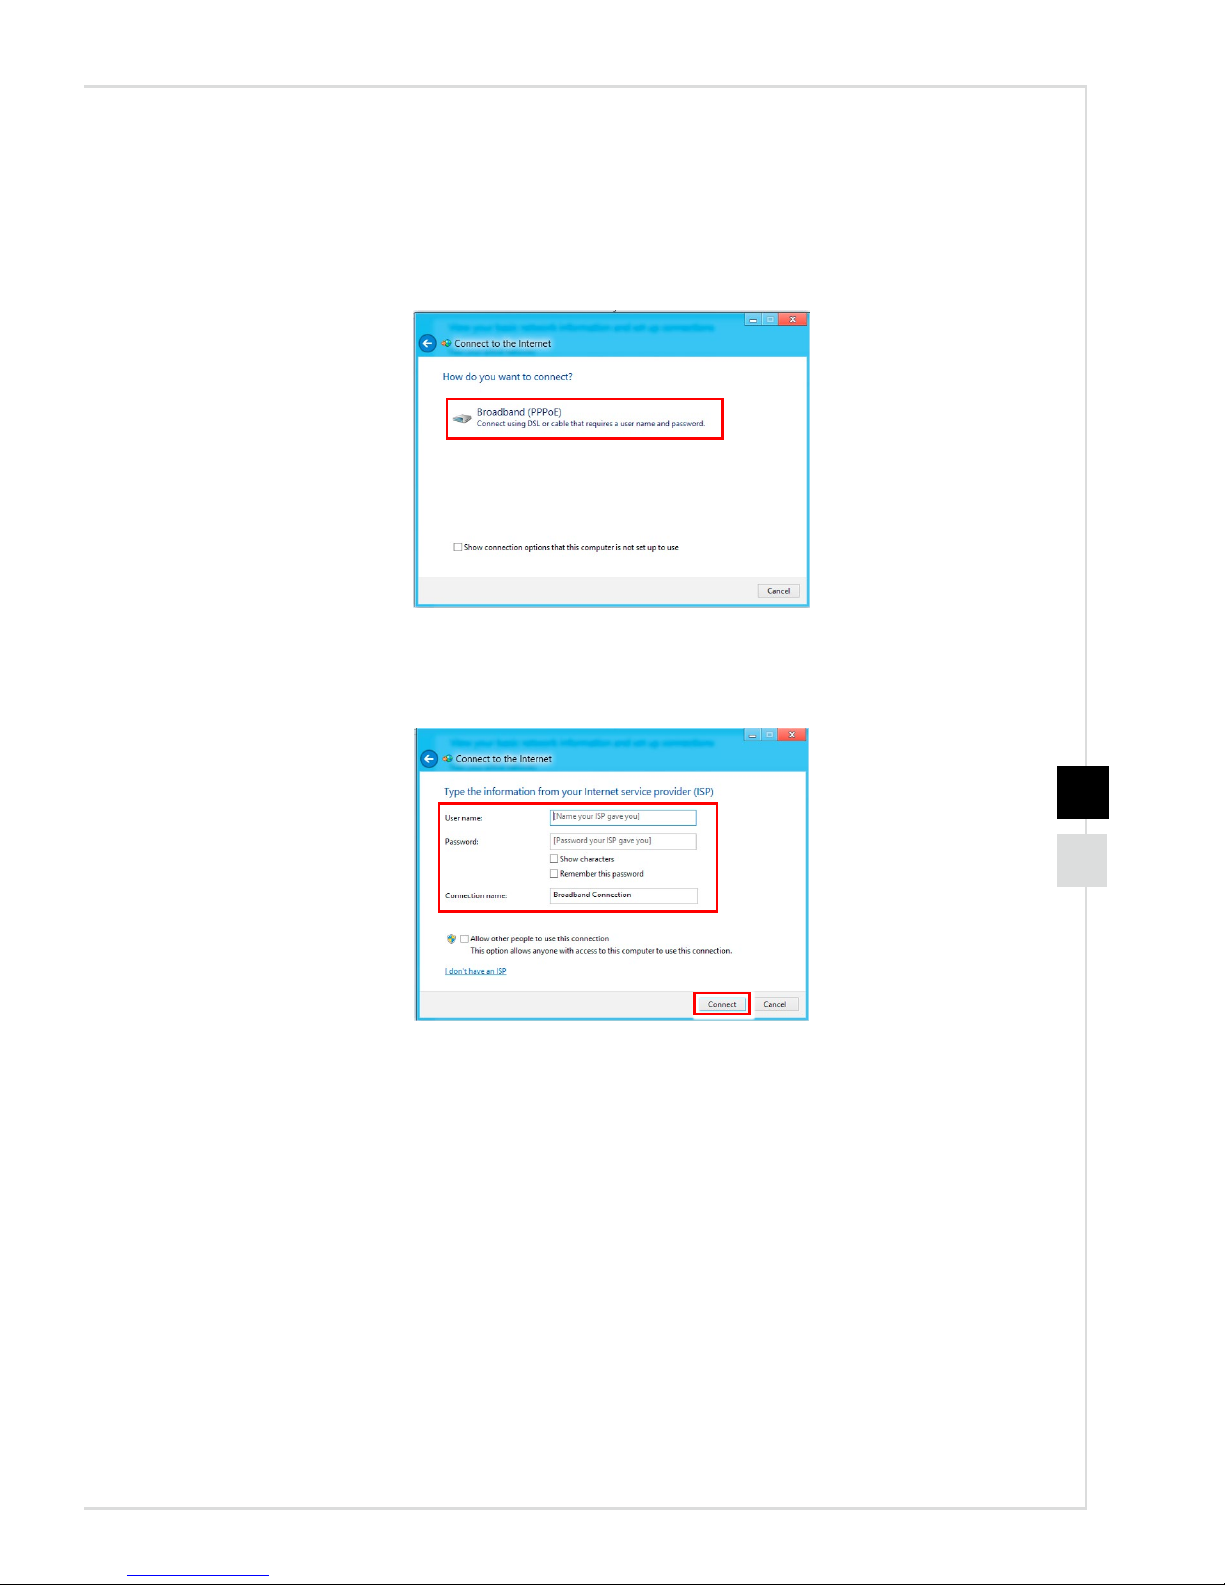
5� Choose [Connect to the Internet]�
6� Select [Broadband (PPPoE)] to connect using DSL or cable that requires a user
name and password�
7� Type the information from your Internet Service Provider (ISP) and click [Connect] to
establish your LAN connection�
Page 20
2-6
h Wireless LAN
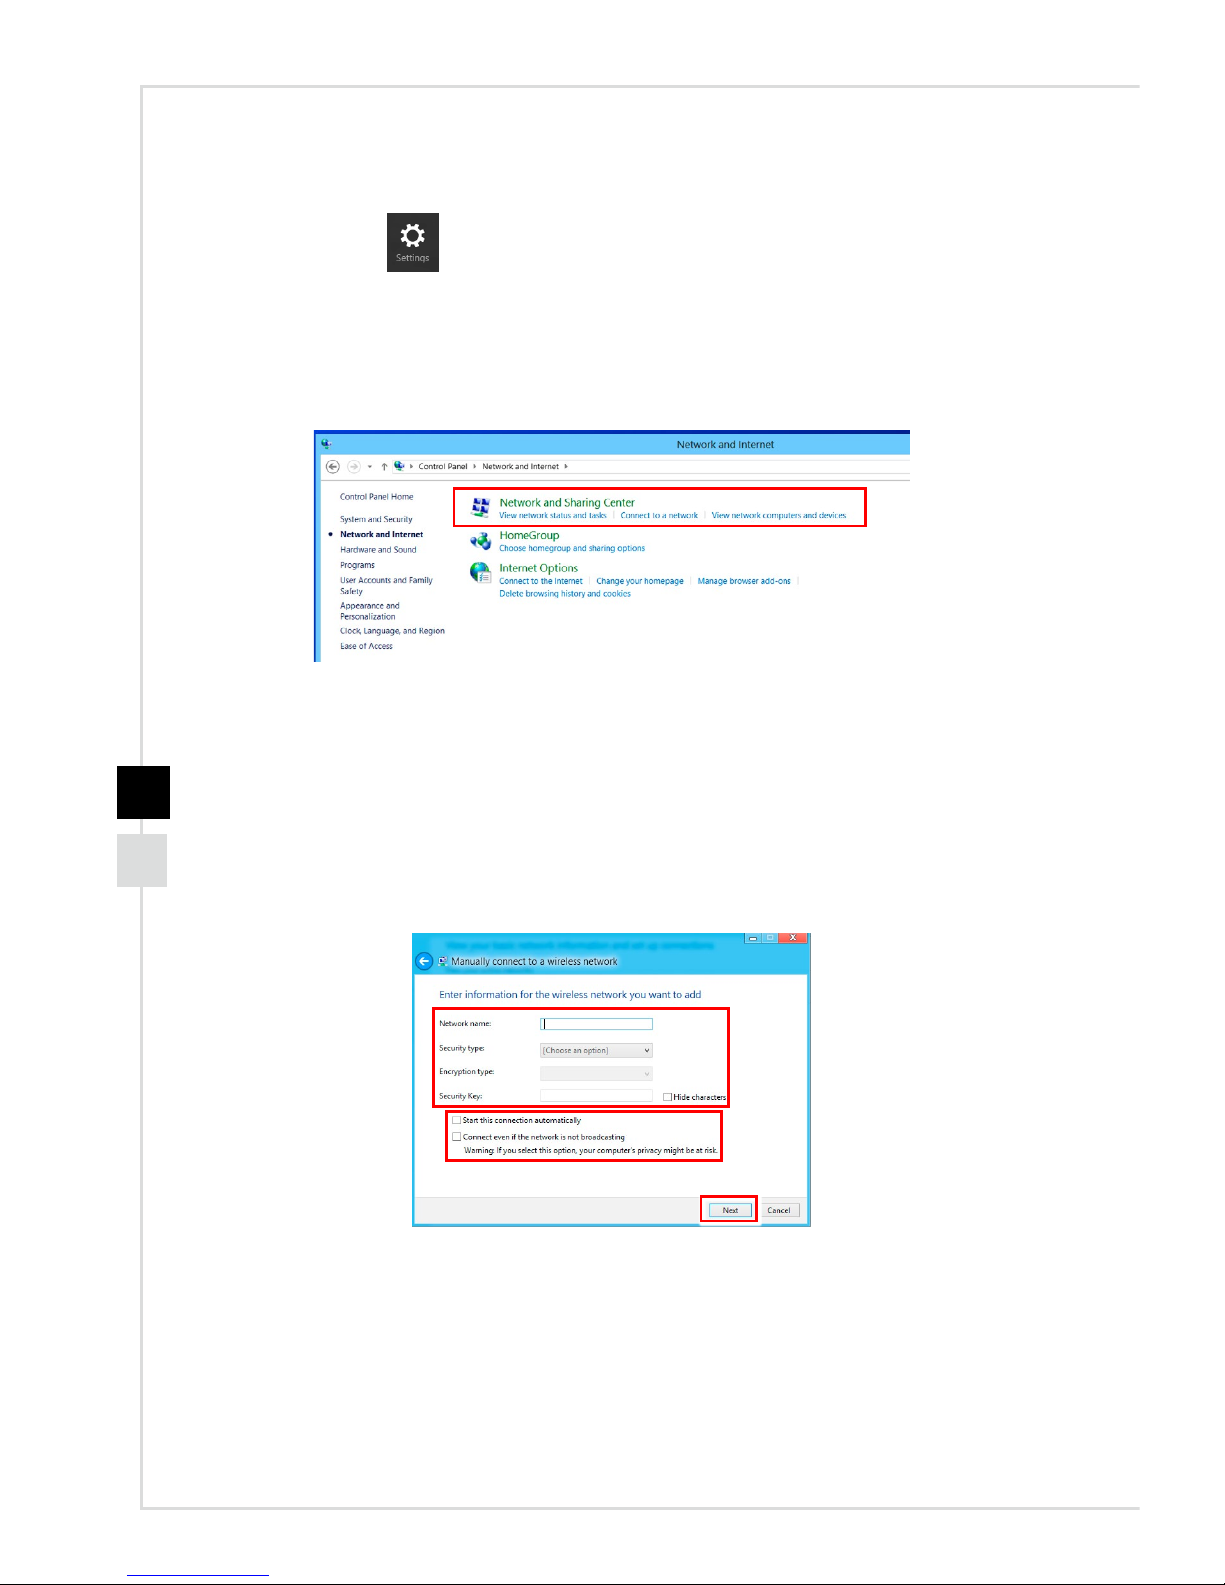
1� Select [Settings] on Desktop, locate a wireless icon with available network�
2� A list of available WLAN connections pops up� Choose a connection from the list�
3� To establish a new connection, select [Network and Sharing Center] under [Network
and Internet] in [Control Panel]�
4� Select [Set up a new connection or network]�
5� Followingly, choose [Manually connect to a wireless network] and click [Next] to
continue�
6� Enter information for the wireless network you intend to add and click [Next] to
proceed�
7� A new WLAN connection has been made� Click [Close] to exit or select [Change
connection settings] to modify the WLAN settings�
Page 21

System Operations
2-7
System Recovery (Windows 8�x)
Important
The System Recovery Function is only available on systems bundled with Windows OS
and MSI utilities by default�
The purposes for using the System Recovery Function may include:
■ Restore the system back to the initial status of original manufacturer’s default
settings�
■ When some errors have occurred to the operating system in use�
■ When the operating system is aected by virus and is not able to work
normally�
■ When you want to install the OS with other built-in languages�
Before using the System Recovery Function, please back up the important data saved
on your system drive to other storage devices�
If the following solution fails to recover your system, please contact the authorized local
distributor or service center for further assistance�
Page 22
2-8
h Recovery from the Operating System
Refresh PC
The Refresh PC utility checks whether the system les, Windows registry, and other
important system components are working ne or not; on nding issues with Windows
les, it will attempt to repair your PC. If your PC isn’t running well, you can refresh it
without losing your personal les.
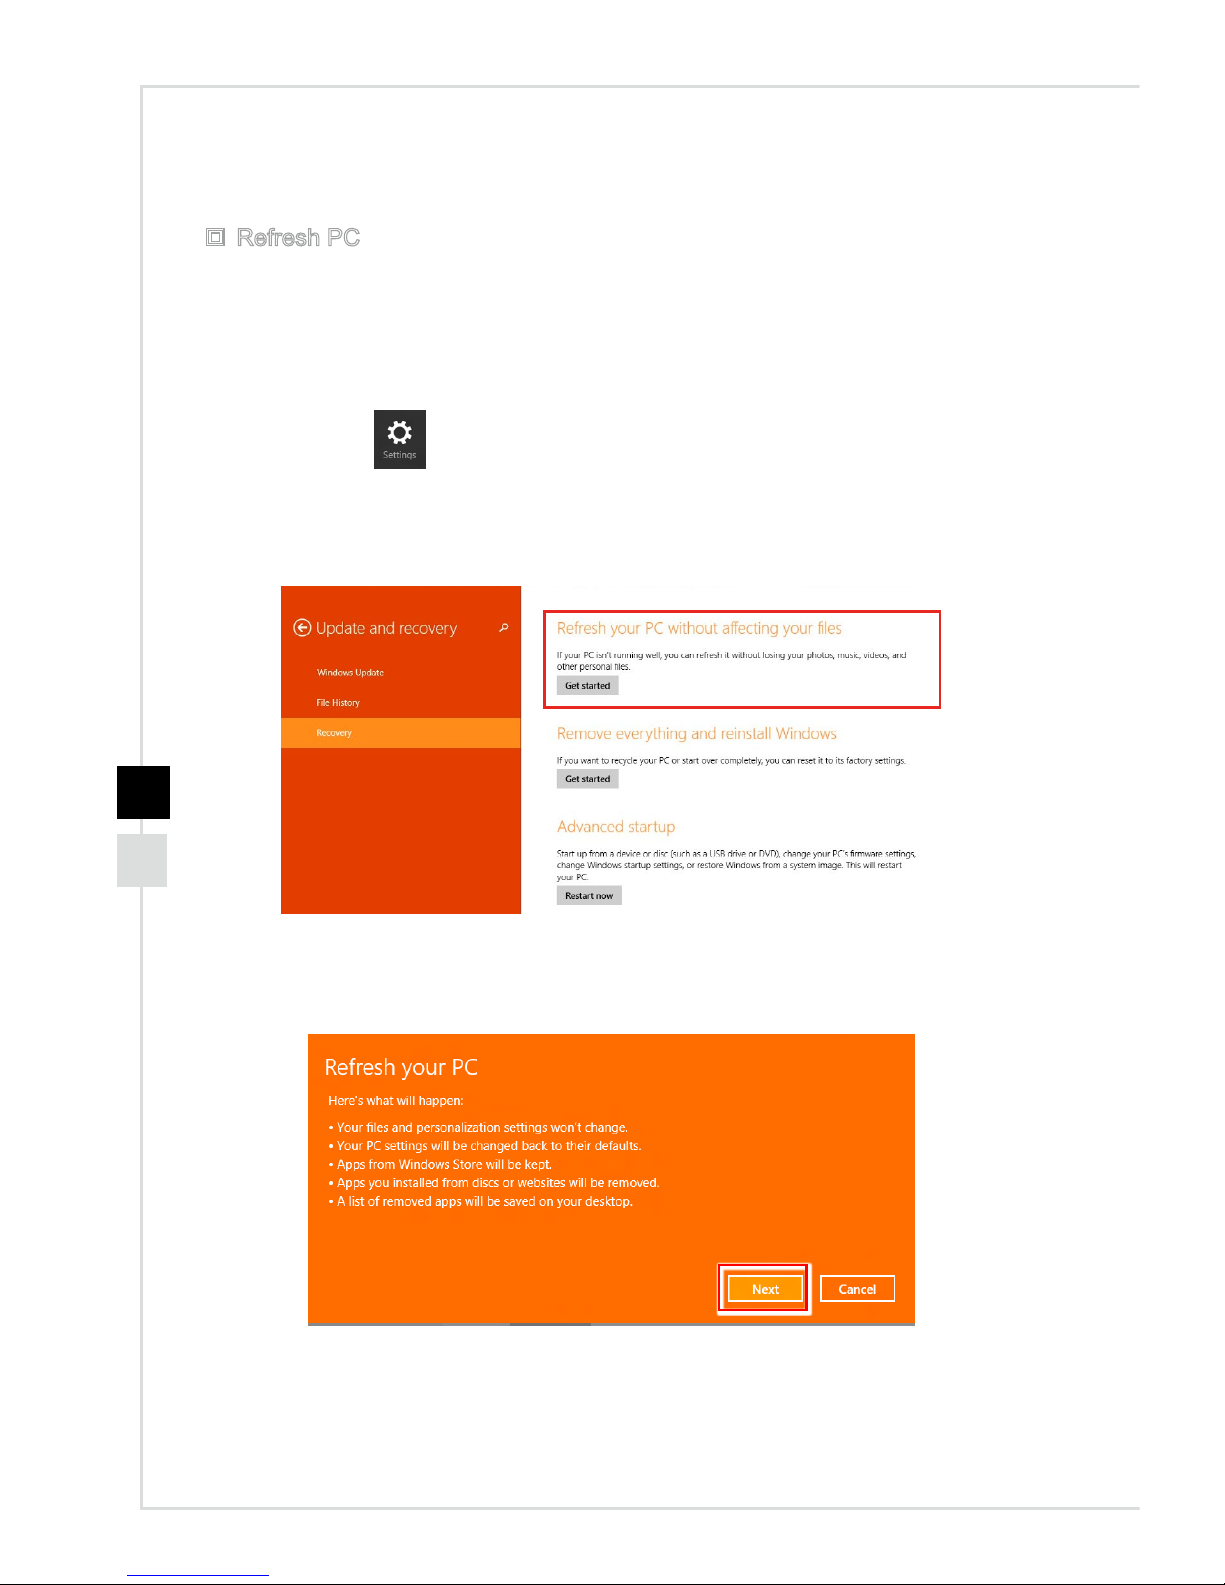
1� Click [Settings]
on desktop, then select [Change PC settings] > [Update and
recovery]�
2. Click [Recovery] > [Refresh your PC without aecting your les], and select [Get
started]�
3� It will show the changes which will be made during the process, click [Next] to
continue�
Page 23
System Operations
2-9
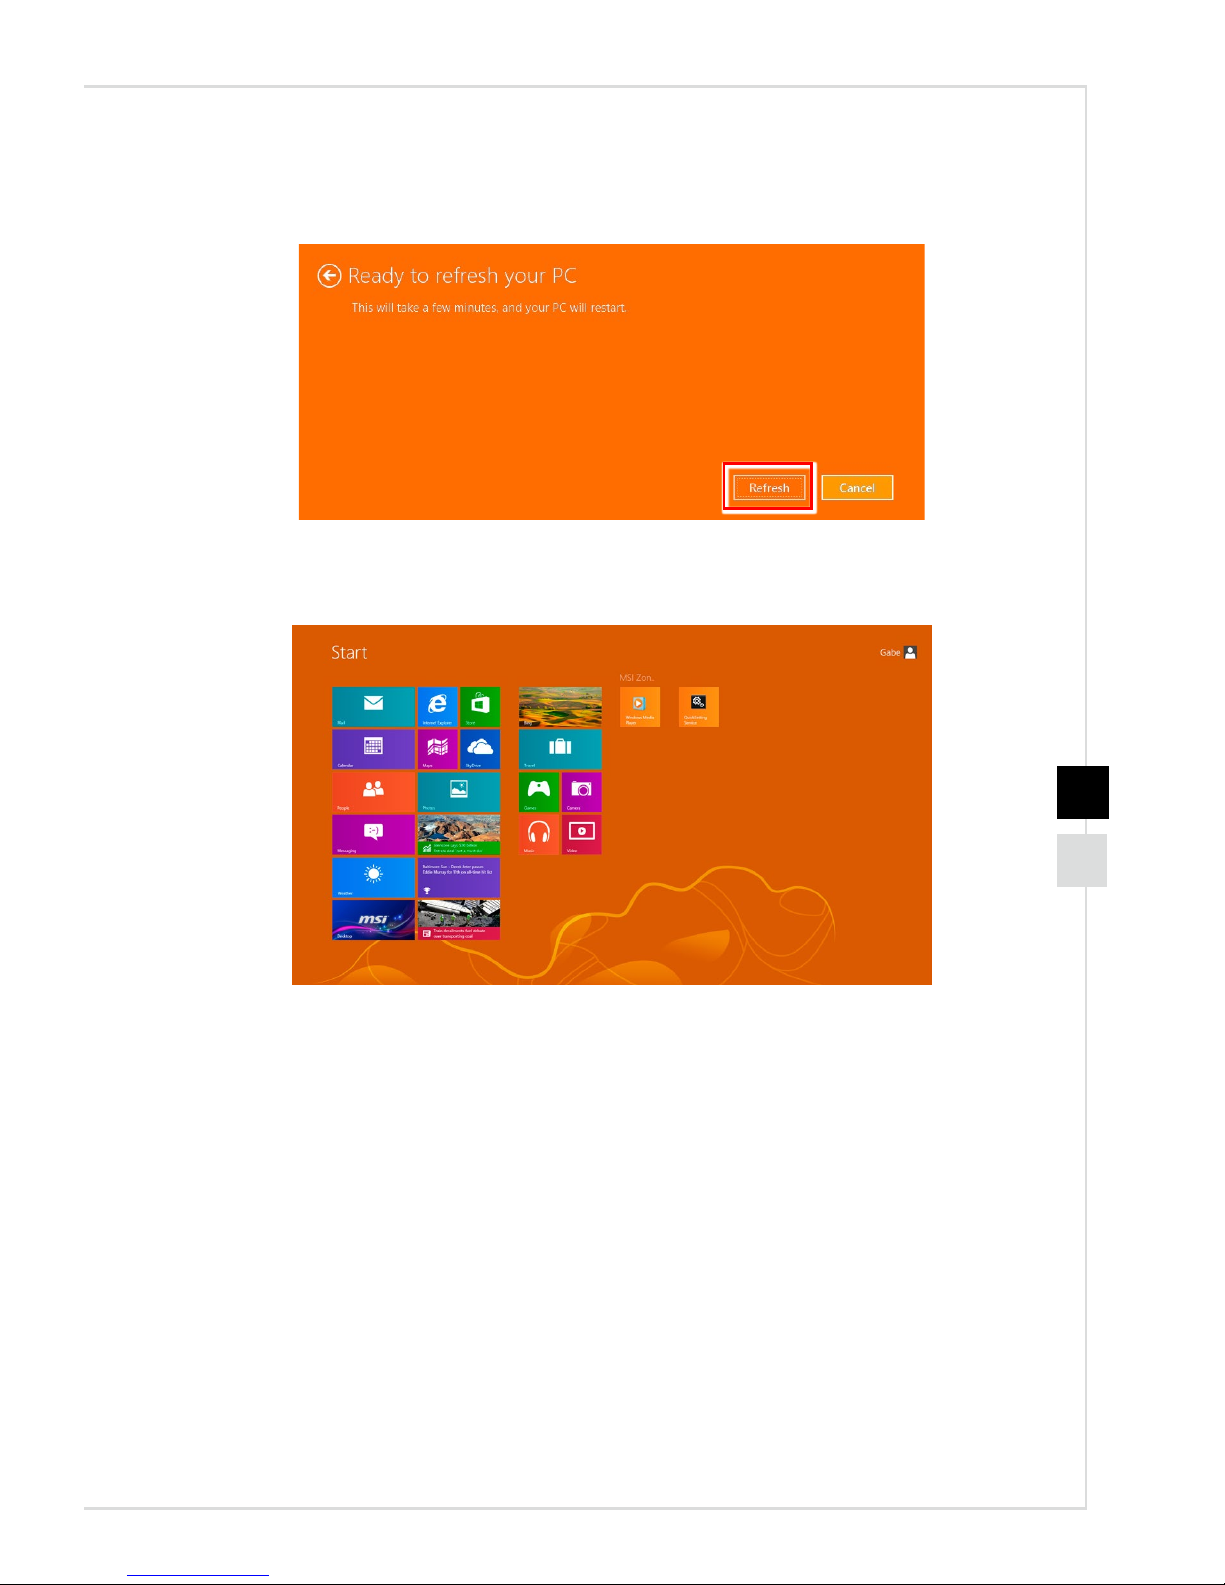
4� A message indicates that your PC is ready to be refreshed, click [Refresh] to start�
This might take a while�
5� After the refresh process ends, you will be back to Windows Start Screen where
you can nd all default Windows utilities and widgets.
Page 24
2-10
Reset PC
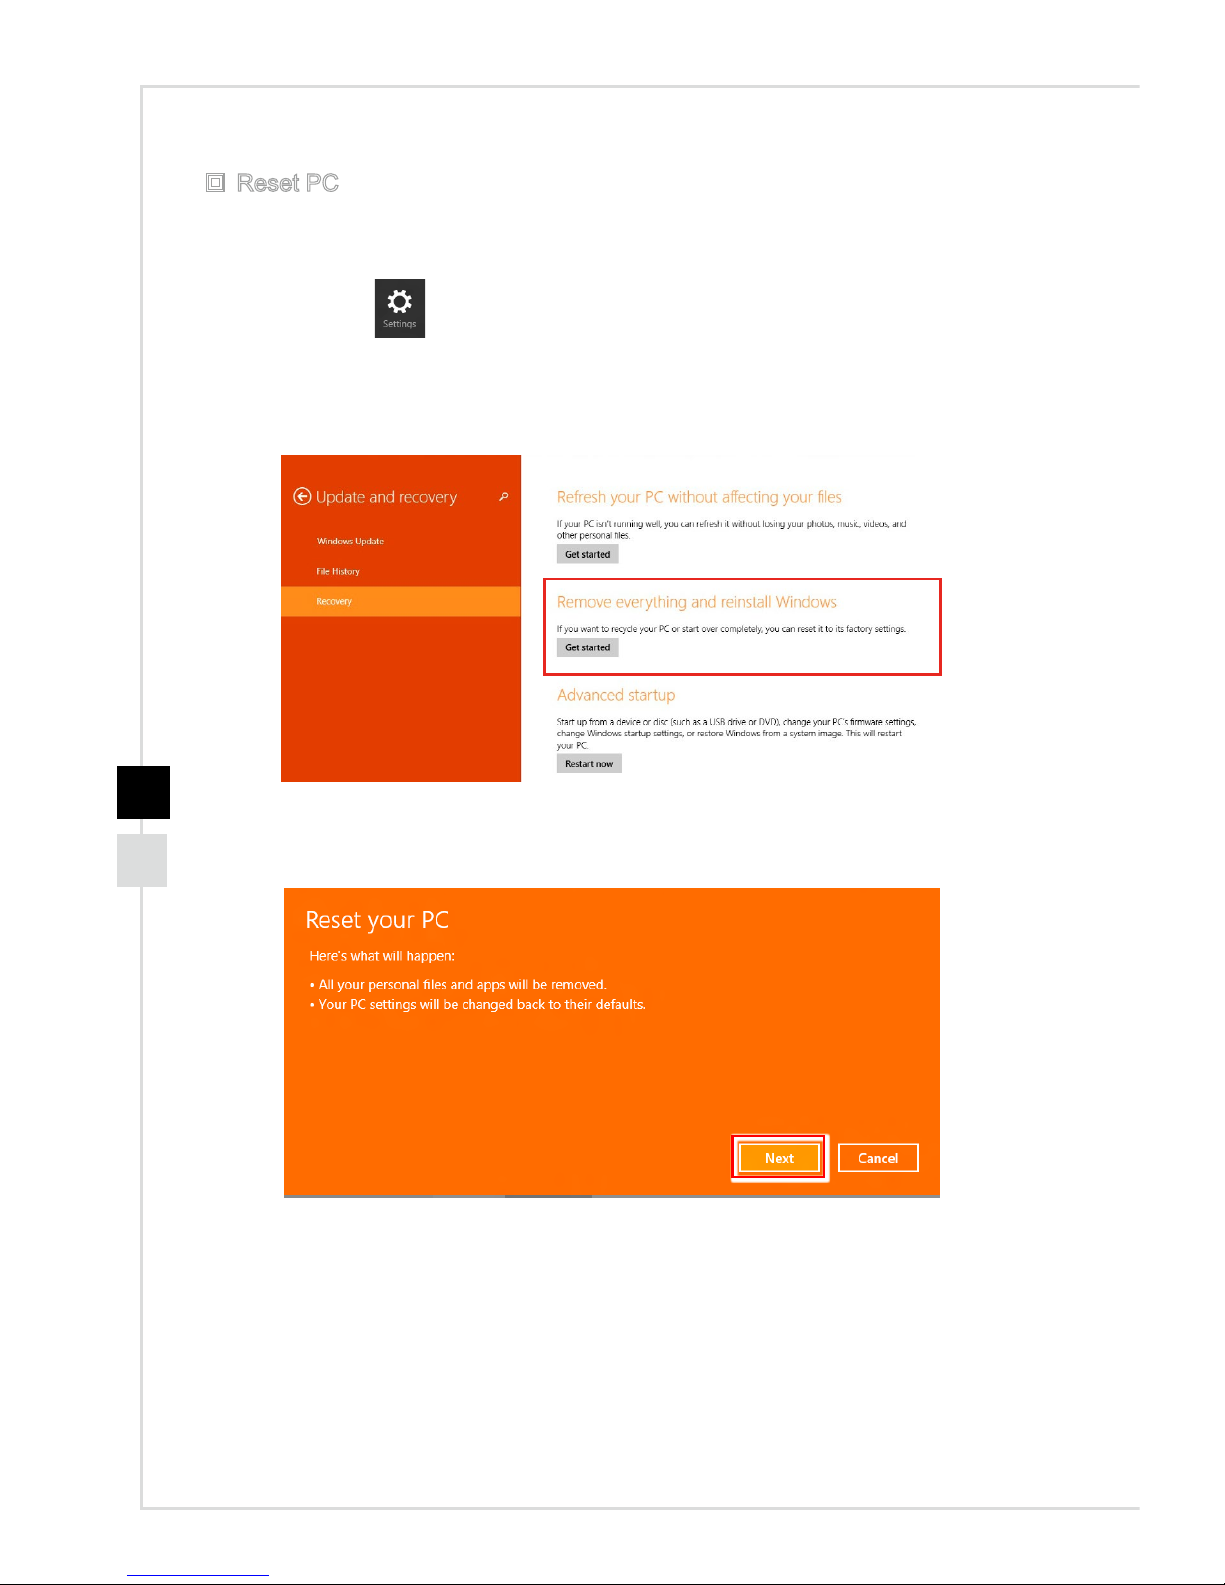
The Reset utility will bring the system back to original factory settings�
1� Click [Settings]
on desktop, then select [Change PC settings] > [Update and
recovery]�
2� Click [Recovery] > [Remove everything and reinstall Windows], and select [Get
started]�
3� It will show the changes to be made during the process, click [Next] to continue�
Page 25
System Operations
2-11
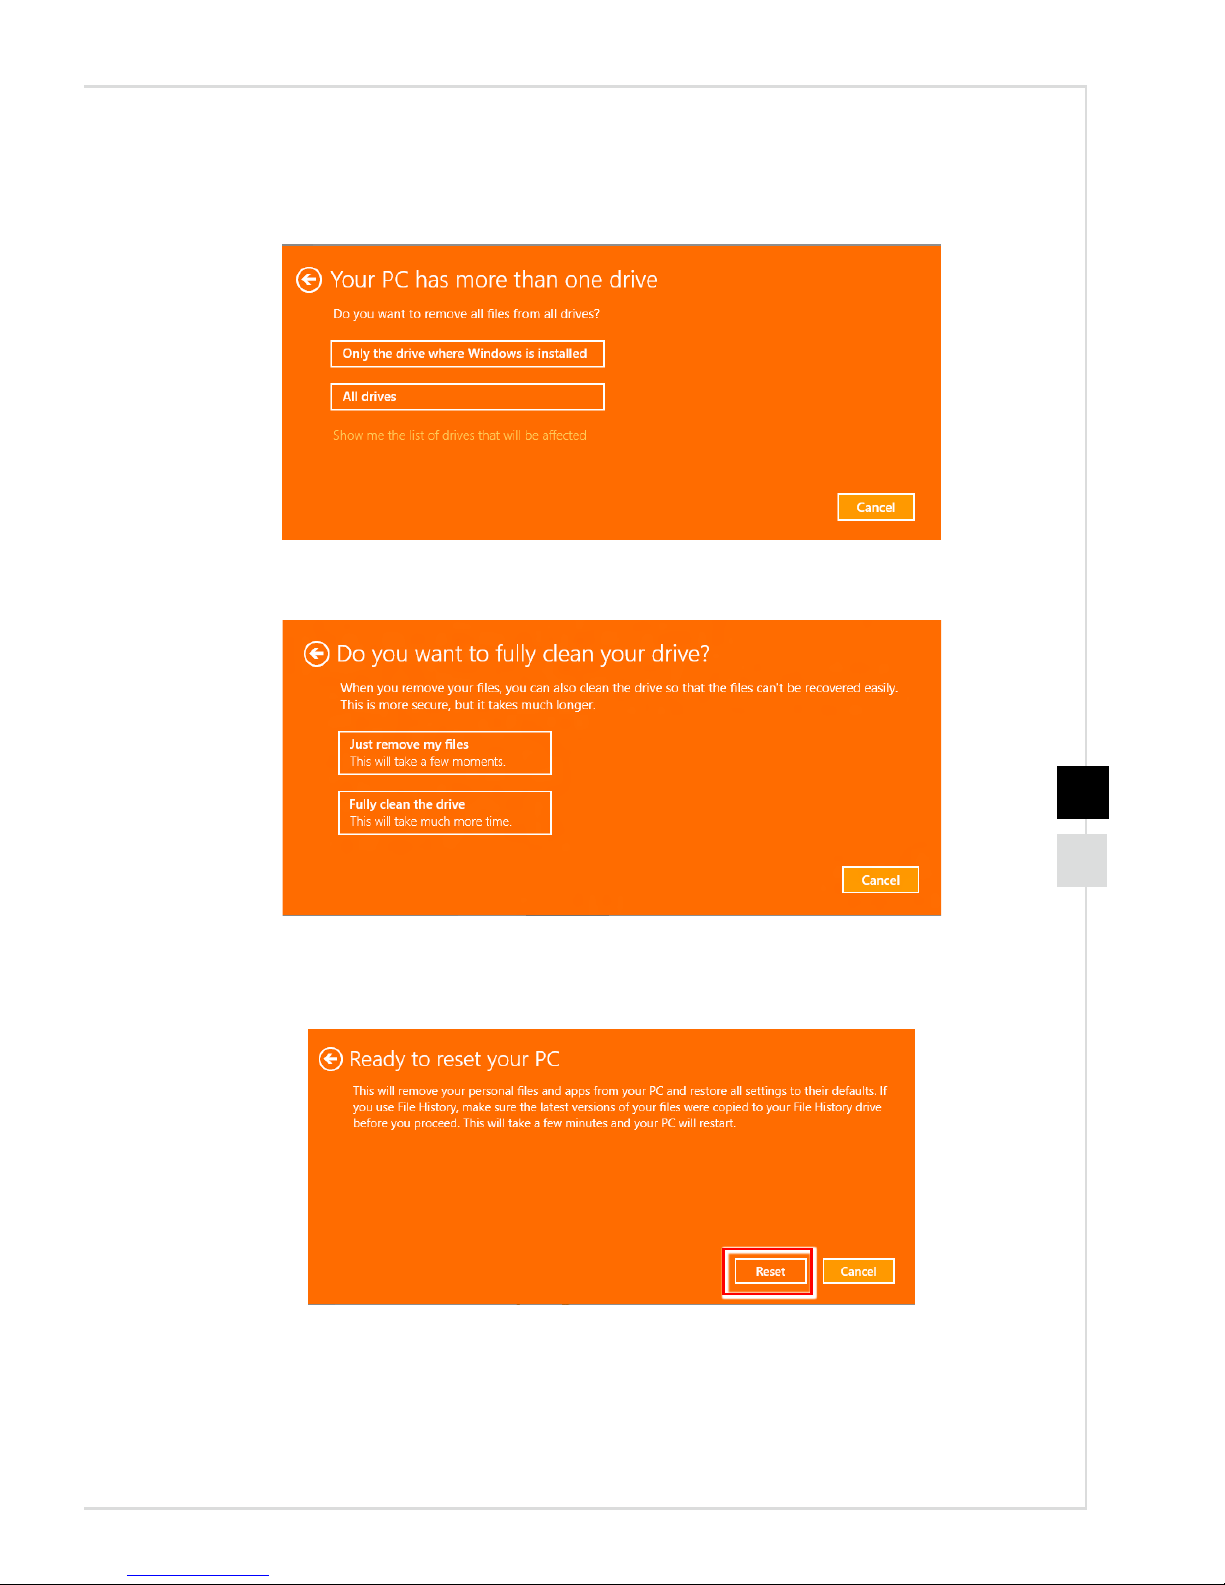
4� You will be prompted to choose which drive you want to clean for a hard disk with
multiple partitions�
5. Now, select either to remove les or to fully clean drives according to your needs.
6� It is now ready to reset your PC, click [Reset] and follow the on-screen instructions
to restart your PC�
Page 26

 Loading...