

Page 1
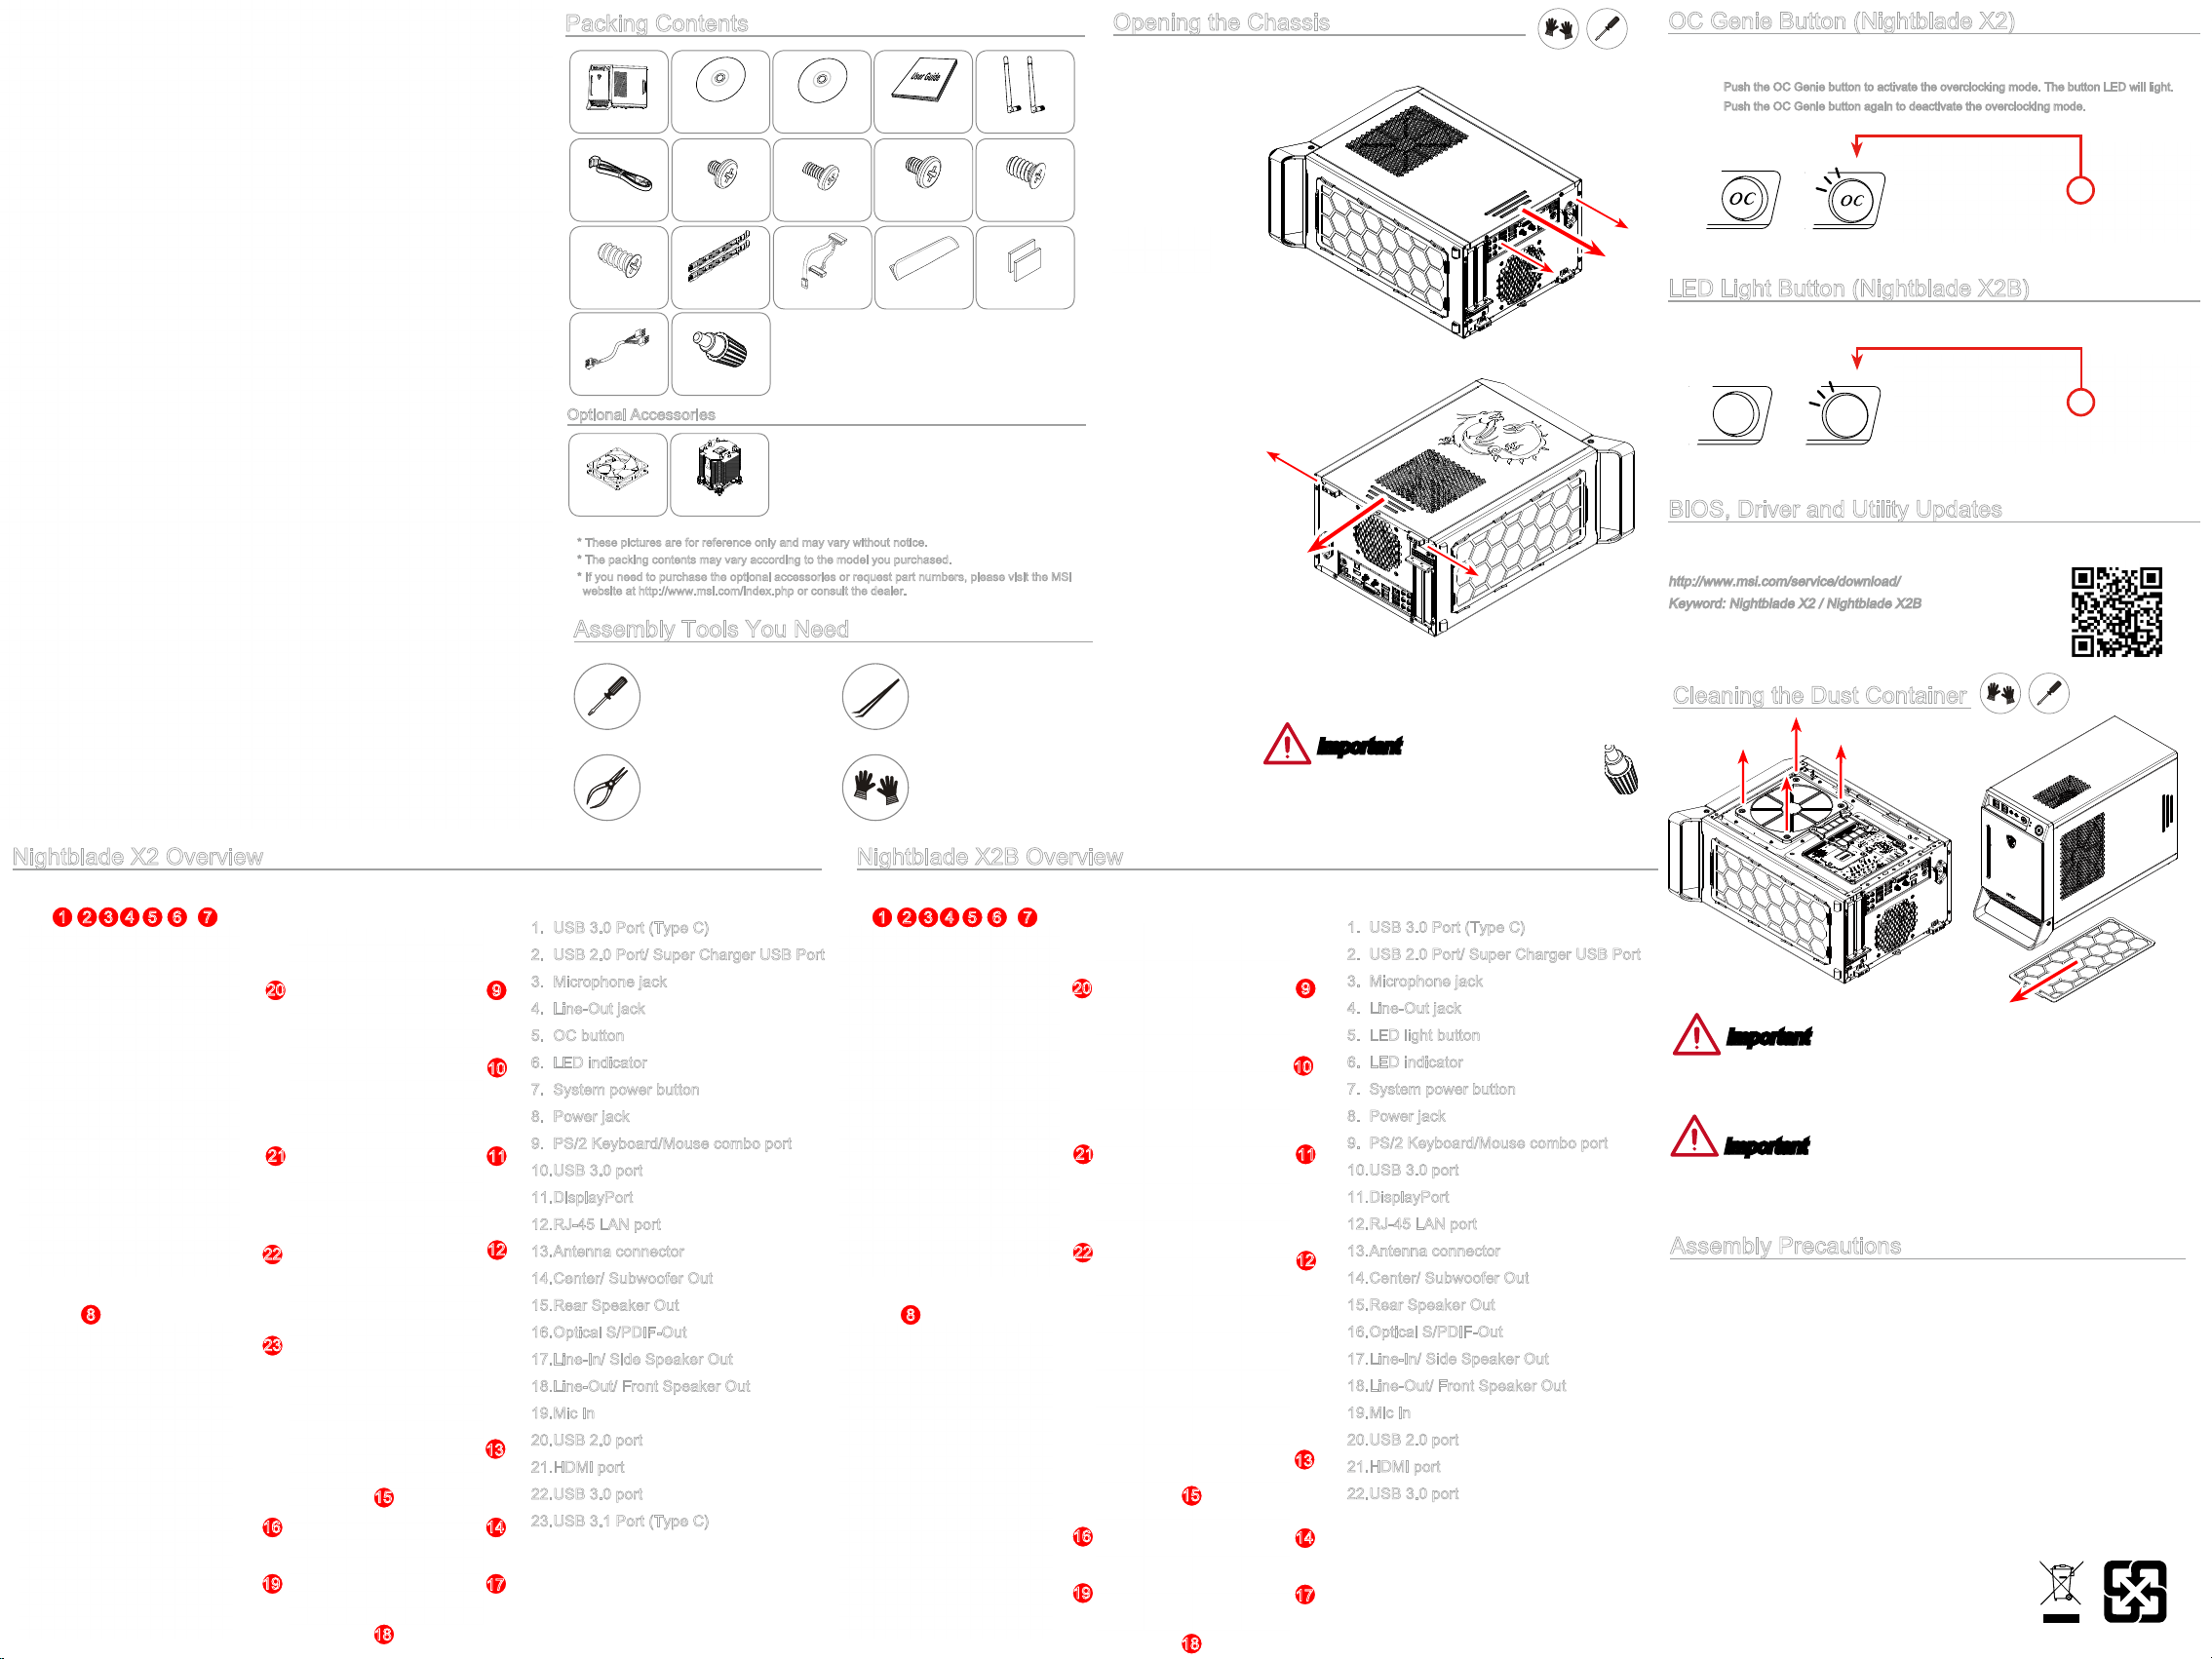
Packing Contents
Nightblade
SATA Cable x 2
Drivers & Utilities
Disc
M2 Screw x 4
Network Driver &
Utilities Disc
M3 Screw x 8
User Guide
#6-32 Flat Screw
x 4
Antenna x 2
#6-32 Sunk Screw
x 1
Opening the Chassis
開啟機箱
开启机箱
シャーシの開ける方
케이스 열기
Membuka Casing
Mở thùng máy ra
เปิดฝาตัวเครื่อง
OC Genie Button (Nightblade X2)
OC Genie button can help to gain the better perfomance while playing 3D games.
■
Push the OC Genie button to activate the overclocking mode. The button LED will light.
Push the OC Genie button again to deactivate the overclocking mode.
■
OC Genie OFF OC Genie ON
G52-B1062X1
T5 Screw x 4
Fan Power Cable
2.5” HDD Slide x 2
Thumber Screw x 4
Slim ODD Cable
Handle Sleeve
VGA Sponge
Optional Accessories
System Fan
* These pictures are for reference only and may vary without notice.
* The packing contents may vary according to the model you purchased.
* If you need to purchase the optional accessories or request part numbers, please visit the MSI
website at http://www.msi.com/index.php or consult the dealer.
CPU Cooler
Assembly Tools You Need
A Phillips (crosshead) screwdriver
and a athead screwdriver, can be
used to do most of the installation.
Choose one with a magnetic head
would be better.
Pliers, can be used as an auxiliary
tool to connect some connectors or
cables.
Forceps, can be used to pick up
tiny screws or set up the jumpers.
Rubber gloves, can prevent
yourself from being incised and
suering the static charge.
Abrir la torre
Ouverture du chassis
Gehäuse önen
Открытие корпуса
Aprire lo Chassis
Kasayı açma
Otevření skříně
Nyissa ki a házat
Otwieranie obudowy
Abrindo gabinete
Het chassis openen
Otvorenie skrine
Deschiderea carcasei
Otvaranje kućišta
Öppna Chassit
Hvordan chassiset åbnes
Kotelon avaaminen
Åpne kabinettet
Korpuse avamine
Korpusa atvēršana
Atidarymas Važiuoklė
Important
These screws can be replaced by thumbscrews for easy chassis
open and close.
LED Light Button (Nightblade X2B)
Push the LED light button to turn on or o the LED on the bottom of the chassis.
LED OFF LED ON
BIOS, Driver and Utility Updates
Visit the MSI website for technical guide, BIOS, driver and utility updates, and other information.
http://www.msi.com/service/download/
Keyword: Nightblade X2 / Nightblade X2B
Cleaning the Dust Container
Nightblade X2 Overview
1 2 3 4 65 7
8
22
23
16
20
21
15
1. USB 3.0 Port (Type C)
2. USB 2.0 Port/ Super Charger USB Port
3. Microphone jack
9
4. Line-Out jack
5. OC button
6. LED indicator
10
7. System power button
8. Power jack
9. PS/2 Keyboard/Mouse combo port
11
10. USB 3.0 port
11. DisplayPort
12. RJ-45 LAN port
12
13. Antenna connector
14. Center/ Subwoofer Out
15. Rear Speaker Out
16. Optical S/PDIF-Out
17. Line-In/ Side Speaker Out
18. Line-Out/ Front Speaker Out
19. Mic In
20. USB 2.0 port
13
21. HDMI port
22. USB 3.0 port
23. USB 3.1 Port (Type C)
14
Nightblade X2B Overview
1 2 3 4 65 7
20
21
22
8
16
15
1. USB 3.0 Port (Type C)
2. USB 2.0 Port/ Super Charger USB Port
3. Microphone jack
9
4. Line-Out jack
5. LED light button
6. LED indicator
10
7. System power button
8. Power jack
9. PS/2 Keyboard/Mouse combo port
11
10. USB 3.0 port
11. DisplayPort
12. RJ-45 LAN port
13. Antenna connector
12
14. Center/ Subwoofer Out
15. Rear Speaker Out
16. Optical S/PDIF-Out
17. Line-In/ Side Speaker Out
18. Line-Out/ Front Speaker Out
19. Mic In
20. USB 2.0 port
13
21. HDMI port
22. USB 3.0 port
14
Important
Regularly cleaning the dust container could keep the system well-ventilated. Clean the dust
container with clean water and dry it before replacing it to the system.
Important
These diagrams here are for reference only and may vary from the product you purchased. The
CPU, CPU cooler, system fan, memory module, graphics card, and storage device showed in the
installation drawing are optional.
Assembly Precautions
■ The components included in this package are prone to damage from electrostatic discharge
(ESD). Please adhere to the following instructions to ensure successful computer assembly.
■ Always turn o the power supply and unplug the power cord from the power outlet before
installing or removing any computer component.
■ Ensure that all components are securely connected. Loose connections may cause the computer
to not recognize a component or fail to start.
■ It is recommended to wear an electrostatic discharge (ESD) wrist strap when handling the
motherboard to prevent electrostatic damage. If an ESD wrist strap is not available, discharge
yourself of static electricity by touching another metal object before handling the motherboard.
■ Before turning on the computer, ensure that there are no loose screws or metal components on
the motherboard or anywhere within the computer case.
■ Do not use the computer in a high-temperature environment.
■ Do not boot the computer before installation is completed. This could cause permanent damage
to the components as well as injury to the user.
■ If you need help during any installation step, please consult a certied computer technician.
19
18
17
19
17
18
Page 2
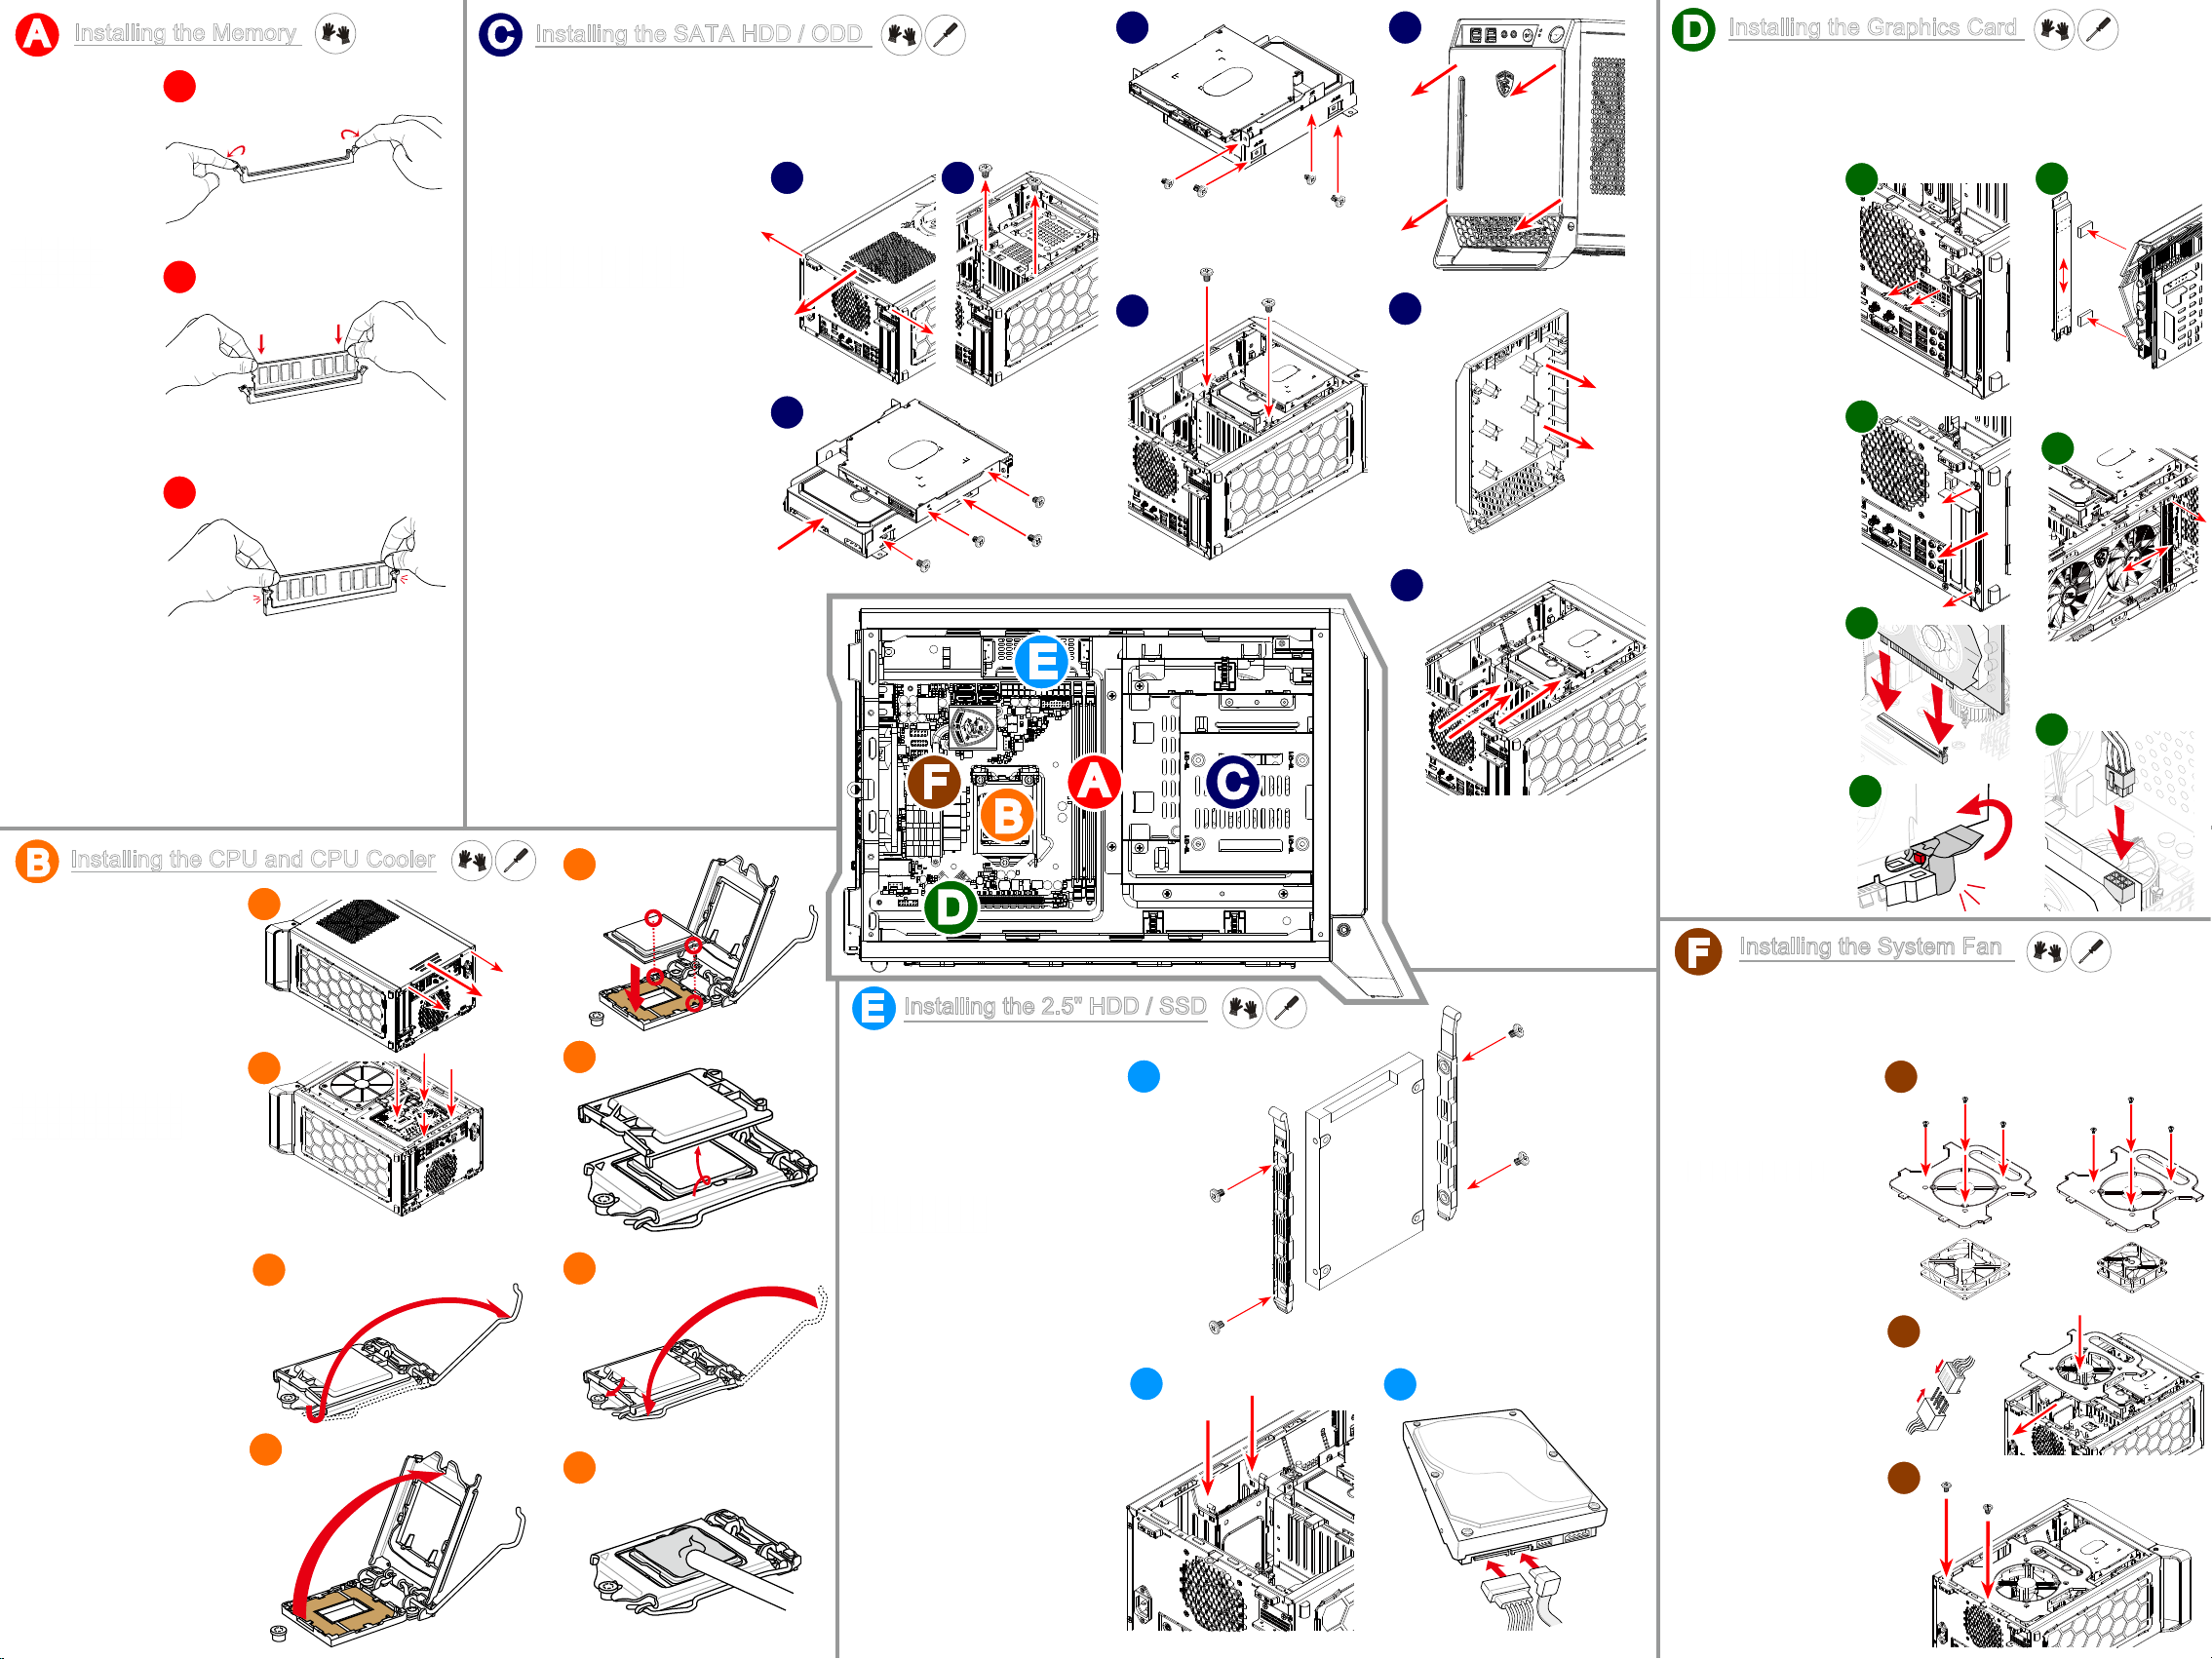
Installing the Memory
This PC provides an optional system fan for better heat
dissipation, especially when your graphics card power
A
安裝記憶體
安装内存
メモリの装着
메모리 설치
Memasang Memori
Gắn Bộ nhớ vào
ติดตั้งหน่วยความจำา
Instalar la memoria
Installer les mémoires
Speicher installieren
Установка памяти
Installare la Memoria
Hafızayı Takma
Instalace pamětí
Memória teleptése
Instalowanie pamięci
Instalando memória
Het geheugen installeren
Inštalácia pamätí
Instalarea memoriei
Instaliranje memorije
Installera Minnet
Installation af hukommelsen
Muistin asentaminen
Installere minne
Mälu paigaldamine
Atmiņas uzstādīšana
Diegimas Atmintis
Installing the CPU and CPU Cooler
B
A-1
A-2
A-3
Installing the SATA HDD / ODD
C
安裝SATA硬碟/ 光碟機
安装SATA硬盘/ 光驱
SATA HDD / ODDの装着
SATA HDD / ODD 설치
Memasang HDD SATA / ODD
Gắn Ổ đĩa cứng SATA và ổ đĩa quang vào.
ติดตั้งสาย SATA สำาหรับ Harddisk และ Optical Drive
Instalar unidades SATA HDD/ODD
Installation du disque dur Sata et du lecteur de disque optique
Festplatte und ODD installieren
Установка SATA HDD / ODD
Installare l' HDD / Unità Ottica SATA
SATA Sabitdisk / Optik Sürücüyü Takma
Instalace SATA disku/mechaniky
SATA HDD / ODD telepítése
Instalowanie dysków SATA HDD / ODD
Instalando SATA HDD / ODD
De SATA HDD/ODD installeren
Inštalácia SATA disku/mechaniky
Instalarea hard disk-ului / unitatii optice
Instaliranje SATA HDD / ODD
Installera SATA HDD/ODD
Installation af SATA HDD / ODD
SATA-kiintolevyn/optisen aseman asentaminen
Installere SATA HDD / ODD
SATA HDD / ODD paigaldamine
SATA HDD/ODD uzstādīšana
Diegimas SATA HDD / ODD
C-1 C-2
C-3
B-5
#6-32 Flat
F
M2
B
M2
#6-32 Flat
E
A
C-4
C-5
M2
#6-32 Flat
#6-32 Flat
C
#6-32 Flat
M2
#6-32 Flat
C-6
C-7
Remove the ODD mylar from the front cover.
C-8
Connect the SATA and power cables.
Installing the Graphics Card
D
安裝顯示卡
安装显示适配器
グラフィックスカードの挿入
외장 그래픽카드 설치
Memasang Graphics Card
Gắn card đồ họa vào
ติดตั้งกราฟฟิกการ์ด
Instalar la Tarjeta Gráca
Installation de la carte graphique
Grakkarte installieren
Установка видеокарты
Installare la Scheda Graca
Ekran Kartını Takma
Instalace gracké karty
Grakus kártya telepítése
Instalowanie karty gracznej
Instalando Placa de vídeo
De grasche kaart installeren
Inštalácia grackej karty
Instalarea placii grace
Instaliranje Gračke kartice
Installera Grakkortet
Installation af grakkortet
Näytönohjaimen asentaminen
Installere grakkort
Graakakaardi paigaldamine
Graskās kartes uzstādīšana
Diegimas grakos plokštę
D-1
D-2
D-3
D-4
D-5
Adjust the sponge to avoid
the viberation caused by the
supporter and graphics card.
D-6
Adjust the supporter when
installing a long graphics card.
D-7
安裝CPU及CPU風扇
安装CPU及CPU风扇
CPU及びCPUクーラーの装着
CPU와 CPU 쿨러 설치
Memasang Prosesor dan pendingin Prosesor
Gắn CPU và bộ tản nhiệt CPU vào
ติดตั้งตัวประมวลผลพร้อมตัวระบายความร้อน
Instalar el Procesador y Disipador
Installation du processeur et refroiddisseur
CPU und CPU-Kühler installieren
Установка процессора и кулера
Installare CPU e il Dissipatore
İşlemci ve Soğutucuyu Takma
Instalace procesoru a chladiče
CPU és CPU hűtő telepítése
Instalowanie procesora i chłodzenia
Instalando CPU e cooler do CPU
De CPU en CPU koeler installeren
Inštalácia procesora a chladiča
Instalarea procesorului si a coolerului de procesor
Instaliranje CPU-a i CPU kulera
Installera CPU och CPU-kylare
Installation af CPU og CPU-køler
Suorittimen ja suorittimen jäähdyttimen asentaminen
Installere CPU og CPU-kjøler
B-1
B-2
B-3
B-4
Remove the cooler back pad sticker lm rst.
B-6
B-7
B-8
D
Installing the 2.5" HDD / SSD
E
安裝2.5” SATA硬碟
安装2.5” SATA硬盘
2.5インチSATA HDDの装着
2.5” SATA HDD 설치
Memasang SATA HDD 2,5”
Gắn Ổ đĩa cứng SATA 2.5” vào
ติดตั้ง Hard disk ขนาด 2.5” แบบ SATA
Instalar la Unidad de Disco Duro SATA de 2,5”
Installation du disque dur SATA 2.5”
2,5” SATA HDD installieren
Установка 2.5” SATA HDD
Installazione del disco rigido SATA 2,5” in corso
2,5” SATA sabit disk kurma
Instalování pevného disku 2,5” SATA HDD
2,5”-es SATA HDD beszerelése
Instalacja dysku twardego SATA 2,5”
Instalação da unidade de disco rígido SATA de 2,5”
De 2.5” SATA HDD installeren
Inštalácia 2,5” pevného disku SATA
Instalare HDD SATA 2,5”
Instaliranje 2,5” SATA HDD-a
Installera din 2,5” SATA –hårddisk
Installation af 2,5” SATA HDD
2,5-tuumaisen SATA-kiintolevyn asentaminen
Installere 2,5-tommers SATA HDD
E-1
E-2
M3
M3
M3
M3
E-3
Connect the SATA and power cables.
Installing the System Fan
F
安裝系統風扇
安装系统风扇
システムファンの装着
시스템 팬 설치
Memasang Kipas Sistem
Gắn quạt tản nhiệt thùng máy vào
ติดตั้งพัดลมระบายความร้อนในตัวเครื่อง
Instalar el ventilador
Installation du système de ventillation
Systemkühler installieren
Установка системного вентилятора
Installare il Sistema di Ventilazione
Sistem Fanını Takma
Instalace ventilátoru
Rendszerhűtő telepíítése
Instalowanie dodatkowego chłodzenia
Instalando Ventoinha
De systeemventilator installeren
Inštalácia ventilátora
Instalarea ventilatorului
Instaliranje sistemskog ventilatora
Installera systemäkten
Installation af systemblæseren
Kotelon tuulettimen asentaminen
Installere systemviften
Süsteemi ventilaatori paigaldamine
Sistēmas ventilatora uzstādīšana
Diegimas sistemos ventiliatorius
consumption is over 280W. Either 92mm or 120mm system
fan is available.
F-1
T5 T5
T5
120mm or 92mm
T5
T5
T5
F-2
#6-32 Flat
F-3
#6-32 Flat
 Loading...