

Page 1

User’s GuideMS-6978 WLAN BOX
1. Introduction
1.1 WLAN BOX
The MS-6978 WLAN BOX is a standard USB Adapter which fits
into any USB Interface. It has two LED indicators and an inte-
grated internal diversity antenna.
Now our WLAN BOX combines the advantage of USB Adapter and
Wireless LAN, which overcomes the limitations of wired networks.
It provides fast, simple, mobile and reliable access, and is designed
for computers with Microsoft Windows® 98SE, ME, 2000, and XP.
1.2 System Requirements
Installation of the WLAN BOX, you will need:
1. Desktop/Notebook PC compatible computer with USB interface
and CD-ROM drive.
2. Windows® 98SE/ME/2000/XP operating system.
3. Minimum 5M bytes free disk space for installing the WLAN
BOX driver and utility program.
1
Page 2

FEDERAL COMMUNICATIONS COMMISSION
INTERFERENCE STATEMENT
This equipment has been tested and found to comply with the limits for a Class B
digital device, pursuant to Part 15 of the FCC Rules. These limits are designed
to provide reasonable protection against harmful interference in a residential
installation. This equipment generates, uses and can radiate radio frequency
energy and, if not installed and used in accordance with the instructions, may
cause harmful interference to radio communications. However, there is no
guarantee that interference will not occur in a particular installation. If this
equipment does cause harmful interference to radio or television reception,
which can be determined by turning the equipment off and on, the user is
encouraged to try to correct the interference by one or more of the following
measures:
-- Reorient or relocate the receiving antenna.
-- Increase the separation between the equipment and receiver.
-- Connect the equipment into an outlet on a circuit different from that to which
the receiver is connected.
-- Consult the dealer or an experienced radio/TV technician for help.
CAUTION:
Any changes or modifications not expressly approved by the grantee of this
device could void
the user's authority to operate the equipment.
Page 3
User’s Guide
MS-6978 WLAN BOX
1.3 Package Content
Unpack the package and check all the items carefully. If any item
contained is damaged or missing, please contact your local dealer as
soon as possible. Also, keep the box and packing materials in case
you need to ship the unit in the future.
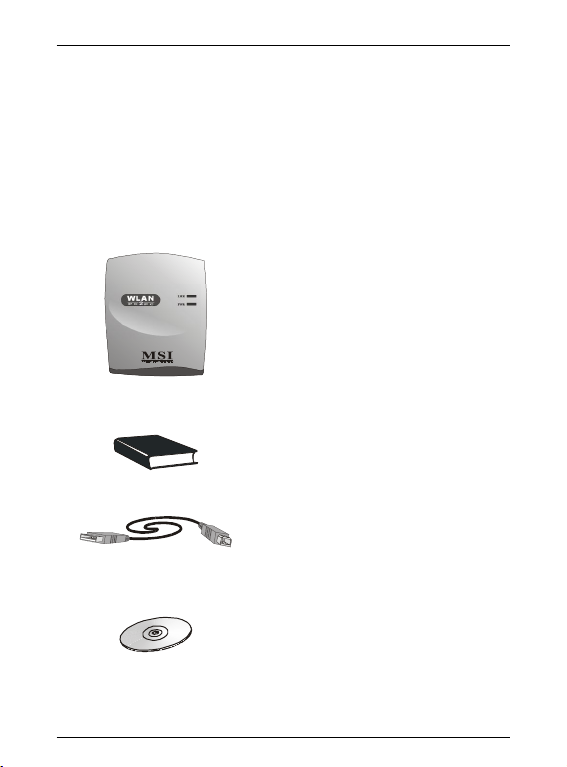
Your WLAN BOX package should contain the following items:
LMK
PWR
MS-6978 WLAN BOX
User’s Manual
USB Cable
Software CD
2
Page 4

1.4 Connecting to PC
User’s GuideMS-6978 WLAN BOX
LMK
PWR
Connecting this A-connector to
the USB connector of your
Desktop/Notebook PC.
Connecting this B-type
connector to the WLAN
BOX.
MSI Reminds You...
We strongly recommend that the WLAN BOX should put
vertically while using to get better performance instead of
laying horizontally.
3
Page 5
User’s Guide
MS-6978 WLAN BOX
2. Driver and Utility Installation
This part provides the procedure to install drivers and the utility.
Each installation procedure comes with a drawing and instruction.
Follow the instruction step by step to finish installation. Please
note that the WLAN BOX should be connected into your PC
after the installation of driver and utility is finished.
2.1 Installation for Windows® 98SE/ME/2000
During the installation, Windows® 98SE/ME/2000 may need to
copy Windows system files from the Windows® 98SE/ME/2000/
XP installation disk/CD. Therefore please prepare a copy of the
Windows® 98SE/ME/2000 installation disk/CD at hand before
installing the driver if possible.
Installation Procedure:
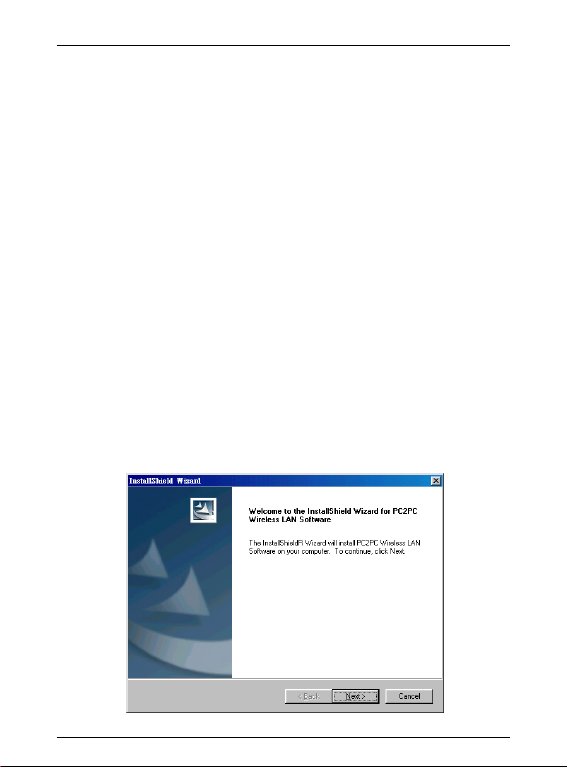
1. Insert the WLAN BOX installation CD into your CD-ROM
drive, and then the setup program should start automatically. If
it doesn’t start, click the Start button at the Taskbar and then
select Run. Enter E:\setup.exe if E is your CD-drive.
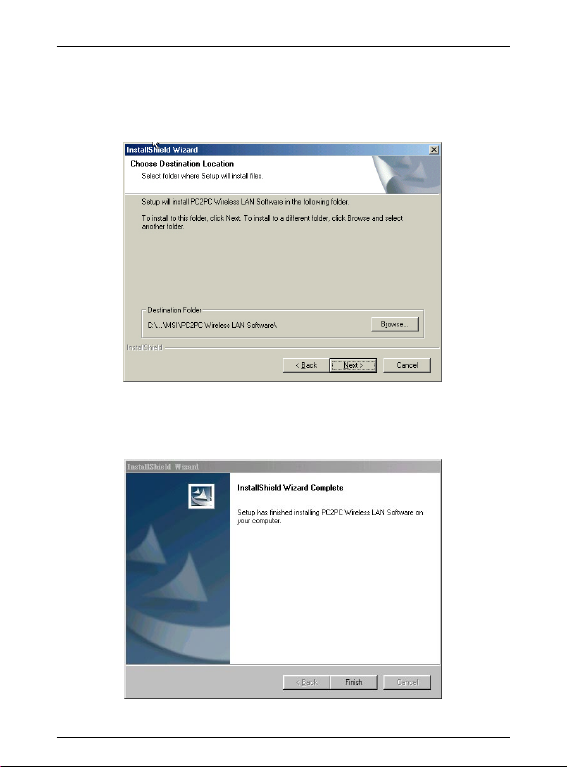
2. Then click Next to read the License Agreement and click Ye s to
4
Page 6
User’s GuideMS-6978 WLAN BOX
agree with and continue, or No to end the installation. Then
specify the location that you want the software installed in your
computer.
3. Then click Next to start installation, then click Finish to continue
as you are notified the installation has been completed.
5
Page 7
User’s Guide
MS-6978 WLAN BOX
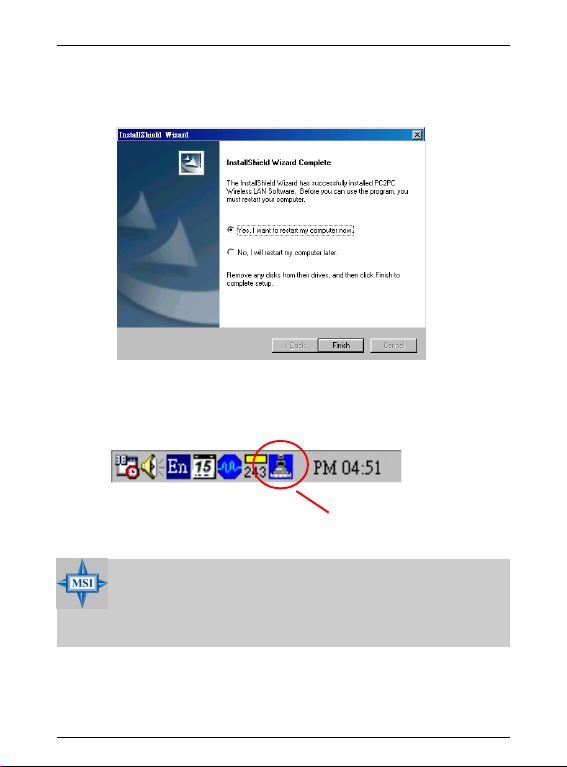
4. InstallShield Wizard may ask you to restart your computer.
Choose Ye s and click Finish to restart your PC.
5. After restarting your PC, you will find a icon indicated MSI
Wireless LAN on your taskbar. Just double-click on it for
configuration.
“MSI Wireless LAN “icon
MSI Reminds You...
This icon will not appear in Windows® XP operating system
environment. Windows® XP uses “Wireless Network
Connection” interface to control the device instead.
6
Page 8

User’s GuideMS-6978 WLAN BOX
2.2 Installation for Windows® XP
Installation Procedure:
1. The first 3 procedues will be the same as in Windows® 98SE/ME/
2000. Please refer to step 1 to 3 at page 4 to 5.
2. Insert your MS-6978 WLAN BOX software into your computer,
and the following window will appear.
Choose Install the software automatically (Recommended) and
click Next.
7
Page 9
User’s Guide
MS-6978 WLAN BOX
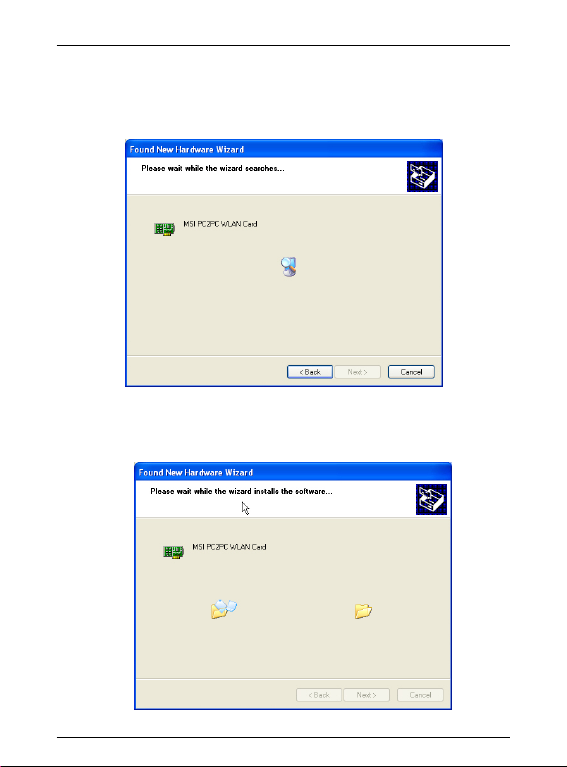
3. The Found New Hradware Wizard will start searching for MSI
PC2PC WLAN Card. Click Next to continue.
4. Please wait for the system to install the software of the new
hardware. It may take few minutes.
8
Page 10
User’s GuideMS-6978 WLAN BOX
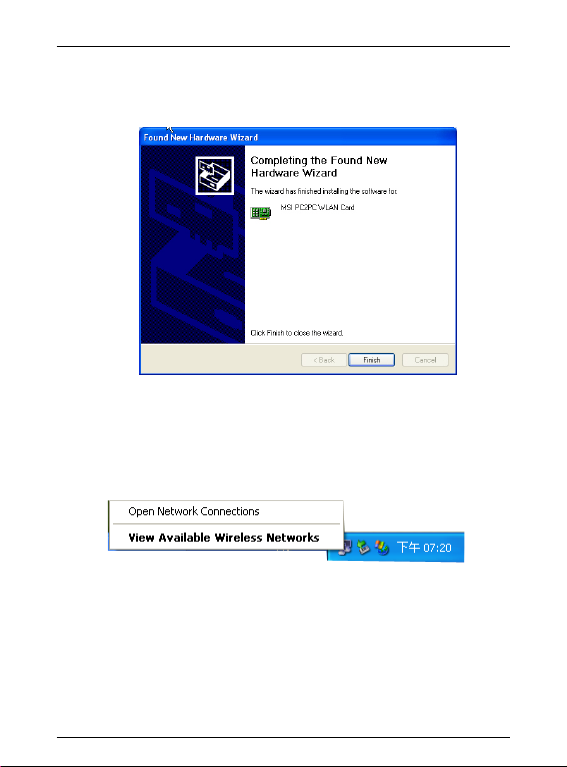
5. The new hardware installation is complete. Click Finish to close
the wizard.
6. After the hardware installation finished, click on the Wireless
Network Connection icon in the right bottom of system bar,
then click View Available Wireless Network.
9
Page 11
User’s Guide
MS-6978 WLAN BOX
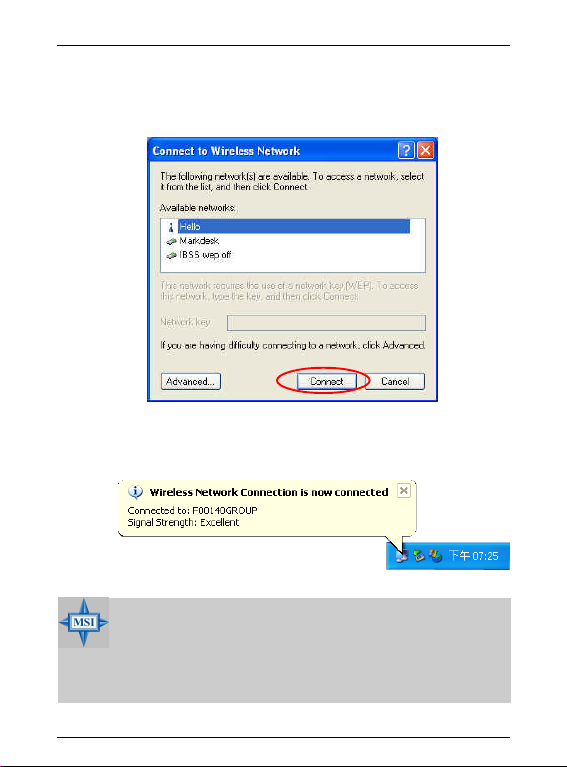
7. The Connect to Wireless Network window appears. Choose which
network you’d like to join in Available networks: list, then click
Connect.
8. The connection is available if you see the following pop-up near
the Wireless Network Connection icon in the right bottom of
system bar.
MSI Reminds You...
Please note you can only connect to one network each
time. If you want to connect to another network, please
select the desired network then click the Connect button
again.
10
Page 12
User’s GuideMS-6978 WLAN BOX
Advanced settings
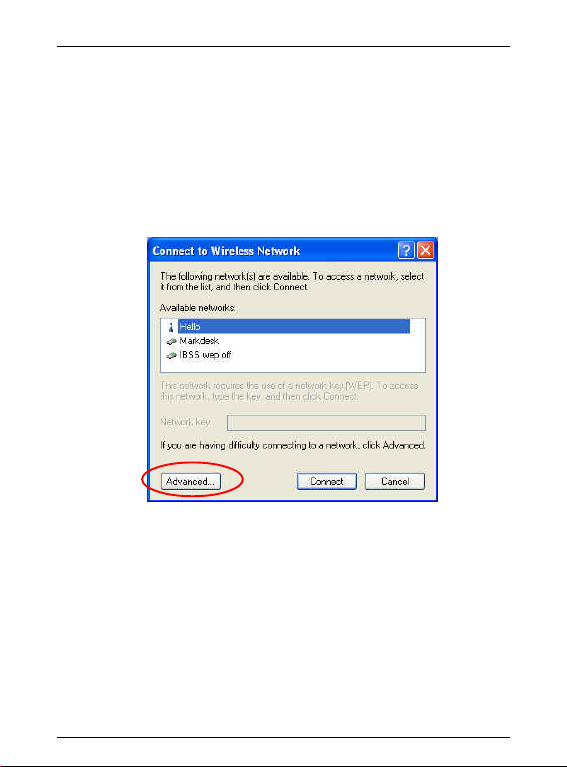
You may do some advanced settings with the following steps:
1. Right click on the Wireless Network Connection icon and choose
View available wireless networks, then click Connect to wireless
Network.
2. The Connect to Wireless Network window appears. Click
Advanced.
11
Page 13
User’s Guide
MS-6978 WLAN BOX
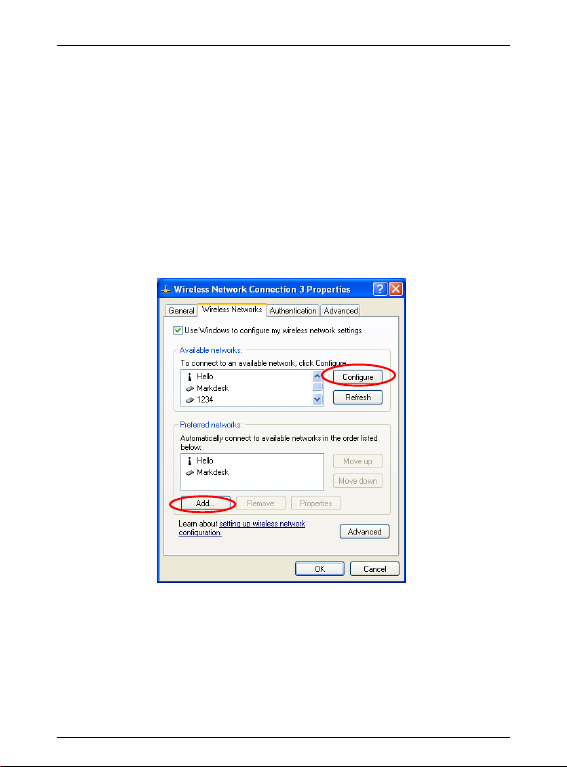
2. The Wireless Networks tab appears. All the available networks
will show in the Available Networks fields, and you can click
Refresh button to refresh or search for the available networks.
You may also choose the networks you prefer in the Preferred
networks and use the Move up/Move down button to set the
priority of your preferred networks.
3. Click on the Configure button to configure the status of existed
networks, or click on the Add button to add a new network.
12
Page 14
User’s GuideMS-6978 WLAN BOX
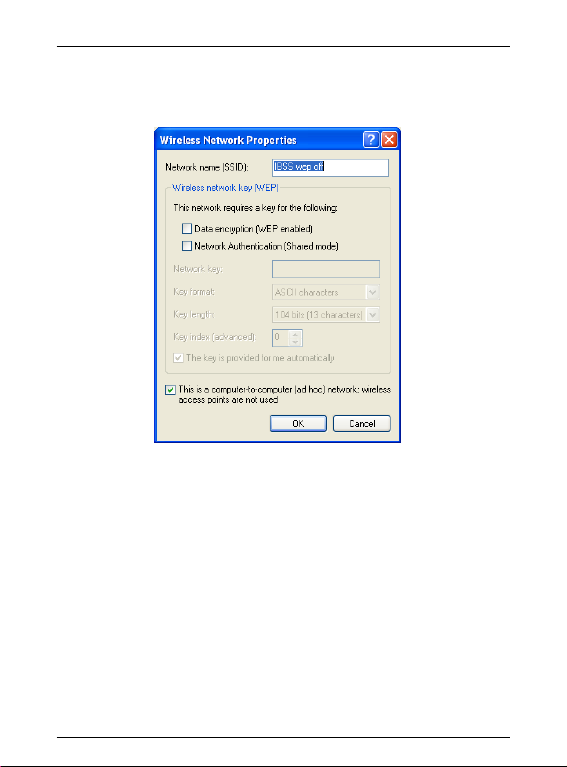
4. The window below will appear to let you add, configure or set
encryption for the network.
13
Page 15
User’s Guide
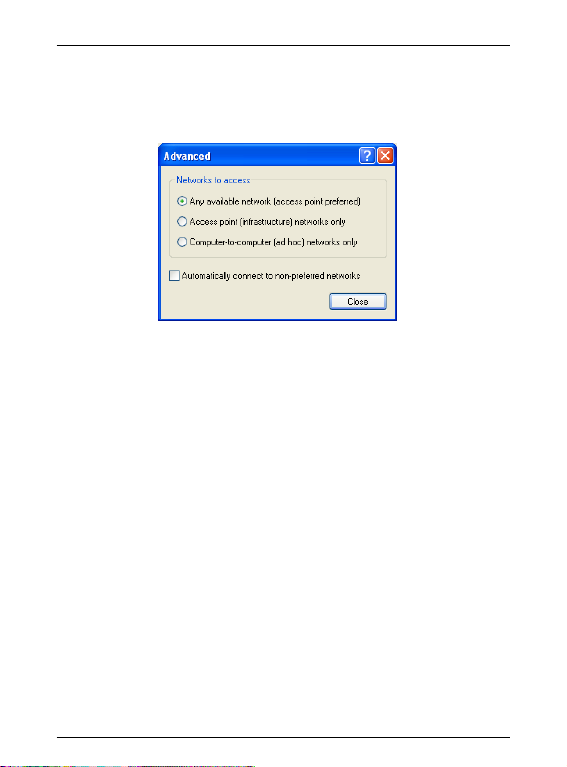
4. Click Advanced button in the Wireless Network Connection
Properties, and the window below will appear. You can set the
desired option according your preference or situation.
MS-6978 WLAN BOX
hAny available network (access point preferred) --- Any available
network detected can be selected.
hAccess point (infrastructure) networks only --- Only access point
(infrastructure) networks can be accessed and connected.
h Computer-to-computer (ad hoc) networks only --- Only ad hoc
networks within the range of your computer can be accessed and
connected.
h Automatically connect to non-preferred networks --- Check this
box to automatically connect to available networks that do not
appear in the Preferred networks list.
14
Page 16
User’s GuideMS-6978 WLAN BOX
2.3 Uninstallation for Windows® 98SE/ME/2000/XP
If you want to uninstall PC2PC Wireless LAN Software, please
follow the steps as below:
MSI Reminds You...
We strongly recommend to uninstall the older version first
before you install updated driver.
Uninstall Procedure:
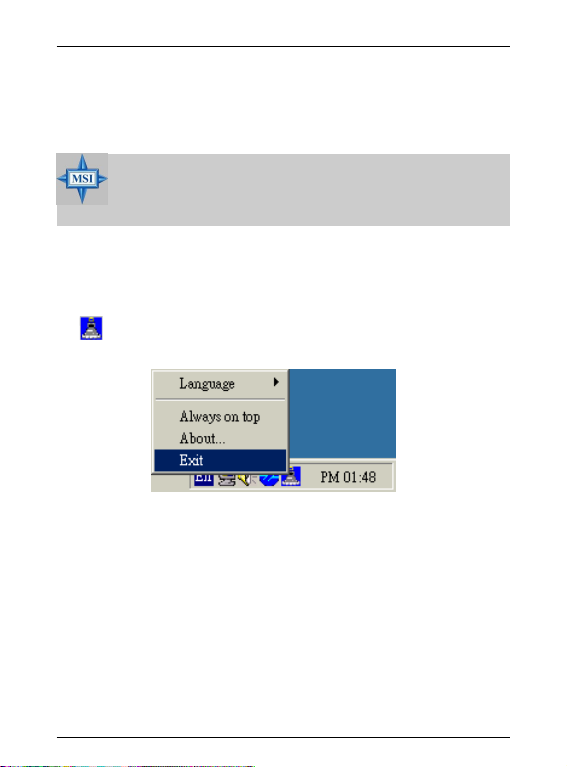
1. From the right bottom corner of system bar, right-click on the
icon, and a window will appear as below. Please note this
procedure is only for Windows® 98SE/ME/2000.
Click Exit.
15
Page 17
User’s Guide
MS-6978 WLAN BOX
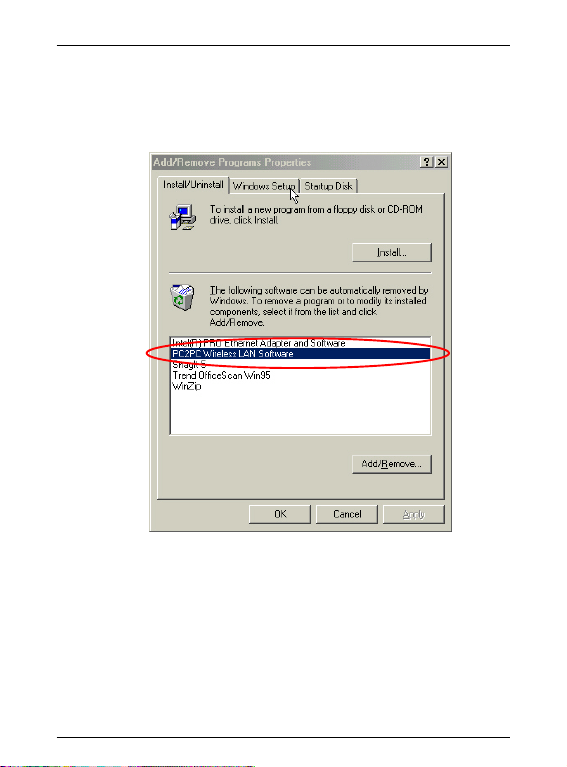
2. Select Start -> Settings -> Control Panel -> Add/Remove Programs.
Choose PC2PC Wireless LAN Software in the Install/Uninstall
list.Then click Add/Remove, and click OK.
3. The software will be removed automatically.
16
Page 18
User’s GuideMS-6978 WLAN BOX
3. Configure the Configuration Utility for
Windows® 98SE/ME/2000
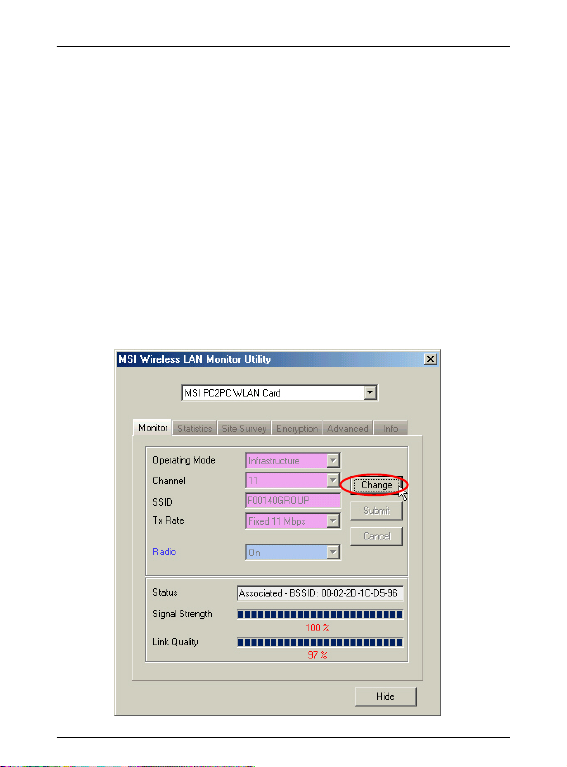
MSI Wireless LAN Monitor Utility is a powerful application which
helps you to configure MSI PC2PC WLAN Card, change Adapter
information about link, configuration and encryption, show the
information of utility/driver/firmwave version, and monitor the
statistics of the communication.
3.1 Monitor
The Monitor screen provides information of the current link
between the MSI PC2PC WLAN Card and the wireless Access Point.
You need to click Change first to adjust the settings, then click
Submit to save your changes.
17
Page 19

User’s Guide
Operating Mode:
MS-6978 WLAN BOX
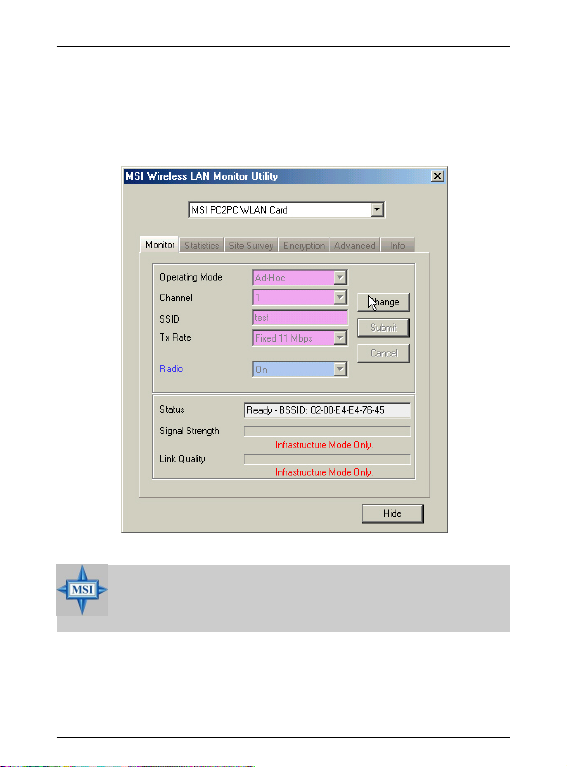
h Ad-Hoc --- this is non-standard peer-to-peer mode of operation
and needs no Access Point. When wireless clients are operated in
this mode, all wireless clients require the same channel number
and SSID. When “Ad-Hoc” mode is selected, the utility will
provide a selection for channel setting.
h Infrastructure --- this mode of operation needs the use of an
Access Point. In this mode, all wireless communicatins between
computers have to be via the Access Point.
You may consult to your Network Administrator if you are not
familiar with the settings described above.
Channel:
Specify the operating radio frequency channel in “Ad-Hoc” mode,
which should be set to the same channel as the other points in the
wireless network.
SSID:
Means Service Set Identifier, an unique name shared among all
points in a wireless network. It must be identical for all points in the
network. MS-6978 will be able to connect to an Access Point with
the same SSID.
Tx Rate:
This field sets the current transmitting rate of the USB Adapter.
There are four fixed rates: 1 Mbps, 2 Mbps, 5.5 Mbps, and 11
Mbps. The Tx Rate should be set to Auto rate to optimize
performance and range, which will adjust the transfer speed for best
performance and longest range automatically.
Radio:
Set to On to activate the radio.
Status:
It shows status information about the radio link.
h Signal Strengh --- This bar shows the received signal strength
level. The higher the blue bar is, the more power the radio signal
18
Page 20
User’s GuideMS-6978 WLAN BOX
is received by the USB Adapter.
h Link Quality --- This bar shows the measured signal level and
connection status. The higher the blue bar is, the better the radio
signal is received by the USB Adapter.
MSI Reminds You...
These two bars are available only in “Infrastructure”
Operating Mode.
19
Page 21
User’s Guide
MS-6978 WLAN BOX
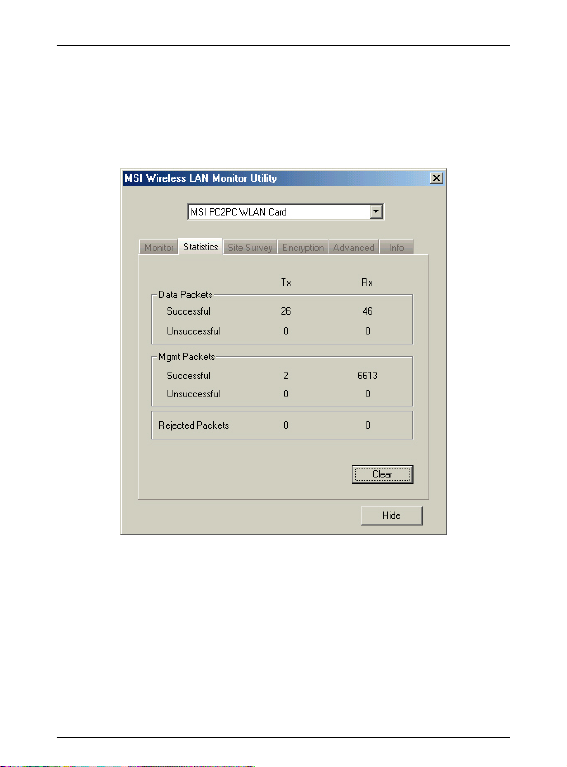
3.2 Statistics
This option shows the available statistic information, including
Data Packets, Management Packets and Rejected Packets. Press
Clear to renew this statistics list.
20
Page 22
User’s GuideMS-6978 WLAN BOX
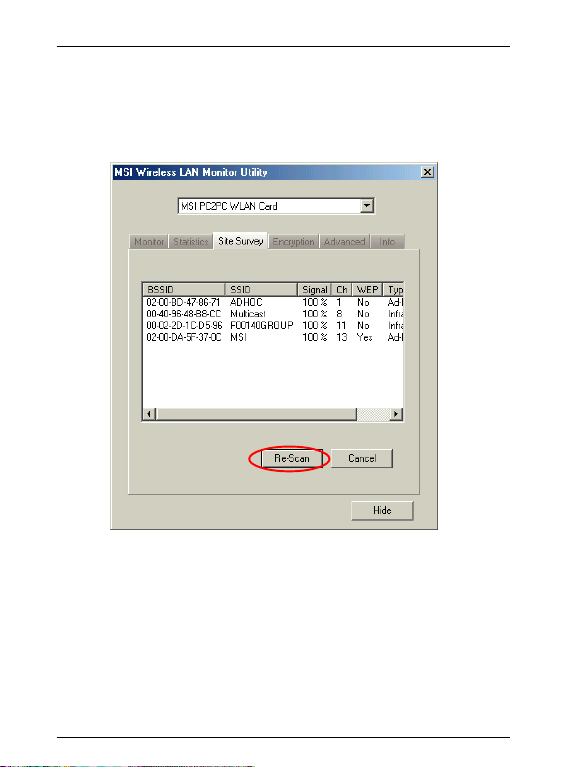
3.3 Site Survey
By choosing this Site Survey option in any of the two modes, all the
channels can be scanned in order to find all the access points within
the range of your card.
It includes the information about BSSID (Basic Service Set
Identification) and SSID of the access point(s), the signal strengh,
the channel where the access point(s) operates, and whether or not
WEP (Wired Equivalent Privacy) encryption is used. You may
press Re-Scan button to update this list. If you want to associate
with any of the Access Point(s), double click on the desired one,
and the system will bring you back to the Monitor screen to show
you the parameters of the connection newly established.
21
Page 23
User’s Guide
MS-6978 WLAN BOX
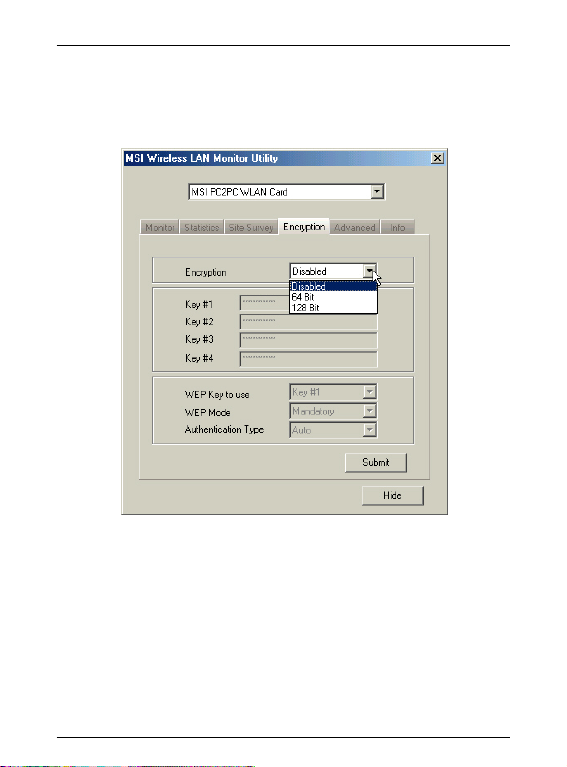
3.4 Encryption
By choosing this option in any of the two modes, you can set for
different WEP keys and specify which one of them to use.
Encryption:
You may enable or disable encryption function in this option.
Key #1 ~ Key #4:
If you enable encryption, you may choose any of the available
WEP keys in these fields in 64-bit or 128-bit WEB keys.
h 64 Bit --- There will be 10 hexadecimal digital.
h 128 Bit --- There will be 26 hexadecimal digital.
22
Page 24
User’s GuideMS-6978 WLAN BOX
WEP Key to use:
The key you choose should be the same for each point on the
network.
WEP mode:
This field let you set the WEP mode. The setting options are
Mandatory and Optional.
h Mandatory --- If you choose this mode, not only WEP will be
used, but also any other station needs to use WEP encryption in
order to establish a communication with your station.
h Optional --- In Optional mode, your station can communicate
with every other station regardless if they use WEP or not.
MSI Reminds You...
The WEP keys must be in HEX format.
Authenication Type:
MS-6978 supports two types of authentication: Open System,
Shared Key.
h Open System --- It is the authentication algorithm used by MS-
6978, which is also the default selection. If the Access Point is
used Open System authentication, then the wireless adapter will
need to be set to the same authentication type.
h Shared Key --- It is available only when WEP encrption is
enabled on MS-6978. Shared Key authentication supports
authentication of hosts as either a member of a group with a
shared secret key or a member of those who don’t have a shared
secret key. The use of WEP privacy mechanism is required to
share the key without transmitting the secret key in the open in
Shared Key authenication.
Finally click Submit to save the changes.
23
Page 25
User’s Guide
MS-6978 WLAN BOX
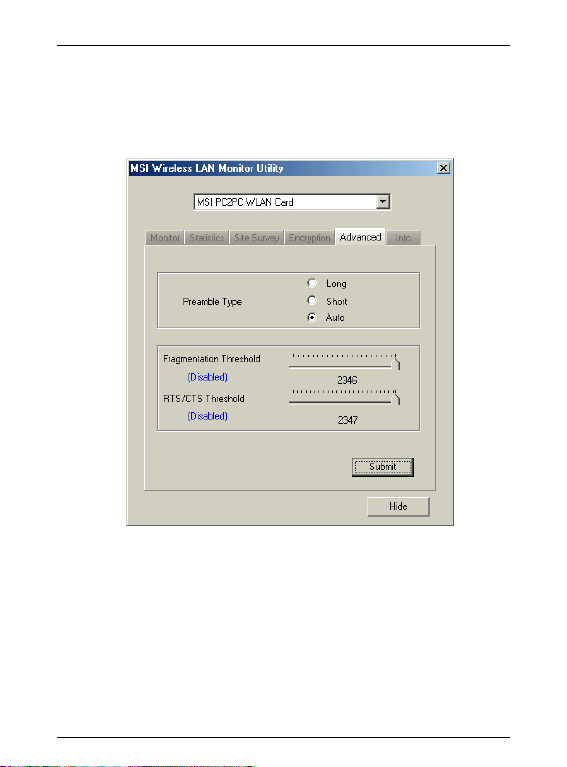
3.5 Advanced
In this option you can change advanced configuration settings,
such as Preamble Type, Fregmentation Threshold, RTS/CTS
Threshold.
Preamble Type:
You may set the length of preamble in this field. Setting options:
Long, Short, Auto.
h Long --- It is set to 144 bits.
h Short --- It is set to 72 bits.
h Auto ---MS-6978 supports an auto-detection feature, it
automatically selects the Preamble Type depending on the Access
Point Preamble Type if this option is selected.
24
Page 26
User’s GuideMS-6978 WLAN BOX
Fragmentation Threshold:
You may set the length of the fragment in this field. Please note
that each fragment should not be larger than the Fragmentation
Threshold.
RTS/CTS Threshold:
You may set the length threshold. Only when the length of the
MPDU is greater than the length threshold, an USB adapter uses a
RTS/CTS exchange for directed frames.
MSI Reminds You...
Changing the settings here is not recommended unless
you are familiar with those advanced configurations.
25
Page 27
User’s Guide
MS-6978 WLAN BOX
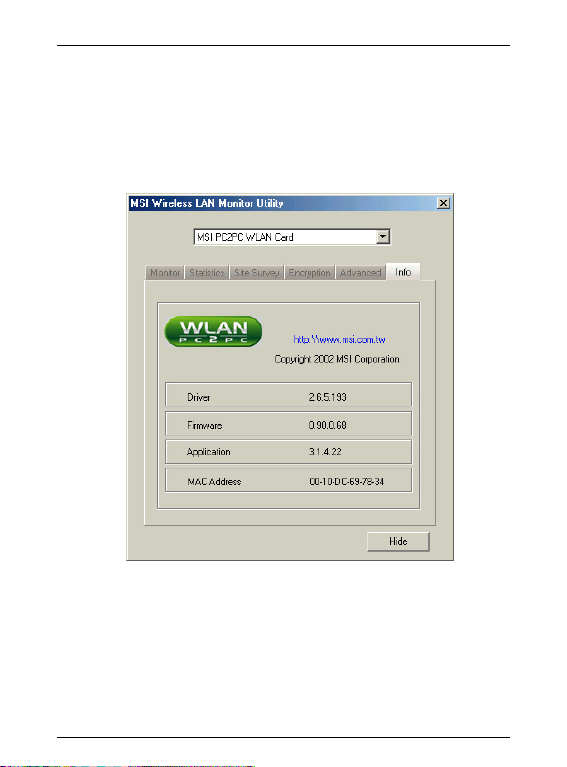
3.6 Info
The Info screen shows the information about MSI PC2PC WLAN
card, including Driver, Firewave, Application and MAC Address.
Click the MSI hyperlink and it will bring you to MSI website for
more information and technical support of this product.
26
Page 28
User’s GuideMS-6978 WLAN BOX
4. Connecting to a Network
This part describes how to prepare for connection to network and
some basic outline of networking basics, including sharing files,
printing from an computer on the network, or accessing the Internet
on multiple computers with one connection.
The following in Control Panel -> Network -> Configuration is
required for all computers if you want to connect to a network:
1. Check Client for Microsoft Network is installed.
2. Check TCP/IP -> MSI PC2PC WLAN Card is installed.
3. Check File and printer sharing for Microsoft Networks.
4.1 Computer Identification
Please verify that each computer has a unique name and common
workgroup name, if you had previously given your Windows 98SE/
ME/2000 computers names.
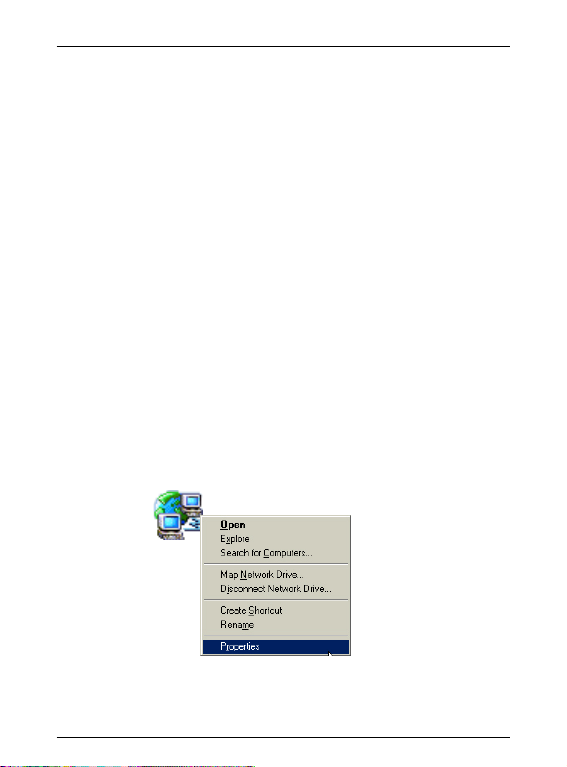
1. On your Desktop, right-click the icon My Network Places select
Properties from the context menu.
27
Page 29
User’s Guide
MS-6978 WLAN BOX
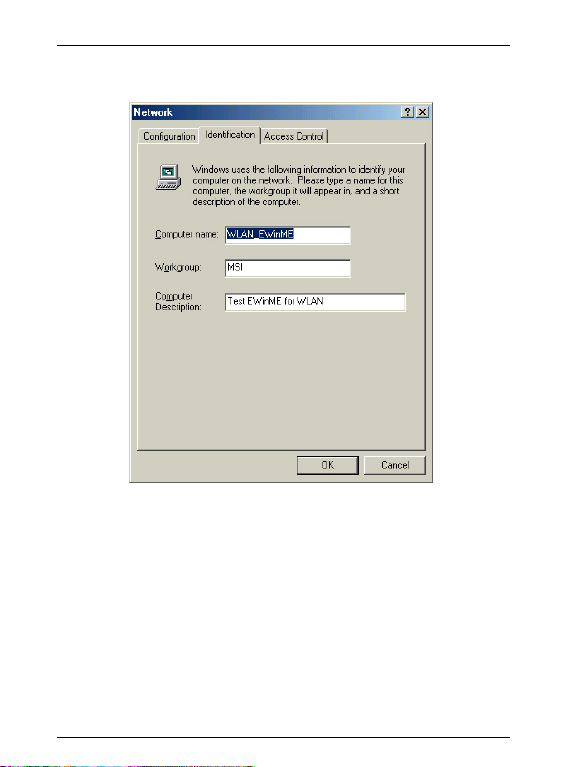
2. Click the Identification tab in the dialog box.
3. In the Computer name box, type a unique, identifying name for
this particular computer. This will be the name of this computer
used by other computers on your network to communicate with.
Each computer’s name must be unique on a particular network to
avoid confusion. Please note that the computer’s name should
not be more than 15 characters without space.
4. Type the workgroup name which this computer will belong to in
the Workgroup box. All the computers on your network should
have an identical Workgroup name.
5. The Computer Description box is optional. You may enter a
description that helps to identify this computer on your network.
28
Page 30
User’s GuideMS-6978 WLAN BOX
Then click Close.
6. Repeat this process for each computer on your network to ensure
that they all have unique “Computer Name” and identical
“Workgroup”.
4.2 How to install TCP/IP
By default, Windows® 98SE/ME/2000 will install TCP/IP
automatically.
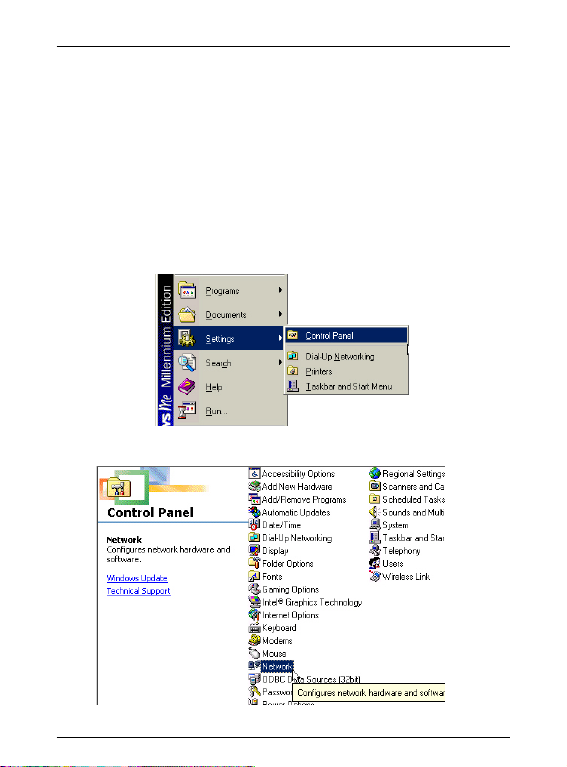
1. Go to Start -> Settings -> Control Panel.
Double-click on the Network.
29
Page 31
User’s Guide
MS-6978 WLAN BOX
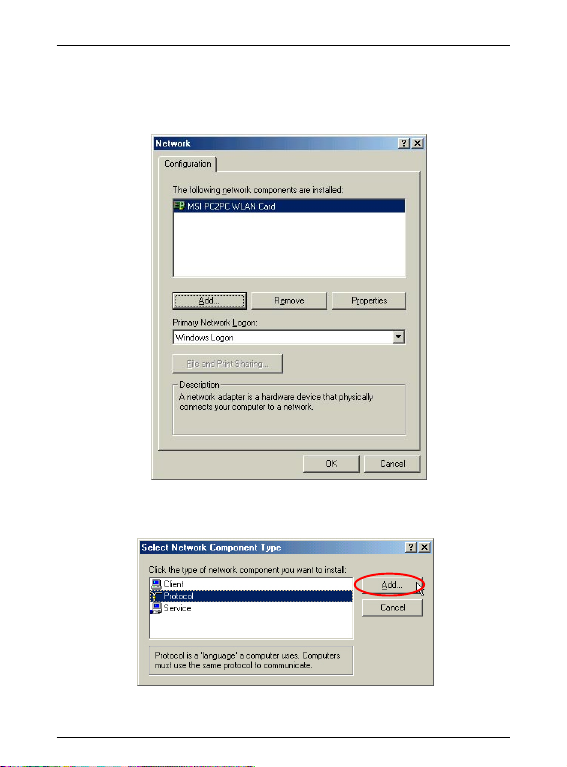
2. If you do see the TCP/IP network as the following screen, plese
select the MSI PC2PC WLAN Card, and click Add.
Select Protocal, and click Add.
30
Page 32
User’s GuideMS-6978 WLAN BOX
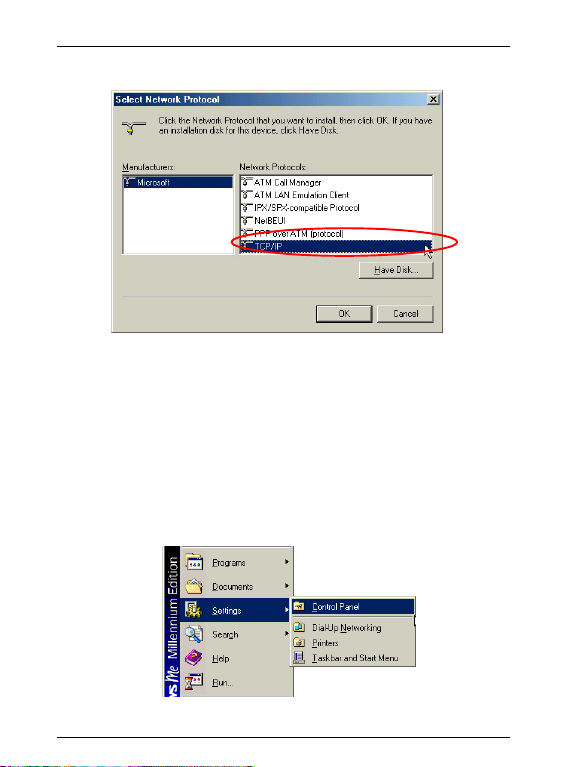
3. Select Microsort, then scroll down to select TCP/IP.
Now the TCP/IP for MSI PC2PC WLAN Card will be available.
Now the TCP/IP installation is finished.
4.3 Configuring a Dynamic IP Address
When the drivers are installed, the default setting here is set to
obtain IP dynamically through a DHCP server. If you’d like check
or change the settings, please follow the steps below:
1. Go to Start -> Settings -> Control Panel.
31
Page 33
User’s Guide
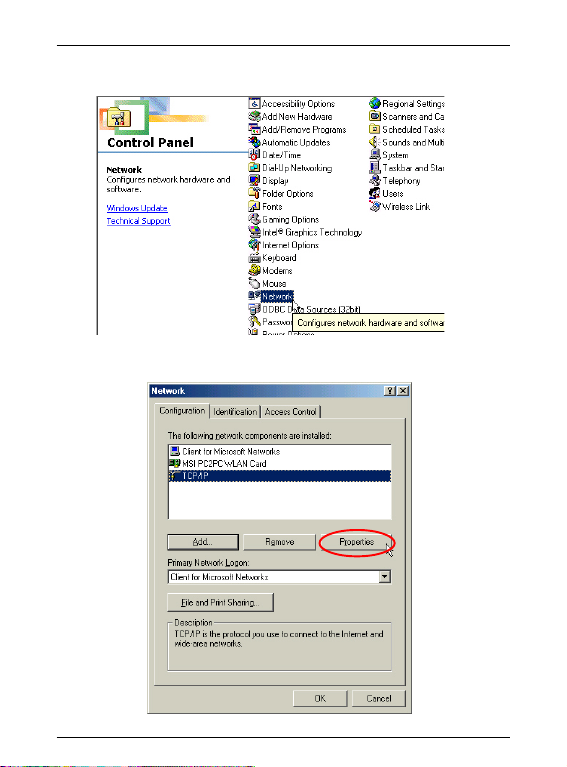
2. Double-click on Network.
3. Click on TCP/IP and then click Properties.
MS-6978 WLAN BOX
32
Page 34
User’s GuideMS-6978 WLAN BOX
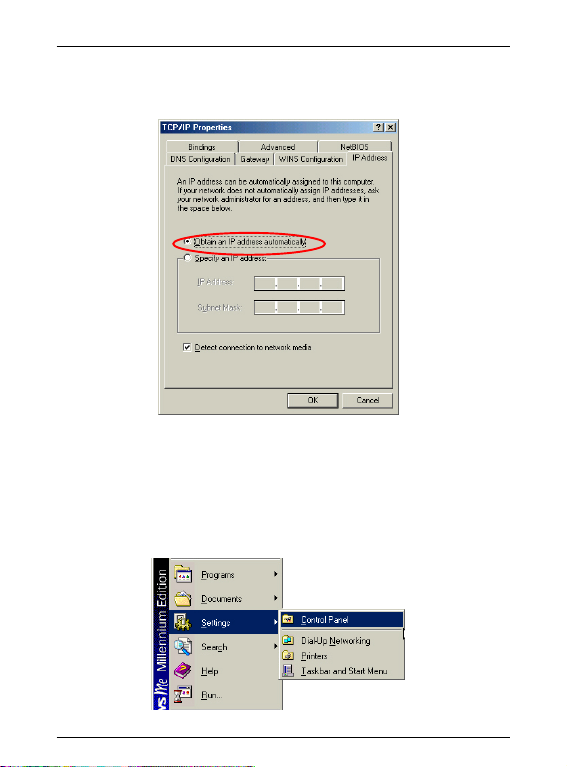
4. When the TCP/IP Properties window appears, choose IP Address
tab and select Obtain an IP Address Automatically.
5. When the Network properties window comes back up, click OK.
Then click Yes to reboot the computer.
4.4 Configuring a Static IP Address
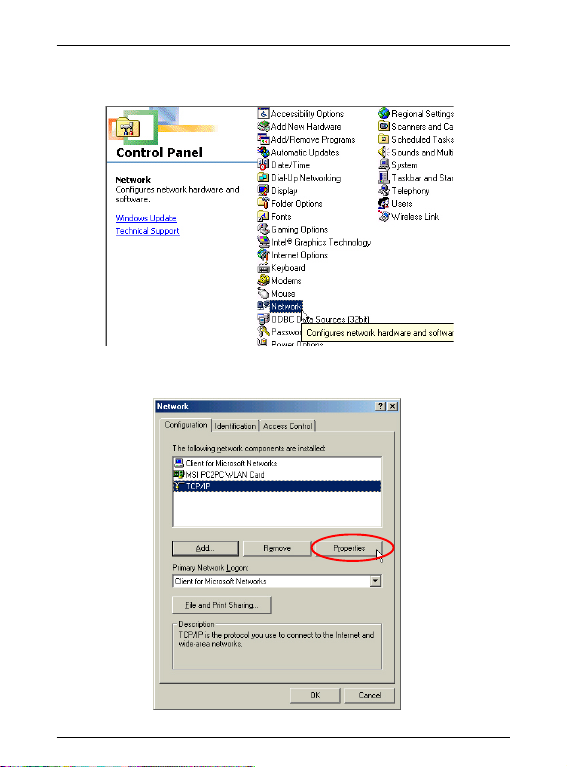
1. Go to Start -> Settings -> Control Panel.
33
Page 35
User’s Guide
2. Double-click on Network.
3. Click on TCP/IP and then click Properties.
MS-6978 WLAN BOX
34
Page 36
User’s GuideMS-6978 WLAN BOX
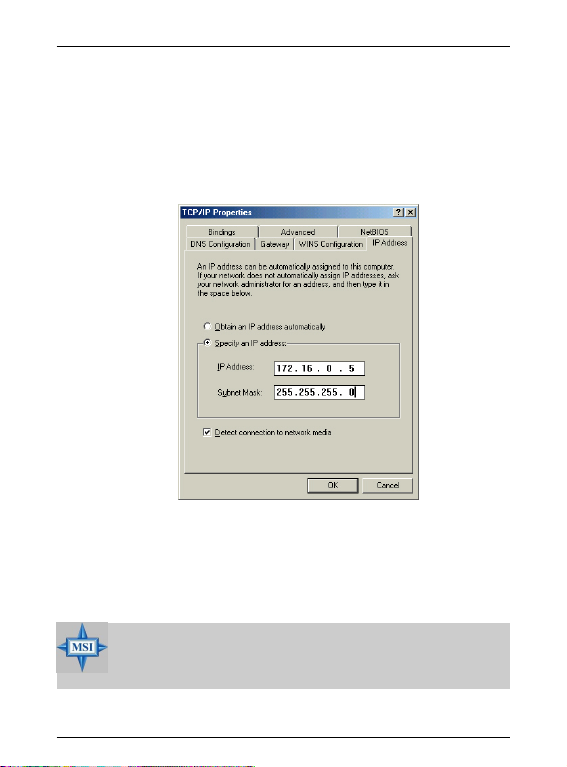
4. When the TCP/IP Properties window appears, choose IP Address
tab and select Specify an IP Address.
5. Enter an IP address into the empty field. Suggested IP Range is
172.16.0.2 to 172.16.0.254, and suggested Subnet Mask is 255.
255.255.0 Then click OK. When the Network Properties window
comes back up, click OK. Then click Yes to reboot the computer.
MSI Reminds You...
IP Addresses must be signed uniquely to each network
adapter .
35
Page 37
User’s Guide
MS-6978 WLAN BOX
4.5 Checking TCP/IP Address of the MSI PC2PC WLAN
Card
For Window® 98SE/ME:
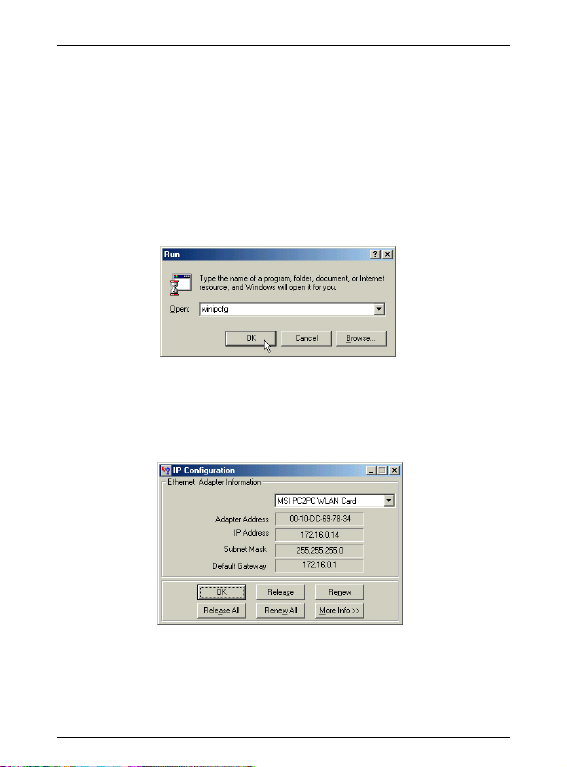
1. Go to Start -> Run.
2. Enter command in the Open: box. Click OK.
3. A DOS prompt window appears.
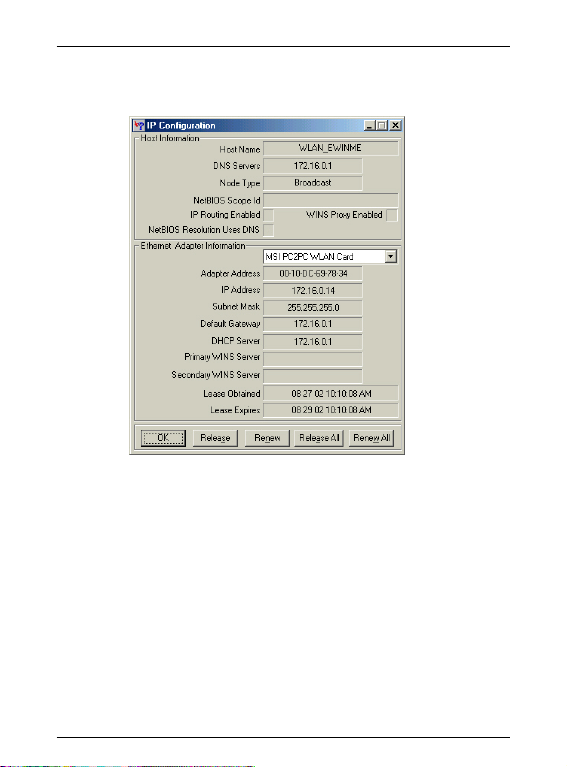
4. Enter winipcfg in the Open box. Click OK.
5. The IP Configuration screen will be displayed, and the IP address
will be displayed in the IP Address box. Please make sure the
configuration of IP Address, Subnet Mask and Default Gateway
is correct.
36
Page 38
User’s GuideMS-6978 WLAN BOX
6. Click on More Info to display additional IP information.
37
Page 39
User’s Guide
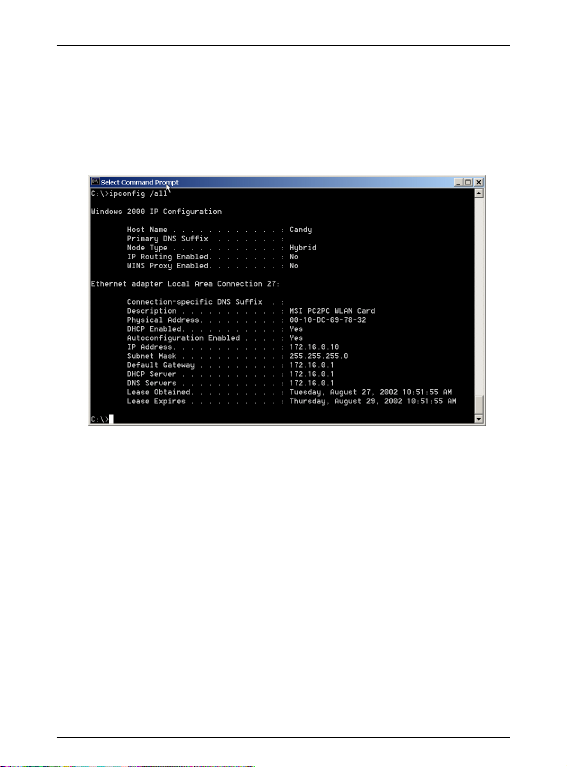
For Window® 2000/XP:
1. Go to Start -> Run..
2. Enter command in the Open box. Click OK.
3. A DOS prompt window appears.
4. Enter ipconfig /all to display IP information.
MS-6978 WLAN BOX
38
Page 40
User’s GuideMS-6978 WLAN BOX
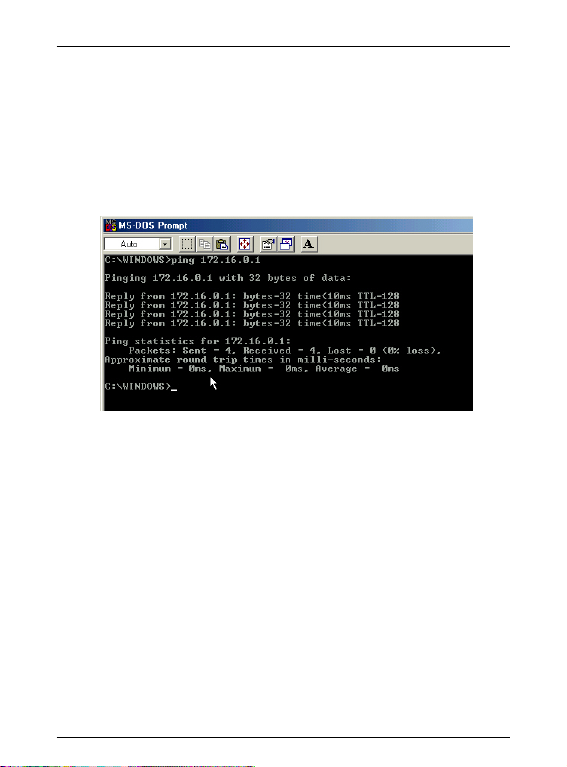
4.6 Checking the Connection by Pinging
1. Go to Start -> Run..
2. Enter command in the Open box. Click OK.
3. A DOS prompt window appears.
4. Type ping 172.16.0.1, which is the the IP address of the Gateway
in this case , and press Enter key.
Then you’ll get replies if the pinging is successful.
39
Page 41
User’s Guide
MS-6978 WLAN BOX
4.7 Sharing Files
You may now open and save files on other computer once your
computers are connected together on a network. You will also be
able to specify particular folders or disk drives to “share” and even
password to protect them. Please verify that each computer has a
unique name and common workgroup name, if you had previously
given your Windows® 98SE/ME/2000
computers names. Follw the steps below to
share specific files and folders with other
computers on your network.
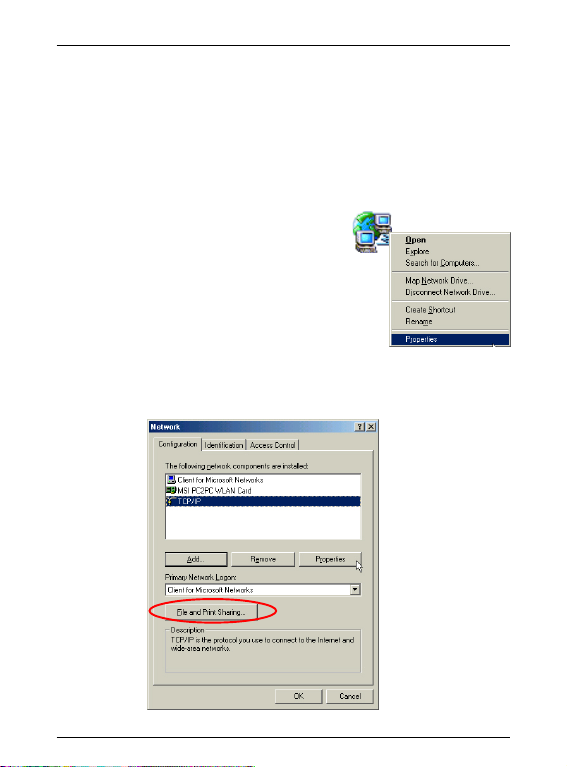
1. On your Desktop, right-click the My
Network Places icon and select
Properties from the context menu.
2. You will configure your computers
network settings in this dialog mostly. It
is also available through the Network icon
in the Control Panel.
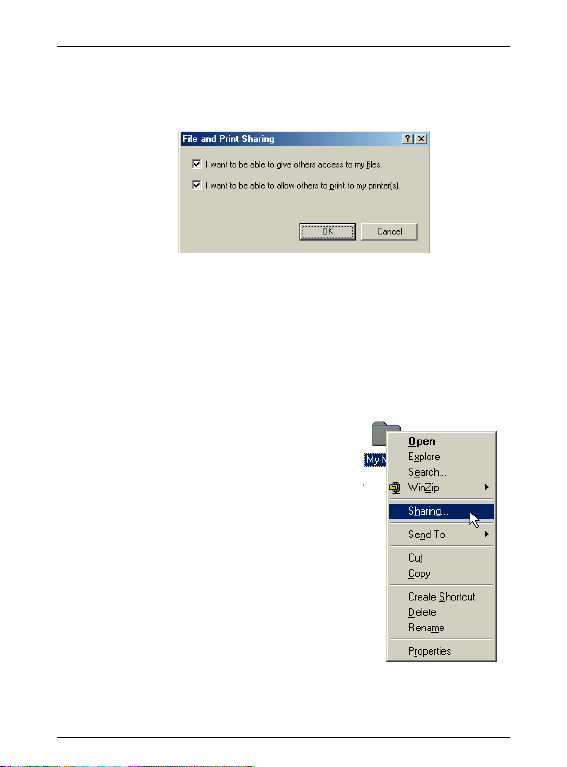
3. Click the File and Print Sharing button.
40
Page 42
User’s GuideMS-6978 WLAN BOX
4. Click to put a check mark next to I want to be able to give others
acccess to my files.
5. Then click OK on the File and Print Sharing dialog box.
6. Click OK on the Network dialog box.
7. Provide the Windows® 98SE/2000/ME CD or direct Windows to
the proper location of the installation files if prompted. Then
reboot if prompted.
8. Now you can identify a particular folder or disk drive to share,
which means you can share a folder that both you and your
family member/colleaque needs to
access occassionally. You can also share
your CD-ROM drive for others to use if
your other computer does not have CDROM. Both of these processes are the
same. Only the disk drives and folders
that you specifically identify as shared
will be accessible to other computers on
your network.
9. Locate the disk drive or folder you want
to share in Windows Explorer or the
My Computer icon on your desktop.
10. Right-click on the disk drive or folder
and select Sharing.
41
Page 43
User’s Guide
MS-6978 WLAN BOX
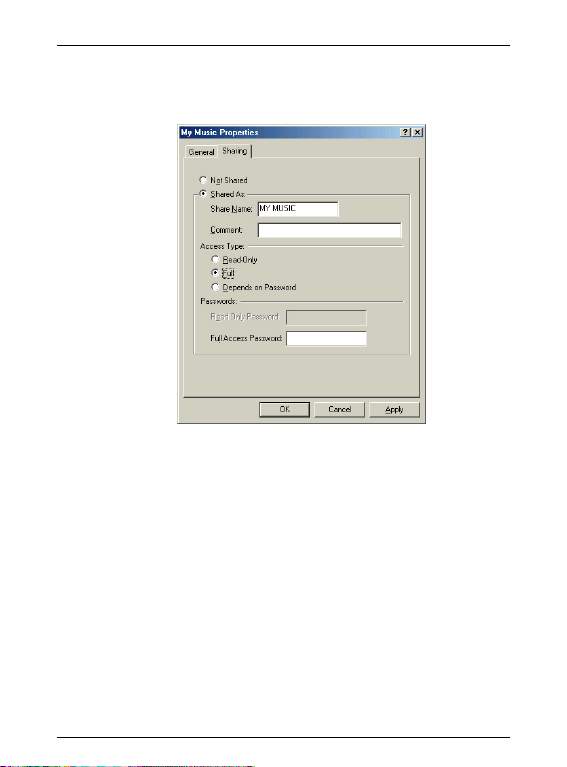
11. Select Share As: to set the parameters for sharing this particular
disk drive or folder.
12. The Share Name: box is used to identify the disk drive or folder
you are sharing to other computers on the network, which can
be helpful as more resources on your network for others.
13. The Comment: box is optional, which can be used to further
describe the disk drive or folder for others on the network.
14. Access Type: allows you to designate how much someone else
can do with this disk drive or folder. Read-Only only allows
others to look at or open the files on the disk drive or in the
folder. Full allows others to read, write, open, save, copy,
move, and even delete files on the disk or in the folder. Depends
on Password gives other computers access conditional on the
password they provide.
15. Passwords: allow you to apply a level of security to your shared
disk drives and folders. Any other computer (user) will be asked
42
Page 44

User’s GuideMS-6978 WLAN BOX
to enter the password you designate here before accessing the
disk drive or folder. Two passwords are used to give two levels
of security (or access) to others on the network using the
Depends on Password setting. Leaving the Password boxes
empty will give everyone on the network access to the disk
drive or folder.
16. Click OK to continue. You will be prompted to enter the
password(s) you provided for verification. Type the password
(s) just as you entered them again.
17. Now you may access this disk drive or folder from another
computer on your network. You may do so by double-clicking
the My Network Places icon on your desktop or inside Windows
Explorer.
18. Navigate to the computer with the shared disk drive or folder
(recognized by the Computer Name you provided) and doubleclick. Now you should see the disk drive or folder, and doubleclick. If you specified a password when sharing this disk drive or
folder, you will be asked for the password.
19. You can access a disk drive or folder shared over the network
from most Windows® 98/ME/2000 applications. You can map
these disk drives and folers to a drive letter on another computer
to make this process easier. For example, on a computer where
you are accessing a shared folder from another computer, inside
Windows Explorer right-click and select Map Network Drive.
Now you are able to assign an available drive letter. Checking
Reconnect at logon allows Windows to map this network drive
each time when you start your computer.
43
Page 45
User’s Guide
MS-6978 WLAN BOX
4.8 Use Windows® XP as Access Point
Windows® XP provides an feature in the Control Panel to help to
link two networks..
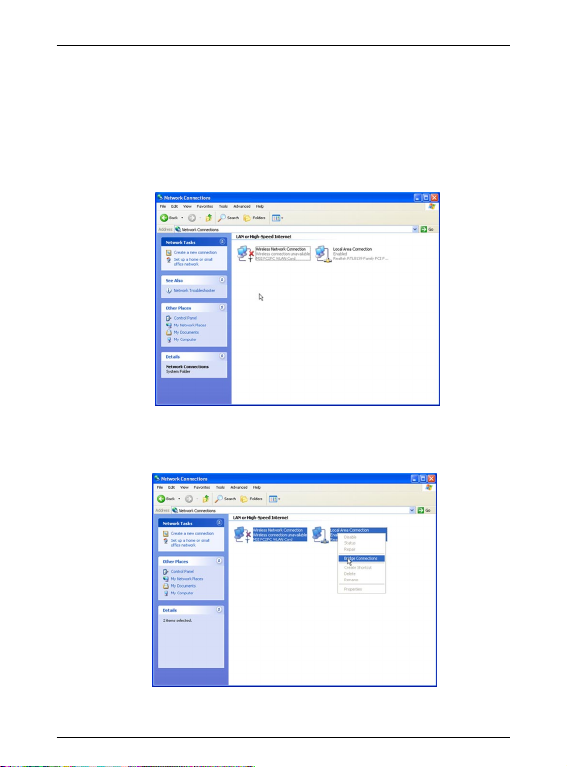
1. In the Control Panel, select Network Connections and the window
below will appear.
2. Select Wireless Network Connection and Local Area Connection
simultaneously, and right click to select Bridge Connections.
44
Page 46
User’s GuideMS-6978 WLAN BOX
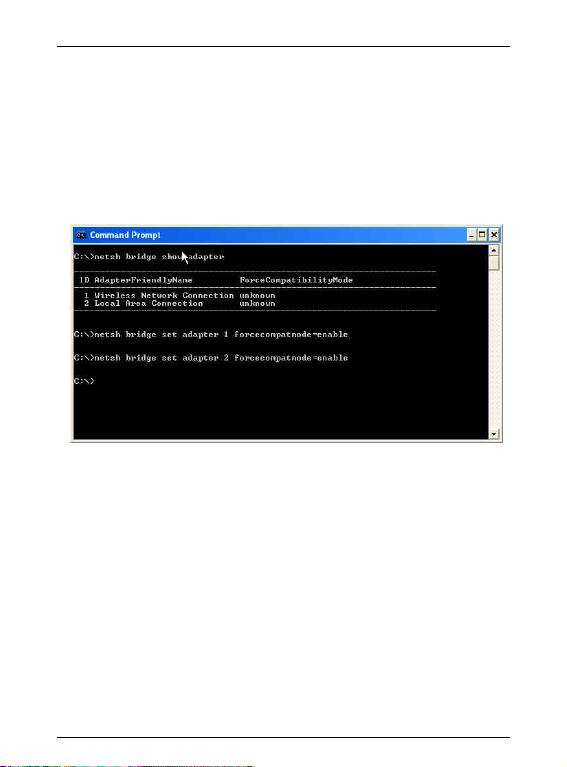
3. Then go to Start -> Run. Enter cmd in the Open box, the click
OK. A DOS prompt window appears.
4. Then type net bridge show adapter.
5. Then type netsh bridge set adapter X forcecompatmode=enable,
where X is your ethernet identifier.
6. Then type netsh bridge set adapter Y forcecompatmode=enable,
where Y is your wireless identifier.
45
Page 47
User’s Guide
MS-6978 WLAN BOX
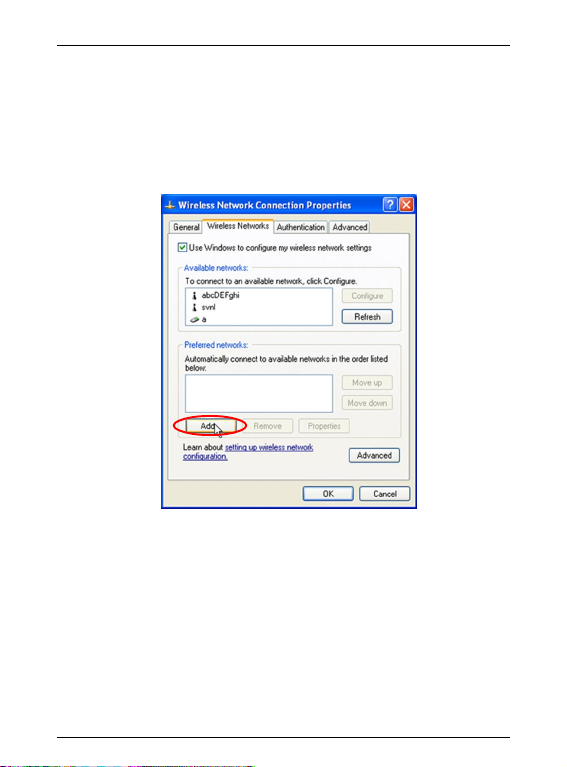
7. Right click the Wireless Network Connection icon in the right
bottom of system bar, choose View Available Wireless Network
---> Advanced. You will get Wireless Network Connection
Properties window. Click Add button to add a new wireless network
connection.
46
Page 48
User’s GuideMS-6978 WLAN BOX
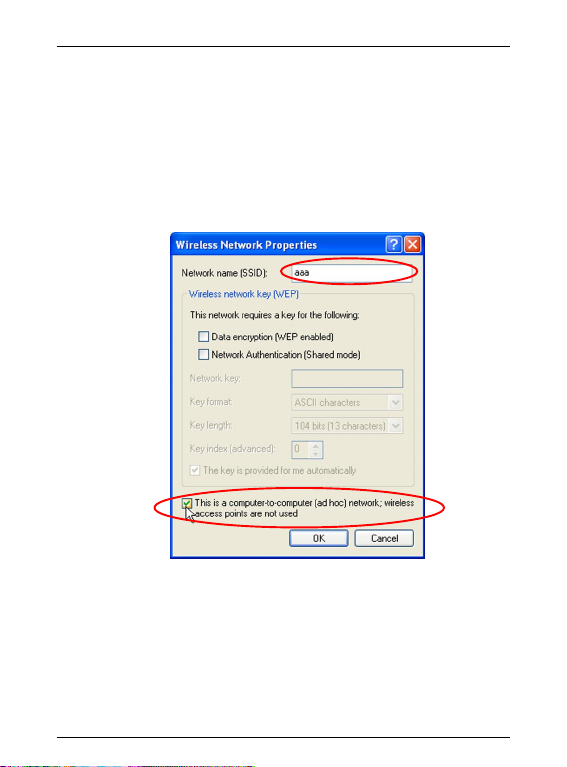
8. Enter the namae for this new network in the Network name
(SSID):, and put a check mark next to This is a computer-to-
computer (ad-hoc) network; wireless access point are not used.
In this case, this computer will function as an access point, while
other computers can use this network name (which is “aaa” in
the picture below) to connect to. Once they connect successfully,
they could access the ethernet LAN via Network Neighborhood.
47
Page 49
User’s Guide
MS-6978 WLAN BOX
5. Troubleshooting
This part describes the problems and corresponding solutions of
driver installation.
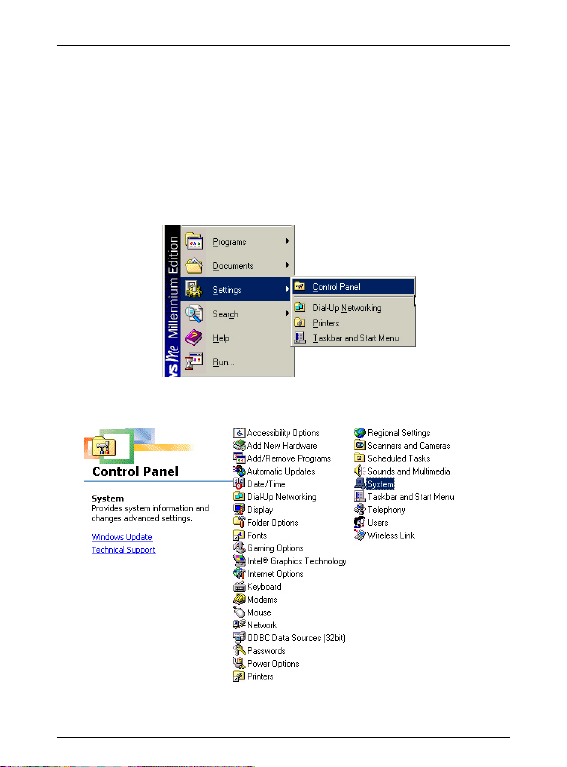
To check if the wireless network adapter drivers are loaded properly:
1. Go to Start -> Settings -> Control Panel.
2. Double-click on System.
48
Page 50
User’s GuideMS-6978 WLAN BOX
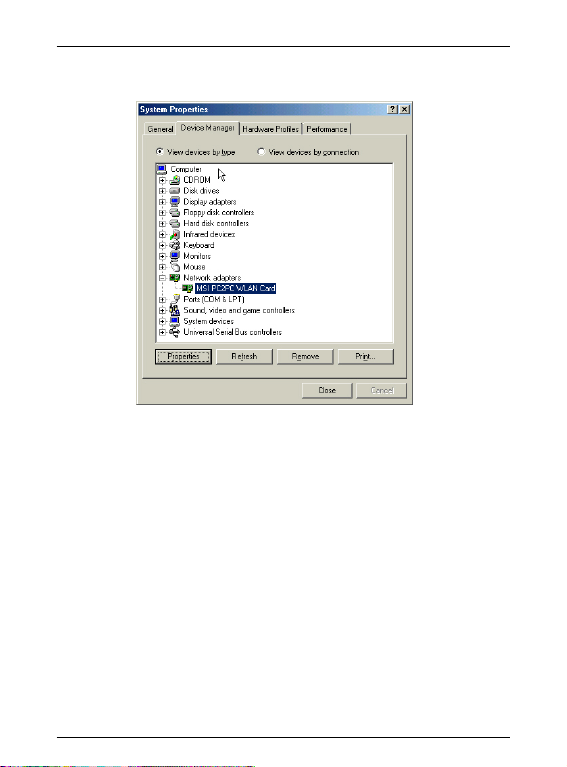
3. Click on the Device Manager Tab.
4. Click on the “+” symbol in front of Network Adapters.
5. Highlight MSI PC2PC WLAN Card.
6. Click on Properties.
49
Page 51
User’s Guide
MS-6978 WLAN BOX
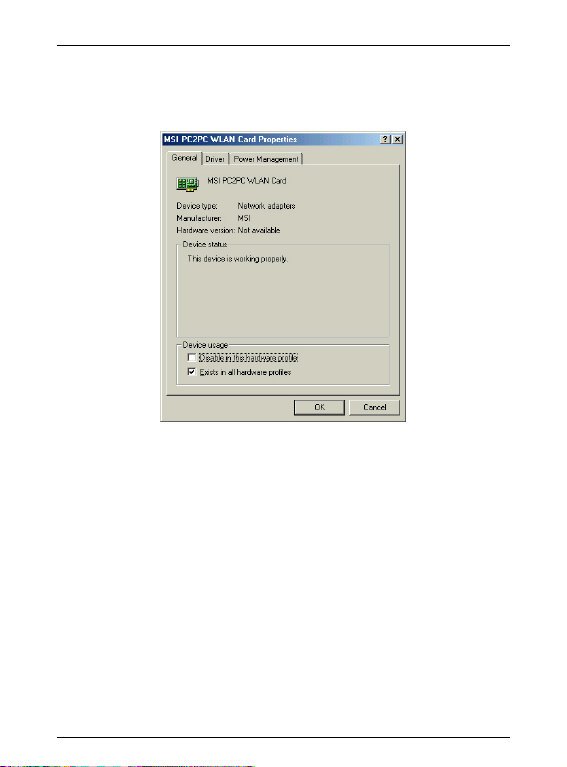
7. Check under Device Status to see if the MSI PC2PC WLAN Card
is working properly.
50
Page 52

User’s GuideMS-6978 WLAN BOX
6. Technical Support
Micro-Star International provides free technical support. If a problem
arises with your system and no solution can be obtained from this
user’s manual, please contact your place of purchase or local
distributor. Alternatively, please try the following help resources
for further guidance.
Visit the MSI website for FAQ, technical guide, driver and
software updates, and other information: http://www.msi.
com.tw/
Contact our technical staff at: [email protected]
51
 Loading...