

Page 1

Page 2

Page 3
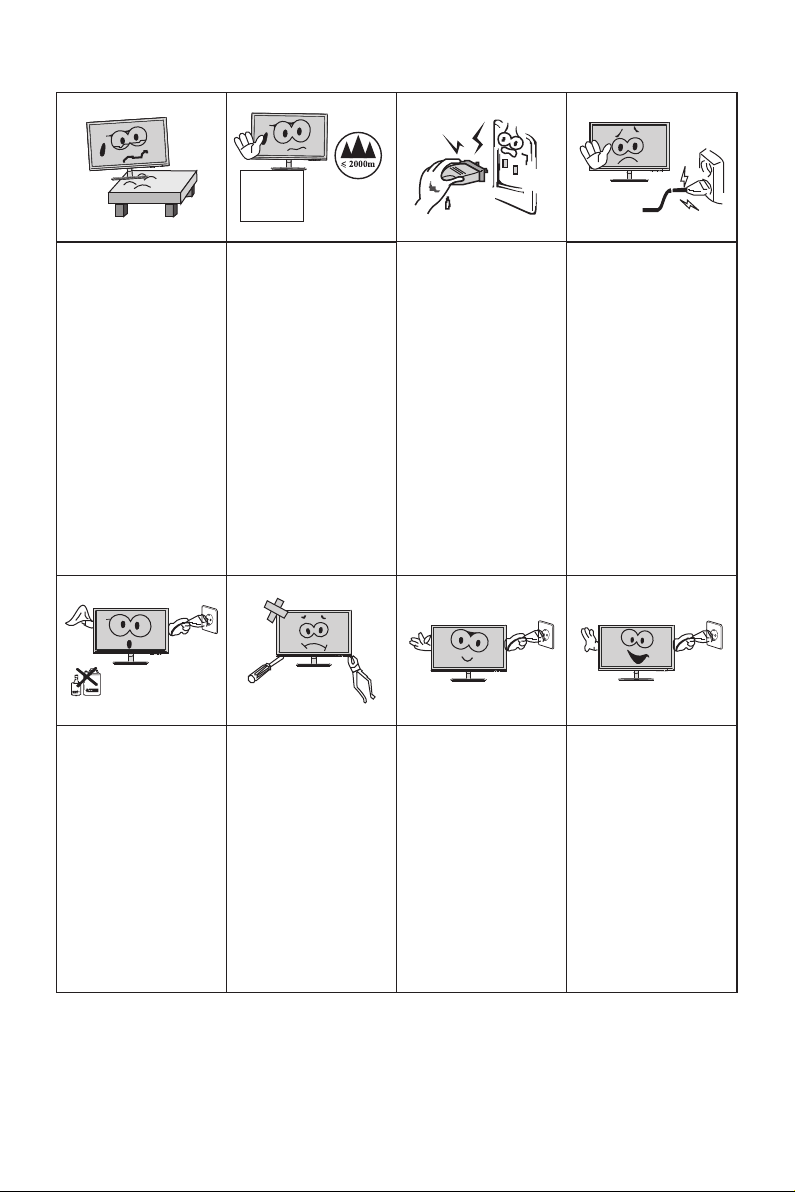
I.Safety Pre vention Measure s
Please always place
this device on a stable
surfa ce; oth erwise,
it m a y f a l l an d b e
dama ged .
Wh e n c lean ing the
dev i c e , be s u r e to
re m o v e the p o w e r
pl u g , u s e a p i e c e
of so f t c loth ra t her
t h a n i n d u s t r i a l
chem i c a l t o c l e a n
the de vic e, be sur e
not to let water enter
the de vic e.
The altitude and the
tropical environment
the adapter fits depend
on which adapter is
used for the device.
The ra tin g pl ate o n
the back of the device
with the above warning
si g n i ndic ates th a t
t h i s p r o d u c t i s
appl i c a b l e f o r t h e
safe use of the region
w i t h a l t i t u d e o f
2,00 0m an d below.
Do not disassemble
this d evi ce w i t h o u t
permi ssion. In ca se
of failure, be sure to
contact a professional
serv ici ng pers on to
fix it. The authorize d
disa sse mbly of thi s
devi c e m a y r e s u l t
in ele ctr ic shoc k or
fire .
Do not hold the plug
w i t h w e t h a n d ;
ot h erw i se, ele c tri c
sh o c k m a y o c c u r .
Make s ure t he p lug
ha s a g o o d t o u c h
because poor touch
may ca use f ir e.
In case of rare smell
or no i se out of thi s
dev i c e , be s u r e to
imme dia tely cu t off
the power supply and
as k a pr o fess i ona l
serv ici ng pers on to
fix th e pro bl em.
Do not use a broken
power plug nor keep
a power cord near heat
sour ce; o th erw ise,
e l e ct r ic s h o ck o r
fire m ay oc cu r.
Wh e n t h i s d e v i c e
is idle fo r long time,
be su r e t o p o wer it
off; otherwise, electric
sh o c k o r f i r e m a y
occu r.
Note:
The device w ith AC switch may u se su ch AC switch as cut-off component .
The device without AC switch may use power plug or coupler as cut-off component.
In case of the n orm al use of the equip m e nt, make sure the cut- o ff compon e nt
can be ac ces sed easily.
All s pecif icatio ns and in format ions ar e subje ct to cha nge wit hout no tice.
-1-
Page 4

II.Install ation Instructi ons
1.Acc ess ories
Power adapter
Signal cable
User manual
Base/Stand
Warranty card
(The above pictures are for illustration only and the physical accessories shall govern.)
2. Ad justment of Ro tat ion Ang le
1. The s cre en may be inc lin ed 5°
forwa rd an d 20°backwar d.
2.
The ang le ma y be adjusted le ft
and rig ht wi thin -30°-30 °.
3. Vertical direction can be adjusted
up and do wn wi thin 65mm.
When ad jus ting the angle o f the
4.
displ ay, be sure not to touc h or
press the sc ree n area.
(The above pictures are for illustration only and the physical accessories shall govern.)
3. Project Assemb ly
See the asse mbl y sketch on the co ver o f the packagin g cas e.
All s pecif icatio ns and in format ions ar e subje ct to cha nge wit hout no tice.
-2-
Page 5

III. Connect t he Monitor to PC
1
2 43
Before connecting the LCD monitor to PC, please power the PC and the monitor
1
DP Por t
Conne ct th e DP cable i nto t he DP IN por t of
the monito r (th is needs the sup por t of the
monitor) .
2
DVI Port
Co n n ect the DVI cable int o the D VI IN port
in t h e b a c k of the m o n i tor ( t h i s n e e ds t he
suppo rt of t he mo nitor).
3
HDMI Port
Conne ct th e H D MI c a b le in to th e HDMI IN
Power adapter
* War ni ng : Always use t he p ow er
cord o f st an da rd c onfig ur at io n.
po r t in t o t h e back of the monitor (this needs
the suppor t of th e monitor).
5
4
Audio I nte rfa ce
Conne ct th e AUDIO cable to the AUDI O out
port in the ba ck of t he display (th is ne eds the
suppo rt of t he mo nitor).
5
Power Plug
Conne ct th e power cord of the mon ito r into
the POWER po rt in t he back of the mon ito r.
(The above pictures are for illustration only and the physical accessories shall govern.)
All s pecif icatio ns and in format ions ar e subje ct to cha nge wit hout no tice.
-3-
Page 6

IV. User Setu p
1. Schemat ic Di agram of Keys
3
5
1
2. Descrip tio n of Keys' Funct ion s
1.
2.
3.
4.
5.
MENU k ey: P re ss th is key to p op up the m ain m enu/b ack to th e
prev iou s menu (i n case of m ain m enu, ex it).
When a m enu i s open, p ress th is ke y as t he RI GHT key to en ter t he
subm enu ;
When n o men u is open , press t his k ey t o swi tch to th e desir ed si gnal
inpu t sou rce.
Whe n a menu is open, press this key as the UP key to increase the
progr ess bar value;
Whe n no menu is open , press this key to sw itch to the desired mode.
When a m enu i s open, p ress th is ke y as t he DO WN key to d ecrea se
the pr ogr ess bar v alue;
When n o men u is open , press t his k ey t o swi tch to th e desir ed si ght
bead ( wit h sight b ead swi tch a ctiva ted).
POWE R/MEN U Key : Press t his key s hor tly to po p up Main
Menu /Co nfirm ; hold th is ke y to p owe r off.
2
4
6.
LE D
In d ic a to r
Blue : Nor ma l pow er-on s tat e; B lin king bl ue: P ower sa ver sta te.
Note: The physical k eys o f the s pecific mode l sha ll govern .
All s pecif icatio ns and in format ions ar e subje ct to cha nge wit hout no tice.
-4-
Page 7

V. Operatio n Menu (OSD) Function Des criptions
Fir st l ev el
menu it em
Secon d le ve l
menu it em
Mode
DCR
FreeSync
Game
Aspect ratio
Crosshair
Response time
Brightness
Contrast
Image
Color Temp.
Gamma
Input
DVI
HDMI
DisplayPort
Language
Setup
Power Off
LED
Reset
Note: The functions may be adjuste d due to specifi c model or the upgrade of softwar e versio n. The p hy si ca l model s ha ll g ov er n.
Thi rd l ev el
menu it em
Standard
Movie
FPS
RTS
Eye Saver
Off
On
Off
On
Auto
16:9
4:3
None
Instructions
Normal use mode
Application mode of seeing film
First person shooting game mode
Strategic game mode
Eye-protecting blue light filtered application mode
Inactivate dynamic contrast
Activate dynamic contrast
Inactivate FreeSync function
Activate FreeSync function, only AMD display card supported (the
support from the display is needed)
Automatic image scale adjustment
Adjust image to be wind screen
Adjust image to be 4:3
Inactivate sight bead function
Switch to the red round sight bead
Switch to the green round sight bead
Switch to the red cross sight bead
Switch to the green cross sight bead
Off
Normal
Extreme
50
100
OD off mode (the support from the display is needed)
OD general mode, reducing motion vague (the support from the
display is needed)
OD top speed mode, reducing motion vague (the support from
the display is needed)
Adjust display bright
0
50
100
Adjust display contrast
0
Warm
Cool
User
1.8
2.2
Set as cold color temperature
Set as warm color temperature
R
G B
50
50 50
100
100 100
0
Adjust color tone brightness grey 1.8
Slightly adjust red color temperature
Slightly adjust green color temperature
Slightly adjust blue color temperature
0 0
Adjust color tone brightness grey 2.2
DVI (digital) signal input
HDMI (digital) signal input
DisplayPort (digital) signal input
繁中
English
French
German
Italian
Spanish
Korean
Japanse
Russian
Portuguese
Off
On
Off
On
Off
On
All s pecif icatio ns and in format ions ar e subje ct to cha nge wit hout no tice.
繁體中文
English
French
German
Italian
Spanish
Korean
Japanse
Russian
Portuguese
Inactivate the timed power-off function
In no- sig nal s tat e, aut oma tic ally pow er off af ter 1 min st and by
LED off
LED on
Exit from this function
Restore to factory settings
-5-
Page 8

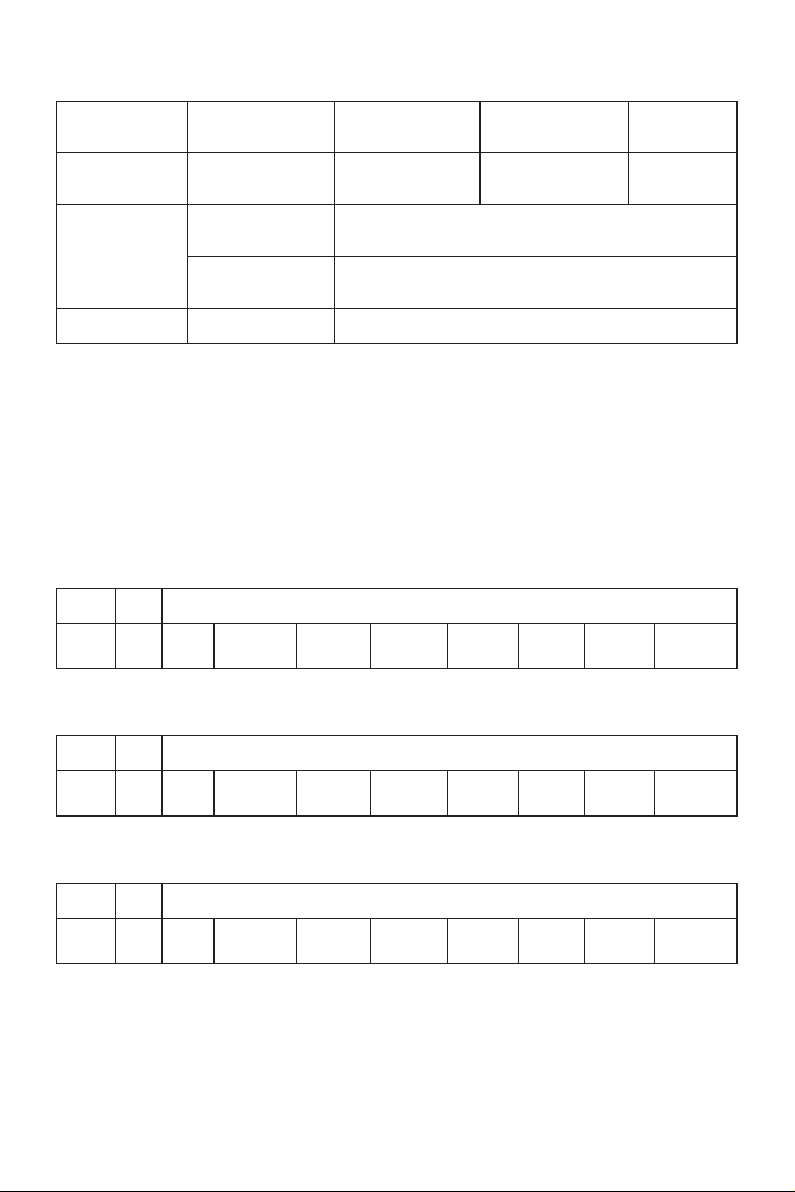
VI. FAQ
Faults occ urr ing
The pow er in dicator
light i s not o n
Impossible plug-and-play
Dimmi ng pi cture
Flickeri ng picture or
picture wi th ri pples
The pow er in dicator
light i s on (f lic kering) ,
but the moni tor h as no
pictures .
Possible s olu tions
◆
Check i f the p ower is on.
◆
Check i f the p owe r cord is connec ted .
◆
Check if the function of plug-and-play of the device
is compati ble w ith PC.
◆
Ch e c k i f th e dis p lay c ard is c o mpatib l e w i t h t h e
plug-and -play function.
◆
Adjus t bri ghtness and co ntr ast .
◆
There may be electrical appliances or equipment
with elect ron ic disturban ce.
◆
Check i f the P C pow er is on.
◆
Check i f the P C dis play card is inserted properly.
◆
Check if the signal cable of the monitor is correctly
connecte d wit h the PC.
◆
Check the signal cable plug of the monitor and make
sure every p in ha s no bendin g.
◆
Observe the indicator light by pressing the Caps
Lock key on the PC keyboard and check if the PC
is working .
Color s hor tage
(red, gree n and blue)
Picture with color difference
(whit e loo ks not white)
◆
Check the si gnal cable of th e mon itor and make
sure every p in ha s no bendin g.
◆
Adjus t RGB c olo r or reselect co lor t emperature .
Pleas e con firm the default va lue s of the output dy nam ic range and the p ixe l
format in th e gra phics Settin gs is " all". when the b rig htness of the sc ree n is
highe r tha n usual.
All s pecif icatio ns and in format ions ar e subje ct to cha nge wit hout no tice.
-6-
Page 9
VII. Product S pecifications
Diagonal
dimensions
68.6cm
(27"FHD)
Ambient
temperature
Humidity
Picture
aspect ratio
16:9
Storage
temperature
Working
temperature
RH for operation
Picture
dimensions (mm)
Dot distance (mm)
597.9*336.3 0.3114*0.1038
-20℃ to 60℃
0℃ to 40℃
20% 80% to
Optimal
resolution
1920*1080
Re m a r k: W h e n t h e r e s o lu t i o n a r e 2 5 6 0 *1 4 4 0 @6 0 H z / 3 4 4 0 * 1 4 40 @ 6 0 Hz /
1920* 108 0@144Hz/25 60* 1440@144Hz /38 40*2160@30 Hz co nnection via D VI
port, pls ch oos e 24+1 pin do ubl e - channel DVI ca ble s.
Note: The actual app lic ation of the abo ve pa rameters sha ll be s ubject to the
speci fic m odel.
VIII. Table of P roduct Preset Mod es
In DVI conne cti on mode
Dis play
dim ensio ns
27"FHD
Asp ect
rat io
16:9
720 x400
( )
70H z
640 x480
( )
60/ 75/72 Hz
Prese t res olu tion/Refre sh ra te
800 x600
(56/ )
60/70/75Hz
102 4x768
(
60/ 72/75 /
120 Hz)
128 0x102 4
(
60/7 5/ Hz)120
144 0x900
(
60 Hz)/12 0
168 0x105 0
( )
60H z
192 0x108 0
( )
60/ 120/1 44Hz
In DP co nnection mod e
Dis play
dim ensio ns
27"FHD
Asp ect
rat io
16:9
720 x400
( )
70H z
640 x480
( )
60/ 75/72 Hz
Prese t res olu tion/Refre sh ra te
800 x600
(56/ )
60/70/75Hz
102 4x768
(
60/ 72/75 /
120 Hz)
128 0x102 4
(
60/7 5/ Hz)120
144 0x900
(
60/ 120Hz )
168 0x105 0
( )
60/ 120Hz
192 0x108 0
( )
60/ 120/1 44Hz
In HDMI conn ect ion mode
Dis play
dim ensio ns
27"FHD
Asp ect
rat io
16:9
720 x400
( )
70H z
640 x480
( )
60/ 75/72 Hz
Prese t res olu tion/Refre sh ra te
800 x600
(56/ )
60/70/75Hz
102 4x768
(
60/ 72/75 /
120 Hz)
128 0x102 4
(
60/7 5/ Hz)120
144 0x900
(
60/ 120Hz )
168 0x105 0
( )
60/ 120Hz
192 0x108 0
( )
60/ 120Hz
Note: The actual app lic ation of the abo ve pa rameters sha ll be s ubject to the
speci fic m odel.
All s pecifi catio ns and in format ions ar e subje ct to cha nge wit hout no tice.
-7-
 Loading...