

Page 1

Page 2
Page 3

Catalog
English
Française
Español
1
15
18
Page 4
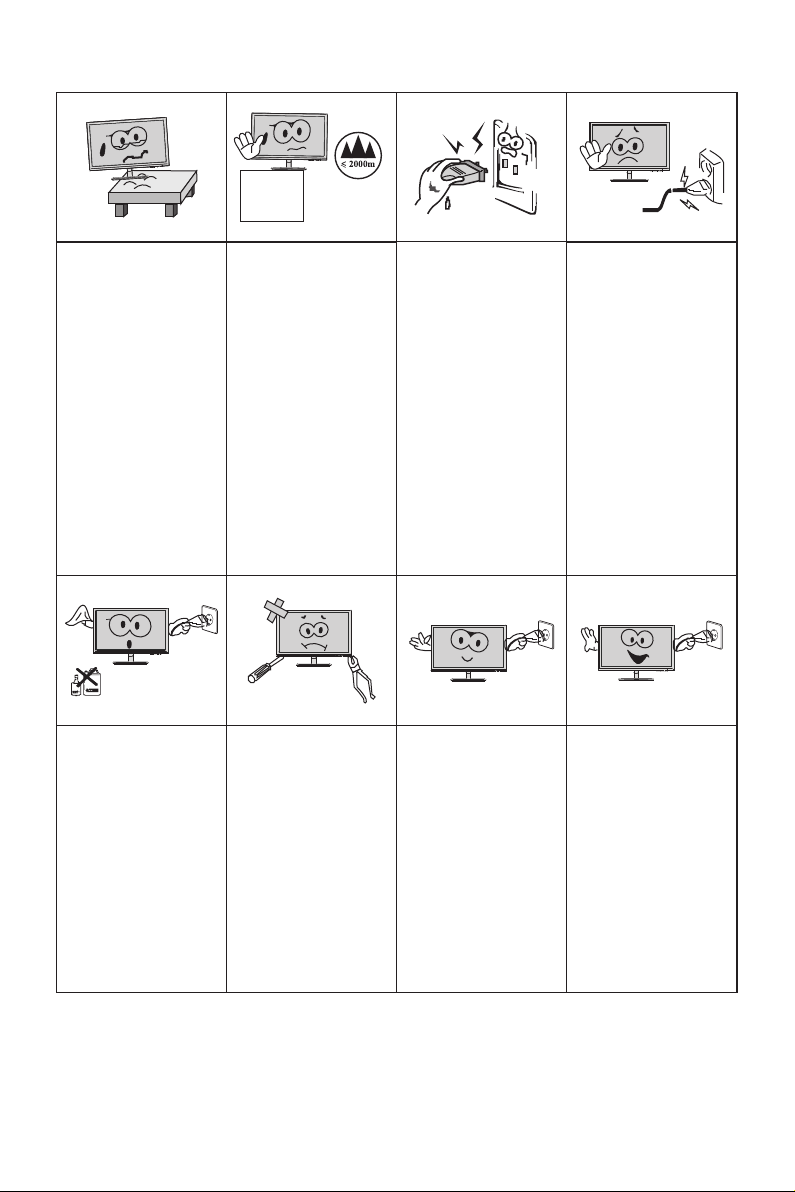
I.Safety Prevention Measures
Please always place
this device on a stable
surface; otherwise,
it m a y fal l a nd b e
damaged.
Wh en cleaning t he
devic e, be su re to
re mov e t he po wer
plug , use a p iec e
of soft c lo th r at he r
t h a n i n d u s t r i a l
che mic a l t o cl e an
the device, be s ure
not to let water enter
the device.
The altitude and the
tropical environment
the adapter fits depend
on which adapter is
used for the device.
The rat ing pla te on
the back of the device
with the above warning
si gn indicates th at
t h i s p r o d u c t i s
app lic a ble fo r th e
safe use of the region
w i t h a l t i t u d e o f
2,000m and below.
Do not disassemble
this de vice wit ho ut
permission. In case
of failure, be sure to
contact a professional
servi cing person to
fix it. The authoriz ed
disassembly of this
dev ice may res u lt
in electric sh ock or
fire.
Do not hold the plug
w i t h w e t h a n d ;
ot he rw is e, electric
sho c k may o c cur .
Make su re the pl ug
has a g ood t o uch
because poor touch
may cau se fire .
In case of rare smell
or noise ou t of this
devic e, be su re to
immediately cut off
the power supply and
as k a p ro fe ss io na l
servi cing person to
fix the p roble m.
Do not use a broken
power plug nor keep
a power cord near heat
source; othe rwise ,
e lectr i c s h o c k or
fire ma y occur.
Whe n t his d e vic e
is idle for long time,
be sure t o po we r it
off; otherwise, electric
shoc k or f i r e ma y
occur.
Note:
The device with AC s witch may use s uch AC switch as c ut-off co mponent.
The device without AC switch may use power plug or coupler as cut-off component.
In case of the no rmal use of the equipme nt , mak e sur e th e cut -o ff comp on ent
can be accessed e asily.
All s pecif icatio ns and in format ions ar e subje ct to cha nge wit hout no tice.
-1-
Page 5
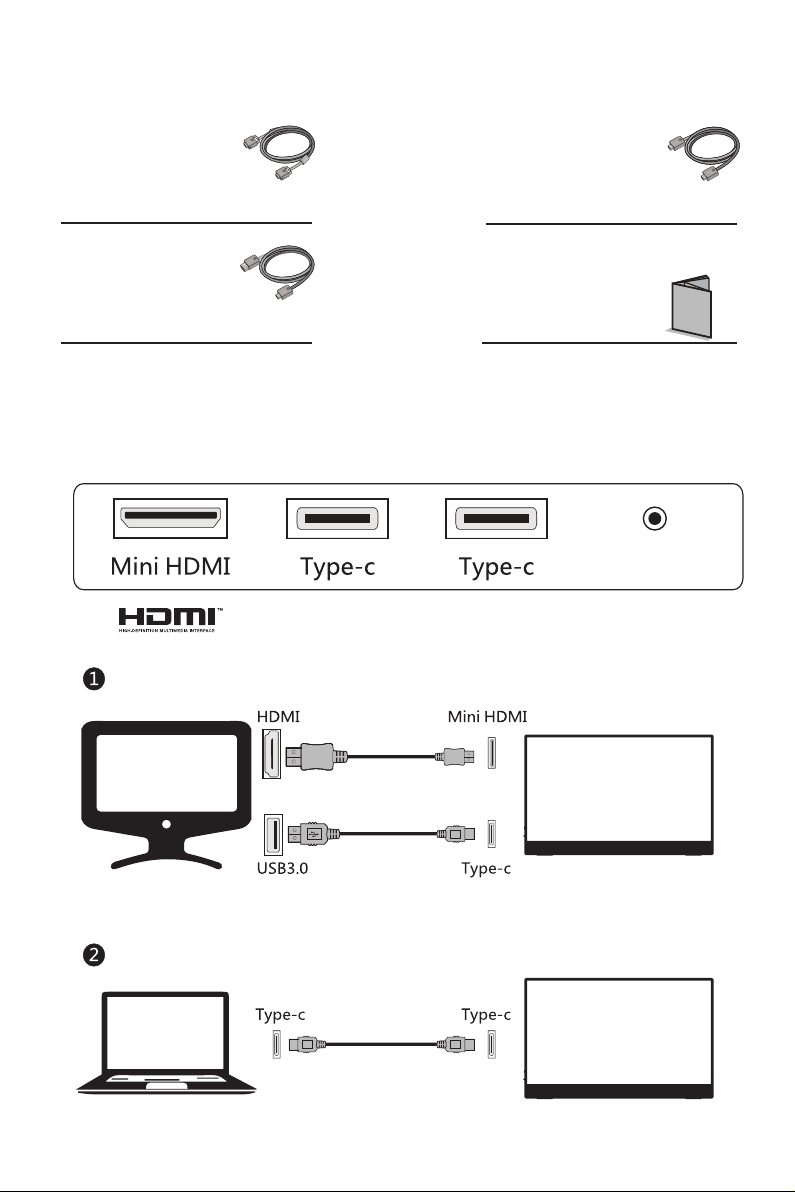
II.Installation Instructions
1.Accessori es
Mini HDMI signal
cable
Mini HDMI: To transmit
standard HDMI video sources
Type-C cable
Type-C: To supply power
to the unit or transmit Type-C
video sources
USB to Type-C cable
USB to Type-C: To supply
power to the unit
User manual
Mini HDMI signal cable, Type-C cable, USB to Type-C cable, User Manual
(Please refer to the actual product for details)
III. Connected as monitor of various devices
Headphone
HDMI of the PC as the signal source
Signal transfer
Power supply
Note: The power must be greater than 10W
Type-C of the laptop as the signal source
Signal transfer
Power supply
Note: The power must be greater than 10W
All s pecif icatio ns and in format ions ar e subje ct to cha nge wit hout no tice.
-2-
Page 6
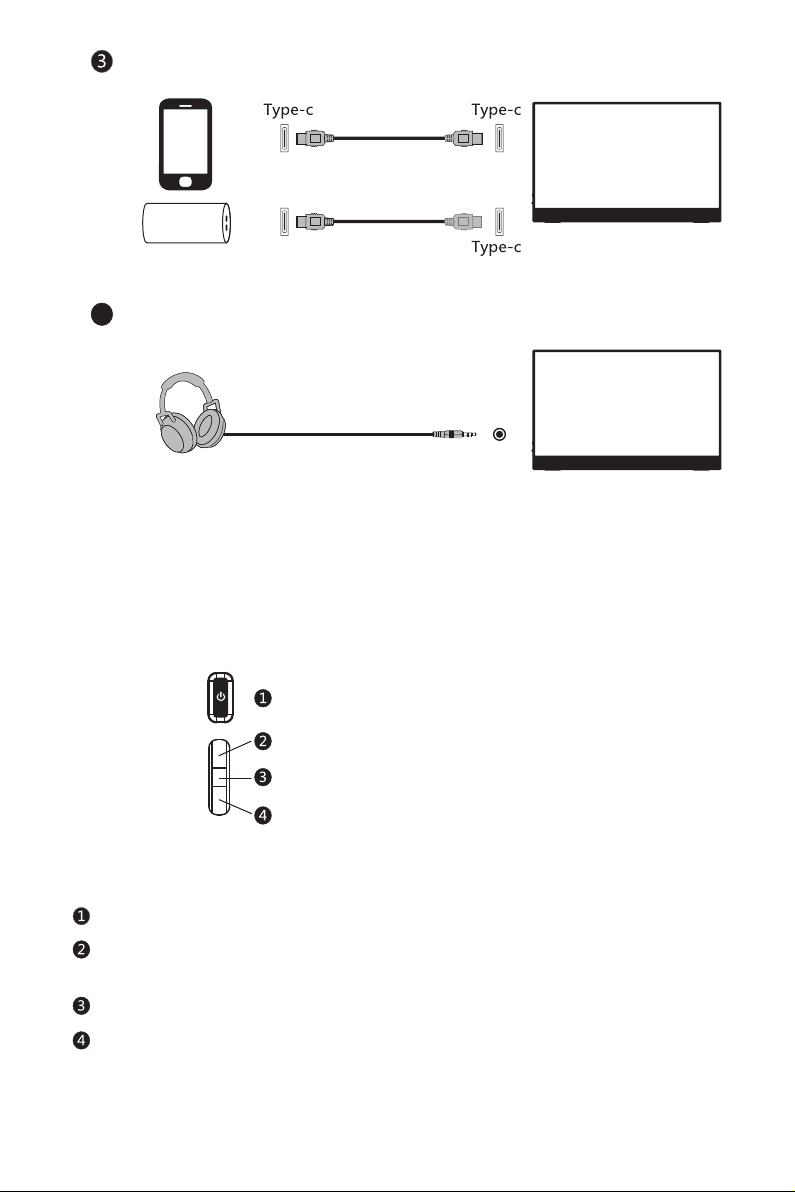
Type-C of the mobile phone as the signal source
Signal transfer
Mobile
power
supply
Earphone jack
4
Note: The power must be greater than 10W
Power supply
Connect to the earphone
(The picture is for reference only)
IV. User Setup
1. Schematic Diagram of Keys
P button
Up button
Middle button
Down button
2. Description of Keys' Functions
P button: [OSD status: Return / non-OSD status: Power]
Up button: [OSD status: Move up/ non-OSD status: Brightness adjusting
switch]
Middle button: [OSD status: Enter / non-OSD status: OSD switch]
Down button: [OSD status: Move down / non-OSD status: Volume adjusting
switch]
Note: Refer to the actual model for details.
All s pecif icatio ns and in format ions ar e subje ct to cha nge wit hout no tice.
-3-
Page 7

V. Operation Menu (OSD) Function Descriptions
Fir st le vel
menu ite m
Brightness
Contrast
DCR
Mode
Color Temp.
Aspect
Input
Adjust
First level
menu icon
Second l eve l
menu ite m
NONE
NONE
On
Off
Return
Exit
Standard
Movie
FPS
RTS
EyeSaver
Return
Exit
Cool
Warm
User
Return
Exit
Auto
16:9
4:3
Return
Exit
Type C1
Type C2
HDMI
Return
Exit
Gamma
Second
level
menu icon
NONE
NONE
Thi rd le vel
menu ite m
NONE
NONE
NONE
NONE
NONE
NONE
NONE
NONE
NONE
NONE
NONE
NONE
NONE
Red
Green
Blue
NONE
NONE
NONE
NONE
NONE
NONE
NONE
NONE
NONE
NONE
NONE
Gamma2.2
Gamma2.4
Return
Exit
Third level
menu icon
NONE
NONE
NONENONE
NONENONE
NONE
NONE
NONE
NONE
NONE
NONE
NONE
NONE
NONE
NONE
NONE
NONE
NONE
NONE
NONE
NONE
NONE
NONE
NONE
NONENONE
NONE
NONE
NONE
Descri pti on
Adjust d isp lay brigh tne ss
Adjust display contrast
Activate dynamic contrast
Inactive dynamic contrast
Return to the previous menu
Exit from the whole menu
Normal work mode
Movie mode
FPS game mode
RTS game mode
Eye protection ray filter application mode
Return to the previous menu
Exit from the whole menu
Set as cold color temperature
Set as warm color temperature
Fine tuning of red color temperature
Fine tuning of green color temperature
Fine tuning of blue color temperature
Return to the previous menu
Exit from the whole menu
Automatically adjust picture aspect ratio
Picture in 16:9 mode
Picture in 4:3 mode
Return to the previous menu
Exit from the whole menu
Type-c (digital) signal input
Type-c (digital) signal input
HDMI (digital) signal input
Return to the previous menu
Exit from the whole menu
Adjust color tone brightness grey 2.2
Adjust color tone brightness grey 2.4
Return to the previous menu
Exit from the whole menu
All s pecif icatio ns and in format ions ar e subje ct to cha nge wit hout no tice.
-4-
Page 8
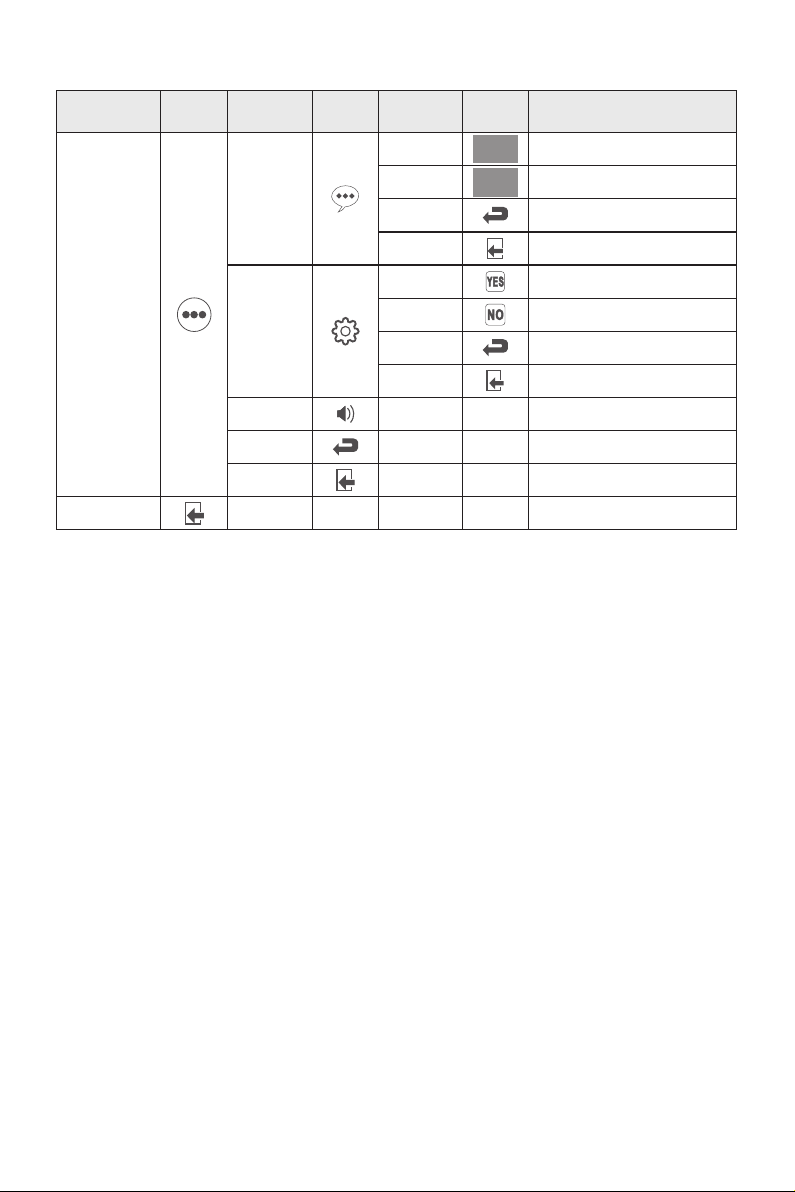
Fir st le vel
menu ite m
Other
Exit
First level
menu icon
Second l eve l
menu ite m
Language
Reset
Sound Adjust the sound level
Return
Exit
Second
level
menu icon
NONENONE
Thi rd le vel
menu ite m
中文 中文
English
Return
Exit
YES
NO
Return
Exit
NONE
NONE
NONE
Third level
menu icon
English
NONENONE
NONE
NONE
NONE
Descri pti on
中文
English
Return to the previous menu
Exit from the whole menu
Reset to factory setup
Exit from this function
Return to the previous menu
Exit from the whole menu
Return to the previous menu
Exit from the whole menu
Exit from the whole menu
Note: The functions may be adjusted due to specific model or the upgrade of software version.
The physical m odel sh all govern.
All s pecif icatio ns and in format ions ar e subje ct to cha nge wit hout no tice.
-5-
Page 9

VI. FAQ
Faults occu rring
The power indicator light
is not on
Impossible plug-and-play
Dimming picture
Flick ering pictur e or
pictu re with r ipples
The power indicator light
is on (fl icker ing), b ut the
monitor has no p ictur es.
Color shortage
(red, green an d blue)
Picture with color difference
(white looks not white)
Use a cable to transmit image
signals and supply power to
the monitor at the same time.
The monitor automatically
turns off when the brightness
or the sound is increased
Possible so lutions
◆
Check if the pow er is on.
◆ Check if the pow er cord i s conne cted.
◆
Check if the function of plug-and-play of the device is
compa tible w ith PC.
◆ Ch ec k if th e di sp la y card is compatible w it h th e
plug- and-play fun ction .
◆
Adjust brightness a nd contrast.
◆
The re may be el ectrical appliances or equipment
with el ectro nic dis turba nce.
◆
Check if the PC po wer is on .
◆ Check if the PC di splay c ard is inserted properly.
◆ Check if the signal cable of the monitor is correctly
conne cted wi th the PC .
◆ Check the signal cable plug of the monitor and make sure
every p in has no b endin g.
◆ Obs erve the ind icator light by pr essing the Caps Lock
key on the PC keyboa rd and check if the PC is wor king.
◆
Check the sign al cable of the mo nitor a nd make s ure
every p in has no b endin g.
◆
Adjust RGB col or or res elect c olor te mpera ture.
◆
Please connect the mo nitor t o the pow er cord .
First connect USB to Type-C
cable and then connect
Type-C cable, it displays "no
signal" and the screen goes
black
The scr een fla shes wh en
Enter i s press ed afte r the
dynamic contrast is s et to
ON and th e prese t mode is
switc hed (fl ashes o nce
every time the b utton i s
pressed)
All s pecif icatio ns and in format ions ar e subje ct to cha nge wit hout no tice.
◆
Pull out the USB t o Type-C c able to r esume n ormal
displ ay, and th en inse rt the Type-C c able.
◆
When DCR is turn ed on, br ightn ess, co ntras t and
prese t mode ar e unava ilabl e; when t he pres et mode i s
set to an y mode ot her tha n the sta ndard , brigh tness ,
contr ast and D CR are un avail able
-6-
Page 10

VII. Product Specifications
Diagonal
dimensions
39.6cm
(15.6″ FHD)
Ambient
temperature
Humidity
Picture
aspect ratio
16:9
Storage
temperature
Working
temperature
RH for
operation
Picture
dimensions (mm)
344.2x193.6
0 to 40℃ ℃
0 to 40℃ ℃
10% to 90%
VIII. Table of Product Preset Modes
Mode Resolution
WUXGA
UXGA
WXGA
SXGA
1920x1080
1680x1050
1440x900
1280x1024
Horizontal frequency
Dot distance (mm)
0.17925 1920x1080
(KHz)
67.5
59.8
55.5
63.5
80.0
48.4
Optimal resolution
Vertical frequency (Hz)
60
60
60
60
75
60
XGA
SVGA
VGA
DOS
1024x768
800x600
640x480
720x400
56.5
60.0
37.9
47.2
46.9
31.5
37.9
37.5
31.5
70
75
60
72
75
60
72
75
70
Note: The a ctual applica tion of the abo ve paramete rs shall be subje ct to the
specific mo de l.
All s pecifi catio ns and in format ions ar e subje ct to cha nge wit hout no tice.
-7-
Page 11

I. Mesures de prévention en matière de sécurité
Veuillez toujours
placer cet app areil
sur une surfac e
stabl e; Sino n, il
peut to mber et ê tre
endommagé.
Lors du nettoyage
de l'appareil, veillez
retirer la fiche
d'alimentation et
utiliser un morceau
de tissu doux plutôt
que produit
chimique industriel
pour nettoyer
l'appareil, veillez à
ne pas laisser l'eau
pénétrer dans le
dispositif.
L'altitude et
l'environnement
tropical auxquels
l'adaptateur s'adapte
dépendent du type
d'adaptateur utilisé
pour l'appareil. La
plaque signalétique à
l'arrière de l'appareil
avec un signe
d'avertissement
supérieur indique
que ce produit est
applicable pour
l'utilisation en toute
sécurité dans la
région avec l'altitude
de 2000 m et moins.
Ne pas démonter
cet appareil sans
autorisation. En cas
d'échec,veuillez
vous assurer de
contacter la
personne de service
professionnel pour
le réparer. Le
démontage non
autorisé de cet
appareil peut
entraîner un choc
électrique ou un
incendie.
Ne pas te nir la
fiche a vec les
mains mouillées;
Sinon, un choc
électrique peut se
produire. Veuillez
s'ass urer qu e la
fiche p ossèd e d'un
bon contact, c ar un
mauvais contact
peut ca user un
incendie.
En cas d'odeur rare
ou de bruit rare
sortant de ce
dispositif,ve uillez
vous assurer de couper
immédiatement
l'alimentation et
demander à une
personne de service
professionnel pour
réparer.
Ne pas utiliser une
fiche d'alimentation
cassée ni garder un
cordon
d'alimentation près
de la source de
chaleur; Sinon, un
choc électrique ou
un incendie peut se
produire.
Lorsque ce
dispositif est inactif
pendant une longue
période, veuillez
vous assurer de
l'éteindre; Sinon, un
choc électrique ou
un incendie peut se
produire.
N.B.:
L'appareil avec commutateur CA peut utiliser ce co mmuta teur CA co mme un co mposa nt
de coupure.
L'appareil avec commutateur CA peut utiliser une fiche se cteur o u un coup leur co mme
composant de c oupure. En cas d 'util isati on norm ale de l' équipement, s'ass urer qu e le
composant de c oupure peut être faci lemen t acces sible .
Toutes l es spéc ifica tions e t inform ation s sont su jettes à c hange ment sa ns préav is.
-8-
Page 12

II. Instructions d'installation
1. Accessoire s
Câble de signal
mini HDMI
Mini HDMI: pour transmettre
des sources vidéo HDMI standard.
Câble de type C.
Type C: pour fournir de
l'énergie à l'unité ou transmettre
des sources vidéo du type C.
Câble USB à type C.
USB à type C: pour alimenter
l'unité
Manuel utilisateur
Câble de signal mini HDMI, câble de type C, câble USB à type C, manuel
de l'utilisateur (prière de vous reporter au produit réel pour plus de détails)
III. Connecté comme moniteur des différents dispositifs périphériques
Headphone
HDMI du PC comme source de signal
Transmission de signal
Alimentation électrique
Note: la puissance doit être supérieure à 10W
Type -C de l’ordinateur portable comme source de signal
Transmission de signal
Alimentation électrique
Note: la puissance doit être supérieure à 10W
Toutes l es spéc ifica tions e t inform ation s sont su jettes à c hange ment sa ns préav is.
-9-
Page 13

Type -C du portable comme source de signal
Transmission de signal
Alimentation
du portable
Prise d'écouteur
4
Note: la puissance doit être supérieure à 10W
Alimentation électrique
Connecter à l'écouteur
(Le schéma est à titre indicatif seulement)
IV. Configuration utilisateur
1. Diagramme schématique d es touches
Bouton P
Bouton vers le haut
Bouton médian
Bouton vers le bas
2. Descript ion des fonctio ns clés
Bouton P: [ État de l'OSD: statut de retour / non OSD: puissance ].
Bouton vers le haut: [ État de l'OSD: déplacer vers le haut /
état non-OSD: interrupteur de réglage de la luminosité ].
Bouton médian: [ État OSD: entrer / non-OSD État: commutateur OSD ].
Bouton vers le bas: [ État de l'OSD: déplacer vers le bas /
état non-OSD: commutateur de réglage du volume ]
(Note: prière de vous reporter au modèle réel pour plus de détails)
Toutes l es spéc ifica tions e t inform ation s sont su jettes à c hange ment sa ns préav is.
-10-
Page 14

V. Descriptions des fonctions du menu d'opération (OSD)
Élément de
menu de
premier niveau
Luminosité
Contraste
DCR
Mode
T°. Couleur
Aspect
Entrée
Adjuster
Icône de menu
de premier
niveau
Élém ent de
men u de
deu xième n iveau
AUCUN
AUCUN
Activé
Désactivé
Retourner
Quitter
Standard
Cinéma
VPS
RTS
Eye Care
Retourner
Quitter
Froide
Chaude
Utilisateur
Retourner
Quitter
Auto.
16:9
4:3
Retourner
Quitter
Type C1
Type C2
HDMI
Retourner
Quitter
Gamma
Icône de menu
de deuxième
niveau
AUCUN
AUCUN
Élém ent de
men u de
troisième niveau
AUCUN
AUCUN
AUCUN
AUCUN
AUCUN
AUCUN
AUCUN
AUCUN
AUCUN
AUCUN
AUCUN
AUCUN
AUCUN
Rouge
Vert
Bleu
AUCUN
AUCUN
AUCUN
AUCUN
AUCUN
AUCUN
AUCUN
AUCUN
AUCUN
AUCUN
Gamma2.2
Gamma2.4
Retourner
Quitter
Icône de menu
de tr oisiè me
niv eau
AUCUN
AUCUN
AUCUNAUCUN
AUCUNAUCUN
AUCUN
AUCUN
AUCUN
AUCUN
AUCUN
AUCUN
AUCUN
AUCUN
AUCUN
AUCUN
AUCUN
AUCUN
AUCUN
AUCUN
AUCUN
AUCUN
AUCUN
AUCUN
AUCUNAUCUN
AUCUNAUCUN
AUCUN
AUCUN
AUCUN
Des cript ion
Ajuste r la Lu minosit é de l' écran
Ajuster le Contraste de l'affichage
Activer le Contraste dynamique
Désactiver le Contraste dynamique
Retourner au menu précédent
Quitter de l'ensemble du menu
Mode de travail normal
Mode Cinéma
Mode de jeu VPS
Mode de jeu RTS
Mode d'application du filtre à rayons
Retourner au menu précédent
Quitter de l'ensemble du menu
Définir comme T°. Couleur froide
Définir comme T°. Couleur chaude
Réglage fin de T°. Couleur rouge
Réglage fin de T°. Couleur verte
Réglage fin de T°. Couleur bleue
Retourner au menu précédent
Quitter de l'ensemble du menu
Ajuster automatiquement le rapport
Image en mode 16: 9
Image en mode 4: 3
Retourner au menu précédent
Quitter de l'ensemble du menu
Entrée de signal (numérique)Type-c
Entrée de signal Type-c(numérique)
Entrée de signal HDMI(numérique)
Retourner au menu précédent
Quitter de l'ensemble du menu
Ajuster la luminosité du ton de
couleur gris 2.2
Ajuster la luminosité du ton de
couleur gris 2.4
Retourner au menu précédent
Quitter de l'ensemble du menu
Toutes l es spéc ifica tions e t inform ation s sont su jettes à c hange ment sa ns préav is.
-11-
Page 15

Élément de
menu de
premier niveau
Autre
Quitter
Icône de menu
de premier
niveau
Élém ent de
men u de
deu xième n iveau
Langue
Icône de menu
de deuxième
niveau
Élém ent de
men u de
troisième niveau
English
Retourner
Quitter
Réinit.
Retourner
Quitter
Son Ajuster le niveau sonore
Retourner
Quitter
AUCUNAUCUN
AUCUN
AUCUN
AUCUN
Icône de menu
de tr oisiè me
niv eau
中文 中文
English
Oui
Non
AUCUNAUCUN
AUCUN
AUCUN
AUCUN
Des cript ion
中文
English
Retourner au menu précédent
Quitter de l'ensemble du menu
Réinit. la configuration d'usine
Quitter cette fonction
Retourner au menu précédent
Quitter de l'ensemble du menu
Retourner au menu précédent
Quitter de l'ensemble du menu
Quitter de l'ensemble du menu
N.B.: L es fonc tions p euven t être aj ustée s en rais on du mod èle spé cifiq ue ou de la m ise à
niveau de la version du logiciel. Le modèle physique prévaudra.
Toutes l es spéc ifica tions e t inform ation s sont su jettes à c hange ment sa ns préav is.
-12-
Page 16

VI. Questions Fréquemment Posées
Défauts sur ve nus
Le voyant d'alimentation
n'est pas allumé
Prêt-à-l'emploi impossible
Image d e gradation
Photo clignotante ou image
avec des ondulations
Le voyant d'alimentation
est allumé (clignotante),
mais le moniteur n'a pas
d'images.
Déficit de cou leur
(rouge, vert e et bleu e)
Ima ge ave c différence
de couleur (aspect blanc
non blanc)
Solutions p ossibles
◆
Vérifier si l' appareil est mis sous t ensio n.
◆ Vérifier si le c ordon d 'alimentation est connec té.
◆
Vérifier si la foncti on Prê t-à-l'empl oi de l'appareil est
comp atible avec le PC.
◆ Vérifier si la carte d'affichage est compatibl e avec la
fonc tion Prêt-à-l'em ploi.
◆
Ajuster la lum inosité et le co ntras te.
◆
Il peut y avoir de s appar eils él ectri ques ou d es
équipements avec des perturbations électroniques.
◆
Vérifier si le P C est act ivé.
◆ Vérifier si la carte d'affichage du PC est correctement insérée.
◆ Vérifier si le c âble de signal du moniteur est
corre cteme nt conn ecté av ec le PC.
◆ Vérifier la fiche du câble de signal pour le moniteur
et s'assurer que chaque broche n'a pas de flexion.
◆ Obser ver le vo yant lu mineu x en appu yant su r la touche
"Verrouillage des Majuscules"sur le clavier du PC et
vérif ier si le P C fonct ionne .
◆
Vérifier le câ ble de signal pour le moniteur et s'assurer
que chaque broche n'a pas de flexion.
◆
Ajuster la coul eur RGB ou ré-séle ctionner la T°. Couleur.
Utilisez un câble pour transmettre des signaux d'image
et alimenter le moniteur en
même temps. Le moniteur
s'éteint automatiquement
lorsque la luminosité ou le
son sont augmentés;
Connectez d'abord USB à la
ligne d'alimentation du type C,
puis connectez la ligne de
signal du type C, affichez "pas
de signal" et puis l'écran noir
L'écran clignote lorsque Enter
est pressée après que le
contraste dynamique est
passé en ON et que le mode
prédéfini est activé (clignoter
chaque fois que le bouton est
pressé)
Toutes l es spéc ifica tions e t inform ation s sont su jettes à c hange ment sa ns préav is.
◆
Prière de connecter le moniteur au cordon d'alimentation.
◆
Retirer le câb le USB au câble ty pe C pour reprendre
l'aff ichag e norma l, et ens uite in sérer l e câble d e type C.
◆
Lorsque le DCR est acti vé, la lu minos ité, le c ontra ste
et le mod e préré glage n e sont pa s dispo nibles; lors que
le mode p rérég lage est réglé s ur n'im porte q uel mod e
autre q ue le sta ndard , la lumi nosit é, le con trast e et le
DCR ne so nt pas di sponi bles.
-13-
Page 17

VII. Spécifications du produit
Dimensions
diagonales
39.6cm
(15.6″ FHD)
Température
ambiante
Humidité
Ratio d'aspect
d'image
16:9
Température
de stockage
Température
de travail
RH pour
l'opération
Dimensions
d'image (mm)
344.2x193.6
0 to 40℃ ℃
0 to 40℃ ℃
10% to 90%
Distance du
point(mm)
0.17925 1920x1080
VIII. Tableau des modes prédéfinis du produit
Mode
WUXGA
UXGA
WXGA
SXGA
Résolution
1920x1080
1680x1050
1440x900
1280x1024
Fréquence horizontale
(KHz)
67.5
59.8
55.5
63.5
80.0
48.4
Résolution optimale
Fréquence verticale
(KHz)
60
60
60
60
75
60
XGA
SVGA
VGA
DOS
1024x768
800x600
640x480
720x400
56.5
60.0
37.9
47.2
46.9
31.5
37.9
37.5
31.5
70
75
60
72
75
60
72
75
70
N.B.: L'app lication réel le des paramè tres ci-dessu s doit être sou mise au
modèle spécif ique.
Toutes l es spéc ifica tions e t inform ation s sont su jettes à c hange ment sa ns préav is.
-14-
Page 18

I. Medidas de Prevención de la Seguridad
Por fav or colo que
este di sposi tivo
sobre una
superficie e stabl e;
de lo contrari o,
podría caers e y
dañarse.
Al limpiar el
dispositivo,
asegúrese de quitar
el enchufe de
alimentación, utilice
un trozo de paño
suave en lugar de
químico industrial
para limpiar el
dispositivo,
asegúrese de no
dejar entrar agua en
el dispositivo.
La altitud y el
ambiente tropical
que se adapte al
adaptador dependen
del adaptador que se
utiliza para el
dispositivo. La placa
de características en
la parte posterior del
dispositivo con la
señal de advertencia
antedicha indica que
este producto es
aplicable para el uso
seguro de la región
con la altitud de 2,
000 m y abajo.
No desarme este
dispositivo sin
permiso. En caso de
fallo, asegúrese de
contactar a la
persona de servicio
profesional para
reparación. El
desmontaje
autorizado de este
dispositivo puede
provocar una
descarga eléctrica o
un incendio.
Do not hold the plug
with wet hand;
otherwise, electric
shock may occur.
Make sure the plug
has a good touch
because poor touch
may cause fire. No
sostenga el enchufe
con la mano húmeda;
de lo contrario, se
puede producir una
descarga eléctrica.
Cerciórese de que el
enchufe tenga un
buen tacto porque el
tacto mal puede
causar el fuego.
En caso de olor raro
o ruido fuera de este
dispositivo,
asegúrese de cortar
inmediatamente la
fuente de
alimentación y
pedirle a una
persona de servicio
profesional para
solucionar el
problema.
No utilice un enchufe
de alimentación
roto ni m anten ga
un cable de
alimentación cerca
de fuentes de calor;
de lo contrari o,
puede producirse
una descarga
eléctrica o un
incendio.
Cuando este
dispositivo esté
inactivo durante
mucho tiempo ,
asegúrese de
apagarlo; de lo
contr ario, puede
producirse una
descarga eléctrica
o un incendio.
Nota:
El dispositi vo con in terru ptor de C A puede usar este i nterr uptor d e CA como
componente de corte .
El dispositi vo sin interru ptor de C A puede utilizar el enchufe o el acoplador de energía
como co mponente del atajo. En caso de u so norm al del equipo, asegúrese de que el
componente de corte s e puede acceder fácil mente .
Todas l as espe cifica cione s e infor macio nes está n sujet as a camb ios sin p revio av iso.
-15-
Page 19

II. Instrucciones de instalación
1. Ac ce sorios
Cable de señal
Mini HDMI
Mini HDMI: Para transmitir
fuentes de video HDMI estándar.
Cable Tipo- C
Tipo-C: Para suministrar la
energía a la unidad o transmitir
las fuentes de video de Tipo-C
Cable USB a Tipo-C
USB a Tipo-C: Para suministrar
la energía a la unidad
Manual del usuario
Cable de señal Mini HDMI, Cable Tipo-C, Cable USB a Tipo-C, Cable Tipo-C,
Manual de Usuario (Para consulte el producto real para más detalles)
III. Conectado como monitor de varios dispositivos.
Headphone
HDMI de la PC como fuente de señal
Transferencia de señal
Fuente de alimentación
Nota: La potencia debe ser más de 10W.
Tipo-C del ordenador portátil como la fuente de señal
Transferencia de señal
Fuente de alimentación
Nota: La potencia debe ser más de 10W.
Todas l as espe cifica cione s e infor macio nes está n sujet as a camb ios sin p revio av iso.
-16-
Page 20

Tipo-C del teléfono móvil como la fuente de señal
Transferencia de señal
Fuente de
alimentación
móvil
4
Conector para auriculares
Fuente de alimentación
Nota: La potencia debe ser más de 10W.
Conectarse a
los auriculares
(La imagen es solo para referencia)
IV. Configuración del usuario
1. Diagrama esq uemático de l as teclas
Botón P
Botón arriba
Botón central
Botón abajo
2. Descripc ió n de las funcio nes de las tecl as
Botón P: [Estado OSD: Estado de Retorno / no OSD: Encendido]
Botón arriba: [Estado OSD: Estado arriba / no OSD: Interruptor de ajuste de brillo]
Botón central: [Estado OSD: Estado de Entrar / no OSD: Interruptor de OSD]
Botón abajo: [Estado OSD: estado abajo / no OSD: Interruptor de ajuste de volumen]
Nota: Consulte el modelo real para más detalles.
Todas l as espe cifica cione s e infor macio nes está n sujet as a camb ios sin p revio av iso.
-17-
Page 21

V. Descripciones de funciones del menú de operación (OSD)
Artículo de menú
de pr imer ni vel
Brillo
Contraste
DCR
Modo
Temp. Color
Aspecto
Entrada
Ajustar
Ico no de
men ú de
pri mer ni vel
Artículo de menú
de segundo nivel
NADA
NADA
Encendido
Apagado
Regresar
Salir
Estándar
Película
FPS
RTS
Eye Care
Regresar
Salir
Frío
Cálido
Usuario
Regresar
Salir
Automático
16:9
4:3
Regresar
Salir
Type C1
Type C2
HDMI
Regresar
Salir
Gamma
Ico no de
men ú de
segundo nivel
NADA
NADA
Artícu lo de menú
de te rcer ni vel
NADA
NADA
NADA
NADA
NADA
NADA
NADA
NADA
NADA
NADA
NADA
NADA
NADA
Rojo
Verde
Azul
NADA
NADA
NADA
NADA
NADA
NADA
NADA
NADA
NADA
NADA
Gamma2.2
Gamma2.4
Regresar
Salir
Ico no de
men ú de
ter cer ni vel
NADA
NADA
NADANADA
NADANADA
NADA
NADA
NADA
NADA
NADA
NADA
NADA
NADA
NADA
NADA
NADA
NADA
NADA
NADA
NADA
NADA
NADA
NADA
NADANADA
NADANADA
NADA
NADA
NADA
Des cripc ión
Ajusta r bri llo de la pan tal la
Ajustar contraste de la pantalla
Activar contraste dinámico
Contraste dinámico inactivo
Volver al menú anterior
Salir de todo el menú
Modo de trabajo normal
Modo de película
Modo de juego de FPS
Modo de juego de RTS
Modo de aplicación de la protección
ocular filtro de rayos
Volver al menú anterior
Salir de todo el menú
Ajustar como temperatura de color fría
Fijar como temperatura de color caliente
Ajuste fino de la temperatura del color
rojo
Ajuste fino de la temperatura de color
verde
Ajuste fino de la temperatura de color
azul
Volver al menú anterior
Salir de todo el menú
Ajustar automáticamente la relación
de aspecto de imagen
Imagen en modo 16:9
Imagen en modo 4:3
Volver al menú anterior
Salir de todo el menú
Entrada de señal de Type-c (digital)
Entrada de señal de Type-c (digital)
Entrada de señal de HDMI (digital)
Volver al menú anterior
Salir de todo el menú
Ajustar el tono de color gris brillo 2.2
Ajustar el tono de color gris brillo 2.4
Volver al menú anterior
Salir de todo el menú
Todas l as espe cifica cione s e infor macio nes está n sujet as a camb ios sin p revio av iso.
-18-
Page 22

Artículo de menú
de pr imer ni vel
Otro
Salir
Ico no de
men ú de
pri mer ni vel
Ico no de
Artículo de menú
de segundo nivel
segundo nivel
men ú de
Artícu lo de menú
de te rcer ni vel
中文 中文
English
Idioma
Regresar
Salir
NO
Reiniciar
Regresar
Salir
Sonido Ajuste del nivel de sonido
Regresar
Salir
NADANADA
NADA
NADA
NADA
Ico no de
men ú de
ter cer ni vel
Des cripc ión
中文
English
English
Volver al menú anterior
Salir de todo el menú
Sì
Restablecer a la configuración de fábrica
Salir de esta función
Volver al menú anterior
Salir de todo el menú
NADANADA
Volver al menú anterior
NADA
NADA
Salir de todo el menú
NADA
Salir de todo el menú
Nota: Las funci ones pueden ser ajustadas debido al modelo específico o a la actualización
de la versión del softw are. El m odelo f ísico d ebe gob ernar se.
Todas l as espe cifica cione s e infor macio nes está n sujet as a camb ios sin p revio av iso.
-19-
Page 23

VI. FAQ
Suceso de fal los
La luz indicadora de
encendido no está
encendida
Plug-and-Play imposible
Atenu ación de imagen
Image n parpadeante o
imagen con ondas
The power indicator
light is on (fli ckeri ng),
but the m onito r has no
pictu res.
Escas ez de col or
(rojo, verde y a zul)
Cuadro con la diferencia
del color (blanco no
parece blanco)
Posibles so luciones
◆
Compruebe si la alimentación está encendida
◆ Compruebe si el cable de alimentación está conectado.
◆
Compruebe si la función de plug-and-Play del
dis posit ivo es co mpati ble con P C.
◆ Compruebe si la tarjeta de visualización es
com patib le con la f unció n Plug- and-P lay.
◆
Ajuste el brillo y el contrast e.
◆
Puede haber aparatos eléctricos o equipos con
per turba cione s elect rónic as.
◆
Compruebe si la alimentación de la PC está encendida.
◆ Compruebe si la tarjeta de visualización de la PC está
correctamente insertad a.
◆ Compruebe si el cable de señal del monitor está
con ectad o corre ctame nte con e l PC.
◆ Compruebe el enchufe del cable de señal del monitor y
a segúr ese de qu e todos l os pine s no esté n dobla dos.
◆ Obs erve la luz indicadora presionando la tecla de Cap s
Loc k en el tec lado de P C y compr uebe si e l PC está
fun ciona ndo.
◆
Compruebe el cable de señal del monitor y asegúrese de que
todos l os pine s no esté n dobla dos.
◆
Ajuste el color RGB o reseleccione la temperatura de color.
Utili ce un cable para
trans mitir s eñale s de
imagen y suministra r la
energía al monitor al
mismo t iempo . El moni tor
se apaga automática mente al a umentarse el
brillo o el sonido
Prime ro cone cte el US B a la
línea de alimentación de
Tip o- C, lue go cone cte a la
línea de señal de Tip o-C,
muestre "sin s eñal" y l uego
la pantalla en negro.
La pantalla parpadea
cua ndo se presione Enter
des pués de que el contraste
din ámico se configure en ON
y el modo predetermi nado
se cambie (parpadea una
vez que se presiona el botón )
Todas l as espe cifica cione s e infor macio nes está n sujet as a camb ios sin p revio av iso.
◆
Por fav or, con ecte el m onito r al cabl e de alim entac ión.
◆
Extra iga el US B al cabl e Tipo-C para reanudar la
visua lizac ión normal y lue go inserte el ca ble Tipo-C.
◆
Cuando DCR está encendido, el brillo, el contraste y el
modo pr edete rmina do no est án disp onibles; cua ndo el
modo pr edete rmina do está c onfig urado e n cualq uier
modo di stint o del sta ndard , el bril lo, el co ntras te, DCR
no está n dispo nibles.
-20-
Page 24

VII. Especificaciones del producto
Dimensiones
diagonales
39.6cm
(15.6″ FHD)
Temperatura
ambiente
Humedad
Relación de
aspecto de imagen
16:9
Temperatura de
almacenaje
Temperatura de
trabajo
RH para la
operación
Picture
dimensions (mm)
344.2x193.6
0 to 40℃ ℃
0 to 40℃ ℃
10% to 90%
Distancia del
punto (mm)
0.17925 1920x1080
VIII. Tabla de modos de preselección del producto
Modo
WUXGA
UXGA
WXGA
SXGA
Resolución
1920x1080
1680x1050
1440x900
1280x1024
Frecuencia horizontal
(KHz)
67.5
59.8
55.5
63.5
80.0
48.4
Resolución óptima
Frecuencia vertical
(Hz)
60
60
60
60
75
60
XGA
SVGA
VGA
DOS
1024x768
800x600
640x480
720x400
56.5
60.0
37.9
47.2
46.9
31.5
37.9
37.5
31.5
70
75
60
72
75
60
72
75
70
Nota: La aplicación real de los parámetros anteriores estará sujeta al modelo específico.
Todas l as espe cifica cione s e infor macio nes está n sujet as a camb ios sin p revio av iso.
-21-
 Loading...