


M510 Series Notebook PC
User’s Guide
G52-B1003XR
I

Regulations Information
FCC-B Radio Frequency Interference Statement
This equipment has been tested and found to comply with the limits for a Class B
digital device, pursuant to part 15 of the FCC rules. These limits are designed to
provide reasonable protection against harmful interference in a residential installation.
This equipment generates, uses and can radiate radio frequency energy and, if not
installed and used in accordance with the instructions, may cause harmful interference
to radio communications. However, there is no guarantee that interference will not
occur in a particular installation. If this equipment does cause harmful interference to
radio or television reception, which can be determined by turning the equipment off
and on, the user is encouraged to try to correct the interference by one or more of the
following measures:
l Reorient or relocate the receiving antenna.
l Increase the separation between the equipment and receiver.
l Connect the equipment into an outlet on a circuit different from that to which
the receiver is connected.
l Consult the dealer or an experienced radio/TV technician for help.
Note
1. The changes or modifications not expressly approved by the party
responsible for compliance could void the user’s authority to operate the
equipment.
2. Shield interface cables and AC power cord, if any, must be used in order to
comply with the emission limits.
FCC Conditions
This device complies with part 15 of the FCC Rules. Operation is subject to the
following two conditions:
1. This device may not cause harmful interference.
2. This device must accept any interference received, including interference
that may cause undesired operation.
II

Safety Guideline for Using Lithium Battery
(Danish) ADVARSEL! Lithiumbatteri – Eksplosionsfare ved fejlagtig
håndtering. Udskiftning må kun ske med batteri af samme fabrikat og type.
Levér det brugte batteri tilbage til leveranduren.
(Deutsch) VORSICHT: Explosionsgefahr bei unsachgemäßem Austausch
der Batterie. Ersatz nur durch denselben oder einen vom Hersteller
empfohlenen gleich-wertigen Typ. Entsorgung gebrauchter Batterien nach
Angaben des Herstellers.
(English) CAUTION: Danger of explosion if battery is incorrectly replaced.
Replace only with the same or equivalent type recommended by the equipment manufacturer. Discard used batteries according to manufacturer’s
instructions.
(Finnish) VAROITUS: Paristo voi räjähtää, jos se on virheellisesti asennettu.
Vaihda paristo ainoastaan valmistajan suosittelemaan tyyppiin. Hävitä
käytetty paristo valmistajan ohjeiden mukaisesti.
(French) ATTENTION: II y a danger d’explosion s’il y a remplacement incorrect de la batterie. Remplacer uniquement avec une batterie du mzme
type ou d’un type équivalent recommandé par le constructeur. Mettre au
rebut les batteries usagées conformément aux instructions du fabricant.
(Norwegian) ADVARSEL: Eksplosjonsfare ved feilaktig skifte av batteri.
Benytt samme batteritype eller en tilsvarende type anbefalt av
apparatfabrikanten. Brukte batterier kasseres i henhold til fabrikantens
instruksjoner.
(Swedish) VARNING: Explosionsfara vid felaktigt batteribyte. Använd samma
batterityp eller en ekvivalent typ som rekommenderas av apparattillverkaren.
Kassera använt batteri enligt fabrikantens instruktion.
III

Caution on Using Modem
1. Never install telephone wiring during a lightning storm.
2. Never install telephone jacks in wet locations unless the jack is specifically
designed for wet locations.
3. Never touch uninsulated telephone wires or terminals unless the telephone
line has been disconnected at the network interface.
4. Use caution when installing or modifying telephone lines.
5. Avoid using the telephone function (other than a cordless type) during an
electrical storm. There may be a remote risk of electric shock from lightning.
6. Do not use the telephone function to report a gas leak in the vicinity of the
leak.
CD-ROM Drive Notice
CAUTION: This appliance contains a laser system and is classified as a “CLASS 1
LASER PRODUCT.” To use this model properly, read the instruction manual carefully
and keep this manual for your future reference. In case of any trouble with this model,
please contact your nearest “AUTHORIZED service station.” To prevent direct
exposure to the laser beam, do not try to open the enclosure.
IV

Safety Instructions
1. Read the safety instructions carefully and thoroughly.
2. Save this User’s Guide for possible use later.
3. Keep this equipment away from humidity and high temperature.
4. Lay this equipment on a stable surface before setting it up.
5. The openings on the enclosure are used for air convection and to prevent the
equipment from overheating. Do not cover the openings.
6. Make sure that the power voltage is within its safety range and has been
adjusted properly to the value of 100~240V before connecting the equipment
to the power inlet.
7. Place the power cord in a way that people are unlikely to step on it. Do not
place anything on the power cord.
8. Always unplug the power cord before inserting any add-on card or module.
9. All cautions and warnings on the equipment should be noted.
10. Never pour any liquid into the opening that could damage the equipment or
cause an electrical shock.
11. If any of the following situations arises, get the equipment checked by a
service personnel:
l the power cord or plug is damaged.
l liquid has penetrated into the equipment.
l the equipment has been exposed to moisture.
l the equipment has not work well or you can not get it work according to
User’s Guide.
l the equipment was dropped and damaged.
l the equipment has obvious signs of breakage.
12. Do not leave the equipment in an unconditioned environment with a storage
temperature of 60OC (140OF) or above, which may damage the equipment.
13. To prevent explosion caused by improper battery replacement, use the same or
equivalent type of battery recommended by the manufacturer only.
V

Notice
Please note that the setting diagrams or values in this guide are FOR YOUR REFERENCE ONLY. The model you bought may be slightly different from the illustrations
and descriptions in this guide. If you are not sure about these information, such as the
computer’s specification and equipment, please ask your local vendor for help.
Trademarks
* All trademarks are the properties of their respective owners.
* Microsoft is a registered trademark of Microsoft Corporation. Windows® 98/ME
2000/XP are registered trademarks of Microsoft Corporation.
* AMI® is a registered trademark of American Megatrends Inc.
* PCMCIA and CardBus are registered trademarks of the Personal Computer
Memory Card International Association.
Release History
Version Revision Note Date
2.0 First release February 2004
2.1 Update Spec. October 2004
VI

Table of Contents
Getting Started
1.1 Before You Begin ................................................................ 1-2
l Unpacking ............................................................................. 1-2
l Features and Benefits ........................................................... 1-3
1.2 Quick Components Guide ................................................. 1-4
l Top-open View...................................................................... 1-4
l Right-side View..................................................................... 1-6
l Left-side View ...................................................................... 1-7
l Rear View ............................................................................. 1-8
l Bottom View ......................................................................... 1-10
1.3 Preparing to Operate.......................................................... 1-12
l Connecting the Power........................................................... 1-12
l Turning On/Off the Notebook PC......................................... 1-14
Basics of Using Notebook PC
2.1 Safety and Comfort Tips..................................................... 2-2
l Set Up Your Work Environment............................................ 2-2
l Have a Good Work Habit ..................................................... 2-3
2.2 Knowing the Keyboard ...................................................... 2-4
l Typewriter Keys ................................................................... 2-5
l Cursor Keys .......................................................................... 2-6
l Numeric Keys ....................................................................... 2-7
l Function Keys ....................................................................... 2-8
2.3 Quick Launch Buttons ....................................................... 2-9
VII

2.4 Knowing the Touchpad....................................................... 2-11
l Using the Touchpad .............................................................. 2-12
l Configuring the Touchpad ..................................................... 2-14
2.5 The Hard Disk Drive .......................................................... 2-15
2.6 Using the Optical Storage Device .................................... 2-16
l Inserting the CD.................................................................... 2-17
l Removing the CD ................................................................. 2-18
l Releasing the CD Manually .................................................. 2-19
2.7 Using the Video Function .................................................. 2-20
l Powerful Video Controller .................................................... 2-20
l Display Modes ...................................................................... 2-21
l Configuring the Display Settings ........................................... 2-22
2.8 Using the Audio Function .................................................. 2-24
l Connecting Audio Devices .................................................... 2-24
l Volume Control ..................................................................... 2-25
Using the Software Applications
3.1 Using the Driver CD .......................................................... 3-2
l When do I Need the Driver CD? ......................................... 3-2
l How to Use the Driver CD?................................................. 3-2
Power Management
4.1 Introduction to the Power Source .................................... 4-2
l The AC Adapter.................................................................... 4-2
l The Battery Pack.................................................................. 4-3
4.2 Managing the Power........................................................... 4-7
l Power Options ...................................................................... 4-7
l Intel® SpeedStep
TM
Technology ........................................... 4-11
VIII

BIOS Setup
5.1 Using BIOS Setup Utility................................................... 5-2
l When to Use BIOS Setup? ................................................... 5-2
l How to Run BIOS Setup? .................................................... 5-2
l Control Keys ......................................................................... 5-3
5.2 Main Menu .......................................................................... 5-4
5.3 Advanced Menu .................................................................. 5-6
5.4 Security Menu ..................................................................... 5-8
5.5 Peripheral Menu ................................................................. 5-11
5.6 Boot Menu........................................................................... 5-12
5.7 Exit Menu ............................................................................ 5-14
Expanding and Upgrading
6.1 Connecting the External Devices .................................... 6-2
l Connecting the Peripheral Devices....................................... 6-2
l Connecting the Communication Devices .............................. 6-5
l Installing the PC Card ........................................................... 6-7
6.2 Safely Remove Hardware .................................................. 6-9
6.3 Upgrading Your System ...................................................... 6-10
IX

Caring Your Notebook PC
7.1 Protecting Your Notebook PC ........................................... 7-2
l Locking Your Computer ........................................................ 7-2
l Setting Up Password............................................................. 7-3
7.2 Tips for Traveling................................................................ 7-4
7.3 Taking Care of Your Computer ......................................... 7-5
l Placing and Operating Your Computer.................................. 7-5
l Cleaning Your Computer ....................................................... 7-6
l Using the Battery Pack......................................................... 7-6
X

Getting Started
Congratulations on purchasing the M510 series Notebook
PC!
This chapter first provides a general introduction on your
Notebook PC, to let you know the hardware components
well and start to work easily. Why wait? Read on to learn
more about the powerful features and multimedia function
of your Notebook PC.
2 - 1
M510 Series Notebook PC
1.1 Before You Begin
Unpacking
First, unpack the shipping carton and check all items carefully. If any item
contained is damaged or missing, please contact your local dealer immediately.
Also, keep the box and packing materials in case you need to ship the unit in
the future.
The package should contain the following items:
One Notebook PC.
One Software CD containing the drivers and utilities.
One User’s Manual and one Quick Guide.
One Warranty Card.
Accessories:
- High-capacity Li-ion battery pack.
- AC adapter and power cord.
- Phone cable/Phone jack (optional).
- Notebook PC carry bag (optional).
1 - 2

Features and Benefits
Next Generation CPU Support. Your Notebook PC is equipped with one of
the latest CPU (central processing unit) that supports Intel® Centrino™
technology for excellent system performance and ultimate mobile function.
Integrated Wireless LAN Solution. The computer is pre-installed with the
Intel PRO/Wireless networking solution that allows you to roam between
different rooms in the office or at home, without being disconnected the
LAN cable. In addition, sharing files and printers can be easy tasks.
USB 2.0 Support. The computer has three USB 2.0 ports that support data
transfer rate up to 480Mb/s. The USB standard allows you to connect up to
127 devices through the single interface, including mouse, keyboard, printer,
hard disk drive, digital camera, and more.
IEEE 1394 Support. IEEE 1394 is a high-speed bus that allows you to
connect up to 63 high-end devices on a single computer.
Memory. The computer provides two memory slots that allows you to
expand the memory size up to 2GB.
Integrated 4-in-1 Card Reader. The integrated 4-in-1 card reader supports
MMC (multi-media card), SD (secure digital), SM (smart media), and MS
(memory stick) cards. Without additional cost of purchasing an external
card reader.
Ultimate Graphic System. The integrated ATI Mobility Radeon 9600/9700
series Video controller with 64/128MB DDR SDRAM empowers your
Notebook PC to become a multimedia center at home, displaying the vivid
and rich-color images.
1 - 3
1 - 4
M510 Series Notebook PC
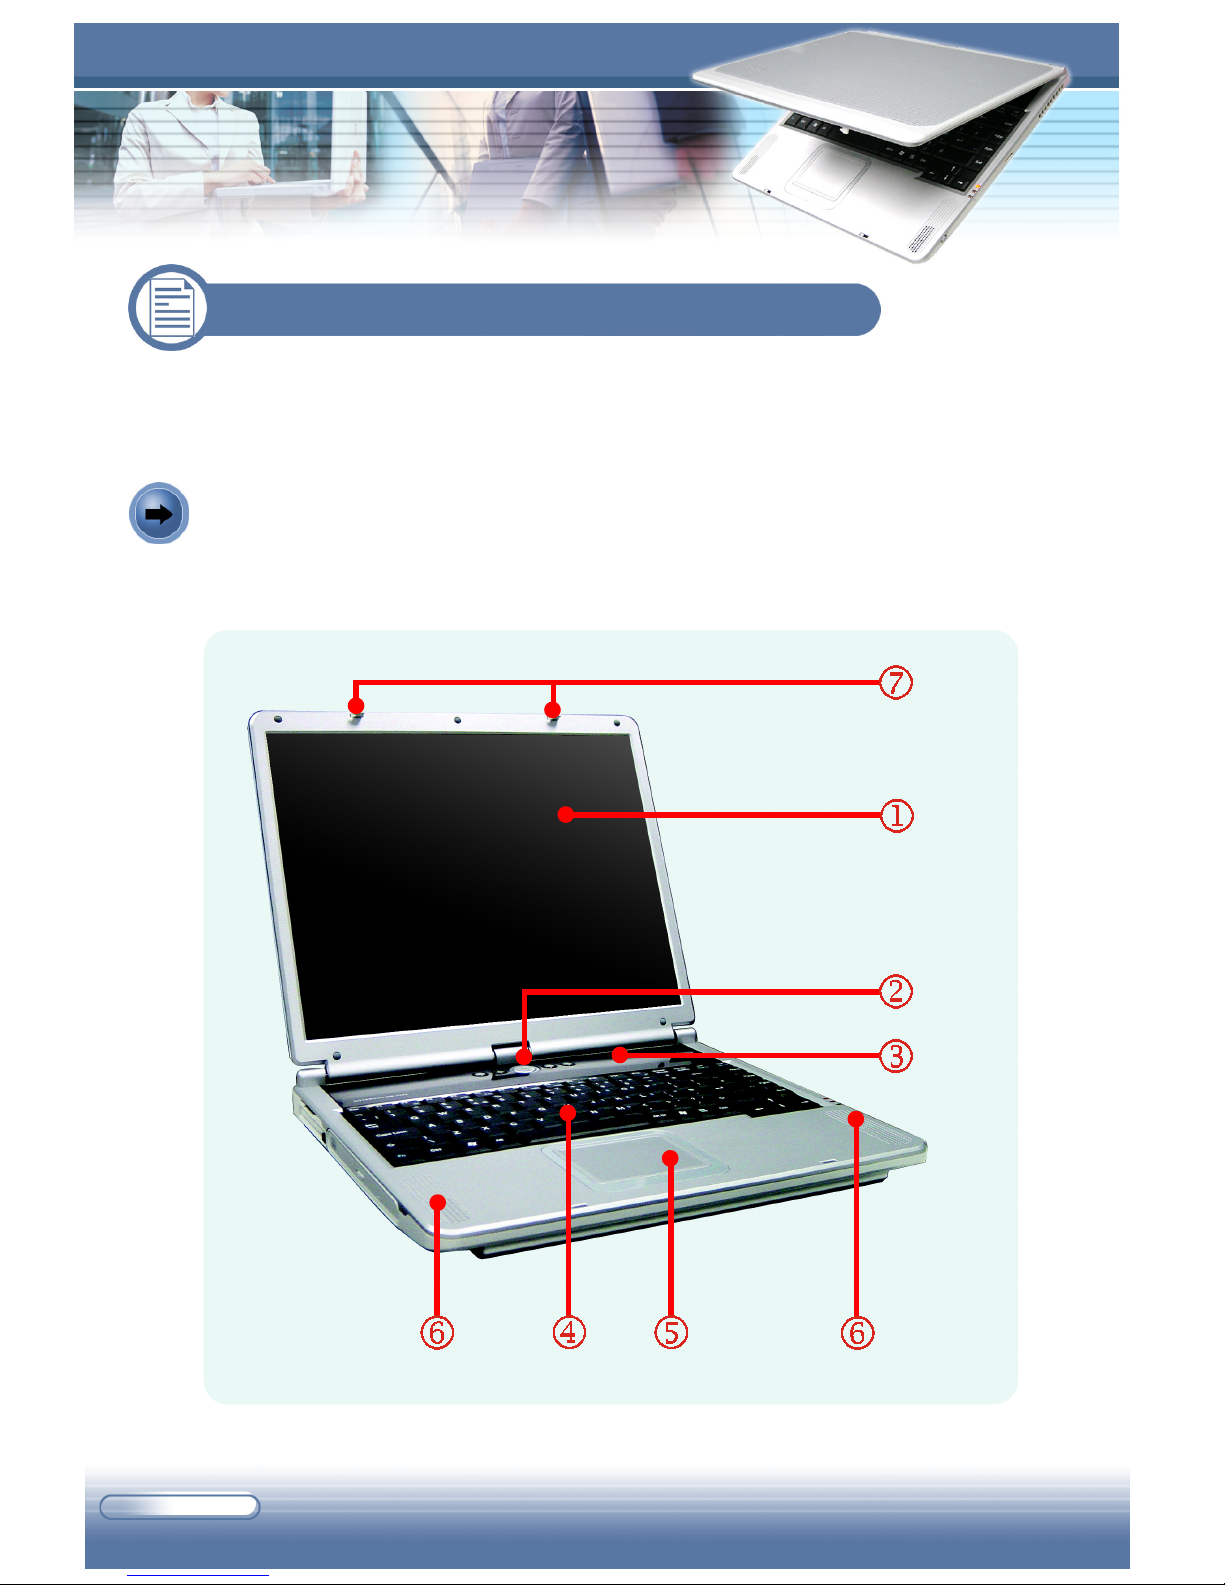
Top-open View
This section provides the multi-views of your Notebook PC, and briefly
introduces the function of each component.
Press the Cover Button to open the top cover (see page 1-6), and you can find
the main operating area of your computer.
1.2 Quick Components Guide
1 - 5
Display Panel
The 15-inch XGA/SXGA+/14.1-inch XGA TFT color LCD screen displays the output
of the computer.
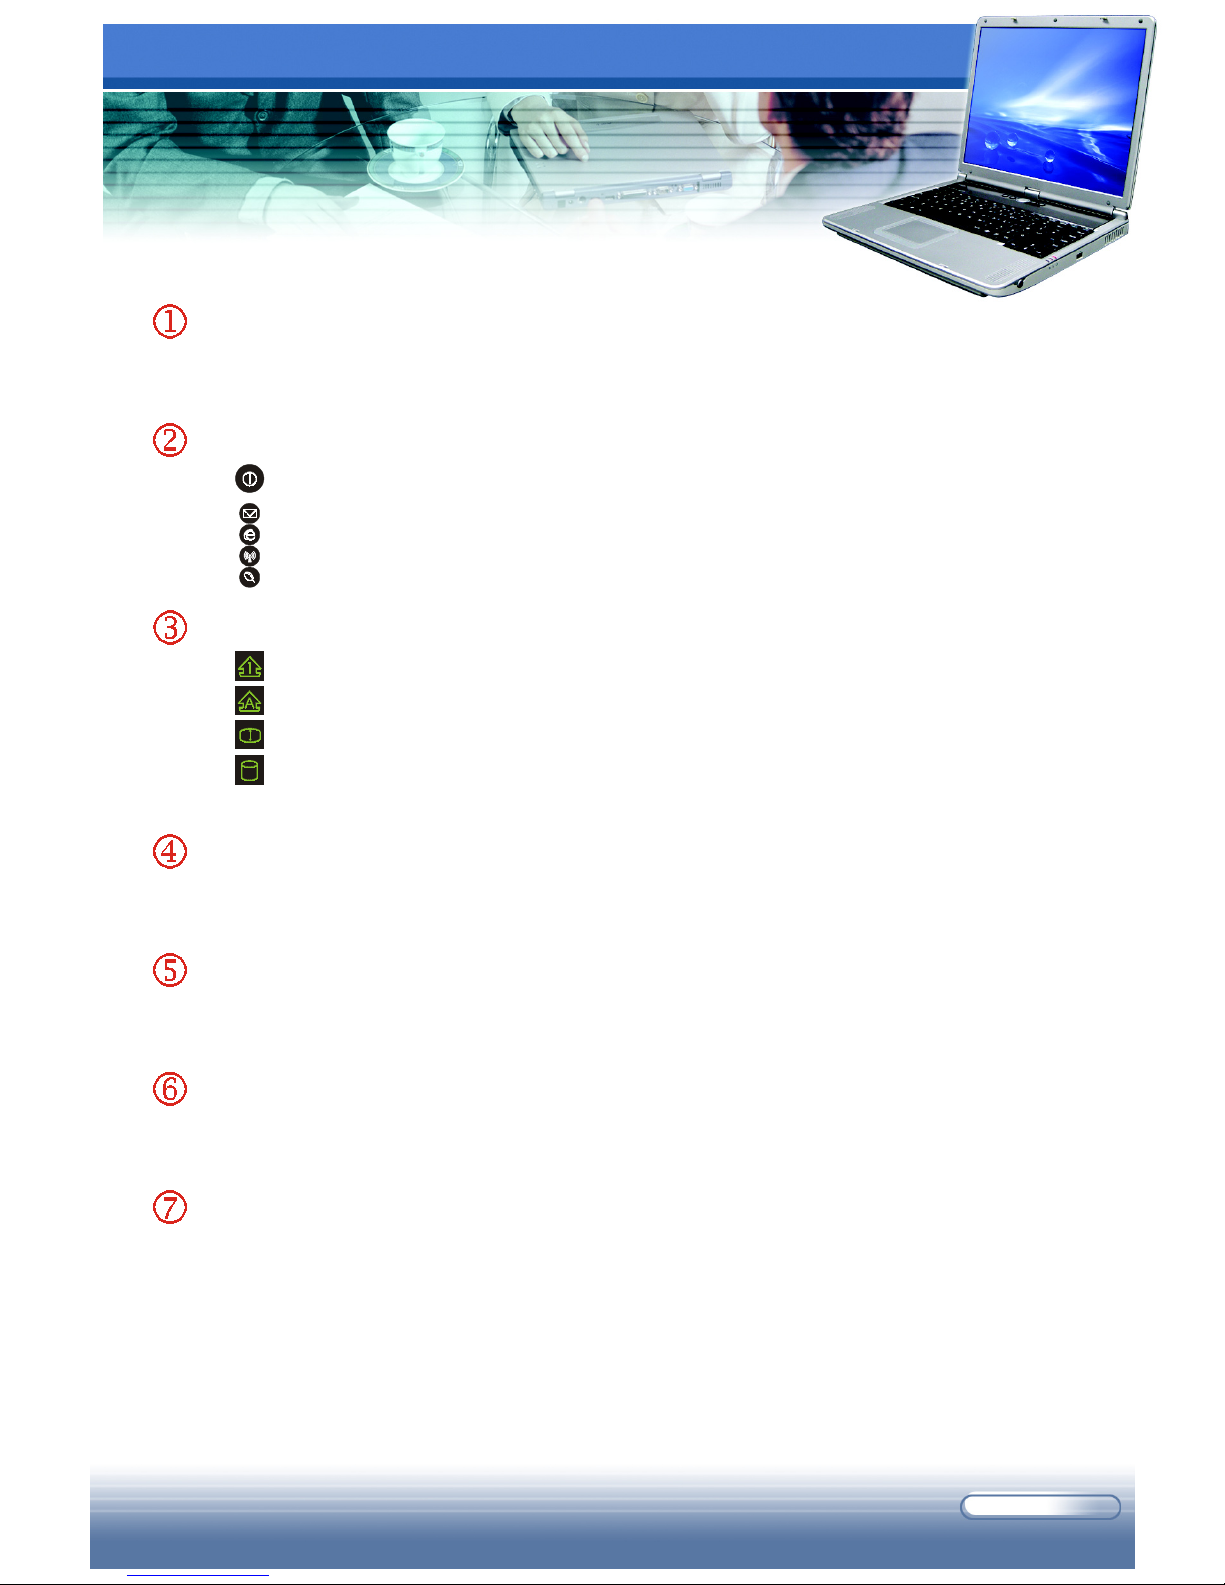
Quick Launch Buttons and Power Button
- Power Button: to turn the computer power ON and OFF.
- Quick Launch Buttons: one-touch buttons, allowing you to launch
specific software application easily (see Quick Launch Buttons in Chapter
2 for more information).
Status LEDs
- Num Lock: glows Green to indicate the Num Lock function is activated.
- Caps Lock: glows Green to indicate the Caps Lock function is activated.
- Scroll Lock: glows Green to indicate the Scroll Lock function is activated.
- Hard Disk In-use: blinks Green to indicate the computer is accessing the
hard disk drive.
Keyboard
The built-in keyboard provides all the functions of a full-sized 87/88-key keyboard
(see Using Keyboard in Chapter 2 for more information).
Touchpad
The pointing device of the computer (see Using Touchpad in Chapter 2 for more
information).
Stereo Speakers
The next-generation high quality speakers send out the sound and voice from the
computer.
Cover Latch
This Cover Latch is used to lock the top cover.

1 - 6
M510 Series Notebook PC
Right-side View
Cover Button
Press this button to open the top cover.
System LEDs
- Wireless LAN: glows Green to indicate the wireless LAN function
of the computer is enabled.
- Power On/Off/Suspend: glows Green to indicate the computer is
turned on; blinks Green to indicate the system is in suspend mode.
- Battery Status: glows Green to indicate the battery is being charged
(with AC adapter connected); glows Orange to indicate low battery
power (less than 5%); blinks Orange to indicate the battery failed.
USB Port
The USB 2.0 port allows you to connect USB-interface peripheral devices,
such as the mouse, keyboard, modem, external hard disk module, printer, and
more.
Ventilator
The ventilator is designed to cool the system. Do not block the ventilator for
air circulation.
Knowing the components on the right side of your computer.
1 - 7
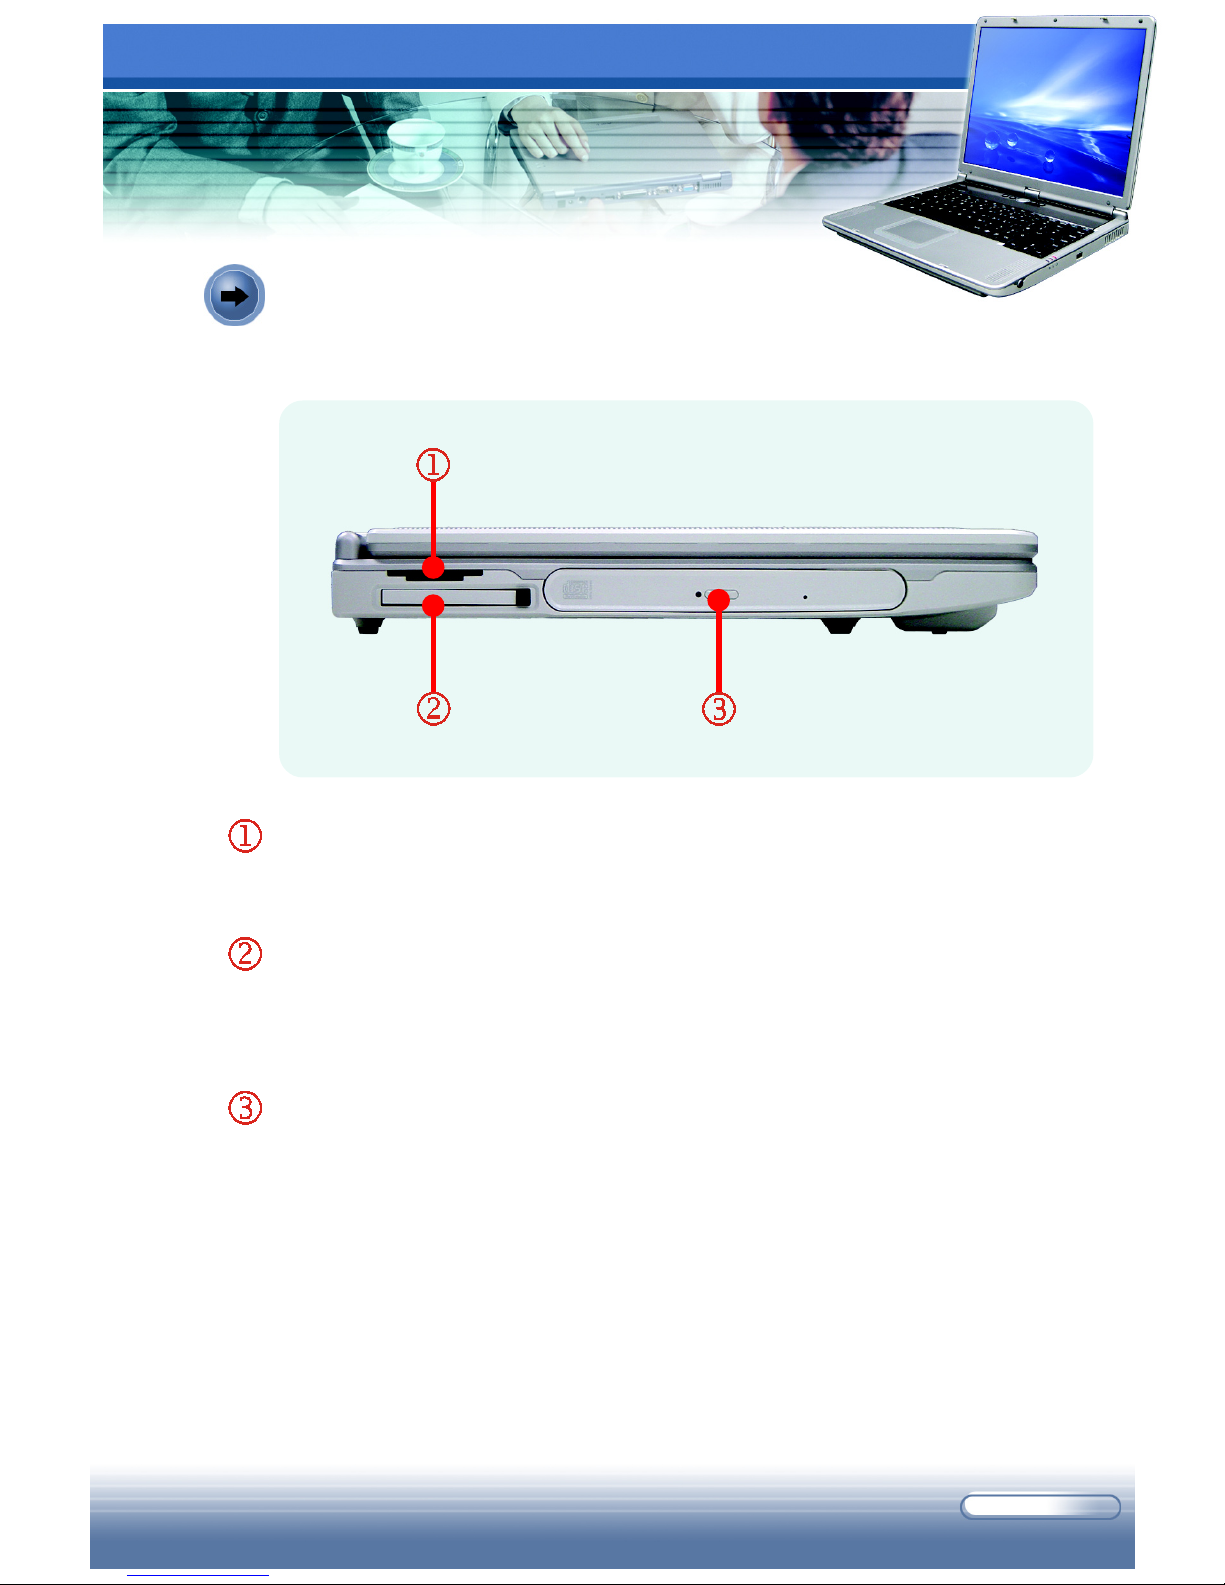
Left-side View
4-in-1 Card Reader
The built-in card reader supports MMC (multi-media card), SD (secure digital),
SM (smart media), and MS (memory stick) cards.
PC Card Slot
The computer provides a PC card slot to support one Type-II PC card for
expansion functions, such as LAN/WLAN card, modem card, memory card,
etc.
Optical Storage Device
A slim CD-ROM/DVD-ROM/CD-RW/DVD Combo/DVD Dual drive is available
in the computer, depending on the model you purchased. The optical device
allows you to use the CD/DVD disc for installing software, accessing data, and
playing music/movie on the computer.
Knowing the components on the left side of your computer.
1 - 8
M510 Series Notebook PC
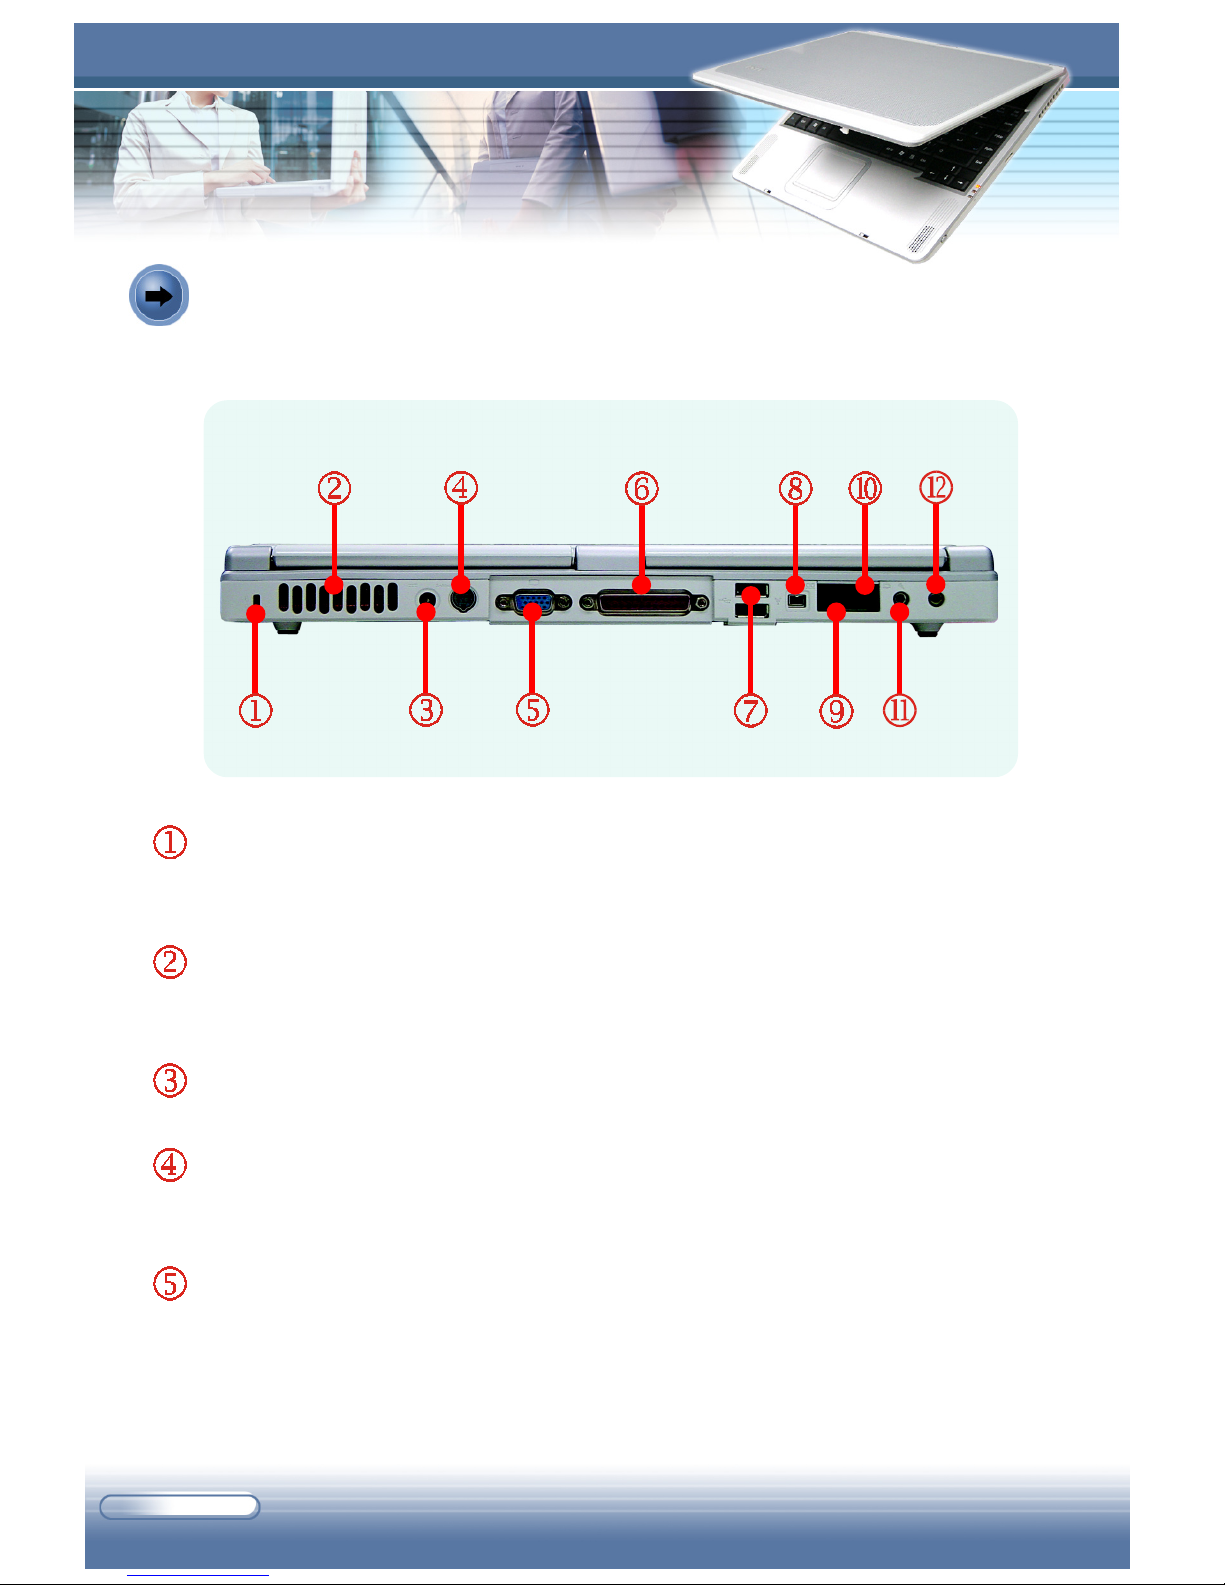
Rear View
Kensington Lock
This port is used to lock the computer to a location for security (see Caring
Your Notebook PC in Chapter 7 for more information).
Ventilator
The ventilator is designed to cool the system. DO NOT block the ventilator for
air circulation.
Power Connector
To connect the AC adapter and supply power for the computer.
S-Video Connector
By using a Super VHS (S-Video) cable, this connector allows you to connect a
television (NTSC/PAL system) for a great view of the computer display.
VGA Port
The 15-pin D-sub VGA port allows you to connect an external monitor or other
standard VGA-compatible device (such as a projector) for a great view of the
computer display.
Your Notebook PC provides many I/O ports on the rear panel.

1 - 9
Parallel Port
The 25-pin D-sub parallel port allows you to connect a parallel device, such as the
printer and scanner.
USB Ports
The USB 2.0 ports allow you to connect USB-interface peripheral devices, such as the
mouse, keyboard, modem, external hard disk module, printer, and more.
IEEE 1394 Port
The IEEE 1394 port is a high-speed bus that allows you to connect high-end digital
devices such as the DV (digital video camera).
RJ-45 Connector
The 100/10 Ethernet connector is used to connect a LAN cable for network connection.
RJ-11 Connector
The computer provides a built-in modem that allows you to connect an RJ-11 telephone
line through this connector. With the 56K V.90 modem, you can make a dial-up
connection.
Microphone Jack
This connector is used to connect an external microphone.
Audio-out Jack
This connector is used to connect a headphone or external speakers.
1 - 10
M510 Series Notebook PC
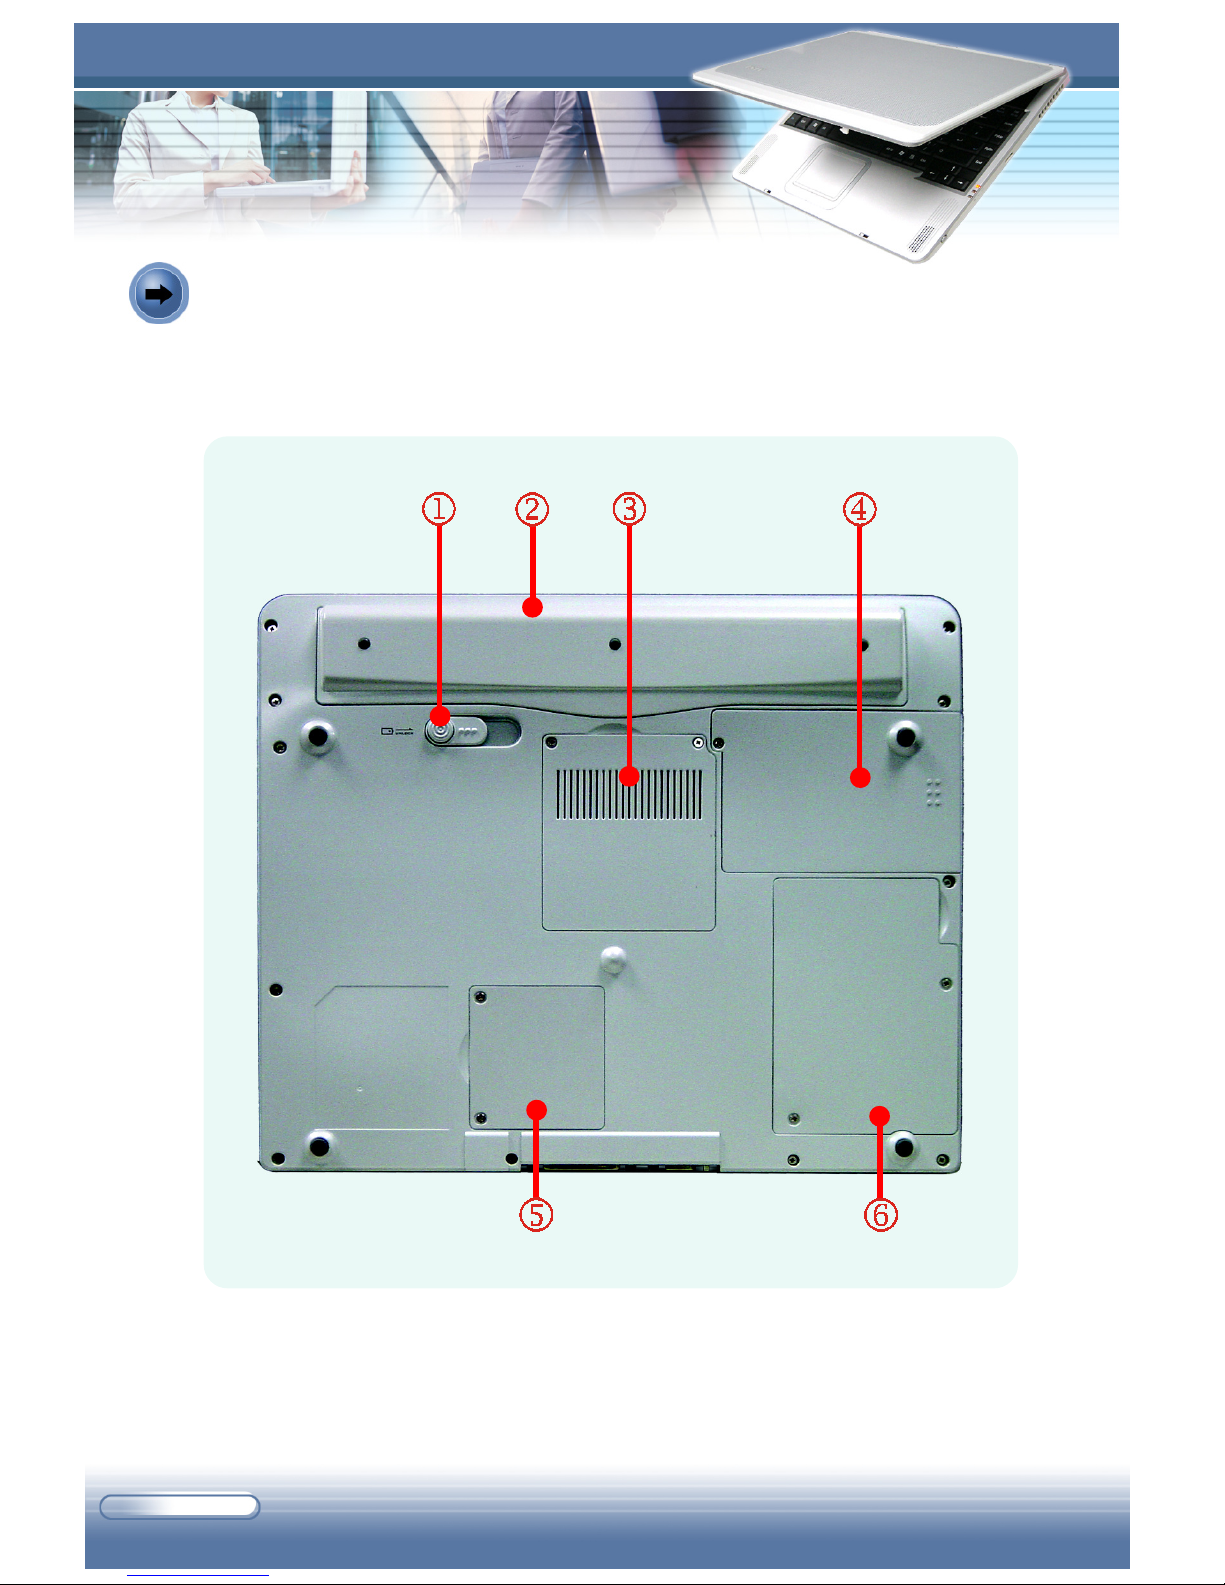
Bottom View
Carefully put the computer upside down, and you can find the core components
of the computer.
1 - 11
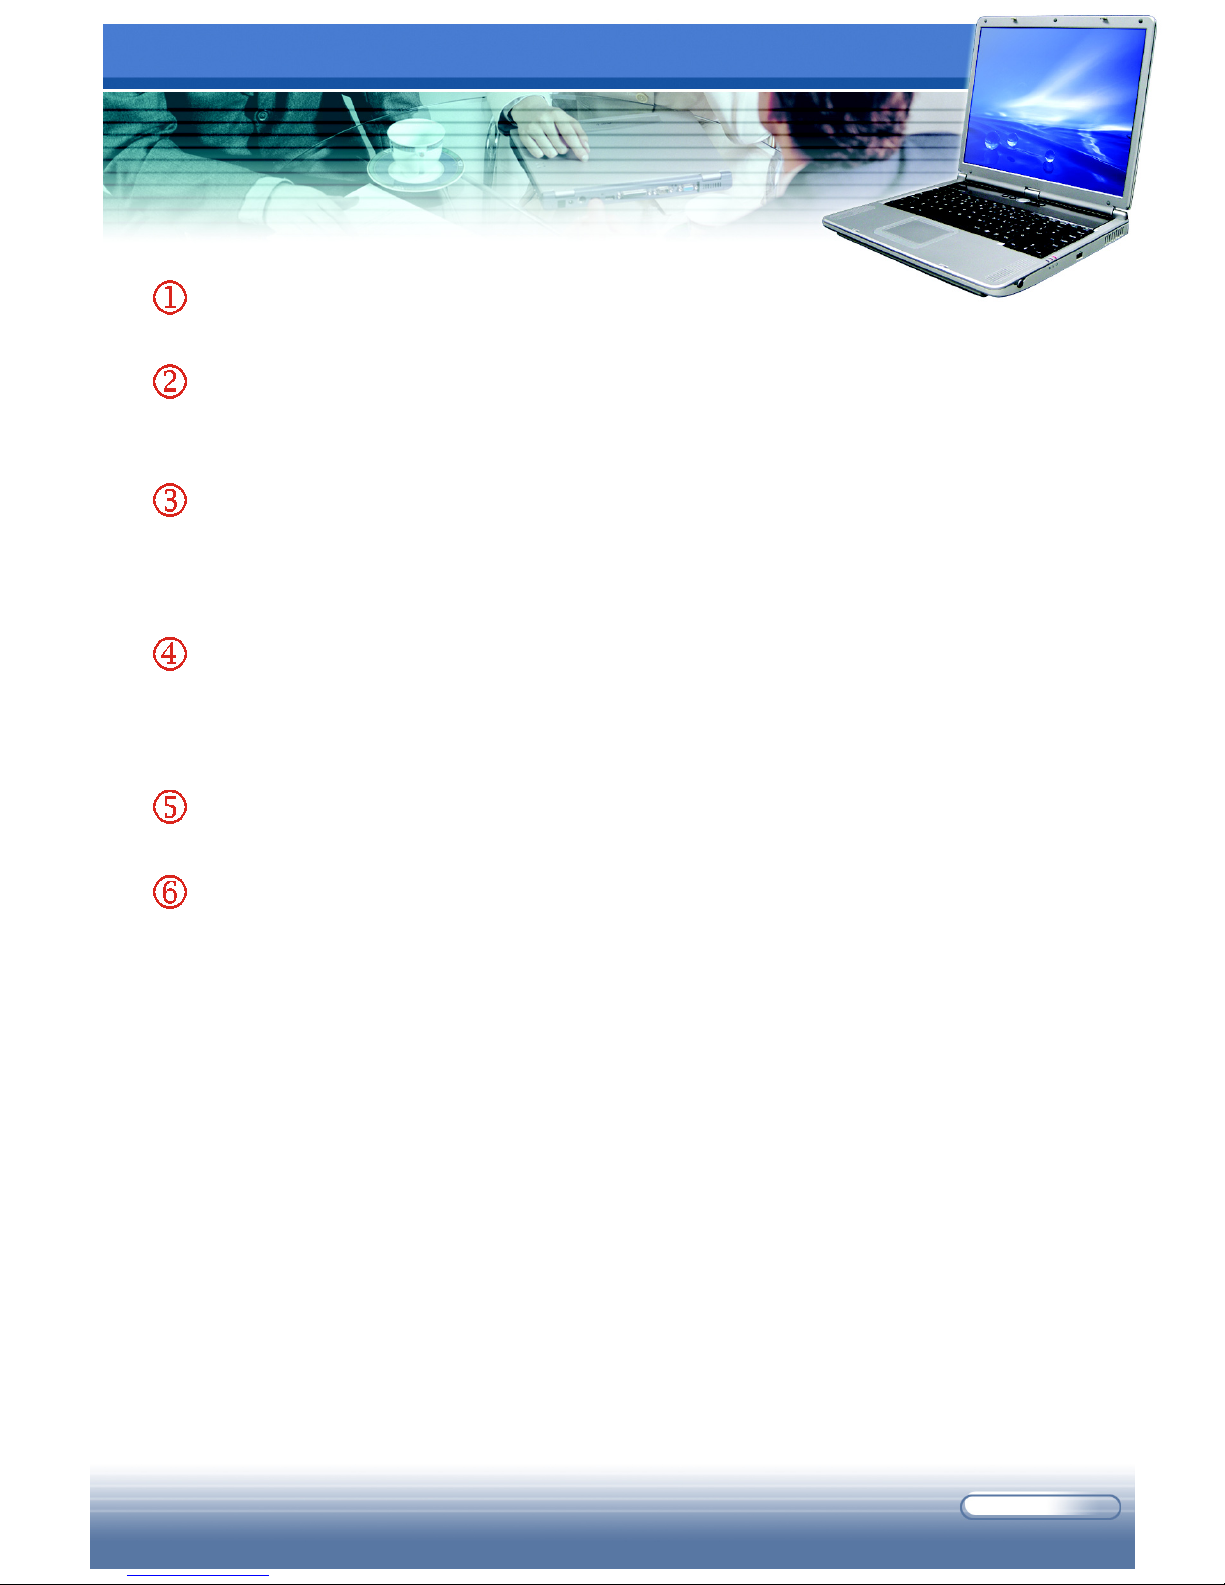
Battery Unlock Button
If you want to replace a battery, press and slide the button to remove the battery pack.
Battery Pack
To supply power to your computer when the AC adapter is not connected (see
Introduction to the Power Source in Chapter 4 for more information).
Memory Compartment
The computer provides two SO-DIMM slots for expanding the memory size up to 2GB.
Please note that the memory installation/replacement must be done by an authorized
retailer.
Hard Disk Drive Compartment
This compartment contains a holder to secure the hard disk drive of the computer.
Please note that the hard disk drive installation/replacement must be done by an
authorized retailer.
Mini PCI Compartment
The computer provides a built-in wireless LAN card that is installed in this compartment.
CPU Compartment
Inside this compartment is the CPU (central processing unit) and thermal module of
the computer.
1 - 12
M510 Series Notebook PC
Connecting the Power
Your Notebook PC is equipped with a high-capacity 8-cell Li-ion battery pack,
and it can operate either on the battery’s power or AC power. However, for the
first time to use your Notebook PC, it is recommended to connect the AC
adapter and use the AC power. When the AC adapter is connected, the battery
is charged immediately.
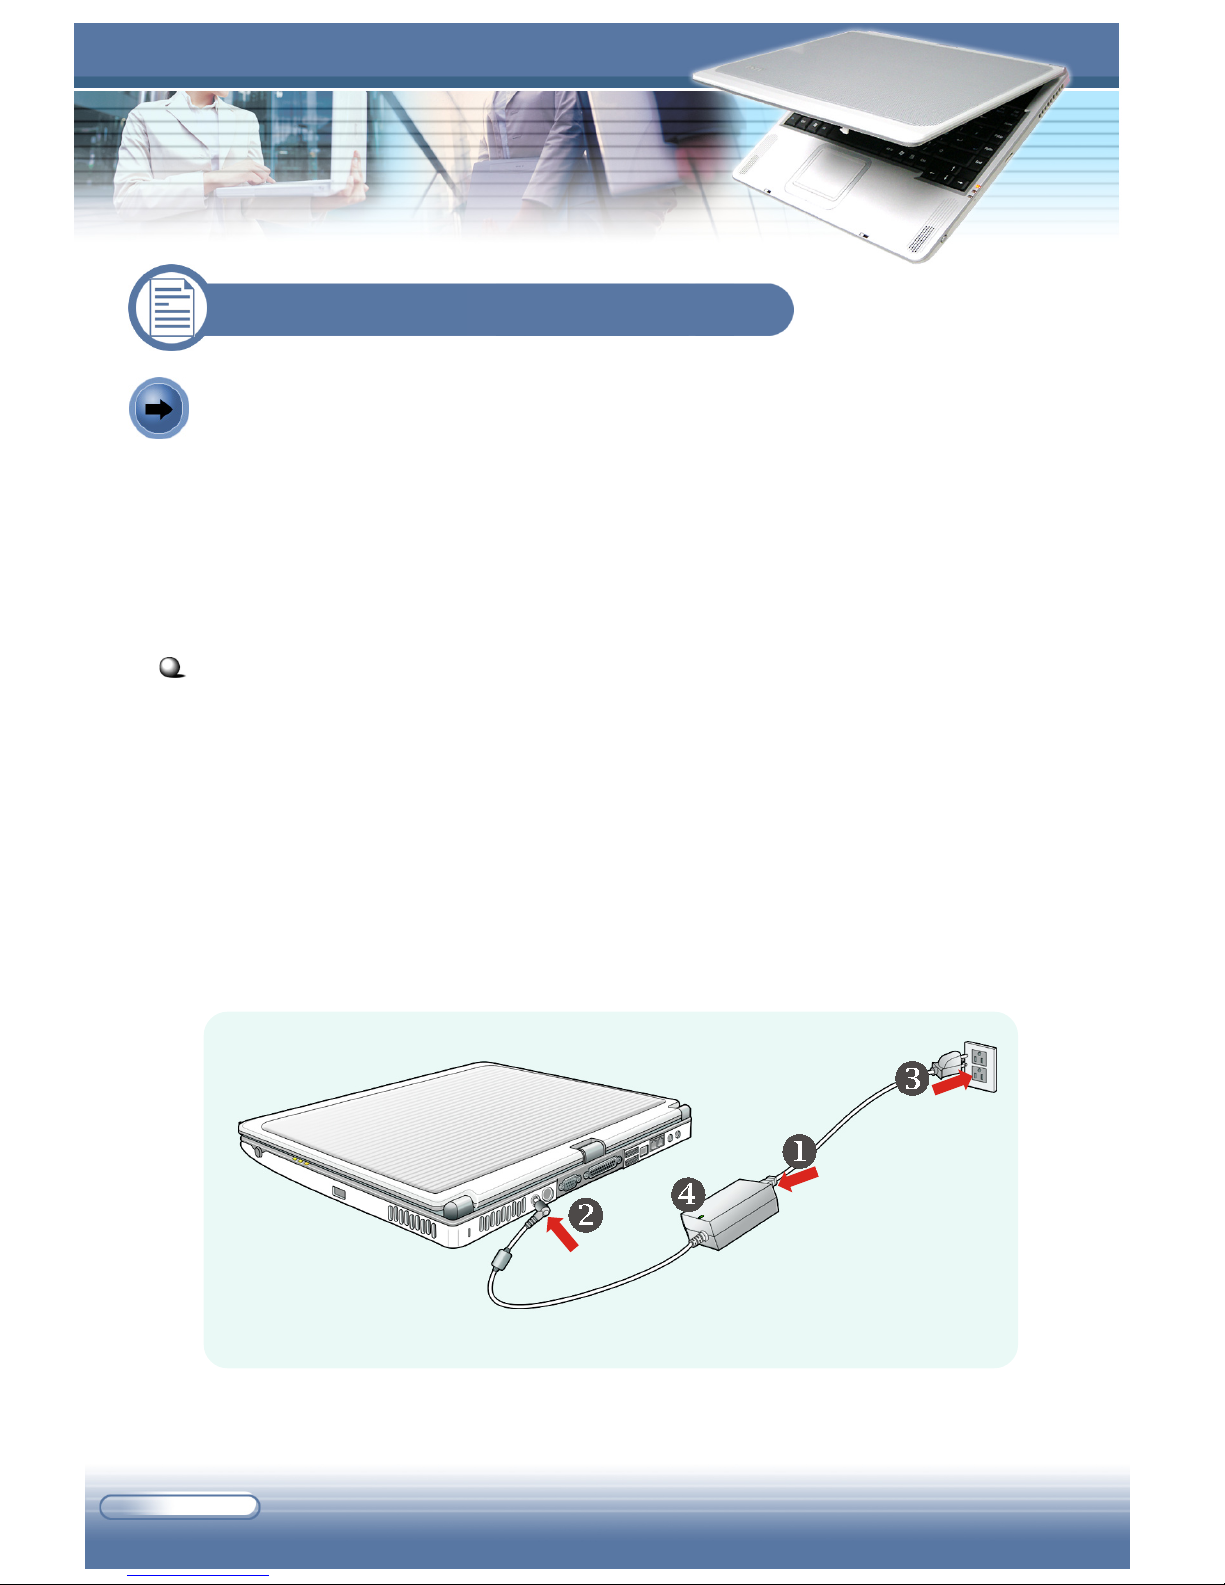
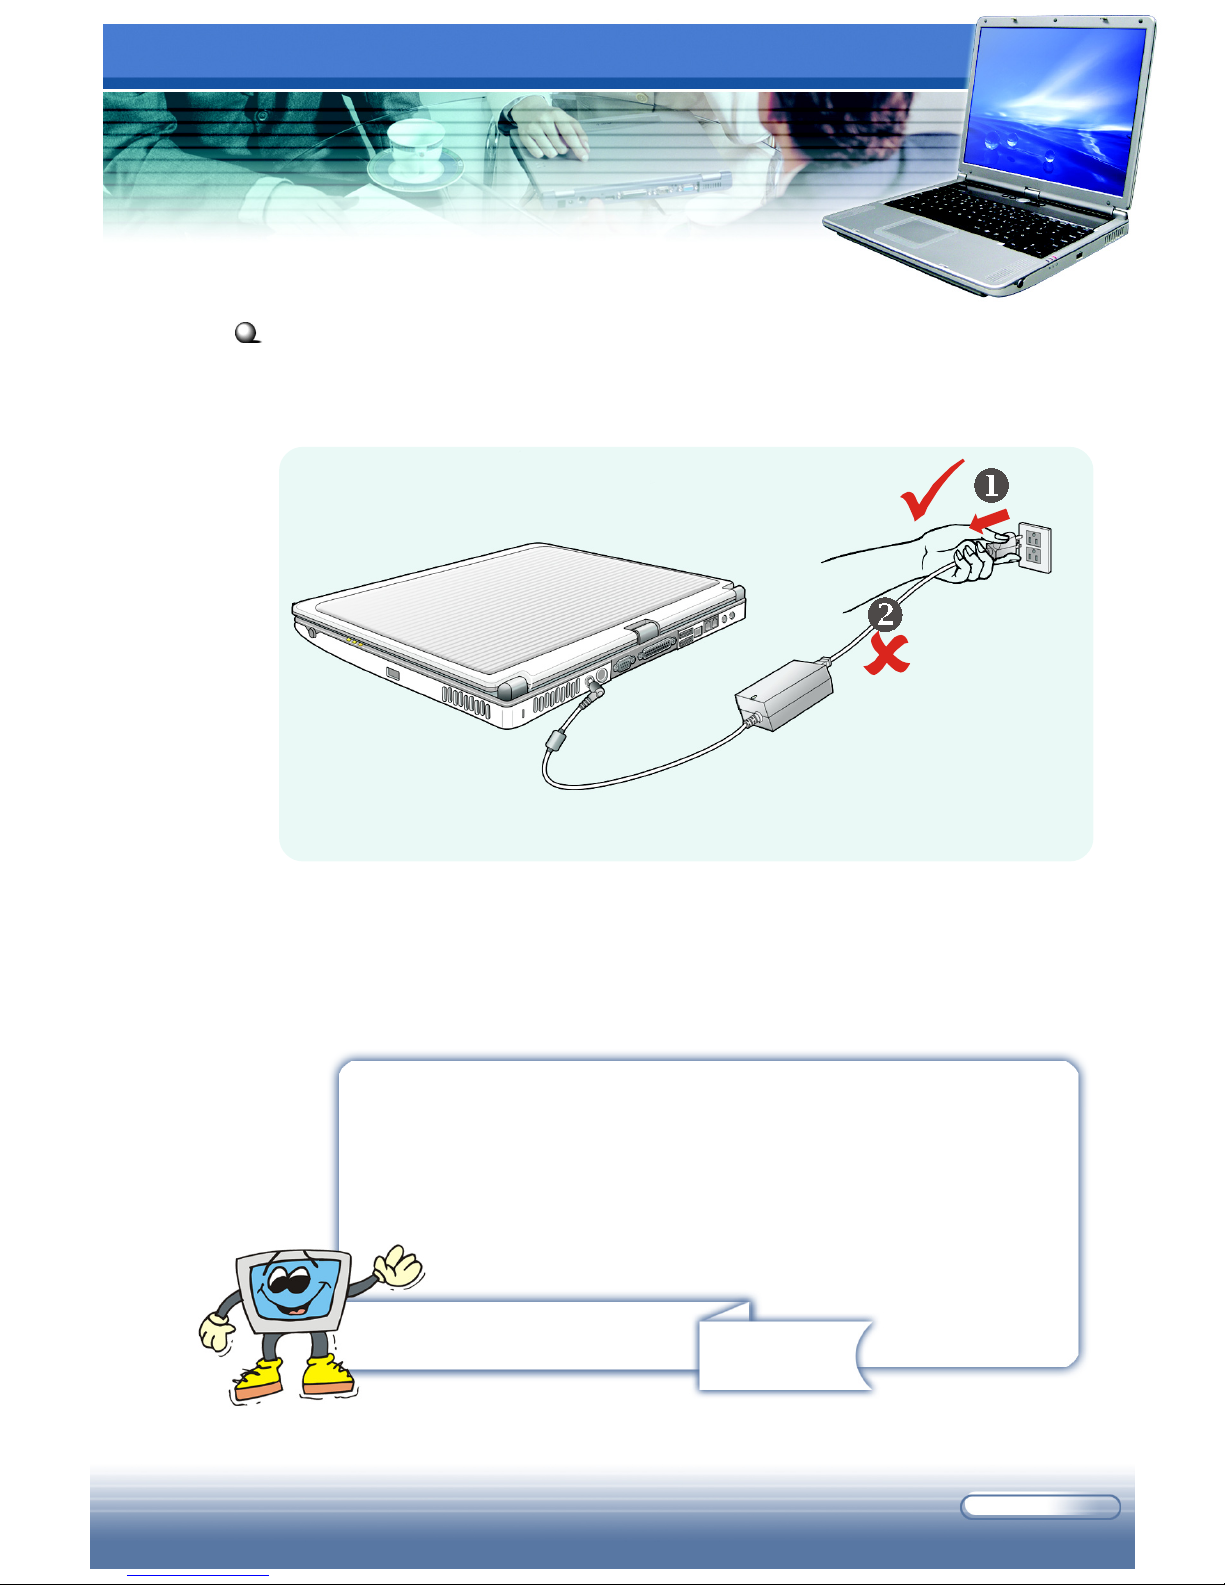
Connecting the AC Power
1. Unpack the package to find the AC adapter and power cord.
2. Attach the power cord to the connector of the AC adapter ().
3. Plug the DC end of the adapter to the computer (), and the male end
of the power cord to the electrical outlet ().
4. When the AC adapter is connected, the green LED on the AC adapter
will light up () to indicate that the computer is powered from the
electrical outlet.
Connecting the AC power
1.3 Preparing to Operate
1 - 13
Disconnecting the AC Power
When you disconnect the AC adapter, you should unplug the power cord from
the electrical outlet first, and then unplug the connector from the computer.
Remind you...
1. The AC adapter included in the package is correct for
your Notebook PC; using other adapter model may
damage the computer or other devices on the computer.
2. When unplugging the power cord, always hold the
connector part of the cord
(), never pull the cord ().
Disconnecting the AC power
1 - 14
M510 Series Notebook PC
Turning On/Off the Notebook PC
Now, when the AC adapter is connected, you are ready to use your computer.
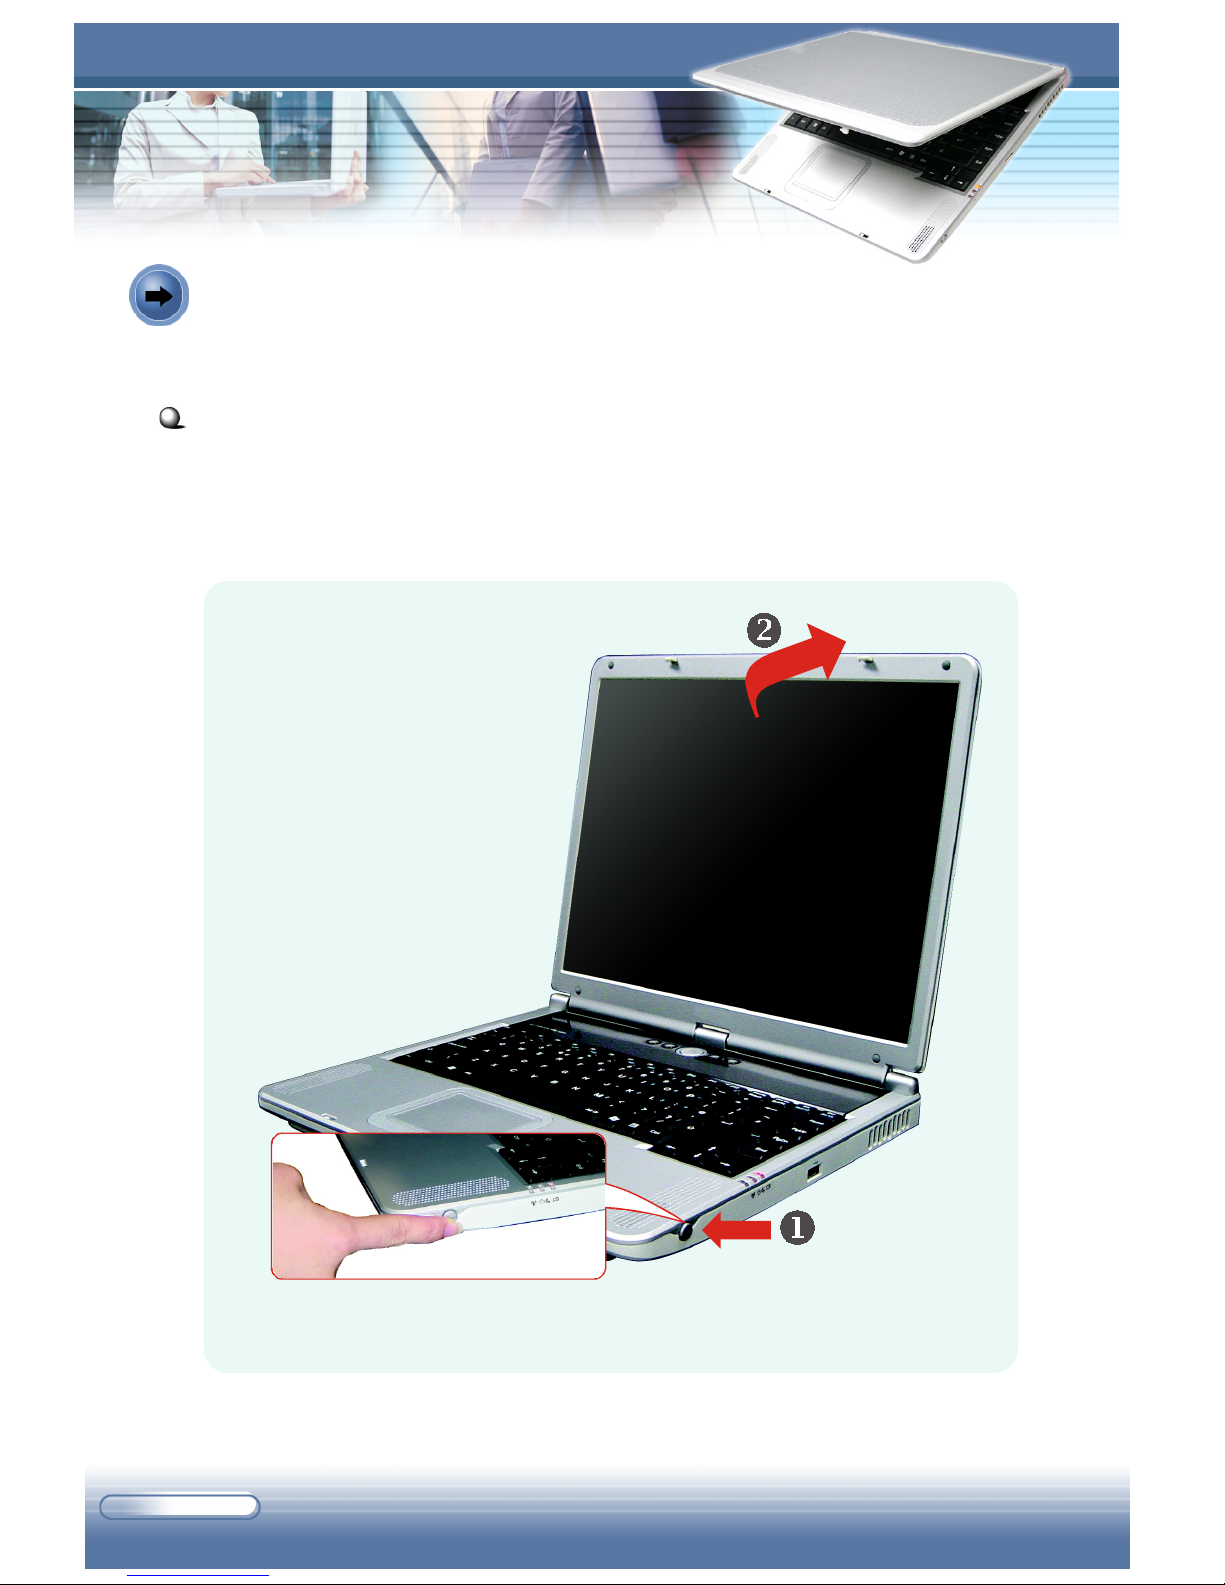
Opening the Top Cover
First, open the top cover by pressing the cover button on the right side of the
computer (), and then lifting the top cover gently (). You can tilt the top
cover forward/backward to the optimal viewing position.
Opening the top cover
1 - 15
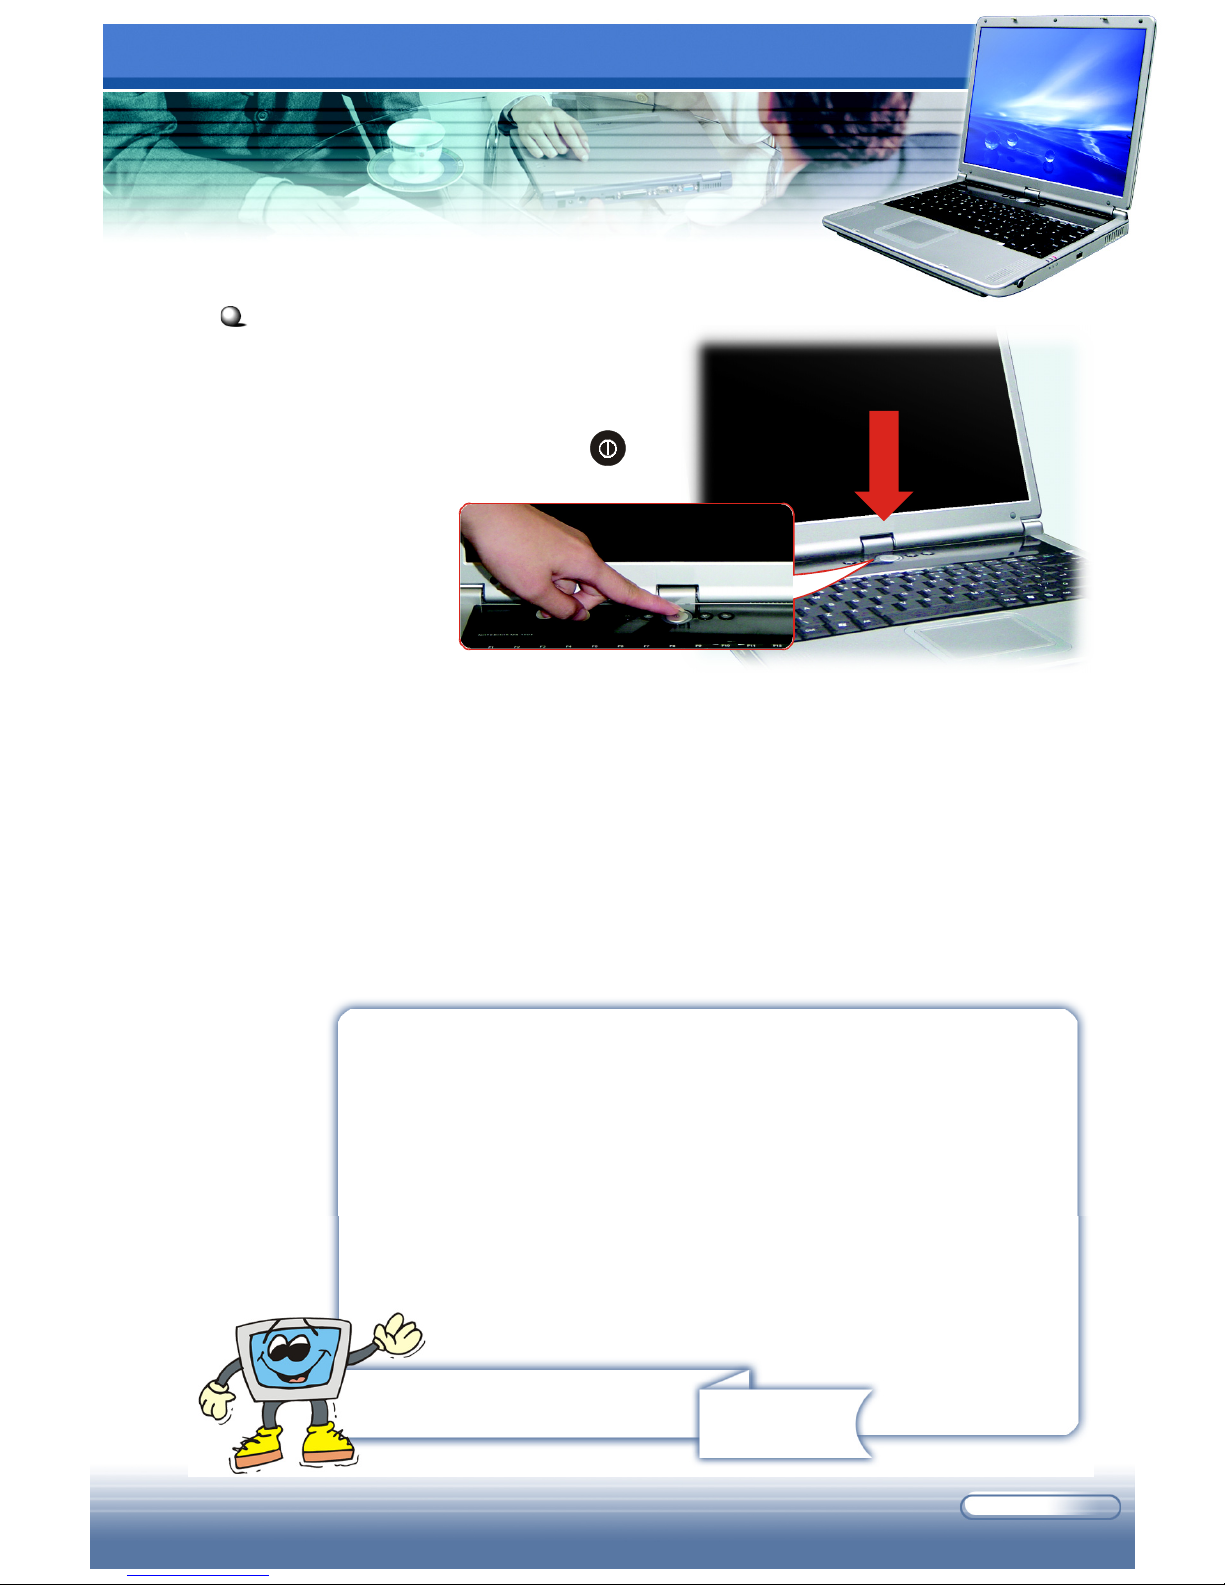
Turning On the Computer
1. Make sure that the computer
is connected to the AC power.
2. Press the power button .
Once pressed, the power button
will light Blue to indicate that
the computer is turned on; meanwhile, the Power LED on the right side
of computer lights Green.
3. When the computer is turned on, it will first perform a series of
diagnostic tests that is called Power-On Self Test (POST). Then, the
operating system (such as Microsoft Windows XP in this manual)
should start, and you can start to work with your Notebook PC!
Remind you...
Power-On Self Test
The POST (Power-On Self Test) is a software controlled diagnostic
test tool, which is a set of routines stored in a computer’s ROM
(read-only memory) that tests various system components such
as the memory, disk drives, and the keyboard to see whether
they are properly connected and operating. If problems are found
during booting, these routines alert the user by sounding a series
of beeps or displaying a message on the screen.
Pressing the power button
1 - 16
M510 Series Notebook PC
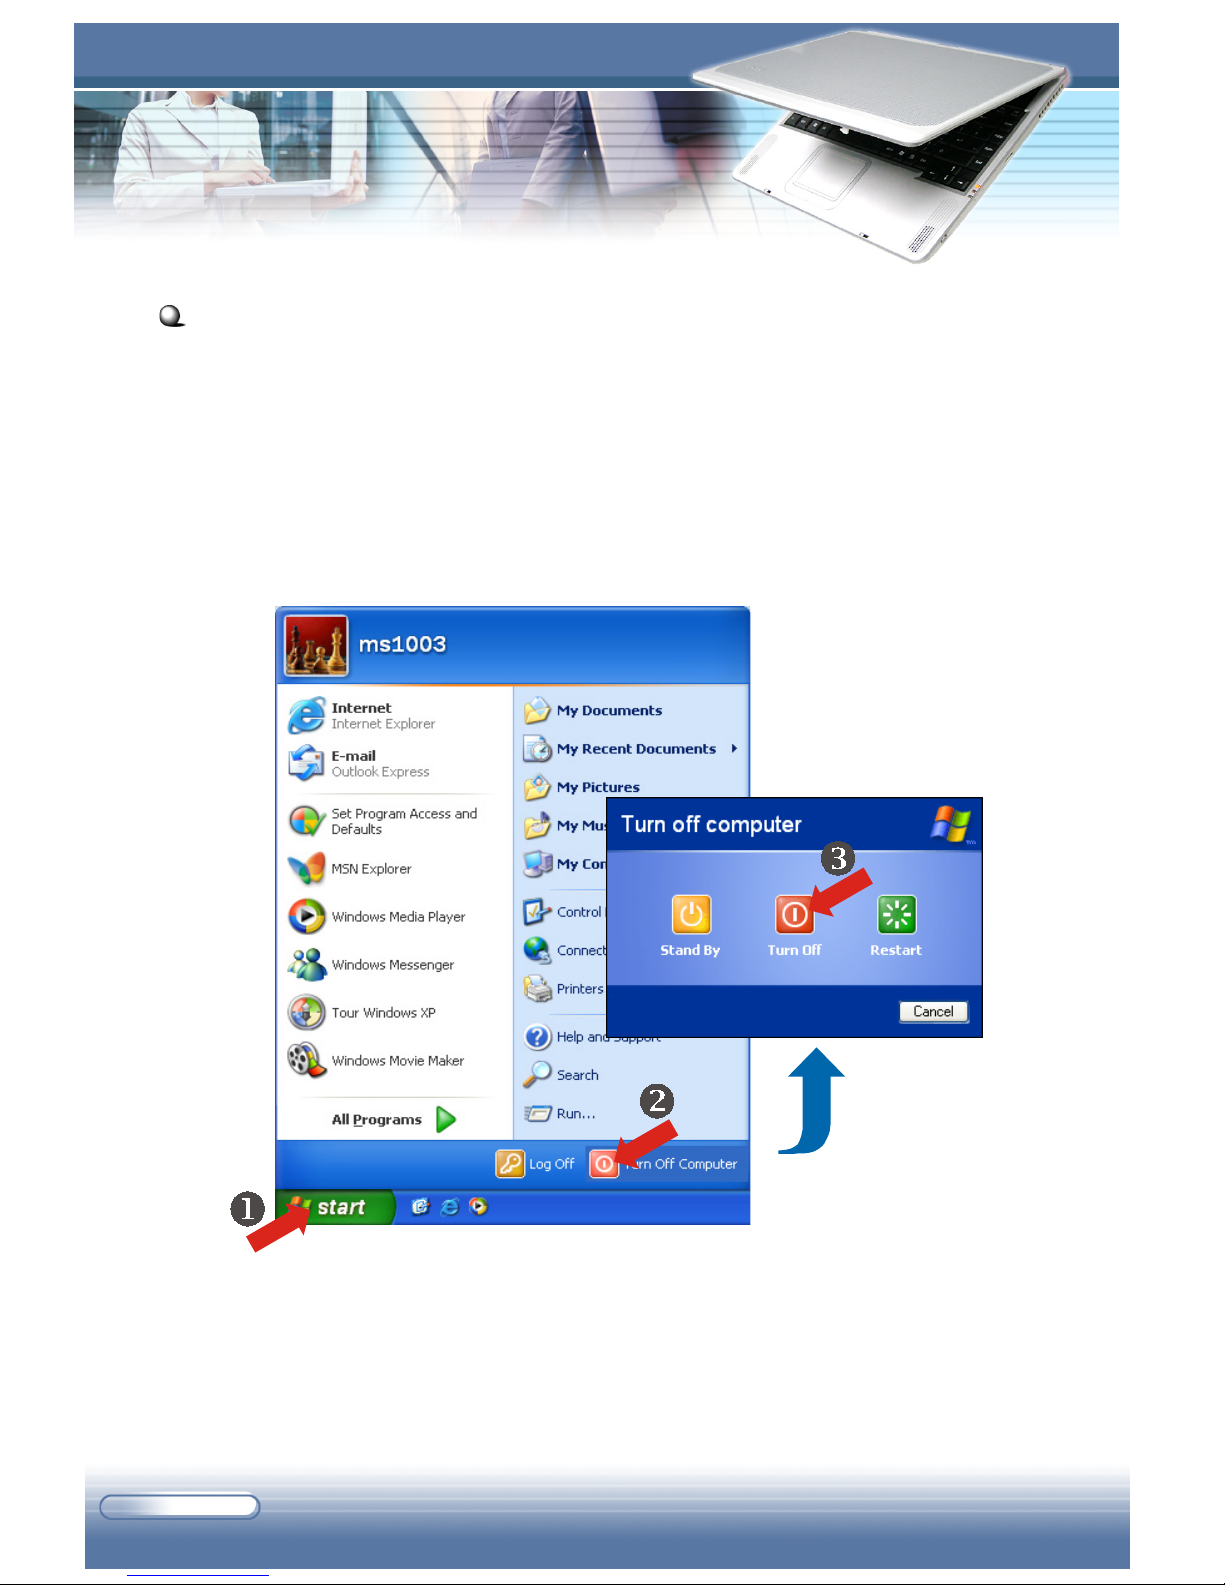
Turning Off the Computer
In Windows operating system, always use the “Shut Down” command of the
system to turn off the computer. This is the normal operating procedure that
can prevent the system problems.
1. Click Start () from the taskbar, and then select the Turn Off
Computer option ().
2. Click Turn Off () to turn off the system.
Turning off the computer
1 - 17
Remind you...
1. If you are working on a program, such as Microsoft Word,
you should save the data and close the program first, and
then turn off the computer. Otherwise, you may lose your
data.
2. Confirm that the Hard Disk In-use LED is OFF before
turning off the computer. Also, remember to remove any
CD disk from the drive.
3. Gently tilt down the top cover when you are closing the
cover, and make sure that the cover latches click into
place securely.

1 - 18
MS-XXXX Notebook
2 - 1
This chapter introduces the operating basics for your
Notebook PC, including the use of keyboard, touchpad, LCD
panel, hard disk drive, and optical storage device. It also
includes the advanced features such as audio and
communication functions.
Basics of Using
Notebook PC
2 - 2
M510 Series Notebook PC
2.1 Safety and Comfort Tips
The Notebook PC is a portable platform that allows you to work anywhere.
However, choosing a good workspace is important if you have to work with
your Notebook PC for long periods of time.
Your work area should have enough illumination.
Choose the proper desk and chair, and adjust their height to fit your
posture when operating.
When sitting on the chair, adjust the chair’s back (if available) to support
your back comfortably.
Place your feet flat and naturally on the floor, so that your knees and
elbows have the proper position (about 90-degree) when operating.
Put your hands on the desk naturally to support your wrists.
Adjust the angle/position of the LCD panel, so that you can have the
optimal view.
Avoid using your Notebook PC in the space where may cause your
discomfort (such as on the bed).
The Notebook PC is an electrical device, please treat it with great care to
avoid personal injury.
Set Up Your Work Environment
If you are a beginner to the Notebook PC, please read the following tips to make
yourself safe and comfortable during the operation.
 Loading...