

Page 1

Intel® Optane™ Memory
Installation Guide
Contents
System Requirements .......................................................................................... 2
Installing the Intel
Removing the Intel
®
Optane™ memory ................................................................. 2
®
Optane™ memory ................................................................ 4
Intel® Optane™ Memory Installation Guide
1
Page 2
System Requirements
y Intel® Optane™ memory ready MSI® motherboards
y Supported 7th Gen, or later, Intel
y System BIOS that supports the Intel
later driver
y Operating system: Windows 10 64 bit (UEFI mode).
®
y Intel
Optane™ Memory Module
®
Core™ - i Processor
®
Rapid Storage Technology (Intel® RST) 15.5 or
Installing the Intel® Optane™ memory
1. Update BIOS.
• Download the latest BIOS file that matches your motherboard model from MSI
website.
• Extract and copy the files into the USB flash drive.
• Power on and press Delete key to enter BIOS Setup menu.
• Insert the USB flash drive that contains the BIOS file into the USB port.
• Select the M-FLASH tab and click on Yes to reboot the system and enter the
flash mode.
• Select the BIOS file to update BIOS.
• After completing the updating process, the system will reboot automatically.
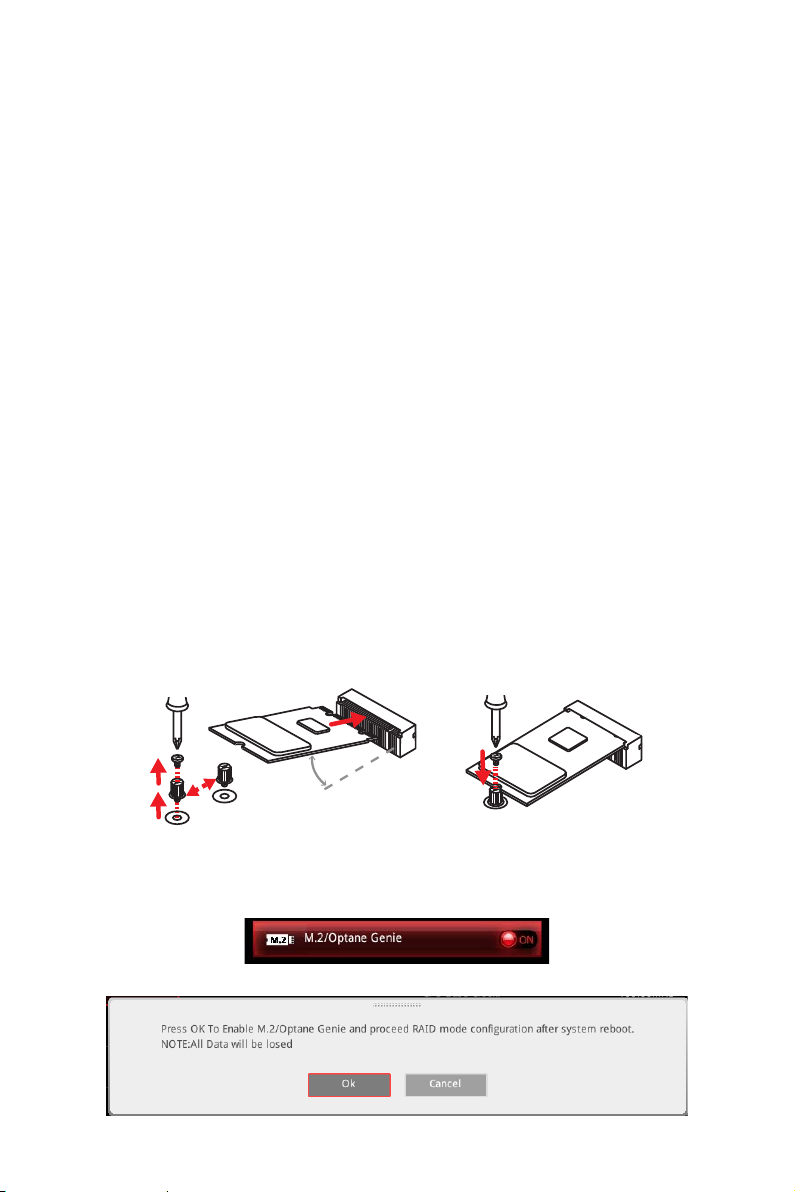
2. Install the Intel
• Power off the system.
• Refer to the User Guide of your motherboard for location to install your Intel
Optane™ memory module.
• Install the Intel
®
Optane™ memory module.
®
Optane™ memory module into the M.2 slot.
®
3. Enable M.2/Optane Genie
• Power on and press Delete key to enter BIOS Setup menu.
• Enable M.2/Optane Genie by clicking the M.2/Optane Genie item.
• Click Ok in the dialog.
Intel® Optane™ Memory Installation Guide
2
Page 3

• Press F10 to save configuration and exit.
4. Install the Intel
®
Optane™ memory SW/driver.
• Reboot to operating system.
• Install the Intel
®
Optane™ memory SW/driver (Intel® Rapid Storage Technology
15.5).
• Reboot System.
5. Enable Intel
• Enable Intel
®
Optane™ Memory.
®
Optane™ Memory via the Intel® Optane™ memory application
(auto-launches upon reboot).
• Click Yes in the dialog.
• Reboot System.
WARNING
Once you enable Intel® Optane™ memory, in order to prevent seriously damage your
operating system, please follow the cautions listed below.
y
DO NOT set the SATA mode back to AHCI in BIOS.
y
DO NOT revert back to older version of the BIOS.
y
DO NOT remove the Intel® Optane™ memory module.
y
DO NOT replace the CPU that is not supported by Intel® Optane™ Memory.
Intel® Optane™ Memory Installation Guide
3
Page 4

Removing the Intel® Optane™ memory
If you no longer want to use Intel® Optane™ memory, you have to disable the Intel®
Optane™ memory before removing the Intel
operating system damage. Please follow the steps below to remove the Intel® Optane™
memory.
1. Disable Intel
• Disable Intel
®
Optane™ Memory.
®
Optane™ Memory via the Intel® Optane™ memory application
(Intel® Rapid Storage Technology).
• Click Yes in the dialog.
®
Optane™ memory module to avoid
• Reboot System.
2. Disable M.2/Optane Genie
• Press Delete key to enter BIOS Setup menu during POST.
• Disable M.2/Optane Genie by clicking M.2/Optane Genie item.
• Click Ok in the dialog.
• Press F10 to save configuration and exit.
• Power off the system.
3. Remove the Intel
Intel® Optane™ Memory Installation Guide
4
®
Optane™ memory module.
 Loading...