

Page 1

Page 2

Page 3

Catalog
English
Française
Español
1
9
17
Page 4
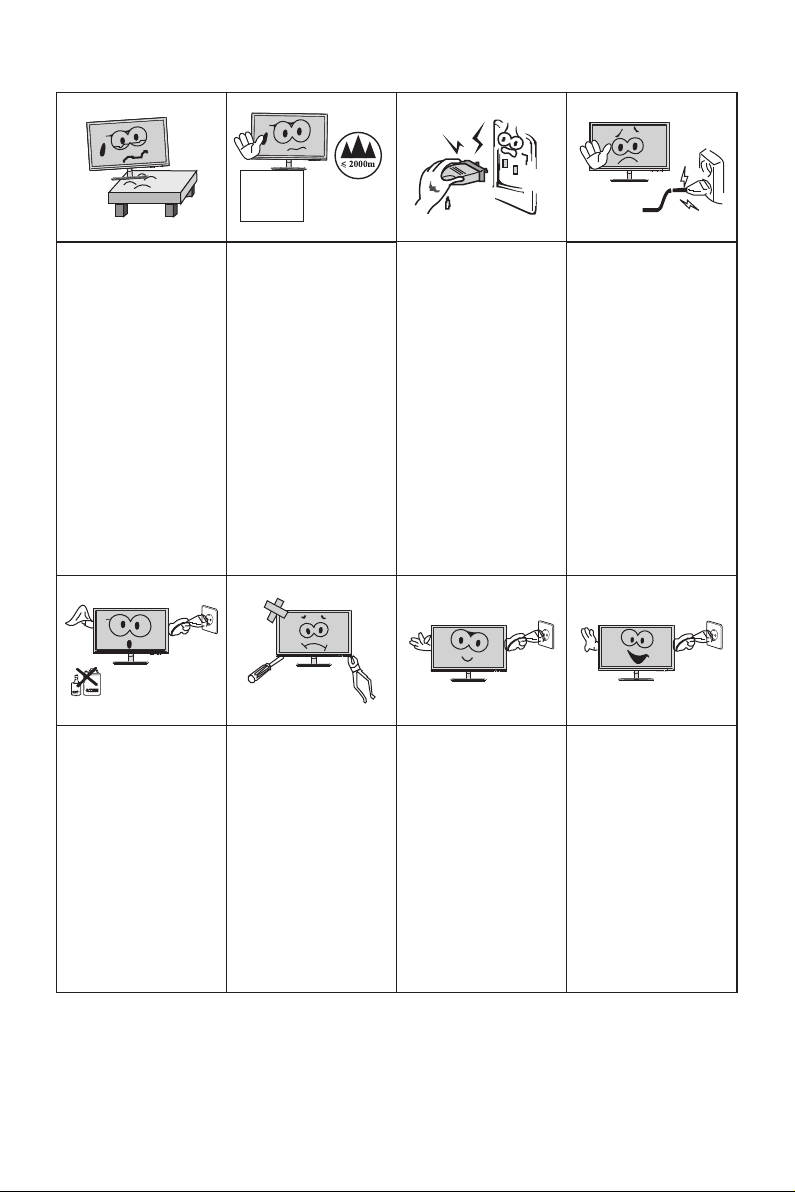
I.Safety Pre vention Measure s
Please always place
this device on a stable
surfa ce; oth erwise,
it m a y f a l l an d b e
dama ged .
Wh e n c lean ing the
dev i c e , be s u r e to
re m o v e the p o w e r
pl u g , u s e a p i e c e
of so f t c loth ra t her
t h a n i n d u s t r i a l
chem i c a l t o c l e a n
the de vic e, be sur e
not to let water enter
the de vic e.
The altitude and the
tropical environment
the adapter fits depend
on which adapter is
used for the device.
The ra tin g pl ate o n
the back of the device
with the above warning
si g n i ndic ates th a t
t h i s p r o d u c t i s
appl i c a b l e f o r t h e
safe use of the region
w i t h a l t i t u d e o f
2,00 0m an d below.
Do not disassemble
this d evi ce w ith out
permi ssion. In ca se
of failure , be sure to
contact a professional
serv ici ng pers on to
fix it. The unauthorized
disa sse mbly of t his
devi ce ma y re sul t
in ele ctr ic shoc k or
fire .
Do not hold the plug
w i t h w e t h a n d ;
ot h erw i se, ele c tri c
sh o c k m a y o c c u r .
Make s ure t he p lug
ha s a g o o d t o u c h
because poor touch
may ca use f ir e.
In case of rare smell
or no i se out of thi s
dev i c e , be s u r e to
imme dia tely cu t off
the power supply and
as k a pr o fess i ona l
serv ici ng pers on to
fix th e pro bl em.
Do not use a broken
power plug nor keep
a power cord near heat
sour ce; o th erw ise,
e l e ct r ic s h o ck o r
fire m ay oc cu r.
Wh e n t h i s d e v i c e
is idle fo r long time,
be su r e t o p o wer it
off; otherwise, electric
sh o c k o r f i r e m a y
occu r.
Note:
The device w ith AC switch may u se su ch AC switch as cut-off component .
The device without AC switch may use power plug or coupler as cut-off component.
In case of the n orm al use of the equip m e nt, make sure the cut- o ff compon e nt
can be ac ces sed easily.
All s pecif icatio ns and in format ions ar e subje ct to cha nge wit hout no tice.
-1-
Page 5
II.Install ation Instructi ons
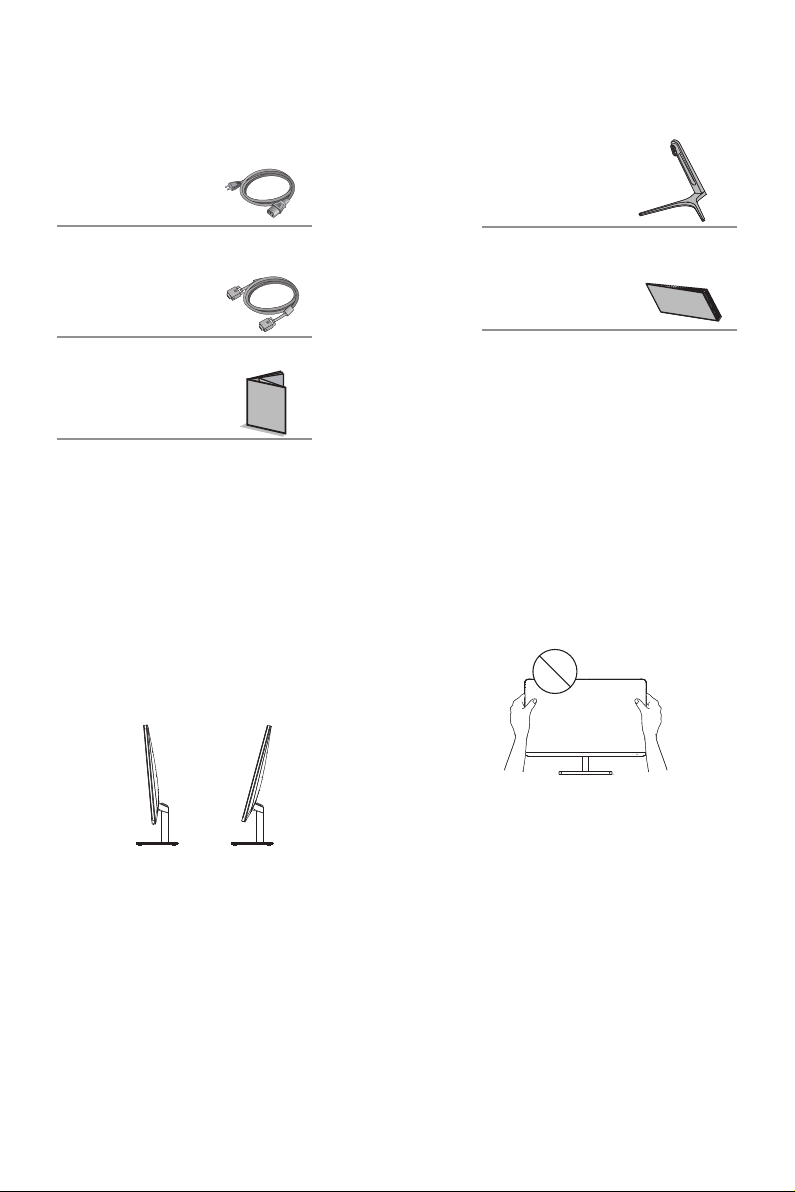
1.Acc ess ories
Power cord
Base/Stand
Signal cable
User manual
(The above pictures are for illustration only and the physical accessories shall govern.)
2. An gle Adj ustment
2.1 Th e screen can be ad jus ted by
inc l i ni n g f orw a r d an d backwa r d ;
ho w e ver, t he s p ecific adju s tment
de p e nds on t h e s p ecific mode l of
the d e v ic e . G e n e rally, it m a y be
inclined 5 ± 2 °fo r w ard a n d 15± 2 °
backw ard .
Warranty card
2.2 When adj usting the ang le of t he
monitor, be sure not to touch or press
the area of th e scr een.
(The above pictures are for illustration only and the physical accessories shall govern.)
All s pecif icatio ns and in format ions ar e subje ct to cha nge wit hout no tice.
-2-
Page 6
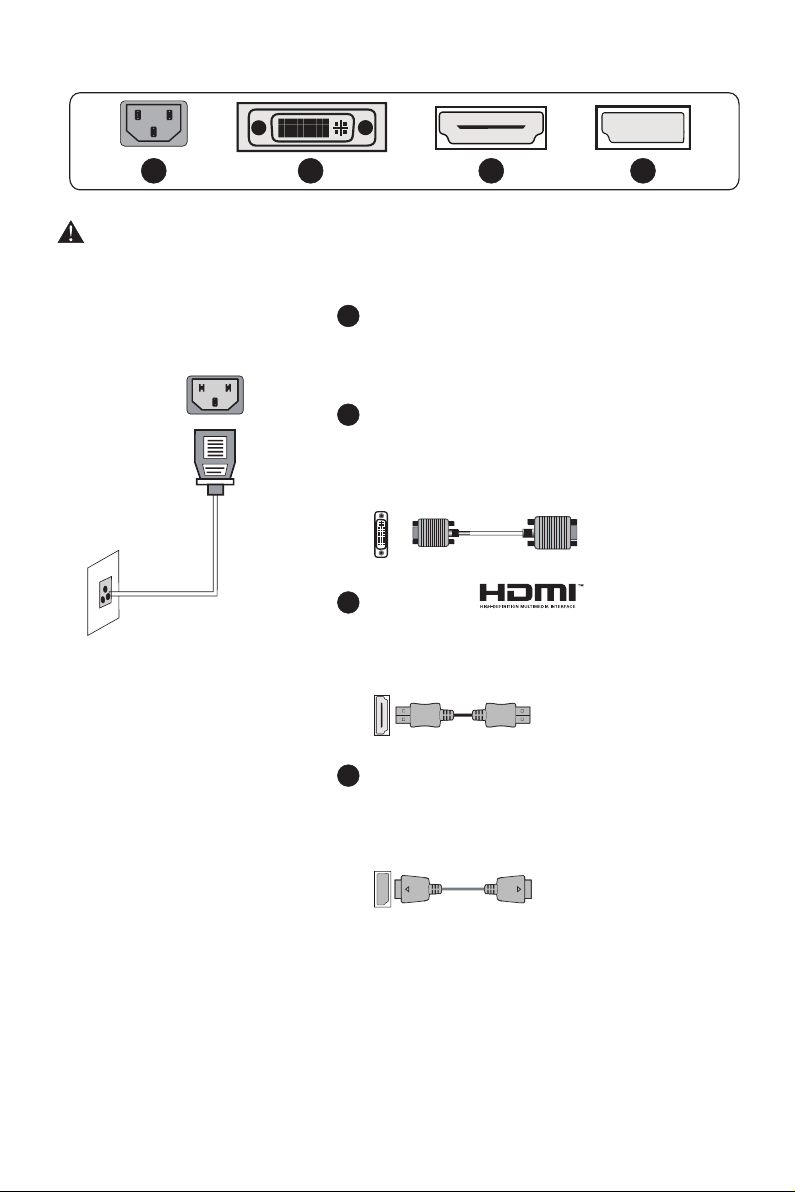
III. Connect t he Monitor to PC
1
2
3
Before connecting the LCD monitor to the PC, please power down the PC and
the monitor.
1
Power P lug
Conne ct th e power cord of the mon ito r into
the POWER po rt in t he back of the mon ito r.
2
DVI Port
Co n n ect the DVI cable int o the D VI IN port
in t h e b a c k of the m o n i tor ( t h i s n e e ds t he
suppo rt of t he mo nitor).
3
HDMI Port
Conne ct th e H D MI c a b le in to th e HDMI IN
Model with inbuilt power supply
* War ni ng : Always use t he p ow er
cord o f st an da rd c onfig ur at io n.
po r t in t o t h e back of the monitor (this needs
the suppor t of th e monitor).
4
4
DP Por t
Co n n ect the DP cable into the DP IN port of
th e mon i tor ( this needs the supp o r t o f th e
monitor) .
(The above pictures are for illustration only and the physical accessories shall govern.)
All s pecif icatio ns and in format ions ar e subje ct to cha nge wit hout no tice.
-3-
Page 7

IV. User Setu p
1. Schemat ic Di agram of Keys
M
E
1 2 3 4 5 6
2. Descrip tio n of Keys' Funct ion s
1.
2.
3.
4.
5.
6.
M
▲
E
LED
indicator
light
Pops u p the m en u/B acks to t he prev iou s menu (i n cas e of m ain m enu,
exit s fro m th e who le menu ).
Wh e n t he menu is ac t ivat ed, use d as th e l e ft func t ion sel ecti o n k ey,
▲
and de cre ases pr ogres siv ely the v alue of t he pr ogres s bar; wh en th e
menu i s ina ctiva ted, us ed as t he s pec ified s hor tc ut mo de hot ke y (for
sigh tin g devic e).
When t he me nu i s act ivate d, us ed a s the r ight fu nctio n sel ectio n key,
and in cre ases pr ogres siv ely the v alue of t he pr ogres s bar; wh en th e
me n u i s i nac tivat ed, u s e d as t h e sp e c i f i e d sh o r t c u t mod e h ot k e y
(FPS /RTS mo de).
If the m enu i s ac tiv ated, c hoose s the c orres pondi ng fu nctio n.
Powe r swi tc h: Po wers on /off th e monit or.
Blue: in normal switch-on state ; flick er ing in blue: in power-saving state.
Note: The physical k eys o f the s pecific mode l sha ll govern .
All s pecif icatio ns and in format ions ar e subje ct to cha nge wit hout no tice.
-4-
Page 8
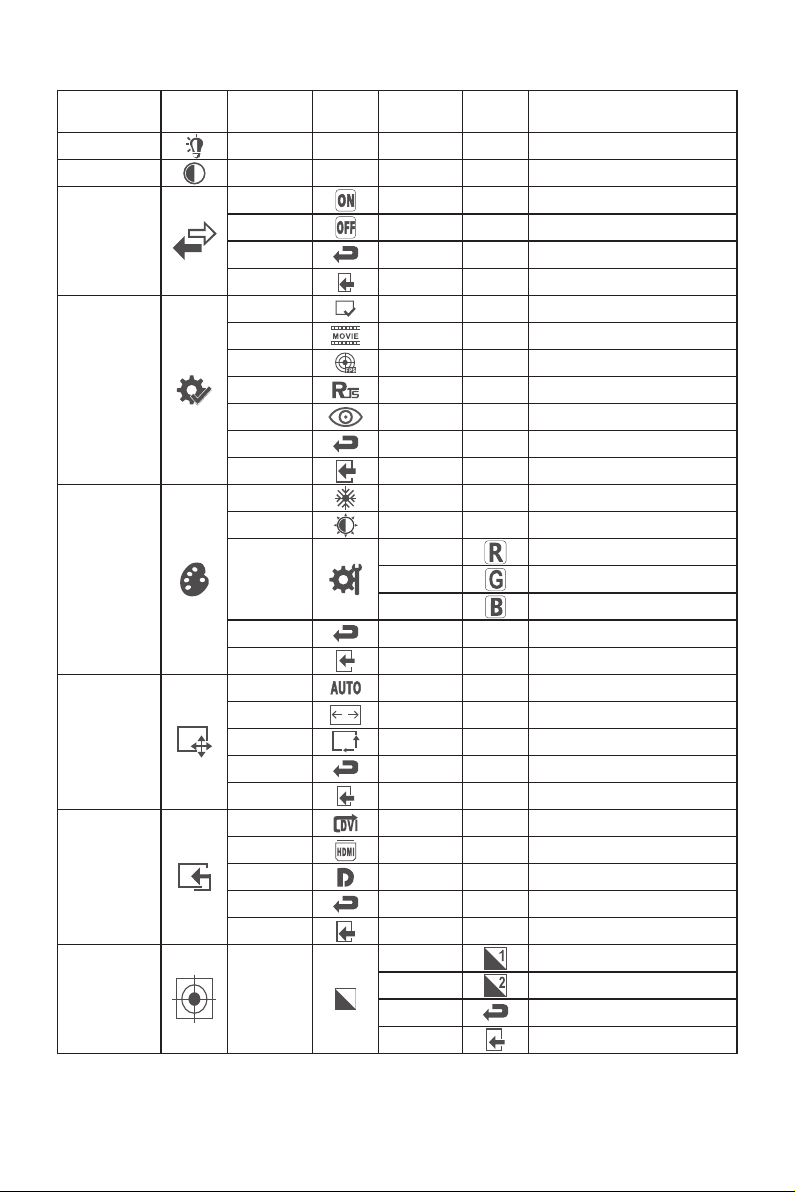
V. Operatio n Menu (OSD) Function Des criptions
Fir st l ev el
menu it em
Brightness
Contrast
DCR
Mode
Color Temp.
Aspect
Input
Adjust
First level
menu icon
Secon d le ve l
menu it em
NONE
NONE
On
Off
Return
Exit
Standard
Movie
FPS
RTS
EyeSaver
Return
Exit
Cool
Warm
User
Return
Exit
Auto
16:9
4:3
Return
Exit
DVI
HDMI
DisplayPort
Return
Exit
Gamma
Second
level
menu icon
NONE
NONE
Thi rd l ev el
menu it em
NONE
NONE
NONE
NONE
NONE
NONE
NONE
NONE
NONE
NONE
NONE
NONE
NONE
Red
Green
Blue
NONE
NONE
NONE
NONE
NONE
NONE
NONE
NONE
NONE
NONE
NONE
NONE
Gamma1
Gamma2
Return
Exit
Third level
menu icon
NONE
NONE
NONENONE
NONENONE
NONE
NONE
NONE
NONE
NONE
NONE
NONE
NONE
NONE
NONE
NONE
NONE
NONE
NONE
NONE
NONE
NONE
NONE
NONE
NONE
NONE
NONE
NONE
Descr ip ti on
Adjus t di sp la y br ightn es s
Adjust display contrast
Activate dynamic contrast
Inactive dynamic contrast
Return to the previous menu
Exit from the whole menu
Normal work mode
Movie mode
FPS game mode
RTS game mode
Eye protection ray filter application mode
Return to the previous menu
Exit from the whole menu
Set as cold color temperature
Set as warm color temperature
Fine tuning of red color temperature
Fine tuning of green color temperature
Fine tuning of blue color temperature
Return to the previous menu
Exit from the whole menu
Automatically adjust picture aspect ratio
Picture in 16:9 mode
Picture in 4:3 mode
Return to the previous menu
Exit from the whole menu
DVI (digital) signal input
HDMI (digital) signal input
Display port (digital) signal input
Return to the previous menu
Exit from the whole menu
Adjust color tone brightness grey 1
Adjust color tone brightness grey 2
Return to the previous menu
Exit from the whole menu
All s pecif icatio ns and in format ions ar e subje ct to cha nge wit hout no tice.
-5-
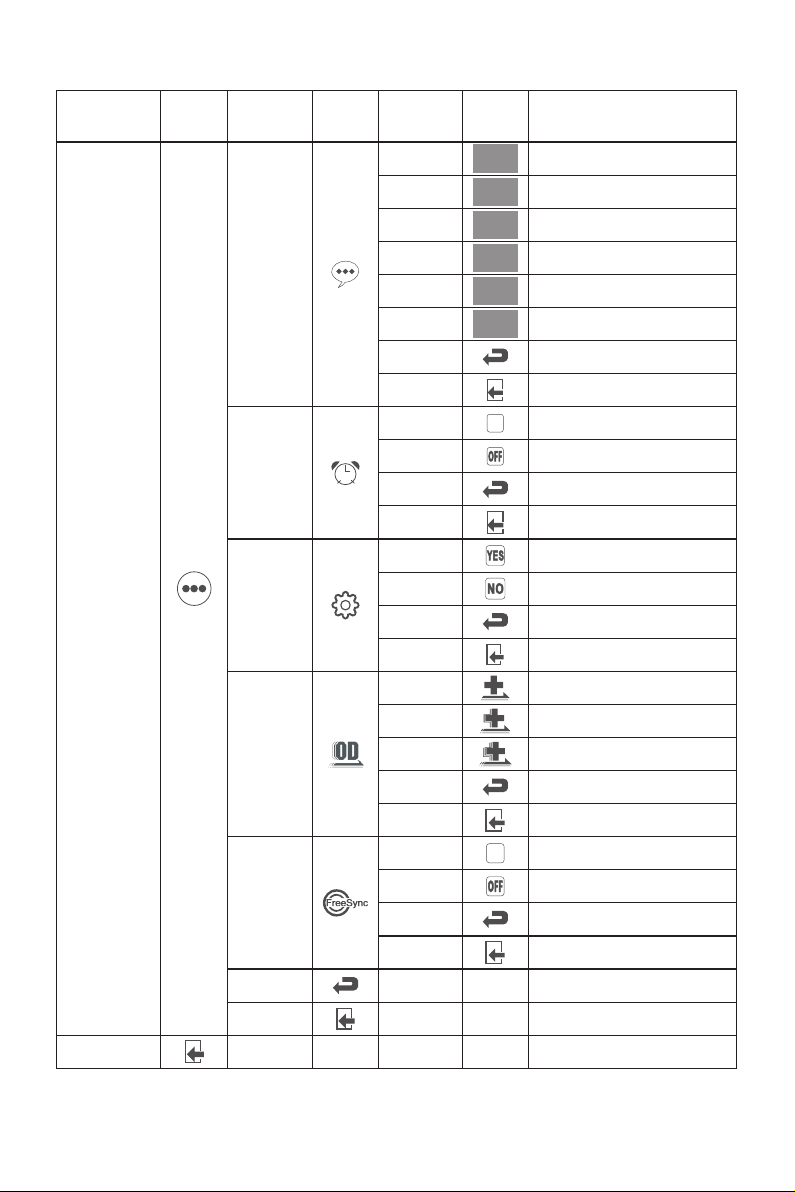
Page 9
Fir st l ev el
menu it em
First level
menu icon
Secon d le ve l
menu it em
Language
Second
level
menu icon
Thi rd l ev el
menu it em
English
Française
Deutsch
Italiano
Español
Third level
menu icon
English
Française
Deutsch
Italiano
Español
Descr ip ti on
English
Française
Deutsch
Italiano
Español
Other
Exit
Power
Off
Reset
Over
driver
FreeSync
Return
Exit
繁中
Return
Exit
On
Off
Return
Exit
YES
NO
Return
Exit
Off
Normal
Extreme
Return
Exit
On
Off
Return
Exit
NONE
NONE
NONENONE
NONE
繁中
繁體中文
Return to the previous menu
Exit from the whole menu
Automatically turn off after saving
ON
power for 1min
Inactivate the function of timed
switch-off
Return to the previous menu
Exit from the whole menu
Reset to factory setup
Exit from this function
Return to the previous menu
Exit from the whole menu
Normal mode
OD general mode, reduce
motion blur
OD extra-high mode, reduce
motion blur
Return to the previous menu
Exit from the whole menu
Activate FreeSync function,Only support AMD
ON
display (this needs the support of the monitor)
Inactivate FreeSync function (this
needs the support of the monitor)
Return to the previous menu
Exit from the whole menu
Return to the previous menu
NONE
NONE
Exit from the whole menu
NONE
Exit from the whole menu
Note: The functions may be adjusted due to specific model or the upgrade of software version.
The ph ysi ca l mod el shal l gov ern.
All s pecif icatio ns and in format ions ar e subje ct to cha nge wit hout no tice.
-6-
Page 10

VI. FAQ
Faults occ urr ing
The pow er in dicator
light i s not o n
Impossible plug-and-play
Dimmi ng pi cture
Flickeri ng picture or
picture wi th ri pples
The pow er in dicator
light is on (f lic kering),
but the moni tor h as no
pictures .
Possible s olu tions
◆
Check i f the p ower is on.
◆
Check i f the p owe r cord is connec ted .
◆
Check if the function of plug-and-play of the device
is compati ble w ith PC.
◆
Ch e c k i f th e dis p lay c ard is c o mpatib l e w i t h t h e
plug-and -play function.
◆
Adjus t bri ghtness and co ntr ast.
◆
There may be electrical appliances or equipment
with elect ron ic disturban ce.
◆
Check i f the P C pow er is on.
◆
Check i f the P C dis play card is inserted properly.
◆
Check if the signal cable of the monitor is correctly
connecte d wit h the PC.
◆
Check the signal cable plug of the monitor and make
sure every p in ha s no bendin g.
◆
Observe the indicator light by pressing the Caps
Lock key on the PC keyboard and check if the PC
is working .
Color s hor tage
(red, gree n and blue)
Picture with color difference
(whit e loo ks not white)
◆
Check the si gnal cable of th e mon itor and make
sure every p in ha s no bendin g.
◆
Adjus t RGB c olo r or reselect co lor t emperature .
Pleas e con firm the default va lue s of the output dy nam ic range and the p ixe l
format in th e gra phics Settin gs is " all". when the b rig htness of the sc ree n is
highe r tha n usual.
All s pecifi catio ns and in format ions ar e subje ct to cha nge wit hout no tice.
-7-
Page 11

VII. Product S pecifications
Diagonal
dimensions
60cm(23.6″)
68.6cm(27″)
80.0cm(31.5″)
Ambient
temperature
Humidity
Picture
aspect ratio
16:9
16:9
16:9
Storage
temperature
Working
temperature
RH for operation
Picture
dimensions (mm)
521.4*293.28
597.9*336.3
698.4*392.85
-20℃ to 60℃
0℃ to 40℃
80%
Dot distance (mm)
0.272
0.3114
0.3637
Optimal
resolution
1920*1080
1920*1080
1920*1080
Note: The actual app lic ation of the abo ve pa rameters sha ll be s ubject to the
speci fic m odel.
VIII. Table of P roduct Preset Modes
In DVI/DP connection mode
Displ ay
dimen si on s
23.6" / 27"
/ 31.5"
Asp ec t ra ti o
16:9
(
(
)
70Hz
72.8 Hz
Re m a r k: W h e n t h e r e s o lu t i o n a r e 2 5 6 0 *1 4 4 0 @6 0 H z / 3 4 4 0 * 1 4 40 @ 6 0 Hz /
1920* 108 0@144Hz/25 60* 1440@144Hz /38 40*2160@30 Hz co nnection via D VI
port, pls ch oos e 24+1 pin do ubl e - channel DVI ca ble s.
Prese t res olu tion/Refre sh ra te
(
60/7 5/
)
(
60/70 /75/
120/1 44Hz
)
(
60/70/7 5/
120/144 Hz
(
60/7 5/120 /
60/1 20/
)
)
144H z
144H z
(
(
60/1 20/
)
)
144H z
60/1 20/
144H z
(
(
(
60/1 20/
144H z
60/1 20/
)
)
144H z
)
60/1 20/
144H z
(
60/1 20/
)
)
144H z
In HDMI conn ect ion mode
Displ ay
dimen si on s
23.6" / 27"
/ 31.5"
Asp ec t ra ti o
16:9
(
(
)
70Hz
72.8 Hz
Prese t res olu tion/Refre sh ra te
60/7 5/
(
60/70 /75/
)
)
120Hz
(
60/70/7 5/
120Hz
(
)
60/7 5/
60/1 20Hz
)
120H z
(
)(
)(
(
) (
) (
60/1 20Hz
60/1 20Hz
)
60/1 20Hz
60/1 20Hz
60/1 20Hz
) (
60/1 20Hz
Note: “O” in dic ates the corre spo nding resolu tio n/refresh ra te is s upported.
“X” indi cat es th e correspond ing resoluti on/ refresh rate i s not s upp orted.
Note: The actual app lic ation of the abo ve pa rameters sha ll be s ubject to the
speci fic m odel.
All s pecif icatio ns and in format ions ar e subje ct to cha nge wit hout no tice.
-8-
)
Page 12

I. Mesures de pr évention en matiè re de sécurité
Veuil lez t oujou rs
plac er ce t appar eil
sur un e sur fa ce
stab le; S in on, i l
peut t omb er e t êtr e
endo mma gé.
Lors du nettoyage
de l'appareil, veillez
retirer la fiche
d'alimentation et
utiliser un morceau
de tissu doux plutôt
que produit
chimique industriel
pour nettoyer
l'appareil, veillez à
ne pas laisser l'eau
pénétrer dans le
dispositif.
L'altitude et
l'environnement
tropical auxquels
l'adaptateur s'adapte
dépendent du type
d'adaptateur utilisé
pour l'appareil. La
plaque signalétique à
l'arrière de l'appareil
avec un signe
d'avertissement
supérieur indique
que ce produit est
applicable pour
l'utilisation en toute
sécurité dans la
région avec l'altitude
de 2000 m et moins.
Ne pas démonter
cet appareil sans
autorisation. En cas
d'échec,veuillez
vous assurer de
contacter la
personne de service
professionnel pour
le réparer. Le
démontage non
autorisé de cet
appareil peut
entraîner un choc
électrique ou un
incendie.
Ne pas t eni r la
fich e ave c le s
main s mou illée s;
Sino n, un c hoc
élec tri que peu t se
prod uir e. Veuil lez
s'as sur er q ue la
fich e pos sè de d' un
bon co nta ct, car u n
mauv ais c ontac t
peut c aus er un
ince ndi e.
En cas d'odeur rare
ou de bruit rare
sorta nt de ce
dispo sitif,veuille z
vous assurer de couper
imméd iatement
l'ali mentation et
deman der à une
personne de service
profe ssionnel pour
répar er.
Ne pas utiliser une
fiche d'alim entation
cassé e ni garder un
cordo n
d'ali mentation près
de la source de
chale ur; Sin on, un
choc électri que ou
un incendie peut se
produ ire.
Lorsque ce
dispositif est inactif
pendant une longue
période, veuillez
vous assurer de
l'éteindre; Sinon, un
choc électrique ou
un incendie peut se
produire.
N.B. :
L'ap par eil ave c commu tat eur CA peu t utili ser c e commu tateu r CA com me un com posan t
de cou pur e.
L'ap par eil ave c commu tat eur CA peu t utili ser u ne fich e secte ur ou u n coupl eur com me
comp osa nt de cou pure. E n cas d 'u til isati on no rmale d e l'équ ipe ment, s 'assu rer q ue le
comp osa nt de cou pure pe ut êt re f aci lemen t acc es sib le.
Toutes l es spéc ifica tions e t inform ation s sont su jettes à c hange ment sa ns préav is.
-9-
Page 13

II. Instruct ions d'installa tion
1. Acce sso ires
Cordon
d'alimentation
Base/Socle
Câble du signal
Manuel utilisateur
(Les images ci-des sus sont à des fins d'illust ration uniquement et les accessoires physi ques
prévaudront.)
2. Aj ustement ang ula ire
2.1 L'écran peut être ajusté en inclinant
vers l'avant et vers l'arrière; Toutefois,
l'ajustement spécifique dépend du
modèle spécifique de l'appareil. En
général, il peut être incliné de 5±2° vers
l'avant et de 15±2° vers l'arrière.
Carte de garantie
2.1 Lors du ré glage de l'ang le du
moniteur, v eillez à ne pas to uch er
ou appu yer s ur la zone de l'éc ran .
(Les images ci-des sus sont à des fins d'illust ration uniquement et les accessoires physi ques
prévaudront.)
Toutes l es spéc ifica tions e t inform ation s sont su jettes à c hange ment sa ns préav is.
-10-
Page 14

III. Connect er moniteur au PC
1
2
3
4
Avant de connecter l'écran LCD au PC,veuillez activer le PC et le moniteur.
1
Fiche sect eur
Connecter le cordon d'alimentation du moniteur
au port ALIMENTATION à l'arrière du moniteur.
2
Port DVI
Connecter le câble DVI au port DVI IN à l'arrière du
moniteur (cela nécessite le support du moniteur).
Port HDMI
3
Connecter le câble HDMI au port HDMI IN à l'arrière
Modèle avec alimentation intégrée
Ave rtissem en t: U ti liser tou jo ur s le
*
cord on d 'a li mentati on a ve c un e
conf ig ur at io n stand ar d.
du moniteur (cela nécessite le support du moniteur).
Port DP
4
Conne cte r le câble DP au po rt DP IN du
moniteur ( cel a nécessi te le s upport du
moniteur ).
(Les images ci-des sus sont à des fins d'illust ration uniquement et les accessoires physi ques
prévaudront.)
Toutes l es spéc ifica tions e t inform ation s sont su jettes à c hange ment sa ns préav is.
-11-
Page 15

IV. Configu ration utilisateur
1. Diag ram me schématiq ue de s touches
M
1 2 3 4 5 6
2. Descrip tio n des fonction s clé s
1.
2.
3.
4.
5.
6.
M
▲
E
Voyant
lumin eux
LED
Affich er le m enu/R etour a u men u précé dent (d ans l e cas du me nu
prin cip al, sor t du menu e nti er).
Lors que l e menu es t activ é, ut il isé c omme to uch e de s éle ction d e la
▲
fonc tio n ga uch e, et dim inu e progr essiv eme nt la val eur de la b arr e de
prog res sion; L orsqu e le me nu est in activ é, ut il isé c omme to uch e de
racc our ci d u mod e racco urc i spéci fié (po ur le d ispos itif de v isé e).
Lors que l e menu es t activ é, ut il isé c omme to uch e de s éle ction d e la
fonc tio n ga uch e, et aug men te p rog ressi vem en t la va leur de l a bar re
de pro gre ssion ; Lorsq ue le m enu est i nacti vé, u ti lis é comme t ouc he
de rac cou rci du mo de racc our ci spéc ifié( Mod e VPS/RTS ).
Si le me nu es t ac tiv é, choi sis se z la fo nctio n corre spo ndant e.
Inte rru pt eur d 'alim ent at ion : Active r/D és act iver le m oni te ur.
Bleu : en ét at d e mis e en marc he no rm al; C ligno te en b leu: en é tat
d'éc ono mie d'é nergi e.
E
N.B.: Les cl és ph ysiques du mod èle s pécifique pr évaudront.
Toutes l es spéc ifica tions e t inform ation s sont su jettes à c hange ment sa ns préav is.
-12-
Page 16

V. Descript ions des fonctions du men u d'opération (OS D)
Élément de
menu de
premier niveau
Luminosité
Contraste
DCR
Mode
T°. Couleur
Aspect
Entrée
Adjuster
Icône de menu
de premier
niveau
Élém ent de
men u de
deu xième n iveau
AUCUN
AUCUN
Activé
Désactivé
Retourner
Quitter
Standard
Cinéma
VPS
RTS
Eye Care
Retourner
Quitter
Froide
Chaude
Utilisateur
Retourner
Quitter
Auto.
16:9
4:3
Retourner
Quitter
DVI
HDMI
DP
Retourner
Quitter
Gamma
Icône de menu
de deuxième
niveau
AUCUN
AUCUN
Élém ent de
men u de
troisième niveau
AUCUN
AUCUN
AUCUN
AUCUN
AUCUN
AUCUN
AUCUN
AUCUN
AUCUN
AUCUN
AUCUN
AUCUN
AUCUN
Rouge
Vert
Bleu
AUCUN
AUCUN
AUCUN
AUCUN
AUCUN
AUCUN
AUCUN
AUCUN
AUCUN
AUCUN
AUCUN
AUCUN
Gamma1
Gamma2
Retourner
Quitter
Icône de menu
de tr oisiè me
niv eau
AUCUN
AUCUN
AUCUNAUCUN
AUCUNAUCUN
AUCUN
AUCUN
AUCUN
AUCUN
AUCUN
AUCUN
AUCUN
AUCUN
AUCUN
AUCUN
AUCUN
AUCUN
AUCUN
AUCUN
AUCUN
AUCUN
AUCUN
AUCUN
AUCUN
AUCUN
AUCUN
AUCUN
AUCUN
Des cript ion
Ajust er l a Lu mi no sité de l 'é cr an
Ajuster le Contraste de l'affichage
Activer le Contraste dynamique
Désactiver le Contraste dynamique
Retourner au menu précédent
Quitter de l'ensemble du menu
Mode de travail normal
Mode Cinéma
Mode de jeu VPS
Mode de jeu RTS
Mode d'application du filtre à rayons
Retourner au menu précédent
Quitter de l'ensemble du menu
Définir comme T°. Couleur froide
Définir comme T°. Couleur chaude
Réglage fin de T°. Couleur rouge
Réglage fin de T°. Couleur verte
Réglage fin de T°. Couleur bleue
Retourner au menu précédent
Quitter de l'ensemble du menu
Ajuster automatiquement le rapport
Image en mode 16: 9
Image en mode 4: 3
Retourner au menu précédent
Quitter de l'ensemble du menu
Entrée de signal DVI (numérique)
Entrée de signal HDMI(numérique)
Entrée du signal du DP (numérique)
Retourner au menu précédent
Quitter de l'ensemble du menu
Ajuster la luminosité du ton de
couleur gris 1
Ajuster la luminosité du ton de
Retourner au menu précédent
Quitter de l'ensemble du menu
Toutes l es spéc ifica tions e t inform ation s sont su jettes à c hange ment sa ns préav is.
-13-
Page 17

Élément de
menu de
premier niveau
Icône de menu
de premier
niveau
Élém ent de
men u de
deu xième n iveau
Langue
Icône de menu
de deuxième
niveau
Élém ent de
men u de
troisième niveau
English
Française
Deutsch
Italiano
Español
Icône de menu
de tr oisiè me
niv eau
English
Française
Deutsch
Italiano
Español
Des cript ion
English
Française
Deutsch
Italiano
Español
Autre
Quitter
Éteindre
Réinit.
OD
FreeSync
Retourner
Quitter
繁中
Retourner
Quitter
Activé
Désactivé
Retourner
Quitter
Oui
Non
Retourner
Quitter
Off
normal
l'extrême
Retourner
Quitter
Activé
Désactivé
Retourner
Quitter
AUCUN
AUCUN
AUCUNAUCUN
AUCUN
繁中
ON
ON
AUCUN
AUCUN
AUCUN
繁體中文
Retourner au menu précédent
Quitter de l'ensemble du menu
Désactiver automatiquement après avoir
économisé de l'énergie pendant 1
Désactiver la fonction de coupure
programmée
Retourner au menu précédent
Quitter de l'ensemble du menu
Réinit. la configuration d'usine
Quitter cette fonction
Retourner au menu précédent
Quitter de l'ensemble du menu
Mode normal
Mode général OD, réduire le flou de
mouvement
Mode OD extra-haute, réduire le flou
de mouvement
Retourner au menu précédent
Quitter de l'ensemble du menu
Activer la fonction FreeSync. Supporter l'affichage
AMD (cela nécessite le support du moniteur)
Désactiver la fonction FreeSync.(cela
nécessite le support du moniteur)
Retourner au menu précédent
Quitter de l'ensemble du menu
Retourner au menu précédent
Quitter de l'ensemble du menu
Quitter de l'ensemble du menu
N.B. : Les fon cti ons peu ven t êt re aj ustée s en rais on du m odèle s péc if iqu e ou de la mi se à
nive au de l a versi on du log ici el. Le mo dèle ph ysi que pré vaudr a.
Toutes l es spéc ifica tions e t inform ation s sont su jettes à c hange ment sa ns préav is.
-14-
Page 18

VI. Question s Fréquemment Pos ées
Défau ts su rvenus
Le voyant d'alimentation
n'est pas allumé
Prêt-à-l'emploi impossible
Image d e gra dation
Photo clignotante ou image
avec des ondulations
Le voyant d'alimentation
est allumé (clignotante),
mais le moniteur n'a pas
d'images.
Solution s pos sibles
◆
Vérifier s i l'a ppareil e st mi s sous tension .
◆
Vérifier s i le co rdon d'al ime ntation est conne cté .
◆
Vérifier si la fonction Prêt-à-l'emploi de l'appareil
est compatible avec le PC.
◆
Vérifier si la carte d'affichage est compatible avec
la fonction Prêt-à-l'emploi.
◆
Ajuster la l uminosité et le con tra ste.
◆
Il peut y avoi r des a ppareil s éle ctriques ou de s
équipements avec des perturbations électroniques.
◆
Vérifier s i le PC e st activé.
◆
Vérifier si la carte d'affichage du PC est correctement
insérée.
◆
Vérifier s i le câ ble de sign al du m oniteur est
correcte men t connecté ave c le PC .
◆
Vérifier la fiche du câble de signal pour le moniteur
et s'assurer que chaque broche n'a pas de flexion.
◆
Observer l e voy ant lumineux e n appuyant sur l a
touche "Verrouillage des Majuscules"sur le clavier
du PC et vérif ier s i le PC fonction ne.
Défic it de c ouleur
(roug e, ve rte e t bleue)
Image avec différence
de couleur (aspect blanc
non bla nc)
◆
Vérifier l e câble de signa l pou r le moniteur et
s'assurer que chaque broche n'a pas de flexion.
◆
Ajuster la c ouleur RGB ou ré-sé lectionner l a
T°. Co ule ur.
* Veuill ez co nfirmer les va leu rs par défaut de l a pla ge dynamique d e sor tie
et le format d e pix el dans les para mètres graphiqu es est «tous» lo rsq ue la
lumin osi té de l'écran es t plu s élevé que d'ha bit ude.
Toutes l es spéc ifica tions e t inform ation s sont su jettes à c hange ment sa ns préav is.
-15-
Page 19

VII. Spécifi cations du produi t
Dimensions
diagonales
60cm(23.6")
68.6cm(27″)
80.0cm(31.5″)
Température
ambiante
Humidité
Ratio d'aspect
d'image
16:9
16:9
16:9
Température
de stockage
Température
de travail
RH pour l'opération
Dimensions
d'image (mm)
521.4*293.28
597.9*336.3
698.4*392.85
-20℃ to 60℃
0℃ to 40℃
80%
Distance du
point(mm)
0.272
0.3114
0.3637
Résolution
optimale
1920*1080
1920*1080
1920*1080
N.B.: L'application réelle des paramètres ci-dessus doit être soumise au modèle
spéci fiq ue.
VIII. Tablea u des modes prédéfi nis du produit
En mode d e con nexion DVI/D P
Dim ens ion s
de l'é cra n
23.6" / 27"
/ 31.5"
Ratio
d'asp ec t
16:9
Remar que : Lorsque la rés olu tion est de 2560 *14 40@60Hz/34 40* 1440@60Hz/
1920* 108 0@144Hz/25 60* 1440@144Hz /38 40*2160@30 Hz co nnexion via le
port DVI, ve uil lez choisir de s câb les DVI à double c anal de 24 + 1 broch e.
Résol uti on prédéfini e/Tau x de rafraîchi sse ment
(
(
(
60/70/7 5/
120/144 Hz
(
60/1 20/
)
)
144H z
60/7 5/120 /
144H z
60/1 20/
)
)
144H z
70Hz
72.8 Hz
)
120/1 44Hz
)
(
(
(
)
60/70 /75/
60/7 5/
(
60/1 20/
144H z
(
60/1 20/
)
)
144H z
(
60/1 20/
144H z
(
(
60/1 20/
144H z
60/1 20/
)
)
144H z
)
En mode d e con nexion HDMI
Dim ens ion s
de l'é cra n
23.6" / 27"
/ 31.5"
Ratio
d'asp ec t
16:9
(
(
)
70Hz
72.8 Hz
Prese t res olu tion/Refre sh ra te
60/7 5/
(
60/70 /75/
)
)
120Hz
(
60/70/7 5/
120Hz
(
)
60/7 5/
60/1 20Hz
)
120H z
(
)(
)(
(
) (
) (
60/1 20Hz
60/1 20Hz
)
60/1 20Hz
60/1 20Hz
60/1 20Hz
) (
60/1 20Hz
N.B.: "O" in diq ue que la résolu tio n correspond ante/tau× de rafr aîc hissement
est suppor té( e).
"×" indiqu e que l a résolution c orr espondante /ta u× de rafraîch iss ement
est non supp ort é(e).
N.B.: L'ap pli cation réell e des paramètr es ci -dessus doit ê tre s oum ise au
modèl e spé cifique.
Toutes l es spéc ifica tions e t inform ation s sont su jettes à c hange ment sa ns préav is.
-16-
)
Page 20

I. Medidas de Pr evención de la Segu ridad
Por fa vor c ol oqu e
este d isp ositi vo
sobr e una
supe rfi ci e est able;
de lo co ntr ario,
podr ía ca erse y
daña rse .
Al limpiar el
dispositivo,
asegúrese de quitar
el enchufe de
alimentación, utilice
un trozo de paño
suave en lugar de
químico industrial
para limpiar el
dispositivo,
asegúrese de no
dejar entrar agua en
el dispositivo.
La altitud y el
ambiente tropical
que se adapte al
adaptador dependen
del adaptador que se
utiliza para el
dispositivo. La placa
de características en
la parte posterior del
dispositivo con la
señal de advertencia
antedicha indica que
este producto es
aplicable para el uso
seguro de la región
con la altitud de 2,
000 m y abajo.
No desarme este
dispositivo sin
permiso. En caso de
fallo, asegúrese de
contactar a la
persona de servicio
profesional para
reparación. El
desmontaje
autorizado de este
dispositivo puede
provocar una
descarga eléctrica o
un incendio.
Do not hold the plug
with wet hand;
otherwise, electric
shock may occur.
Make sure the plug
has a good touch
because poor touch
may cause fire. No
sostenga el enchufe
con la mano húmeda;
de lo contrario, se
puede producir una
descarga eléctrica.
Cerciórese de que el
enchufe tenga un
buen tacto porque el
tacto mal puede
causar el fuego.
En caso de olor raro
o ruido fuera de este
dispositivo,
asegúrese de cortar
inmediatamente la
fuente de
alimentación y
pedirle a una
persona de servicio
profesional para
solucionar el
problema.
No utilice un enchufe
de ali men tació n
roto n i man te nga
un cab le de
alim ent ación c erca
de fuentes de calor;
de lo co ntr ario,
pued e pro ducir se
una de sca rga
eléc tri ca o un
ince ndi o.
Cuan do es te
disp osi tivo es té
inac tiv o duran te
much o tie mp o,
aseg úre se de
apag arl o; de lo
cont rar io, pue de
prod uci rse una
desc arg a eléct rica
o un inc end io.
Nota :
El dis pos itivo c on inte rru ptor de C A puede us ar es te inte rrupt or de C A como
comp one nte de co rte.
El dis pos itivo s in inte rru ptor de C A puede ut ili zar el en chufe o e l aco plado r de ener gía
como c omp onent e del ata jo. E n ca so de u so norm al de l equip o, aseg úre se de que e l
comp one nte de co rte se pu ede a ccede r fácil men te.
Todas l as espe cifica cione s e infor macio nes está n sujet as a camb ios sin p revio av iso.
-17-
Page 21

II. Instrucc iones de instalac ión
1. Ac cesorios
Cable de
alimentación
Base/soporte
Cable de señal
Manual del usuario
(Los cuadros antedich os es tán para la ilust rac ión s olamente y los ac ces ori os
físicos debe n gobernarse.)
2. Aj uste del ángul o
2.1 La pa nta lla puede ajus tar se
incli nan do hacia adela nte y h acia
atrás; sin e mba rgo, el ajuste
espec ífi co de pende del m ode lo
espec ífi co de l disposi tiv o.
Generalm ente, puede in cli narse
5 ± 2 ° hacia adel ante y 15 ± 2 °
hacia a trá s.
Tarjeta de garantía
2.2 Al aju sta r el ángulo del mo nit or,
asegú res e de no tocar o pres ion ar
el área d e la pa ntalla.
(Los cuadros antedich os es tán para la ilust rac ión s olamente y los ac ces ori os
físicos debe n gobernarse.)
Todas l as espe cifica cione s e infor macio nes está n sujet as a camb ios sin p revio av iso.
-18-
Page 22

III. Conecta r el monitor a la PC
1
2
3
4
Antes de conectar el monitor LCD a la PC, por favor encienda el PC y el monitor.
1
Enchu fe de e nergía
Conecte el cable de alimentación del monitor en
el puerto de alimentación en la parte posterior
del monitor.
2
Puerto DVI
Conecte el cable DVI en el puerto DVI IN en la parte
posterior del monitor (esto soporte del monitor).
3
Puerto HDM I
Conectar el cable HDMI en el puerto HDMI IN
Model o con f uente de
alime nta ción incorpo rad a
Adve rt en ic a: Utilic e si em pr e el c able
*
de alimentación de la configuración estándar.
en la parte posterior del monitor (esto necesita
el soporte del monitor).
4
Puerto DP
Connect the DP cable into the DP IN port of the
monitor (this needs the support of the monitor).
(Los cuadros antedichos están para la ilustración solamente y los accesorios físicos
deben reg irs e.)
Todas l as espe cifica cione s e infor macio nes está n sujet as a camb ios sin p revio av iso.
-19-
Page 23

IV. Configu ración del usuario
1. Diag ram a esquemátic o de la s teclas
M
E
1 2 3 4 5 6
2. Descrip ción de las func ion es de las teclas
1.
2.
3.
4.
5.
6.
M
▲
E
Luz de
indic ado r
del LED
Aparece el menú/reverso en el menú anterior (en caso de menú principal,
sale d el me nú comp leto) .
Cuando se activa el menú, se utiliza como tecla de selección de función
▲
izquierda y disminuye progresivamente el valor de la barra de progreso;
Cuando el menú está inactivado, se utiliza como el modo de acceso directo
espe cif icado ( para el d isp ositi vo de avi sta mient o).
Cuand o se activa el menú, se utili za como tecla de selección de función
dere cha y a ument a progr esi vamen te el val or de l a barra d e progr eso ;
Cuan do el m enú est á inact iva do, se ut iliza c omo m odo de at ajo de
tecl ado ( mo do FP S/RTS).
Si el me nú es tá a cti vado, s ele cc ion e la func ión c orres pondi ent e.
Inte rru pt or de e ncend ido : En erg ía ence ndi do/ apa gado de l mon itor.
Azul : Est ad o de co nmuta ció n no rma l; parp ade o en azul : estad o de
ahor ro de e nergí a.
Nota: las cl ave s físicas del mo del o específico d ebe n regirse .
Todas l as espe cifica cione s e infor macio nes está n sujet as a camb ios sin p revio av iso.
-20-
Page 24

V. Descripc iones de funciones del me nú de operación (OS D)
Artículo de menú
de pr imer ni vel
Brillo
Contraste
DCR
Modo
Temp. Color
Aspecto
Entrada
Ajustar
Ico no de
men ú de
pri mer ni vel
Artículo de menú
de segundo nivel
NADA
NADA
Encendido
Apagado
Regresar
Salir
Estándar
Película
FPS
RTS
Eye Care
Regresar
Salir
Frío
Cálido
Usuario
Regresar
Salir
Automático
16:9
4:3
Regresar
Salir
DVI
HDMI
DP
Regresar
Salir
Gamma
Ico no de
men ú de
segundo nivel
NADA
NADA
Artícu lo de menú
de te rcer ni vel
NADA
NADA
NADA
NADA
NADA
NADA
NADA
NADA
NADA
NADA
NADA
NADA
NADA
Rojo
Verde
Azul
NADA
NADA
NADA
NADA
NADA
NADA
NADA
NADA
NADA
NADA
NADA
NADA
Gamma1
Gamma2
Regresar
Salir
Ico no de
men ú de
ter cer ni vel
NADA
NADA
NADANADA
NADANADA
NADA
NADA
NADA
NADA
NADA
NADA
NADA
NADA
NADA
NADA
NADA
NADA
NADA
NADA
NADA
NADA
NADA
NADA
NADA
NADA
NADA
NADA
NADA
Des cripc ión
Ajust ar b ri ll o de l a panta ll a
Ajustar contraste de la pantalla
Activar contraste dinámico
Contraste dinámico inactivo
Volver al menú anterior
Salir de todo el menú
Modo de trabajo normal
Modo de película
Modo de juego de FPS
Modo de juego de RTS
Modo de aplicación de la protección
ocular filtro de rayos
Volver al menú anterior
Salir de todo el menú
Ajustar como temperatura de color fría
Fijar como temperatura de color caliente
Ajuste fino de la temperatura del color
rojo
Ajuste fino de la temperatura de color
verde
Ajuste fino de la temperatura de color
azul
Volver al menú anterior
Salir de todo el menú
Ajustar automáticamente la relación
de aspecto de imagen
Imagen en modo 16:9
Imagen en modo 4:3
Volver al menú anterior
Salir de todo el menú
Entrada de señal de DVI (digital)
Entrada de señal de HDMI (digital)
Entrada de señal del puerto (digital)
de la exhibición
Volver al menú anterior
Salir de todo el menú
Ajustar el tono de color gris brillo 1
Ajustar el tono de color gris brillo 2
Volver al menú anterior
Salir de todo el menú
Todas l as espe cifica cione s e infor macio nes está n sujet as a camb ios sin p revio av iso.
-21-
Page 25

Artículo de menú
de pr imer ni vel
Ico no de
men ú de
pri mer ni vel
Artículo de menú
de segundo nivel
Idioma
Ico no de
men ú de
segundo nivel
Artícu lo de menú
de te rcer ni vel
English
Française
Deutsch
Italiano
Español
Ico no de
men ú de
ter cer ni vel
English
Française
Deutsch
Italiano
Español
Des cripc ión
English
Française
Deutsch
Italiano
Español
Otro
Salir
Encendido
Reiniciar
OD
FreeSync
Regresar
Salir
繁中
Regresar
Salir
Encendido
Apagado
Regresar
Salir
Sì
NO
Regresar
Salir
Off
Normal
Extreme
Regresar
Salir
Encendido
Apagado
Regresar
Salir
NADA
NADA
NADANADA
NADA
繁中
繁體中文
Volver al menú anterior
Salir de todo el menú
Apagar automáticamente después de
ON
la energía del ahorro por 1 minuto
Desactivar la función de desconexión
de temporizador
Volver al menú anterior
Salir de todo el menú
Restablecer a la configuración de fábrica
Salir de esta función
Volver al menú anterior
Salir de todo el menú
Modo normal
Modo general de OD, reduce el
desenfoque del movimiento
Modo extraalto del OD, reduce el
desenfoque del movimiento
Volver al menú anterior
Salir de todo el menú
Activar la función de sincronización
ON
libre. Sólo
Desactivar la función de sincronización
libre (esto necesita el apoyo del monitor)
Volver al menú anterior
Salir de todo el menú
Volver al menú anterior
NADA
NADA
Salir de todo el menú
NADA
Salir de todo el menú
Nota: Las funcion es pueden ser ajustadas debido al modelo específico o a la actuali zación
de la ve rsi ón del so ftwar e. El m od elo f ísico d ebe g ob ern arse.
Todas l as espe cifica cione s e infor macio nes está n sujet as a camb ios sin p revio av iso.
-22-
Page 26

VI. FAQ
Suces o de fa llo s
La luz in dic adora de
encen did o no está
encen did a
Plug-and-Play imposible
Atenu aci ón de imagen
Image n par padeante o
image n con o ndas
The pow er in dicator
light i s on (f lickering) ,
but the moni tor h as no
pictures .
Posibles s olu ciones
◆
Compr ueb e si la alimenta ció n está encendi da
◆
Compruebe si el cable de alimentación está conectado.
◆
Compr ueb e si la función de p lug -and-Play de l
disposit ivo e s compatible c on PC .
◆
Compr ueb e si la tarjeta de v isu alización es
compatib le co n la función Plu g-a nd-Play.
◆
Ajuste el br illo y el contra ste .
◆
Puede h abe r aparatos elé ctr icos o equipos c on
perturba cio nes electrón ica s.
◆
Compruebe si la alimentación de la PC está encendida.
◆
Compruebe si la tarjeta de visualización de la PC
está corre cta mente insert ada .
◆
Compr ueb e si el cable de señ al de l monitor está
conectad o cor rectamente c on el P C.
◆
Compr ueb e el enchufe del c abl e de señal del
monitor y as egú rese de que todo s los p ines no
estén dobl ado s.
◆
Observe la luz indicadora presionando la tecla de
Caps Lock en e l tec lado de PC y compr ueb e si el
PC está func ion ando.
◆
Escasez de c olor
(rojo , ver de y az ul)
Cuadr o con l a diferencia
del col or (b lanco no
parec e bla nco)
Compruebe el cable de señal del monitor y asegúrese
de que todos l os pi nes no estén dob lados.
◆
Ajuste el color RGB o reseleccione la temperatura
de color.
* Por favor co nfi rme los valore s por d efecto del ran go di námico de sali da y
el formato de píxel en la configuración de gráficos es "TODO". Cuando el brillo
de la pan tal la es más alto de lo u sua l.
Todas l as espe cifica cione s e infor macio nes está n sujet as a camb ios sin p revio av iso.
-23-
Page 27

VII. Especif icaciones del pro ducto
Dimensiones
diagonales
60cm(23.6″)
68.6cm(27″)
80.0cm(31.5″)
Temperatura
ambiente
Humedad
Relación de
aspecto de imagen
16:9
16:9
16:9
Temperatura de
almacenaje
Temperatura de
trabajo
RH para la
operación
Picture
dimensions (mm)
521.4*293.28
597.9*336.3
698.4*392.85
-20℃ to 60℃
0℃ to 40℃
80%
Distancia del
punto (mm)
0.272
0.3114
0.3637
Resolución
óptima
1920*1080
1920*1080
1920*1080
Nota: La apl icación real d e los p arámetros an ter iores estará s uje ta al modelo
espec ífi co.
VIII. Tabla de m odos de preselecc ión del producto
En modo d e con exión de DVI/D P
Displ ay
dimen si on s
23.6" / 27"
Asp ec t ra ti o
/ 31.5"
Observac ión : Cuando la r eso lución es 2560 *14 40@60Hz/34 40* 1440@60Hz/
1920* 108 0@144Hz/25 60* 1440@144Hz /38 40*2160@30 Hz co nexión vía el
puert o de DV I, po r favor elige pi n doble 24+1 - cab le de c anal de DVI.
Resol uci ón de preselec ció n/velocida d de ac tualizació n
(
(
16:9
(
60/70/7 5/
120/144 Hz
(
60/1 20/
)
)
144H z
60/7 5/120 /
144H z
60/1 20/
)
)
144H z
70Hz
72.8 Hz
)
120/1 44Hz
)
(
(
(
)
60/70 /75/
60/7 5/
(
60/1 20/
144H z
(
60/1 20/
)
144H z
(
(
60/1 20/
144H z
(
60/1 20/
)
144H z
60/1 20/
)
)
144H z
)
En modo d e con exión de HDMI
Displ ay
dimen si on s
23.6" / 27"
Nota: O" indica que se admite la tasa de resolución/actualización correspondiente.
/ 31.5"
"
Asp ec t ra ti o
16:9
(
(
)
70Hz
72.8 Hz
Prese t res olu tion/Refre sh ra te
60/7 5/
(
60/70 /75/
)
)
120Hz
(
60/70/7 5/
120Hz
(
)
60/7 5/
60/1 20Hz
)
120H z
(
)(
)(
(
) (
) (
) (
60/1 20Hz
60/1 20Hz
)
60/1 20Hz
60/1 20Hz
60/1 20Hz
60/1 20Hz
)
"X" indica que no se admite la tasa de resolución/actualización correspondiente.
Nota: La aplicación real de los parámetros anteriores estará sujeta al modelo específico.
Todas l as espe cifica cione s e infor macio nes está n sujet as a camb ios sin p revio av iso.
-24-
 Loading...