

Page 1

Page 2

I.Safety Pre vention Measure s
Please always place
this device on a stable
surfa ce; oth erwise,
it m a y f a l l an d b e
dama ged .
Wh e n c lean ing the
dev i c e , be s u r e to
re m o v e the p o w e r
pl u g , u s e a p i e c e
of so f t c loth ra t her
t h a n i n d u s t r i a l
chem i c a l t o c l e a n
the de vic e, be sur e
not to let water enter
the de vic e.
The altitude and the
tropical environment
the adapter fits depend
on which adapter is
used for the device.
The ra tin g pl ate o n
the back of the device
with the above warning
si g n i ndic ates th a t
t h i s p r o d u c t i s
appl i c a b l e f o r t h e
safe use of the region
w i t h a l t i t u d e o f
2,00 0m an d below.
Do not disassemble
this d evi ce w ith out
permi ssion. In ca se
of failure , be sure to
contact a professional
serv ici ng pers on to
fix it. The unauthorized
disa sse mbly of t his
devi ce ma y re sul t
in ele ctr ic shoc k or
fire .
Do not hold the plug
w i t h w e t h a n d ;
ot h erw i se, ele c tri c
sh o c k m a y o c c u r .
Make s ure t he p lug
ha s a g o o d t o u c h
because poor touch
may ca use f ir e.
In case of rare smell
or no i se out of thi s
dev i c e , be s u r e to
imme dia tely cu t off
the power supply and
as k a pr o fess i ona l
serv ici ng pers on to
fix th e pro bl em.
Do not use a broken
power plug nor keep
a power cord near heat
sour ce; o th erw ise,
e l e ct r ic s h o ck o r
fire m ay oc cu r.
Wh e n t h i s d e v i c e
is idle fo r long time,
be su r e t o p o wer it
off; otherwise, electric
sh o c k o r f i r e m a y
occu r.
Note:
The dev ice w ith AC switch may u se su ch AC switch as cut-off component .
The device without AC switch may use power plug or coupler as cut-off component.
In case of the n orm al use of the equip m e nt, make sure the cut- o ff compon e nt
can be ac ces sed easily.
All s pecif icatio ns and in format ions ar e subje ct to cha nge wit hout no tice.
-1-
Page 3
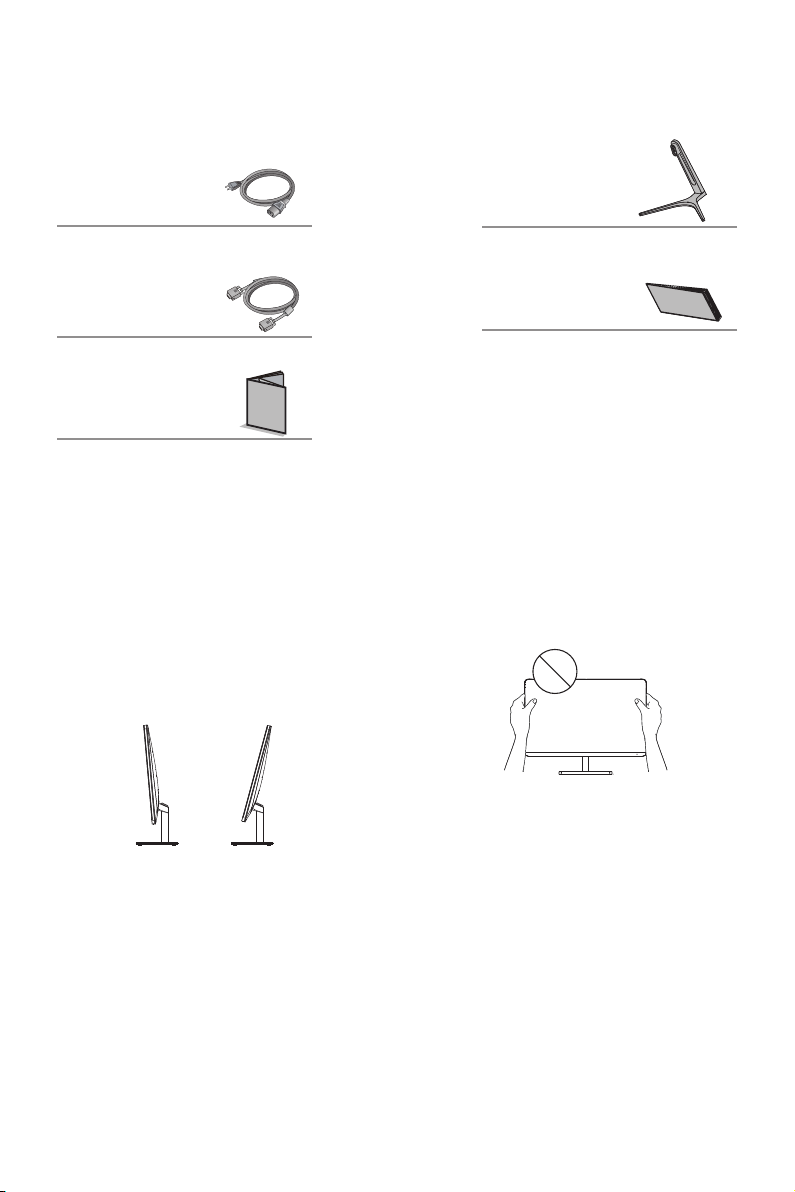
II.Install ation Instructi ons
1.Acc ess ories
Power cord
Base/Stand
Signal cable
User manual
(The above pictures are for illustration only and the physical accessories shall govern.)
2. An gle Adj ustment
2.1 Th e screen can be ad jus ted by
inc l i ni n g f orw a r d an d backwa r d ;
ho w e ver, t he s p ecific adju s tment
de p e nds on t h e s p ecific mode l of
the d e v ic e . G e n e rally, it m a y be
inclined 5 ± 2 °fo r w ard a n d 15± 2 °
backw ard .
Warranty card
2.2 When adj usting the ang le of t he
monitor, be sure not to touch or press
the are a of th e scr een.
(The above pictures are for illustration only and the physical accessories shall govern.)
All s pecif icatio ns and in format ions ar e subje ct to cha nge wit hout no tice.
-2-
Page 4

III. Connect t he Monitor to PC
1
2
3
Before connecting the LCD monitor to the PC, please power down the PC and
the monitor.
1
Power P lug
Conne ct th e power cord of the mon ito r into
the POWER po rt in t he back of the mon ito r.
2
VGA Port
Co n n ect the VGA cable into t he VG A IN port
in t h e b a c k of the m o n i tor ( t h i s n e e ds t he
suppo rt of t he mo nitor).
3
HDMI Port
Conne ct th e H D MI c a b le in to th e HDMI IN
Model with inbuilt power supply
* War ni ng : Always use t he p ow er
cord o f st an da rd c onfig ur at io n.
po r t in t o t h e back of the monitor (this needs
the sup por t of th e monitor).
(The above pictures are for illustration only and the physical accessories shall govern.)
All s pecif icatio ns and in format ions ar e subje ct to cha nge wit hout no tice.
-3-
Page 5

IV. User Setu p
1. Schemat ic Di agram of Keys
M
E
1 2 3 4 5 6
2. Descrip tio n of Keys' Funct ion s
1.
2.
3.
4.
5.
6.
M
▲
E
LED
indicator
light
Pops u p the m en u/B acks to t he prev iou s menu (i n cas e of m ain m enu,
exit s fro m th e who le menu ).
Wh e n t he menu is ac t ivat ed, use d as th e l e ft func t ion sel ecti o n k ey,
▲
and de cre ases pr ogres siv ely the v alue of t he pr ogres s bar; wh en th e
menu i s ina ctiva ted, us ed as t he s pec ified s hor tc ut mo de hot ke y (for
sigh tin g devic e).
When t he me nu i s act ivate d, us ed a s the r ight fu nctio n sel ectio n key,
and in cre ases pr ogres siv ely the v alue of t he pr ogres s bar; wh en th e
me n u i s i nac tivat ed, u s e d as t h e sp e c i f i e d sh o r t c u t mod e h ot k e y
(FPS /RTS mo de).
If the m enu i s ac tiv ated, c hoose s the c orres pondi ng fu nctio n.
Powe r swi tc h: Po wers on /off th e monit or.
Blue: in normal switch-on state ; flick er ing in blue: in power-saving state.
Note: The physical k eys o f the s pecific mode l sha ll govern .
All s pecif icatio ns and in format ions ar e subje ct to cha nge wit hout no tice.
-4-
Page 6

V. Operatio n Menu (OSD) Function Des criptions
Fir st l ev el
menu it em
Brightness
Contrast
DCR
Mode
Color Temp.
Aspect
Input
Adjust
First level
menu icon
Secon d le ve l
menu it em
NONE
NONE
On
Off
Return
Exit
Standard
Movie
FPS
RTS
EyeSaver
Return
Exit
Cool
Warm
User
Return
Exit
Auto
16:9
4:3
Return
Exit
VGA
HDMI
Return
Exit
Auto
adjust
Auto color
Gamma
Second
level
menu icon
NONE
NONE
Thi rd l ev el
menu it em
NONE
NONE
NONE
NONE
NONE
NONE
NONE
NONE
NONE
NONE
NONE
NONE
NONE
Red
Green
Blue
NONE
NONE
NONE
NONE
NONE
NONE
NONE
NONE
NONE
NONE
NONE
NONE
NONE
Gamma1
Gamma2
Return
Exit
Third level
menu icon
NONE
NONE
NONENONE
NONENONE
NONE
NONE
NONE
NONE
NONE
NONE
NONE
NONE
NONE
NONE
NONE
NONE
NONE
NONE
NONE
NONE
NONE
NONE
NONE
NONE
NONE
NONE
NONE
NONE
Descr ip ti on
Adjus t di sp la y br ightn es s
Adjust display contrast
Activate dynamic contrast
Inactive dynamic contrast
Return to the previous menu
Exit from the whole menu
Normal work mode
Movie mode
FPS game mode
RTS game mode
Eye protection ray filter application mode
Return to the previous menu
Exit from the whole menu
Set as cold color temperature
Set as warm color temperature
Fine tuning of red color temperature
Fine tuning of green color temperature
Fine tuning of blue color temperature
Return to the previous menu
Exit from the whole menu
Automatically adjust picture aspect ratio
Picture in 16:9 mode
Picture in 4:3 mode
Return to the previous menu
Exit from the whole menu
VGA (digital) signal input
HDMI (digital) signal input
Return to the previous menu
Exit from the whole menu
Automatically adjust the horizontal/vertical
location, focusing and clock of pictures
Adjust the white balance of pictures
Adjust color tone brightness grey 1
Adjust color tone brightness grey 2
Return to the previous menu
Exit from the whole menu
All s pecif icatio ns and in format ions ar e subje ct to cha nge wit hout no tice.
-5-
Page 7

Fir st l ev el
menu it em
First level
menu icon
Secon d le ve l
menu it em
Language
Second
level
menu icon
Thi rd l ev el
menu it em
English
Française
Deutsch
Italiano
Español
Third level
menu icon
English
Française
Deutsch
Italiano
Español
Descr ip ti on
English
Française
Deutsch
Italiano
Español
Other
Exit
Power
Off
Reset
Over
driver
Return
Exit
繁中
Return
Exit
On
Off
Return
Exit
YES
NO
Return
Exit
Off
Normal
NONENONE
Extreme
Return
Exit
NONE
NONE
NONE
繁體中文
繁中
Return to the previous menu
Exit from the whole menu
Automatically turn off after saving
ON
power for 1min
Inactivate the function of timed
switch-off
Return to the previous menu
Exit from the whole menu
Reset to factory setup
Exit from this function
Return to the previous menu
Exit from the whole menu
Normal mode
OD general mode, reduce
motion blur
OD extra-high mode, reduce
motion blur
Return to the previous menu
Exit from the whole menu
Return to the previous menu
NONE
NONE
Exit from the whole menu
NONE
Exit from the whole menu
Note: The functions may be adjusted due to specific model or the upgrade of software version.
The ph ysi ca l mod el shal l gov ern.
All s pecif icatio ns and in format ions ar e subje ct to cha nge wit hout no tice.
-6-
Page 8

VI. FAQ
Faults occ urr ing
The pow er in dicator
light i s not o n
Impossible plug-and-play
Dimmi ng pi cture
Flickeri ng picture or
pictu re wi th ri pples
The pow er in dicator
light i s on (f lic kering) ,
but the moni tor h as no
pictu res .
Possible s olu tions
◆
Check i f the p ower is on.
◆
Check i f the p owe r cord is con nec ted .
◆
Check if the function of plug-and-play of the device
is compati ble w ith PC.
◆
Ch e c k i f th e dis p lay c ard is c o mpatib l e w i t h t h e
plug-and -play function.
◆
Adjus t bri ghtness and co ntr ast.
◆
There may be electrical appliances or equipment
with elect ron ic disturban ce.
◆
Check i f the P C pow er is on.
◆
Check i f the P C dis play card i s inserted properly.
◆
Check if the signal cable of the monitor is correctly
connecte d wit h the PC.
◆
Check the signal cable plug of the monitor and make
sure every p in ha s no bendin g.
◆
Observe the indicator light by pressing the Caps
Lock key on the PC keyboard and check if the PC
is working .
Color s hor tage
(red, g ree n and blue)
Picture with color difference
(whit e loo ks not white)
◆
Check the si gnal cable of th e mon itor and make
sure every p in ha s no bendin g.
◆
Adjus t RGB c olo r or reselect co lor t emperature .
Pleas e con firm the defau lt va lue s of the output dy nam ic range and the p ixe l
format in th e gra phics Settin gs is " all". when the b rig htness of the sc ree n is
highe r tha n usual.
All s pecifi catio ns and in format ions ar e subje ct to cha nge wit hout no tice.
-7-
Page 9

VII. Product S pecifications
Diagonal
dimensions
60cm(23.6″)
Ambient
temperature
Humidity
Picture
aspect ratio
16:9
Storage
temperature
Working
temperature
RH for operation
Picture
dimensions (mm)
521.4*293.28
-20℃ to 60℃
5℃ to 40℃
20% to 80%
Dot distance (mm)
0.27156x0.27156
Optimal
resolution
1920*1080
Note: The actual app lic ation of the abo ve pa rameters sha ll be s ubject to the
speci fic m odel.
VIII. Table of P roduct Preset Mod es
In VGA connection mode
Displ ay
dimen si on s
In HDMI conn ect ion mode
Displ ay
dimen si on s
23.6"
23.6"
Asp ec t ra ti o
16:9
Asp ec t ra ti o
16:9
( )
70H z
( )
70H z
(
60/ 72/
75H z
(
60/ 72/
75H z
Prese t res olu tion/Re fre sh ra te
(
56/6 0/72/
)
75Hz
(
)
60/70 /
75Hz
( )
60/ 75Hz
)
Prese t res olu tion/Re fre sh ra te
(
56/6 0/72/
)
75Hz
(
)
60/70 /
75Hz
( )
60/ 75Hz
)
136 0X768
( )
60H z
( )
60H z
160 0X900
( )
60H z
168 0X105 0
( )
60H z
192 0x108 0
( )
60H z
192 0x108 0
( )
60/ 75Hz
Note: The actual app lic ation of the abo ve pa rameters sha ll be s ubject to the
speci fic m odel.
All s pecifi catio ns and in format ions ar e subje ct to cha nge wit hout no tice.
-8-
Page 10

 Loading...