

MSH PROTOS Instruction Manual
RC Helicopter
Instructions Manual
Flybarless
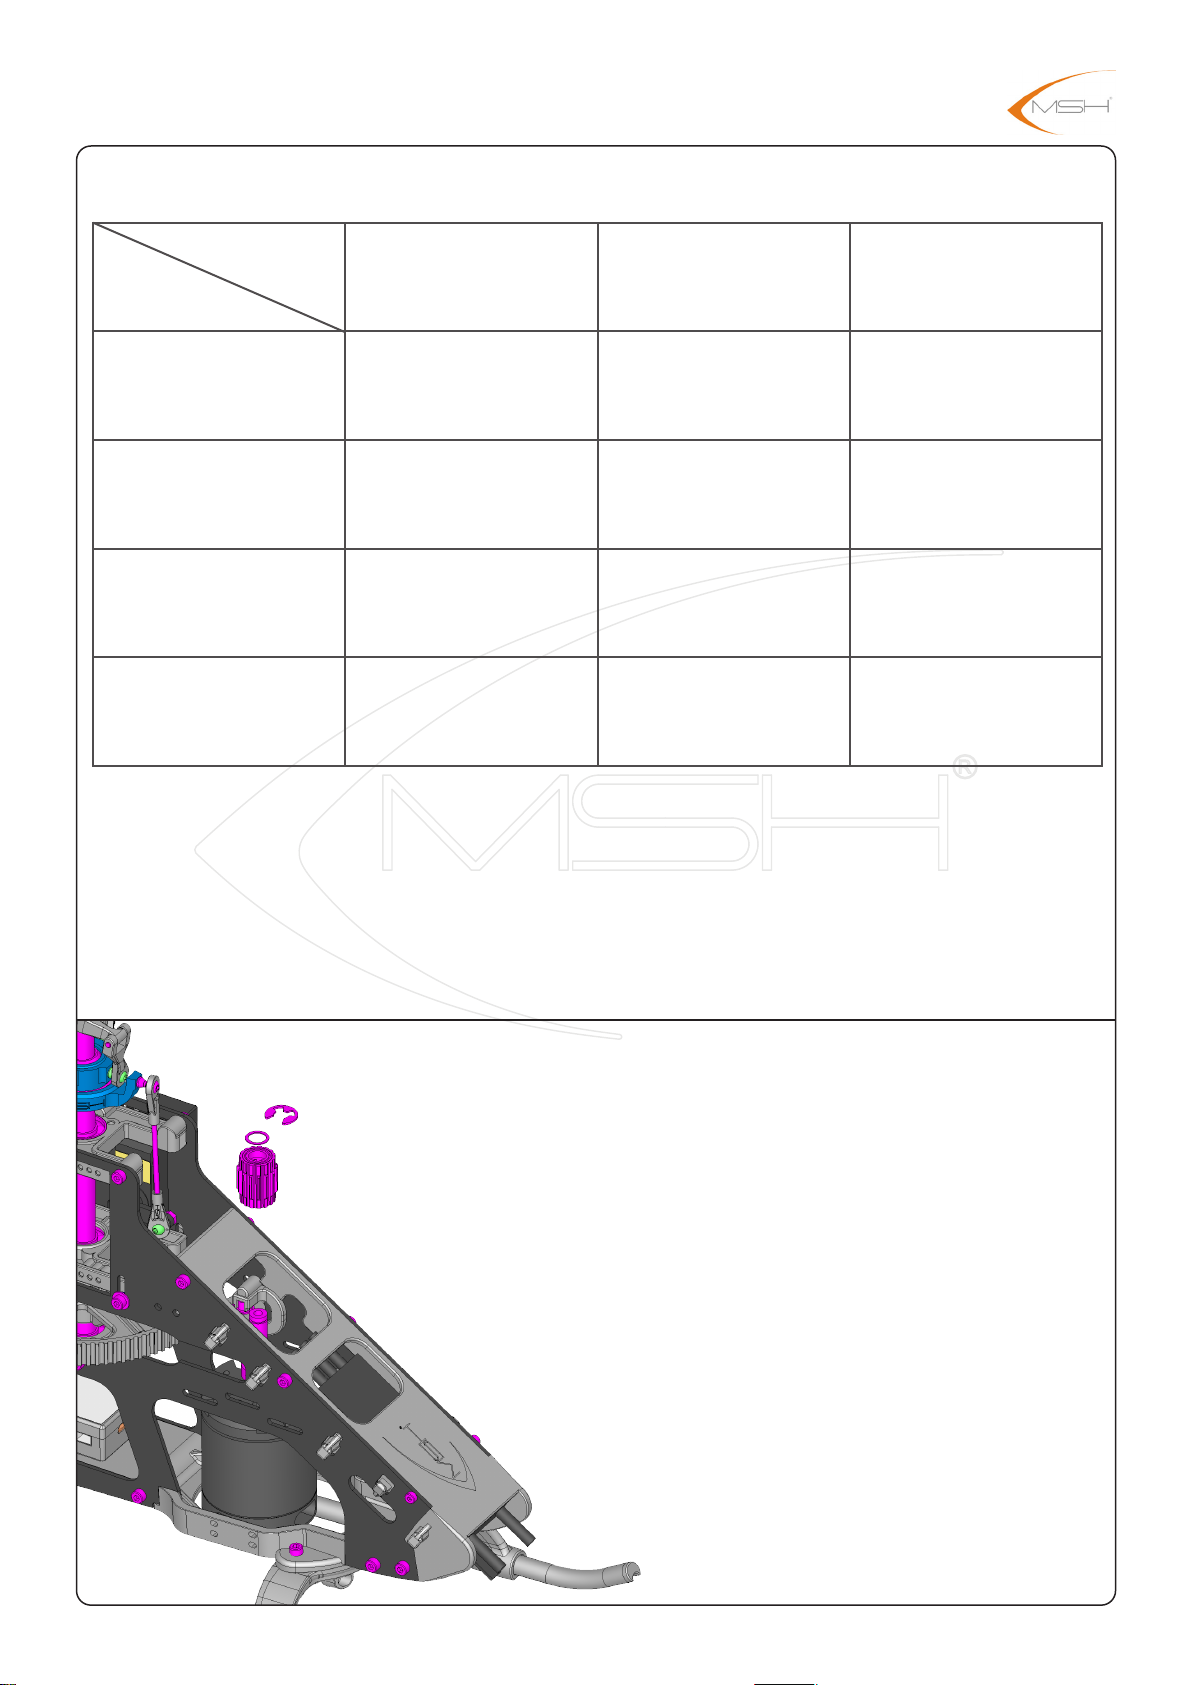
Main rotor diameter : 965mm
Tail rotor diameter : 192mm
Lenght without main blades : 955mm
Lenght with main blades : 1185mm
Main blades lenght : 425mm
Overall height : 270mm
Tail rotor - Main rotor ratio : 4,65
Main pulley : 93T
Weight ready to y with 6sLipo : 1550g
1
(may vary with dierent electronics)

RC Helicopter
Index
Instructions Manual
Page Content
Always follow these rules for safety
3
Tools required for assembly
4
R/C equipment required for assembly
5
Motor pinion teeth choice
6
7-13
14-19
20-28
29-31
32
Main Frame Assembly
Head Assembly
Tail Assembly
Motor Installation
Battery, ESC and Canopy Installation
33
34
35-46
Belt Tensioning Diagram
Main blades
Spare parts
2
Always follow these rules for safety
Operate the helicopter in open areas with no people nearby.
Do NOT operate the helicopter in the following places and situations (or else you risk severe
accidents):
-in places where children gather or people pass through
-in residential areas and parks
-indoors and in limited space
-in windy weather or when there is rain, snow, fog or other precipitation
If you do not observe these instructions you may be held reliable for personal injury or property damage!
Always check the R/C system prior to operating your helicopter.
When the R/C system batteries get weaker,the operational range of the R/C system decreases.
Note that you may lose control of your model when operating it under such conditions.
Keep in mind that other people around you might also be operating a R/C model.
Never use a frequency which someone else is using at the same time.
Radio signals will be mixed and you will lose control of your model.
If the model shows irregular behavior, bring the model to a halt immediately and disconnect the batteries.
Investigate the reason and fix the problem.
Do not operate the model again as long as the problem is not solved, as this may lead to further trouble
and unforeseen accidents.
In order to prevent accidents and personal injury, be sure to observe the following:
Before flying the helicopter, ensure that all screws are tightened.
A single loose screw may cause a major accident.
Replace all broken or defective parts with new ones, as damaged parts lead to crashes.
Never approach a spinning rotor. Keep at least 10 meters/yards away from a spinning rotor blades.
Do not touch the motor immediately after use. It may be hot enough to cause burns.
Perform all necessary maintenance.
PRIOR TO ADJUSTING AND OPERATING YOUR MODEL, OBSERVE THE FOLLOWING
Operate the helicopter only outdoors and out of people’s reach as the main rotor operates at high rpm!
While adjusting, stand at least 10 meters
Novice R/C helicopter pilots should always seek advice from experienced pilots to obtain hints with assembly
and for pre-fight adjustments.
Note that a badly assembled or insuffciently adjusted helicopter is a safety hazard!
In the beginning, novice R/C helicopter pilots should always be assisted by an experienced pilot
and never fly alone!
MSHeli Srl
Italy
3
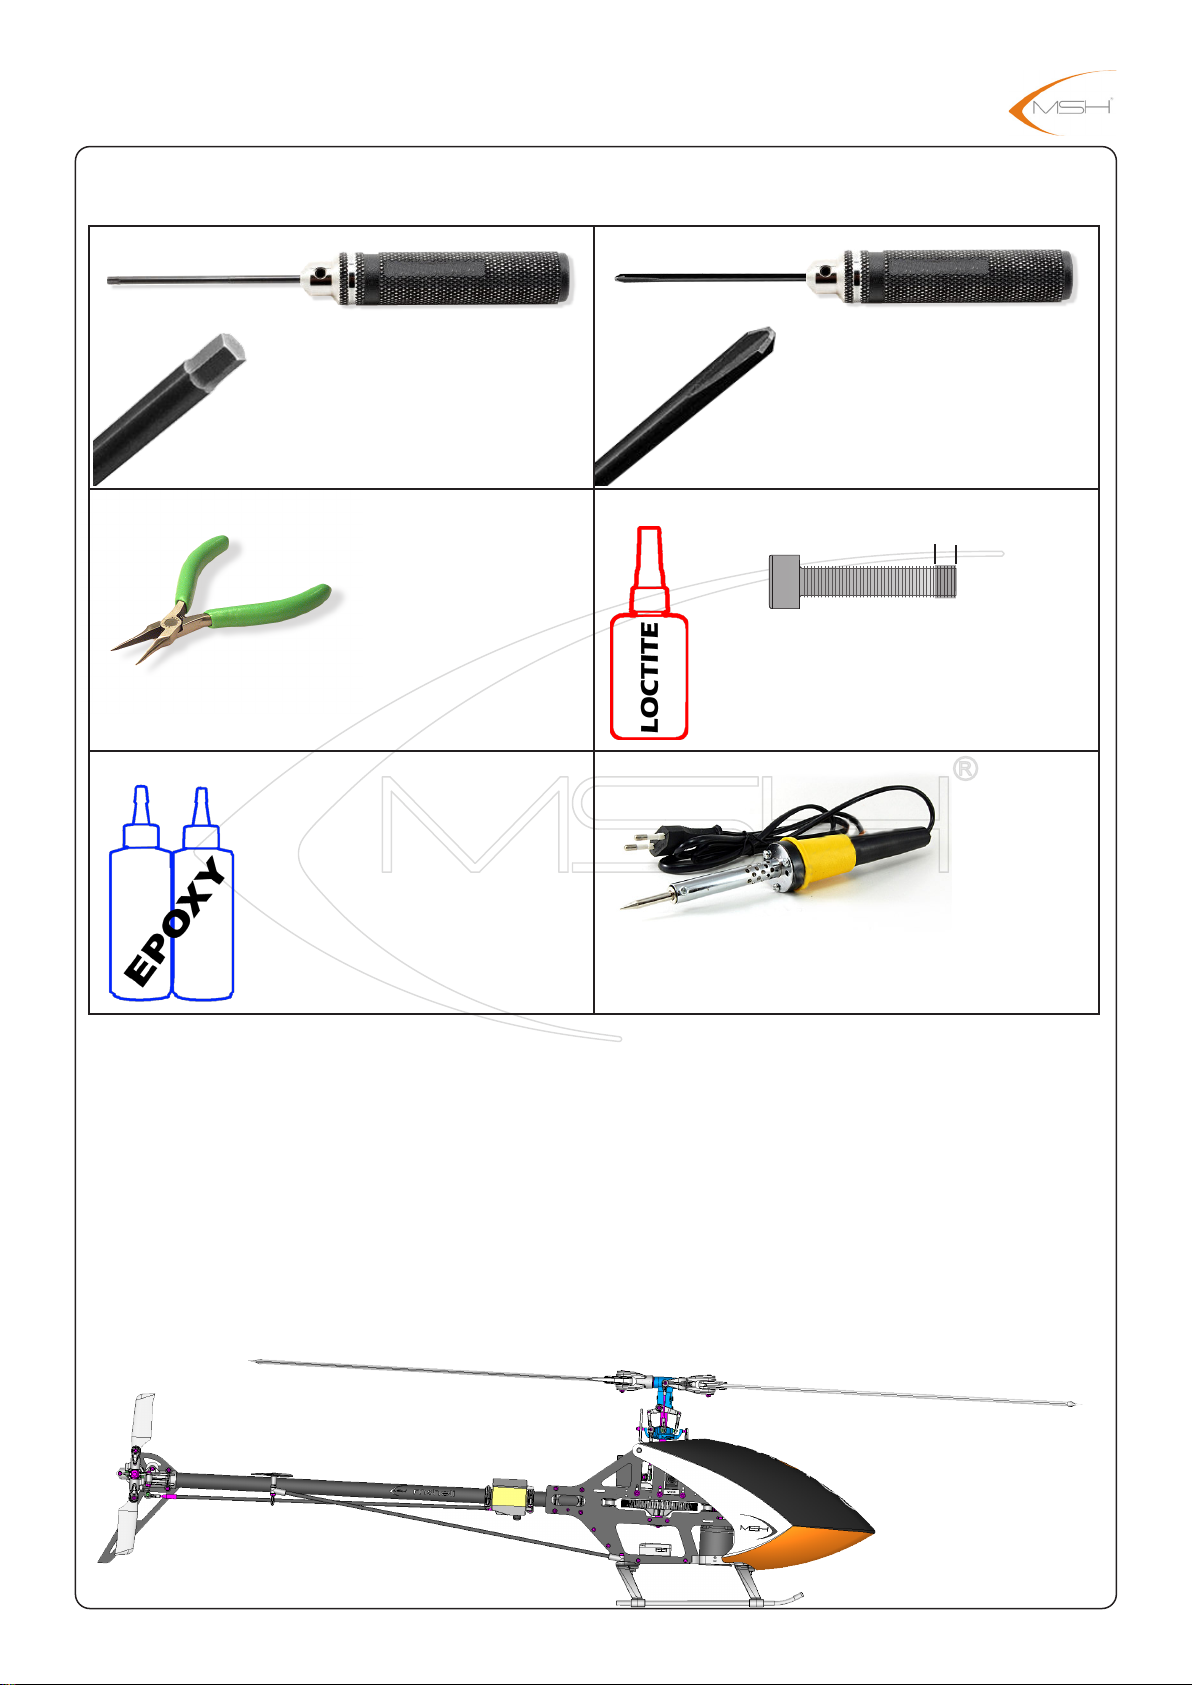
Tools required for assembly
1.5 / 2 / 2.5 mm
Hexagon screw drivers
Needle nose pliers
Slow curing epoxy
Philips
Screw driver
Glue widht 2mm aprox.
Thread lock Medium (blue)
Soldering iron
4
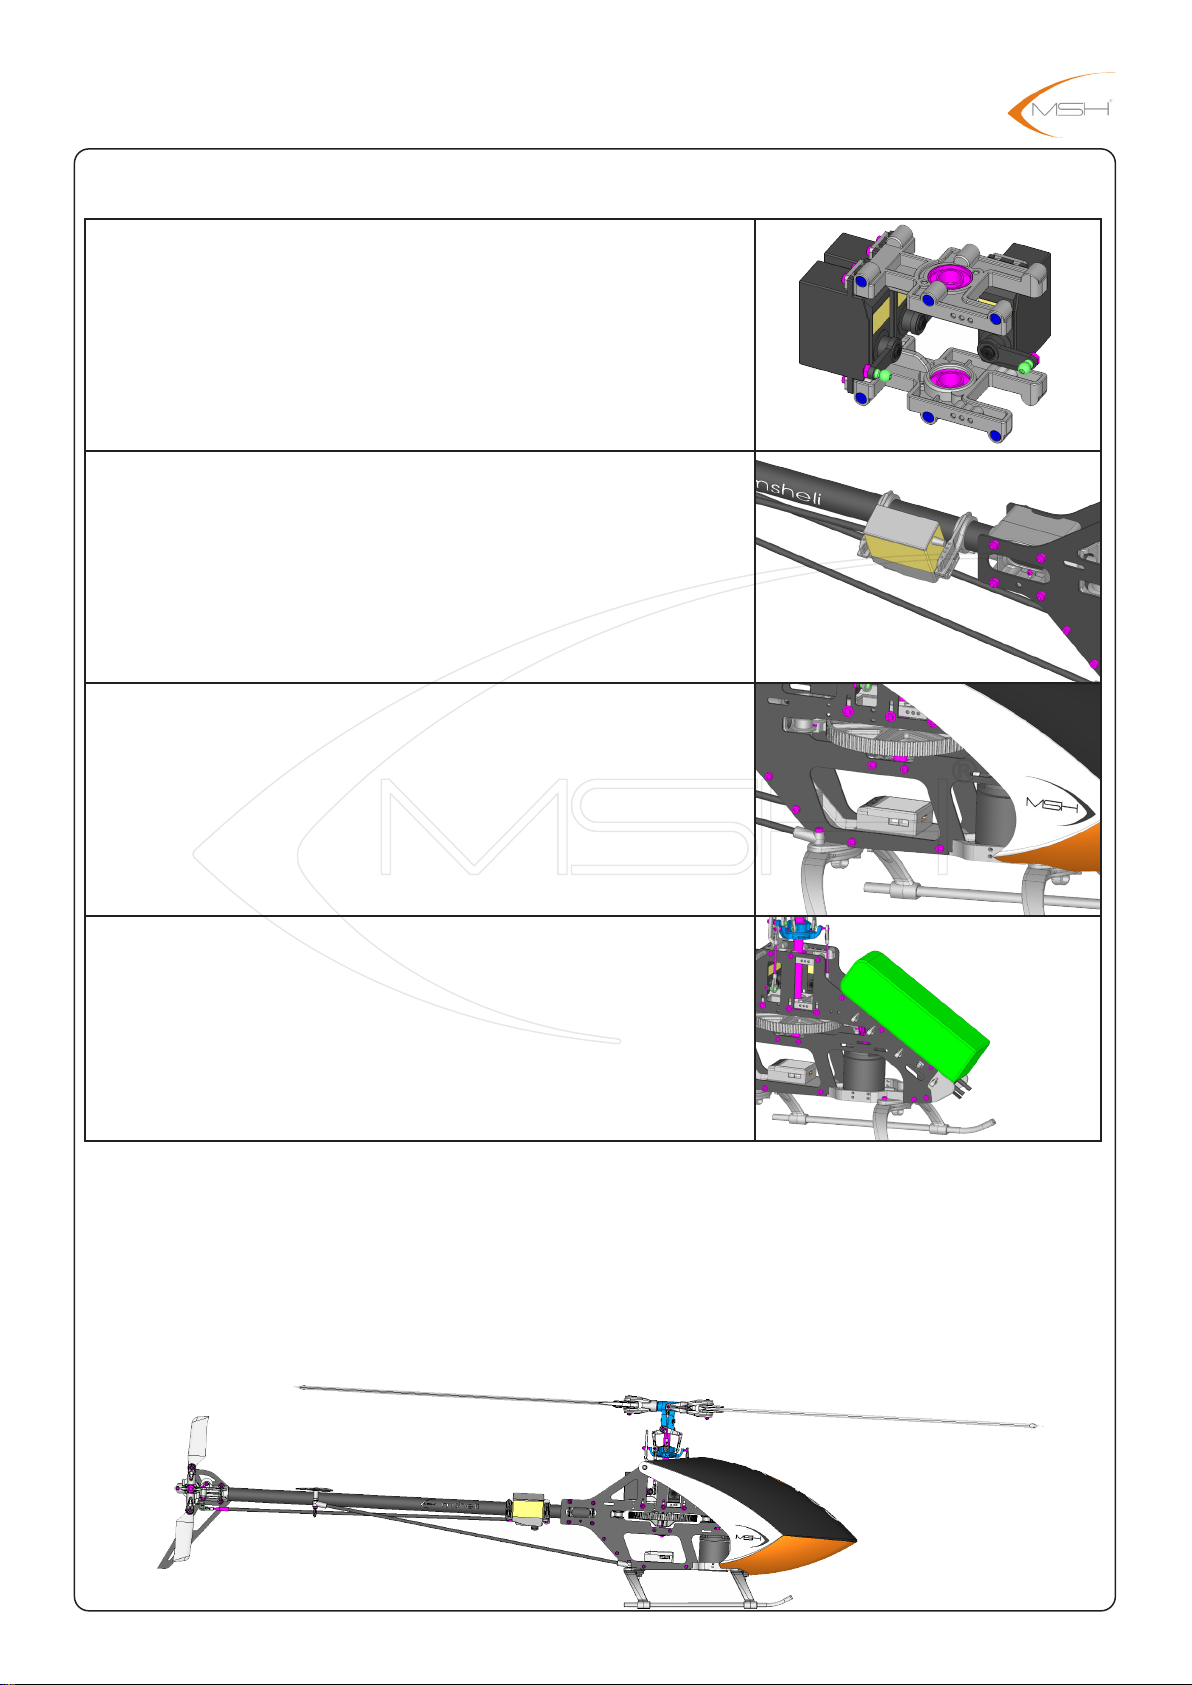
R/C equipment required for assembly
Swashplate servos supported:
Mini servos
Tail servo supported:
Mini and Regular size servos
Trasmitter / Receiver:
Satellites:
Spektrum : DSM 2 - DSM X
Futaba : S-Bus - S-Bus 2
HOTT SumD
MPX Srxl
Standard receiver: all
Battery pack:
LiPo 4s 3700mAh
LiPo 5s 3300/3700mAh
LiPo 6s 2500mAh/3000mAh
5
Motor pinion teeth choice
Battery
Fly
Style
type
LiPo 4s
3700mAh
LiPo 5s
3700mAh
LiPo 6s
2500mAh
Beginner
Sport
Soft 3D
Hard 3D
18T (2400RPM) 15T (2500RPM)
19T (2550RPM) 16T (2650RPM)
20T (2650RPM) 17T (2850RPM)
- 18T (2950RPM)
-
13T (2550RPM)
14T (2750RPM)
15T (3000RPM)
6
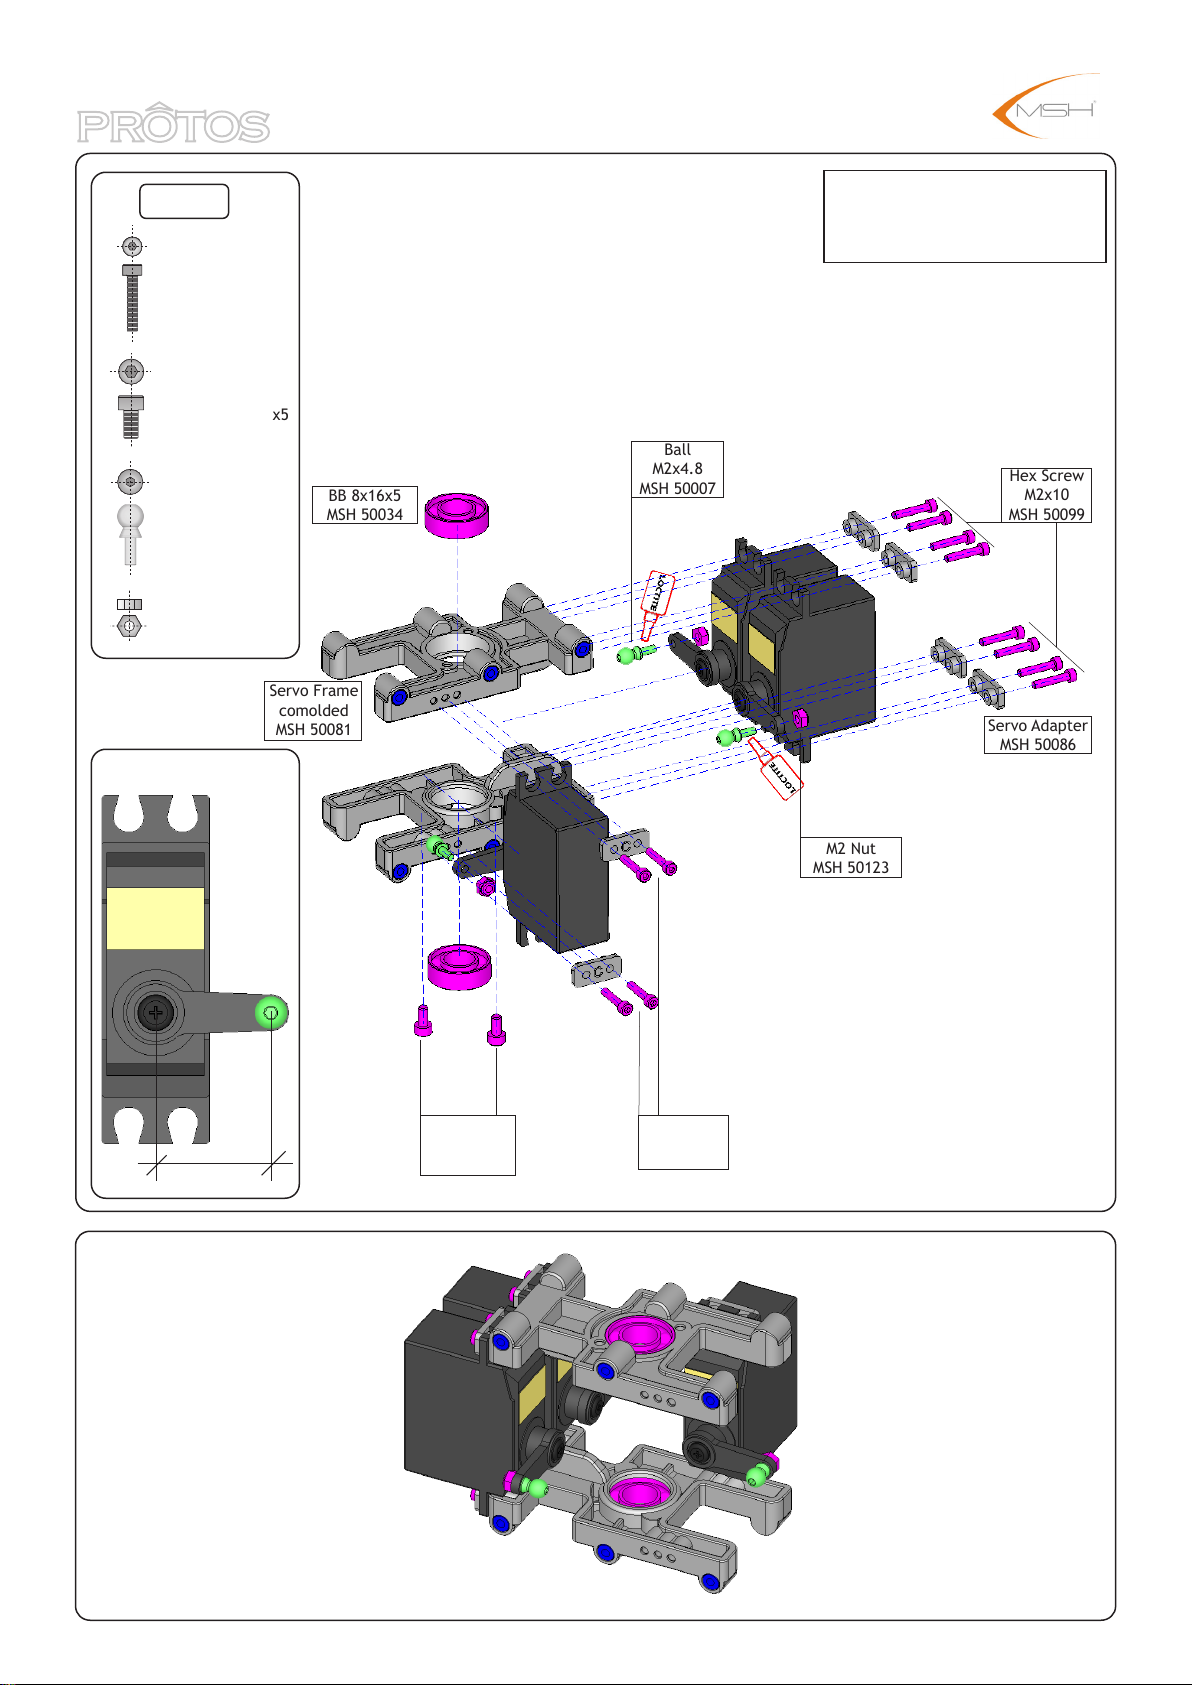
BAG-A
Hex Screw M2x10
MSH 50099
Hex Screw M2.5x5
MSH 50101
Ball M2x4.8
MSH 50007
M2 Nut
MSH 50123
BB 8x16x5
MSH 50034
Servo Frame
comolded
MSH 50081
Ball
M2x4.8
MSH 50007
Tips/Instructions
Hex screw M2.5x5 only on
lower servo frame.
Hex Screw
M2x10
MSH 50099
Servo Adapter
MSH 50086
16 mm
Hex Screw
M2.5x5
MSH 50101
M2 Nut
MSH 50123
Hex Screw
M2x10
MSH 50099
7
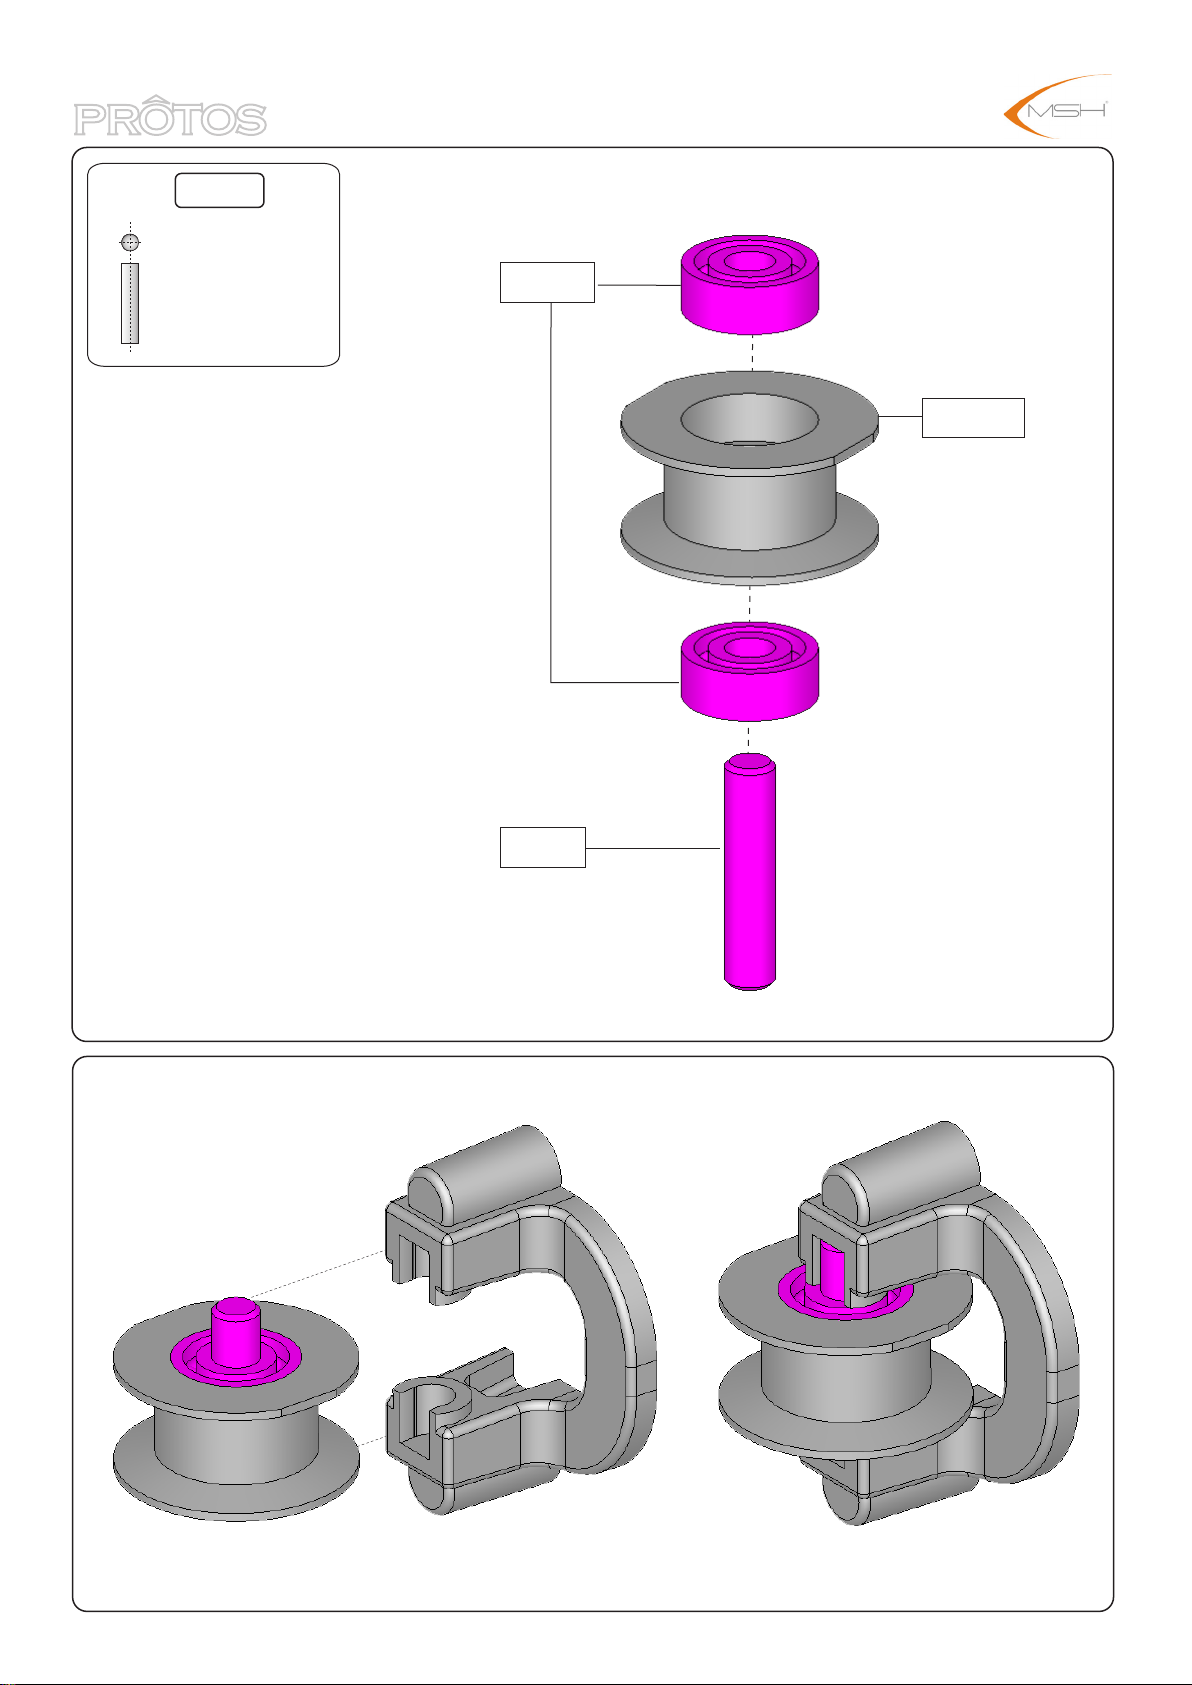
BAG-B
Pin 3x14
MSH 50059
BB 3x8x3
MSH 50033
Guide Pulley
MSH 50091
Pin 3x14
MSH 50059
8
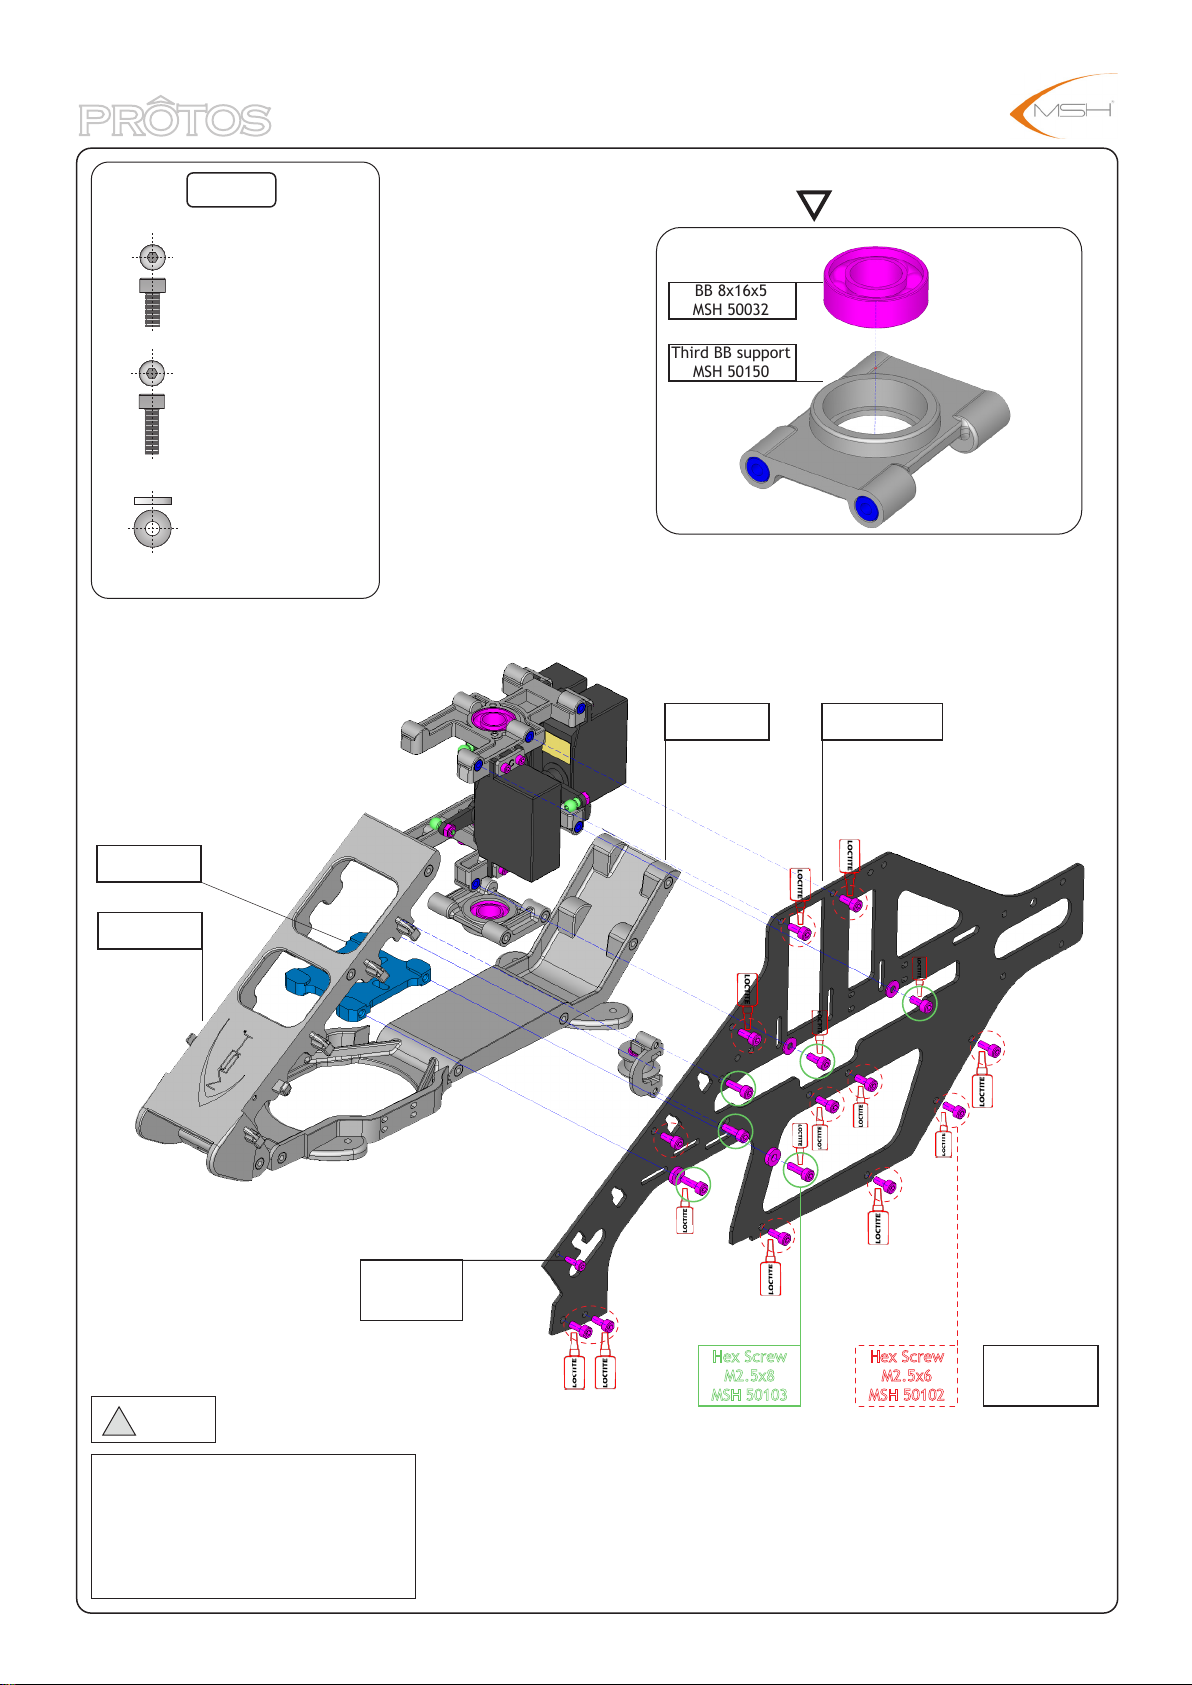
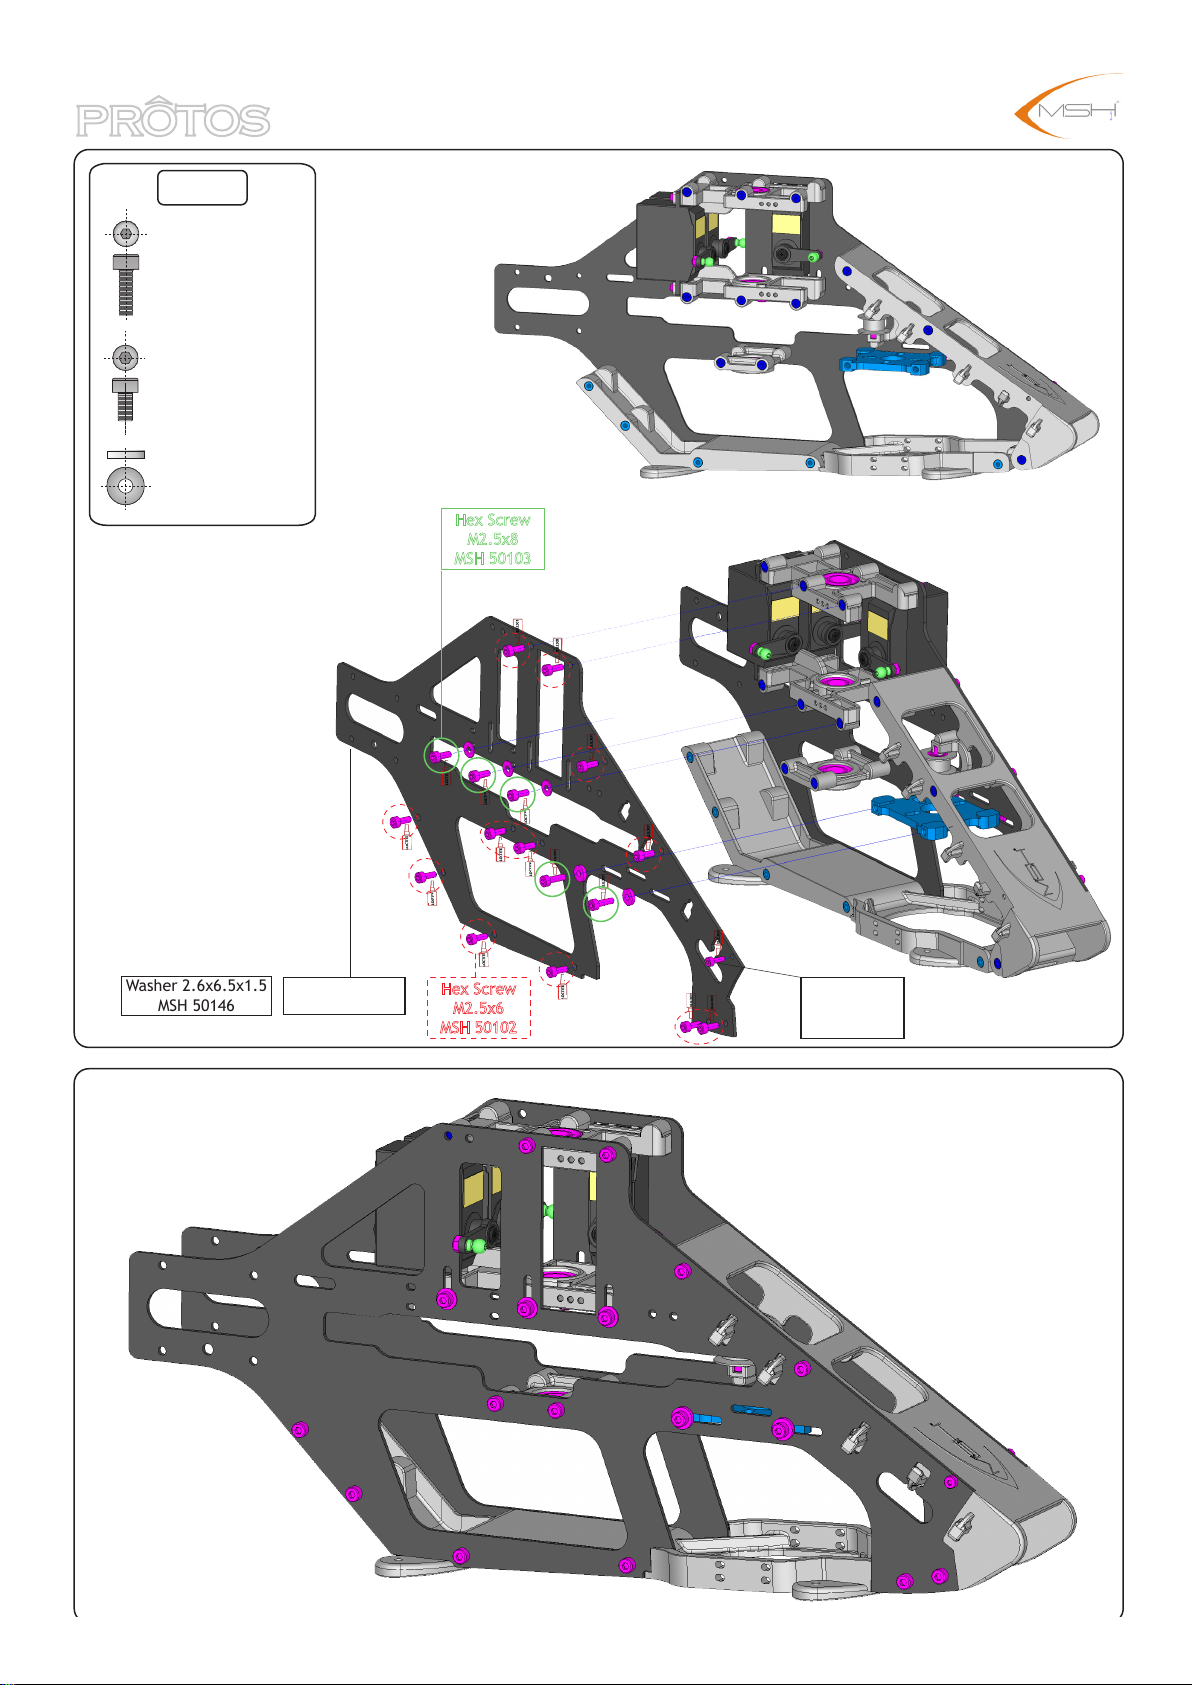
BAG-B
Caution
Motor Mount
MSH 50028
Hex Screw
M2.5x6
MSH 50102
Hex Screw
M2.5x8
MSH 50103
Washer
2.6x6.5x1.5
MSH 50146
BB 8x16x5
MSH 50032
Third BB support
MSH 50150
Under plate
MSH 50149
Carbon frame L
MSH 50151
Battery plate
MSH 50148
CAUTION
!
Use Thread lock on every screw
metal/metal such as screws
that keep the servo frame in place.
Hex Screw
M2x6
MSH 50098
Hex Screw
M2.5x8
MSH 50103
Hex Screw
M2.5x6
MSH 50102
Washer
2.6x6.5x1.5
MSH 50146
9
BAG-B
Hex Screw
M2.5x8
MSH 50103
Hex Screw M2.5x6
MSH 50102
Washer 2.6x6.5x1.5
MSH 50146
Hex Screw
M2.5x8
MSH 50103
Washer 2.6x6.5x1.5
MSH 50146
Carbon frame R
MSH 50152
Hex Screw
M2.5x6
MSH 50102
Hex Screw
M2x6
MSH 50098
10
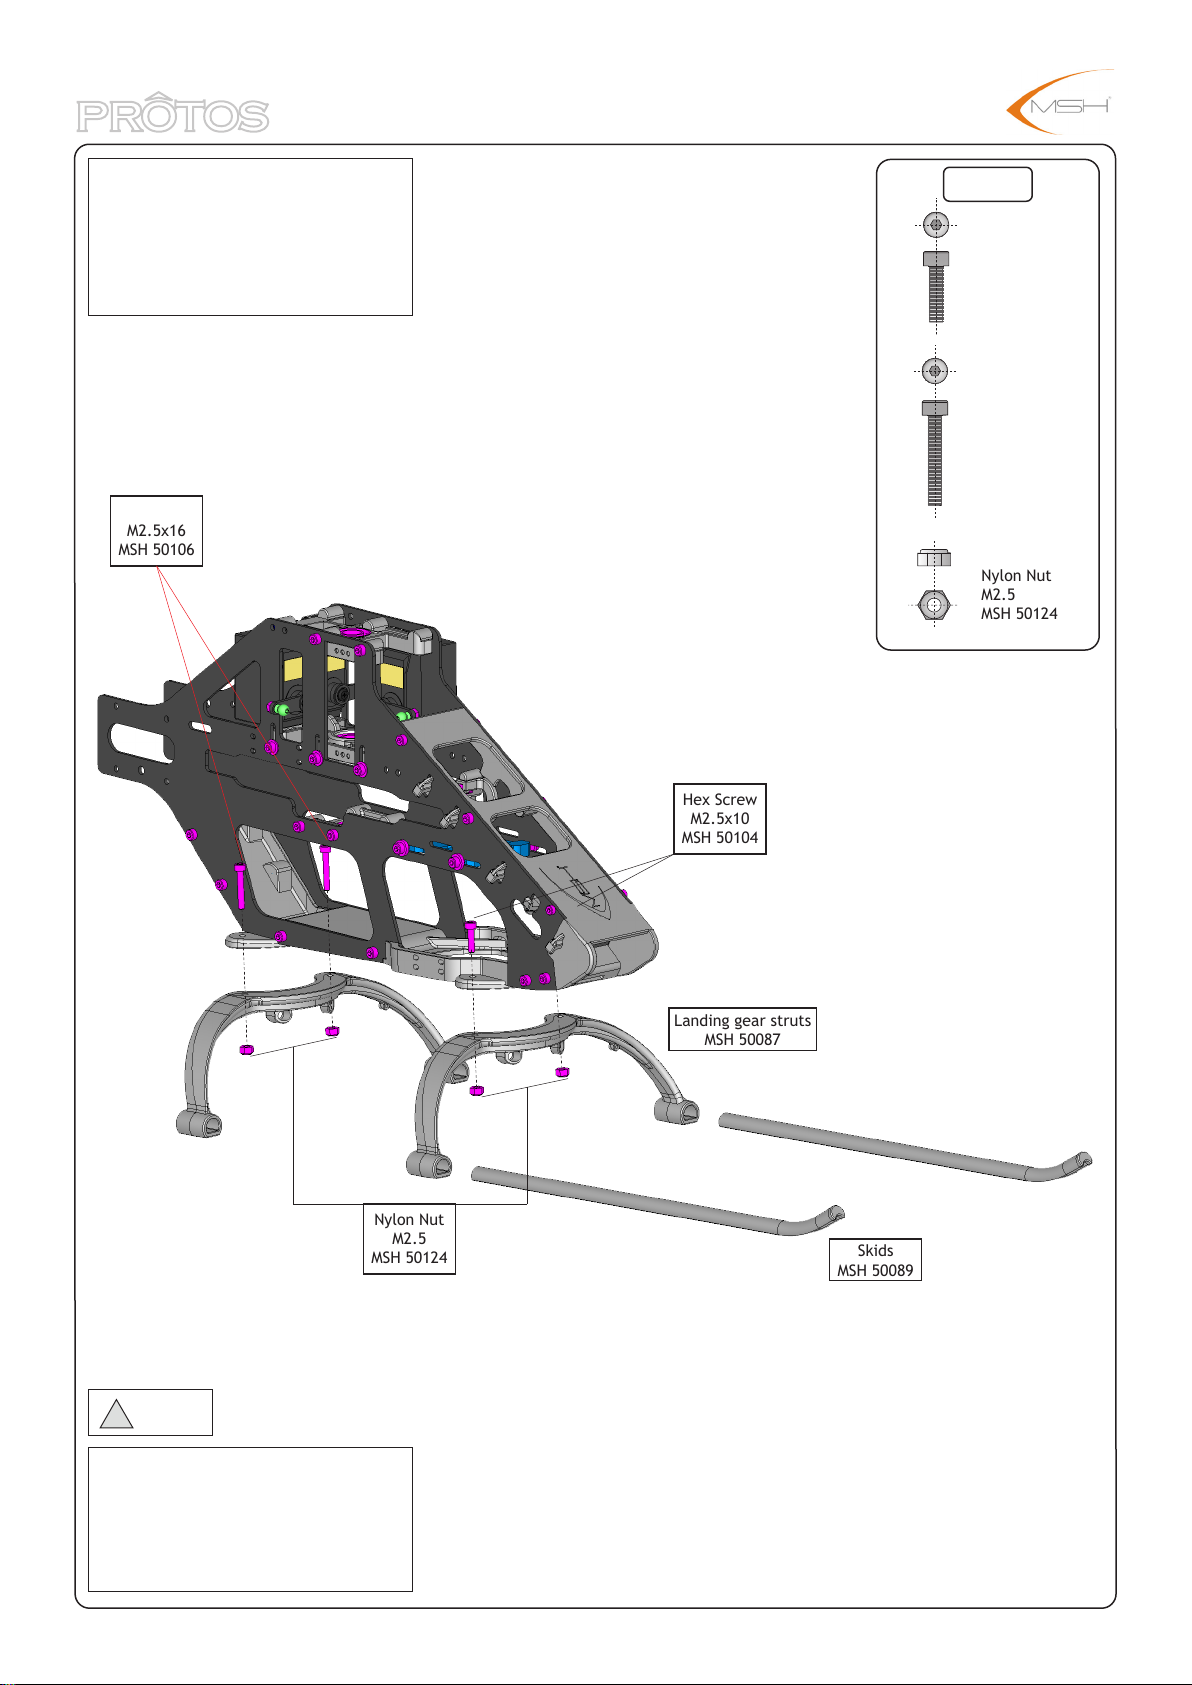
Tips/Instructions
Slide skids in both struts until "click"
in position. Both struts should "click".
BAG-B
If Skids are hard to slide in position
use an hair drier to heat struts holes.
Hex Screw
M2.5x16
MSH 50106
Hex Screw
M2.5x10
MSH 50104
Hex Screw
M2.5x16
MSH 50106
Nylon Nut
M2.5
MSH 50124
Hex Screw
M2.5x10
MSH 50104
CAUTION
!
Do not fully tighten hex screws 2.5x16
yet as they are used later to keep
boom braces in position.
Nylon Nut
M2.5
MSH 50124
Landing gear struts
MSH 50087
Skids
MSH 50089
11
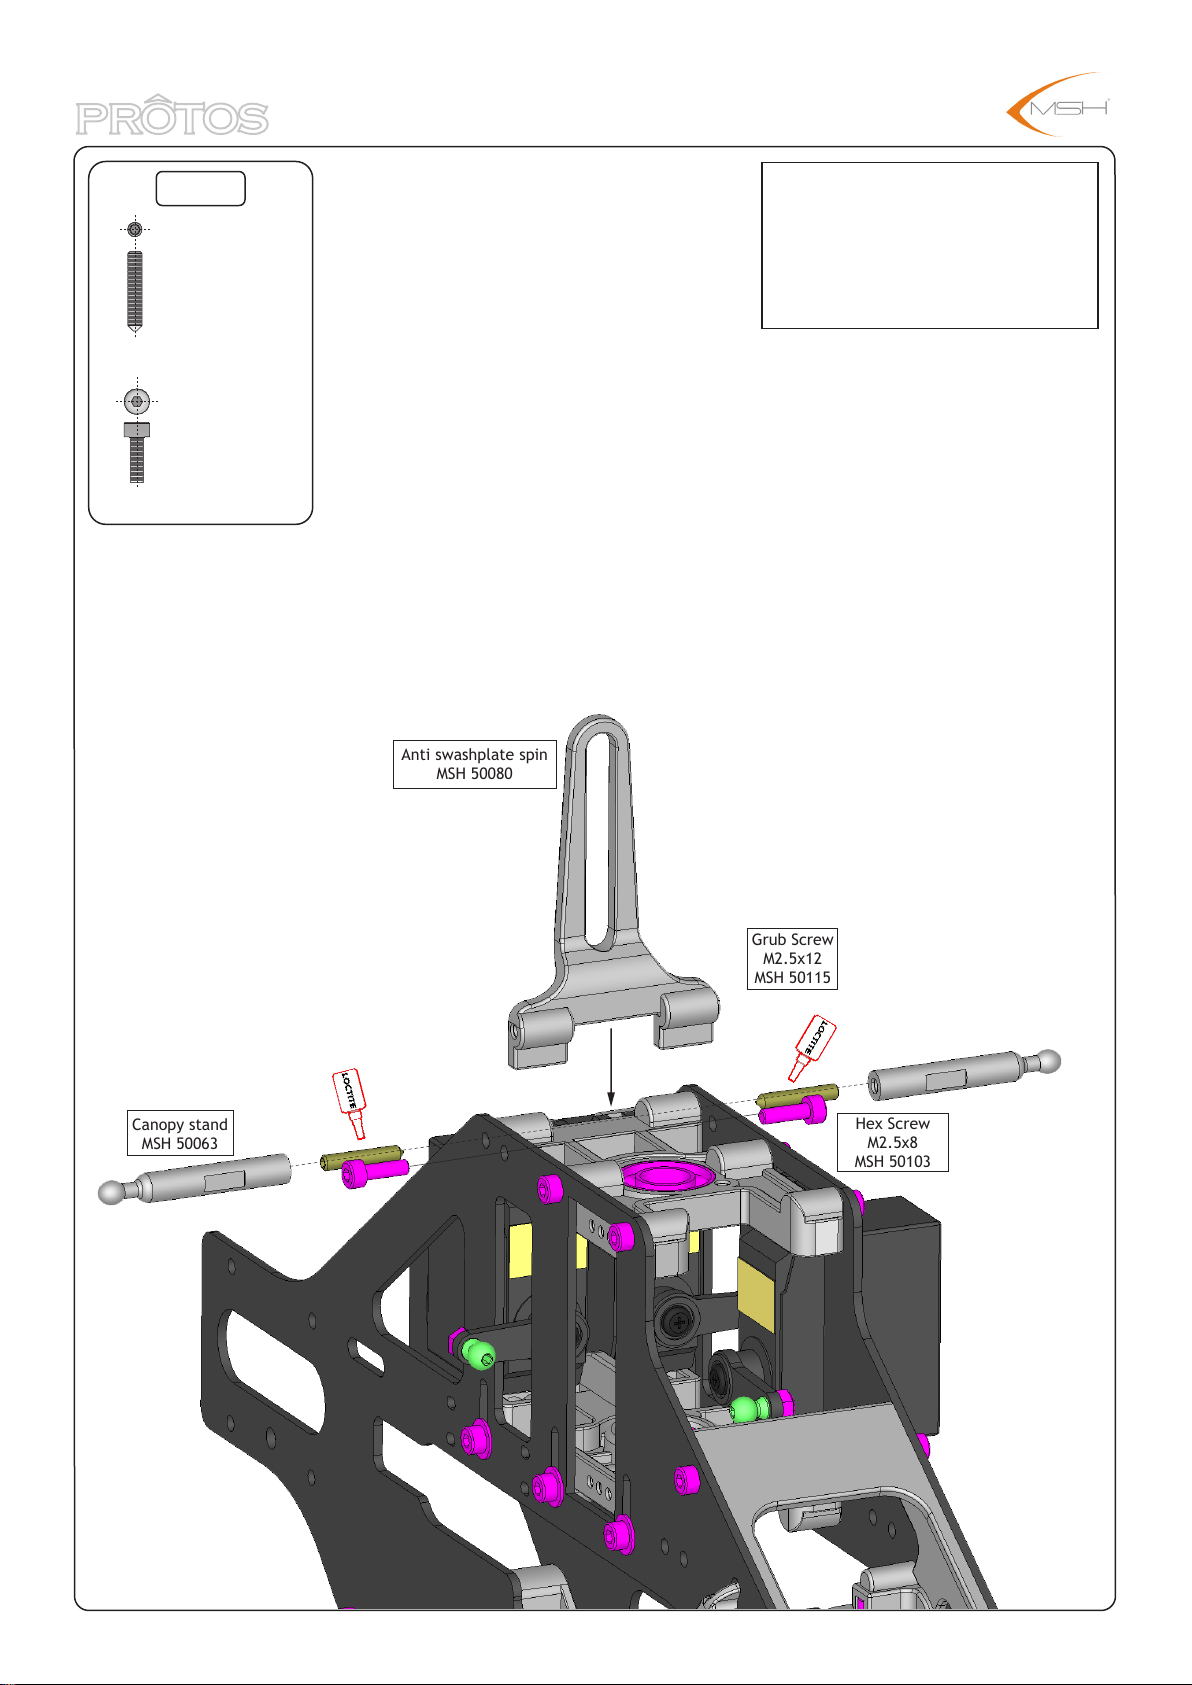
BAG-B
Grub Screw
M2.5x12
MSH 50115
Hex Screw
M2.5x8
MSH 50103
Tips/Instructions
Use thread lock on grub screw M2.5x12 on
the side that goes in the servo frame.
Grub screw can be screwed in by hand and
tightened with MSH 50063 (Canopy post)
using the two flat surfaces.
Anti swashplate spin
MSH 50080
Canopy stand
MSH 50063
Grub Screw
M2.5x12
MSH 50115
Hex Screw
M2.5x8
MSH 50103
12
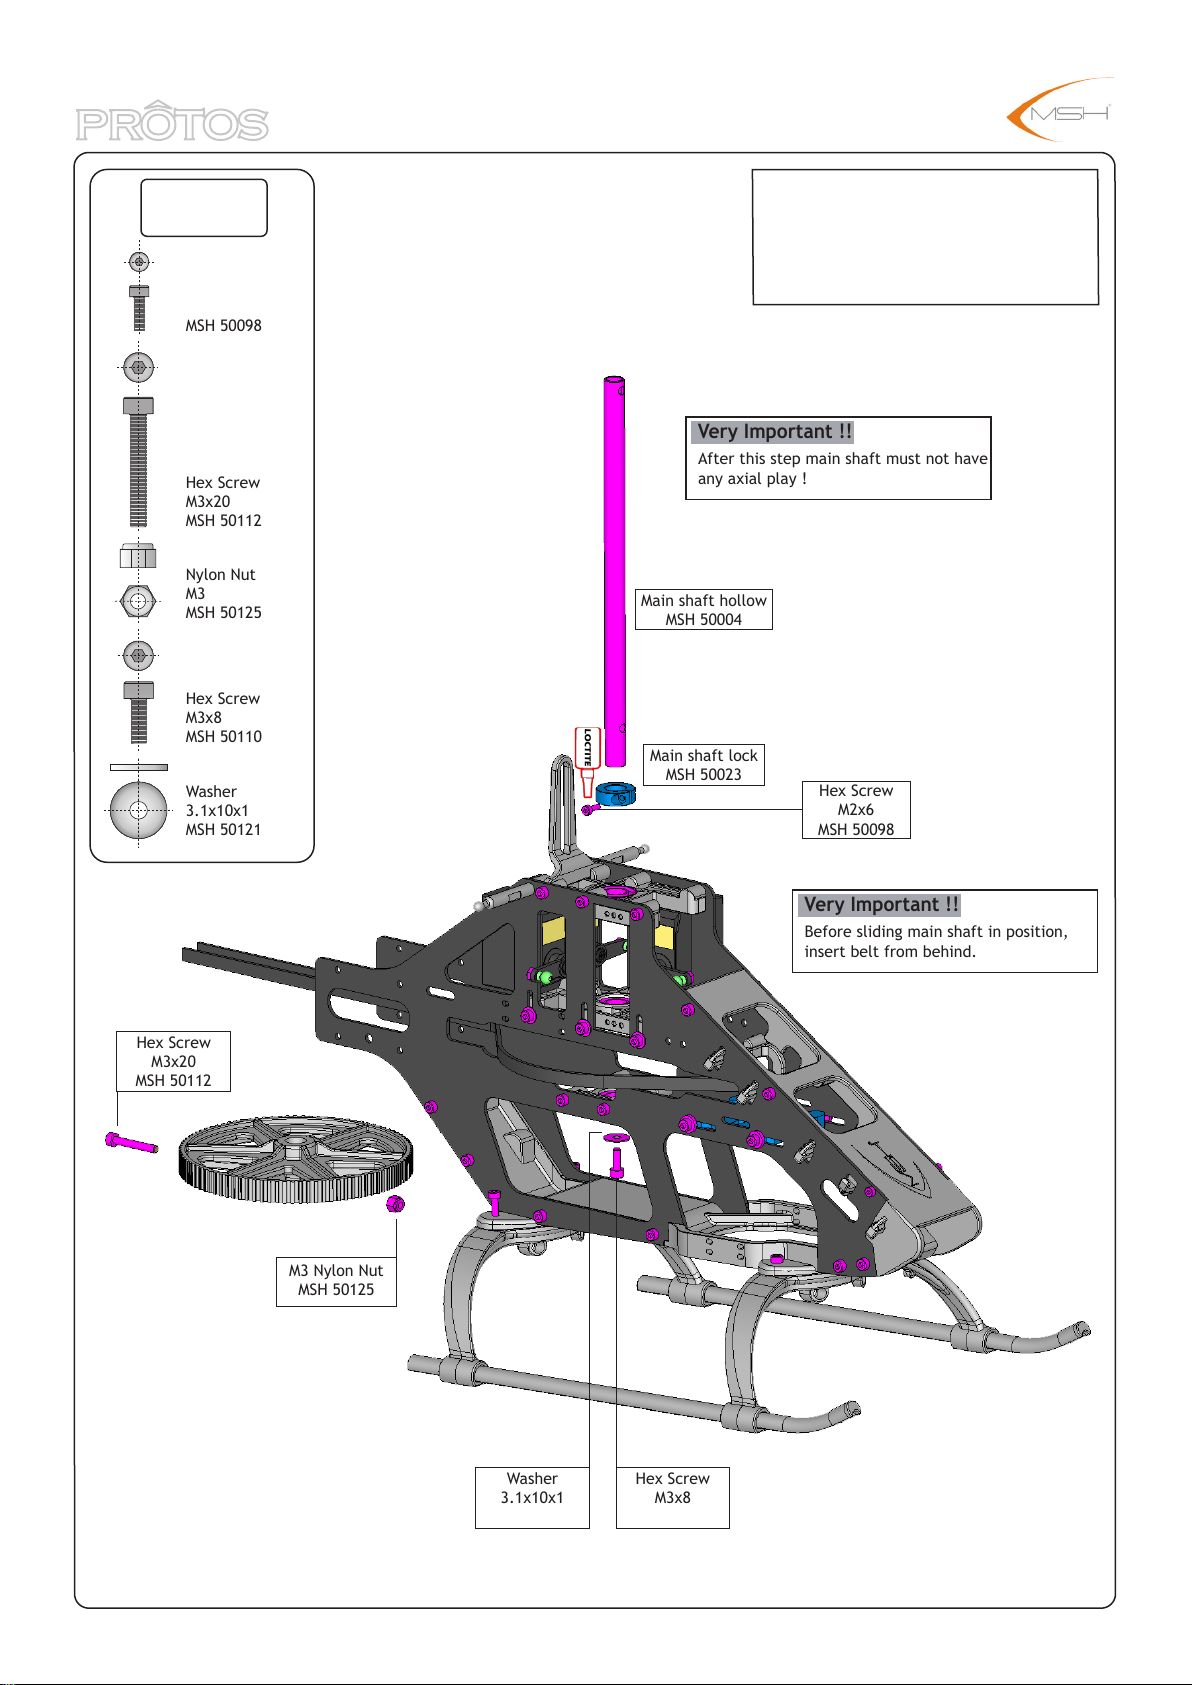
BAG-C
Belt from box
Hex Screw
M2x6
MSH 50098
Hex Screw
M3x20
MSH 50112
Nylon Nut
M3
MSH 50125
Hex Screw
M3x8
MSH 50110
Washer
3.1x10x1
MSH 50121
Tips/Instructions
Make sure hex screw M3x8 is fully tightened
on bottom of main shaft than pulling main
shaft gently lock collar in position.
Main shaft should not have any vertical play.
Very Important !!
After this step main shaft must not have
any axial play !
Main shaft hollow
MSH 50004
Main shaft lock
MSH 50023
Hex Screw
M2x6
MSH 50098
Hex Screw
M3x20
MSH 50112
M3 Nylon Nut
MSH 50125
Washer
3.1x10x1
MSH 50121
Very Important !!
Before sliding main shaft in position,
insert belt from behind.
Hex Screw
M3x8
MSH 50110
13
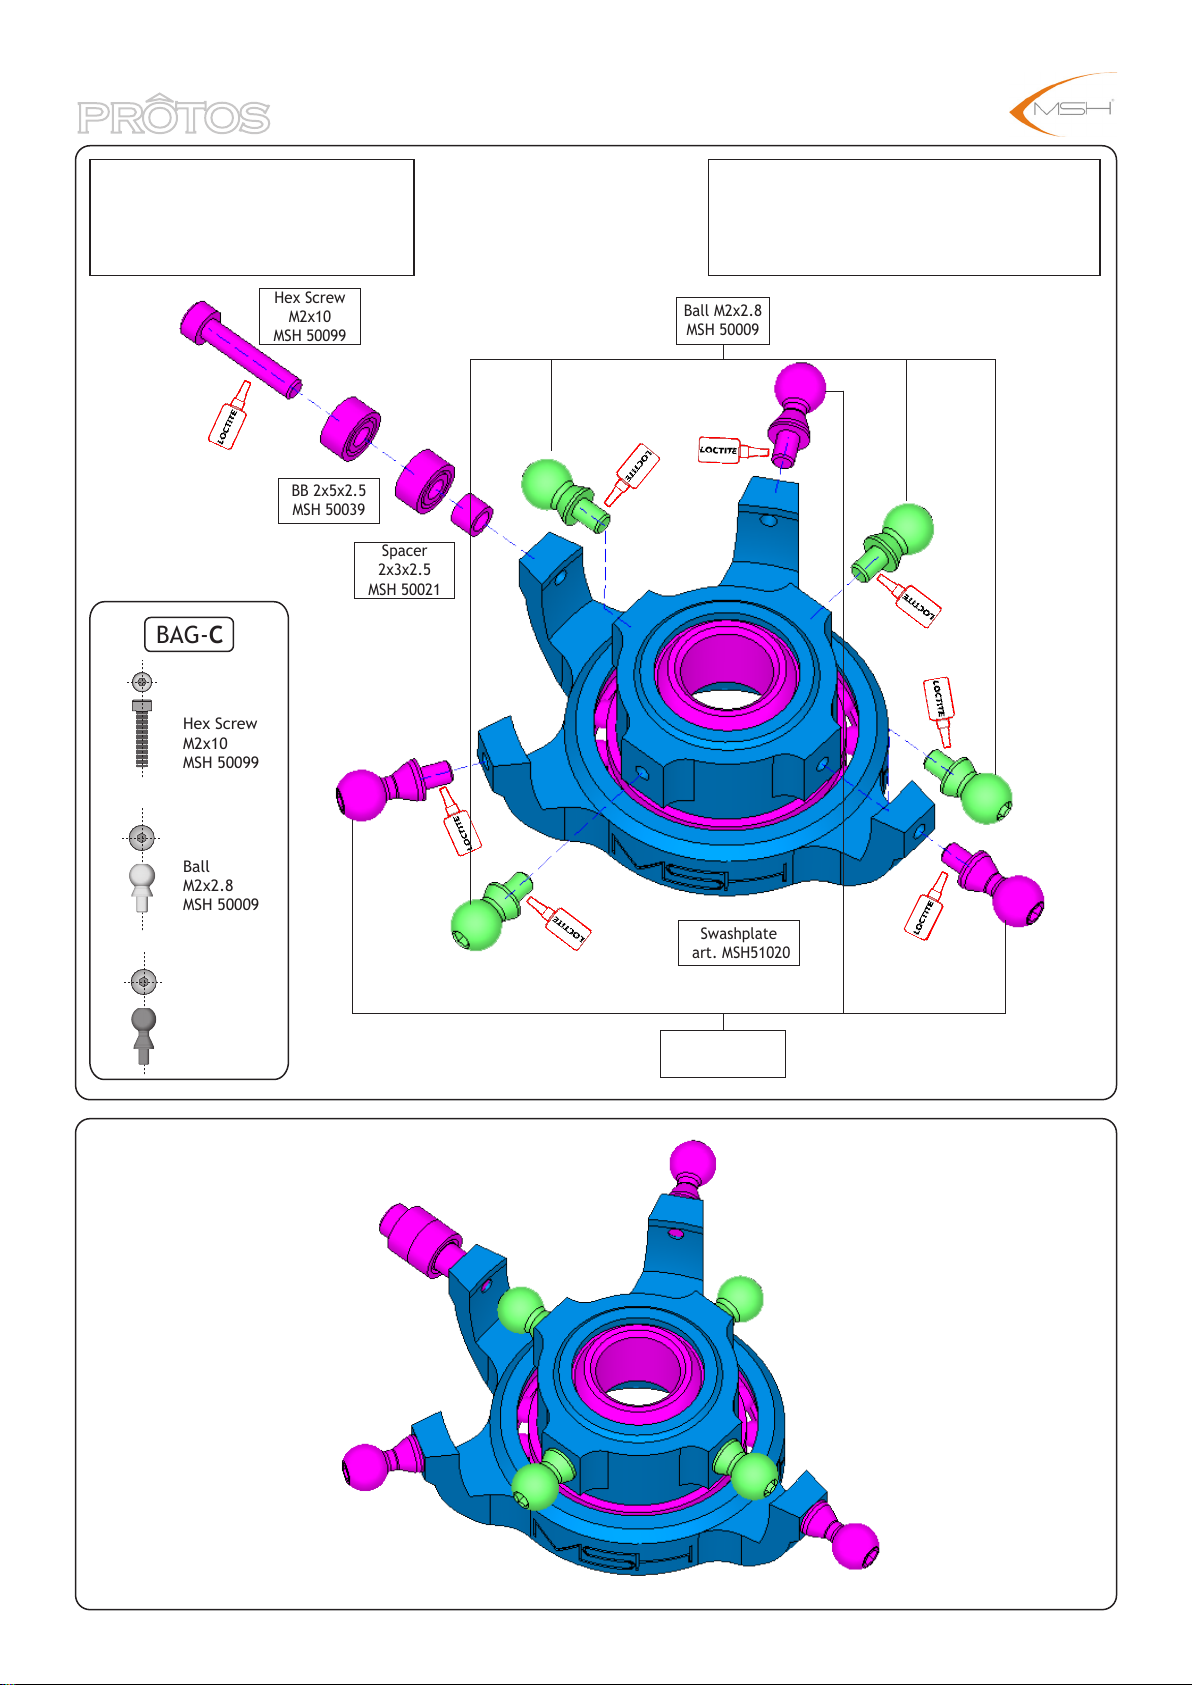
Tips/Instructions
Use Thread lock on balls and screw M2x10.
Important
Please pay attention to ball lenght :
Longer on the outer part of swashplate
and Shorter on the inside.
BAG-C
Hex Screw
M2x10
MSH 50099
Ball
M2x2.8
MSH 50009
Hex Screw
M2x10
MSH 50099
BB 2x5x2.5
MSH 50039
Ball M2x2.8
MSH 50009
Spacer
2x3x2.5
MSH 50021
Swashplate
art. MSH51020
Ball
M2x2.8
MSH
50175
Ball M2x2.8 FBL
MSH 50175
14
 Loading...