

MSF 16th Edition, 17th Edition, Motorcycle Operator's Manual

MOTORCYCLE
OPERATOR
MANUAL
MSF LICENSIN G PROGR AMS
a n m s f m a n u a l
With Supplementary Information
for Three-Wheel Motorcycles
16th Edition

2 Preface
Welcome to the Sixteenth Edition of
the MSF Motorcycle Operator Manual
(MOM). Operating a motorcycle safely
in traffic requires special skills and
knowledge. The Motorcycle Safety
Foundation (MSF) has made this manual
available to help novice motorcyclists
reduce their risk of having a crash. The
manual conveys essential safe riding
information and has been designed
for use in licensing programs. While
designed for the novice, all motorcyclists
can benefit from the information this
manual contains.
The original Motorcycle Operator
Manual was developed by the National
Public Services Research Institute (NPSRI)
under contract to the National Highway
Traffic Safety Administration (NHTSA)
and within the terms of a cooperative
agreement between NHTSA and the
MSF. The manual and related tests
were used in a multi-year study of
improved motorcycle operator licensing
procedures, conducted by the California
Department of Motor Vehicles under
contract to NHTSA.
The purpose of this manual is to
educate riders and to help them avoid
crashes while safely operating either
a standard two-wheel motorcycle or a
three-wheel motorcycle.
This latest edition has undergone
significant improvements, and contains
new, more in-depth information,
designed to:
• Guide riders in preparing to ride
safely
• Develop effective street strategies
• Give riders more comprehensive
understanding of safe group riding
practices
• Describe in detail best practices for
carrying passengers and cargo
In promoting improved licensing
programs, the MSF works closely with
state licensing agencies. The Foundation
has helped more than half the states
in the nation adopt the Motorcycle
Operator Manual for use in their
licensing systems.
Improved licensing, along with high
quality motorcycle rider education and
increased public awareness, has the
potential to reduce crashes. Staff at the
Foundation are available to assist state,
private and governmental agencies in
efforts to improve motorcycle safety.
Tim Buche
President,
Motorcycle Safety Foundation
2 Jenner, Suite 150
Irvine, CA 92618-3806
www.msf-usa.org

contents 3contents
THE RIDER AND
THE MOTORCYCLE ���������������������������4
PREPARING TO RIDE
Wear the Right Gear ����������������������������5
Know Your Motorcycle ������������������������7
Know Your Responsibilities ���������������10
RIDE WITHIN YOUR ABILITIES
Basic Vehicle Control ��������������������������11
Keeping Your Distance �����������������������15
SEE �������������������������������������������������������20
Intersections ���������������������������������������21
Increasing Conspicuity �����������������������24
Crash Avoidance ���������������������������������27
Handling Dangerous Surfaces �����������30
Mechanical Problems �������������������������33
Animals �����������������������������������������������34
Flying Objects �������������������������������������35
Getting Off the Road �������������������������35
Carrying Passengers
and Cargo ���������������������������������������35
Group Riding ���������������������������������������38
BEING IN SHAPE TO RIDE
Why This Information Is
Important ���������������������������������������42
Alcohol and Other Drugs in
Motorcycle Operation ��������������������42
Alcohol in the Body ����������������������������42
Alcohol and the Law ��������������������������44
Minimize the Risks �����������������������������44
Step in to Protect Friends ������������������45
Fatigue ������������������������������������������������45
EARNING YOUR LICENSE ��������������46
THREE-WHEEL SUPPLEMENT
Supplementary Information
for Three-Wheel Motorcycles ���������48
Know Your Vehicle ������������������������������48
Basic Vehicle Control ���������������������������50
Carrying Passengers and Cargo ����������53
HAND SIGNALS �������������������������� 55
T-CLOCS PRE-RIDE CHECKLIST ����57
4 the rider and the Motorcycle
Motorcycling is a
unique experience.
Compared to a car,
you don’t sit in a
motorcycle, you
become part of it.
Not as a passive
driver, but as an
active rider arcing
into a string of
smooth corners,
playing along with
the rhythm of the
road; shifting,
accelerating,
and braking
with precision.
Whether you
ride to and from
work or prefer
the camaraderie of a group ride on the
weekend, motorcycling engages all your
senses and creates an invigorating sense
of freedom.
Along with that freedom comes
responsibility. All states require
some form of license endorsement
demonstrating you possess a minimum
level of skill and knowledge. This
booklet and other motorcycle
publications can help prepare you to
be successful. You might also consider
taking a formal hands-on training
course, even if your state doesn’t require
that you complete one. You’ll learn how
to improve your riding skills and mental
strategies, so you can be a safer, more
alert rider.
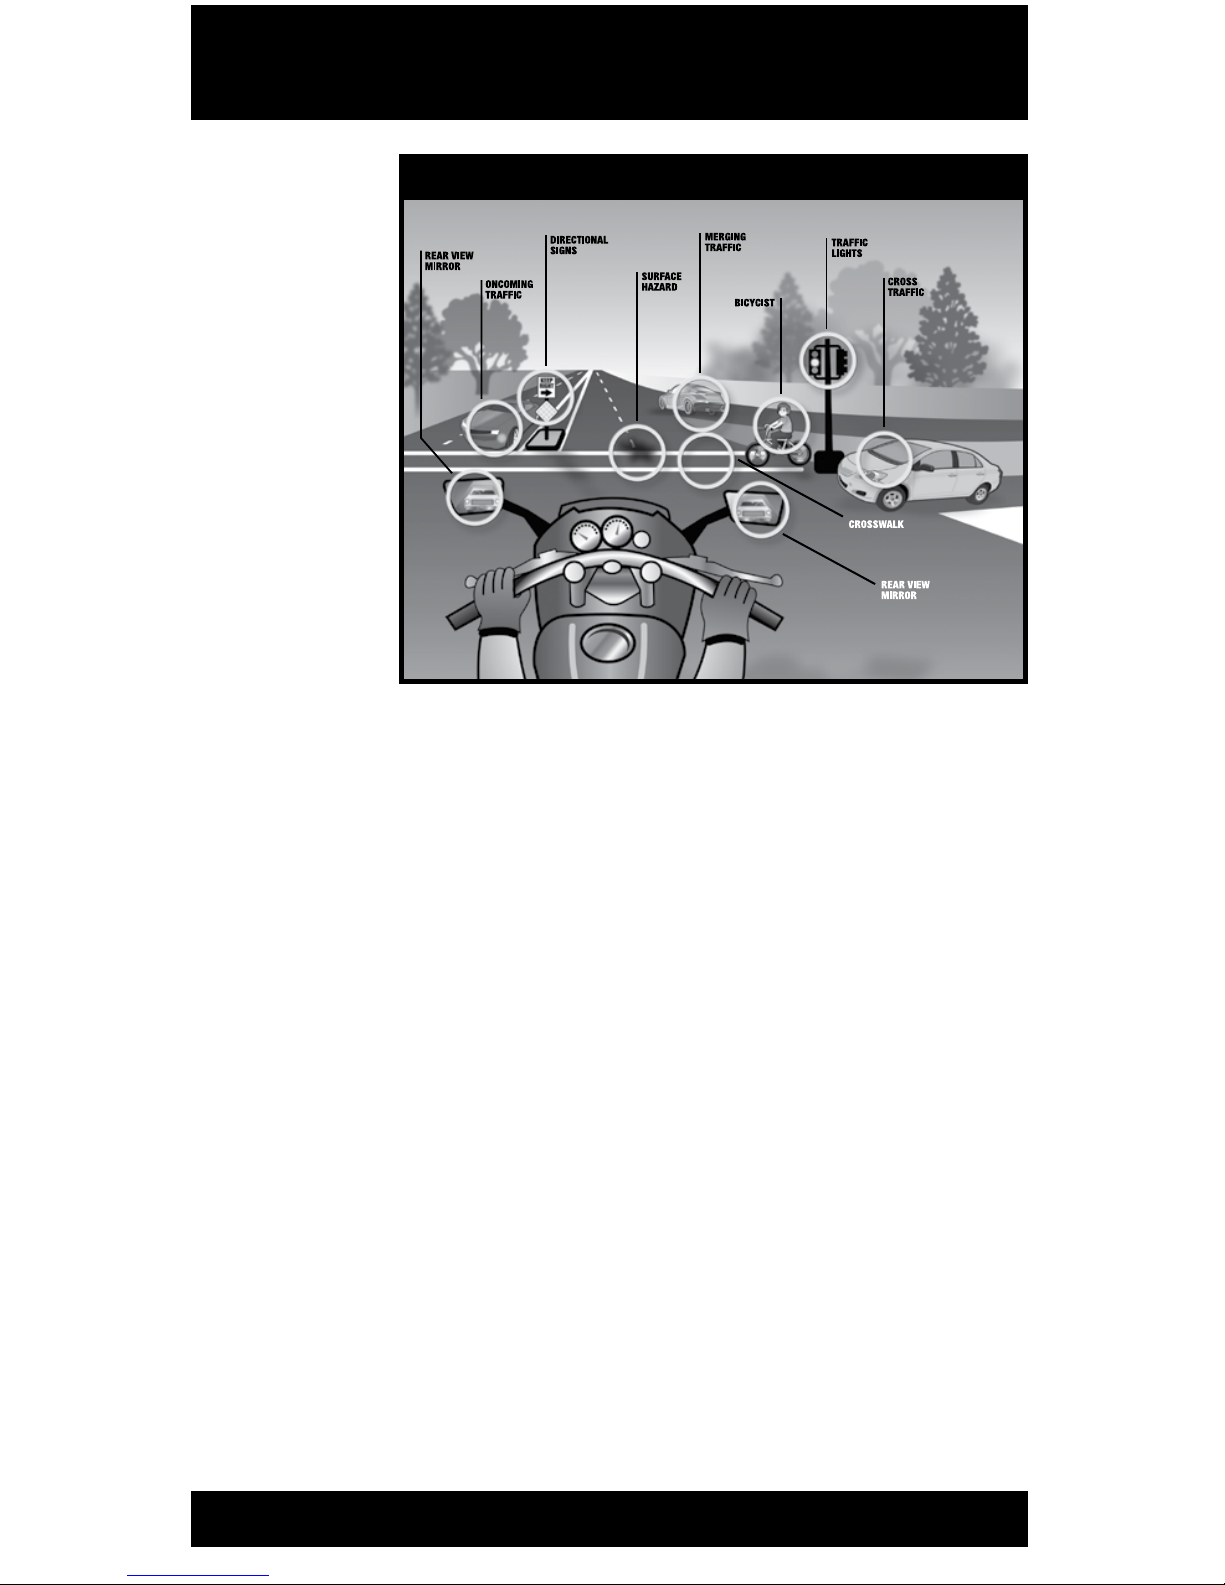
The diagram above illustrates the
complex environment that awaits you,
and supports the concept that, as the
Motorcycle Safety Foundation says,
“Safe riding is as much a skill of the
eyes and mind as it is of the hands and
feet.”
Successfully piloting a motorcycle is a
much more involved task than driving a
car. Motorcycling requires a fine sense
of balance and a heightened sense of
awareness and position amidst other
roadway users. A motorcycle responds
more quickly to rider inputs than a car,
but is also more sensitive to outside
forces, like irregular road surfaces or
crosswinds. A motorcycle is also less
visible than a car due to its narrower
profile, and offers far less protection by
exposing its rider to other traffic and
the elements. All these risks can be
managed through study, training, and
practice.
riding environMent

PreParing to ride 5
What you do before you start a trip goes a long way toward determining
whether or not you’ll get where you want to go safely. Before taking off on any
trip, a safe rider makes a point to:
1� Wear the right gear�
2� Become familiar with the motorcycle�
3� Check the motorcycle equipment�
4� Be a responsible rider�
Wear the right gear
When you ride, your gear is “right”
if it protects you. In any crash, you have
a far better chance of avoiding serious
injury if you wear:
• A DOT compliant helmet�
• Face or eye protection�
• Protective clothing�
Helmet Use
Crashes can occur — particularly
among untrained, beginning riders.
And one out of every five motorcycle
crashes results in head or neck injuries.
Head injuries are just as severe as neck
injuries — and far more common. Crash
analyses show that head and neck
injuries account for a majority of serious
and fatal injuries to motorcyclists.
Research also shows that, with few
exceptions, head and neck injuries are
reduced by properly wearing a quality
helmet.
Some riders don’t wear helmets
because they think helmets will limit
their view to the sides. Others wear
helmets only on long trips or when
riding at high speeds. But, here are
some facts to consider:
• A DOT-compliant helmet lets
you see as far to the sides as
necessary. A study of more than
900 motorcycle crashes, where
40% of the riders wore helmets,
did not find even one case in which
a helmet kept a rider from spotting
danger.
• Most crashes happen on short
trips (less than five miles long), just
a few minutes after starting out.
• Most riders are riding slower than
30 mph when a crash occurs. At
these speeds, helmets can cut both
the number and the severity of head
injuries by half.
No matter what the speed, helmeted
riders are three times more likely to
survive head injuries than those not
wearing helmets at the time of the
crash. The single most important thing
you can do to improve your chances of
surviving a crash is to wear a securelyfastened, quality helmet.
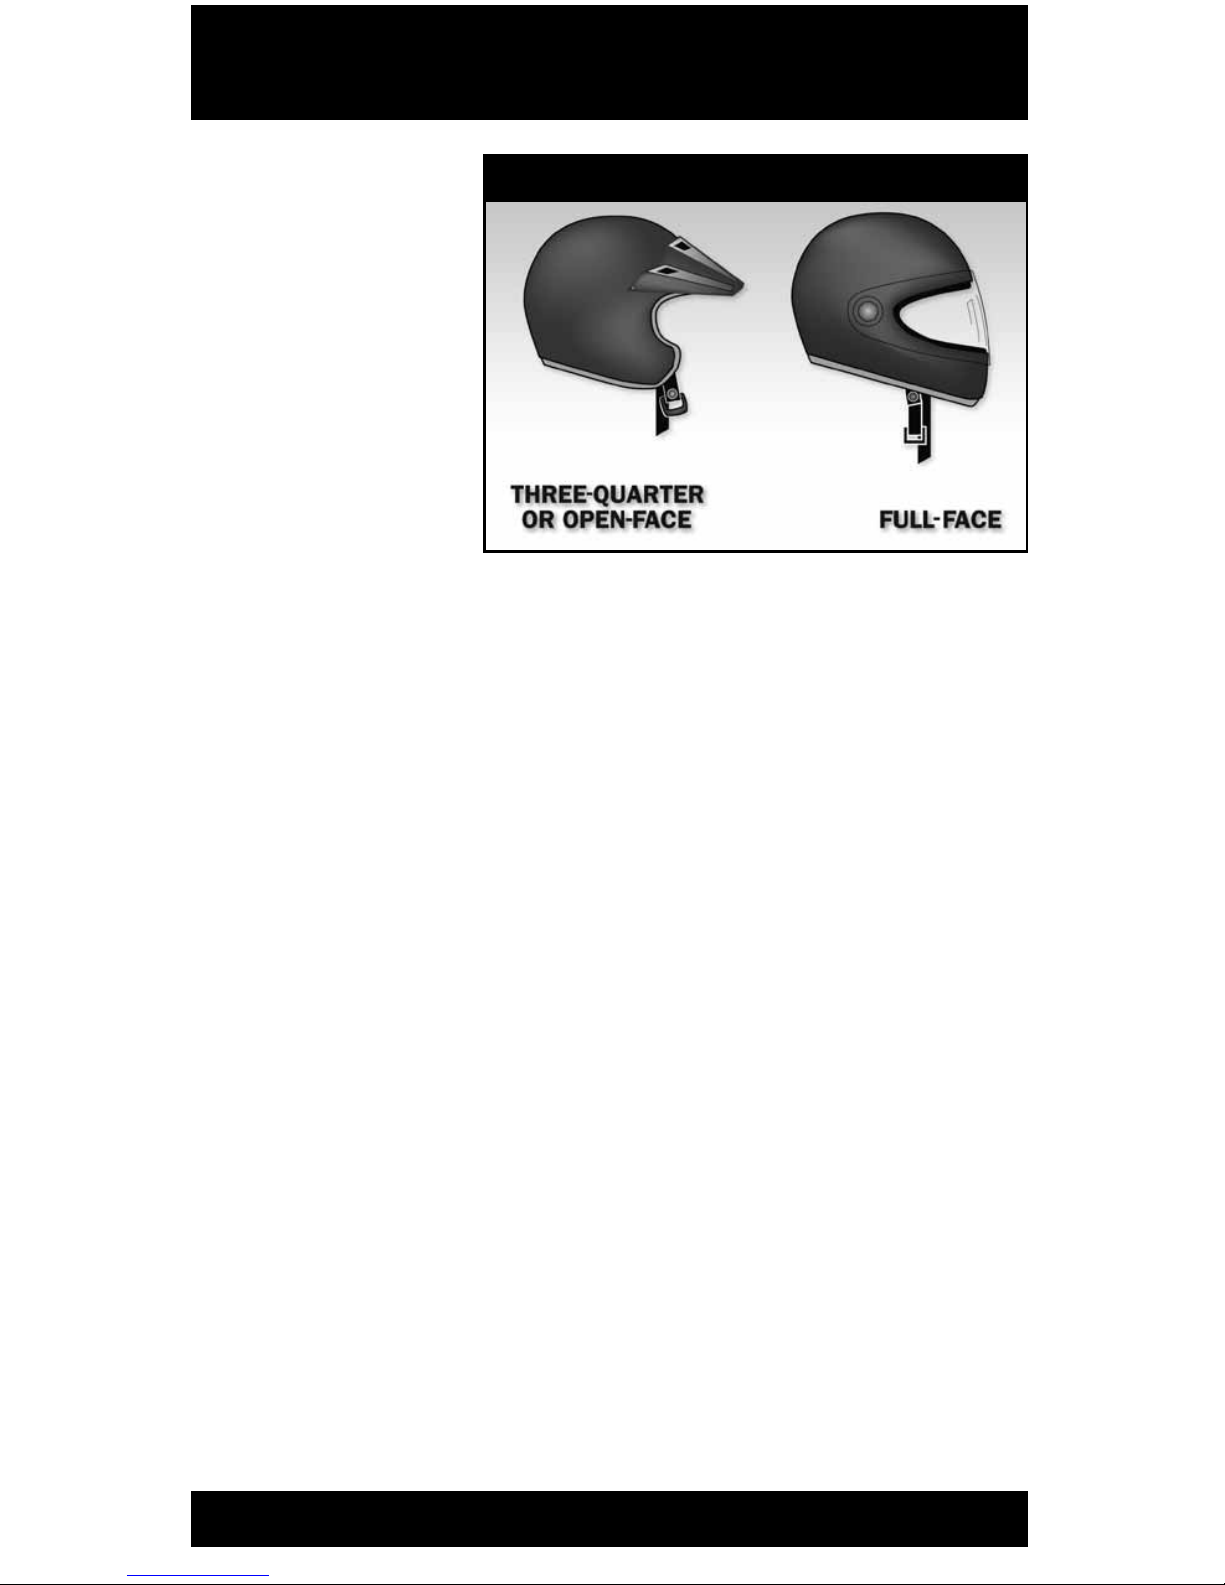
Helmet Selection
There are two primary types of
helmets, providing two different levels
of coverage: three-quarter and full face.
Whichever style you choose, you can
get the most protection by making sure
that the helmet:
• Is designed to meet U�S�
Department of Transportation
(DOT) and state standards. Helmets
with a label from the Snell Memorial
Foundation also give you an
assurance of quality.
• Fits snugly, all the way around.
• Has no obvious defects such as
cracks, loose padding or frayed
straps.
6 PreParing to ride
Whatever helmet you
decide on, keep it securely
fastened on your head
when you ride. Otherwise,
if you are involved in a
crash, it’s likely to fly off
your head before it gets a
chance to protect you.
Eye and Face
Protection
A plastic shatter-resistant
faceshield can help protect
your whole face in a
crash. It also protects you
from wind, dust, dirt, rain, insects and
pebbles thrown up from cars ahead.
These problems are distracting and
can be painful. If you have to deal
with them, you can’t devote your full
attention to the road.
Goggles protect your eyes, though
they won’t protect the rest of your face
like a faceshield does. A windshield
is not a substitute for a faceshield or
goggles. Most windshields will not
protect your eyes from the wind. Neither
will eyeglasses or sunglasses. Glasses
won’t keep your eyes from watering,
and they might blow off when you turn
your head while riding.
To be effective, eye or faceshield
protection must:
• Be free of scratches.
• Be resistant to penetration.
• Give a clear view to either side.
• Fasten securely, so it does not
blow off.
• Permit air to pass through, to
reduce fogging.
• Permit enough room for
eyeglasses or sunglasses, if needed.
Tinted eye protection should not be
worn when little light is available.
Clothing
The right clothing protects you in
a collision. It also provides comfort,
as well as protection from heat, cold,
debris and hot and moving parts of the
motorcycle. It can also make you more
visible to others.
• Jacket and pants should cover
arms and legs completely. They
should fit snugly enough to keep
from flapping in the wind, yet
loosely enough to move freely.
Leather offers the most protection.
Sturdy synthetic material provides
a lot of protection as well. Wear
a jacket even in warm weather to
prevent dehydration. Many are
designed to protect without getting
you overheated, even on summer
days. Some riders choose jackets
and pants with rigid “body armor”
inserts in critical areas for additional
protection.
• Boots or shoes should be high
and sturdy enough to cover your
ankles and give them support. Soles
should be made of hard, durable,
slip-resistant material. Keep heels
short so they do not catch on rough
surfaces. Tuck in laces so they won’t
catch on your motorcycle.
helMets

7
• Gloves allow a better grip and help
protect your hands in a crash. Your
gloves should be made of leather or
similar durable material.
• Hearing protection reduces
noise while allowing you to hear
important sounds such as car horns
or sirens. Long term exposure to
engine and wind noise can cause
permanent hearing damage even
if you wear a full face helmet.
Whether you choose disposable
foam plugs or reusable custom
molded devices, be sure you adhere
to state laws regarding hearing
protection.
In cold or wet weather, your clothes
should keep you warm and dry, as
well as protect you from injury. You
cannot control a motorcycle well if
you are numb. Riding for long periods
in cold weather can cause severe chill
and fatigue. A winter jacket should
resist wind and fit snugly at the neck,
wrists and waist. Good-quality rainsuits
designed for motorcycle riding resist
tearing apart or ballooning up at high
speeds.
KNOW YOUr
MOtOrCYCLe
There are plenty of things on the
highway that can cause you trouble.
Your motorcycle should not be one
of them. To make sure that your
motorcycle won’t let you down:
• Start with the right motorcycle
for you.
• Read the owner’s manual.
• Be familiar with the motorcycle
controls.
• Check the motorcycle before
every ride.
• Keep it in safe riding condition
between rides.
• Avoid add-ons and modifications
that make your motorcycle harder
to handle.
The Right Motorcycle For You
First, make sure your motorcycle is
right for you. It should “fit” you. Your
feet should reach the ground while
you are seated on the motorcycle, and
the controls should be easy to operate.
Smaller motorcycles are usually easier
for beginners to operate.
At a minimum, your street-legal
motorcycle should have:
• Headlight, taillight and
brakelight�
clothing
A plastic shatter-resistant face
shield:
A. Is not necessary if you have a
windshield.
B. Only protects your eyes.
C. Helps protect your whole face.
D. Does not protect your face as well
as goggles.
test yourself 1
Answer - page 47
8 PreParing to ride
• Front and rear brakes�
• Turn signals�
• Horn�
• Two mirrors�
Borrowing and Lending
Borrowers and lenders of motorcycles,
beware. Crashes are fairly common
among beginning riders — especially
in the first months of riding. Riding
an unfamiliar motorcycle adds to the
problem. If you borrow a motorcycle,
get familiar with it in a controlled area.
And if you lend your motorcycle to
friends, make sure they are licensed and
know how to ride before allowing them
out into traffic.
No matter how experienced you
may be, ride extra carefully on any
motorcycle that’s new or unfamiliar
to you. More than half of all crashes
involve riders with less than five months
of experience on their motorcycle.
Get Familiar with the
Motorcycle Controls
Make sure you are completely familiar
with the motorcycle before you take
it out on the street. Be sure to review
the owner’s manual. This is particularly
important if you are riding a borrowed
motorcycle.
If you are going to use an unfamiliar
motorcycle:
• Make all the checks you would on
your own motorcycle.
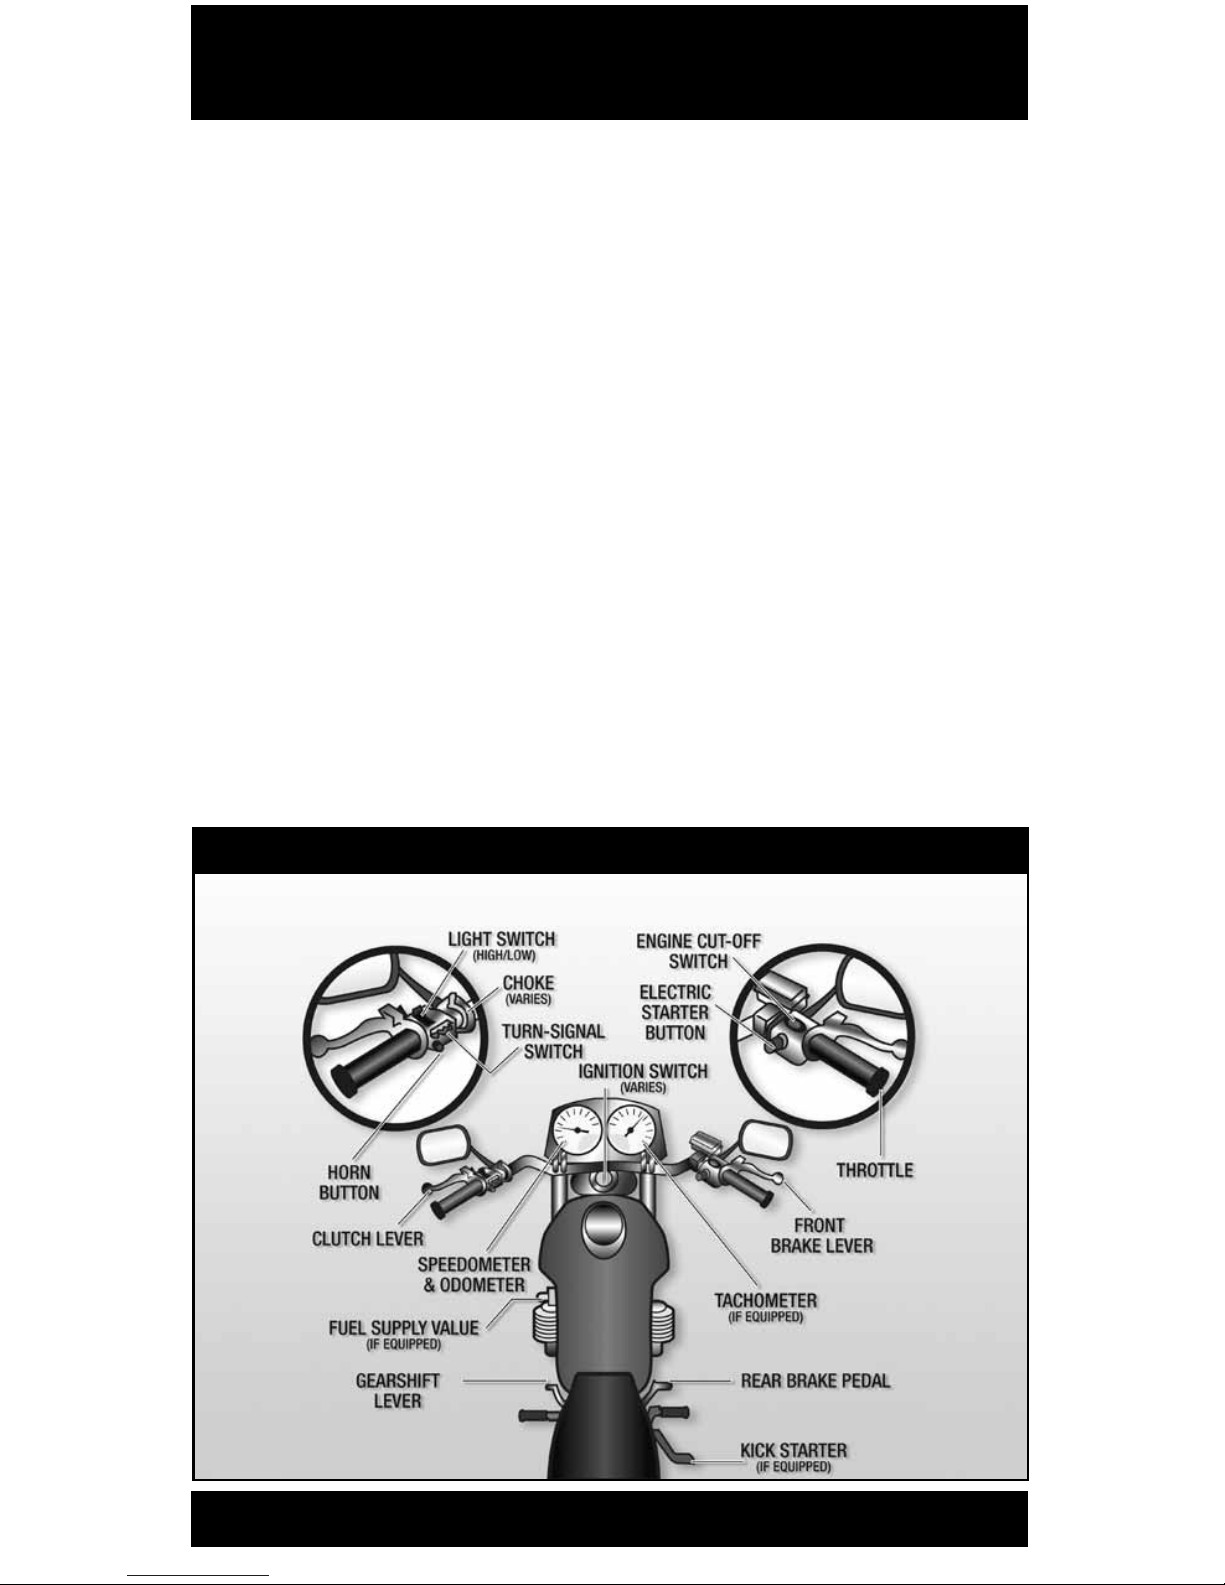
• Find out where everything is,
particularly the turn signals, horn,
headlight switch, fuel-supply valve
and engine cut-off switch. Find and
operate these items without having
to look for them.
Motorcycle controls

9
• Know the controls� Work the
throttle, clutch, brakes, and shifter a
few times before you start riding.
• Ride very cautiously and be aware
of surroundings. Accelerate gently,
take turns more slowly and leave
extra room for stopping.
Check Your Motorcycle
A motorcycle needs more frequent
attention than a car. A minor technical
failure on a car is seldom more than an
inconvenience for the driver. The same
failure on a motorcycle may result in a
crash or having to leave your motorcycle
parked on the side of the road. If
anything’s wrong with your motorcycle,
you’ll want to find out about it before
you get in traffic.
The primary source of information
about how a motorcycle should be
inspected and maintained is its owner’s
manual. Be sure to absorb all of its
important information. A motorcycle will
continue to ride like new if it is properly
maintained and routine inspections
become part of its maintenance cycle.
A pre-ride inspection only takes
a few minutes and should be done
before every ride to prevent problems.
It’s quick and easy to check the critical
components and should be as routine
and automatic as checking the weather
forecast before heading out for the day.
A convenient reminder developed by
MSF is T-CLOCS
SM
. There is a T-CLOCS
“tear-out” sheet at the back of this
manual for you to keep with you when
you ride. A T-CLOCS inspection should
be conducted before every ride, and
includes checks of:
T — Tires and Wheels
• Check tire inflation pressure,
treadwear and general condition of
sidewalls and tread surface.
• Try the front and rear brake levers
one at a time. Make sure each feels
firm and holds the motorcycle when
fully applied.
C — Controls
• Make sure the clutch and throttle
operate smoothly. The throttle
should snap back to fully closed
when released. The clutch should
feel tight and should operate
smoothly.
• Try the horn. Make sure it works.
• Clean and adjust your mirrors
before starting. It’s difficult to ride
with one hand while you try to
adjust a mirror. Adjust each mirror
so you can see the lane behind and
as much as possible of the lane next
to you. When properly adjusted, a
mirror may show the edge of your
arm or shoulder – but it’s the road
behind you and to the side that are
most important.
L — Lights and Electrics
• Check both headlight and taillight.
Test your switch to make sure both
high and low beams work.
• Turn on both right and left hand
turn signals. Make sure all lights are
working properly.
• Try both brakes and make sure each
one turns on the brake light.
O — Oil and Other Fluids
• Check engine oil and transmission
fluid levels.
• Check the brake hydraulic fluid and
coolant level weekly.
• Be sure your fuel valve is open
before starting out. With the fuel
valve closed, your motorcycle may
start with only the fuel that is still in
the lines, but will stall once the lines
are empty.

10 PreParing to ride
• Look underneath the motorcycle for
signs of an oil or fuel leak.
C — Chassis
• Check the front suspension. Ensure
there is no binding. The rear shocks
and springs should move smoothly.
• Be sure the chain is adjusted
according to the manufacturer’s
specifications and that the sprockets
are not worn or damaged.
S — Stands
• Ensure the side stand operates
smoothly and that the spring holds
it tightly in the up position. If
equipped, the center stand should
also be held firmly against the frame
whenever the motorcycle is moving.
Additionally, regular maintenance
such as tune-ups and oil changes are as
important for a motorcycle as routine
checkups by your doctor are for you.
Wear and tear is normal with use;
routine maintenance will help prevent
costly breakdowns. The schedule for
regular upkeep for motorcycle parts
and controls is contained in your
motorcycle’s owner’s manual.
KNOW YOUr
reSPONSiBiLitieS
“Accident” implies an unforeseen
event that occurs without fault or
negligence. In traffic, that is not the
case. In fact, most people involved in a
crash can claim some responsibility for
what takes place.
Consider a situation where someone
decides to drive through an intersection
on a yellow light turning red. Your
light turns green. You pull into the
intersection without checking for
possible traffic. That is all it takes for the
two of you to crash. It was the driver’s
responsibility to stop, and it was your
responsibility to look before pulling out.
Both of you are at fault. Someone else
might be the first to start the chain of
events leading to a crash, but it doesn’t
leave any of us free of responsibility.
As a rider you can’t be sure that other
operators will see you or yield the right
of way. To lessen your chances of a
crash occurring:
• Be visible — wear proper clothing,
use your headlight, ride in the best
lane position to see and be seen.
• Communicate your intentions —
use the proper signals, brake light
and lane position.
• Maintain an adequate space
cushion — when following, being
followed, lane sharing, passing and
being passed.
• Search your path of travel 12
seconds ahead.
• Identify and separate hazards.
• Be prepared to act — remain alert
and know how to carry out proper
crash-avoidance skills.
Blame doesn’t matter when someone
is injured in a crash. The ability to ride
aware, make critical decisions and carry
them out separates responsible riders
from the rest. Remember, it is up to you
to keep from being the cause of, or an
unprepared participant in, any crash.
More than half of all crashes:
A. Occur at speeds greater than
35mph.
B. Happen at night.
C. Are caused by worn tires.
D. Involve riders who have less than
five months of experience on their
motorcycles.
test yourself 2
Answer - page 47
ride within your abilities 11
This manual cannot teach you how to control direction, speed or balance.
That’s something you can learn only through practice, preferably in a formal
course of instruction like an MSF RiderCourse. But control begins with knowing
your abilities and riding within them, along with knowing and obeying the rules
of the road.
BaSiC VehiCLe CONtrOL
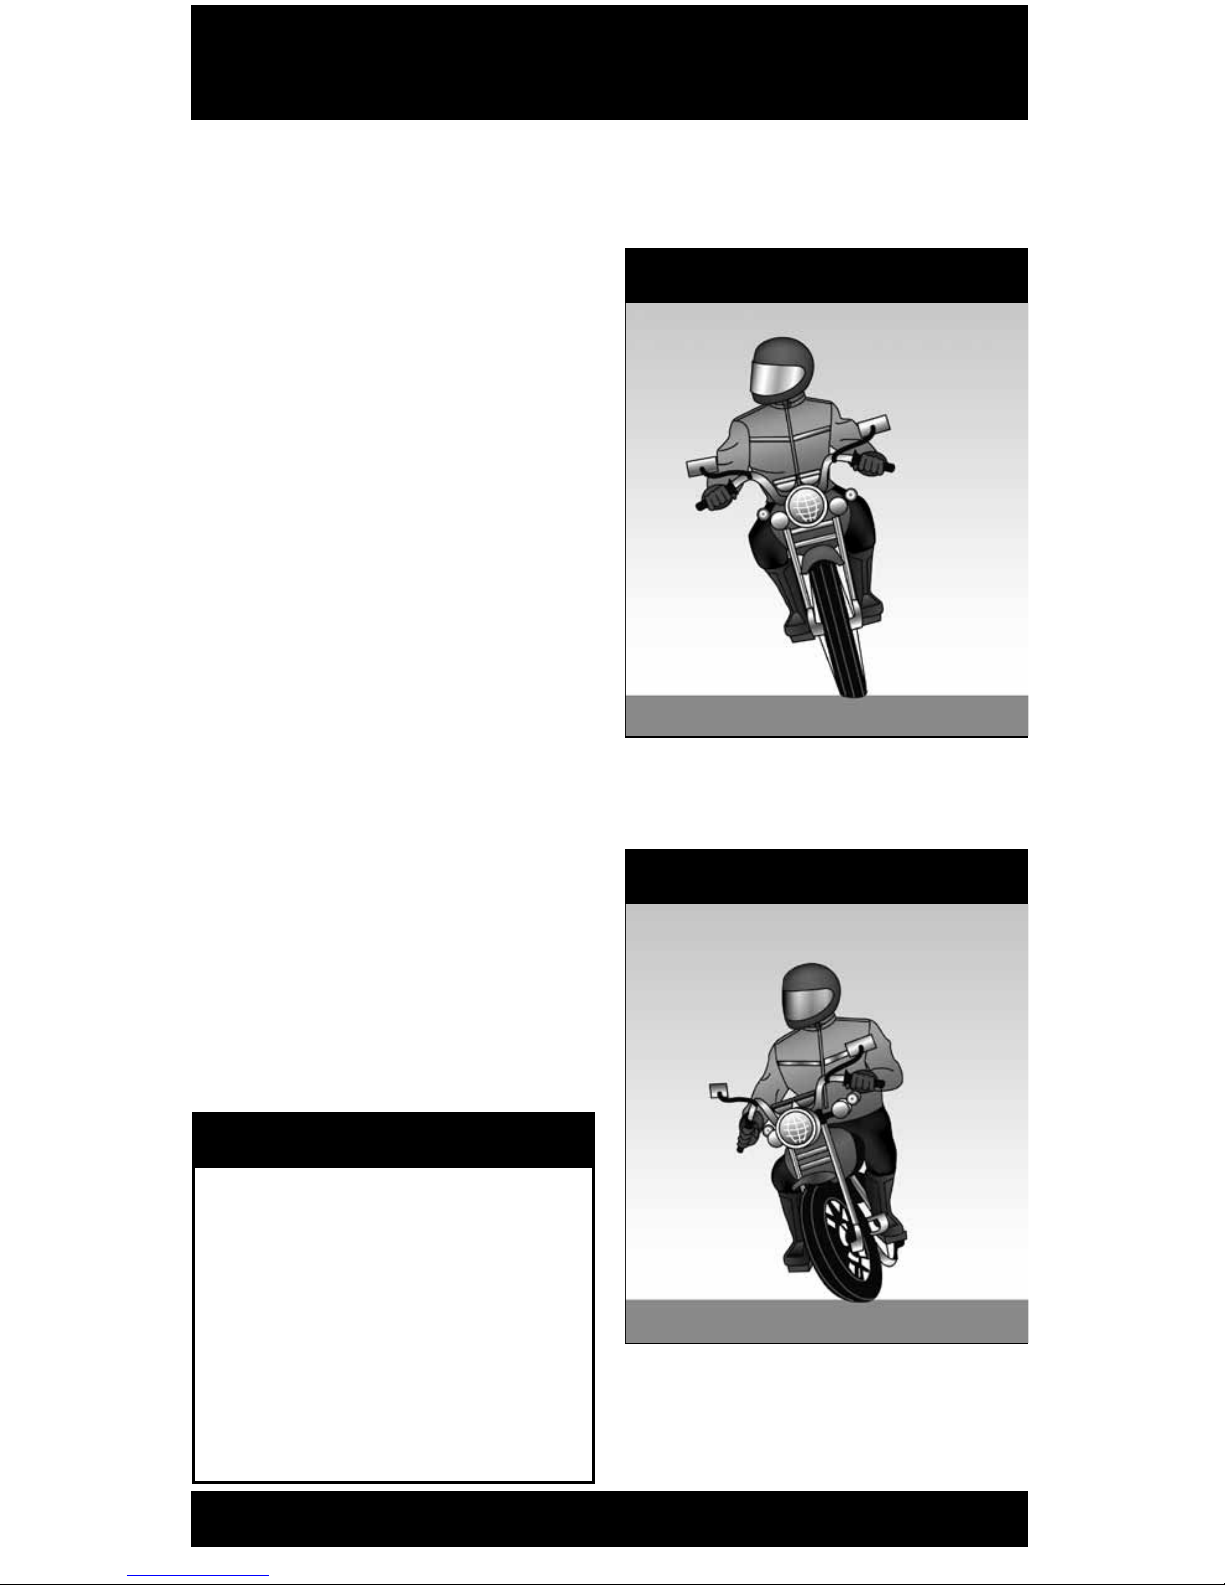
Body Position
To control a motorcycle well:
• Posture — Position yourself
comfortably so you are able to
operate all the controls and can use
your arms to steer the motorcycle,
rather than to hold yourself up.
This helps you bond with your
motorcycle and allows you to react
quickly to hazards.
• Seat — Sit far enough forward so
that arms are slightly bent when
you hold the handgrips. Bending
your arms permits you to press on
the handlebars without having to
stretch.
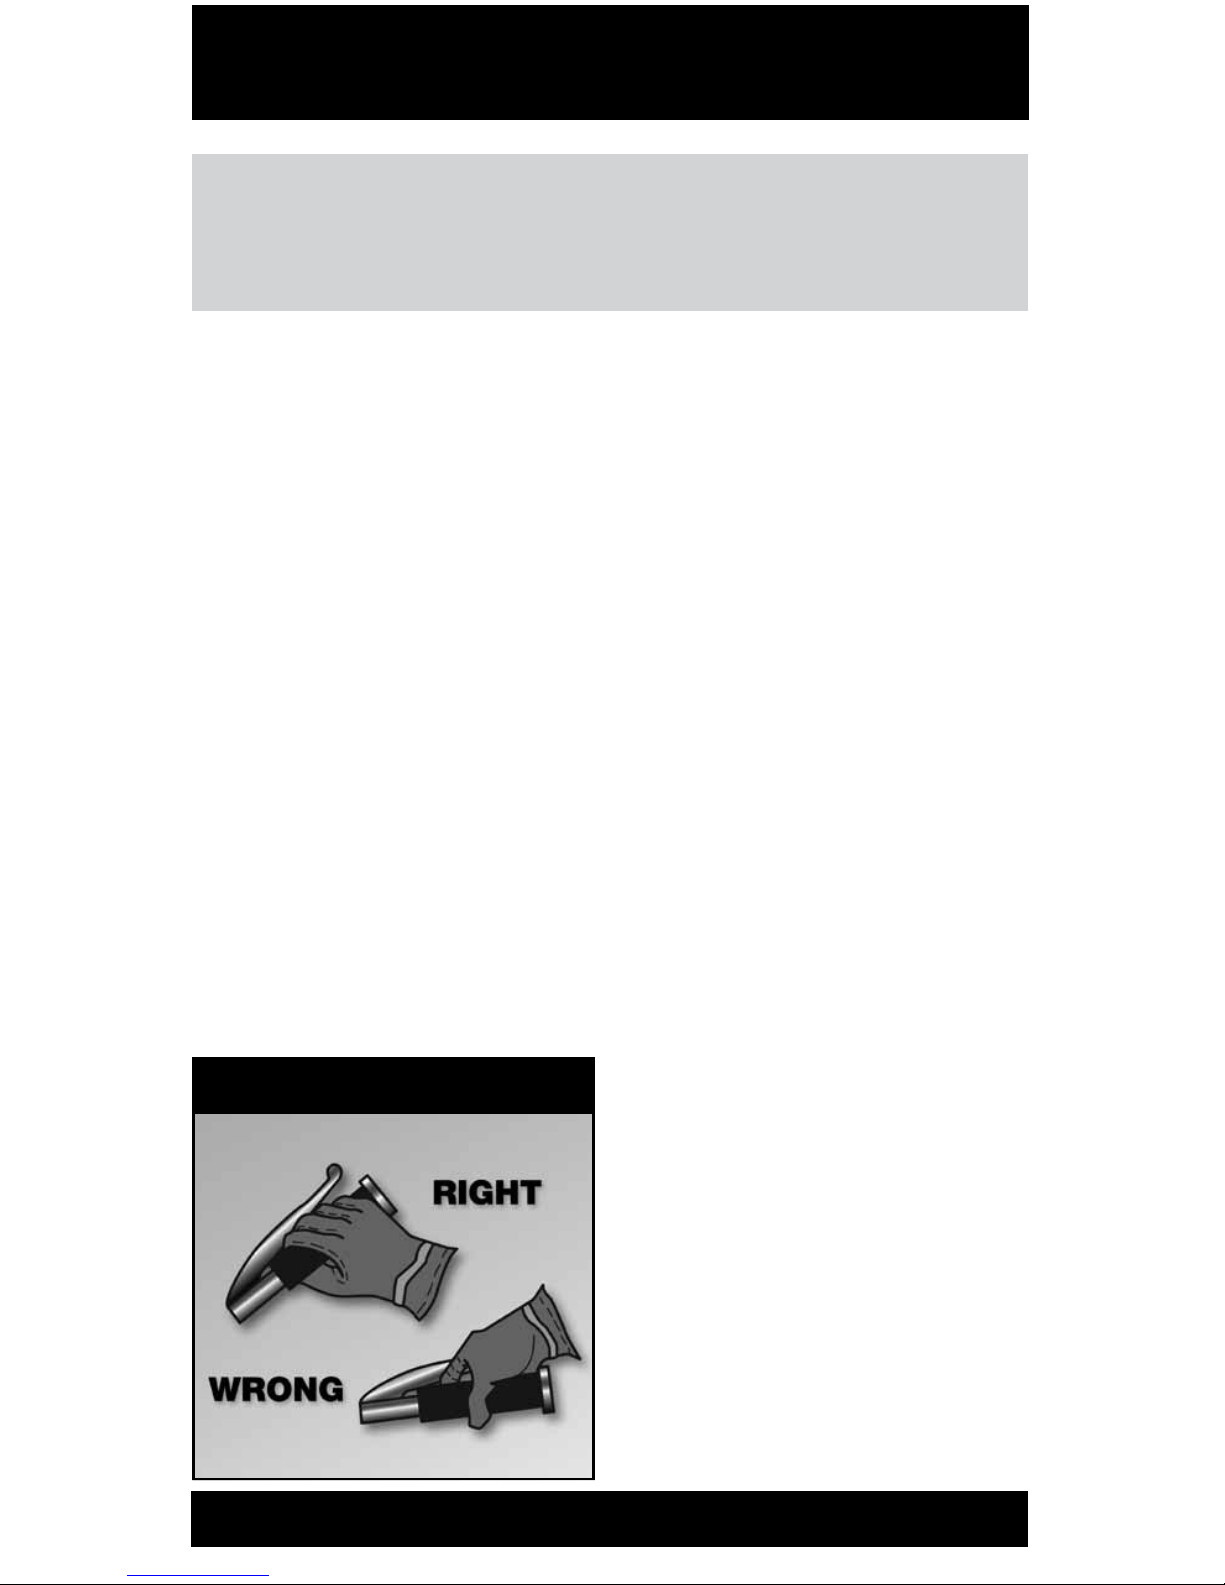
• Hands — Hold the handgrips
firmly to keep your grip over rough
surfaces. Start with your right
wrist flat. This will help you keep
from accidentally using too much
holding handgriPs
throttle. Also, adjust the handlebars
so your hands are even with or
below your elbows. This permits
you to use the proper muscles for
precision steering.
• Knees — Keep your knees against
the gas tank to help you keep your
balance as the motorcycle turns.
• Feet — Keep your feet firmly on the
footrests to maintain balance. Don’t
drag your feet. If your foot catches
on something, you could be injured
and it could affect your control of
the motorcycle. Keep your feet near
the controls so you can get to them
fast if needed. Also, don’t let your
toes point downward — they may
get caught between the road and
the footrests.
Shifting Gears
There is more to shifting gears than
simply getting the motorcycle to pick
up speed smoothly. Learning to use the
gears when downshifting, turning or
starting on hills is equally important for
safe motorcycle operation.
The gearshift lever is located in front
of the left footrest and is operated by
the left foot. To shift “up” to a higher
gear, position your foot under the
shift lever and lift. To downshift, press
the shift lever down. The shift lever
changes one gear each time it is lifted
or pressed down. Whenever the lever
is released, spring loading returns it to
center, where the mechanism resets
for the next shift up or down. A typical
gear pattern is 1-N-2-3-4-5. The N is

12 ride within your abilities
for neutral, which is selected by either
a “half lift” from 1st gear or a “half
press” from 2nd gear. Most motorcycles
have five gears, but some have four or
six gears.
As your motorcycle increases
speed, you will need to shift up to a
higher gear. Shift up well before the
engine RPM reaches its maximum
recommended speed. As a general rule,
shift up soon enough to avoid overrevving the engine, but not so soon to
cause the engine to lug.
When upshifting, use a 3-step
process: 1) Roll off the throttle as you
squeeze the clutch lever, 2) lift the
shift lever firmly as far as it will go, 3)
smoothly ease out the clutch and adjust
the throttle. Once the shift is completed,
release the shift lever to permit it to
reset for the next shift.
You should shift down through the
gears with the clutch as you slow or
stop, and can also shift down when you
need more power to accelerate.
Make certain you are riding slowly
enough when you shift into a lower
gear. If not, the motorcycle will lurch,
and the rear wheel may skid. When
riding downhill or shifting into first gear
you may need to use the brakes to slow
enough before downshifting safely.
When downshifting, use a 3-step
process: 1) Roll off the throttle as you
squeeze the clutch lever, 2) press the
shift lever down firmly, 3) ease out the
clutch lever as you roll on the throttle.
Once the shift is completed, release
the shift lever to permit it to reset for
the next shift. Rolling on the throttle
slightly while smoothly easing out the
clutch can help the engine come up
to speed more quickly and make the
downshift smoother. Shifting to a lower
gear causes an effect similar to using
the brakes. This is known as engine
braking. To use engine braking, shift
down one gear at a time and ease out
the clutch through the friction zone
between each downshift. Keep the
clutch in the friction zone until the
engine speed stabilizes. Then ease out
the lever fully until ready for the next
downshift. Usually you shift gears one at
a time, but it is possible to shift through
more than one gear while the clutch is
squeezed.
Remain in first gear while you are
stopped so that you can move out
quickly if you need to.
Work toward a smooth, even clutch
release, especially when downshifting. It
is best to change gears before entering
a turn. However, sometimes shifting
while in the turn is necessary. If so,
remember to do so smoothly. A sudden
change in power to the rear wheel can
cause a skid.
Braking
Improper braking technique remains
a significant contributing factor in many
motorcycle crashes. Your motorcycle
has two brake controls: one for the
front wheel and one for the rear wheel.
Always use both brakes every time you
shifting gears

13
slow or stop. The front brake is more
powerful and can provide at least 70%
of your total stopping power. The front
brake is safe to use if you use it properly.
Maximum straight-line braking is
accomplished by fully applying both
front and rear brakes without locking
either wheel.
To do this:
• Squeeze the front brake
smoothly, firmly and with
progressively more force. Do not
grab the brake lever or use abrupt
pressure.
• As the motorcycle’s weight
transfers forward, more traction
becomes available at the front
wheel, so the front brake can be
applied harder after braking begins.
• Keep your knees against the
tank and your eyes up, looking
well ahead. This helps you stop the
motorcycle in a straight line.
• Apply light-to-lighter pressure
to the rear brake pedal to prevent a
rear wheel skid. As weight transfers
forward less traction is available
at the rear. Use less rear brake
pressure.
Using both brakes for even “normal”
stops will permit you to develop the
proper habit or skill of using both brakes
properly in an emergency. Squeeze the
front brake and press down on the rear.
Grabbing at the front brake or jamming
down on the rear can cause the brakes
to lock, resulting in control problems.
Braking in a Corner
Any time a motorcycle is leaned over,
the amount of traction available for
braking is reduced. The greater the lean
angle, the more the possibility of the
tires losing traction.
To stop as quickly and as safely as
possible in a curve, and depending on
road and traffic conditions, try to get the
motorcycle as perpendicular to the road
as possible, then brake. If conditions do
not allow, brake smoothly and gradually,
but do not apply as much braking force
as you would if the motorcycle were
straight up. As you slow, you can reduce
your lean angle, and as more traction
becomes available for braking, you can
more firmly apply the brakes, so that
by the time the motorcycle is stopped,
the motorcycle is straight up, and the
handlebars are squared.
Linked and Integrated
Braking Systems
Some motorcycles have linked braking
which connects the front and rear
brakes on the motorcycle and applies
braking pressure to both brakes when
either the front lever or rear pedal is
applied. An integrated braking system
is a variation of the linked system in
which partial front braking is applied
whenever the rear brake is activated.
Consult your owner’s manual for a
detailed explanation on the operation
and effective use of these systems.
Anti-Lock Braking Systems
(ABS)
ABS is designed to prevent wheel
lock-up and avoid skids when stopping
in straight-line, panic situations. ABS
operates when maximum pressure on
both the front and rear brake controls
is applied. If electronic sensors detect
the possibility of a wheel lock, brake
hydraulic pressure, is released then
reapplied to maintain maximum braking
effectiveness.
The system is capable of releasing and
reapplying pressure more than 15 times
per second.
14 ride within your abilities
Turning
Approach turns and curves with
caution. Riders often try to take curves
or turns too fast. When they can’t hold
the turn, they end up crossing into
another lane of traffic or going off the
road. Or, they overreact and brake too
hard, causing a skid and loss of control.
Use four steps for better control:
• SLOW — Reduce speed before the
turn by closing the throttle and, if
necessary, applying both brakes.
• LOOK — Look through the turn
to where you want to go. Turn
just your head, not your shoulders,
and keep your eyes level with the
horizon.
• PRESS — To turn, the motorcycle
must lean. To lean the motorcycle, press on the handgrip in
the direction of the turn. Press left
handgrip — lean left — go left.
Press right handgrip — lean right —
go right. The higher the speed in a
turn, the greater the lean angle.
• ROLL — Roll on the throttle to
maintain or slightly increase speed.
This helps stabilize the motorcycle.
In normal turns, the rider and the
motorcycle should lean together at the
same angle.
In slow, tight turns, counterbalance by
leaning the motorcycle only and keeping
your body straight.
slow, tight turns
norMal turns
When riding, you should:
A. Turn your head and shoulders
to look through turns.
B. Keep your arms straight.
C. Keep your knees away from
the gas tank.
D. Turn just your head and eyes
to look where you are going.
test yourself 3
Answer - page 47
15
KeePiNg YOUr DiStaNCe
The best protection you can have is
distance — a “cushion of space” —
separating yourself from other vehicles
on the roadway. This will provide you
with a clear view of emerging traffic
situations, so that if someone else
makes a mistake, you will have:
• More time to respond.
• More space to maneuver, including
an escape route if necessary.
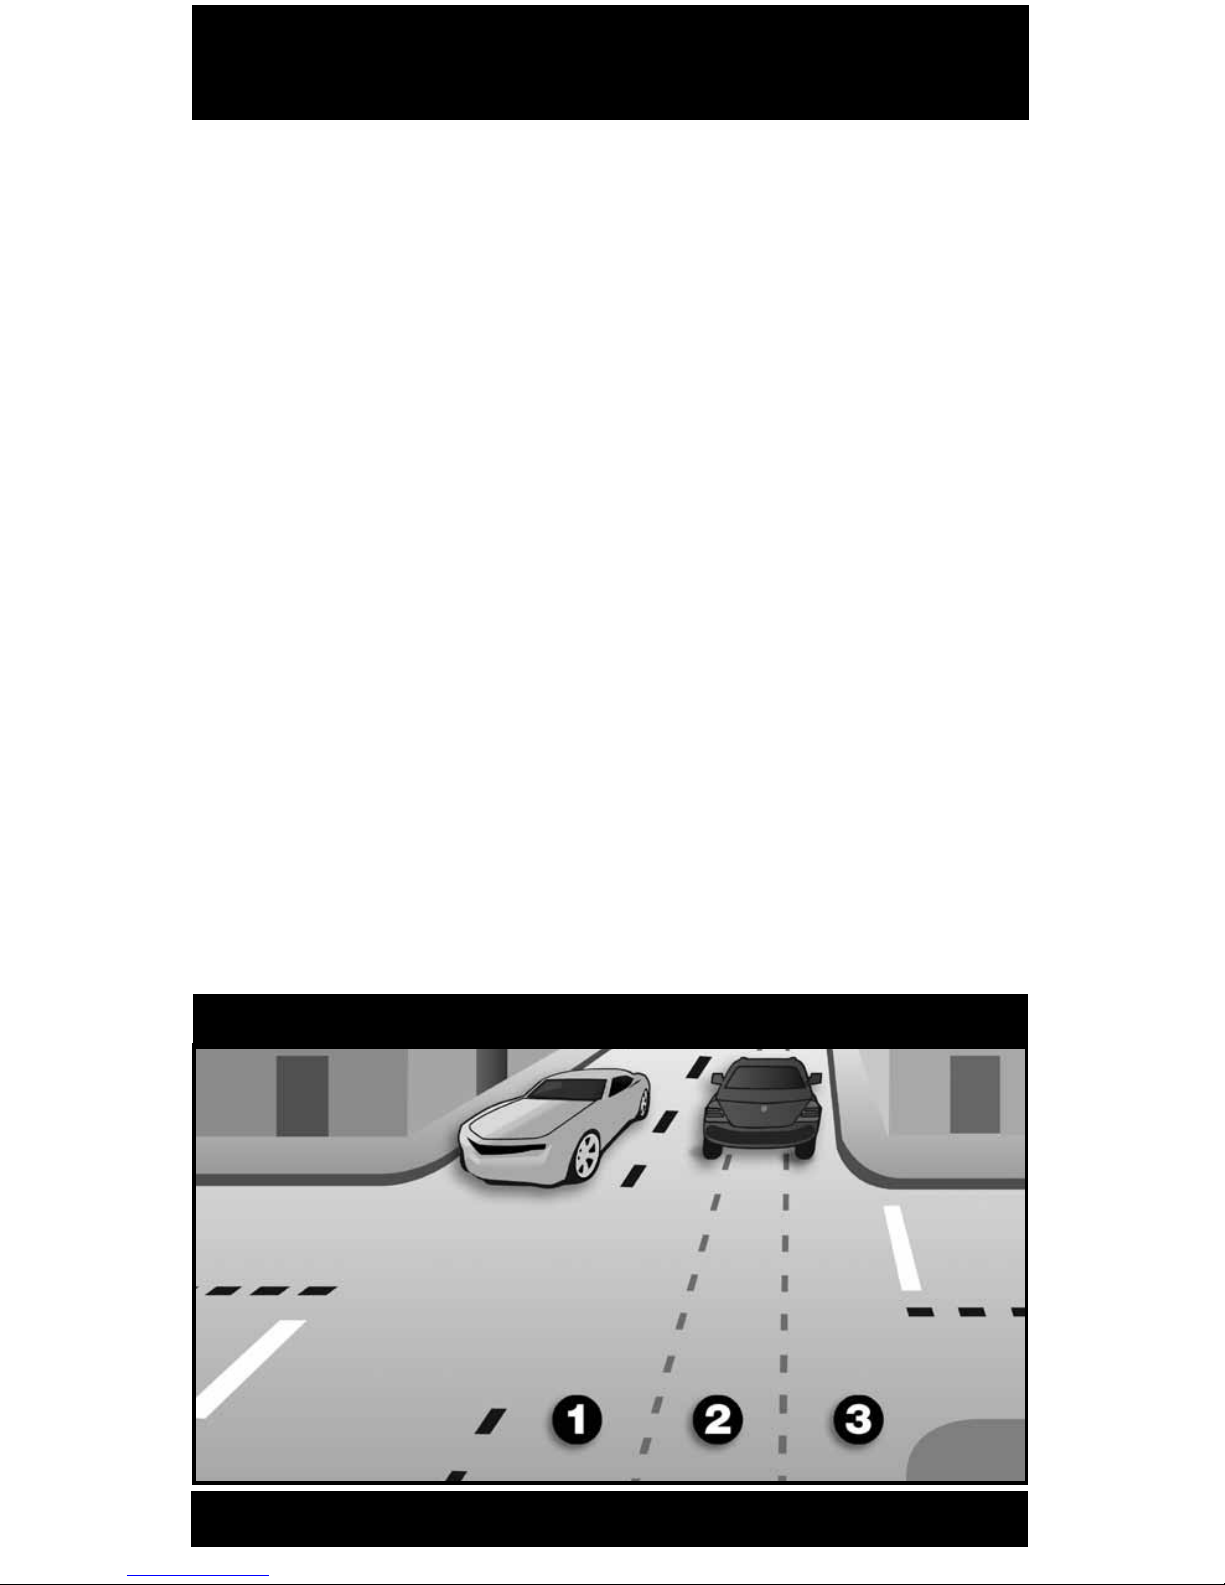
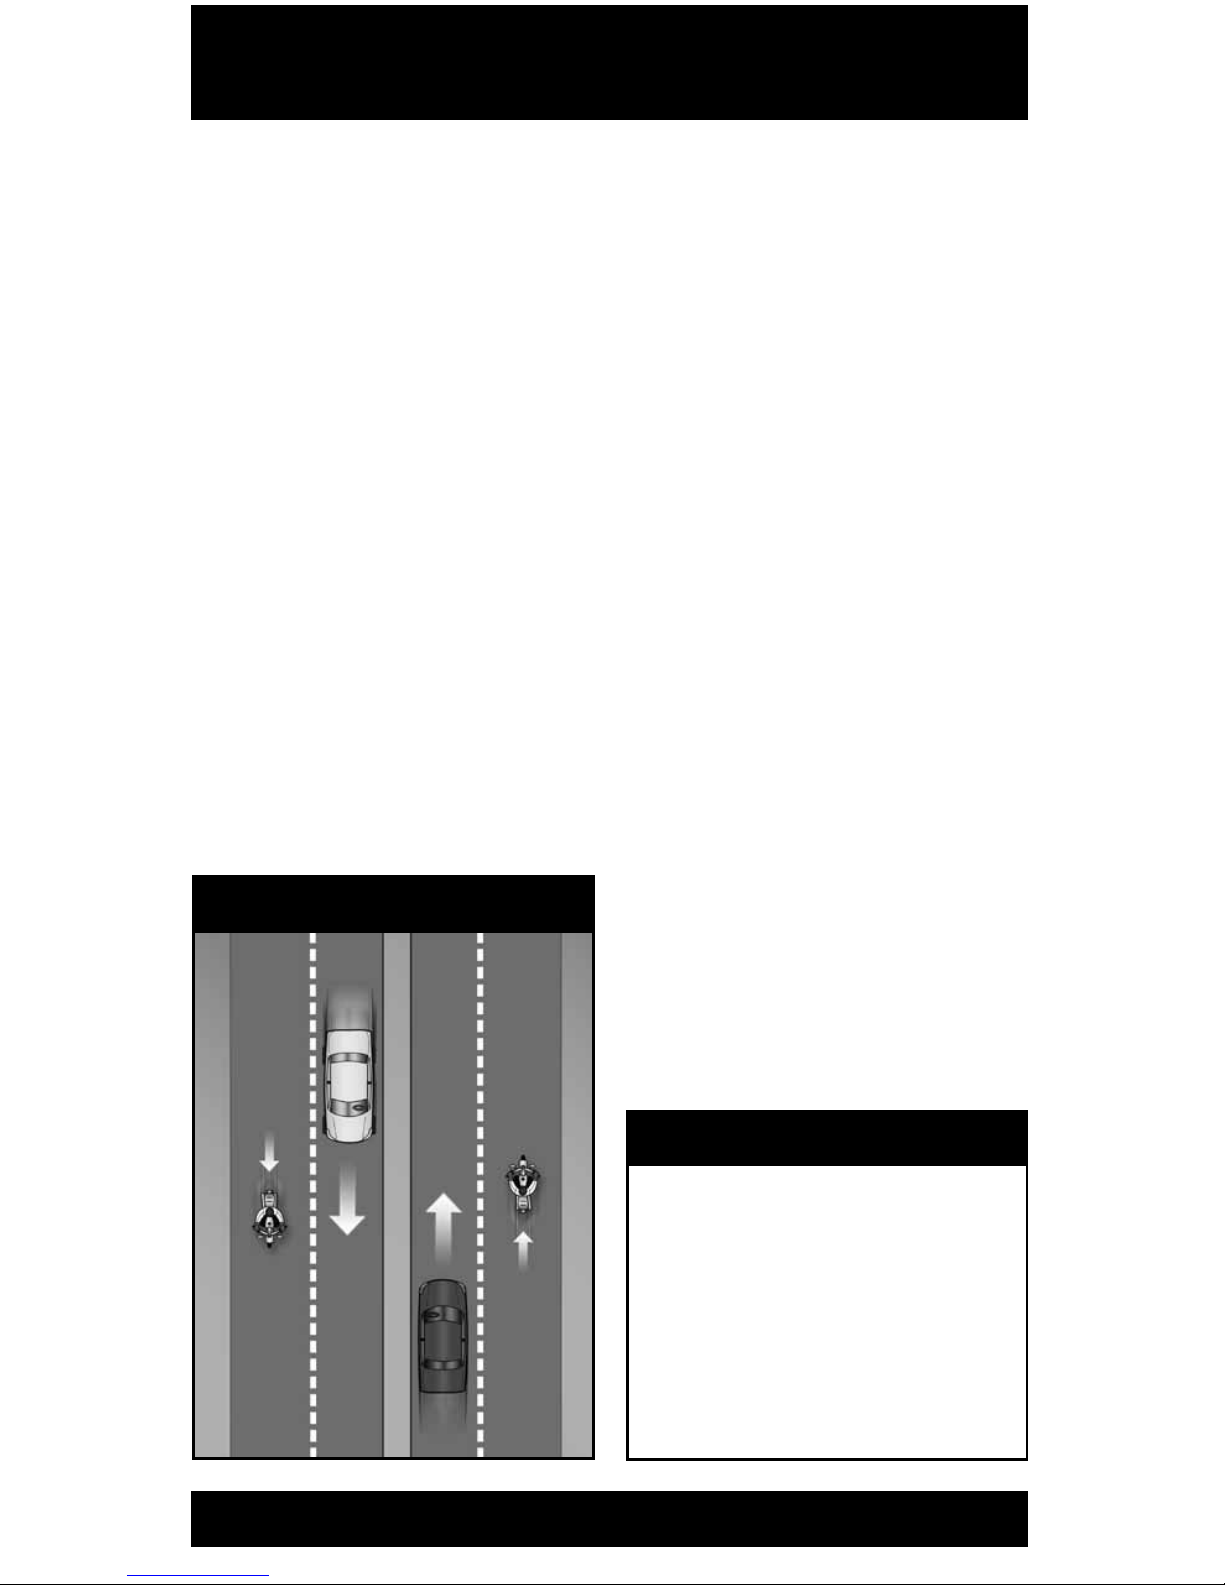
Lane Positions
Successful motorcyclists know that
they are safer when clearly seen. In
some ways the size of the motorcycle
can work to your advantage. Each traffic
lane gives a motorcycle three paths of
travel, as indicated in the illustration.
Your lane position should help you:
• Increase your ability to see and be
seen.
• Avoid others’ blind spots.
• Avoid surface hazards.
• Protect your lane from other drivers.
• Communicate your intentions.
• Avoid windblast from other
vehicles.
• Provide an escape route.
• Set up for turns.
Many motorcyclists consider the left
third of the lane – the left tire track of
automobiles – to be their default lane
position. You should then consider
varying your lane position as conditions
warrant, keeping mind that no portion
of the lane need be avoided —
including the center.
You should position yourself in the
portion of the lane where you are most
likely to be seen and you can maintain
a space cushion around you. Change
position as traffic situations change.
Ride in path 2 or 3 if vehicles and other
potential problems are on your left
only. Remain in path 1 or 2 if hazards
are on your right only. If vehicles are
being operated on both sides of you,
the center of the lane, path 2, is usually
your best option.
Remember, the center third of the
lane is the place where debris and oil
drippings from cars collect and where
hazards such as manhole covers are
located. Unless the road is wet, the
lane Positions
16 ride within your abilities
average center strip permits adequate
traction to ride on safely. You can
operate to the left or right of the grease
strip and still be within the center third
of the traffic lane. Avoid riding on big
buildups of oil and grease usually found
at busy intersections or tollbooths.
Experienced riders rely on their own
best judgment and instincts. One
absolute, however, is to avoid riding in
another vehicle’s blind spot.
Following Another Vehicle
“Following too closely” is a factor in
crashes involving motorcyclists. In traffic,
motorcycles need as much distance
to stop as cars. Normally, a minimum
of two seconds distance should be
maintained behind the vehicle ahead.
To gauge your following distance:
• Pick out a marker, such as a
pavement marking or lamppost, on
or near the road ahead.
• When the rear bumper of the
vehicle ahead passes the marker,
count off the seconds: “onethousand-one, one-thousand-two.”
• If you reach the marker before
you reach “two,” you are following
too closely.
A two-second following distance
leaves a minimum amount of space to
stop or swerve if the driver ahead stops
suddenly. It also permits a better view of
potholes and other hazards in the road.
A larger cushion of space is needed
if your motorcycle will take longer
than normal to stop. If the pavement
is slippery, if you cannot see through
the vehicle ahead, or if traffic is heavy
and someone may squeeze in front of
you, open up a three-second or more
following distance.
Keep well behind the vehicle ahead
even when you are stopped. This will
make it easier to get out of the way
if someone bears down on you from
behind. It will also give you a cushion of
space if the vehicle ahead starts to back
up for some reason.
following
17
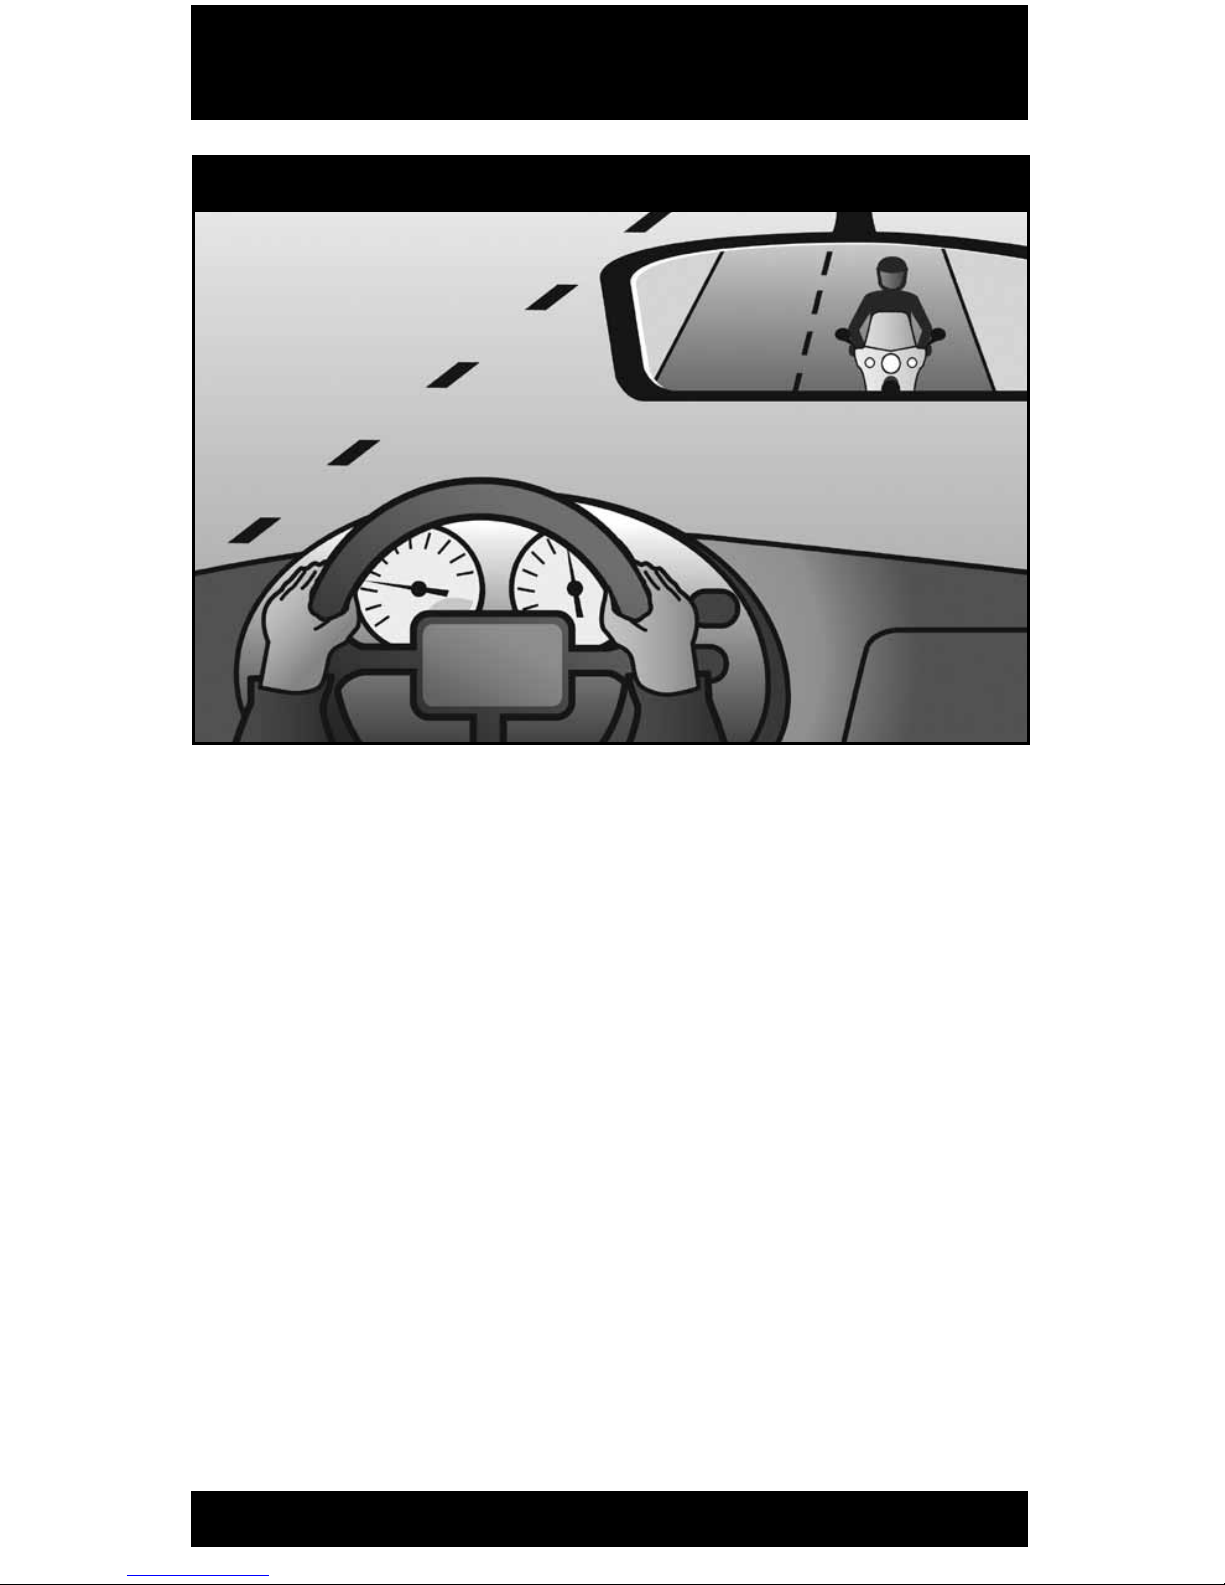
When behind a car, ride where the
driver can see you in the rearview mirror.
Riding in the center portion of the lane
should put your image in the middle of
the rearview mirror — where a driver is
most likely to see you.
Riding at the far side of a lane may
permit a driver to see you in a sideview
mirror. But remember that most drivers
don’t look at their sideview mirrors
nearly as often as they check the
rearview mirror. If the traffic situation
allows, the center portion of the lane is
usually the best place for you to be seen
by the drivers ahead and to prevent lane
sharing by others.
Being Followed
Speeding up to lose someone following
too closely only ends up with someone
tailgating you at a higher speed.
A better way to handle tailgaters
is to get them in front of you. When
someone is following too closely,
change lanes and let them pass. If you
can’t do this, slow down and open up
extra space ahead of you to allow room
for both you and the tailgater to stop.
This will also encourage them to pass.
If they don’t pass, you will have given
yourself and the tailgater more time and
space to react in case an emergency
does develop ahead.
Passing and Being Passed
Passing and being passed by another
vehicle is not much different than with a
car. However, visibility is more critical. Be
sure other drivers see you, and that you
see potential hazards.
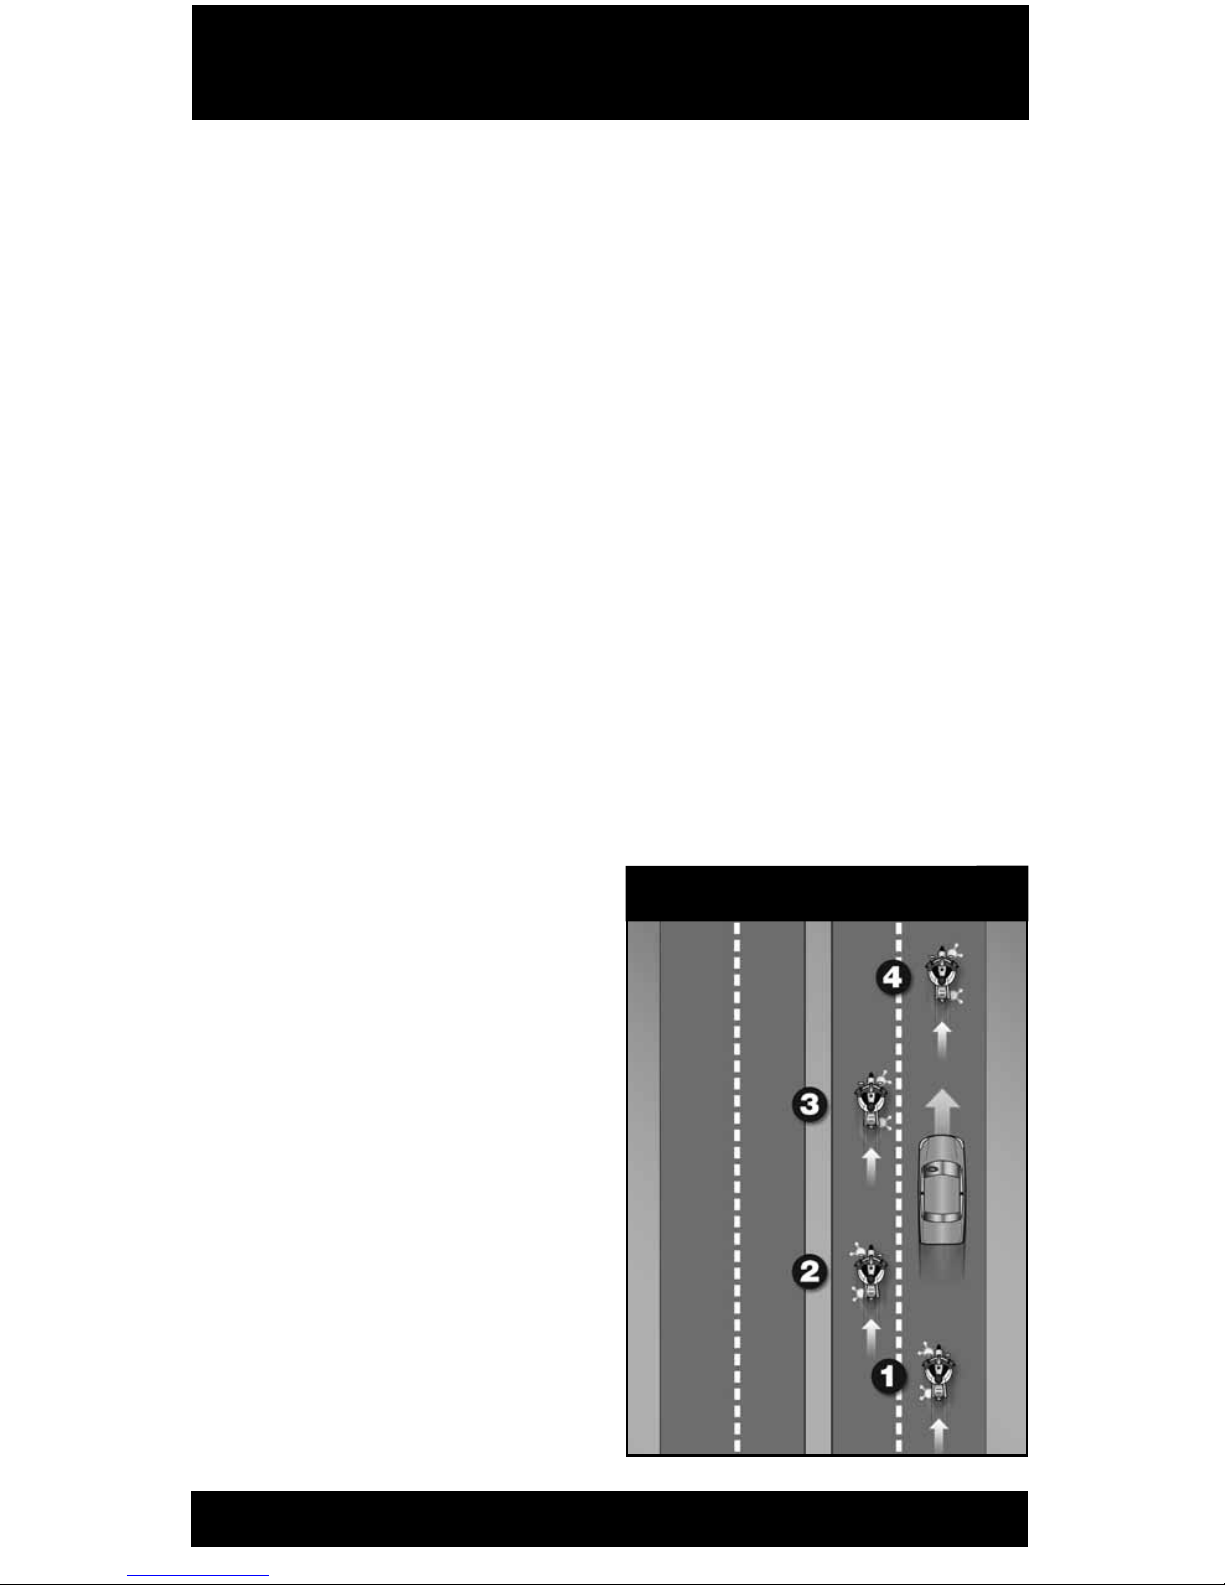
Passing
1� Ride in the left portion of the
lane at a safe following distance
to increase your line of sight and
make you more visible. Signal
and check for oncoming traffic.
Use your mirrors and turn your
head to look for traffic behind.
2� When safe, move into the left
lane and accelerate. Select a lane
position that doesn’t crowd the
car and provides space to avoid
hazards in your lane.
3� Ride through the blind spot as
quickly as possible.
4� Signal again, and complete
mirror and headchecks before
returning to your original lane
and then cancel the signal.
Remember, passes must be
completed within posted speed
limits, and only where permitted�
Know your signs and road markings!
Passing
18 ride within your abilities
Being Passed
When you are being passed from
behind, stay in the center portion of
your lane. Riding close to the passing
vehicle could put you in a hazardous
situation.
Avoid being hit by:
• The other vehicle — A slight
mistake by you or the passing driver
could cause a sideswipe.
• Extended mirrors — Some drivers
forget that their mirrors hang out
farther than their fenders.
• Objects thrown from windows
— Even if the driver knows you’re
there, a passenger may not see you
and might toss something on you or
the road ahead of you.
• Blasts of wind from larger
vehicles — They can affect your
control. You have more room for
error if you are in the middle portion
when hit by this blast than if you
are on either side of the lane.
Do not move into the portion of the
lane farthest from the passing vehicle. It
might invite the other driver to cut back
into your lane too early.
Lane Sharing
Cars and motorcycles need a full lane
to operate safely. Lane sharing is usually
prohibited.
Riding between rows of stopped or
moving cars in the same lane can leave
you vulnerable to the unexpected. A
hand could come out of a window;
a door could open; a car could turn
suddenly. Discourage lane sharing by
others. Keep a center-portion position
whenever drivers might be tempted
to squeeze by you. Drivers are most
tempted to do this:
• In heavy, bumper-to-bumper
traffic.
• When they want to pass you.
• When you are preparing to turn at
an intersection.
• When you are moving into an exit
lane or leaving a highway.
Usually, a good way to handle
tailgaters is to:
A. Change lanes and let them pass.
B. Use your horn and make
obscene gestures.
C. Speed up to put distance
between you and the tailgater.
D. Ignore them.
test yourself 4
Answer - page 47
being Passed
 Loading...