

Page 1
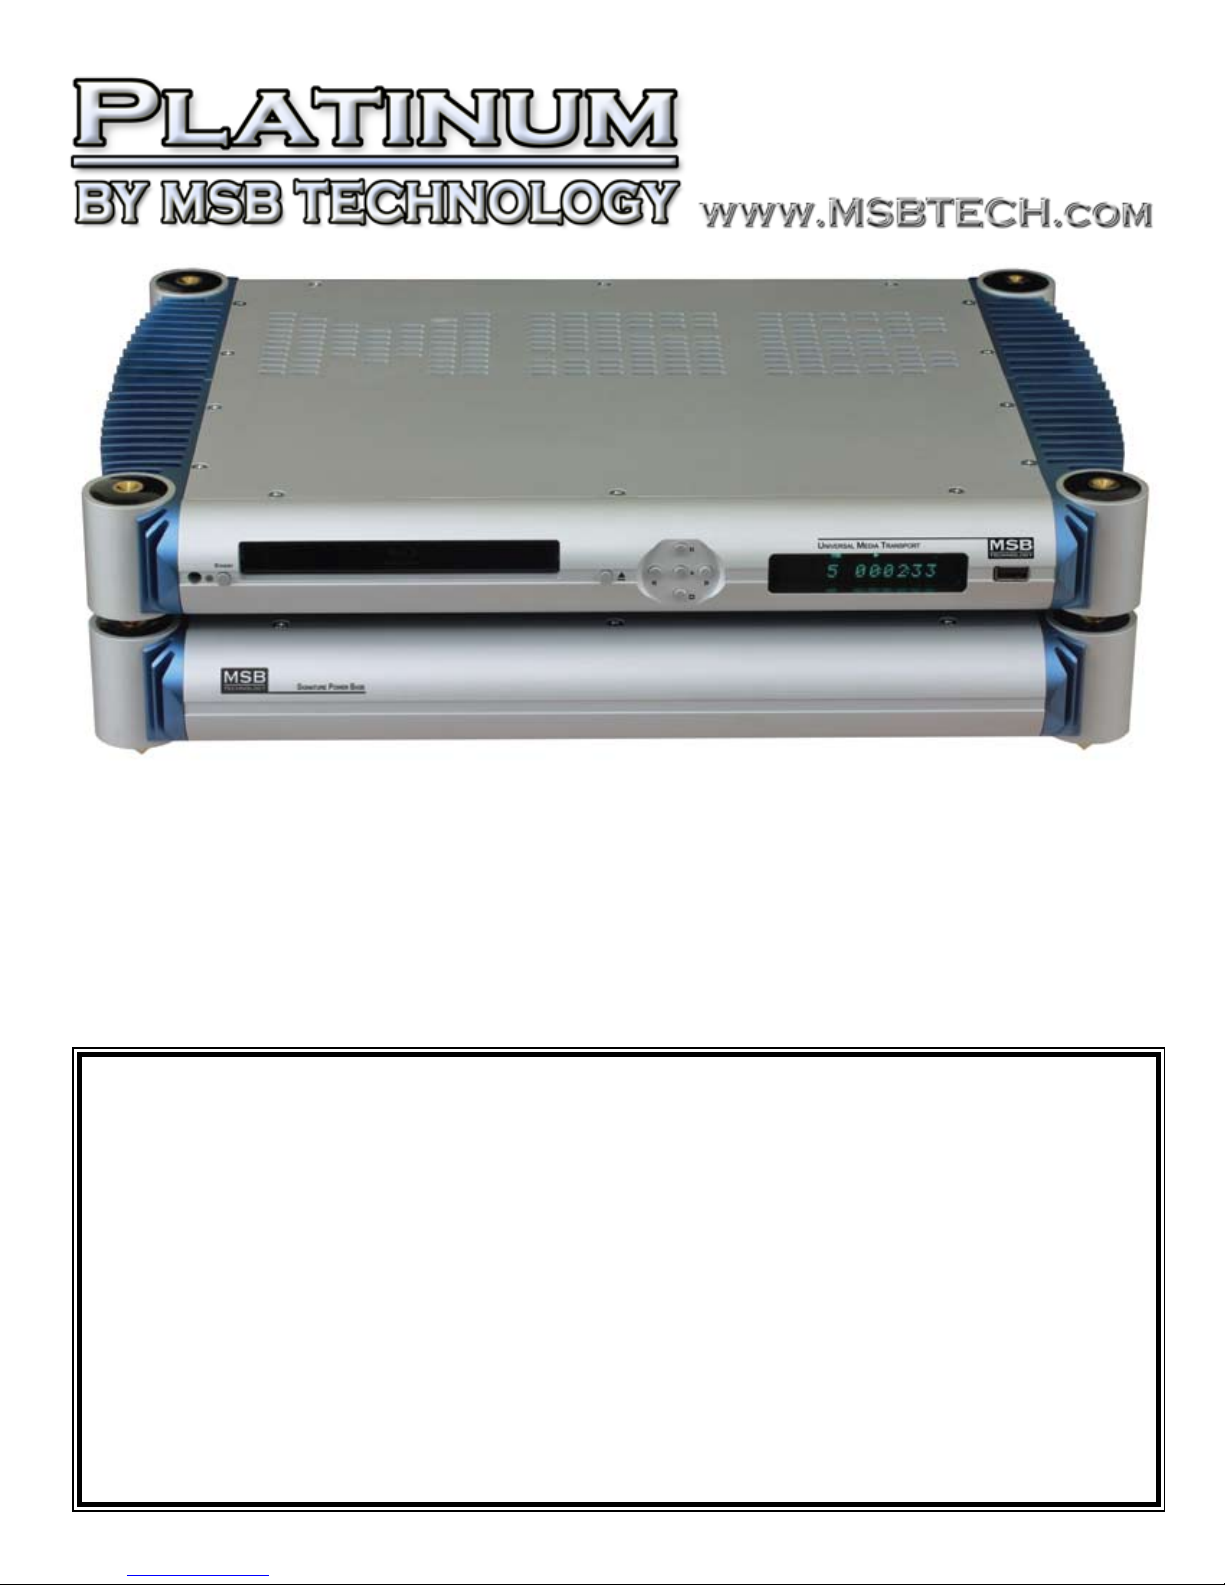
Universal Media Transport
Users Manual
Rev 1 (3/11)
St e r e o Ve r S i o n f o r 2 Ch a n n e l Pl a y b a C k o f a l l S o u r C e S
Vi d e o ou t p u t s : An A l o g Co A x i A l , An A l o g Co m p o s i t e , 2 Hdmi
di g i t A l A u d i o ou t p u t s : op t i C A l , Co A x i A l RCA, BA l A n C e d xlR, BR i d g e d msB ne t w o R k
An A l o g Au d i o ou t p u t s : no n e
Bi t st R e A m su R R o u n d ou t p u t s : op t i C A l A n d Co A x i A l
me d i A Co n n e C t i o n s : tw o usB i n p u t s , esA t A , Co m p u t e R ne t w o R k
mA x i m u m ou t p u t Re s o l u t i o n : 24 B i t , 192 kHz pCm, 32 B i t , 192 kHz msB ne t w o R k
Fi l e ty p e s : wAV, FlAC, mp3, do l B y di g i t A l Hd, dts Hd A n d m o R e
di s C yy p e s : Cd, sACd, Bl u RA y , HRx, dVd, dVd Au d i o A n d m o R e
models: st e R e o Fo R us e w i t H A n msB dAC
st e R e o Fo R us e w i t H A no n -msB dAC l i m i t e d t o 96 kHz sA m p l e R A t e
st e R e o Fo R us e w i t H A no n -msB dAC l i m i t e d t o 192 kHz sA m p l e R A t e
1
Page 2

Universal Media Transport
Quick start guide
Setup and Connections:
1. Display - If you plan to play music from DVD, BluRay, USB or Network, attach any display to the analog video output or HDMI
1.
2. Internet - If you plan to stream from the internet or want a rmware update online, plug COMPUTER LAN into any computer
network (wireless is not recommended).
3. Connect Audio - For use with an MSB DAC, use the MSB CAT-6 cable to connect MSB NETWORK OUTPUT to the MSB
NETWORK INPUT on the DAC. For other DACs, connect any of the DIGITAL AUDIO OUTPUTS (1 to 4) to the DAC.
4. Select MODE - This lighted toggle switch on the back is set to one of three modes:
up: Audio Mode = Best quality audio but you may have lip sync issues if you watch video sources.
middle: Movie Mode = Same as Audio Mode but DVD has reduced delay and reduced sound quality.
down: Hi-Res Video Mode = All media has reduced delay and reduced sound quality for best lip sync matching.
Disc Operations: Normally for disc operations you just put the disc in and it will start playing. Volume up/down buttons on the remote
actually control the volume of the DAC IV.
Basic File Operations: Get to know the HOME MENU button, navigation arrows and RETURN buttons on the remote. They get you
around the operation of the transport. All sources are treated basically the same, whether they are CD, USB Memory stick or Network
streaming. You select and browse the source.
Video Settings:
Feel free to browse and adjust video and HDMI settings as needed. They can be changed using the dedicated remote buttons, or changed
in the Video Setup Menu. Either way changes will be saved when the unit is put in Standby.
Audio Settings:
Any adjustment of audio processing menu settings may dramatically hurt the audio quality. The only “safe” setting is audio delay if needed.
The UMT is congured in one of three congurations when ordered. This conguration can be changed by playing a conguration le
downloaded from the MSB website or playing a conguration le supplied on a CD. The congurations are:
MSB DAC - Upsampling and Reclocking Optimized for the 32 bit, 384 kHz MSB DAC. (Default Conguration)
Non- MSB DAC up to 24 bit, 96 kHz sample rate - Upsampling and Reclocking Optimized for DACs limited to 24 bit, 96 kHz.
Non- MSB DAC up to 24 bit, 192 kHz sample rate - Upsampling and Reclocking Optimized for DACs limited to 24 bit, 192 kHz.
Factory Reset:
If all goes wrong do a reset to factory settings, SETUP: DEVICE SETUP: RESET FACTORY DEFAULTS and select ADVANCED
AUDIO mode when prompted. Then go to SETUP: and make the following changes:
1. PLAYBACK SETUP: SACD PRIORITY and select STEREO.
2. AUDIO FORMAT SETUP: HDMI AUDIO: OFF
3. AUDIO PROCESSING: SPEAKER CONFIGURATION: and set CENTER to LARGE.
Network Player:
This unit will play music from any computer or storage device on your network, but they must rst be shared. So for example you can
share your iTunes playlists. You can also share your music on a network storage device. Instructions for sharing vary depending on
your computer OS and applications.
Burn-In:
The concept of burn-in is little understood. Does it take your ears some time to get used to the incredibly detailed and life-like sound of
an MSB product or is something actually changing? The feedback we receive leads us to recommend at least 100 hours of burn-in on
this UMT. Customers generally recommend one month.
Warning: Please verify that the UMT you just purchased is covered under warranty. This UMT was sold to the Distributor named on
your box label If the country and year do not match your purchase location, your warranty may be invalid. Check with MSB.
2
Page 3
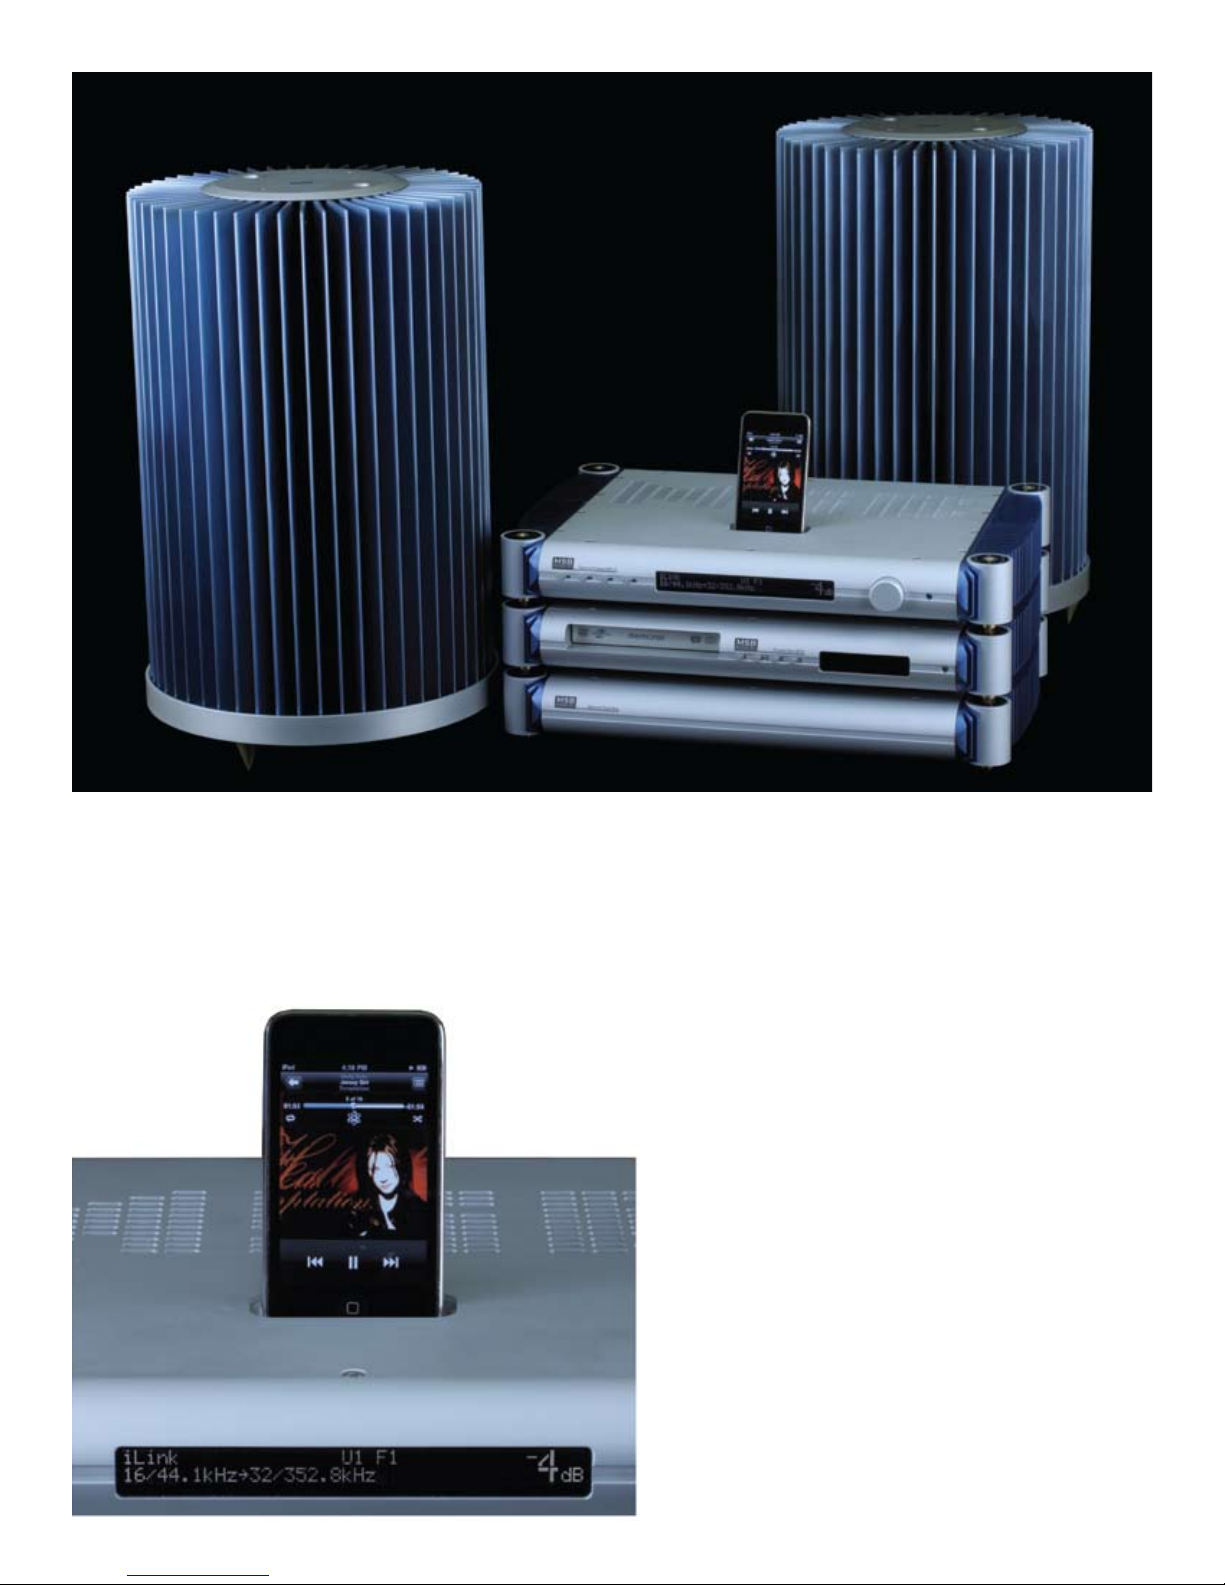
Here is the complete MSB System, available in Matt White or Satin Black. Custom colors also available.
MSB System
Although the UMT can be used with any DAC there are special features that can only be enjoyed with an MSB DAC. The big limitation
is the standard S/PDIF digital audio output format. Is is limited to 24 bits. The MSB Network which is used to connect the UMT to an
MSB DAC is limited to 32 bits, so extra resolution is provided
with the MSB DAC. This resolution comes into play with
sources like SACD and multichannel DTS and Dolby Digital
HD Blu-ray discs.
With the fantastic detail of the DAC IV, we recommend not
using an external preamp, but taking advantage of the passive
stepped attenuator option in the DAC IV. With no preamp
to muddy the signal, the amp is presented with an amazingly
detailed signal.
Also please consider one of the MSB Amps, also optimized for
the speed and accuracy of the MSB DAC.
iLInk II Upgrade for MSB DAC IV
About the only thing the UMT does not do is host an iPod.
This can be done directly with the DAC IV. This option adds
an iPod dock to the cover of the DAC IV. There are no setup
options or controls. Plug in the iPod and press play. In addition,
the square remote buttons on the DAC remote can be used to
control the iPod.
The iLink II will charge the iPod when plugged in. It works well
with all Generation 6 or later models including the classic, touch
and nano models. It also seems to work with the iPhone.
3
Page 4

Contents
Stereo Version for 2 Channel Playback of all sources 1
Quick start guide 2
Setup and Connections: 2
Audio Settings: 2
Factory Reset: 2
Network Player: 2
Burn-In: 2
MSB System 3
iLInk II Upgrade for MSB DAC IV 3
Rear Panel Details 5
Connections 6
Video Connections 6
Method 1 – HDMI Connection Directly to a Display 6
Method 2 – DVI Connection to a Display 6
Method 3 – Component Video Connection to a Display
Video Settings 6
Audio Connection 7
Audio on HDMI 7
UMT with MSB DAC 7
UMT with Non-MSB DAC (96k or 192k) 7
Power Connection 7
USB and eSata Connections 8
Computer Network Connection 8
Internet connection through Ethernet cable 8
Internet connection through Wireless USB Adaptor 8
Custom Installation 9
External IR (Infrared Remote) Installation 9
RS232 Control 9
Changing the Remote Code 10
Front Panel Controls 11
Video Setup 12
Reset Factory Settings - Easy Setup Wizard 15
Access the Easy Setup Wizard 15
Choose the Primary Video Output 15
Select the Best Output Resolution 15
Determine the Display Aspect Ratio 16
Select the Audio Setting 17
Complete the Easy Setup Wizard 17
Additional Important Settings 17
BASIC OPERATIONS 18
Disc Playback 18
Fast Playback 18
Pause and Frame-by-Frame 18
Slow Playback 18
Blu-ray Disc Menu Playback 18
DVD Menu Playback 19
On-Screen Display 19
Volume Control 19
Mute 19
Audio Language/Track Selection 20
Subtitle Selection 20
Angle Selection 20
Picture-in-Picture and Secondary Audio 20
BD-Live 20
ADVANCED OPERATIONS 21
TV System Selection 21
Output Resolution 21
Zooming and Aspect Ratio Control 22
Zoom Levels for HDMI 1 Output 22
Zoom Levels for HDMI 2 & Analog (Component) Video 23
Subtitle Shift 23
Repeat Playback 23
Repeat a Selected Section 24
Shufe and Random Playback 24
Playback by Chapter or Track Number 24
Playback from a Specic Location - DVD and Blu-ray Discs 24
6
Playback from a Specic Location - CD and SACD discs 25
Memory and Automatic Resume 25
Viewing Pictures on DVD-Audio Discs 26
Pure Audio Mode 26
MEDIA FILE PLAYBACK 26
Playback from a USB or e-SATA Drive 26
Supported USB Drives 26
The Home Menu 27
Playing Music Files 27
Playing Movie Files 28
Viewing Photo Files 28
Adding Background Music 29
SETUP MENU OPTIONS 29
Using the Setup Menu System 29
Playback Setup 30
Video Setup 31
Picture Adjustment 31
HDMI Options 32
Audio Format Setup 34
Blu-ray Audio Playback 35
Recommended Audio Format Options 35
Audio Processing Setup 36
Speaker Conguration 36
Down Mix Mode 36
Speaker Settings 36
Other Audio Processing Settings 36
Device Setup 38
Network Setup 40
Language Code List 42
Warranty 42
4
Page 5
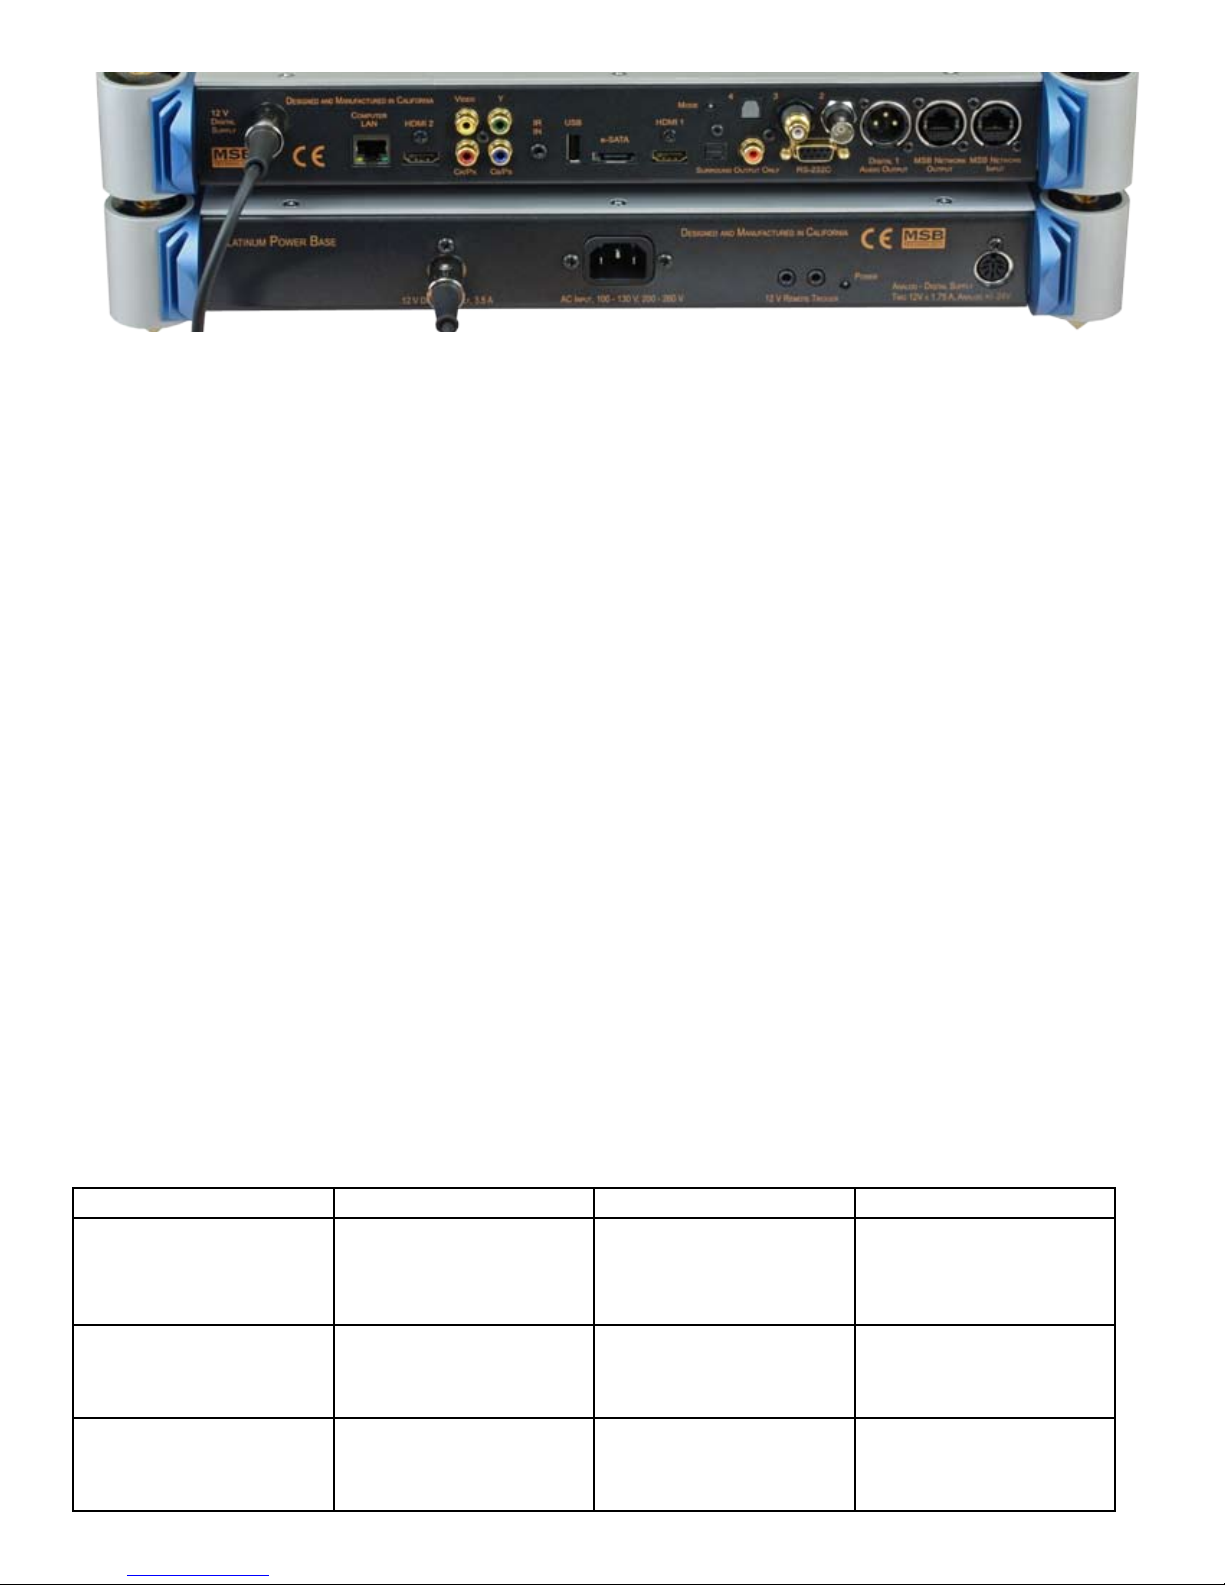
Rear Panel Details
1. Power Input – This product must be plugged into a Platinum power base with a digital supply or an external desktop supply. It will
not work with any previous MSB power supplies such as the P1000.
2. Ethernet LAN Port– This is for connection the UMT to a home computer network for streaming and for connection to the internet.
3. HDMI 2– This is a secondary HDMI output. By default it’s turned off in the menus. For normal operation use HDMI 1.
4. Composite Video Output– A standard analog video output. This is a low quality output.
5. Component Video Output– A analog input used on older projectors and monitors.
6. IR In Port– An IR port for use with an external receiver.
7. USB 2.0 Port– This port is the same as the front. It is to be used with the optional wireless network device or an external USB hard
drive or USB ash drive.
8. E-SATA– This is to be used to connect and external hard drive. This is not to be connected directly to a computer.
9. HDMI 1– This is the primary HDMI output. This is the preferred method of connection a video display.
10. Surround Toslink Output– This is only to be used with an external surround processor. It’s not recommended for normal use.
11. Surround Coaxial Output– This is only to be used with an external surround processor. It’s not recommended for normal use.
12. RS-232– The RS-232 input is for control of the unit. For use with complete system controllers.
13. Toslink – The highest jitter format but offering ground isolation and noise immunity over long runs. Limited to 24 bit data.
14. Coaxial – A good output for short runs. Limited to 24 bit data.
15. BNC – A high performance output for short runs. Limited to 24 bit data.
16. Balanced digital – The AES/EBU Professional output is the preferred output for non-MSB equipment. The balanced nature of this
output allows great cable lengths as well as total noise immunity. Limited to 24 bit data.
17. MSB Network Output – The MSB Network uses CAT-6 cabling. It provides an output for use with other MSB products. It can
handle 8 channels of data up to 384 kHz and 32 bits. On the UMT it will output 32 bits when upsampling or playback of SACDs.
18. MSB Network Input – This is a pass-through feature allowing any device with a MSB Network output to be connected. When the UMT
is in standby, this input is selected. It’s decoded and output directly on the MSB Network output and the other digital outputs.
19. Output Mode Switch– This switch controls the output mode of UMT. MSB DAC and Non-MSB DAC modes are congured when
the DAC is purchased but can be changed with a Firmware update found on the MSB web site.
Switch Function MSB DAC MODE Non-MSB DAC 96 kHz limit Non-MSB DAC 192 kHz limit
Switch UP (Green)
Audio Mode - Best quality
audio but lip sync maybe off
for videos
Switch MIDDLE (Amber)
Movie Mode - Best Audio
except reduced delay for
standard DVD and Blu-ray
Switch DOWN (Red)
Hi-Res Video Mode - Good
audio with reduced delay
for best video
Upsampling OFF,
Reclocking ON
Upsampling OFF,
Reclocking ON except for 48k,
96k and 192k
Upsampling OFF,
Reclocking OFF
96 kHz Upsampling ON,
Reclocking ON
96 kHz Upsampling ON,
Reclocking ON except for 48k,
96k and 192k
96 kHz Upsampling ON,
Reclocking OFF
5
192 kHz Upsampling ON,
Reclocking ON
192 kHz Upsampling ON,
Reclocking ON except for 48k,
96k and 192k
192 kHz Upsampling ON,
Reclocking OFF
Page 6
Connections
Video Connections
The UMT has a range of applications. If your only use is the playing of audio discs, then no video connection is required. The system
setup is optimum for you and all you have to do is make the proper audio connections. If your interests is in playing music from a Hard
Disc, USB stick or from a computer network, then a video display is needed for navigation. A small computer monitor with no audio
and an HDMI or analog component video input would be ideal. If you plan to watch DVDs or Blu-Ray discs then the UMT will need to
be connected to your video display or projector. For the best results, an HDMI or DVI connection should be used although quite good
results are possible with analog component video.
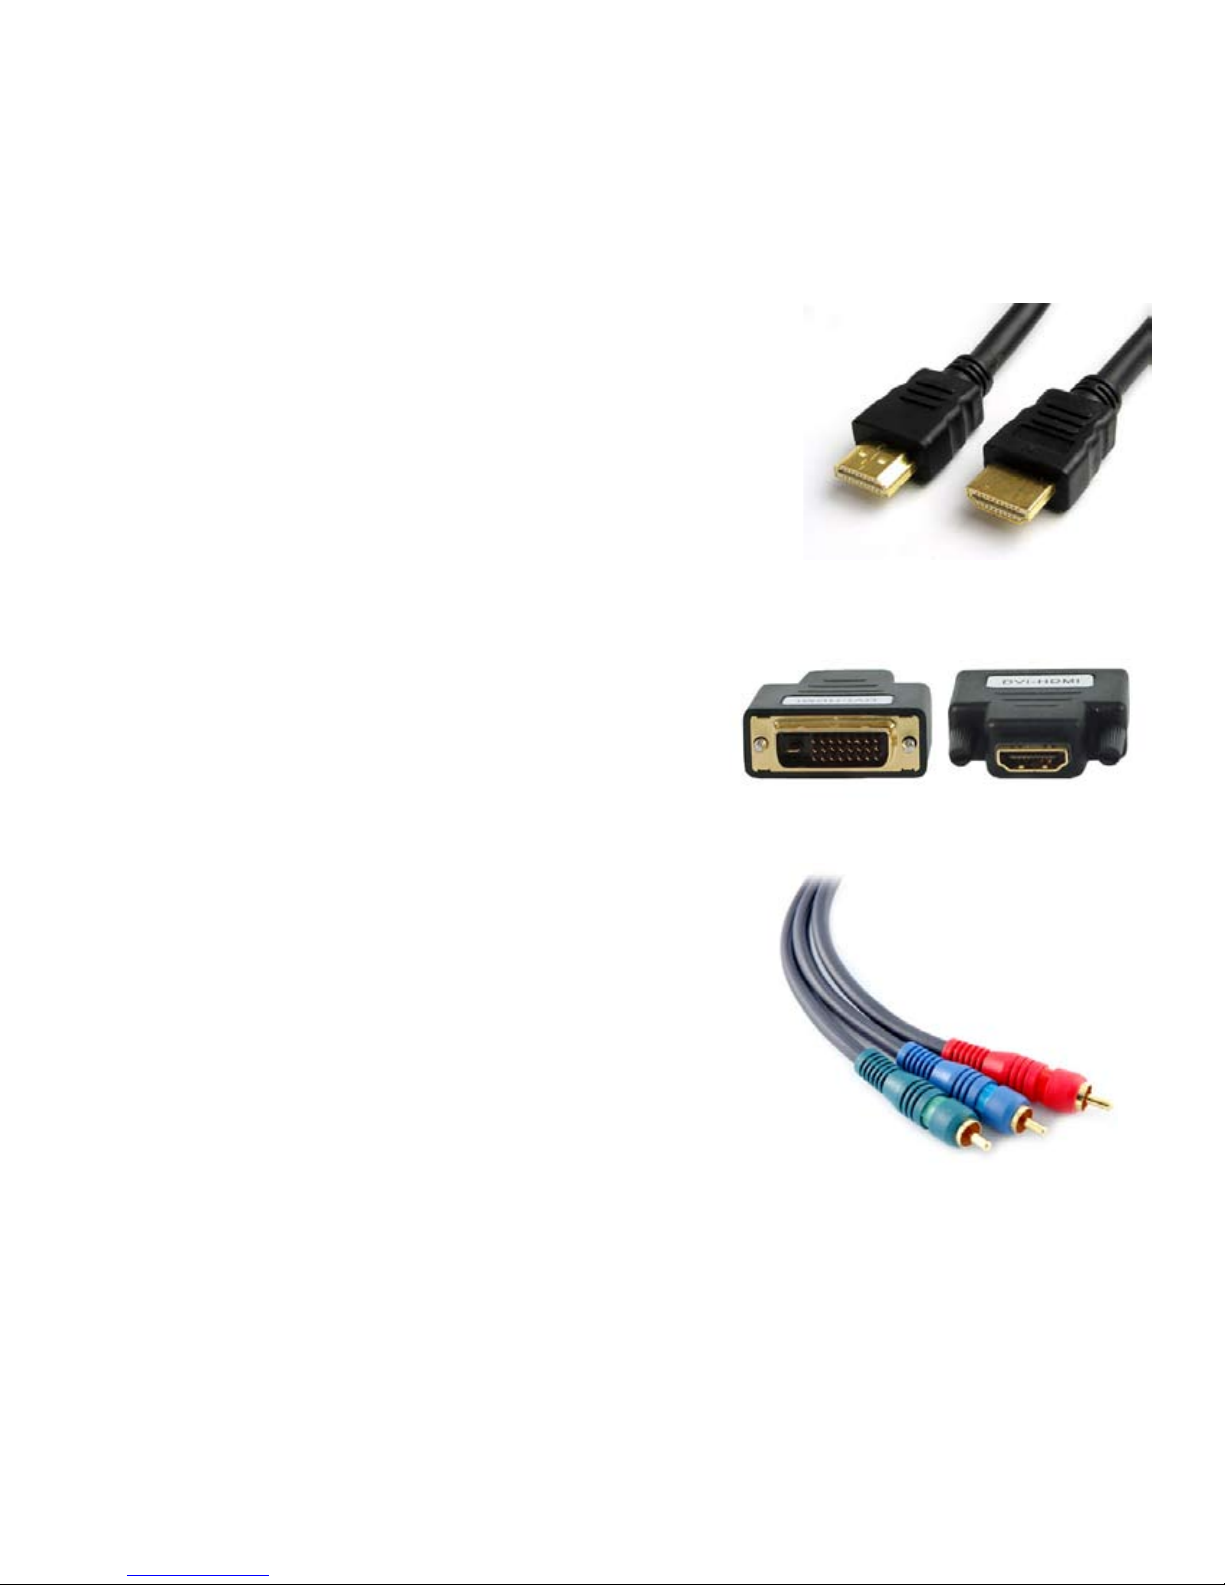
Method 1 – HDMI Connection Directly to a Display
If your Display has an HDMI (High-Denition Multimedia Interface) input, you can use the
included HDMI cable to connect the player to the Display. This connection method delivers
both video and audio in a digital format via a single cable. The HDMI video output of the
player allows for the highest possible video quality and resolution. The audio is of low quality
and should NOT be used.
There are two HDMI output terminals (HDMI 1 and HDMI 2) on the rear panel of UMT, both
of which can be connected to your Display. We recommend to use HDMI 1 since it benets
from the dedicated Marvell DEO video processor, and set the “Primary Output” option in the
setup menu to “HDMI 1” (below). This output should also be set to “Video Only”.
You may connect the composite video cable to a TV for troubleshooting purposes, or if only menu navigation is desired, because it only
produces a standard denition video signal and forfeits the advantage of high denition video.
Method 2 – DVI Connection to a Display
If your display has a DVI input that supports HDCP, you can purchase an HDMIDVI adapter cable to connect the player to the display. This connection method
delivers digital video to the display without any signal degradation. The HDMI
video output of the UMT presents the highest possible video quality and resolution.
We recommend to use HDMI 1 since it can benet from the dedicated video
processor, and set the “Primary Output” option in the setup menu to “HDMI 1”
(please see more details below).
Method 3 – Component Video Connection to a Display
If your display has no digital video input but has component video inputs, please use a
set of component video cables to connect the component video output of the player to the
display, and remember to set the “Primary Output” option in the setup menu to “Analog”
(please see more details below). The connectors are color coded, so please make sure the
cable connections match on both ends. The component video connection will produce a
very clear picture with high color accuracy.
When the “Primary Output” option in the “Video Setup” section of the Setup menu is
set to “HDMI 1” or “HDMI 2”, the component video connection will not output video
when playing a Blu-ray Disc with 1080p 24Hz content, or will only output video with
a low resolution (480i/576i) when playing a DVD. This is not a malfunction. You
must set “Primary Output” to “Analog” in order to properly use the component video
connection.
When playing a Blu-ray Disc, video resolution over the component output can be up to
1080i. 1080p content will be interlaced into 1080i signal for the component output.
Video up-conversion over the component output is only available for unencrypted discs such as home video and consumer-created
contents. Most commercially pressed DVD discs are CSS encrypted and will be limited to 480i/480p resolution. This restriction applies
to the component output only. The HDMI output is protected with HDCP and has no such restriction.
Video Settings
Primary Output: To select the primary video output port. The options are:
• HDMI 1 – Use HDMI 1 as the primary video output port. This setting will ensure that the HDMI 1 output gets the best possible
picture quality. The dedicated QDEO DE2750 video processor will be used unless “Source Direct” for output resolution is selected,
in which case QDEO DE2750 video processor is bypassed. Component and composite video output may not be available or may be
limited to a lower resolution based on content source limitations.
• HDMI 2 – Use HDMI 2 as the primary video output port. Similar to “HDMI 1”, this setting ensures that the HDMI 2 output gets
the best possible picture quality, except that it utilizes the video decoder in the player to perform necessary video processing, not the
6
Page 7
DE2750 video processor.
• Analog – Use component video as the primary video output port.
This setting will ensure that the component output is always
available and displays proper video signals. The video decoder
in the player performs any necessary format conversion, and the
DE2750 video processor is completely bypassed.
NOTE: Copyright control mechanisms encoded on the disc may limit
the output resolution of the component video output. For DVD, if
CSS encryption is in use the output resolution is limited to no more
than 480p/576p; for Blu-ray Discs, the output resolution is limited
to no more than 1080i, and could be lower if the disc contains the
Image Constraint Token.
Audio Connection
Audio on HDMI
Although the UMT will output audio over HDMI, this audio will not
benet from the MSB processing and its use is not recommended. Set
the HDMI Audio output to “OFF”. Even if the audio is not used, the
audio limitations of a display which contains audio can over-ride the
high resolution capability of the UMT so please be alert to this issue.
The easiest way to check for this problem is to play an SACD. The
output should be 32 bit, 176.4 kHz with the upsampling turned off.
Audio Ground Noise
Today we are on a new frontier of performance with new multi-
media sources loaded with electrical noise unlike anything we
ever experienced in the past. At the same time we have made great
improvements in jitter the enemy of the last decade, making ground
noise which used to be lost in the jitter, the dominant problem. And
again, grounding issues are back, making a huge difference, but now
in harshness, focus, detail and air, instead of hum.
The MSB Network
One of the most powerful feature of the Platinum is the MSB
network. This network plugs into the MSB input of the Platinum and
is automatically detected and activated. The MSB network has the
following capability:
• Unidirectional communications over any twisted pair
• Simultaneous transmission of 8 audio channels with 32 bit
resolution at 384 kHz sampling rate
• MSB CAN Interbox communication Bus (for volume and trim
data)
• A single serial channel of 384 kbits/sec for control and system
data.
This network is our answer to 384 kHz audio transmission and
multichannel transmission in the same package. We provide network
outputs to our own transport and offer a source upgrade to your
transport as well. In our surround processor upgrade, up to 8 channels
of decoded data can be sent through one wire to separate DACs. The
twisted pair format is very convenient as it has become the standard
for all computer networks. Ethernet networks use CAT6 wire which
contains 4 twisted pairs. This one cable could be used to send 32
channels of 32 bit, 384 kHz audio data! Several cables are available
for connecting MSB transports to the Platinum including CAT6 cable
at any length up to 80 feet.
There is no intuition, right or wrong with high frequency ground noise.
When all we had to deal with was 60 Hz AC hum, the concept was
easy to visualize. Get rid of ground loops. But now we are ghting
a new animal. We have had some idea about ground noise, but our
experience has shown just how tricky it is. It all started for me with
the question of why the sound changed when I changed my digital
cable? The DAC reclocks and all the bits arrive correctly in memory.
What is different? Ground noise. Now as we do network streaming
and have a Blu-ray player hooked up to an LCD monitor as a source,
the matrix becomes impossible to deal with anyway but the old way.
Try making changes and listen.
The Ground Lift feature of the DAC IV
This feature is the most powerful tool available for UMT setup and makes a huge difference in sound!
So we have given you all the tools to get it right. The most important is a ground lift in the DAC IV menus that disconnects the analog
part of the DAC output stage from the chassis and digital ground. The idea is to avoid ground loops and if your Amps are grounded this
connection SHOULD be lifted. If your AMPs oat, lifting this ground connection could result in the destruction of your DAC should you
accidentally discharge a lot of static to the AMP. So make sure the Amplier case is grounded before doing the ground lift.
The PRO I2S Input Board
The next tool is the interconnect. The job of the interconnect is to get the digital bits from the transport to the DAC. We want all the bits
sent without errors. All the interconnect types will do this. The standard connections are limited to 24 bits and the MSB network is 32
bits. Otherwise they all do the same job, EXCEPT were it relates to ground noise. Here we have big differences. Optical has no ground
and the balanced almost no ground. Coax has a transformer coupled ground and the MSB Network a solid ground. The network provides
the best connection in a perfect system, but rarely are systems perfect. The new PRO I2S input provides a ground isolated MSB Network
input. This is the best of all worlds and is the preferred input for the UMT. If you do not have the PRO input and you are hooked up to
video, you may well nd the optical connection best sounding. There is no ground connection at all. There is no rule. Any could sound
best in your system. You just have to try them.
7
Page 8
UMT with MSB DAC
There are three versions of the rmware that run in the UMT, one for use with MSB DACs and two for use with non-MSB DACs. When
using the UMT with an MSB DAC the UMT should be connected to the PRO I2S Ground Isolated MSB Network I input on the DAC
with a MSB Network Cable. This will allow a high-resolution low-jitter connection to be made for all audio. This is the only audio
connection needed. If you have a second MSB source such as the DATA CD IV, its MSB Network can be plugged into the standard
MSB Network In on the DAC.
UMT with Non-MSB DAC (96k or 192k)
With a UMT set up for use without an MSB DAC, the highest quality digital connection should be made with the DAC that the DAC
can support. We would generally rank the connections in this order: Balanced XLR, Coaxial RCA, Optical.
Power Connection
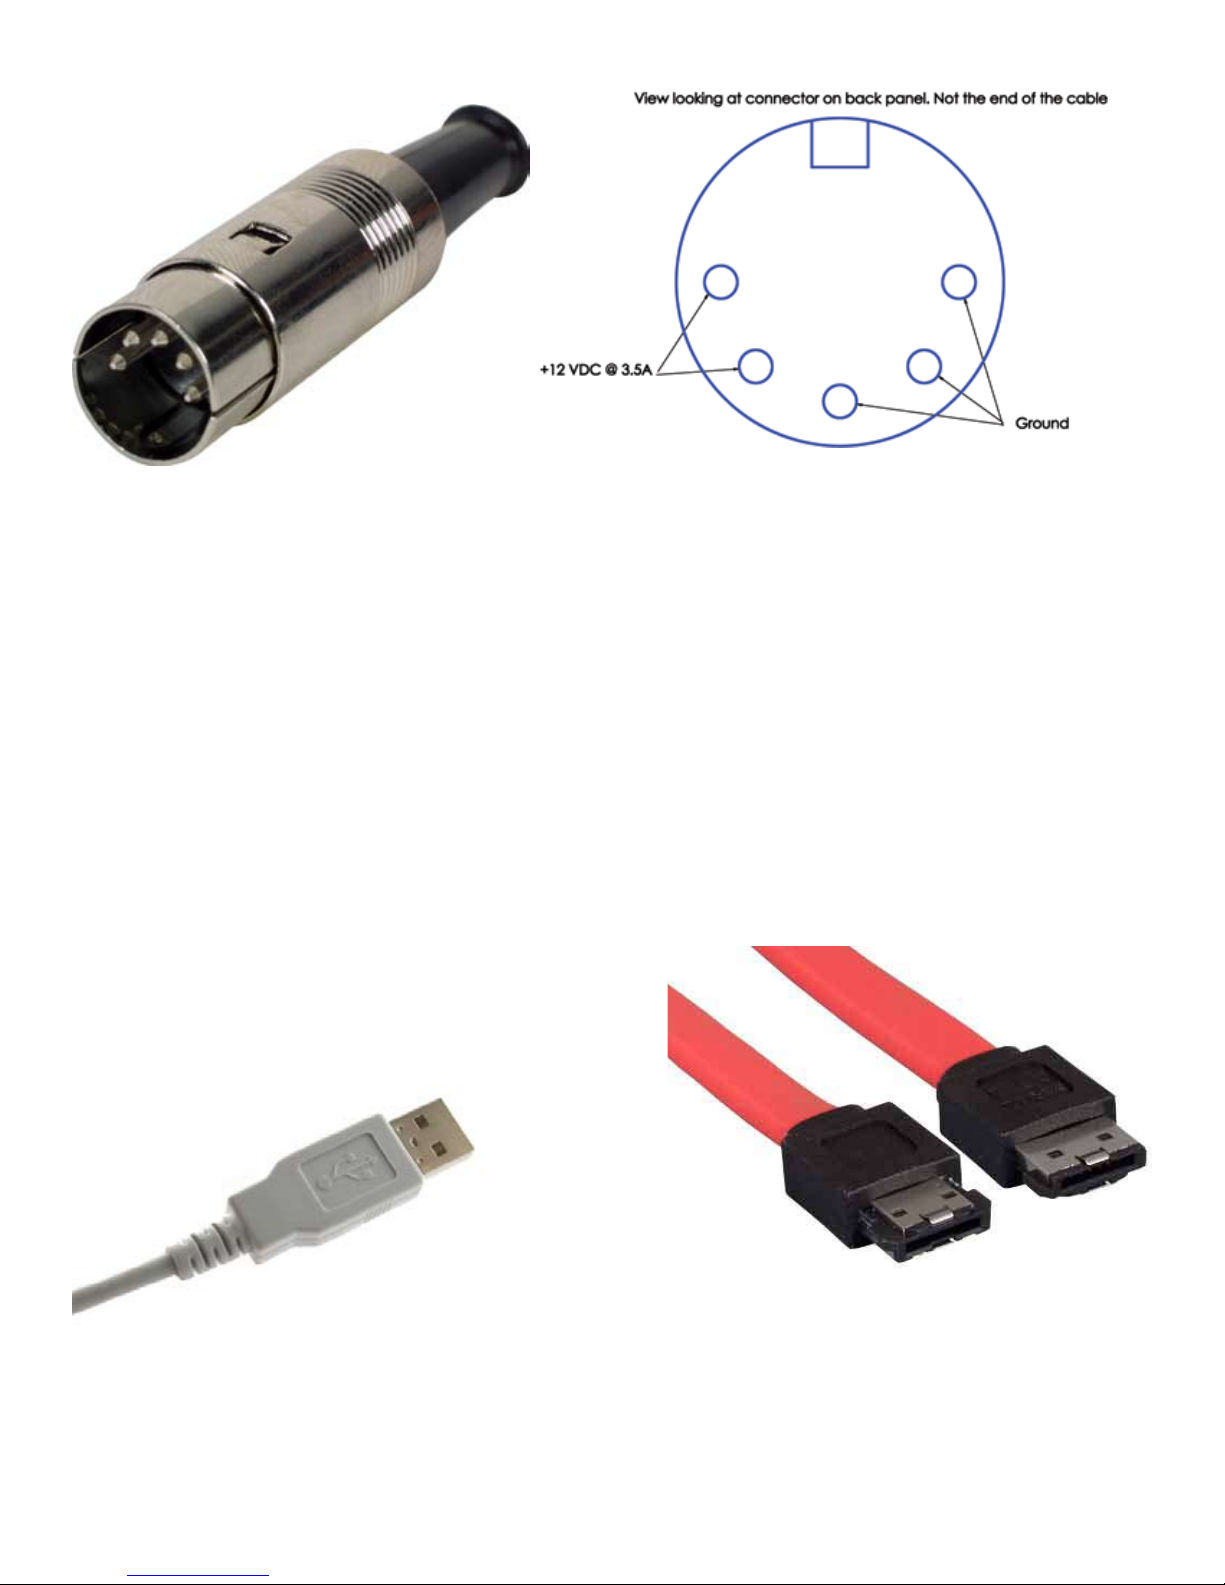
The UMT must be connected to a 12 VDC supply with a 5 pin DIN connector. The MSB Power Base provides an output for a single
UMT. A desktop supply is also available. The UMT can be adapted to run from a 12V Battery or alternative supply. The connection
diagram is shown above.
USB and eSata Connections
A USB or eSata Storage device may be attached to either of the USB
inputs. These inputs are for reading storage devices only and should not
be attached to a computer, iPod or other USB peripheral. Appropriate
devices would include USB memory sticks and USB or eSata Hard
Drives.
USB memory
sticks and USB
Hard Disc drives
can be attached.
8
eSata Cable for HDD connection
Page 9
Computer Network Connection
The UMT has signicant internet exploration capabilities. Currently it supports both Netix and Blockbuster for instant online media
streaming, as well as in-home network media sharing via My Network which is functionally equivalent to DLNA. Additional network
applications may be added with future rmware updates. The UMT also supports the BD-Live feature offered on some Blu-ray Disc titles.
BD-Live offers extra downloadable content and additional online interactive programs. Content available on BD-Live vary by discs and
studios, and may include additional subtitles, commentaries, movie trailers, games, or online chat. Connecting the player to the Internet
will also allow the player to obtain rmware updates via the Internet. In order to utilize the BD-Live feature or update rmware via the
Internet, the player needs to be connected to a broadband Internet connection. It is not necessary to connect to the Internet if you do not
intend to use the network streaming, BD-Live and online rmware updating functionality.
The UMT provides two network connection methods: through Ethernet cable or through the external wireless adaptor included with the
player. For the fastest and most stable network connection, we recommend using Ethernet cable whenever it is possible.
Internet connection through Ethernet cable
• Plug one end of a network cable (Category 5/5E straight Ethernet cable) into the LAN port on the back of the UMT.
• Plug the other end of the network cable into a LAN port on the broadband router or modem.
• After physically connecting the player to a broadband Internet connection, some network conguration may be required. Please refer
to the Network Setup section for details.
• Refer to the operating instructions supplied with the broadband router or modem, or contact the Internet service provider for questions
related to setting up the router or modem.
NOTE: Only connect the LAN port of the player to an Ethernet port that supports 10BASE-T or 100BASE-TX. Connecting to any other
ports or jacks, such as a phone jack, can damage the player. Streaming services such as Netix and Blockbuster may require membership
and may also be limited to service in the US only.
Internet connection through Wireless USB Adaptor
The wireless adaptor included in the UMT package has been pre-congured to work with your player. It is compatible with 802.11b/g/n
2.4GHz wireless networks.
Make sure the broadband Internet connection is available and the Wi-Fi function on your wireless router or access point has been turned
on, then plug the adaptor into one of the two USB2.0 ports available on your UMT.
After the physical connection, some network conguration is required. Please refer to the Network Setup section for details.
A 6-foot USB extension cable is also included in the package. Connect it between the USB port on the player and your wireless adaptor
if needed.
Custom Installation
External IR (Infrared Remote) Installation
The UMT features an IR IN port on its back panel. If the player is to be installed in an equipment cabinet where direct line-of-sight is
not available for remote control, your custom home theater installer can purchase an external IR Remote Sensor and plug it into the IR
IN port. Place the sensor head at a location where there is direct line-of-sight to ensure reliable operation.
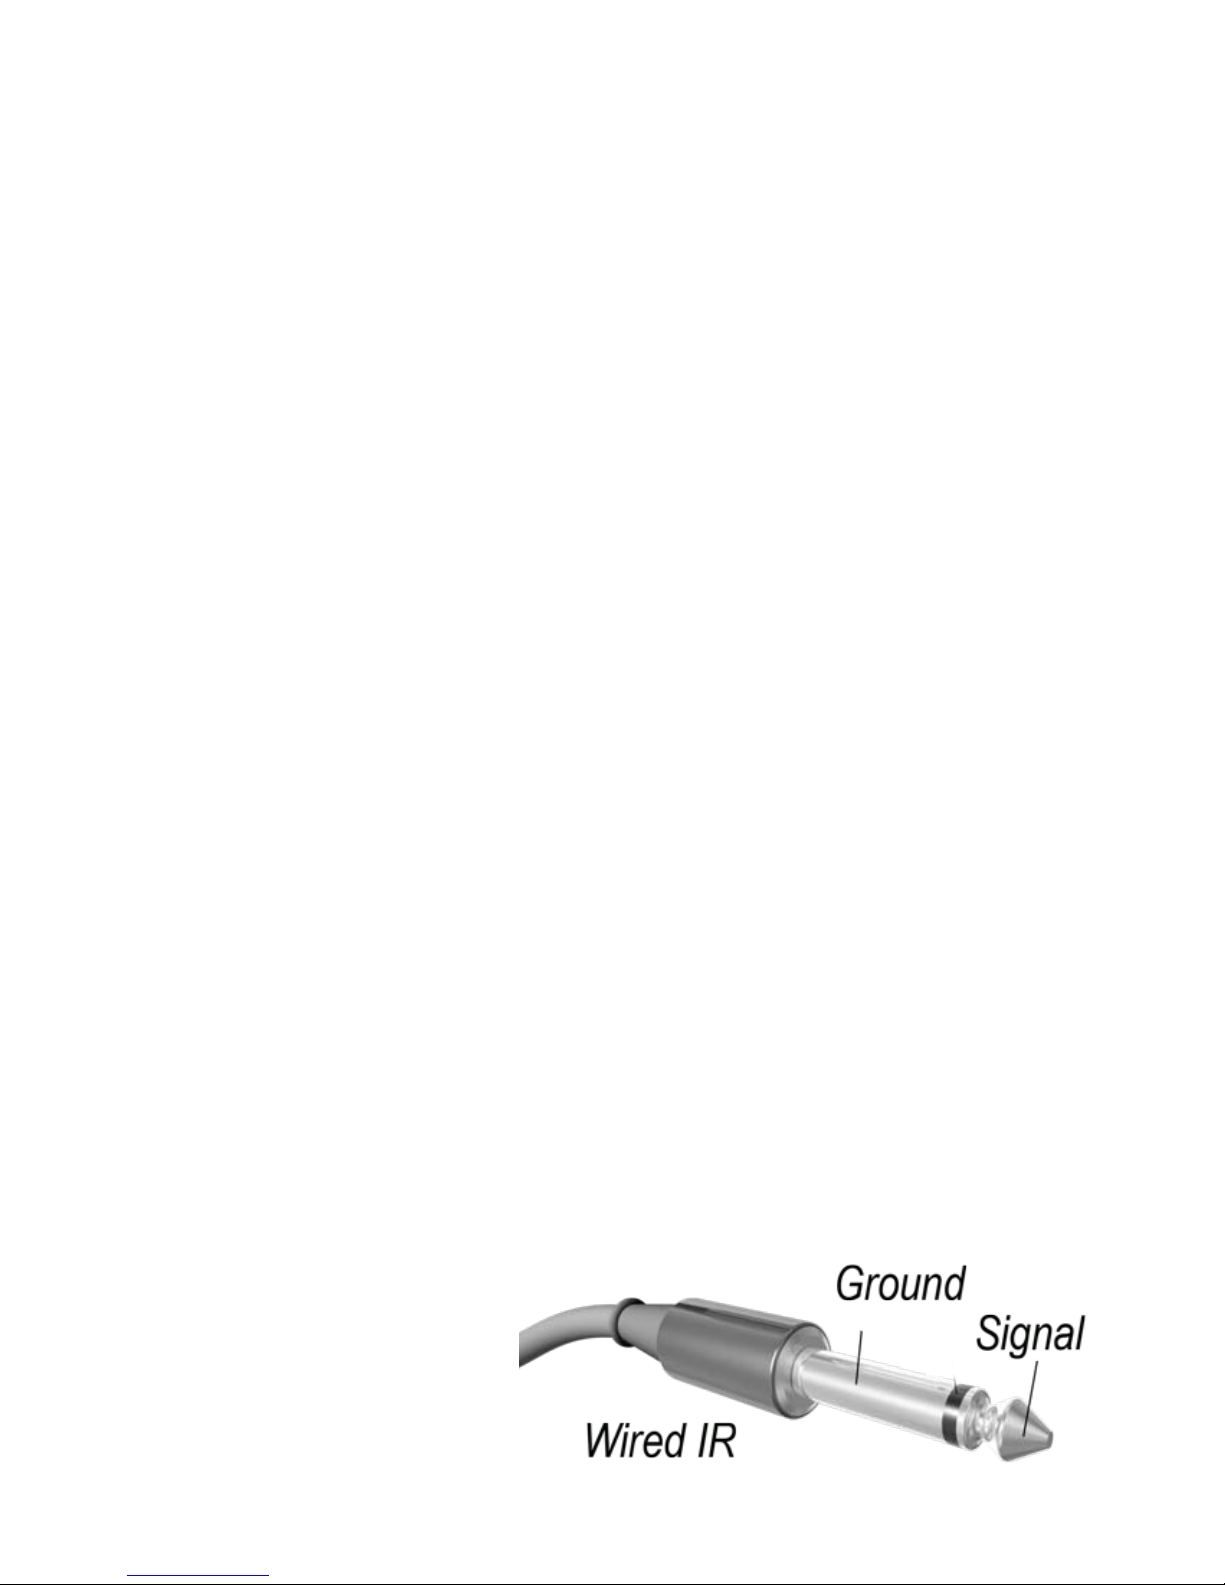
Use a 3.5mm Mono Cable to make the connection.
• When an external IR sensor is plugged in, the original IR sensor window on the front panel will be disabled.
• MSB cannot guarantee that the IR IN port will be compatible with devices that are not manufactured by MSB.
• Connecting the IR IN port to an incompatible device may result in damage to the connected device or the player.
Please contact MSB customer support if you plan to integrate the player into an IR distribution system. Customer support can provide
recommendations on how to properly connect the
control signals.
RS232 Control
The UMT has an RS232 control port and can be
integrated into most custom home theater control
systems. Please ask your custom installer to contact
MSB for the RS232 control protocol.
9
Page 10
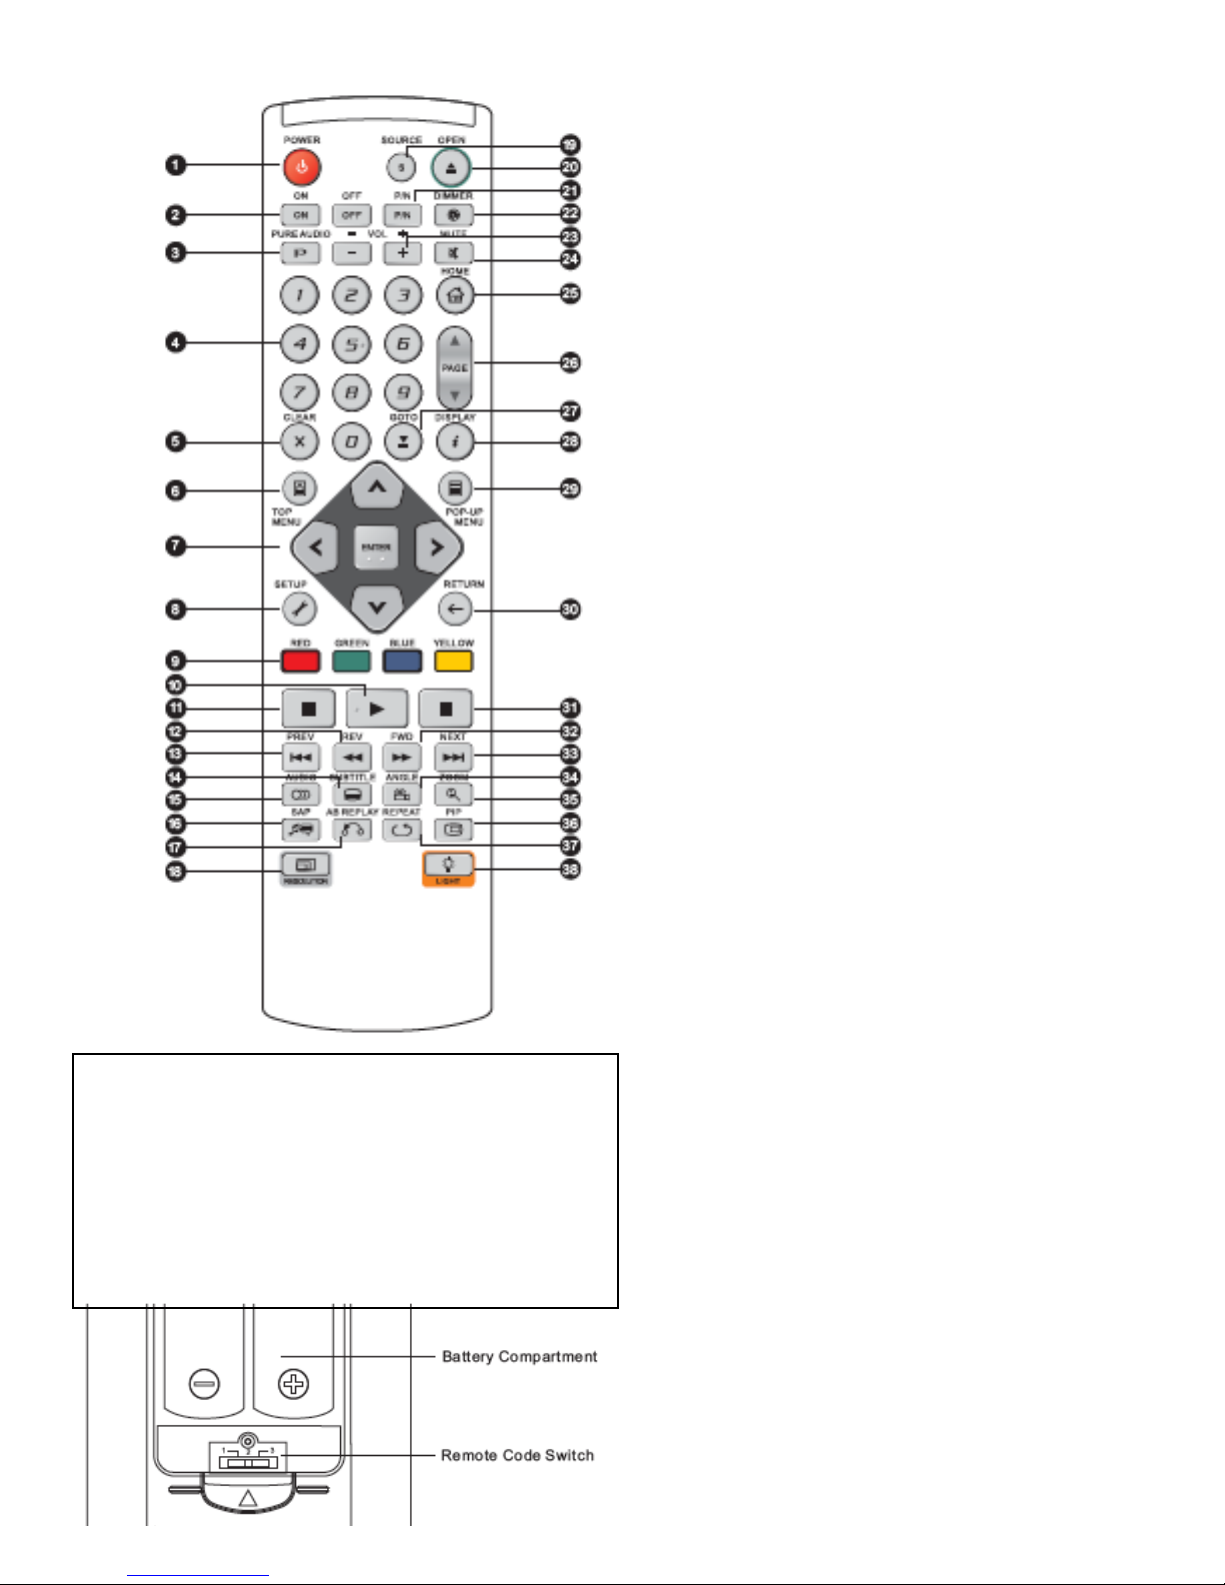
1. POWER: Toggle power STANDBY and ON
2. ON/OFF: Discrete on/off power buttons
3. PURE AUDIO: Turn off/on video
4. NUMBER Buttons: Enter numeric values
5. CLEAR: Clear numeric input
6. TOP MENU: Show BD top menu or DVD title menu
7. ARROW and ENTER Buttons: Navigate menu selection
8. SETUP: Enter the player Setup Menu
9. COLOR Buttons: Function varies by content
10. PLAY: Start playback
11. STOP: Stop playback
12. REV: Fast reverse play
13. PREV: Skip to previous
14. SUBTITLE: Change subtitle language
15. AUDIO: Change audio language or channel
16. SAP: Turn on/off Secondary Audio Program
17. A-B REPLAY: Repeat play the selected section
Changing the Remote Code
The remote control supports one of three remote codes. The default
is “Code 1”. If you experience conicts with another remote, you can
select a different remote code.
To select a new remote code, open the battery compartment cover of
the remote control, and then ip the switch to one of the positions
marked as “1”, “2”, or “3”. Close the battery compartment cover. Make
sure that the UMT player is turned on and the disc tray is ejected. Aim
the remote control at the player. Press and hold the ENTER button for
5 seconds. The player will start using the new remote code.
18. RESOLUTION: Switch output resolution
19. SOURCE: Select the internet media or application source
20. OPEN: Open/close the disc tray
21. P/N: Switch output TV system: NTSC, PAL or MULTI
22. DIMMER: Dim the front panel display
23. VOLUME +/-: Increase/Decrease volume on DAC IV
(Volume bar on OSD should be ignored)
24. MUTE: Mute audio
25. HOME: Go to Home Menu to select media source
26. PAGE UP/DOWN: Show the previous/next page
27. GOTO: Play from a specied location
28. DISPLAY: Show/hide the On-Screen Display
29. POP-UP MENU: Show BD pop-up menu or DVD menu
30. RETURN: Return to the previous menu or mode
31. PAUSE: Pause playback
32. FWD: Fast forward play
33. NEXT: Skip to the next
34. ANGLE: Change the camera angle
35. ZOOM: Zoom in/out and adjust aspect ratio
36. PIP: Show/hide the Picture-in-Picture
37. REPEAT: Repeat play
38. LIGHT: Activate the back light for the remote control
10
Page 11
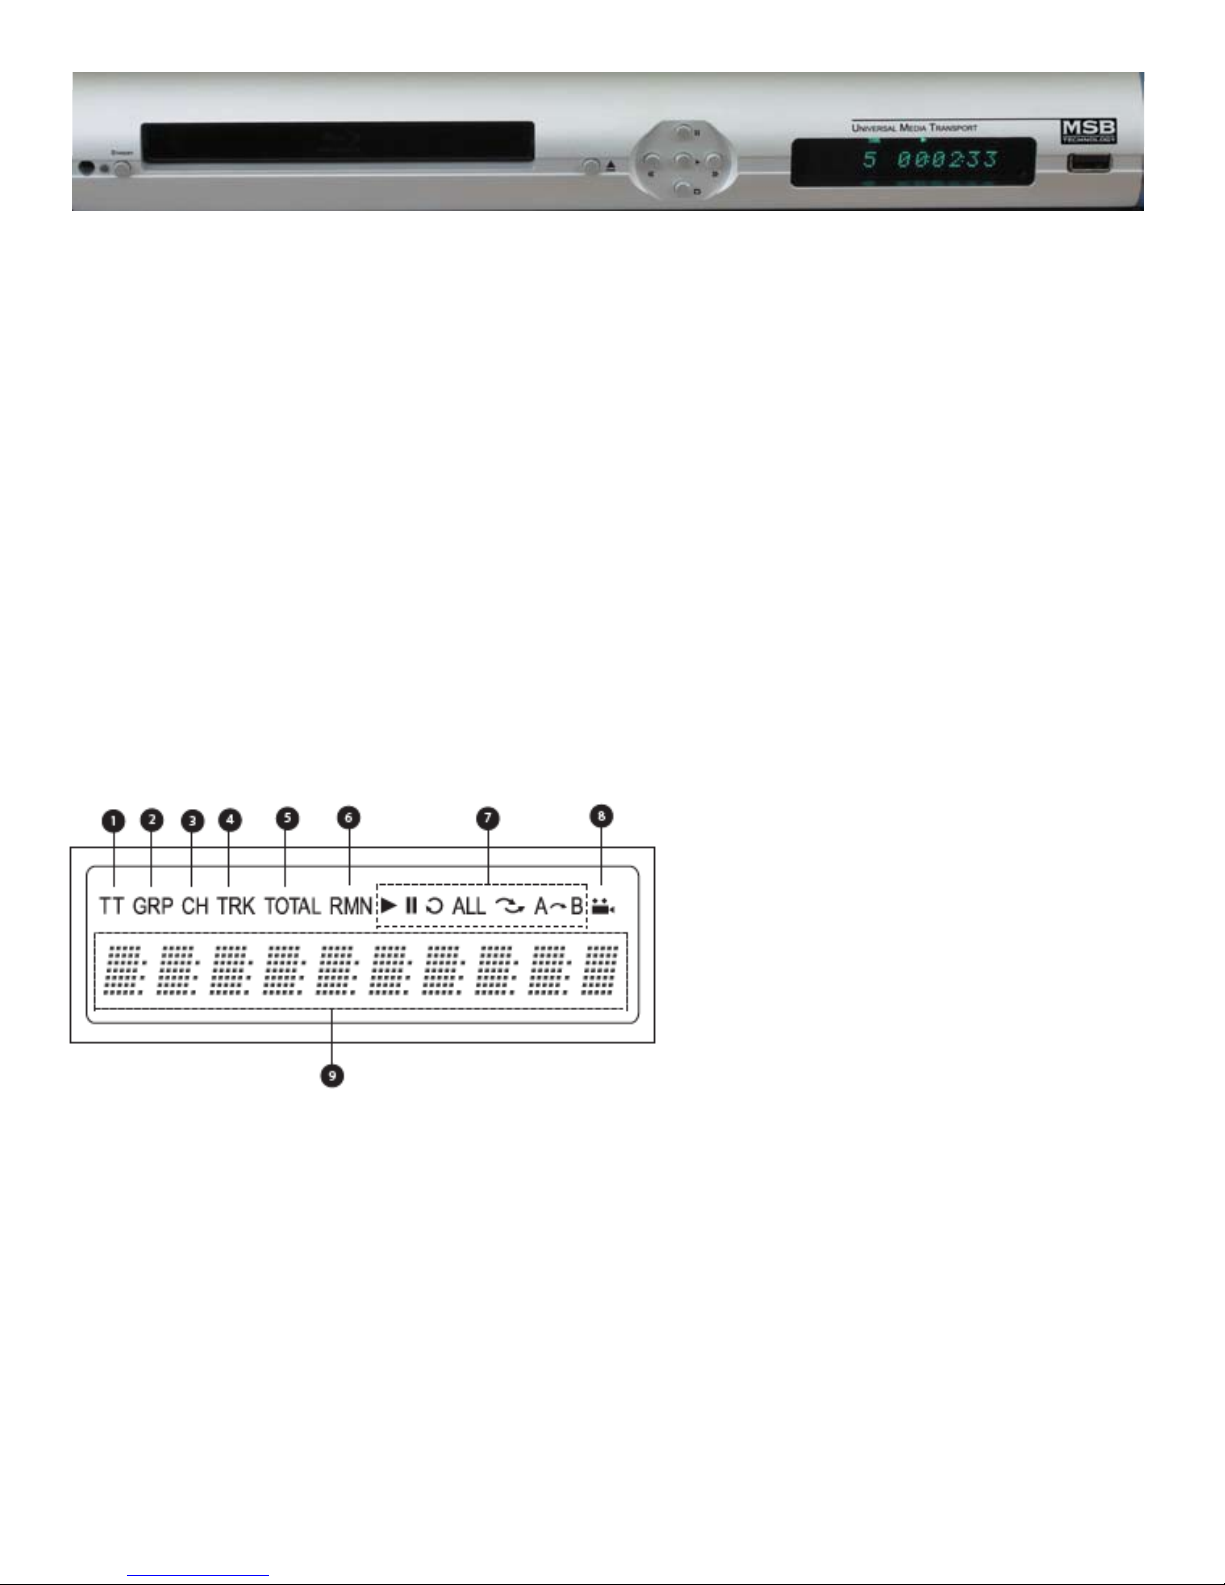
Front Panel Controls
Standby Button – This is used to reset the unit and to switch to the MSB Network pass through. The MSB Network pass through is the
MSB Network input on the unit. This allows other transports with a MSB Network output to be connected to the same DAC. When
the light is red, the unit is in standby and the MSB Network Input is selected. When the light is green, the UMT is on. The UMT is
slow when going into or out of standby. Also, the UMT saves it’s settings only when going into Standby. If you do allow the unit to
go into Standby it will not save it’s settings.
Eject – It open and closes the drawer. If Autoplay is enabled in the settings (default setting) the UMT will start playing the disc when
the drawer is closed.
Track Arrows/Navigation Arrows - When a disc is playing these buttons will track. When in the UMT or a DVD menu these buttons will
function as left/right navigation control.
Pause/Navigation Arrow - When a disc is playing the button will function as pause. When in the UMT or a DVD menu this button will
function up.
Play/Enter - When a disc is playing the button will function as play. When in the UMT or a DVD menu this button will function enter.
Stop/Navigation Arrow - When a disc is playing the button will function as stop. When in the UMT or DVD menu this button will
function down.
Display - The display can be used with the playback of standard discs. If you need to play data discs (HRx) or Network streaming and
external display will need to be used.
USB Input - The front panel USB can be used to plug in USB Flash drives or other external storage devices. It’s for playback of music
and video les and MUST NOT be connected to a computer. This port will not work with a iPod.
1. Title – When illuminated, the displayed time applies to a title.
2. Group – When illuminated, the displayed time applies to a group
3. Chapter – When illuminated, the displayed time applies to a chapter
4. Track – When illuminated, the displayed time applies to a track
5. Total – When illuminated, the displayed time is the total play time
6. Remaining – When illuminated, the displayed time is the remaining play time
7. Playback Status – Indicates playback status such as Play, Pause, Repeat, Repeat All, Random/Shufe, and A-B Repeat
8. Angle Icon – Indicates that the scene contains additional camera angle(s)
9. Main Display – Text messages and numeric display
11
Page 12
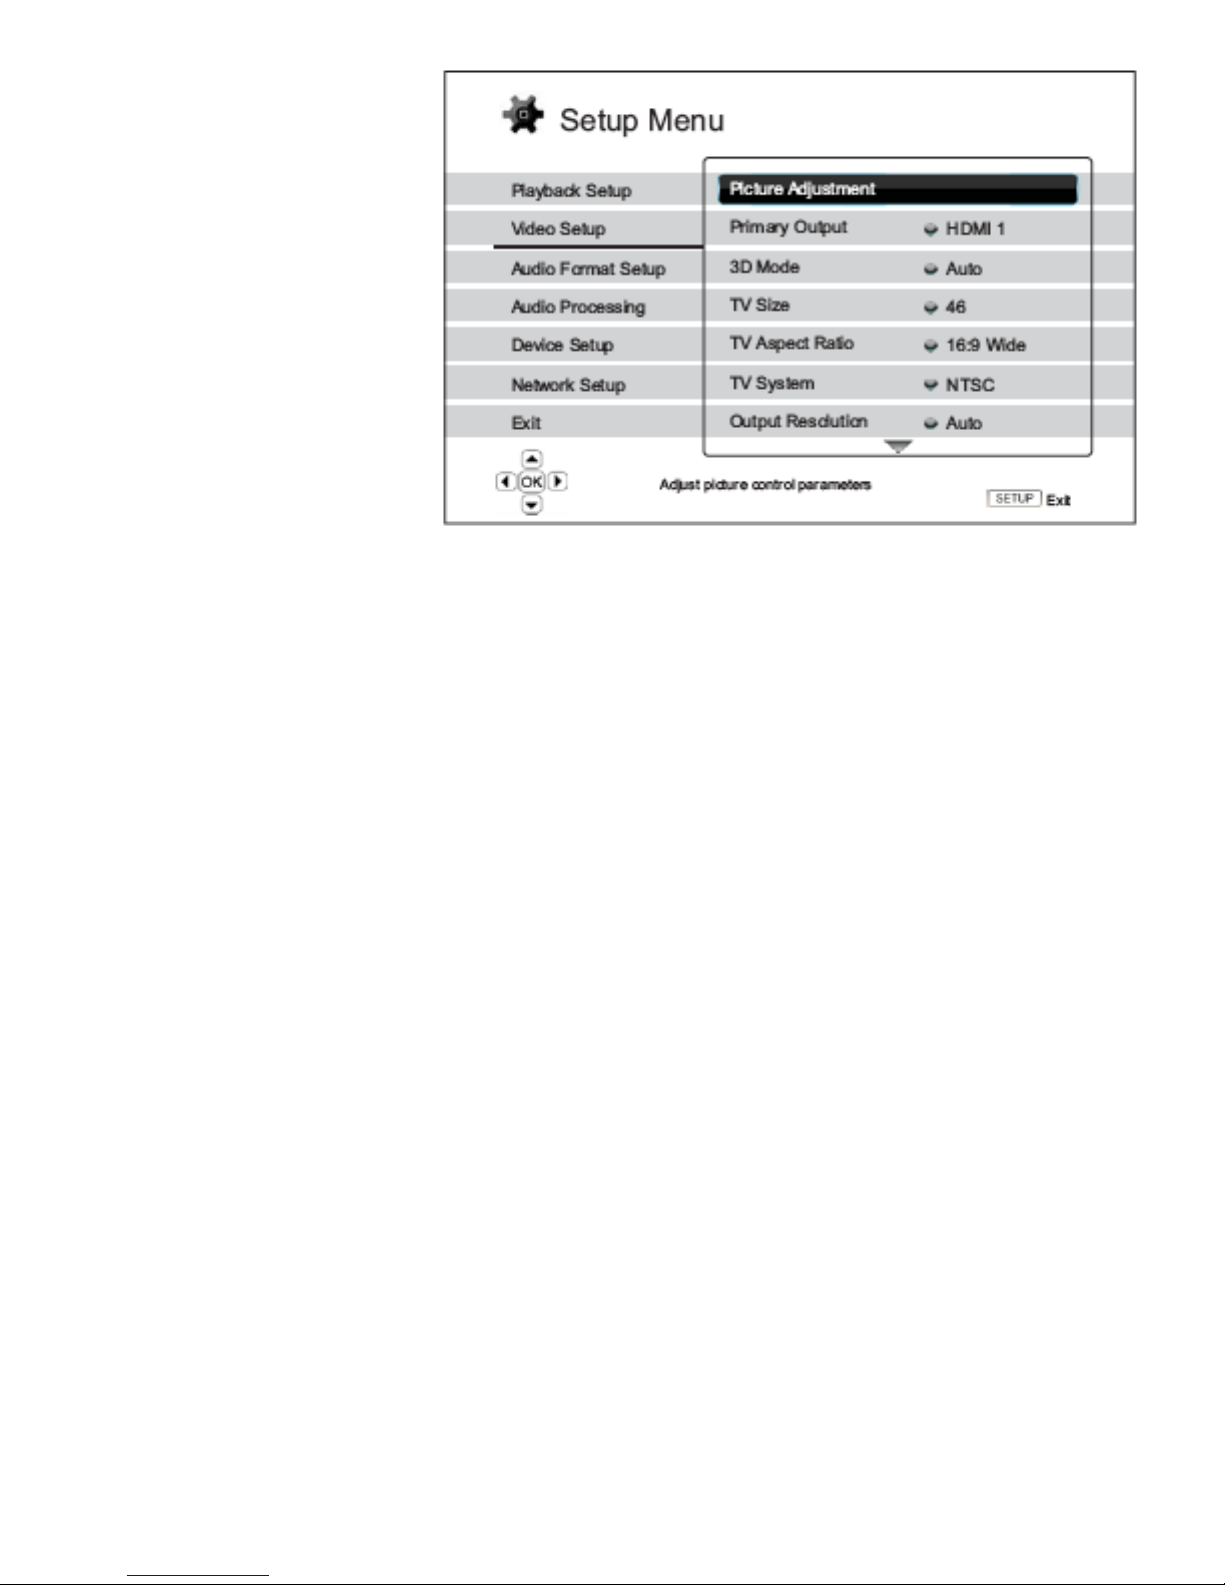
Video Setup
The “Video Setup” section of the Setup Menu
system allows you to congure video output
options. MSB has set the video setup to what
we think are the best settings, assuming you
have a wide-screen display with HDMI inputs.
With any other display options you will need
to make the adjustments below. The menu
items in this section are:
1. Picture Adjustment: To adjust picture
control parameters. The UMT provides a wide
array of picture controls. Please refer to the
Picture Adjustment section of this manual for
details of each control.
2. Primary Output: To select the primary video
output port. The options are:
• HDMI 1 – Use HDMI 1 as the
primary video output port. This
setting will ensure that the HDMI 1
output gets the best possible picture quality. The dedicated QDEO DE2750 video processor will be used unless “Source Direct”
for output resolution is selected, in which case QDEO DE2750 video processor is bypassed. Component and composite video
output may not be available or may be limited to a lower resolution based on content source limitations.
• HDMI 2 – Use HDMI 2 as the primary video output port. Similar to “HDMI 1”, this setting ensures that the HDMI 2 output gets
the best possible picture quality, except that it utilizes the video decoder in the player to perform necessary video processing,
not the DE2750 video processor.
• Analog – Use component video as the primary video output port. This setting will ensure that the component output is always
available and displays proper video signals. The video decoder in the player performs any necessary format conversion, and the
DE2750 video processor is completely bypassed.
NOTE: Copyright control mechanisms encoded on the disc may limit the output resolution of the component video output. For DVD, if
CSS encryption is in use the output resolution is limited to no more than 480p/576p; for Blu-ray Discs, the output resolution is limited
to no more than 1080i, and could be lower if the disc contains the Image Constraint Token.
3. 3D Mode: To choose the video output mode for available 3D contents at the HDMI output ports.
The options are:
• Auto – Output 3D if supported both by the disc content and the display. The player automatically checks for the existence of
3D content on the disc and the 3D compatibility of the TV or projector. If both are qualied, the player sends 3D video from
its HDMI output terminals, otherwise only 2D video is sent out. Active shutter 3D-compatible glasses (which are not sold by
MSB) are required to enjoy the 3D movie on your TV.
• Off – Always output 2D video format, even when 3D video exists on the disc. This guarantees the video quality if your TV is
not 3D compatible, or some necessary part (such as the 3D glasses) is missing.
4. TV Size: To enter the diagonal screen size of your HDTV. This option applies to 3D mode, to help the player adjust the 3D image for
better visual quality. Use the number buttons on the remote control to enter the actual diagonal size of your TV screen, or use the DOWN
ARROW button to delete the digits. The default is 46 inches.
5. TV Aspect Ratio: To set the aspect ratio of the player’s output image. The options are:
• 4:3 Letterbox – Choose this when the display is standard 4:3. A widescreen image is displayed in “letterbox” format with black
borders on top and bottom.
• 4:3 Pan & Scan – Choose this when the display is standard 4:3. A widescreen image will be stretched.
• 16:9 Wide – Choose this when the display is widescreen 16:9. 16:9 materials will be displayed in its native aspect ratio, and 4:3
materials will be stretched horizontally.
• 16:9 Wide/Auto – Choose this when the display is widescreen 16:9. 16:9 materials will be displayed in its native aspect ratio,
and 4:3 materials will be displayed with black borders on both sides in order to maintain the original 4:3 aspect ratio.
For a detailed description on how to choose a proper TV Aspect Ratio, please refer to the Determine the Display Aspect Ratio section
of this manual.
6. TV System: To choose the output video system or broadcast standard (PAL/NTSC) to match the type of TV. The options are:
12
Page 13

• NTSC (default) – When playing NTSC-encoded discs, no system conversion is performed. PAL-encoded contents are converted to
NTSC output. Blu-ray Discs encoded with 24Hz frame rate are converted to 60Hz frame rate if neither 1080p24 Output nor Source
Direct output resolution is enabled.
• PAL – When playing PAL-encoded discs, no system conversion is performed. NTSC encoded contents are converted to PAL output.
Blu-ray Discs encoded with 24Hz frame rate are converted to 50Hz frame rate if neither 1080p24 Output nor Source Direct output
resolution is enabled.
• Multi-system – No system conversion is performed. The output video system is the same as that encoded on the disc. Blu-ray Discs
encoded with 24Hz frame rate are converted to 60Hz frame rate if neither 1080p24 Output nor Source Direct output resolution is
enabled. Requires a TV that supports both NTSC and PAL systems.
NOTE: DO NOT select “Multi-system” if your TV does not support both NTSC and PAL systems. The TV display may become a black
screen upon inserting a disc encoded in a different system than your TV supports. Should this happen, you can press the OPEN button
to eject the disc tray, and then use the Setup Menu to correct the “TV System” setting.
7. Output Resolution: To choose the output resolution that best matches your television’s native resolution. For a detailed description on
how to choose a proper output resolution, please refer to the Select the Best Output Resolution section of this manual.
8. 1080p24 Output: To set 1080p 24Hz output options. This option only applies to the HDMI output at 1080p resolution. Many Blu-ray
Discs that originated from theatrical movies are encoded using 24Hz frame rate, the same number of frames per second as the original
theatrical lm. If the TV properly supports 1080p 24Hz, smoother motion can be achieved by enabling 1080p24 Output for such discs.
The available options are:
• Auto – Video encoded in 24Hz frame rate will be output as 1080p 24Hz if the TV informs the player that it can support the 1080p24
signal.
• On – Video encoded in 24Hz frame rate will be output as 1080p 24Hz without regard to whether the TV can support the 1080p24
signal or not. This is useful if the TV can actually support 1080p24 but does not properly state its capability. Please note that if the
TV cannot support 1080p24, selecting this option will result in no video.
• Off (default) – Video encoded in 24Hz frame rate will be converted to 60Hz (NTSC) or 50Hz (PAL)
9. HDMI Options: To congure video options that apply only to the HDMI output. This item contains a sub-menu with multiple conguration
options. Please refer to the HDMI Options section of this manual for details of each option.
10. Display Options: To congure the options for displaying on-screen information. The following display options are available:
• Subtitle Shift – To set the display position for subtitles. When the “Subtitle Shift” is set at 0 (default), subtitles are displayed at the
original position as specied on the disc. When it is set at a value between 1 and 5, subtitles are shifted up. When it is set at a value
between -1 and -5, subtitles are shifted down. This feature is helpful for customers using a 2.35:1 “Constant Image Height” video
projection system. Subtitles can be shifted to the active video area so they do not get cut off.
• OSD Position – To set the display position for the on-screen display (OSD). When the “OSD Position” is set at 0, the OSD is shown
at the top and bottom of the video screen. When it is set at a value between 1 and 5, the OSD is shifted towards the center of the
video screen. Similar to the subtitle shift setting above, the “OSD Position” feature is helpful for customers using a 2.35:1 “Constant
Image Height” video projection system.
• OSD Mode – To select how long the on-screen display information, such as elapsed or remaining time, stays on the TV screen. The
available options are:
• Normal – On-screen display information stays on the TV screen until the user cancels it.
• Silent – On-screen display information shows on the TV screen for a few seconds and then disappears. The front panel display
still maintains the selected display information.
• Remaining – On-screen display information stays on the TV screen until the user cancels it. By default displays remaining time
instead of elapsed time.
• Angle Mark (on/off) – To turn on/off the display of an angle mark when a DVD or Blu-ray Disc with multiple available angles is
played. Keeping the angle mark off avoids distraction from normal movie watching.
• PIP Mark (on/off) – To turn on/off the display of a Picture-in-Picture mark when a Blu-ray Disc with secondary video is played.
Keeping the PIP mark off avoids distraction from normal movie watching.
• SAP Mark (on/off) – To turn on/off the display of a Secondary Audio Program mark when a Blu-ray Disc with secondary video and
audio is played. Keeping the SAP mark off avoids distraction from normal movie watching.
• Screen Saver – To turn on/off the screen saver function. The screen saver is designed to minimize burn-in concerns for plasma and
CRT display devices. The available options are:
• On – After about 3 minutes of inactivity, the player will show an animated OPPO logo moving on a black background. This allows
most areas of the screen to rest and gives all areas an equal opportunity to refresh.
13
Page 14

• Off – The screen saver will not be activated. Use this option if your TV does not have a burn-in issue.
• Energy Saver – Video output will be turned off after 3 minutes of inactivity. Many projectors and LCD TVs will go into a standby
or sleep mode and turn off their projection lamp or LCD backlight lamp, thus saving energy and prolonging the lamp life. When
you press any button on the UMT remote control or the player’s front panel, the screen saver will be canceled and video output
will be restored. If your TV is already in standby or sleep mode, you may need to wake up the TV by pressing a button on its
remote or control panel.
14
Page 15
Reset Factory Settings - Easy Setup Wizard
Access the Easy Setup Wizard
The UMT is delivered with the optimum audio settings. You may need to adjust the settings for your video display. If all else fails, you
may reset the UMT to the original settings.
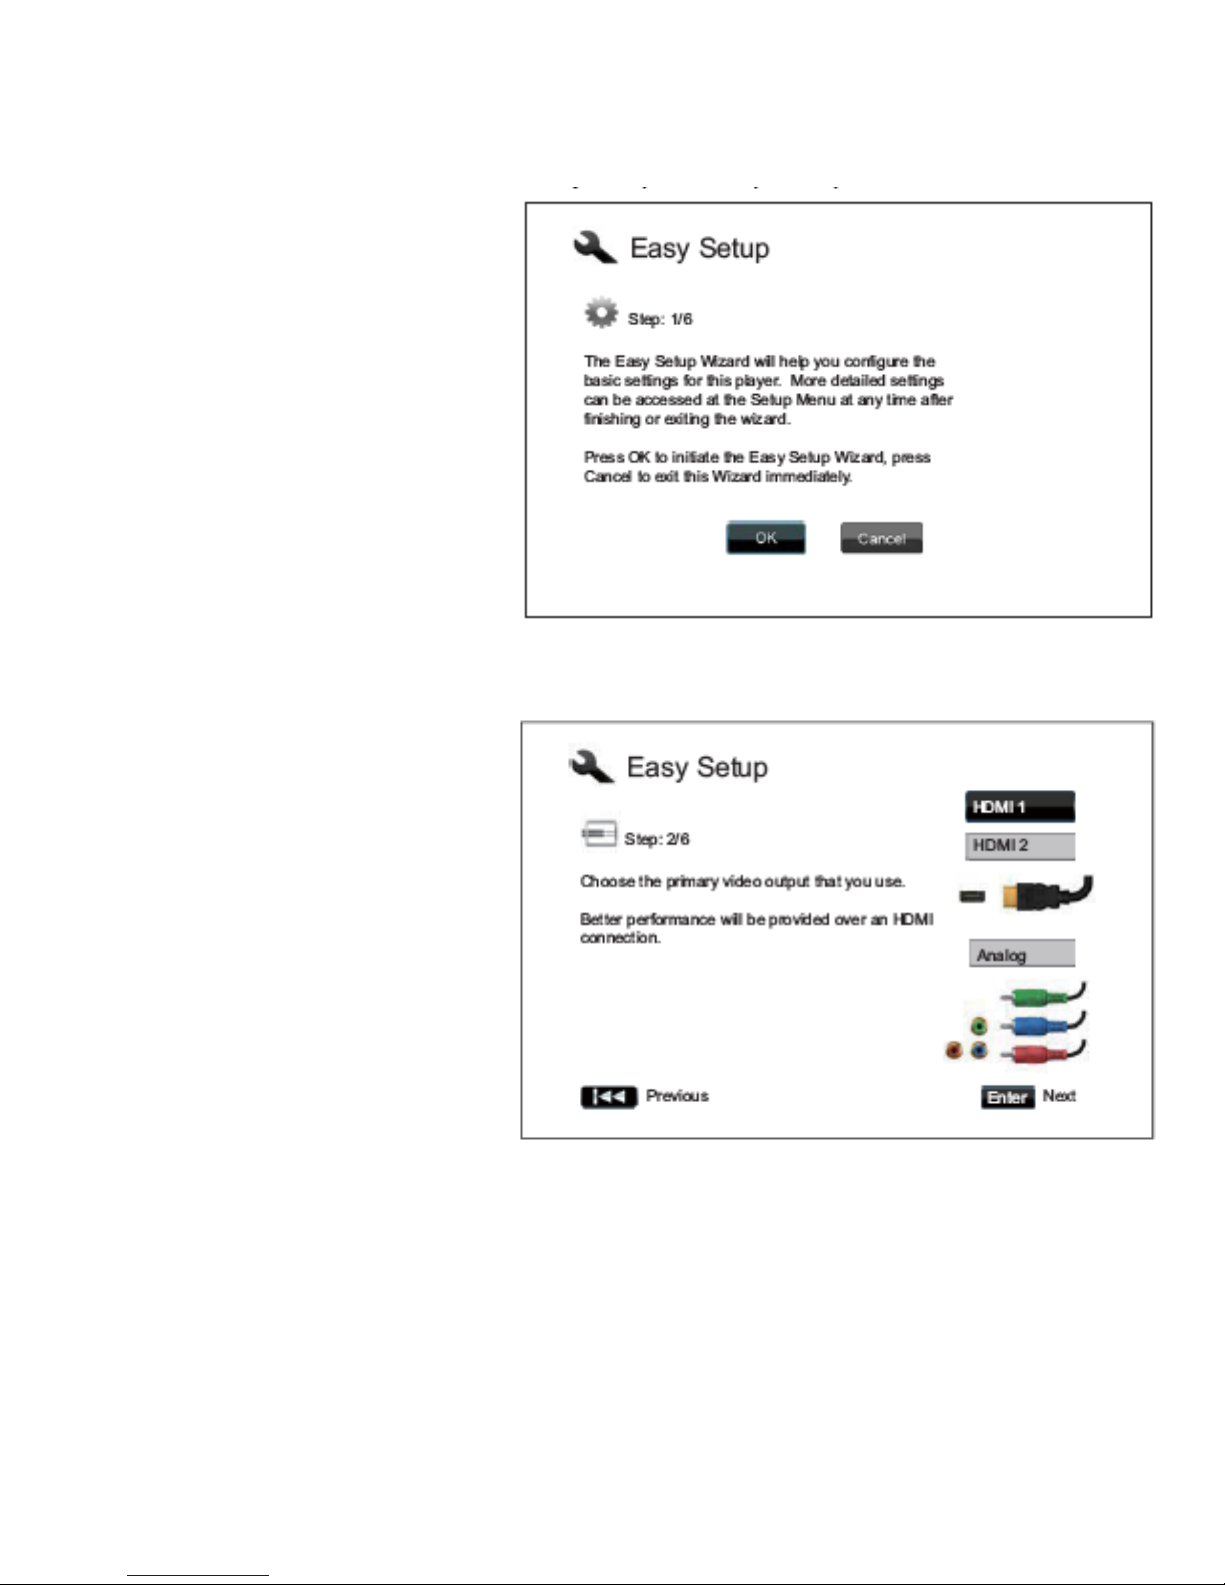
To start the Easy Setup Wizard, please follow these
steps:
1) Turn on the Display.
2) Turn on the player.
3) Switch the input selection on your TV so that the
TV displays the signal from the player. You will see
the background screen with the Blu-Ray Disc logos.
To access Easy Setup Wizard, please press the SETUP
button on the remote control, select Device Setup, then
Reset Factory Default. Select “OK” to conrm loading
the factory default settings. Once the factory default
settings are loaded the Easy Setup Wizard will appear.
The rst step of the Easy Setup Wizard allows you to
skip the entire wizard. If you are familiar with setting up
audio/video equipment and would like to customize the
player settings using its Setup Menu, you may use the
LEFT/RIGHT ARROW buttons to select the “Cancel”
option, then press the ENTER key to exit the Easy Setup
Wizard. Otherwise, to continue with the Easy Setup Wizard, select the “OK” option and press the ENTER key.
Choose the Primary Video Output
The player can output video through its HDMI and
component output terminals. (Composite video output
is also available but not recommended.) By setting the
“Primary Video Output” option, the player can optimize
video output of the selected terminal. The choices are
“HDMI 1”, “HDMI 2” and “Analog”. If you connect
the player to the TV using an HDMI cable, please select
“HDMI 1”. If you connect the player to the TV using
component video cables, please select “Analog”.
Please note: The best performance will be provided over
the HDMI connection. Between the two HDMI outputs,
HDMI 1 should be given priority for use since it benets
from the superior Marvell QDEO video processing
solution.
To make your selection, use the UP/DOWN ARROW
buttons to highlight the choice, and then press the
ENTER button to go to the next step.
Select the Best Output
Resolution
One of the major advantages of the MSB UMT is its ability to play high-denition Blu-Ray video and also up-convert standard denition
video stored on DVD discs to high denition. The sophisticated video processor inside the player ensures that the video will have the best
possible color, detail and motion. The player offers several standard and high denition video output resolutions. To get the best visual
result, it is important to select an output resolution that best matches your TV or display device.
The rule of thumb when selecting an output resolution is to match the “native resolution” of your TV or display device as closely as
possible. The “native resolution” is the resolution of the actual display component in the TV, such as the Plasma panel, LCD panel, or
DLP™ chip. The TV may accept input signals with lower or higher resolutions than its native resolution. In such cases the electronics in
the TV will up-scale or downscale the video to t its display component. Unfortunately many TVs on the market only do an average job
scaling the video. On the other hand, if you set the MSB UMT to output a resolution that matches or is very close to the native resolution
of the TV, you are more likely to get a great picture.
For the latest generation of 1080p, “Full HD” or “True HD” displays, the best output resolution will naturally be 1080p. (A few early model
1080p displays do not accept 1080p signal. For these displays the best output resolution to use is 1080i.) For all other digital televisions
this will likely be 720p. For CRT tube or rear projection televisions this will likely be 1080i. For EDTV displays (very rare if they have
HDMI or DVI) this will be 480p (NTSC) or 576p (PAL). These are general recommendations that work for most users, but there can be
15
Page 16
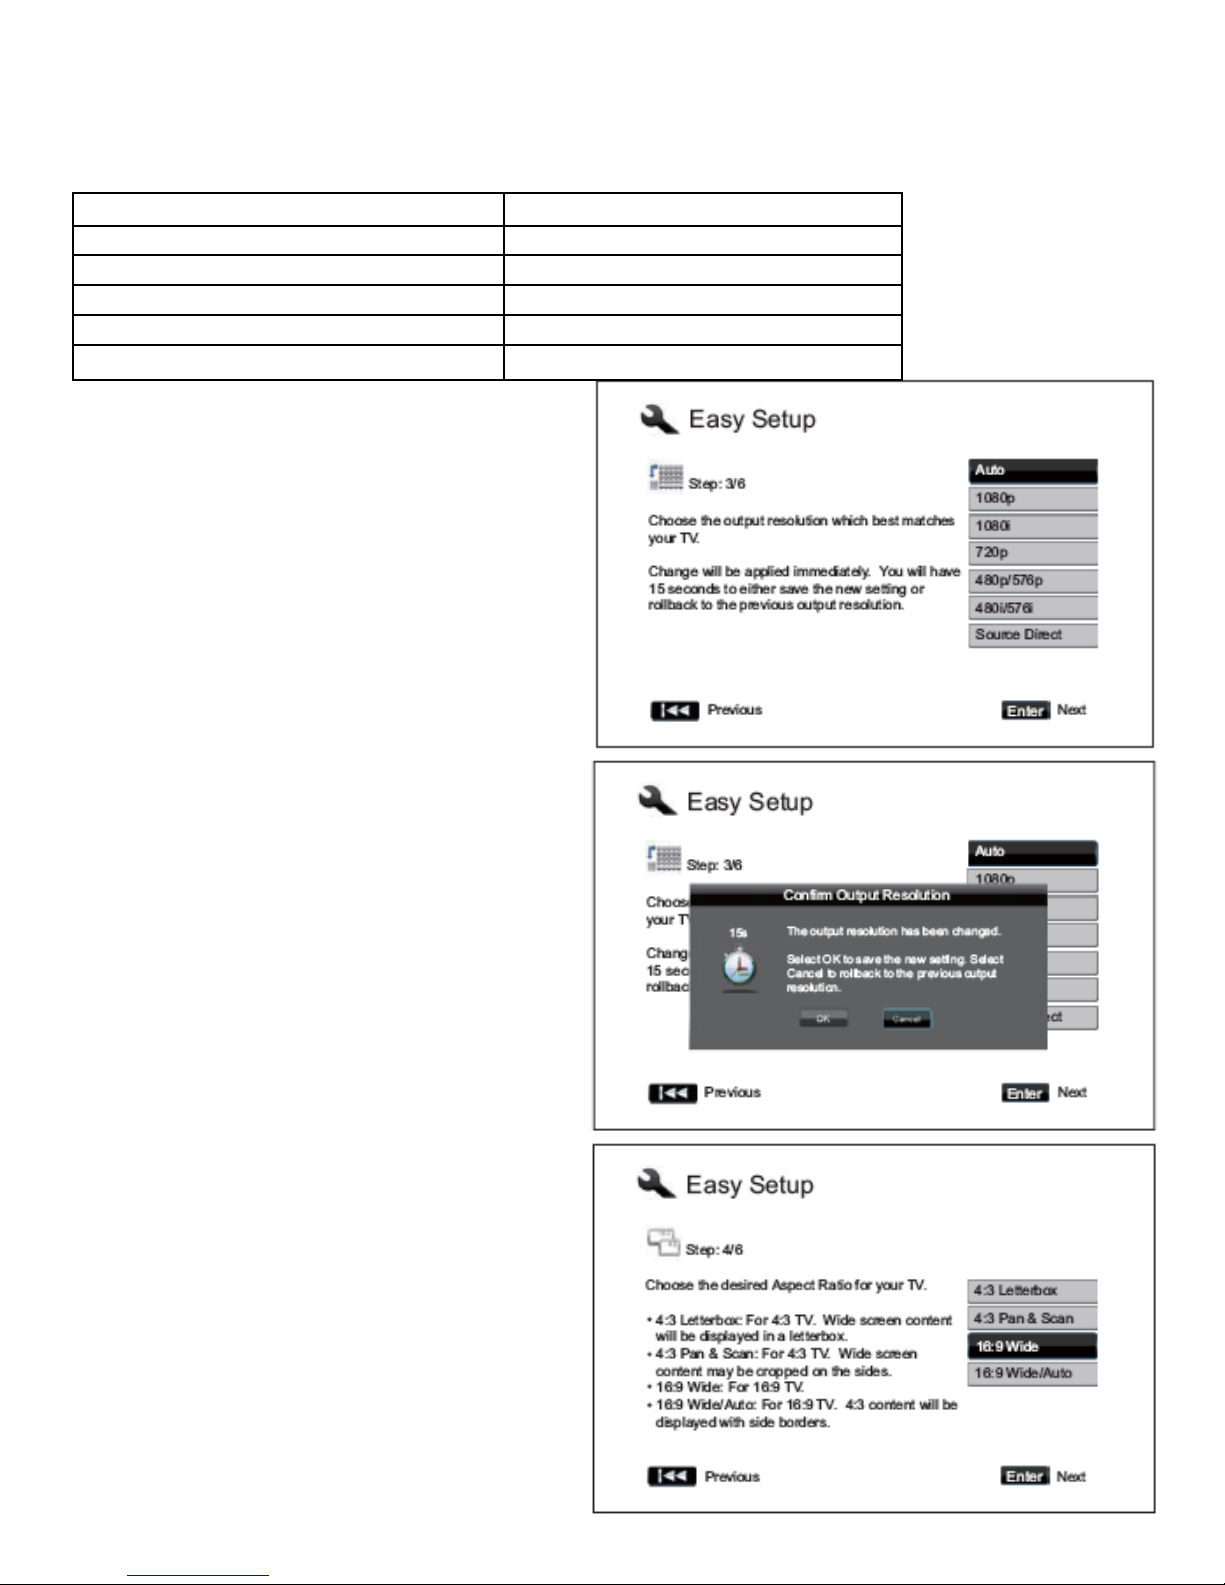
exceptions. Advanced users may want to try all supported resolutions and choose the one that provides the best visual result.
The MSB UMT supports a special “Source Direct” output resolution on its HDMI output. This resolution is recommended for use with
external video processors or high-end TVs. In “Source Direct” mode, the player works as a “transport”. It decodes video from the discs
and then sends the raw video signal in its native resolution and format, without extra processing, to the external video processor or TV.
The actual output resolution varies by content:
Content Source Direct Output Resolution
NTSC DVD 480i
PAL DVD 576i
Most Blu-ray Movies (lm-source) 1080p 23.976 or 1080p 24Hz
Most Blu-ray TV shows or Concerts (video-source) 1080i
SACD and DVD-Audio 1080i
Depending on your selection of “Primary Video Output”, the
available output resolution selections will differ. For the HDMI
1 and HDMI 2 output, the following output resolutions are
available: Auto, 1080p, 1080i, 720p, 480p/576p, 480i/576i, and
Source Direct. If “Auto” is selected, the player will determine its
output resolution based on the best signal resolution that the TV
can display.
For the Analog (component) output, the following output
resolutions are available: 1080p, 1080i, 720p, 480p/576p and
480i/576i. Please note 1080p only applies to HDMI output, if it
is selected for component video outputs, it will automatically be
down-scaled to 1080i. Please refer to the specications of your
TV to nd the best resolution to use.
Press the UP/DOWN ARROW buttons to select the desired output
resolution, then press the ENTER button. The player will apply
the selected output resolution and ask you to conrm the selection.
If your TV supports the selected resolution, you will see a dialog
box with a count-down clock. Use the LEFT ARROW button to
highlight the “OK” option and press the ENTER button to save
the resolution setting. If your TV does not support the selected
resolution, you may see a black screen or an error message. In this
case please wait for 15 seconds and the Easy Setup screen will
reappear. Select a different resolution that your TV can support.
Determine the Display Aspect Ratio
If you have a 4:3 or standard denition screen, select one of these
options:
• 4:3 Letterbox – 4:3 TV Letterbox. Choose when the display is
4:3. Widescreen image is displayed in “letterbox” format with
black borders on top and bottom (preferred).
• 4:3 Pan & Scan – 4:3 TV Pan and Scan. Choose when the display
is 4:3. Both sides of a widescreen image are clipped (you lose
about 30% of the picture).
If you have a widescreen (16:9) display, select one of these
options:
• 16:9 Wide – 16:9 (widescreen) sources will be displayed in
their native aspect ratio, and 4:3 sources will be horizontally
stretched.
• 16:9 Wide/Auto – 16:9 (widescreen) as well as 4:3 sources will
be displayed in their native aspect ratio. Please note that in
this mode 4:3 sources will be displayed with black borders
on both left and right sides to maintain the correct 4:3 aspect
ratio (preferred).
Press the UP/DOWN ARROW buttons to select the proper aspect
ratio for your TV, then press the ENTER button.
16
Page 17
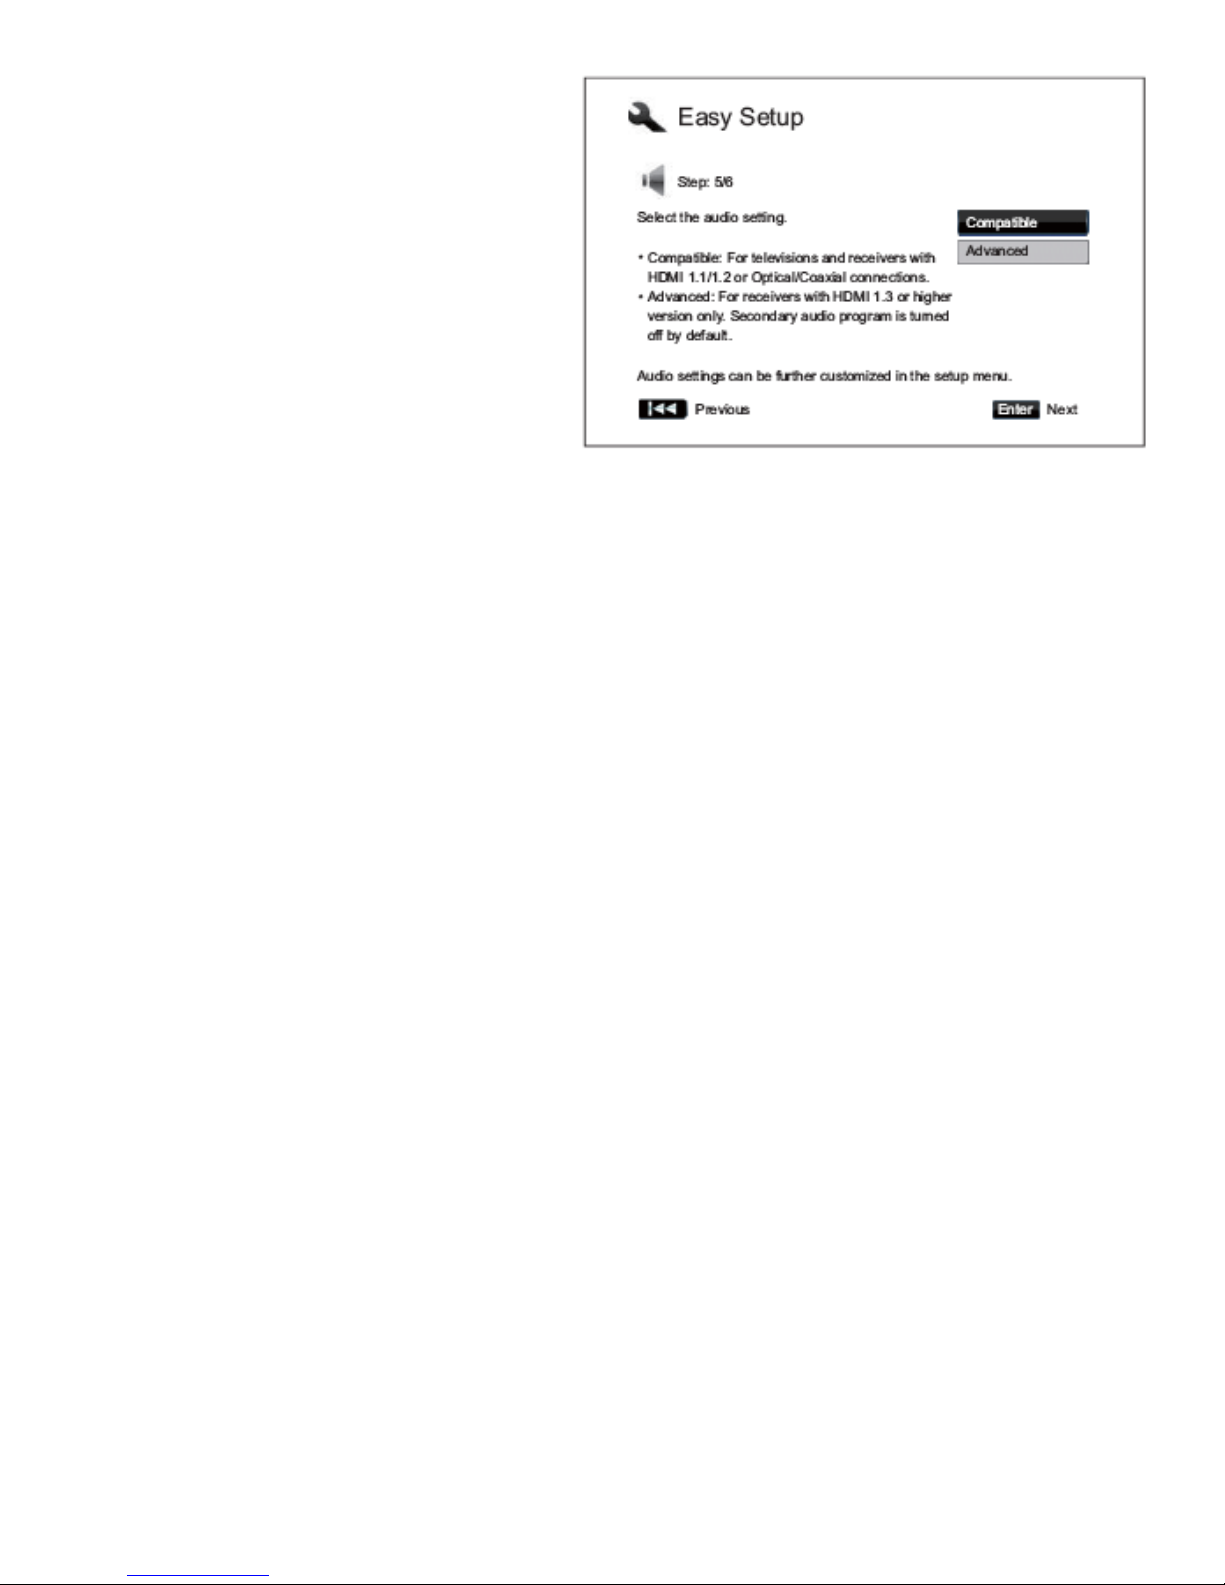
Select the Audio Setting
The Blu-ray Disc format brings not only high resolution video,
but also high bit rate audio such as Dolby Digital Plus, Dolby
TrueHD, DTS-HD High Resolution and DTS-HD Master Audio.
Blu-ray Discs may also include additional audio features such
as menu click sound and Secondary Audio Program (SAP –
audio associated with the secondary video in Picture-in-Picture
mode). For the UMT, the “Advanced” setting should always be
selected.
Press the UP/DOWN ARROW buttons to select “Advanced” and
then press the ENTER button. You will also need to customize
the audio settings using the player’s Setup Menu. This is covered
next.
Complete the Easy Setup Wizard
Once you have selected the audio setting, the initial Easy Setup
Wizard is completed.
Press the ENTER button to close the Easy Setup Wizard. You now need to go into the setup and change additional settings.
Additional Important Settings
In order for the UMT to perform at the highest quality, the default settings need to be changed. Go into the setup by pressing “Setup” on
the remote. Once in the setup, change the following settings.
1. PLAYBACK SETUP: SACD PRIORITY and select STEREO.
2. AUDIO FORMAT SETUP: HDMI AUDIO: OFF
3. AUDIO PROCESSING: SPEAKER CONFIGURATION: and set CENTER to LARGE.
4. VIDEO SETUP: DISPLAY OPTIONS: SCREEN SAVER: ENERGY SAVER (we like this mode as it turns the video display off
after a few minutes of inaction but it is your choice).
Your setup is now complete! Enjoy your MSB Universal Media Transport.
17
Page 18
BASIC OPERATIONS
Disc Playback
1. Press the POWER button to turn on the player.
2. Press the OPEN/CLOSE (OPEN) button to eject the disc tray.
3. Place the disc with the label side facing up and the recorded side facing down.
4. Press the OPEN/CLOSE (OPEN) button again to retract the tray.
5. The player will read the disc information and starts playback.
6. Depending on the content of the disc, a menu or navigation screen may appear. Please use the navigation ARROW and SELECT
buttons to select the content to play.
7. To stop playback, press the STOP button.
8. To turn off the player, press the POWER button.
NOTE: During DVD and some Blu-ray Disc playback, pressing the STOP button for the rst time brings the player to a pre-stop mode.
You can resume playback from the stopped point by pressing the PLAY button. This pre-stop mode allows you to change the player
settings and then resume playback. To completely stop playback, press the STOP button twice.
Certain Blu-ray Discs with BD-Java technology do not support the pre-stop mode. Pressing the STOP button during playback of such
discs will completely stop the disc. Pressing the PLAY button once the disc is stopped will restart it from the very beginning.
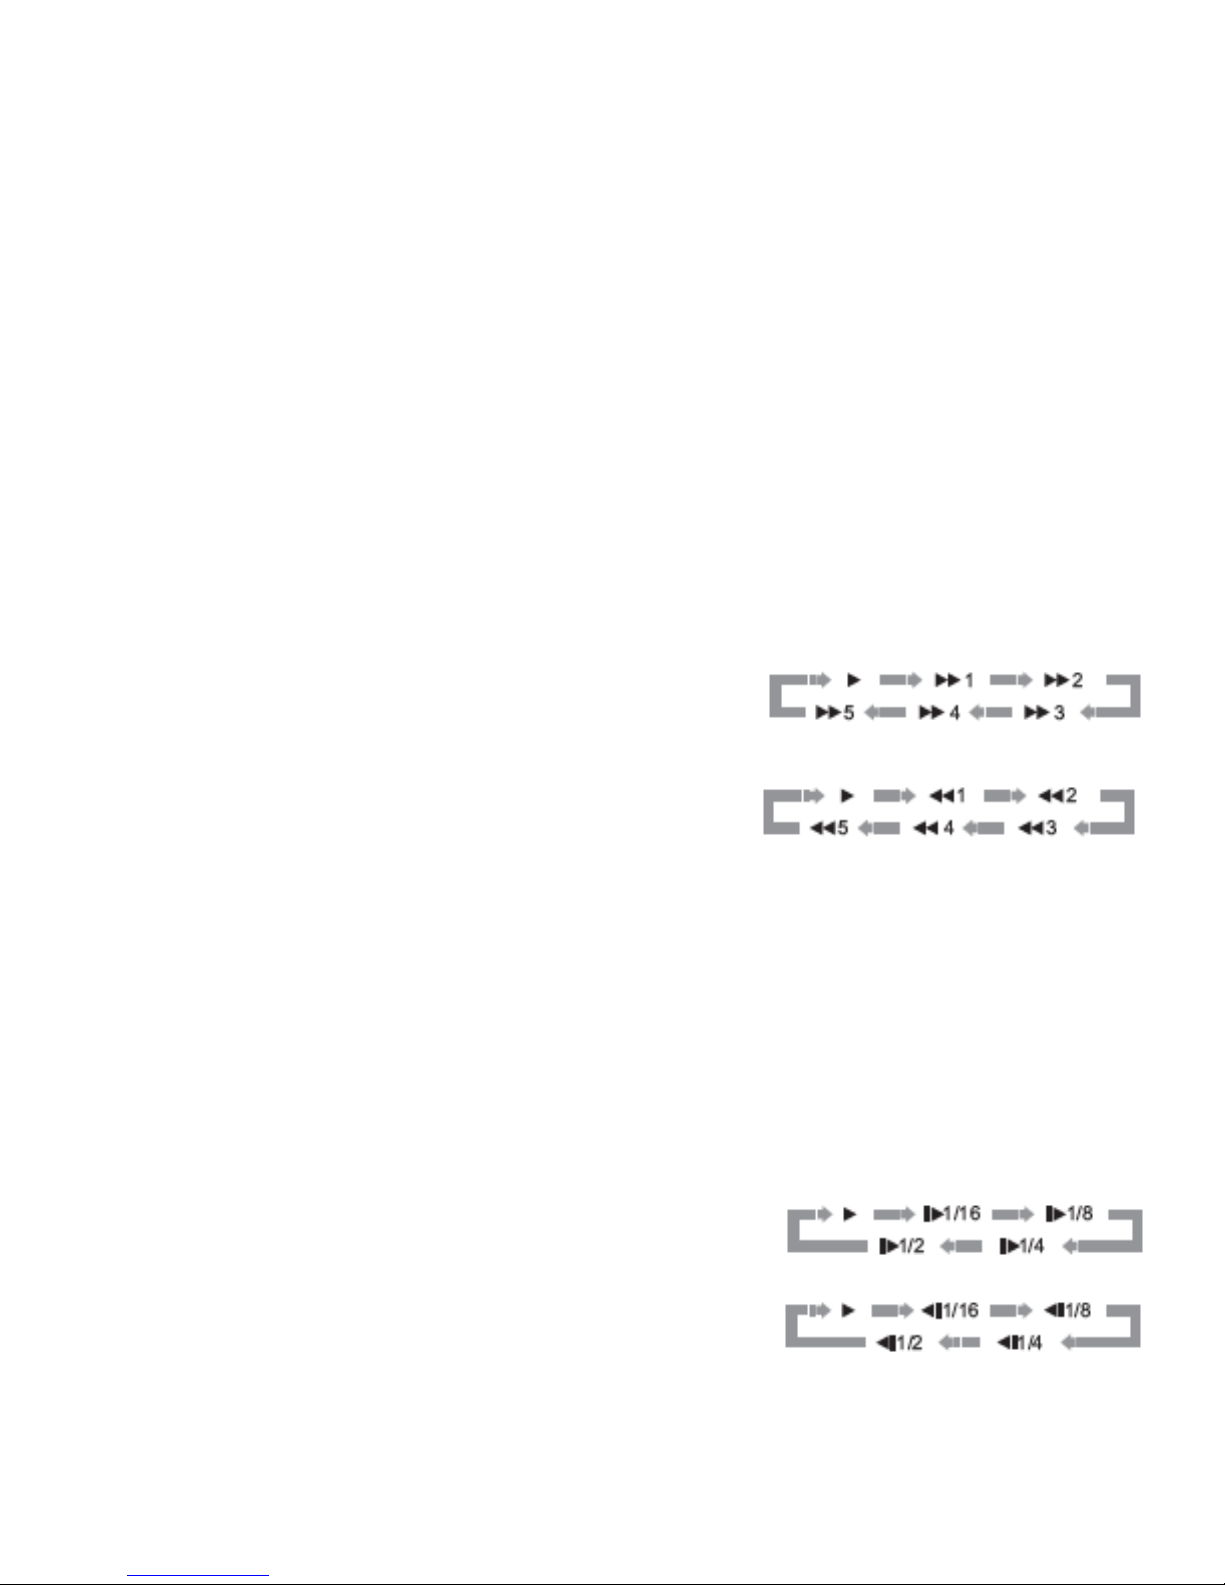
Fast Playback
You may fast forward or reverse during playback.
1. Press the FWD button on the remote control and the player starts fast forward
playback. Each press of the FWD button switches the playback speed in the
following sequence:
2. Press the REV button on the remote control and the player starts fast reverse playback.
Each press of the REV button switches the playback speed in the following sequence:
NOTE: Certain Blu-ray Discs utilizing the BD-Java technology may have their own
fast forwarding and reversing control. The actual speed varies by disc, and a progress
scale may be displayed by the disc.
Pause and Frame-by-Frame
1. During playback, press the PAUSE button to temporarily pause the program. In this mode, a PAUSE icon will appear on the TV
screen.
2. While a DVD or Blu-ray Disc is paused, press the PREV or NEXT button to reverse or advance the video frame-by-frame.
3. Press the PLAY button to resume normal playback.
NOTE: If the screen saver is set to “On” or “Energy Saver,” after pausing for 3 minutes the player will activate the screen saver.
Slow Playback
To play the video in slow-motion, please use the following steps.
1. Press the PAUSE button on the remote control to pause the playback rst.
2. Press the FWD button to select a forward slow playback speed. Each press of the FWD button switches the playback speed in the
following sequence:
3. Press the REV button to select a reverse slow playback speed. Each press of the REV
button switches the playback speed in the following sequence:
4. To exit the slow playback mode, press the PLAY button.
NOTE: Certain Blu-ray Discs utilizing the BD-Java technology may not support slow
playback.
Blu-ray Disc Menu Playback
1. Blu-ray Discs usually contain a Top Menu and a Pop-up Menu. The Top Menu normally appears at the beginning of the playback, after
the previews and copyright messages. The Pop-up Menu can be accessed during the movie without interrupting playback.
2. During playback, press the POP-UP MENU button to access the Pop-up Menu. Press the TOP MENU button to access the Top
Menu.
18
Page 19
3. Navigate the menu using the ARROW buttons, and then press the ENTER button to make the selection.
4. Some menus make use of the COLOR buttons. You can select menu functions by pressing the corresponding COLOR button on the
remote control.
DVD Menu Playback
1. Some DVD discs contain title menu or chapter menu functions.
2. During playback, press the TOP MENU button to return to the disc title menu. Press the POP-UP MENU button to display the chapter
menu. Depending on the disc, one or both menus may not exist.
3. Navigate the menu using the ARROW buttons, and then press the ENTER button to make the selection.
4. Press the RETURN button to return to the previous menu. The return location varies by disc.
On-Screen Display
1. During the playback of a DVD or Blu-ray Disc, press the DISPLAY button on the remote control to show status information; For CD
and SACD, the status information is shown automatically.
2. While the status information is shown, press the PAGE UP/DOWN buttons to scroll through several display formats. The playback
time information displayed on the front panel changes together with the on-screen display.
3. Press the DISPLAY button again to hide the on-screen display. The playback time information display on the front panel will remain
in the selected format.
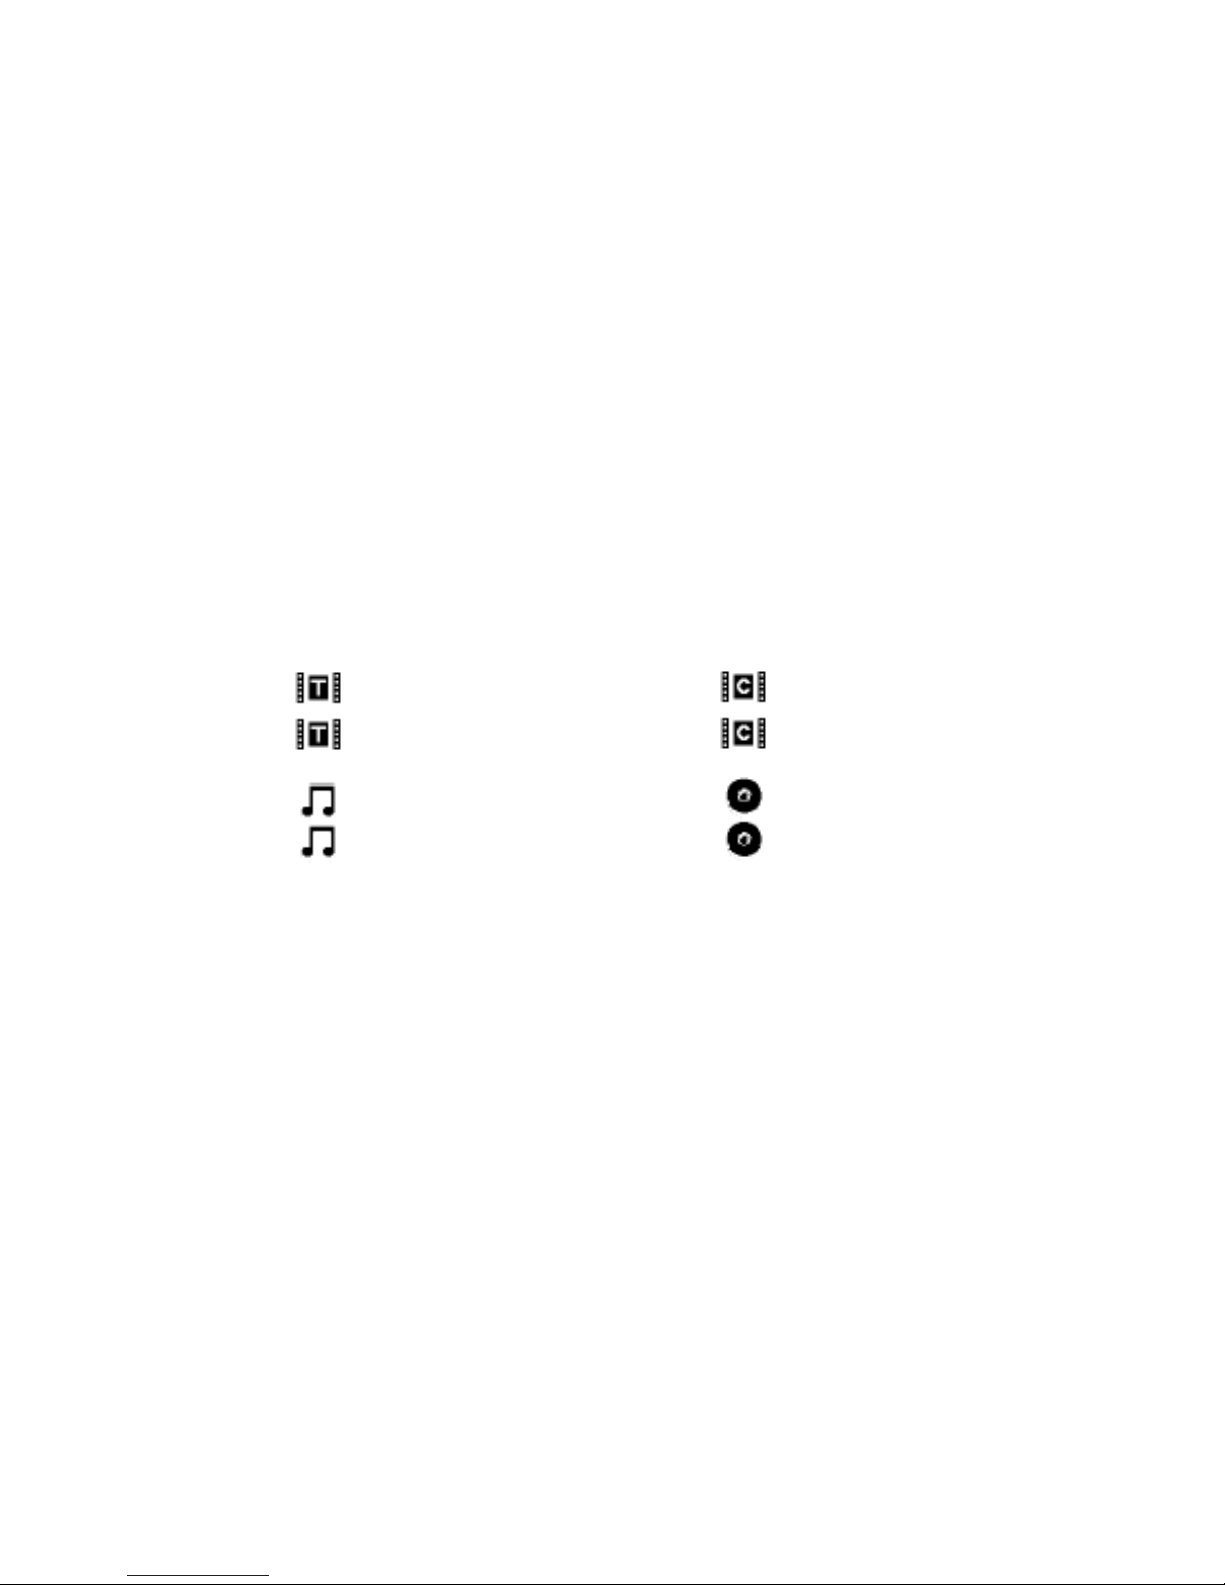
The following display formats are available:
DVD and Blu-ray Disc:
- Title elapsed time - Chapter elapsed time
- Title remaining time - Chapter remaining time
CD and SACD:
- Track elapsed time - Disc elapsed time
- Track remaining time - Disc remaining time
In addition to the playback time, the on-screen display may also contain the following information about the content currently
playing:
• Playback status: an icon indicating play, pause, and fast forward/reverse status.
• Bit rate meter: an indication of the bit rate of the audio and video stream.
• Current and total title numbers. (DVD and Blu-ray Discs)
• Current and total chapter numbers of the current title. (DVD and Blu-ray Discs)
• Current and total tracks. (CD and SACD)
• Audio information: current and total available number of audio tracks, language, format, and channels.
• Subtitle information: current and total available number of subtitle tracks and language.
• Video format information: encoding type, frame rate and original aspect ratio.
Volume Control
On the UMT remote, the volume control buttons will control any Platinum DAC IV with rev 3.6 or higher code. (if this feature does not
work, check your rmware code revision on the DAC IV and download an update.)
• Press the VOL – button to decrease the volume.
• Press the VOL + button to increase the volume.
Mute
1. Press the MUTE button on the remote control during content playback to turn off audio output. The TV screen displays a mute icon.
The front panel MUTE indicator will also light up.
2. Press the MUTE button again to resume audio output.
NOTE: Check the MUTE status on the front panel display of the player when there is no audio output. You may also press the MUTE
button to verify the MUTE status.
19
Page 20
Audio Language/Track Selection
1. To select the audio language or track, press the AUDIO button on the remote control during playback.
2. Repeat pressing the AUDIO button or use the UP/DOWN ARROW buttons to choose from all available language or audio tracks.
NOTE: Availability of languages and audio channels varies by disc. Some DVD-Audio discs allow audio track selection with the AUDIO
button, while others require the user to select from the audio setup menu of the disc. When playing an SACD with both multi-channel
and stereo contents, the AUDIO button can be used to switch between the two formats.
Subtitle Selection
1. When playing a DVD, Blu-ray Disc or other video programs recorded with subtitles, press the SUBTITLE button on the remote control
to select the desired subtitle.
2. Repeat pressing the SUBTITLE button or use the UP/DOWN ARROW buttons to choose from all available subtitles.
3. To turn off subtitles, select “Off” from the list.
NOTE: This function is available only when the discs are recorded with multiple angles. The angle mark on the screen can be turned
off using the Setup Menu of the player.
Angle Selection
1. When playing a DVD or Blu-ray Disc, an angle mark will be displayed on the screen when the player detects scenes recorded with
multiple angles.
2. Press the ANGLE button on the remote control to select the desired playing angle.
3. To resume normal playback, repeat pressing the ANGLE button until the default angle is displayed.
Picture-in-Picture and Secondary Audio
1. Certain Blu-ray Discs contain secondary video (Picture-in-Picture, or PIP) and secondary audio. This feature is often called BONUSVIEW.
When such a disc is played, a Picture-in-Picture mark (PIP Mark) and a Secondary Audio Program mark (SAP Mark) may be displayed
on the screen to alert you to the availability of the secondary audio/video content.
2. The disc menu usually features interactive controls to turn on/off the Picture-in-Picture video and Secondary
Audio Program. Please use those controls to select the desired secondary audio/video content.
3. There is a PIP button on the remote control. If the disc menu does not offer interactive Picturein-Picture controls, please use this button
to turn on/off Picture-in-Picture or select from multiple secondary video programs.
4. There is also a SAP button on the remote control. If the disc menu does not offer interactive secondary audio controls, please use
this button to turn on/off Secondary Audio Program or select from multiple secondary audio tracks. Secondary Audio Programs are
generally only available when Picture-in-Picture is shown.
NOTE: This function is available only when the discs are recorded with secondary video and audio programs. Some discs may not play
back according to the PIP and SAP buttons. Certain discs can ignore the remote control commands. The PIP and SAP Marks on the
screen can be turned off using the Setup Menu of the player.
BD-Live
Some Blu-ray Disc titles are released with the BD-Live feature. BD-Live offers extra downloadable contents and
additional online interactive programs. The available BD-Live contents vary by discs and studios, and may include
additional subtitles, commentaries, preview trailers, games, and online chat. The player needs to be connected to the
Internet in order to play BD-Live contents.
Depending on how the studios organize their BD-Live contents, some Blu-ray Discs may start downloading BD-Live contents when
playback starts; some have a BD-Live selection on its main menu; some may show a prompt to ask whether you would like to start
downloading; and some may ask you to sign up for a membership or account. Please follow the instructions that come with the disc to
enjoy BD-Live contents.
Your Internet connection speed, the overall Internet trafc situation and the capacity of the BD-Live content servers can all affect how
fast BD-Live contents can be downloaded. If you encounter slow downloading or intermittent playback, please play the disc without
accessing the BD-Live features, or try again at a different time.
When you use the BD-Live feature, the player or disc ID and your IP (Internet Protocol) address may be sent to the content provider via
the Internet. Generally, no personally identiable information is sent. However technologies exist to match your IP address to a certain
geographical area or service provider. Your Internet service provider also has the knowledge of who is using which IP address. If the BDLive content provider requires you to login using a membership or account, the content provider will have access to your membership or
account information. Please check with your Internet service provider and the BD-Live content providers for their privacy policy.
You can choose to restrict BD-Live Access using the player’s Setup Menu.
20
Page 21

ADVANCED OPERATIONS
TV System Selection
While you may want to set the video output system (NTSC/PAL) to the same as that supported by your TV, realize that the UMT will
convert any content that is not in the correct format your TV understands. The default output is NTSC for North America.
Press and hold the P/N button for 5 seconds on the remote control to cycle the video output to PAL, NTSC or “Multi” system. The TV
screen displays the selected system name.
Some points to keep in mind:
• When the video output is set to PAL or NTSC system, the player will convert the disc content to the selected system.
• When the video output is set to “Multi”, the player will not perform system conversion. The “Multi” mode is only to be used if your
TV supports both NTSC and PAL systems.
• Most TV sets only support one of the NTSC or PAL systems. If the wrong output is selected, the TV may not display a picture. In
this case repeat pressing the P/N button until a supported system is selected.
• The output system selected with the P/N button will be remembered when the player is turned off. The output system selection
can also be done by setting the “TV System” item in the “Video Setup” section of the player’s Setup Menu. (Refer to page 53 for
details.)
Output Resolution
The UMT supports multiple output resolutions. For detailed discussion on how to choose the best output resolution, please refer to the
Select the Best Output Resolution section of this manual. If you would like to change the output resolution, you may do so by pressing
the RESOLUTION button on the remote control:
1. Make sure the video cable is properly connected.
2. Turn on the TV. Adjust the TV to use the proper input (HDMI, DVI or Component).
3. Make sure that the player is turned on. Although the output resolution can be changed “on the y”, it is recommended that you stop
playback and take out the disc before changing the output resolution. Press the RESOLUTION button. A “Resolution Setting” menu
appears on the TV screen. If the TV does not support the current resolution and you cannot see the “Resolution Setting” menu, the
current resolution is also displayed on the front panel.
4. Use the UP/DOWN ARROW buttons to select the new output resolution. You may also press the RESOLUTION button multiple
times to cycle through the available output resolutions. The new resolution is also displayed on the front panel if you cannot see the
“Resolution Setting” menu on the TV screen.
5. Press the ENTER button to apply the selected output resolution. Or, if you do not want to change the output resolution, press the
RETURN button to exit.
The following output resolutions are available:
NTSC output via HDMI 1 or HDMI 2:
PAL output via HDMI 1 or HDMI 2:
NTSC output via Analog (component):
PAL output via Analog (component):
* When 1080p is selected for the Analog output, the actual component output resolution will be 1080i.
Auto > 1080p(60Hz/24Hz) > 1080i 60Hz > 720p 60Hz
> 480p > 480i > Source Direct
Auto > 1080p(50Hz/24Hz) > 1080i 50Hz > 720p 50Hz >
576p > 576i > Source Direct
1080p 60Hz* > 1080i 60Hz > 720p 60Hz > 480p > 480i
1080p 50Hz* > 1080i 50Hz > 720p 50Hz > 576p > 576i
NOTE: Some TV sets do not support one or more output resolutions (particularly 1080p). If an incompatible output resolution is selected,
you will get a blank screen or an error message. In this case please select an output resolution that is supported by the TV. If you cannot
get a picture using the HDMI or component output, please connect the player to the TV using the composite video output, then use the
Setup Menu to adjust the player settings.
Video up-conversion over the component output is only available for unencrypted discs such as home video and consumer-created
contents. Most commercially pressed DVD discs are CSS-encrypted and will be limited to 480i/480p resolution. This restriction applies
to the component output only. The HDMI output is protected with HDCP and has no such restriction.
21
Page 22
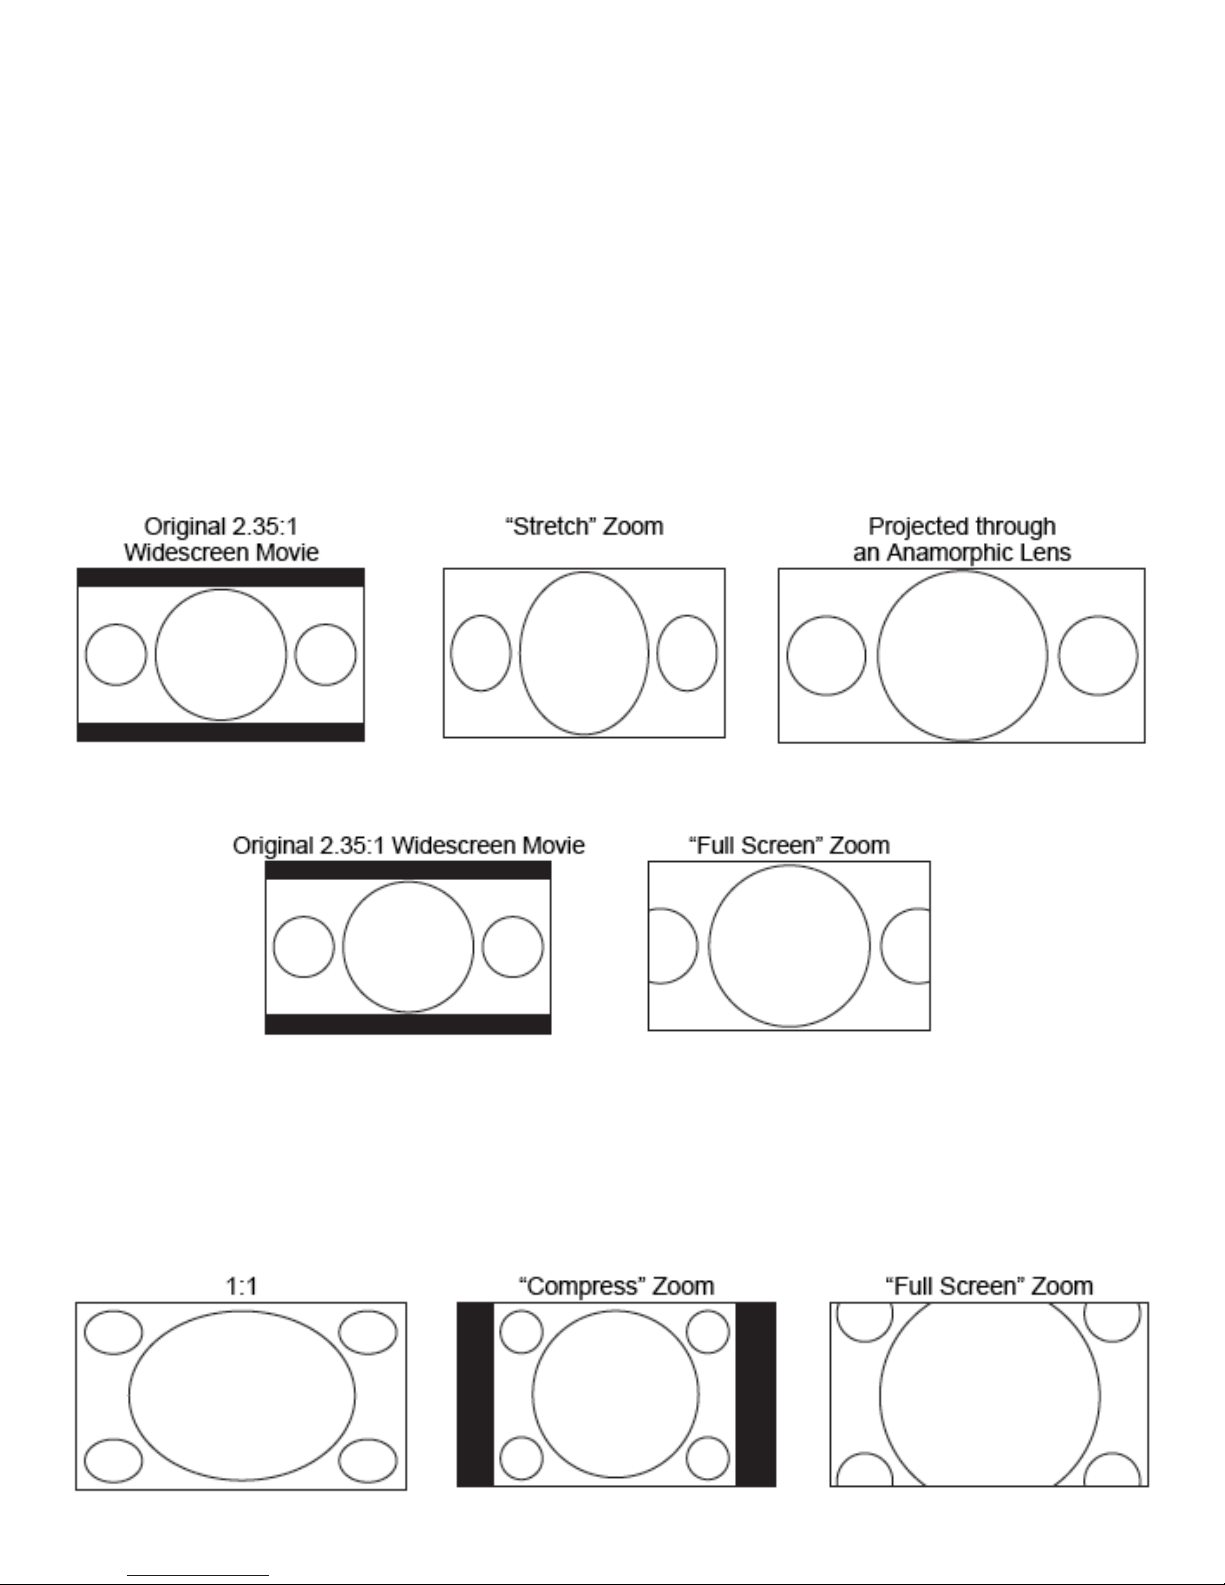
Zooming and Aspect Ratio Control
This feature zooms in or out of the displayed frame and also changes the aspect ratio (image width vs. height). To change the zoom level,
press the ZOOM button on the remote control. Each press of the ZOOM button will switch the zoom level in sequence.
Zoom Levels for HDMI 1 Output
The following zoom levels are available when “Primary Output” is set to “HDMI 1”:
1:1 (No zooming) > Stretch/Compress > Full Screen
> Under Scan > 1.2 > 1.3 >1.5 > 2.0 > ½ >Back to 1:1 again
The zoom level is reset to 1:1 when the disc is ejected, or when the player is turned off.
The available zoom levels depend on the “TV Aspect Ratio” setting in the Setup Menu and the aspect ratio of the DVD or Blu-ray Disc.
The following zoom levels may be useful for some special applications:
1) Playing 16:9 BD or DVD when “TV Aspect Ratio” is set to “16:9 Wide” or “16:9 Wide/Auto”
• Stretch – The image is vertically stretched by 1.33 times. For movies with 2.35:1 aspect ratio, this zoom level cuts off the black
borders at the top and bottom of the image. Users of projector with anamorphic lens may nd this mode helpful.
• Full Screen – The image is stretched by 1.33 times for both vertical and horizontal directions. For movies with 2.35:1 aspect ratio,
this zoom level cuts off the black borders at the top and bottom of the image while maintaining the correct aspect ratio. The left and
right sides of the image are slightly cropped.
2) Playing 4:3 BD or DVD when “TV Aspect Ratio” is set to “16:9 Wide”
• 1:1 - The image lls up the entire 16:9 screen but is horizontally stretched. Figures may look shorter and wider than they should
be.
• Compress – The player maintains the correct 4:3 aspect ratio and adds borders to the left and right sides of the image. The brightness
level of the borders can be set by the “Border Level” setting in the “Picture Adjustment” section of the Setup Menu.
• Full Screen – This zoom level maintains the correct aspect ratio but crops the top and bottom slightly in order to t the 4:3 image to
the 16:9 screen.
22
Page 23
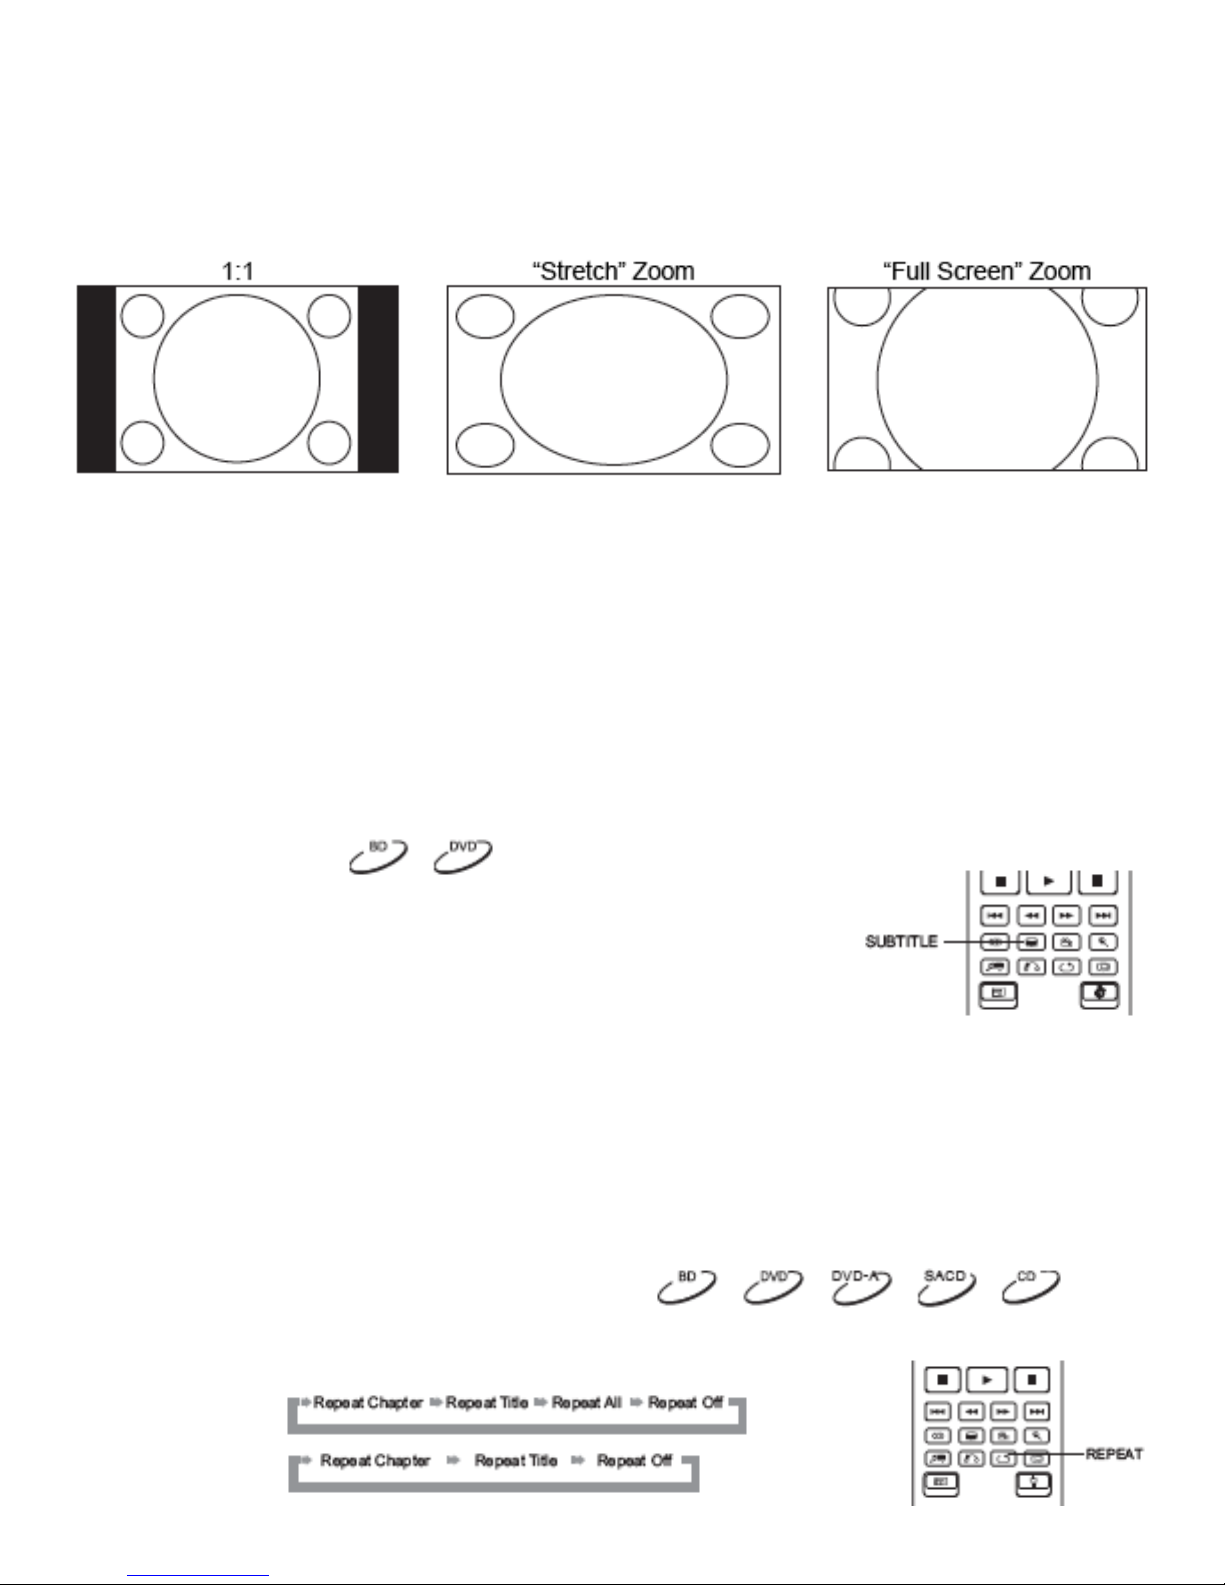
3) Playing 4:3 BD or DVD when “TV Aspect Ratio” is set to “16:9 Wide/Auto”
• 1:1 – The player maintains the correct 4:3 aspect ratio and adds borders to the left and right sides of the image.
• Stretch – The image is horizontally stretched by 1.33 times. This zoom level lls up the 16:9 screen, but gures may look shorter
and wider than they should be.
• Full Screen – This zoom level maintains the correct aspect ratio but crops the top and bottom slightly in order to t the 4:3 image to
the 16:9 screen.
The “Under Scan” zoom level shrinks the image by 5%. This zoom level may be used to compensate for TVs that over scan, so the viewer
can see the entire image area with no cropping. All other zoom levels are indicated by their respective zoom ratio.
NOTE: Some early DVD titles (released from 1997 until early 2000’s) use a 4:3 non-anamorphic widescreen aspect ratio. When played
on a 16:9 display, the content is shown in a small window with black borders on all four sides. The top and bottom borders are encoded
into the video. The left and right borders are added by the player to maintain the correct aspect ratio. For this type of discs the “Full
Screen” zoom mode can be used to eliminate the borders. Due to the dominance of wide screen or 16:9 TV, NO specic ZOOM levels
are provided for “TV Aspect Ratio” of “4:3 Letterbox” or “4:3 Pan & Scan”
Zoom Levels for HDMI 2 & Analog (Component) Video Output
The following zoom levels are available when “Primary Output” is set to “HDMI 2 & Analog”:
1:1 (No zooming) > Stretch/Compress > Full Screen > Under Scan > 1.2 > 1.3 >1.5 > 2.0 > ½ >Back to 1:1 again
NOTE: The ZOOM feature may not be available when certain DVD or Blu-ray Discs are played because the disc author chooses to
disable ZOOM.
Subtitle Shift
For customers using a 2.35:1 “Constant Image Height” video projection system, subtitles may get
cut off because they are positioned outside of the active video area. The Subtitle Shift feature can
be useful to these customers. The player can shift subtitles up or down so they are displayed within
the active video area.
To shift the display position of subtitles, please follow these steps:
1. When playing a DVD, Blu-ray Disc or other video programs recorded with subtitles, select the
desired subtitle from the disc menu or using the remote.
2. Press and hold the SUBTITLE button on the remote control until the “Shift Subtitle Position” prompt appears on the screen.
3. Wait until some subtitle text is shown on the screen. Use the UP/DOWN ARROW buttons to move the subtitle text to the desired
position.
4. Press the ENTER button to set the subtitle display position.
Once the “Subtitle Shift” position is set, it is remembered by the player in the Video Setup > Display Options > Subtitle Shift setup
menu option. The setting will be applied to subtitles of all DVD and Bluray Discs from now on. You can also change the setup menu
item directly.
Repeat Playback
To repeat a certain chapter, title, track or disc, press the REPEAT button on the remote control.
Each press of the REPEAT button switches the repeat mode in the following sequence:
DVD and DVD-Audio:
Blu-ray Disc:
23
Page 24
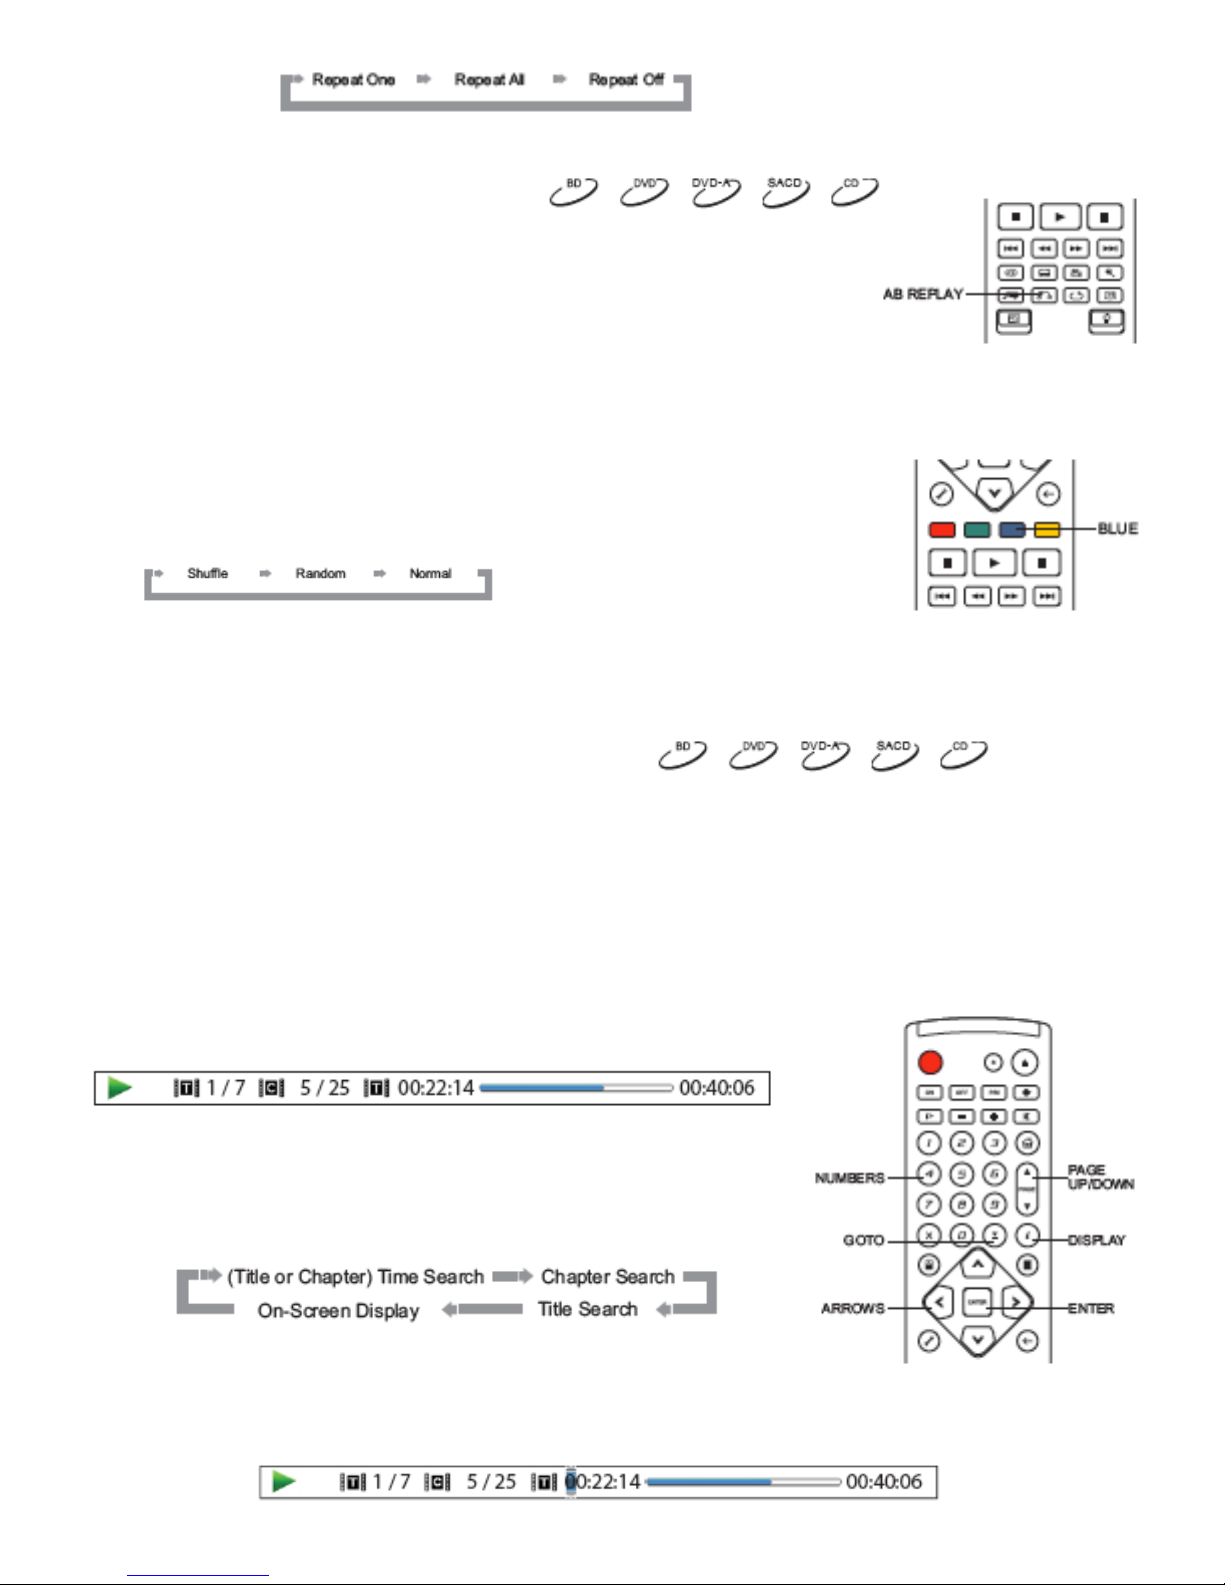
CD and SACD:
NOTE: Certain Blu-ray Discs may not allow for repeating.
Repeat a Selected Section
To repeatedly play a specied section, please follow these steps:
1. During normal playback, press the AB REPLAY button on the remote at the desired beginning point
(Point A) for the repeat play. The TV screen displays “A-”.
2. When playback reaches the desired ending point (Point B) for the repeat play, press the AB REPLAY
button again. The player now repeatedly plays back the specied section (A-B). The TV screen displays
“A-B”.
3. Press the AB REPLAY button for the third time to resume normal playback.
NOTE: Not available for all disc formats or contents. Certain Blu-ray Discs may not allow for repeating.
Shuffle and Random Playback
When playing a CD or SACD, press the BLUE button on the remote control to activate the Shufe
and Random modes. Each press of the BLUE button switches the playback mode in the following
sequence:
In normal playback mode, each track is played back in sequential order. As the name implies, the Random playback mode randomly
selects a track to play. The Shufe mode also plays back the tracks in random order, but it ensures that each track is played only once.
Selecting the Shufe or Random mode cancels any Repeat mode you may be using. Similarly, selecting a Repeat mode cancels any
Shufe or Random mode.
Playback by Chapter or Track Number
During the playback of a disc, you can use the NUMBER buttons on the remote control to directly jump to a specied chapter or track
number. For example:
• To select the seventh track, press the [7] button.
• To select the 16th track, press [1] followed by [6] in quick succession.
NOTE: Certain DVD-Audio and Blu-ray Discs may not allow for direct chapter selection.
Playback from a Specific Location - DVD and Blu-ray Discs
During the playback of a DVD or Blu-ray Disc, you may specify a location to start playback
by entering the title, chapter or time directly. Press the GOTO button to bring up the on-
screen display.
On top of the video screen, the on-screen display information has the following components
(from left to right): Playing Status, Title, Chapter, Time Counter, Progress Indicator, and
Total Time. After pressing the GOTO button for the rst time, the cursor will be positioned
at the Time Counter. This is the “Time Search” mode. Each subsequent press of the GOTO
button will switch the search mode in the following sequence:
1. Title time search. For example, search for a specied time within the currently playing
title.
Press the GOTO button to bring up the on-screen display. The cursor will be positioned at the Time Counter. Use the NUMBER or
ARROW buttons to enter the hours, minutes and seconds for your specied search and press the ENTER button.
24
Page 25
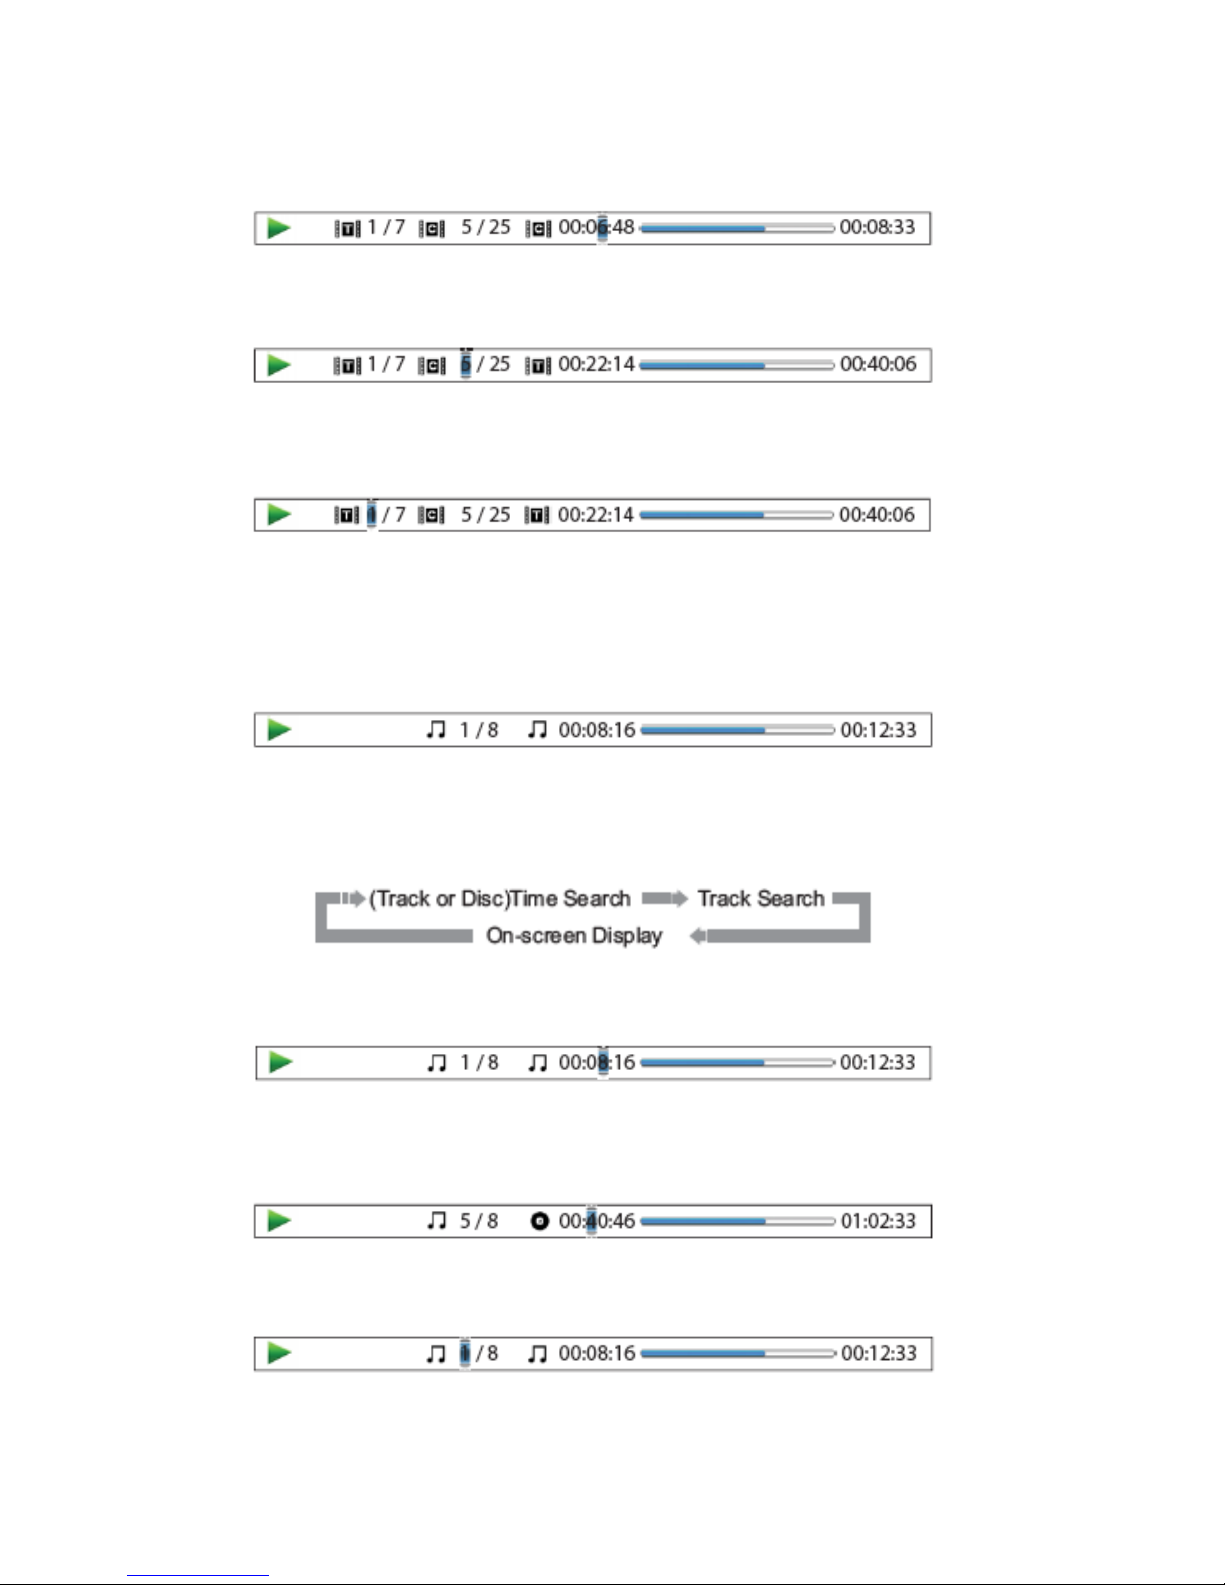
2. Chapter time search. For example, search for a specied time within the currently playing chapter.
Press the DISPLAY button to bring up the on-screen display. Use the PAGE UP or PAGE DOWN button to switch the display to Chapter
Time mode (note the icon placed on the left of the Time Counter changes from the Title icon to the Chapter icon). Press the GOTO button
to position the cursor at the Time Counter, then use the NUMBER or ARROW buttons to enter the hours, minutes and seconds for your
specied search and press the ENTER button.
3. Chapter search. For example, search for Chapter 7 of the currently playing title.
Repeatedly press the GOTO button until the cursor is positioned at the Chapter location. Use the NUMBER or ARROW buttons to enter
or select 7 and press the ENTER button.
4. Title search. For example, search for Title 6 of the currently playing disc.
Repeatedly press the GOTO button until the cursor is positioned at the Title location. Use the NUMBER or ARROW buttons to enter or
select 6 and press the ENTER button.
NOTE: Some discs may prohibit the search operation. You will not be able to select a search location, or you may get an “invalid operation”
icon after specifying a search location. Some Blu-ray Discs feature their own search function. Please follow the on-screen instructions
to use the search function provided by such discs.
Playback from a Specific Location - CD and SACD discs
You may specify a point to start playback by entering the disc elapsed time, track elapsed time or track number directly. When playing
CD and SACD discs, the on-screen display automatically shows on the TV screen:
The on-screen display has the following components (from left to right): Playing Status, Track Number, Time Counter, Progress Indicator,
and Total Time.
To specify a playback location using one of the following search modes, press the GOTO button. Each press of the GOTO button switches
the search mode in the following sequence:
1. Track time search. For example, search for a specied time within the currently playing track.
Press the GOTO button to place the cursor on the track Time Counter. Use the NUMBER or ARROW buttons to enter the hours, minutes
and seconds for your specied search and press the ENTER button.
2. Disc time search. For example, search for a specied elapsed time of the entire disc.
While the on-screen display is shown, press the PAGE UP or PAGE DOWN button to switch the Time Counter to Disc Time mode. Press
the GOTO button to place the cursor at the Disc Time Counter. Use the NUMBER or ARROW buttons to enter the hours, minutes and
seconds for your specied search and press the ENTER button.
3. Select a track. For example, search for Track 6 of the currently playing disc.
Repeatedly press the GOTO button until the cursor is placed on the Track Number position. Use the NUMBER or ARROW buttons to
enter or select Track 6 and press the ENTER button.
Memory and Automatic Resume
1. The player automatically remembers the current position when playback is interrupted. Operations such as STOP, OPEN/EJECT or
turning POWER off will cause the player to save the current playing position.
25
Page 26
2. The position is memorized even after turning off the unit or changing the disc.
3. When the next time the disc with a memorized playing position is played back, the player will recognize the saved playing position.
Playback will automatically resume from this saved position. However if you wish to cancel the automatic resume and start playback
from the beginning, you may press the STOP button when prompted.
4. The player can remember playback position for up to 5 discs. When the sixth disc is memorized, the oldest one is replaced.
NOTE: Some Blu-ray Discs do not support resuming and will always play from the beginning.
Viewing Pictures on DVD-Audio Discs
Some DVD-Audio discs contain static pictures, such as photos of the band or narration of the album. When a DVD-Audio track is playing,
you may use the PAGE UP button to select the previous picture or the PAGE DOWN button to select the next picture.
NOTE: Availability of static pictures depends on the DVD-Audio disc.
Pure Audio Mode
You can enjoy higher quality audio by turning off the video processing and output. The Pure Audio
mode reduces any potential interference between the video and audio signals.
1. Press the PURE AUDIO button on the remote control to turn off video and enter Pure Audio mode.
Video output will cease, the power light will dim and the front panel displays will turn off.
2. Press the PURE AUDIO button again to resume video and cancel Pure Audio mode.
NOTE: Pure Audio mode is automatically canceled when the unit is switched off or when playback is stopped. Because HDMI carries
audio together with video, the HDMI video signal cannot be completely turned off. A black screen is transmitted instead to minimize
any potential interference.
MEDIA FILE PLAYBACK
In addition to playing standard disc-based formats such as Blu-ray Disc, DVD, CD and SACD, the UMT can play media les. You can
enjoy digital music, movies and photos stored on an optical disc (recordable CD or DVD), a USB (Universal Serial Bus) drive, or an
e-SATA (external Serial ATA) drive. Due to the variation of media, encoding software and techniques used, compatibility cannot be
guaranteed for all user-created or downloaded contents. Support for such contents is on a best effort basis.
Playback from a USB or e-SATA Drive
The UMT is equipped with two USB ports (one on the front panel and the other on the back) and
one e-SATA port on the back. You may use the USB port to plug in a USB drive, or the e-SATA
port to plug in an e-SATA drive.
The USB ports are rated to provide a maximum of 5V,
1000mA power to the USB drive. It is sufcient for USB
thumb drives and ash memory card readers, but may not be
sufcient for USB hard disks. It is recommended to check
with your drive manufacturer for power requirement, or use
an external power supply.
For the e-SATA port, you need to use an e-SATA drive with an external power supply. The e-SATA
port on the UMT does NOT support “hot-plug”. To avoid any damage to your drive and the port,
please always plug in or unplug the drive when the player is turned off.
Supported USB Drives
• This unit supports “USB Mass Storage Class Bulk-Only Transport” devices only. Most USB thumbs drives, portable hard disk drives
and card readers conform to this device class. Other USB devices such as MP3 players, digital cameras, and mobile phones may not
be compatible.
• Supported USB drives can be formatted with the FAT (File Allocation Table), FAT32 or NTFS (New Technology File System) le
system.
• In some cases, an incompatible USB/e-SATA device may cause the player to stop responding. If this occurs simply turn off the power,
remove the USB device, and turn the player back on.
• The player accesses the USB drive in read-only mode. In order to minimize the risk of data corruption, it is recommended that you
only unplug the USB device when playback is completely stopped.
• DO NOT attempt to plug in a USB connector to the e-SATA port, or plug in an e-SATA connector to the USB port(s). This might
damage both your drive and the port(s).
26
Page 27
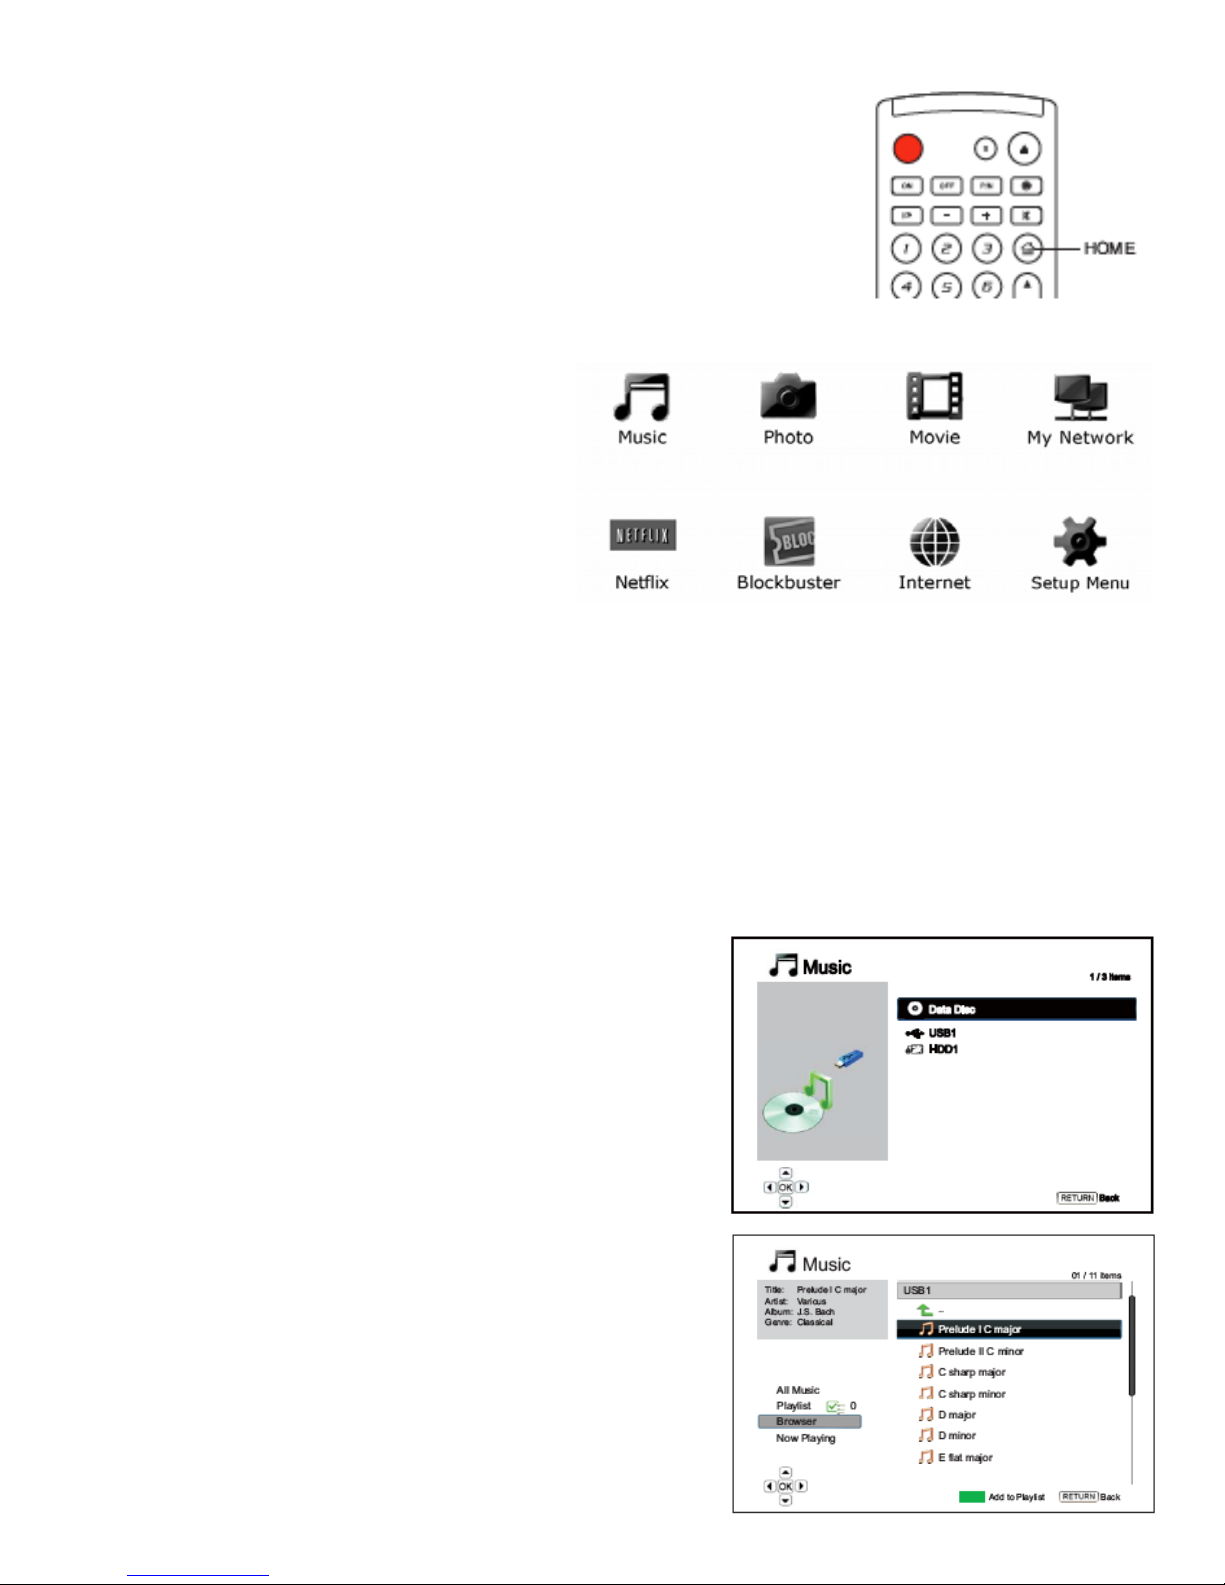
The Home Menu
When a USB/e-SATA drive or an optical disc stored with media les is inserted, the player presents
a “Home Menu” to assist you in navigating and playing the les. You can also bring up the Home
Menu with the HOME button on the remote control. The Home Menu is the starting point for
accessing media les.
There are eight selections in the HOME Menu:
• Depending on what type of media les that you intend to play, you can choose among the
“Music”, “Movie” and “Photo” categories.
• “Netix” connects you to your Netix account and provides the online movie streaming
capability.
• “Blockbuster” connects you to your Blockbuster account
and provides the online movie streaming capability.
• “Internet” contains the shortcuts to Netix and Blockbuster,
as well as the additional network applications which may
be added in the future.
• “My Network” is an experimental feature right now. It
enables the player to stream audio, video and photo from
media servers on the home network.
• “Setup Menu” selection will bring you to the player’s Setup
Menu, just like pressing the SETUP button on the remote
control.
NOTE: The experimental features are not ofcially supported. MSB does not offer technical support via e-mail or phone for these
experimental features. Different internet streaming applications may have different function mappings to the UMT remote control. To
exit Netix, press HOME button. To exit Blockbuster, either press HOME button or repeatedly press RETURN button till the Home
Menu shows.
Playing Music Files
To play digital music les stored on an optical disc, USB or e-SATA drive, select “Music” from the Home Menu. A le browser will
appear to assist you in navigating the les and folders.
The rst step is to select the “Data Disc”, USB or e-SATA device that contains the music les. The player will take a moment to read the
media and list the folders and music les.
In the music browser, you can perform the following operations:
• Press the UP/DOWN ARROW or PAGE UP/DOWN buttons to move the
cursor and select music les.
• When a music le is highlighted by the cursor, press the ENTER or PLAY
button to start playback.
• Press the GREEN color button to add the currently highlighted music le to
the Playlist. A green check mark will appear in front of the le name, and the
Playlist count in the lower left corner of the screen will increase by one.
• Press the LEFT ARROW button to move the cursor to the Selection Menu in the
lower left corner of the screen. This menu contains the following choices:
o All Music – List all music les in a at view without any directory
structure.
o Playlist – List only music les added to the Playlist.
o Browser – List folders and music les according to the original directory
structure on the disc or USB drive.
o Now Playing – Show the status of the currently playing music le.
o Press the RIGHT ARROW button to move the cursor back to the le
listing.
27
Page 28
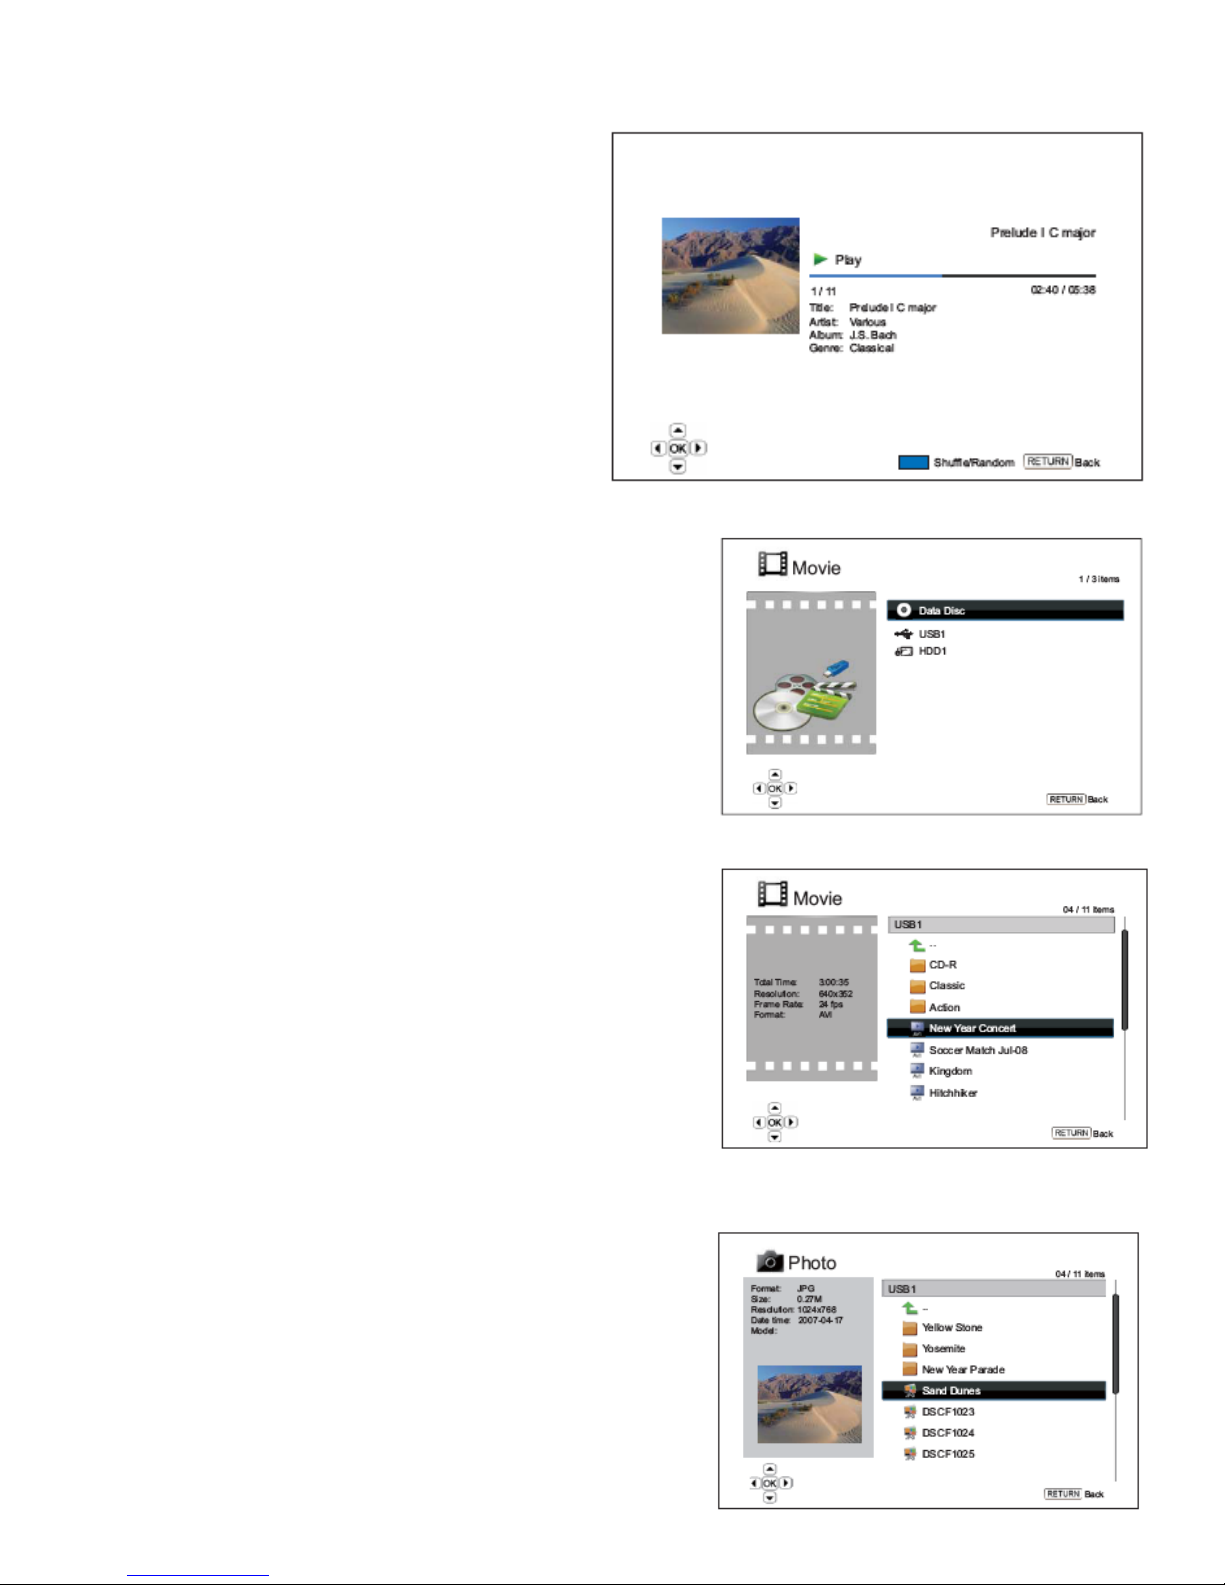
If a music le starts playing and there is no other user operation, the “Now Playing” screen will appear after a few seconds. You can also
get to this screen using the “Now Playing” menu. This screen can show the following information:
• Playback status: Play, Stop, Pause
• Playback mode: Shufe, Random, Repeat One, Repeat All
• Playback progress: track and time
• Other embedded information: If the music le contains supported
album art image and tags, those will be displayed.
The following operations are available while the “Now Playing”
screen is shown:
• Normal playback control: PLAY, STOP, PAUSE, PREV/NEXT,
REV, and FWD
• Special playback mode: REPEAT and Shufe/Random (BLUE
color button)
• Return to the Browser without stopping the music: RETURN
• Stop playback and return to the Browser: Press STOP twice.
Playing Movie Files
To play movie les stored on an optical disc, USB or e-SATA drive, select “Movie”
from the Home Menu. A le browser will appear to assist you in navigating the
les and folders. The rst step is to select the “Data Disc”, USB or e-SATA device
that contains the movie les. The player will take a moment to read the media
and list the folders and movie les. In the movie browser, you can perform the
following operations:
• Press the UP/DOWN ARROW or PAGE UP/DOWN buttons to move the cursor
and select movie les.
• When a movie le is highlighted by the cursor, press the ENTER or PLAY button
to start playback.
Once a movie le starts playing, the normal playback control functions are available.
To stop the movie and return to the le browser, press STOP twice. You can also
press the HOME button at any time to get back to the Home Menu.
Viewing Photo Files
To view digital photo les stored on an optical disc, USB or e-SATA drive, select
“Photo” from the Home Menu. A le browser will appear to assist you in navigate
the les and folders.
The rst step is to select the “Data Disc”, USB or e-SATA device that contains the
photo les. The player will take a moment to read the media and list the folders
and photo les.
In the photo browser, you can perform the following operations:
• Press the UP/DOWN ARROW or PAGE UP/DOWN buttons to move the
cursor and select photo les.
• When a photo le is highlighted by the cursor, press the ENTER or PLAY button to start playback in a full screen slide show
fashion.
The following operations are available during the photo slide show:
• Show the help screen: DISPLAY
• Normal playback control: PLAY, STOP, PAUSE, and PREV/NEXT
• Adjust slide show speed: REV and FWD
• Zoom: ZOOM. Once in a zoom mode the ARROW buttons can be used to
pan the photo.
• Reect (ip the photo along its horizontal axis to make it upside-down): UP
ARROW
28
Page 29
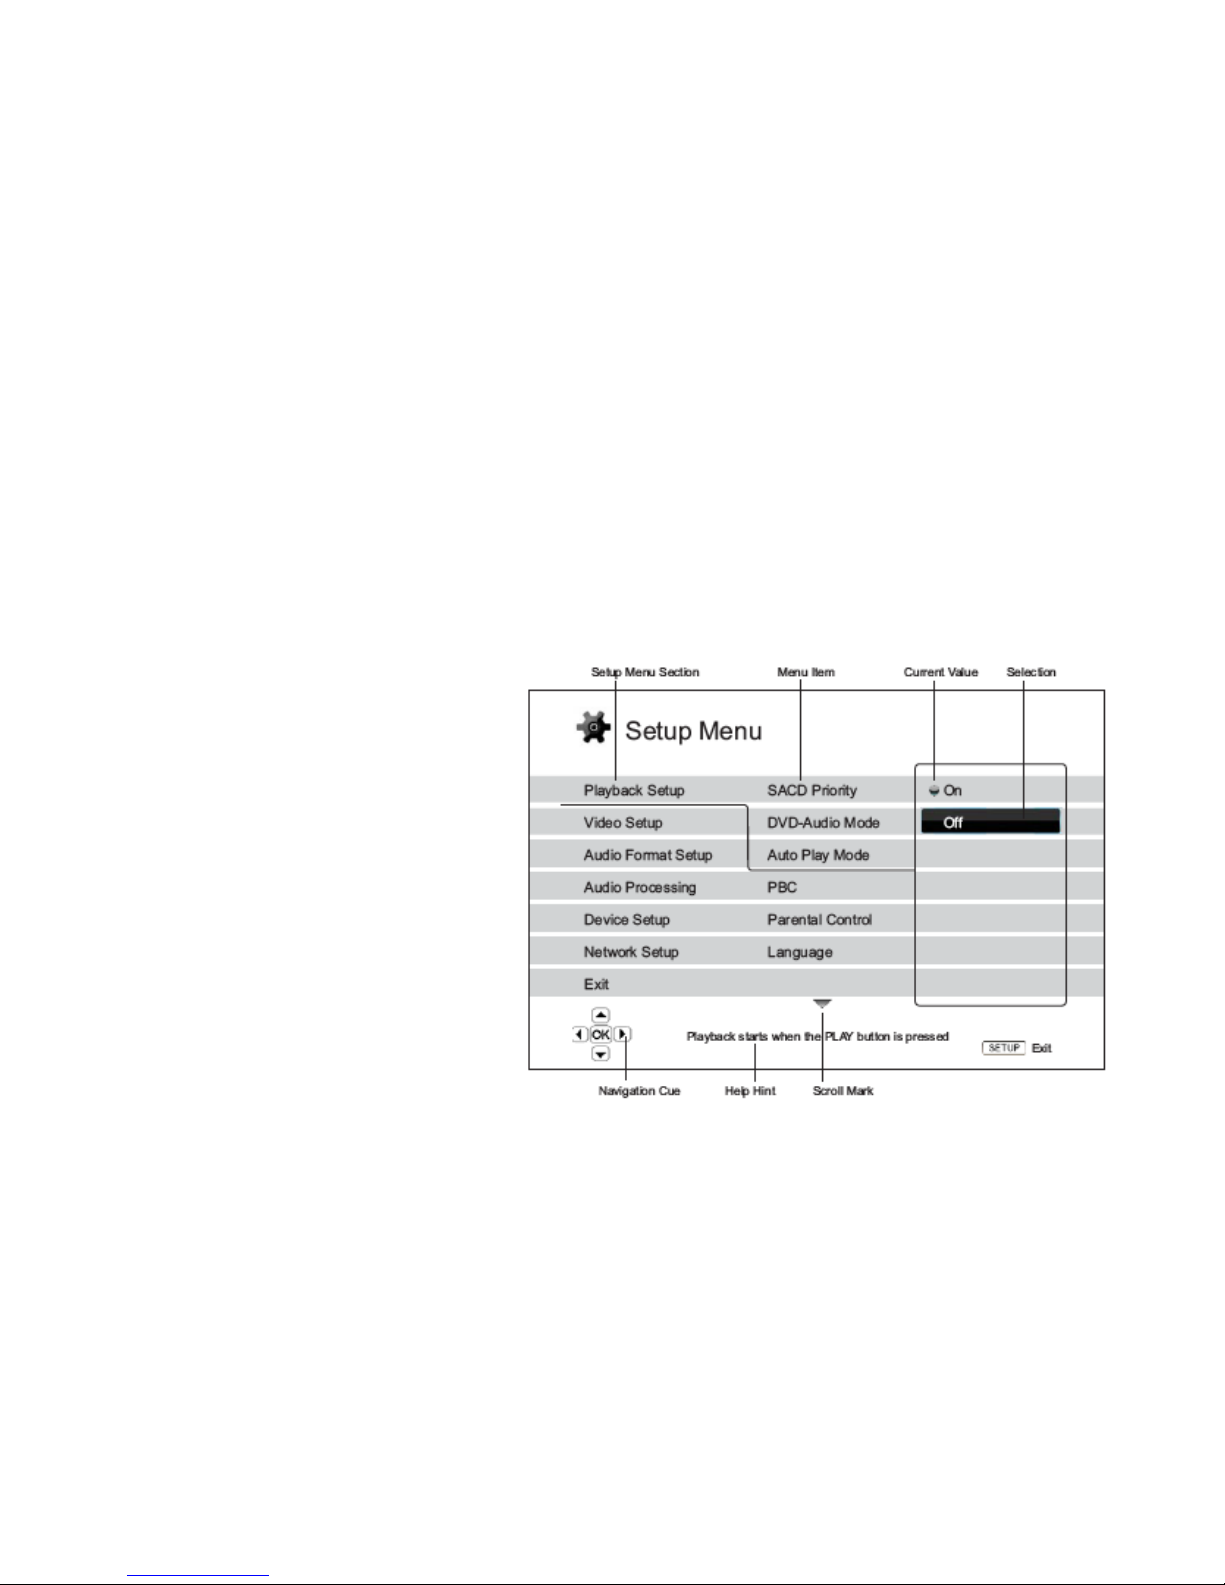
• Mirror (ip the photo along its vertical axis to make it a mirror image): DOWN ARROW
• Rotate left (counterclockwise): LEFT ARROW
• Rotate right (clockwise): RIGHT ARROW
• Repeat: REPEAT
• Show photos in “Digest” mode: RED color button. The “Digest” mode shows the 9 photo thumbnails in a screen to make visual
navigation easy.
• Show EXIF information: GREEN color button
• Play in random sequence: BLUE color button
• Change slideshow transition effect: YELLOW color button.
Adding Background Music
You can add background music to the photo slideshow. To do so, you will need to prepare some digital music les. The music les can
be stored on the same disk as the photos, or on a different USB / e-SATA drive. Start music playback rst by selecting “Music” from the
home menu. Once the music is playing, press the HOME button to get back to the home menu, and start the photo slideshow by selecting
“Photo” in the usual manner.
SETUP MENU OPTIONS
The Setup Menu of the UMT presents many setup and conguration options. For most users, the default conguration will be sufcient
and will not require any changes to the settings. However if you need to congure the player to perfectly match your home theater setup
and viewing preferences, please refer to the following sections for details about each conguration option.
Using the Setup Menu System
In many places of this guide, the player’s Setup Menu
needs to be adjusted to match your specic audio/video
conguration. When performing menu adjustments,
we will use the following terminology to indicate the
location of the desired function:
Setup Menu Section > Menu Item > Selection
Setup Menu Section is the uppermost Setup Menu level.
With the UMT there are six (6) Setup Menu sections
listed in the left column of the Setup Menu screen. They
are: Playback Setup, Video Setup, Audio Format Setup,
Audio Processing, Device Setup, and Network Setup.
Menu Item is the parameter to be adjusted which appears
in the center column of the Setup Menu. Once you enter
a Setup Menu Section, the list of Menu Items and their
current value are displayed in a box.
Selection is the actual numeric or descriptive element
that represents the change being made to the selected
parameter. It is the item located to the right of its
corresponding Menu Item.
A Scroll Mark appears at the top or bottom of the menu when there are more Menu Items or Selections than what can t in a screen. You
may use the UP and DOWN ARROW buttons to scroll the display in order to access additional items.
The preceding diagram should give a good description of the various elements and their context. In this screen we could, for example,
instruct you to set the Auto Play Mode parameter to Off in the Playback Setup section. To indicate where we were, you would see the
following: Playback Setup > Auto Play Mode > Off.
NOTE: It is possible that some setup items are grayed-out and inaccessible. This can be caused by the disc still being played back or
interlocking with mutually exclusive setup items. Please stop playback or eject the disc before trying to change these setup items. If
you still cannot access the setup item, please check for conguration conicts and consistency. For example, if “Video Setup > Primary
Output” is set to “Analog”, the “Output Resolution > Auto (or Source Direct)” menu item will be grayed-out. Setting “Primary Output”
to “HDMI 1 (or HDMI 2)” will enable the “Auto (or Source Direct)” resolution.
To access the player’s Setup Menu simply press the SETUP button on the remote control. Since some Setup Menu options can become
inaccessible when the player is playing a disc, it is recommended that you operate the Setup Menu when playback is fully stopped or
when there is no disc in the player.
29
Page 30
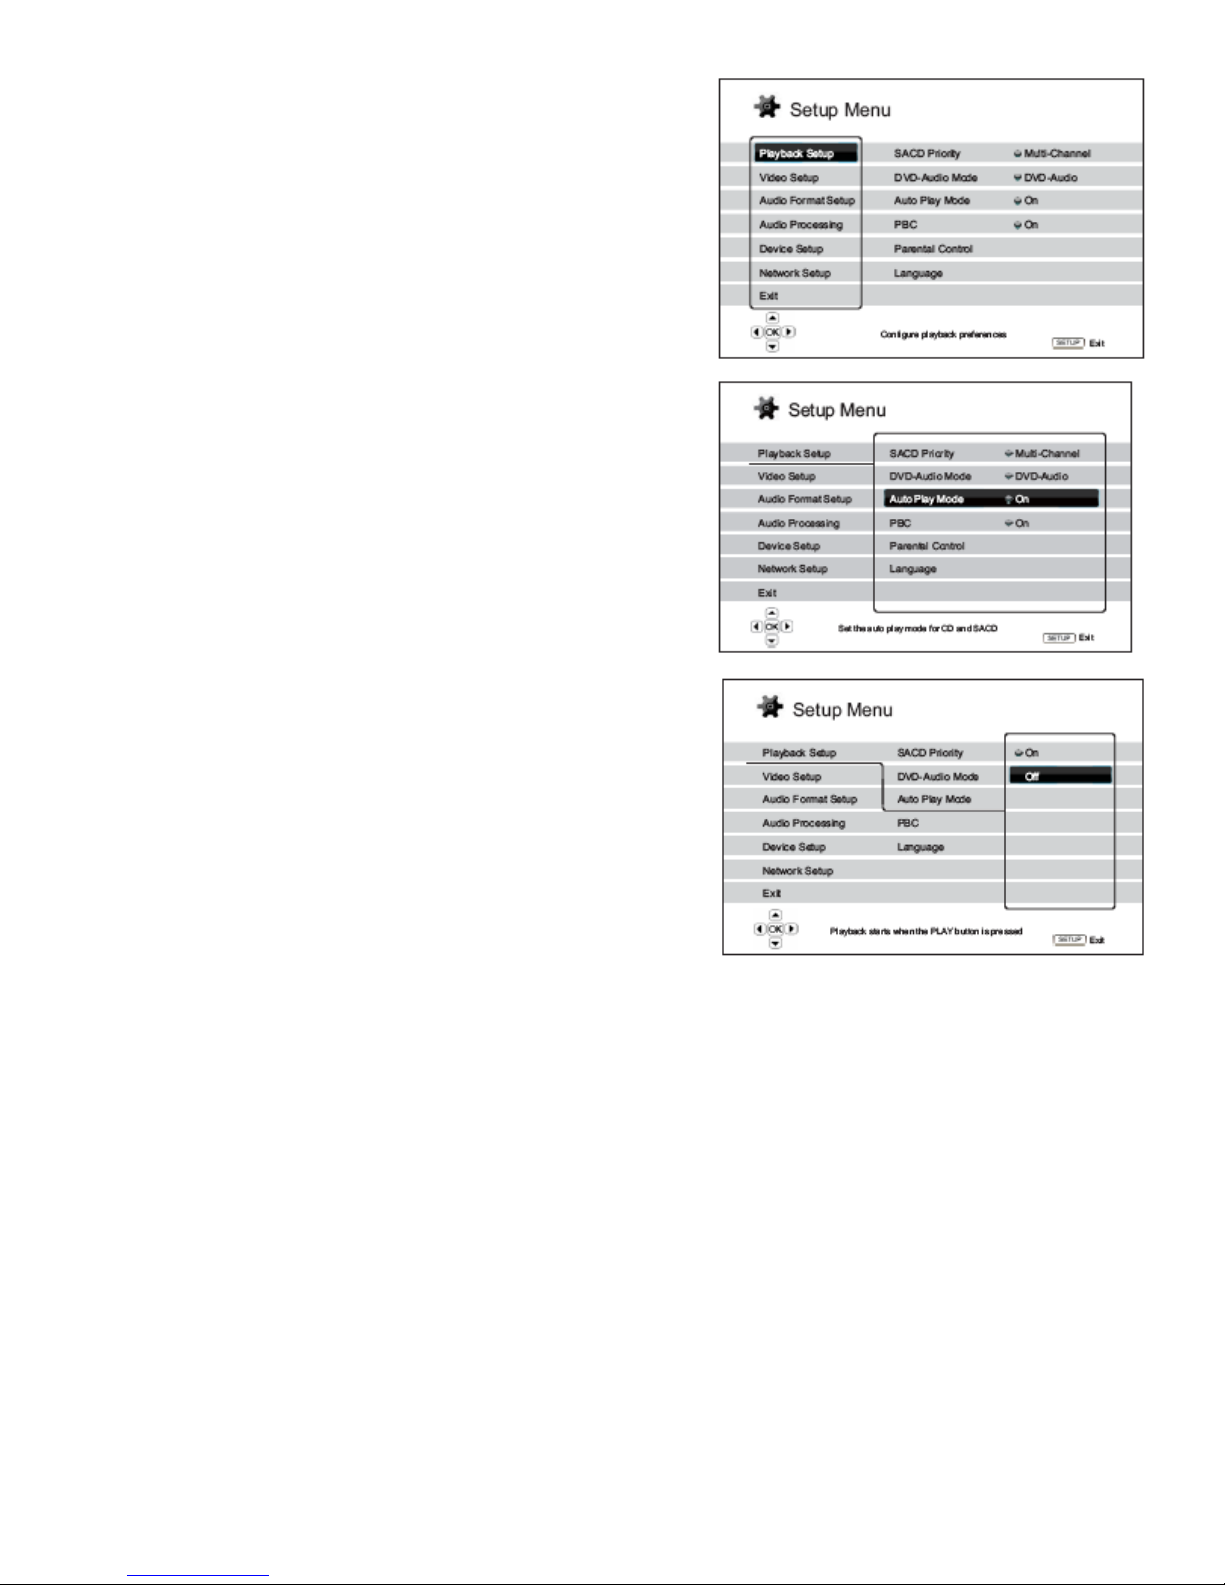
1. Press the SETUP button on the remote control, and the TV screen displays
the following:
2. Press the UP/DOWN ARROW buttons to select the section. There are 6
sections: Playback Setup, Video Setup, Audio Format Setup, Audio Processing,
Device Setup, and Network Setup. Press the ENTER button or the RIGHT
ARROW button to enter the selected section.
3. Press the UP/DOWN ARROW buttons to select the setup item to be changed,
and press the ENTER or RIGHT ARROW button to change the setting. When
the scroll icon is shown at the top or bottom of the Setup Menu, it indicates
that there are more menu items that can be accessed by scrolling with the UP/
DOWN ARROW buttons. For example, in the Playback Setup section, you
may use the UP/DOWN ARROW buttons to select the “Auto Play Mode”
setup item, and press the ENTER button to change the “Auto Play Mode”
setting.
4. To select a value from the list of available settings, press the UP/DOWN
ARROW buttons and then press the ENTER button to conrm. For example,
to select “Off” for “Auto Play Mode”, use the UP/DOWN ARROW buttons
to highlight the “Off” selection and press the ENTER button.
5. To exit the SETUP menu at any time, press the SETUP button on the remote
control or select Exit from the Setup Menu sections.
The settings are permanently saved when the player is turned off using either the
front panel power button or the remote control. If the AC power is interrupted
before the player enters standby status, the settings will not be saved. To ensure
proper saving of the SETUP menu settings, please turn off the player and turn it
back on after you make major changes to the SETUP menu options.
Playback Setup
The “Playback Setup” section is designed to congure playback preferences for
various contents.
1. SACD Priority: To select which audio layer to play for SACD (Super Audio
CD). The options are:
• Multi-Channel – Play the multi-channel surround audio layer
• Stereo – Play the 2-channel stereo audio layer
• CD Mode – Play the CD layer of a hybrid SACD disc
2. DVD-Audio Mode: To select which portion of a DVD-Audio disc to play.
The options are:
• DVD-Audio – Play the DVD-Audio portion of the disc with high-resolution audio
• DVD-Video – Play the DVD-Video portion of the disc with Dolby Digital or DTS audio
3. Auto Play Mode (On / Off): To select whether the player shall start playing an audio CD or SACD automatically. When auto play
mode is turn on, these discs will start playing upon insertion into the player. When auto play mode is turned off, the player will wait
for the user to start playback by pressing the PLAY button.
4. PBC – Play Back Control: To enable/disable Play Back Control. Play Back Control is a primitive form of disc menu. The options
are:
• On – If the disc contains Play Back Control, show the menu.
• Off – Play back the contents by sequence.
5. Parental Control: To set parental control ratings in order to prevent minors from watching inappropriate content. This function depends
on the disc being properly rated and encoded.
• Press the ENTER button to bring up the rating selection menu.
• To adjust the parental control settings, you must enter the current parental control password.
If you have not set a parental control password yet, the default password is “0000”.
• The parental control menu contains the following sub-items:
• BD Ratings - Press the UP/DOWN ARROW buttons to select the rating allowed for Blu-ray Discs. “Off” means no ratings control
and all discs are allowed to play. Numbers 1 to 21 corresponds to the age limit. Discs encoded with an age limit that is equal to or
30
Page 31
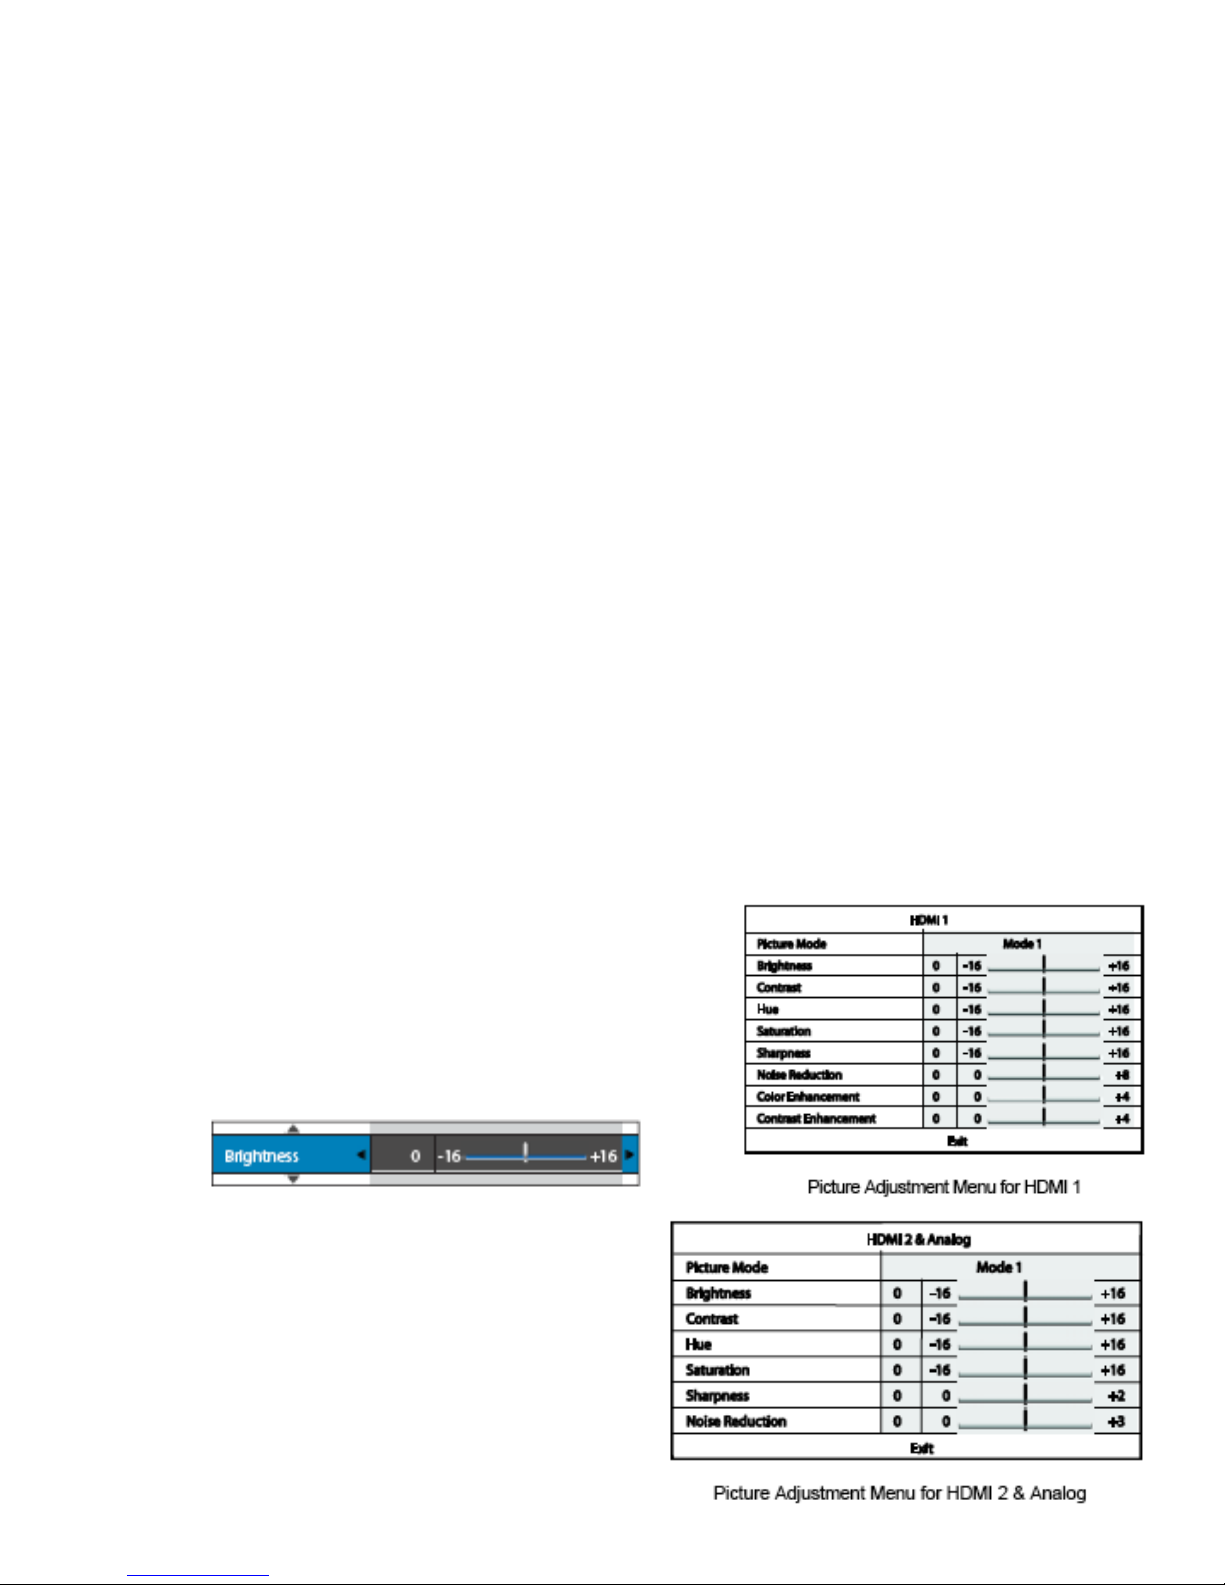
below the selected age will be allowed, and any rating above the selected age will be blocked.
• DVD Ratings - Press the UP/DOWN ARROW buttons to select the rating to allow for DVD. The available ratings are Kid, G,
PG, PG-13, PGR, R, NC17, Adult and Off. The selected rating and below will be allowed, and any rating above will be blocked.
If “Off” is selected, all discs are allowed to play.
• Area Code – Some Blu-ray Discs may have different parental control ratings for different geographical areas. At this time the
player only supports the parental control ratings used in the United States.
• Change Password – To change the parental control password, enter a 4-digit number as the new password. Enter the new password
again to conrm. If the two entries are matching, the new password replaces the old parental control password.
6. Language: To congure language preferences. The menu contains the following sub-items:
• Player Language – To choose the display language for the player’s Setup Menu and the on-screen display. At this time only
English is available.
• Disc Menu Language – To choose the preferred language for displaying DVD and Blu-ray Disc menus. If a disc menu of the
selected language is available, that menu will be shown instead of the default disc menu.
• Audio Language – To choose the preferred audio language for DVD and Blu-ray Discs. If an audio track of the selected language
is available on the disc, the audio track will be played back.
• Subtitle Language – To choose the preferred subtitle language for DVD. If a subtitle of the selected language is available, it will
be displayed. When “Auto” is selected, the subtitle display is decided by the disc.
NOTE: If your preferred language is not listed in the Audio, Subtitle or Disc Menu options, select “Other” and enter the Language Code
found in this manual.
Video Setup
General video setup options are covered in the beginning of this manual.
Picture Adjustment
Picture Adjustment is a special section of the Video Setup menu. It allows you to ne tune many picture control parameters in order to
achieve the optimal picture quality and visual result. To use Picture Adjustment, press the SETUP button on the remote control to enter
the player’s Setup Menu and choose “Video Setup” – “Picture Adjustment”, then select the primary video output terminal:
For information on how to choose your primary video output, please refer to Primary Output. You can use the LEFT/RIGHT ARROW
to select your choice, then press the ENTER button to bring up the Picture Adjustment menu. Depending on your primary video output,
the detailed Picture Adjustment menu can be slightly different:
To change a picture adjustment parameter, use the UP/DOWN ARROW buttons to
highlight the parameter, and use the LEFT/RIGHT ARROW buttons to change its
value.
To aid in the adjustment of picture control parameters, the picture adjustment menu
will be reduced to only show the parameter being adjusted once you press the LEFT/
RIGHT ARROW buttons (except the Picture Mode, which you will directly see the
mode name switches between Mode 1, 2 and 3, and all the other parameters are
adjusted automatically to the stored value). The reduced menu will be positioned
near the bottom of the screen.
You can continue adjusting the current parameter by pressing the LEFT/
RIGHT ARROW buttons. To select another parameter, press the UP/DOWN
ARROW buttons. Press the ENTER button to return to the large Picture
Adjustment menu.
To exit the Picture Adjustment menu and return to the Setup Menu, either
select “Exit” or press the RETURN button.
The following picture adjustment controls are available for all HDMI 1,
HDMI 2 and Analog (Component):
1. Picture Mode: To use the customized picture mode saved by you. The
UMT allows you to save up to three (3) customized modes. Press the
LEFT/RIGHT ARROW buttons to switch the mode and all parameters
will be automatically adjusted to their stored values. Changes to the
31
Page 32

current parameter values will be stored automatically when you exit the Picture Adjustment screen or switch to another Picture
Mode.
2. Brightness: To adjust the brightness (black level) of the video output.
3. Contrast: To adjust the contrast (white level) of the video output.
NOTE: Proper brightness and contrast settings are necessary for a quality video output. If you do not have the correct black and white
levels, your images can appear washed out or can lose detail in shadows when watching darker scenes. Televisions have brightness (black
level) and contrast (white level) controls; however it may require a combination of tweaking both the player and your television to get
the optimal result. We recommend using a calibration disc such as the Spears & Munsil™ High Denition Benchmark Blu-ray Edition or
Digital Video Essentials HD Basics as aids for adjusting. First adjust the television’s picture controls for the best possible picture. Once
that is done, try changing the player’s settings to further rene the picture to the optimal result.
4. Hue: To adjust the hue (tint) of the video output.
5. Saturation: To adjust the saturation (color intensity level) of the video output.
6. Sharpness: To set the sharpness of video output. Sharpness is a video processing function that can control the image sharpness but at
the same time may cause unwanted artifacts. For HDMI 1, the sharpness level can be set between -16 and +16. The default is level
0, which turns off sharpness enhancement. The negative levels may be used to reduce or eliminate overly sharpened video. However,
the picture may appear soft. The positive levels increase the sharpness.
• At level 1, the player applies low level Detail Enhancement, during which the video processor isolates the detailed parts from
the original image, processes them separately and integrates back before the nal output.
• At level 2, the player increases Detail Enhancement to a higher level. Generally, to make an image “sharper”, we recommend
using level 1 and 2.
• At level 3 and above, the player adds Luminance Transition Improvement (LTI) and Chroma Transition Improvement (CTI),
which further sharpen the luminance transition and chroma transition. However, we do not recommend using level 3 and above
unless the source content is poorly produced and blurry.
For HDMI 2 & Analog, the sharpness level can be set between 0 and +2. The default is level 0. The higher the level, the sharper the
video details are. However, too high a sharpness level may cause while line etching around objects.
7. Noise Reduction: To select whether the player shall apply video noise reduction processing. For HDMI 1, the noise reduction level
can be set between 0 and 8. The default is level 0, which turns off noise reduction.
• When set to level 1, the player adjusts the picture quality by reducing the “mosquito noise” (artifacts around the outlines of
objects) and “block noise” (mosaic-like patterns caused by video compression). These two noise reduction are also called
Compression Artifacts Reduction (CAR) and have several levels of aggressiveness.
• When set to level 2, the player applies the Motion Adaptive Video Noise Reduction (VNR), which handles the random noise and
the lm-grain noise (natural variation of picture intensity caused by lm grain). Its level is automatic because there is a noise
estimator circuitry in the video processor that calculates how much noise presents and adjusts the level of VNR accordingly.
• When set to 3 or 4, the player applies both CAR and Motion Adaptive VNR, with more aggressive “block noise” reduction at
level 4.
• At level 5, the player applies aggressive CAR for low quality video content, and adds Motion Adaptive VNR at level 6.
• At level 7, the player applies the most aggressive CAR for very low quality video, and adds Motion Adaptive VNR at level 8.
Remember that excessive noise reduction may cause a loss of details. We recommend using the noise reduction function only when
you encounter poorly encoded or compressed video that has apparent noise artifacts.
For HDMI 2 & Analog, the noise reduction level can be set between 0 and +3. The default is level 0. When user increases the level,
the player adjusts the picture quality by applying mosquito noise reduction, random noise reduction and MPEG block noise reduction
at the same time. The higher level user sets, the more aggressive noise reduction functions apply.
The following picture adjustment controls are only available for HDMI 1 video output:
8. Color Enhancement: To select the color enhancement level on the video output. This enhances certain colors in the spectrum and
enables vivid colors in outdoor scenes without causing hue shifts, loss of detail or changes in skin tones.
9. Contrast Enhancement: To select the contrast enhancement level on the video output. This expands detail in shadows.
HDMI Options
HDMI Options are a sub-menu of the Video Setup menu. It allows you to congure some video settings that are unique to the HDMI
output. To enter this sub-menu, select “HDMI Options” from the Video Setup menu. To exit this sub-menu, press the RETURN button
or the LEFT arrow key. The following HDMI options are available:
1. Color Space (HDMI 1) – To select the color space for the HDMI 1 output. The available options are:
32
Page 33

• Auto (Recommended) – The player checks with the display device to automatically determine what color space to use. If the
display device supports YCbCr 4:4:4, then it will be used to avoid extra color space conversion.
• RGB Video Level – The HDMI output uses RGB color space and normal signal range suitable for video displays.
• RGB PC Level – The HDMI output uses RGB color space and expands the signal range. The expanded signal range is suitable
for personal computer (PC) displays. Some TVs are designed to be used as a PC monitor, and expect signal in expanded RGB
range when the DVI input is selected. For these displays if the video signal uses the normal RGB range, the black-white contrast
will be reduced. You can set the player to use the RGB PC Level output and restore proper contrast.
• YCbCr 4:4:4 – The HDMI output uses YCbCr 4:4:4 color space.
• YCbCr 4:2:2 – The HDMI output uses YCbCr 4:2:2 color space. Generally this is the color space that is closest to the color
space encoded on the discs. (All discs are encoded in YCbCr 4:2:0 color space, and the video decoder decodes it into YCbCr
4:2:2.)
2. Color Space (HDMI 2) – To select the color space for the HDMI 2 output. The available options are the same as those for Color
Space (HDMI 1).
3. Deep Color (HDMI 1) – To select the Deep Color mode for the HDMI 1 output. Deep Color is an OPTION for some TVs or projectors
that feature HDMI v1.3 or higher input. Normally, each pixel of the video image is transmitted using 24-bit data (8-bit per channel
for R, G, B or Y, Cb, Cr). If Deep Color is supported, each pixel of the video image can be transmitted using 30-bit (10-bit per
channel) or 36-bit (12-bit per channel) data. The increased bit depth should result in smoother color transitions and better gradients.
The available options are:
• 36 Bits – Use the 36-bit per pixel Deep Color mode.
• 30 Bits (Dithered) – Use the 30-bit per pixel Deep Color mode with dithering technique.
• 30 Bits – Use the 30-bit per pixel Deep Color mode.
• Off (Dithered) –Do not use Deep Color, but apply the dithering technique.
• Off (default) – Do not use Deep Color.
4. Deep Color (HDMI 2) – To select the Deep Color mode for the HDMI 2 output. The available options are the same as those for
HDMI Deep Color (HDMI 1).
NOTE: Since the Deep Color feature is OPTIONAL and may not be supported by all TVs, enabling Deep Color while connected to
a TV without this feature may result in no effect or no video. At this time, no disc is encoded with Deep Color. Enabling Deep Color
will not magically make colors richer, but will help preserve the maximum precision as a result of video processing and picture control
adjustment. Dithering is a technique to improve the image color depth with limited color quantization.
5. Demo Mode – To enable a special split-screen demonstration mode. This is designed for the demonstration of the Qdeo video
processing technology. It can also be used as an aid for setting picture control adjustments for Noise Reduction, Color Enhancement
and Contrast Enhancement. It should NOT be used for normal movie watching. The available options are:
• On – The video screen will be split in half. The left side shows video without the help of Qdeo video processing, and the right
side demonstrates the result of Qdeo video processing.
• Off (default) – Normal viewing mode. NOTE The demo mode is canceled automatically after the player is turned off.
33
Page 34
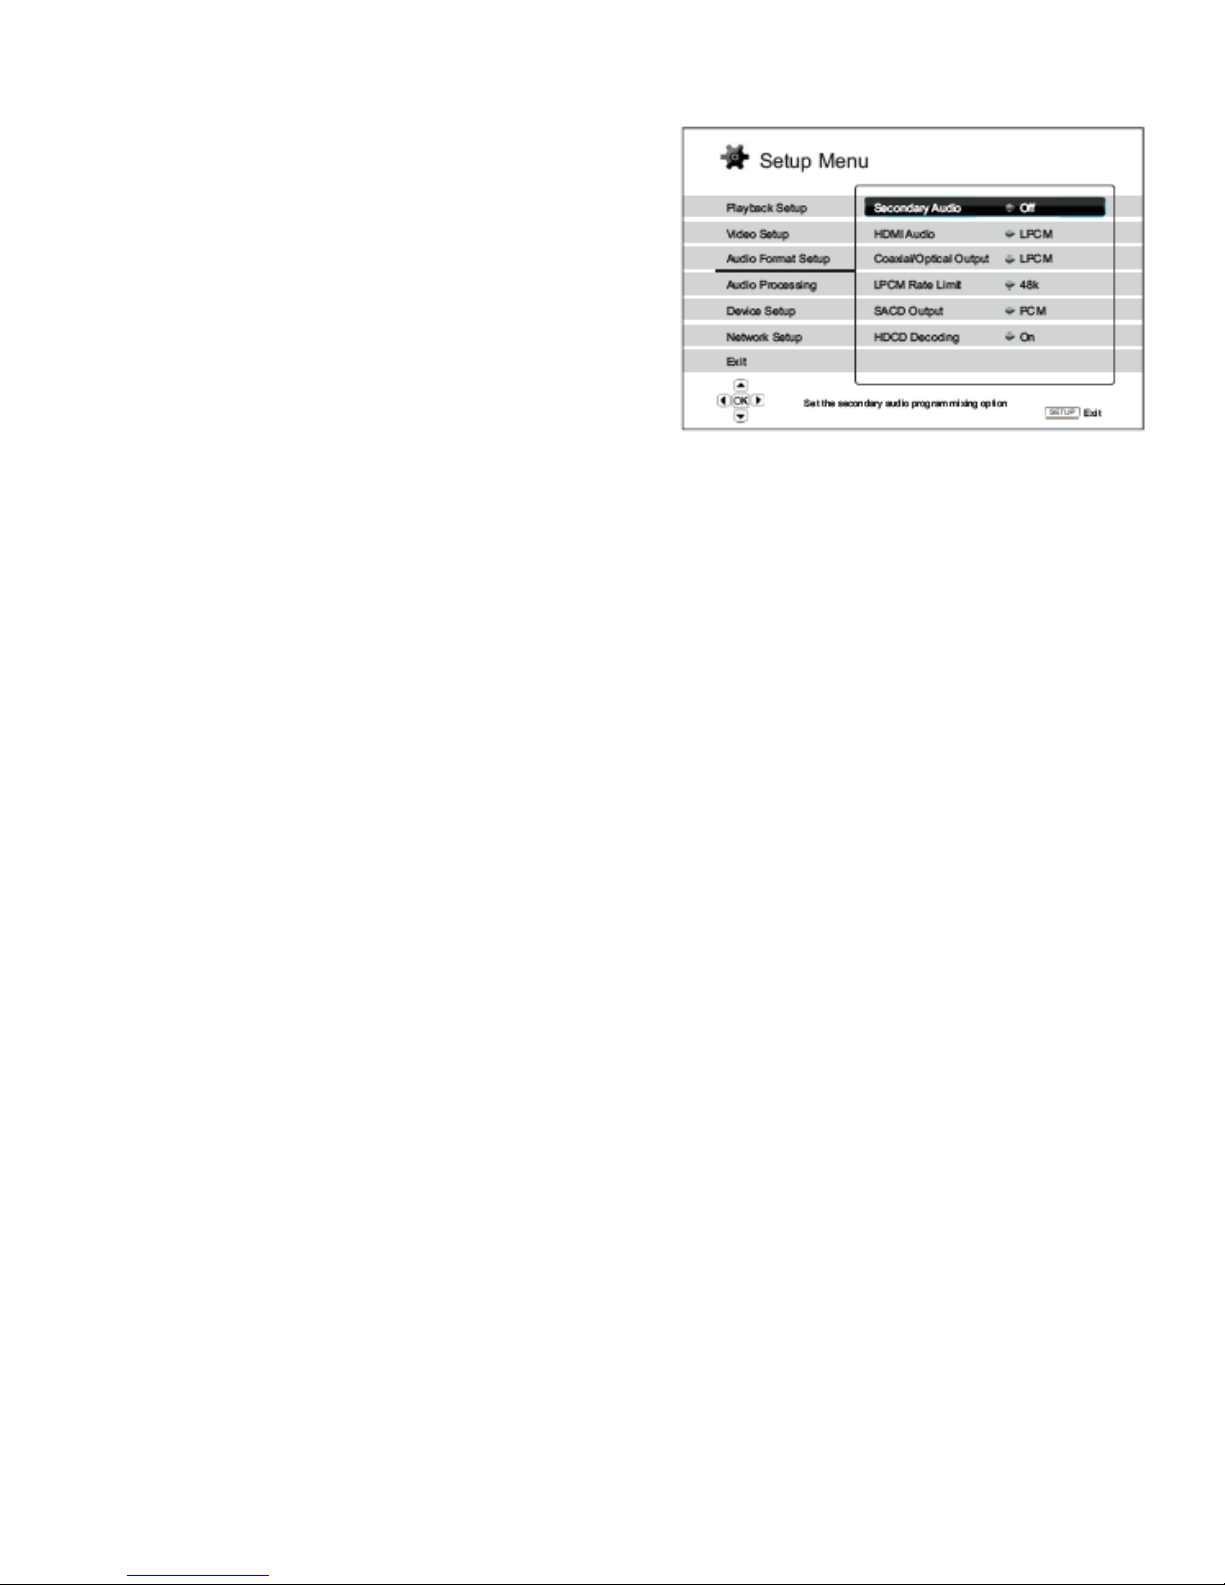
Audio Format Setup
The “Audio Format Setup” section of the Setup Menu system allows you to
congure preferences for audio output formats. As the UMT is a transport
capable of outputting the highest quality audio, the user is cautioned against
changing any of these menu items. The menu items in this section are:
1. Secondary Audio: To set the Secondary Audio Program mixing option.
Some Blu-ray Discs contain a secondary audio and video program, such
as the director’s commentary. Some Bluray Discs have a sound effect
when you make menu choices. This Setup Menu item allows you to
decide whether to mix the Secondary Audio Program and menu clicking
sound into the primary audio. The options are:
• On – The Secondary Audio Program and menu clicking sound are
mixed into the primary audio. Usually this will cause the primary
audio volume to be slightly reduced and should be avoided.
• Off– The Secondary Audio Program and menu clicking sound are
not mixed into the primary audio and you cannot hear the secondary audio or menu clicking sound. This setting preserves the
highest possible audio quality for the primary audio.
2. HDMI Audio: To select digital audio output format from the HDMI port. The options are:
• Auto (default) – The player checks with the device connecting to HDMI output to automatically determine which audio format to
use.
• LPCM – Digital audio output via HDMI will be multi-channel Linear PCM format. When this option is selected, compressed audio
bit streams will be decoded by the player. This setting is recommended when connecting the HDMI output directly to a TV or to a
receiver without advanced audio decoding capabilities. This process bypasses the MSB processing.
• Bitstream – Digital audio output via HDMI will be in bitstream format. This option is recommended when connecting the HDMI output
to an A/V receiver or processor that supports advanced audio decoding, such as Dolby TrueHD and DTS-HD Master Audio.
• Off – No digital audio output via HDMI. This is recommended.
NOTE If you use HDMI to connect audio to an HDMI A/V receiver or audio processor, it is important that you choose 720p or higher
HDMI output resolution when playing high resolution audio content (DVD-Audio, SACD, Dolby TrueHD and DTS-HD Master Audio).
According to the HDMI specication, the bandwidth available for audio is proportional to the total bandwidth used by video. At 480p/576p
resolution, the HDMI specication can only support 2 channels of audio with high sample rate (up to 192kHz), or 8 channels of audio
with standard sample rate (up to 48kHz). If you play high resolution audio content at the 480p/576p resolution, you may get reduced
audio resolution, incomplete audio channels, or even no audio/video output at all. Choosing a higher output resolution such as 720p or
above allows enough bandwidth for all high sample rate audio channels.
3. Coaxial/Optical Surround Output: To set the output format for the Surround coaxial/optical digital audio output for use with Dolby
Digital and DTS-compatible receivers. The options are:
• LPCM – Forces down-mixed 2-channel digital audio output. Choose this setting if your receiver/amplier only supports stereo
digital (PCM) audio. This option should NOT be selected. The UMT digital outputs always output LPCM. This option is for
the coaxial and optical surround output only.
• Bitstream– Passes audio as compressed bitstream format to the receiver/amplier. Choose this setting if your receiver/amplier
is capable of decoding Dolby Digital and/or DTS. This output will work but bypasses the MSB processing and should only be
used for movies.
4. LPCM Rate Limit: This menu item does NOT change the sample rate of the digital audio outputs.
NOTE: Output sample rate is set using the small toggle switch on the rear of the unit only when upsampling is enabled.
5. SACD Output: To select audio output format for SACD. The options are:
• PCM – DO NOT SELECT THIS OPTION.
• DSD – SACD DSD data is output over HDMI without any conversion. For the digital audio outputs, DSD data is processed by
the internal MSB processor to obtain the highest possible digital audio. The S/PDIF outputs 172.4 kHz 24 bit digital audio but
the MSB Network outputs the full resolution 32 bit output.
6. HDCD Decoding: To set the audio decoding option for HDCD (High Denition Compatible Digital) discs. The options are:
• On – HDCD is decoded with the idea of an expanded the dynamic range but with the resolution of the MSB DAC this is a step down
in the UMT.
• Off– HDCD is treated as a regular CD. This is the only option for the highest quality audio output. Unfortunately HDCD decoders
are quite dated and when enabled, actually process and reduce the performance of all music played. Best to leave it OFF.
34
Page 35

Blu-ray Audio Playback
Blu-ray Discs may contain many types of audio signal formats, some of which are high resolution types such as Dolby TrueHD and
DTS-HD Master Audio. Blu-ray Discs also have many optional audio components such as the Secondary Audio Program and menu
clicking sound. The UMT is specically a 3 channel player. Multichannel formats are processed and downmixed to two channel. On
high resolution discs this can provide higher quality audio than selecting the 2 channel PCM track. For example a 24 bit multichannel
mix has the center mixed with the fronts and provides a 25 bit output to the MSB DAC.
Recommended Audio Format Options
Depending on your specic audio system, the audio format options of the UMT may need to be adjusted to match your conguration.
NOTE: In all cases the menu settings should be left the same, as received or as reset according to the RESET TO FACTORY STANDARD
section. Do not attempt to make any audio changes using the menu options.
NOTE: This is the STEREO version of the UMT. Do NOT attempt to use it for multi-channel applications. Instead order the
MULTICHANNEL version of the UMT.
35
Page 36
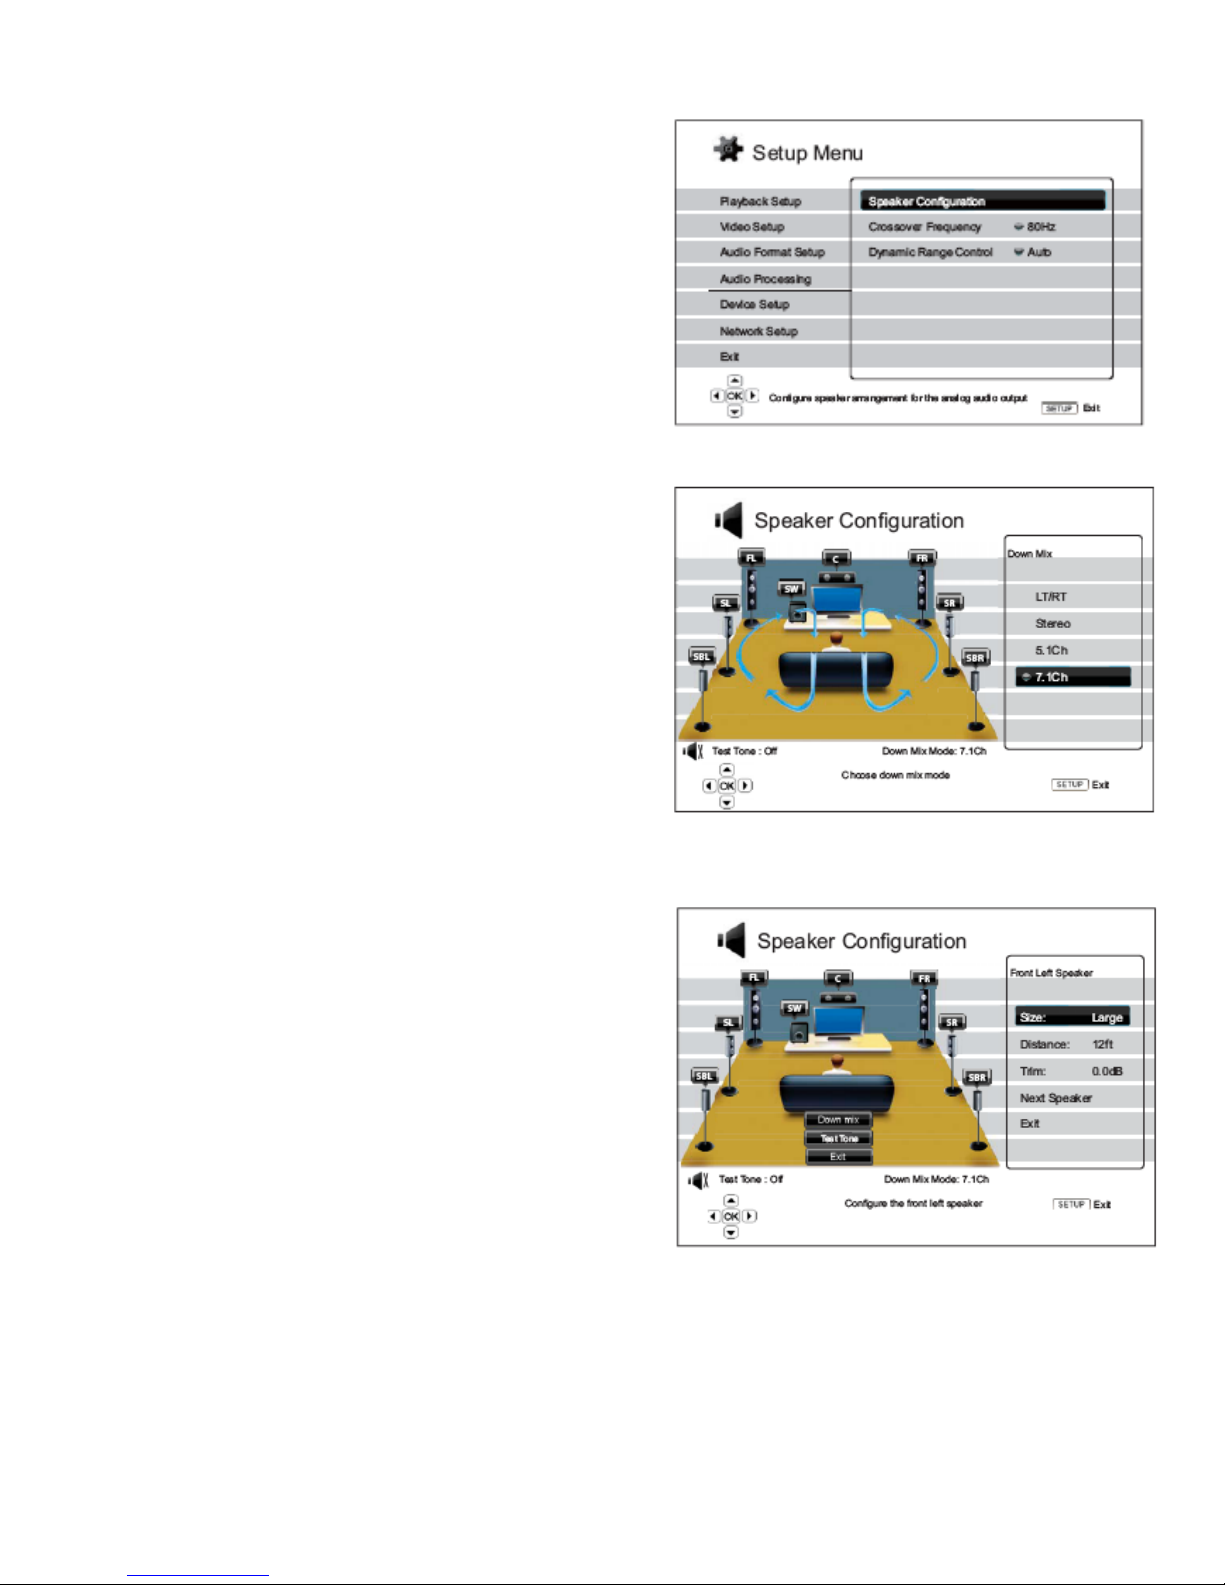
Audio Processing Setup
The “Audio Processing Setup” section of the Setup Menu system allows you
to congure how the player will process audio signals before sending them to
the output. This ONLY impacts the playback of multichannel sources. None
of the settings have any impact on 2 channels sources such as CDs.
Speaker Configuration
In the Speaker Conguration menu you can congure speaker settings such as
down-mix mode, number of speakers, their distance, size and trim level. The
Speaker Conguration menu shows an illustration of the speaker placements
to assist you on properly conguring the speaker parameters. Many of these
settings apply to the MultiChannel UMT and should not be adjusted.
Upon entering this menu, the cursor is positioned on the front left speaker.
You may use the LEFT/RIGHT ARROW buttons to move the cursor. The
RIGHT ARROW button moves the cursor in clockwise sequence, and the
LEFT ARROW button moves the cursor in counterclockwise sequence.
When the cursor is over the “Down Mix”, “Test Tone” or “Exit” options, you can also use the UP/DOWN ARROW button to highlight
these options.
Down Mix Mode
This is a Stereo UMT. Down mixing is automatic so please do not change
but leave set to 7.1 Ch.
Speaker Settings
For each speaker in the home theater system, you can set its size, distance
and trim level. Again, as this UMT is a Stereo transport, all speaker sizes
should be left large and no trim levels should be changed. Delay for the
center channel may be adjusted as the center channel is downmixed into the
fronts. The delay settings will adjust the center channel in relation to the
fronts. It should match the front channels.
To congure a speaker, use the LEFT/RIGHT ARROW buttons to move the
cursor to highlight the speaker and press the ENTER button. The Speaker
Settings menu on the right side of the screen will be activated. In the Speaker
Settings menu, use the UP/DOWN ARROW buttons to select a parameter, and then press the ENTER button to change it. To exit the
Speaker Settings menu and return to the Speaker Conguration illustration, press the LEFT ARROW button or select the “Exit” option.
You can also move on to congure the next speaker by selecting the “Next
Speaker” option.
1. Size: Please set all speakers to LARGE.
NOTE The front, surround and surround back speakers are congured as
pairs. Changes to the size of one speaker will automatically change the other
speaker of the pair.
2. Distance: The speaker distance parameters set delay control for the
corresponding audio channel. The delay is to compensate for the audio
propagation time difference caused by the placement of speakers.
Speaker distance delay is only applied if the player is decoding multi-
channel audio. Since the delay is calculated based on the distance
difference from each speaker to the listener’s position, it is important to
set the distance for the front speakers rst and then the other speakers.
Any time you change the distance of the front speakers, the distance of
the other speakers will be automatically adjusted to maintain the same
distance difference.
Because the Center is phantom, it should be set to the same distance as the fronts. The front distance can be adjusted to match the
video delay, which varies among displays.
3. Trim Level: The trim level should not be adjusted.
Other Audio Processing Settings
In addition to Speaker Conguration, Crossover Frequency and Dynamic Range Control are audio processing settings that can be
congured:
1. Crossover Frequency: Not relevant in this case as speakers are set to LARGE.
36
Page 37

2. Dynamic Range Control: DRC can smooth out the sound by reducing the peaks and boasting the valleys. It would typically be used
with poorly produced TV shows were the voices are drowned out by the background sounds. Enabling DRC may make low level
audio more audible during low-level listening. This should NEVER be used for MUSIC! The available options are:
• Auto – Play at the dynamic range specied by the disc. This option applies to Blu-ray Discs only. For other disc types no dynamic
range compression is applied.
• On – Turn on dynamic range compression.
• Off– Turn off dynamic range compression.
37
Page 38
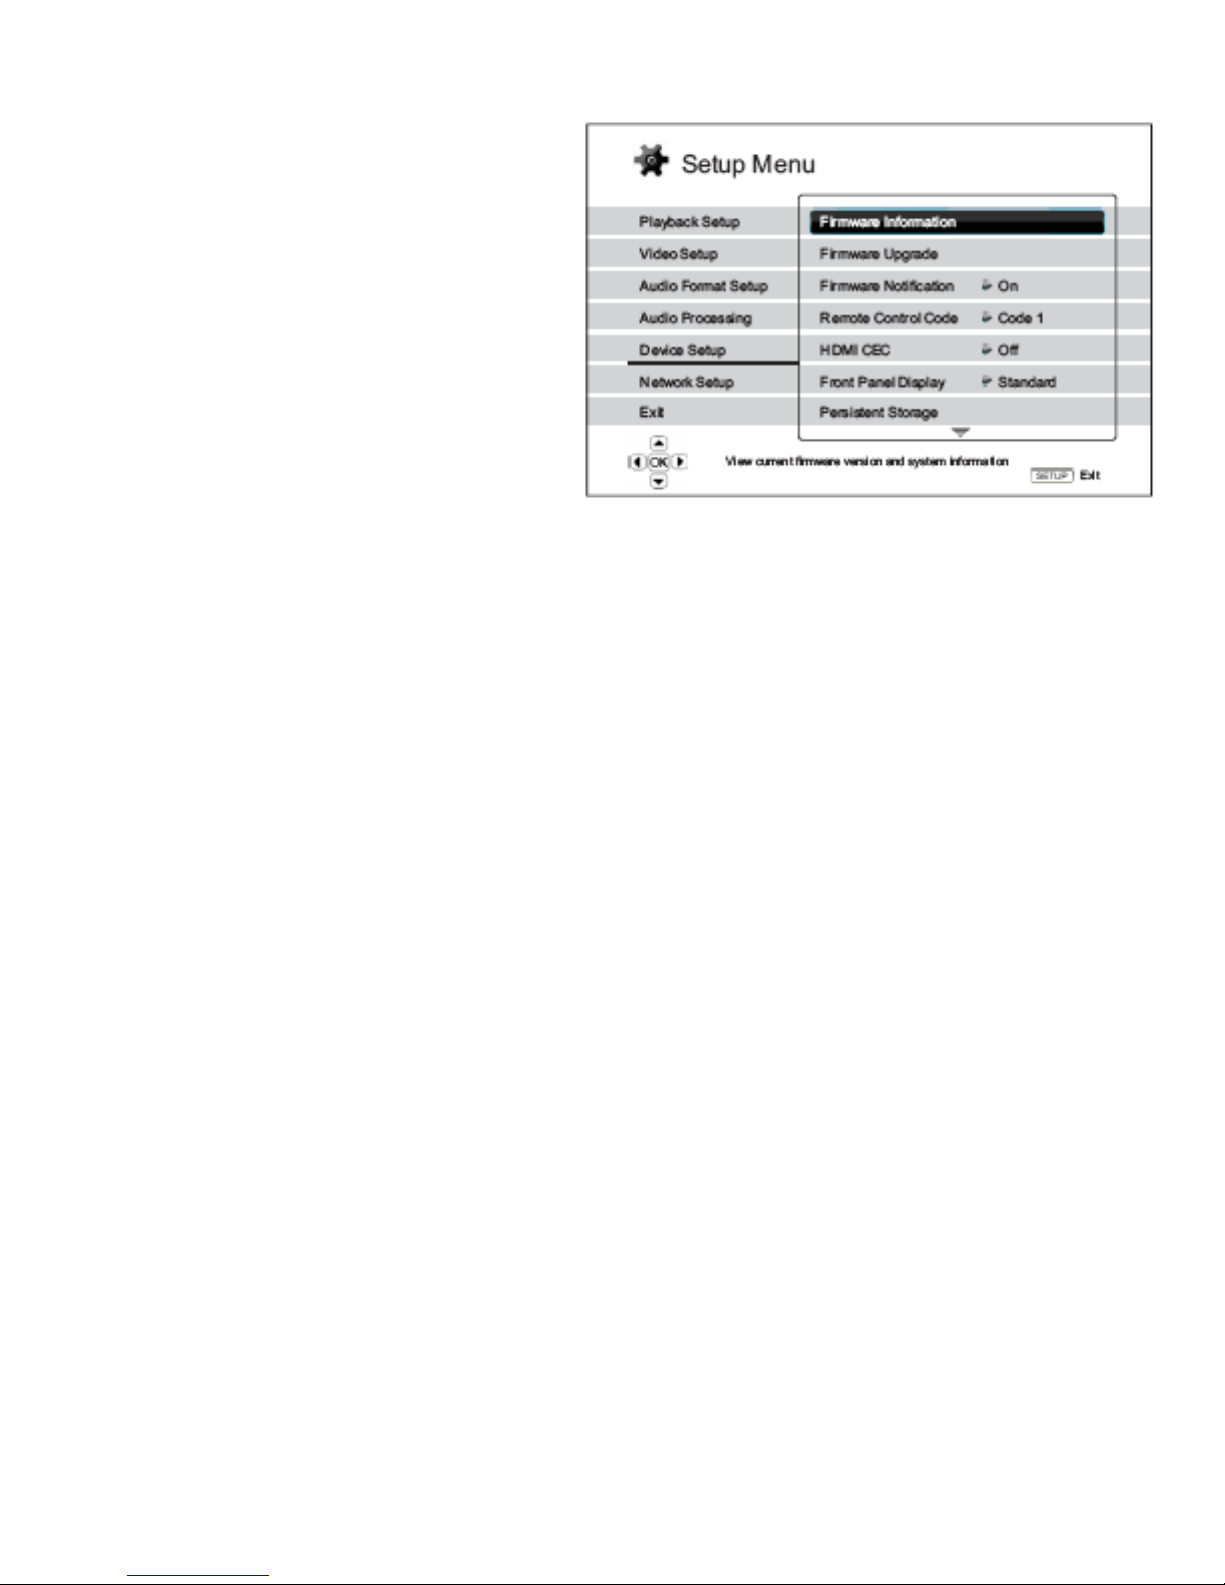
Device Setup
The “Device Setup” section of the Setup Menu system allows
you to congure additional player options related to the hardware
and control functions. The menu items in this section are:
1. Firmware Information: To display the currently installed
OPPO rmware version.
2. Firmware Upgrade: Now this can be a little bit confusing.
There are two sets of rmware in the UMT. MSB has based
our transport on the OPPO 93 player and the rmware is
deliberately compatible so you can get updates from OPPO
as soon as they are available. There is also MSB rmware
in the UMT. Update les are available from the MSB web
site.
3. OPPO Firmware Upgrade Procedure: This operation is only
available when the playback is completely stopped or when
there is no disc loaded. The rmware is the system software
that controls the features and functions of the player. Since
the Blu-ray Disc specications are new and evolving, it is
possible that a Blu-ray disc manufactured after the player was manufactured uses certain new features of the Blu-ray Disc specications.
To ensure the best possible viewing experience, the player may need a rmware update from time to time. Please visit the OPPO
Digital web site www.oppodigital.com to check for rmware updates and instructions on installing the updates. There are three ways
to upgrade the player’s rmware. The options are:
• Via USB – You may download the rmware les from the OPPO Digital web site to a USB drive and then use the USB drive
to upgrade the player. Please follow the instructions on the rmware download web page.
• Via Disc – You may request a rmware upgrade disc from OPPO Digital or download a disc image from the OPPO Digital web
site and burn an upgrade disc. Please follow the instructions that come with the upgrade disc.
• Via Network – If the player has a working Internet connection (see page 18 and 75), you may upgrade the player directly over
the Internet. Please follow the instructions on your TV screen.
Note: It is very important that after you do a Oppo Firmware upgrade that you Reset to Factory Settings following the instructions in this
manual. The rmware update leaves all settings in an unknown position. You must update.
4. MSB Firmware Upgrade Procedure: This operation is only available when the playback is completely stopped or when there is no
disc loaded. The rmware is the system software that controls the digital audio processing of the player. To ensure the best possible
listening experience, the player may need a rmware update from time to time. Please visit the MSB Technology web site www.
msbtech.com to check for rmware updates and instructions on installing the updates. There are two ways to upgrade the player’s
rmware. The options are:
• Via USB – You may download the rmware les from the MSB web site to a USB drive and then use the USB drive to upgrade
the player. Please follow the instructions on the rmware download web page.
• Via Disc – You may request a rmware upgrade disc from MSB or download a disc image from the MSB web site and burn an
upgrade disc. Please follow the instructions that come with the upgrade disc.
5. OPPO Firmware Notication: To set whether the player should automatically check if new rmware versions are available on the
Internet server and notify the user about new rmware. The options are:
• On – Check for new rmware version automatically and notify the user about new rmware. Requires a working network
connection.
• Off – Do not check for new rmware version automatically.
6. Remote Control Code: The UMT can respond to one of 4 sets of remote control codes. The default is “Code 1”. If you have other
products placed close to the UMT, the other products may respond to the UMT remote control. In this case you can select a different
remote code to avoid conicts. The available codes are:
• Code 1 – UMT remote code set 1. This is the default remote code.
• Code 2 – UMT remote code set 2. Use this code if you have other products placed close to the UMT that share the same
codes.
• Code 3 – UMT remote code set 3. Use this code if Code 2 did not solve your problem.
• Alt. Code – Alternative remote code. The alternative remote control code enables users to program their universal remote controls
that come with TV, projector or A/V receiver to operate the UMT. If the universal remote control has a DVD player control
function, please program it with the code for TOSHIBA, PHILIPS, MAGNAVOX, MARANTZ or ZENITH DVD players. Since
each brand of remote control may have several sets of codes, you may need to try several times using different codes to nd a
38
Page 39

working code. If you have selected a new remote code, you must set the remote control handset to use the same code. Please
refer to the Changing the Remote Code section of this manual for details. If you have selected “Alt. Code”, the supplied handset
will not operate the player, and you must use a universal remote control with the properly congured code set.
7. HDMI CEC: To set HDMI Consumer Electronics Control (CEC) mode. CEC is an optional HDMI feature that enables convenient
remote control and automatic setup of consumer electronics over the HDMI connection. The remote control function allows you to
use a single remote handset to operate multiple devices connected via HDMI. For example, you may use the TV remote to control
playback of the Blu-ray Disc player. The automatic setup function can automatically turn on the TV and change to the proper input
when you start playing a disc in the Blu-ray Disc player. It can also turn off the player automatically when you turn off the TV. The
implementation and compatibility of this feature varies by device manufacturer. Each may only implement part of the features or add
their own proprietary functions. The manufacturer-specic implementation of the HDMI CEC function is often given a proprietary
name of “…Link” or “…Sync”. The UMT provides three HDMI CEC function modes for each of its HDMI outputs:
• HDMI 1 – HDMI CEC is enabled on HDMI 1 output. Use this mode if your other devices are compatible with the player.
• HDMI 1 (Limited) – HDMI CEC is enabled on HDMI 1 output, but the BDP-93 will only respond to playback control commands.
It will not respond or issue power on/off and input selection commands. Use this mode if you do not want the automatic setup
function to turn on/off your devices.
• HDMI 2 – HDMI CEC is enabled on HDMI 2 output. Similar to HDMI 1.
• HDMI 2 (Limited) – HDMI CEC is enabled on HDMI 2 output, but the BDP-93 will only respond to playback control commands.
Similar to HDMI 1 (Limited).
• Off (default) – HDMI CEC feature is turned off on both HDMI output terminals. The player will not respond to HDMI CEC
commands from other devices, nor will it setup other devices automatically.
8. Front Panel Display: To control the display intensity of the front panel Vacuum Fluorescent Display (VFD) information windows.
If you feel that the display becomes a distraction to your enjoyment of the video, this option allows you to dim it or turn it off. The
available options are:
• Full - The VFD windows (both left and right sides) are at full brightness for all displays.
• Standard (default) - The VFD windows are at full brightness. The right side window is automatically turned off after 30 seconds,
and resume momentarily if there is any user operation.
• Dim - The VFD windows are at reduced brightness. The right side window is automatically turned off after 10 seconds, and
resumes momentarily if there is any user operation.
• Off – The VFD windows are turned off. In this mode the display will resume momentarily if there is any user operation.
9. Persistent Storage: To manage the persistent storage for BD-Video contents. The persistent storage is a data storage area that holds
additional contents for BonusView and BD-Live features. The data will be kept even if you turn off the player. The following persistent
storage management options are available:
• Storage Device – To select which storage device should be used as the persistent storage. The UMT preserves about 1GB of
internal ash memory that can be used for persistent storage. There are also two USB ports on the player that can accept a USB
drive to be used as the persistent storage. The choices are:
• Internal Flash – Use the internal ash memory for persistent storage.
• USB Drive – Use a USB drive for persistent storage. To meet the specication for BD-Live, a USB ash drive of 1GB or larger
is required. A USB hard drive is not recommended.
NOTE: The new storage device choice becomes effective only after the player is restarted. Please make sure that you turn off the player
and then turn it back on after changing the “Storage Device” option.
• Total Space – To display the total space of the persistent storage.
• Available Space – To display the currently available space of the persistent storage. If the available space becomes too low,
some Blu-ray Discs may not play properly.
• Erase BD-Video Data – To erase the BD-Video data from the persistent storage.
10. Netix: To de-activate your Netix account. The available options are:
• Netix ESN – To display the Netix ESN (Electronic Serial Number) for your player.
• De-activate Netix – To de-activate the access to your Netix account from your player. Once de-activated, you have to go to
the Home menu, enter the Netix option and go through the activation procedure again to be able to access Netix from your
player.
11. DivX® VOD DRM: To register or de-register your player for DivX® digital right management for video on demand. A register or
de-register code will be generated and shown.
12. Easy Setup: Choose this option to bring up the Easy Setup procedure.
39
Page 40
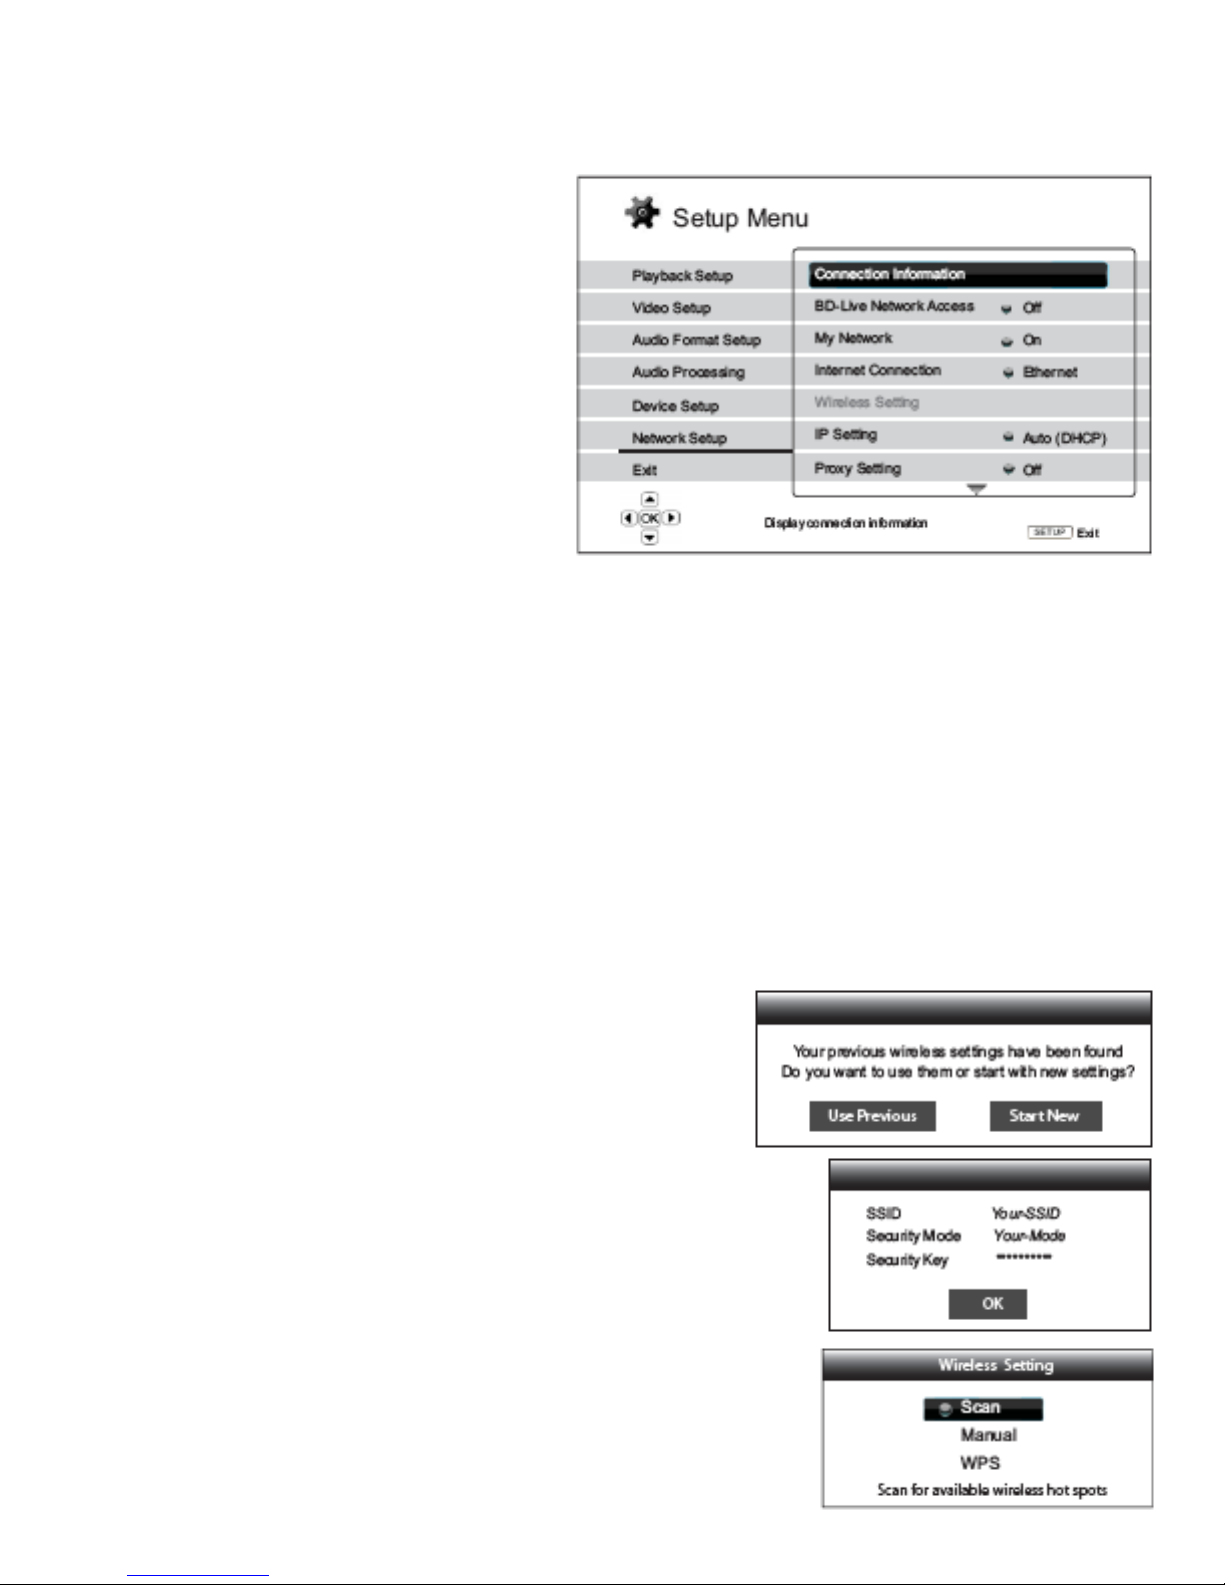
13. Reset Factory Defaults: To reset all settings to the factory default value. The remote control code, parental control password and
ratings will not be reset. This operation is only available when the playback is completely stopped or when there is no disc loaded.
Network Setup
The “Network Setup” section of the Setup Menu system allows
you to congure the parameters for the Internet connection of
the player, test the connection and restrict BD-Live access. The
menu items in this section are:
1. Connection Information: To display the current internet
connection information, such as connection type, IP
address, Ethernet MAC, Wireless MAC, etc.
2. BD-Live Network Access: To restrict BD-Live content
access. The available options are:
• On – BD-Live access is permitted.
• Limited – BD-Live access is permitted only for
contents that have a valid content owner certicate.
Internet access is prohibited if the BD-Live contents
do not have a certicate. This option ensures that you
are accessing only authentic content, although it may
block your access to smaller independent content providers.
• Off (recommended) – BD-Live access is prohibited.
3. My Network: To set the My Network (in-home media sharing) client option. My Network option enables the player to stream audio,
video and photo from media servers within the home network. The available options are:
• On (default) – Enable the My Network client. A broadband internet connection is required, and the available media servers are
listed inside the “My Network” option of the Home menu.
• Off – Disable the My Network client. No media servers will be shown in “My Network” option, and a warning message will
pop up once you enter the “My Network” option.
4. Internet Connection: To select the internet connection type. The available options are:
• Ethernet (default) – Connect to the internet through the Ethernet cable. Please refer to the connection instructions. Choosing
this will make the “Wireless Setting” option gray and un-selectable.
• Wireless – Connect to the internet through the external wireless adaptor. Please refer to the connection instructions. Choosing
“Wireless” will start the wireless setting procedure, and also make the “Wireless Setting” option in the next row selectable.
• Off – Internet access is prohibited. This will make all the remaining options in Network Setup screen gray and un-selectable.
5. Wireless Setting – To start the wireless setting procedure. The wireless setting
procedure can be started either by selecting the “Wireless Setting” option, or by
selecting “Wireless” in “Internet Connection” option. The procedure is described
as follows:
• The player rst searches for the last successful wireless settings. If they exist, a
message will pop up to remind you. The available options are:
• Use Previous – To use the last successful wireless setting. A summary of the
previous wireless settings will pop up showing information like SSID (Service Set
Identier), Security Mode and Security Key (in asterisk *). Then a connection test will
be automatically performed and the test result is shown on the screen.
• Start New – To start a new wireless conguration. The UMT supports three wireless
conguration methods and the available options are:
• Scan – To scan for available wireless hotspot. The player automatically scans
for any available wireless hotspots nearby and the search results are listed in a
window. You can press the UP/DOWN ARROW buttons to highlight a hotspot
then press the ENTER button to select it. If this hotspot is secured, you need to
input the security key using the remote control. Then a connection test will be
automatically performed and the test result is shown on the screen.
• Manual – To manually set the information for a wireless hotspot. You need to
use the remote control to input the SSID, select the Security Mode and input the
Security Key. Then a connection test will be automatically performed and the
40
Page 41
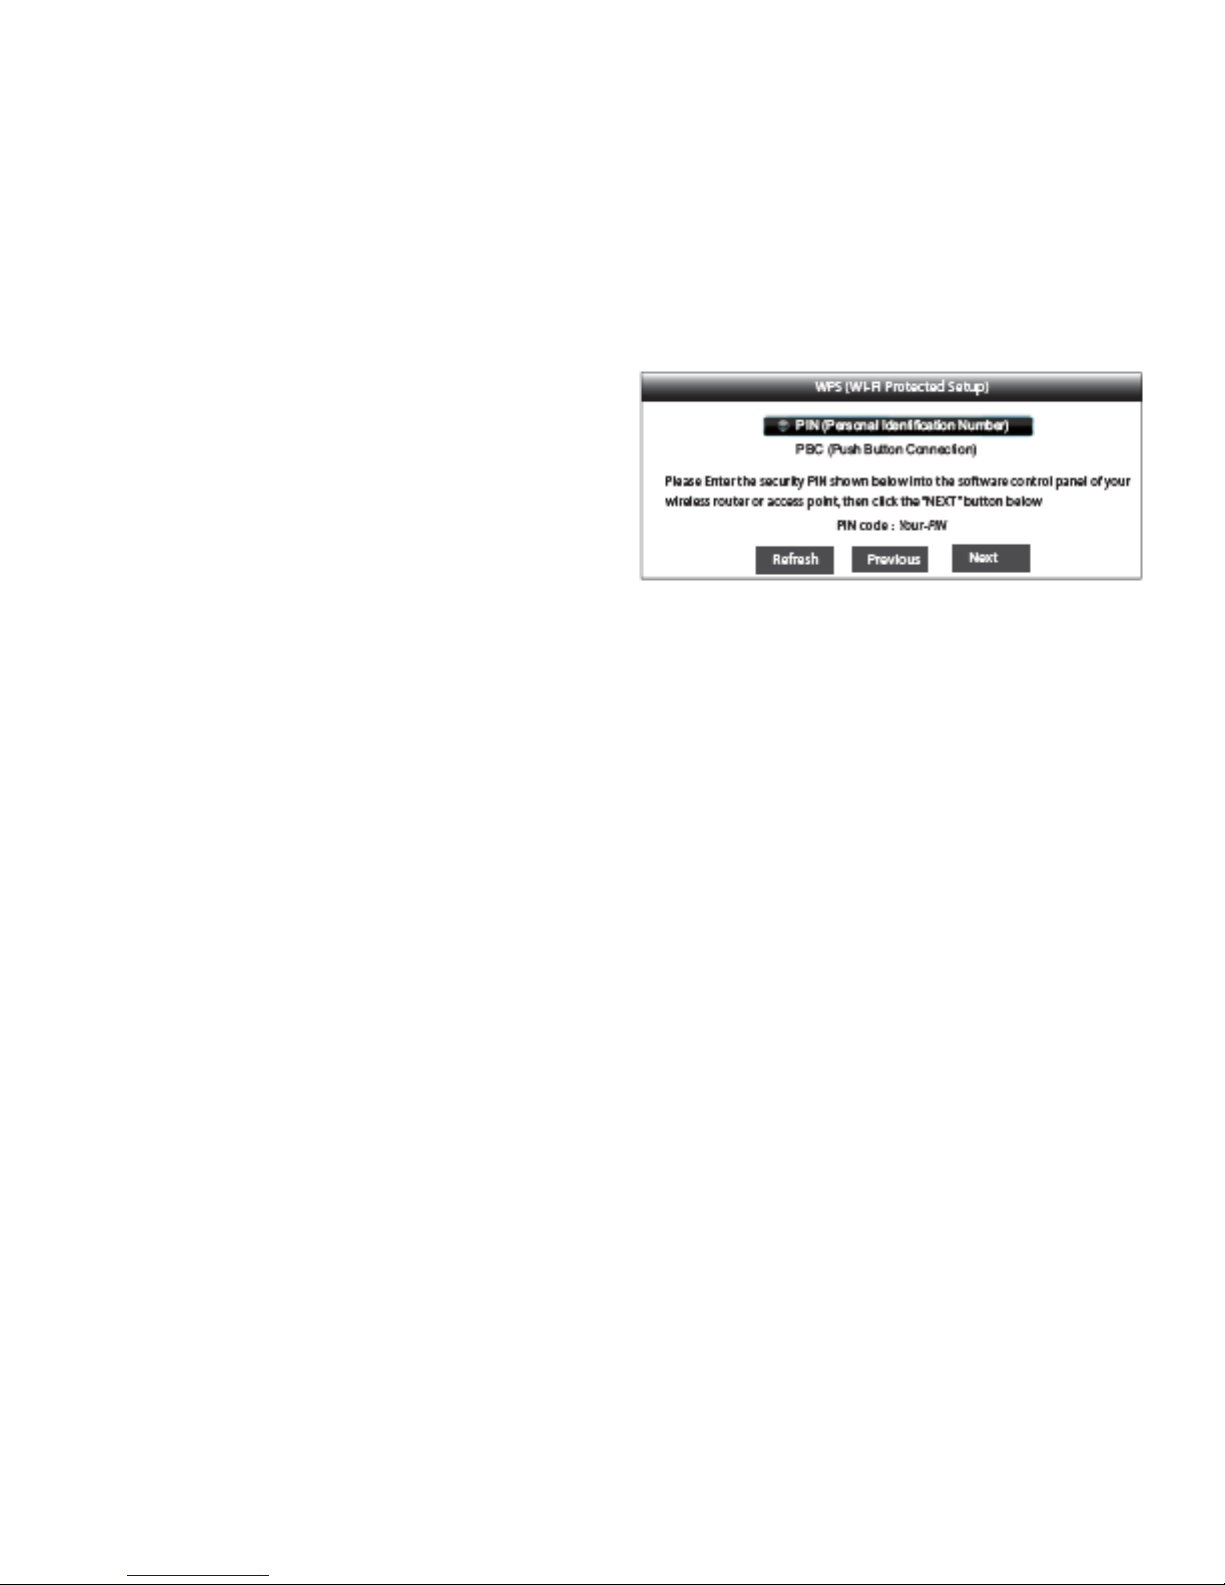
test result is shown on the screen.
• WPS – To start the Wi-Fi Protected Setup. BDP-93 supports the WPS standard to provide an easy and secure establishment
of a wireless home network. The available options are:
• PIN – To congure the WPS using a Personal Identication Number. UMT will generate a PIN and you need to input
it into the software control panel of your wireless router or access point. Please follow the on-screen instructions.
• PBC - To congure the WPS using Push Button Control. You need to push a PBC button on your wireless router or
access point to initiate the wireless connection. Please follow the on-screen instructions.
NOTE: SSID is short for Service Set Identier. It is an identier for each wireless router or access point, and is also referred as a network
name. WPS is short for Wi-Fi Protected Setup (WPS). It is the latest standard for easy and secure wireless home network conguration.
It is also named Wi-Fi Simple Cong. To use WPS, a WPS compatible router or access point is required.
6. IP Setting: To determine how the player obtains its IP address. The
available options are:
• Auto (DHCP) - The player automatically obtains its IP address
information using DHCP (Dynamic Host Configuration
Protocol). This is the default setting. In most cases, automatic
IP conguration can be used.
• Manual – Manually enter the numeric IP address information.
Set the IP conguration manually only when the router has
no DHCP server functions or when the router’s DHCP server
function is disabled. For more information on how to manually
congure the Internet connection and what values to use, please
consult your broadband router/modem instruction manuals or call your Internet service provider.
• Internet Connection – Depending on your choice in “Internet Connection” option, this can be “Wireless” or “Ethernet”.
• IP Address: The Internet Protocol address of the player. When “IP Setting” is set to “Auto (DHCP)”, the value displayed
here is obtained using DHCP and cannot be changed.
• Subnet Mask: Each IP address has an associated subnet mask. It is used by the player to decide whether to route network
trafc through the router or directly to another device on the same network. When “IP Setting” is set to “Auto (DHCP)”,
the value displayed here is obtained using DHCP and cannot be changed.
• Gateway: The IP address of the router. It is also called “default gateway” or “default router”. When “IP Setting” is set to
“Auto (DHCP)”, the value displayed here is obtained using DHCP and cannot be changed. S E T U P M E N U O P T I O
N S 78
• DNS 1: The IP address of the rst (primary) DNS (Domain Name System) server. DNS is the mechanism to translate humanreadable addresses (such as www.msbtech.com) to numeric IP addresses. When “IP Setting” is set to “Auto (DHCP)”, the
value displayed here is obtained using DHCP and cannot be changed.
• DNS 2: The IP address of the second (secondary) DNS server. When “IP Setting” is set to “Auto (DHCP)”, the value
displayed here is obtained using DHCP and cannot be changed.
7. Proxy Setting: To congure the proxy server settings. The proxy server works as an intermediary for network communication between
clients and other servers, which can provide benets like security, anonymity, speedup or circumventing regional restrictions.
• On – To access the Internet via a proxy server.
• Proxy Host: To enter the proxy host name using the remote control.
• Proxy Port: To enter the proxy host port number using the remote control.
• Off (default) – Do not use a proxy server.
8. Connection Test: To test the Internet connection. It is recommended that you test the connection when you initially connect the player
to the Internet, or whenever changes to “Connection Method”, “Wireless Setting”, “IP Setting” and other network parameters are
made.
41
Page 42
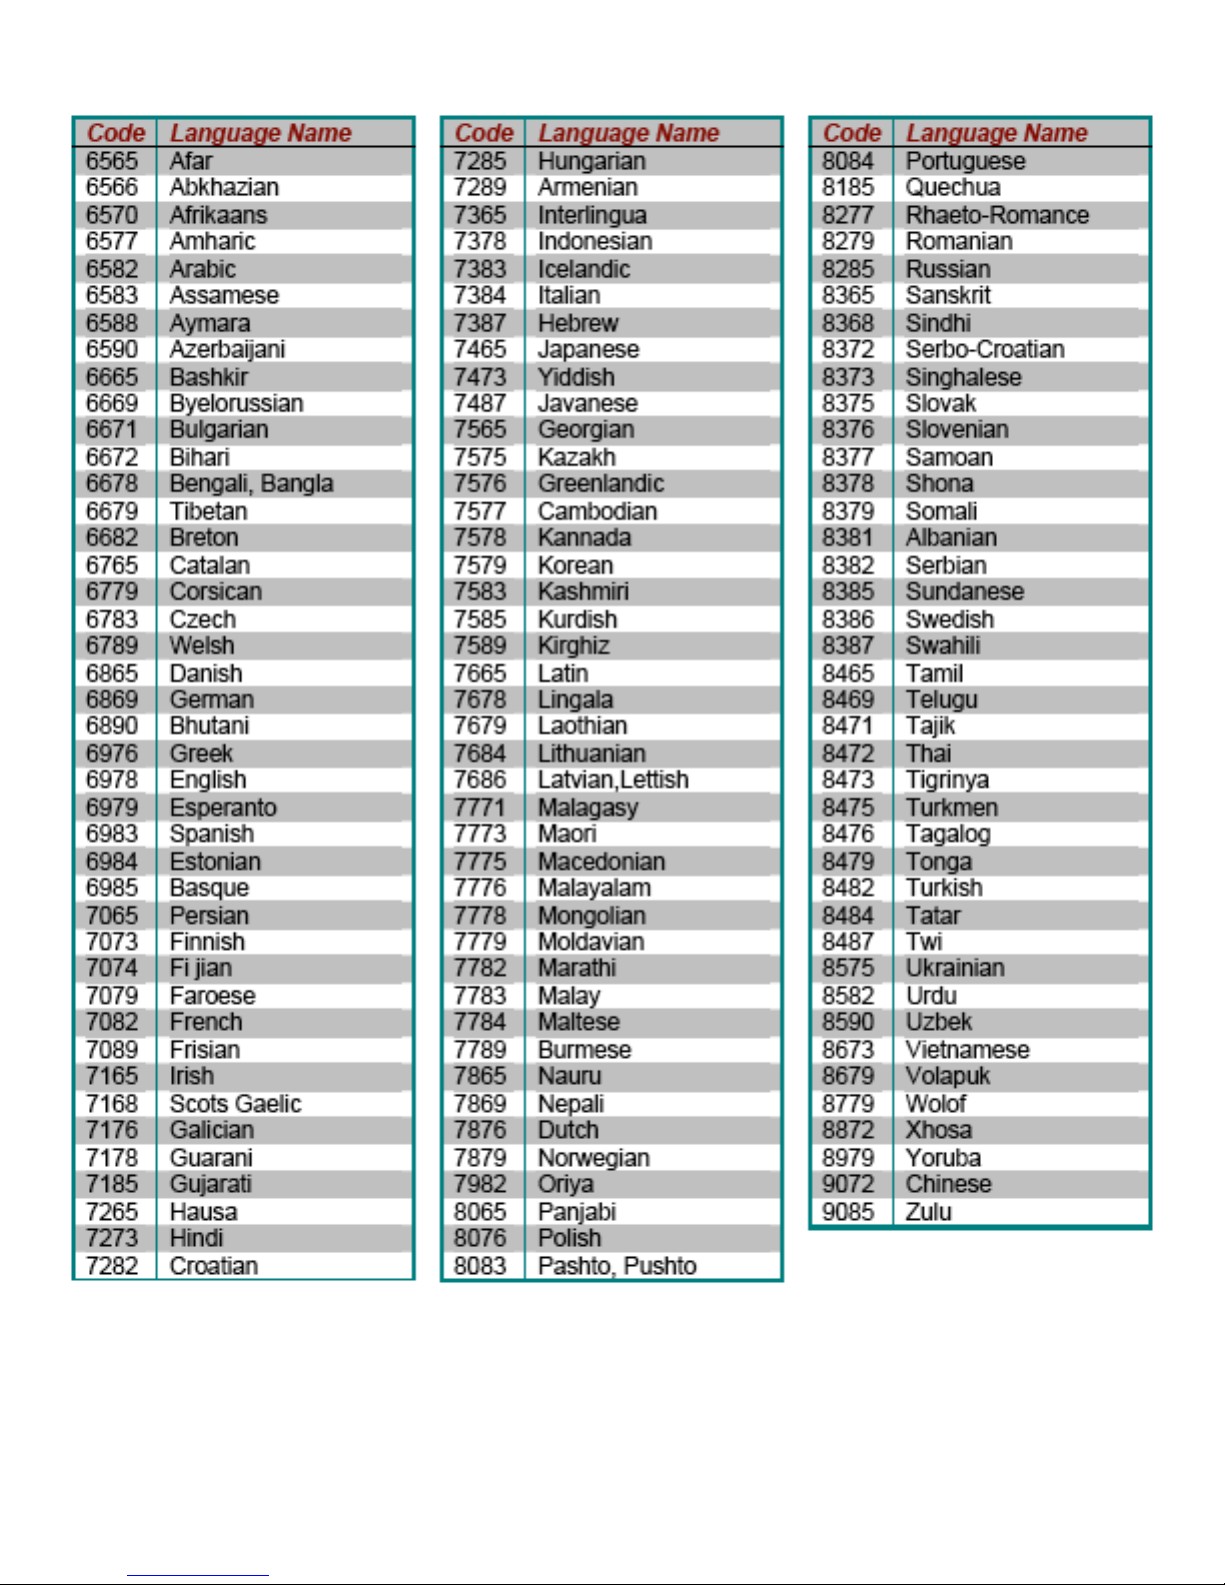
Language Code List
All MSB products carry a one year warranty. No returns accepted without an RMA. All units must be returned to the distributor in the
country of origin. MSB will not make warranty repairs on grey market products. Be sure the product you purchased is authorized to be
in your country. Upon receipt, MSB will repair or replace any defective product. All product shipped FOB Aptos. Shipping and shipping
damage is the responsibility of the consignee.
Warranty
42
Page 43
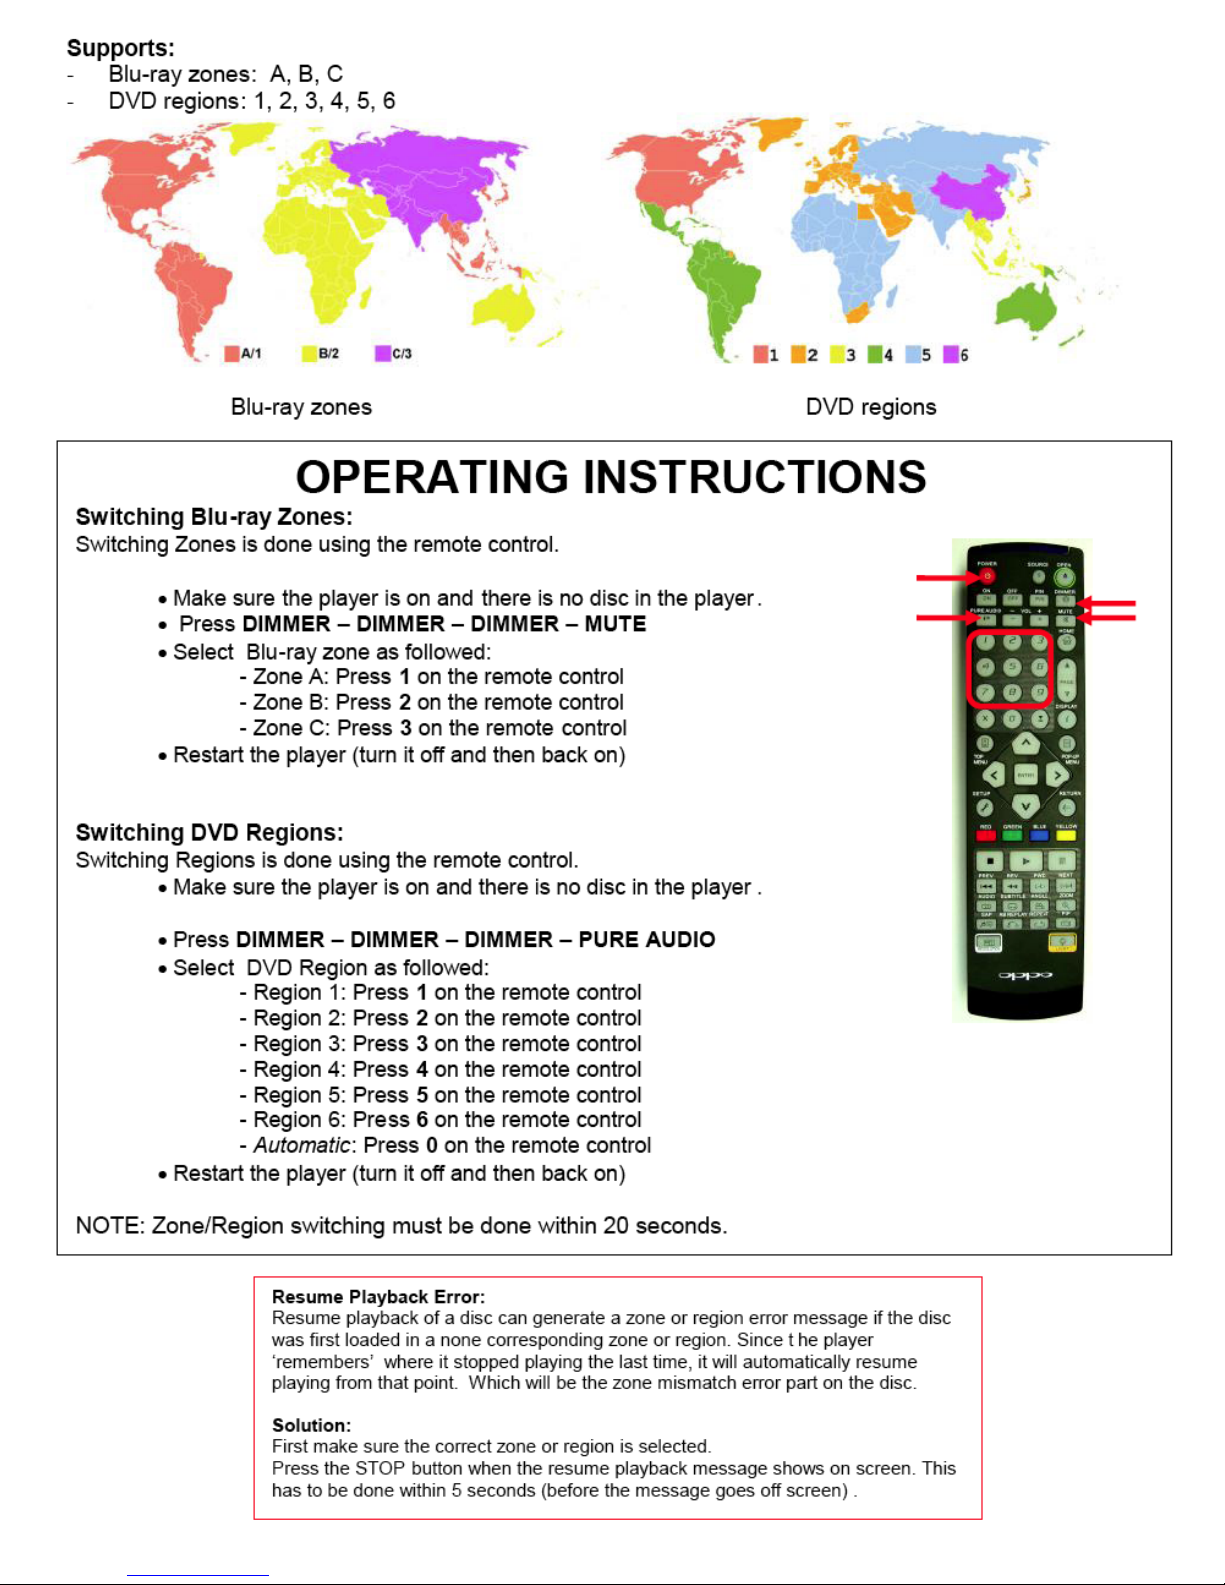
Optional Zone Free Upgrade
43
Page 44

44
 Loading...