

Page 1
© 2001, MSA Rose P/N 10016732, Rev. B
Lynx Hoist
™
Personnel/Materials Hoist
User Instructions
WARNING
National standards and state, provincial and federal laws require the user to
be trained before using this product. Use this manual as part of a user safety
training program that is appropriate for the user’s occupation. These instructions must be provided to users before use of the product and retained
for ready reference by the user. The user must read, understand (or have
explained), and heed all instructions, labels, markings and warnings supplied with this product and with those products intended for use in association with it. FAILURE TO DO SO MAY RESULT IN SERIOUS INJURY OR DEATH.
1.0 LYNX HOIST DESCRIPTION
The Rose Lynx Hoist is suitable for lifting, lowering and positioning either personnel or materials. It is
designed for use in conjunction with Rose anchorage connectors, fall arresters and other components to
make up complete systems for manriding, work positioning, materials handling, emergency rescue and
evacuation. Rose components are available to provide backup fall arrest for all such systems.
There are three standard Lynx Hoist types. They differ only in the configuration of their integral mounting
brackets. Two standard line lengths are available in either galvanized or stainless steel wire rope. Other line
lengths can be special ordered. All hoist models are equipped with an emergency drive and air drive
adapter. All standard Lynx Hoists can be retrofitted with these upgrades. The principle Hoist specifications
are present in Appendix A. A list of Lynx Hoist types and models is provided in Appendix B. Accessories
and companion products, including the Hoist air drive, are listed in Appendix C. All models meet current
regulations for personnel related mechanical devices.
The three standard Lynx Hoist types are:
• Figure 4: Side-mount hoist for installation on the Lynx Tripod.
• Figure 5: Boom-mount hoist with an extension frame and anchorage hook for installation on the Lynx
Tripod and a variety of other suitable anchorage connectors
• Figure 6: Socket-mount hoist for use with the Rose vehicle mounted davit
These three mounting arrangements may be interfaced with other anchorage connectors approved by
Rose. Additionally, custom anchorage connectors and mounting brackets may be obtained from Rose as
part of engineered systems for specific applications.
All Lynx Hoists embody several standard features:
!
Model Number
Serial Number
Page 2
Page 2 © 2001, MSA Rose
P/N 10016732, Rev. B User Instructions n Lynx Hoist
• Rated working load 310 lbs (140 kg) for personnel and 620 lbs (280 kg) for materials & emergency
rescue
• An open drum wound with 3/16 in (5 mm) 7 x 19 galvanized or stainless steel wire rope, in lengths of
50 ft (16 m) or 105 ft (32 m)
• Reserve line on the drum to prevent overloading the point of line termination on the drum
• Built in shock absorber
• Clutched drive to prevent hoist overload, and reduce the possibility of injury to a person if snagged on
a structural member during lifting
• Triple-braking system
• Steel housing and mounting bracket
• Self-locking swivel snaphook
• Manual crank handle with anti-backlash brake
• Level Wind Mechanism for a tangle free cable drum
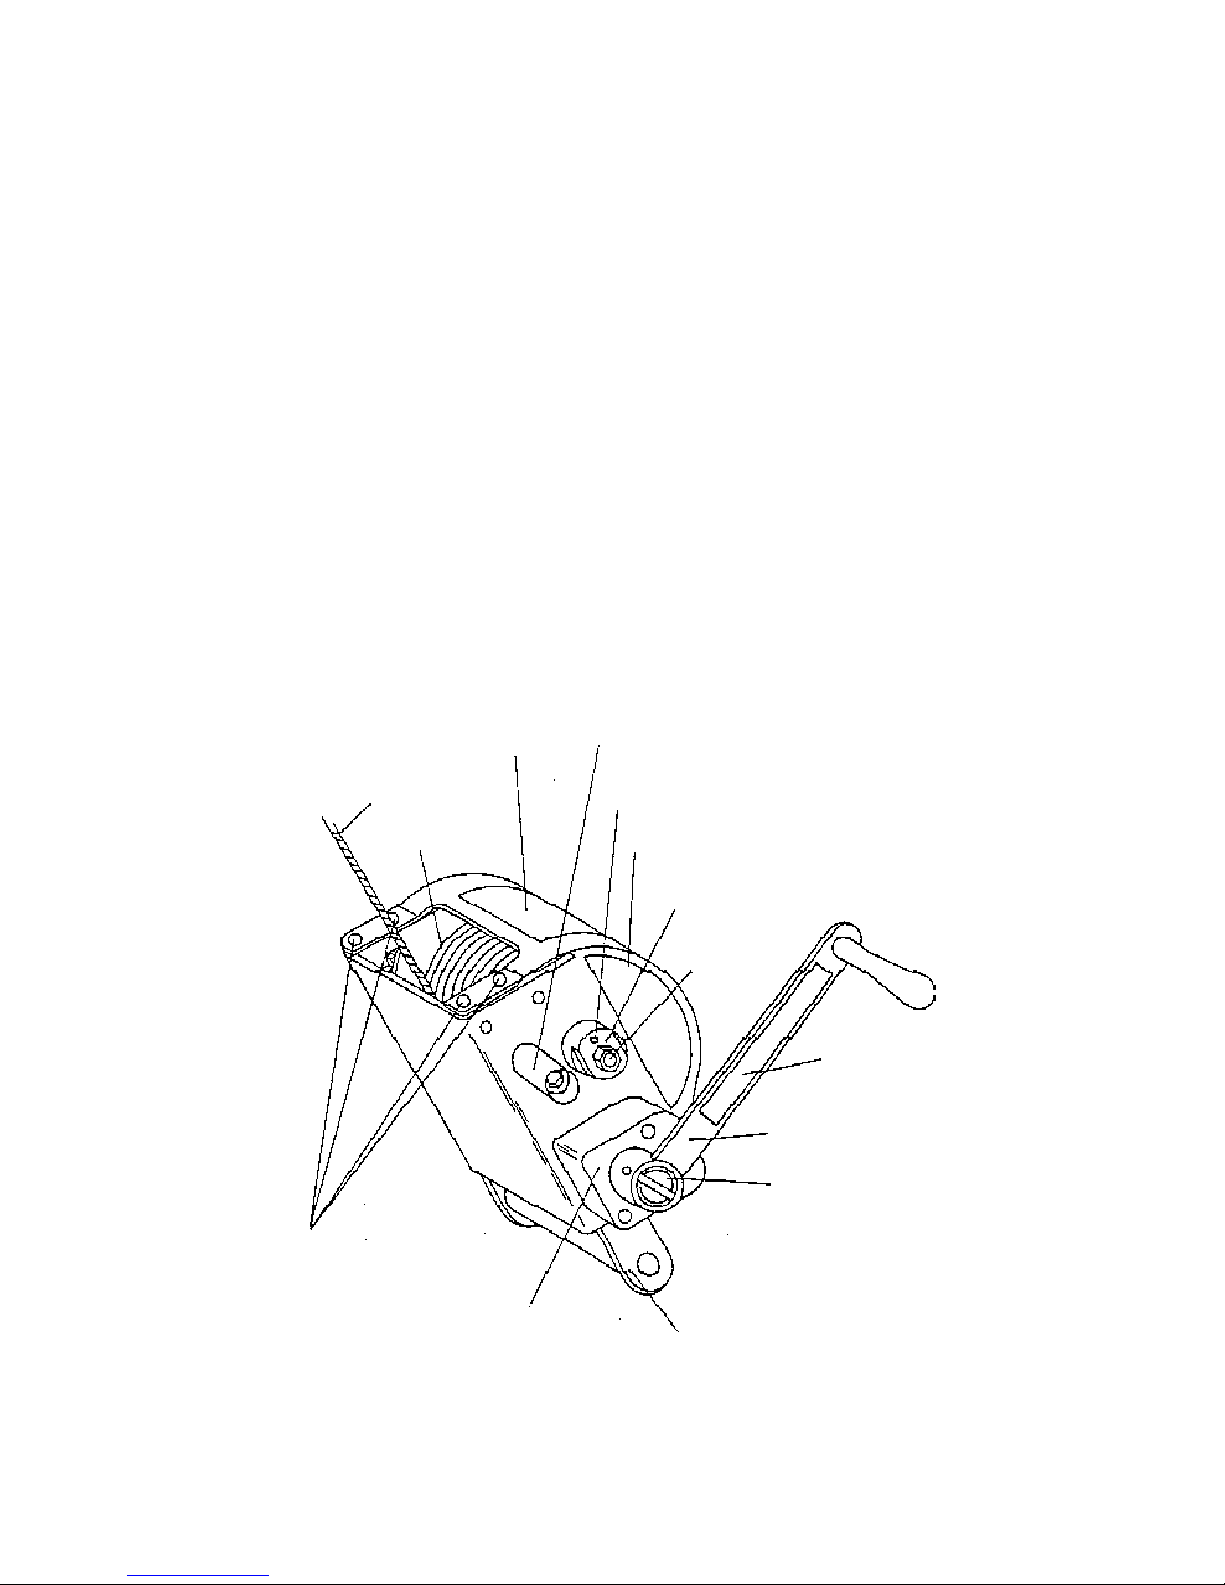
FIGURE 1
LYNX HOIST PERSONNEL/MATERIALS HOIST (VIEW FROM HANDLE SIDE)
Instruction Label
Drum
Hoist Line
Torque Resistor
Shaft
Impact Load Indicator
Air Drive Installation Label
Load Indicator Label
Drum Axle
Handle Label
Hoist Crank Handle
Hoist Drive Shaft
Carrying Handle (Boom and Side-Mount Models)
Drive Mechanism Housing
Hoist Housing Screws
Page 3
© 2001, MSA Rose Page 3
User Instructions n Lynx Hoist P/N 10016732, Rev. B
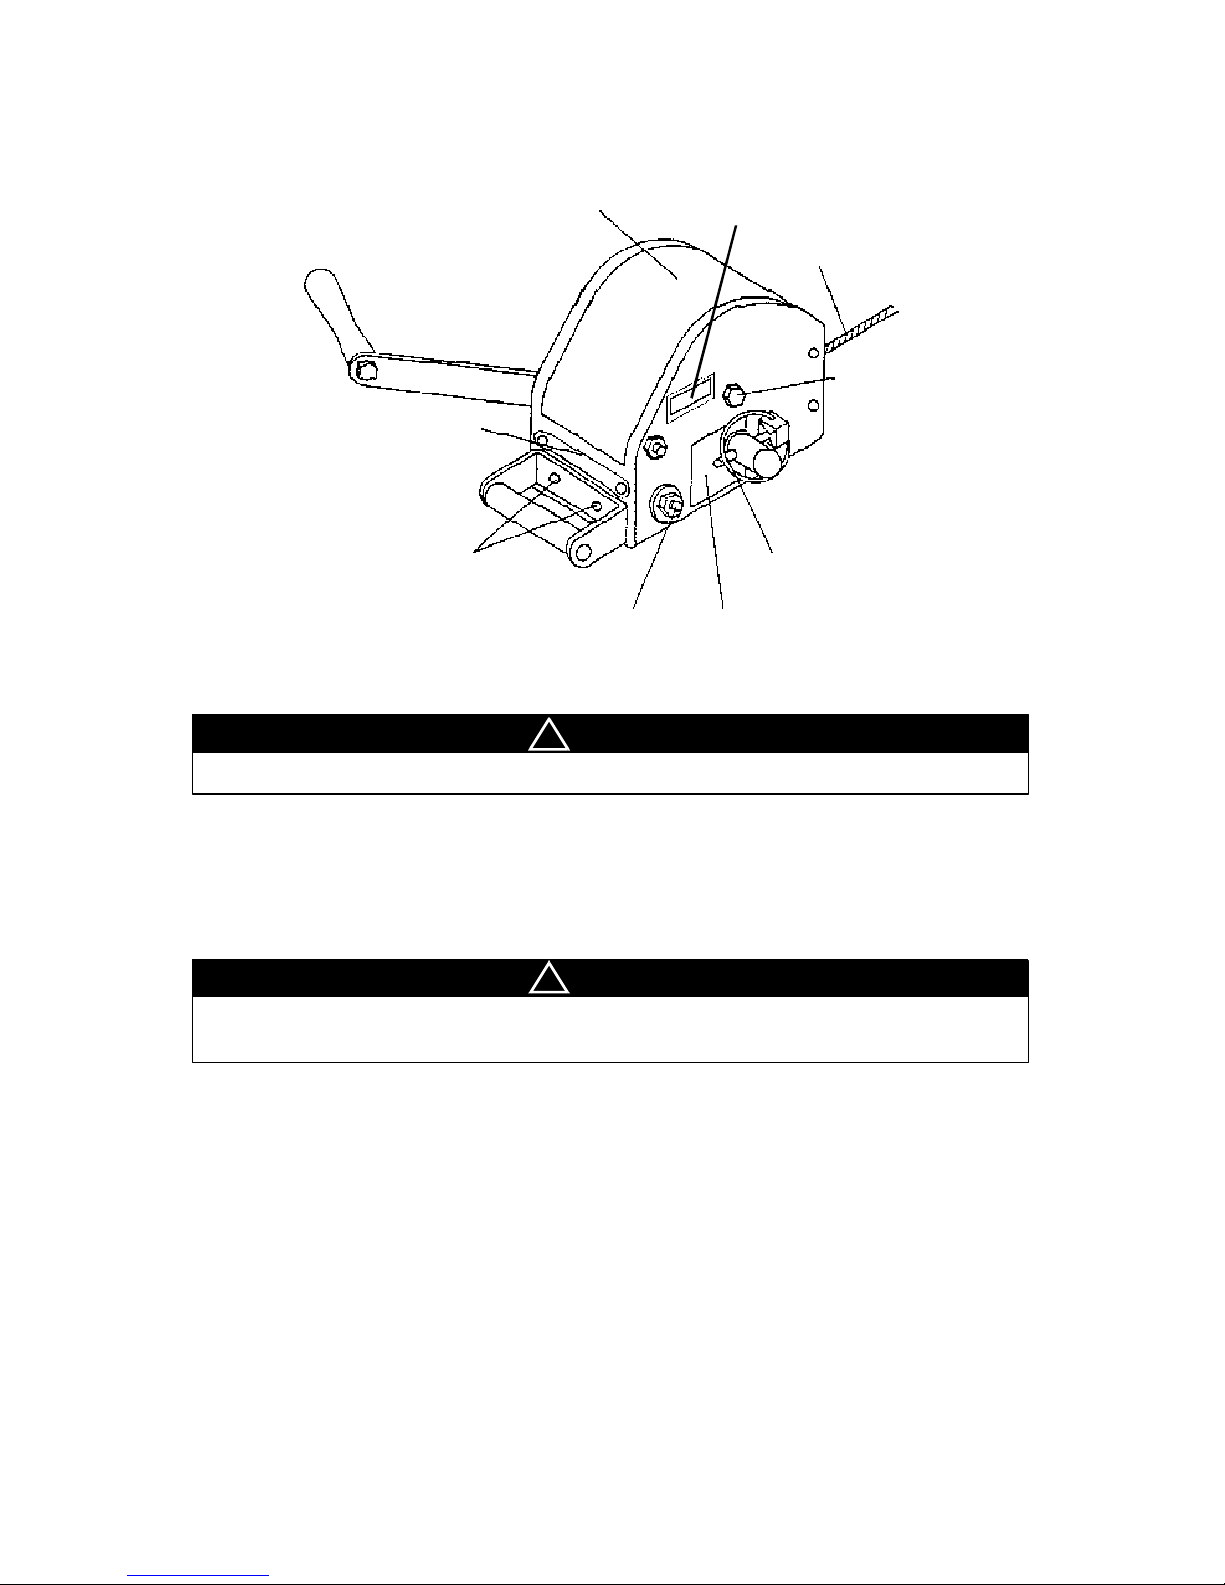
FIGURE 2
LYNX HOIST PERONNEL/MATERIALS HOIST (REVERSE VIEW)
! CAUTION
The user should prevent the buildup of slack line that would allow free fall.
Internal mechanisms of the hoist are protected by a formed steel housing. All parts are zinc chromate plated
to resist corrosion. The load end of the line is terminated with a self-locking swivel snaphook which requires
two separate and distinct manipulations to unlock and open the snap gate. When released, the snap gate will
automatically close and lock. See Figure 3.
The hoist has a level wind mechanism which help the guide line to lay and wrap tightly around the drum.
! CAUTION
To prevent loose coils of line on the drum, always maintain at least 15 lbs
(6.75 kg) of tension on the line when paying it out.
The hoist is normally operated with the standard manual crank handle shown in Figure 1. To extract line or
lower a load, rotate the handle in a counterclockwise direction. To retract line or raise a load, rotate the handle
in a clockwise direction. To suspend a load, release the handle. A brake in the drive mechanism inhibits the
drum from free wheeling. The brake operates even when the crank handle is removed for attachment of the
optional air drive.
Air Drive Option
An optional air drive system – P/N 506420 – is available for use in applications requiring long line runs or
rapid retrieval of a load. The air drive system consists of an air-driven motor with a filter-lubricator that
cleans, lubricates and regulates the pressure of plant air or compressed air supplied to the motor.
Instruction Label
Hoist Line
Drum Axle
Serial Number Label
Emergency Drive Activator Pin
Emergency Drive
Label
Hoist Drive Shaft
Carrying Handle Retention Screws
Date of Manufacture Label
Page 4
Page 4 © 2001, MSA Rose
P/N 10016732, Rev. B User Instructions n Lynx Hoist
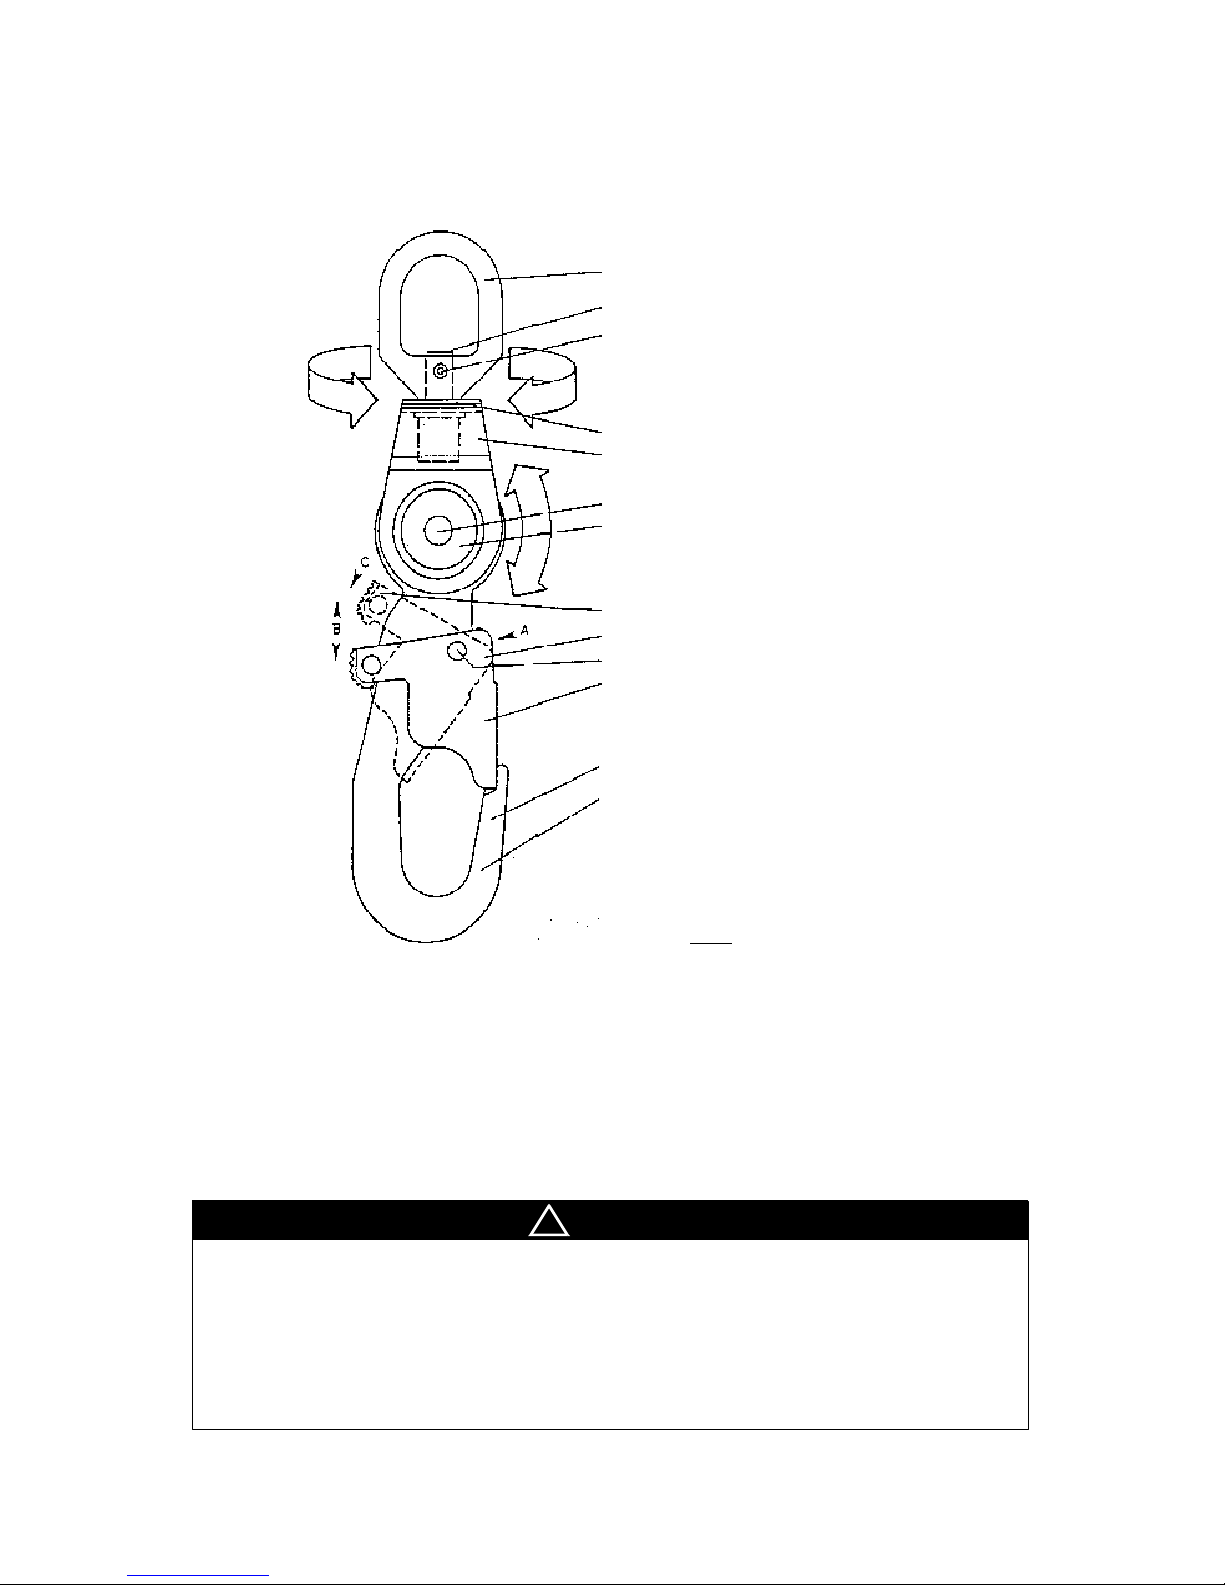
FIGURE 3
RL20 SWIVEL SNAPHOOK
Swivel Eye
Stud
Roll Pin
Side Plate (upper)
Side Plate (lower)
Rivet
Washer (2)
Thumb Grip
Trigger (lock)
Rivet (2)
Gate
Nose
Snaphook Body
Caution!
Gate should not open under pressure from any direction unless
unlocked. If this condition is not met, or if any steps A, B or C cannot
be performed properly, remove
the snaphook from service.
EMERGENCY DRIVE
All hoists are equipped with an optional emergency drive. See Figure 2. Activation of the emergency drive
bypasses the load-limiting clutch and permits emergency lifting in excess of the maximum rated working
load.
! CAUTION
The emergency drive must be used only in case of an emergency where loads
in excess of the rated working load must be raised or lowered. Immediately
after emergency drive use, the hoist must be removed from service and
returned to the manufacturer for inspection and service. Before use, the hoist
must be inspected for presence of the emergency drive activation pin.
Remove the hoist from use if this pin is missing.
Page 5
© 2001, MSA Rose Page 5
User Instructions n Lynx Hoist P/N 10016732, Rev. B
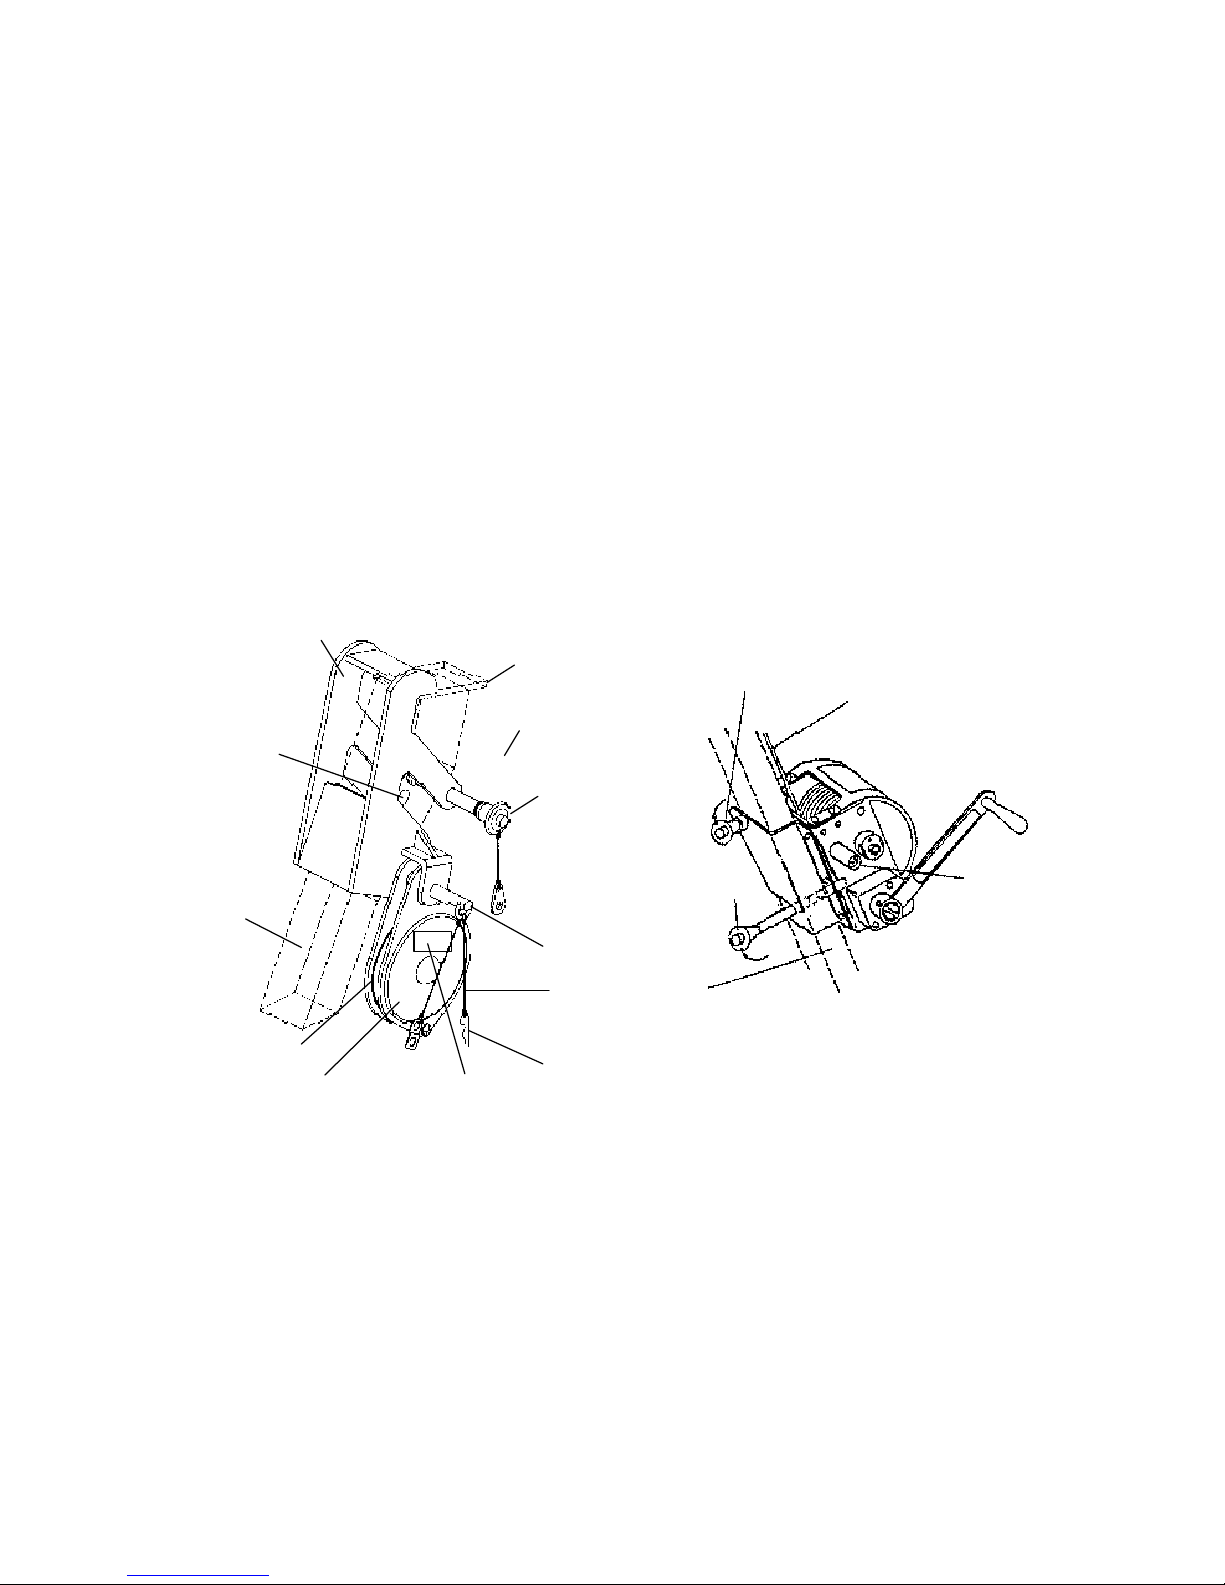
1.1 DESCRIPTION OF SIDE-MOUNT HOIST
The Side-Mount hoist is designed for use with the Lynx Tripod – P/N 10022050, P/N 10022051. See Figure
4. It may also be used with other anchorage connectors approved by Rose. The Side-Mount hoist serves
as the primary lifting-lowering device for systems which use the tripod to position equipment for confined
space entry above the area to be accessed. The hoist mounts to the side of the tripod leg. This position
permits operation of the hoist by a surface attendant positioned away from the confined space access point,
maximizes the usable space to the interior of the tripod and increases stability by lowering the tripod’s center
of gravity.
When installed on the Lynx Tripod, a pulley mounting bracket and Side-Mount pulley – P/N 506473 – are
required for rigging the Side-Mount hoist line at the tripod head. This permits full use of the interior headroom
of the tripod.
Note: When using the hoist for lifting-lowering of personnel, an independent fall arrest system is required. The
Rose Lynx Rescuer retractable lifeline or Rose Dyna-Lock™ is recommended. See section 1.4.2. Other fall
arrest systems are also available from Rose.
FIGURE 4
SIDE-MOUNT LYNX HOIST
Tripod Head
Lanyard (attached to
pulley bracket)
Ball Lock Pin
Clevis Pin
Lanyard
(attached to pulley bracket)
Hairpin Cotter
Pulley LabelSide Mount Pulley
Hoist Line
Tripod Leg
(outside face)
Tripod Leg
Hinge Pin
Side Mount Pulley Bracket
Hoist Line
Air Drive Torque
Resistor Shaft
Tripod Leg
(Outside Face)
Ball Lock Pin (attached
to tripod)
Ball Lock Pin (attached
to hoist)
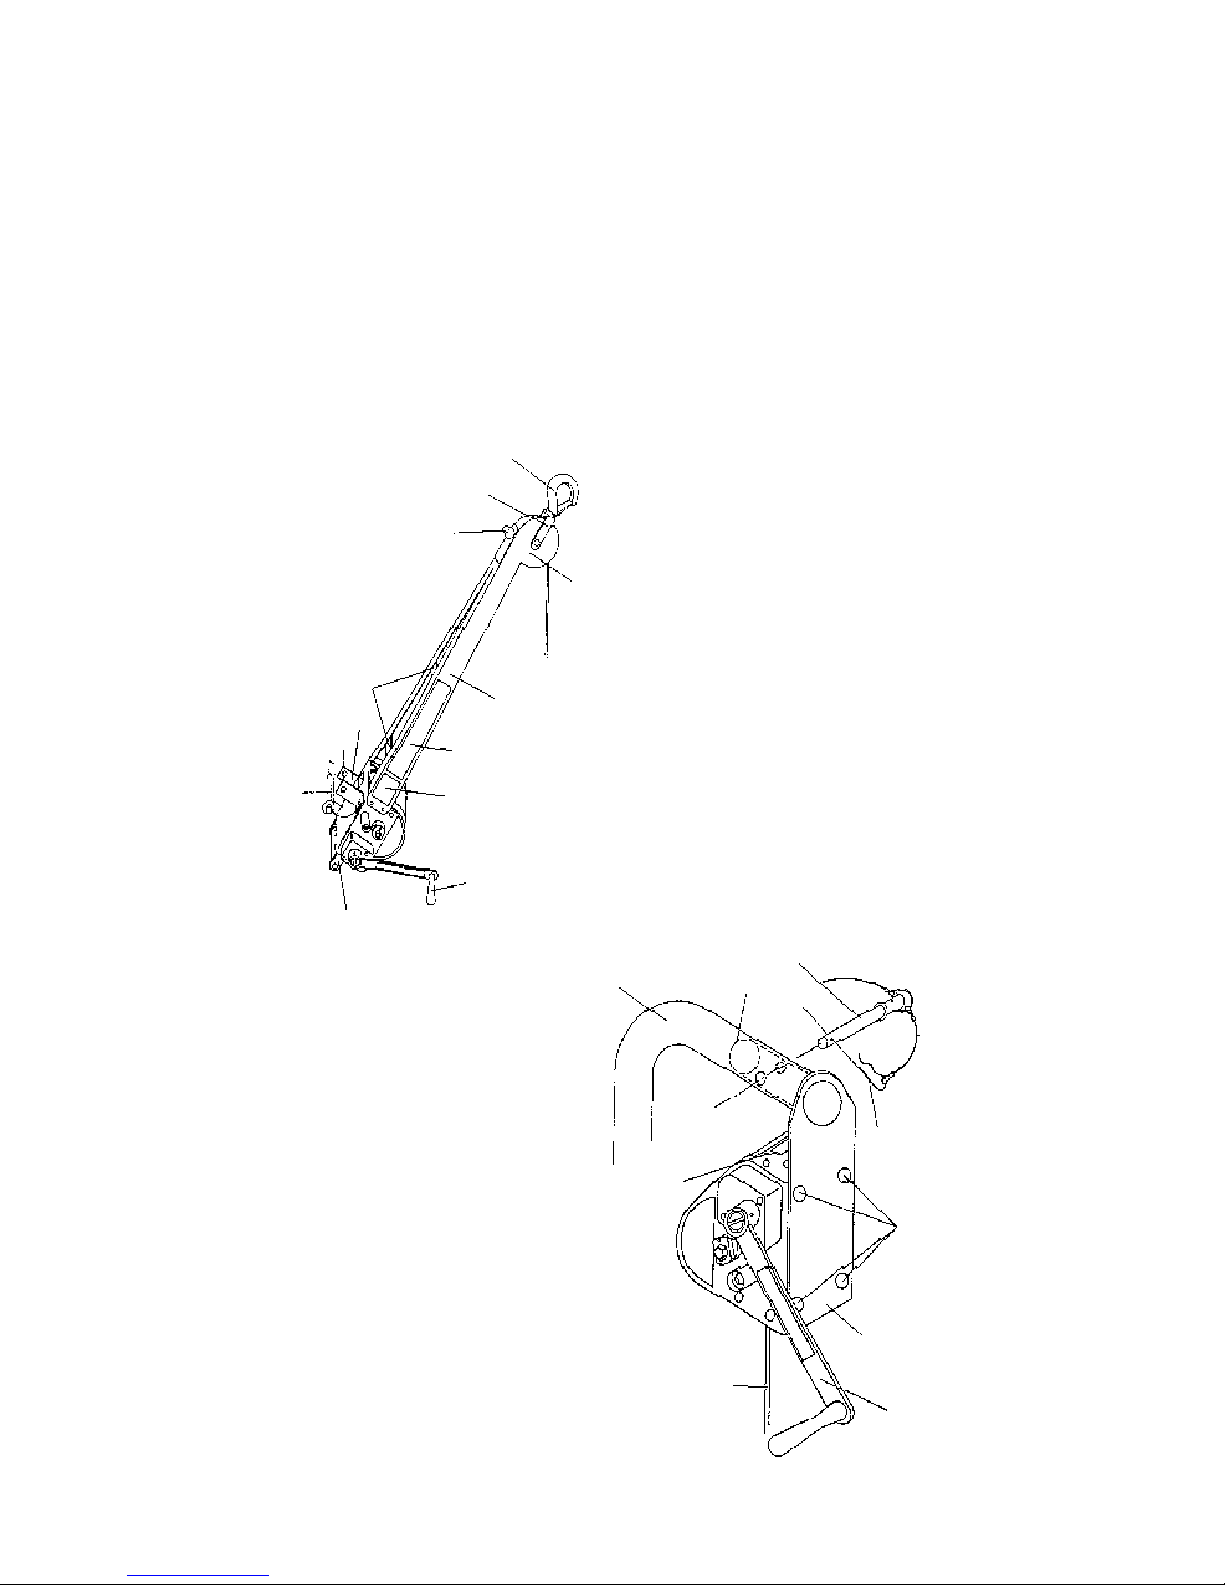
1.2 DESCRIPTION OF BOOM-MOUNT HOIST
The Boom-Mount hoist consists of the basic hoist with an integral 42 in (107 cm) extension frame. See
Figure 5. The Boom-Mount hoist is compatible with the Lynx Tripod, and can also be used in numerous
applications with a variety of anchorage connectors.
The extension frame enable operation of the hoist by a user positioned away from the area to be accessed.
Connection of the hoist to a suitable anchorage connector over the work area is enabled by a connector
yoke/anchorage hook assembly integrally mounted at the end of the extension frame. Both the connector
yoke and anchorage hook will swivel, permitting the user to position the anchorage hook for speedy
connection to the previously installed anchorage connector.
Page 6
Page 6 © 2001, MSA Rose
P/N 10016732, Rev. B User Instructions n Lynx Hoist
1.3 DESCRIPTION OF SOCKET-MOUNT HOIST
The Socket-Mount hoist is manufactured for use with the Rose Davitruck System (P/N 506356) which is a
vehicle-mounted system. The vehicle-mounted davit provides an anchorage connection means in a variety
of situations where anchorage connectors cannot be mounted directly above the work area. The davit may
be rotated through 360 degrees, permitting attachment of equipment for fall protection and materials handling
at a stable work surface, and subsequent positioning of personnel and/or materials over the work area. See
Figure 6.
FIGURE 5
BOOM-MOUNT LYNX HOIST
Anchorage Snaphook
Anchorage Connector Yoke
Anchorage Hook Stop
Sheave Housing
Extension Frame
Instruction Label
Caution Label
Hoist Crank
Handle
Handle
Ball Lock Pin
Tripod Mounting
Bracket
Extension Frame
Handles
FIGURE 6
SOCKET-MOUNT LYNX HOIST
Davit Arm
Mounting Tube
Clevis Pin (attached to davit)
Hairpin Cotter
Mounting Bracket
Attachment Screws
Hoist Mounting Bracket
Crank Handle
Hoist LIne
Service Date Label
Page 7

© 2001, MSA Rose Page 7
User Instructions n Lynx Hoist P/N 10016732, Rev. B
1.4 ACCESSORIES AND COMP ANION PRODUCTS
A list of Lynx Hoist accessories and companion products is provided in Appendix C.
! CAUTION
Under no circumstances should products of other manufacturers be used in
conjuction with Rose products or systems without the prior written consent of
Rose Manufacturing Company. Use of incompatible products by other manufacturers may result in serious personal injury or death, and damage to
equipment.
2.0 INSTALLATION
2.1 INSTALLING THE BOOM-MOUNT HOIST TO OTHER
ANCHORAGES
The anchorage used to suspend the hoist for personnel or materials hoisting must be strong enough to
support the load with an adequate safety factor. The required safety factors are 10:1 for personnel, 5:1 for
materials. For personnel hoisting, the anchorage must have a strength of at least 5,000 lbs (22 kN). A backup
fall arrest system must be utilized.
! CAUTION
Select the anchorage and anchorage connector with which the hoist will be
used under the guidance of a qualified person. If any question arises as the
suitability of the anchorage connector for the intended application,
discontinue installation of the hoist and contact the manufacturer.
! CAUTION
Install the installation snaphook so that unwanted movement of the snap
and attached hoist is prevented. Otherwise, movement of a load may cause
sudden movement of the snaphook and result in loss of balance by the
operator.
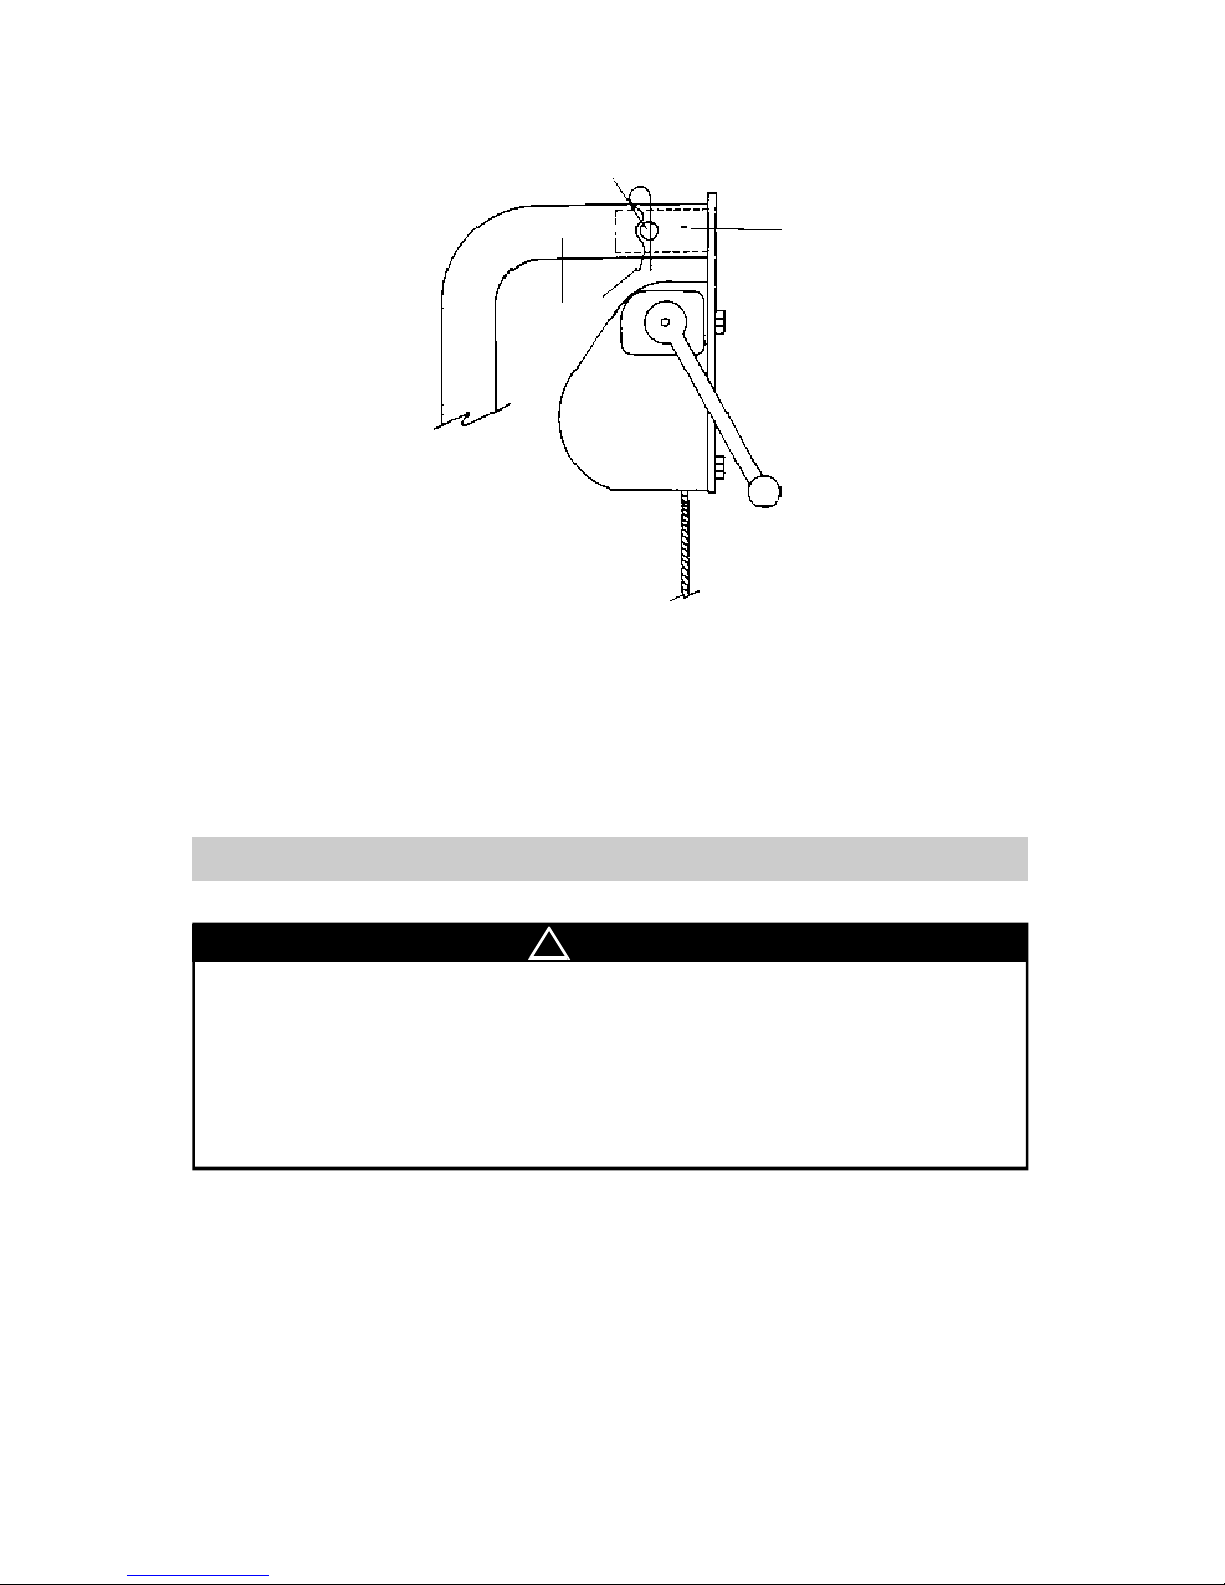
2.2 INSTALLING THE SOCKET-MOUNT HOIST
The socket-mount hoist is designed for installation of Rose vehicle-mounted davits. Socket-mount hoists are
supplied with a mounting tube which interfaces with the boom arm of the davit. To install the hoist, follow the
steps below in sequence and refer to Figure 16.
Page 8
Page 8 © 2001, MSA Rose
P/N 10016732, Rev. B User Instructions n Lynx Hoist
FIGURE 16
INSTALLATION OF SOCKET-MOUNT HOIST2.5.1
Step 1: Slide the hoist-mounting tube (A) into end of davit arm (B). If installing the hoist on a DaviTruck
vehicle-mounted davit, first erect the DaviTruck in accordance with the instructions and labels
accompanying that product.
Step 2: Align the holes in the davit arm with the holes in the hoist-mounting tube.
Step 3: Insert the davit boom arm clevis pin (C) through the holes in the davit arm and mounting tube.
Step 4: Secure the clevis pin with the hairpin cotter (D).
3.0 OPERATING INSTRUCTIONS
! CAUTION
Inspect the hoist according to the instructions in Section 4.0 of this manual
before and after each use. Also inspect each component with which the hoist
will be used according to the instructions accompanying that product. If any
component is found to be damaged, altered or defective, immediately
remove the system from use. Do not attempt field repair of equipment, and do
not attempt use of the system without first replacing any damaged, altered or
defective component.
3.1 RESCUE PLAN
Always have a rescue plan when using the hoist for lifting or lowering personnel. A fall arrest system should
always be used when lifting or lowering personnel, in case disconnection of the hoist line is necessary or
in case failure of the hoist or hoist anchorage means occurs. A backup lifeline such as the Lynx Rescuer,
which has an integral rescue winch that raises and lowers, is recommended to provide immediate rescue
capability.
Page 9

© 2001, MSA Rose Page 9
User Instructions n Lynx Hoist P/N 10016732, Rev. B
! CAUTION
Read this User Instruction completely and inspect the device before and after
each use. Read and heed all labels on the device. Failure to observe
instructions may result in serious or fatal injury. Keep this User Instruction in
a safe place, readily accessible to all who may need to use the hoist. Require
anyone intending to use the hoist to read this User Instruction carefully and
completely before using it. Periodically read all labels and this User
Instruction to reinforce knowledge.
3.3 OPERATION OF THE HOIST
! CAUTIONS
n Never leave a load hanging from the hoist while the hoist is unattended.
n Always be sure the line is pulling straight out from the hoist drum – never
at an angle.
n Never exceed the maximum rated loads listed on the hoist specification
label.
n Never alter the mechanics of the hoist except to retrofit the air drive adapter
kit in accordance with these instructions.
n Never use two or more hoists to raise or lower a heavier load. Load shifting
may place the entire load on one hoist, causing sequesntial failure of both
units.
n Always apply loads evenly. Do not jerk or bounce loads as this dynamic
loading may generate forces in excess of the maximum working load.
n Each time a load is lifted, first test the hoist by lifting the load a few inches.
n Always keep hands away from pinch points around load-bearing lines,
pulleys and drums during operation.
n Always ensure level winding when extracting or retracting line by guiding
the line. Use a gloved hand when guiding the line to avoid cuts and wire
slivers. Continually inspect for level winding during operation.
n It is critical that the hoist operator remain a safe distance away from any
fall hazard or load which could cause injury in the event of a loss of
balance on the part of the operator, or in the event of a load fall. When
operating the hoist in a fall hazard area, the operator must wear appropriate fall protection equipment connected to an independent anchorage.
n All labels must be visible and the operator should never come between the
hoist housing and line. The hoist operator must always operate the hoist
with the housing and crank between him or herself and the load.
n Never install the hoist where any member of the work crew must be
stationed in line with a tensioned hoist line. Should the line fail, stored
energy may cause recoil of the line with sufficient force to cause serious or
fatal injury.
Page 10

Page 10 © 2001, MSA Rose
P/N 10016732, Rev. B User Instructions n Lynx Hoist
The hoist is a lifting/lowering/positioning hoist only. It is not to be used as a fall arrest device. Personnel using
the hoist for lifting/lowering/positioning must have a backup fall arrest system, such as a Lynx Rescuer or
Dyna-Lock Retractable Lifeline, plus a full body harness. When using the hoist for personnel, never have
more than one person on the hoist at the same time. Never carry personnel and materials at the same time.
3.3.1 LOWERING A LOAD
To lower a load with personnel suspended, rotate the crank handle counter clockwise.
To extract line from the hoist when there is no suspended load, rotate the handle counter clockwise while
pulling on the line with at least 15 pounds of force. Unless the line is thus loaded, the drive will not rotate
the drum. This is an anti-backwinding feature that prevents loosening of the cable lays on the drum. To
resume lifting, make three (3) clockwise revolutions of the crank handle.
3.3.2 SUSPENDING A LOAD
To suspend a load, slowly release the crank handle. If the handle is not cranked in a clockwise direction
before suspending the load, slight rotation (up to 1/2 revolution) of the drum may occur as internal friction
disks are tightened. This will result in up to 9 in (23 cm) additional line being extracted from the drum.
3.3.3 RAISING A LOAD
To raise a load, rotate the crank handle clockwise. A clicking sound will be heard as line is reeled in. When
reeling in line, check to be sure the line wraps evenly and tightly around the drum.
! CAUTION
In the event of a fall, lift before lowering to disengage the secondary brake
pawls. Lift first at least one half turn of the drum before attempting to lower.
Unless the secondary brake pawls are disengaged after a fall, the hoist will
not pay out line.
3.4 USING THE AIR DRIVE
! CAUTION
When using the air drive, always keep the hoist crank handle close at hand in
case the air supply is interrupted and a load must be raised or lowered
manually.
Before using air drive, verify that the torque resistor shaft has been installed. See Figure 1.
To install and use the air drive, follow the following steps and refer to Figure 17.
Page 11

© 2001, MSA Rose Page 11
User Instructions n Lynx Hoist P/N 10016732, Rev. B
FIGURE 17
INSTALLATION OF AIR DRIVE ON HOIST
Step 1: Pull the handle (not shown in Figure 17) off the drive shaft (A).
Step 2: Align the pin (B) in the air drive head with the notch in the drive shaft (C), and the air drive housing
socket (E) with the previously installed torque resistor shaft (F).
Step 3: Push air drive fully onto the hoist shafts and rotate the air drive head by hand so that the pin (B)
engages the notch in the hoist drive shaft.
Step 4: To lift a load rotate the directional control knob on the air drive in a counter-clockwise direction and
depress the throttle lever. To lower the load, rotate the directional control knob in a clockwise
direction and depress the throttle lever.
Step 5: To remove the air drive, grip the body of the motor, apply slight rotation to the air drive head and pull
directly away from the hoist.
4.0 INSPECTION
All Rose products are inspected and tested under controlled conditions at the factory before shipment. User
inspection, maintenance and storage of the equipment takes on added importance once the device is
subjected to potentially severe environmental and work place conditions.
Before each use the user should carefully inspect the device by following the inspection instructions on the
specification and instruction labels. Inspect the functioning of the device according to the instructions in this
section and examine the unit for excessive wear, damage, alteration or missing parts.
A recommended inspection form is included at the back of this manual.
Note: Inspection items marked with an asterisk (*) need not be performed daily, but must be performed at
regular intervals and before and after lengthy periods of storage. The frequency of periodic inspection
depends on the severity of environmental conditions and frequency of use of the unit, but must be performed
at least every six months.
Periodic inspection must be performed by a competent person and must include all inspection items listed
in this section. The results of this inspection must be documented using the inspection forms at the end of this
User Instruction. The appropriate month and year on the inspection grid on the product must also be
permanently marked using a steel stamp, taking care to not damage the hoist housing.
Hoist Drive Shaft (A)
Air Drive Head (C)
Pin (B) Air Powered Motor
D
Torque Resistor Shaft (A) Air Drive Housing Socket (E)
Page 12

Page 12 © 2001, MSA Rose
P/N 10016732, Rev. B User Instructions n Lynx Hoist
4.1 INSPECTING HOIST FUNCTIONS & OPTIONAL FEATURES
! CAUTION
When a test load is needed to allow inspection of any hoist function, do not
use personnel as a load. Make sure the area below hoist is free and clear of
any obstructions. Always inspect the hoist functions prior to each use.
4.1.1 LINE PA YOUT AND RETRIEVAL
Mount the hoist to a suitable anchorage connector (such as the Lynx Tripod or davit anchorage connector)
to allow operation of the crank. Maintaining tension on the hoist line, rotate the crank counterclockwise to pay
the line out. Then rotate the crank clockwise to check for proper line retrieval. A clicking sound indicates that
line retreval is functioning correctly. Remove the product from use and return it to Rose if no clicking sound
is heard. During line extraction and retraction, check that the winding guide wraps the line tightly around the
drum.
4.1.2 HANDLE P/N 521204
Check for cracks, bends, broken welds and corrosion on the handle. Remove the product from use if any
of these conditions are found and contact Rose Manufacturing for a replacement handle. Check that the
O-ring set in the slot on the inside of the handle is present and not worn. If it’s missing or worn, contact Rose
Manufacturing for a replacement O-ring, P/N 621982.
4.1.3 EMERGENCY DRIVE
Check the emergency drive pin (shown in Figure 2) to make sure it is present. Remove the product from
use and return the unit to Rose Manufacturing for service if the emergency drive pin is missing.
4.1.4 AIR DRIVE TORQUE RESISTOR SHAFT
Check for cracks and bends in the torque resistor shaft. Check that the set screw is present and tight.
4.2 INSPECTING INSTALLATION BRACKET & HOUSING
4.2.1
Check for presence of all labels shown in Figures 1, 2 , 6 and Appendix D of this User Instruction. See that
all labels are clear – not damaged – and legible. Check that the inspection grid date is within the previous six
months. If six months have passed since the previous inspection, remove the product from use for
inspection by a competent person, according to the instructions in section 4.0 of this User Instruction.
4.2.2
Using fingers, check all bolts and nuts on the housing to ensure their tightness. If loose, tighten them. Check
to see if any bolts, nuts or other parts are missing or have been improperly substituted or altered in any way.
4.2.3
Look carefully for signs of cracks, dents, deformation or ruptures in the metal housing and installation bracket
(see Figures 3, 4 and 5). Minor dents which do not affect function do not require user action.
Page 13

© 2001, MSA Rose Page 13
User Instructions n Lynx Hoist P/N 10016732, Rev. B
4.2.4
Check the housing for signs of corrosion. Pay particular attention to the area around the installation hook and
all bolts and nuts.
4.2.5
Check for signs that the housing and drum are rubbing. This will be evidenced by wear on the drum flanges
and worn plating on the housing.
4.2.6
Check the impact load indicator pin on the drum axle nut (the nut with wrench flats shown in Figure 1). The
impact load indicator is a roll pin which will be forced part way out of the nut if the hoist sees an impact load
that activates the internal shock absorbing mechanisms.
4.2.7
If the user’s model is a boom-mount hoist, check the extension frame and anchorage hook for cracks, or
bends which may impair strength or function, broken welds and corrosion. Check that the sheave mounted
at the boom end is undamaged and rotates freely.
4.3 INSPECTING THE SNAPHOOK
4.3.1
Check all parts of the swivel snaphook for signs of alteration, distortion, cracks, deep nicks, dents or cuts.
Also check for indications that the snap has been subjected to intense heat which could affect its strength.
4.3.2
Unlock (A) and depress the snaphook gate (B) to its full open position and release (C). See Figure 3 for
depiction of steps A, B and C.
4.3.3
Inspect for signs of corrosion or excess wear and remove the product from use if there is any question
whether detected wear and/or corrosion may affect strength or function.
4.3.4
Check to see that the snap body swivels freely around the bolt connecting it to the snap eye.
4.4 LINE FITTINGS
4.4.1
Check the two pressed metal ferrules and the metal thimble. If the user’s unit has a splice as the means of
attaching the snaphook, the splice must be completely and tightly tucked with no loops or loose ends.
5.0 MAINTENANCE, STORAGE & SERVICE
Proper functioning and length of useful life of the hoist depends on the user’s proper care, maintenance and
storage of the product. The hoist should be formally inspected at least every 6 months and the results logged
in this User Instruction.
Page 14

Page 14 © 2001, MSA Rose
P/N 10016732, Rev. B User Instructions n Lynx Hoist
The hoist winding mechanism is virtually maintenance free. All bearings are lubricated for life. The hoist
contains no user serviceable parts.
Note: Do not lubricate any part of the hoist except the wire rope and the snaphook.
The line should be wound out fully and checked for any sign of wear or damage as outlined in Section 4.0.
Do not break the stainless steel band which retains safety wraps on the drum.
5.1 CARE AND MAINTANCE
Inspect the product in accordance with the User Instruction. Prevent denting or deformation of the housing.
Never drop the unit from any height. Always set it down carefully. When in use, protect the line from
contacting sharp corners and edges. Prevent loops from forming in a slack line and being pulled tight,
causing line kinking. Do not allow foreign matter to enter the housing. Do not permit the line to snag or be
crushed. Heed all caution labels and instructions as these are intended to prevent damage to the product as
well as guide the user in correctly operating the device. periodically use a clean, damp (not wet) cloth to
remove dirt or contamination which may cause corrosion or hamper legibility of labels. Never use solvents
to clean the housing as they may break down the label adhesive.
If necessary, use a clean dry cloth to wipe the line dry as it is slowly re-reeled back into the device. If
necessary, lubricate the line after this operation.
Lubrication must only be applied to a clean, dry wire line because it is effective only when the dressing
comes in contact with metal. If inspection reveals buildup of contaminants, use a densley bristled fiber brush
(not wire) to remove the contaminants. Never use gasoline or kerosene as a solvent. Pay particular attention
to cleaning the gaps between the line strands so lubricant can penetrate into the line core and fill these gaps
to seal out moisture and foreign particles.
Use a low viscosity field lubricant having moisture resistant, non-corrosive properties such as EWRS No.
66X, available from Ironside Company, Columbus, Ohio. It may be applied by brush or swabbing with a
cloth saturated with the lubricant. Wipe off excess lubrication with a clean dry cloth.
It is impossible to specify the time intervals between lubrications. However, the line should be properly
lubricated at all times, and periodic inspections will indicate when it must be done. In corrosive environments, the line should be cleaned and lubricated more frequently. If the hoist is taken out of service for an
appreciable length of time, the line should be cleaned and lubricated before storage.
5.2 STORAGE
Store the device in a clean, dry place indoors, out of direct sunlight. If lengthy storage is required, periodically
inspect the device. Store the device away from heat and steam, and never allow it to rest for lengthy periods
of time on concrete or ash floors, as the lime sulfur and ash can cause corrosion.
5.3 OWNER REGISTRATION
When the hoist is purchased, the owner must immediately read this User Instruction and return the Owner
Registration card included with the device. Each unit has a unique serial number indentifying all information
associated with the unit. The serial number enables Rose employees to identify when the unit was
manufactured, the related engineering, testing records, quality assurance records, related service records,
and the date the unit was sold and shipped to the user or Rose distributor.
The Owner Registration card contains information which is vital to the maintenance of the device. It must be
completely and accurately filled out by the owner and returned to Rose Manufacturing Company
immediately after purchase.
Be sure to enter the owner’s permanent address and telephone number. Do not enter the address and phone
number of a temporary job site or temporary office. Please type or print legibly in ink. This is a permanent
record.
Page 15

© 2001, MSA Rose Page 15
User Instructions n Lynx Hoist P/N 10016732, Rev. B
5.4 OBTAINING FACTORY SERVICE
When factory service is required for the hoist, the steps below must be carefully followed:
1. Prepare and mail a purchase order for the requested service to Rose Manufacturing Company, 2250
S. Tejon Street, Englewood, CO 80110
2. The purchase order must contain:
a. Owner’s name, address, phone and fax numbers
b. The name of owner’s employee who can be contacted to authorize repair charges if
necessary
c. The hoist’s serial number, it’s type and last inspection date.
d. Brief explanation of service and known repairs to be performed (for example, annual service,
kinked line, broken snaphook, etc.).
e. The statement: “Basic service charge authorized. Advise price of repairs.” Please note that
any unit sent to Rose Manufacturing for service must, at a minimum, be disassembled,
inspected and reassembled by Rose in order to determine if any service is required.
Therefore, the minimum service charge must always be made.
f. The billing address if the owner already has an account with Rose. Otherwise, Rose terms
are C.O.D. in the continental USA, and cash in advance, including freight charges
elsewhere.
g. The return shipment address. Rose freight terms are prepaid and added if the owner has an
account. Otherwise, the terms are freight collect.
5.5 SERVICE AND INSPECTION LOGS
Rose recommends that the hoist be formally inspected at least every 6 months, and immediately before it
is used to carry personnel. It is the responsibility of the user and the user’s management to perform timely
formal inspections, and to log such inspections in this section.
5.5.1 INSPECTION LOG
Proceed down the column using the inspection categories and steps shown on the left as a checklist in
conjuction with the inspection procedures in section 4.0 of this User Instruction. If the unit passes the
inspection step, enter “OK” in the adjacent space of the column for this particular inspection. If at any point
in the inspection procedure the unit fails to pass an inspection step, take the action specified in the appropriate
subsection of section 4.0 and make a notation in the Inspection Log.
Page 16

Page 16 © 2001, MSA Rose
P/N 10016732, Rev. B User Instructions n Lynx Hoist
Date of Inspection
Inspector
Bolts/Nuts/Screws
Labels
Damage
Corrosion
Impact Load Indicator
Anchorage Hook*
Handle
Braking
Emergency Drive Pin
Torque Resistor Shaft
Locking Action
Corrosion
Swivel
Damage/Wear
Line Ferrules/Splices
Thimble
*Boom-mount hoist models only
Snaphook Functions Housing/Bracket/Boom*
LYNX HOIST INSPECTION LOG
Serial Number ________________________ Rose Part Number ____________________
Date of Manufacture _____________________________
Page 17

© 2001, MSA Rose Page 17
User Instructions n Lynx Hoist P/N 10016732, Rev. B
LYNX HOIST LINE INSPECTION LOG
Serial Number ________________________ Rose Part Number ____________________
Date of Manufacture _____________________________
Date of
Inspection
Location* Measured
Diameter
In 1 Lay In 1 Strand of 1
Lay
Corrosion Abrasion,
Excess Wear
Lubrication
*Measure location from thimble
Page 18

Page 18 © 2001, MSA Rose
P/N 10016732, Rev. B User Instructions n Lynx Hoist
APPENDIX A
LYNX HOIST SPECIFICATIONS
SPECIFICATION MOUNTING BRACKET UNIT OF MEASURE
Safety Factor (Personnel) 10:1 –
Safety Factor (Materials) 5:1 –
Max. Working Load (Personnel) 310 lb
140 kg
Max. Working Load (Materials) 620 lb
280 kg
Minimum Line Strength 3,300 lb
14.7 kN
Line Diameter 3/16 in
5 mm
Swivel Snaphook Gate Opening 13/16 in
20 mm
Crank Force to Lift 310 lbs/140 kg 13 lb
58 N
Cranking Diameter 20 in
51 cm
Avg. Lifting Speed (310 lbs/140 kg load) 25 ft/min
7.6 m/min
SIDE BOOM SOCKET
Net Weight with 105 ft of line 47 62 51 lb
21 28 23 kg
Boom Frame Length N/A 42 N/A in
N/A 107 N/A cm
Boom Hook Gate Opening N/A 7/8 N/A in
N/A 22 N/A mm
Page 19

© 2001, MSA Rose Page 19
User Instructions n Lynx Hoist P/N 10016732, Rev. B
APPENDIX B
LYNX HOIST TYPES AND MODELS
Side 105 ft X 10016566
Side 50 ft X 10016567
Side 105 ft X 10016568
Side 50 ft X 10016569
Boom 105 ft X 10016680
Boom 50 ft X 10016681
Boom 105 ft X 10016682
Boom 50 ft X 10016683
Socket 105 ft X 10016684
Socket 50 ft X 10016693
Socket 105 ft X 10016694
Socket 50 ft X 10016695
Mount
Type
Model (1)
Length
Wire Rope
Galv. S.S.
Part Number
Page 20

Page 20 © 2001, MSA Rose
P/N 10016732, Rev. B User Instructions n Lynx Hoist
APPENDIX C
LYNX HOIST ACCESSORIES & COMPANION PRODUCTS
X X X 501500 Fallbloc System
X 505282 Anchorage Connector Strap, nylon, 5 ft
X 505298 Anchorage Connector Strap, polyester, 5 ft
X X X 506202 Dyna-Lock (10 m), galvanized steel
X X X 506203 Dyna-Lock (10 m), stainless steel
X X X 506204 Dyna-Lock (16 m), galvanized steel
X X X 506205 Dyna-Lock (16 m), stainless steel
X X X 506206 Dyna-Lock (22 m), galvanized steel
X X X 506207 Dyna-Lock (22 m), stainless steel
X X X 506208 Dyna-Lock (30 m), galvanized steel
X X X 506209 Dyna-Lock (30 m), stainless steel
X X 10022050 Lynx Tripod (8 ft)
X X 10022051 Lynx Tripod (10 ft)
X X 506216 Dynevac II, Dyna-Lock 22/30 bracket for Tripod
X X X 506222 Split-mount pulley
X X 506232 Dynevac II 10/16 bracket for Tripod
X 506252 BeamGlide trolley
X X X 506615 Dyna-Lock, 20’ web unit
X X X 506619 Dyna-Lock Backpacker, 20’ web unit
X X X 506261 Dynevac II and Dyna-Lock 22/30 flat surface bracket
X 506356 DaviTruck vehicle-mounted davit
X 506362 Dynevac II and Dyna-Lock 22/30 davit brackets
X X X 506420 Air-powered drive assembly
X 521245 Side-mount pulley bracket
X 622002 Side-mount pulley
X X X various Pullover harness (see brochure)
X X X 501012 Bosun’s chair with spreader bar
X X X 501015 Bosun’s chair without spreader bar
X X X 503215 Portable ladder, rope with wood rungs
X X X 503216 Portable ladder, strap with aluminum rungs
X X X 505199 Retrieval lanyard w/RL20 snaphooks, thimble center
X X X 507130 Retreival lanyard w/RL20 snaphooks, 14” spreader bar
X X X 507131 Retreival lanyard w/RL20 snaphooks, 22” spreader bar
X X X 10011744 Lynx Rescuer 16M
X X X 10011745 Lynx Rescuer 30M
Lynx Hoist
Side Socket Boom
Accessory/Companion Description
Accessory/
Companion P/N
Page 21

© 2001, MSA Rose Page 21
User Instructions n Lynx Hoist P/N 10016732, Rev. B
BOOM MOUNT HOIST
INSTRUCTION LABEL
SIDE MOUNT HOIST INSTRUCTION LABEL
Page 22

Page 22 © 2001, MSA Rose
P/N 10016732, Rev. B User Instructions n Lynx Hoist
REMOVE FROM USE
IF PIN PROTRUDES
EMERGENCY DRIVE LABEL
SOCKET MOUNT HOIST INSTRUCTION LABEL
SIDE MOUNT HOIST PULLEY LABEL
P/N 521203 Mfd. _______________________
Capacity: 310 lbs (Personnel)
620 lbs (Materials)
USE ONLY WITH ROSE HOIST
™
Follow instructions on hoist
Rose Manufacturing Company
2250 South Tejon Street
Englewood, CO 80110
XXXXXXXXXXXXXX
SERIAL NUMBER TAG
P/N 622003, Rev B.
Page 23

© 2001, MSA Rose Page 23
User Instructions n Lynx Hoist P/N 10016732, Rev. B
Raise Lower
HANDLE LABEL
EMERGENCY DRIVE LABEL
LAST FACTORY SERVICE DATE LABEL
EMERGENCY
DRIVE
1. Grasp ring
2. Pull pin out
3. Turn handle 9
revolutions to engage Emergency Drive
4. Return to factory for
service immediately after
use.
AIR DRIVE ATTACHMENT INSTRUCTION LABEL
Part Number/N° de Piéce
Date of Mfr./Date de Manuf.
Serial Number/ N° de Série
LABEL P/N 620979, REV.A
Page 24

Page 24 © 2001, MSA Rose
P/N 10016732, Rev. B User Instructions n Lynx Hoist
WARRANTY
Express Warranty – Rose/MSA warrants that the product furnished is free from mechanical defects
or faulty workmanship for a period of one (1) year from first use or eighteen (18) months from date
of shipment, whichever occurs first, provided it is maintained and used in accordance with Rose/
MSA’s instructions and/or recommendations. Replacement parts and repairs are warranted for
ninety (90) days from the date of repair of the product or sale of the replacement part, whichever
occurs first. Rose/MSA shall be released from all obligations under this warranty in the event
repairs or modifications are made by persons other than its own authorized service personnel or
if the warranty claim results from misuse of the product. No agent, employee or representative of
Rose/MSA may bind Rose/MSA to any affirmation, representation or modification of the warranty
concerning the goods sold under this contract. Rose/MSA makes no warranty concerning components or accessories not manufactured by Rose/MSA, but will pass on to the Purchaser all
warranties of manufacturers of such components. THIS WARRANTY IS IN LIEU OF ALL OTHER
WARRANTIES, EXPRESS, IMPLIED OR STATUTORY, AND IS STRICTLY LIMITED TO THE
TERMS HEREOF. ROSE/MSA SPECIFICALLY DISCLAIMS ANY WARRANTY OF MERCHANTABILITY OR FITNESS FOR A PARTICULAR PURPOSE. For additional information please contact
the Customer Service Department at 1-800-MSA-2222 (1-800-672-2222).
ROSE MANUFACTURING COMPANY n 2250 SOUTH TEJON STREET
ENGLEWOOD n COLORADO n 80110-1000 n USA
TEL. (303) 922-6246 n TOLL FREE (800) 722-1231 n FAX (303) 934-9960
Beamglide™, Davitruck™, Lynx Hoist™, Lynx Paw Retractable™, Lynx Rescuer™,
Fallbloc™, Pullover™ and Ropod™ are trademarks, rights to which are held by
Rose Manufacturing Company, USA.
U.S. Patent No.: 5150768, 5217084, 5090507, 5361867
 Loading...