

Page 1
1
because we all are different
LOGOL2NEGPDF
Page 2

2
Page 3
3
,
2
2
,
2
2
A1 A2
B1
B2 B3
B4
B5
B6
B7 C1
C2
D
Type No
Page 4

4
DESCRIPTION............................................................................................5
DESCRIPTION............................................................................................9
DESCRIPCIÓN ......................................................................................... 13
C DESCRIPCIÓN ...........................................................................................?
USA / CAN / MX
Page 5
5
DESCRIPTION
These earmuffs are designed to reduce exposure to harmful levels of noise. To ensure you get the best comfort, fit
and function from the product, read the instructions carefully and save them for future reference.
Refer to the attenuation data tables for details on noise reduction. Make sure you have selected the correct
product for your application.
FITTING INSTRUCTIONS
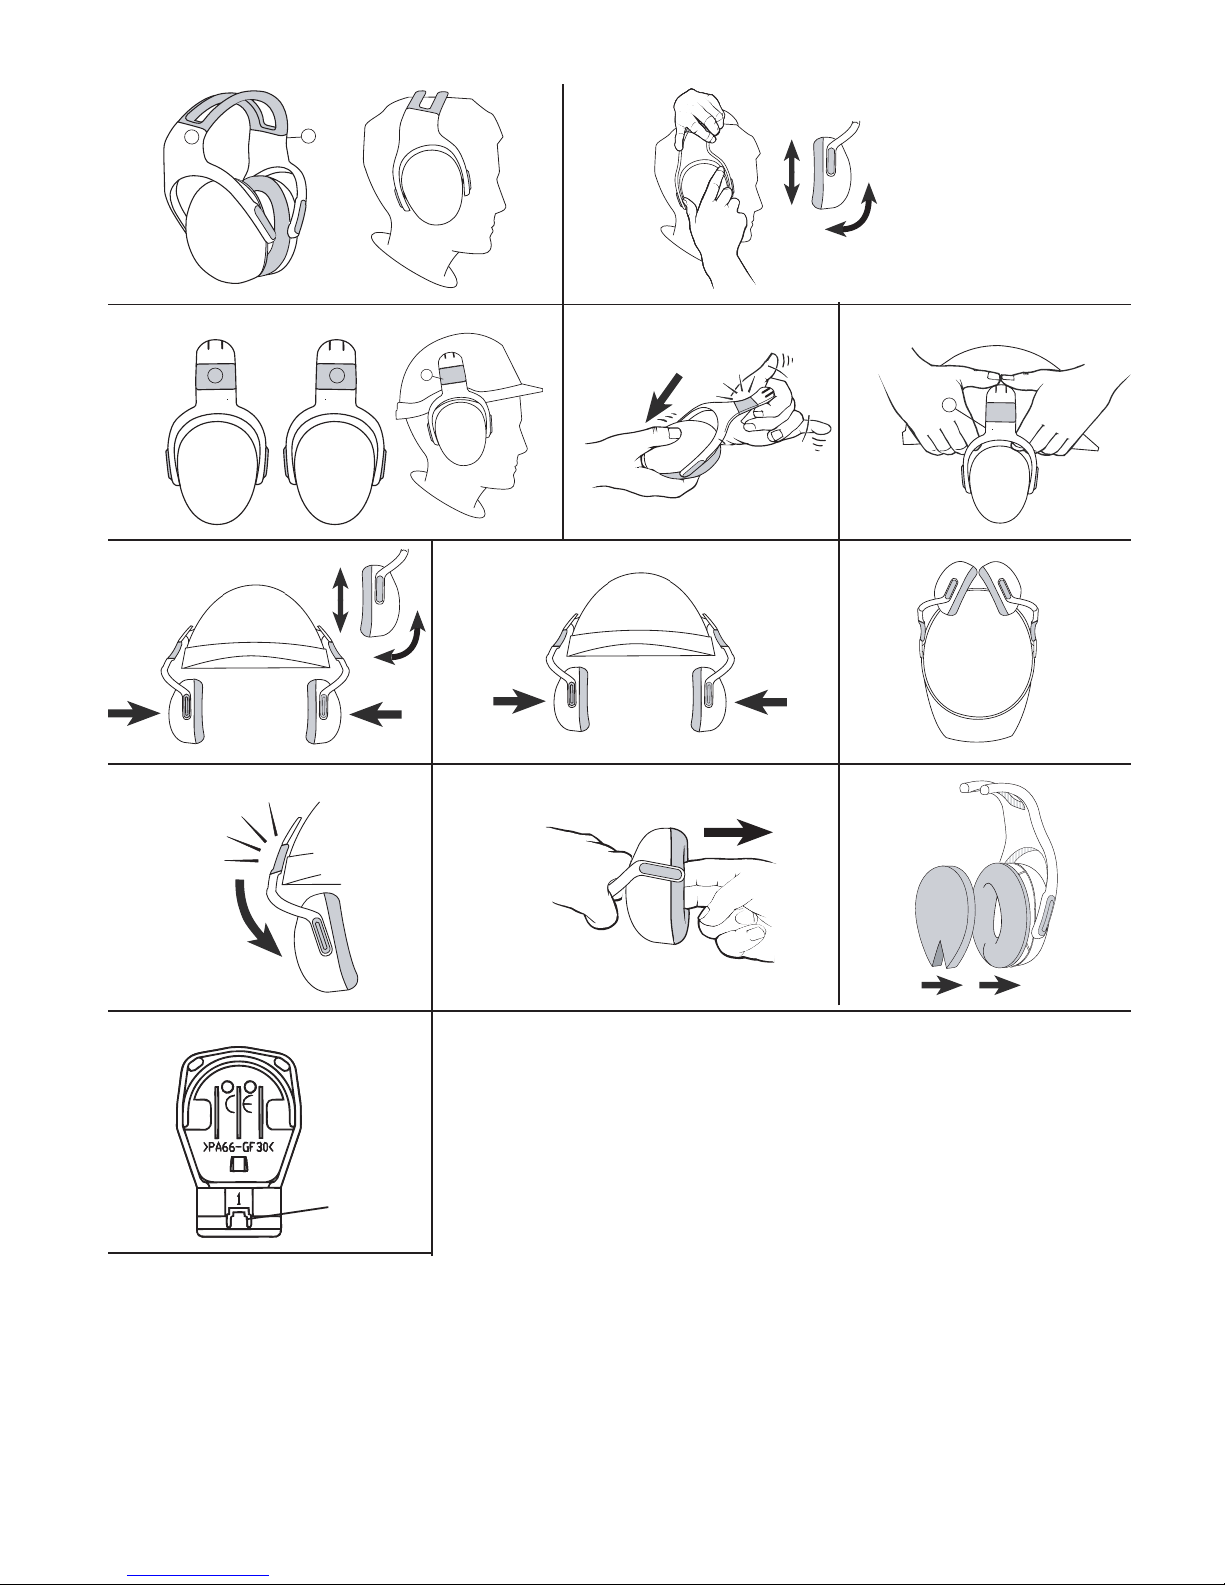
Refer to corresponding illustrations at beginning of this instruction manual.
CAUTION!
Spread the ear cups only enough to clear the ears.Do not reform or reshape the headband.
Foreign objects (such as pencils) between the ear cup and wearer’s head reduce the efficiency of the ear muff.
Remove as much hair as possible.
Use glasses with smallest temple available (cable type is best).
Headband version (Illustration A):
A 1: The inside of the headband is marked with a letter L above the left cup and a letter R above the right cup.
Ensure that the headband is positioned correctly, with the left cup on the left ear and the right cup on the right ear.
A 2: With the headband over the head, adjust the height of the cups by sliding them up or down so they
completely enclose the ears.
Helmet attachment (Illustration B):
B1: Left and Right cups. The earmuff marked with the letter L must be attached to the left side of the helmet, and
the earmuff marked with the letter R must be attached to the right side of the helmet.
CAUTION!
If the helmet is worn in reverse (with the brim to the rear), the muffs must be worn on the right and left ears as
marked. Failure to do so may result in a reduction of attenuation.
B 2-3: Fitting the cups. Pull the ear cup down to the bottom of the yolk and lift the blade until the spring clicks up.
Push the attachment blade firmly into the slot on the side of the helmet until it clicks into place.
B 4: Working Position. Adjust the cups until they are comfortable. Make sure that the cushions seal tightly around
the ears.
CAUTION!
In noisy environments, the earmuffs must be worn in the working position at all times.
B 5: Stand-by position. Pull the ear-muff away from the ear until it locks into the stand-by position.
B 6: Parked Position. First lift the cups to the stand-by position, and then rotate them back to the next fixed
position. In this position, the cushion does not get damaged or dirty and the cups can dry out on the inside.
NOTE: Do not press the cups onto the helmet shell as this will lock the spring in the ear-muff arm and damage the
attachment slots on the side of the helmet.
B 7: Storage Position. When the helmet is not in use, lower the ear-muffs and press them inward.
Note: These helmet-mounted hearing protectors are only approved for use with MSA slotted caps.
STORAGE
When the hearing protector is not in use, store it in such a way that the headband is not stretched and the
cushions are not compressed. Keep the ear-muffs dry and clean, store them at normal room temperature and do
not place them in direct sunlight.
CAUTION!
If storage recommendations are not followed, the protection afforded by the hearing protector may be severely
impaired.
MAINTENANCE
Clean and disinfect the cups, cushions and inserts with mild soap and water only. Ear muffs and cushions in
particular may deteriorate with use. Examine at frequent intervals for cracking and leakage, for example at the
start of every working shift. Replace damaged or worn ear muffs or cushions.
USA / CAN / MX
Page 6
6
HYGIENE KITS The cushions and inserts are replaceable. Always replace worn or damaged parts. Remove the
cushion by pulling it straight out (refer to illustration C1 at beginning of this instruction manual). Replace the old
cushion and insert with new ones from the hygiene kit (refer to illustration C2 at beginning of this instruction
manual). If the ear muff is used regularly, replace the hygiene kit at least twice a year to ensure that the noise
attenuation performance is maintained.
Note: Use only hygiene kits (cushions and inserts) from MSA.
left/RIGHT ™ Ear muff Order Kit #
LOW 10092878
MEDIUM 10092879
HIGH 10092880
WARRANTY
The product is guaranteed for one year from date of purchase against defects in material or workmanship. This
guarantee does not extend to damage caused by product misuse, abuse or unauthorized modifications. To make a
claim, please contact the source of purchase.
TESTING AND APPROVALS
The Noise Reduction Rating (NRR) is third-party certified in accordance with ANSI S3.19-1974. It also meets CSA
Class A.
Use Limitations
The level of noise entering a person’s ear, when hearing protection is worn as directed, is closely approximated by
the difference between the A-weighted environmental noise level and the NRR.
Example: The environmental noise level as measured at the ear is 92 dB(A). The NRR is (24) decibels (dB). The
level of noise entering the ear is approximately equal to 68dB(A) [92 – 24 dB(A)].
CAUTION!
For noise environments dominated by frequencies below 500 Hz the C-weighted environmental noise level
should be used.
The EPA has selected the NRR as a measure of a hearing protector’s noise reducing capabilities. There is no
warranty as to the suitability of the NRR as a measure of the actual workplace protection since such protection is
highly dependent on user training, motivation, and utilization. Refer to the above instructions for proper fit.
Although hearing protectors can be recommended for protection against the harmful effects of impulsive noise,
the Noise Reduction Rating (NRR) is based on the attenuation of continuous noise and may not be an accurate
indicator of the protection attainable against impulsive noise such as gunfire.
The noise reduction capability of this hearing protector against impulsive noise may be estimated by referring to
the attenuation performance of the hearing protector at the frequency of the impulsive noise exposure as provided
in the attenuation data on the package.
To estimate the noise reduction capability of this hearing protector against impulsive noise, refer to the
Attenuation Data below or on the product package. If the frequency of the impulsive noise is 2000 hertz (Hz), for
example, the mean (average) reduction of noise attained by test subjects at that frequency was 32.1 decibels (dB).
Using the standard deviation of + 2.8 dB, the estimated noise reduction at 2000 Hz would range from 29.3 dB to
34.9 dB.
Refer to manufacturer of equipment producing the impulsive noise to determine the frequency.
WARNING!
An appropriate hearing conservation program must be utilized that includes adequate monitoring and
audiometric testing to ensure effective hearing protection. Improper use of the hearing protector or failure to
conduct adequate monitoring and testing can result in hearing loss or other serious personal injury.
USA / CAN / MX
Page 7

7
ATTENUATION DATA
ANSI S3.19-1974
ATTENUATION DATA - Headband version
LOW
Frequency (Hz) 125 250 500 1000 2000 3150 4000 6300 8000 NRR
Mean (dB) 14.4 15.8 25.4 34.7 31.0 32.6 34.4 35.7 36.0
21
Standard deviation (dB) 2.1 2.5 2.6 3.1 2.4 2.8 2.7 2.9 2.2
MEDIUM
Frequency (Hz) 125 250 500 1000 2000 3150 4000 6300 8000 NRR
Mean (dB) 17.1 20.6 30.2 36.3 36.7 38.1 39.1 41.3 41.2
25
Standard deviation (dB) 2.6 2.0 2.7 3.0 2.9 2.9 3.1 2.6 2.9
ATTENUATION DATA - Helmet version
LOW
Frequency (Hz) 125 250 500 1000 2000 3150 4000 6300 8000 NRR
Mean (dB) 13.6 17.3 25.1 31.3 32.1 32.6 35.0 35.0 34.6
21
Standard deviation (dB) 2.9 2.8 2.3 3.0 2.8 2.4 2.1 2.8 2.7
MEDIUM
Frequency (Hz) 125 250 500 1000 2000 3150 4000 6300 8000 NRR
Mean (dB) 16.8 21.5 29.1 36.0 36.5 38.7 37.6 40.4 39.4
25
Standard deviation (dB) 3.0 2.2 2.1 3.1 3.3 2.8 2.9 3.8 4.4
HIGH
Frequency (Hz) 125 250 500 1000 2000 3150 4000 6300 8000 NRR
Mean (dB) 18.7 25.0 34.9 39.3 39.0 36.9 37.3 40.1 39.2
28
Standard deviation (dB) 2.6 2.6 2.9 3.0 2.3 2.4 2.3 2.2 2.8
HIGH
Frequency (Hz) 125 250 500 1000 2000 3150 4000 6300 8000 NRR
Mean (dB) 19.8 26.0 33.2 38.8 37.8 36.8 38.0 39.8 38.8
28
Standard deviation (dB) 2.6 1.9 2.1 3.3 3.1 2.9 2.8 2.1 3.3
Helmet-mounted Noise Reduction Ratings listed above are for Medium V-Gard Caps only.
Noise Reduction Rating and Attenuation Values for other MSA slotted helmets may vary.
Contact MSA for more information.
USA / CAN / MX
Page 8

8
Warning!
For noise environments dominated by frequencies below 500 Hz, the C-weighted environmental noise level
should be used. Improper fit of this device will reduce its effectiveness in attenuating noise. Failure to follow
this warning can result in serious personal injury or permanent hearing loss.
MSA Corporate Headquarters
P.O. Box 426
Pittsburgh, PA 15230
USA
Phone 412.967.3000
U.S. Customer Service 1.800.MSA.2222
MSA Canada 416.520.4225
MSA Mexico (52) 55 2122 5770
MSA International 412.967.3354
www.MSAnet.com
USA / CAN / MX
Page 9

9
DESCRIPTION
Ces protecteurs auditifs (coquilles antibruit) sont conçus pour diminuer l’exposition aux niveaux de bruits
nuisibles et dangereux. Pour obtenir les meilleurs niveaux de confort, d’ajustement et de fonctionnement relatifs
à ce produit, veuillez lire attentivement toutes les instructions et directives afférentes, et veuillez les conserver aux
fins de consultation ultérieure.
Consultez les tableaux de données d’atténuation du bruit pour obtenir tous les détails se rapportant à la réduction
du bruit. Assurez-vous également de sélectionner le bon produit convenant à votre application particulière.
INSTRUCTIONS RELATIVES À L’AJUSTEMENT
Reportez-vous aux illustrations correspondantes au début de ce mode d’emploi.
MISE EN GARDE
Écartez les coquilles antibruit suffisamment pour dégager les oreilles.
Ne déformez pas et ne tordez par le bandeau serre-tête pour l’ajuster sur le crâne.
Les objets étrangers (tels que les crayons) placés entre la coquille auditive et la surface de la tête ont pour
conséquence de réduire l’efficacité du protecteur auditif. Poussez vers l’extérieur et sur les côtés le plus de
cheveux possibles, afin d’éviter tout amoncellement de cheveux sous les coquilles.
Utilisez des lunettes dotées des plus petites branches de maintien disponibles (les modèles à branches câblées
sont les meilleures).
Version de casque auditif à bandeau serre-tête (illustration A) :
A 1: L’intérieur du bandeau serre-tête est marqué de la lettre L, juste au-dessus de la coquille de gauche, et il
est marqué de lettre R, à l’autre extrémité au-dessus de la coquille de droite. Vérifiez si le bandeau crânien est
correctement positionné, en veillant à ce que la coquille de gauche soit placée du côté de l’oreille gauche, et que la
coquille de droite soit placée du côté de l’oreille droite.
A 2: Lorsque le bandeau crânien est placé sur la tête, ajustez la hauteur des coquilles antibruit en les faisant
coulisser du haut vers le bas, et vice-versa, de sorte à recouvrir totalement les oreilles.
Griffes de fixation pour casque de sécurité (illustration B) :
B1: Coquilles de gauche et de droite. La coquille marquée de la lettre L doit être fixée au côté gauche du casque,
alors que la coquille marquée de la lettre R doit être rattachée au côté droit du casque.
MISE EN GARDE
Si le casque de sécurité est porté à l’envers (le bord frontal étant placé à l’arrière pour protéger la nuque), les coquilles auditives doivent être repositionnées correctement, côté gauche et côté droit en respectant le marquage.
L’inobservation de cette mise en garde entraînera une réduction de l’atténuation du bruit.
B 2-3: Ajustement des coquilles. Tirez la coquille antibruit vers le bas, jusqu’au moyeu, puis soulevez la lame de
sorte à amorcer la résistance du ressort. Enfoncez la lame de fixation fermement dans la fente, située sur le côté
du casque, et ce, jusqu’à ce que vous entendiez le déclic d’enclenchement.
B 4: Position de fonctionnement. Ajustez les coquilles jusqu’à un niveau de confort acceptable. Assurez-vous que
les coussinets protègent bien les oreilles en offrant une parfaite étanchéité au bruit.
MISE EN GARDE
Dans les environnements bruyants, les protecteurs auditifs doivent recouvrir les oreilles en tout temps.
B 5: Position « prêt-à-l’emploi ». Soulevez le protecteur auditif pour que l’oreille soit dégagée, et ce, jusqu’à
l’enclenchement de la position « prêt-à-l’emploi ».
B 6: Position d’attente permanente. D’abord, soulevez les coquilles pour les mettre en position « prêt-à-l’emploi
». Ensuite, rabattez-les vers l’arrière pour atteindre l’autre position d’attente permanente. Quand les coquilles sont
placées de cette façon, en position d’attente fixe, leurs coussinets ne sont pas vulnérables à une détérioration
quelconque ni à l’accumulation de saletés. De plus, l’intérieur des coquilles peut sécher facilement. AVIS :
N’appuyez pas les coquilles sur la coque du casque car cela aurait pour conséquence de verrouiller le ressort
situé à l’intérieur du bras-levier du protecteur auditif, et ainsi endommager les fentes de fixation intégrées sur les
côté du casque de sécurité.
B 7: Position d’entreposage (rangement). Lorsque le port du casque de sécurité n’est pas nécessaire, il vous suffit
de rabaisser les coquilles antibruit et de les ramener vers l’intérieur du casque.
Note: Ces protecteurs auditifs montés sur casquette de sécurité sont homologués uniquement pour un usage
USA / CAN / MX
Page 10

10
conjoint avec les casquettes de sécurité à fentes de marque MSA.
ENTREPOSAGE
Lorsqu’on n’utilise pas les protecteurs auditifs, veuillez les entreposer de façon à ne pas étirer le bandeau
serre-tête ni à comprimer les coussinets antibruit. Préservez les coquilles dans un endroit sec et propre; puis,
rangez-les à température ambiante normale, et évitez le contact direct avec la lumière solaire.
MISE EN GARDE
Si ces recommandations d‘entreposage ne sont pas respectées, la protection auditive que procure ces coquilles
antibruit risque d’en souffrir sévèrement.
ENTRETIEN
Nettoyez et désinfectez les coquilles, les coussinets et les pièces intercalaires au moyen d’une eau savonneuse
à savon doux seulement. Avec l’usage, les coquilles antibruit et les coussinets, en particulier, peuvent subir des
dommages et se désagréger. Veuillez examiner ces pièces régulièrement et fréquemment, et tentez de repérer les
signes de craquelures ou de diminution de la protection, au début de chaque quart de travail. Vous devez remplacer immédiatement les protecteurs/coussinets usés ou qui ont subi une détérioration quelconque.
TROUSSES D’HYGIÈNE
Les coussinets et pièces d’insertion intercalaires sont remplaçables. Il est impératif de toujours remplacer les
composantes endommagées et usées. Enlevez les coussinets en tirant dessus directement vers l’extérieur (voir
l’illustration C1 au début de ce mode d’emploi). Substituez de nouveaux coussinets et nouvelles pièces d’insertion
en les prenant de la trousse d’hygiène (voir l’illustration C2 au début de ce mode d’emploi). Si on utilise régulièrement le protecteur auditif, vous devez remplacer la trousse d’hygiène au moins deux fois par année, afin de
maintenir un niveau élevé de rendement d’atténuation du bruit.
Note : N’utilisez que des trousses d’hygiène de marque MSA (coussinets et pièces d’insertion).
Coquille antibruit de left/RIGHT ™ N° de trousse (commande)
LOW / FAIBLE 10092878
MEDIUM / MOYEN 10092879
HIGH / ÉLEVÉ 10092880
GARANTIE
Le produit est garanti contre toute défectuosité, de matériau ou de fabrication, pendant 1 an à partir de la
date d’achat. Cette garantie n’inclue pas les dommages provoqués par un usage abusif, à mauvais escient, ou
provenant de modifications non autorisées. Pour formuler une plainte ou une demande d’indemnisation par
revendication, s.v.p. veuillez communiquer avec la personne qui a conclu l’achat à l’origine.
ESSAIS ET HOMOLOGATIONS
Le taux de réduction du bruit (TRB) est certifié par un organisme tiers, conformément à la norme S3.19-1974 de
l’ANSI. Ce TRB répond également aux exigences de la classe A de la CSA.
Restrictions d’usage
Quand l’utilisateur porte une protection auditive, respectant les recommandations du fabricant, le niveau de bruit
qui pénètre dans son oreille est évalué avec précision selon la différence obtenue entre le niveau de bruit environnemental pondéré-A et le TRB.
Exemple : Si le niveau de bruit environnemental mesuré à l’oreille est de 92 dB(A), et que le TRB est de (24)
décibels (dB). Le niveau de bruit pénétrant dans l’oreille est d’environ 68dB(A), soit [92 – 24 dB(A)].
MISE EN GARDE
En ce qui concerne les environnements bruyants dominés par des fréquences inférieures à 500 Hz, il faut utiliser
le niveau de bruit environnemental pondéré-C.
L’EPA (l’agence américaine de protection de l’environnement) a sélectionné le TRB en tant que mesure de la
capacité de réduction du bruit d’un protecteur auditif. Aucune garantie n’est offerte quant à la pertinence et à la
convenance du TRB en tant que mesure de la protection auditive réelle en milieu de travail, étant donné qu’une
USA / CAN / MX
Page 11

11
telle protection dépend principalement de la formation que reçoit l’utilisateur, de sa motivation, et de l’utilisation
qu’il fait de son protecteur auditif. Veuillez vous reporter aux instructions ci-dessus pour en savoir plus sur
l’ajustement approprié.
Bien qu’on puisse recommander l’usage des protecteurs auditifs pour assurer une protection efficace contre les
effets nuisibles de bruits impulsifs, il faut savoir que la mesure du taux de réduction du bruit (TRB) se base sur
l’atténuation d’un bruit continu et peut donc être un indicateur inexact de la protection antibruit pour des bruits
impulsifs et de courte durée comme des coups de feu par exemple.
On peut estimer la capacité de réduction du bruit de ce protecteur auditif, au contact d’un bruit impulsif, en se
reportant à la performance d’atténuation atteignable du protecteur auditif selon la fréquence de l’exposition au
bruit impulsif, tel qu’il appert dans les données d’atténuation de bruit sur l’emballage.
Pour estimer convenablement la capacité de réduction du bruit de ce modèle de protecteur auditif contre le bruit
impulsif, veuillez consulter les données d’atténuation ci-dessous ou celles imprimées sur l’emballage du produit.
Par exemple, quand la fréquence du bruit impulsif est de 2000 Hertz (Hz), la moyenne de réduction du bruit atteinte chez les sujets d’essai, à cette fréquence, est de 32,1 décibels (dB). Si l’on prend en compte l’écart-type de
+ 2.8 dB, la réduction de bruit estimée à 2000 Hz fluctuerait entre 29,3 dB et 34,9 dB.
Communiquez avec le fabricant de l’équipement produisant le bruit impulsif afin de déterminer la fréquence
exacte.
AVERTISSEMENT
Il est impératif de mettre sur pied un programme de protection de l’ouïe approprié, qui comprend une surveillance adéquate et des essais audiométriques, afin d’assurer une protection auditive efficace. Tout mauvais usage
du protecteur auditif, ou toute inobservation du conseil de surveillance adéquate et d’essais du niveau de bruit,
peuvent entraîner la perte de la faculté auditive ou causer d’autres blessures personnelles sérieuses.
NORME S3.19-1974 DE L’ANSI
DONNÉES D’ATTÉNUATION DU BRUIT – Version modèle à bandeau serre-tête
FAIBLE
Fréquence (Hz) 125 250 500 1000 2000 3150 4000 6300 8000 NRR
Moyenne (dB) 14,4 15,8 25,4 34,7 31,0 32,6 34,4 35,7 36,0
21
Écart-type (dB) 2,1 2,5 2,6 3,1 2,4 2,8 2,7 2,9 2,2
MOYEN
Fréquence (Hz) 125 250 500 1000 2000 3150 4000 6300 8000 NRR
Moyenne (dB) 17,1 20,6 30,2 36,3 36,7 38,1 39,1 41,3 41,2
25
Écart-type (dB) 2,6 2,0 2,7 3,0 2,9 2,9 3,1 2,6 2,9
ÉLEVÉ
Fréquence (Hz) 125 250 500 1000 2000 3150 4000 6300 8000 NRR
Moyenne (dB) 18,7 25,0 34,9 39,3 39,0 36,9 37,3 40,1 39,2
28
Écart-type (dB) 2,6 2,6 2,9 3,0 2,3 2,4 2,3 2,2 2,8
USA / CAN / MX
Page 12
12
AVERTISSEMENT
En ce qui concerne les environnements bruyants dominés par des fréquences inférieures à 500 Hz, il faut utiliser
le niveau de bruit environnemental pondéré-C. Tout mauvais ajustement de cet équipement entraînera une
diminution de son efficacité en matière d’atténuation du bruit. L’inobservation de cet avertissement risque de
provoquer de grave blessures corporelles ou la perte totale et permanente de l’ouïe.
Siège social corporatif de MSA
P.O. Box 426
Pittsburgh, PA 15230
USA
Tél.: 412.967.3000
Service à la clientèle (É.-U.): 1.800.MSA.2222
MSA Canada : 416.520.4225
MSA Mexique : (52) 55 2122 5770
MSA International : 412.967.3354
www.MSAnet.com
DONNÉES D’ATTÉNUATION DU BRUIT – Version modèle à bandeau serre-tête
FAIBLE
Fréquence (Hz) 125 250 500 1000 2000 3150 4000 6300 8000 NRR
Moyenne (dB) 14,4 15,8 25,4 34,7 31,0 32,6 34,4 35,7 36,0
21
Écart-type (dB) 2,1 2,5 2,6 3,1 2,4 2,8 2,7 2,9 2,2
MOYEN
Fréquence (Hz) 125 250 500 1000 2000 3150 4000 6300 8000 NRR
Moyenne (dB) 17,1 20,6 30,2 36,3 36,7 38,1 39,1 41,3 41,2
25
Écart-type (dB) 2,6 2,0 2,7 3,0 2,9 2,9 3,1 2,6 2,9
DONNÉES D’ATTÉNUATION DU BRUIT – Version modèle à fi xation sur casque de sécurité
FAIBLE
Fréquence (Hz) 125 250 500 1000 2000 3150 4000 6300 8000 NRR
Moyenne (dB) 13,6 17,3 25,1 31,3 32,1 32,6 35,0 35,0 34,6
21
Écart-type (dB) 2,9 2,8 2,3 3,0 2,8 2,4 2,1 2,8 2,7
MOYEN
Fréquence (Hz) 125 250 500 1000 2000 3150 4000 6300 8000 NRR
Moyenne (dB) 16,8 21,5 29,1 36,0 36,5 38,7 37,6 40,4 39,4
25
Écart-type (dB) 3,0 2,2 2,1 3,1 3,3 2,8 2,9 3,8 4,4
ÉLEVÉ
Fréquence (Hz) 125 250 500 1000 2000 3150 4000 6300 8000 NRR
Moyenne (dB) 18,7 25,0 34,9 39,3 39,0 36,9 37,3 40,1 39,2
28
Écart-type (dB) 2,6 2,6 2,9 3,0 2,3 2,4 2,3 2,2 2,8
ÉLEVÉ
Fréquence (Hz) 125 250 500 1000 2000 3150 4000 6300 8000 NRR
Moyenne (dB) 19,8 26,0 33,2 38,8 37,8 36,8 38,0 39,8 38,8
28
Écart-type (dB) 2,6 1,9 2,1 3,3 3,1 2,9 2,8 2,1 3,3
Les taux de réduction de bruit pour les coquilles antibruit fi xées sur casque de sécurité, décrits ci-dessus,
concernent les casquettes de sécurité V-Gard de taille moyenne seulement.
Pour ce qui concerne les autres modèles de casques à fentes de marque MSA, le taux de réduction de bruit
et les valeurs d’atténuation peuvent varier.
Contactez MSA pour obtenir de plus amples renseignements.
USA / CAN / MX
Page 13

13
DESCRIPCION
Estos protectores auditivos fueron diseñados para reducir la exposición a peligrosos niveles de ruido. Para
asegurar el mejor confort, ajuste y funcionamiento del producto, lea cuidadosamente las instrucciones y
guárdelas para futura referencia.
Refiérase a las tablas de atenuación para detalles sobre los niveles de reducción. Asegúrese de seleccionar el
producto correcto para su aplicación.
INSTRUCCIONES DE COLOCACION
Refiérase a las ilustraciones correspondientes al inicio de este manual de instrucciones.
CUIDADO
Separe las copas solo lo suficiente para cubrir o despejar los oídos.
No deforme o modifique a la banda flexible.
Objetos extraños (como lápices) ubicados entre la copa y la cabeza del usuario reduce la eficiencia del protector
auditivo. Remueva la mayor cantidad posible de cabello.
Solo si es necesario, utilice anteojos con la menor patilla posible (tipo “cable” es lo mejor).
Versión con Banda Flexible (Ilustración A)
A1: El interior de la banda flexible esta marcada con la letra L por encima de la copa izquierda y una letra R por
encima de la copa derecha. Asegúrese de que la banda flexible esté correctamente posicionada, con la copa
izquierda en el oído izquierdo y la copa derecha en el oído derecho.
A2: Con la banda flexible sobre la cabeza, ajuste la altura de las copas deslizándolas hacia arriba o hacia abajo
para que cubran completamente los oídos.
Versión con anclaje para casco (Ilustración B)
B1: Copas derechas e izquierdas. La copa marcada con la letra L debe ser montada sobre el lado izquierdo del
casco, y la copa marcada con la letra R debe ser montada sobre el lado izquierdo del casco.
CUIDADO
Si el casco es utilizado en sentido opuesto (con la visera en la parte posterior), los protectores auditivos deberán
utilizarse en el oído izquierdo (L) y derecho (R), tal como están marcados. De no hacerlo, resultará en una
reducción de la atenuación.
B 2-3: Colocando las copas. Baje el protector auditivo, hasta la parte inferior del clip de montaje, y levántela hacia
fuera. Introduzca firmemente el soporte del protector en la ranura que posee el casco en su lateral, hasta que
escuche un click que determina su correcta colocación.
B4: Posición de trabajo. Ajuste los protectores auditivos hasta una posición confortable, asegurándose que
cubran la oreja en su totalidad.
CUIDADO
En entornos ruidosos el protector auditivo deberá siempre estar en posición de trabajo.
B5: Posición de descanso: Extender los protectores auditivos hacia afuera hasta que queden en posición de
descanso.
B6: Posición estacionaria: Primero coloque los protectores auditivos hasta la posición de descanso y gírelos hacia
arriba hasta la próxima posición fija. En esta posición las almohadillas no se estropean y las copas se secaran de
cualquier humedad que contengan.
Nota: No presione los protectores contra el casco cuando estén en la posición estacionaria ya que se bloquea el
clip de montaje pudiendo dañar las ranuras laterales del casco.
B7: Posición de Almacenamiento: Cuando el casco no es utilizado, coloque los protectores auditivos hacia abajo
y hacia adentro.
Nota: Estos protectores auditivos con montaje para casco solo están aprobados para utilizarse con casco MSA
con ranuras laterales.
ALMACENAMIENTO
Cuando el protector auditivo no es utilizado, almacénelo de tal forma que la banda flexible y las almohadillas no
estén comprimidas. Mantenga las copas secas y limpias, almacenadas en un ambiente de temperatura normal y
sin exponerlos a la luz solar directa.
USA / CAN / MX
Page 14

14
ATENCION!
De no seguir las recomendaciones de almacenamiento, la protección ofrecida por el protector auditivo puede ser
severamente disminuida.
MANTENIMIENTO
Limpie y desinfecte las copas, almohadillas e insertos solo con jabón suave y agua. El protector auditivo y
particularmente las almohadillas pueden deteriorarse con el uso. Examínelos frecuentemente para determinar si
existen rajaduras o pérdidas, por ejemplo antes de iniciar cada turno de trabajo. Siempre reemplace toda parte
dañada o deteriorada.
KITS DE HIGIENE Las almohadillas y los insertos son reemplazables. Siempre remplace las partes dañadas o
deterioradas. Retire las almohadillas tirando firmemente hacia fuera (refiérase a la ilustración C1 al inicio de
este manual de instrucción). Reemplace las almohadillas e insertos viejos por un nuevo kit de higiene (refiérase
a la ilustración C2 al inicio de este manual de instrucción). Si el protector auditivo es usado con regularidad,
reemplace el kit de higiene al menos dos veces al año para asegurar que la atenuación de ruidos es mantenida.
Protector Auditivo left/RIGHT ™ CODIGO #
LOW / BAJA 10092878
MEDIUM / MEDIA 10092879
HIGH / ALTA 10092880
GARANTÍA
Este producto posee una garantía de un año a partir de la fecha de compra por defecto de materiales o defectos
de fabricación. Esta garantía no se extiende a daños causados por mal uso, abuso o modificaciones no
autorizadas. Para realizar un reclamo, por favor contacte a su proveedor.
ENSAYOS Y APROBACIONES
La escala de reducción de ruido (NRR – Noise Reduction Rating) es certificada por una tercera parte, de acuerdo
con ANSI S3.19-1974. También cumple con CSA Clase A.
Limitaciones de uso
El nivel de ruido que ingresa al oído de una persona cuando utiliza una protección auditiva de acuerdo a lo
indicado, es aproximadamente cercano a la diferencia entre el nivel de ruido A ponderado y el valor NRR.
Ejemplo: El nivel de ruido ambiente medido en el oído es de 92 dB(A). El valor NRR es 24dB. El nivel de ruido que
ingresa al oído es aproximadamente igual a 68dB(A) [92-24 dB(A)]
CUIDADO!
Para ruidos ambientales donde las frecuencias por debajo de los 500 Hz son predominantes, deberán
considerarse los valores de sonido ambiental C-ponderado.
EPA ha seleccionado al NRR como medida de las capacidades de reducción de ruido de los protectores auditivos.
No hay garantía de la aplicación del NRR como medida de protección en un área de trabajo, debido a que la
protección es altamente dependiente de la utilización, motivación y entrenamiento del usuario. Refiérase a las
instrucciones anteriores para su correcta utilización.
Aun cuando los protectores auditivos pueden ser recomendados como protección frente a los efectos nocivos del
ruido impulsivo, el valor NRR esta basado en la atenuación de ruido continuo y puede no ser un indicador preciso
de la protección obtenida contra el ruido impulsivo como un disparo.
La capacidad de reducción de ruidos de este protector auditivo frente a ruidos impulsivos puede estimarse
refiriéndose al desempeño de atenuación del protector auditivo frente a una frecuencia similar a la del ruido
impulsivo al que se expone, provista en la información de atenuación en el embalaje del producto.
Para estimar la capacidad de reducción del ruido de este protector auditivo frente a ruidos impulsivos, refiérase
a la Información de Atenuación más abajo, o en el embalaje del producto. Si la frecuencia del ruido impulsivo es
de 2000 Hertz (Hz), por ejemplo, la media (promedio) de reducción de ruido alcanzada en ensayos sometidos
a esa frecuencia fue de 32.1 decibeles (dB). Utilizando la desviación estándar de + 2.8 dB, la reducción de ruido
estimada a 2000 Hz se encontrara entre 29,3 dB y 34,9 dB.
Consulte al fabricante del equipo que produce los ruidos impulsivos para determinar la frecuencia.
USA / CAN / MX
Page 15

15
¡ADVERTENCIA!
Debe aplicarse un programa apropiado de protección auditiva que incluya un adecuado monitoreo y ensayos
audiométricos para asegurar la efectiva protección auditiva. El uso inapropiado del protector auditivo o la
ineficiente aplicación del monitoreo y ensayos pueden resultar en la perdida de la capacidad auditiva o serias
lesiones al usuario.
INFORMACION DE ATENUACION
ANSI S3.19-1974
INFORMACION DE ATENUACION – Versión con Banda Flexible
LOW / BAJA
Frecuencia (Hz) 125 250 500 1000 2000 3150 4000 6300 8000 NRR
Media (dB) 14.4 15.8 25.4 34.7 31.0 32.6 34.4 35.7 36.0
21
Desvío estándar 2.1 2.5 2.6 3.1 2.4 2.8 2.7 2.9 2.2
MEDIUM / MEDIA
Frecuencia (Hz) 125 250 500 1000 2000 3150 4000 6300 8000 NRR
Media (dB) 17.1 20.6 30.2 36.3 36.7 38.1 39.1 41.3 41.2
25
Desvío estándar 2.6 2.0 2.7 3.0 2.9 2.9 3.1 2.6 2.9
INFORMACION DE ATENUACION – Versión con Anclaje para Cascos
LOW / BAJA
FFrecuencia (Hz) 125 250 500 1000 2000 3150 4000 6300 8000 NRR
Media (dB) 13.6 17.3 25.1 31.3 32.1 32.6 35.0 35.0 34.6
21
Desvío estándar 2.9 2.8 2.3 3.0 2.8 2.4 2.1 2.8 2.7
MEDIUM / MEDIA
FFrecuencia (Hz) 125 250 500 1000 2000 3150 4000 6300 8000 NRR
Media (dB) 16.8 21.5 29.1 36.0 36.5 38.7 37.6 40.4 39.4
25
Desvío estándar 3.0 2.2 2.1 3.1 3.3 2.8 2.9 3.8 4.4
HIGH / ALTA
Frecuencia (Hz) 125 250 500 1000 2000 3150 4000 6300 8000 NRR
Media (dB) 18.7 25.0 34.9 39.3 39.0 36.9 37.3 40.1 39.2
28
Desvío estándar 2.6 2.6 2.9 3.0 2.3 2.4 2.3 2.2 2.8
HIGH / ALTA
Frecuencia (Hz) 125 250 500 1000 2000 3150 4000 6300 8000 NRR
Media (dB) 19.8 26.0 33.2 38.8 37.8 36.8 38.0 39.8 38.8
28
Desvío estándar 2.6 1.9 2.1 3.3 3.1 2.9 2.8 2.1 3.3
USA / CAN / MX
Page 16

16
¡Advertencia!
Para ruidos ambientales donde las frecuencias por debajo de los 500 Hz son predominantes, deberán
considerarse los valores de sonido ambiental C-ponderado. La colocación inapropiada de este equipo reducirá
su efectividad para atenuar ruidos. No seguir esta advertencia puede resultar en serias lesiones personales o
perdida auditiva permanente.
MSA Corporate Headquarters
P.O. Box 426
Pittsburgh, PA 15230
USA
Phone / Teléfono 412.967.3000
U.S. Customer Service / Atención al Cliente 1.800.MSA.2222
MSA Canada 416.520.4225
MSA Mexico (52) 55 2122 5770
MSA International 412.967.3354
www.MSAnet.com
INFORMACION DE ATENUACION – Versión con Banda Flexible
LOW / BAJA
Frecuencia (Hz) 125 250 500 1000 2000 3150 4000 6300 8000 NRR
Media (dB) 14.4 15.8 25.4 34.7 31.0 32.6 34.4 35.7 36.0
21
Desvío estándar 2.1 2.5 2.6 3.1 2.4 2.8 2.7 2.9 2.2
MEDIUM / MEDIA
Frecuencia (Hz) 125 250 500 1000 2000 3150 4000 6300 8000 NRR
Media (dB) 17.1 20.6 30.2 36.3 36.7 38.1 39.1 41.3 41.2
25
Desvío estándar 2.6 2.0 2.7 3.0 2.9 2.9 3.1 2.6 2.9
INFORMACION DE ATENUACION – Versión con Anclaje para Cascos
LOW / BAJA
FFrecuencia (Hz) 125 250 500 1000 2000 3150 4000 6300 8000 NRR
Media (dB) 13.6 17.3 25.1 31.3 32.1 32.6 35.0 35.0 34.6
21
Desvío estándar 2.9 2.8 2.3 3.0 2.8 2.4 2.1 2.8 2.7
MEDIUM / MEDIA
FFrecuencia (Hz) 125 250 500 1000 2000 3150 4000 6300 8000 NRR
Media (dB) 16.8 21.5 29.1 36.0 36.5 38.7 37.6 40.4 39.4
25
Desvío estándar 3.0 2.2 2.1 3.1 3.3 2.8 2.9 3.8 4.4
HIGH / ALTA
Frecuencia (Hz) 125 250 500 1000 2000 3150 4000 6300 8000 NRR
Media (dB) 18.7 25.0 34.9 39.3 39.0 36.9 37.3 40.1 39.2
28
Desvío estándar 2.6 2.6 2.9 3.0 2.3 2.4 2.3 2.2 2.8
HIGH / ALTA
Frecuencia (Hz) 125 250 500 1000 2000 3150 4000 6300 8000 NRR
Media (dB) 19.8 26.0 33.2 38.8 37.8 36.8 38.0 39.8 38.8
28
Desvío estándar 2.6 1.9 2.1 3.3 3.1 2.9 2.8 2.1 3.3
Las escalas de reducción de ruidos (NRR – Noise Reduction Rating) para la versión con Anclaje para
cascos, listada arriba, son aplicables solo para cascos MSA V-Gard Medio.
Las escalas de reducción de ruidos (NRR - Noise Reduction Rating) y los Valores de Atenuación para otros
cascos MSA pueden variar.
Contacte a MSA para mayor información.
USA / CAN / MX
Page 17

17
Page 18

18
www.left-right.eu
SD071023104
 Loading...