

Page 1

®
FireHawk
Rescue Belt II
INSTRUCTIONS FOR USE AND CARE
WARNING
u
This manual must be carefully read and followed by all persons who
have or will have the responsibility for using or servicing this Rescue
Belt Escape System. This Rescue Belt II will perform as designed only
if used and serviced according to the instructions; otherwise it could
fail to perform as designed, and persons who rely on the Rescue Belt II
could sustain serious personal injury or death.
National standards and state, provincial, and federal laws require the
user to be trained before using this product. Use this manual as part
of a user safety training program that is in accordance with department guidelines. These instructions must be provided to users before
each use of the product and retained for reference by the user.
The warranties made by MSA with respect to the product are voided if the product is
not used and maintained in accordance with the instructions in this manual. Please
protect yourself and your employees by following the instructions. Please read and
observe the WARNINGS and CAUTIONS inside. For any additional information relative to use or repair, write or call 1-877-672-3473 (FIRE) during regular working hours.
MSA 314 (L) Rev. 3 © MSA 2013 Prnt. Spec. 10000005389(A) Mat. 10115063
Doc. 10115063
Page 2

INTRODUCTION
TABLE OF CONTENTS
Introduction..............................................................................................................................................................................2
Limitations ...............................................................................................................................................................................2
Training....................................................................................................................................................................................2
Inspection Before Use .............................................................................................................................................................3
Operation and Use ..................................................................................................................................................................4
Installing the FireHawk Rescue Belt II on the Air Mask ..........................................................................................................5
Removing the FireHawk Rescue Belt II from the Air Mask.....................................................................................................7
Repacking the Rope in the FireHawk Rescue Belt II..............................................................................................................7
Re-installing the Quick-Release ..............................................................................................................................................8
Cleaning and Storage..............................................................................................................................................................9
Useful Life..............................................................................................................................................................................10
Replacement Kits ..................................................................................................................................................................10
Sample Rescue Belt Usage and Inspection History .............................................................................................................12
INTRODUCTION
The FireHawk Rescue Belt II is a personal escape system
integrated into an MSA air mask. Rescue belts listed in
this manual are NIOSH CBRN approved only when used
in conjunction with an MSA CBRN approved air mask. The
Rescue Belt II is designed to provide the user a means of
escape from an elevated position. Use of the Rescue Belt
II must be in accordance with the user’s fire department
procedures. The Rescue Belt II is an EMERGENCY device
which must only be used when all other escape options
have been exhausted.
This FireHawk Rescue Belt II is NFPA 1983 approved for
use as a personal escape system for emergency escape
when installed on MSA approved air masks. It can also be
used as a stand alone product, when it is not installed on
an air mask. The Rescue Belt II is only approved by
NIOSH when used in conjunction with an MSA approved
air mask.
Fits Waist
P/N
10119391 36” - 59” Aramid Hook 50 ft M7 and M7XT
10119392 36” - 59” Aramid Carabiner 50 ft M7 and M7XT
10119369 36” - 59” Aramid/Nylon Hook 50 ft M7 and M7XT
10119370 36” - 59” Aramid/Nylon Carabiner 50 ft M7 and M7XT
10119395 36” - 59” Aramid Hook 50 ft AirHawk II
10119390 36” - 59” Aramid Carabiner 50 ft AirHawk II
10119393 36” - 59” Aramid/Nylon Hook 50 ft AirHawk II
10119394 36” - 59” Aramid/Nylon Carabiner 50 ft AirHawk II
Size
Rope Material
Anchor
Type
Rope
Length
Air Mask
Type
LIMITATIONS
WARNING
u
Read and follow all limitations carefully.
Misuse can result in death or serious injury.
• Use as a single person, one time use escape device,
unless used for training. Units used for training may be
reused; however, MUST be used in conjunction with an
independent fall protection system.
• The combined weight of the user and all equipment
must not exceed 310lbs.
• Remove from service if used in an escape, exposed to
chemicals, or does not meet inspection criteria.
• Use ONLY as a complete system. NEVER alter this
device or use the components with other systems.
• Do Not use to hang tools or other equipment.
TRAINING
WARNING
u
• An independent fall protection system with
safety line and full body fall protection harness MUST be used in conjunction with this
Rescue Belt II during training.
• Remove the Rescue Belt II from training service when it does not comply with the
inspection criteria described in this manual.
• Rescue belts used for training purposes
MUST be designated for training use ONLY
and marked as such.
Misuse can result in death or serious injury.
This personal escape system meets the requirements for
escape belts with optional flame resistance and fire
escape systems of NFPA 1983, Standard on Life Safety
Rope and Equipment for Emergency Services, 2012
Edition, which includes testing at a 310 pound weight
capacity.
MSA 314 (L) Rev. 3 - 10115063
CAUTION
u
Wear gloves when using this device.
2
Page 3

INSPECTION BEFORE USE
Training must only be performed under direct supervision
of a trained professional and in accordance with local fire
department guidelines. A trained professional must identify
training structures and anchor points. An independent
fall protection safety line (such as MSA Dyna-Lock, SRL,
or equivalent) and a full body fall protection harness
(such as MSA TechnaCurv Harness or equivalent) MUST
be used in conjunction with the Rescue Belt II during
training. Also, Replacement Kit (P/N 10118506) should be
purchased to designate the Rescue Belt II as training
equipment and to keep rope ends from fraying.
To order training equipment contact MSA Customer
Service Center at 1-800-672-2222.
It is the responsibility of the purchaser and user of this
product to:
• Learn through PERSONAL instruction from a rescue
instructor who is well versed in all phases of technical
rescue. Never attempt to use this product until you
have received such instruction and are deemed competent in its use by the instructor.
• Use this product only in accordance with local fire
department procedures.
• Read all the product information and labels and follow
them.
• Use good judgment and do not exceed the limitations
of the user’s skill or the equipment.
Additional information regarding escape rope and belts
can be found in NFPA 1500, Standard on Fire Department
Occupational Safety and Health Program and NFPA 1983,
Standard on Life Safety Rope.
INSPECTION BEFORE USE
Inspect the Rescue Belt II in anticipation of deployment in
an emergency situation. Also, inspect it before use in a
training situation.
If the unit exhibits any of the indicated conditions, immediately remove it from service. See the Service section of
this manual for appropriate component replacement.
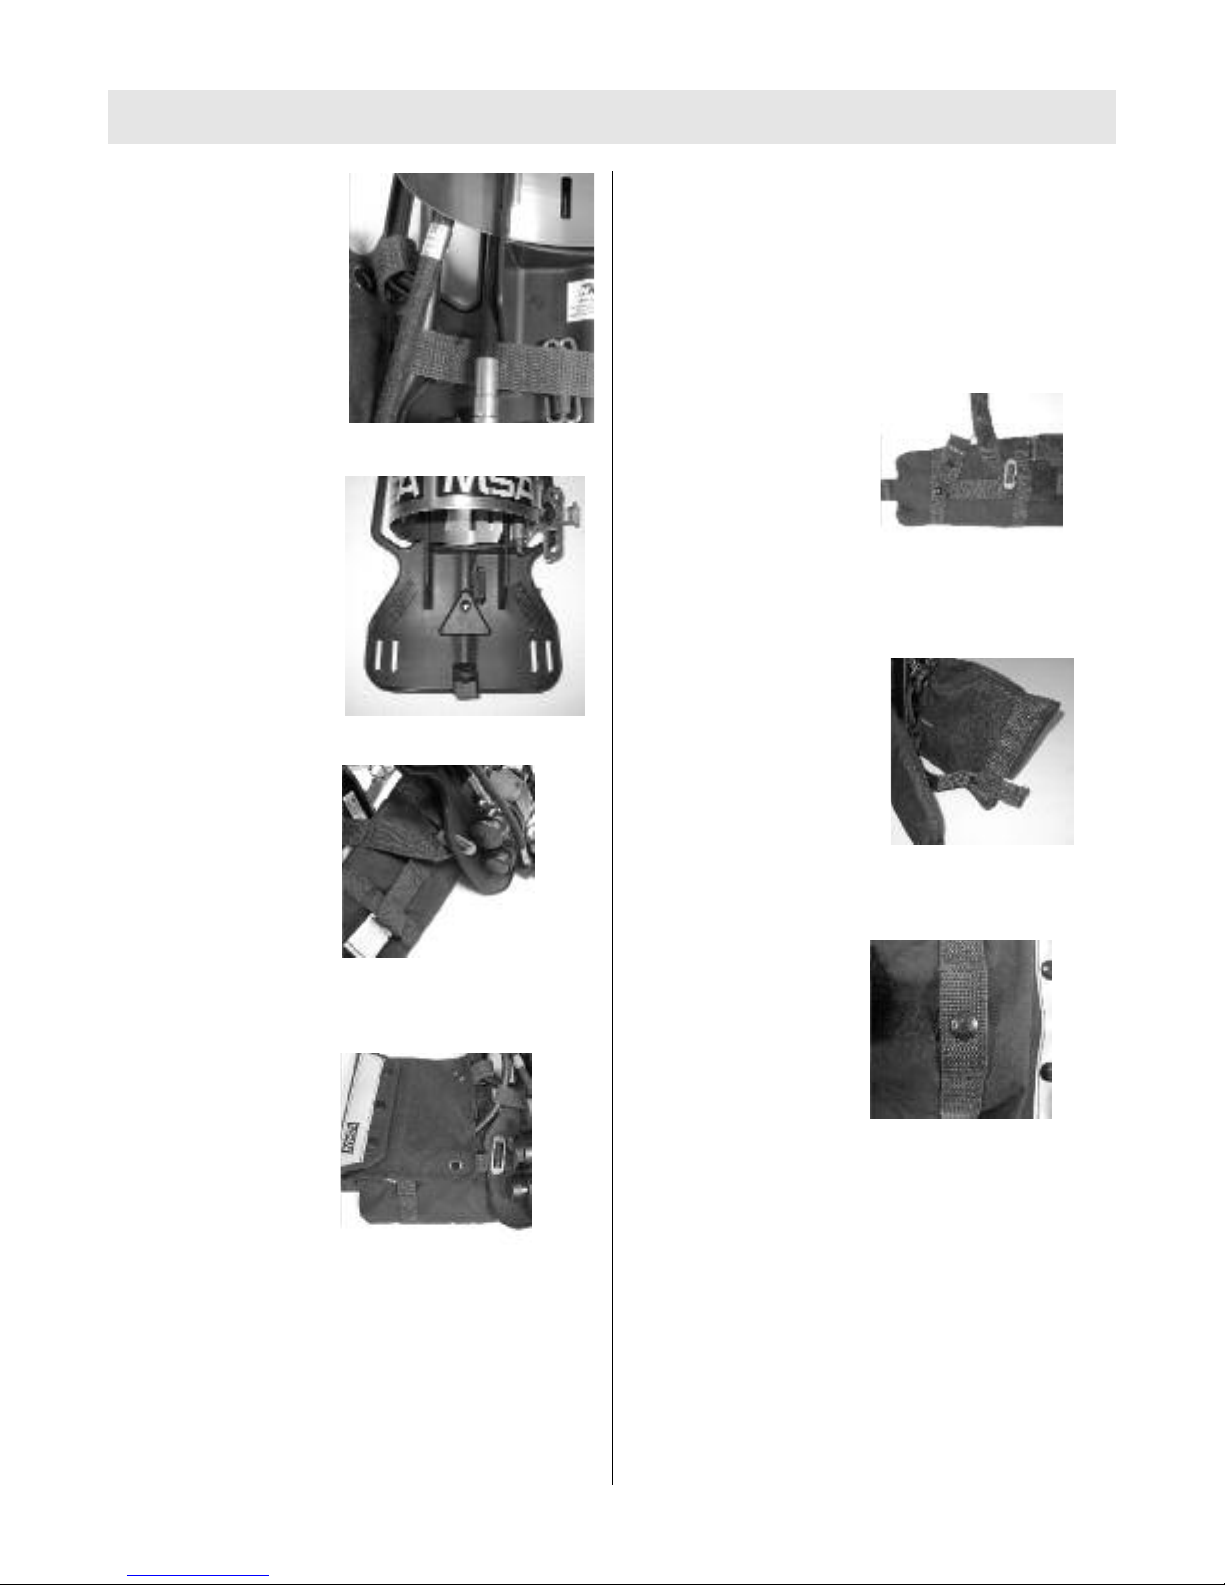
1. Waist Belt
a. Inspect the webbing of the belt for damage (cuts,
abrasion, discoloration, or signs of UV or chemical
damage).
b. Inspect the yellow stitching for signs of abrasion,
damage from heat, and for loose or missing stitches.
c. Inspect hardware for burrs, cracks, wear, corrosion,
or other damage. Ensure the waist belt buckle
opens and closes properly.
2. Rope
a. Open the flap on the lumbar pad and inspect the
first 24 inches of rope. (Inspect the entire length of
rope if the rescue belt was used in training.)
b. Inspect the sewn eye on the rope for signs of
abrasion, loose stitching, or other damage.
c. Inspect the rope for signs of damage such as
stiffness, discoloration, or abrasion.
d. If it is suspected that the rope was exposed to any
harmful chemicals, replace the rope. Damage to the
rope by chemicals can be invisible to the eye.
3. Descender Assembly
a. Verify that the descender is securely stowed in the
lower elastic loop within the lumbar pad.
b. Verify that the rope is not twisted around the
descender in a manner that would impede its
removal during use.
c. Verify that the rope is tightly routed through the
descender and that there are no loops of slack in
the rope between the holes in the descender.
4. Hook/Carabiner
a. Verify that the hook or carabiner is securely stowed
and that it can be easily deployed during use.
i. The hook should be inserted into the upper elastic
loop such that the eye of the hook is oriented into
the lumbar pad and the hook portion curves
around the stowed descender.
ii. If present, the carabiner should be placed in the
lumbar pad above the descender. The carabiner
should not be clipped to any of the sewn loops
within the lumbar pad.
b. If present, verify that the gate of the carabiner opens
and closes properly.
5. Lumbar Pad
a. Inspect the lumbar pad to verify that all webbing
loops are securely attached and that there is no
damage to any of the stitching.
b. Inspect the entire surface of the lumbar pad for
discoloration, severe abrasion damage, holes, or
signs of heat or chemical damage.
c. Inspect the seams to verify that there is no loose
stitching or holes.
d. Verify that the flap on the lumbar pad opens and
closes properly.
e. Once all the previous inspection procedures have
been followed, ensure that the tail of the rope with
the stopper knot protrudes from the flap of the
lum-bar pad between the two snaps so that it can
easily be located during an emergency situation.
f. Ensure the tail of the rope with the stopper knot pro-
trudes from the flap opening between the two
snaps on the flap so that it can easily be located
during an emergency.
6. Quick-Release Mechanism
a. Verify that the quick-release webbing is properly
connected to the rescue belt. The sewn fold on the
webbing should protrude completely through the
slots in the Nomex plate in the center of the lumbar
pad. The Velcro hook and loop fastener should be
securely fastened.
b. Verify that the snaps are able to be easily released
by tugging on the ends of the quick-release strap.
Ensure that the snaps are securely fastened before
use.
3
MSA 314 (L) Rev. 3 - 10115063
Page 4

OPERATION AND USE
c. Verify that the lumbar support straps located in the
top center of the lumbar pad are properly routed
through the quick-release webbing straps and that
the ends of these straps are fully engaged with the
sewn fold on the webbing of the quick-release strap.
d. Verify that the tri-bars are securely engaged with the
lower slots on the backplate.
7. Lumbar attachment strap
a. Verify that the tri-bar(s) are securely engaged with
the center slot(s) on the backplate.
8. Accessory pouches
a. Verify that the quick-release webbing is properly
routed through any accessory pouches installed on
the air mask.
9. Regulator Holder
a. Verify that the Firehawk Regulator holder is securely
installed on the waist belt. THE REGULATOR
HOLDER MUST NOT BE INSTALLED ON THE
QUICK-RELEASE STRAPS. This will impede the
function of the quick-release mechanism. Refer to
the Installing the FireHawk Rescue Belt II on the Air
Mask section for detailed assembly instructions.
OPERATION AND USE
Donning
Refer to the user instructions for donning the air mask.
Instructions are supplied with the air mask.
User Instructions
FireHawk M7XT Air Mask 10128861
FireHawk M7 Air Mask 10082858
FireHawk M7 Responder 10086011
FireHawk MMR Air Mask 10023638
AirHawk II Air Mask 10088650
1. While donning the air mask, secure the Rescue Belt II
around the waist by connecting the hook buckle to the
adjusting D-ring. Adjust the webbing to a snug fit. The
waist belt buckles should be in the center of the waist.
2. Tuck the excess webbing of belt between the regulator
holder and the waist belt by pulling outward on the regulator holder and stowing the folded excess webbing
under the regulator holder.
Using the FireHawk Rescue Belt II for
Emergency Escape
CAUTION
u
Wear gloves when using this device.
1. Locate the point of escape and a suitable anchor point.
Ensure that the waist belt is fastened securely around
the waist.
2. Ensure the anchor and exit point are free of sharp
edges which could cause the rope to fail.
WARNING
u
The anchor MUST be capable of supporting the
ser and all accompanying equipment. Proper
u
training is required to identify appropriate
anchor points and methods of attachment.
Failure to select a suitable anchorage and
secure the line properly can result in serious
ersonal injury or death.
p
3. Deploy the hook/carabiner and descender by pulling
forcefully on the knotted rope end protruding from the
right side of the Rescue Belt II. The flap on the lumbar
pad will open and the hook/carabiner and descender
will deploy from the lumbar pad at once.
4. Attach the hook/carabiner to a secure anchor.
5. Feed the rope through the descender until the window
or egress point can be reached by squeezing the lever
on the descender while paying out rope.
6. Prior to egress, ensure that the descender is positioned in the center of the waist.
7. While positioning at the point of egress, do not
squeeze the lever of the descender as this will allow
the rope to slip through the device.
8 Once positioned for egress, grip the rope entering the
descender firmly and maintain the grip throughout the
entire rappel. Squeeze the lever on the descender to
allow the rope to move freely through the device.
WARNING
u
• DO NOT remove hand from the rope entering
the descender during descent. Doing so can
result in rapid descent.
• Never jump or allow slack line to develop
between the Rescue Belt II and the anchor.
This will cause excessive shock loads to
develop in the system, which can result in
damage to the rope or separation from the
anchor.
Misuse can result in death or serious injury.
9. Continue descending at a slow, controlled rate until a
safe area is reached.
10. Once a safe area is reached, the rope can be separated from the air mask by releasing the termination knot
at the end of the rope and pulling the remaining rope
through the descender. The termination knot is
released by pulling on the end of the rope. If this separation method is used, Replacement Kit (P/N
10118506) should be purchased in order to replace the
releasable knot components. Alternately, the waist belt
can be removed from the air mask by pulling the quickrelease straps and removing the
rescue belt.
MSA 314 (L) Rev. 3 - 10115063
4
Page 5

OPERATION AND USE
In emergency situations, the FireHawk Rescue Belt II can
be used while detached from the air mask. The Rescue
Belt II should only be detached from the air mask in emer-
ency situations when all other options have been
g
exhausted.
To detach the FireHawk Rescue Belt II from
the air mask while wearing the air mask:
1. Locate the reflective pull tabs on the left and right
sides of the Rescue Belt II.
2. Pull the reflective pull tabs to release the snaps.
3. Continue to pull the quick-release straps outward and
away from the body to disengage the hook and loop.
4. Continue to pull the quick-release straps until the air
mask has been released from the Rescue Belt II.
5. Loosen the pull straps of the air mask and release the
chest strap (if present).
6. Remove the facepiece.
7. Remove the air mask.
8. The Rescue Belt II can be used as a stand alone
escape system. Follow the usage instructions above to
escape.
Using the FireHawk Rescue Belt II for Work
Positioning
NOTE: The FireHawk Rescue Belt II includes a D-ring,
approved for use as a positioning attachment, per NFPA
1983, 2012 Edition.
CAUTION
u
Wear gloves when using this device.
1. Verify that the quickrelease strap is properly installed on the lum-
ar pad assembly.
b
2. Verify that lumbar
attachment web is
installed as shown. The
tri-bars should protrude
beyond the edges of
the 2 vertical straps in
the center of the lumbar pad.
NOTE: If installing the Rescue Belt II on an AirHawk II Air
Mask or an NFPA 1981, 2002 Edition air mask, an alternate lumbar attachment adapter is required. To install this
adapter, the quick-release must be deployed and reinstalled to capture the adapter. Refer to the Re-installing
the Quick-Release section of this manual before proceeding with the following steps.
3. Orient the air mask as
shown.
WARNING
u
• Positioning attachments, such as lanyards
or carabiners, must not exceed 24 inches in
length when measured from the inside edge
of the positioning D-ring on the Rescue Belt
II to the furthest inside edge of the attachment hardware.
• Positioning attachment hardware must be
rated to exceed the weight of the user.
• The positioning attachment D-ring must not
be used as a fall arrest attachment point.
Misuse can result in death or serious injury.
1. Connect the positioning attachment to the D-ring located on the front of the Rescue Belt II.
2. Connect the positioning attachment to a secure
anchor.
3. Verify that both points of attachment are securely fastened before weighting the positioning attachment.
INSTALLING THE FIREHAWK RESCUE BELT II
ON THE AIR MASK
NOTE: The following steps assume that the pull straps,
waist belt, rescue belt, and lumbar pad have been
removed from the carrier and harness assembly.
4. Install each of the tribars from the lumbar
attachment straps into
the two center slots on
the backplate. Verify
that the tri-bars are fully
engaged by tugging on
the lumbar attachment
strap.
5
MSA 314 (L) Rev. 3 - 10115063
Page 6
INSTALLING THE FIREHAWK RESCUE BELT II
OTE: If the ExtendAire
N
II Emergency Breathing
System is installed on the
air mask, install the hose
restraint in the right center
slot in the backplate first,
before installing the tri-bars
from the rescue belt.
Install the left tri-bar of the
rescue belt once the right
side has been securely
installed with the hose
restraint in place.
NOTE: If installing the
Rescue Belt II on an
AirHawk II or NFPA 1981,
2002 Edition air mask,
install the tri-bar on the
lumbar attachment adapter
in the single right center
slot of the backplate.
5. Install the left tri-bar into
the bottom left slot on
the backplate.
®
7. Attach the right and left pull straps from the rescue belt
to the adjuster buckles on the shoulder straps. Ensure
that the pull straps are not twisted.
8. If the air mask has the ExtendAire II pouch or Quick-Fill
pouch installed, the pull straps and quick-release
straps must be routed through the webbing loops on
the back of the pouch. If these pouches are not
installed, skip the following steps.
a. Disengage the snap on
the quick-release
webbing by pulling on
the end of the quickrelease strap with the
reflective patch.
b. Route the quick-release
webbing strap through
the bottom webbing loop
on the back side of the
pouch.
NOTE: If the ExtendAire II
Emergency Breathing
System is installed on the
air mask, the left tri-bar of
the rescue belt will share
the left slot on the backplate with the attachment
loop of the ExtendAire II
hose pouch.
6. Insert the right tri-bar of the rescue belt into the outer
right slot of the back plate.
NOTE: If the Quick-Fill hose pouch is installed on the air
mask, the right tri-bar of the rescue belt will share the right
slot on the backplate with the attachment loop of the
Quick-Fill hose pouch.
MSA 314 (L) Rev. 3 - 10115063
c. Re-install the snap.
The Rescue Belt II
uses directional
snaps to prevent
accidental disengagement if the release
strap was to snag. To
mate the directional
snap, locate the dot
on the snap. Engage
the portion of the
snap on the side
opposite the dot first
and then push down
on the dot side.
6
Page 7

REMOVING THE FIREHAWK RESCUE BELT II
d. Route the pull strap
through the top webbing loop on the
back side of the
pouch before weaving the pull strap
through the adjuster
buckle on the shoulder strap.
REMOVING THE FIREHAWK RESCUE BELT II
FROM THE AIR MASK
1. Orient the air mask as
shown.
2. Slide the descender
along the rope by holding down the black
lever on the descender,
until the descender is
approximately 12 inches from the hook/carabiner.
3. Flake the rope into a pile. To do this, start at the end of
the rope closest to the hook/carabiner and begin laying
the rope on top of itself until the other end of the rope
has been reached.
4. Verify that the warning labels are in place at the last 15
and 10 feet of rope.
2. Remove right and left tri-bars from the backplate.
3. Remove the center tri-bar(s) from the backplate.
4. Remove the pull straps from the right and left shoulder
straps.
REPACKING THE ROPE IN THE FIREHAWK
RESCUE BELT II
The FireHawk Rescue Belt II is designed for one time,
emergency escape use only. The FireHawk Rescue Belt II
may be re-used in a controlled training environment where
a backup fall arrest system is used. Rescue belts used in
training must be designated for training use only. The rope
must be inspected prior to each use. The rope must be
reinstalled in the lumbar pad prior to each use to prevent
snags or entanglement hazards.
The FireHawk Rescue Belt II must be removed from the
air mask before repacking the rope. Refer to the Removing
the FireHawk Rescue Belt II from the Air Mask section of
this manual.
1. Completely remove the rope from the lumbar pad.
5. Verify that the
releasable termination
knot is at the end of the
rope and that all labels
are in place.
6. Fold back the flap on the lumbar pad and insert the
releasable termination knot deep into the compartment
closest to the waist belt.
7. Continue to insert 6-12 inch increments of rope into the
lumbar pad and allow the rope to settle naturally as
more rope is inserted. Push the rope deep into the
pouch so that it evenly fills the entire lumbar pad until
all of the rope has been installed.
WARNING
u
DO NOT coil the rope. DO NOT feed large
amounts of rope into the lumbar pad at
once. Doing so may cause the rope to knot or
bind during escape. Misuse can result in death
or serious injury.
7
MSA 314 (L) Rev. 3 - 10115063
Page 8

REMOVING THE RESCUE BELT II FROM THE AIR MASK
8. Fold the descender strap in half and rotate the descender so that it points toward the opening in the lumbar
pad. The rope between the descender and the hook/
arabiner should lay over the top of the descender.
c
9. Insert the descender
and rope into the lower
loop of elastic webbing
inside the lumbar pad
until the elastic loop is
near the exposed end
of the descender.
10. Insert the eye of the
hook into the top loop
of elastic webbing in
the lumbar pad and
position the hook such
that it wraps around the
exposed portion of the
descender.
NOTE: If a carabiner is present, place the carabiner in the
lumbar pad above the descender. The carabiner should
not be clipped to any of the sewn loops within the lumbar
pad.
13. The stopper knot in the
rope should be
exposed when the flap
n the lumbar pad is
o
closed.
RE-INSTALLING THE QUICK-RELEASE
The FireHawk Rescue Belt II is designed for one time,
emergency use only. The FireHawk Rescue Belt II may be
re-used in a controlled training environment where a backup fall arrest system is used. Rescue Belts used in training
must be designated for training use only. If the quickrelease was deployed as part of an emergency bail out,
remove the Rescue Belt from service. If the quick-release
was deployed as part of a training exercise, proceed to the
following steps to re-install the quick-release.
1. Remove the pull straps
from the shoulder
straps of the air mask
and identify the right
and left straps (left
strap shown).
11. Position the tail of rope with the stopper knot along the
waist belt and between the 2 snaps.
12. Fasten the snaps. The
Rescue Belt II uses
directional snaps to
prevent accidental disengagement. To mate
the directional snaps,
locate the dot on the
snap. Engage the portion of the snap on the
side opposite the dot
first and then push
down on the dot side.
MSA 314 (L) Rev. 3 - 10115063
2. Orient the
lumbar pad
as
shown.
8
Page 9

CLEANING AND STORAGE / USEFUL LIFE
3. Install the left strap by
orienting it as shown.
Fold the webbing at the
edge of of the Velcro
hook fastener tape
such that the Velcro
hook fastener tape
faces down.
4. Insert the folded webbing under the second
webbing loop from the
left on the lumbar pad.
Continue to route the
folded webbing under
the stiff Nomex plate
and back out through
the left slot in the
Nomex plate.
5. Continue to pull the webbing through the left slot in the
Nomex plate until the sewn fold in the webbing has
pulled completely through the slot.
10. Fasten the snap on the
under side of the left
most webbing strap of
the lumbar pad. The
Rescue Belt II uses
directional snaps to
prevent accidental disengagement. To mate
the directional snaps,
locate the dot on the
snap. Engage the portion of the snap on the
side opposite the dot first and then push down on the
dot side.
11. Repeat these steps for the right quick-release webbing
strap.
12. Feed the lumbar
attachment webbing
under the lumbar support straps of the lumbar pad
6. Fold over the left lumbar support strap located on the top edge of
the lumbar pad. Insert
the folded webbing
strap through the slot in
the left lumbar support
strap until the sewn fold
in the webbing strap
completely passes
through the slot.
7. Pull the tri-bar to the left until the sewn fold in the quick
release-strap has been pulled tight against the left slot
in the Nomex plate.
8. Pull on the quick-release webbing directly below the tribar until the slack in the webbing to the right of the
sewn fold has been pulled tight against the sewn fold.
Do not pull the sewn fold through the slot in the Nomex
plate.
9. Mate the Velcro hook and loop fastener tape on the
quick-release strap with the lumbar pad.
NOTE: This step is not necessary if installing the
FireHawk Rescue Belt II on an AirHawk II or NFPA 1981,
2002 Edition air mask.
NOTE: If installing the rescue belt on an AirHawk II
or NFPA 1981, 2002
Edition air mask, the right
lumbar support strap of the
lumbar pad must be routed
through the lumbar attachment adapter before feeding the sewn fold of
the quick-release strap
through the slot on the right
lumbar support strap of the
lumbar pad.
CLEANING AND STORAGE
Clean the FireHawk Rescue Belt II with mild soap and
water. Do not use bleach or harsh chemicals to clean the
Rescue Belt II or any of its components. Allow the Rescue
Belt II to air dry. Do not dry with heat or UV sources.
Store the FireHawk Rescue Belt II away from heat,
moisture, light, chemicals or their vapors, or other
degrading elements. Prior to using a rescue belt which has
been stored for a long period of time, an inspection of the
components should be performed.
9
MSA 314 (L) Rev. 3 - 10115063
Page 10

REPLACEMENT KITS
When storing an air mask with the FireHawk Rescue Belt
II installed at cold temperatures, it is recommended that
the waist belt be adjusted to the smallest waist size. At
xtreme cold temperatures, the waist pad materials may
e
become stiff and could impede the adjustment of the
waist belt during donning at these temperatures.
USEFUL LIFE
The useful life of the FireHawk Rescue Belt II is 10 years
when properly stored, or carried on an air mask, in an
environment not exposed to UV or degrading elements as
indicated above. The useful life of the belt assembly and
rope on Rescue Belt II units used for training varies
depending on the frequency of use as follows:
Excessive and/or weekly use: 3-6 months
Occasional Use: 1-2 years
Seldom Use: 2-5 years
The date of manufacture can be found on the waist belt
label and on the rope label located near the sewn eye of
the rope.
Remove the Rescue Belt II from service when it reaches
the useful life above, or sooner if it fails to meet the
inspection criteria. Replacing the belt assembly and/or
rope will restore the useful life for those components.
6. Insert the end of the
rope through the
spacer and slide the
ew spacer
n
approximately 8 inches
from the end of the
rope.
7. Tie the releasable
termination knot as
shown. Be sure the
spacer is captured by
the knot.
SERVICE
All service for the FireHawk Rescue Belt II is end-user serviceable. Replacement kits can be found in the Replace-
ment Kits section of this manual.
Installing replacement 10 and 15 foot labels:
1. Completely remove the FireHawk Rescue Belt II from
the air mask.
2. Remove the entire length of rope from the lumbar pad.
3. Remove the damaged 10 and 15 foot indicator labels.
4. Measure 10 feet from the end of the rope and install
the 10 foot indicator label by removing the adhesive
backing and folding the label in half around the rope
and adhering the label to itself.
5. Measure 15 feet from the end of the rope and repeat
the same procedure for the 15 foot indicator label.
6. Refer to the Repacking the Rope in the Rescue Belt II
section of this manual.
Replacing the releasable termination knot at
the end of the rope:
1. Completely remove the FireHawk Rescue Belt II from
the air mask.
2. Remove the entire length of rope from the lumbar pad.
3. Untie the releasable termination knot at the end of the
rope.
4. Remove all labels and discard the spacer.
5. Place one end of the “replacement” tape flush up
against the end of the rope. Adhere this end to the
rope and tightly wrap the tape around the rope overlapping the first pass. Wrap until all tape is used.
10118503 Waist Belt Adjuster Buckle
10118505 10/15 ft Labels (packs of 10 each)
10118506 Releasable Knot Replacement Kit
10118507 Lumbar Attachment, FireHawk M7XT / M7 Air Mask
10118508 Lumbar Attachment, AirHawk II Air Mask
10118509 Waist Belt Extender
10118510 Quick-Release Strap, Right
10118511 Quick-Release Strap, Right
10118512 Lumbar Pad
10118513 Waist Belt (less Adjuster Buckle)
10118514 Rope, Aramid, 50 ft, Hook
10118516 Rope, Aramid, 50 ft, Sewn Eye (less Carabiner)
10118518 Rope, Aramid/Nylon, 50 ft, Hook
10118520 Rope, Aramid/Nylon, 50 ft, Sewn Eye (less Carabiner)
10118522 Descender Assembly
10120214 Carabiner
10120371 Regulator Mount, Firehawk
10119369
10119370
10119391 Rescue Belt II, FireHawk M7XT / M7, 50’, Aramid Rope, Hook
10119392
10119393 Rescue Belt II, AirHawk II, 50’, Aramid/Nylon Rope, Hook
10119394 Rescue Belt II, AirHawk II, 50’, Aramid/Nylon Rope, Carabiner
10119395 Rescue Belt II, AirHawk II, 50’, Aramid Rope, Hook
10119396 Rescue Belt II, AirHawk II, 50’, Aramid Rope, Carabiner
Rescue Belt II, FireHawk M7XT / M7, 50’, Aramid/Nylon Rope,
Hook
Rescue Belt II, FireHawk M7XT / M7, 50’, Aramid/Nylon Rope,
Carabiner
Rescue Belt II, FireHawk M7XT / M7, 50’, Aramid Rope,
Carabiner
MSA 314 (L) Rev. 3 - 10115063
10
Page 11

REPLACEMENT KITS
8. Apply the blank
releasable knot label by
inserting the label
hrough the loop in the
t
knot and wrapping the
label around the rope
that leads to the end of
the rope. Wrap the
label so that it adheres
to itself.
9. Place the “pull to
release” label
approximately 3 inches
from the end of the
rope. Fold the label in
half and remove the
adhesive backing.
Wrap the label around
the rope and adhere
the label to itself.
10. Refer to the Repacking the Rope in the FireHawk
Rescue Belt II section of this manual.
Replacing the adjuster buckle on the waist belt
1. Remove the adjuster buckle from the waist belt.
2. Insert the end of the
waist belt up and over
the knurled sliding bar
and back out toward
the lumbar pad.Ensure
that the buckle is
oriented with the round
side of the adjuster
facing down.
6. Install the descender strap on to the replacement waist
belt as shown. Ensure that the waist belt passes
through both loops of webbing on the descender strap
nd that the descender is oriented as shown.
a
7. Using permanent ink, place a check mark in the box
on the label that corresponds to the correct part
number. Refer to the label marking on the waist belt
being replaced.
8. Insert the free end of
the waist belt into the
lumbar pad assembly.
The waist belt must
pass through the stiff
webbing loop on the
right side of the interior
of the lumbar pad. The
waist belt should exit
the lumbar pad by
passing through the
opening on the left side
of the lumbar pad.
9. Install the adjuster buckle on to the free end of the
waist belt. Refer to Replacing adjuster buckle on the
waist belt section of this manual.
10. Install the regulator
holder on the free end
of the waist belt. The
regulator holder must
be oriented so that the
plastic holder tab faces
up.
11. Refer to the Repacking the rope in the FireHawk
Rescue Belt II section of this manual.
Replacing the quick-release straps
Refer to Re-installing the Quick-Release section of this
manual.
Replacing the waist belt
1. Completely remove the FireHawk Rescue Belt II from
the air mask.
2. Remove the entire length of rope from the lumbar pad.
3. Remove the adjuster buckle and regulator holder from
the left side of the waist belt.
4. Remove the waist belt from the lumbar pad assembly.
5. Remove the descender strap from the waist belt.
Replacing the rope
1. Completely remove the FireHawk Rescue Belt II from
the air mask.
2. Remove the entire length of rope from the lumbar pad.
3. Remove the releasable termination knot from the rope.
4. Remove the rope from the descender.
11
MSA 314 (L) Rev. 3 - 10115063
Page 12

REPLACEMENT KITS
5. Install the replacement
rope into the descender. The rope should be
outed through the
r
descender as shown.
When routing the rope
through the descender,
use care not to damage
the 10 and 15 foot indicator labels on the
rope.
6. Tie the releasable termination knot at the end of the
rope and install the appropriate labels. Refer to
Replacing the releasable termination knot at the end of
the rope section of this manual.
7. Install the rope into the lumbar pad. Refer to the
Repacking the rope in the FireHawk Rescue Belt II
section of this manual.
Replacing the descender assembly
1. Completely remove the FireHawk Rescue Belt II from
the air mask.
2. Remove the entire length of rope from the lumbar pad.
3. Remove the adjuster buckle and regulator holder from
the left side of the waist belt.
4. Remove the waist belt from the lumbar pad assembly.
5. Remove the descender strap from the waist belt.
6. Remove the releasable termination knot from the rope.
7. Remove the rope from the descender and discard the
escender assembly. When removing the rope from
d
the descender, use care not to damage the 10 and 15
foot indicator labels on the rope.
8. Install the rope into the
descender. The rope
should be routed
through the descender
as shown. When routing the rope through
the descender, use
care not to damage the
10 and 15 foot indicator
labels on the rope.
9. Tie the releasable termination knot at the end of the
rope and install the appropriate labels. Refer to
Replacing the releasable termination knot at the end of
the rope section of this manual.
10. Install the rope into the lumbar pad. Refer to the
Repacking the rope in the FireHawk Rescue Belt II
section of this manual.
SAMPLE-RESCUE BELT USAGE AND INSPECTION HISTORY
Part #
Serial #
Date in Service:
Inspect the Rescue Belt II for damage or excessive wear before and after the Rescue Belt is worn, and at least monthly. If
any doubt exists as to the integrity of the Rescue Belt, remove from service immediately.
Date Used Location Type of Use Exposure Inspected Comments
Date By (initials/badge#)
MSA 314 (L) Rev. 3 - 10115063
12
Page 13

Pour obtenir plus d’informations, appeler le 1-877-673-3473 (FIRE) ou consulter notre site Web au www.MSAsafety.com
CRANBERRY TWP.,
PENNSYLVANIE, É.-U. 16066
Ceinture d’évacuation
Rescue Belt II
®
FireHawk
INSTRUCTIONS D’UTILISATION ET D’ENTRETIEN
AVERTISSEMENT
u
Les personnes qui ont ou auront la responsabilité d’utiliser ou d’entretenir ce
système d’évacuation avec ceinture d’évacuation Rescue Belt II doivent lire et
suivre attentivement les directives contenues dans ce manuel. Cette ceinture
d’évacuation Rescue Belt II fonctionnera selon ses spécifications uniquement si
elle est utilisée et entretenue conformément aux instructions fournies, sans
quoi elle pourrait ne pas remplir la fonction pour laquelle elle a été conçue et les
personnes dont la sécurité en dépend pourraient subir des blessures graves ou
mortelles.
Les normes nationales ainsi que les lois fédérales et provinciales exigent que
l’utilisateur reçoive la formation nécessaire avant d’utiliser ce produit. Utiliser
ce manuel dans le cadre d’un programme de formation sur la sécurité en accord
avec les directives du département. Ces instructions doivent être fournies aux
utilisateurs avant qu’ils ne commencent à utiliser le produit, et laissées à leur
disposition pour consultation future.
Les garanties fournies par MSA relatives au produit sont annulées si le produit n’est
pas utilisé et entretenu en accord avec les instructions contenues dans ce manuel.
Veillez à assurer votre sécurité ainsi que celle de vos employés en suivant les
instructions. Lire et observer les messages d’AVERTISSEMENT et de MISE EN
GARDE contenus dans ce manuel. Pour toute information complémentaire relative à
l’utilisation ou à la réparation, écrire ou téléphoner au 1-877-672-3473 (FIRE) pendant
les heures de bureau.
MSA 314 (L) Rév. 3 © MSA 2013 Spéc. d’imp. 10000005389(A) Mat. 10115063
Doc. 10115063
Page 14

INTRODUCTION
TABLE DES MATIÈRES
Introduction............................................................................................................................................................................14
Restrictions............................................................................................................................................................................14
Formation ............................................................................................................................................................................. 14
Inspection avant utilisation ...................................................................................................................................................15
Fonctionnement et utilisation ................................................................................................................................................16
Installation de la ceinture d’évacuation Rescue Belt II FireHawk sur le masque à air .........................................................17
Dépose de la ceinture d’évacuation Rescue Belt II FireHawk du masque à air ..................................................................19
Réinsertion de la corde dans la ceinture d’évacuation Rescue Belt II FireHawk .................................................................19
Réinstallation du dispositif à déconnexion rapide ................................................................................................................20
Nettoyage et entreposage .....................................................................................................................................................21
Durée de vie utile ..................................................................................................................................................................22
Trousses de rechange ..........................................................................................................................................................22
Échantillon – Historique d’utilisation et d’inspection de la ceinture d’évacuation Rescue Belt ............................................24
INTRODUCTION
La ceinture d’évacuation Rescue Belt II FireHawk est un système
d’évacuation personnelle intégré à un masque à air de MSA. Les
ceintures d’évacuation décrites dans ce manuel sont approuvées
NIOSH CBRN uniquement lorsqu’elles sont utilisées conjointement
avec un masque à air de MSA approuvé CBRN. La ceinture
d’évacuation Rescue Belt II est conçue pour offrir à l’utilisateur un
moyen d’évacuation à partir d’un emplacement en hauteur.
L’utilisation de la ceinture d’évacuation Rescue Belt II doit être
conforme aux procédures du service d’incendie de l’utilisateur. La
ceinture d’évacuation Rescue Belt II est un dispositif d’URGENCE
qui doit être utilisé uniquement lorsque toutes les autres options
d’évacuation ont été épuisées.
Cette ceinture d’évacuation Rescue Belt II FireHawk est certifiée
NFPA 1983 et approuvée comme système d’évacuation
personnelle lors d’une évacuation d’urgence lorsqu’elle est
installée sur un masque à air MSA approuvé. Elle peut également
être utilisée comme produit autonome, lorsqu’elle n’est pas
installée sur un masque à air. La ceinture d’évacuation Rescue
Belt II est approuvée NIOSH lorsqu’elle est utilisée en conjonction
avec un masque à air approuvé MSA.
Réf.
10119391
10119392
10119369
10119370
10119395
10119390
10119393
10119394
Convient aux
tailles
91 à 150 cm
(36 à 59 po)
91 à 150 cm
(36 à 59 po)
91 à 150 cm
(36 à 59 po)
91 à 150 cm
(36 à 59 po)
91 à 150 cm
(36 à 59 po)
91 à 150 cm
(36 à 59 po)
91 à 150 cm
(36 à 59 po)
91 à 150 cm
(36 à 59 po)
Matériau
de la corde
Aramide Crochet
Aramide Mousqueton
Aramide/Nylon Crochet
Aramide/Nylon Mousqueton
Aramide Crochet
Aramide Mousqueton
Aramide/Nylon Crochet
Aramide/Nylon Mousqueton
Type
d’ancrage
Longueur
du câble
15,2 m
(50 pi)
15,2 m
(50 pi)
15,2 m
(50 pi)
15,2 m
(50 pi)
15,2 m
(50 pi)
15,2 m
(50 pi)
15,2 m
(50 pi)
15,2 m
(50 pi)
Type de
masque à air
M7 et M7XT
M7 et M7XT
M7 et M7XT
M7 et M7XT
AirHawk II
AirHawk II
AirHawk II
AirHawk II
Ce système d’évacuation personnel satisfait aux exigences pour
ceintures d’évacuation avec systèmes d’évacuation résistants aux
flammes et au feu en option de la norme NFPA 1983, Cordes et
équipement de sécurité pour services d’urgence, édition 2012, qui
inclut un test à une capacité de poids de 140 kg (310 lb).
MSA 314 (L) Rév. 3 - 10115063
RESTRICTIONS D’UTILISATION
AVERTISSEMENT
u
Lire et suivre minutieusement toutes les
restrictions d’utilisation. Une mauvaise utilisation
peut causer des blessures graves ou mortelles.
• Ce produit peut être utilisé comme dispositif
d’évacuation pour une seule utilisation et une seule
personne, à moins qu’il ne soit utilisé pour la formation.
Les dispositifs utilisés pour la formation peuvent être
réutilisés; cependant, ils DOIVENT être utilisés
conjointement avec un système antichute indépendant.
• Le poids combiné de l’utilisateur et de tout son
équipement ne doit pas dépasser 140 kg (310 lb).
• Retirer le dispositif du service s’il a été utilisé lors d’une
évacuation, s’il a été exposé à des produits chimiques
ou s’il ne respecte pas les critères d’inspection.
• Utiliser ce dispositif UNIQUEMENT en tant que système
complet. NE JAMAIS modifier ce dispositif ou utiliser ses
composants avec d’autres systèmes.
• Ne pas utiliser ce dispositif pour suspendre des outils ou
d’autres équipements.
FORMATION
AVERTISSEMENT
u
• Un système antichute indépendant avec une
longe de sécurité et un baudrier complet
antichute DOIT être utilisé conjointement
avec la ceinture d’évacuation Rescue Belt II
pendant la formation.
• Cesser d’utiliser la ceinture d’évacuation
Rescue Belt II pour la formation lorsqu’elle
ne respecte pas les critères d’inspection
décrits dans ce manuel.
• Les ceintures d’évacuation Rescue Belt II
utilisées lors de la formation DOIVENT être
utilisées UNIQUEMENT pour la formation et
être marquées pour cet usage.
Une mauvaise utilisation peut causer des
blessures graves ou mortelles.
MISE EN GARDE
u
Porter des gants lors de l’utilisation de ce dispositif.
14
Page 15

INSPECTION AVANT UTILISATION
La
formation pratique doit uniquement être effectuée sous la
supervision directe d’un professionnel dûment formé et en accord
avec les directives du service d’incendie local. Un professionnel
dûment formé doit identifier les structures d’entraînement et les points
d’ancrage. Un système antichute indépendant avec longe de sécurité
(comme le Dyna-Lock de MSA, un SRL ou un produit équivalent) et
un baudrier complet antichute (comme le baudrier TechnaCurv de
MSA ou un produit équivalent) DOIVENT être utilisés conjointement
avec la ceinture d’évacuation Rescue Belt II pendant la formation. De
plus, une trousse de rechange (Réf. 10118506) doit être achetée afin
de designer la ceinture d’évacuation Rescue Belt II comme
équipement de formation et pour éviter que les extrémités de la corde
ne s’effilochent.
Pour commander de l’équipement de formation, contacter le Centre
de service à la clientèle de MSA au 1-800-672-2222.
Il incombe à l’acheteur et à l’utilisateur de ce produit de se conformer
à ce qui suit :
• Apprendre grâce à des instructions PERSONNELLES données
par un instructeur de sauvetage versé dans toutes les phases du
sauvetage technique. Ne jamais tenter d’utiliser ce produit avant
d’avoir reçu de telles instructions et d’être considéré par votre
instructeur comme compétent pour cette utilisation.
• Utiliser ce produit uniquement en accord avec les procédures du
service d’incendie local.
• Lire toutes les informations sur le produit et les étiquettes et
suivre les consignes.
• Faire preuve de bon jugement et ne pas outrepasser les
aptitudes de l’utilisateur ou les limites de l’équipement.
Pour obtenir plus d’information sur les cordes d’évacuation et les
ceintures d’évacuation, consulter la norme NFPA 1500 (programme
de santé et sécurité au travail du département de lutte contre les
incendies [Fire Department Occupational Safety and Health
Program]) et la norme NFPA 1983 (Câbles de sécurité [Life Safety
Rope]).
INSPECTION AVANT UTILISATION
Inspecter régulièrement la ceinture d’évacuation Rescue Belt II en
prévision de toute situation d’urgence. Inspecter également la
ceinture d’évacuation avant de l’utiliser lors de la formation.
Si le dispositif présente n’importe laquelle des conditions indiquées,
le retirer immédiatement du service. Voir la section
« Entretien » de ce manuel pour connaître les composants de
rechange appropriés.
1. Ceinturon
a. Inspecter la corde du ceinturon pour y détecter tout dommage
(coupures, abrasion, décoloration ou signes de dommages
causés par les UV ou des produits chimiques).
b. Inspecter la couture jaune pour y détecter des signes
d’abrasion, de dommages causés par la chaleur, ainsi que
des mailles manquantes ou brisées.
c. Inspecter les ferrures pour y détecter toutes piqûres, fissures,
usures, ainsi que des signes de corrosion ou d’autres
dommages. Vérifier que la boucle du ceinturon s’ouvre et se
ferme correctement.
2. Corde
a. Ouvrir le rabat du coussinet lombaire et inspecter les premiers
61 cm (24 po) de corde. (Inspecter la corde sur toute la
longueur si la ceinture d’évacuation a été utilisée pour la
formation.)
b. Inspecter l’œillet cousu sur la corde pour y détecter des
signes d’abrasion, des mailles lâches ou d’autres dommages.
c. Inspecter la corde pour y détecter des signes de dommages,
comme de la rigidité, de la décoloration ou de l’abrasion.
d. Remplacer la corde s’il est possible qu’elle ait été exposée à
des produits chimiques corrosifs. Les dommages causés à la
corde par des produits chimiques peuvent être invisibles.
3. Descendeur
a. Vérifier que le descendeur est rangé de manière sécuritaire
sur la boucle élastique inférieure du coussinet lombaire.
b. Vérifier que la corde n’est pas vrillée autour du descendeur,
ce qui empêcherait son retrait pendant l’utilisation.
c. Vérifier que la corde est correctement acheminée à travers le
descendeur et qu’elle ne comporte pas de mou entre les trous
du descendeur.
4. Crochet/Mousqueton
a. Vérifier que le crochet ou le mousqueton est rangé de
manière sécuritaire et qu’il peut être facilement déployé
pendant l’utilisation.
i. Le crochet doit être inséré dans la boucle élastique
supérieure de façon que l’œillet du crochet soit dans le
coussinet lombaire et que le crochet lui-même soit incurvé
autour du descendeur.
ii. Si un mousqueton est utilisé, il doit être placé dans le
coussinet lombaire au-dessus du descendeur. Le
mousqueton ne doit pas être accroché à une des boucles
cousues du coussinet lombaire.
b. Si un mousqueton est utilisé, s’assurer que sa mâchoire
s’ouvre et se ferme correctement.
5. Coussinet lombaire
a. Inspecter le coussinet lombaire pour vérifier que toutes les
boucles cousues sont fermement fixées et que les coutures
ne présentent aucun dommage.
b. Inspecter toute la surface du coussinet lombaire pour y
détecter la présence de décoloration, de dommages
importants causés par de l’abrasion, de trous ou de signes de
dommages causés par la chaleur ou des produits chimiques.
c. Inspecter les coutures pour vérifier qu’elles ne comportent pas
de mailles lâches ou de trous.
d. Vérifier que le rabat du coussinet lombaire s’ouvre et se ferme
correctement.
e. Lorsque toutes les procédures d’inspection précédentes ont
été effectuées, s’assurer que l’extrémité de la corde
comportant le nœud d’arrêt dépasse du rabat du coussinet
lombaire entre les deux boutons-pression afin qu’elle puisse
être facilement localisée en cas d’urgence.
f. S’assurer que l’extrémité de la corde comportant le nœud
d’arrêt dépasse du rabat du coussinet lombaire entre les deux
boutons-pression, afin qu’elle puisse être facilement localisée
en cas d’urgence.
6. Mécanisme à déconnexion rapide
a. Vérifier que le dispositif à déconnexion rapide est
correctement fixé à la ceinture d’évacuation. Le repli cousu de
la longe doit dépasser et sortir complètement par les fentes
de la plaque Nomex au centre du coussinet lombaire.
L’attache à velcro doit être fixée de manière sécuritaire.
b. Vérifier que les boutons-pression peuvent être détachés
facilement en tirant sur les extrémités de la courroie à
déconnexion rapide. S’assurer que les boutons-pression sont
enclenchés de manière sécuritaire avant toute utilisation.
15
MSA 314 (L) Rev. 3 - 10115063
Page 16

FONCTIONNEMENT ET UTILISATION
c. Vérifier que les courroies du support lombaire situées
dans la partie centrale supérieure du coussinet lombaire
sont correctement acheminées à travers les courroies à
déconnexion rapide et que ces courroies sont entièrement
engagées dans le repli cousu sur la courroie à
déconnexion rapide.
d. Vérifier que les boucles triples sont insérées de manière
sécuritaire dans les fentes inférieures de la plaque
dorsale.
7. Courroie de fixation de lombaire
a. Vérifier que la ou les boucles triples sont insérées de
manière sécuritaire dans les fentes centrales de la plaque
dorsale.
8. Pochettes pour accessoires
a. Vérifier que les courroies à déconnexion rapide sont
correctement acheminées à travers toutes les pochettes
pour accessoires installées sur le masque à air.
9. Support du détendeur
a. Vérifier que le support du détendeur FireHawk est installé
de manière sécuritaire sur le ceinturon. LE SUPPORT DU
DÉTENDEUR NE DOIT PAS ÊTRE INSTALLÉ SUR LES
COURROIES À DÉCONNEXION RAPIDE. Cela risquerait
de nuire au fonctionnement du mécanisme de
déconnexion rapide. Consulter la section « Installation de
la ceinture d’évacuation Rescue Belt II FireHawk sur le
masque à air » pour obtenir des instructions détaillées sur
l’assemblage.
FONCTIONNEMENT ET UTILISATION
Essayage
Consulter les instructions d’utilisation pour l’essayage du masque à air.
Les instructions sont fournies avec le masque à air.
Instructions d’utilisation
Masque à air FireHawk M7XT 10128861
Masque à air FireHawk M7 10082858
FireHawk M7 Responder 10086011
Masque à air FireHawk MMR 10023638
Masque à air AirHawk II 10088650
1. Après l’essayage du masque à air, fixer la ceinture
d’évacuation Rescue Belt II autour de votre taille et raccorder le
crochet de verrouillage à l’anneau en D de réglage. Régler la
longueur de la corde pour qu’elle soit serrée et confortable.
Les boucles du ceinturon doivent être au centre de la taille.
2. Rentrer le surplus de corde de la ceinture entre le support du
détendeur et le ceinturon en tirant le support du détendeur vers
l’extérieur pour insérer le surplus de corde sous le support du
détendeur.
Utilisation de la ceinture d’évacuation Rescue Belt II
FireHawk pour une évacuation d’urgence
MISE EN GARDE
u
Porter des gants lors de l’utilisation de ce dispositif.
1. Repérer le point d’évacuation et un point d’ancrage approprié.
S’assurer que le ceinturon est fixé de manière sécuritaire
autour de la taille.
MSA 314 (L) Rev. 3 - 10115063
2. S’assurer que le point d’ancrage et le point de sortie ne
comportent pas de rebords acérés qui pourraient endommager
la corde.
AVERTISSEMENT
u
Le point d’ancrage DOIT pouvoir supporter le poids de
l’utilisateur et de tout son équipement. Une formation
appropriée est requise pour identifier les bons points
d’ancrage et les méthodes d’ancrage appropriées.
Toute négligence dans le choix d’un point d’ancrage
approprié et dans la fixation sécuritaire de la longe
peut occasionner des blessures graves ou mortelles.
3.
Déployer le crochet/mousqueton et le descendeur en tirant
fermement l’extrémité de la corde munie d’un nœud qui dépasse
du côté droit de la ceinture d’évacuation Rescue Belt II.
du coussinet lombaire s’ouvre et le crochet/mousqueton et le
descendeur se déploient simultanément à partir du coussinet
lombaire.
4. Fixer le crochet/mousqueton à un ancrage sécuritaire.
5. Faire passer la corde dans le descendeur en serrant le levier
du descendeur jusqu’à ce qu’une fenêtre ou une sortie
d’évacuation soit atteinte.
6. Avant de procéder à l’évacuation, s’assurer que le descendeur
est placé au centre de la taille.
7. Pendant le positionnement au point d’évacuation, ne pas serrer
le levier du descendeur ce qui aurait pour effet de permettre à
la corde de défiler dans le dispositif.
8. Une fois rendu au point d’évacuation, saisir fermement la corde
qui entre dans le descendeur et maintenir cette prise pendant
toute la durée du rappel. Serrer le levier du descendeur afin de
permettre à la corde de se déplacer librement dans le dispositif.
AVERTISSEMENT
u
• NE PAS retirer la main de la corde qui entre dans
le descendeur pendant la descente, ce qui pourrait
provoquer une descente trop rapide.
• Ne jamais sauter ou laisser du mou s’accumuler
dans la corde entre la ceinture d’évacuation
Rescue Belt II et le point d’ancrage, pour éviter
qu’une force de choc excessive ne soit exercée
sur le système et n’endommage la corde ou la
détache de son point d’ancrage.
Une mauvaise utilisation peut causer des blessures
graves ou mortelles.
9. Continuer la descente de manière lente et contrôlée
jusqu’à un lieu sûr.
10. Lorsque l’utilisateur est en lieu sûr, la corde peut être
enlevée du masque à air en relâchant le nœud
d’extrémité de la corde et en tirant le reste de la corde
hors du descendeur. Le nœud d’extrémité est dégagé
en tirant sur l’extrémité de la corde. Si cette méthode
de séparation est utilisée, une trousse de rechange
(Réf. 10118506) doit être achetée afin de remplacer
les composants du nœud débrayable. Le ceinturon
peut également être enlevé du masque à air en tirant
sur les courroies à déconnexion rapide et en enlevant
la ceinture d’évacuation.
16
Le rabat
Page 17

FONCTIONNEMENT ET UTILISATION
Dans des situations d’urgence, la ceinture d’évacuation Rescue
Belt II FireHawk peut être utilisée alors qu’elle n’est pas
attachée au masque à air. La ceinture d’évacuation Rescue
Belt II peut uniquement être détachée du masque à air dans
des situations d’urgence, lorsque toutes les autres options
d’évacuation ont été épuisées.
Pour détacher la ceinture d’évacuation Rescue Belt
II FireHawk du masque à air alors que ce dernier
est porté :
1. Localiser les languettes réflectives sur le côté gauche et
droit de la ceinture d’évacuation Rescue Belt II.
2. Tirer les languettes réflectives pour détacher les boutonspression.
3. Continuer à tirer sur les courroies à déconnexion rapide
vers l’extérieur pour les éloigner du corps afin de dégager
l’attache à velcro.
4. Continuer à tirer sur les courroies à déconnexion rapide
jusqu’à ce que le masque à air soit dégagé de la ceinture
d’évacuation Rescue Belt II.
5. Desserrer les courroies de dégagement du masque à air et
relâcher la sangle de poitrine (le cas échéant).
6. Enlever la pièce faciale.
7. Enlever le masque à air.
8. La ceinture d’évacuation Rescue Belt II peut être utilisée
comme système d’évacuation autonome. Suivre les
instructions d’utilisation ci-dessus lors d’une évacuation.
Utilisation de la ceinture d’évacuation
Rescue Belt II FireHawk comme système de
positionnement de travail
REMARQUE : La ceinture d’évacuation Rescue Belt II
FireHawk comporte un anneau en D et est approuvée pour
une utilisation comme ancrage de positionnement selon les
normes NFPA 1983, édition 2012.
MISE EN GARDE
u
Porter des gants lors de l’utilisation de ce dispositif.
AVERTISSEMENT
u
Les ancrages de positionnement, comme les longes
•
et les mousquetons, ne doivent pas avoir une
longueur supérieure à 61 cm (24 po) lorsqu’ils sont
mesurés à partir du bord interne de l’anneau en D
de positionnement de la ceinture d’évacuation
Rescue Belt II jusqu’au bord interne le plus éloigné
de la ferrure de fixation.
• La ferrure de fixation doit être calibrée de manière
à surpasser le poids de l’utilisateur.
• L’anneau en D de l’ancrage est conçu pour le
positionnement et ne doit pas être utilisé comme
point d’ancrage antichute.
Une mauvaise utilisation peut causer des blessures
graves ou mortelles.
1. Raccorder l’ancrage de positionnement à l’anneau en D
situé à l’avant de la ceinture d’évacuation Rescue Belt II.
2. Raccorder l’ancrage de positionnement à un ancrage
sécuritaire.
3. Vérifier que les deux points d’ancrage sont fixés de
manière sécuritaire avant de placer du poids sur
l’ancrage de positionnement.
INSTALLATION DE LA CEINTURE D’ÉVACUATION
RESCUE BELT II FIREHAWK SUR LE MASQUE À AIR
REMARQUE : Les étapes suivantes doivent être effectuées
lorsque les courroies de dégagement, le ceinturon, la ceinture
d’évacuation et le coussinet lombaire ont été enlevés de
l’utilisateur et du baudrier.
1. Vérifier que la courroie à
déconnexion rapide est
correctement installée sur
le coussinet lombaire.
2. Vérifier que la courroie de
fixation lombaire est
installée comme il est
illustré. Les boucles triples
doivent dépasser des
rebords des deux courroies
verticales au centre du
coussinet lombaire.
REMARQUE : Si la ceinture d’évacuation Rescue Belt II
est fixée à un masque à air AirHawk II ou à un masque à
air NFPA 1981, édition 2002, un autre adaptateur de
fixation lombaire est requis. Pour installer cet adaptateur,
le dispositif à déconnexion rapide doit être déployé et
réinstallé pour capturer l’adaptateur. Consulter la section
« Réinstallation du dispositif à déconnexion rapide » de ce
manuel avant d’effectuer les étapes suivantes.
3. Orienter le masque
à air comme il est
illustré.
4. Installer chacune des
boucles triples des
courroies de fixation
lombaire dans les deux
fentes centrales de la
plaque dorsale. Vérifier
que les boucles triples
sont complètement
engagées dans la
courroie de fixation
lombaire.
17
MSA 314 (L) Rev. 3 - 10115063
Page 18

INSTALLATION DE LA CEINTURE D’ÉVACUATION RESCUE BELT II FIREHAWK
REMARQUE : Si le
système respiratoire
d’urgence ExtendAire
®
II est
installé sur le masque à air,
installer d’abord la courroie
de retenue du tuyau dans la
fente centrale de droite de la
plaque dorsale avant
d’installer les boucles triples
de la ceinture d’évacuation.
Installer la boucle triple
gauche de la ceinture
d’évacuation lorsque le côté
droit aura été installé de manière sécuritaire avec la courroie
de retenue du tuyau en place.
REMARQUE : Si la ceinture
d’évacuation Rescue Belt II
est installée sur un masque à
air AirHawk II ou NFPA 1981,
édition 2002, installer la
boucle triple dans la fente
centrale droite de la plaque
dorsale de l’adaptateur de
fixation lombaire.
REMARQUE : Si la pochette de tuyau Quick-Fill est installée
sur le masque à air, la boucle triple droite de la ceinture
d’évacuation doit partager la fente droite de la plaque dorsale
avec la boucle de fixation de la pochette de tuyau Quick-Fill.
7. Fixer les courroies de dégagement droite et gauche de la
ceinture d’évacuation aux boucles de réglage des sangles
d’épaule. S’assurer que les courroies de dégagement ne
sont pas vrillées.
8. Si le masque à air comporte une pochette ExtendAire II ou
Quick-Fill, les courroies de dégagement et les courroies à
déconnexion rapide doivent être acheminées à travers les
boucles des courroies à l’arrière de la pochette. Si ces
pochettes ne sont pas installées, passer les étapes
suivantes.
a. Détacher le bouton-
pression des courroies à
déconnexion rapide en
tirant l’extrémité de la
courroie à déconnexion
rapide munie d’une
bande réflective.
5. Installer la boucle triple
gauche dans la fente
inférieure gauche de la
plaque dorsale.
REMARQUE :
Si le
système respiratoire
d’urgence ExtendAire II est
installé sur le masque à air, la
boucle triple droite de la
ceinture d’évacuation doit
partager la fente droite de la
plaque dorsale avec la boucle
de fixation de la pochette de
tuyau ExtendAire II.
6. Insérer la boucle triple droite de la ceinture d’évacuation
dans la fente droite extérieure de la plaque dorsale.
b. Acheminer la courroie à
déconnexion rapide à
travers la boucle
inférieure à l’arrière de la
pochette.
c. Refermer le bouton-
pression. La ceinture
d’évacuation Rescue
Belt II utilise des
boutons-pression
directionnels pour
éviter tout décrochage
accidentel si la
courroie à
déconnexion rapide
venait à être
accrochée. Pour jumeler les boutons-pression
directionnels, identifier le point sur les boutons-pression.
Engager d’abord la partie du bouton-pression du côté
opposé au point, puis appuyer sur le côté qui comporte
le point.
MSA 314 (L) Rev. 3 - 10115063
18
Page 19

DÉPOSE DE LA CEINTURE D’ÉVACUATION RESCUE BELT II FIREHAWK
d. Acheminer la courroie
de dégagement à
travers la boucle
supérieure à l’arrière
de la pochette avant
de l’insérer à travers
la boucle de réglage
de la sangle d’épaule.
DÉPOSE DE LA CEINTURE D’ÉVACUATION RESCUE
BELT II FIREHAWK DU MASQUE À AIR
1. Orienter le masque à air comme il est illustré.
2. Faire glisser le
descendeur le long de la
corde en tenant le levier
noir du descendeur
jusqu’à ce qu’il soit à
environ 30 cm (12 po) du
crochet/mousqueton.
3. Extraire la corde et la
disposer en une pile. Pour ce faire, prendre l’extrémité de
la corde la plus près du crochet/mousqueton et commencer
à la disposer en rond jusqu’à l’autre extrémité.
4. Vérifier que les étiquettes d’avertissement sont en place à
4,5 m (15 pi) et 3 m (10 pi) de l’extrémité de la corde.
2. Enlever les boucles
triples droite et gauche de
la plaque dorsale.
3. Enlever la ou les boucles triples centrales de la plaque
dorsale.
4. Enlever les courroies de dégagement des sangles d’épaule
droite et gauche.
RÉINSERTION DE LA CORDE DANS LA CEINTURE
D’ÉVACUATION RESCUE BELT II FIREHAWK
La ceinture d’évacuation Rescue Belt II FireHawk est conçue
pour être utilisée une seule fois et uniquement lors d’une
évacuation d’urgence. La ceinture d’évacuation Rescue Belt II
FireHawk peut être réutilisée pour de la formation dans un
environnement contrôlé lorsqu’un dispositif antichute personnel
supplémentaire est utilisé. Les ceintures d’évacuation utilisées
lors de la formation pratique doivent être désignées pour la
formation uniquement. La corde doit être inspectée avant
chaque utilisation. La corde doit être réinstallée dans le
coussinet lombaire avant chaque utilisation pour éviter les
risques d’accrochage et d’enchevêtrement.
La ceinture d’évacuation Rescue Belt II FireHawk doit être
enlevée du masque à air avant de réemballer la corde.
Consulter la section « Dépose de la ceinture d’évacuation
Rescue Belt II FireHawk du masque à air » de ce manuel.
1. Enlever toute la corde du coussinet lombaire.
5. Vérifier que le nœud
d’extrémité débrayable
est bien présent à
l’extrémité de la corde et
que toutes les étiquettes
sont en place.
6. Replier le rabat sur le coussinet lombaire et insérer le
nœud d’extrémité débrayable au fond du compartiment le
plus près du ceinturon.
7. Continuer à insérer la corde dans le coussinet lombaire par
incréments de 15 à 30 cm (6 à 12 po) en laissant la corde
se déposer naturellement au fur et à mesure qu’elle est
insérée. Pousser la corde au fond de la pochette afin que
le coussinet lombaire soit uniformément rempli en
s’assurant que la corde est insérée sur toute sa longueur.
AVERTISSEMENT
u
NE PAS enrouler la corde. NE PAS insérer une trop
grande longueur de corde à la fois dans le
coussinet lombaire. Cela pourrait faire en sorte
que la corde s’emmêle ou s’accroche pendant un
sauvetage. Une mauvaise utilisation peut causer
des blessures graves ou mortelles.
19
MSA 314 (L) Rev. 3 - 10115063
Page 20

DÉPOSE DE LA CEINTURE D’ÉVACUATION RESCUE BELT II DU MASQUE À AIR
8. Plier la courroie du descendeur en deux et tourner le
descendeur pour l’orienter vers l’ouverture du
coussinet lombaire. La corde entre le descendeur et le
rochet/mousqueton doit reposer sur le dessus du
c
descendeur.
9. Insérer le descendeur
et la corde dans la
boucle inférieure de la
longe élastique, à
l’intérieur du coussinet
lombaire, jusqu’à ce
que la boucle élastique
soit près de l’extrémité
exposée du
descendeur.
10. Insérer l’œillet du
crochet dans la boucle
supérieure de la longe
élastique du coussinet
lombaire et placer le
crochet pour qu’il
s’enroule autour de la
partie exposée du
descendeur.
13. Le nœud d’arrêt à
l’extrémité de la corde
doit être exposé
orsque le rabat du
l
coussinet lombaire est
fermé.
RÉINSTALLATION DU DISPOSITIF À
DÉCONNEXION RAPIDE
La ceinture d’évacuation Rescue Belt II FireHawk est
conçue pour être utilisée une seule fois et uniquement lors
d’une évacuation d’urgence. La ceinture d’évacuation
Rescue Belt II FireHawk peut être réutilisée pour de la
formation dans un environnement contrôlé lorsqu’un
dispositif antichute personnel supplémentaire est utilisé.
Les ceintures d’évacuation utilisées lors de la formation
pratique doivent être désignées pour la formation
uniquement. Si le dispositif à déconnexion rapide a été
déployé lors d’une évacuation d’urgence, la ceinture
d’évacuation doit être retirée du service. Si le dispositif à
déconnexion rapide a été déployé lors d’un exercice de
formation, suivre les étapes ci-dessous pour réinstaller le
dispositif à déconnexion rapide.
REMARQUE : Si un mousqueton est utilisé, il doit être
placé dans le coussinet lombaire au-dessus du
descendeur. Le mousqueton ne doit pas être accroché à
une des boucles cousues du coussinet lombaire.
11. Placer l’extrémité de la corde avec le nœud d’arrêt le
long du ceinturon et entre les deux (2) boutonspression.
12. Attacher les boutonspression. La ceinture
d’évacuation Rescue
Belt II utilise des
boutons-pression
directionnels pour
éviter tout décrochage
accidentel. Pour
jumeler les boutonspression directionnels,
identifier le point sur les
boutons-pression.
Engager d’abord la partie du bouton-pression du côté
opposé au point, puis appuyer sur le côté qui comporte
le point.
1. Enlever les courroies
de dégagement des
sangles d’épaule du
masque à air et
identifier les sangles
droite et gauche (la
sangle gauche est
illustrée).
2. Orienter le
coussinet
lombaire
comme il est
illustré.
MSA 314 (L) Rev. 3 - 10115063
20
Page 21

NETTOYAGE ET ENTREPOSAGE/DURÉE DE VIE UTILE
3. Installer la sangle gauche
en l’orientant comme il
est illustré. Plier la sangle
sur le bord de l’attache à
velcro pour orienter
l’attache vers le bas.
4. Insérer la sangle pliée
sous la deuxième boucle
de la sangle à partir de la
gauche du coussinet
lombaire. Continuer à
acheminer la sangle pliée
sous la plaque Nomex
rigide et la faire ressortir
par la fente gauche de la
plaque Nomex.
5. Continuer à tirer la sangle à travers la fente gauche de la
plaque Nomex jusqu’à ce que la pliure cousue de la sangle
soit complètement sortie par la fente.
6. Plier la courroie gauche
du support lombaire
située sur le bord
supérieur du coussinet
lombaire. Insérer la
courroie pliée dans la
fente de la courroie
gauche du support
lombaire jusqu’à ce que
la pliure cousue de la
courroie ressorte
complètement de la
fente.
7. Tirer la boucle triple vers la gauche jusqu’à ce que la
courroie à déconnexion rapide soit bien serrée contre la
fente gauche de la plaque Nomex.
8. Tirer la courroie à déconnexion rapide directement sous la
boucle triple jusqu’à ce que la sangle à droite du repli
cousu ait été tirée contre le repli cousu. Ne pas tirer le repli
cousu à travers la fente de la plaque Nomex.
9. Jumeler les parties de l’attache à velcro sur la courroie à
déconnexion rapide avec le coussinet lombaire.
10. Attacher le boutonpression situé sous la
courroie la plus à gauche
du coussinet lombaire.
La ceinture d’évacuation
Rescue Belt II utilise des
boutons-pression
directionnels pour éviter
tout décrochage
accidentel. Pour jumeler
les boutons-pression
directionnels, identifier le
point sur les boutons-pression. Engager d’abord la partie
du bouton-pression du côté opposé au point, puis appuyer
sur le côté qui comporte le point.
11. Refaire ces étapes pour la courroie à déconnexion rapide
droite.
12. Acheminer la courroie de
la fixation lombaire sous
les courroies du support
lombaire du coussinet
lombaire.
REMARQUE : Cette étape n’est pas nécessaire lors de
l’installation de la ceinture d’évacuation Rescue Belt II
FireHawk sur un masque à air AirHawk II ou NFPA 1981,
édition 2002.
REMARQUE : Si la ceinture
d’évacuation est installée sur
un masque à air AirHawk II
ou NFPA 1981, édition 2002,
la courroie droite du support
lombaire du coussinet
lombaire doit être acheminée
à travers l’adaptateur de
fixation lombaire avant
d’acheminer la pliure cousue de la courroie à déconnexion
rapide à travers la fente de la courroie droite du support
lombaire du coussinet lombaire.
NETTOYAGE ET ENTREPOSAGE
Nettoyer la ceinture d’évacuation Rescue Belt II FireHawk
avec du savon doux et de l’eau. Ne pas utiliser d’eau de
javel ou de produits chimiques abrasifs pour nettoyer la
ceinture d’évacuation Rescue Belt II ou ses composants.
Laisser la ceinture d’évacuation Rescue Belt II sécher à l’air.
Ne pas faire sécher à la chaleur ou sous rayonnement UV.
Ranger la ceinture d’évacuation Rescue Belt II FireHawk à
l’abri de la chaleur, de l’humidité, de la lumière, de produits
chimiques ou de leurs vapeurs ou de tout autre élément de
dégradation. Avant d’utiliser une ceinture d’évacuation qui a
été entreposée pendant une période de temps prolongée,
effectuer une inspection de ses composants.
21
MSA 314 (L) Rev. 3 - 10115063
Page 22

TROUSSES DE RECHANGE
Lors de l’entreposage à basse température du masque à air avec
la ceinture d’évacuation Rescue Belt II FireHawk installée, il est
recommandé que le ceinturon soit réglé à la taille la plus petite.
À des températures très froides, les matériaux du coussinet de la
taille peuvent devenir rigides ce qui pourrait empêcher l’ajustement
du ceinturon lors de l’essayage à ces températures.
DURÉE DE VIE UTILE
La durée de vie utile de la ceinture d’évacuation Rescue Belt II
FireHawk est de dix (10) ans lorsqu’elle est correctement
entreposée ou fixée à un masque à air, conservée dans un
environnement protégé contre les rayons UV et les autres éléments
de dégradation, comme il est indiqué ci-dessus. La durée de vie
utile de la ceinture d’évacuation Rescue Belt II et de la corde
utilisées lors de la formation varie selon la fréquence d’utilisation,
comme il est indiqué ci-dessous :
Utilisation excessive ou hebdomadaire : 3 à 6 mois
Utilisation occasionnelle : 1 à 2 ans
Utilisation très occasionnelle : 2 à 5 ans
La date de fabrication est indiquée sur l’étiquette du ceinturon et
l’étiquette de la corde est située près de l’œillet cousu de la corde.
Retirer la ceinture d’évacuation Rescue Belt II du service lorsqu’elle
a atteint la fin de sa durée de vie utile, indiquée ci-dessus, ou plus
tôt si elle ne répond pas aux critères d’inspection. Le remplacement
de la ceinture ou de la corde restaure la durée de vie utile de ces
composants.
ENTRETIEN
L’entretien de la ceinture d’évacuation Rescue Belt II FireHawk peut
être entièrement effectué par l’utilisateur final. La description des
trousses de rechange est fournie à la section « Trousses de
rechange » de ce manuel.
Installation des étiquettes de rechange placées à 3 m
et 4,5 m (10 pi et 15 pi) :
1. Retirer complètement la ceinture d’évacuation Rescue Belt II
FireHawk du masque à air.
2. Retirer toute la longueur de la corde du coussinet lombaire.
3. Enlever les étiquettes usagées placées à 3 m et 4,5 m
(10 pi et 15 pi).
4. Mesurer 3 m (10 pi) à l’extrémité de la corde et placer
l’étiquette de 3 m (10 pi); enlever l’endos adhésif de l’étiquette
et la replier en deux autour de la corde de manière à faire
adhérer l’étiquette sur elle-même.
5. Mesurer 4,5 m (15 pi) à l’extrémité de la corde et placer
l’étiquette de 4,5 m (15 pi) et répéter la même procédure pour
l’étiquette de 4,5 m (15 pi).
6. Consulter la section « Réinsertion de la corde dans la ceinture
d’évacuation Rescue Belt II » de ce manuel.
Remplacement du nœud d’extrémité débrayable en fin
de corde :
1. Retirer complètement la ceinture d’évacuation Rescue Belt II
FireHawk du masque à air.
2. Retirer toute la longueur de la corde du coussinet lombaire.
3. Défaire le nœud d’extrémité débrayable à l’extrémité de la
corde.
4. Enlever toutes les étiquettes et jeter la butée.
5. Placer une extrémité du ruban de « rechange » à égalité avec
l’extrémité de la corde. Faire adhérer cette extrémité à la corde
et enrouler le ruban autour de la corde en faisant chevaucher
le premier tour. Enrouler tout le ruban.
MSA 314 (L) Rev. 3 - 10115063
6. Insérer l’extrémité de la
corde dans la nouvelle
butée et la faire glisser
jusqu’à environ 20 cm
(8 po) de l’extrémité de la
corde.
7. Faire le nœud d’extrémité
débrayable comme il est
illustré. S’assurer que la
butée est saisie dans le
nœud.
10118503 Boucle de réglage du ceinturon
10118505 Étiquettes placées à 3 m et 4,5 m (10 pi et 15 pi) (parquets de 10 chaque)
10118506 Trousse de rechange de nœud débrayable
10118507 Courroie de fixation lombaire, masque à air FireHawk M7XT/M7
10118508 Courroie de fixation lombaire, masque à air AirHawk II
10118509 Prolongation de ceinturon
10118510 Courroie à déconnexion rapide, droite
10118511 Courroie à déconnexion rapide, droite
10118512 Coussinet lombaire
10118513 Ceinturon (sans boucle de réglage)
10118514 Corde, Aramide, 15 m (50 pi), crochet
10118516 Corde, Aramide, 15 m (50 pi), œillet cousu (sans mousqueton)
10118518 Corde, Aramide/nylon, 15 m (50 pi), crochet
10118520 Corde, Aramide/nylon, 15 m (50 pi), œillet cousu (sans mousqueton)
10118522 Descendeur
10120214 Mousqueton
10120371 Support du détendeur, FireHawk
10119369
10119370
10119391
10119392
10119393
10119394
10119395
10119396
Ceinture d’évacuation Rescue Belt II, FireHawk M7XT/M7,
15 m (50 pi), corde en Aramide/nylon, crochet
Ceinture d’évacuation Rescue Belt II, FireHawk M7XT/M7,
15 m (50 pi), corde en Aramide/nylon, mousqueton
Ceinture d’évacuation Rescue Belt II, FireHawk M7XT/M7,
15 m (50 pi), corde en Aramide, crochet
Ceinture d’évacuation Rescue Belt II, FireHawk M7XT/M7,
15 m (50 pi), corde en Aramide, mousqueton
Ceinture d’évacuation Rescue Belt II, AirHawk II,
15 m (50 pi), corde en Aramide/nylon, crochet
Ceinture d’évacuation Rescue Belt II, AirHawk II,
15 m (50 pi), corde en Aramide/nylon, mousqueton
Ceinture d’évacuation Rescue Belt II, AirHawk II,
15 m (50 pi), corde en Aramide, crochet
Ceinture d’évacuation Rescue Belt II, AirHawk II,
15 m (50 pi), corde en Aramide, mousqueton
22
Page 23

TROUSSES DE RECHANGE
8. Fixer l’étiquette vide du
nœud débrayable en
insérant l’étiquette dans
la boucle du nœud et en
enroulant l’étiquette
autour de la partie de la
corde qui termine la
corde. Enrouler l’étiquette
de manière à ce qu’elle
adhère sur elle-même.
9. Placer l’étiquette « tirer
pour dégager » (pull to
release) à environ 76 mm
(3 po) de l’extrémité de la
corde. Plier l’étiquette en
deux et enlever l’endos.
Enrouler l’étiquette autour
de la corde et coller
l’étiquette sur elle-même.
10. Consulter la section « Réinsertion de la corde dans la
ceinture d’évacuation Rescue Belt II FireHawk » de ce
manuel.
Remplacement de la boucle de réglage du
ceinturon
1. Enlever la boucle de réglage du ceinturon.
2. Insérer l’extrémité du
ceinturon par-dessus la
barre coulissante moletée
et la faire ressortir en
direction du coussinet
lombaire. S’assurer que la
boucle est orientée avec
le côté arrondi de
l’ajusteur, vers le bas.
6. Installer la courroie du descendeur sur le ceinturon de
rechange, comme il est illustré. S’assurer que le ceinturon
est inséré à travers les deux boucles de la courroie du
descendeur et que le descendeur est orienté comme il est
illustré.
7. Faire une marque à l’encre permanente dans la case de
l’étiquette qui correspond au numéro de référence
approprié. Consulter les indications de l’étiquette du
ceinturon de rechange.
8. Insérer l’extrémité libre
du ceinturon dans le
coussinet lombaire.
Le ceinturon doit passer
à travers la boucle rigide
du côté droit à l’intérieur
du coussinet lombaire.
Le ceinturon doit ressortir
du coussinet lombaire par
l’ouverture pratiquée du
côté gauche du coussinet
lombaire.
9. Installer la boucle de réglage sur l’extrémité libre du
ceinturon. Consulter la section « Remplacement de la
boucle de réglage sur l’extrémité libre du ceinturon » de ce
manuel.
10. Installer le support du
détendeur sur l’extrémité
libre du ceinturon. Le
support du détendeur doit
être orienté pour que la
languette du support en
plastique pointe vers le
haut.
11. Consulter la section « Réinsertion de la corde dans la
ceinture d’évacuation Rescue Belt II FireHawk » de ce
manuel.
Remplacement des courroies à déconnexion rapide
Consulter la section « Réinstallation du dispositif à
déconnexion rapide » de ce manuel.
Remplacement du ceinturon
1. Déposer complètement la ceinture d’évacuation Rescue
Belt II FireHawk du masque à air.
2. Retirer toute la longueur de la corde du coussinet lombaire.
3. Enlever la boucle de réglage et le support du détendeur du
côté gauche du ceinturon.
4. Enlever le ceinturon du coussinet lombaire.
5. Enlever la courroie du descendeur du ceinturon.
Replacement de la corde
1. Retirer complètement la ceinture d’évacuation Rescue
Belt II FireHawk du masque à air.
2. Retirer toute la longueur de la corde du coussinet
lombaire.
3. Enlever le nœud d’extrémité débrayable de la corde.
4. Enlever la corde du descendeur.
23
MSA 314 (L) Rev. 3 - 10115063
Page 24

TROUSSES DE RECHANGE
5. Installer la corde de
rechange dans le
descendeur. La corde
doit être acheminée
dans le descendeur,
comme il est illustré.
Lorsque la corde est
acheminée dans le
descendeur, faire
attention de ne pas
endommager les
étiquettes placées à 3 m
et 4,5 m (10 pi et 15 pi) de l’extrémité de la corde.
6. Nouer le nœud d’extrémité débrayable à l’extrémité de
la corde et fixer les étiquettes appropriées. Consulter la
section « Remplacement du nœud d’extrémité
débrayable à l’extrémité de la corde » de ce manuel.
7. Placer la corde dans le coussinet lombaire. Consulter la
section « Réinsertion de la corde dans la ceinture
d’évacuation Rescue Belt II FireHawk » de ce manuel.
Remplacement du descendeur
1. Retirer complètement la ceinture d’évacuation Rescue
Belt II FireHawk du masque à air.
2. Retirer toute la longueur de la corde du coussinet
lombaire.
3. Enlever la boucle de réglage et le support du détendeur
du côté gauche du ceinturon.
4. Enlever le ceinturon du coussinet lombaire.
5. Enlever la courroie du descendeur du ceinturon.
6. Enlever le nœud d’extrémité débrayable de la corde.
7. Enlever la corde du descendeur et jeter le descendeur.
Lors de la dépose de la corde du descendeur, faire
attention de ne pas endommager les étiquettes placées
à 3 m et 4,5 m (10 pi et 15 pi) de l’extrémité de la corde.
8. Placer la corde dans le
descendeur. La corde
doit être acheminée
dans le descendeur,
comme il est illustré.
Lorsque la corde est
acheminée dans le
descendeur, faire
attention de ne pas
endommager les
étiquettes placées à 3 m
et 4,5 m (10 pi et 15 pi)
de l’extrémité de la corde.
9. Nouer le nœud d’extrémité débrayable à l’extrémité de
la corde et fixer les étiquettes appropriées. Consulter la
section « Remplacement du nœud d’extrémité
débrayable à l’extrémité de la corde » de ce manuel.
10. Placer la corde dans le coussinet lombaire. Consulter la
section « Réinsertion de la corde dans la ceinture
d’évacuation Rescue Belt II FireHawk » de ce manuel.
ÉCHANTILLON – HISTORIQUE D’UTILISATION ET D’INSPECTION DE LA CEINTURE D’ÉVACUATION
Nº de pièce
Nº de série
Date d’entrée en service :
Inspecter la ceinture d’évacuation Rescue Belt II pour y détecter des dommages ou une usure excessive avant et après
chaque utilisation de la ceinture d’évacuation, et au moins une fois par mois. S’il existe le moindre doute quant à l’intégrité
de la ceinture d’évacuation, la retirer immédiatement du service.
Date d’utilisation Endroit Type d’utilisation Exposition Inspectée Commentaires
Date Par (initiales/nº de badge)
MSA 314 (L) Rev. 3 - 10115063
24
Page 25

Para obtener mayor información, llame al 1-877-673-3473 (FIRE) o visite nuestro sitio web en www.MSAsafety.com
CRANBERRY TWP., PENSILVANIA, EE. UU. 16066
Cinturón de rescate
®
FireHawk
INSTRUCCIONES PARA EL USO Y CUIDADO
ADVERTENCIA
u
Este manual deberá ser leído y seguido cuidadosamente por todas las personas
que tengan o vayan a tener la responsabilidad de usar o reparar este sistema de
escape con cinturón de rescate. Este cinturón de rescate II funcionará conforme
a su diseño solamente si se usa y se mantiene de acuerdo con las instrucciones;
de lo contrario, podría no funcionar correctamente y las personas que dependen
de él para su seguridad podrían sufrir lesiones personales graves o la muerte.
II
Tanto las normas nacionales como las leyes estatales, provinciales y federales
exigen que se capacite al usuario antes de usar este producto. Utilice este
manual como parte de un programa de capacitación sobre normas de seguridad
del usuario que resulte acorde a las normas de su departamento. Los usuarios
deberán disponer de estas instrucciones antes de cada uso de este producto.
Las mismas deberán estar siempre a su disposición para servirles como
referencia.
Las garantías otorgadas por la compañía MSA con respecto a este producto pierden
su validez si el uso y mantenimiento no se realizan de conformidad con las
instrucciones en este manual. Protéjase y proteja a sus empleados siguiendo las
instrucciones. Lea y siga las ADVERTENCIAS y PRECAUCIONES que se encuentran
en este manual. Para obtener información adicional relativa al uso o reparación,
escriba o llame al 1-877-672-3473 (FIRE) durante el horario regular de trabajo.
MSA 314 (L) Rev. 3 © MSA 2013 Especificaciones de impresión 10000005389(A) Mat. 10115063
Doc. 10115063
Page 26

INTRODUCCIÓN
CONTENIDO
Introducción. ..........................................................................................................................................................................26
Limitaciones...........................................................................................................................................................................26
Capacitación......................................................................................................................................................................... 26
Inspección antes de usar .....................................................................................................................................................27
Funcionamiento y uso ..........................................................................................................................................................28
Instalación del cinturón de rescate FireHawk II en la máscara de aire ................................................................................29
Retiro del cinturón de rescate FireHawk II de la máscara de aire .......................................................................................31
Reempaque de la cuerda en el cinturón de rescate FireHawk II..........................................................................................31
Reinstalación del mecanismo de liberación rápida ..............................................................................................................32
Limpieza y almacenamiento ..................................................................................................................................................33
Vida útil..................................................................................................................................................................................34
Juegos de reemplazo ...........................................................................................................................................................34
Ejemplo del historial de uso e inspección de un cinturón de rescate ..................................................................................36
INTRODUCCIÓN
El cinturón de rescate FireHawk II es un sistema de escape
personal integrado a una máscara de aire de MSA. Los cinturones
de rescate listados en este manual cuentan con la aprobación para
QBRN del NIOSH solo cuando se usan junto con una máscara de
aire aprobada para QBRN de MSA. El cinturón de rescate II está
diseñado para permitirle al usuario escapar de una posición
elevada. El cinturón de rescate II deberá usarse conforme a los
procedimientos del departamento de bomberos del usuario. El
cinturón de rescate II es un dispositivo de EMERGENCIA que
deberá usarse solo cuando se han agotado todos los demás
medios de escape.
Este cinturón de rescate FireHawk II cuenta con la aprobación
NFPA 1983 para el uso como sistema de escape personal para
escape de emergencia cuando se instala con máscaras de aire
aprobadas por MSA. También se puede usar como un producto
autónomo, cuando no está instalado en una máscara de aire. El
cinturón de rescate II solo está aprobado por el NIOSH cuando se
usa junto con una máscara de aire aprobada por MSA.
N/P
10119391
10119392
10119369
10119370
10119395
10119390
10119393
10119394
Se ajusta al
tamaño de la
cintura
91 a 150 cm
(36 a 59 pulg.)
91 a 150 cm
(36 a 59 pulg.)
91 a 150 cm
(36 a 59 pulg.)
91 a 150 cm
(36 a 59 pulg.)
91 a 150 cm
(36 a 59 pulg.)
91 a 150 cm
(36 a 59 pulg.)
91 a 150 cm
(36 a 59 pulg.)
91,44 a 149,86 cm
(36 a 59 pulg.)
Material de la
cuerda
Fibra aramida Gancho
Fibra aramida Mosquetón
Fibra
aramida/nilón
Fibra
aramida/nilón
Fibra aramida Gancho
Fibra aramida Mosquetón
Fibra
aramida/nilón
Fibra
aramida/nilón
Tipo de
anclaje
Gancho
Mosquetón
Gancho
Mosquetón
Largo de la
cuerda
15,2 metros
(50 pies)
15,2 metros
(50 pies)
15,2 metros
(50 pies)
15,2 metros
(50 pies)
15,2 metros
(50 pies)
15,2 metros
(50 pies)
15,2 metros
(50 pies)
15,2 metros
(50 pies)
Tipo de
máscara
de aire
M7 y M7XT
M7 y M7XT
M7 y M7XT
M7 y M7XT
AirHawk II
AirHawk II
AirHawk II
AirHawk II
LIMITACIONES
ADVERTENCIA
u
Lea y siga todas las limitaciones cuidadosamente.
El uso indebido puede provocar la muerte o
lesiones graves.
• Use el dispositivo de escape con una sola persona y
una sola vez, a menos que se use para capacitación.
Las unidades usadas para capacitación se pueden
volver a utilizar; sin embargo DEBERÁN ser usadas
junto con un sistema de protección contra caídas
independiente.
• El peso combinado del usuario y todos los equipos no
deberá exceder 140 kg (310 lb).
• Retírelo del servicio si se usa en un escape, se expone
a sustancias químicas o no cumple con los criterios de
inspección.
• Úselo SOLAMENTE como sistema completo. NUNCA
modifique este dispositivo o use sus componentes con
otros sistemas.
• NO lo use para colgar herramientas u otro equipo.
CAPACITACIÓN
ADVERTENCIA
u
• Durante la capacitación, DEBERÁ usarse un
sistema de protección contra caídas
independiente con línea de seguridad y arnés
de protección contra caídas de cuerpo
entero junto con el cinturón de rescate II.
• Retire el cinturón de rescate II del servicio
de capacitación cuando no cumpla con los
criterios de inspección descritos en este
manual.
• Los cinturones de rescate que se usan para
fines de capacitación DEBERÁN ser
designados para capacitación SOLAMENTE y
deberán marcarse con este fin.
Este sistema de escape personal cumple con los requisitos para
cinturones de escape con resistencia a las llamas y sistemas de
escape de incendios opcionales según NFPA 1983, Norma sobre
cuerdas y equipo de seguridad para casos de emergencia, Edición
2012, que incluye pruebas con una capacidad de peso de
140 kg (310 lb).
MSA 314 (L) Rév. 3 - 10115063
El uso indebido puede provocar la muerte o
lesiones graves.
PRECAUCIÓN
u
Use guantes al utilizar este dispositivo.
26
Page 27

INSPECCIÓN ANTES DE USAR
La capacitación solo se deberá realizar bajo la supervisión directa de
un profesional capacitado y conforme a las normas del cuerpo de
bomberos local. Un profesional capacitado deberá identificar las
estructuras y puntos de anclaje para la capacitación. Durante la
capacitación, DEBERÁ usarse una línea de seguridad independiente
para protección contra caídas (como la Dynalock o una cuerda
amortiguadora autorretráctil de MSA, o su equivalente) y un arnés de
protección contra caídas de cuerpo entero (como el arnés
TechnaCurv de MSA o su equivalente) junto con el cinturón de
rescate II. Asimismo, deberá comprarse el Juego de reemplazo
(N/P 10118506) para designar el cinturón de rescate II como equipo
de capacitación y para evitar que los extremos de las cuerdas se
deshilachen.
Para pedir equipo de capacitación, comuníquese con el Centro de
servicio al cliente de MSA llamando al 1-800-672-2222.
Es responsabilidad del comprador y usuario de este producto:
• Aprender a usarlo a través de instrucción PERSONAL por parte
de un instructor de rescate que conozca bien todas las fases del
rescate técnico. Nunca intentar usar este producto hasta haber
recibido dicha instrucción y el instructor considere que es
competente en su uso.
• Usar este producto solamente conforme a los procedimientos del
cuerpo de bomberos local.
• Leer toda la información del producto y etiquetas y seguir lo que
allí se estipula.
• Usar buen juicio y no exceder las limitaciones de las destrezas del
usuario o el equipo.
Se puede obtener información adicional sobre cuerdas y cinturones
de escape en la norma NFPA 1500 sobre programas de salud y
seguridad ocupacional del cuerpo de bomberos y en la norma
NFPA 1983 sobre cuerdas de seguridad.
INSPECCIÓN ANTES DE USAR
Inspeccione el cinturón de rescate II para estar preparado para el uso
en una situación de emergencia. Además, inspecciónelo antes de
usarlo en una situación de capacitación.
Si la unidad muestra alguna de las condiciones indicadas, sáquela
de inmediato del servicio. Consulte la sección Servicio en este
manual para ver el reemplazo apropiado de los componentes.
1. Cinturón
a. Inspeccione la cincha del cinturón en busca de daños (cortes,
abrasiones, decoloración o señales de daños por rayos UV o
relacionados con sustancias químicas).
b. Inspeccione las costuras amarillas para ver si hay abrasión,
daños producidos por calor y puntadas flojas o faltantes.
c. Inspeccione los componentes metálicos para ver si hay
rebabas, fisuras, desgaste, corrosión u otros daños.
Asegúrese de que la hebilla del cinturón abra y cierre
debidamente.
2. Cuerda
a. Abra la solapa de la almohadilla lumbar e inspeccione los
primeros 61 cm (24 pulg.) de cuerda. (Inspeccione toda la
cuerda si el cinturón de rescate se usó para capacitación).
b. Inspeccione el ojal cosido en la cuerda para ver si hay
señales de abrasión, costuras sueltas u otros daños.
c. Inspeccione la cuerda para ver si hay señales de daños como
rigidez, decoloración o abrasión.
d. Si sospecha que la cuerda ha sido expuesta a sustancias
químicas nocivas, reemplace la cuerda. El daño a la cuerda
por sustancias químicas es invisible.
3. Dispositivo de descenso
a. Verifique que la unidad de descenso esté almacenada de
manera segura en el bucle elástico inferior de la almohadilla
lumbar.
b. Verifique que la cuerda no esté torcida alrededor de la unidad
de descenso de tal manera que impida sacarla durante el
uso.
c. Verifique que la cuerda pase de manera ajustada por el
dispositivo de descenso y que no hayan bucles de holgura en
la cuerda, entre los agujeros de la unidad de descenso.
4. Gancho/mosquetón
a. Verifique que el gancho o mosquetón esté almacenado de
manera segura y que se pueda desplegar fácilmente durante
el uso.
i. El gancho deberá insertarse en el bucle elástico superior
para que el ojal del gancho quede orientado hacia la
almohadilla lumbar y la parte del gancho rodee el
dispositivo de descenso almacenado.
ii. Si está presente, el mosquetón deberá colocarse en la
almohadilla lumbar sobre el dispositivo de descenso. El
mosquetón no se deberá enganchar en ningún bucle
cosido de la almohadilla lumbar.
b. Si está presente, verifique que la puerta del mosquetón abra y
cierre debidamente.
5. Almohadilla lumbar
a. Inspeccione la almohadilla lumbar para verificar que los
bucles de cincha estén conectados de manera segura y que
no haya daños en ninguna costura.
b. Inspeccione toda la superficie de la almohadilla lumbar para
ver si hay descoloración, daños por abrasión severa, agujeros
o señales de daños por calor o sustancias químicas.
c. Inspeccione las costuras para verificar que no estén flojas o
que tengan agujeros.
d. Verifique que la solapa de la almohadilla lumbar abra y cierre
debidamente.
e. Cuando se hayan seguido todos los procedimientos de
inspección anteriores, asegúrese de que el extremo de la
cuerda con el nudo de tope sobresalga de la solapa de la
almohadilla lumbar, entre los dos broches, para que se pueda
ubicar fácilmente durante situaciones de emergencia.
f. Asegúrese de que el extremo de la cuerda con el nudo de
tope sobresalga de la apertura de la solapa, entre los dos
broches de la solapa, para que se pueda ubicar fácilmente
durante situaciones de emergencia.
6. Mecanismo de liberación rápida
a. Verifique que la cincha de liberación rápida esté conectada
debidamente al cinturón de rescate. El doblez cosido de la
cincha deberá salir completamente por las ranuras de la
placa Nomex que se encuentra en el centro de la almohadilla
lumbar. El sujetador de gancho y bucle de Velcro deberá
asegurarse firmemente.
b. Verifique que los broches se puedan liberar fácilmente tirando
de los extremos de la correa de liberación rápida. Asegúrese
de que los broches estén firmemente asegurados antes del
uso.
27
MSA 314 (L) Rev. 3 - 10115063
Page 28

FUNCIONAMIENTO Y USO
c. Verifique que las correas de soporte lumbar ubicadas en la
parte central superior de la almohadilla lumbar pasen
debidamente por las correas de liberación rápida y que los
extremos de estas correas estén bien acoplados al doblez
cosido de la correa de liberación rápida.
d. Verifique que las barras triples estén bien acopladas en las
ranuras inferiores de la placa de apoyo.
7. Correa de la conexión lumbar
a. Verifique que la(s) barra(s) triple(s) esté(n) bien
acoplada(s) en la(s) ranura(s) central(es) de la placa de
apoyo.
8. Bolsas de accesorios
a. Verifique que la cincha de liberación rápida pase
debidamente a través de cualquier bolsa de accesorios
instalada en la máscara de aire.
9. Soporte del regulador
a. Verifique que el soporte del regulador FireHawk esté
instalado de manera segura en el cinturón. EL SOPORTE
DEL REGULADOR NO SE DEBERÁ INSTALAR EN LAS
CORREAS DE LIBERACIÓN RÁPIDA. Esto impedirá el
funcionamiento del mecanismo de liberación rápida.
Consulte la sección Instalación del cinturón de rescate
FireHawk II en la máscara de aire para obtener
instrucciones detalladas de ensamblado.
FUNCIONAMIENTO Y USO
Colocación
Consulte las instrucciones del usuario para colocarse la
máscara de aire.
Las instrucciones se proporcionan con la máscara de aire.
Instrucciones para el usuario
Máscara de aire FireHawk M7XT 10128861
Máscara de aire FireHawk M7 10082858
FireHawk M7 Responder 10086011
Máscara de aire FireHawk MMR 10023638
Máscara de aire AirHawk II 10088650
1. Al colocarse la máscara de aire, fije el cinturón de rescate II
alrededor de la cintura, conectando la hebilla con gancho al
anillo en D de ajuste. Ajuste bien la cincha. La hebillas del
cinturón deberán estar en el centro de la cintura.
2. Para meter el exceso de cincha de la correa entre el soporte
del regulador y el cinturón, hale hacia fuera el soporte del
regulador y guarde el exceso de cincha doblada bajo el
soporte del regulador.
Uso del cinturón de rescate FireHawk II para escapes
de emergencia
PRECAUCIÓN
u
Use guantes al utilizar este dispositivo.
1. Ubique el punto de escape y un punto de anclaje idóneo.
Asegúrese de que el cinturón esté bien sujeto alrededor de la
cintura.
2. Asegúrese de que el anclaje y el punto de salida no tengan
bordes afilados que pudieran hacer que la cuerda falle.
ADVERTENCIA
u
El anclaje DEBERÁ ser capaz de sostener al usuario
con todo su equipo. Se requiere capacitación
apropiada para identificar los puntos de anclaje y
métodos de conexión apropiados. El no seleccionar
un anclaje idóneo y asegurar debidamente la línea
puede causar lesiones personales graves o la muerte.
3. Despliegue el gancho/mosquetón y el dispositivo de descenso,
halando fuertemente el extremo de la cuerda con nudo que
sobresale del lado derecho del cinturón de rescate II. La
solapa de la almohadilla lumbar se abrirá y el
gancho/mosquetón y el dispositivo de descenso se
desplegarán inmediatamente desde la almohadilla lumbar.
4. Conecte el gancho/mosquetón a un anclaje seguro.
5. Alimente la cuerda en el dispositivo de descenso hasta que la
ventana o punto de salida se pueda alcanzar, presionando la
palanca en el dispositivo, al tiempo que va soltando la cuerda.
6. Antes de salir, asegúrese de que el dispositivo de descenso
esté colocado en el centro de la cintura.
7. Al colocarse en el punto de salida, no apriete la palanca del
dispositivo de descenso, ya que esto permitirá que la cuerda
se deslice a través del dispositivo.
8. Una vez que esté colocado en posición de salida, sujete
firmemente la cuerda que entra por el dispositivo de descenso
y manténgala sujetada durante todo el descenso. Apriete la
palanca del dispositivo de descenso para permitir que la
cuerda se desplace libremente por el dispositivo.
ADVERTENCIA
u
• NO retire la mano de la cuerda que entra en el
dispositivo de descenso durante el descenso. El
hacerlo puede resultar en un descenso rápido.
• Nunca salte o permita que haya holgura en la
cuerda entre el cinturón de rescate II y el anclaje.
Esto ocasionará que se produzcan cargas de
impacto excesivas en el sistema, lo que puede
resultar en daños a la cuerda o en la separación
del anclaje.
El uso indebido puede provocar la muerte o lesiones
graves.
9. Continúe descendiendo a una velocidad lenta y
controlada hasta llegar a un área segura.
10. Cuando llegue a un área segura, la cuerda se puede
separar de la máscara de aire liberando el remate en
el extremo de la cuerda y halando la cuerda restante
por el dispositivo de descenso. El remate se libera
halando el extremo de la cuerda. Si usa este método
de separación, deberá comprarse el Juego de
reemplazo (N/P 10118506) para reemplazar los
componentes del nudo desatable. Igualmente, se
puede quitar el cinturón de la máscara de aire,
halando las correas de liberación rápida y quitando el
cinturón de rescate.
MSA 314 (L) Rev. 3 - 10115063
28
Page 29

FUNCIONAMIENTO Y USO
En situaciones de emergencia, el cinturón de rescate
FireHawk II se puede usar mientras esté desconectado de
la máscara de aire.
desconectar de la máscara de aire en situaciones de
emergencia cuando se han agotado todos las demás opciones.
Para desconectar el cinturón de rescate
FireHawk II de la máscara de aire mientras usa
la máscara de aire:
1. Use las lengüetas reflectoras en los lados derecho e
izquierdo del cinturón de rescate II.
2. Hale las lengüetas reflectoras para liberar los broches.
3. Continúe halando las correas de liberación rápida hacia
fuera y alejándolas del cuerpo para destrabar el gancho y
bucle.
4. Continúe halando las correas de liberación rápida hasta
que la máscara de aire haya sido liberada del cinturón de
rescate II.
5. Afloje las correas deslizables de la máscara de aire y libere
la correa del pecho (si está presente).
6. Quítese la pieza facial.
7. Quítese la máscara de aire.
8. El cinturón de rescate II se puede usar como sistema de
escape autónomo. Siga las instrucciones de uso arriba
para escapar.
Uso del cinturón de rescate FireHawk II para
posicionamiento en el trabajo
NOTA: el cinturón de rescate FireHawk II incluye un anillo
en D aprobado para el uso como conexión de
posicionamiento según NFPA 1983, edición 2012.
Use guantes al utilizar este dispositivo.
• Las conexiones de posicionamiento, como
cuerdas amortiguadoras o mosquetones, no
deberán tener más de 61 cm (24 pulg.) de largo
cuando se midan desde el borde interior del anillo
en D de posicionamiento ubicado en el cinturón de
rescate II, hasta el borde más interno del herraje
de conexión.
La capacidad de las conexiones de posicionamiento
•
deberá exceder el peso del usuario.
• El anillo en D para conexión de posicionamiento
no se deberá usar como punto de conexión para la
detención de caídas.
El uso indebido puede provocar la muerte o lesiones
graves.
1. Conecte la conexión de posicionamiento en el anillo en D
ubicado en la parte frontal del cinturón de rescate II.
2. Conecte la conexión de posicionamiento en un anclaje
seguro.
3. Verifique que ambos puntos de conexión estén
firmemente asegurados antes de poner peso en la
conexión de posicionamiento.
INSTALACIÓN DEL CINTURÓN DE RESCATE
FIREHAWK II EN LA MÁSCARA DE AIRE
El cinturón de rescate II solo se deberá
PRECAUCIÓN
u
ADVERTENCIA
u
NOTA: los siguientes pasos presuponen que las correas
deslizables, el cinturón, el cinturón de rescate y la almohadilla
lumbar han sido retirados de la unidad del soporte y arnés.
1. Verifique que la correa de
liberación rápida esté
debidamente instalada en
el conjunto de la
almohadilla lumbar.
2. Verifique que la cincha de
la conexión lumbar se
instale como se muestra.
Las barras triples deberán
sobresalir más allá de los
bordes de las 2 correas
verticales en el centro de la
almohadilla lumbar.
NOTA: Si instala el cinturón de rescate II en una máscara
de aire AirHawk II o en una máscara de aire NFPA 1981,
edición 2002, se requiere un adaptador de conexión
lumbar alterno. Para instalar este adaptador, se deberá
desplegar y volver a instalar el mecanismo de liberación
rápida para que el adaptador quede instalado. Consulte la
sección Reinstalación del mecanismo de liberación rápida
en este manual antes de continuar con los siguientes
pasos.
3. Oriente la máscara
de aire como se
muestra.
4. Instale cada una de las
barras triples de las
correas de la conexión
lumbar en las dos
ranuras centrales de la
placa de apoyo.
Verifique que las barras
triples estén totalmente
acopladas, halando la
correa de la conexión
lumbar.
29
MSA 314 (L) Rev. 3 - 10115063
Page 30

INSTALACIÓN DEL CINTURÓN DE RESCATE FIREHAWK II
NOTA: Si el sistema de
respiración de emergencia
ExtendAire
®
II se instala en la
máscara de aire, instale la
restricción de la manguera en
la ranura central derecha de
la placa de apoyo primero,
antes de instalar las barras
triples del cinturón de
rescate. Instale la barra triple
izquierda del cinturón de
rescate cuando el lado
derecho haya sido instalado
de manera segura con la restricción de la manguera en su
sitio.
NOTA: Si instala el cinturón
de rescate II en una máscara
de aire AirHawk II o en una
máscara de aire NFPA 1981,
edición 2002, instale la barra
triple en el adaptador de la
conexión lumbar, en la ranura
central derecha individual de
la placa de apoyo.
NOTA: Si la bolsa de la manguera de llenado rápido Quick-Fill
se instala en la máscara de aire, la barra triple derecha del
cinturón de rescate compartirá la ranura derecha de la placa de
apoyo con el bucle de conexión de la bolsa de la manguera de
llenado rápido Quick-Fill.
7. Conecte las correas deslizables derecha e izquierda desde
el cinturón de rescate hasta las hebillas de ajuste en las
correas de los hombros. Asegúrese de que las correas
deslizables no estén torcidas.
8. Si la máscara de aire tiene instalada la bolsa ExtendAire II
o la bolsa Quick-Fill, las correas deslizables y las correas
de liberación rápida pueden pasarse por los bucles de la
cincha en la parte posterior de la bolsa. Si estas bolsas no
están instaladas, omita los siguientes pasos.
a. Destrabe el broche en la
cincha de liberación
rápida halando el
extremo de la correa de
liberación rápida con el
parche reflector.
5. Instale la barra triple
izquierda en la ranura
izquierda inferior de la
placa de apoyo.
NOTA: Si el sistema de
respiración de emergencia
ExtendAire II se instala en la
máscara de aire, la barra
triple izquierda del cinturón
de rescate compartirá la
ranura izquierda de la placa
de apoyo con el bucle de
conexión de la bolsa de la
manguera ExtendAire II.
6. Introduzca la barra triple derecha del cinturón de rescate
en la ranura derecha exterior de la placa de apoyo.
b. Pase la correa de
liberación rápida por el
bucle inferior de la cincha
en la parte posterior de la
bolsa.
c. Vuelva a instalar el
broche. El cinturón de
rescate II usa broches
direccionales para
evitar que se
desprendan
accidentalmente si la
correa de liberación se
trabara. Para hacer
coincidir el broche
direccional, ubique el
punto en el broche.
Primero agarre la parte del broche en el lado opuesto
del punto, y luego presione hacia abajo en el lado del
punto.
MSA 314 (L) Rev. 3 - 10115063
30
Page 31

RETIRO DEL CINTURÓN DE RESCATE FIREHAWK II
d. Pase la correa
deslizable por el bucle
superior de la cincha
en la parte posterior
de la bolsa, antes de
introducir la correa
deslizable en la hebilla
de ajuste en la correa
de los hombros.
RETIRO DEL CINTURÓN DE RESCATE FIREHAWK II
DE LA MÁSCARA DE AIRE
1. Oriente la máscara de aire como se muestra.
2. Deslice el dispositivo de
descenso a lo largo de la
cuerda, manteniendo
presionada la palanca
negra del dispositivo de
descenso hasta que el
dispositivo de descenso
esté aproximadamente a
30 cm (12 pulg.) del
gancho/mosquetón.
3. Pliegue la cuerda formando una pila. Para hacerlo,
comience por el extremo de la cuerda más cercano al
gancho/mosquetón y comience a colocar la cuerda sobre sí
misma hasta que alcance el otro extremo de la cuerda.
4. Verifique que las etiquetas de advertencia estén en su sitio,
por lo menos en los últimos 4,5 y 3 metros
(15 y 10 pies) de cuerda.
2. Retire las barras triples
izquierda y derecha de la
placa de apoyo.
3. Retire las barras triples centrales de la placa de apoyo.
4. Retire las correas deslizables de las correas de los
hombros derecha e izquierda.
REEMPAQUE DE LA CUERDA EN EL CINTURÓN DE
RESCATE FIREHAWK II
El cinturón de rescate FireHawk II está diseñado para usarlo
una sola vez en un escape de emergencia. El cinturón de
rescate FireHawk II se puede volver a usar en un entorno de
capacitación controlado donde se use un sistema de detención
de caídas de respaldo. Los cinturones de rescate usados
durante la capacitación deberán designarse solo para fines de
capacitación. La cuerda deberá inspeccionarse antes de cada
uso. La cuerda deberá volverse a insertar dentro de la
almohadilla lumbar antes de cada uso para evitar el peligro de
que se trabe o enrede.
El cinturón de rescate FireHawk II deberá desconectarse de la
máscara de aire antes de volver a empacar la cuerda. Consulte
la sección Retiro del cinturón de rescate FireHawk II de la
máscara de aire en este manual.
1. Retire toda la cuerda de la almohadilla lumbar.
5. Verifique que el remate
desatable esté en el
extremo de la cuerda y
que todas las etiquetas
estén en su sitio.
6. Doble hacia atrás la solapa de la almohadilla lumbar e
introduzca el remate desatable en el fondo del
compartimiento más cercano al cinturón.
7. Continúe insertando cuerda en incrementos de 15 a 30 cm
(6 a 12 pulg.) en la almohadilla lumbar y permita que la
cuerda se asiente naturalmente a medida que se inserta.
Empuje la cuerda hasta el fondo de la bolsa para que llene
de manera pareja toda la almohadilla lumbar hasta meter
toda la cuerda.
ADVERTENCIA
u
NO enrolle la cuerda. NO alimente cantidades
grandes de cuerda a la vez en la almohadilla
lumbar. Hacerlo puede ocasionar que la cuerda se
anude o se trabe durante el escape. El uso
indebido puede provocar la muerte o lesiones
graves.
31
MSA 314 (L) Rev. 3 - 10115063
Page 32

RETIRO DEL CINTURÓN DE RESCATE II DE LA MÁSCARA DE AIRE
8. Doble la correa del dispositivo de descenso en dos y
gire el dispositivo de descenso para que apunte hacia
la apertura de la almohadilla lumbar. La cuerda entre
l dispositivo de descenso y el gancho/mosquetón
e
deberá descansar sobre la parte superior del
dispositivo de descenso.
9. Introduzca el dispositivo
de descenso y la
cuerda en el bucle
inferior de la cincha
elástica dentro de la
almohadilla lumbar,
hasta que el bucle
elástico esté cerca del
extremo expuesto del
dispositivo de
descenso.
10. Introduzca el ojal del
gancho en el bucle
superior de la cincha
elástica de la
almohadilla lumbar y
coloque el gancho de
modo que rodee la
parte expuesta del
dispositivo de
descenso.
NOTA: Si hay un mosquetón, deberá colocarse en la
almohadilla lumbar encima del dispositivo de descenso.
El mosquetón no se deberá enganchar en ningún bucle
cosido de la almohadilla lumbar.
13. El nudo de tope de la
cuerda deberá quedar
expuesto cuando la
olapa de la
s
almohadilla lumbar
esté cerrada.
REINSTALACIÓN DEL MECANISMO DE
LIBERACIÓN RÁPIDA
El cinturón de rescate FireHawk II está diseñado para
usarlo una sola vez en un escape de emergencia. El
cinturón de rescate FireHawk II se puede volver a usar en
un entorno de capacitación controlado donde se use el
sistema de detención de caídas de respaldo. Los
cinturones de rescate usados durante la capacitación
deberán designarse solo para fines de capacitación. Si el
mecanismo de liberación rápida se activó como parte de
un rescate de emergencia, retire el cinturón de rescate del
servicio. Si se activó el mecanismo de liberación rápida
como parte de un ejercicio de capacitación, continúe con
los siguientes pasos para volver a instalar el mecanismo
de liberación rápida.
1. Retire las correas
deslizables de las
correas de los hombros
de la máscara de aire e
identifique las correas
derecha e izquierda (se
muestra la izquierda).
11. Ponga el extremo de la cuerda con el nudo de tope a
lo largo del cinturón, entre los 2 broches.
12. Cierre los broches. El cinturón de rescate II usa
broches direccionales
para evitar que se
desprendan
accidentalmente. Para
hacer corresponder los
broches direccionales,
ubique el punto en el
broche. Primero agarre
la parte del broche en
el lado opuesto del
punto y luego presione
hacia abajo en el lado
del punto.
MSA 314 (L) Rev. 3 - 10115063
2. Oriente la
almohadilla
lumbar como
se muestra.
32
Page 33

LIMPIEZA Y ALMACENAMIENTO / VIDA ÚTIL
3. Instale la correa izquierda
y oriéntela como se
muestra. Doble la cincha
en el borde de la cinta
del sujetador con gancho
de Velcro para que esta
quede hacia abajo.
4. Inserte la cincha doblada
bajo el segundo bucle de
cincha desde la izquierda
en la almohadilla lumbar.
Continúe pasando la
cincha doblada bajo la
placa rígida Nomex y de
vuelta por la ranura
izquierda de la placa
Nomex.
5. Continúe halando la cincha a través de la ranura izquierda
de la placa Nomex hasta que el doblez cosido de la cincha
haya salido totalmente por la ranura.
6. Doble la correa de
soporte lumbar izquierda
ubicada en el borde
superior de la almohadilla
lumbar. Introduzca la
correa doblada a través
de la ranura en la correa
de soporte lumbar
izquierda, hasta que el
doblez cosido de la
correa haya salido
totalmente por la ranura.
7. Hale la barra triple hacia la izquierda hasta que el doblez
cosido contra la correa de liberación rápida quede bien
apretada en la ranura izquierda de la placa Nomex.
8. Hale la correa de liberación rápida directamente debajo de
la barra triple hasta que la holgura de la cincha a la
derecha del doblez cosido quede bien apretada contra el
doblez cosido. No hale el doblez cosido por la ranura de la
placa Nomex.
9. Haga corresponder la cinta del sujetador de gancho y bucle
de Velcro de la correa de liberación rápida con la
almohadilla lumbar.
10. Cierre el broche que está
debajo de la correa que
se encuentra más a la
izquierda de la
almohadilla lumbar. El
cinturón de rescate II usa
broches direccionales
para evitar que se
desprendan
accidentalmente. Para
hacer corresponder los
broches direccionales,
ubique el punto en el broche. Primero agarre la parte del
broche en el lado opuesto del punto, y luego presione
hacia abajo en el lado del punto.
11. Repita estos pasos con la correa de liberación rápida
derecha.
12. Introduzca la cincha de la
conexión lumbar bajo las
correas de soporte
lumbar de la correa
lumbar.
NOTA: este paso no es necesario si instala el cinturón de
rescate FireHawk II en una máscara de aire AirHawk II o
NFPA 1981, edición 2002.
NOTA: Si instala el cinturón
de rescate en una máscara
de aire AirHawk II o
NFPA 1981, edición 2002,
la correa de soporte lumbar
derecha de la almohadilla
lumbar deberá pasar por el
adaptador de la conexión
lumbar antes de introducir el
doblez cosido de la correa de
liberación rápida por la
ranura de la correa de soporte lumbar derecha de la
almohadilla lumbar.
LIMPIEZA Y ALMACENAMIENTO
Limpie el cinturón de rescate FireHawk II con jabón suave y
agua. No use blanqueador o sustancias químicas para
limpiar el cinturón de rescate II o cualquiera de sus
componentes. Deje secar el cinturón de rescate II al aire
libre. No lo seque con calor o fuentes de rayos UV.
Almacene el cinturón de rescate FireHawk II lejos del calor,
humedad, luz, sustancias químicas o sus vapores u otros
elementos que lo puedan degradar. Antes de usar un
cinturón de rescate que ha estado guardado durante un
tiempo prolongado, deberá realizarse una inspección de los
componentes.
33
MSA 314 (L) Rev. 3 - 10115063
Page 34

JUEGOS DE REEMPLAZO
Al guardar la máscara de aire con el cinturón de rescate
FireHawk II instalado en temperaturas frías, se recomienda que
el cinturón se ajuste al tamaño de cintura más pequeño. A
temperaturas extremadamente frías, los materiales de la
almohadilla para la cintura puede tornarse rígidos y podrían
impedir el ajuste del cinturón al ponérselo a esas temperaturas.
VIDA ÚTIL
La vida útil de un cinturón de rescate FireHawk II es de 10 años
cuando se guarda debidamente o se lleva en una máscara de aire
en un ambiente donde no esté expuesto a los rayos UV o a
elementos que lo degraden como se indica arriba. La vida útil del
conjunto del cinturón y cuerda en las unidades de cinturón de
rescate II que se usan para capacitación varía según la frecuencia
de uso como se indica a continuación:
Uso excesivo y/o semanal: 3 a 6 meses
Uso ocasional: 1 a 2 años
Uso esporádico: 2 a 5 años
La fecha de fabricación se puede encontrar en la etiqueta del
cinturón y en la etiqueta de la cuerda ubicada en el ojal cosido de
la cuerda.
Saque el cinturón de rescate II del servicio cuando cumpla su vida
útil como se menciona arriba o antes si no cumple con los criterios
de inspección. El reemplazo del conjunto de correa y/o cuerda
restablecerá la vida útil de esos componentes.
SERVICIO
Todo el servicio para el cinturón de rescate FireHawk II puede
realizarlo el usuario final. Los juegos de reemplazo se pueden
encontrar en la sección Juegos de reemplazo en este manual.
Instalación de las etiquetas de reemplazo de
3 y 4,5 metros (10 y 15 pies):
1. Retire completamente el cinturón de rescate FireHawk II de la
máscara de aire.
2. Retire toda la cuerda de la almohadilla lumbar.
3. Retire las etiquetas indicadoras de 3 y 4,5 metros (10 y
15 pies) dañadas.
4. Mida 3 metros (10 pies) del extremo de la cuerda e instale la
etiqueta indicadora de 3 metros (10 pies); para esto retire el
respaldo adhesivo y doble la etiqueta en dos alrededor de la
cuerda y péguela sobre sí misma.
5. Mida 4,5 metros (15 pies) del extremo de la cuerda y repita el
mismo procedimiento con la etiqueta de 4,5 metros (15 pies).
6. Consulte la sección Reempaque de la cuerda en el cinturón de
rescate II en este manual.
Reemplazo del remate desatable en el extremo de la
cuerda:
1. Retire completamente el cinturón de rescate FireHawk II de la
máscara de aire.
2. Retire toda la cuerda de la almohadilla lumbar.
3. Desate el remate desatable en el extremo de la cuerda.
4. Retire todas las etiquetas y deseche el espaciador.
5. Coloque un extremo de la cinta de “reemplazo” al ras con el
extremo de la cuerda. Pegue este extremo a la cuerda y
envuelva la cinta firmemente alrededor de la cuerda, cubriendo
la primera pasada. Siga envolviendo hasta haber usado toda la
cinta.
6. Introduzca el extremo de la
cuerda en el espaciador y
deslice el nuevo
espaciador a
aproximadamente
20 cm (8 pulg.) del
extremo de la cuerda.
7. Amarre el remate
desatable como se
muestra. Asegúrese de
que el espaciador quede
dentro del nudo.
10118503 Hebilla de ajuste del cinturón
10118505 Etiquetas de 3/4,5 m (10/15 pies) [paquetes de 10 c/u]
10118506 Juego de reemplazo del nudo desatable
10118507 Conexión lumbar, máscara de aire FireHawk M7XT / M7
10118508 Conexión lumbar, máscara de aire AirHawk II
10118509 Extensor del cinturón
10118510 Correa de liberación rápida, derecha
10118511 Correa de liberación rápida, derecha
10118512 Almohadilla lumbar
10118513 Cinturón (sin hebilla de ajuste)
10118514 Cuerda, fibra aramida, 15 metros (50 pies), con gancho
10118516 Cuerda, fibra aramida, 15 metros (50 pies), ojal cosido (sin mosquetón)
10118518 Cuerda, fibra aramida/nilón, 15 metros (50 pies), con gancho
10118520
10118522 Dispositivo de descenso
10120214 Mosquetón
10120371 Montaje de regulador, FireHawk
10119369
10119370
10119391
10119392
10119393
10119394
10119395
10119396
Cuerda, fibra aramida/nilón, 15 metros (50 pies), ojal cosido (sin mosquetón)
Cinturón de rescate II, FireHawk M7XT / M7, 15 m (50 pies),
cuerda de fibra aramida/nilón, gancho
Cinturón de rescate II, FireHawk M7XT / M7, 15 m (50 pies),
cuerda de fibra aramida/nilón, mosquetón
Cinturón de rescate II, FireHawk M7XT / M7, 15 m (50 pies),
cuerda de fibra aramida, gancho
Cinturón de rescate II, FireHawk M7XT / M7, 15 m (50 pies),
cuerda de fibra aramida, mosquetón
Cinturón de rescate II, AirHawk II, 15 m (50 pies),
cuerda de fibra aramida/nilón, gancho
Cinturón de rescate II, AirHawk II, 15 m (50 pies),
cuerda de fibra aramida/nilón, mosquetón
Cinturón de rescate II, AirHawk II, 15 m (50 pies),
cuerda de fibra aramida, gancho
Cinturón de rescate II, AirHawk II, 15 m (50 pies),
cuerda de fibra aramida, mosquetón
MSA 314 (L) Rev. 3 - 10115063
34
Page 35

JUEGOS DE REEMPLAZO
8. Ponga la etiqueta del
nudo desatable en
blanco, introduciéndola
en el bucle del nudo y
doblándola alrededor de
la cuerda que lleva al
extremo de la cuerda.
Doble la etiqueta para
pegarla sobre sí misma.
9. Ponga la etiqueta que
dice “jale para liberar” a
aproximadamente
76 mm (3 pulg.) del
extremo de la cuerda.
Doble la etiqueta en dos
y retire el respaldo
adhesivo. Doble la
etiqueta alrededor de la
cuerda para pegarla
sobre sí misma.
10. Consulte la sección Reempaque de la cuerda en el cinturón
de rescate FireHawk II en este manual.
Reemplazo de la hebilla de ajuste del cinturón
1. Retire la hebilla de ajuste del cinturón.
2. Introduzca el extremo del cinturón hacia arriba y sobre la
barra deslizante estriada y de vuelta hacia fuera en
dirección a la almohadilla
lumbar. Asegúrese de que
la hebilla esté orientada
con el lado redondo del
ajuste hacia abajo.
6. Instale la correa del dispositivo de descenso en el cinturón
de reemplazo como se muestra. Asegúrese de que el
cinturón pase a través de ambos bucles de la cincha de la
correa del dispositivo de descenso y que el dispositivo de
descenso esté orientado como se muestra.
7. Con tinta permanente ponga una marca de verificación en
la casilla de la etiqueta que corresponda al número de
pieza correcto. Consulte la marca en la etiqueta del
cinturón que se reemplaza.
8. Introduzca el extremo
libre del cinturón en el
conjunto de la
almohadilla lumbar. El
cinturón deberá pasar por
el bucle de cincha rígido
en el lado derecho de la
parte interior de la
almohadilla lumbar. El
cinturón deberá salir por
la almohadilla lumbar,
pasando por la apertura
en el lado izquierdo de la
almohadilla lumbar.
9. Instale la hebilla de ajuste en el extremo libre del cinturón.
Vea la sección Reemplazo de la hebilla de ajuste en el
cinturón en este manual.
10. Instale el soporte del
regulador en el extremo
libre del cinturón. El
soporte del regulador
deberá orientarse para
que la lengüeta plástica
del soporte quede hacia
arriba.
Reemplazo de las
correas de liberación
rápida
Consulte la sección
Reinstalación del mecanismo
de liberación rápida en este manual.
Reemplazo del cinturón
1. Retire completamente el cinturón de rescate FireHawk II de
la máscara de aire.
2. Retire toda la cuerda de la almohadilla lumbar.
3. Retire la hebilla de ajuste y el soporte del regulador del
lado izquierdo del cinturón .
4. Retire el cinturón del conjunto de la almohadilla lumbar.
5. Retire la correa del dispositivo de descenso del cinturón.
11. Consulte la sección Reempaque de la cuerda en el cinturón
de rescate FireHawk II en este manual.
Reemplazo de la cuerda
1. Retire completamente el cinturón de rescate
FireHawk II de la máscara de aire.
2. Retire toda la cuerda de la almohadilla lumbar.
3. Suelte el remate desatable de la cuerda.
4. Retire la cuerda del dispositivo de descenso.
35
MSA 314 (L) Rev. 3 - 10115063
Page 36

JUEGOS DE REEMPLAZO
5. Instale la cuerda de
reemplazo en el
dispositivo de descenso.
La cuerda deberá pasar
por el dispositivo de
descenso como se
muestra. Cuando pase
la cuerda por el
dispositivo de descenso,
tenga cuidado de no
dañar la etiquetas
indicadoras de 3 y
4,5 metros (10 y 15 pies) en la cuerda.
6. Amarre el remate desatable en el extremo de la cuerda
e instale las etiquetas apropiadas. Consulte la sección
Reemplazo del remate desatable en el extremo de la
cuerda en este manual.
7. Instale la cuerda en la almohadilla lumbar. Consulte la
sección Reempaque de la cuerda en el cinturón de
rescate FireHawk II en este manual.
Reemplazo del conjunto del dispositivo de
descenso
1. Retire completamente el cinturón de rescate FireHawk II
de la máscara de aire.
2. Retire toda la cuerda de la almohadilla lumbar.
3. Retire la hebilla de ajuste y el soporte del regulador del
lado izquierdo del cinturón.
4. Retire el cinturón del conjunto de la almohadilla lumbar.
5. Retire la correa del dispositivo de descenso del cinturón.
6. Suelte el remate desatable de la cuerda.
7. Retire la cuerda del dispositivo de descenso y deseche
el conjunto del dispositivo de descenso. Cuando retire la
cuerda del dispositivo de descenso, tenga cuidado de
no dañar las etiquetas indicadoras de 3 y 4,5 metros
(10 y 15 pies) en la cuerda.
8. Instale la cuerda en el
dispositivo de descenso.
La cuerda deberá pasar
por el dispositivo de
descenso como se
muestra. Cuando pase
la cuerda por el
dispositivo de descenso,
tenga cuidado de no
dañar las etiquetas
indicadoras de 3 y
4,5 metros (10 y
15 pies) en la cuerda.
9. Amarre el remate desatable en el extremo de la cuerda
e instale las etiquetas apropiadas. Consulte la sección
Reemplazo del remate desatable en el extremo de la
cuerda en este manual.
10. Instale la cuerda en la almohadilla lumbar. Consulte la
sección Reempaque de la cuerda en el cinturón de
rescate FireHawk II en este manual.
EJEMPLO DEL HISTORIAL DE USO E INSPECCIÓN DE UN CINTURÓN DE RESCATE
Número de pieza
Número de serie
Fecha de puesta en servicio:
Inspeccione el cinturón de rescate II para detectar daños o desgaste excesivo antes y después de usar el cinturón de
rescate y al menos todos los meses. Si tiene dudas sobre la integridad del cinturón de rescate, retírelo del servicio de
inmediato.
Fecha de uso Ubicación Tipo de uso Exposición Inspeccionado Comentarios
Fecha
Por (iniciales/número de distintivo)
MSA 314 (L) Rev. 3 - 10115063
36
 Loading...