

Page 1
Operating Manual
MSA Cairns® XF1
Fire Helmet
Order No.: CH180A33- PQ730227/00
MSAsafety.com
Page 2

Thank you for purchasing your new MSA Cairns Fire Helmet. Welcome to the MSA Cairns Community of
Fire Helmet owners! Congratulations: you've just joined the thousands of Cairns Fire Helmet owners who
know why MSA Cairns is the market leading fire helmet in North America.Take these three steps to become
actively engaged with other helmet owners:
(1) Go to www.MSAsafety.com/registration and register your fire helmet for its lifetime warranty.
(2) Follow us on Facebook (facebook.com/MSAsafetyFire) and Twitter
(@MSAsafety, #lovemyCairns).
(3) Visit our active fire service brotherhood of MSA Cairns Fire Helmet owners at MSAFIRE.com
KEYWORD: CairnsCommunity.
The warranties made by MSA with respect to the product are voided if the product is not used and maintained
according to the instructions in this manual. Read and observe the DANGERS, WARNINGS and CAUTIONS
inside. If any information in this manual is unclear, or if you have any questions, contact MSA Customer
Service at 1-877-MSA-FIRE or visit our website at (MSAFIRE.com) before using this fire helmet.
1000 Cranberry Woods Drive
Cranberry Township, PA 16066
USA
Phone 1-800-MSA-2222
Fax 1-800-967-0398
For your local MSA contacts please go to our website www.MSAsafety.com
©
MSA 2018. All rights reserved
Page 3

Contents
1 Dangers, Warnings and Cautions . . . . . . . . . . . . . . . . . . . . . . . . . . . . . . . . . . . . . . . . . . . . . . . . . . . . . . . 5
2 Description
2.1 Overview . . . . . . . . . . . . . . . . . . . . . . . . . . . . . . . . . . . . . . . . . . . . . . . . . . . . . . . . . . . . . . . . . . . . . . . . . 6
2.2 Technical Specifications. . . . . . . . . . . . . . . . . . . . . . . . . . . . . . . . . . . . . . . . . . . . . . . . . . . . . . . . . . . . . . 6
. . . . . . . . . . . . . . . . . . . . . . . . . . . . . . . . . . . . . . . . . . . . . . . . . . . . . . . . . . . . . . . . . . . . . . . . . . . 6
3 Attaching Ear Covers and Accessories. . . . . . . . . . . . . . . . . . . . . . . . . . . . . . . . . . . . . . . . . . . . . . . . . . 7
3.1 Ear Covers . . . . . . . . . . . . . . . . . . . . . . . . . . . . . . . . . . . . . . . . . . . . . . . . . . . . . . . . . . . . . . . . . . . . . . . . 7
3.2 Visor. . . . . . . . . . . . . . . . . . . . . . . . . . . . . . . . . . . . . . . . . . . . . . . . . . . . . . . . . . . . . . . . . . . . . . . . . . . . . 8
3.3 Lighting Module . . . . . . . . . . . . . . . . . . . . . . . . . . . . . . . . . . . . . . . . . . . . . . . . . . . . . . . . . . . . . . . . . . . . 8
3.4 Communication Headset . . . . . . . . . . . . . . . . . . . . . . . . . . . . . . . . . . . . . . . . . . . . . . . . . . . . . . . . . . . . . 9
4 Donning the Helmet. . . . . . . . . . . . . . . . . . . . . . . . . . . . . . . . . . . . . . . . . . . . . . . . . . . . . . . . . . . . . . . . .. .10
4.1 Pre-donning Adjustments. . . . . . . . . . . . . . . . . . . . . . . . . . . . . . . . . . . . . . . . . . . . . . . . . . . . . . . . . . . . 10
4.2 Donning . . . . . . . . . . . . . . . . . . . . . . . . . . . . . . . . . . . . . . . . . . . . . . . . . . . . . . . . . . . . . . . . . . . . . . . . . 11
4.2.1 Chinstrap . . . . . . . . . . . . . . . . . . . . . . . . . . . . . . . . . . . . . . . . . . . . . . . . . . . . . . . . . . . . . . . . . . . . . . . . 11
4.2.2 Face Shield and Visor . . . . . . . . . . . . . . . . . . . . . . . . . . . . . . . . . . . . . . . . . . . . . . . . . . . . . . . . . . . . . . 12
5 Doffing the Helmet. . . . . . . . . . . . . . . . . . . . . . . . . . . . . . . . . . . . . . . . . . . . . . . . . . . . . . . . . . . . . . . . . . . . 13
6 Care and Maintenance
6.1 Routine Cleaning . . . . . . . . . . . . . . . . . . . . . . . . . . . . . . . . . . . . . . . . . . . . . . . . . . . . . . . . . . . . . . . . . . 15
6.1.1 Fire Helmet Shell . . . . . . . . . . . . . . . . . . . . . . . . . . . . . . . . . . . . . . . . . . . . . . . . . . . . . . . . . . . . . . . . . . 15
6.1.2 Impact Cap. . . . . . . . . . . . . . . . . . . . . . . . . . . . . . . . . . . . . . . . . . . . . . . . . . . . . . . . . . . . . . . . . . . . . . . 15
6.1.3 Ear Covers, Ratchet Cover, Chinstrap and Headband Liner (Soft Goods) . . . . . . . . . . . . . . . . . . . . . . 16
6.1.4 Chinstrap . . . . . . . . . . . . . . . . . . . . . . . . . . . . . . . . . . . . . . . . . . . . . . . . . . . . . . . . . . . . . . . . . . . . . . . . 16
6.1.5 Face Shield and Visor . . . . . . . . . . . . . . . . . . . . . . . . . . . . . . . . . . . . . . . . . . . . . . . . . . . . . . . . . . . . . . 18
6.2 Advanced Cleaning . . . . . . . . . . . . . . . . . . . . . . . . . . . . . . . . . . . . . . . . . . . . . . . . . . . . . . . . . . . . . . . . 19
6.3 Routine Inspection . . . . . . . . . . . . . . . . . . . . . . . . . . . . . . . . . . . . . . . . . . . . . . . . . . . . . . . . . . . . . . . . . 20
6.3.1 Fire Helmet Shell . . . . . . . . . . . . . . . . . . . . . . . . . . . . . . . . . . . . . . . . . . . . . . . . . . . . . . . . . . . . . . . . . . 20
6.3.2 Suspension . . . . . . . . . . . . . . . . . . . . . . . . . . . . . . . . . . . . . . . . . . . . . . . . . . . . . . . . . . . . . . . . . . . . . . 20
6.3.3 Impact Cap. . . . . . . . . . . . . . . . . . . . . . . . . . . . . . . . . . . . . . . . . . . . . . . . . . . . . . . . . . . . . . . . . . . . . . . 21
6.3.4 Ear Covers, Ratchet Cover and Headband Liner . . . . . . . . . . . . . . . . . . . . . . . . . . . . . . . . . . . . . . .. . 21
6.3.5 Headband . . . . . . . . . . . . . . . . . . . . . . . . . . . . . . . . . . . . . . . . . . . . . . . . . . . . . . . . . . . . . . . . . . . . . . . 21
6.3.6 Chinstrap . . . . . . . . . . . . . . . . . . . . . . . . . . . . . . . . . . . . . . . . . . . . . . . . . . . . . . . . . . . . . . . . . . . . . . . . 21
6.3.7 Face Shield . . . . . . . . . . . . . . . . . . . . . . . . . . . . . . . . . . . . . . . . . . . . . . . . . . . . . . . . . . . . . . . . . . . . . . 21
6.3.8 Visor. . . . . . . . . . . . . . . . . . . . . . . . . . . . . . . . . . . . . . . . . . . . . . . . . . . . . . . . . . . . . . . . . . . . . . . . . . . . 21
6.3.9 Edge Trim. . . . . . . . . . . . . . . . . . . . . . . . . . . . . . . . . . . . . . . . . . . . . . . . . . . . . . . . . . . . . . . . . . . . . . . . 22
6.3.10 Reflective Trim . . . . . . . . . . . . . . . . . . . . . . . . . . . . . . . . . . . . . . . . . . . . . . . . . . . . . . . . . . . . . . . . . . . . 22
6.4 Advanced Inspection . . . . . . . . . . . . . . . . . . . . . . . . . . . . . . . . . . . . . . . . . . . . . . . . . . . . . . . . . . . . . . . 22
6.4.1 Fire Helmet Disassembling Procedure . . . . . . . . . . . . . . . . . . . . . . . . . . . . . . . . . . . . . . . . . . . . . . . . . 23
6.4.2 Fire Helmet Resassembling Procedure . . . . . . . . . . . . . . . . . . . . . . . . . . . . . . . . . . . . . . . . . . . . . . . . . 24
6.5 Storage. . . . . . . . . . . . . . . . . . . . . . . . . . . . . . . . . . . . . . . . . . . . . . . . . . . . . . . . . . . . . . . . . . . . . . . . . . 25
. . . . . . . . . . . . . . . . . . . . . . . . . . . . . . . . . . . . . . . . . . . . . . . . . . . . . . . . . . . . . . . . 14
US
MSA Cairns® XF1
3
Page 4

7 Replacement Parts and Accessories . . . . . . . . . . . . . . . . . . . . . . . . . . . . . . . . . . . . . . . . . . . . . . . . . . . 26
7.1 Replacement Parts . . . . . . . . . . . . . . . . . . . . . . . . . . . . . . . . . . . . . . . . . . . . . . . . . . . . . . . . . . . . . . . . 26
7.2 Accessories . . . . . . . . . . . . . . . . . . . . . . . . . . . . . . . . . . . . . . . . . . . . . . . . . . . . . . . . . . . . . . . . . . . . . . 26
8 Warranty and Product Registration . . . . . . . . . . . . . . . . . . . . . . . . . . . . . . . . . . . . . . . . . . . . . . . . . . . . 27
9 Contacting MSA
. . . . . . . . . . . . . . . . . . . . . . . . . . . . . . . . . . . . . . . . . . . . . . . . . . . . . . . . . . . . . . . . . . . . . . 27
MSA Cairns® XF1
US
4
Page 5

Dangers, Warnings and Cautions
1 Dangers, Warnings and Cautions
WARNING!
Firefighting is an extremely dangerous activity. All personnel who have or will have the responsibility
for using or maintaining this fire helmet must follow the instructions in this manual carefully. This fire
helmet will perform as designed only if it is used and maintained according to the instructions. Otherwise, the fire helmet could fail to perform as designed, and personnel who rely on it for their safety can
sustain serious personal injury or death.
This fire helmet does NOT provide protection from all burns, injuries, diseases, conditions, or hazards.
Do not perform firefighting activities without the proper training and equipment.
Use extreme caution for all operations.
Use MSA Cairns
Occupational Safety and Health Program (current edition); CFR Title 29, Part 1910, Subpart I,
Personal Protective Equipment; NFPA 1971, Standard on Protective Ensembles for Structural and
Proximity Fire Fighting (current edition); and NFPA 1951, Standard on Protective Ensembles for Technical Rescue Incidents (current edition), as applicable.
This fire helmet provides LIMITED protection to the head when worn during structural, or rescue firefighting activities, as designated. Avoid exposure to flashovers, collapses, falls, and other conditions
that may exceed the protective capacity of the fire helmet.
If this fire helmet is exposed to heat, you may be BURNED with NO warning and NO sign of damage
to the fire helmet.
The NFPA-compliant face shield and/or the optional ANSI Z87 visor provide LIMITED protection to the
area they cover.
The visor provides LIMITED protection to the area covered. The visor is not certified according to
NFPA standards but meets the ANSI Z87.1 standard (most recent edition). The face shield MUST be
worn with the visor to maintain an NFPA compliant structural or rescue firefighting helmet ensemble.
Use adequate eye protection. Removal of NFPA-compliant eye protection voids the fire helmet's
NFPA certification.
To provide maximum protection and reduce the risk of injury, adjust the fire helmet with all components
in position to fit on the head properly and fasten the chinstrap securely.
The screw covers on both the lateral brackets for the impact cap must be snapped closed, covering
the screws underneath, to maintain optimal dielectric protection.
Do not use the helmet as a vehicular or sports helmet.
Follow the procedures in Section 6.3 "Routine Inspection" to inspect the fire helmet after EACH use.
Replace any part of the fire helmet that shows signs of wear or damage.
Use only components and accessories that are included with the original fire helmet or approved by
MSA. Using unauthorized components or accessories can adversely affect fire helmet performance.
Do not alter, paint, or attach any item that is not recommended by MSA to the fire helmet.
Do not use abrasive cleaners or solvents to clean the fire helmet.
Use only fire helmet markings (front identification shields, retro reflective trim) and fire helmet accessories (integrated lighting modules, communications headsets, etc.) that are supplied and/or
approved by MSA.
Failure to obey these warnings can result in serious personal injury or death.
®
XF1 Fire Helmets within the guidelines of NFPA 1500, Standard on Fire Department
US
MSA Cairns® XF1
5
Page 6
2 Description
1
6
5
2
3
4
9
8
7
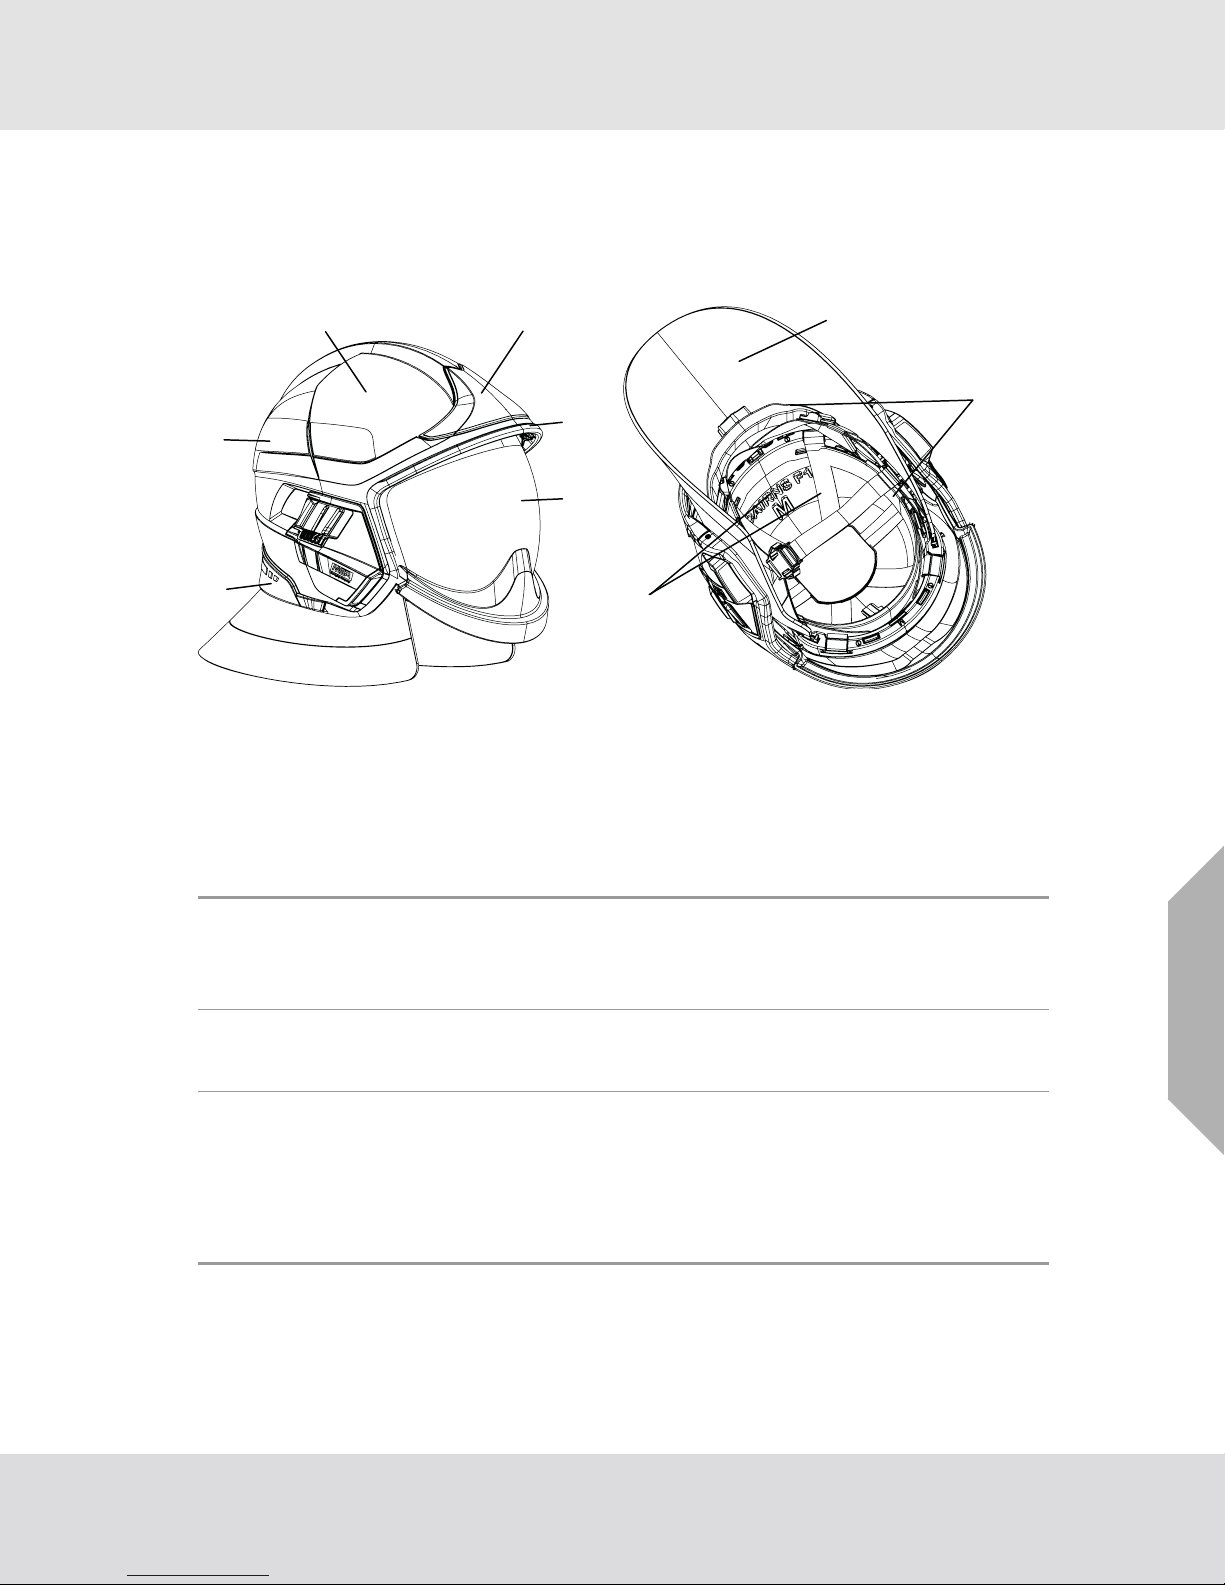
2.1 Overview
The fire helmet consists of the following components:
Description
1 Shell 6 Reflective trim
2 Front plate 7 Ear covers
3 Front edge trim 8 Retention system (headband and chinstrap)
4 Face shield 9 Energy absorbing system (impact cap and suspension)
5 Rear edge trim
2.2 Technical Specifications
• Medium (M) for head sizes from 6-1/2 to 7-3/4 inches
Helmet sizes
Weight
(Helmet with face shield,
no options)
Options
(52 cm to 62 cm)
• Large (L) for head sizes from 7-1/8 to 8-1/8 inches
(57 cm to 65 cm)
• M: 3.5 lb ± 1 oz (1590 ± 30 g)
• L: 3.81 lb ± 1 oz (1730 ± 30 g)
• Integrated lighting module
•Visor
• Flexible Microphone Headset
Detailed information regarding the lighting module and the Flexible
Microphone Headset can be found in separate user manuals for
these devices.
US
MSA Cairns® XF1
6
Page 7
3 Attaching Ear Covers and Accessories
E
D
AB
C
F
3.1 Ear Covers
The helmet has 6 slots for installing the ear covers
(A, B, C, D, E and F).
Attaching Ear Covers and Accessories
(1) Place the ear covers upside down above the helmet.
(2) Insert the 2 clips marked in the central slots (A, B).
US
(3) Push the 4 pressure clips in order (C, D, E and
then F) until the clips lock.
MSA Cairns® XF1
7
Page 8
3.2 Visor
2
2
(b)(b)(b)
L
(a)(a)(a)
click
Attaching Ear Covers and Accessories
(1) Place the visor upside down above the
helmet.
(2) Insert the 2 clips simultaneously into the
dedicated slots.
(3) Lock the visor module by fixing the visor on
the shell connection pin (right and left).
The visor provides LIMITED protection to the area covered. The visor is not certified according to
NFPA standards but meets the ANSI Z87.1 standard (most recent edition). The face shield MUST be
worn with the visor to maintain an NFPA compliant structural or rescue firefighting helmet ensemble.
3.3 Lighting Module
US
(1) Place the helmet upside down with the face shield
towards you.
(2) Insert the left box (L) of the XF1 lighting module
into the space provided on the left side of the
helmet and firmly clip the box into place.
MSA Cairns® XF1
8
Page 9

Attaching Ear Covers and Accessories
(a)(a)(a)
(b)
(b)(b)
R
click
CLICK
(3) Repeat for the right box (R).
(4) Ensure that the lighting module cable is placed in
the indicated area.
(5) Refer to the lighting module user instruction
(MSAfire.com/Cairns) for details on operation.
3.4 Communication Headset
Refer to the Communication headset operating manual (MSAfire.com/Cairns).
If both the lighting module and XF1 flexible microphone headset are installed inside the helmet, disassemble the flexible microphone headset first and then disassemble the lighting module.
US
MSA Cairns® XF1
9
Page 10

4 Donning the Helmet
4.1 Pre-donning Adjustments
Headband and Nape Strap Adjustments
Donning the Helmet
(1) Choose helmet size M or L (refer to Section 2.2
"Technical Specifications") according to your
head size.
(2) Adjust the front headband position by sliding the
headband up or down.
(3) Position the front headband inside the helmet to
avoid contact between headband and mask.
(4) Adjust nape strap/rear headband by rotating to
optimize fit on back of the head.
(5) Ensure that both the left and right side adjust-
ments are on the same setting so that the helmet
sits properly on the head.
US
MSA Cairns® XF1
10
Page 11

Donning the Helmet
4.2 Donning
WARNING!
To provide maximum protection, make sure to adjust the helmet properly. Tightening the ratchet
beyond its limits can cause damage to internal gears and result in reduced protection.
Failure to obey this warning can result in serious personal injury or death.
(1) Open the headband by turning the ratchet knob
counterclockwise (left).
(2) Position the chinstrap as shown before donning the
helmet.
(3) Put the helmet on your head.
(4) While holding the helmet down on your head, turn
the ratchet knob clockwise until the helmet feels
snug and comfortable.
(5) Lower the ear cover over your ears and over the
ratchet knob.
4.2.1 Chinstrap
WARNING!
Never wear the fire helmet without fastening and tightening the chinstrap.
Failure to obey this warning can result in serious personal injury or death.
The chinstrap is equipped with 3 adjustment points to allow quick and simple adjustment while the
helmet is on the head.
US
MSA Cairns® XF1
11
Page 12

Donning the Helmet
(1) Completely loosen the 3 adjustment points (chin-
strap buckle and 2 rear adjustments).
(2) Place helmet on head. Make sure that it is well
positioned.
(3) Close the chinstrap buckle.
(4) Tighten the chinstrap by pulling on the excess
chinstrap length.
(5) Secure the excess chinstrap length with the hook
and loop.
(4)
(6)
(6) Tighten the two rear adjustment straps by pulling
the excess strap length forward and slightly down
until a snug but comfortable fit is achieved.
4.2.2 Face Shield and Visor
WARNING!
Performance of the face shield and visor are obtained only in use position (low position).
Keep face shield and visor in standby position (stowed under the helmet shell) during the use of a
breathing apparatus (SCBA).
Do not wear a face shield over an SCBA face piece.
Visors worn over corrective lenses may transmit impacts which may damage the corrective
eyewear thus creating a hazard to the user.
Service life of face shield and visor depends on the conditions of use.
Any face shield or visor that has been scratched, dropped or damaged must be replaced.
Failure to obey these warnings can result in serious personal injury or death.
Face Shield
US
(1) Position by pushing it up or pulling it down as far as
it will go.
MSA Cairns® XF1
12
Page 13

Optional Visor
(1) Position by pushing it up or pulling it down.
(2) Tilt the visor towards the face by pushing the finger
spaces on either side of the visor for an optimal fit.
If further adjustment of the visor is needed to optimize the distance to the face:
(1) Unclip the yellow stopper.
Doffing the Helmet
(2) Clip the yellow stopper in positions (A), (B) or (C)
to optimize fit of the visor on the face.
5 Doffing the Helmet
(1) Loosen and unbuckle the chinstrap.
(2) While holding the helmet, turn the ratchet knob counterclockwise (to the left) to loosen the head-
band.
(3) Remove the helmet.
US
MSA Cairns® XF1
13
Page 14

Care and Maintenance
6 Care and Maintenance
WARNING!
Replace the helmet after it has withstood an impact, even if there is no visible damage.
Do not drop the fire helmet.
Avoid unnecessary impacts to the fire helmet which could damage the face shield and/or optional
visor (cracks/scratches).
Failure to obey these warnings can result in serious personal injury or death.
Carefully obey all of the procedures for cleaning, inspecting, repairing, and storing the fire helmet.
For additional guidance, refer to the current edition of NFPA 1851, which specifies the minimum selection, care, and maintenance requirements for structural and proximity firefighting protective ensembles and the individual ensemble elements, including fire helmets and interface components that are
compliant with NFPA 1971, Standard on Protective Ensembles for Structural Fire Fighting and Proximity Fire Fighting.
MSA Cairns® XF1
US
14
Page 15

Care and Maintenance
6.1 Routine Cleaning
WARNING!
Helmets that are dirty or soiled from firefighting activities may be contaminated with toxins that are
poisonous, pathogenic, toxic or carcinogenic. Failure to properly clean the helmet after each use
per the recommended cleaning procedures may result in injuries, illness, disease and/or death.
Helmets should be properly cleaned consistent with NFPA 1851 under the supervision of the
authority having jurisdiction and standard operating procedures.
Do not use cleaning solvents, oils, varnishes, or polishes other than those recommended in this
manual to clean or decontaminate fire helmets or fire helmet components.
Do not use abrasives, solvents, paint removers, acetone, paint or lacquer thinner, or any chlori-
nated organic solvents to clean the fire helmet shell. Use of these substances can degrade the
protective properties of the helmet shell.
Do not use equipment that produces mechanical action such as tumbling or agitation to machine-
wash or dry complete fire helmets.
Do not use forced hot air or put the fire helmet directly on a heat source to dry it.
Do not apply paint, stickers, cleaning products with a hydrocarbon base or solvents to the fire
helmet or visors to prevent damaging the materials of your helmet.
Failure to obey these warnings can result in serious personal injury or death.
• To prevent contamination after firefighting activities, clean the fire helmet after each use, before
inspection.
• Elements contaminated by CBRN agents must be handled according to decontamination and
disposal procedures set by the applicable authorities.
• Remove any fire helmet that has been exposed to chemical or biological contaminants from
service and clean it using the procedures in the Section 6.2 "Advanced Cleaning".
• For cleaning, use a solution of 1.5 oz (43 g) of mild detergent per 1 gal (3.8 L) of water at a
temperature no higher than 110 °F (43 °C).
• Do not use a fire helmet that is wet from use or cleaning. Allow all parts to air dry completely before
use.
• Do not use a heat source such as forced air to dry components more quickly. Do not tumble dry.
6.1.1 Fire Helmet Shell
• Wipe with mild detergent solution and a soft cloth. Do not use solvent based products or abrasive
materials.
6.1.2 Impact Cap
To clean the inside of the impact cap (when installed inside the fire helmet shell), wipe it with a soft
sponge or cloth dampened with a solution of warm water and mild detergent. Allow the impact cap to
air-dry completely. Do not use a heat source such as forced air to dry the impact cap more quickly. Do
not tumble dry.
US
MSA Cairns® XF1
15
Page 16

Care and Maintenance
C
6.1.3 Ear Covers, Ratchet Cover, Chinstrap and Headband Liner (Soft Goods)
(1) Remove the ratchet cover, headband liner and chinstrap (refer to Section 6.4.1 "Fire Helmet
Disassembling Procedure").
(2) Machine-wash the components with a mild liquid detergent at a temperature no higher than
110°F (43°C).
(3) Allow the components to air-dry completely. Do not use a heat source such as forced air to dry
components more quickly. Do not tumble dry.
(4) Reassemble all soft goods into the fire helmet.
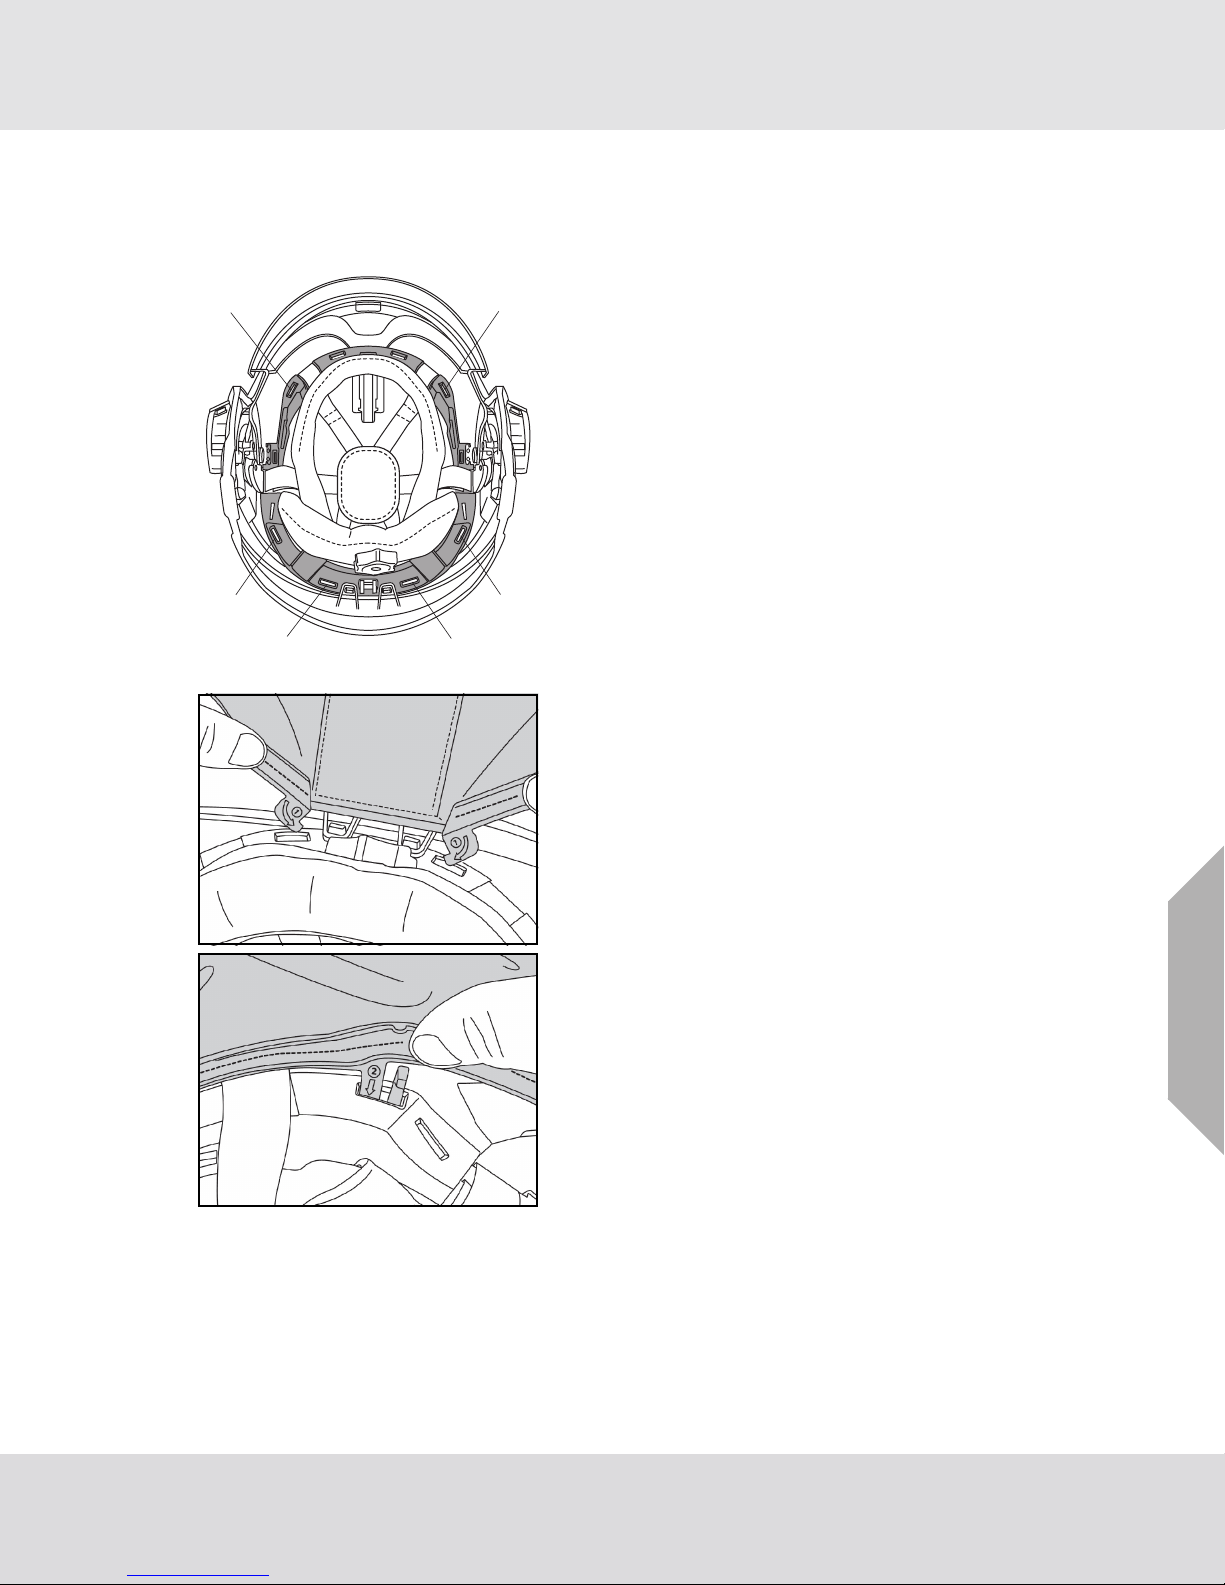
6.1.4 Chinstrap
Chinstrap Disassembly before Cleaning
(1) Unlock metallic trapezoid (chinstrap 3rd point) from the
hook by pushing it (first A then B).
(2) Rotate the clips on right and left side of the chinstrap
90 degrees towards the rear of the helmet (C).
(3) Push each clip forward (D) and raise it on the back (E).
US
MSA Cairns® XF1
16
Page 17

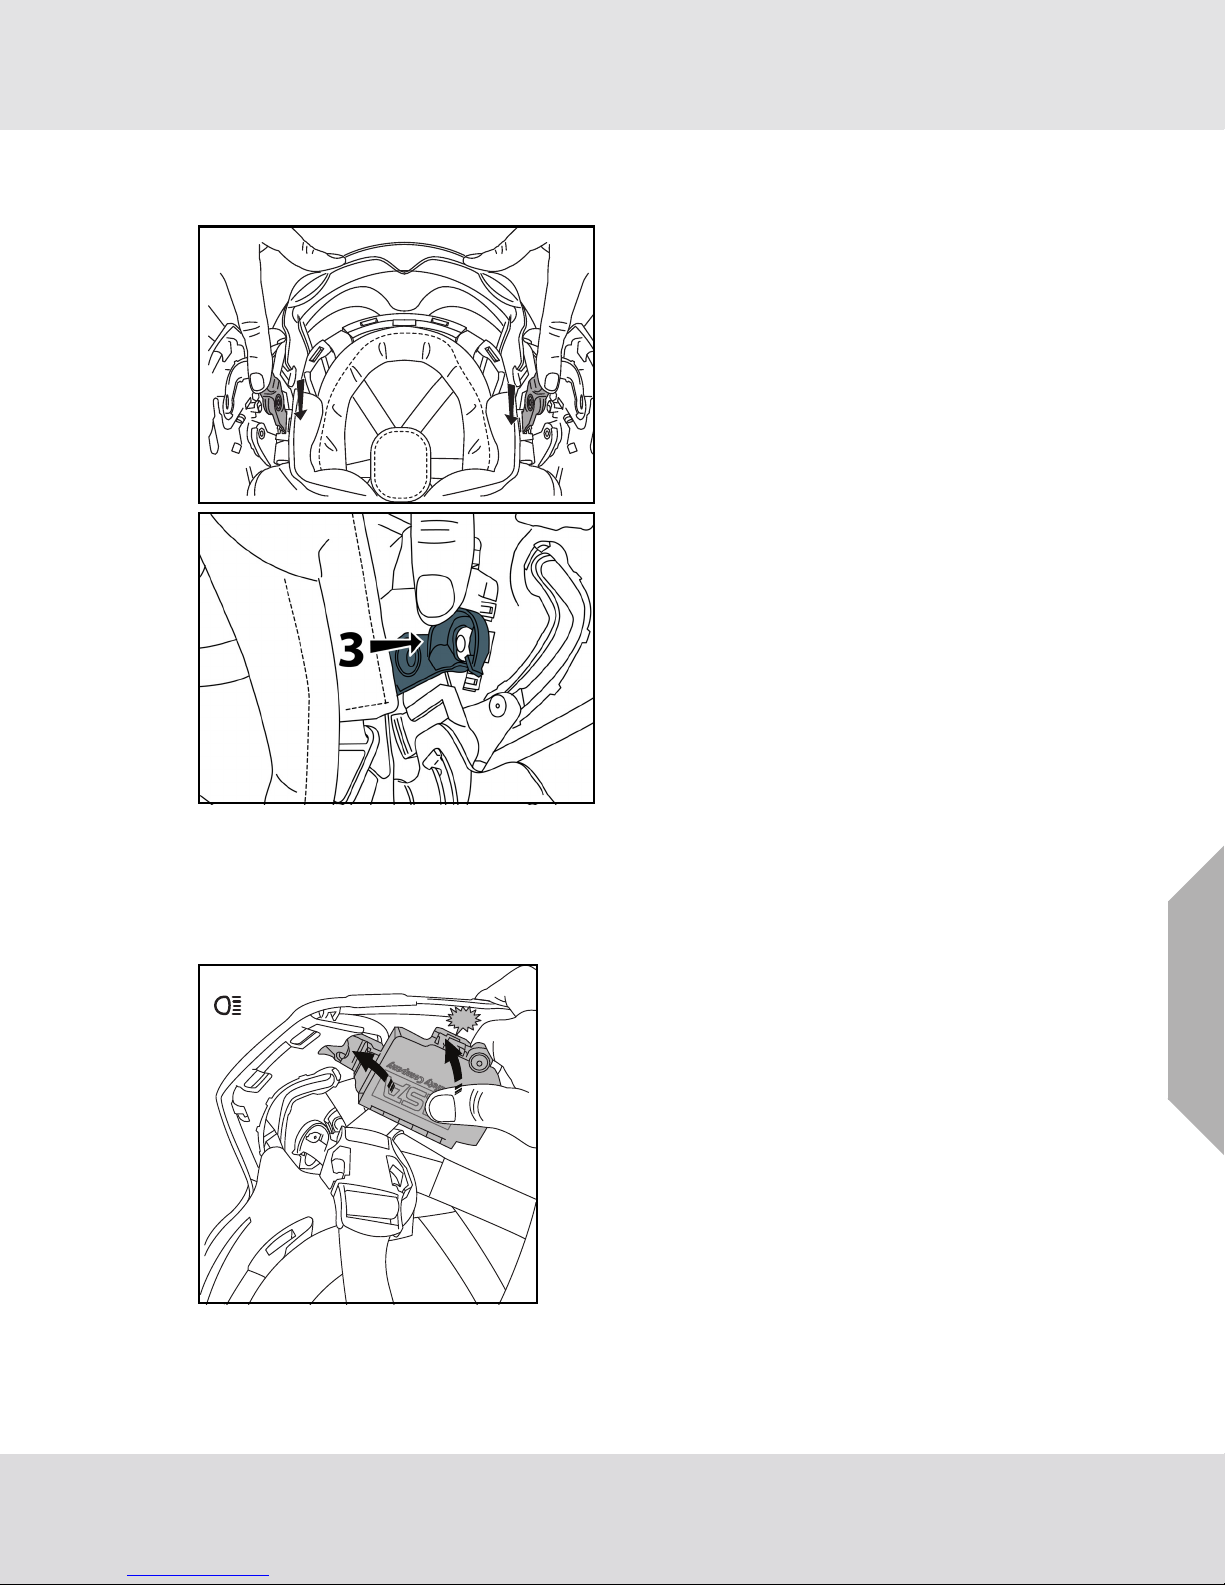
Chinstrap Assembly after Cleaning
F
Care and Maintenance
(4) Detach the crown pad to release the crown strap.
(5) Detach the hook-and-loop tab on each side of the
headband liner behind the ear (near the ratchet).
(6) Remove the chinstrap from the helmet.
(1) Attach the crown pad to the suspension to position
the crown strap.
(2) Place the crown pad straps between the plastic
headband and the headband liner.
(3) Secure the straps in place by reattaching the head-
band liner to the plastic headband using the hookand-loop tabs.
(4) Insert both clips (F) into the slots vertically.
US
MSA Cairns® XF1
17
Page 18

Care and Maintenance
I
(5) Rotate clips 90 degrees towards the rear (G) and
push clips in (H).
(6) Rotate the clips 90 degrees forward into the wearing
position (I).
Attachment of the 3rd point (at the back)
(7) Insert the metallic trapezoid and lock it in the hook by
pulling it vertically (first K then J).
6.1.5 Face Shield and Visor
• Wipe with mild detergent solution and a soft cloth. Do not use solvent based products or abrasive
materials.
• Allow the face shield or visor to air dry completely. Do not use a heat source such as forced air to
dry the impact cap more quickly. Do not tumble dry.
US
MSA Cairns® XF1
18
Page 19

Care and Maintenance
6.2 Advanced Cleaning
WARNING!
Only a manufacturer-trained organization, verified organization, or verified Independent Service
Provider (ISP) can perform advanced cleaning.
Failure to follow the recommended cleaning procedures can result in illness or disease.
Do not use cleaning solvents, oils, varnishes, or polishes to clean or decontaminate fire helmets
or fire helmet components. If it is necessary to use a stronger cleaning agent than what is recommended in this manual, contact MSA Customer Service at 1-877-MSA-FIRE.
Do not use abrasives, solvents, paint removers, acetone, paint or lacquer thinner, or any chlori-
nated organic solvents to clean the fire helmet shell. Use of these substances can degrade the
protective properties of the helmet shell.
Do not use equipment that produces mechanical action such as tumbling or agitation to machine-
wash or machine-dry complete fire helmets.
Do not use forced hot air or put the fire helmet directly on a heat source to dry it.
Do not use a fire helmet that is wet from use or cleaning. Allow all parts to dry completely before
use.
Do not apply paint, stickers, cleaning products with a hydrocarbon base or solvents to the fire
helmet or visors to prevent damaging the materials of your helmet.
Failure to obey these warnings can result in serious personal injury or death.
• For advanced cleaning, perform the procedures in Routine Cleaning Sections 6.1.1 "Fire Helmet
Shell" through 6.1.5 "Face Shield and Visor", followed by the procedures in this section.
(1) Don protective gloves.
(2) Remove all detachable components and accessories from the fire helmet. Wash and air-dry
them separately.
(3) Immerse the entire fire helmet in a solution of 1.5 oz (43 g) of mild detergent per 1 gal (3.8 L) of
water at a temperature no higher than 110°F (43 °C).
(4) Use a soft brush to remove dirt and other debris from the fire helmet.
(5) Rinse the fire helmet and accessories thoroughly with water.
(6) Use a clean cloth dampened with water to wipe the fire helmet and accessories.
(7) Put the fire helmet in a clean, safe place to air-dry. Do not use a heat source such as forced air
to dry components more quickly. Do not tumble dry.
US
MSA Cairns® XF1
19
Page 20

Care and Maintenance
6.3 Routine Inspection
WARNING!
Failure to follow the recommended inspection procedures can reduce fire helmet performance and
result in serious personal injury, disease, illness, or death.
Do not use a fire helmet that has damage.
Do not attempt to test the fire helmet. The performance properties of the fire helmet and its components cannot be properly tested by a user in the field.
Failure to obey these warnings can result in serious personal injury or death.
Clean the fire helmet per section 6.1 "Routine Cleaning" prior to inspection.
Inspect the fire helmet after each use for the following signs of damage from impact and thermal exposure. If any of these conditions exist, remove the fire helmet from service immediately and repair or
replace it as applicable.
After each use, check every part of the fire helmet and, especially the attachment points.
• No evident wear
• No fractures or cracks
• Continued, proper fit
WARNING!
Replace the helmet after it has withstood an impact, even if there is no visible damage.
Ensure the screw covers on both the lateral brackets for the impact cap are snapped closed, covering
the screws underneath, to maintain optimal dielectric protection.
In case of visible damage identified during the routine inspection (before or after use), such as
impacts, significant scratches, coating removal on the shell or visors, melted parts, broken parts, torn
straps or padding, missing components, non-operational moving parts (such as visors or ratchet), etc.,
the fire helmet should be taken to the trained maintenance technician or an MSA approved maintenance center.
Failure to obey these warnings can result in serious personal injury or death.
6.3.1 Fire Helmet Shell
If any of the following conditions exist, replace the entire fire helmet ensemble.
• Any cracks
• Blisters or bubbles
6.3.2 Suspension
If any of the following conditions exist, replace the suspension:
• Straps have missing, cut, fraying, or broken stitching
• Straps are torn or abraded
• Straps are brittle or discolored
• Suspension attachment clips are broken, brittle, whited, or discolored
US
MSA Cairns® XF1
20
Page 21

Care and Maintenance
6.3.3 Impact Cap
If any of the following conditions exist, replace the applicable part:
• Cracks in the foam or plastic liner
• Depressions or dents in the foam equal to or larger than a thumbnail
• Punctures, blisters, or discoloration due to impact, excessive heat, or normal wear
• Separation of foam from the black liner
• Screw covers on the lateral brackets will not stay closed, or are broken or missing
6.3.4 Ear Covers, Ratchet Cover and Headband Liner
If any of the following conditions exist, replace the applicable part:
• Missing, cut, or broken stitching
• Torn, discolored charred, perforated or seared
• Missing or broken fasteners for ear cover
6.3.5 Headband
If any of the following conditions exist, replace the headband:
• Brittle, torn, cracked, or broken
•Holes
• Able to open ratchet by tugging on nape arms (rather than turning the knob)
6.3.6 Chinstrap
If any of the following conditions exist, replace the chinstrap:
• Frayed, missing, or broken parts
• Missing, cut, frayed, or broken stitching
• Clogged or worn-out hook-and-loop fastener
• Brittle, broken, or missing quick-release buckle
• Broken or cracked attachment points
• Webbing is torn or abraded
• Webbing is brittle or discolored
6.3.7 Face Shield
If any of the following conditions exist, replace the face shield or mounting hardware:
• Blistered, bubbled, cracked, charred or otherwise damaged hardware or lens
• Lens will not stay in the stowed position and/or cannot be adjusted
6.3.8 Visor
If any of the following conditions exist, replace the visor or attachment clips, as applicable:
• Blistered, bubbled, cracked, or charred lens
• Broken quick-connect attachment clips
• Lens will not stay in the stowed position and/or cannot be adjusted
US
MSA Cairns® XF1
21
Page 22

Care and Maintenance
6.3.9 Edge Trim
If any of the following conditions exist, replace the edge trim:
•Broken
• Edge trim pulled away from brim
6.3.10 Reflective Trim
If the reflective trim is charred, partially detached, nonreflective, and/or missing, replace it.
6.4 Advanced Inspection
WARNING!
Only a manufacturer-trained organization, verified organization, or verified Independent Service
Provider (ISP) can perform advanced inspection.
Failure to obey this warning can result in serious personal injury or death.
Advanced inspection includes all of the items listed for 6.3 "Routine Inspection" as well as the
following items. After the fire helmet is put into service, do an Advanced Inspection of all protective
ensemble elements at least every 12 months, or whenever a routine inspection removes the
ensemble from service, whichever occurs first.
NOTICE
For the purposes of replacement (according to NFPA 1851, Standard on Selection, Care, and Maintenance of Protective Ensembles for Structural Fire Fighting and Proximity Fire Fighting) and
warranty, the manufacturing date for the fire helmet ensemble is based on the oldest original part
shipped as a component of the complete compliant fire helmet ensemble, irrespective of the manufacturing date of the replaced parts.
Disassemble the fire helmet using the instructions in Section 6.4.1 "Fire Helmet Disassembling Procedure"and inspect all components for the conditions listed in Section 6.3 "Routine Inspection".
US
MSA Cairns® XF1
22
Page 23

6.4.1 Fire Helmet Disassembling Procedure
8
7
5
1
2
3
4
6
9
10
11
12
Care and Maintenance
Fig. 1 Exploded view
1 Reflective trim 7 Impact cap
2 Shell 8 Suspension including lateral brackets and screw covers
3 Front plate 9 Headband
4 Front edge trim 10 Headband liner and ratchet cover
5 Rear edge trim 11 Chinstrap
6 Face shield 12 Ear cover
The following instructions enable a complete disassembling of the fire helmet for individual component
inspection.
(1) Turn the fire helmet upside down.
(2) Remove the ear cover.
US
(3) Remove the headband liner and the ratchet cover.
MSA Cairns® XF1
23
Page 24

Care and Maintenance
(4) Remove the chinstrap as described in Section 6.1.4 "Chinstrap".
(5) Remove the headband assembly:
a) Release the 2 rear attachments by sliding them through the wider area of the groove.
b) Slide the yellow front part out of its rail.
c) Release the front attachment by bringing them in a vertical position to get out of the slots.
(6) If necessary, remove the energy absorption system (impact cap + suspension) from the shell:
a) Move the side clips by detaching them from the shell connection pin.
b) Lift and remove screw covers on the lateral bracket for the impact cap on both sides.
c) Using a Torx 20 tool, remove the two attachment screws.
d) Unclip the rear of the suspension and slide the energy absorption system out of the helmet
shell.
(7) If necessary, separate the impact cap from the suspension:
a) Remove the attachment clip (front).
b) Gently pull the impact cap out of the suspension ring.
(8) If necessary, remove the face shield:
a) Move the face shield in the in-use position.
b) Unlock the upper face shield’s clips by rotating them at 180° (facing the opposite direction from
the engraved lock), using a Torx 15 tool.
c) Push the visor inwards, so that the upper clips get out of the rail and rotate the top of the visor
away from the helmet.
d) Slide the lower clips towards the top of the rail pushing the visor inwards to release the visor
from the helmet.
(9) If necessary, remove the edge trim:
a) Using a Torx 10 tool, remove the rear edge trim attachment screw
b) Using a Torx 10 tool, remove the two front edge trim attachment screws
c) Gently separate the rear and front edge trims in their attachment area and pull out the trims
from the shell.
6.4.2 Fire Helmet Resassembling Procedure
The following instructions enable a complete reassembling of the fire helmet if fully disassembled.
(1) Install the rear and front edge trim and lock them with their respective screws using a Torx 10 tool
US
(2) Install the face shield:
a) Insert the lower clips in the lower rail, and pull them to the end of the sliding rail (corresponding
to the in-use position of the face shield), leaving the upper clips outside the helmet shell.
b) Rotate the top of the visor towards the helmet and gently push the visor inwards to insert the
upper clips in their location.
c) Lock the upper clips rotating them at 180° (facing the engraved lock), using a Torx 15 tool.
MSA Cairns® XF1
24
Page 25

Care and Maintenance
(3) Attach the impact cap to the suspension and lock the attachment clip.
(4) Install the energy absorption module inside the helmet shell:
a) Install the inner module, sliding it inside the shell until rear locating clips are properly posi-
tioned in their lugs
b) Lock the inner module using 2 new screws to ensure proper locking.
c) Press the screw covers firmly back over the screws to ensure a tight seal on each lateral
bracket for the impact cap until the covers are secured.
(5) Install the headband assembly:
a) Attach the black side parts, inserting them vertically in their slot, and rotate them once the
attachment clip is properly inserted.
b) Insert and slide the yellow front part through its rail.
c) Complete the installation by inserting the 2 rear attachment points through the mounting
groove.
(6) Install the chinstrap as described in Section 6.1.4 "Chinstrap".
(7) Install the headband liner and ratchet cover.
(8) Install the ear covers as described in Section 3.1 "Ear Covers".
6.5 Storage
WARNING!
Do not store equipment that is not explicitly authorized by MSA in or on the fire helmet. The storage
of gloves, wedges, lights, and other equipment in or on the fire helmet can dramatically change the
protective capacity of the fire helmet.
Failure to obey this warning can result in serious personal injury or death.
• Clean the fire helmet (shell and internal components) after use before storing.
• Store the fire helmet in a clean, dry area where it is not exposed to heat, cold, or sunlight.
• Store the fire helmet in a proper storage bag and/or in a closed cabinet to avoid extended exposure
to cold, humidity, exhaust fumes, etc.
• When not in use, store the fire helmet with the ratchet suspension set to its smallest size.
• Store the face shield and visor (if applicable) inside the fire helmet (stowed position).
US
MSA Cairns® XF1
25
Page 26

Replacement Parts and Accessories
7 Replacement Parts and Accessories
Please see our catalog, visit MSAFIRE.com or contact your authorized MSA fire service distributor for
a full line of genuine MSA accessories and replacement parts.
7.1 Replacement Parts
Description Part Number
Clear face shield XF1 GA1156
Edge trim XF1, Large size (rear + front edge trim) GA1165-L
Edge trim XF1, Medium size (rear + front edge trim) GA1165-M
Impact cap XF1, (Size M: Medium / L: Large) GA1157-M / GA1157-L
Suspension XF1, (Size M: Medium / L: Large) GA1158-M / GA1158-L
Headband Assembly XF1 GA1161
Kit, Headband liner and ratchet cover XF1 GA1162
Chinstrap XF1 GA1160
Front plate GA1150-xx
Kit, reflective material (lime-yellow) XF1 GA1153
Ear cover XF1 GA1159
Kit, Screws, Edge Trim XF1, 50/package GA1163
Kit, Screws M4x12 TBC steel, 50/package GA1027
Lateral brackets with screw cover (L&R) GA1166
7.2 Accessories
Description Part Number
Lighting module GA1484
Ocular visor kit XF1 GA1087C
Headset Boom Microphone 1 LS GA010002H3
Headset Boom Microphone 2 LS GA010002H3A
US
MSA Cairns® XF1
26
Page 27

Warranty and Product Registration
8 Warranty and Product Registration
Refer to ID 3600-72-MC (MSA Cairns 10-Year Warranty and Terms of Sale).
Registering your new fire helmet is important! Registering your new fire helmet will help MSA provide
quicker, more efficient service and support. Your product registration can help ensure you get the most
out of your warranty, especially if your fire helmet was a gift and you don't have a proof of purchase
date.
Registering your product will solidify the start date on your warranty period and eliminate confusion
and frustration if you ever have to take advantage of your warranty.
Finally, in the unlikely event a safety notification or warranty service is required, MSA will have the
ability to contact you. Your completed registration also helps us to keep you updated on support,
service, product information and promotions/special offers.
To register your new MSA Cairns Fire Helmet, go to http://us.msasafety.com/productRegistration
9 Contacting MSA
Keep these instructions in a safe place so you can refer to them in the future. For questions regarding
the operation of this fire helmet or suggestions and comments about it, contact Customer Service at
1-877-MSA-FIRE.
.
MSA Cairns® XF1
US
27
Page 28

For local MSA contacts, please visit us at MSAsafety.com
Because every life has a purpose...
 Loading...