

Page 1

Operating Manual
OptimAir TL PAPR
Order No.: 10077289/14
Print Spec: 10000005389 (R)
CR: 800000042077
MSAsafety.com
Page 2

WARNING!
Read this manual carefully before using or maintaining the device. The device will perform as designed only if it is used and
maintained with the manufacturer's instructions. Otherwise, it could fail to perform as designed, and persons who rely on this
device could sustain serious injury or death.
The warranties made by MSA with respect to the product are voided if the product is not installed and used in accordance with
the instructions in this manual. Please protect yourself and your employees by following the instructions.
Please read and observe the WARNINGS and CAUTIONS inside. For additional information relative to use or repair, call
1-800-MSA-222 during regular working hours.
MSA, MSA The Safety Company, and the MSA The Safety Company Logo are Registered Trademarks of MSA Technology,
LLC in the U.S. and/or Other Countries. For all other trademarks see https://us.msasafety.com/Trademarks.
1000 Cranberry Woods Drive
Cranberry Township, PA 16066
USA
Phone 1-800-MSA-2222
Fax 1-800-967-0398
For your local MSA contacts please go to our website www.MSAsafety.com
© MSA 2020. All rights reserved
Page 3

US
Contents
1 Introduction 5
1.1 NIOSH Approval Information Cautions and Limitations 5
1.2 S—Special or Critical User's Instructions 5
2 General Description 9
2.1 Description 9
2.2 Respirator Use Limitations 9
2.3 NIOSH Approval Information 10
2.3.1 Protection 10
2.4 Exposure Limits (References) 10
2.4.1 Exposure Limits for Mixtures 10
2.4.2 Technical Information 11
2.4.3 Battery Pack 11
2.4.4 Contents 11
3 Preparing the OptimAir TL PAPR for Use 13
3.1 Checkpoints Before Use 13
3.2 Charging the Battery Pack 13
3.2.1 Standard Battery 13
3.2.2 Extended Life Battery 14
3.3 Installing the Battery Pack into the Battery Compartment of the Blower Assembly 15
3.4 Installing the Protective Cover 15
3.5 Installing the Cartridges 16
3.6 Optional Accessory 17
3.6.1 Attaching the Spark Covers (Recommended for use in spark environments) 17
3.7 Installing the Waistbelt and Optional Shoulder Strap 18
3.7.1 Decon Belt with Cam Buckle 18
3.7.2 Decon Belt with Side Release Buckle 18
3.7.3 Comfort Belt 18
3.7.4 Optional Shoulder Strap (use only with Comfort Belt) 18
3.8 Installing the Breathing Tube 19
3.8.1 Attaching the Breathing Tube Assembly to the Blower 19
3.8.2 Attaching the Breathing Tube Assembly to the Full Coverage Hoods 19
3.8.3 Attaching the Breathing Tube to the Low Profile Hood 22
3.9 Installing the Optional HoodLens Cover 22
4 Donning and Use 23
4.1 Donning 23
4.1.1 Donning the Blower Assembly 24
4.1.2 Donning the PAPR Hood 25
4.1.3 Adjusting the Hood Suspension (when applicable) 26
4.1.4 Adjusting the headband 27
4.1.5 Installing the Suspension (when applicable) 28
4.1.6 Donning the Hood with V-Gard® Cap (when applicable) 28
4.1.7 Donning the Low Profile PAPRHood 30
4.1.8 Donning the Tight-fitting Facepiece 30
4.2 Using the OptimAir TL PAPR 30
OptimAir TL PAPR 3
Page 4

US
5 Removing the Respirator 32
5.1 Decontamination 32
5.2 Removing the Battery 32
6 Cleaning and Inspection 34
6.1 Cleaning and Disinfecting 34
6.2 Inspection 35
7 Storage 36
7.1 Storing the Respirator 36
7.2 Storing the Batteries 36
8 Cartridge and Battery Disposal 37
8.1 Cartridge Disposal 37
8.2 Battery Disposal 37
8.2.1 Disposing of the Standard Battery 37
8.2.2 Disposing of Extended Life Battery 37
9 Accessories and Reorder Information 38
10 Troubleshooting 49
11 Warranty 50
OptimAir TL PAPR 4
Page 5

US 1 Introduction
1 Introduction
1.1 NIOSH Approval Information Cautions and Limitations
A — Not for use in atmospheres containing less than 19.5 percent oxygen.
B — Not for use in atmospheres immediately dangerous to life or health.
C —Do not exceed maximum use concentrations established by regulatory standards.
Do not use powered air-purifying respirators if airflow is less than four cfm (115 lpm) for tight fitting facepieces or six cfm
F —
(170 lpm) for hoods and / or helmets.
Follow established cartridge and canister change schedules or observe ESLI to ensure that cartridges and canisters are
H —
replaced before breakthrough occurs.
I — Contains electrical parts that may cause an ignition in flammable or explosive atmospheres.
J —Failure to properly use and maintain this product could result in injury or death.
L — Follow the manufacturer's User's Instructions for changing cartridges, canisters and / or filters.
All approved respirators shall be selected, fitted, used, and maintained in accordance with MSHA, OSHA, and other
M —
applicable regulations.
Never substitute, modify, add, or omit parts. Use only exact replacement parts in the configuration as specified by the
N —
manufacturer.
O — Refer to User's Instructions, and / or maintenance manuals for information on use and maintenance of these respirators.
P — NIOSH does not evaluate respirators for use as surgical masks.
S — Special or critical user's instructions and / or specific use limitations apply. Refer to User's Instructions before donning.
1.2 S—Special or Critical User's Instructions
During use of the OptimAir TL PAPR, the atmosphere must be monitored for the level of contamination and a means of escape
must be provided in the event that the contamination level increases to immediately dangerous to life and health (IDLH) levels.
The OptimAir TL PAPR must be properly inspected before use, properly decontaminated, if necessary, after use, properly
cleaned and maintained after use, and properly stored between uses.
The OptimAir TL PAPR contains a battery and may not be taken into or used in atmospheres containing flammable or
explosive gases, vapors, or dusts when the concentration of such contaminants is near or above the lower flammable limit
(LFL).
Do not use the OptimAir TL PAPR for firefighting, in oxygen-deficient atmospheres, or for protection against airborne
contaminants from which the cartridge does not protect.
WARNING!
• An adequate respiratory protection program must include knowledge of hazards, hazard assessment, selection of proper
respiratory protective equipment, instruction and training in the use of equipment, inspection and maintenance of
equipment, and medical surveillance.
OptimAir TL PAPR 5
Page 6

US 1 Introduction
• This respirator will perform as designed only if used and maintained according to the manufacturer's instructions. The
Program Administrator and the users must read and understand these instructions before using or servicing this product.
• If the respirator does not perform as specified in this manual, it must not be used until it has been checked by authorized
personnel.
• DO NOT alter, modify, or substitute any components. The OptimAir TL PAPR has no user-serviceable parts except as
indicated in this manual. DO NOT disassemble the product beyond the manufacturer’s recommendations.
• Inspect the respirator regularly and maintain it according to the instructions. Repairs must only be made by properly trained
personnel.
• This respiratory protective device does not supply oxygen. Use only in adequately ventilated areas which conform to the
appropriate standard.
• This respirator must be used in conjunction with the proper chemical or particulate canister/cartridge(s) for protection
against specific contaminants. If you cannot determine that the filter canister/cartridge(s) used with this device is designed
for the contaminant, or if you do not know the identity of the contaminant, do not use this device. Call MSA Customer
Service, 1-800-MSA-2222 (1-800-672-2222) for more information.
• DO NOT use when concentrations of contaminants are unknown.
• DO NOT allow blockage of the cartridge inhalation port.
• DO NOT use when appropriate exposure limit (PEL, REL, TLV, etc.) is not known.
• Leave the contaminated area immediately if:
– Breathing becomes difficult
– Dizziness or other distress occurs
– You taste or smell the contaminant
– You experience nose or throat irritation
– Instructed by responsible individuals
– An alarm sounds
• Use strictly according to the instructions, labels, and limitations pertaining to this device. Follow an established
canister/cartridge(s) change out schedule.
• This respirator may not provide a satisfactory seal with certain facial characteristics, such as beards or large sideburns that
prevent direct contact between the skin and the sealing surface of the facepiece. Do not use this facepiece if such
conditions exist.
• DO NOT wear eyeglasses under the facepiece. The temples or sidebars on eyeglasses will prevent an air-tight seal. If you
must wear glasses, install the spectacle kit.
• The user must perform a respirator fit test (Quantitative Test or Qualitative Test) when tightfitting facepieces are used and
follow all warnings and limitations specified.
• Wear impermeable protective clothing to prevent exposure to gases and vapors that can poison by skin absorption.
• DO NOT use this respiratory protective device in explosive atmospheres.
• DO NOT use for urethane paints or other paints containing isocyanates unless an appropriate cartridge change-out
schedule is developed. Due to their poor warning properties, over exposure can occur without user awareness and result in
severe permanent damage to the respiratory system. If unable to develop an appropriate change-out schedule, use an air
supplied respirator or SCBA.
• DO NOT drop the OptimAir TL PAPR. If the OptimAir TL PAPR is dropped leave the contaminated area immediately and
inspect the unit for damage. If the plastic cartridge or blower housing is cracked it may cause contaminants to get into the
system.
• Follow cartridge installation instructions (see the Installing the Cartridges section) very carefully to prevent cross threading.
Failure to follow these warnings can result in serious personal injury or death.
OptimAir TL PAPR 6
Page 7

US 1 Introduction
WARNING!
• This respirator/filter provides LIMITED protection. A respirator paired with an appropriate particulate filter may help reduce
exposure to airborne biological agents, including H1N1 (swine) flu virus, avian (bird) flu virus, other types of influenza,
SARS, or other bacterial or viral biological agents and help reduce the risk for infection during a pandemic, but WILL NOT
ELIMINATE the risk of exposure, infection, illness, or death.
• This respirator/filter is certified by NIOSH to comply with the requirements specified for the designated filter efficiency
level; however, appropriate authorities have NOT established a safe level of exposure to biological agents. Therefore, the
respirator may NOT prevent transmission of influenza virus.
• Refer to the Centers for Disease Control and Prevention (CDC) at www.cdc.gov for guidance on the use of respirators to
help decrease exposure to viral pathogens or other airborne biological agents in community, home, and occupational
settings. The CDC recommends fit testing, medical evaluations, and training for optimal effectiveness when a respirator is
used in a non-occupational setting. Neglecting these preparatory measures may cause an unsafe condition. Respirators
used in an occupational setting MUST be used in accordance with a complete respiratory protection program as required by
OSHA, which includes proper selection, training, fit-testing, and fitchecking. Detailed information on a respiratory
protection program is available by contacting OSHA or visiting www.osha.gov.
• Do NOT remove respirator in contaminated areas. The outer surface of the respirator MUST be treated as if it is
contaminated at all times. Tight-fitting safety goggles, or a full-facepiece respirator, may further help prevent transmission
of viral pathogens or other airborne biological agents.
• The CDC recommends frequent hand washing and wearing gloves to help prevent transmission of disease due to exposure
to surfaces where contaminants may be present, and also immediately following removal of the respirator.
• Do NOT reuse or share maintenance-free respirators. ALWAYS clean cartridge-style respirators before reuse in
accordance with the instructions provided.
• This respirator/filter is NOT for use by (a) children, or (b) people with a medical condition that may be adversely affected by
using it.
• This respirator is equipped with an exhalation valve. Exhaled air from the user passes, unfiltered, through the exhalation
valve and into the surrounding environment. Do not use where a sterile field is required.
• NIOSHdoes not evaluate respirators for use as surgical masks.
Failure to follow these warnings can result in serious personal injury or death.
The tight-fitting OptimAir TL PAPR must be properly prepared for use, properly donned, and a negative pressure leak test must
be conducted in an area known to be free of contaminants before it can be used.
Before entry into a contaminated area, the maximum safe duration of use must be determined. The maximum safe duration of
use depends primarily on:
• The amount and type of contamination in the air and the capacity of the cartridge to filter that contaminant.
• The amount of airborne particles (dust) in the atmosphere.
• The charge contained in the battery.
• The physiological limits of the respirator user.
The maximum expected cartridge life shall be determined based on the amount of contaminant in the atmosphere and the
capacity of the cartridges together with the expected air flow through the cartridges.
A fully charged battery may be used for a minimum of four (4) hours depending on the cartridge type used and the conditions
under which the PAPR is used.
OptimAir TL PAPR 7
Page 8

US 1 Introduction
NOTE: It is recommended that the OptimAir TL PAPR be used in environments where the temperature is between 32°F (0°C)
and 110°F (43°C). Operation in environments where the temperature is below 32°F (0°C) or above 110°F (43°C) could
negatively affect battery and blower performance.
With new cartridges/filters and a fully charged battery, the standard battery should operate for a minimum of four hours and the
extended life battery for a minimum of eight hours, depending on the conditions in which the PAPR is used.
WARNING!
DO NOT expose the battery to conditions that can result in electrostatic discharge. Electrostatic discharge may result in rapid
reduction of the available charge on the battery and lead to a corresponding reduction in remaining service time without an
alarm. Conditions that can result in electrostatic discharge include, but are not limited to, touching the battery contacts or
placing the battery on a metal surface with the contents facing down.
Failure to follow this warning can result in serious personal injury or death.
OptimAir TL PAPR 8
Page 9

US 2 General Description
2 General Description
2.1 Description
The OptimAir TL Respirator is a blower-assisted, air-purifying respirator referred to as a Powered Air-Purifying Respirator or a
PAPR.
The filtering system consists of a waist-mounted batterydriven blower assembly device and two (2) cartridges. The blower
assembly contains an electric motor driving an air fan. A rechargeable 12 volt (nominal) nickel-metal hydride (NiMH) or 14.4
volt (nominal) lithium ion (Li-Ion) battery pack is inserted onto the bottom of the blower assembly. The user of the respirator
breathes ambient air after the air has passed through the cartridges. The cartridges include a mechanical filter to trap airborne
particles and may also include a sorbent bed of activated carbon to adsorb various gases and vapors. The chemical cartridges
are approved for specific gases/vapors as noted in this user’s instruction manual.
The blower assembly assists breathing by drawing air through the cartridges and delivering the purified air through a breathing
tube to the respirator inlet covering (i.e. facepiece, hood, etc).
The OptimAir TL PAPR is NIOSH approved for use with MSA hoods and tight fitting facepieces noted in this user’s instruction
manual. Refer to the separate NIOSH Approval Label (P/N 10078677) for a complete list of approved part numbers and
limitations.
Contact MSACustomer Service for additional technical specifications (ie weights, materials of construction, etc).
2.2 Respirator Use Limitations
The respirator must not be worn in atmospheres which exceed any of the following limitations:
• Maximum use concentrations (whichever is lower):
– Contaminant IDLH
– 1000 times the exposure limit for the contaminants present. (Low Profile Hood 25 times)
– 1000 ppm (parts per million) organic vapors (for organic vapor cartridges).
• The limitations outlined in the applicable NIOSH approval.
• Any applicable limitation contained in a standard established by a regulatory agency (such as OSHA) with jurisdiction over
the wearer.
• This respirator can be used for protection against a mixture of contaminants that are present simultaneously or alternately
against one contaminant then another (using the same cartridges or filters) if the mixture meets the following conditions:
– The cartridge/canister/filter must be approved for all contaminants present.
– Particulates (dusts, mists, fumes, asbestos, and radionuclides) can be mixed with any other particulate or any gas or
vapor for which the cartridge/canister is approved.
– Contaminants present simultaneously must be below IDLH levels for the specific contaminants. If any one
contaminant in the mixture exceeds the IDLH concentration then the entire mixture must be treated as IDLH and the
respirator cannot be used (except for escape from particulates with appropriate filter).
OptimAir TL PAPR 9
Page 10

US 2 General Description
2.3 NIOSH Approval Information
2.3.1 Protection
HE – High Efficiency Particulate Air Filter for Powered, Air Purifying Respirators
Purifying Protection Code Protects Against
OV/CL/CD/HC/HS/SD/HE/HF Organic Vapor OV
Chlorine CL
Chlorine Dioxide CD
Hydrogen Chloride HC
Hydrogen Sulfide HS
Sulfur Dioxide SD
Hydrogen Fluoride HF
Particulate, High Efficiency HE
AM/CL/CD/FM/HC/HS/MA/SD/HE/HF Ammonia AM
Chlorine CL
Chlorine Dioxide CD
Methylamine MA
Formaldehyde FM
Hydrogen Chloride HC
Hydrogen Sulfide HS
Sulfur Dioxide SD
Hydrogen Fluoride HF
Particulate, High Efficiency HE
Cartridge, HE Particulate, High Efficiency HE
2.4 Exposure Limits (References)
A listing of acceptable exposure limits from the following sources is provided in MSA’s Response® Guide. Contact MSA at 1800-MSA-2222 for information.
• American Conference of Governmental Industrial Hygienists (ACGIH)
• Occupational Safety and Health Administration (OSHA)
• National Institute for Occupational Safety and Health (NIOSH)
• American Industrial Hygiene Association (AIHA)
2.4.1 Exposure Limits for Mixtures
The American Conference of Governmental Industrial Hygienists (ACGIH) publishes the following information to determine the
TLV of a mixture.
First determine the total concentration of the chemical mixture (C
C2, C3, . . . ) using the following formula: C
Mixture=C1+C2
+ C3+ . . .
) from the individual contaminant concentrations (C1,
Mixture
OptimAir TL PAPR 10
Page 11

US 2 General Description
The TLV of the mixture (T
) is found by using the following formula where T1, T2, T3, . . . are the individual contaminant
Mixture
TLVs and C1, C2, C3, . . . are the individual contaminant concentrations:
Only use these equations if the contaminants present are actually mixed. Some substances do not mix and may be present
separately, for example, in pockets or at different levels. In that case, the lowest TLV of the substances present must be used
to determine the appropriate respirator category for protection against all contaminants present.
See MSA’s Response® Respirator Guide for additional information.
2.4.2 Technical Information
Airflow: When used with the MSA battery pack, the OptimAir TL PAPR provides a constant filtered airflow of a minimum of
170 lpm to the hood, and 115 lpm to the tight fitting facepiece.
2.4.3 Battery Pack
Rechargeable 12 volt (nominal) nickel-metal hydride (NiMH) battery pack. (Standard Battery) Rechargeable 14.4 volt (nominal)
lithium ion (Li-Ion) battery pack. (Extended Life Battery)
2.4.4 Contents
The OptimAir TL PAPR kit is shipped with the components listed.
NOTE: Upon receipt of the PAPR kit, inspect the contents for shipping damage and ensure all components are present.
Loose Fitting Kit with Standard Battery
• OptimAir TL PAPR Blower Assembly
• Breathing Tube Assembly - Hood
• Decon Belt Assembly
• Standard Battery Pack
• Standard Battery Charger
• User’s Instruction Manual
Loose Fitting Kit with Extended Life Battery
• OptimAir TLPAPRBlower Assembly
• Breathing Tube Assembly - Hood
• Decon Belt Assembly
• Extended Life Battery Pack
• Extended Life Battery Charger
• User's Instruction Manual
OptimAir TL PAPR 11
Page 12

US 2 General Description
Loose Fitting Kit with Extended Life Battery, Hood, and Filter
• OptimAir TL PAPR Blower Assembly
• Breathing Tube Assembly - Hood
• Decon Belt Assembly (Side Release)
• Extended Life Battery Pack
• Extended Life Battery Charger
• Hood
• HEFilters
• User’s Instruction Manual
Tight Fitting Kit with Standard Battery
• OptimAir TL PAPR Blower Assembly
• Breathing Tube Assembly - Facepiece
• Decon Belt Assembly
• Standard Battery Pack
• Standard Battery Charger
• User’s Instruction Manual
Tight Fitting Kit with Extended Life Battery
• OptimAir TL PAPR Blower Assembly
• Breathing Tube Assembly - Facepiece
• Decon Belt Assembly
• Extended Life Battery Pack
• Extended Life Battery Charger
• User’s Instruction Manual
NOTE: Unless otherwise noted cartridges, filters, hoods, and tight-fitting facepieces must be ordered separately. See the
Accessories and Reordering Information.
OptimAir TL PAPR 12
Page 13

US 3 Preparing the OptimAir TL PAPR for Use
3 Preparing the OptimAir TL PAPR for Use
3.1 Checkpoints Before Use
(1) Check that all parts of the respirator are complete and undamaged. See the Inspection section for inspection procedures.
(2) Check that the cartridge approval is appropriate and effective against the contaminant in the use environment. Always
use two MSA cartridges of the same type.
3.2 Charging the Battery Pack
The battery pack must be fully charged before the respirator is first used. Use only MSA P/N 10076110 battery charger for the
standard battery pack and P/N 10076017 battery charger for the extended life battery pack. Other chargers can damage the
battery due to internal wiring differences or incorrect charging rates.
NOTE: Commercially available power strips may be used with the required battery chargers to charge multiple battery packs
at one time.
The standard battery pack should be stored between -4˚F to 140˚F (-20˚C to 60˚C) and the extended life battery pack should be
stored between -4˚F to 122˚F (-20˚C to 50˚C). Storage temperatures exceeding this range could result in permanent damage to
the battery pack. If the battery pack has been stored fully charged for more than one week, the battery pack should be charged
until a full charge is indicated.
Charge the battery pack at 32°F to 104°F (0ºC to +40ºC). Charging at temperatures below this range will result in incomplete
charge. Charging above the range will result in reduced cycle life.
WARNING!
• DO NOT charge the battery pack where there are explosive concentrations of combustible gases, vapors, or mists. An
explosion or fire can result. Replace the charger if the cord is damaged or worn, or if the case is cracked or distorted.
• DO NOT use a damaged charger.
• DO NOT touch the battery contacts.
• Never place the battery on a metal surface with the contacts facing down.
• DO NOT expose the battery to conditions that can result in electrostatic discharge. Electrostatic discharge may result in
rapid reduction of the available charge on the battery and lead to a corresponding reduction in remaining service time
without an alarm. Conditions that can result in electrostatic discharge include, but are not limited to, touching the battery
contacts or placing the battery on a metal surface with the contacts facing down.
Failure to follow these warnings can result in serious personal injury or death.
3.2.1 Standard Battery
(1) Push the plug into the female connector.
(2) Plug the charger into a 115-120 V, 50, 60 Hz (standard AC) outlet. The charger can be used internationally with the
appropriate adapter up to 240 VAC.
(3) Charge the battery pack until a full charge is indicated.
OptimAir TL PAPR 13
Page 14

US 3 Preparing the OptimAir TL PAPR for Use
Charger LED Indications
Condition Indication
Rapid Charge Red
Charge Complete Green
Charge Pending Amber
Charge Failure Red Flash
No AC or No Battery OFF
When the battery is charging, the LED will be red.
If the battery is not at the proper voltage for a rapid charge the LED is amber. In this state the battery undergoes a trickle
charge. Charging starts when the battery pack reaches the optimum charging voltage.
If the LED is flashing red, there is a failure. Disconnect battery pack, and unplug charger. Plug the charger back into outlet and
reconnect battery pack to reset charger. If LED flashes red during any part of the charge, after it has been reset, remove the
battery from service.
3.2.2 Extended Life Battery
(1) Push the plug into the female connector.
(2) Plug the charger into a 15-120 V, 50, 60 Hz (standard AC) outlet. The charger can be used internationally with the
appropriate adapter up to 240 VAC.
(3) Charge the battery pack until a full charge is indicated.
Charger LED Indications
Condition Indication
Rapid Charge Flash 50/50
Charge Complete Green
Charge Pending Blink 10/90
Charge Failure Fast Blink
No AC or No Battery OFF
NOTE: (50/50) means the LED is on for 50% of the cycle time and off for 50% of the cycle time. (10/90) means the LED is on
for 10% of the cycle time and off for 90% of the cycle time.
When the battery is charging, the LED blinks (50/50).
When the battery is fully charged, the LED is steady green. The battery can stay connected to the charger until needed.
If the battery is not at the proper voltage for a rapid charge the LED blinks (10/90). In this state, the battery undergoes a trickle
charge. The charging will start when the battery pack reaches the optimum charging voltage.
If a fast blink of the LED occurs, there is a failure. Disconnect the battery pack, and unplug the charger. Plug the charger back
into outlet and reconnect battery pack to reset charger.
NOTE: If a fast blink of the LED occurs during any part of the charger, after the charger has been reset, remove the battery
from service.
OptimAir TL PAPR 14
Page 15
US 3 Preparing the OptimAir TL PAPR for Use
NOTE: For optimal battery cycle life, follow the charging, storage and use conditions specified in this manual.
3.3 Installing the Battery Pack into the Battery Compartment of the Blower Assembly
WARNING!
• DO NOT use any battery which shows signs of damage, such as bulging, swelling, leaking fluid, or a cracked housing.
• DONOT remove, replace, or install the battery pack where there are explosive concentrations of combustible gases,
vapors, or mists. An explosion or file can result.
Failure to follow these warnings can result in serious personal injury or death.
(1) The kidney shaped battery can only be properly installed in one orientation.
(2) Slide the fixed tab end of the battery into the slot and push the contact end in until it
snaps into place.
(3) The OptimAir TL PAPR will not operate properly if the battery is not installed
correctly.
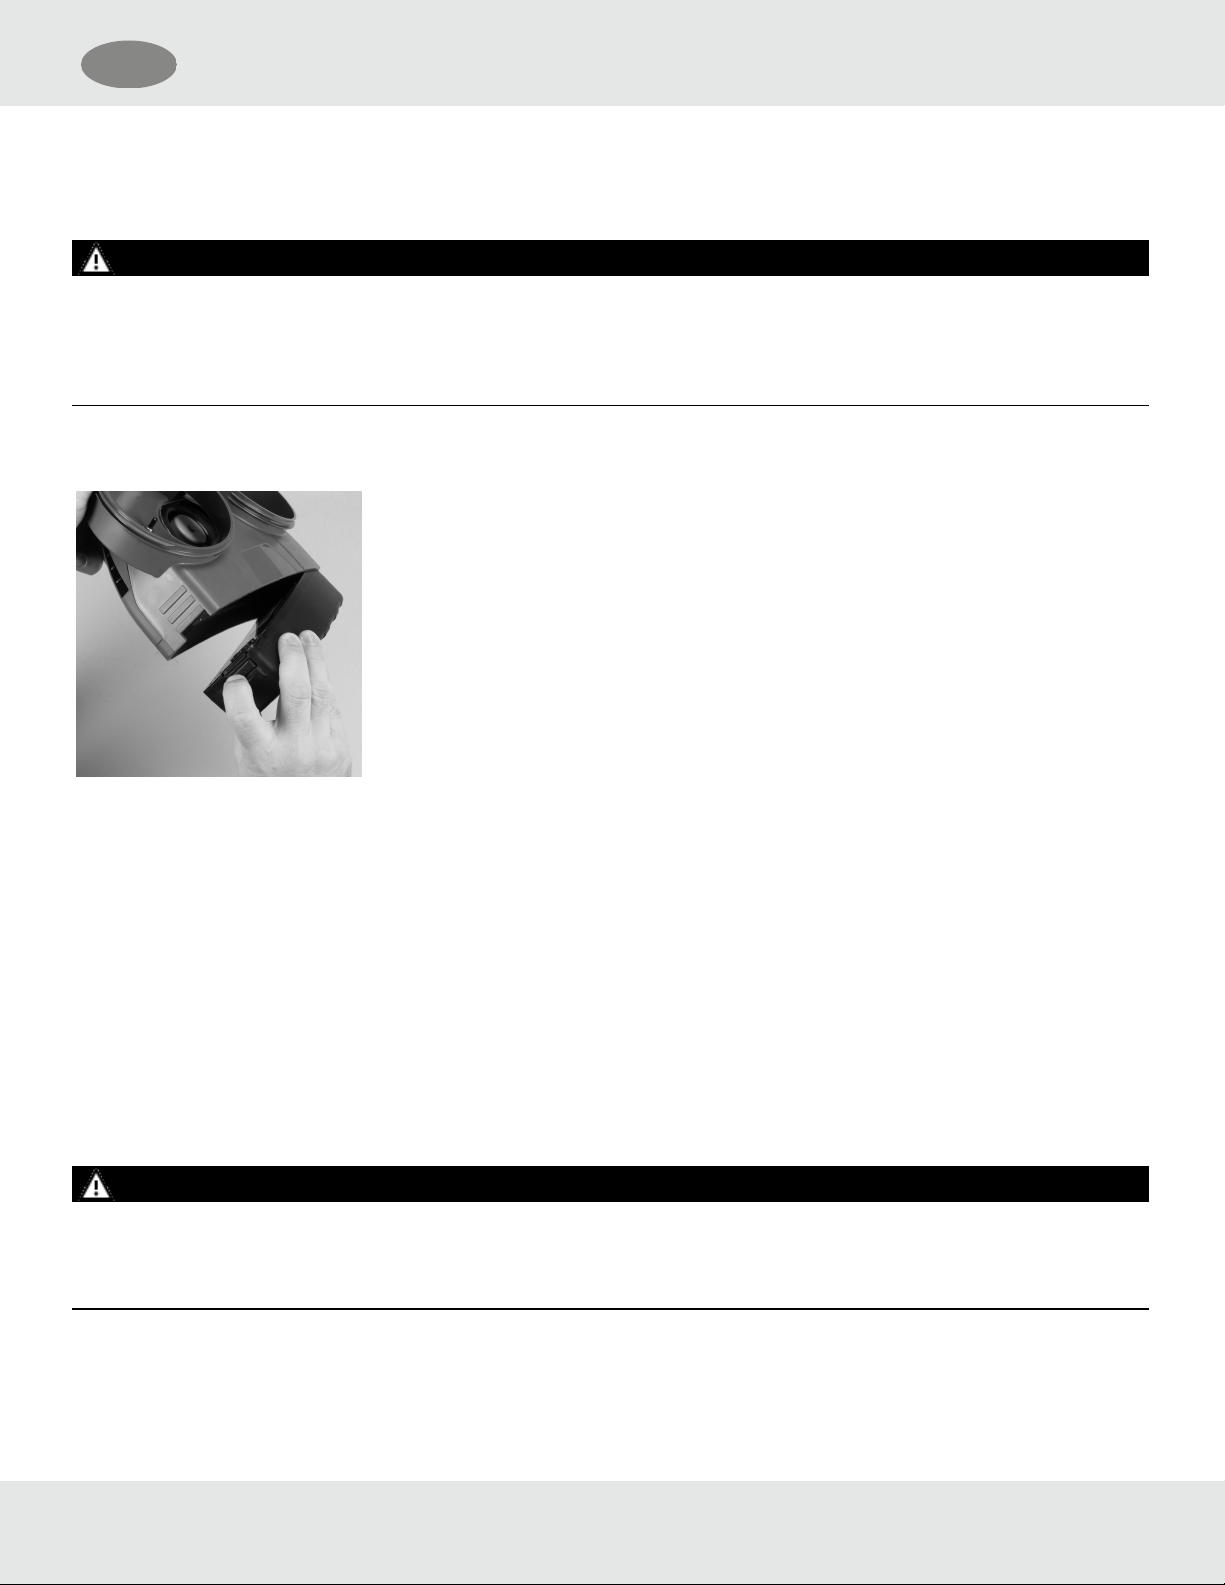
3.4 Installing the Protective Cover
NOTE: For use with decon waist belts only. DO NOT use the protective cover with the comfort belt.
(1) Slide the protective cover over breathing tube and motor blower unit. (It may be helpful to turn on the motor blower during
this step.)
(2) Push cover openings over cartridge receptacles.
(3) Attach cartridges as instructed in the “Installing the Cartridges” section of this manual.
(4) Lift edges of protective cover openings over cartridge bases and seal with tape.
WARNING!
DO NOT allow the protective cover, or any object, to interfere with the cartridge o-ring and receptacle sealing surface or an
airtight seal will not be achieved.
Failure to follow this warning can result in serious personal injury or death.
(5) Cut protective cover tube to desired length and seal to breathing tube connector with tape.
(6) Thread decon belt through the slits in the protective cover and the loops on the blower assembly.
(7) Fold and tape bottom of cover.
OptimAir TL PAPR 15
Page 16
US 3 Preparing the OptimAir TL PAPR for Use
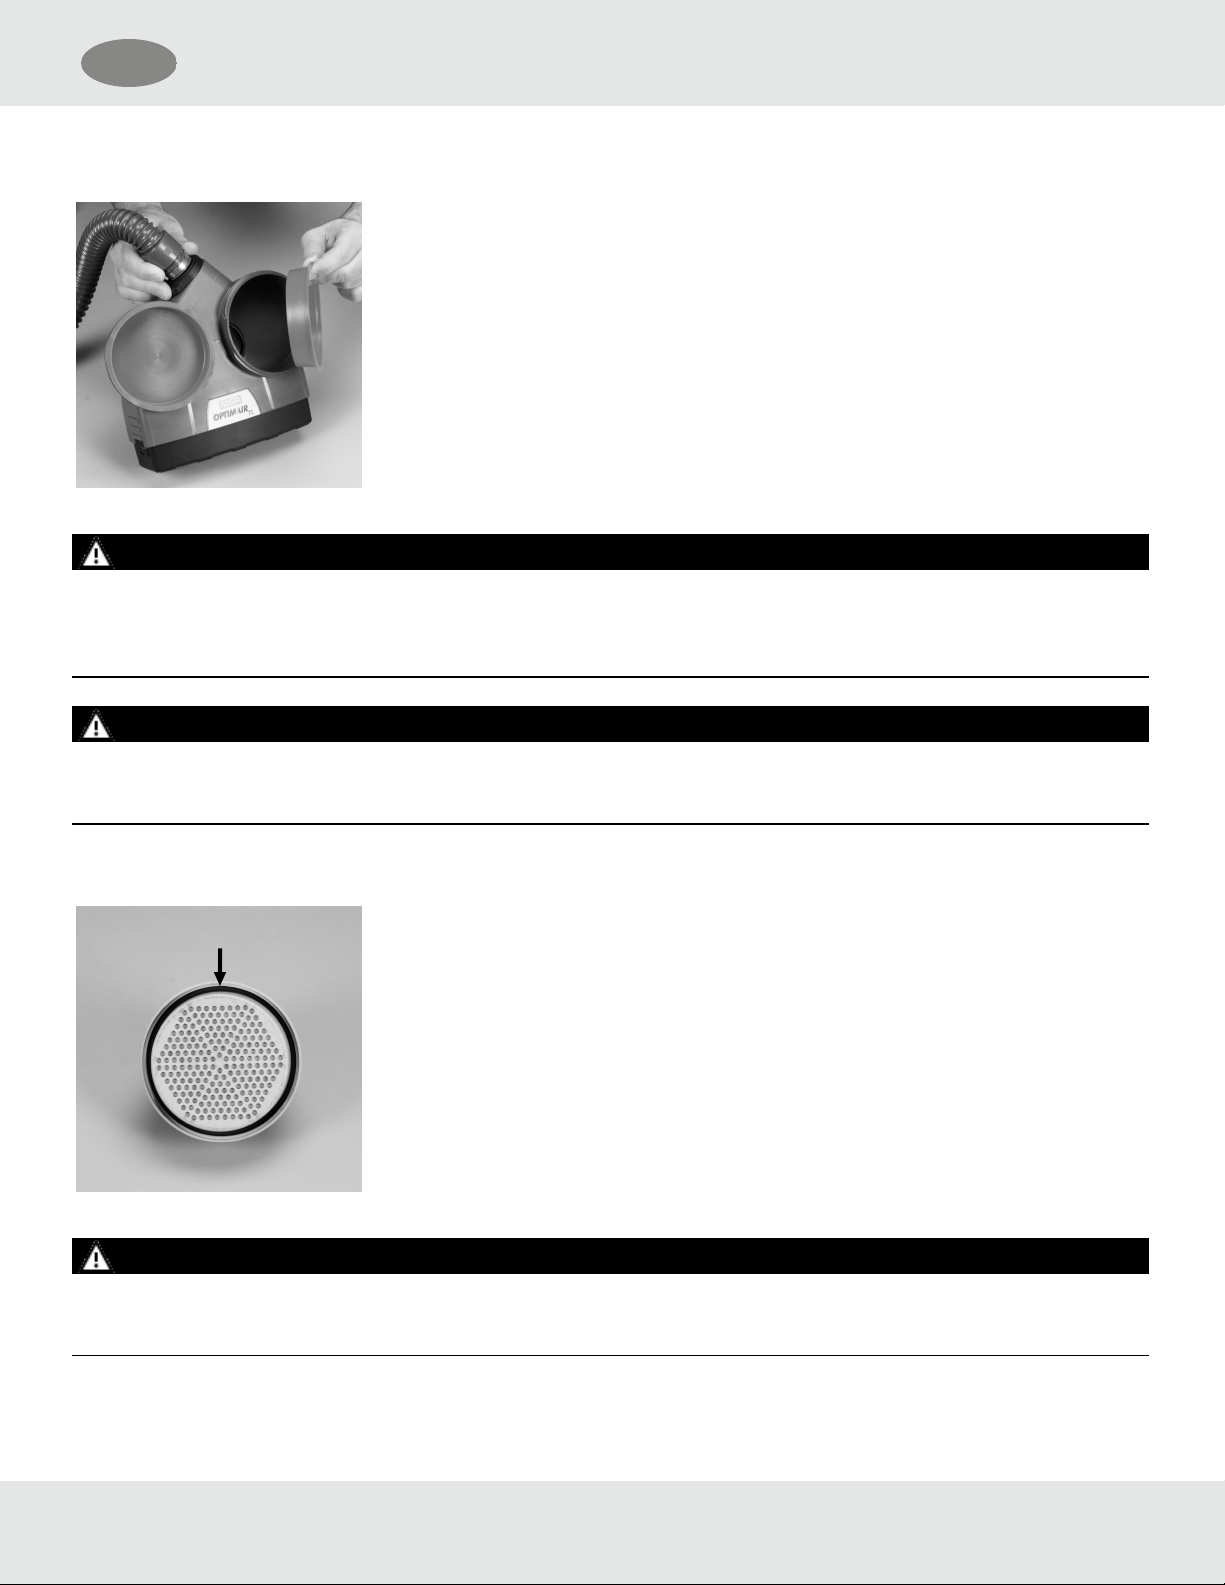
3.5 Installing the Cartridges
Ensure the optional cartridge receptacle plugs are removed.
WARNING!
Two new MSA cartridges of the same type must be installed before each use. Refer to the NIOSH Approval Label for approval
information.
Failure to follow this warning can result in serious personal injury or death.
WARNING!
DO NOT reuse combination cartridges. Combination cartridges are intended for one time use only.
Failure to follow this warning can result in serious personal injury or death.
NOTE: Cartridges are considered to be in service when they are removed from their packaging.
NOTE: Black gaskets are assembled into each OptimAir TL cartridge. Ensure the
gaskets are installed before using the cartridges. Do not attempt to remove gaskets from
cartridges, this could tear or damage the gasket.
WARNING!
DO NOT use a OptimAir TL PAPR blower with one or both of the cartridges damaged or missing.
Failure to follow this warning can result in serious personal injury or death.
(1) Remove both cartridges from their packaging.
OptimAir TL PAPR 16
Page 17

US 3 Preparing the OptimAir TL PAPR for Use
(2) Inspect the cartridges to be sure that they are not damaged and the gaskets are
present.
(3) To ensure proper attachment and prevent cross threading, carefully attach both
cartridges by using the following procedure:
a) Place the unit on a flat surface with the cartridge receptacles facing up
b) Ensure the optional cartridge receptacle plugs are removed
c) Set the cartridge in place on top of the cartridge receptacle
d) Turn the cartridge counter-clockwise until it drops into position
e) Turn the filter clockwise until the cartridge is snug
f) Hand-tighten only
WARNING!
DO NOT cross-thread the cartridges.
Failure to follow this warning can result in serious personal injury or death.
3.6 Optional Accessory
3.6.1 Attaching the Spark Covers (Recommended for use in spark environments)
NOTE: The spark cover should only be used with the Extended Life Battery (P/N 10076109)
(1) Remove the cartridges and spark covers from the packaging.
(2) Attach the cartridges to the PAPR.
(3) Once the cartridge is attached, align the feet of the spark cover with the inlet hole of
the cartridge.
OptimAir TL PAPR 17
Page 18

US 3 Preparing the OptimAir TL PAPR for Use
(4) Grasp the outside of the cartridge, and twist and push on the spark cover. The spark
cover will snap in place.
(5) To remove the spark cover, gently squeeze the outside of the cover, twist, and pull
the spark cover off.
(6) Check the spark cover before each use to ensure no sparks have created holes or
warped the part. If holes are created or the part is warped, replace the spark cover
with a new one.
3.7 Installing the Waistbelt and Optional Shoulder Strap
3.7.1 Decon Belt with Cam Buckle
Thread the belt through the two belt loops on the back of the blower assembly.
3.7.2 Decon Belt with Side Release Buckle
(1) Note the lacing path of the belt through the male buckle.
(2) Remove the male buckle and keeper loop from the end of the belt.
(3) Thread the belt through the two belt loops on the back of the blower assembly.
(4) Replace the keeper loop and lace the male buckle back onto the belt.
3.7.3 Comfort Belt
NOTE: Adjust the belt for proper fit prior to installation.
(1) Thread the belt through the belt loop on the back of the blower assembly.
(2) Thread the belt through the loop on the back of the comfort belt.
(3) Thread the belt through the second belt loop on the back of the blower assembly.
(4) Thread the belt through the slide on the comfort belt.
3.7.4 Optional Shoulder Strap (use only with Comfort Belt)
(1) Flip the back of the buckle to open the clip.
(2) Clip one end of the shoulder strap near the back of the belt on the right side.
(3) Clip the other end of the shoulder strap near the front of the belt on the left side.
(4) Adjust the length so the waistbelt is positioned properly on the lower back.
OptimAir TL PAPR 18
Page 19

US 3 Preparing the OptimAir TL PAPR for Use
3.8 Installing the Breathing Tube
3.8.1 Attaching the Breathing Tube Assembly to the Blower
(1) Inspect the o-ring in the breathing tube inlet. If the o-ring is damaged, missing, or the
breathing tube is difficult to install, replace the o-ring. Reorder PN 10085084 (Pack
of 10).
(2) Attach the breathing tube inlet to the blower outlet connection by aligning the marks
on the bayonet fitting and turning the breathing tube to align the arrow on the unit to
the second mark on the breathing tube.
(3) Ensure that the bayonet flange is positioned properly.
3.8.2 Attaching the Breathing Tube Assembly to the Full Coverage Hoods
There are two methods (locking clamp, threaded connector) of attaching the breathing tube assembly to Full Coverage material
hoods. Breathing tube assembly (P/N 10049631 and 10082281) may be used with the hoods. P/N 10082281 is approximately
4” longer than P/N 10049631.
NOTE: Ensure the hood and components are not torn or damaged.
OptimAir TL PAPR 19
Page 20

US 3 Preparing the OptimAir TL PAPR for Use
Using the Locking Clamp Method
(1) Note the smooth, gray section at the end of the breathing tube. This is the part of the
breathing tube that the locking clamp will be attached to.
(2) Slide the breathing tube into the hose inlet on the back of the hood approximately 3
½ inches from the hose end.
WARNING!
Failure to place the breathing tube far enough into the hood inlet may result in reduced airflow which can result in serious
personal injury or death.
Failure to follow this warning can result in serious personal injury or death.
(3) Once the breathing tube is in position, place the locking clamp around the hood and breathing tube.
(4) Determine where the smooth, gray section of the breathing tube is, and tighten the locking clamp in this location.
(5) Squeeze the locking clamp until it cannot be tightened further.
OptimAir TL PAPR 20
Page 21

US 3 Preparing the OptimAir TL PAPR for Use
Using the Threaded Connector Method
(1) Remove the gray locking nut (shown above) that is screwed onto the end of the
hose. It will not be needed for use with loose fitting hoods. This nut is used for
attaching the hose to the Low Profile Hood.
(2) Install the flat gray rubber washer provided onto the threaded end of the breathing
tube.
(3) Connect the breathing tube to the hood by threading the breathing tube into the
threaded hood connector. Tighten the connection by turning the threaded hood
connector nut with a ratcheting motion, releasing the threaded connector after each
turn, until the connection is hand tight. Avoid twisting or kinking the hood by
releasing the nut after each turn.
OptimAir TL PAPR 21
Page 22

US 3 Preparing the OptimAir TL PAPR for Use
(4) The threaded hood connection is designed to swivel. Adjust the orientation of the
breathing tube so that it will not twist or kink the hood during use.
3.8.3 Attaching the Breathing Tube to the Low Profile Hood
(1) Remove the gray locking nut from the threaded end of the hose.
(2) Insert the hose into the air inlet hole in the back of the low profile hood.
(3) Reach inside the low profile hood and secure the gray locking nut to the threaded
end of the hose.
3.9 Installing the Optional HoodLens Cover
(1) Peel protective backing stickers from the ends of the hood lens cover.
(2) Ensure the hood lens is in the curved position.
(3) Insert one hand into the hood behind the lens.
(4) Press the hood lens cover onto the lens.
OptimAir TL PAPR 22
Page 23

US 4 Donning and Use
4 Donning and Use
4.1 Donning
WARNING!
Donning and doffing must be done in an area known to be free of contaminants. The user must have practiced this procedure
before attempting to use the respirator for respiratory protection.
Failure to follow this warning can result in serious personal injury or death.
Audible and Visible Alarms
The OptimAir TL PAPR is equipped with audible and visible alarms that indicate low battery voltage and improper air flow.
Battery Indicator
The battery indicator will display the general state of the charge of the battery.
When the battery voltage drops below minimum allowable voltage, the OptimAir TL will
notify the user with audible (double continuous beep) and visible warnings. The unit will
continue to alarm for approximately 15 minutes or until it is shut off. After 15 minutes the
unit will shut off to avoid over discharging and damage to the battery.
WARNING!
DO NOT expose the battery to conditions that can result in electrostatic discharge. Electrostatic discharge may result in rapid
reduction of the available charge on the battery and lead to a corresponding reduction in remaining service time without an
alarm. Conditions that can result in electrostatic discharge include, but are not limited to, touching the battery contacts or
placing the battery on a metal surface with the contacts facing down.
Failure to follow this warning can result in serious personal injury or death.
Flow Indicator
The OptimAir TL PAPR continuously monitors the RPM of the motor. RPM is indicative of the airflow generated by the blower.
If the RPM is too low or too high the user is warned by an audible (single continuous beep) and visible alarm. The unit will
continue to alarm until the issue is addressed or the unit is shut off.
OptimAir TL PAPR 23
Page 24

US 4 Donning and Use
The flow alarm may be triggered by a restriction in the flow path of the respirator system.
Restrictions can be due to clogged filters, blockage of the cartridge inlets, or a restriction
in the air inlet of a loose fitting hood. A flow alarm can also be caused by a hose
connection that is not fully engaged or one that is installed incorrectly.
4.1.1 Donning the Blower Assembly
Follow the instructions that correspond with the hood being used when donning the PAPR hood.
(1) Examine the breathing tube assembly to verify that it is properly tightened to the
hood or facepiece and the blower assembly.
(2) Examine the cartridges to verify that they are properly installed to the blower
assembly.
(3) Turn the unit ON to confirm that the battery is properly installed and the blower
assembly is working. Do this by pressing the ON/OFF button and holding for one to
two seconds.
(4) Turn the unit off by pressing and holding the ON/OFF button for 3-4 seconds.
(5) Don the waistbelt and the blower assembly with the OptimAir TL PAPR blower
outlet located at the top of the unit. The unit may be worn on the hip or the small of
the back.
(6) Fasten the buckle and adjust the waistbelt.
OptimAir TL PAPR 24
Page 25

US 4 Donning and Use
NOTE: Ensure the belt is properly tightened so that the OptimAir TLPAPR blower does
not fall off or slide down the body during use.
NOTE: Protective clothing, the V-Gard Cap or the OptimAir TL suspension, if used, must be arranged so that it does not
interfere with the fit of the hood or restrict airflow to the cartridges.
4.1.2 Donning the PAPR Hood
(1) Turn on the PAPR blower motor. Let air flow through the unit for a few seconds.
(2) Using both hands spread the opening of the hood apart.
(3) Pull the hood over the head.
(4) As the hood is pulled down, ensure the suspension sits on the head, if the hood with
suspension is being worn.
NOTE: MSA recommends use of a buddy system to check for proper hood donning.
OptimAir TL PAPR 25
Page 26

US 4 Donning and Use
(5) When using a single bib hood, the knit collar must contact the wearer’s skin. When
using a double bib hood, ensure the inner bib is tucked in completely. If necessary,
use the buddy method to ensure proper donning.
(6) Once the hood is donned, use a buddy to check the hood inlet to make sure it is
straight and not twisted. There should be no kinks in the hood inlet when the
breathing tube is connected.
WARNING!
Kinks in the hood inlet fabric may result in reduced airflow.
Failure to follow this warning can result in serious personal injury or death.
4.1.3 Adjusting the Hood Suspension (when applicable)
If the hood suspension sits too high or too low on your head, the crown strap must be adjusted.
(1) Remove the suspension from the hood by taking apart the Velcro material at the
three attachment points.
(2) Adjust the crown strap by undoing the Velcro material on the strap and reconnecting
it either tighter or looser. Try on the suspension.
OptimAir TL PAPR 26
Page 27

US 4 Donning and Use
(3) If it still does not fit properly, repeat step 2.
4.1.4 Adjusting the headband
(1) To loosen the headband, squeeze the 1Touch® buckle and slide the headband
apart.
(2) To tighten the headband, squeeze the two tabs together to slide the headband
together.
(3) Once the headband is adjusted to the proper size, replace in the hood.
OptimAir TL PAPR 27
Page 28

US 4 Donning and Use
4.1.5 Installing the Suspension (when applicable)
(1) Spread the neckseal opening apart and put the suspension back into the hood.
(2) Line up the center suspension connector with the seam in the center of the hood. If
necessary, look through the lens to align the parts.
(3) Push the suspension firmly into the hood to connect the Velcro attachments.
(4) Once the center suspension connector is in position, attach each side connection
the same way. Push the suspension firmly into the hood to connect the Velcro
attachments.
4.1.6 Donning the Hood with V-Gard®Cap (when applicable)
NOTE: The V-Gard Cap may be used as the suspension for PAPR hoods that require a suspension. The V-Gard Cap must be
used with the OptimAir TL Hood with V-Gard Fastener Kit (P/N 10089665)
(1) Remove the standard suspension from the PAPR hood and set aside.
OptimAir TL PAPR 28
Page 29

US 4 Donning and Use
(2) Locate the two flanges on the front of the V-Gard cap.
(3) Remove the backing from the adhesive loop fastener. Place the fastener on the
flange, lining up the fastener with the front and bottom edges of the flange.
NOTE: Repeat this step for both sides of the V-Gard cap.
(4) Place the V-Gard cap inside the PAPR hood. Line up the back ends of the loop fastener strip on the V-Gard cap with the
ends of the hook fastener on the inside of the hood. Press firmly to fasten the V-Gard cap to the V-Gard hood.
(5) Don the hood and ensure that the V-Gard is fitted properly inside the hood. If fitted improperly, remove the hood and
repeat step 5.
(6) Once the hood is donned, use a buddy to check the hood inlet to make sure it is straight and not twisted. There should be
no kinks in the hood inlet when the breathing tube is connected.
NOTE: When properly installed, the PAPR Hood with the VGard cap will function similarly to the PAPR hood with standard
suspension.
OptimAir TL PAPR 29
Page 30

US 4 Donning and Use
4.1.7 Donning the Low Profile PAPRHood
(1) Turn on the PAPRblower motor. Let air flow through the unit for a few seconds.
(2) Place the hood over the head, ensuring the visor is in front of the face and the
comfort band is approximately above the eyebrows.
(3) Ensure the elastic seal runs above the ear and under then chin. It must be ensured
that the hood fits snugly against the skin, particularly down the sides of the face
adjacent to the ears.
(4) Ensure the hose inlet is seated at the base of the user's skull.
(5) Ensure the top of the hood is fully inflated and air is flowing over the user's head.
NOTE: MSA recommends use of a buddy system to check for proper hood donning.
4.1.8 Donning the Tight-fitting Facepiece
Refer to the facepiece user instructions for facepiece donning and negative pressure seal test instructions.
Facepiece User Instruction Part Number
Advantage®3100 Facepiece 10028994
Advantage 4100 Facepiece 10073772
Ultra Elite®Facepiece 10050775
4.2 Using the OptimAir TL PAPR
(1) Turn the blower on by depressing and holding the ON/ OFF button for 1-2 seconds.
(2) Once a full charge is indicated on the battery charger and the unit is initially turned on, listen for a series of beeps and
observe that the three LED lights on the unit illuminate. If the unit does not beep or the three LED lights fail to illuminate
during initial start-up, the unit should be checked by authorized personnel prior to use.
(3) Follow the instructions and properly don the hood or facepiece.
(4) Wait four minutes to ensure that the unit has calibrated itself properly.
OptimAir TL PAPR 30
Page 31

US 4 Donning and Use
(5) The work zone may now be entered.
NOTE: If the hood lens cover is contaminated, peel the outermost layer away by pulling on the outermost tab and tearing it at
the perforated edges.
WARNING!
• Immediately leave the contaminated area if the airborne contaminant is detected by odor, taste, eye irritation, or if any
discomfort is felt during use.
• If air flow is noticeably decreased or stops completely, leave the contaminated area immediately.
• If the battery compartment becomes hot to the touch, leave the contaminated area and turn the unit off immediately,
decontaminate if necessary, and check the respirator.
• The low battery alarm sounds and/or flashes when there are approximately 15 minutes of service time remaining. Leave the
contaminated area immediately if the low battery alarm activates.
• DO NOT expose the battery to conditions that can result in electrostatic discharge. Electrostatic discharge may result in
rapid reduction of the available charge on the battery and lead to a corresponding reduction in remaining service time
without an alarm. Conditions that can result in electrostatic discharge include, but are not limited to, touching the battery
contacts or placing the battery on a metal surface with the contacts facing down.
• A decontamination procedure for the user and the protective equipment must be developed and implemented.
• Once the user leaves the contaminated area, he or she must enter the decontamination area and follow the set
decontamination procedure.
• Once the user and the protective equipment have been decontaminated, properly dispose of affected equipment as required
by federal, state and/or local laws.
• Leave the motor blower on. Do not breathe through the respirator for long periods of time with the motor-blower shut off.
With the blower off, carbon dioxide can concentrate in the hood
Failure to follow these warnings can result in serious personal injury or death.
OptimAir TL PAPR 31
Page 32

US 5 Removing the Respirator
5 Removing the Respirator
Turn the unit OFF by holding the ON/OFF button down for three to four seconds.
5.1 Decontamination
WARNING!
DO NOT remove respirator until respirator and protective clothing are decontaminated; otherwise, exposure to contaminants
may result. Follow decontamination and disposal procedures established by appropriate authorities.
Failure to follow this warning can result in serious personal injury or death.
Once the protective equipment has been decontaminated, proper disposal of affected equipment must be performed. Disposal
is to be performed as required by federal, state, and/or local laws.
When conditions are safe to remove and handle the respirator, the hood or facepiece may be removed and the unit can be
turned off. Accessories/components (belt, cartridges, etc.) can be removed at that time.
WARNING!
DO NOT reuse the cartridges. Cartridges are considered to be in service when they are removed from their packaging.
Cartridges are intended for one time use only and must be disposed of upon termination of use.
Failure to follow this warning can result in serious personal injury or death.
5.2 Removing the Battery
WARNING!
DO NOT remove, replace or install the battery pack where there are explosive concentrations of combustible gases, vapors, or
mists. An explosion or fire can result.
Failure to follow this warning can result in serious personal injury or death.
(1) Press the lock button on the side of the battery and lift the battery out of its slot.
(2) Rechargeable batteries can be recharged according to the instructions on the
battery label and the Charging the Battery Pack section of these user instructions.
OptimAir TL PAPR 32
Page 33

US 5 Removing the Respirator
WARNING!
The standard rechargeable battery can be charged by MSA battery charger P/N 10076110
ONLY. Extended life batteries can be charged by MSA battery charger P/N 10076107
ONLY.
Failure to follow this warning can result in serious personal injury or death.
CAUTION!
DO NOT dispose of batteries as ordinary trash. Follow the instructions included in the Disposal of Cartridges and Batteries
section.
Failure to follow this caution can result in minor or moderate injury.
OptimAir TL PAPR 33
Page 34

US 6 Cleaning and Inspection
6 Cleaning and Inspection
6.1 Cleaning and Disinfecting
All components must be thoroughly cleaned after each use. Clean the OptimAir TL with Confidence Plus® Cleaner (P/N
10009971) from MSA. Refer to the label for use instructions. A solution as effective as Confidence Plus Cleaning Solution and
compatible with MSA respirator components may be substituted.
WARNING!
DO NOT inhale or touch the contaminant when handling the respirator or its parts. Use equipment designed to protect you from
the specific contaminant. If necessary, dispose of equipment to protect yourself from the contaminant.
Failure to follow this warning can result in serious personal injury or death.
NOTE: The used cartridges must be removed from the respirator and disposed of as directed in the Cartridges section of this
user’s instruction manual.
(1) Preparing the cleaner:
a) Follow the instructions with the Confidence Plus Cleaning Solution.
b) If the Confidence Plus Cleaning Solution is not used, prepare in accordance with the instructions provided with
cleaning products.
(2) Disconnect the breathing tube from the hood or facepiece.
(3) Clean and disinfect the hood or facepiece.
a) Use a damp cloth or sponge saturated with Confidence Plus or equivalent cleaning solution to wipe the hood or
facepiece material clean.
NOTE: Refer to the facepiece instructions for detailed facepiece decontamination instructions.
(4) Separate the motor-blower, breathing tube, waist belt, and cartridges.
(5) Inspect the equipment for damaged threads, cracked plastic or rubber components, worn or frayed belts, or other
damaged components.
(6) Inspect the hose for tears or holes.
(7) Use a damp cloth or sponge saturated with Confidence Plus or equivalent cleaning solution to wipe the breathing tube
and motor-blower clean.
NOTE: Cartridge receptacle plugs are available as an accessory to help protect the motor
blower assembly during cleaning (PN 10081414).
OptimAir TL PAPR 34
Page 35

US 6 Cleaning and Inspection
(8) Carefully clean the breathing tube connection and cartridge ports to remove deposits that could prevent an airtight seal.
WARNING!
DO NOT submerge the blower assembly.
Failure to follow this warning can result in serious personal injury or death.
(9) Thoroughly wash and rinse the waist belt in the Confidence Plus or equivalent cleaning solution. A soft brush or sponge
may be used.
NOTE: The comfort belt and shoulder strap are machine washable.
(10) Reassemble the respirator so that it will be ready for use.
6.2 Inspection
(1) Inspect all hardware to ensure proper condition of threads, bayonet tabs, and buckles. Inspect the equipment for
damaged threads, cracked plastic or rubber parts, worn or frayed belts, or other damaged components.
(2) Inspect all gaskets and seals and ensure that they are present and in good condition.
(3) Inspect the blower assembly and breathing tube assembly for damage or cracks. Ensure that there are no loose objects
rattling inside the blower assembly.
(4) Inspect the hood material for tears or holes. Inspect the suspension. Replacement sweatbands may be ordered in
packages of 10 (P/N 10083618).
(5) Inspect the hose for tears or holes.
(6) Correct any deficiencies immediately or tag the respirator as in need of repair and remove it from service.
(7) Ensure that the unit is working properly before storage.
OptimAir TL PAPR 35
Page 36

US 7 Storage
7 Storage
CAUTION!
• Ensure that the unit is working properly before storage by temporarily installing a battery as instructed in the Before Use
section. Remove the battery after testing.
• DO NOT store the unit with the battery installed. Always remove the battery from the blower assembly for storage. Store
the battery and the blower assembly away from sunlight, heat, or moisture.
Failure to follow these cautions can result in minor or moderate injury.
7.1 Storing the Respirator
• Store only undamaged respirators and breathing tubes for further use. When not in use, store the respirator in cool, dry, and
clean ambient air.
• The cartridge receptacles may be plugged with MSA’s cartridge receptacle plugs
(optional).
NOTE: Tape can be placed over the hose ends to keep out contaminants during storage.
7.2 Storing the Batteries
The standard battery pack should be stored fully charged at temperatures between -4˚F to 140˚F (-20˚C to 60˚C). Extended life
batteries should be stored at temperatures between -4˚F to 122˚F (-20˚C to 50˚C). Storage temperatures exceeding this range
could result in permanent damage to the battery pack. If the battery pack has been stored fully charged for more than one
week, recharge the battery pack until a full charge is indicated.
OptimAir TL PAPR 36
Page 37

US 8 Cartridge and Battery Disposal
8 Cartridge and Battery Disposal
8.1 Cartridge Disposal
Remove the used cartridges and dispose of them properly. Dispose of the cartridges in accordance with federal, state, and
local regulations.
WARNING!
Handle used cartridges with care. Used cartridges may contain contaminant and must be handled as contaminated or
potentially contaminated objects.
Failure to follow this warning can result in serious personal injury or death.
8.2 Battery Disposal
WARNING!
DO NOT dispose of the battery in fire. It may explode.
Failure to follow this warning can result in serious personal injury or death.
8.2.1 Disposing of the Standard Battery
NOTE: NiMH cells contained in the MSA Standard battery pack are classified by the federal government as a nonhazardous
waste and are safe for disposal as municipal waste.
(1) Apply a piece of non-conductive insulating tape across the contact pads and charging port and dispose of the battery
pack.
(2) NiMH cells contained in the MSA battery pack contain recyclable materials. Dispose of or recycle batteries in
accordance with all applicable federal, state, and local regulations.
8.2.2 Disposing of Extended Life Battery
Dispose of or recycle batteries in accordance with all applicable federal, state, and local regulations.
OptimAir TL PAPR 37
Page 38

US 9 Accessories and Reorder Information
9 Accessories and Reorder Information
Item
OptimAir TL PAPR Kit
Loose Fitting, Standard
Battery (Blower, Battery
Standard, Charger Standard,
Hood Hose, Decon Belt With
Cam Buckle, Instruction
Manual) Cartridges not
included
OptimAir TL PAPR Kit
Loose Fitting, Extended
Life Battery (Blower,
Battery Extended Life,
Charger Extended Life, Hood
Hose, Decon Belt With Cam
Buckle, Instruction Manual)
OptimAir TL PAPR Kit
Tight Fitting, Standard
Battery (Blower, Battery
Standard, Charger Standard,
Facepiece Hose, Decon Belt
With Cam Buckle,
Instruction Manual)
Reorder
Part
Quantity
Number
10081116 1 4.1 lbs.
10081117 1 4.1 lbs.
10081114 1 4.1 lbs.
Ship Weight
(estimated)
Photo
OptimAir TL PAPR Kit
Tight Fitting, Extended
Life Battery (Blower,
Battery Extended Life,
Charger Extended Life,
Facepiece Hose, Decon Belt
With Cam Buckle,
Instruction Manual)
Loose Fitting Kit with
Extended Life Battery,
Yellow Low Profile Hood,
HEFilters
10081115 1 4.1 lbs.
10214804 1 5.75 lbs.
OptimAir TL PAPR 38
Page 39

US 9 Accessories and Reorder Information
Reorder
Item
Part
Quantity
Number
Loose Fitting Kit with
Extended Life Battery, White
Low Profile Hood, HEFilters
Loose Fitting Kit with
Extended Life Battery, Full
Hood, HEFilters
OptimAir TL Blower Only 10088150 1 1.3 lbs.
10214805 1 5.75 lbs.
10214891 1 5.8 lbs.
Ship Weight
(estimated)
Photo
OptiFilter (TL)
OV/AG/HE/HF
OptiFilter (TL)
AM/FM/AG/HE/HF
OptiFilter (TL) HE 10080455 6 3.0 lbs.
Hood, Tychem Material SL,
Single Bib, Locking Clamp
10080454 6 6.3 lbs.
10080456 6 7.7 lbs.
10083385 4 3.8 lbs.
OptimAir TL PAPR 39
Page 40

US 9 Accessories and Reorder Information
Item
Hood, Tychem Material SL,
Single Bib, Threaded Hose
Connection
Reorder
Part
Quantity
Number
10083381 4 4.7 lbs.
Ship Weight
(estimated)
Photo
Hood, Tychem Material SL,
Double Bib, Locking Clamp
10083386 4 4.2 lbs.
OptimAir TL PAPR 40
Page 41

US 9 Accessories and Reorder Information
Item
Hood, Tychem Material SL,
Double Bib, Threaded Hose
Connection
Reorder
Part
Quantity
Number
10083382 4 3.8 lbs.
Ship Weight
(estimated)
Photo
Hood, Single Bib, Locking
Clamp
10083383 4 3.7 lbs.
OptimAir TL PAPR 41
Page 42

US 9 Accessories and Reorder Information
Item
Hood, Single Bib, Threaded
Hose Connection
Reorder
Part
Quantity
Number
10083329 4 4.4 lbs.
Ship Weight
(estimated)
Photo
Hood, Double Bib, Locking
Clamp
10083384 4 3.8 lbs.
OptimAir TL PAPR 42
Page 43

US 9 Accessories and Reorder Information
Item
Hood, Double Bib, Threaded
Hose Connection
Reorder
Part
Quantity
Number
10083330 4 4.4 lbs.
Ship Weight
(estimated)
Photo
Hood,Double Bib, Threaded
Hose Connection, Yellow
Hood,Single Bib, Threaded
Hose Connection, Yellow
Hood, Single Bib, w/o
Suspension, Threaded
Connector
Hood, Single Bib, w/o
Suspension, Locking Clamp
Hood, Single Bib, Yellow,
w/o Suspension, Threaded
Connector
Hood, Double Bib, w/o
Suspension, Threaded
Connector
Hood, Double Bib, w/o
Suspension, Locking Clamp
Hood, Double Bib, Yellow,
w/o Suspension, Threaded
10086925 4 4.4 lbs.
10086926 4 4.4 lbs.
10083387 4 4.4 lbs.
10083391 4 3.7 lbs.
10094878 4 4.4 lbs.
10083388 4 4.4 lbs.
10083392 4 4.2 lbs.
10094879 4 4.4 lbs.
OptimAir TL PAPR 43
Page 44

US 9 Accessories and Reorder Information
Reorder
Item
Part
Quantity
Number
Connector
Hood, Single Bib, Tychem
SL, w/o Suspension,
Threaded Connector
Hood, Single Bib, Tychem
SL, w/o Suspension,
Locking Clamp
Hood, Double Bib, Tychem
SL w/o Suspension,
Threaded Connector
Hood, Double Bib, Tychem
SL w/o Suspension, Locking
Clamp
Fastener Kit, OptimAir TL
Hood with V-Gard
Hood, Low Profile, Yellow 10215117 4 0.2 lbs.
10083389 4 4.7 lbs.
10083393 4 3.8 lbs.
10083390 4 4.8
10083394 4 4.2 lbs.
10089665 1 0.2 lbs.
Ship Weight
(estimated)
Photo
Hood, Low Profile, White 10215118 4 0.2 lbs.
Facepiece, Advantage 3100,
Rubber Harness
Sm: 10028999
Md: 10028998
Lg: 10029000
1 1.6 lbs.
OptimAir TL PAPR 44
Page 45

US 9 Accessories and Reorder Information
Reorder
Item
Part
Quantity
Number
Spark Cover 10068152 1 1.5 oz.
Facepiece, Advantage 3100,
Advantage Harness
Facepiece, Advantage 4100,
(requires RD40 Inlet
Assembly), Silicone, cloth
head harness
Sm: 10031343
Md: 10031342
Lg: 10031344
Sm: 10083796
Md: 10083792
Lg: 10083800
1 1.6 lbs.
1 1.6 lbs.
Ship Weight
(estimated)
Photo
Facepiece, Advantage 4100
(requires RD40 Inlet
Assembly), Hycar, cloth
head harness
Facepiece, Advantage 4100
(requires RD40 Inlet
Assembly), Silicone, rubber
head harness
Facepiece, Advantage 4100
(requires RD40 Inlet
Assembly), Hycar, rubber
head harness
RD40 Inlet Assembly 10065330 1 0.2 lbs.
Facepiece, Ultra Elite, Black
Silicone
Facepiece, Ultra Elite, Black
Hycar Rubber
Sm: 10083797
Md: 10083793
Lg: 10083801
Sm: 10083798
Md: 10083794
Lg: 10083802
Sm: 10083799
Md: 10083795
Lg: 10083803
Sm: 493072
Md: 493028
Lg: 493116
Sm: 493064
Md: 493020
Lg: 493108
1 1.1 lbs.
1 1.9 lbs.
1 1.9 lbs.
OptimAir TL PAPR 45
Page 46

US 9 Accessories and Reorder Information
Reorder
Item
Part
Quantity
Number
Facepiece, Hose 10049630 1 0.6 lbs.
Hood Hose 10049631 1 0.5 lbs.
Hood Hose, Extended
LengthBreathing Tube
Assembly Faceshield or
Hood
10082281 1 1.1 lbs.
Ship Weight
(estimated)
Photo
Breathing Tube Assembly
Faceshield or Hood
Battery, Standard 10076108 1 1.1 lbs.
Battery Charger, Standard 10076110 1 0.4 lbs.
Battery, Extended Life 10076109 1 1.2 lbs.
Charger, Extended Life 10076107 1 0.4 lbs.
Comfort Belt 10049623 1 0.5 lbs.
10082281 1 1.1 lbs.
Shoulder Strap 10059112 1 1.3 oz.
OptimAir TL PAPR 46
Page 47

US 9 Accessories and Reorder Information
Reorder
Item
Part
Quantity
Number
Hood Lens Cover 10082441 10 0.6 lbs.
Protective Cover for blower
and hose
Protective Cover for blower
and hose, yellow
Protective Cover for blower
and hose, yellow HD
Decon Belt with Cam Buckle 10074725 1 0.4 lbs.
Decon Belt with Side Release Buckle
10075779 5 0.9 lbs.
10087152 5 0.9 lbs.
10091958 5 1.0 lbs.
10078201 1 0.4 lbs.
Ship Weight
(estimated)
Photo
Spark Cover 10068152 1 1.5 lbs.
Hood Suspension 10078469 1 2.0 oz.
Hood Sweatbands 10083618 10 1.4 oz.
Hood Hose Clamps 10083843 6 1.0 oz.
Hose o-ring (Blower end of
hose
10085084 10 0.2 oz.
OptimAir TL PAPR 47
Page 48

US 9 Accessories and Reorder Information
Reorder
Item
Part
Quantity
Number
Cartridge Receptacle Plugs
(2 recommended)
Instruction Manual 10077289 1 0.3 lbs.
10081414 1 0.7 oz.
Ship Weight
(estimated)
Photo
OptimAir TL PAPR 48
Page 49

US 10 Troubleshooting
10 Troubleshooting
Audible alarm – If an alarm sounds, look at the visible battery and flow indicator to determine the potential cause of the alarm.
If the fan LED is flashing red continue troubleshooting in the flow alarm section. If the battery LED is flashing red continue
troubleshooting in the battery alarm section in this manual. It is also possible to differentiate between the two types of alarms
by listening to the frequency of the buzzer. A flow alarm will be a single repeating beep; a battery alarm will beep twice and
repeat.
Flow alarm – A flow alarm is indicated by a single beep that is repeated along with a light illuminating the fan pictogram near
the on/off switch. Potential causes of a flow alarm:
• If cartridges have been in service too long they may be restricted or clogged causing a low flow alarm.
• Check for any potential obstructions that could be blocking the inlet holes of the cartridges (i.e. loose clothing worn by the
user or something in the work area itself.)
• If wearing a hood, inspect the hose-to-hood interface for twisting or kinking of the hood which can restrict air flow. Readjust
the hose connection to eliminate any kinking. Refer to the hood section of this manual for further instructions.
• Inspect the hose to ensure the bayonet connection is fully and properly engaged in the blower housing. A hose that is
partially removed or one that is installed incorrectly will trigger a flow alarm.
Battery alarm - A battery alarm is indicated by a repeating double beep and a flashing red LED on the battery indicator.
Potential causes for a battery alarm are:
• The battery could be drained from normal use and needs to be recharged
• If the battery is draining more quickly than usual it may be old and in need of replacement
• Contaminated contacts on the blower or battery. Inspect pins and pads and clean appropriately
NOTE: Use caution when cleaning the battery contact pads so as not to short circuit the battery.
Difficulty installing the hose in the blower – If it is difficult to install the bayonet end of the hose into the blower unit,
replace the o-ring (reorder P/N 10085084, pack of 10).
Blower unit will not turn on – If the unit does not operate:
• Ensure the battery is fully charged and the contact pins and pads are free from contaminants. The battery charge can be
checked by removing it from the unit and connecting it to the battery charger.
• Press the on/off switch and hold for 1 – 2 seconds.
OptimAir TL PAPR 49
Page 50

US 11 Warranty
11 Warranty
Mine Safety Appliances Company
General Express Warranty and Terms of Sale
(1) Express Warranty - MSA warrants that the product furnished under this order is free from mechanical defects or faulty
workmanship for a period of one (1) year from date of shipment, provided it is maintained and used in accordance with
MSA’s instructions and/or recommendations. This warranty does not apply to expendable or consumable parts whose
normal life expectancy is less than one (1) year such as cartridges. Replacement parts and repairs are warranted for
ninety (90) days from the date of repair of the product or sale of the replacement part, whichever occurs first. MSA shall
be released from all obligations under this warranty in the event repairs or modifications are made by persons other than
its own or authorized service personnel or if the warranty claim results from misuse of the product. No agent, employee or
representative of MSA may bind MSA to any affirmation, representation or modification of the warranty concerning the
goods sold under this contract. THIS WARRANTY IS IN LIEU OF ALL OTHER WARRANTIES, EXPRESS, IMPLIED
OR STATUTORY, AND IS STRICTLY LIMITED TO THE TERMS HEREOF: MSA SPECIFICALLY DISCLAIMS ANY
WARRANTY OF MERCHANTABILITY OR OF FITNESS FOR A PARTICULAR PURPOSE.
(2) Exclusive Remedy - It is expressly agreed that the Purchaser’s sole and exclusive remedy for breach of the above
warranty, for any tortious conduct of MSA, or for any other cause of action, shall be the repair and/or replacement, at
MSA’s option, of any equipment or parts thereof, that after examination by MSA are proven to be defective. Replacement
equipment and/or parts will be provided at no cost to the purchaser, F.O.B. MSA’s plant. Failure of MSA to successfully
repair any non-conforming product shall not cause the remedy established hereby to fail of its essential purpose.
(3) Exclusion of Consequential Damages - Purchaser specifically understands and agrees that under no circumstances
will MSA be liable to Purchaser for economic, special, incidental or consequential damages or losses of any kind
whatsoever, including but not limited to, loss of anticipated profits and any other loss caused by reason of the
nonoperation of the goods. This exclusion is applicable to claims for breach of warranty, tortious conduct or any other
cause of action against MSA.
OptimAir TL PAPR 50
Page 51

US
OptimAir TL PAPR 51
Page 52

US
OptimAir TL PAPR 52
 Loading...