

Mr. Steam 104232RDBN, 104232RDOR, 104232RDBB, 104232RDPB, 104232RDPC Installation Manual
...Page 1

mr.steam
________________________________________________________________________________________________
®
Installation, Operating & Maintenance Instructions
®
AirTempo
Wireless Touch Control with Steamhead
Installation, Operation & Maintenance Manual
®
1
Page 2

mr.steam
________________________________________________________________________________________________
When installing and using this electrical equipment, basic safety precautions should always be followed, including the following:
®
Installation, Operating & Maintenance Instructions
IMPORTANT SAFETY INSTRUCTIONS
1. READ AND FOLLOW ALL INSTRUCTIONS
WARNING
2.
!
of 16 to use this steambath.
WARNING
3. Steam is hot and can cause injury or
!
death if improperly used. Steam rooms contain steam
and elevated temperatures. Please read and observe
all warnings in this manual before installing or using a
steam room.
4. To reduce the risk of injury:
WARNING
!
A. The wet surfaces of steam enclosures may be slippery.
Use care when entering or leaving.
B. The steam head is hot. Do not touch the steamhead and
avoid the steam near the steamhead.
C. Prolonged use of the steam system can raise excessively
the internal human body temperature and impair the
body’s ability to regulate its internal temperature (hyper-
Do not permit children under the age
SAVE THESE INSTRUCTIONS
2
thermia). Limit your use of steam to 10-15
minutes until you are certain of your body’s
reaction.
D. Excessive temperatures have a high potential
for causing fetal damage during the early
months of pregnancy. Pregnant or possibly
pregnant women should consult a physician
regarding correct exposure.
E. Obese persons and persons with a history of
heart disease, low or high blood pressure,
circulatory system problems, or diabetes
should consult a physician before using a
steambath.
F. Persons using medication should consult a
physician before using a steambath since
some medication may induce drowsiness
while other medications may affect heart
rate, blood pressure and circulation
.
HYPERTHERMIA
temperature of the body reaches a level several
degrees above the normal body temperature of
98.6° F. The symptoms of hyperthermia include an
increase in the internal temperature of the body,
dizziness, lethargy, drowsiness, and fainting. The
effects of hyperthermia include:
a) Failure to perceive heat;
b) Failure to recognize the need to exit the steam-
bath;
c) Unawareness of impending risk;
d) Fetal damage in pregnant women;
e) Physical inability to exit the steambath; and
f) Unconsciousness.
The use of alcohol, drugs, or medi-
WARNING
!
cation can greatly increase the risk of hyperthermia.
occurs when the internal
Page 3

mr.steam
________________________________________________________________________________________________
®
Installation, Operating & Maintenance Instructions
READ ME FIRST!
WARNING
As you follow these instructions, you will notice warning and
!
caution symbols. This blocked information is important for the safe and efficient installation and operation of the steambath system. These are types
of potential hazards that may occur during installation and operation:
WARNING
Indicates a potentially hazardous situation, which could
!
result in death or serious injury.
Indicates a potentially hazardous situation, which may result
CAUTION
!
in minor or moderate injury or product damage.
IMPORTANT NOTE: This highlights information that is especially relevant
to a problem-free installation.
All information in these instructions is based on the latest product information available at the time of publication. Sussman-Automatic Corporation
reserves the right to make changes at any time without notice.
Table of Contents:
Important Safety Instructions ...................................2
Before Installing .......................................................4
Dimensional Information .........................................5
Installation ...............................................................6
Surface Mount & Glass Mount........................... 6-7
Wireless Receiver............................................... 7-8
Remote Temperature Probe ............................ 9-11
AirTempo Operating Instructions .................... 12-14
Battery Replacement .............................................15
System Status Codes .............................................16
Pairing, Care & Maintenance, Warranty ................16
Conformity & Compliances ..................................17
FCC Statements ....................................................18
Parts List & Technical Specs ..................................19
Glass Mount Mask ........................................... 20-21
Flush Mount Installation .................................. 22-23
Flush Mount Template ..........................................23
3
Page 4

mr.steam
________________________________________________________________________________________________
Before Installing
Carefully inspect the control and packaging for shipping damage. In the event of
shipping damage, please contact the carrier for claim information. Our customer
service department can assist you with any missing or damaged parts.
CAUTION
!
To avoid unintentional steambath operation, do not locate the
control where other controls, accessories, shower heads, valves, body sprays
or similar within the shower could cause confusion or interfere with the MrSteam
control’s intended use and function.
Do not use any AirTempo
®
iGenie
controls without reading and understanding the respective Installation
and Operation Manual and MrSteam steam generator Installation and Operation
Manual. Failure to read and understand these instructions may result in an
inoperative or hazardous installation.
WARNING
A peel and stick warning sticker is provided in the MrSteam steam
!
generator Installation, Operation and Maintenance Manual. This manual is provided with every steam generator. The warning sticker must be read and perma-
nently afxed in a conspicuous location near the steam room. Failure to read and
afx this warning sticker in a conspicuous location may result in serious injury or
death. Please call MrSteam at 800 767-8326 for a free replacement or if you have
any questions regarding the warning sticker.
Install the AirTempo, iSteam, iTempo or iTempoPlus controls according to installation instructions. Failure to install according to instructions will result in an inoperative control or hazardous overheating or inadequate heating of the steam room. If
an AirTempo, iSteam, iTempo or iTempoPlus control is installed outside the steam
®
Installation Instructions
room a Remote Temperature Probe (PN MSTS) must be installed inside the steam
room per instructions for the Remote Temperature Probe. Failure to install according to
instructions will result in an inoperative control and overheating of the steam room.
Do not route AirTempo, iSteam, iTempoPlus, iTempo, Home Wizard or
!
WARNING
iGenie control wiring inside conduit together with power lines or close to hot water or
steam piping. Doing so may result in an inoperative or hazardous installation.
Do not alter or modify any MrSteam product. Doing so may result in an
WARNING
!
®
, iSteam®, iTempoPlus®, iTempo®, HomeWizard® or
inoperative or hazardous installation and will void the warranty.
IMPORTANT NOTES:
• Turn power to the steam generator OFF before connecting the control to the
generator. Failure to turn the power off will result in an inoperable control.
• Do not operate AirTempo, iTempoPlus, iTempo, Home Wizard or iGenie controls with
anything other than a MrSteam eTempo compatible steam generator. MrSteam residential steam generators with serial numbers lower than 900000, or any other brand
of steam generator are not to be operated with AirTempo, iTempoPlus, iTempo,
Home Wizard or iGenie controls. Doing so may result in an inoperative installation.
• This document contains important safety, operation and maintenance information.
Leave this document with the homeowner. Do not discard this document.
• Discontinue use of the steam generator or control if the steam generator is
damaged or otherwise not functioning properly. Doing so may result in an inoperative or hazardous installation.
• All drawings are for illustrative purposes only.
44
Page 5

mr.steam
________________________________________________________________________________________________
®
Installation Instructions
Dimensional Information for the AirTempo
BOX CONTENTS:
• AirTempo Control
• Decorative Trim
• Cable (3 ft.)
• Wireless Receiver
• Batteries (2)
• Mounting Screws (2)
• Steamhead
• Tube of Silicone Sealant
• Surface Mount Bayonet
• Owner’s Manual
3-5/8”
3-5/8”
(shown with decorative trim)
3/4”
1-5/8”
4-7/8”
Wireless ReceiverAirTempo
Drawings for illustrative purposes only
7/8”
55
Page 6

mr.steam
________________________________________________________________________________________________
®
Installation Instructions
Installation Instructions for AirTempo
STEP 1
Determine the desired installation location of the control. The AirTempo
are designed to be installed inside or outside the steam room as a matter of
personal preference. If the control is installed outside the steam room a Remote
Temperature Probe part number MSTS must be installed inside the steam room.
IMPORTANT NOTE: See installation instructions for the MSTS Temperature
Probe (pgs. 10-12) before rough-in or installation of control.
If the control is installed inside the steam room the control must be located:
• 4-5 feet above the oor near the bather seating area.
• On a vertical wall
The control features an integral temperature sensor. Locate the control in a
location representative of the desired steam bathing temperatures. Do not
locate the control above or near the steam head or direct steam emissions.
Locating the controls near the steamhead or near direct steam emissions may
result in poor steam room temperature control.
The control can be located up to 60 feet from the wireless receiver.
Construction materials affect the communication between the control and
receiver. Test the range of the AirTempo. It may be necessary to change
the location of the wireless receiver to improve the range.
Contact MrSteam technical service for an optional 30 or 60 foot cable.
66
controls
STEP 2
The AirTempo control can be surface or ush
mounted according to personal preference.
Flush mount components are sold separately
(104232RD & 104232SQ). Contact a MrSteam
representative if a ush mount kit is needed,
see page 22.
Surface Mount AirTempo
• Remove the surface mount bayonet from
the back of the AirTempo Control.
• Remove & discard the release paper to
expose the adhesive liner.
• Ensure the mounting surface is clean & dry.
• Place the bayonet on the wall in the desired
location.
IMPORTANT NOTE: Use the screw and anchor provided to secure
the bayonet to the wall as required for rough or uneven wall
surfaces. The surface mount bayonet supports the weight of the
AirTempo control.
Page 7

mr.steam
________________________________________________________________________________________________
Mounting on Glass
When installing AirTempo on glass a peel and stick film is provided on pages
20-21 and may be used as a mask for a clean look from behind the glass.
®
Installation Instructions
Wireless Receiver Installation
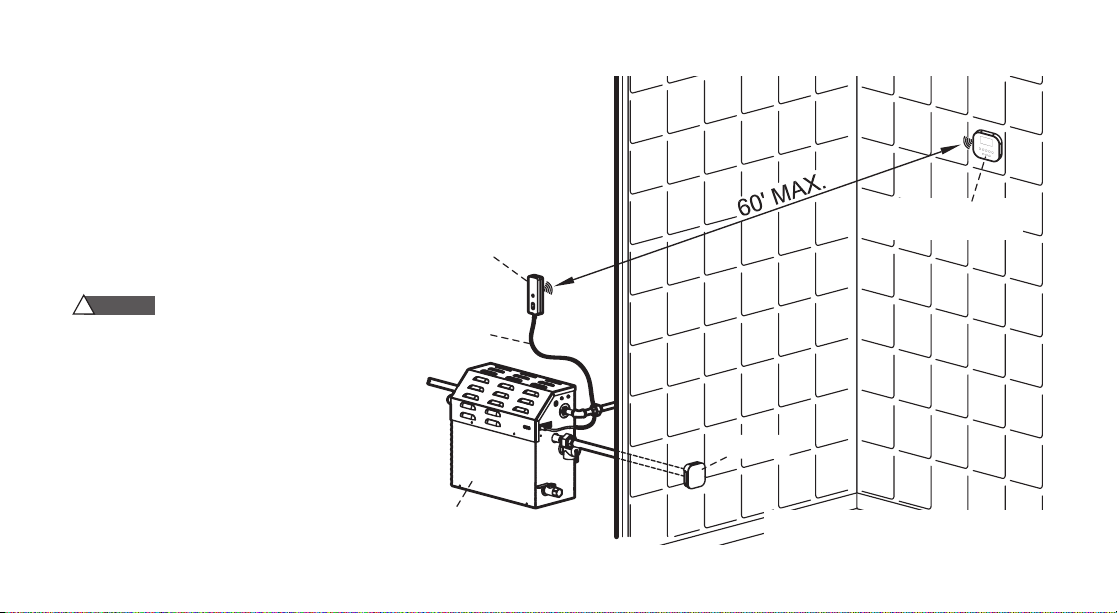
The control can be located up to 60 feet from the
wireless receiver. Construction materials may affect
the communication between the control and the
receiver. Test the range of the AirTempo. It may
be necessary to change the location of the wireless
receiver to improve the range. Contact MrSteam
technical service for an optional 30 or 60 foot cable.
Using the 3 foot cable provided, plug one end into
the steam bath generator and the other end into the
AirTempo.
Attach the dongle on a wall adjacent to the steam
generator using the screw provided.
Steam
Generator
Wireless
Receiver
77
Page 8
mr.steam
________________________________________________________________________________________________
IMPORTANT NOTE: Do not rest the dongle on the
steam generator, the metal case of the generator
may shield the RF signal.
®
Installation Instructions
The control features an integral temperature sensor.
Locate the control in a location representative of the
desired steam bathing temperatures. Do not locate
the control above or near the steam head or direct
steam emissions.
CAUTION
!
To avoid unintentional
steambath operation, do not locate
the control where other controls,
accessories, shower heads, valves,
body sprays or similar within the shower
could cause confusion or interfere with the
MrSteam control’s intended use and function.
8
3 ft. Cable Standard
(optional 30’ or 60’
cable available)
Wireless Receiver
Steam
Generator
AirTempo Control
Surface or Flush Mount
Steam Head
All drawings for illustrative purposes only.
Page 9

mr.steam
________________________________________________________________________________________________
Installing the Remote Temperature Probe
CAUTION
The Remote Temperature Probe is required when the
!
AirTempo control is installed outside the steam room. Failure to install the
probe, or failure to install the probe correctly will result in an inoperable
control and result in excessive temperatures and a hazardous condition.
CAUTION
The Remote Temperature Probe is for use with AirTempo,
!
iTempo and iTempoPlus controls only. Do not use with any other controls.
Do not use any other temperature probe with the AirTempo, iTempo and
iTempoPlus controls. Noncompatible products may result in an inoperative
control and a hazardous condition.
CAUTION
Install the AirTempo controls according to the installation
!
instructions on pages 6-7. Failure to do so may result in an inoperative
control and a hazardous condition.
1. Determine the location of the Remote Temperature Probe:
The Remote Temperature Probe must be installed:
a. On a vertical surface
b. 4-5 feet above the oor
c. in a location representative of the desired steam bathing temperature.
®
Installation, Operating & Maintenance Instructions
(PN: MSTS)
Locating the MSTS near the steamhead or near direct steam
emissions may result in poor steam room temperature control.
d. The probe has an integral 30’ cable. Insure that the probe and/or
steam generator are located accordingly.
2. Drill a 5/16 inch diameter hole in the wall.
Do not oversize or under size the hole. Clean area thoroughly.
NOTE: The silicone supplied by MrSteam can be used to meet a variety of sealing and gasketing. It cures to silicone rubber and adheres
to glass, wood, metal, porcelain, ceramic tile, painted surfaces, many
plastics and rubber. Surfaces must be clean and dry. Apply thin layer
of product. Fit together and support if necessary. Allow excess material to cure, then trim with a sharp blade. Sealant “skins” in 5 minutes,
dries to touch in 1 hour. Fully cures and bonds in 24 hrs.
3. Remove the knock-out from the steam generator jacket as shown in
Diagram 1.
4. Insert the probe cable through the knock-out and connect to the
connector on the steam generator printed circuit board marked EXT
TEMP as shown in Diagram 1.
9
Page 10

mr.steam
________________________________________________________________________________________________
®
Installation Instructions
DIAGRAM 1
Temperature
Probe Connection
Knock-Out
Temperature
Probe Cable
(30 feet)
Mr.Steam Steam Generator
(shown with cover removed
and NOT installed)
Drawings for Illustrative Purposes Only.
10
Temperature
Sensor Probe
Page 11

mr.steam
________________________________________________________________________________________________
5. Route the end of the probe cable with the temperature probe
through the wall into the steam room as shown in Diagram 2.
IMPORTANT NOTE: Do not strain, staple, pinch or otherwise
damage the probe cable.
6. With a minimal length of the cable exposed apply silicone
(provided) to the hole in the wall as required to create a moisture seal as shown in Diagram 2.
7. Push the temperature cable and probe into hole as required to
leave minimum 1/4”, maximum 1/2” of the bulb exposed as
shown.
®
Installation Instructions
WARNING
Insure a minimum of 1/4” of the temperature probe is exposed
!
to the air. Failure to do so may interfere with the ability to sense temperature and may result in excessive steam room temperatures.
The exposed area of the temperature probe must be free of
WARNING
!
silicone or any materials or obstructions that prevent direct exposure to the
steam room air. Failure to do so may interfere with the ability to sense temperature and
NOTE:
ste am roo m
int eri or
may result in excessive steam room temperatures
For Illustrative Purposes Only. Drawings Not to Scale
1
⁄4" minimum
1
maximum
⁄2"
Silicone Sealant
.
Diagram 2
Wall
Sectional View
Cable
Installed Remote Temperature Probe
showing a minimum of 1/4” of the probe
exposed to steam room air
11
Page 12

mr.steam
________________________________________________________________________________________________
®
Installation Instructions
AirTempo Operating Instructions
The AirTempo features programmable temperature
control, programmable time duration, AromaSteam
ON/OFF, ChromaSteam® control and two personal
settings.
The LCD will be OFF until a button is pressed. The
LCD remains lit for 10 seconds after the last button
is pressed. When the steam generator turns OFF
the display will turn on and read OFF. While the
generator is steaming the LED above AROMA and
CHROMA will alternately ash every 2 seconds.
WARNING
!
Set the steam bathing temperature
according to personal preference, however it is
highly recommended to begin steam bathing at a
low temperature setting for a very short duration to
gauge comfort and safety levels.
12
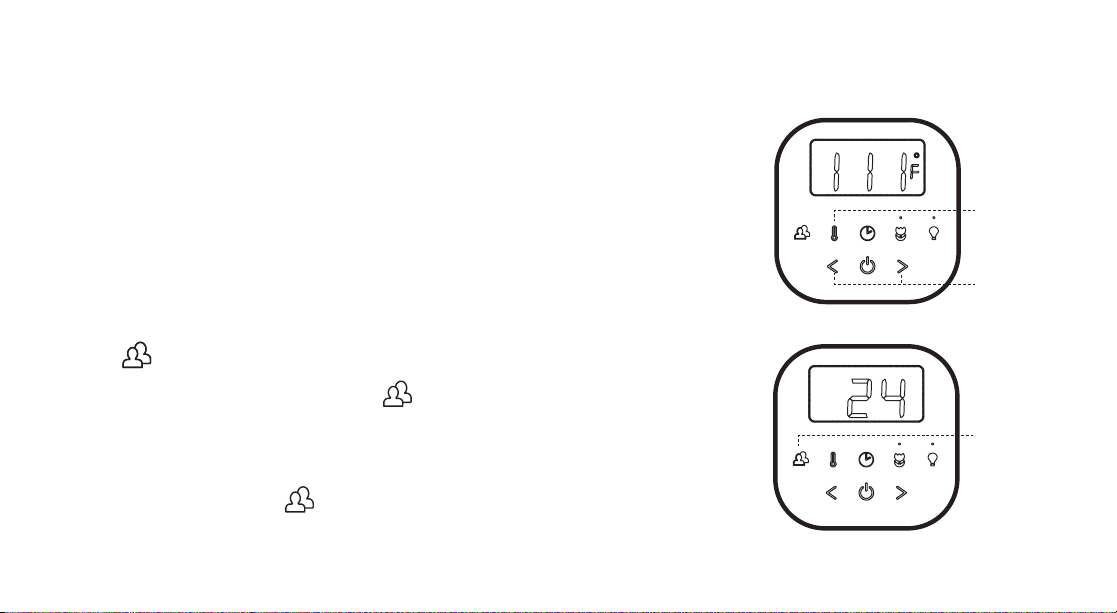
ON/OFF Diagram 1
Press the ON/OFF key for 1 second to start the
ow of steam. The Temperature Set Point is
displayed. Steam will begin to ow a few minutes
after the control is turned ON. The duration required for the steam room to reach steam bathing
temperatures depends on the steam room
construction and steam generator specifications.
To stop the ow of steam before time expires press
the ON/OFF key. Steam may continue to ow
for a short time after the control is turned OFF
SETTING THE STEAMBATH DURATION
Diagram 2
Press TIME key to set or display the steambath
duration time. The control is pre-set and will display
a TIME setting of 20 minutes (default setting).
With the TIME displayed, press the LEFT or RIGHT
arrows to set the desired duration time (2-60
minutes) in two minute increments.
Diagram 1
ON/OFF
Diagram 2
Time
Page 13
mr.steam
________________________________________________________________________________________________
®
Operating Instructions
SETTING THE TEMPERATURE
Diagram 3: Press TEMP key to set the desired temperature or display the temperature setting. The control
is preset and will display a temperature setting of 110˚F (default setting). With the temperature displayed,
press the LEFT or RIGHT arrows to set the desired temperature (80°F to 120°F) in one degree increments.
Set the steam bathing temperature according to personal preference, however it is highly recommended
to begin steam bathing at a low temperature setting to gauge comfort and safety levels.
MEMORY FEATURE
If the control is turned off manually before it times out then the default settings of 20 minutes and 110°F
will be used the next time the control is turned on. If the control times out (not manually turned off) then
the previous user time and temperature settings will be used when the steambath is turned on.
USER PRESETS
Use the key program to store preferred settings.
To program preferred settings:
Press ON/OFF key to turn generator on. Press key once to program PROG1.
Press it twice to program PROG2. The selected setting will be displayed.
Enter the preferred time and temperature settings.
The AirTempo will store the following settings: Set point, Time duration & Aroma state.
To select PROG1 or PROG2:
Press ON/OFF key then press key once to select PROG1, press it twice to select PROG2.
The steambath will operate at the stored settings.
Diagram 4
Diagram 3
Diagram 4
TEMP
Time &
Temperature
adjustment
User Preset
13
Page 14

mr.steam
________________________________________________________________________________________________
®
Operating Instructions
AROMA
CHROMA
14
AROMASTEAM
The AromaSteam is an optional accessory that automatically
injects aromatic oil into the steam. Press the ON/OFF key to
turn the steam generator on. Then, press the AROMA key.
The Aroma indicator will turn ON. The AromaSteam turns off
automatically when the steam generator stops heating. Press
the AROMA key to turn it off during a steam session. The indicator will turn off. To conserve battery life, the indicator will
only be lit when the display is ON.
CHROMASTEAM
The ChromaSteam is an optional accessory that provides
colored light in the steam room. Press the CHROMA key to
turn light on. Press twice to select the next color. Press again
to turn the light off. Note that the light can be turned ON
even if the steam generator is OFF. To conserve battery, the
indicator will only be lit when the display is ON.
TEMP
USING AIRTEMPO AS A REMOTE
The AirTempo can be removed from its holder and used as a remote
control to warm up the steam shower. When AirTempo is returned to its
holder the steam generator will run for the full set duration. After 10 minutes the steam generator turns off if the AirTempo is not returned to its
dock. The steam generator will not restart unless AirTempo is in its dock.
USING iGENIE WITH AIRTEMPO
iGenie will allow the steam generator to warm up the steam room for
10 minutes. To continue the steam bath session press any button on the
AirTempo control. After 10 minutes the steam generator turns off if the
AirTempo is not touched. The steam generator will not restart unless
AirTempo is in its dock.
CHANGING THE TEMPERATURE UNITS
When the generator is ON, press and hold the TEMP key for 10
seconds. The temperature units will toggle to Fahrenheit (F) or
Celsius (C).
(˚F/˚C)
Page 15

mr.steam
________________________________________________________________________________________________
®
Operating Instructions
Battery Replacement
The batteries in AirTempo will need periodic replacement. Both batteries
should be replaced at the same time with new CR2450 coin cell batteries.
WARNING
CHOKE HAZARD. The batteries and battery doors are
!
small pieces, keep out of reach of children.
WARNING
KEEP BATTERIES OUT OF REACH OF CHILDREN.
!
Swallowing may lead to serious injury or death in as little as 2 hours due
to chemical burns and potential perforation of the esophagus. Immediately see a doctor.
Remove the AirTempo from the wall by sliding it up and off the bayonet holder.
The AirTempo comes off the ush mount holder by grasping the bezel and pulling the assembly straight out of the ush mount box.
Use a soft cloth to dry off the control.
With two fingers turn the battery doors in the direction noted. The left battery
cover is opened by turning it clockwise, the right cover is opened by turning it
counterclockwise.
Discard both batteries and replace with new batteries, the positive side of the
battery goes towards the “+” symbol on the battery door.
Replace the battery door and lock in place.
To prevent water from getting in the control, ensure the
CAUTION
!
battery doors are in the locked position before reinstalling control.
Risk of explosion if battery is replaced by an incorrect
CAUTION
!
type. Dispose of used batteries according to the instructions.
Batteries
Battery Doors
15
Page 16

mr.steam
________________________________________________________________________________________________
®
Maintenance Instructions
System Status Codes
The AirTempo may display a status code if the steam system is not
functioning correctly.
CO indicates the AirTempo control has lost communication with the steam
generator. Ensure all connections are secure between the steam generator
and the transceiver
Err P
indicates an error while pairing, reset the control and redo pairing.
A complete list of steam generator status codes can be found in the MrSteam
Residential Steambath Installation Operation and Maintenance Manual.
Pairing
AirTempos are factory paired, however if more than one steam system is
installed in close proximity the AirTempo controls must be paired to their
transceivers to prevent interference.
To pair AirTempo use a blunt object to press the button inside the transceiver
adjacent to the LED. Hold the button for 5 seconds, when the transceiver
is in pairing mode the LED will turn blink blue for 2 minutes.
While the transceiver LED is blinking, press and hold the button on
AirTempo for 5 seconds until the display reads PAIR.
16
Care Tips for AirTempo Controls and Steamheads
1. Use only mild soap and water on a soft cloth to clean
the control and steamhead.
2. Do not use abrasive cleansers
3. If the decorative cover is damaged call MrSteam
technical service for replacement parts.
Warranty
To register your steam generator unit online and to review
the MrSteam Limited Lifetime Warranty please go to:
blog.mrsteam.com/wr
Page 17
mr.steam
________________________________________________________________________________________________
(For European Version)
DECLARATION OF CONFORMITY
Product: MrSteam AirTempo Control
Item Number: AirTempo
Equipment Class: III
AirTempo Control and Wireless Receiver
The objects of the declaration described here are in conformity with the
relevant requirements contained in the European 2014/53/EU Directive.
EN 60950-1:2006 + A11:2009 + A1:2010 + A12:2011 + A2:2013.
ETSI EN 300 220-2 V2.4.1 (2012-05)
EN 301 489-3 V1.6.1 (2013-08)
EN 55032: 2012
EN 55024: 2010
®
Maintenance Instructions
CE COMPLIANCE INFORMATION FOR THE EUROPEAN UNION
INSTRUCTIONS FOR DISPOSAL OF WASTE EQUIPMENT
BY PRIVATE USERS IN THE EUROPEAN UNION:
This symbol on the product or its packaging indicates this product
must not be disposed of with other household waste. Instead, it
is the user’s responsibility to dispose of their waste equipment by
handing it over to a designated collection point for the recycling of
waste electrical and electronic equipment. The separate collection
help to conserve natural resources and ensure that it is recycled in a manner that
protects human health and the environment. For more information about where
you can drop off your waste equipment for recycling, please contact your local
city office, your household waste disposal service or location where you purchased the product.
and recycling of your waste equipment at the time of disposal will
Product name: AirTempo Mr.Steam
Product Type: AirTempo 43-20 34th Street
Brand: MrSteam Long Island City, NY 11101
17
Page 18

mr.steam
________________________________________________________________________________________________
®
Maintenance Instructions
(For North American Version)
FCC/Industry Canada Two Part Statement:
This device complies with FCC Part 15 and Industry Canada license exempt
RSS standard(s). Operation is subject to the following two conditions: (1) this
device may not cause interference, and (2) this device must accept any interference, including interference that may cause undesired operation of the device.
Le présent appareil est conforme aux CNR d’Industrie Canada applicables
aux appareils radio exempts de licence. L’exploitation est autorisée aux deux
conditions suivantes: (1) l’appareil ne doit pas produire de brouillage, et (2)
l’utilisateur de l’appareil doit accepter tout brouillage radioélectrique subi,
même si le brouillage est susceptible d’en compromettre le fonctionnement.
Per Industry Canada RSS rules:
This device complies with Health Canada’s Safety Code. The installer of this
device should ensure that RF radiation is not emitted in excess of the Health
Canada’s requirement.
Cet appareil est conforme avec Santé Canada Code de sécurité 6. Le programme d’installation de cet appareil doit s’assurer que les rayonnements RF
n’est pas émis au-delà de I’exigence de Santé Canada.
Changes or modifications not expressly approved by the party responsible for
compliance could void the user’s authority to operate the equipment.
Les changements ou modifications non expressément approuvés par la partie
responsable de la conformité pourraient annuler l’autorité de l’utilisateur à
utiliser cet équipement.
18
NOTE: This equipment has been tested and found to comply with the limits
for a Class B digital device, pursuant to part 15 of the FCC Rules. These limits
are designed to provide reasonable protection against harmful interference in a
residential installation. This equipment generates, uses and can radiate radio frequency energy and, if not installed and used in accordance with the instructions,
may cause harmful interference to radio communications. However, there is no
guarantee that interference will not occur in a particular installation. If this equipment does cause harmful interference to radio or television reception, which can
be determined by turning the equipment off and on, the user is encouraged to
try to correct the interference by one or more of the following measures:
• Reorient or relocate the receiving antenna.
• Increase the separation between the equipment and receiver.
• Connect the equipment into an outlet on a circuit different from
that to which the receiver is connected.
• Consult the dealer or an experienced radio/TV technician for help.
This Class B digital apparatus complies with Canadian ICES-003.
Cet appareil numérique de la classe B est conforme à la norme NMB-003 du
Canada.
Page 19

mr.steam
________________________________________________________________________________________________
Parts List:
Item # Description Used on
104208BK Electronic Assembly Black All
104208WH Electronic Assembly White All
104209 Retention Ring Flush Mount
(AirTempo Flush)
104210 Flush Mount Box Flush Mount
(AirTempo Flush)
104211 Surface Mount Holder Surface Mount
104212 Wireless Receiver All
104213XX Round Beze
(AirTempo Flush)
104214XX Square Bezel Flush mount
104215XX Surface Bezel Surface mount
104220 AirTempo Cable All
®
Maintenance Instructions
Technical Specifications:
Wireless Receiver Unit
Temperature operating -20 C ~ +50 C
Temperature storage -40 C ~ +85 C
Humidity 90%RH non-condensing
Usage type Indoor
Dimensions 41.5 x 117.5 x 22.5 mm (1.625 x 4.875 x 0.875 in.)
Operating frequencies 865 ~ 868 MHz (European Version)
910 ~ 920 MHz (North American Version)
(AirTempo Surface)
l Flush mount
(AirTempo Surface)
(specify finish)
(specify finish)
(specify finish)
Operating voltage 5.0 V
AirTempo Control Unit
Temperature operating -20 C ~ +60 C
Temperature storage -30 C ~ +60 C
Humidity 100%RH condensing (
IP Rating IPX5
Usage type Indoor
Dimensions 90.0 x 90.0 x 19.0 mm
(3.625 x 3.625 x 0.75 in. )
Operating frequencies
910 ~ 920 MHz (North American Version)
Operating voltage 3.0 V
Battery Type CR2450 Primary Manganese Dioxide Lithium Batteries
(
provided by Steam Generator Unit
(limited by battery & LCD
external surface only
(
without decorative bezel)
865 ~ 868 MHz (European Version)
(replace only with battery UL1642 approved
)
)
)
)
19
Page 20

Glass Mount Mask
20
Page 21

Glass Mount Mask
21
Page 22

mr.steam
________________________________________________________________________________________________
®
Installation Instructions
Flush Mount AirTempo
IMPORTANT NOTE: Flush mount components are sold separately (104232RD
& 104232SQ). Contact a MrSteam representative if a ush mount kit is needed.
• Remove the surface mount bayonet from the back of the AirTempo control.
The surface mount bayonet is not used when ush mounting. The surface
mount decorative bezel is not used when ush mounting.
• Using the template provided on page 23, cut the hole in the desired location.
Do not oversize or undersize the cutout. Ensure the template
is level before cutting the hole.
• Test t the ush mount box to ensure the hole is the correct size.
• Ensure the mounting surface is clean and dry
• Apply a thin bead of silicone in the location shown as required to create a
moisture seal. Remove and discard the release paper to expose the adhesive
liner.
NOTE: The silicone supplied by MrSteam can be used for sealing and
gasketing. It cures to silicone rubber and adheres to glass, wood, metal,
porcelain, ceramic tile, painted surfaces, many plastics and rubber. Surfaces
must be clean and dry. Apply thin layer of product. Fit together and support if
necessary. Allow excess material to cure, then trim with a sharp blade. Sealant
“skins” in 5 minutes, dries to touch in 1 hour. Fully cures and bonds in 24 hrs.
22
IMPORTANT NOTE: Do not apply excessive amounts of
silicone. Do not apply silicone to any other parts of the control
including the adhesive gasket. Place the ush mount box into
the hole.
IMPORTANT NOTE: The magnet in the ush mount box
should be orientated at the bottom of the box when installed.
Magnet
Page 23
mr.steam
________________________________________________________________________________________________
®
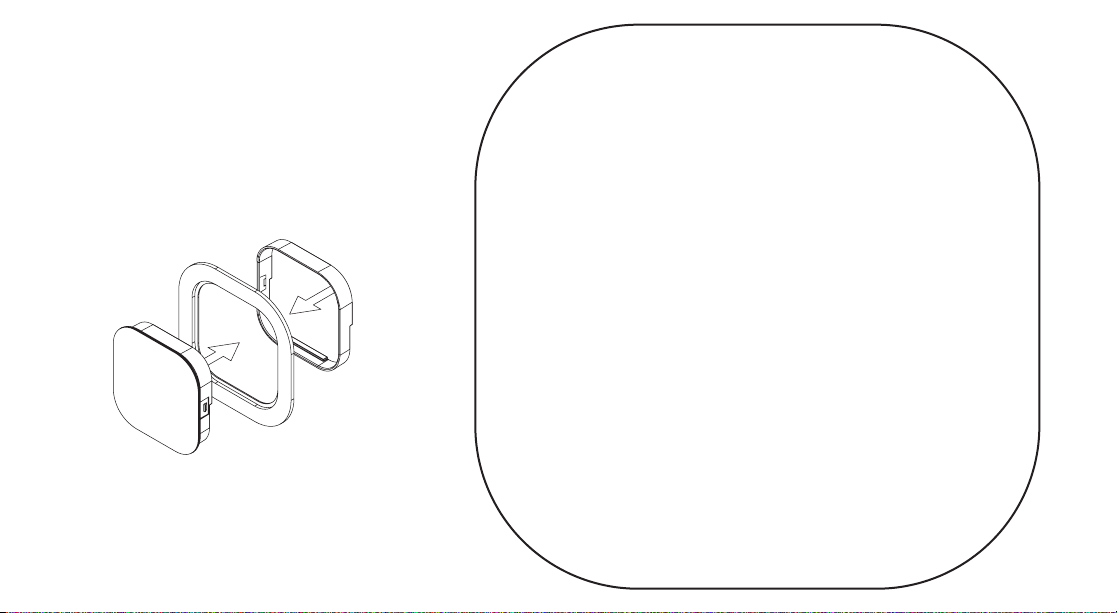
Place the electronic assembly into the decorative
bezel as shown. The retention ring snaps onto the
assembly from behind. The 3 piece assembly can then
be placed into the ush mount box. There is a magnet
in the box that will hold the control in place.
Template
For Flush Mount Kit Installation
23
Page 24

www.mrsteam.com
For more information call Sales & Support at: 1.800.76.STEAM
Products, information and specifications are subject to change without notice.
(East Coast)
mr.steam
43-20 34th Street, Long island City NY 11101 9410 S. La Cienega Blvd., Inglewood CA 90301
800 767 8326 fa x: 718 472 3256 800 727 8326 fax: 310 216 2944
Sussman-Automatic Corporation® [email protected] www.mrsteam.com
1.800.72.STEAM
(West Coast)
PN 100503 rev 10.16
 Loading...