


User’s Guide
Version 1.0
April 2002
Page 1 Rev. 00.AJ FoolProof Instructions

Table of Contents
What Is FoolProof™?...........................................................................................4
Getting Started.....................................................................................................7
Installing the Batteries ..................................................................................8
Operating the Base Unit .............................................................................10
Remote Setup/Add Remote........................................................................13
Setting the Alarms.......................................................................................16
Setting an Individual Remote’s Alarm Settings...................................18
Turning Alarms Off......................................................................................20
Setting the Time and Date..........................................................................21
FoolProof Settings and Functions .....................................................................23
Remote Settings .........................................................................................24
Alarm Settings .....................................................................................24
General Settings: Priority Setting .......................................................25
Disable/Enable Remote.......................................................................26
Rename Remote..................................................................................28
Delete Remote.....................................................................................30
Transferring a Remote to a New Base Unit ........................................31
Alarms Log..................................................................................................32
Types of Alarms...................................................................................33
Setup Functions..........................................................................................34
Suspend...............................................................................................34
Reactivating Suspended Systems.......................................................35
Default Alarm Setup.............................................................................36
Adjust Contrast ....................................................................................39
Set Time/Date......................................................................................40
Accessing the Secure Menu................................................................41
Shutdown.............................................................................................43
Restarting After Shutdown...................................................................43
Set Owner’s Name...............................................................................45
Set Password.......................................................................................47
Time Settings.......................................................................................49
Date Settings .......................................................................................50
Set Language ......................................................................................51
FoolProof Instructions Rev. 00.AJ Page 2

Troubleshooting .................................................................................................52
Forgotten Passwords..................................................................................53
Changing Batteries .....................................................................................54
Saving the Time and Date When Changing Batteries ...............................55
Optimizing Battery Life................................................................................56
Airplane Travel and FoolProof....................................................................57
Using a Remote to Alert a Base Unit..........................................................58
Accessories for FoolProof..................................................................................59
Technical Assistance...........................................................................60
Returning Product..............................................................................................61
Page 3 Rev. 00.AJ FoolProof Instructions

What Is FoolProof™?
FoolProof is a monitoring device that will watch your valued
programmed and the user activates remotes, the FoolProof
personal property 24 hours a day, while continually
performing system checks to ensure continuous reliability.
It is able to communicate with multiple remote devices that
are attached to objects that are in your proximity or
possession. This device allows you to manage objects
according to your desired parameters.
The FoolProof device is user programmable (distances,
alarm settings, object titles etc.) and may be set according
to your individual specifications. Once the base unit is
Security System serves as a small network.
If you should walk away from any or all of the remote units
(outside of the distance zones you specify) or if a remote
unit leaves the specified distance zone, you may be
notified discreetly by a vibration. If you do not respond to
the vibration, the device may attempt to notify you again by
audible alarm (user selectable).
Once the alarm is activated (visual, vibration, or sound),
the LCD screen will display which personal item is in an
alarm state.
FoolProof Instructions Rev. 00.AJ Page 4

Each remote unit contains unique identification information
and will be identifiable only by its own master unit, thus
ensuring that a FoolProof device used by someone else
will not interfere with your FoolProof device.
Page 5 Rev. 00.AJ FoolProof Instructions

How Does FoolProof Work?
The FoolProof Personal Security System is comprised of a
base unit and remote units.
The base unit manages the security system. The remote
units are placed on personal items that are to be
monitored. Data is transmitted and received by both units.
FoolProof continuously monitors signal and system
integrity including battery levels. Parameters that meet
your specifications are entered into the base unit. If these
preset parameters are compromised in any way, the
system will go into alarm state. Once the base unit is in
alarm state, it will notify the user by preset alarm modes
(visual, vibration, or sound).
FoolProof Instructions Rev. 00.AJ Page 6

Getting Started
Before using your new FoolProof Security System, you
should complete the following steps.
1. Install the batteries. See page #8.
2. Set up the remote(s). See page #13.
3. Set up the alarm zones. See page #16.
4. Set the time and date. See page #21.
You should also consider setting a password to provide an
extra level of protection. See page #47.
Page 7 Rev. 00.AJ FoolProof Instructions

Installing the Batteries
Before using the FoolProof Security System, you must
install the included batteries.
You will need a small Phillips screwdriver.
Base Unit:
Install two AAA size batteries in the back of the base unit.
Open the battery compartment by pressing down on the
battery cover tab and pulling forward.
FoolProof Instructions Rev. 00.AJ Page 8
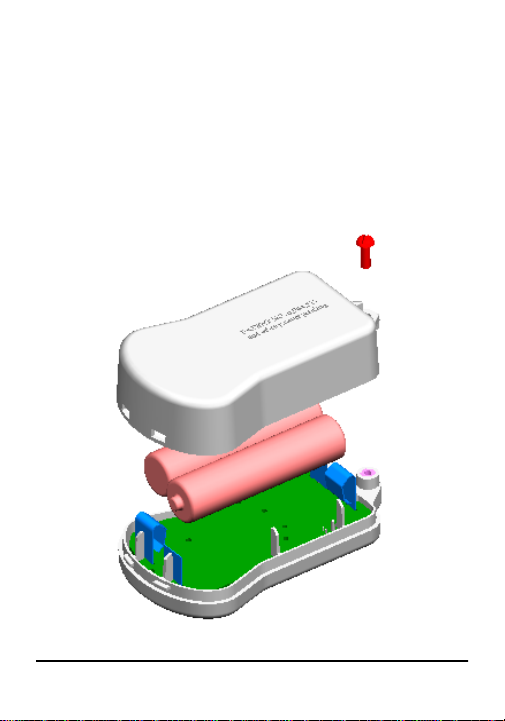
Remote Unit:
Open the unit by unscrewing the small screw located at the
small end of the unit with a Phillips screwdriver. Carefully
insert two AAA batteries in the appropriate directions as
shown below with the + (positive) side of the battery facing
in the same direction as the positive symbol (+) printed on
the green circuit board inside the remote unit.
Page 9 Rev. 00.AJ FoolProof Instructions

Operating the Base Unit
test process. You will hear it beep
Turning the base unit on. Simply insert the batteries and
the base unit will turn itself on.
Each time the base unit is powered on, it will go through a
system check and a selfand the vibrator motor will self-test.
The first screen you will see is the MRSI logo splash
screen. To continue, press any button.
NOTE: The display (not the unit itself) will turn off two
minutes after you last pressed a button on the keypad.
This allows the unit to save battery power. However, the
unit will continue to track the remotes, unless you have
disabled the remotes or shut down the remotes and the
base unit. To view the display again, simply press any
button.
Turning the base unit off or suspending the base unit.
To turn the base unit off, you can simply remove the
batteries or use the Shutdown function. Use the SETUP
menu to access the shutdown and the suspension
functions. See the Setup Functions section on page #34
for instructions.
FoolProof Instructions Rev. 00.AJ Page 10

Buttons. There are six buttons on a FoolProof device.
The ENT button functions much like the Enter key on a
computer keyboard. Pressing ENT selects highlighted
items and processes those functions and displays the next
menu in a sequence.
The CLR button performs clearing functions such as
backspacing or causing the device to display a previous
menu or function.
Four directional buttons lie between the CLR and ENT
buttons. These buttons are used for navigation and
changing options.
… (LEFT button)
† (RIGHT button)
‡ (UP button)
ˆ (DOWN button)
Page 11 Rev. 00.AJ FoolProof Instructions

Operating the Remote Units
communication between the base unit and the remote unit.
. Press the button on the remote
Each remote unit has one button. Pressing the button will
send a signal to the base unit.
After using the SHUTDOWN function on the base unit, you
must press the button on the remote unit to re-establish
The SHUTDOWN function stops the remote units from
sending signals to the base unit. Pressing the button on
the remote unit restores communication between the
remote unit and the base unit.
After using the SUSPEND function on the base unit, it is
not necessary to press the button on the remote unit within
24 hours to re-establish communication with the base unit.
However, pressing the button will re-establish
communication more quickly. It is necessary to press the
remote button to re-establish communication with the base
unit if the remote unit has been suspended for more than
24 hours.
Locating a lost base unit
unit briefly and then release it. Within a couple of seconds,
the base unit alarm will sound several times. (If you can't
find the base unit before its alarm stops, repeat the
procedure.)
FoolProof Instructions Rev. 00.AJ Page 12

Remote Setup/Add Remote
Using the base unit, press the UP button until the
To begin using the FoolProof Security System, you will
need to set up the remotes.
1. Make sure batteries have been installed in both
units before continuing.
2.
word MENU is highlighted.
3. Press the ENT button.
4. Press the RIGHT button twice to get to the
SETUP tab.
5. Select the ADD REMOTE on the menu by
pressing the down button two times and then
pressing the ENT button.
6. A screen will appear indicating that it is listening
for a new remote.
7. Set the remote unit close to the base unit (within
six inches) and press the button on the remote
unit for at least five (5) seconds. This will send a
signal to the base unit, and the base unit will add
the remote to its list of remotes.
8. A screen will appear telling you that a new
remote has been detected.
Note: New remotes are added with a LOW
PRIORITY setting. To have your FoolProof
Security System track items more closely, you
Page 13 Rev. 00.AJ FoolProof Instructions

will need to change the remotes to a HIGH
by pressing the ENT
.
PRIORITY setting. See page #25 for
instructions.
You can monitor a maximum of 25 remotes with
one base station, with a maximum of 20 remotes
at a LOW PRIORITY setting and 5 remotes with
a HIGH PRIORITY setting.
9. Press any key to go to the REMOTE tab screen
to customize the options for this new remote.
10. The following are instructions to rename the
remote.
11. The REMOTE tab should be selected with the
text “MENU FOR” and the current remote name.
12. Press the DOWN button 3 times.
13. Choose RENAME REMOTE
button.
14. At the RENAME [remote name] TO: prompt,
press the UP or DOWN button to scroll through
the list of preset names for remotes. To give a
remote a custom name, select CUSTOM NAME
See the Rename Remote section on page #26
for instructions on entering a custom name. To
select a preset name for your remote, highlight
the name you have chosen and press the ENT
button.
15. Press CLR to return to the list of remotes.
Continue naming any additional remote units.
FoolProof Instructions Rev. 00.AJ Page 14
16. Press CLR to return to the Main Menu.
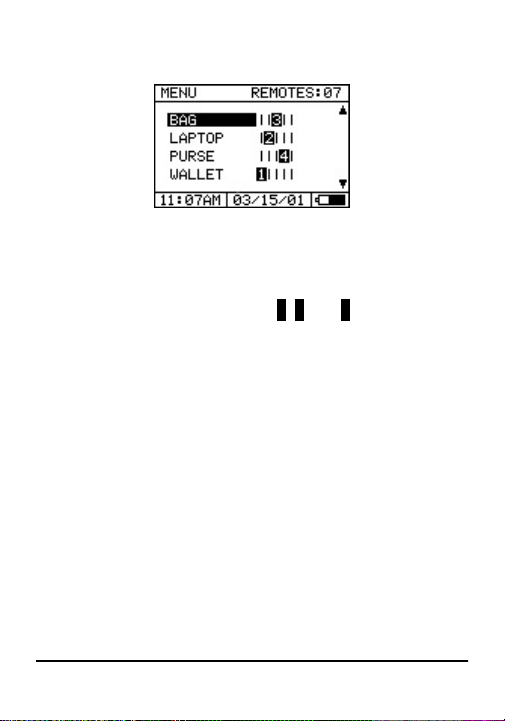
Figure 1. The Main Menu.
The Main Menu displays each remote in your own
FoolProof Security System. The 1, 2,and 3, have
reference to the zone where the remotes currently are in
relation to their distance from the base unit.
Page 15 Rev. 00.AJ FoolProof Instructions

Setting the Alarms
unit display screen when a remote travels outside
remote travels outside the associated alarm zone
You can leave the alarm settings at the factory default
levels or change them to meet your preferences.
There are three alarm types for the FoolProof Security
System.
• Silent: An exclamation mark will appear in front
of the alarm name on the main menu of the base
the specified alarm zone range. For example, if
your car keys leave the alarm zone range, you
will see !CAR KEYS displayed.
• Vibrate: The base unit will vibrate when a
range. An alarm screen will appear at the same
time to warn you visually that a remote has left
the alarm zone.
• Audible: An audible alarm will sound from the
base unit when a remote travels outside the
associated alarm zone range. An alarm screen
will appear at the same time to warn you visually
that a remote has left the alarm zone.
FoolProof Instructions Rev. 00.AJ Page 16

You can also select a combination of alarm types.
: The base unit will vibrate when
seconds later, the base unit will sound an audible
e, you may set a distance range. The
• Vibrate/Audible
a remote leave the alarm zone and then, 30
alarm. The alarm screen will appear each time
an audible or vibration alarm is activated.
• Audible/Vibrate: The base unit will sound an
alarm when a remote leave the alarm zone and
then, 30 seconds later, the base unit will vibrate.
The alarm screen will appear each time an
audible or vibration alarm is activated.
Under each alarm typ
distance ranges are defined as follows:
• Default: This setting uses the default settings
found under the SETUP menu.
• Zone 01: The distance range for this setting is
approximately 10-20 feet. If you choose this
zone, an alarm will be activated (either silent,
vibrate, or audible depending on the alarm type
setting) after a remote goes beyond this distance
from the base unit.
• Zone 02: The distance range for this setting is
approximately 30-50 feet. If you choose this
zone, an alarm will be activated (either silent,
vibrate, or audible depending on the alarm type
Page 17 Rev. 00.AJ FoolProof Instructions

setting) after a remote goes beyond this distance
If you want to set an individual remote’s alarm settings, use
from the base unit.
• Zone 03: The distance range for this setting is
approximately 60-80 feet. If you choose this
zone, an alarm will be activated (either silent,
vibrate, or audible depending on the alarm type
setting) after a remote goes beyond this distance
from the base unit.
Setting an Individual Remote’s Alarm Settings
It is recommended that you use the default alarm settings
found under the Setup menu. Using the default settings
will cause each remote to react to an alarm state in a
consistent manner.
the following steps.
1. From the Main Menu, press the UP button or the
DOWN button until the desired remote is
highlighted.
2. Press the ENT button to select the remote.
3. The remote menu is displayed with ALARM
SETTINGS highlighted. Press ENT.
4. The first time you access the alarm settings, the
display will read DEFAULT. This setting means
that the alarm setting uses the default alarm
FoolProof Instructions Rev. 00.AJ Page 18

settings found under the SETUP tab. Using the
To create a custom alarm setting for an individual
DEFAULT setting is recommended in order to
keep all remotes using the alarm settings
consistently. However, you may set custom
alarm settings for individual remotes.
5.
remote, press the RIGHT button to select
CUSTOM. (To change the setting back to
DEFAULT, press the LEFT button.)
6. Change the custom alarm type by pressing the
DOWN button. Use the RIGHT and LEFT
buttons to select an alarm type. Choose from
SILENT, VIBRATE, AUDIBLE,
VIBRATE/AUDIBLE, or AUDIBLE/VIBRATE.
7. Press the DOWN button again to set the alarm
zone. Use the RIGHT and LEFT buttons to
select a zone. Choose from Zone 01, 02, or 03.
8. Press ENT to save the changes.
9. Press CLR to return to the Remote Menu.
Page 19 Rev. 00.AJ FoolProof Instructions

Turning Alarms Off
If a remote unit moves beyond the distance zones specified
mote’s alarm settings (see previous section)
on the base unit, an alarm will be activated. If the alarm is
an audible or vibration alarm, an alarm message will
appear on the base unit’s screen. To clear alarm
messages, simply press any button.
Figure 2. Alarm warning screen.
If you do not want to hear an audible alarm, change either
an individual re
or the default alarm settings under the Setup tab.
When a remote’s batteries are low on power, an audible
alarm will sound once and place a battery icon next to the
remote’s name on the main screen. When the battery on
the remote is dead, then the remote will go into zone alarm
state.
If the base unit’s batteries are low on power, the unit will
beep once every minute to notify you of low battery power.
FoolProof Instructions Rev. 00.AJ Page 20

Setting the Time and Date
At the TIME: prompt, the hour will be highlighted.
Press the RIGHT button to highlight the minutes.
month. Press the UP or DOWN button to change
As part of the initial setup of your FoolProof Security
System, you should set the time and date.
1. From the Main Menu, press the UP button to
highlight MENU.
2. Press the ENT button to continue.
3. Press the RIGHT button two (2) times to select
the SETUP tab.
4. Press the DOWN button four (4) times to
highlight SET TIME/DATE and press ENT.
5.
Press the UP or DOWN button to change the
hour.
6.
Press the UP or DOWN button to change the
minutes.
7. Press the RIGHT button again to highlight
AM/PM. Press the UP or DOWN button to
change.
8. Press the RIGHT button again to highlight the
the month.
9. Press the RIGHT button again to highlight the
day of month. Press the UP or DOWN button to
change the day of month.
Page 21 Rev. 00.AJ FoolProof Instructions

10. Press the RIGHT button again to highlight the
year. Press the UP or DOWN button to change
the year.
11. Press the ENT button to save the time and date.
12. Press CLR to return to the Main Menu.
FoolProof Instructions Rev. 00.AJ Page 22

FoolProof Settings and Functions
1. Remote Settings
2. Alarms Log
3. Setup Functions
Page 23 Rev. 00.AJ FoolProof Instructions

Remote Settings
on page
To change the settings for individual remotes, select the
desired remote from the Main Menu by highlighting the
remote’s name and pressing the ENT button.
Alarm Settings
See Setting an Individual Remote’s Alarm Settings
#18 for instructions.
Figure 3. Remote Settings Menu.
FoolProof Instructions Rev. 00.AJ Page 24

General Settings: Priority Setting
Remotes can be set with HIGH or LOW priority. High
Priority means that the base unit tries to communicate with
the remote once every six seconds to check its location.
Low priority means that the base unit sends a signal to
communicate with the remote once every 30 seconds.
High Priority uses more of a remote’s battery power, and
Low Priority uses less of a remote’s battery power. The
base unit’s battery life is not affected by changing the
Priority Setting.
To change the Priority Setting, follow the instructions
below.
1. From the Main Menu, use the UP or DOWN
button to highlight a remote.
2. Press the ENT button to select the remote.
3. Press the DOWN button once to select
GENERAL SETTINGS.
4. Press the ENT button.
5. To change the PRIORITY, press the RIGHT or
LEFT button to highlight HIGH or LOW.
6. Press the ENT button to save.
7. Press CLR to return to the Main Menu.
Page 25 Rev. 00.AJ FoolProof Instructions

Disable/Enable Remote
If you do not want to track a remote for a period of time,
you can disable that remote. The remote will not be
tracked while it is disabled. Disabling a remote will not
turn off the remote. However, the remote will shut itself
down if it remains disabled for more than 24 hours. After
24 hours, you will need to press the button on the remote
to re-establish communication between the remote and the
base unit.
Use the following steps to disable a remote:
1. From the Main Menu, use the UP or DOWN
button to highlight a remote.
2. Press the ENT button to select the remote.
3. Press the DOWN button two (2) times to select
DISABLE REMOTE.
4. Press ENT to disable the selected remote.
5. Confirm that you want to disable a remote at the
confirmation screen by pressing the LEFT button
to highlight OK and then pressing the ENT
button, or press the ENT button to select
CANCEL if you do not want to disable the
remote.
6. Press CLR to return to the Main Menu.
FoolProof Instructions Rev. 00.AJ Page 26

Use the following steps to enable a remote:
1. From the Main Menu, use the UP or DOWN
button to highlight a remote.
2. Press the ENT button to select the remote.
3. Press the DOWN button two (2) times to select
ENABLE REMOTE.
4. Press ENT to enable the selected remote.
5. Press CLR to return to the Main Menu.
Page 27 Rev. 00.AJ FoolProof Instructions

Rename Remote
To give a remote a different name, use the following steps.
1. From the Main Menu, use the UP or DOWN
button to highlight a remote.
2. Press the ENT button to select the remote.
3. Press the DOWN button three (3) times to select
RENAME REMOTE.
4. At the RENAME [remote name] TO: prompt,
press the UP or DOWN button to scroll through
the list of preset names for remotes. To select a
preset name for your remote, highlight the name
you have chosen and press the ENT button.
a. To give a remote a custom name,
select CUSTOM NAME.
b. FoolProof’s virtual keyboard will
appear.
c. Use the RIGHT, LEFT, UP, or DOWN
button to select letters (or numbers).
When a desired letter (or number) is
highlighted, press ENT.
d. To delete a letter (or number), press
the CLR button or highlight t and
press ENT.
e. To add a space in the remote name,
highlight SPC and press ENT.
FoolProof Instructions Rev. 00.AJ Page 28

f. Continue selecting letters until you
have a complete name. You can
provide a name with a maximum of ten
characters.
g. To cancel the remote name change,
press CLR.
h. To save the remote name change,
press the LEFT button until DONE is
highlighted and press ENT or use the
arrow buttons to highlight 8 and press
ENT.
5. Press CLR to return to the Main Menu.
Page 29 Rev. 00.AJ FoolProof Instructions

Delete Remote
If you do not want the base unit to track a remote any
longer (for example, the remote unit gets lost or you want
to transfer a remote from one base to another base), you
can delete the remote.
1. From the Main Menu, use the UP and DOWN
buttons to highlight a remote.
2. Press the ENT button to select the remote.
3. Press the DOWN button four times to select
DELETE REMOTE.
4. Press the ENT button.
5. At the confirmation screen, press ENT to cancel
the Delete Remote action or press the LEFT
button to highlight OK and press ENT to delete
the remote.
6. Press CLR to return to the Main Menu.
Note: To reacquire a deleted remote, use the Add Remote
instructions on page #36.
Note: If the remote is lost or the base unit cannot detect
the remote, you will be prompted with a message:
“Communication with remote failed, press ENT to delete
remote.” Press ENT if your remote is lost. If you are
transferring the remote to another base unit, press CLR
and repeat the process, making sure the remote is close to
the original base unit.
FoolProof Instructions Rev. 00.AJ Page 30

Transferring a Remote to a New Base Unit
You can have existing remotes in your FoolProof system
transferred to a different or a new base unit.
To transfer a remote, you must use the Delete Remote
function to delete the remote from the existing base unit.
See the previous page for instructions. Use the Add
Remote function to add the remote to a different base unit.
Note: If the base unit cannot detect the remote, you will be
prompted with a message: “Communication with remote
failed, press ENT to delete remote.” Press CLR to cancel
the delete action and repeat the process, making sure the
remote is close to the original base unit the base unit can
detect the remote. If you delete the remote without the
base unit detecting the remote, you will not be able to add
it to another base unit. You will only be able to add it back
to the original base unit.
Page 31 Rev. 00.AJ FoolProof Instructions

Alarms Log
Use the UP or DOWN button to scroll through the
Your FoolProof Security System maintains a log of alarm
events for each remote. Use the following steps to view
the alarms log.
1. From the Main Menu, press the UP button to
highlight MENU.
2. Press the ENT button to continue.
3. Press the RIGHT button once to select the
ALARMS tab.
4. The ALARMS LOG appears with the date of the
alarm and the name of the remote that
experienced the alarm.
5.
list of alarms.
6. Highlight an alarm event and press ENT to view
the alarm details.
7. The remote name, alarm date, alarm time, and
type of alarm are listed.
8. Press CLR two (2) times to return to the Main
Menu.
FoolProof Instructions Rev. 00.AJ Page 32

Types of Alarms
Type Description
LOW BATTERY The battery in the remote unit is
low on power. Replace the
battery to stop this alarm.
LIMIT EXCEEDED The remote has moved outside
the alarm zone. The base unit
may or may not be able to
communicate with the remote.
Page 33 Rev. 00.AJ FoolProof Instructions

Setup Functions
Suspend
To temporarily stop communication between the base unit
and all remotes, you can put your FoolProof Security
System into suspend mode. This action will temporarily
stop the base unit and all remotes until you re-activate the
system. Suspending remotes does not turn them off.
Warning: The base unit will not respond if a remote
leaves an alarm zone while the system is suspended.
To reactivate remotes suspended for more than 24 hours,
you must press the button on each remote to re-establish
communication between the base unit and the remotes.
Use the following steps to suspend your system.
1. From the Main Menu, press the UP button to
highlight MENU.
2. Press the ENT button to continue.
3. Press the RIGHT button two (2) times to select
the SETUP tab.
4. Press the ENT button to select SUSPEND.
5. A confirmation screen appears to confirm the
system suspension. Press ENT to CANCEL the
suspension action or press the LEFT button to
FoolProof Instructions Rev. 00.AJ Page 34

select OK and press ENT to put the system in
suspension.
6. The base unit screen will go blank and the
system will be suspended.
Reactivating Suspended Systems
You can quickly reactivate your FoolProof system after
putting it in the Suspend mode.
1. To reactivate the system after suspending it,
simply press any button on the base unit.
2. You will be asked to confirm the reactivation of
your system. Select OK and press ENT to
reactivate the system.
Note: All system settings will remain as previously set.
Page 35 Rev. 00.AJ FoolProof Instructions

Default Alarm Setup
These settings will change how the base unit will respond
to an alarm event for all remotes using the default alarm
settings. The default alarm settings will be used for all
remotes, unless you have set individual remotes to use
custom alarm settings.
For example, if you set the default settings to be VIBRATE
and Zone 02 and all remotes are set to use the default
settings, your base unit will vibrate when any of your
remotes is farther than 30-50 feet (Zone 02) away from
your base unit.
Use the following steps to change the default alarm
settings.
1. From the Main Menu, press the UP button to
highlight MENU.
2. Press the ENT button to continue.
3. Press the RIGHT button two (2) times to select
the SETUP tab.
4. Press the DOWN button once to select the
DEFAULT ALARM SETUP option.
5. Press the ENT button.
6. Select an alarm type by pressing the RIGHT and
LEFT buttons to choose between SILENT,
FoolProof Instructions Rev. 00.AJ Page 36

VIBRATE, AUDIBLE, VIBRATE/AUDIBLE, and
AUDIBLE/VIBRATE.
7. Press the DOWN button to select an alarm zone
range.
8. Select the alarm zone by pressing the RIGHT
and LEFT buttons. Choose between zone 01,
02, and 03.
9. Press ENT to save the changes.
Description of alarm zones:
Zone Description
01 Alarm will be activated when remote
moves more than about 10-20 feet away
from the base unit.
02 Alarm will be activated when remote
moves more than about 30-50 feet away
from the base unit.
03 Alarm will be activated when remote
moves more than about 60-80 feet away
from the base unit.
NOTE: The above distances may vary depending on
immediate surroundings. If the unit is experiencing
excessive false alarms, set the base alarm zone for that
remote to a higher zone.
Page 37 Rev. 00.AJ FoolProof Instructions

Add New Remote
Press the DOWN button two (2) times to highlight
When you want to add a new remote to your FoolProof
Security System, you can use this function.
1. Place the new remote close to the base unit
(within a few inches.)
2. From the Main Menu, press the UP button to
highlight MENU.
3. Press the ENT button to continue.
4. Press the RIGHT button two (2) times to select
the SETUP tab.
5.
ADD NEW REMOTE and press ENT.
6. The base unit will display the following message:
LISTENING FOR A NEW REMOTE, PRESS
CLR TO CANCEL. (To cancel the operation,
press the CLR button.)
7. Press and hold the button on the new remote for
at least five (5) seconds.
8. When the new remote is detected, the base unit
will beep once and display the message, “NEW
REMOTE DETECTED.”
9. Press any key.
10. The base unit will display the REMOTE menu.
11. Rename the remote using the instructions on
page #28.
FoolProof Instructions Rev. 00.AJ Page 38

Adjust Contrast
Press the UP button to decrease the contrast and
To adjust the contrast of the display, use the following
steps.
1. From the Main Menu, press the UP button to
highlight MENU.
2. Press the ENT button to continue.
3. Press the RIGHT button two (2) times to select
the SETUP tab.
4. Press the DOWN button three (3) times to
highlight ADJUST CONTRAST and press ENT.
5.
the DOWN button to increase the contrast. The
factory default contrast setting is 10. A contrast
of 00 will give the brightest background while a
contrast of 20 will give the darkest background.
6. Press ENT to save the contrast setting.
7. Press CLR to return to the Main Menu.
Page 39 Rev. 00.AJ FoolProof Instructions

Set Time/Date
To change the time and date shown on the bottom row of
the FoolProof base unit, follow the instructions found on
page #21.
FoolProof Instructions Rev. 00.AJ Page 40

Accessing the Secure Menu
hlight
The Secure Menu allows you to set your name as the
owner’s name and shutdown your FoolProof Security
System.
To access the Secure Menu, use the following steps.
1. From the Main Menu, press the UP button to
highlight MENU.
2. Press the ENT button to continue.
3. Press the RIGHT button two (2) times to select
the SETUP tab.
4. Press the DOWN button five (5) times to hig
ACCESS SECURE MENU and press ENT.
5. If you have set up a password, you will then be
notified that a password is required to access the
secure menu. Press any button to continue. If
you have not set a password, you will see the
secure menu – skip the next four steps.
6. Use the RIGHT, LEFT, UP, or DOWN buttons to
select letters (or numbers) to enter your
password. When a desired letter (or number) is
highlighted, press ENT.
7. To delete a letter (or number), press the CLR
button or highlight t and press ENT.
Page 41 Rev. 00.AJ FoolProof Instructions

8. To use a space in your password, highlight SPC
To finish entering your password, press the LEFT
and press
and press ENT.
9.
button until DONE is highlighted and press ENT
or use the arrow buttons to highlight 8
ENT.
FoolProof Instructions Rev. 00.AJ Page 42

Shutdown
press
base unit to turn it on. You will see the message
FoolProof Security System (the base unit will turn
Use the Shutdown function to completely disable and turn
off your FoolProof Security System, both the base unit and
all remotes. No signals or communication will be passed
between the remotes and the base station.
1. Access the SECURE MENU (see previous
section).
2. Select the SHUTDOWN option and press ENT.
3. At the confirmation screen, press ENT to choose
CANCEL if you do not want to shutdown or
the LEFT button to highlight OK and press ENT
to shutdown.
4. The base unit’s display will go blank and the
remotes will be turned off.
Restarting After Shutdown
1. To restart your system, press any button on the
“PLEASE CONFIRM THAT YOU WISH TO
ENABLE ALL REMOTES AND THE BASE
UNIT.”
2. At the confirmation screen, press ENT to choose
CANCEL if you do not want to restart your
off again) or press the LEFT button to highlight
Page 43 Rev. 00.AJ FoolProof Instructions

OK and press ENT to restart and enable your
system.
3. The main menu will be displayed on the base
unit’s screen.
4. If the base unit doesn’t detect your remotes
within a few seconds, you can press the button
on each remote to re-establish communication.
The remotes should be in close proximity to the
base unit when you reactivate your system.
FoolProof Instructions Rev. 00.AJ Page 44

Set Owner’s Name
OWN
Use this function to set your name as the owner of your
FoolProof Security System.
1. Select the SET OWNER”S NAME option and
press ENT.
2. To set your first name, press ENT at the FIRST:
prompt.
3. Use FoolProof’’s virtual keyboard to type your
first name. Use the RIGHT, LEFT, UP, or D
buttons to select letters. When a desired letter is
highlighted, press ENT.
4. To delete a letter, press the CLR button or
highlight t and press ENT.
5. To add a space in your name, highlight SPC and
press ENT.
6. To cancel the change to your name, press CLR.
7. Continue selecting letters until you have a
complete name. You can provide a name with a
maximum of ten characters.
8. To save your name, press the LEFT button until
DONE is highlighted and press ENT or use the
arrow buttons to highlight 8 and press ENT.
9. Press the DOWN button to set your last name.
10. Repeat steps 3-8 to enter your last name.
Page 45 Rev. 00.AJ FoolProof Instructions

11. Press the DOWN button to select DONE and
press ENT to save the changes you have made
to the owner’s name.
FoolProof Instructions Rev. 00.AJ Page 46

Set Password
nd
Use this function to set the password for accessing the
Secure Menu.
1. From the Main Menu, press the UP button to
highlight MENU.
2. Press the ENT button to continue.
3. Press the RIGHT button two (2) times to select
the SETUP tab.
4. Press the DOWN button six (6) times to highlight
the SET PASSWORD option and press ENT.
5. At the OLD: prompt, press ENT to enter your old
password. If you have not yet set a password,
you will only be able to use the NEW: prompt –
skip to step 12.
6. To enter your old password, use FoolProof’s
virtual keyboard. Use the RIGHT, LEFT, UP, a
DOWN buttons to select letters. When a desired
letter is highlighted, press ENT.
7. To delete a letter, press the CLR button or
highlight t and press ENT.
8. To cancel changing your password at any time,
press CLR several times until you return to the
Main Menu.
9. Continue selecting letters until you have a
complete password.
Page 47 Rev. 00.AJ FoolProof Instructions

10. To complete the entry of your old password,
press the LEFT button until DONE is highlighted
and press ENT or use the arrow buttons to
highlight 8 and press ENT.
11. Press the DOWN button to move to the NEW:
prompt.
12. Press ENT to enter your new password.
13. Use FoolProof’s virtual keyboard to enter your
new password. Use the RIGHT, LEFT, UP, and
DOWN buttons to select letters. When a desired
letter is highlighted, press ENT.
14. To delete a letter, press the CLR button or
highlight t and press ENT.
15. To cancel changing your password at any time,
press CLR several times until you return to the
Main Menu.
16. Continue selecting letters until you have a
complete password.
17. To complete the entry of your new password,
press the LEFT button until DONE is highlighted
and press ENT or use the arrow buttons to
highlight 8 and press ENT.
18. After entering your new password, the word
DONE will be highlighted. To make the change
to your password you must press the ENT button
to save the change.
FoolProof Instructions Rev. 00.AJ Page 48

Time Settings
Use this setting to switch between 12 hour and 24 hour
time displays.
1. From the Main Menu, press the UP button to
highlight MENU.
2. Press the ENT button to continue.
3. Press the RIGHT button two (2) times to select
the SETUP tab.
4. Press the DOWN button seven (7) times to
highlight TIME SETTINGS and press ENT.
5. Press the UP or DOWN button to select 12
HOUR or 24 HOUR.
6. Press ENT to save the change.
7. Press CLR to return to the Main Menu.
Page 49 Rev. 00.AJ FoolProof Instructions

Date Settings
Use this setting to switch between MM/DD and DD/MM
date displays.
1. From the Main Menu, press the UP button to
highlight MENU.
2. Press the ENT button to continue.
3. Press the RIGHT button two (2) times to select
the SETUP tab.
4. Press the DOWN button eight (8) times to
highlight DATE SETTINGS and press ENT.
5. Press the UP or DOWN button to select
MM/DD/YY or DD/MM/YY.
6. Press ENT to save the change.
7. Press CLR to return to the Main Menu.
FoolProof Instructions Rev. 00.AJ Page 50

Set Language
Use this setting to change the language of the FoolProof
base unit display.
1. From the Main Menu, press the UP button to
highlight MENU.
2. Press the ENT button to continue.
3. Press the RIGHT button two (2) times to select
the SETUP tab.
4. Press the DOWN button nine (9) times to
highlight SET LANGUAGE and press ENT.
5. Press the UP or DOWN buttons to select
language choice.
6. Press ENT to save the change.
7. Press CLR to return to the Main Menu.
Page 51 Rev. 00.AJ FoolProof Instructions

Troubleshooting
1. Forgotten Passwords
2. Changing Batteries
3. Saving the Time and Date When Changing
Batteries
4. Optimizing Battery Life
5. Suspending FoolProof for Airplane Take-off and
Landing
6. Using a Remote to Alert a Base Unit
FoolProof Instructions Rev. 00.AJ Page 52

Forgotten Passwords
displayed on the SET PASSWORD screen when you press
Access the Set Password screen to display your password.
You MUST have both your base unit and a remote next to
each other to obtain your password. Your password will be
and hold the button on one of your remotes.
1. From the Main Menu, press the UP button to
highlight MENU.
2. Press the ENT button to continue.
3. Press the RIGHT button two (2) times to select
the SETUP tab.
4. Press the DOWN button six (6) times to highlight
the SET PASSWORD option and press ENT.
5. With the remote next to the base unit, press the
button on the remote.
6. Your password will be displayed after the OLD:
prompt.
Page 53 Rev. 00.AJ FoolProof Instructions

Changing Batteries
When remote units are low on battery power, the base unit
will display an alarm message. View the Alarms Log to
determine if the alarm was for a remote unit that left the
alarm distance zone or if the remote unit’s battery power is
low. Replace batteries as soon as possible when you see
these alarms. Once the batteries have lost power, your
remote units will no longer function.
When a base unit is low on battery power, it will beep once
every minute to warn you that battery power is low. The
battery indicator displayed on the lower right side of the
screen will show little or no power. You should replace the
batteries as soon as possible when the base unit indicates
that battery power is low.
Unit Type of Battery
Base Unit (2) AAA batteries
Remote Unit (2) AAA batteries
Insert batteries following the pattern shown inside the
battery compartments. The units will not function if
batteries are inserted improperly.
FoolProof Instructions Rev. 00.AJ Page 54

Saving the Time and Date When Changing
Batteries
When changing the batteries in your FoolProof Security
System, you can make sure the time and date settings are
saved on the device by doing one of the following:
• Use the SUSPEND or SHUTDOWN functions on
the base station before removing the spent
batteries and inserting the new batteries.
• Use a wall adapter plug to provide power to the
base unit while you change batteries.
Page 55 Rev. 00.AJ FoolProof Instructions

Optimizing Battery Life
The batteries used in the base unit and remote units can
experience longer battery life if the following suggestions
are followed.
• Use the Shutdown function to turn off your
FoolProof Security System when it is not in use.
• Change the Priority setting to LOW for each
remote. A Priority setting of HIGH causes the
remote and the base unit to communicate with
each other much more frequently and thereby
uses more battery power. The LOW Priority
setting uses less battery power. Remember,
there is a trade-off between using less battery
power and a system that doesn’t check for
remotes that have moved as often.
FoolProof Instructions Rev. 00.AJ Page 56

Airplane Travel and FoolProof
Note: If you use the Shutdown mode (rather than Suspend
While you are traveling by air with your FoolProof Security
System, it is highly recommended that you suspend the
system during the take-off and landing of the airplane.
Putting the system in Suspend mode will cause the system
to be suspended. Pressing any button will re-activate the
system.
mode), you may need to activate each remote individually
by pressing the button on the remote.
Page 57 Rev. 00.AJ FoolProof Instructions

Using a Remote to Alert a Base Unit
When you press the button on a remote unit, it will cause
the base unit to activate the base unit’s alarm (using the
remote’s current alarm setting.)
This function may be useful in locating lost base units.
FoolProof Instructions Rev. 00.AJ Page 58

Accessories for FoolProof
Additional Remotes. FoolProof all of your important
personal belongings! One base unit can monitor up to 25
remotes. Additional remotes can be purchased from a
local Authorized Retailer/Distributor. For a list of
Retailers/Distributors, please visit our web site:
www.mrsicorp.com
Belt Clip. The base unit has a slot on the back that will
work with certain kinds of belt clips. The belt clip sold as
an accessory for cellular telephones is recommended.
External Power Source. FoolProof has the added feature
of being powered from an external AC Adapter with a DC
power cable. This can be purchased from a local
electronics store.
NOTE: The External DC plug must have a 2.5 mm
( + ) POSITIVE shell with a 1 mm pin and supply
3 Volts DC.
Page 59 Rev. 00.AJ FoolProof Instructions

Technical Assistance
Enter your question(s) on the Technical Assistance Page. If
Visit our Web Site at: www.mrsicorp.com.
Click on the link for the Technical Assistance Page.
the question cannot be answered via the web site, a
tracking code will be assigned.
Before calling the help desk you must have the tracking
code that has been assigned your question(s).
Help Desk: 801-123-4567
NOTE: This is NOT a toll-free number and charges will be
billed to your phone.
FoolProof Instructions Rev. 00.AJ Page 60

Returning Product
product will be replaced at no charge to the customer. If we
determine that the problem is from neglect or improper use,
You must write the tracking code that was assigned to your
In the unlikely event that our product fails to operate
properly due to workmanship or component failure, all
repairs or replacement will be at our discretion. If the
product is found to be faulty, all attempts will be made to
repair the product. If the product cannot be repaired, the
we will notify you via e-mail or by letter of the cost to repair
the product.
question(s) from our web site on the return package as
instructed below.
ATTN: (Enter tracking code from web site)
NEWONICS
2550 South 2300 West
Suite 11
Salt Lake City, UT 84119
Page 61 Rev. 00.AJ FoolProof Instructions

FCC Information
This device complies with Part 15 of the FCC Rules.
Operation is subject to the following two conditions:
(1) This device may not cause harmful interference
(2) This device must accept any interference received,
including interference that may cause undesired operation.
NOTE: This equipment has been tested and found to
comply with the limits for a Class B digital device, pursuant
to Part 15 of the FCC Rules. These limits are designed to
provide reasonable protection against harmful interference
in a residential installation. This equipment generates,
uses and can radiate radio frequency energy and, if not
installed and used in accordance with the instructions, may
cause harmful interference to radio communications.
However, there is no guarantee that interference will not
occur in a particular installation. If this equipment does
cause harmful interference to radio or television reception,
which can be determined by turning the equipment off and
on, the user is encouraged to try to correct the interference
by one or more of the following measures:
-Reorient or relocate the receiving antenna.
-Increase the separation between the equipment and
receiver.
FoolProof Instructions Rev. 00.AJ Page 62

-Connect the equipment into an outlet on a circuit different
from that to which the receiver is connected.
-Consult the dealer or an experienced radio/TV technician
for help.
IMPORTANT NOTE: To comply with FCC RF exposure
compliance requirements, this device must not be colocated or operated in conjunction with any other antenna
or transmitter.
CAUTION: Changes or modifications not expressly
approved by MRSI International could void the user's
authority to operate the equipment.
Page 63 Rev. 00.AJ FoolProof Instructions

© 2002 MRSI International, Inc. All rights are reserved. No reproduction in whole or
in part is allowed without prior written approval. The MRSI and FoolProof logos are
trademarks of MRSI International, Inc.
Printed in the U.S.A.
FoolProof Instructions Rev. 00.AJ Page 64
 Loading...