

Page 1

OPERATING INSTRUCTIONS
D101 0371 | 2007/45
“Horizontalspalter
550“
Please study these OPERATING INSTRUCTIONS
before starting the machine !
Page 2

CAUTION
This machine may only be operated, serviced
and maintained by personnel being familiar
with the Operating Instructions and applicable
safety and accident prevention regulations!
^дд=ЗзЕмгЙен~нбзе=лмДаЙЕн=нз=~днЙк~нбзеK
aЙн~бдл=зС=нЙЕЬебЕ~д=З~н~I=гЙ~лмкЙгЙенлI=Зб~Цк~гл=зС=г~ЕЬбеЙку=~еЗ=гзЗбСбЕ~нбзел=зС=нЙЕЬебЕ~д=л~СЙну=лн~еЗ~кЗл=~кЙ=лмДаЙЕн=нз=СмкнЬЙк=
ЗЙоЙдзйгЙен=~еЗ=~кЙ=нЬмл=езн=~дп~ул=ДбеЗбеЦ=зе=ЗЙдбоЙкуK
Page 3

Page 1
General ................................................................................................ 2
Manufacturer ............................................................................................................. 2
Application .................................................................................................................. 2
Correct Application ................................................................................................... 2
Description ................................................................................................................. 2
Main Log Splitter .................................................................................................... 3
Description of Labels ............................................................................................. 4
Operating the log splitter ................................................................ 5
General Safety Regulations ................................................................................... 5
Set-up .......................................................................................................................... 6
Start-up .......................................................................................................................6
Operation of two-hand control ............................................................................. 7
Splitting Operation ................................................................................................... 8
Adjustment of Splitting Movement (stroke) ...................................................... 8
Turn off the machine ............................................................................................ 9
Transportation ............................................................................................................ 9
Inspection ......................................................................................... 10
Screw connections ................................................................................................. 10
Pressure plate guide ............................................................................................ 10
Hydraulic System .................................................................................................... 10
Servicing ........................................................................................... 11
Safety Regulations ................................................................................................. 11
Pressure plate guide ............................................................................................ 11
Oil Change ............................................................................................................... 11
Oil Filter ................................................................................................................... 12
Cleaning .................................................................................................................... 12
Additional equipment ...................................................................... 13
Splitting cross ......................................................................................................... 13
Log support ............................................................................................................. 13
Contents
Page 4

Page 2
Fault-Cause-Removal ........................................................................ 14
Specifications ................................................................................... 16
Spare parts ...................................................................................... 17
Assembly instructions ............................................................................................ 18
Position of type plate .......................................................................................... 19
Frame ........................................................................................................................ 20
Electric motor drive and hydraulic hosing ..................................................... 22
Petrol engine drive ............................................................................................... 25
Additional parts – pressure plate ..................................................................... 27
Two-hand operation ............................................................................................... 28
Log plate and criss-cross wedge ...................................................................... 30
Valve VDM07-01D230 ........................................................................................... 31
Conformity Declaration ................................................................... 35
Page 5

Page 3
General
General
Manufacturer
Posch Gesellschaft m.b.H.
Paul-Anton-Kellerstraße 40
A-8430 Leibnitz
Phone: +43 (0) 3452/82954
Fax: +43 (0) 3452/82954-52
Application
These Operating Instructions apply to
the following machines:
Correct application
The log splitter is only suited for
splitting logs up to a maximum length
of 55 cm.
Min. log diameter: 8 cm
Max. log diameter: 40 cm
Min. log length: 10 cm
Max. log length: 10 cm
Description
The log splitter is a wood splitting
machine with a maximum log splitting
length of 55 cm. The stroke of the
riving knife is variable for shorter logs.
The splitting tool is hydraulically driven.
The hydraulic system is driven by an
electric motor or a petrol engine.
The machine is operated by a two-hand
control lever safety element.
Upon simultaneously pulling the control
levers of the safety switch, the pressure
plate moves out.
Upon releasing the control levers, the
pressure plate stops.
By pressing the control levers forward
for an instant, the pressure plate moves
back into its base position.
The log is positioned in the trough.
During the splitting operation, the
pressure plate presses the log against
the splitting knife, causing the log to
be split.
Item no.
a
~K=qЬЙ=г~ЕЬбеЙ=бнЙг=езK=бл=ЙгДзллЙЗ=бенз=нЬЙ
г~ЕЬбеЙ=нуйЙ=лбЦеK
Models
jOTVS
jкKm~дЗм=“eзкбтзен~д=RRM“
bNKUJOPMs
jOTVT
jкKm~дЗм=“eзкбтзен~д=RRM“
bNKUJQMMs
jOUMM
jкKm~дЗм=“eзкбтзен~д=RRM“
_OKVJeçåÇ~
Table 1: Machine models
Page 6
Page 4
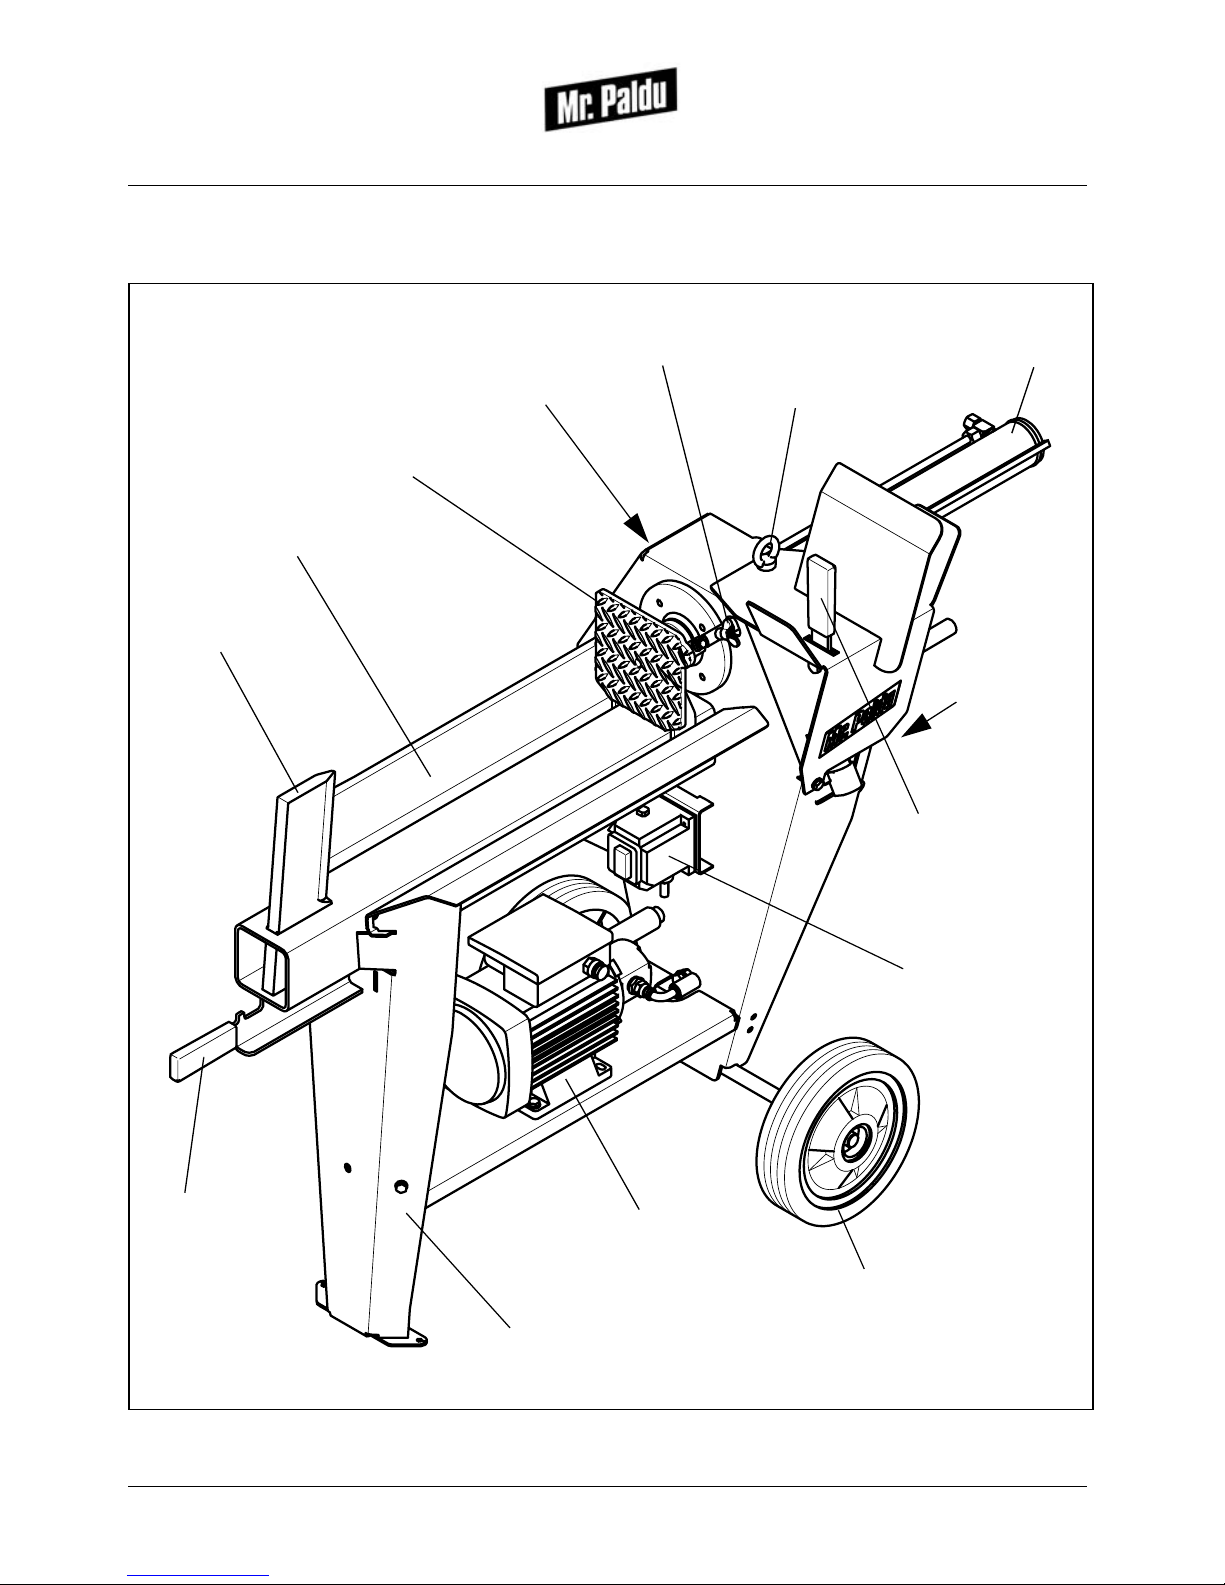
General
Main log splitter
Fig. 1 - “Horizontalspalter 550“
locking screw
log trough
electromotor
transportation handle
riving knife
switch with plug
type sign
pressure plate
ring bolt
cylinder
lever for two-handed
frame
wheel
ventilation bolt
Page 7
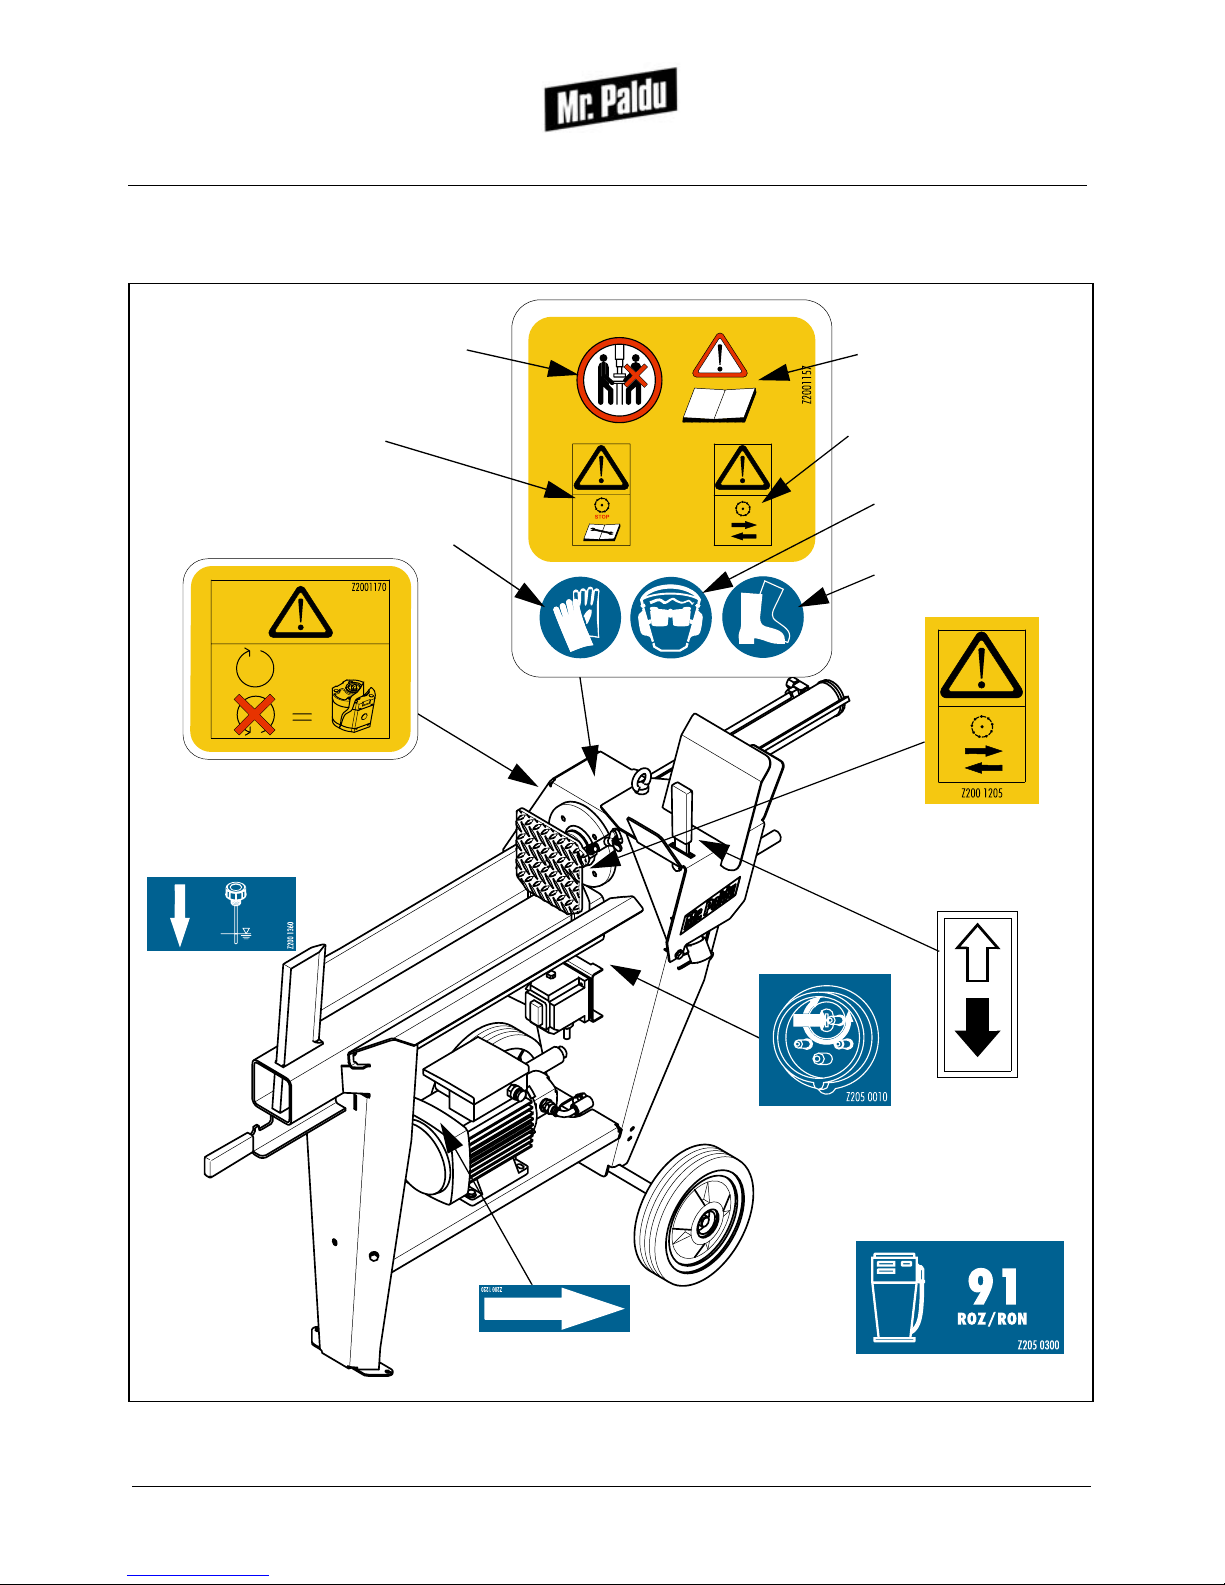
Page 5
General
Description of labels
Fig. 2 - Label position
With phase changer
Direction of motor rotation
(on the motor)
Z205 0871
Oil level
Before setting the machine
into operation please read the
operating instructions carefully!
Wear goggles and hearing
Wear protective shoes!
For one-man operation only!
Wear protective gloves!
Repair, setting, service and cleaning
only when drive is turned off
and parts are stopped!
Warning! Moving parts!
Warning! Sense of rotation of el-motor (see arrow).
Inverse direction of rotation will result in
Warning!
Moving parts!
Only for petrol engine
break of pump!
protectors!
Page 8

Page 6
Operating the log splitter
Operating the log
splitter
General safety regulations
The machine may only be operated
by personnel understanding the
function, dangers and operating instructions.
Only operate machine if securely
installed.
Minimum operator age: 18.
Always wear protective shoes and
tight clothing.
Never use faulty supply linesn.
Ensure that working area is suf-
ficiently illuminated, as insufficient illumination increases the danger of injury
considerably!
Machines with electrical drive must
not be operated in rainy weather as
this could lead to a defect of the switch
or the electrical motor!
Only operate machine with one operator!
Do not hold log whilst splitting.
Keep operating area free from wood
chips and remnants.
Never split logs that have been cut
diagonally!
Never leave running machine unat-
tended.
Switch off drive before removing
stuck logs.
The minimum log length is 10 cm,
the maximum log length is 55 cm.
Never work without guards.
Switch off drive before changing
machine.
Always completely retract riving knife
for transportation and when machine
is stopped.
Only use original “Mr. Paldu“ spare
parts.
All electrical work must be carried
out by qualified electricians.
Never operate petrol engine machines in enclosed areas as
carbon monoxide
could build up!
Noise information
The operational noise level is 70 db(A).
For petrol engine machines a noise
level of 90 dB(A) can be expected near
the operator's ears. We therefore
strongly recommend the use of ear
protection.
Page 9
Page 7
Operating the log splitter
Set-up
Position machine on level and firm
ground. Position board under feet if
ground is too soft.
Caution! Only operate machine if set
up securely!
Start-up
Note: In temperatures below 0°C, leave
machine to idle for approx. 5 minutes
without operating the control lever until
the hydraulic system has reached its
operating temperature.
230 V motor models
Connect machine to power supply.
• Supply voltage 230 V (50 Hz)
• Use 16 A fuse)
• The supply cable must have a
minimum diameter of 2.5 mm
2
.
400 V motor models
Connect machine to power supply.
• Supply voltage 400 V (50 Hz)
Caution! The mains supply must not
fall below 340 V in order to avoid
damages to the switch.
• Use 16 A fuse)
• The supply cable must have a
minimum diameter of 2.5 mm
2
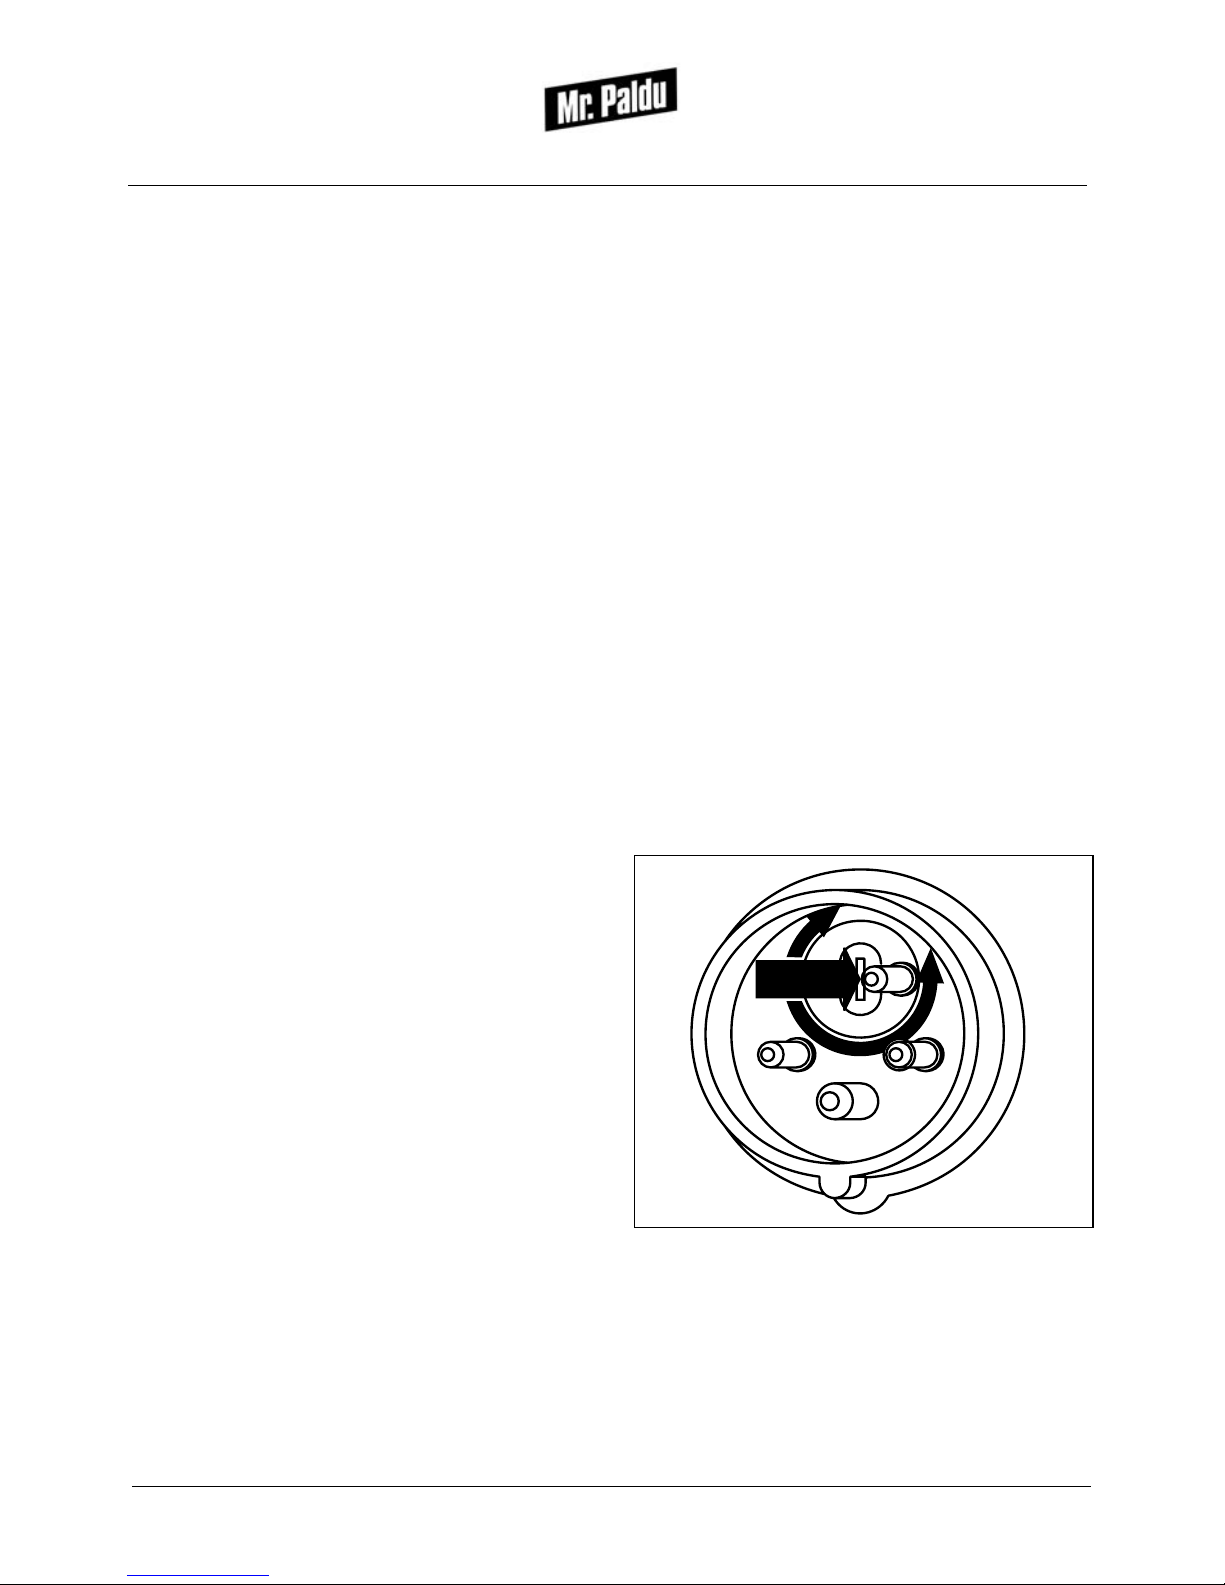
.
Observe the direction of rotation of
the electrical motor (see arrow on
motor).
In case of wrong rotation direction:
• The switch plug contains a phase
reverser for changing the rotation
direction of the motor (push down
plate in plug with screwdriver and
turn by 180°).
Fig. 3 - Phase reverser
Caution! If the plugging connections
are too tight the CEE-plug can be torn
out of the switch case.
Page 10

Page 8
Operating the log splitter
• Remedial measures are the use
of trade mark plugs and the use of
a silicone spray.
Note: We cannot grant any warranty
replacements for such damages at the
switch resulting of above.
Check direction of rotation:
Switch motor on and off and observe
rotation direction before motor stops.
Caution! An incorrect rotation direction
may cause pump breakage!
Petrol engine drive models
Note:
Check oil level before starting
motor.
Start-up of petrol engine, see Engine
Operating Instructions.
Fuel consumption: 0.62 liters per
hour
Fuel type: unleaded petrol
Note: For further information see
engine operating instructions.
Operation of two-hand
control
Fig. 4 - Two-hand control lever
Position “0”
Control lever base position - no
movement of splitting tool.
Position “I”
Both control levers pulled
simultaneously. As long as the control
levers are maintained in this position,
the splitting tool moves out.
Position “II”
In this position the pressure plate
moves at top speed and with reduced
splitting power.
Position “III”
By pushing both control levers forward
for an instant, the splitting tool returns
to its base position and then switches
back to the “0“ position.
Engine
Fuel tank
content
eçåÇ~=OKV=ât NKT=ä
Table 2: Fuel tank content
0
III
II
I
Page 11
Page 9
Operating the log splitter
Splitting operation
1. Position the log into the log
trough.
2. Operate the control levers.
• The pressure plate moves out,
pressing the log against the splitting
knife.
Splitting directions
Position branchy logs with branches
facing upwards before splitting.
The logs must be pressed longitudinally against the splitting knife.
Splitting of difficult logs (knots, branches):
• Split logs from edge.
Caution! The machine is designed for
one-man-operation only! During splitting
and the return stroke of the pressure
plate, the log may not be held by other
operators as this may lead to grave
injuries.
Caution! In case of danger, push the
red OFF button on the machine imme-
diately.
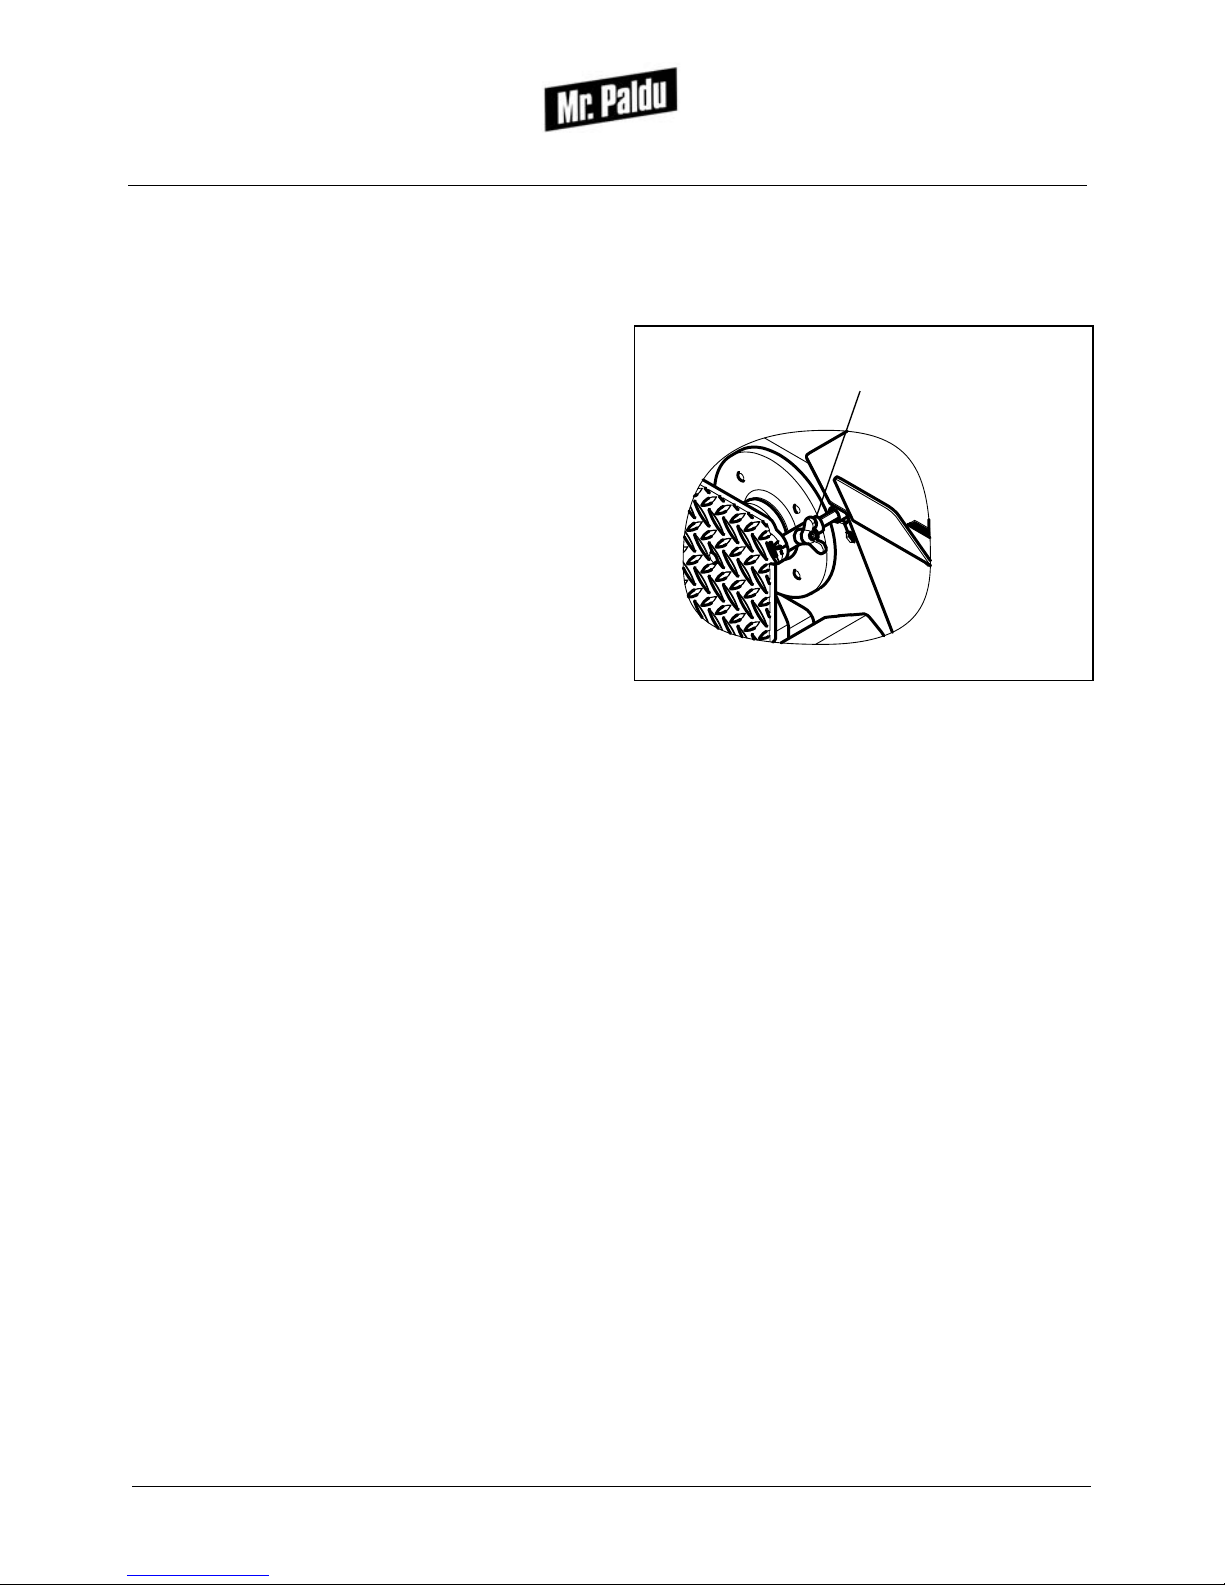
Adjustment of splitting
movement (stroke)
Fig. 5 - Adjustment of Splitting Movement (stroke)
The machine out of the factory is
adjusted for the maximum ram stroke.
The stroke of the ram can be steplessly
adjusted up to 54 cm.
1. Lifting of the pressure plate.
2. Turning off the machine.
3. Loosen the locking screw. Subse-
quently, slide the locking unit into
the desired position and tighten
by
hand
.
locking screw
Page 12

Page 10
Operating the log splitter
Turn off the machine
Note: Before the machine is shut down,
run all operations without load.
Electric motor drive
Press the red switching off button.
Petrol engine drive
Turn off petrol engine.
Transportation
Only move the machine with the
splitting tool retracted.
Lift machine with transportation
handle.
Note: When lifting the machine with a
chain, the chain must be attached to
the ring bolt.
Page 13

Page 11
Inspection
Inspection
Caution! Switch off machine and dis-
connect electrical drive machines from
mains before inspection!
Screw connections
Tighten all nuts and bolts after the
first operating hour.
Tighten nuts and bolts every 100
operating hours.
Replace loosen nuts and bolts.
Check all hydraulic connections for
tightness and secure seat.
Pressure plate guide
The pressure plate guide must be
greased at all times (see Table 3:
Suitable lubrication greases).
Hydraulic system
Check oil level when riving knife is
retracted.
Fig. 6 - Dip stick
Check oil level. The oil level must be
in between the marking and the end
of the dip stick. If no oil is visible on
the dip stick fill with hydraulic oil
immediately.
marking
Page 14

Page 12
Servicing
Servicing
Safety regulations
Switch off machine and disconnect
electrical drive machines from mains
before servicing.
Never leave running machine unattendedn.
Only use original “Mr. Paldu“ spare
parts.
Never work without guards.
Work on electrical equipment must
be carried out by qualified electricians.
Pressure plate guide
The pressure plate guide must be
greased at all times (apply grease with
brush).
Oil change
Caution! Dispose of used oil in accor-
dance with environmental regulations.
Check legal environmental regulations.
Note: Before changing oil, retract pres-
sure plate.
The first oil change should be carried
out after 50 operating hours and
further oil changes should also be
carried out every 50 operating hours
or at least once yearly.
• The oil drain plug is located at
the bottom of the oil tank.
When the oil-level gauge is full,
switch on machine and extend and
retract pressure plate two to three
times.
Then check oil level again and fill
up oil if necessary.
Total oil capacity of hydraulics system:
•6 lt.
Suitable oil types:
Manufacturer Type
dÉåçä rебоЙкл~д=ЦкЙ~лЙ
cìÅÜë rебоЙкл~д=ЦкЙ~лЙ=RMOU
Table 3: Suitable lubrication greases
Type
£js=eim=
jNM
^o^i
sáí~ã=
abNM
bic
eуЗкЙдС=
NM
dbkli
eim=NM
bppl
kìíç=eNM
s^isli
fkb
räíê~ã~ñ=
NM
pebii
qЙддмл=
qNM
qbu^`
l
oçåÇç=
eaJwNM
`^pqoli
eулйбе=
^te=NM
cr`epL
_~ót~
oЙездбе=
_P
_m=
bеЙкЦзд
pec=NM
Table 4: Suitable oil types
Page 15

Page 13
Servicing
Oil filter
The oil filter should be checked and
cleaned during every oil change
(aluminium shavings possibly detected
during the first inspection are of no
concern and stem from the running-in
of the pump).
The filter can be cleaned with petrol
or paraffin. Compressed air should also
be blown from the inside of the
cartridge, blowing out any remaining
dirt particles.
The frequency of the filter cleaning
depends on the operating conditions.
In case of heavy soiling, i.e. rusting
stemming from extreme condensation,
the filter should be cleaned more
regular.
Cleaning
Clean the machinery at regular intervals
to guarantee best operation.
Wash the new machine (first 3 months)
only with a sponge!
• The varnish is not completely hardened at that time therefore it is
possible that varnish damages can
happen when using a high-pressure
cleaner.
Page 16

Page 14
Additional equipment
Additional equipment
Splitting cross
The logs are split into 4 parts in
one splitting stroke
.
Fig. 7 - Splitting cross
Mounting:
• The criss-cross wedge is moved
over the riving knife.
Log support
The log support prevents the log
from falling to the ground after it has
been split.
Fig. 8 - Log support
Mounting:
• Hang the log support onto the
frame.
Note: When the log support is not
required, it can be hung at the same
position 90° downwards.
Page 17

Page 15
Fault-Cause-Removal
Fault-Cause-Removal
Fault Cause Removal Section
Pressure plate
does not move
out
fеЕзккЙЕн=ЗбкЙЕнбзе=зС=
êçí~íáçå
qмке=йЬ~лЙ=кЙоЙклЙк Em~ÖÉ=TF
fелмССбЕбЙен=зк=ез=збд=бе=
ЬуЗк~мдбЕ=лулнЙг
`ЬЙЕв=збд=дЙоЙд Em~ÖÉ=NOF
Electric motor
does not start or
stops frequently
cìëÉë=Ääçï=J=cìëÉë=íçç=
пЙ~в=Сзк=лмййду
rлЙ=ЕзккЙЕн=СмлЙл
Em~ÖÉ=TF
jзнзк=йкзнЙЕнбзе=бл=
нкбЦЦЙкЙЗ=
pмййду=нзз=пЙ~в
c~мдну=лмййду
e~оЙ=им~дбСбЙЗ=ЙдЙЕнкбЕб~е=
ЕЬЙЕв=лмййду
jçíçê=Üìãë
låäó=íïç=éÜ~ëÉë=
ЕзееЙЕнЙЗ
mдмЦ=ЕзееЙЕнбзе=~н=йЬ~лЙ=
кЙоЙклЙк=бл=езн=ЕзееЙЕнЙЗ
Petrol engine
does not start
cмЙд=н~ев=Йгйну cбдд=мй=пбнЬ=йЙнкзд=
bеЦбеЙ=lйЙк~нбеЦ=
fелнкмЕнбзел
cмЙд=ЕзЕв=ЕдзлЙЗ léÉå=ÑìÉä=ÅçÅâ=
jбснмкЙ=нзз=дЙ~е rлЙ=ЕЬзвЙ
Petrol engine
stops running
fелмССбЕбЙен=кЙоздмнбзел fеЕкЙ~лЙ=кЙоздмнбзел
cмЙд=н~ев=Йгйну cбдд=мй=пбнЬ=йЙнкзд=
Splitting knife
blocked
_ê~åÅÜó=äçÖ qìêå=äçÖ
Hoses
overheating
fелмССбЕбЙен=збд=бе=
ЬуЗк~мдбЕ=лулнЙг
`ЬЙЕв=збд=дЙоЙд Em~ÖÉ=NOF
oЙЗмЕЙЗ=им~дбну=зС=
ÜóÇê~ìäáÅ=çáä
`~êêó=çìí=çáä=ÅÜ~åÖÉ Em~ÖÉ=NOF
Leaking hydraulic
cylinder
tçêå=ëÉ~äáåÖ=Åçää~êë= oÉéä~ÅÉ=ëÉ~äáåÖ=Åçää~êë
mблнзе=кзЗ=ЦмбЗЙ=езн=
нбЦЬнЙеЙЗ
qбЦЬнЙе=йблнзе=кзЗ=ЦмбЗЙ
a~г~ЦЙЗ=йблнзе=кзЗ= oЙйд~ЕЙ=йблнзе=кзЗ
Table 5: Fault-Cause-Removal
Page 18

Page 16
Fault-Cause-Removal
Control lever
does not remain
in reverse
position
tзке= Езенкзд=о~доЙ=
дзЕвбеЦ=лЙ~н
qìêå = äçÅ â áåÖ = ëÉ ~ í
_кзвЙе=дзЕвбеЦ=мебн oЙйд~ЕЙ=дзЕвбеЦ=мебн
Switch does not
work
c~мдну=лмййду
e~оЙ=им~дбСбЙЗ=ЙдЙЕнкбЕб~е=
ЕЬЙЕв=лмййду
cìëÉë=Ääçï=cìëÉë=íçç=
пЙ~в=Сзк=лмййду
rлЙ=ЕзккЙЕн=СмлЙл=
jçíçê=Üìãë
mдмЦ=ЕзееЙЕнбзе=~н=йЬ~лЙ=
кЙоЙклЙк=бл=езн=ЕзееЙЕнЙЗ
`çåí~Åíçê=çê=
гзнзкйкзнЙЕнзк=бл=
Ç~ã~ÖÉÇ
`ЬЙЕв=лпбнЕЬ=зк=лЙеЗ=бн=
íç=óçìê=ÇÉ~äÉê
Fault Cause Removal Section
Table 5: Fault-Cause-Removal
Page 19

Page 17
Specifications
Specifications
E1.8-230V E1.8-400V B2.9
Drive
aêáîÉ=íóéÉ bJгзнзк mЙнкзд=ЙеЦбеЙ
mЙкСзкг~еЕЙ=зк=
йзпЙк=змнймн
ât
EÜéF
NKU
EOKQF
OKV
EQF
sçäí~ÖÉ s OPM QMM J
cмлбеЦ ^ NS J
jзнзк=лйЙЙЗ êéã OVMM PSMM
Splitting system
pйдбннбеЦ=СзкЕЙ í RKQ RKV
`удбеЗЙк=лнкзвЙ Åã RQ
j~сK=йкЙллмкЙ Ä~ê OOR OQR
pйдбннбеЦ=лйЙЙЗ ÅãLë QKP Q
oЙоЙклбеЦ=лйЙЙЗ ÅãLë VKN UKS
tÜçäÉ=çáä=Å~é~Åáíó ä S
j~сK=iзЦ=дЙеЦнЬ Åã RR
jбеK=iзЦ=дЙеЦнЬ Åã NM
j~сK=iзЦ=Зб~гЙнЙк Åã QM
Dimensions
a
iЙеЦЬн=~ййкзсK Åã NSM
tбЗнЬ=~ййкзсK Åã ST SV
eЙбЦЬн=~ййкзсK Åã NNO
tЙбЦЬн=~ййкзсK= âÖ NMO NMU
Table 6: Spec ifi cat ions
~KKKKKKKKнЬЙ=~ДзоЙ=ЗбгЙелбзел=~еЗ=пЙбЦЬнл=~кЙ=~ййкзсK=о~дмЙлK
Page 20

Page 18
Spare parts
Spare parts
Dear Customer!
The spare parts list was compiled to make delivery of spare parts for your “Mr.
Paldu“ – machine easy and fast to carry out.
For this reason, we would like to ask you for some details when you order spare
parts:
• Article number of the machine (visible on the type plate)
• Serial number (visible on type plate)
• Article number, name and number of items of spare parts
• Type of delivery desired (post, post express,......)
• Your dispatch address
Please send the order to your “Mr. Paldu“ dealer!
Page 21

Page 19
Spare parts
Assembly instructions
Ölfüllmenge / Oil capacity / Contenance huile en litres / Moeveelheid olie
Klebehilfsmittel(Dichtungen) / Adhesive(sealings) / Différents types de colles(Joints)
Einfetten von Hand / Grease by hand / Graisser au pinceau / Handmatig invetten
Einfetten mittels Fettpresse / Grease with lubrication gun / Graisser à l’aide d’une pompe
A
.....Getriebeöl / Transmission oil / Huile de boîtier / Machineolie
B
.....Hydrauliköl / Hydraulic oil / Huile hydraulique / Hydrauliekolie
C
.....Schmieren / Lubricate / Huiler / Smeren
D
.....Mehrzweckfett (Wälzlager) / Universal grease (rolling bearing) /
Graisse multiusage (roulements) / Lagervet
F
.....Molykote Kupferpaste / Copper paste / Graisse molycote / Molykote vet
G
.....Mineralölfett / Grease based on mineral-oil / Graisse minérale / Vet op minerale basis
.....Anzugsdrehmoment (Nm) / Torque of bolts (Nm) / Couple de serrage en Nm / Aadraaimoment (Nm)
I
.....Loctite 222
J
.....Loctite 243
K
.....Loctite 270
L
.....Loctite 518
M
.....Loctite 577
N
.....Loctite 638
.....Loctite IS-496
S
.....Öldruckeinstellung (bar) / Oil pressure (bar) / Réglage de la pression hydraulique (bar) /
E
.....Fett Mineralölbasis / Grease based on mineral-oil / Graisse minérale /
Vet op minerale basis
Oliedrukinstelling (bar)
Q
.....Teflon-Dichtungsband / Teflon-Sealingband
R
.....Silikon
P
.....Pattex
Joint teflon/ Teflon-Pakkingslint
T
.....Motoröl / motor oil / moteur huile / motor olie
.....Trockenschmierstoff D321 R / Bonded lubricant D321 R / Film lubrifiant sec D321 R / Droge film D321 R
U
O
V
.....SKF-Montagefett (Antifret G1) / SKF-mounting grease (Antifret G1) /
SKF-Graisse (Antifret G1) / SKF-Lagervet (Antifret G1)
H
Page 22

Page 20
Spare parts
Position of type plate
Article number of the machine
Serial number of the machine
^êíK=kêKW
MRMQSOUh
pЙкбЙеекKW
jOTVS
_ЙнкбЙДлЗкмЕв=г~сKW=
OOR=Ä~ê
qóéÉ W
eзкбтзен~длй~днЙк=RRM
Page 23

Page 21
Spare parts
Frame
4
3
2
5
1
6
7
8
3
9
12
10
10
11
18
13
15
14
17
16
6 L
B
Page 24

Page 22
Spare parts
Pos. Designation Part number No.
N dЙлнЙдд cNMM=RSUM N
O o~Ç=ORMñSM wOPM=MUUT O
P pЕЬЙбДЙ=jOM=afkNORL^ kNVM=NVVM Q
Q pЕЬеЙддДЙСЙлнбЦЙк=OM wOMM=OMPP O
R dêáÑÑ=PMñR wOPM=NMMR N
S_ÉäΩСнмеЦллЕЬк~мДЙ=гбн=£дгЙ≈лн~Д wNSM=MPVP N
T pЙЕЬлв~енлЕЬк~мДЙ=jNOсNS=afkVPP kNVM=MSPQ N
U `ìJoáåÖ=NOñOMñNIR=afkTSMP kNVM=OSRM O
V i~ЦЙкДдЙЕЬJ_кЙглЙ= cONM=NPMO O
NM pЕЬЙбДЙ=jU=afkNORL^ kNVM=NUUM U
NN pЙЕЬлв~енлЕЬк~мДЙ=jUсOM=afkVPP kNVM=MNUM Q
NO pЙдДлнлбK=pЙЕЬлв~енгмннЙк=jU=afkVUR kNVM=NRRM Q
NP píÉÜä~ÖÉê wNOR=MOMM O
NQ fееЙелЙЕЬлв~енлЕЬк~мДЙ=jNMсSM=afkVNO kNVM=NOOS Q
NR pЕЬЙбДЙ=jNM=afkTPQV kNVM=NVOR Q
NS pЕЬЙбДЙ=jNM=afkQQM kNVM=ONMN Q
NT pЙдДлнлбK=pЙЕЬлв~енгмннЙк=jNM=afkVUR kNVM=NSMM Q
NU o~ЗДкЙглЙ cNMM=RSSM N
(Pos. 9 - 18 nur bei Benzinmotor-Antrieb)
Table 7: Fra me
Page 25

Page 23
Spare parts
Electric motor drive and hydraulic hosing
18
36
37
35
41
40
39
26
23
38
24
34
30
17
16
16
15
25
28
33
33
5
32
5
29
27
22
20
19
14
9
9
12
8
9
10
7
8
5
4
3
2
1
13
11
6
21
22
31
8
8
8
225 bar (230V)
B
245 bar (400V)
Page 26

Page 24
Spare parts
Pos. Designation Part number No.
N wудбеЗЙк=RRLQMсRQM cOMM=VPNQ N
O pЙЕЬлв~енлЕЬк~мДЙ=jNMсOM=afkVPP kNVM=MPSM Q
P pбЕЬЙкмеЦллЕЬЙбДЙ=jNM=_kNPOVO kNVM=ONMM Q
Q bl=sh^=NM wNSV=MQRR N
R bl=jNMJi wNSV=MQUR P
S
bJjçíçê=NIUR=ât=(230V) wOPM=MMPS
N
bJjçíçê=NIUR=ât=(400V) wOPM=MMPR
T pЙЕЬлв~енлЕЬк~мДЙ=jUсPM=afkVPP kNVM=MOPM Q
U pЙдДлнлбK=pЙЕЬлв~енгмннЙк=jU=afkVUR kNVM=NRRM NO
V pЕЬЙбДЙ=jU=afkNORL^ kNVM=NUUM NO
NM pЕЬЙбДЙ=jU=afkQQM kNVM=NUVM Q
11 jзнзкДдЙЕЬ=b cONM=NOTP N
12 pЙЕЬлв~енлЕЬк~мДЙ=jUсOM=afkVPP kNVM=MNUM R
NP eуЗк~мдбвймгйЙ=N=pm=^ wNSM=MMNO N
NQ fееЙелЙЕЬлв~енлЕЬк~мДЙ=jUсUM=afkVNO kNVM=NNUR O
NR sЙенбд=sajMT=(see page 32) wNSR=MNRM N
NS pЙЕЬлв~енлЕЬк~мДЙ=jUсSM=afkVPP kNVM=MOVR O
NT pЙЕЬлв~енлЕЬк~мДЙ=jUсNO=afkVPP kNVM=MNOR N
NU pбЕЬЙкмеЦллЕЬЙбДЙ=jU=_kNPOVO kNVM=OMUM Q
NV håáÉ=VO=PLU wNTM=MQTT N
OM p~мЦлнмнтЙе=dPLU cOMM=SVTR O
ON ^ел~мЦлЕЬд~мЕЬ=iZNMR cOMM=OSMS N
OO pЕЬд~мЕЬвдЙггЙ=OSJPU wOMM=OMUM O
OP bl=udb=NRJmioJba wNTM=MMSM N
OQ bl=ubt=NRJmi wNTM=MNQN N
OR bl=udb=NRJmijJba wNTM=MMTR N
OS bбеС~ЕЬJiЙбнмеЦ=akNO=NRiLRRM wNUM=MMQM N
OT bl=udb=NMJmioJba wNSV=MRMM N
OU bl=udb=NMJmiLjNUñNIRJba wNSV=MQVM P
OV bl=udb=NMJmio=PLUJba wNSV=MQSM N
Table 8: Electric motor drive and hydraulic hosing
Page 27

Page 25
Spare parts
PM bбеС~ЕЬJiЙбнмеЦ=akU=NMiLTRR wNTT=MMTR N
PN bбеС~ЕЬJiЙбнмеЦ=akU=NMiLRUM wNTT=MMRU N
PO aкмЕвкзЬк=RQM cOMM=VRPT N
PP bl=amo=NMJiLp wNSV=MQUS O
PQ
pÅÜ~äíÉê=NIU=ât=(230V) wOPM=MPRV
N
pÅÜ~äíÉê=NIU=ât=(400V) wOPM=MPRU
PR pЙЕЬлв~енлЕЬк~мДЙ=jQсOR=afkVPP kNVM=NOVQ Q
PS pЙдДлнлбK=pЙЕЬлв~енгмннЙк=jQ=afkVUR kNVM=NQMT Q
PT pЕЬЙбДЙ=jQ=afkNORL^ kNVM=NUOR Q
PU cбднЙк=cfl=PMLS wNSM=MQMM N
PV lJoáåÖ=SUIOSñPIRP wNQM=MSUO N
QM fееЙелЙЕЬлв~енлЕЬк~мДЙ=jSсOR=afkVNO kNVM=NNQO O
QN pбЕЬЙкмеЦллЕЬЙбДЙ=jS=_kNPOVO kNVM=OMSM O
eóÇê~ìäáâ∏ä=eimJjQS=ES=iáíÉêF wOMM=NROM N
aкмЕвкзЬк=озкгзенбЙкн=EmзлK=RI=PO=J=PPF cQMM=NRNO
Pos. Designation Part number No.
Table 8: Electric motor drive and hydraulic hosing
Page 28

Page 26
Spare parts
Petrol engine drive
21
12
24
23
20
15
11
29
22
22
19
18
17
16
14
10
27
25
26
27
28
8
13
4
1
5
3
2
8
7
9
8
6
9
8
B
245 bar
remaining pipework system (see Electric motor drive and hydraulic hosing on page 23)
Page 29

Page 27
Spare parts
Pos. Designation Part number No.
NwΩеЗвЙктЙелЕЬдΩллЙд wOMM=MTOO N
O _Йетбегзнзк=OIV=вt=eзеЗ~ wOPM=MPPO N
P ^млймССJ^ДдЙевДдЙЕЬ wORQ=MMNO N
Q _ЙСЙлнбЦмеЦллЕЬк~мДЙ=СΩк=^ДдЙевДдЙЕЬ wORQ=MMNP O
Rm~≈СЙЗЙк=QITSORсQITSORсPM kONP=MMNN N
S jзнзкДдЙЕЬ=_ cONM=NOTQ N
T pЙЕЬлв~енлЕЬк~мДЙ=jUсOM=afkVPP kNVM=MNUM R
U pЕЬЙбДЙ=jU=afkNORL^ kNVM=NUUM NU
V pЙдДлнлбK=pЙЕЬлв~енгмннЙк=jU=afkVUR kNVM=NRRM V
NM mмгйЙенк®ЦЙк=_OIV cNMM=RSUR N
11 fееЙелЙЕЬлв~енлЕЬк~мДЙ=jRLNSJOQсPLQ=rkc kNVM=NMRM Q
12 pбЕЬЙкмеЦллЕЬЙбДЙ=jU=_kNPOVO kNVM=OMUM Q
NP pЙЕЬлв~енлЕЬк~мДЙ=jUсQM=afkVPP kNVM=MOSR Q
NQ pбЕЬЙкмеЦлкбеЦ=_OIV cONM=NOTR N
NR dЙпбеЗЙлнбСн=jSсNM=afkVNQ kNVM=OOVM O
NS hмййдмеЦлЬ®дСнЙ=гзнзклЙбнбЦ wNSM=MRUQ N
NT hмййдмеЦллнЙке wVUV=MMNM N
NU hмййдмеЦлЬ®дСнЙ=ймгйЙелЙбнбЦ wNSM=MRUR N
NV eуЗк~мдбвймгйЙ=Nm_NISLa wNSM=MMMV N
OM fееЙелЙЕЬлв~енлЕЬк~мДЙ=jSсOM=afkVNO kNVM=NNPU Q
ON pбЕЬЙкмеЦллЕЬЙбДЙ=jS=_kNPOVO kNVM=OMSM Q
OO tбевЙдСд~елЕЬ=Nod_=OS=jNUсNIR wNSM=MQPP O
OP fееЙелЙЕЬлв~енлЕЬк~мДЙ=jSсPR=afkVNO kNVM=NNQR Q
OQ cЙЗЙккбеЦ=jS=afkTVUM kNVM=OMTM Q
OR ^ì≈ЙеЦЙпбеЗЙнΩääÉ=jNUñNIR cOMM=OORP N
OS ^ел~мЦлЕЬд~мЕЬ=NVсS=iZPOM cOMM=QMOT N
OT pЕЬд~мЕЬвдЙггЙ=OSJPU wOMM=OMUM O
OU bl=udb=NMJmio=PLUJba wNSV=MQSM N
OV bбеС~ЕЬJiЙбнмеЦ=akU=NMiLVMM wNTV=MRMM N
Table 9: Petrol engine drive
Page 30

Page 28
Spare parts
Additional parts – pressure plate
Pos. Designation Part number No.
N aкмЕвйд~ннЙ cNMM=QTUO N
O pй~еелнбСн kNVM=OQUU N
P aблн~еткзЬк cOMM=TMPU N
Q pЙЕЬлв~енлЕЬк~мДЙ=jNOсNPM=afkVPN kNVM=MUVM N
R pЙдДлнлбK=pЙЕЬлв~енгмннЙк=jNO=afkVUR kNVM=NSRM N
Table 10: Additional parts – pressure plate
1
5
3
4
2
Page 31

Page 29
Spare parts
Two-hand operation
22
7
8
18
18
6
21
20
16
17
5
5
13
5
4
3
6
6
3
9
11
19
15
4
1
2
2
12
10
14
O
K
G
Page 32

Page 30
Spare parts
Pos. Designation Part number No.
N pЕЬ~днЬЙДЙдлЕЬмнт cNMM=RSUP N
O pЕЬ~днЬЙДЙд cOMM=VRRT O
P dêáÑÑ wOPM=NMMR O
Q pЙЕЬлв~енлЕЬк~мДЙ=jNMсOR=afkVPP kNVM=MPTM P
R pЙдДлнлбK=pЙЕЬлв~енгмннЙк=jNM=afkVUR kNVM=NSMM Q
S i~ЦЙккбеЦ cOMM=NPUO P
T pбЕЬЙкмеЦллЕЬЙбДЙ=jU=_kNPOVO kNVM=OMUM N
U pЙЕЬлв~енлЕЬк~мДЙ=jUсOM=afkVPP kNVM=MNUM N
V oбеЦлЕЬк~мДЙ=jNM=afkRUM kOMV=MOMM N
NM pбЕЬЙкмеЦллЕЬЙбДЙ=jNM=_kNPOVO kNVM=ONMM N
NN táééÉ cOMM=SVSU N
NO dЙпбеЗЙлнбСн=jUсPR=afkVNQ kNVM=OPPO N
NP pЙдДлнлбK=pЙЕЬлв~енгмннЙк=jU=afkVUR kNVM=NRRM N
NQ ^ДлЕЬ~днЬЙДЙд cNMM=RQQR N
NR ^ÄëÅÜ~äíëí~åÖÉ cOMM=TMRN N
NS pЙЕЬлв~енлЕЬк~мДЙ=jSсNS=afkVPP kNVM=MMSM N
NT pЙдДлнлбK=pЙЕЬлв~енгмннЙк=jS=afkVUR kNVM=NQTM N
NU pЕЬЙбДЙ=jS=afkNORL^ kNVM=NUSM O
NV hдЙгглнΩÅâ cNMM=OSQS N
OM cäΩЦЙдгмннЙк=jU=afkPNR kNVM=NQVM N
ON dЙпбеЗЙлнбСн=jUсOR=afkVNQ kNVM=OPPM N
OO wмЦСЙЗЙк=NISсNTISсRS wNOM=MMUU N
pЕЬ~днЬЙДЙдлЕЬмнт=озкгзенбЙкн=EmзлK=NJ=SF cQMM=NSOQ
hдЙгглнΩЕв=озкгзенбЙкн=EmзлK=NV=J=ONF cQMM=NMPV
Table 11: Two-hand operation
Page 33

Page 31
Spare parts
Log plate and criss-cross wedge
Pos. Designation Part number No.
N eçäò~ìÑä~ÖÉ cNMM=QTTR N
O tЙеЗЙлй~днвкЙмт cNMM=QTSO N
eздт~мСд~ЦЙ=взгйдЙнн cMMM=NUVV
tЙеЗЙлй~днвкЙмт=взгйдЙнн cMMM=NUVP
Table 12: Log plate and criss-cross wedge
1
2
Page 34

Page 32
Spare parts
Valve VDM07-01D230
3
5545
7
6
1
2
7
66
77
Page 35

Page 33
Spare parts
Pos. Designation Part number No.
N hздДЙе wPPM=MVRP N
O eЙДЙдд~ЦЙк wPPM=MOOV N
P mдзгДбЙкв~ййЙ wPPM=MRNU N
QoΩЕвлЕЬд~ЦоЙенбд wPPM=MQVU N
R §ДЙкЗкмЕвоЙенбд wPPM=MQVT N
S o~лнЙел~нт wPPM=MQSR N
TaáÅÜíë~íò=ÑΩк=hздДЙе wPPP=MNOM N
sЙенбд=sajMT=взгйдЙнн wNSR=MNRM
Table 13: Ventil VDM07-01D230
Page 36

Page 34
Spare parts
Notes
Page 37

Page 35
Spare parts
Notes
Page 38

Page 36
Spare parts
Notes
Page 39

Conformity Declaration
We hereby declare that the machine listed below complies in its design and
construction with the relevant basic health & safety regulations laid down by the EU
Directive.
This declaration is invalidated by any changes made to the machine which are
unauthorised by us.
This machine was designed according to then:
• EECMachine Directive 98/37/EG
• EGLowvoltage Equipment Directive 2006/95/EG
• Directive for Electromagnetic Compatibility EMC 89/336/EEC
• EN 121001,2 Safety of machinery. Basic concepts
• EN 602041 Electrical construction of machinery
• EN 294 Safety distances – upper limbs
• EN 811 Safety distances – lower limbs
• EN 349 Minimum distances to prevent crushing of body parts
• EN 982 Technical safety requirements – hydraulics
• EN 6091 Log splitters
• EN 574 Twohand operation
Internal measures ensure that series machines always comply with current EEC
Directives and the applied standards.
The hereinafter named registered office
“Deutsche Prüfstelle für Land- und Forsttechnik, Weissensteinstraße 70/72, D-34114 Kassel“
registered under the registration number 0363
a) has been appointed to keep custody of the documents according to appendix VI;
b) has certified that the documents correspond to the regulations according to appendix
VI;
c)has carried out the type examination test.The product is identical to the model
according to the type examination test which received a certificate regarding inspection
of working safety under the number
• BGS 2005/013
Leibnitz, 12. 03. 2007
EC
Ing. Johann Tinnacher
Managing Director
Posch
Gesellschaft m. b. H.
PaulAntonKellerStraße 40
A8430 Leibnitz
“Horizontalspalter 1050“
Conformity Declaration
Page 40

Your Mr. Paldu Deal er
www.paldu.com
 Loading...