

Page 1
LEADERS IN CAMERA ROBOTICS
CRANES AND RIGS | BROADCAST | HEADS & DSLR | PRODUCT PHOTOGRAPHY | RENTALS
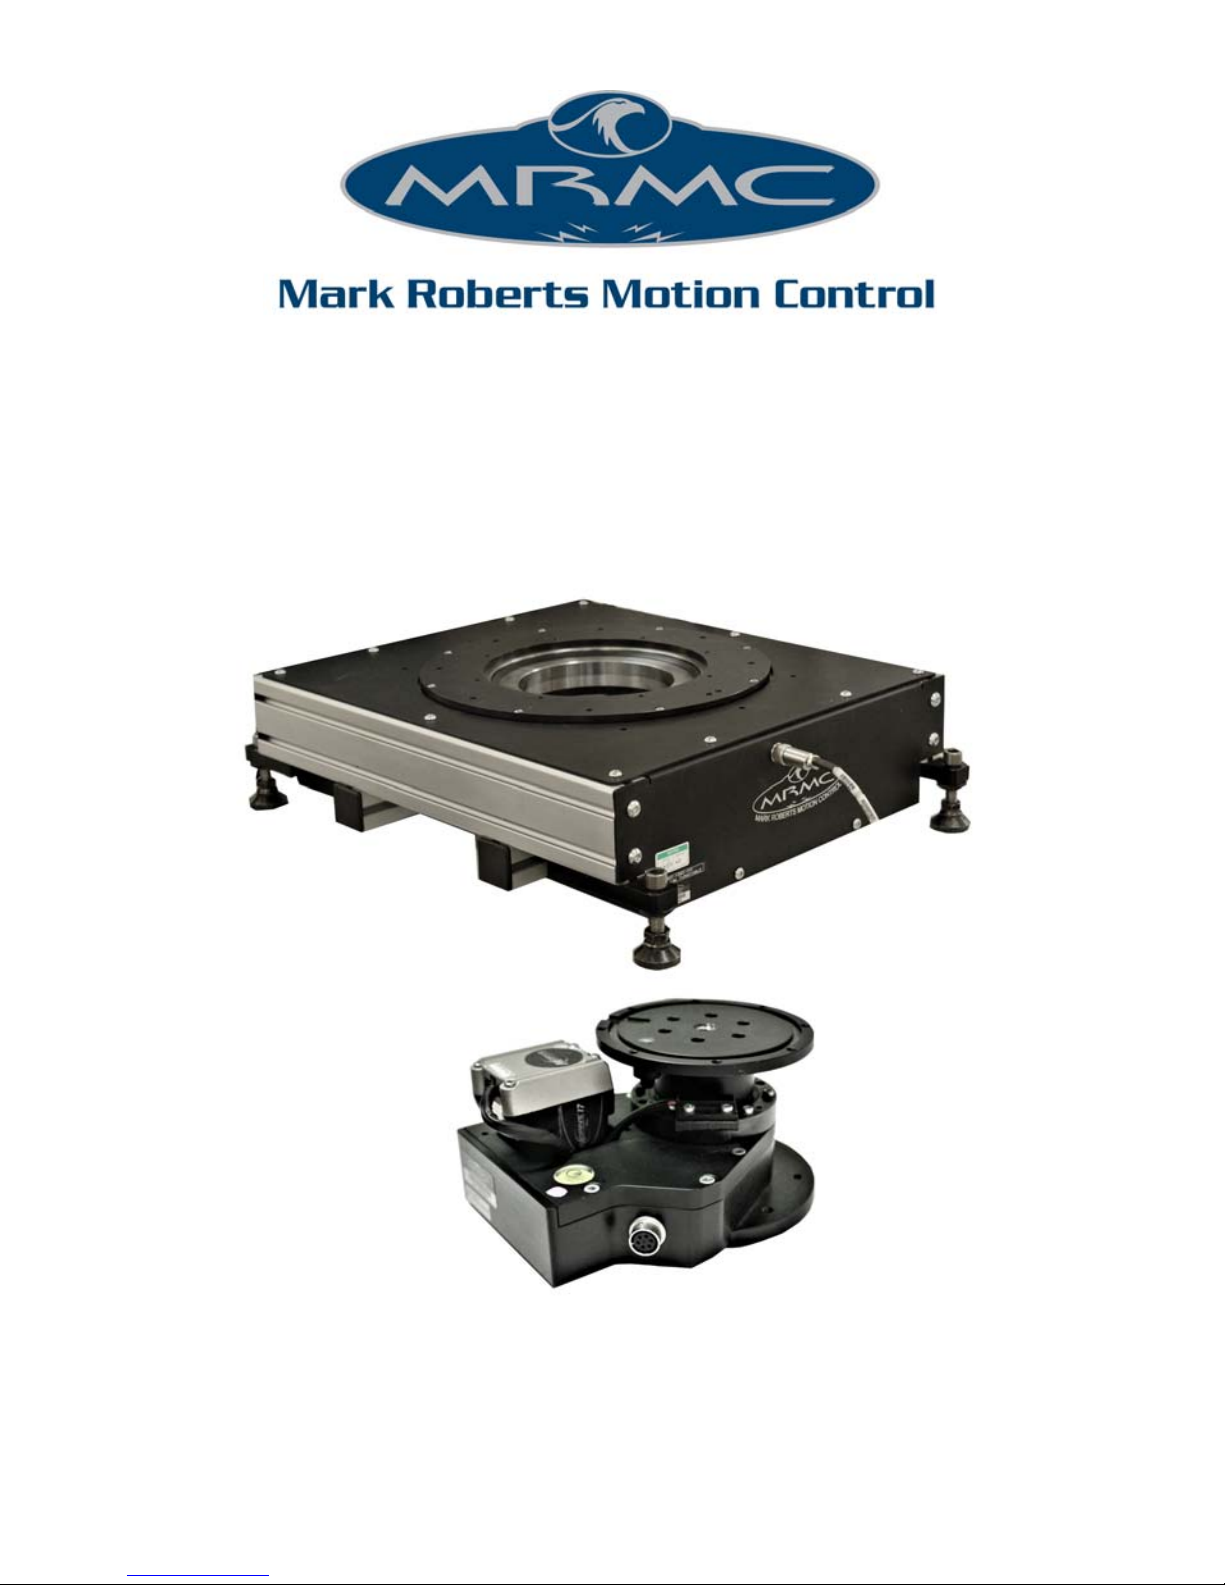
Turntable
AUTOMATED PRODUCT PHOTOGRAPHY
Quick Start Guide
Part number: MRMC-1082-00
MRMC-1096-00
Product Code: MRMC-1502-00
Page 2

ii
Turntable Quick Start Guide
Product code: MRMC-1331-00, MRMC-1096-00
Part number: MRMC-1082-00
© 2017 Mark Roberts Motion Control ® Ltd. All rights reserved.
No part of this publication may be reproduced, transmitted, or translated
by any means — graphical, electronic, or mechanical — including
photocopying, recording, taping, or storage in an information retrieval
system, without the express written permission of Mark Roberts Motion
Control.
Although every care has been taken to ensure that the information in this
document is accurate and up to date, Mark Roberts Motion Control
continuously strives to improve their products and may make changes to
the hardware, firmware, and software described in this document. Mark
Roberts Motion Control therefore cannot be held responsible for any
error or omission in this document.
All product names mentioned herein are the trademarks or registered
trademarks of their respective owners.
Contact information
Mark Roberts Motion Control Ltd.
Unit 3, South East Studios
Blindley Heath
Surrey
RH7 6JP
United Kingdom
Telephone: +44 (0) 1342 838000
E-mail: [email protected] (sales and general enquiries)
[email protected] (customer support)
Web: www.mrmoco.com
www.mrmocorentals.com
Page 3

Turntable Quick Start Guide
iii
Turntable Quick Start GuideTurn t ab l eQuick Start Guide
Contents
Chapter 1 Quick Start..................................................................... 1
Important safety instructions...............................................1
General care................................................................... 1
Location .........................................................................1
Intellectual property ..................................................... 1
Overview .................................................................................2
Connecting the cables ...........................................................3
Medium Turntable........................................................ 3
Small Turntable............................................................. 4
Appendix 2 Back panel ...................................................................... 5
Connector summary.............................................................. 5
Stepper motor connector............................................. 5
Appendix 3 Specifications................................................................. 7
Medium Turntable................................................................. 7
Small Turntable ......................................................................7
Small Turntable mounting holes .......................9
Page 4

Turntable Quick Start Guide
iv
Page 5

Turntable Quick Start Guide
1
Turntable Quick Start GuideTurn t ab l eQuick Start Guide
Chapter 1 Quick Start
Important safety instructions
To ensure the best from the product, please read this manual carefully.
Keep it in the safe place for future reference.
To reduce the risk of electric shock, do not remove the cover from the
unit. No user serviceable parts inside. Refer servicing to qualified
personnel.
General care
Do not force switches or external connections.
When moving the unit, disconnect the mains cable.
Do not attempt to clean the unit with chemical solvents or
aerosol cleaners, as this may damage the unit. Use a clean dry
cloth.
Do not use around flammable gas. All electrical equipment can
generate sparks that can ignite flammable gas.
Keep away from pets and children. The head has powerful
motors that can pinch, so take care not to get your hands
trapped in the head or cabling.
Keep cables tidy. Use cable ties to keep them out of harm’s way.
If you have a head with slip rings then make use of them; avoid
running any cables between the base and the rotating head or
camera.
Location
Installation of this unit should be away from sources of excessive heat,
vibration, and dust.
Intellectual property
This product includes confidential and/or trade secret property.
Therefore, you may not copy, modify, adapt, translate, distribute, reverse
engineer, or decompile contents thereof.
Page 6

Turntable Quick Start Guide
2
Overview
Thank you for using the Turntable from Mark Roberts Motion Control
(MRMC). You can use the Turntable for day in and day out use in
product photography. Currently, it has two variants: Medium Turntable
and Small Turntable. Turntable gives you the following features:
High speed
Zero backlash
Precise movement
Different size disks can be used depending on your product
dimensions
Medium Turntable is centreless so cables or power can be fed
through to appliances
Small turntable can be positioned upside down to hang fashion
accessories on such as bags
Page 7
Turntable Quick Start Guide
3
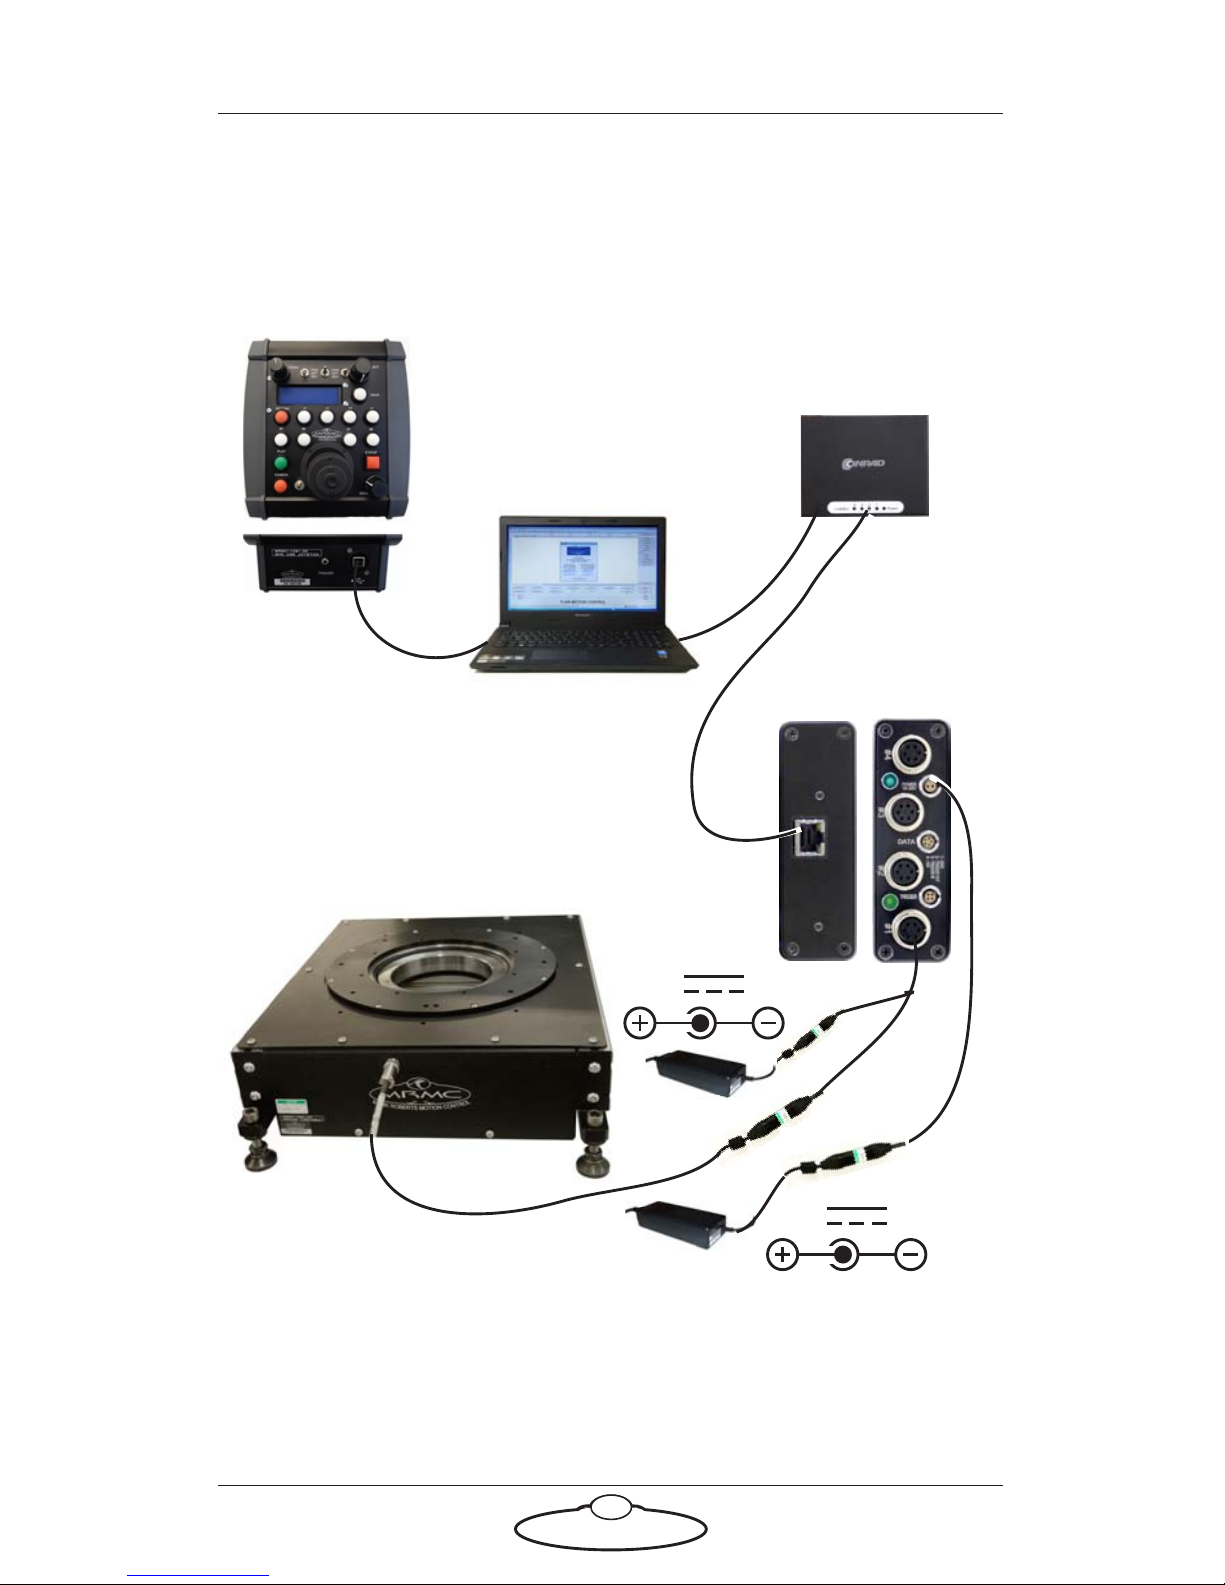
Connecting the cables
Medium Turntable
USB Joystick
Example controller:
PC running Flair
Network Hub
Quad box
Rear Front
Medium Turntable
48V 3.4A
24V 5A
USB
ETHERNE
T
ETHERNET
POWER
The diagram shows a typical application. Attach the power cables last.
The controller can be any MRMC controller such as a PC running Flair
Motion Control Software or one of the MSA-based controllers such the
Large Flat Panel (LFP), MSA-20 Handwheels, Joystick Controller, or Mini
MSA.
Page 8
Turntable Quick Start Guide
4
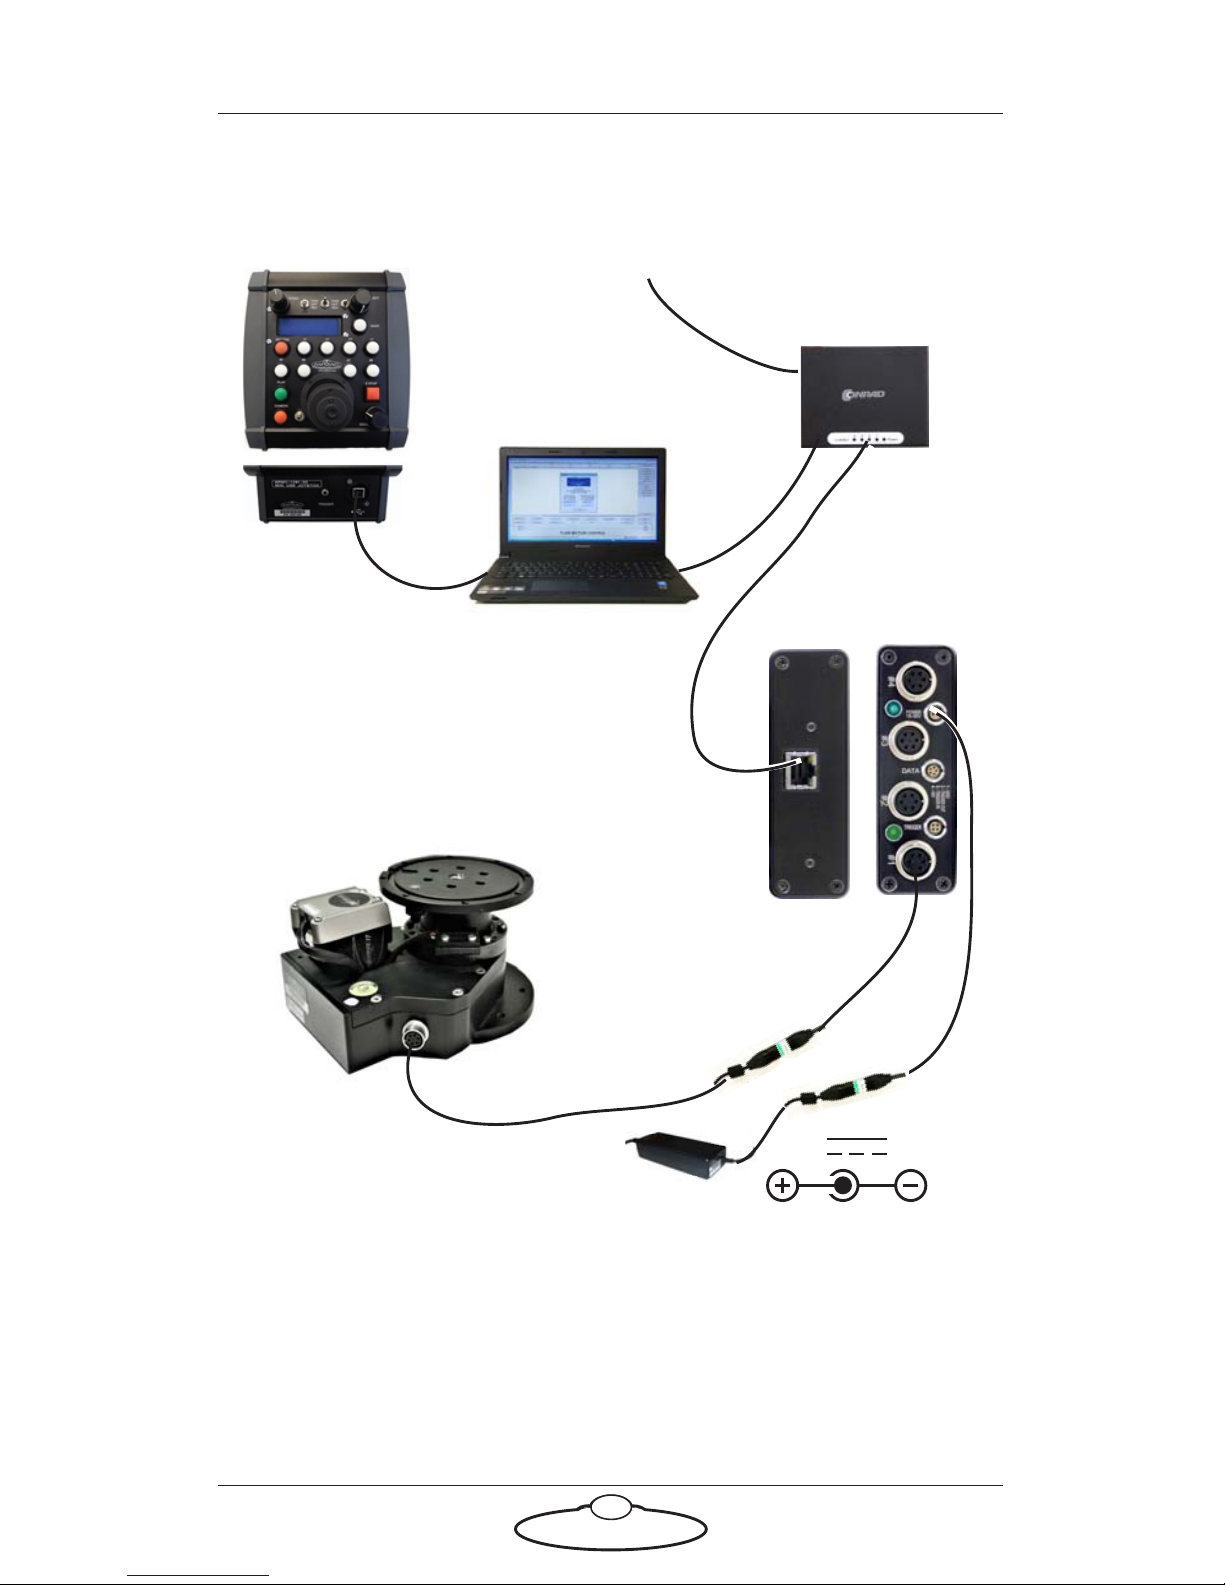
Small Turntable
USB Joystick
Example controller:
PC running Flair
Network Hub
Quad box
Rear Front
Small Turntable
24V 5A
USB
ETHERNE
T
ETHERNET
POWER
POWER
STEPPER MO
VER MOTOR
The diagram shows a typical application. Attach the power cables last.
The controller can be any MRMC controller such as a PC running Flair
Motion Control Software or one of the MSA-based controllers such the
Large Flat Panel (LFP), MSA-20 Handwheels, Joystick Controller, or Mini
MSA.
Page 9

Turntable Quick Start Guide
5
Turntable Quick Start GuideTurn t ab l eQuick Start Guide
Appendix 2 Back panel
Connector summary
Stepper motor connector
This connector connects the model
mover motor cable to the stepper
motor connector on the quad box. The
cable can also be a split to provide 48V
power to the quad box.
1. GND
2. 24V
3. 5V
4. Homing Datum
5. Step
6. Direction
5
6
1
3
2
4
Page 10

Turntable Quick Start Guide
6
Notes
Page 11
Turntable Quick Start Guide
7
Turntable Quick Start GuideTurn t ab l eQuick Start Guide
Appendix 3 Specifications
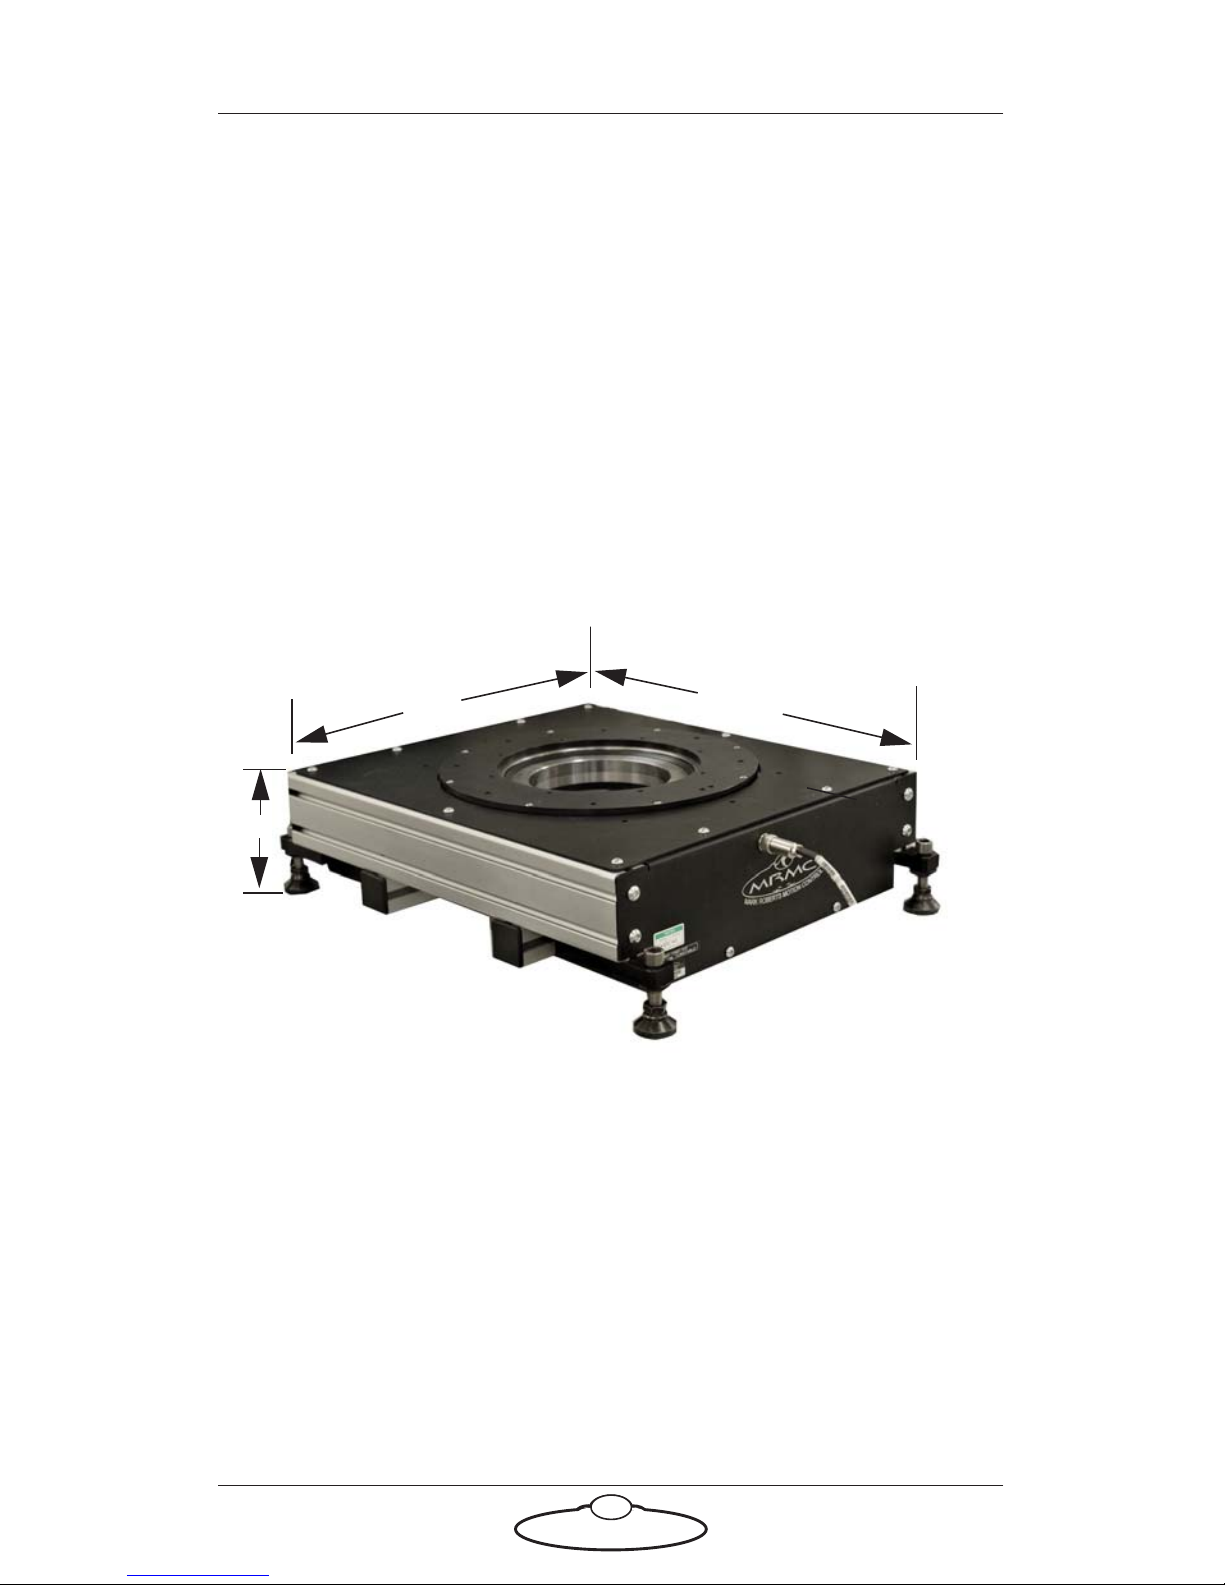
Medium Turntable
Weight: 2.8Kg
Power requirements: 24-48 Volts DC
Temperature range: -10 to +45 °C
Humidity tolerance: 0% to 90% relative humidity, non-condensing
Rotation speed: 90°/s
Load capacity: 200Kg
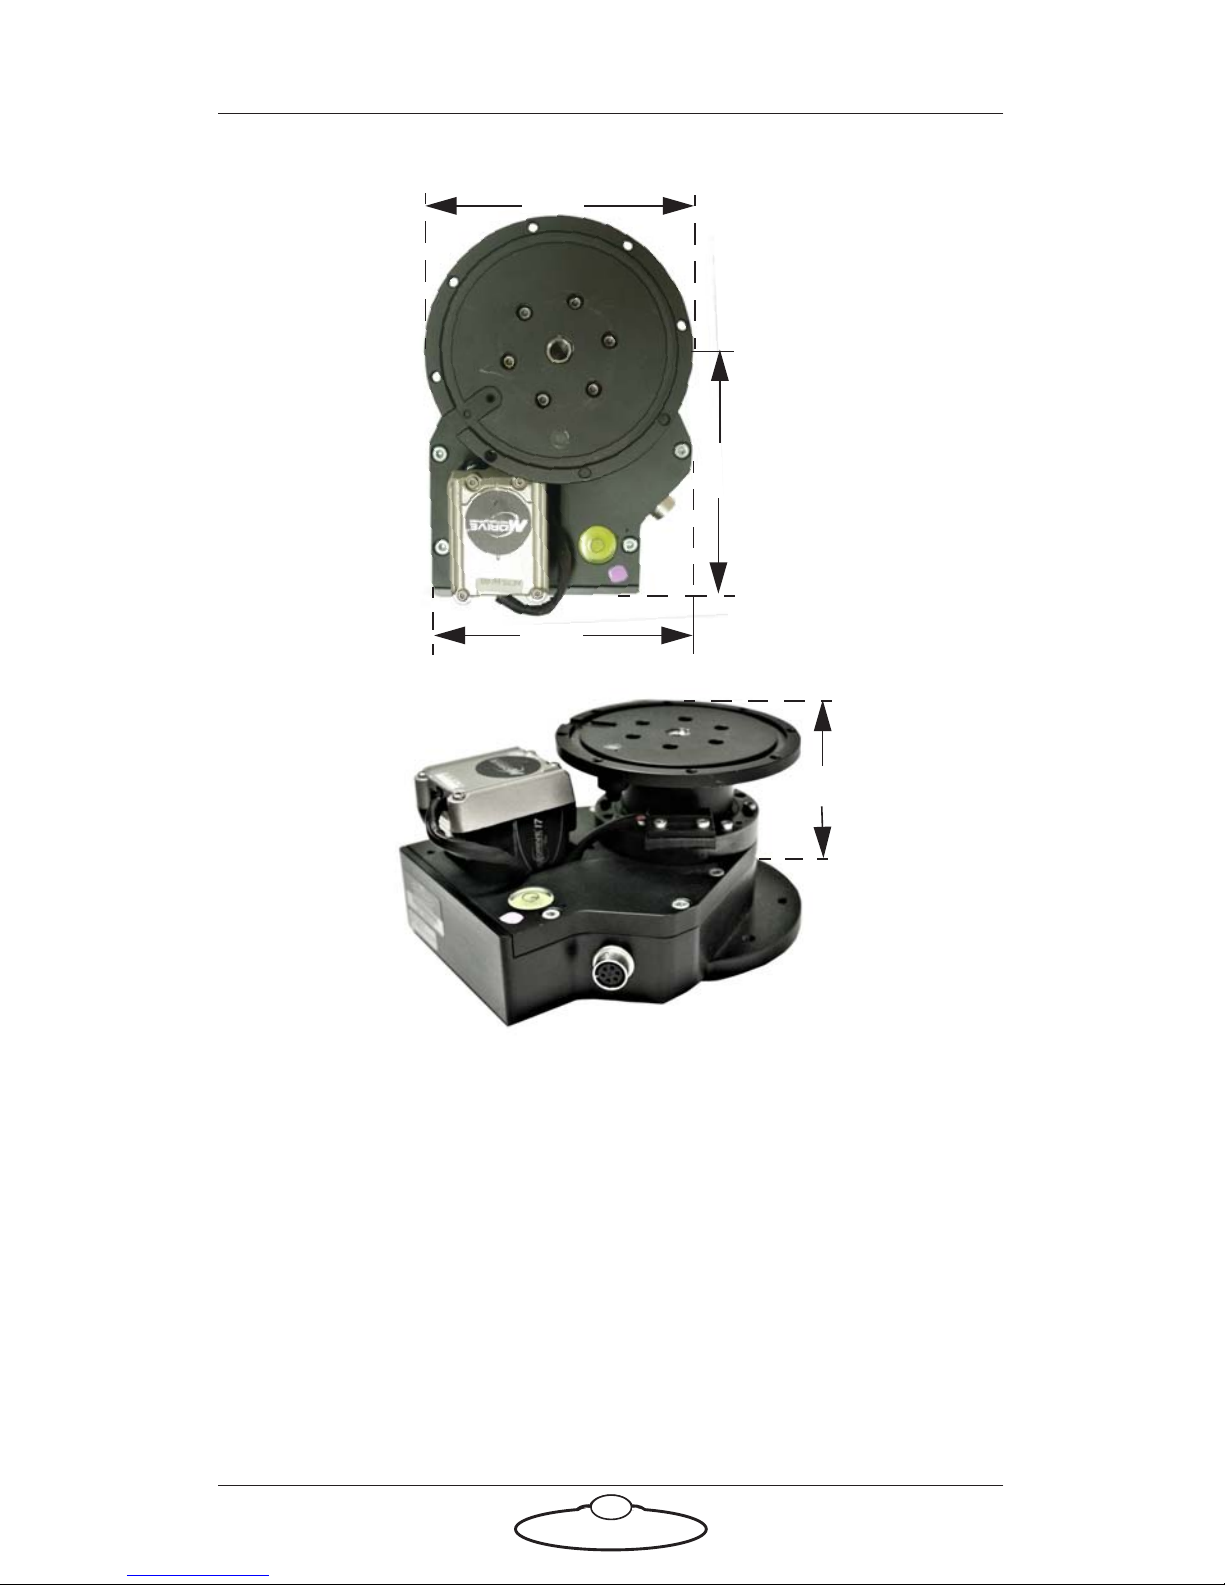
Dimensions are shown as follows. All measurements are in mm.
Small Turntable
Weight: 2.8Kg
Power requirements: 24 Volts DC
Temperature range: -10 to +45 °C
Humidity tolerance: 0% to 90% relative humidity, non-condensing
Rotation speed: 100°/s
555
42
150
440
Medium Turntable
Page 12
Turntable Quick Start Guide
8
Load capacity: 20Kg
114
109
125
110
Page 13
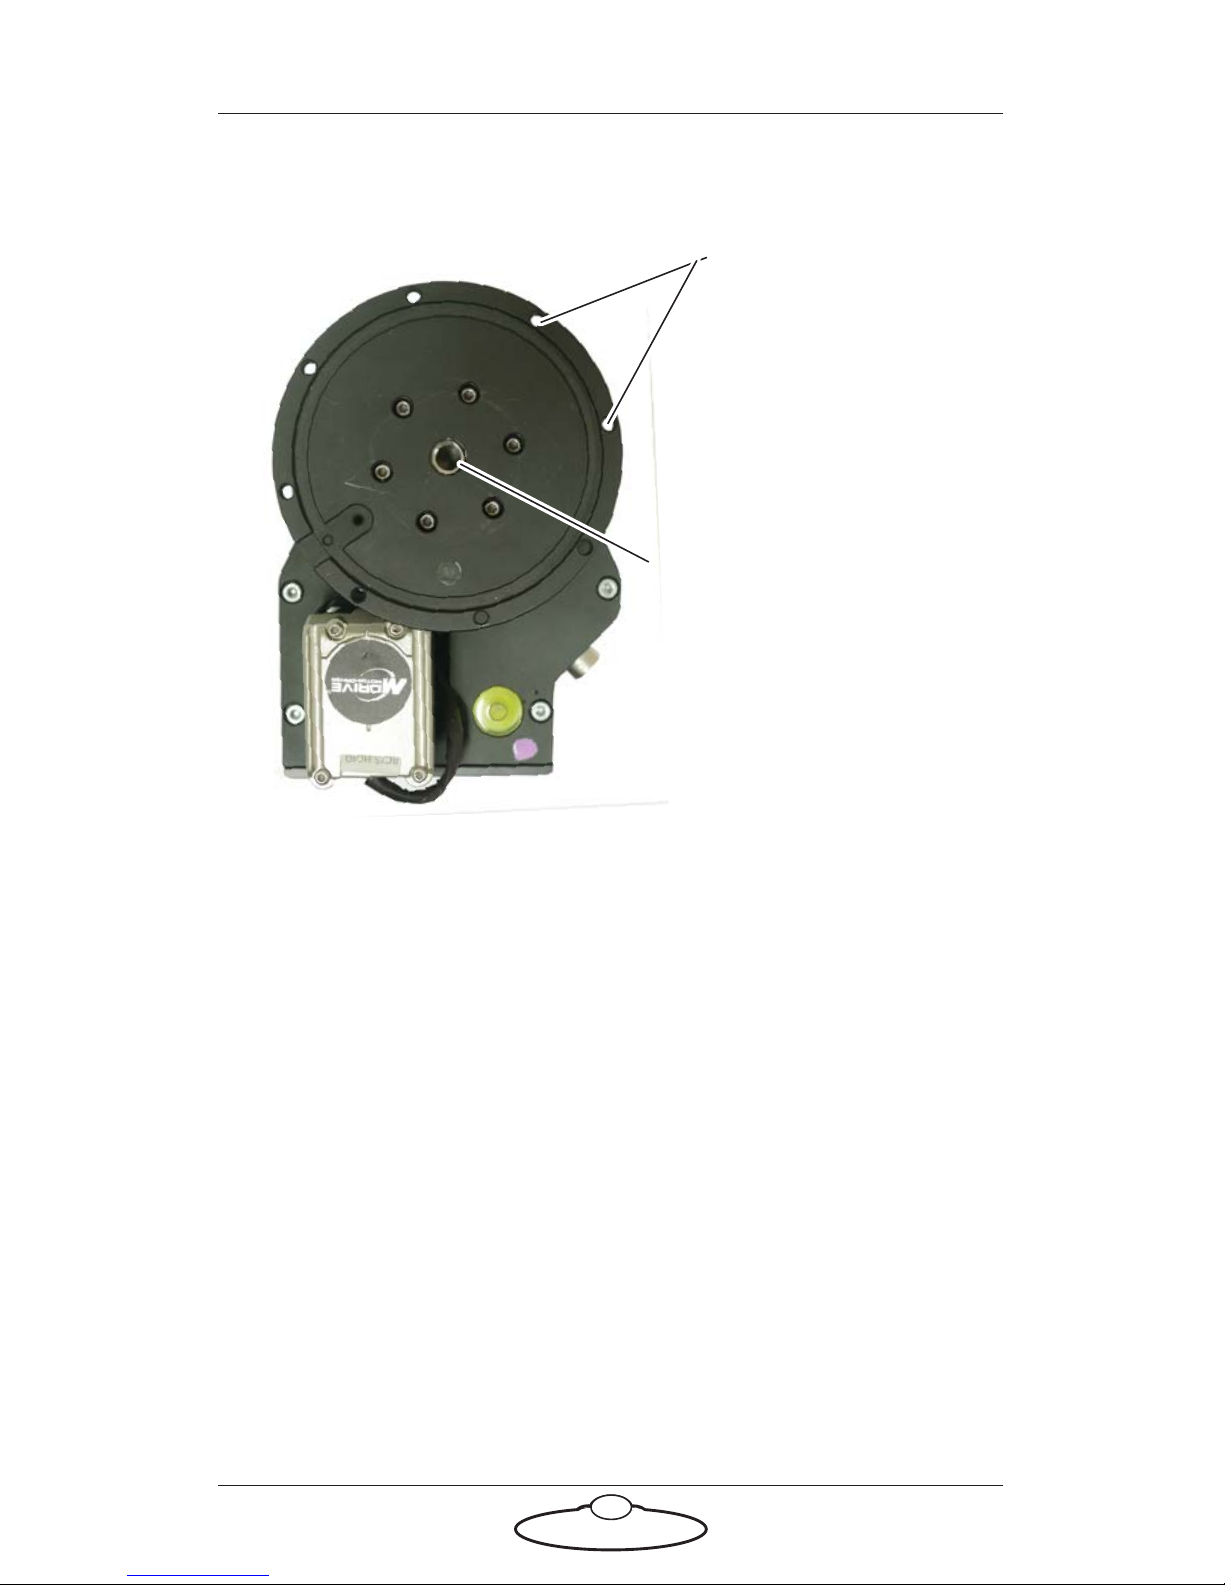
M5 threaded holes, 6 mm
deep and evenly spaced.
These can be used to mount
different sized disks based
on your object size.
3/8-16 centre hole
Turntable Quick Start Guide
9
Small Turntable mounting holes
Page 14
Turntable Quick Start Guide
10
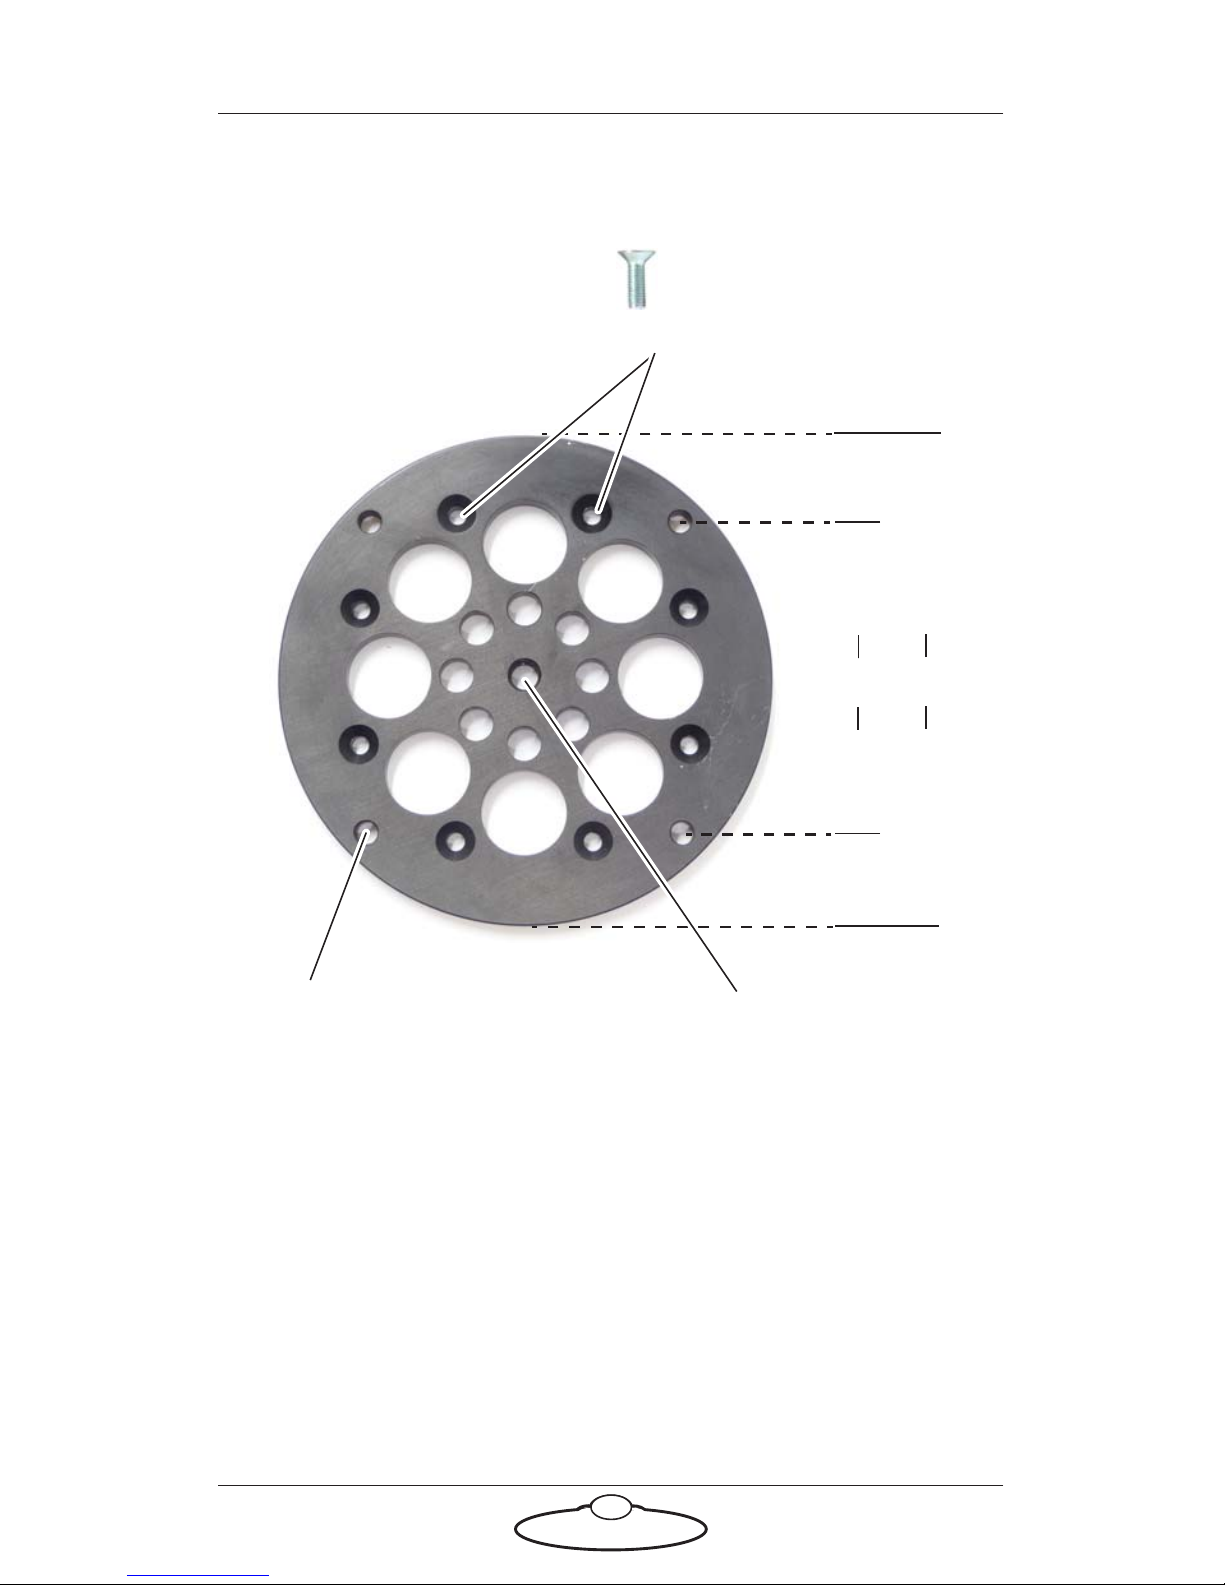
M6 unthreaded holes
around the edge for
mounting the plate onto
any solid surface.
Small riser plate
M5 unthreaded countersunk
holes for attachment to the
bottom of the head, using M5
CSK (countersunk) bolts 12
mm long.
3/8-16 centre hole
threaded for a
standard heavy-duty
tripod mounting bolt.
All other holes in the
plate are unthreaded.
92
Thickness: 8 mm
145
Page 15
Turntable Quick Start Guide
11
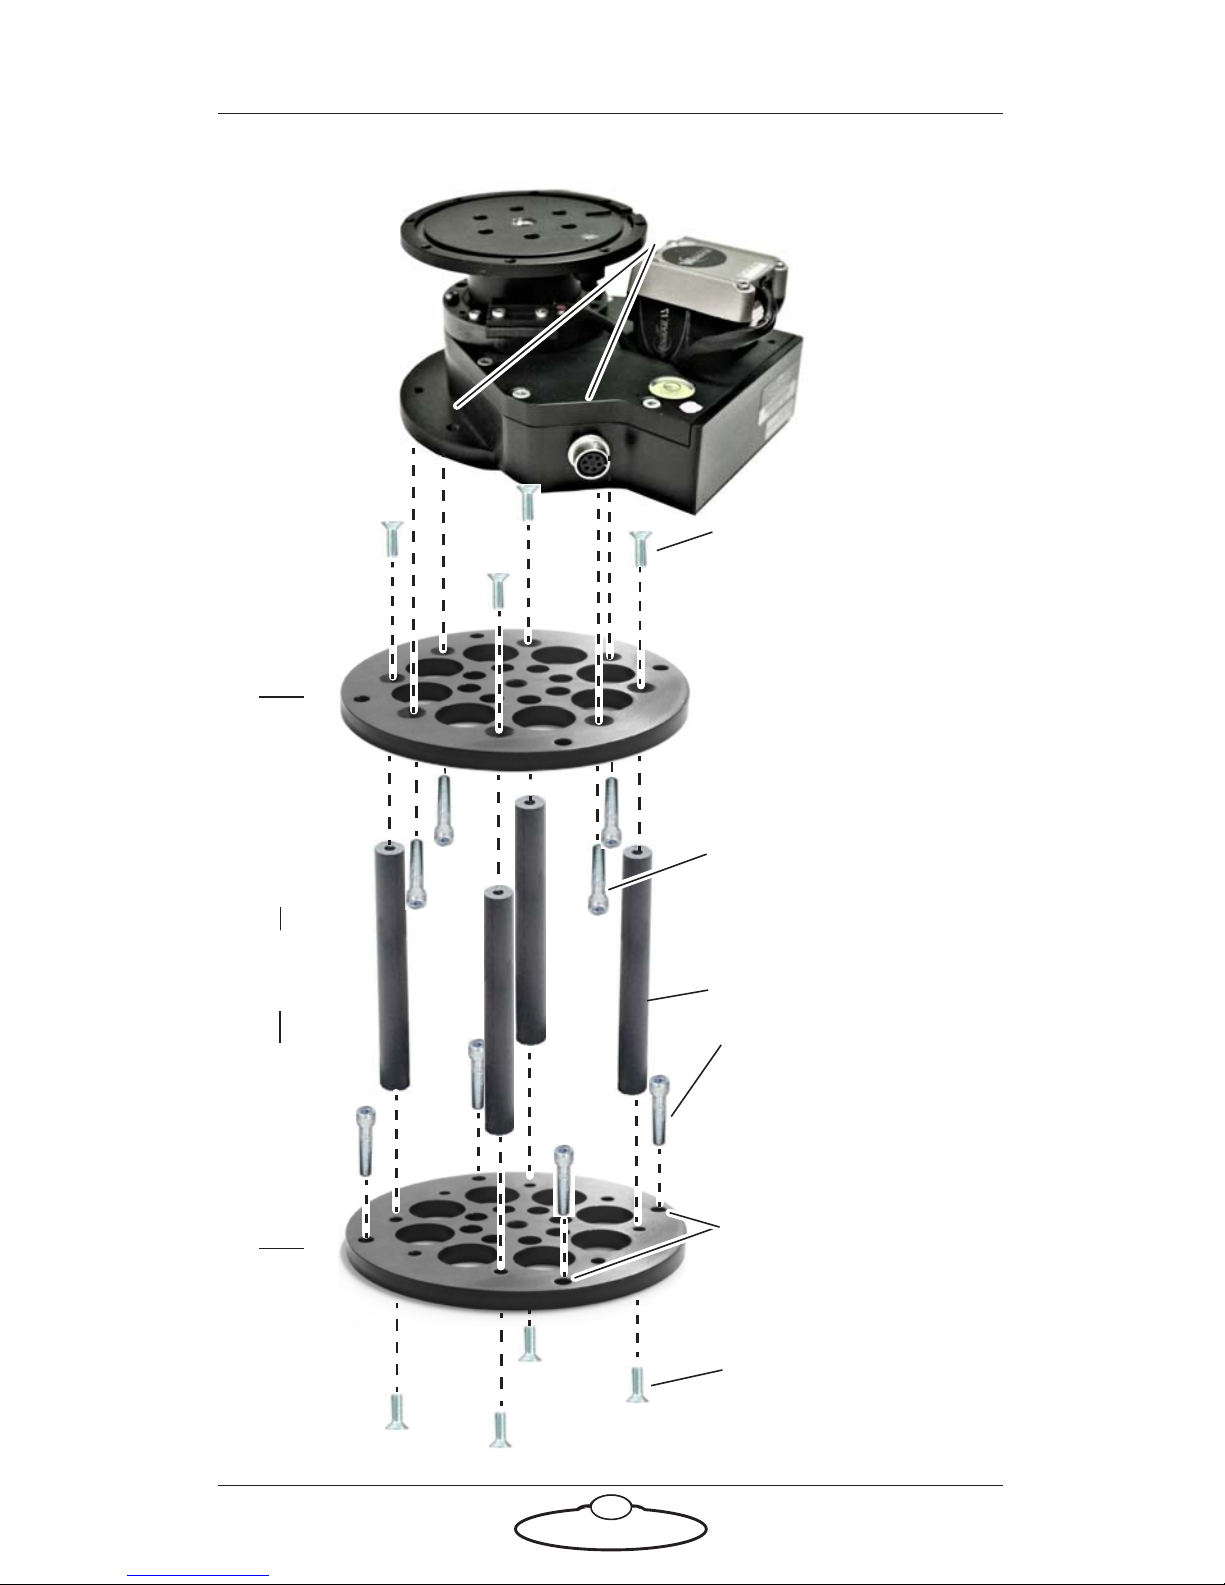
M6 unthreaded holes
around the edge for
mounting the plate onto
any solid surface.
Optional riser
M5 CSK (countersunk)
bolts 12 mm long.
Plate
8 mm
110 mm
thickness:
M5 CSK (countersunk)
bolts 12 mm long.
final height
M6 bolts or screws
suitable for the surface
on which you are
mounting the riser.
Small riser plate. Top and
bottom plates are
identical, but the bottom
one is inverted to cater
for the countersunk bolts
that go into the columns
Riser columns
M5 cap-head bolts for
attaching the riser to the
base of the head, 12 mm
long.
Page 16
Turntable Quick Start Guide
12
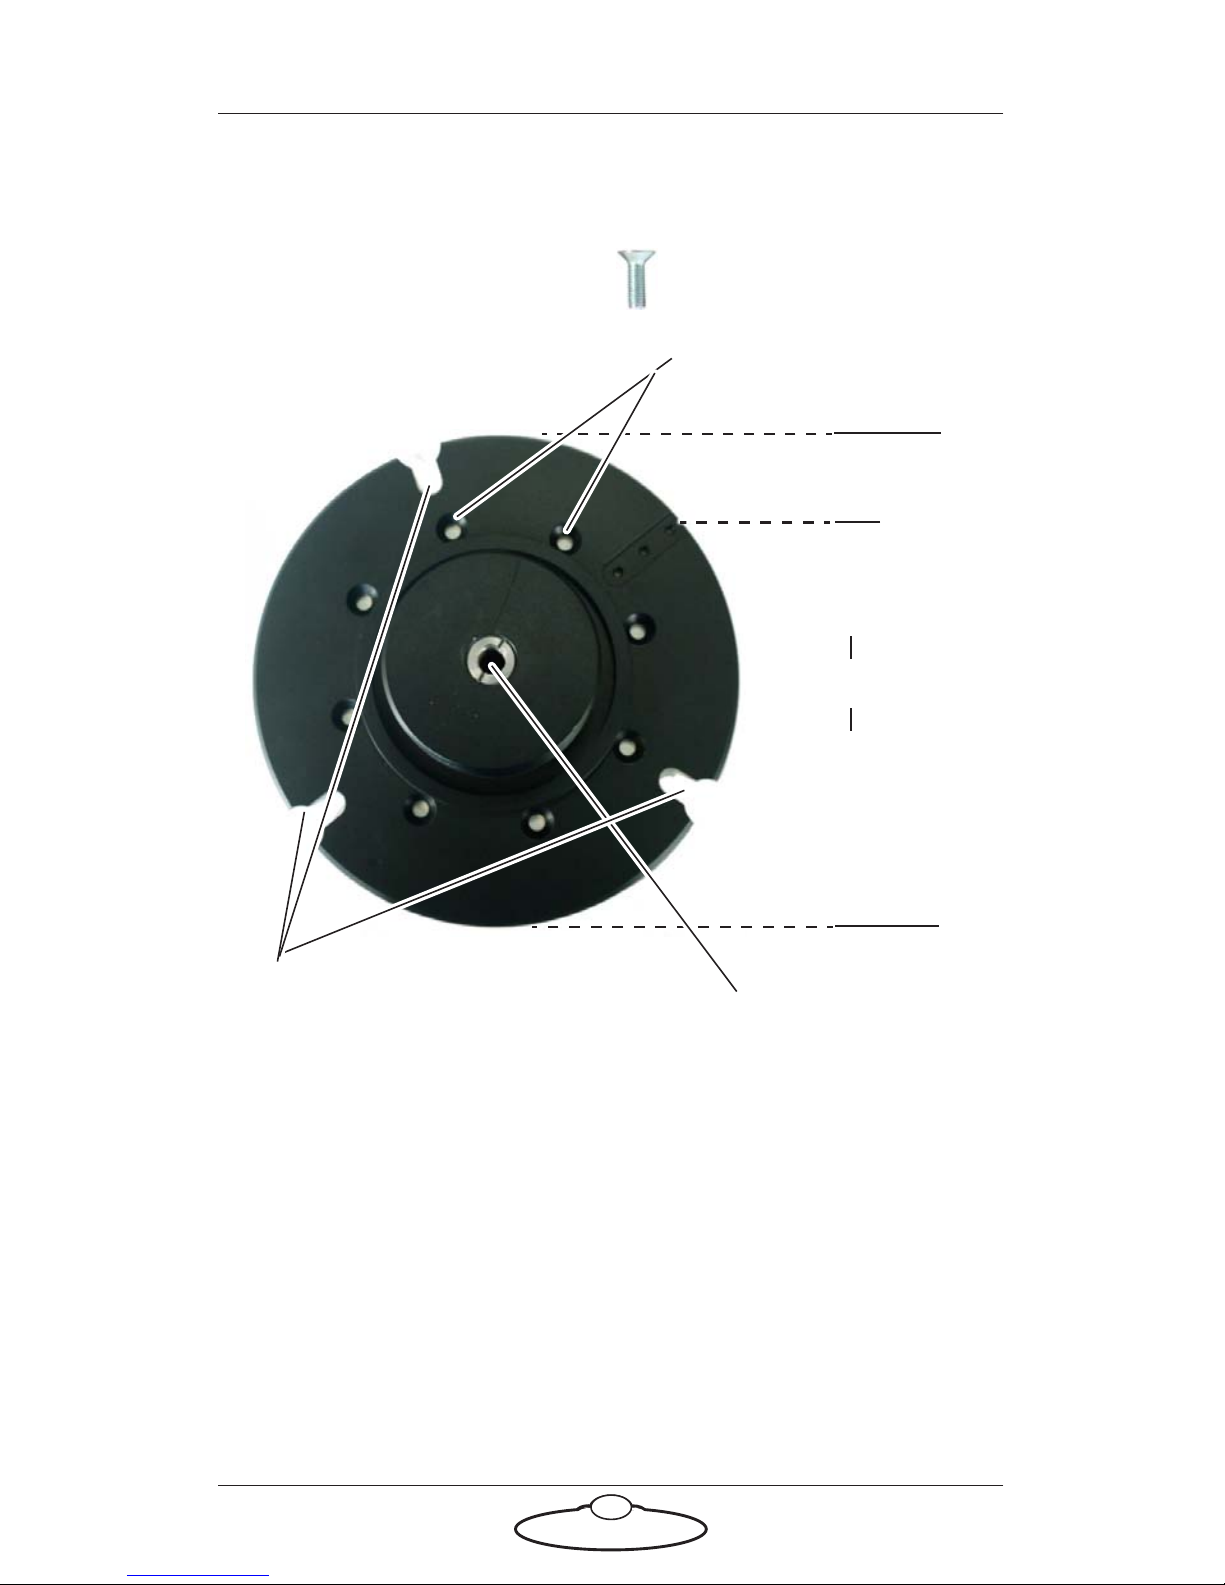
Mitchell Mounting adaptor plate
M5 unthreaded countersunk
holes for attachment to the
bottom of the head, using M5
CSK (countersunk) bolts 12
mm long.
3/8-16 centre hole
threaded for a
standard heavy-duty
tripod mounting bolt.
All other holes in the
plate are unthreaded.
Thickness: 8 mm
170
M8 mounting slots
Page 17
Turntable Quick Start Guide
13
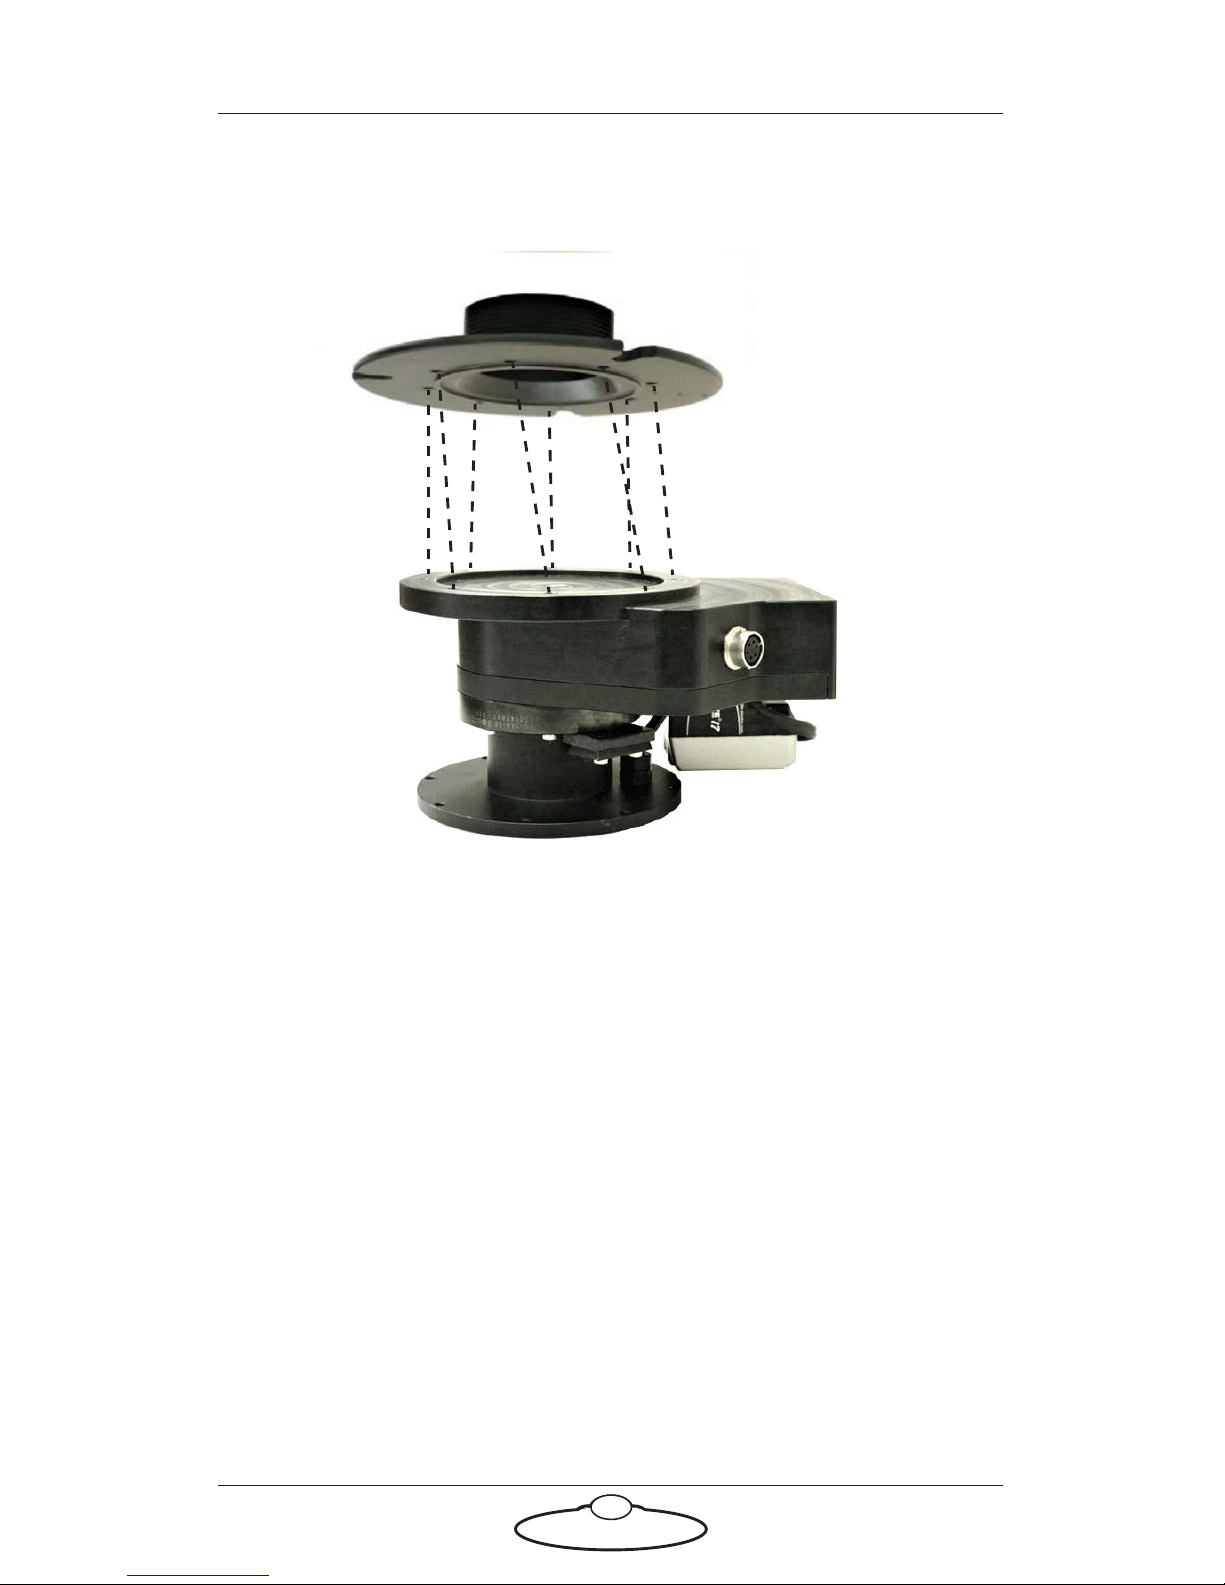
Small turntable Underslung
Mitchell mounting
adapter plate can
be used to mount
small Turntable in
an underslung or
overslung position
Page 18

Turntable Quick Start Guide
14
Notes
Page 19

Turntable Quick Start Guide
15
Notes
Page 20
Mark Roberts Motion Control Ltd.
Unit 3, South East Studios, Blindley Heath, Surrey RH7 6JP
United Kingdom
Telephone: +44 (0) 1342 838000
[email protected]
www.mrmoco.com
 Loading...