

Page 1
COMPACT PROPANE HEATER
Part No. MH9BX
Portable Buddy
User Manual and
Product Specications
by PRIMUS
®
Image for representation purposes only and may differ from actual product.
DO NOT: Operate this appliance before reading the instruction booklet
DO NOT: Place articles on or against this appliance
DO NOT: Store chemicals, ammable materials or spray aerosols near this appliance
DO NOT: Operate with panels, covers or guards removed from this appliance.
DO NOT: Operate in an enclosed area without ventilation
DO NOT: Operate in a boat, caravan or tent
IMPORTANT
Read these instructions for use carefully. Familiarise yourself
with the appliance before connecting it to its gas container.
Keep these instructions for future reference.
Page 2
Important
1. Please read all instructions carefully.
2. Dispose of all polythene packaging
carefully and keep out of the hands of
young children.
Safety warning
Please read all safety warning and assembly
instructions before use. Retain all information
for future reference. Failure to follow the
instructions may cause personal injury and/or
damage.
1. Never use in unventilated or enclosed
areas. This heater consumes air and could
endanger life if used in unventilated or
enclosed areas.
2. Only non rellable 468g disposable
cylinders are to be used with this appliance.
CAUTION - IT MAYBE HAZARDOUS TO
ATTEMPT TO FIT OTHER TYPES OF GAS
CONTAINERS.
3. Never leave heater unattended when in use.
CAUTION - accessible parts may be very hot.
Keep young children away.
4. Always use oven mitts/oven gloves when
handling the heater after use.
Installation, operation and
maintenance instructions
Safety information: if you smell gas
• If there is a leak on your appliance (smell of
gas), immediately attempt to turn off.
• Remove the appliance to a well ventilated
location away from any ignition source.
• Only check for leaks outdoors using soapy
water.
• Do not try to detect leaks using a ame.
• When leak has stopped, ventilate and
disperse gas from the area before
continuing.
IMPORTANT: read this instruction for use
carefully. Familiarise yourself with the appliance
before connecting it to the gas bottle. This
appliance is for use with disposable propane
cartridges only.
• Do not remove regulator, connect to
high-pressure canister or use adaptors.
• When changing gas cartridge ensure that
it is undertaken in a well ventilated area,
preferably outside and away from sources
of ignition such as naked ames, pilot
ames, electrical and heating equipment
and people.
• To check if cartridge has sufcient gas
pick up cartridge and shake from side to
side. If there is movement or the sounds of
liquid moving inside the cartridge then it will
contain gas.
FOR OUTDOORS USE ONLY - ONLY USE IN
WELL VENTILATED AREAS.
This appliance shall only be used in an above
ground open air situation with natural ventilation,
without stagnant areas, where gas leakage and
products of combustion are rapidly dispersed
by wind and natural convection.
CARBON MONOXIDE HAZARD — THIS
APPLIANCE CAN PRODUCE CARBON
MONOXIDE WHICH HAS NO ODOUR.
USING IT IN AN ENCLOSED SPACE (FOR
EXAMPLE, CARAVAN, TENT, CAR, MOBILE
HOME) MAY CAUSE DEATH.
THIS APPLIANCE IS ONLY TO BE USED
ON SOLID AND STABLE HORIZONTAL
SURFACES.
Safety Instructions
Page 3
Caution
NEVER assemble or operate the unit on
unstable or uneven ground. Always operate
in open and well-ventilated areas.
NEVER operate inside a tent, caravan, camper
trailer vehicle or boat.
NEVER leave the unit unattended
whilst operating.
NEVER open the control panel or
dis -assemble unit.
This appliance is not intended for use by young
children or inrm person unless they have been
adequately supervised by a responsible person
to ensure that they can use the appliance
safely. Young children should be supervised
to ensure that they do not play with the
appliance. This appliance is to be installed as
per local regulation and in accordance with
AS5601/AG601.
Safety after installation
The purpose of this section is to direct your
attention to the possibility of accidents that can
be avoided.
• This appliance is not to be used in enclosed
areas and must be operated away from any
type of ammable material or liquid.
• This appliance must be operated a
minimum of 100mm from all solid or noncombustible surfaces.
• During the operation of this appliance all air
openings and vents must be kept free from
obstructions to ensure correct operation.
• Remember the appliance produces heat,
therefore some parts will get hot. Allow to
cool before touching.
• Do not leave children unattended near the
appliance when in use.
• Do not store or use petrol or other
ammable liquids in the vicinity of this or any
other appliance.
• Do not modify this appliance.
• Do not use adaptors.
• Do not allow clothing to pass over or lay on
the appliance.
• Protect the appliance from wind and drafts
when in use.
• Do not operate appliance below ground
level or in areas where unburned gas could
build up.
• Do not move appliance while operating
• Clean after use.
• Do not use this appliance if it is leaking,
damaged or does not work properly.
• Do not use this appliance if it has damaged
or worn seals.
• This appliance must only be serviced by an
authorised person.
• Store the gas cartridge outdoors in a well
ventilated area or in a storage area compliant
with AS1596.
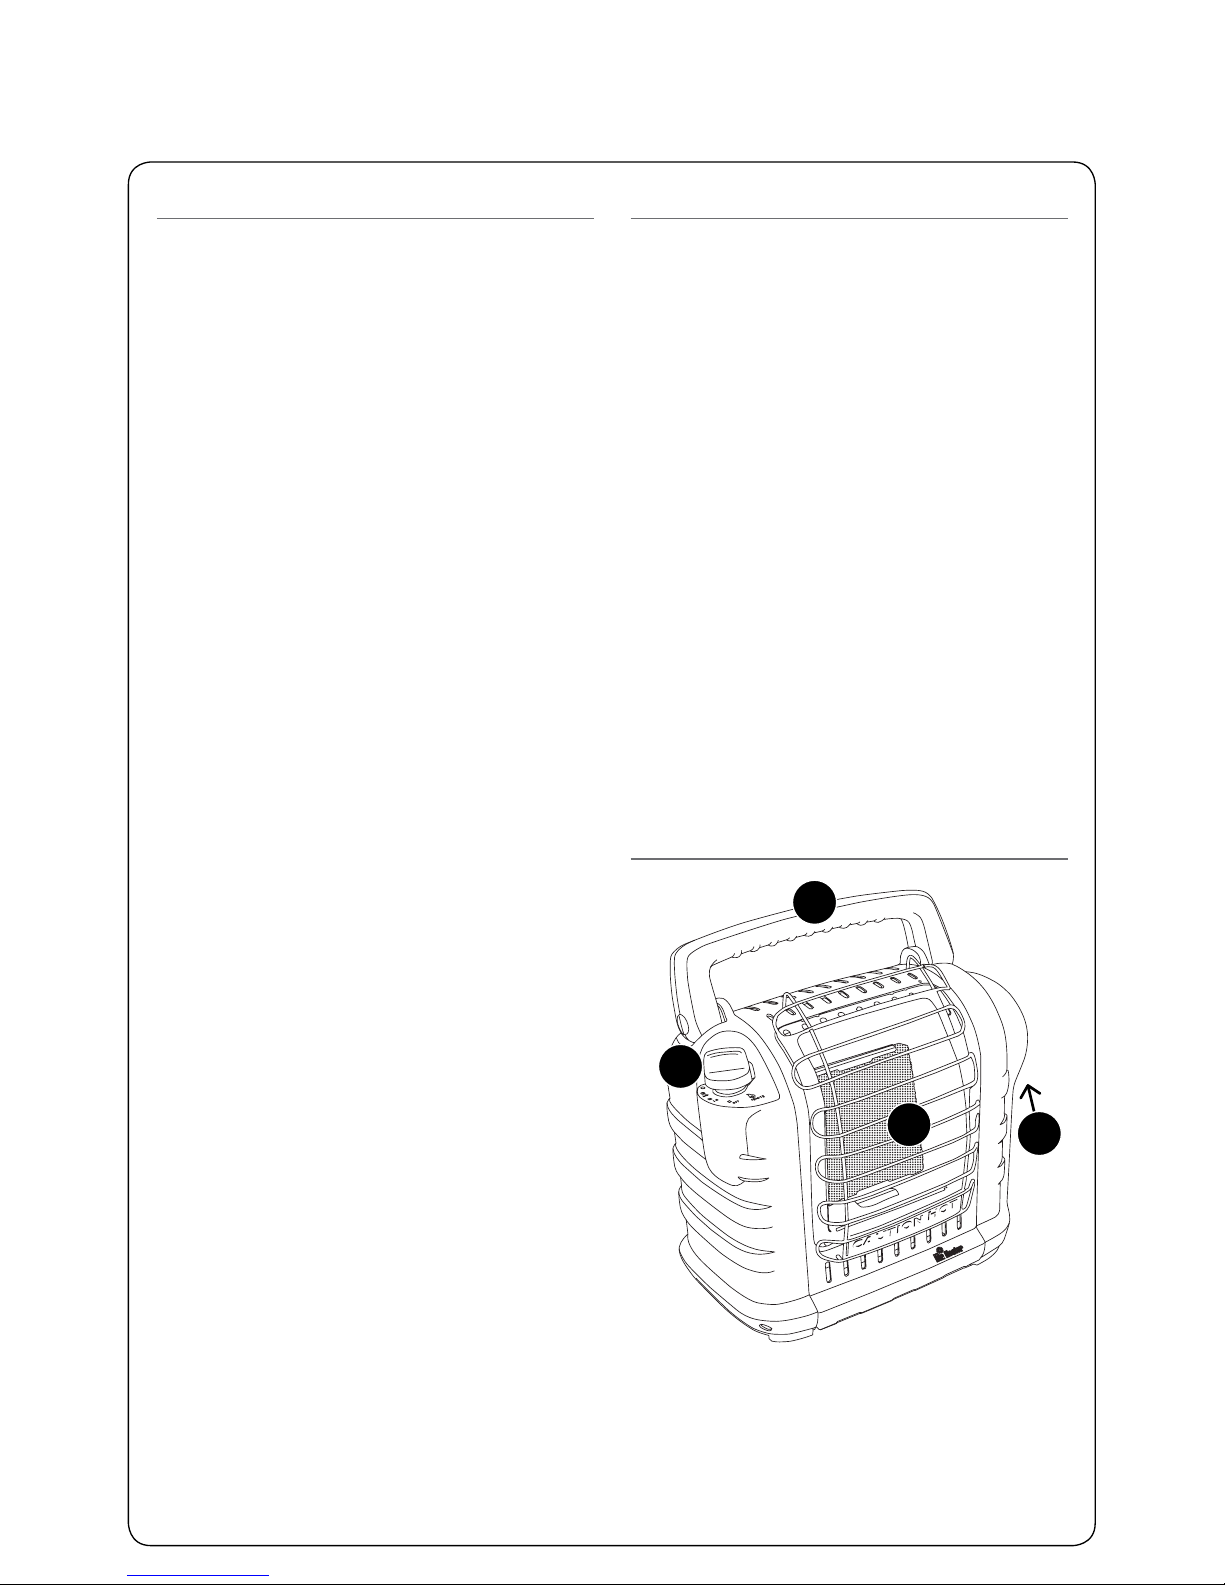
1. Control knob
2. Burner tile
3. Folding carry handle
4. Propane cartridge cavity
1
2
4
Product Identication
3
Page 4
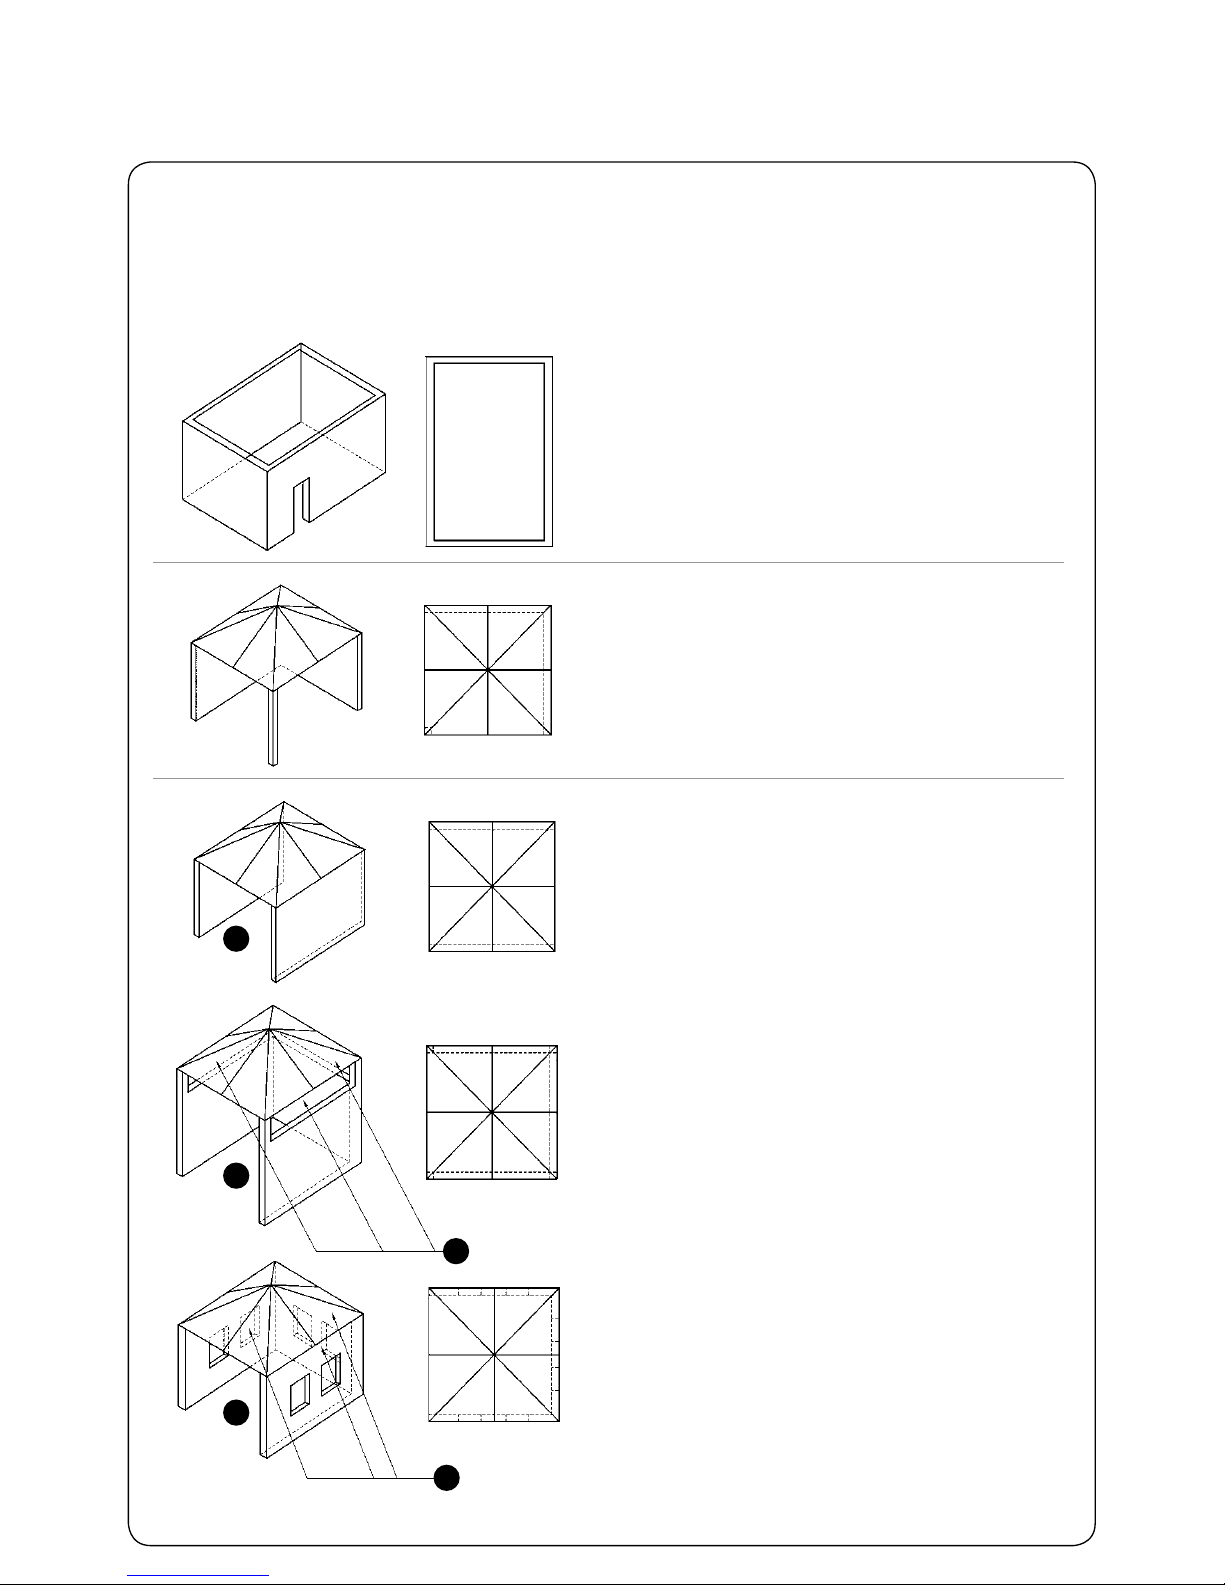
Safety Instructions
This appliance shall only be used in an above ground open air situation with natural ventilation,
without stagnant areas, where gas leakage and products of combustion are rapidly dispersed by
wind and natural convection. Any enclosure in which the appliance is used shall comply with one
of the following:
1
1
1
2
2
(A) An enclosure with walls on all sides, but with
no overhead cover.
(B) Within a partial enclosure that includes an
overhead cover and no more than two walls.
(C) Within a partial enclosure that includes an
overhead cover and more than two walls,
the following shall apply:
(1) At least 25% of the total wall area is
completely open.
(2) 30% or more in total of the remaining wall
side, back and front wall areas is open and
unrestricted.
(3) In the case of balconies, 20% or more of
the total wall area shall remain open and
unrestricted”
Page 5

Lighting and Operating Instructions
Step 1
WARNING: Always inspect propane cylinder
and heater propane connections for damage,
dirt, and debris before attaching propane
cylinder. Do not use if head of cylinder is
damaged, punctured or deteriorated.
• Use only LP Gas cylinders marked
in accordance with the U.S. Dept. of
Transportation (DOT).
• Use only 468g disposable cylinders that
mate with No. 600 valve connection.
• Heater and attached cylinder must be in an
upright position during operation.
• Make sure four-position Control Knob is in
“OFF” position.
Step 2
• Swivel regulator outward for easy tank
installation. Screw 468g disposable LP Gas
supply cylinder clockwise (from bottom) into
portable heater until hand-tight.
• Check cylinder connection for leaks with
soapy water at the threaded connection
under the domed plastic cover where the
cylinder screws into the regulator. SEE
WARNING! ON THE UNDERSIDE OF THE
DOMED PLASTIC COVER.
Step 3
• Slightly depress and turn Control Knob
counterclockwise to “PILOT” position and
depress to light.
• If heater does not light, hold down for
approximately 30 seconds; release and
depress again. Repeat until pilot lights.
¥
¥
¥
Page 6

Step 4
• After pilot lights, hold down for 30-60
seconds and then release knob. Knob
should return to fully extended position.
• To operate heater, slightly depress Control
Knob and gently turn to lock in the “HI”.
position to light burner tile. Leave on “HI”
position until burner tile turns bright orange.
• After burner tile has turned bright orange,
adjust heat output by turning Control Knob
to desired position (“LO” or “HI” setting).
Warning:
DO NOT OPERATE HEATER UNLESS CONTROL KNOB IS LOCKED IN A POSITION
MARKED “HI”, “LO” or “PILOT”.
NEVER SET CONTROL KNOB BETWEEN LOCKED POSITIONS. POOR COMBUSTION AND
HIGHER LEVELS OF CARBON MONOXIDE MAY RESULT.
• To shut off heater, slightly push down and
turn Control Knob clockwise to
“OFF” position.
• CAUTION: After turning heater off, wire
guard will remain hot. Allow to thoroughly
cool before storing.
• Do not operate, store or remove cylinder
near ammable items or ignition sources.
• LP-GAS CYLINDERS MUST BE
DISCONNECTED FROM HEATER WHEN
NOT IN USE!
¥
¥
¥
Shut Down Instructions
Page 7

Appliance is only to be serviced or repaired
by an authorised service centre. Return
appliance to place of purchase or contact
Primus Customer Service (contact details
on back cover).
Always keep the heater area clear and free
from combustible materials, gasoline and other
ammable vapors and liquids.
Keep the vent areas (slots in the bottom and
the top at the front and rear of heater) clear at
all times.
Visually inspect the pilot ame and burner
periodically during use. The pilot ame should
be blue in color (not yellow) and will extend
beyond the thermocouple.
The ame will surround the thermocouple just
below the tip.
A slight yellow ame may occur where the pilot
ame and main burner ame meet. The burner
should be bright orange (with a slight blue color
around the border, a red-orange haze that is
visible on the ceramic tile is acceptable) and
without a noticeable ame. A blue ame that
rolls out at the top of the ceramic tile indicates
an accumulation of dust, lint or spider webs
inside the casing assembly and main burner
assembly. If the pilot is yellow or the burner has
a noticeable ame, cleaning may be required.
Use the following procedure to inspect the
casing assembly and main burner assembly.
Maintenance
Page 8

Replacement Parts List
1. 32017 Knob, Valve, Safety, Red
32019 Knob, Valve, Safety, Green
2. 32054 Valve, Assy, Control
3. 32056 Tube, Burner, Main
4. 32053 Tube, Inlet, Assy
5. 32051 Guard, Wire
32061 Guard, Wire, Heavy
6. 33092 Panel, Front, Metal, Red
33094 Panel, Front, Metal, Yellow
33093 Panel, Front, Metal, Green
7. 75191 Panel, Back, Metal,
w/32004, Red
75194 Panel, Back, Metal,
w/32004, Yellow
75196 Panel, Back, Metal,
w/32004, Green
8. 32027 Brkt, Valve
9. 32028 Heat, Shield
10. 32015 Handle, Back, Plastic, Gray
32074 Handle, Back, Plastic, Black
11. 32014 Handle, Front, Plastic, Gray
32072 Handle, Front, Plastic, Black
12. 75198 Assy, Regulator, w/Support
13. 32080 Housing, Left, Plastic, Gray
32085 Housing, Left, Plastic, Black
14. 32021 Reector, Metal
15. 33088 Tile, Replacement Kit, MH9BX
16. 32032 Burner, Assy
17. 33090 Housing, Right, Plastic, Gray
33091 Housing, Right, Plastic, Black
18. 32068 Orice, Assy with O-Ring
19. 32052 Orice, Holder
20. 32023 Floor, Panel, Metal
21. 73403 Switch, Tipover
22. 32046 Brkt,ODS
(Oxygen Depletion Sensor)
23. 73404 ODS, Pilot, Assy
24. 32057 Tube, Pilot, Assy
25. 32067 Magnet, Tank
No Part # Description No Part # Description No Part # Description
Page 9

Problem Remedy
If Spark electrode does not produce
spark.
Check spark electrode; if defective, replace ODS
(Oxygen Depletion Sensor).
Check igniter wire is correctly attached to spark
electrode.
Check igniter wire; if damaged, replace.
Check piezo igniter; if defective, replace control
valve.
If Spark electrode produces spark but
pilot does not light.
No gas to heater – install disposable cylinder or
connect hose and lter where required and turn on
valve at remote cylinder.
Check if “PILOT” position is properly aligned – turn
gas control knob to “PILOT” position and depress.
Check is pilot is blocked from spider web or dirt –
clean pilot, see MAINTENANCE.
If Pilot ame does not stay lit when knob
is released.
Check if control knob in “PILOT” position not
completely depressed or held in long enough to
purge air from lines.
If pilot ame is not surrounding thermocouple – clean
pilot, see MAINTENANCE.
Check if pilot assembly is defective – replace.
Check if tip switch wires are disconnected – connect.
If Main burner does not ignite.
Check if main burner orice is blocked – clean
burner, see MAINTENANCE.
If Heater keeps shutting “OFF” during
normal operation.
Check if pilot is blocked – clean pilot, see
MAINTENANCE.
Tip over switch may have been activated from
bumping heater. Re-light.
Check if regulator is defective - Replace regulator.
Check for internal contamination - Replace control
valve and regulator.
Call Technical Services for additional information.
Troubleshooting Instructions
Page 10

This Appliance
- Must only be serviced by an authorised person
- Suitable for camping use only
- Shall NOT be exposed to moisture or rain
- Shall only be used with a propane gas cartridge certied to:
DOT2P, UN2037, EN417
- May be hazardous to attempt to t other types of gas containers
- Only be used in a well ventilated area
- Can produce carbon monoxide which has no odor.
Using it in an enclosed space (e.g. caravan, tent, car, mobile home) may cause death.
AS 2658:2008
Cert. GSCS20193
SAI Global
Specications
Part No: MH9BX
Dimensions: 330 x 204 x 343mm
Net Weight: 3.69kg (excluding cylinder)
Injector Size: 0.93mm
Gas Consumption: 9.5 Mj/hr
189 g/hr
Page 11

Page 12

CUSTOMER SERVICE 1300 555 197
enquiries@primusaustralia.com.au
Distributed by
PRIMUS AUSTRALIA PTY LTD
Bundoora Victoria 3083
www.primusaustralia.com.au
 Loading...