

Mr. Heater MH530FAERT, MH530FAET Owner's Manual
OPERATING INSTRUCTIONS AND OWNERÊS MANUAL
Model #
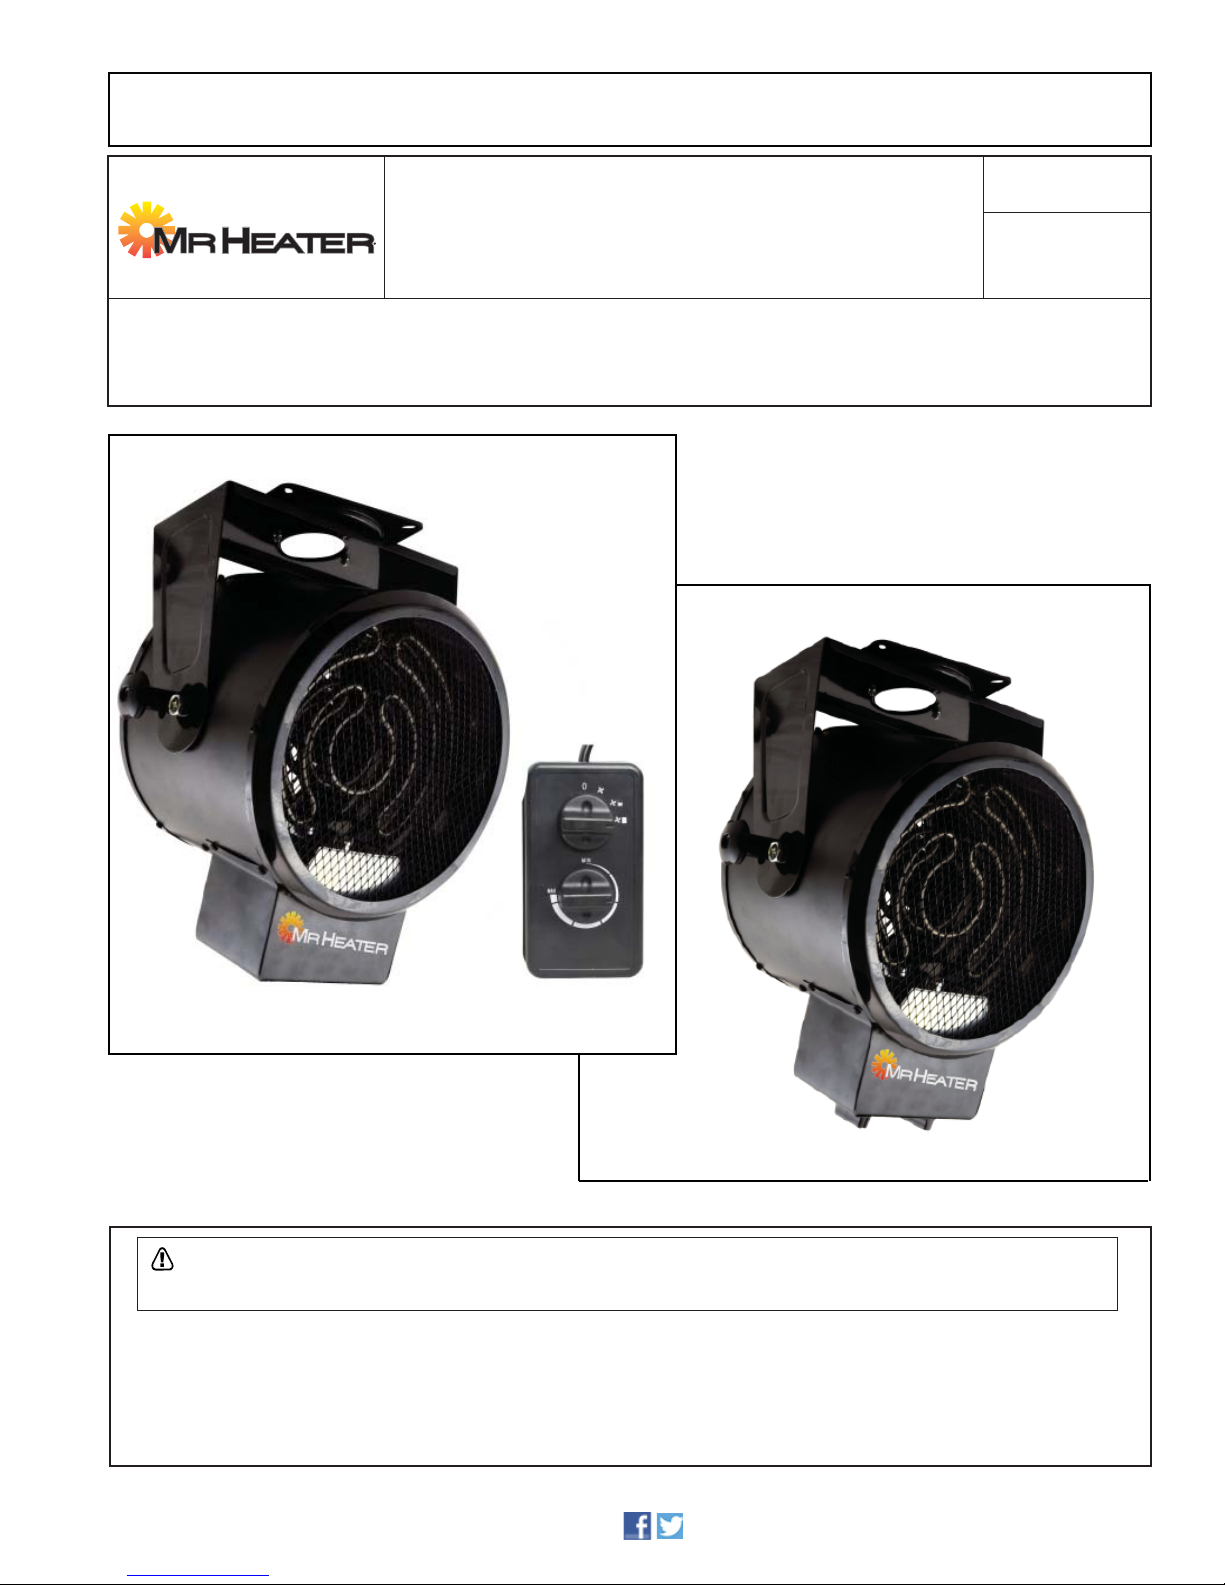
ELECTRIC FORCE AIR HEATER
READ INSTRUCTIONS CAREFULLY: Read and follow all instructions. Place instructions in a safe
place for future reference. Do not allow anyone who has not read these instructions to assemble,
adjust or operate the heater.
MH530FAET
MH530FAERT
MH530FAERT
Languages included
• English
• Spanish
• French
WARNING: If the information in this manual is not followed exactly, a fire or
explosion may result causing property damage, personal injury or loss of life.
· This heater has hot or arcing parts inside. Do not use it in areas where gasoline, paint or other
flammable liquids are used or stored.
· Service must be performed by a qualified service agency.
MH530FAET
www.mrheater.com • 800-251-0001
2016
Definitions: Safety Guidelines IMPORTANT INSTRUCTIONS.
The definitions below describe the level of severity for each signal word. Please read the manual and pay attention to these symbols.
Danger: Indicates an imminently hazardous situation which, if not avoided, will result in death or serious injury.
Warning: Indicates a potentially hazardous situation which, if not avoided, could result in death or serious injury.
Caution: Indicates a potentially hazardous situation which, if not avoided, may result in minor or moderate injury.
NOTICE: Indicates a practice not related to personal injury which, if not avoided, may result in property damage.
WARNING: DO NOT OPERATE THIS
HEATER UNTIL YOU READ AND
UNDERSTAND THIS INSTRUCTION
MANUAL FOR SAFETY, OPERATION,
AND MAINTENANCE INSTRUCTIONS.
CAUTION: Use of this heater in any means not described
in this manual may cause fire, electric shock, personal injury
and/or property damage.
CAUTION: This heater is hot when in use. To avoid burns,
do not let bare skin touch hot surfaces. Keep combustible
materials, such as furniture, pillows, bedding, papers,
clothes, and curtains at least 6 feet ( 1.8 m) from the front
of the heater and keep them at least 2 feet (.6 m) away
from the sides and rear
CAUTION: In order to avoid unintended cycling of the
heater, always turn off when not in use.
CAUTION: Do not cover the power supply wiring or run
the wiring under any carpet or rugs. Arrange cord and
connections away from traffic patterns so it is not a tripping
hazard.
CAUTION: Connect unit to only properly grounded outlets
and adequately sized and grounded electrical systems.
CAUTION: Do not use this unit with unapproved or under
sized electrical connections or wiring. They may overheat
and cause a risk of fire.
WARNING: Do not expose to wet conditions; unit is in-
tended for indoor use only.
WARNING: This heater is not intended for use in bathrooms,
laundry areas and similar indoor locations. Never locate heater
where it may fall into a bathtub or other water container.
WARNING: Do not insert or allow any foreign objects to
enter the unit via the intake or exhaust vents on the unit.
Failure to observe this warning may result in electric shock,
fire or damage to the unit.
WARNING: To prevent fire do not block either the air intake
or exhaust in any manner. Do not use on soft surfaces like a
bed, where openings may get blocked.
WARNING: Unit is equipped with internal active electri-
cal components that spark during use. Do not use in areas
where fumes from gasoline, paint or other flammable liquids
may be present.
WARNING: Extreme caution must be used when any heater
is used by or near children or invalids and whenever the
heater is left operating and unattended.
WARNING: Do not operate any heater with a damaged cord
or plug or after the heater malfunctions, has been dropped
or damaged in any manner. Discard heater, or return to au-
thorized service facility for examination and/or repair.
WARNING: Do not use outdoors.
WARNING: Use this heater only as described in this manual.
Any other use not recommended by the manufacturer may
cause fire, electric shock, or injury to persons.
SAVE THESE INSTRUCTIONS.
CONTENTS
WARNINGS ................................................................................. 2
ASSEMBLY ..................................................................................3
OPERATING ................................................................................ 3
SPECIFICATIONS ..........................................................................3
CLEARANCES .............................................................................. 3
MAINTENANCE .......................................................................... 4
TROUBLE SHOOTING ..................................................................5
WIRING DIAGRAM ......................................................................5
PARTS LIST ............................................................................... 6-7
EXPLODED VIEW ...................................................................... 6-7
WARRANTY ................................................................................ 8
INSTRUCTIONS FOR ORDERING PARTS ........................................8
LANGUAGES
ENGLISH ............................................................................ 1-8
FRENCH .................................................................................. 1-8
SPANISH ................................................................................. 1-8
Mr. Heater Forced-Air Electric Construction Heater Operating Instructions and OwnerÊs Manual
GENERAL INFORMATION
RETAIN THIS MANUAL FOR FUTURE REFERENCE. FOR QUESTIONS, PROBLEMS, MISSING PARTS BEFORE RETURNING TO RETAILER PLEASE CALL
WITH MODEL NUMBER AND SERIAL NUMBER OF HEATER: 1-800-321-0001
MONDAY-FRIDAY 8-5 PM EASTERN TIME
OR E-MAIL USING THE MR. HEATER WEBSITE:
WWW.MRHEATER.COM
In order to provide the best service possible
Mr. Heater is now giving you more ways to
get in touch with us:
FACEBOOK: Find us on Facebook
TWITTER: Find us on twitter
YouTube: There are now informational videos on YouTube.
WEBSITE: Mr. HeaterÊs full line of product are now at
WWW.MRHEATER.COM
2
SPECIFICATIONS
Model: MH530FAET MH530FAERT
Heat Output BTU/WATTS 18084/5300
Airflow (CFM) 246 246
Electrical Supply 240Vac 240Vac
Thermostat 32°F - 185°F 32°F - 185°F
Power Cord
Dimensions: (L‰xW‰xH‰) 13.18‰x12.2‰x13.97‰ 14.37‰x13.77‰x16.14‰
Weight (lbs.) 16.7 LBS. 17.75 LBS.
Outlet (M) 6Ê (1.8M) 6Ê (1.8M)
Rear (M) 2Ê (.6M) 2Ê (.6M)
Sides (M) 2Ê (.6M) 2Ê (.6M)
4Ê POWER CABLE INCLUDED 4Ê POWER CABLE INCLUDED
Clearance to Combustibles
18084/5300
Assembly & Installation:
• Remove the heater and all of the packaging material from
the box.
• Check all of the packing material for loose parts and set
aside.
• Thoroughly inspect the heater for damage. If any is found
do not contact the place of purchase. Please call the
Manufacturer at 800-251-0001.
INCLUDED IN THE BOX:
• Heater
• Hanging bracket
• Mounting plate
• Swivel Plate
• Angle adjustment knobs
• Heater fastening bolts
• 4- 8 mm Nuts, Bolts and lock washers
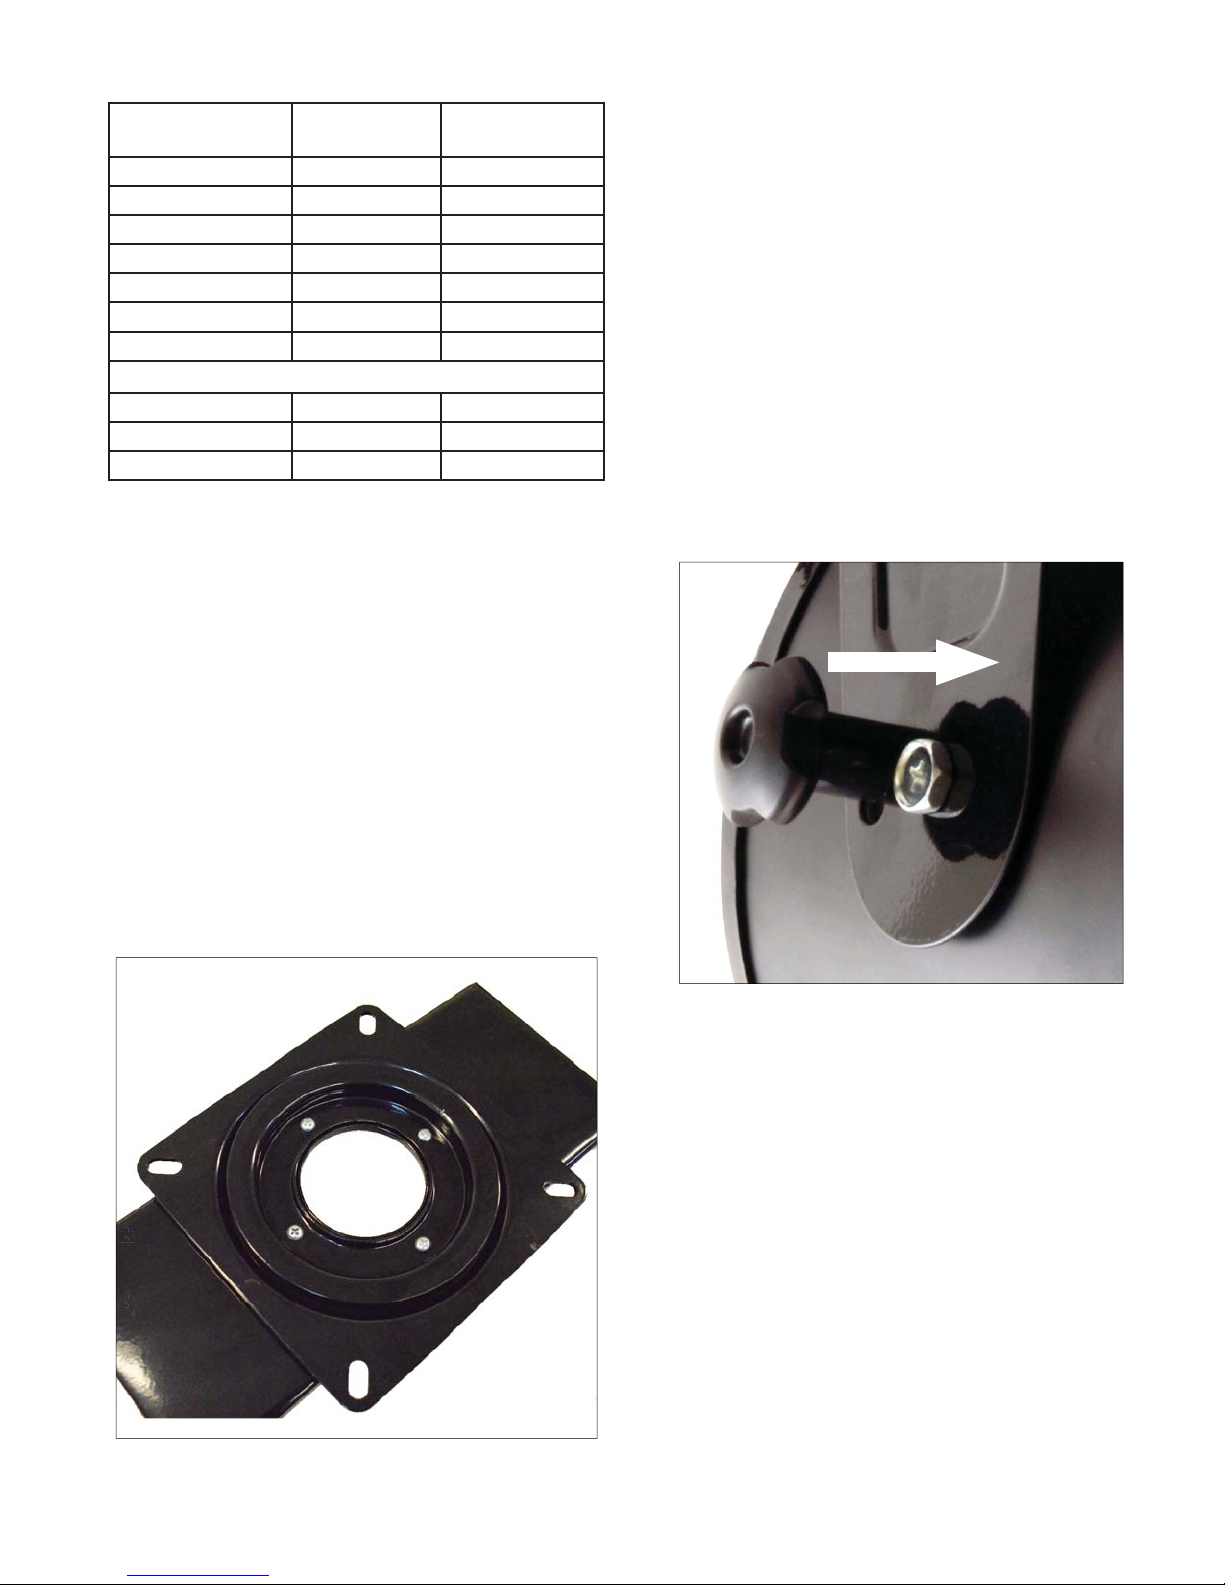
To Assemble, use the 8 mm nuts, bolts and lock washers to the
attach the swivel plate and the Mounting Plate to the hanging
bracket See figure 1. The nut and lock washer should be on the
underside.
Next, Locate a space to hang the heater on the ceiling. The
clearance to combustibles outlined in the specifications table
on page 3 and should be located within 4 feet of your power
connection or the location of where you plan to mount the
junction box your heater will be supplied from.
Once a location has been selected, fasten the mounting bracket
and accompanying hanging kit with 4 appropriately sized lag
bolts/or wall anchors that can support the weight of the heater
(not included). The weight of your heater can be found in the
specifications table on page 3. The best option is to attach the
anchors directly into a solid surface like a joist or plywood. If
that is not available consult with your local hardware store for
other options. There are many different Drywall anchors or
masonry anchors that will work.
Once you have selected a location and mounted the hanging
brackets you can now hang the heater. It is recommend that
you have help for this step. While you or your helper is holding
the heater in place, Install the two large Phillips head bolts and
angle adjustment knobs. See figure 2. At this point the heater
should look like the photo on the front of this manual.
Figure 2.
FRONT OF HEATER
Figure 1.
selected space should leave enough room to maintain the
Mr. Heater Forced-Air Electric Construction Heater
Wiring information:
The heaters covered in this manual are designed to be installed
and serviced by only licensed trained professionals. Heaters should
only be installed on a dedicated 240 volt circuit with a 30 amp
double pole breaker. Refer to NEC code ANSI/NFPA NO. 70-2011 for
specifics.
Remote Thermostat:
Units equipped with a remote thermostat will need to have the
cradle for the thermostat mounted in an appropriate location.
Using two wall anchors, (not included) mount the Thermostat
cradle to the wall. Select a location within 3.5 feet of the
heater. The cradle should be mounted in a location as to not be
affected by the air flow of the heater. If possible do not mount
on an un-insulated wall or in direct sunlight. That may cause the
heater to cycle unnecessarily.
Operating Instructions and OwnerÊs Manual
3
Operational Information
Heat is created by electric current passing through coiled metal
elements bringing them up to very high temperatures. The
fan then passes room air over the hot elements exchanging
cold air for warm. The air moving over the coils keeps them
from reaching temperatures that are not safe for the normal
operation of the heater. Therefor it is important to keep all
combustible materials and any objects that may be sucked
into the fan blades at a safe distance (please refer to the
specification table for appropriate clearances). Make sure that
the fan blades remain unobstructed at all times. Keep unit clean
and dust free. Do not block unit intake or exhaust at any time.
If damage has occurred please refer to the parts listing in this
manual and contact the manufacturer for a replacement.
WARNING: The electrical circuit must be properly grounded,
failure to do so may result in electric shock or property
damage.
WARNING: Always plug or wire heaters directly into a wall
receptacle or appropriate junction box. Never use with an
extension cord or re-locatable power tap (outlet/power strip).
These Electric forced air heaters are specifically designed to
be permanently installed by hanging from ceiling or overhead
structure. Do not attempt to use them as a portable heater.
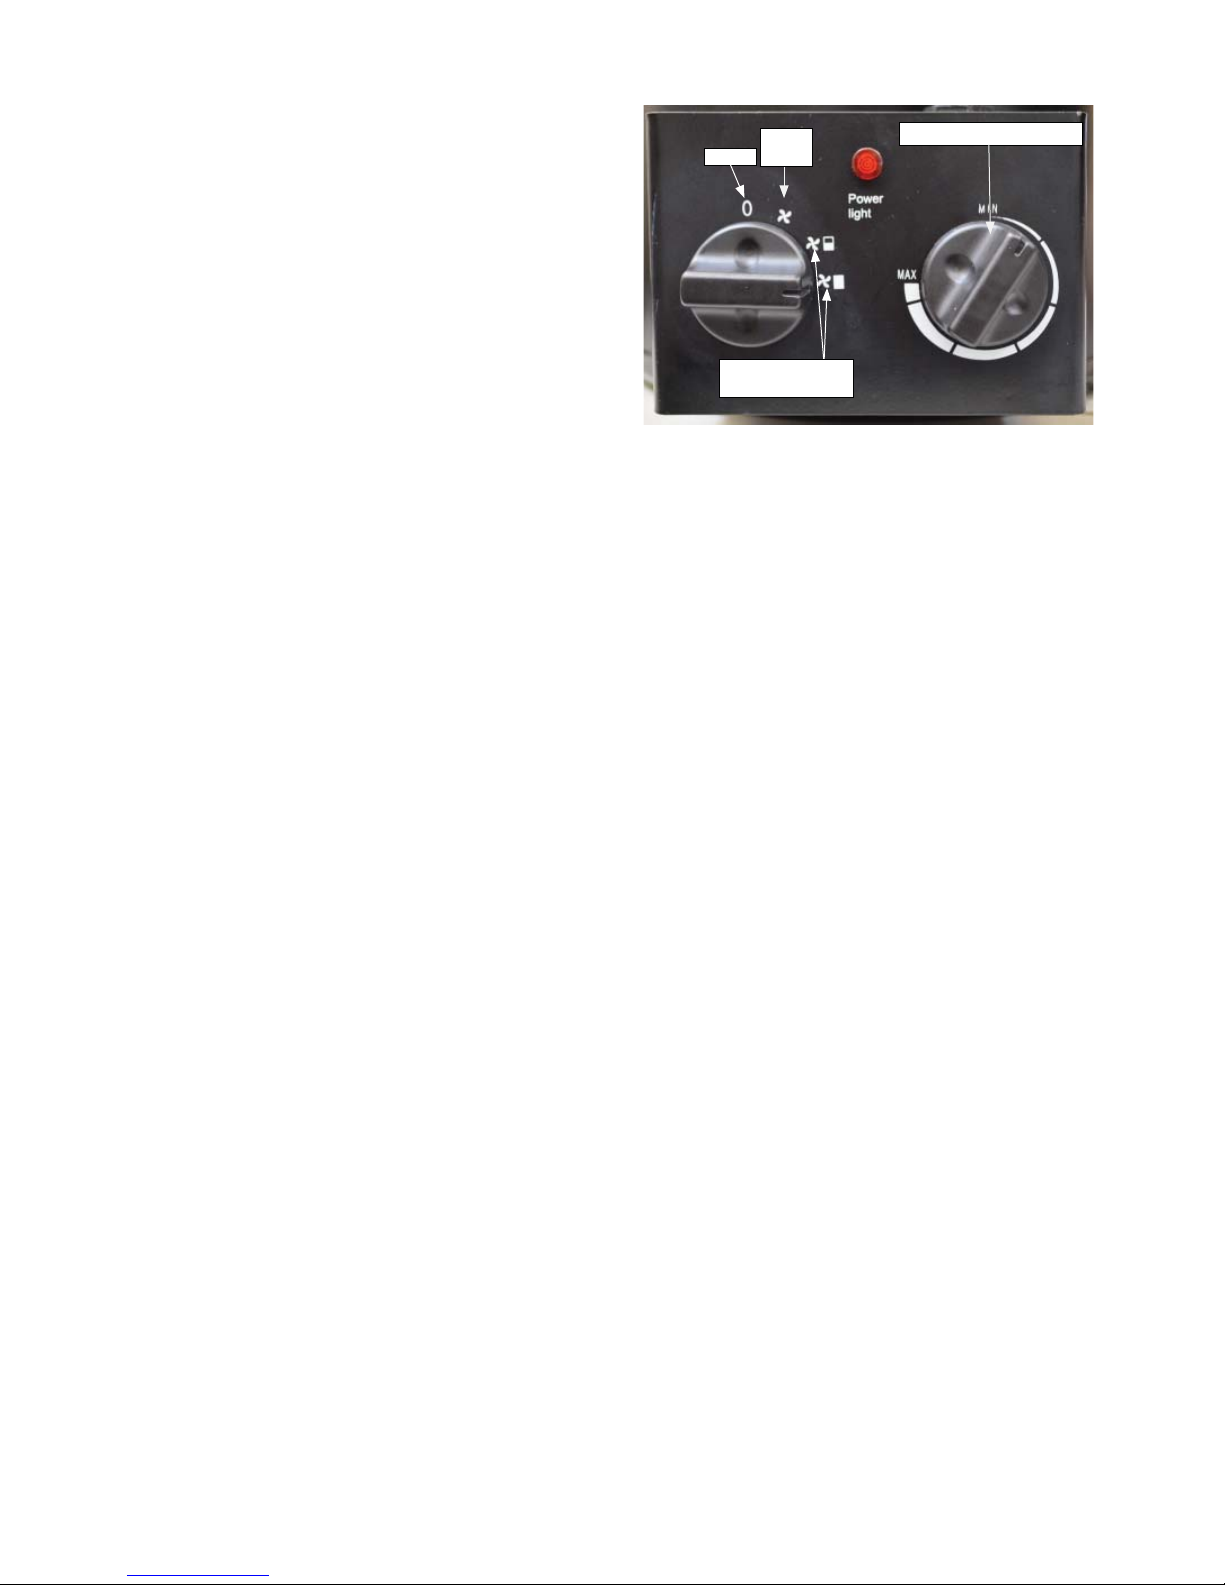
Starting Instructions
1. With the heater properly installed and the power supplied to the unit
move the heat selection knob to the setting you want. There are both
high and low settings, along with a fan only option. Refer to Figure 3,
for information about each setting.
2. Turn thermostat to desired setting. Clockwise will increase the set
point, counter clockwise will reduce the setting. An audible click can
be heard when the current temperature in the space is matched on the
dial.
3. The Heating element and fan will remain on until the temperature
setting is reached. The unit will cycle on and off as needed.
CONTROL
FAN
OFF
ONLY
HEAT SETTINGS
LOW/HIGH
THERMOSTAT KNOB
To Stop Heating
1. Rotate the thermostat knob to the lowest position.
2. Rotate the power switch into the „off‰ position.
Maintenance
WARNING:
Never attempt to service the heater while the unit is hot
or In use. Only qualified service technicians should service
these units.
• Thoroughly inspect the unit prior to use.
• Keep heater clean and free of dust and debris.
• The use of an air compressor can be used to blow out the dust
from the heater case.
as to not damage any internal components.
• A soft dry cloth should be used for cleaning of outer shell and
mounting brackets.
• The fan motor is sealed and does not need to be lubricated.
For service :
Please call Toll-Free 800-251-0001 www.mrheater.com
Our office hours are 8:00 AM – 5:00 PM, EST, Monday through
Friday. Please include the model number, date of purchase, and
description of problem in all communication.
Be sure to only use moderate air pressure
Mr. Heater Forced-Air Electric Construction Heater Operating Instructions and OwnerÊs Manual
4
English
Troubleshooting
Unit does not work •Defective thermostat or wrong thermostat setting
•Open circuit breaker or fuse
•Thermal overload switch has been tripped
•Damaged or defective plug or outlet
Unit runs continuously •Defective thermostat or wrong thermostat setting
•Heat losses higher than unit capacity (unit undersized)
Elements are on but motor does not
rotate
Enclosure is extremely hot •Defective thermal protection
Desired room temperature cannot be reached • One or more elements are defective
Overheating • Defective thermostat or blocked inlet or outlet (HLS tripped)
WARNING: USE ONLY MANUFACTURER’S REPLACEMENT PARTS. USE OF ANY OTHER PARTS COULD CAUSE INJURY OR
DEATH. REPLACEMENT PARTS ARE ONLY AVAILABLE DIRECT FROM THE FACTORY AND MUST BE INSTALLED BY A QUALIFIED SERVICE AGENCY.
•Defective Motor
•Blocked fan blades
•Blocked air vents
•Defective motor
• Defective thermostat or wrong thermostat setting
• Voltage lower than that written on Rate tag
• Heat losses higher than unit capacity (unit undersized)
• Defective Motor (slow motor operation)
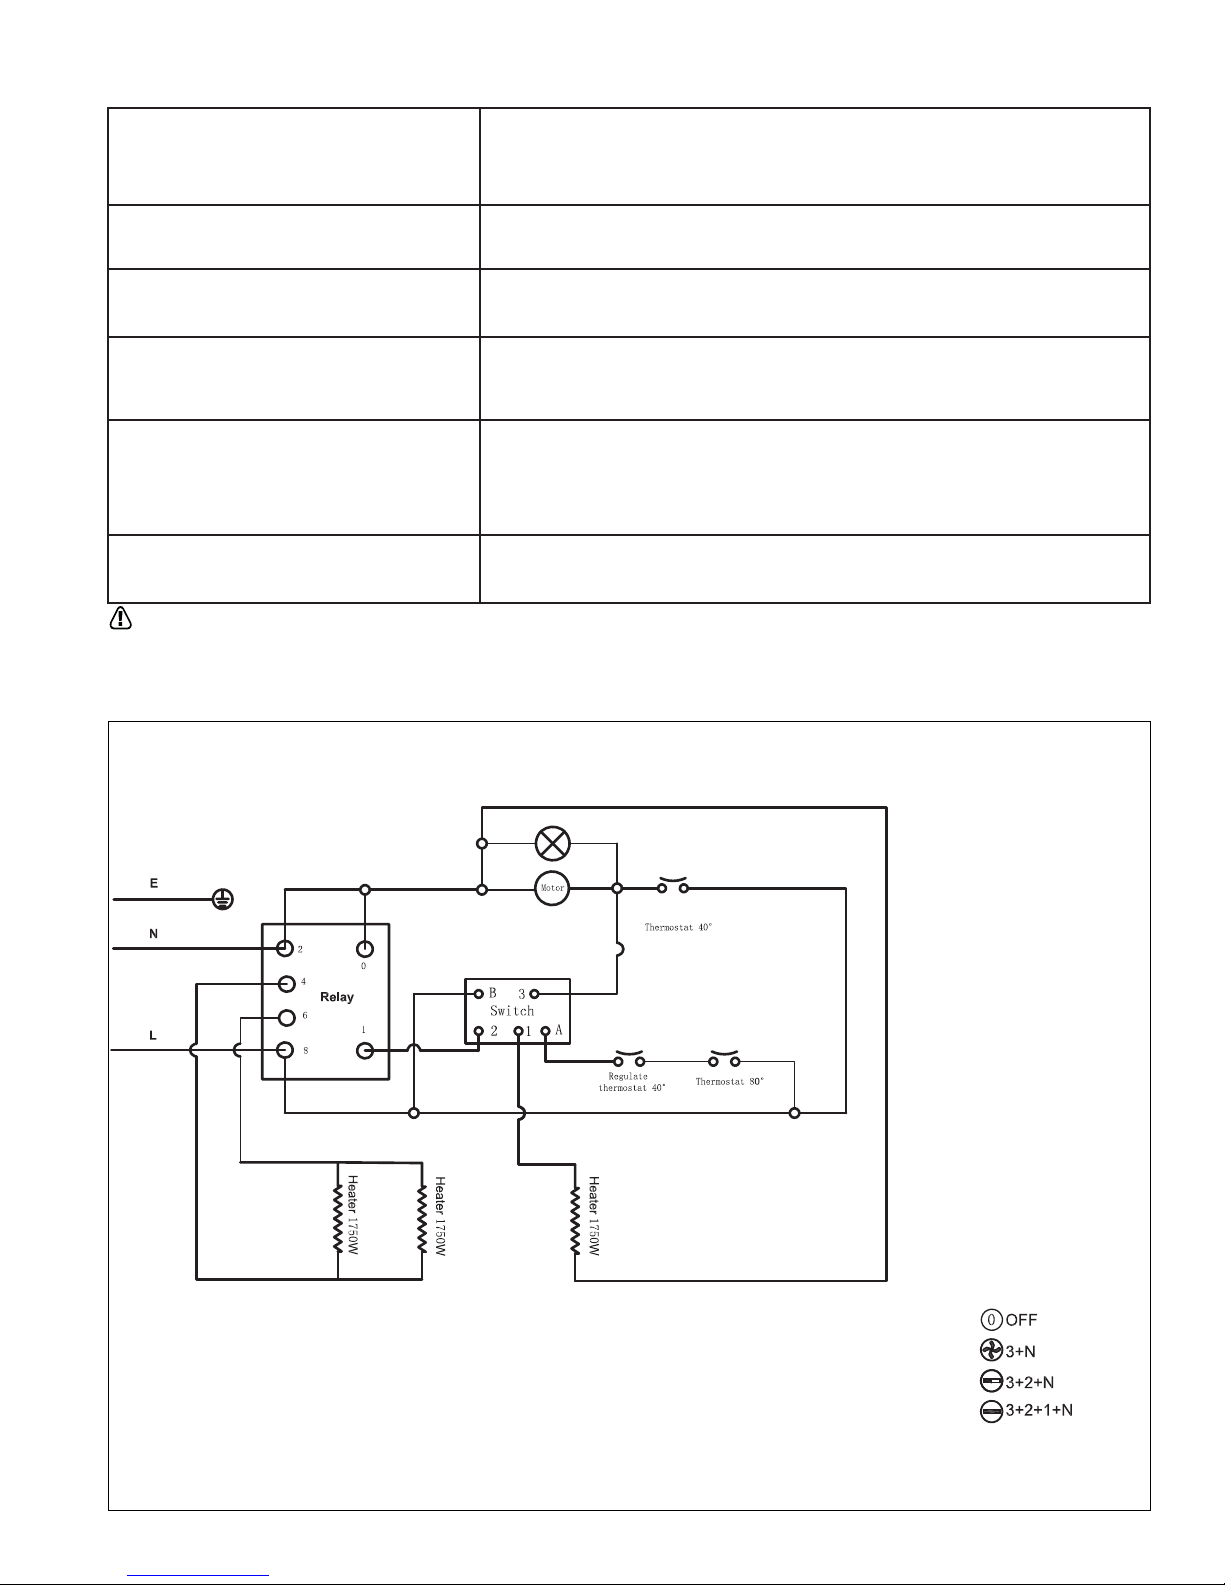
WIRING DIAGRAM MH530FAERT/MH530FAET
MH530FAERT/MH530FAET CIRCUIT DIAGRAM
Mr. Heater Forced-Air Electric Construction Heater
Operating Instructions and OwnerÊs Manual
5
SWITCH DETAILS

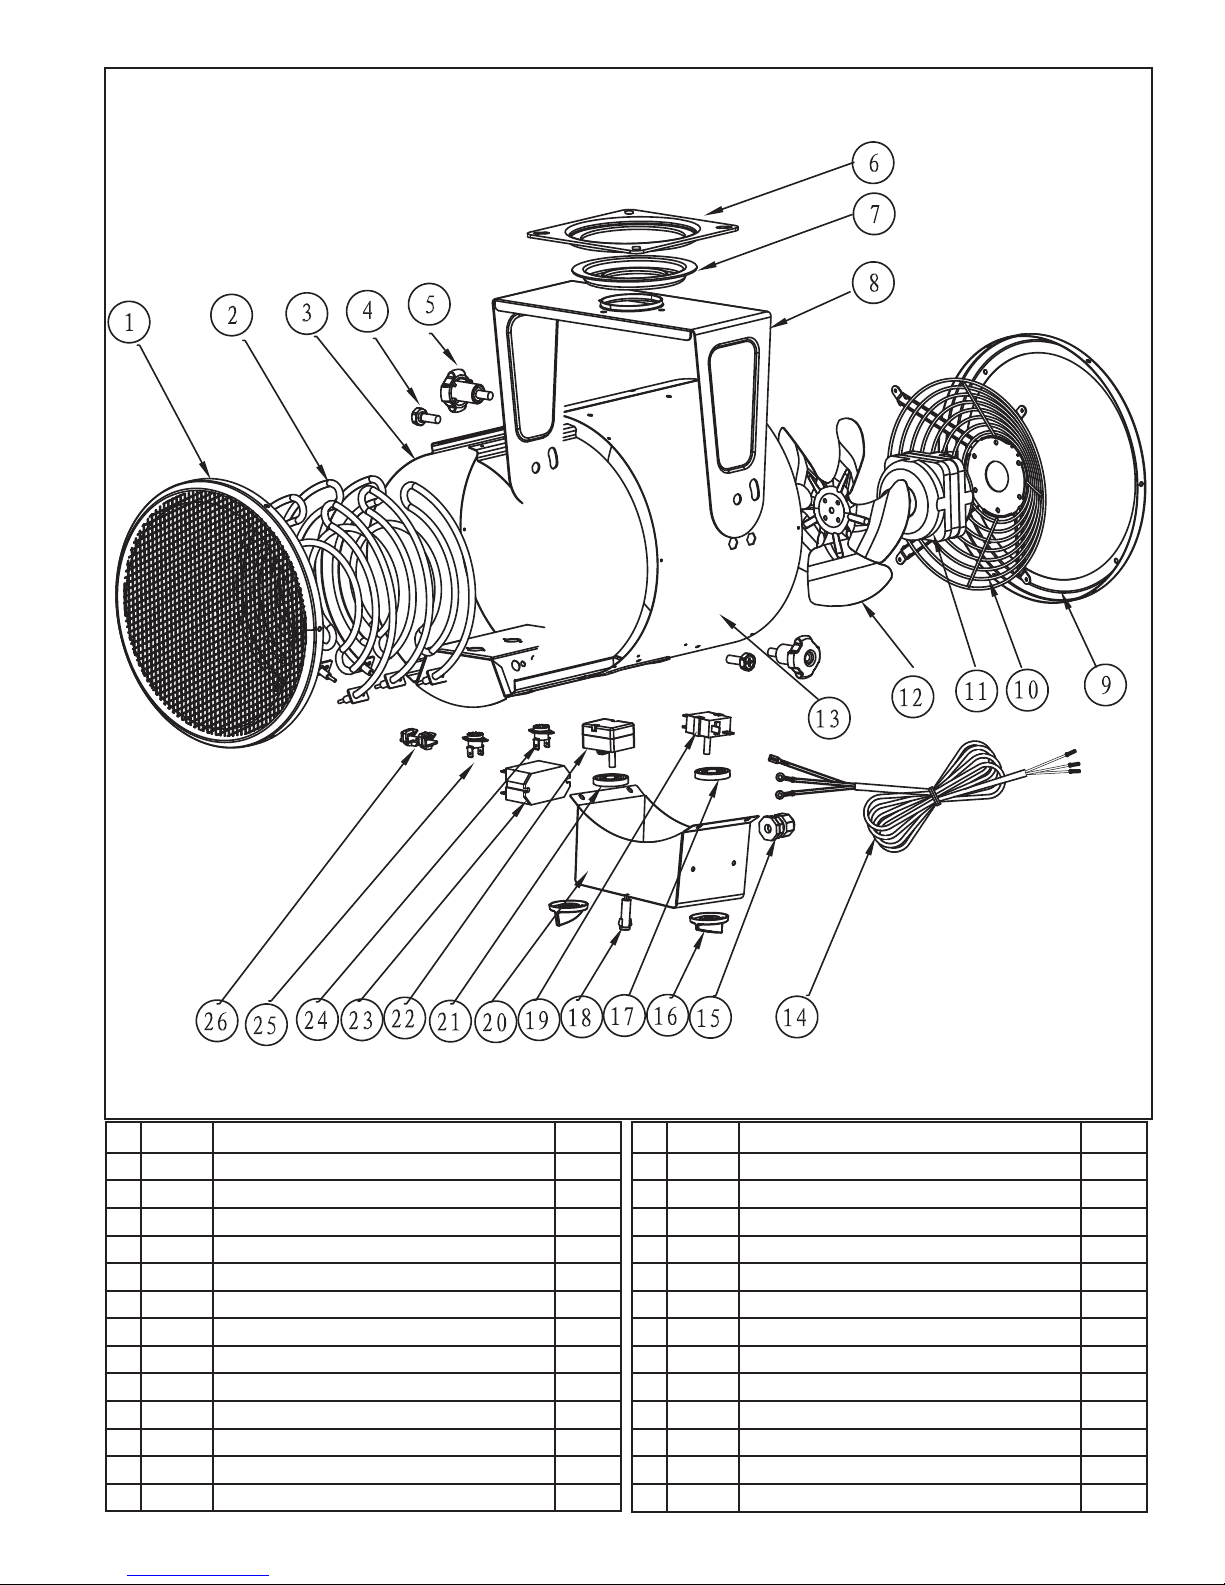
MH530FAERT
# P/N DESCRIPTION QTY
1 41225 Outlet screen 1
2 41226 Heating Coil 1
3 41227 High Limit Switch (1) 1
4 41228 Internal Chamber 1
5 41229 High Limit Switch (2) 1
6 41230 Contactor Terminal Block 1
7 41231 LED 1
8 41232 Outer Chamber 1
9 41233 Control Box 1
10 N/A Wire Ties 2
11 41235 Thermostat 1
12 41236 Knob 1
13 41237 Remote Thermostat Housing Top 1
14 41238 Setting Control Switch 1
Mr. Heater Forced-Air Electric Construction Heater Operating Instructions and OwnerÊs Manual
# P/N DESCRIPTION QTY
15 41239 Remote Thermostat Housing Bottom 1
16 41240 Remote Thermostat Wall Mount Cradle 1
17 41241 Bolt 1
18 41242 Angle Adjustment Knob 1
19 41243 Screen Guard 1
20 41244 Screen Guard Bracket 1
21 41245 Fan Motor 1
22 41246 Fan Blade 1
23 41247 Mounting Plate 1
24 41248 Swivel Plate 1
25 41249 Mounting Bracket 1
26 41250 Power Cord 1
27 41251 Thermostat Cord
6
1
MH530FAET
# P/N DESCRIPTION QTY
1 41252 Outlet screen 1
2 41253 Heating Coil 1
3 41254 Internal Chamber 1
4 41255 Bolt 1
5 41256 Adjustment Knob 1
6 41257 Mounting Plate 1
7 41258 Swivel Plate 1
8 41259 Mounting Bracket 1
9 41260 Guard Bracket 2
10 41261 Fan Guard 2
11 41262 Fan Motor 1
12 41263 Fan Blade 1
13 41264 Outer Barrel 1
Mr. Heater Forced-Air Electric Construction Heater
# P/N DESCRIPTION QTY
14 41265 Power Cord 1
15 41266 Strain Relief 1
16 41267 Knob 1
17 41268 Thermostat Coil Spring 1
18 41269 Power LED 1
19 41270 Thermostat 1
20 41271 Control Box 1
21 41272 Selector Switch Spring 2
22 41273 Selector Switch 1
23 41274 Contactor Terminal Block 2
24 41275 High Limit Switch (1) 1
25 41276 High Limit Switch (2) 1
26 N/A Wire TIes
Operating Instructions and OwnerÊs Manual
7
1
Model #
OPERATING INSTRUCTIONS
MH530FAET
AND OWNER’S MANUAL
WARNING:
USE ONLY MANUFACTURERÊS REPLACEMENT PARTS. USE OF ANY OTHER PARTS
COULD CAUSE INJURY OR DEATH. REPLACEMENT PARTS ARE ONLY AVAILABLE
DIRECT FROM THE FACTORY AND MUST BE INSTALLED BY A QUALIFIED SERVICE
AGENCY.
PARTS ORDERING INFORMATION:
PURCHASING: Accessories may be purchased at any Mr. Heater local dealer or
direct from the factory
FOR INFORMATION REGARDING SERVICE
Please call Toll-Free 800-251-0001
www.mrheater.com
Our office hours are 8:00 AM – 5:00 PM, EST, Monday through Friday.
MH530FAERT
Please include the model number, date of purchase, and description of problem in
all communication.
LIMITED WARRANTY
Mr. Heater, Inc. warrants its heaters and accessories to be free from defects in
material and workmanship for a period of 1 year from date of purchase. Mr.
Heater, Inc. will repair or replace this product free of charge if it has been proven
to be defective within the 1-year period, and is returned at customer expense with
proof of purchase to Mr. Heater, Inc. within the warranty period.
Mr. Heater, Inc. reserves the right to make changes at any time, without notice or
obligation, in colors, specifications, accessories, materials and models.
MR. HEATER, INC., 4560 W. 160TH ST., CLEVELAND, OHIO 44135 • 800-251-0001
Mr. Heater is a registered trademarks of Mr. Heater, Inc.
© 2016, Mr. Heater/Mr. Heater. All rights reserved
U.L. 2021 CSA C22.2#46
 Loading...