

Page 1
INSTRUCTIONS AND PARTS LIST
06/08 Rev A
RETAIN THESE INSTRUCTIONS FOR FUTURE REFERENCE. INSTALLER – LEAVE THESE
INSTRUCTIONS WITH THE CONSUMER
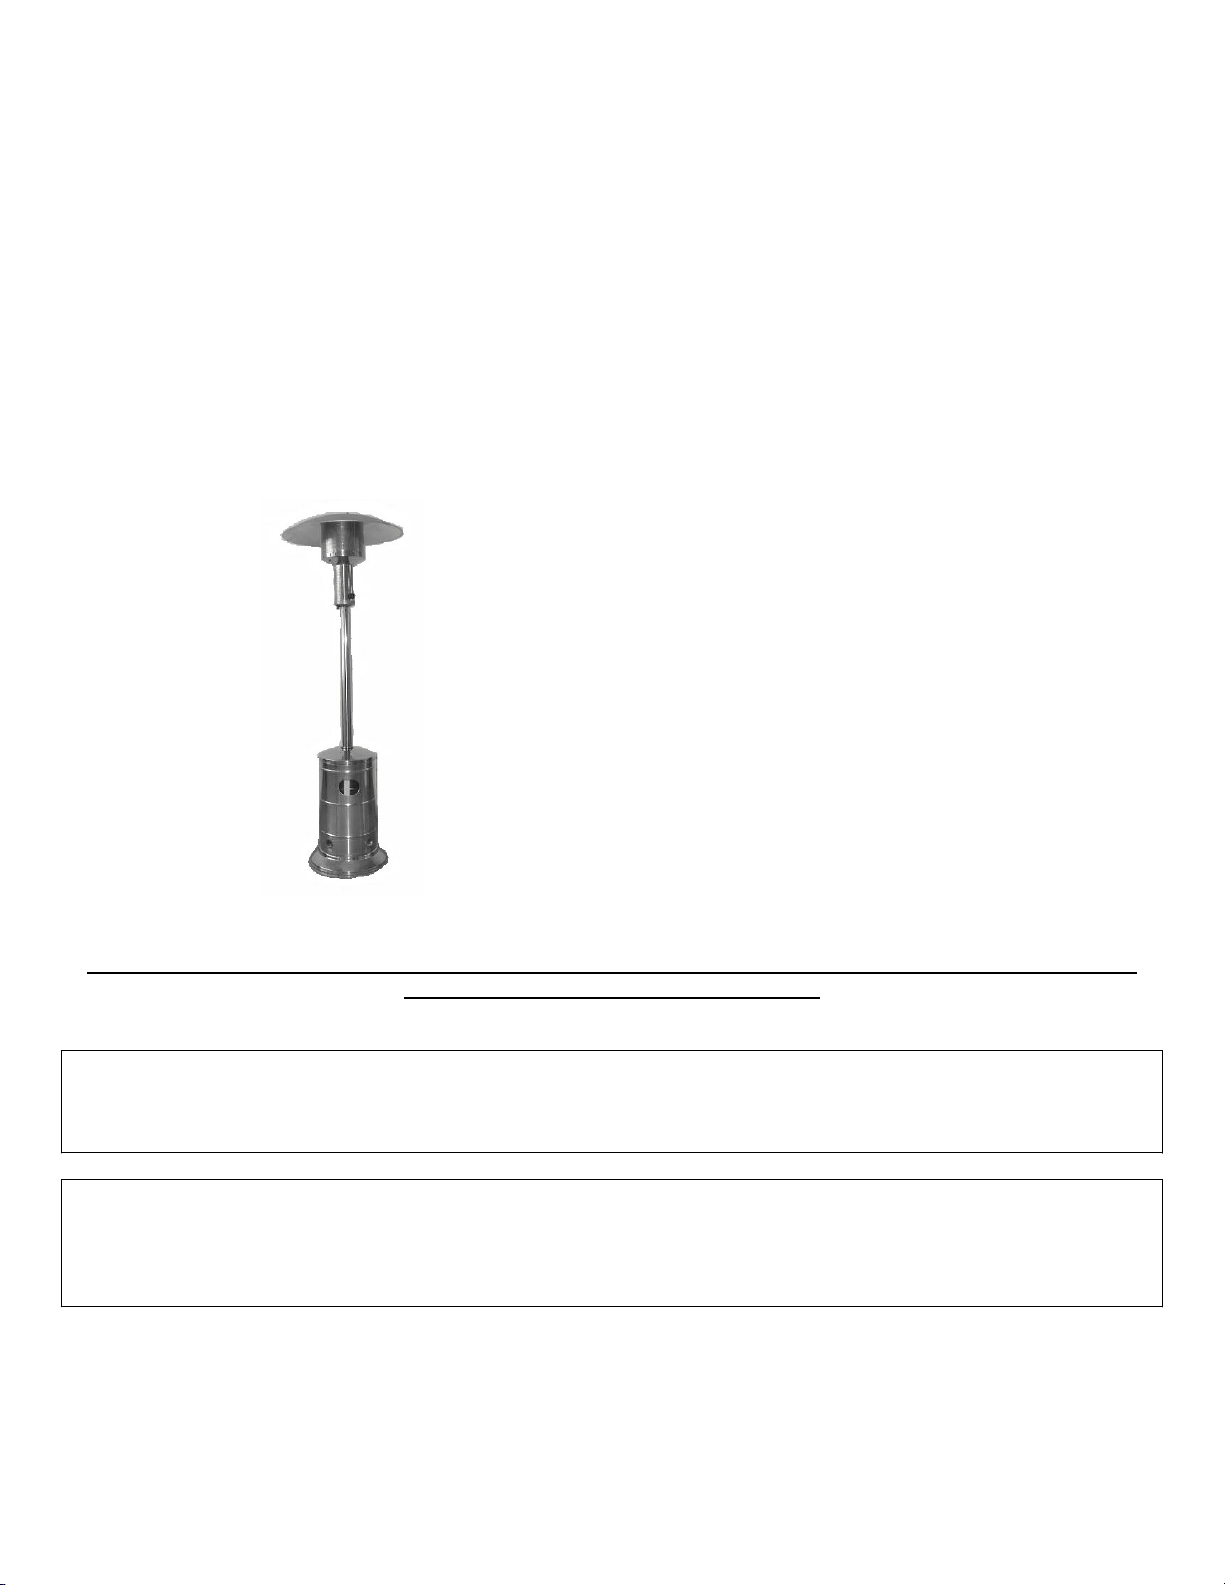
PATIO HEATER
MODELS: MH40PH
LP GAS-FIRED OUTDOOR PATIO HEATER
40,000 BTU/HR
Specifications
Type of Gas For use with Propane Only
Input rating
Manifold Pressure 10
Regulator Pressure 1
Orifice Size 1
Maximum Supply Pressure 150psig
Minimum inlet supply pressure 5psig
40,000 Btu/Hr
.7” Water Column
1
.0” Water Column
.95mm
YOUR
GENERAL HAZARD WARNING:
IMPROPER INSTALLATION, ADJUSTMENT, ALTERATION. SERVICE, OR MAINTENANCE CAN CAUSE
INJURY OR PROPERTY DAMAGE.
INSTRUCTIONS THOROUGHLY BEFORE INSTALLING OR SERVICING THIS EQUIPMENT.
WARNING: FIRE, BURN, INHALATION, AND EXPLOSION HAZARD. KEEP SOLID COMBUSTIBLES, SUCH
AS BUILDING MATERIALS, PAPER OR CARDBOARD, A SAFE DISTANCE AWAY FROM THE HEATER AS
RECOMMENDED BY THE INSTRUCTIONS.
CONTAIN VOLATILE OR AIRBORNE COMBUSTIBLES, OR PRODUCTS SUCH AS GASOLINE, PAINT
THINNER, DUST PARTICLES OR UNKNOWN CHEMICALS.
Page 1 of 11 0253700 - 0296656
SAFETY IS IMPORTANT TO YOU AND TO OTHERS SO PLEASE READ THESE INSTRUCTIONS
BEFORE YOU OPERATE THIS HEATER.
READ THE INSTALLATION, OPERATING AND MAINTENANCE
NEVER USE THE HEATER IN SPACES WHICH DO OR MAY
ENERCO / MR. HEATER
th
4560 W. 160
TEL: 1-800-251-0001
St., CLEVELAND, OHIO 44135
FAX: 1-800-321-0552
Page 2
06/08 Rev A
WARNING: FOR OUTDOOR USE ONLY
FOR YOUR SAFETY
Do not store or use gasoline or other
flammable vapors and liquids in the
this or any other appliance.
FOR YOUR SAFETY
If you smell gas:
1. Shut off gas to the appliance.
2. Extinguish and open flame.
3. If odor continues, immediately call you
gas supplier.
Safety Precautions:
Care must be taken for the supervision of
•
children in the vicinity of an operating or hot
heater.
Due to the high surface temperatures adults and
•
children must observe clearances to avoid burns
or clothing ignition.
Check the heater thoroughly for damage. DO
•
NOT operate a damaged heater.
The heater should be inspected before each use,
•
and at least annually by a qualified service
person.
Do Not Modify the heater or operate a heater,
•
which has been modified from its original
condition.
Do Not operate a heater that is not fully
•
assembled.
Use only with propane gas.
•
Use only Vapor withdraw propane cylinder.
•
Disconnect the propane cylinder from the heater
•
when not in use.
Never use the heater if the ballast weight is not
•
assembled onto the base. The base must be
weighted to avoid tipping.
Use only the regulator provided with the heater.
•
Never connect heater to an unregulated gas
supply.
This heater is for outdoor use only; even so
•
make sure that there is ample fresh air
ventilation. DO NOT use in buildings, garages,
or other enclosed spaces.
If at any time gas odor is detected,
•
IMMEDIATELY DISCONTINUE operation until
the source of gas has been located and
corrected. See Fuel Safety Precautions for
more details about smelling odors.
Install the heater such that it is not directly
•
exposed to water spray, rain and or dripping
water or wind.
vicinity of
CALIFORNIA PROPOSITION 65 – WARNING
Fuels used in gas or oil-fired appliance and
the products of combustion of such f
uels,
contain chemicals known to the State of
California to cause cancer, birth defects and
other reproductive harm. California Health &
Safety Code Sec. 25249.6
Always maintain minimum clearances to people
•
or combustibles (like paper) of: Horizontal from
dome (360
Operate only on a level stable surface.
•
Do not move, handle or service while hot or
•
burning.
Do not use heater in a windy condition where
•
wind speed exceeds 10 mph.
Use only in accordance with local codes.
•
Do not hang or attach clothing or any other
•
combustibles from, on or near heater.
Check control compartment burners and
•
circulation air passageways for free air passage;
make sure that there are no obstructions. These
areas are a common location for spider webs,
which can present a dangerous condition,
damage the heater and render it unsafe for use.
The heater must be checked if any of the
following conditions exist:
Only a qualified service person should install
•
and repair this heater.
Stainless steel emitter and gas valve should not
•
be cleaned or painted. The reflector and control
cover may be cleaned with a non-corrosive /
non-combustible solution, but not painted.
After initial assembly and after every cylinder
•
replacement, all gas connection should be
checked for leaks with a soap and water solution,
NEVER USE FLAME
o
) – 3ft; Ceiling – 3ft.
a. Gas smell along with predominate
yellow tipping
of the burner flames.
b. Heater does not reach temperature.
c. Uneven burner glow.
d. Burner makes popping noises during
al use, other than during shutdown.
norm
Page 2 of 11
Page 3
Fuel Safety Precautions
06/08 Rev A
WARNING
Asphyxiation Hazard
Do not use this heater for heating human
living quarters.
Do not use in unventilated areas.
The flow of combustion and ventilation air
must not be obstructed.
Proper ventilation air must be provided to
support the combustion air requirements of
the heater being used.
Refer to the specification section of the
heater's Manual,
FUEL GAS ODOR ----------------
LP gas and natural gas have man-made
odorants added specifically for detection of
fuel gas leaks.
If a gas leak occurs you should be able to
smell the fuel gas. Since Propane (LP) is
heavier than air you should smell for the gas
odor low to the floor.
ANY GAS ODOR IS YOUR SIGNAL TO GO
INTO IMMEDIATE ACTION!
Do not take any action that could ignite the fuel
gas. Do not operate any electrical switches. Do
not pull any power supply or extension cords. Do
not light matches or any other source of flame. Do
not use your telephone.
Get everyone out of the building and away from
the area immediately.
Close all propane (LP) gas tank or cylinder fuel
supply valves, or the main fuel supply valve
located at the meter if you use natural gas.
Propane (LP) gas is heavier than air and may
settle in low areas. When you have reason to
suspect a propane leak, keep out of all low areas.
Use your neighbor's phone and call your fuel gas
supplier and your fire department. Do not re-enter
the building or area.
Stay out of the building and away from the area
until declared safe by the firefighters and your fuel
gas supplier.
FINALLY, let the fuel gas service person and the
firefighters check for escaped gas. Have them air
out the building and area before you return.
Properly trained service people must repair the
leak, check for further leakages, and them relight
the appliance for you.
ODOR FADING - NO ODOR DETECTED----
Some people cannot smell well. Some people
cannot smell the odor of the man-made chemical
added to propane (LP) or natural gas. You must
determine if you can smell the odorant in these
fuel gases.
heater data plate, or contact the ENERCO /
MR. HEATER to determine combustion air
ventilation requirements of the heater.
Lack of proper ventilation air will lead to
improper combustion.
Improper combustion can lead to carbon
monoxide poisoning leading to serious
injury or death. Symptom of carbon
monoxide poisoning can include headaches
dizziness and difficulty in breathing
.
Learn to recognize the odor of propane (LP) gas
and natural gas. Local propane (LP) gas dealers
will be more than happy to give you a scratch and
sniff pamphlet. Use it to become familiar with the
fuel gas odor.
Smoking can decrease your ability to smell. Being
around an odor for a period of time can affect your
sensitivity to that particular odor. Odors present in
animal confinement buildings can mask fuel gas
odor.
The odorant in propane (LP) gas and natural
gas is colorless and the intensity of its odor
can fade under some circumstances.
If there is an underground leak, the movement of
gas through the soil can filter the odorant.
Propane (LP) gas odor may differ in intensity at
different levels. Since Propane (LP) gas is heavier
than air, there may be more odor at lower levels.
Always be sensitive to the slightest gas odor. If you
continue to detect any gas odor, no matter how small,
treat it as a serious leak. Immediately go into action as
discussed previously
ATTENTION - CRITICAL POINTS TO
REMEMBER!
Propane (I-P) gas has a distinctive odor. Learn to
recognize these odors. (Reference Fuel Gas Odor
and Odor Fading sections above.
Even If you are not property trained in the service
and repair of the heater, ALWAYS be consciously
aware of the odors of propane (LP) gas and
natural gas.
If you have not been properly trained in repair and
service of propane (LP) gas then do not attempt to
light heater, perform service or repairs, or make
any adjustments to the heater on the propane (LP)
gas fuel system.
A periodic sniff test around the heater or at the
heater's joints; i.e. hose, connections, etc., is a
good safety practice under any conditions. If you
smell even a small amount of gas, CONTACT
YOUR FUEL GAS SUPPLIER IMMEDIATELY.
DO NOT WAIT
\\Commserv\Users\EGI_Shared\Engineering\Labels & Manuals WIP\MH40PH\MH40PH Manual.doc Page 3 of 11
Page 4
ASSEMBLY INSTRUCTIONS.
06/08 Rev A
Removing Heater from Package:
1. Remove heat er, reflector from carton.
2. Remove all shipping packaging from heater
components.
3. Retain all packaging material and carton, until
heater warranty has expired. Any warranty returns
require original packaging and carton.
4. Check heater for any shipping damage. If any is
found, immediately contact and return heater to
dealer / distributor where purchased.
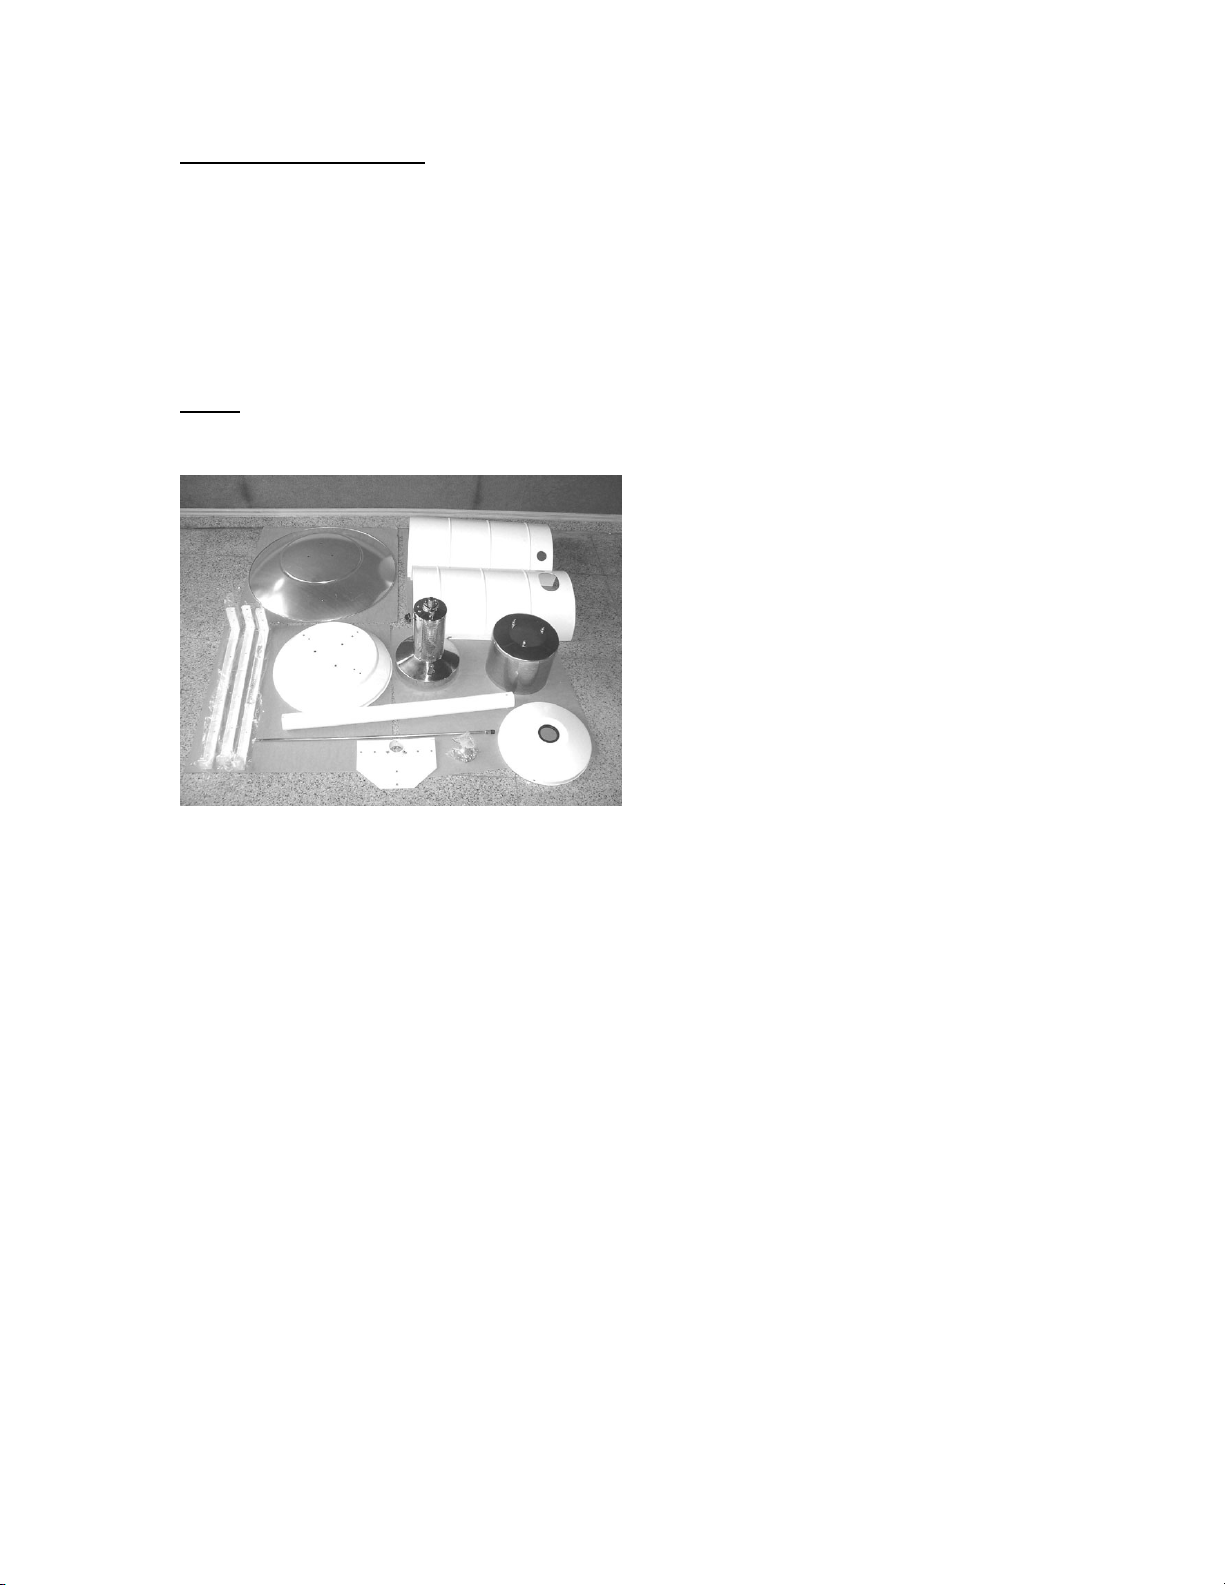
Remove all components from package and
Step 1:
inspect parts.
Packaging includes:
Nut & Bolt Pack Containing:
4pcs--3/16”-24x3/8” screws
12pcs--1/4”-20x3/4” bolts 12pcs--1/4”-20 nuts
24pcs--1/4” flat washers
12pcs--1/4” lock washers
4pcs--Pan head screws 4--Pan head Washers
3pcs--1/4”-20x1/2” bolts
3pcs--1/4”-20x1/2” bolts (stainless steel)
3pcs--5/16”-18 round head nuts
6pcs-5/16” flat washers
Loose Items:
1-Dome 1-Emitter
1-Burner Assembly
1-Post 1-Gas Line
3-Legs 1-Post support
1-Cylinder Cap
1-Base 1-Chain
1-Back Cylinder Cover
1-Front Cylinder Cover
\\Commserv\Users\EGI_Shared\Engineering\Labels & Manuals WIP\MH40PH\MH40PH Manual.doc Page 4 of 11
Page 5

Step 2: Tighten the 3 nuts on the emitter top.
06/08 Rev A
Step 4: Attach 3 Legs to Post Support (6 bolts 1/4"-20×
3/4"& 12 flat washers & 6 lock washers & 6 nuts)
Step 3: Attach Emitter Assembly to Burner Assembly
(4-screws 3/16"-24×3/8")
Step 5: (If your patio heater has Wheels, please
assemble the wheels as Attachment 2, before Step 5).
Step 6: Install Post onto Post Support and attach it (3
bolts 1/4"-20×1/2" & 3 flat washers)
Attach 3 Legs/Post Support Assembly to Base (6 bolts
1/4"-20×3/4"& 12 flat washers & 6 lock washers & 6
nuts)
Step 7: Attach Cylinder Back Cover to Legs (4-pan
head screws, 4-flat washers)
\\Commserv\Users\EGI_Shared\Engineering\Labels & Manuals WIP\MH40PH\MH40PH Manual.doc Page 5 of 11
Page 6

Step 8: Place Cylinder Cap onto Post pull into place.
06/08 Rev A
Step 10: Leak Test #1:
*Mix a leak check solution (1-part liquid dishwashing
detergent to 3-parts water).
*Connect the Hose and Regulator Assembly to the Gas
Line and tighten. Then connect the Regulator to the
propane cylinder.
*Apply several drops of the leak check solution to the
gas connection at the burner assembly.
*Make sure that the heater control knob is turned “OFF”.
*”Open” the Propane Cylinder Valve.
*If bubbles appear at the connection, there is a leak and
it must be tightened until no bubbles appear. MAKE
SURE THERE IS NO LEAKS.
*”Close” the Propane Cylinder Valve, then disconnect
the Hose and regulator Assembly from the Propane
Cylinder and the Gas Line
Step 9: Assemble the Gas Line to the Burner Assembly
and tighten.
Step 11: (please read the NOTE)
Carefully insert the Gas Line into the Post.
Take great care not damage the flare fitting on the Gas
Line that will connect to the Hose and Regulator.
**NOTE:
If your patio heater has a Bar Table, please assemble
the table as Attachment 1, before Step 11.
\\Commserv\Users\EGI_Shared\Engineering\Labels & Manuals WIP\MH40PH\MH40PH Manual.doc Page 6 of 11
Page 7

06/08 Rev A
Step 12: Attach Burner Assembly to the Post (3 bolts
1/4"-20×1/2" & 3 flat washers)
Step 13: Attach Dome to the Emitter (3 round-head nuts
M8 & 6 flat washers)
Step 14: Connect the Hose and Regulator
Assembly to the Flare Fitting on the Gas Line and
tighten.
Step 15: Leak Test #2:
*Attach the regulator to the Propane Cylinder.
*Apply several drops of the Leak Check Solution (Step
10) to the hose / gas line connection.
*Make sure the Heater Control Knob is “OFF”.
**”Open” the Propane Cylinder Valve.
*If bubbles appear at the connection, there is a leak and
it must be tightened until no bubbles appear. MAKE
SURE THERE IS NO LEAKS.
*”Close” the Propane Cylinder Valve, then disconnect
the Hose and regulator Assembly from the Propane
Cylinder and the Gas Line
\\Commserv\Users\EGI_Shared\Engineering\Labels & Manuals WIP\MH40PH\MH40PH Manual.doc Page 7 of 11
Page 8

Step 16: Place the Propane Cylinder into the
06/08 Rev A
Base. Then lift the cylinder Cap Support, to hold
the cap in position. Attach the Front Cover to the
Back Cover. Then lower Cap.
Gas Requirements:
The heater comes with a regulator for hook-up to
a standard propane gas cylinder set up for vapor
withdrawal (operated with the cylinder vertical).
The gas cylinder must be constructed and
marked in accordance with specifications of the
U.S. Department of Transportation for propane
cylinders. Never connect the heater to an
unregulated cylinder. The heater is shipped from
the factory for use with propane never substitute
gases.
CAUTION: When the heater is to be operated in
the presence of other people the user is
responsible for properly acquainting those
present with safety precautions, and other
hazards involved.
Fuel Connection:
1. Use a 20-po und (5-gallon) vapor
withdrawal propane cylinder. Not
supplied with the heater.
2. Place the cylinder in the heater base
with the valve accessible.
3. Connect the PO L fitting of the hose &
regulator assembly to the propane
cylinder by rotating the plastic POL nut
clockwise onto the propane cylinder’s
valve outlet and securely tighten.
4. Make sure that the safety valve is turned
off then open the cylinder’s valve and
check all gas connection with a soap
and water solution. DO NOT USE A
FLAME. The gas connections to check
include those in the heater base and the
connections in the burner assembly.
To Light:
Relight After Shutdown:
• Caution: Never leave heater operating
unattended.
1. Remove the Cylinder cover on the base.
2. Make sure that all gas co nnections
where checked with a soap and water
solution before igniting heater, as
described in the fuel connection section
of this manual.
3. Fully open the valve on the propane
cylinder.
4. Turn safety gas control knob to “pilot”
position.
5. Push in and ho ld the gas control knob
then push and release the ignition
button repeatedly until there is a flame
at the pilot. If the ignition button does
not work the pilot may be lit using a
match through the access hole, found
under the emitter base.
6. Keep the control knob depressed for at
least 30 seconds after pilot ignition then
release control knob.
7. Turn the burner on to maximum rate
then reduce to desired burner setting.
8. Replace the cylinder cover on the base
to cover the propane cylinder.
• Caution: White smoke may appear
around the emitter screen during the
first few minutes of the initial burning.
1. Turn the gas control knob to “OFF”
position.
2. Wait 5 minutes.
3. Restart following “To Light” procedure.
\\Commserv\Users\EGI_Shared\Engineering\Labels & Manuals WIP\MH40PH\MH40PH Manual.doc Page 8 of 11
Page 9

To Shutdown:
06/08 Rev A
1. Turn gas control knob clockwise to
“OFF” position.
o Caution: Cylinder removal
should only be undertaken
when heater is cool to the
touch.
2. If the heater is not to be used, securely
close the valve at the propane cylinder.
3. Do not attempt to relight the heater for
at least 5 minutes after the propane
cylinder valve has been closed.
Storage:
Maintenance:
• Never store a propane cylinder inside a
building or in the vicinity of any gas, oil
or solid fuel-burning appliance. Cylinder
must be disconnected and removed
from the heater base assembly and
stored in accordance with local, state
and federal codes. In the absents of
such codes, install in accordance with
American National Standard (ANSI) /
National Fire Protection Association
(NFPA) publication “Standard for the
Storage and Handling of Liquefied
Petroleum Gases ANSI/NFPA 58-latest
edition
1. A qualified person should inspect the
heater before each use, and at least
annually.
2. Before each use, check the POL fitting
for any damage, and replace if any
damage is found.
Safety:
BEWARE OF SPIDERS
CAUTION: BURNER TUBES MUST BE
INSPECTED AND CLEANED BEFORE
EACH USE.
Spiders and small insects occasionally spin
webs or make nests in the burner tubes and
or orifices during warehousing and transit.
These webs or nests can lead to a gas flow
obstruction, which could result in a fire in and
around the burner tube. This type of fire is
know as FLASHBACK and can cause serious
damage to your patio heater and creates an
unsafe operating condition for the user.
Although an obstructed burner tube is not the
only cause of FLASHBACK, it is the most
common cause, and frequent inspections and
cleaning of the burner tube is necessary.
3. Turn off the propane vapor supply at the
cylinder when the heater is not to be
used.
4. Inspect and clean the air circulation,
combustion and ventilation
passageways of the heater, burner,
burner venturi and main burner orifice at
least once a year or immediately upon
indication of any of the following
systems:
• Flashback.
• Smell of aldehydes.
• Predominate yellow fames.
• Excessive popping noises during
operation.
• Diminished and uneven emitter
glow.
5. When the heater is to be stored indoors,
the connection between the LP-gas
supply cylinder and the heater must be
disconnected and the cylinder removed
from the heater and stored in
accordance with chapter 5 of the
standard for “Storage and Handling of
Liquefied Petroleum Gases” ANSI/NFPA
58.
Only recoat those portions of the heater (post,
base assembly) with high temperature (1200
paint. Never paint the reflector, or any portion of
the stainless steel burner assembly. The
reflector may be cleaned with a non-corrosive /
non-combustible product.
o
F)
Warning:
Local codes for installation of propane
systems may very considerably. Therefore,
ask your local propane supplier for advice
on propane system installation in your
particular area. In the absence of local
codes, install in accordance with American
National Standards Institute (ANSI) /
National Fire Protection Association (NFPA)
publication “Standard for the Storage and
Handling of Liquefied Petroleum Gases
ANSI/NFPA 58 and National Fuel Gas
Code ANSI Z223.1.” Your propane supplier,
fire marshal or library should have a copy.
The propane supply system must be
arranged for vapor withdrawal. Propane
cylinders must be secured in the base and
changed in the upright position to keep them
from falling or being knocked over.
\\Commserv\Users\EGI_Shared\Engineering\Labels & Manuals WIP\MH40PH\MH40PH Manual.doc Page 9 of 11
Page 10

Servicing:
06/08 Rev A
A hazardous condition may result if a heater is used
that has been modified or is not functioning properly.
When the heater is working properly:
• The flame is contained within the heater.
• The flame is essentially blue.
• There is no strong disagreeable odor, eye
burning or other physical discomfort.
• There is no smoke or soot internal or external
to the heater.
• There is no unplanned or unexplained
shutdown of the heater.
• There is no Flashback.
• There are no excessive popping noises during
operation.
• There is no diminished and uneven emitter
glow.
The parts list shows the heater as it was constructed.
Do not use a heater, which is different from that shown.
In this regard, only the cylinder connections and
regulator supplied with the heater. Do not use
alternative parts. For this heater the regulator is set for
11.0” water column outlet pressure. If there is any
uncertainty about the regulator setting, have it checked.
A heater that is not working properly must be repaired,
but only by a trained, experienced service person.
Contact the factory for the service center nearest you.
Instructions for Ordering Parts:
All parts orders must show heater model number,
item number, part number, and description. We
recommend that only parts supplied by the
manufacture be used on this unit. A locally
purchased part may appear to be identical,
although in reality it might endanger the heater or
the persons operating the heater.
The heater should be serviced only by a trained,
experienced service person. Read the section on
“Servicing” before ordering parts.
For parts orders, contact us at
TEL: 1-800-251-0001 FAX: 1-800-321-0552
ENERCO / MR. HEATER
th
4560 W. 160
St., CLEVELAND, OHIO 44135
Warranty:
Warranty information may be obtained at
TEL: 1-800-251-0001 FAX: 1-800-321-0552
You may obtain in-warranty or out-of-warrant y service
by returning the heater postage prepaid to:
ENERCO / MR. HEATER
th
4560 W. 160
In-warranty products returned to the service
department will be repaired with no change for either
parts or labor and will be returned to you freight
prepaid. Please include a brief statement indicating:
• Problem for repair
• Date of purchase
• Place of purchase
• Serial Number
• Proof of purchase.
Out-of-warranty products returned to the service
department will be repaired with a charge for parts and
labor and will be returned to you freight collect.
St., CLEVELAND, OHIO 44135
\\Commserv\Users\EGI_Shared\Engineering\Labels & Manuals WIP\MH40PH\MH40PH Manual.doc Page 10 of 11
Page 11

06/08 Rev A
\\Commserv\Users\EGI_Shared\Engineering\Labels & Manuals WIP\MH40PH\MH40PH Manual.doc Page 11 of 11
Page 12

06/08 Rev A
 Loading...