

Mr. Freeze EIM-404 Instruction Manual
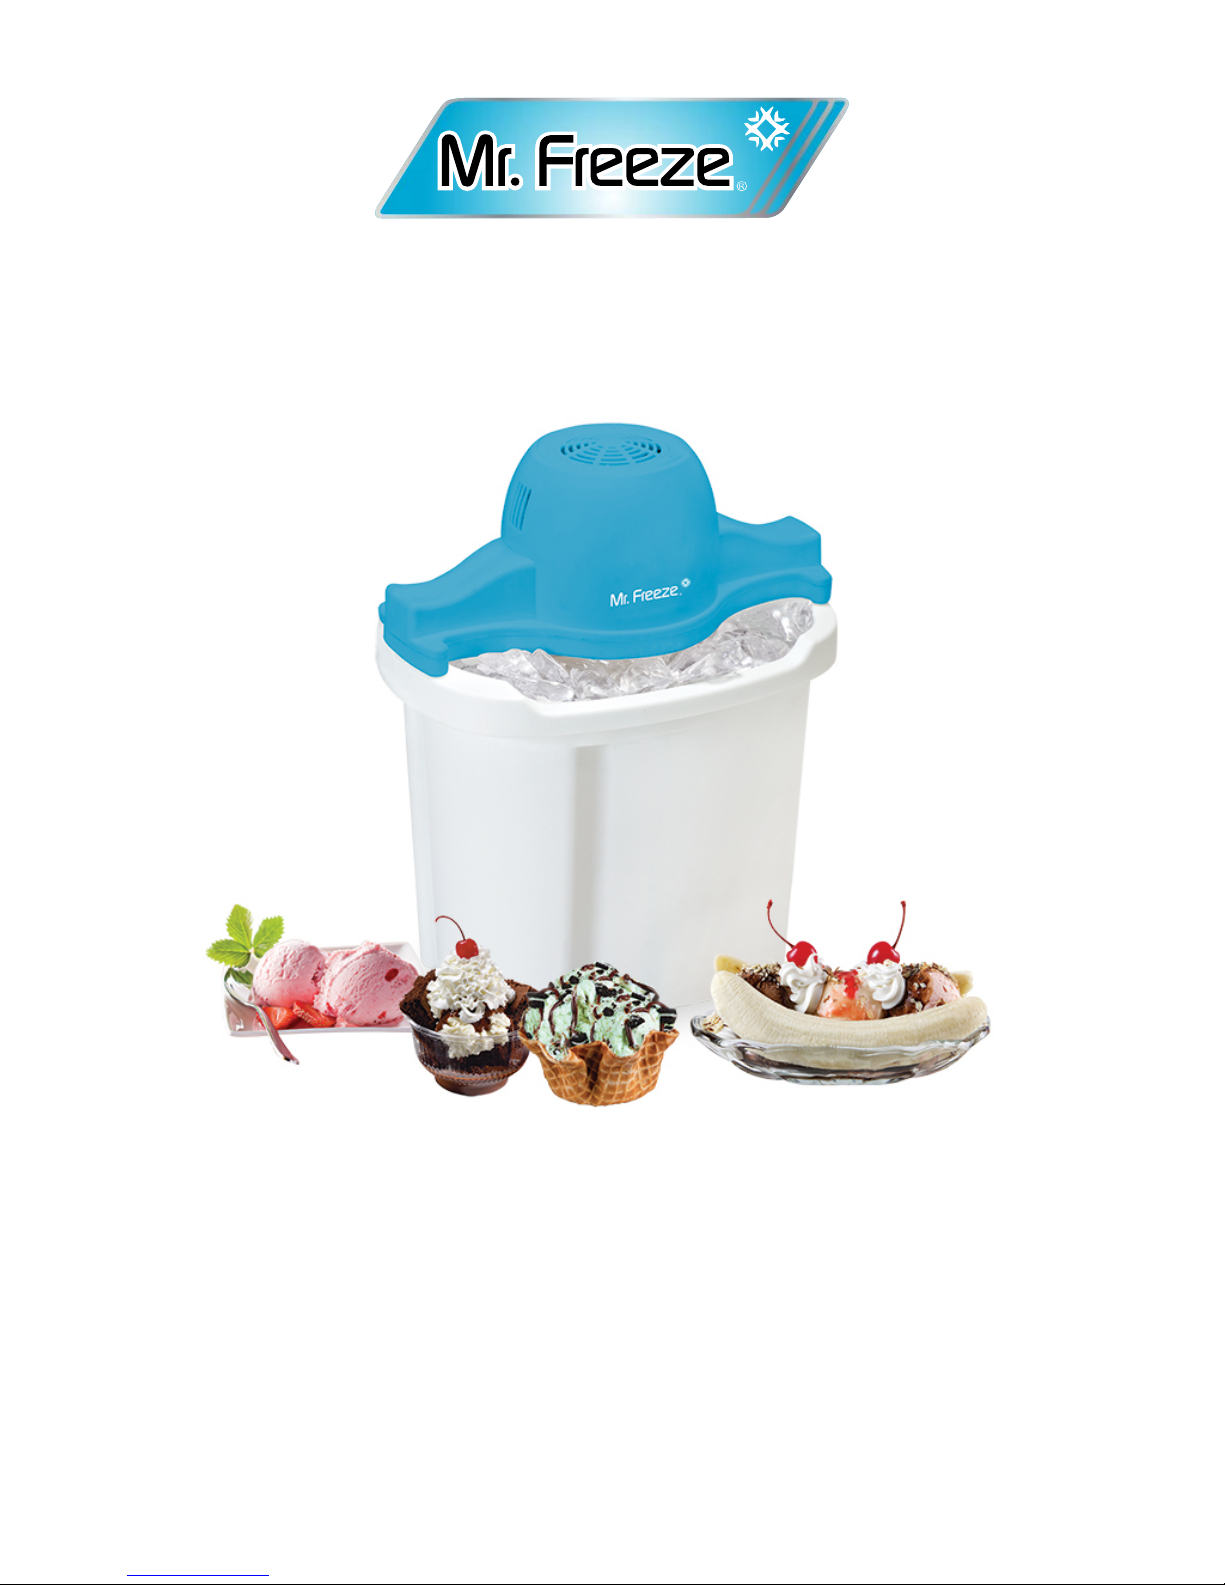
4Qt. Electric Ice Cream Maker
Maquina Para Hacer Nieve
Model EIM-404
Instruction Manual
Before operating your new appliance, please read all instructions
carefully and keep for future reference

1
When using electrical appliances, basic safety precautions should always be followed, including the
following:
SAVE THESE INTRUCTIONS
THIS PRODUCT IS FOR HOUSEHOLD USE ONLY!
IMPORTANT SAFEGUARDS
1.
Read all instructions before operating.
2. Do not use this unit for any other purpose
than its intended use.
3. Close supervision is always necessary
when this unit is used by or near children.
4. Do not leave this unit unattended while in
use. Always unplug the product from the
electrical outlet when not in use.
5. Always place the product on a flat, steady,
stable, scratch-resistant surface.
6. Always use the product in a well-ventilated
area.
7. Do not place the product on or near a gas
or electric stove or burners. Do not place
the product inside or on top of a heated
conventional oven, microwave oven, or
other heat source.
8. Keep the power cord and plug away from
any heated surfaces.
9. Do not submerse the motor or expose the
electrical components of this product to
water or any other liquids.
10. Do not use attachments not recommended
or sold by the product manufacturer, as a
risk of fire, electrical shock, or serious
personal injury may result.
11. Plug the product
into a standard 120V AC
electrical outlet only.
12. Do not plug or unplug the product from the
electrical outlet with a wet hand.
13. Never operate this product while you are
standing/sitting in a damp or wet area.
14. To avoid a circuit overload, do not operate
another electrical product on the same
electrical circuit as this product.
15. Do not allow the power cord or plug to
hang (i.e., over the edge of a table or
counter) where it may be tripped over or
pulled.
16. Disconnect the plug (do not pull on power
cord) from the electrical outlet. Do not put
any stress on the power cord where it
connects to the product, as it could fray
and break.
17. Never operate this product if it has a
damaged power cord or plug, is not
working properly, has been dropped,
damaged or malfunctions in any manner,
or the power cord or handle is exposed to
water or any other liquids. Do not attempt
to examine or repair this product yourself.
Return the product to manufacturer service
center for examination and/or repair.
18. This product
is intended for indoor, noncommercial, non-industrial, household use
only. Do not use outdoors.

2
SHORT CORD PURPOSE
NOTE:
A short power cord is provided to
reduce the risk of personal injury resulting
from becoming entangled in or tripping over
a longer cord.
Longer power-supply cords or extension
cords are available and may be used if
care is exercised in their use.
If an extension cord is used: (1) the
marked electrical rating of the extension
cord should be at least as great as the
electrical rating of the product; (2) the
extension cord should be arranged so that
it will not drape over the countertop or
tabletop where it can unintentionally be
pulled on or tripped over by
children or
pets.
POLARIZED PLUG
If this appliance is equipped with a
polarized plug
(one blade is wider than the
other), please follow the below instructions:
To reduce the risk of electrical shock, this
plug is intended to fit into a polarized outlet
only one way. If you are unable to fit the
plug into the electrical outlet, try reversing
the plug.
If the plug still does not fit, contact a
qualified electrician. Never use the plug
with an extension cord unless the plug can
be fully inserted into the extension cord.
Do not alter the plug of the product or any
extension cord being used with this
product. Do not attempt to defeat the
safety purpose of the polarized plug.
3
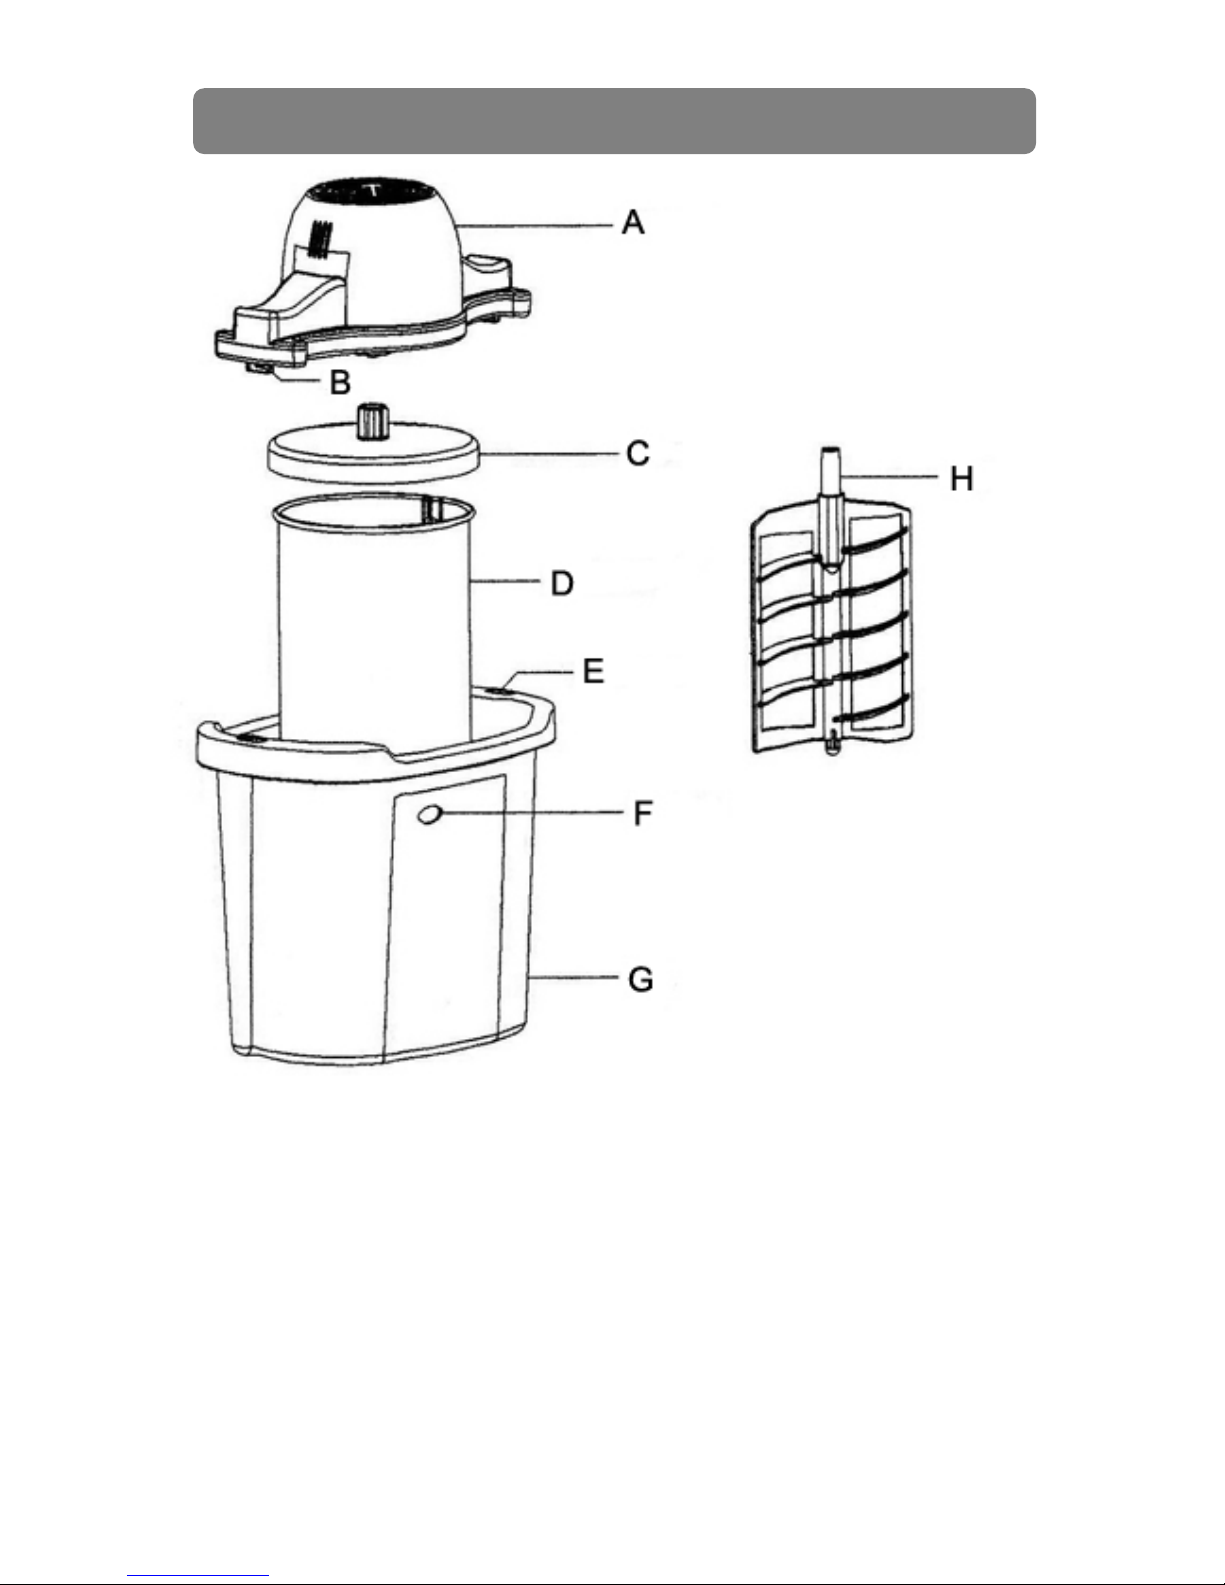
A) Electric Motor
B) Power Cord
C) Canister Lid
D) Freezing Canister
E) Bucket Locking Slots
F) Drainage Hole
G) Plastic Bucket
H) Mixing Spatula
PARTS IDENTIFICATION
4
BEFORE FIRST USE:
NOTE: Always read all instructions and safeguards before operation.
HOW TO USE:
PREP – Chill ice cream canister in the freezer for 2-3 hours prior to use. Do NOT leave ice cream
canister inside the freezer for more than 6 hours.
HOW TO USE YOUR ICE CREAM MAKER
1. Remove all packaging materials
including plastic, cardboard,
Styrofoam and literature.
2. Make sure that all parts are present
and in good condition before
discarding packaging materials.
3. Wash the canister lid, canister and
mixing spatula in warm soapy water.
Rinse and dry thoroughly.
CAUTION: DO NOT WASH PARTS IN
DISHWASHER.
4. Use a damp cloth to wipe clean the
electric motor and plastic bucket.
WARNING: DO NOT USE ANY
ABRASIVE CLEANERS OR
SCOURING PADS TO CLEAN UNIT.
CAUTION: NEVER IMMERSE THE
MOTOR OR ELECTRICAL
COMPONENT OR POWER CORD IN
WATER OR ANY OTHER LIQUID AT
ANY TIME.
1. Using your favorite recipe, prepare
the necessary ingredients per recipe
instructions.
2. Pour the prepared and chilled ice
cream mixture into the chilled ice
cream canister. Do not fill more than
2/3 full.
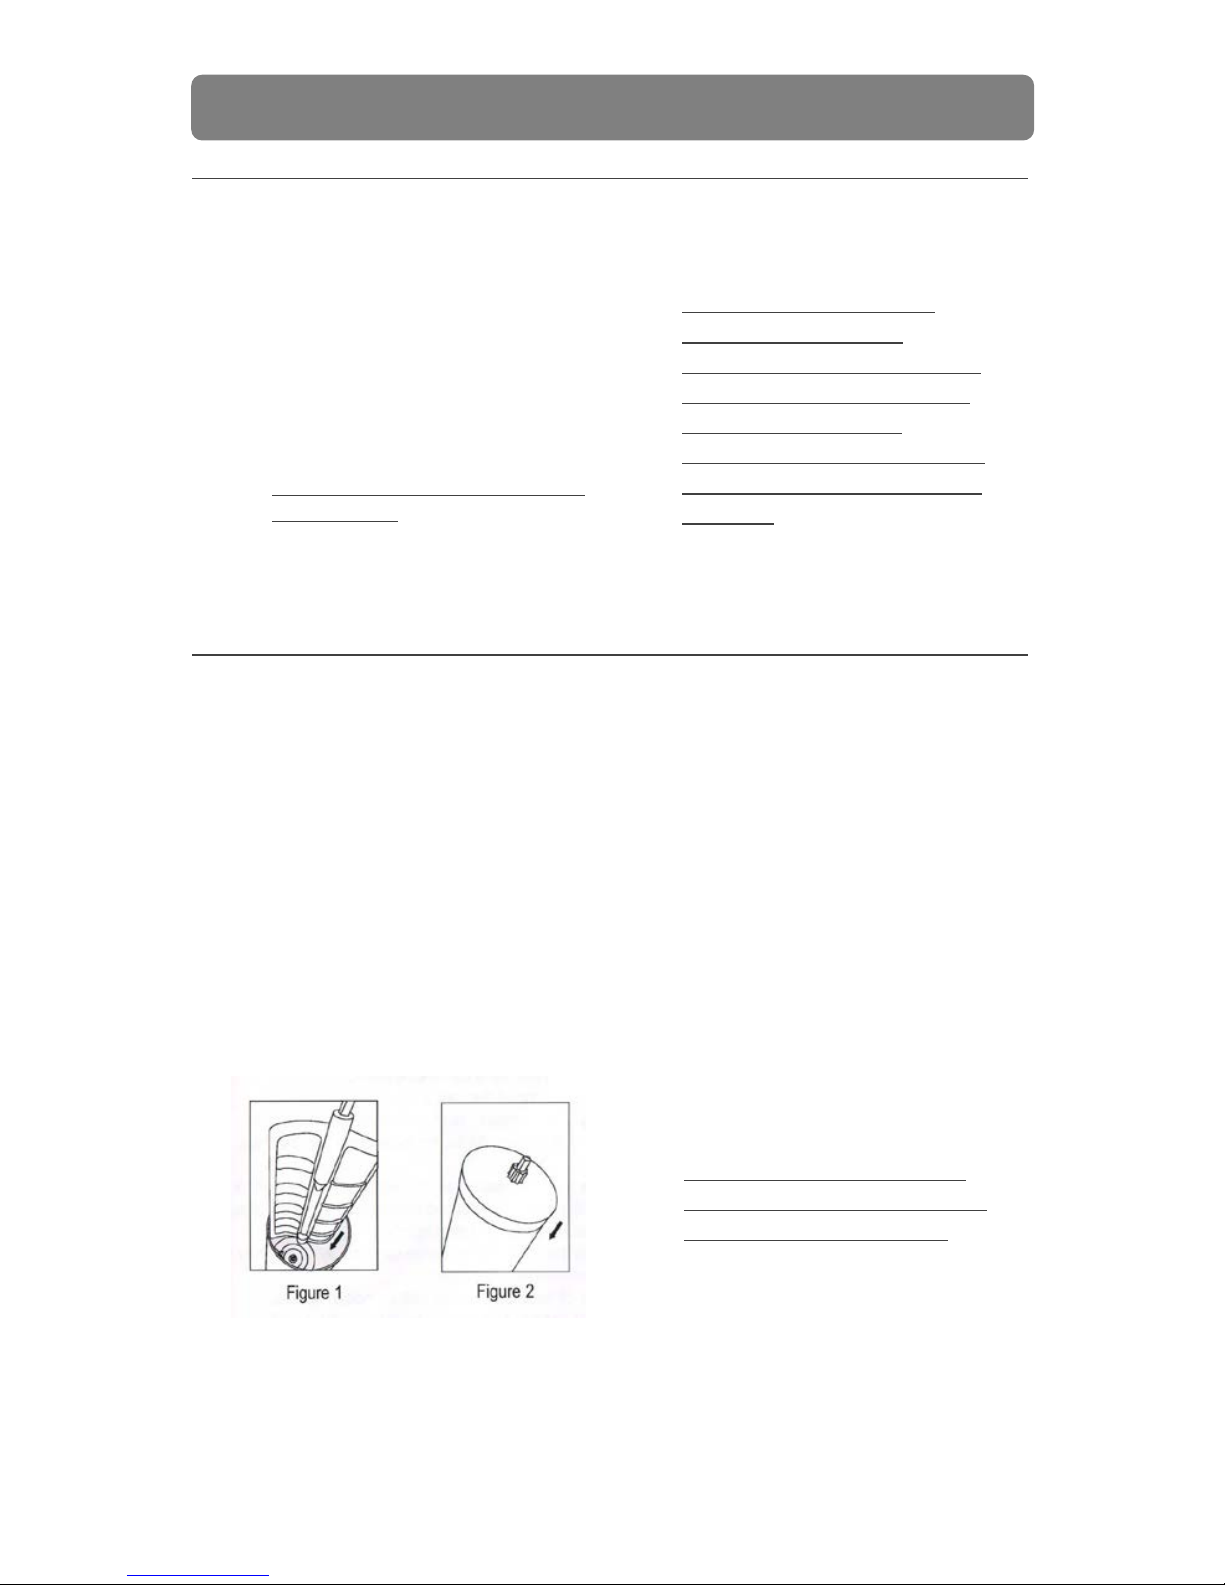
3. Insert the Blending Spatula and make
sure the bottom of the spatula is fixed
in the center of the bottom of the
canister. (Figure 1)
4. Place the lid on the canister. (Figure
2)
5. Place the canister into the plastic
bucket and make sure it engages the
cone in the center of the bucket.
6. Align the electric motor at a very
slight angle above the end of the
spatula and ensure that the spatula is
inserted properly into the motor end.
7. Adjust downwards so the locking
latches on both sides of the electric
motor fits into the Locking Slots on
the bucket.
8. Turn the electric motor slightly to lock
it into place.
9. Plug the power cord into and
electrical outlet if the Electric Motor is
being used.
NOTE: During churning process,
the canister should be turning, the
spatula will remain stationary.

5
HOW TO USE YOUR ICE CREAM MAKER (CONT.)
10. Now prepare the bucket by filling it
with ice to the top of the canister.
11. Add 1-2 cups of rock salt to the top of
the ice inside the bucket.
12. Run the cranking system for
approximately 5 minutes so that the
canister chills evenly.
13. As the ice begins to melt down by 2-3
inches, add more ice and more cups
of rock salt into the bucket.
14. Allow the machine to churn for 45
minutes (If the motor has stopped
prematurely, turn the motor off, break
up any ice blockages with the plastic
stirrer and start it up again).
15. Once the churning is complete (the motor
will
automatically
shut off when the
contents inside become too thick for the
blending spatula), unplug and remove the
motor. Clear the ice and salt away from
the lid of the canister to prevent it from
falling into the canister of ice cream.
16. Remove the cover and carefully lift out
the Blending Spatula and scrape off any
excess ice cream.
17. The ice cream consistency is very fresh
so it will be more of a soft-serve texture.
18. If a harder consistency is desired,
transfer the contents to a freezable
container and freeze for 3-4 hours.
HELPFUL TIPS & NOTES
1. Make sure to use ice that is crushed
inside the bucket. Ice should be
small, coarse pieces.
2. As the canister is turning, make sure
to periodically mix the salt and ice
together by using the plastic stirrer
every 10-15 minutes while the
machine is in use.
3. It is recommended to store the ice
cream inside the freezing canister.
4. If the ice cream consistency is too
soft, put the contents into a freezable
container and freeze for 3-4 hours.
5. Do not plug up the drainage hole on the
side of the bucket. This is for draining
excess salt water and should be kept
open at all times.
6. If the electric motor stops churning
before the 45-minutes is complete,
check to make sure there is no blockage
of ice jamming against the canister. If
there is ice blocking the canister, turn off
the motor and remove the jammed ice.
7. The electric motor will
automatically
shut off if the ingredients in the canister
are too thick or too hard to blend
anymore. Once removed, the motor will
function normally again.

6
NOTE: ALWAYS UNPLUG MACHINE AND ALLOW IT TO COMPLETELY COOL BEFORE CLEANING OR
STORING.
HOW TO CLEAN
1. Clean the electric motor with a
damp cloth to remove any debris.
CAUTION: NEVER IMMERSE THE
MOTOR IN WATER OR ANY
OTHER LIQUIDS.
2. Clean the bucket with a sponge
and warm soapy water to remove
the salt-water residue. Rinse and
dry thoroughly to ensure the salt
does not corrode the metal
accessories or parts.
DO NOT WASH BUCKET IN
DISHWASHER.
3. Wash the plastic canister lid and
mixing spatula in warm soapy
water and dry thoroughly.
DO
NOT WASH PARTS IN
DISHWASHER.
4. Wash the freezing canister in
warm soapy water and dry
thoroughly. Never freeze the
canister while it is still wet.
CAUTION: DO NOT USE ANY
ABRASIVE CLEANERS.
WARNING: THIS MACHINE AND
ITS ACCESSORIES ARE NOT
DISHWASHER SAFE.

7
*NOTE: Not all recipes will yield 4qts (128oz.). You may need to double or divide recipe in half
to yield desired amount.
CHOCOLATE ICE CREAM
10 EGG YOLKS 4 CUPS MILK
4 CUPS DOUBLE/HEAVY CREAM 4 OZ. SUGAR
6 TLBS OF COCOA POWDER
Optional
: 2 level teaspoons corn flour
(for thicker texture or when ice cream maker has a bowl that
needs advance freezing)
1. Mix together the egg yolks, sugar (and corn flour if using it) in a bowl, stirring well and beat until
smooth. Pour the milk into a saucepan and heat gently on a medium heat until hot. DO NOT BOIL.
Then stir the hot milk into the egg and sugar mix. Mix well.
2. Pour the mixture back into the saucepan and heat gently, stirring frequently. DO NOT BOIL. After
several minutes it will start to thicken into custard. At this point remove the pan from the heat, add
the cocoa powder using a sifter and mix well ensuring any lumps of cocoa powder have dissolved.
Leave the mixture to chill.
3. Once chilled, mix until slushy. Add the heavy cream and make sure it mixes in well. Transfer the
mixture to the ice cream maker and freeze according to the instructions.
CHOCOLATE CHIP ICE CREAM
4 CUPS MILK 4 CUPS DOUBLE/HEAVY CREAM
1 ½ CUPS SUGAR 2 ½ CUPS PLAIN CHOCOLATE (GRATED OR MINI CHIPS)
1. Add the milk and sugar into a saucepan and heat gently, dissolving the sugar. Remove from heat
once sugar is dissolved and leave the mixture to cool completely.
2. When mixture is cool, stir in the heavy cream. Then add in the grated chocolate or mini chocolate
ships. Transfer the complete mixture into the ice cream maker and freeze according to the
instructions.
ICE CREAM RECIPES

8
VANILLA ICE CREAM
10 EGG YOLKS (BEATEN) 3 CUPS HEAVY/CREAM
1 CUP SUGAR 2 VANILLA PODS
3 CUPS FULL CREAM MILK (SCORED DOWN THE MIDDLE)
Optional:2
level teaspoons cornflower
(for a thicker texture or when using an ice cream maker with a
bowl that has to be frozen in advance)
1. Pour the milk into a saucepan and bring slowly to a simmer. DO NOT BOIL. Once mixture is
bubbling slightly, remove from heat. Place the vanilla pods into it and leave to infuse for about 20
minutes.
2. In a bowl, beat together the egg yolks and sugar (and cornflower if using it) until thick. Carefully
remove the vanilla pod from the pan of milk and scrape out any excess seeds into the milk. Whisking
constantly, pour the milk mixture into the mixture of egg yolks and sugar. Whisk until mixed well.
Pour the mixture back into the pan and heat gently, constantly stirring until the mixture thickens to a
custard -
DO NOT BOIL OR MIXTURE WILL CURDLE. When you see a film form over the back of
your spoon, remove the saucepan from the heat. Let mixture cool completely.
3. When the custard base is completely cooled, stir in heavy cream and transfer to a chilled bowl. For
best results refrigerate the mix for at least 3 hours (overnight if you have the time). Transfer the
mixture into ice cream maker and freeze according to the instructions.
STRAWBERRY ICE CREAM
4 LBS FRESH STRAWBERRIES 4 CUPS FULL CREAM MILK
2 CUPS SUGAR (split into 2 1 cup. halves) 4 CUPS HEAVY CREAM
12 EGG YOLKS (beaten) 4 TSP VANILLA EXTRACT
Optional: 2
level teaspoons cornflower
(for a thicker texture or when using an ice cream maker with
a bowl that has to be frozen in advance)
1. De-stalk, wash and chop the strawberries into small pieces. Place in a mixing bowl and add 1 cup
of sugar. Mash well until you have a smooth mixture. Chill the mixture in the refrigerator.
2. Mix together the egg yolks, the remaining 1 cup of sugar (and cornflower if using it). Beat until
smooth. Pour the milk into a saucepan and heat gently on a medium heat until hot. DO NOT BOIL.
Then stir the hot milk into the egg and sugar mix. Mix well.
ICE CREAM RECIPES (CONT.)
 Loading...