

Page 1
User Manual
Parts List:
Item Description Qty Item Description Qty
1 Projector 1 10 Strings with Hooks 4
2 Adaptor for projector 1 11 Carrying Case 1
3 Remote Control 1 12 Pole A 4
4 Bluetooth speaker 1 13 Pole B 2
5 USB wire for charging Bluetooth speaker 1 14 Pole C 2
6 Audio wire for Bluetooth speaker 1 15 Pole D 1
7 Screen 1 16 Mouse 1
8 Bungie Cord 6
9 Stake 4
Made in China
Page 1 of 15
Page 2

THIS PRODUCT IS NOT A TOY!
Please read this entire instruction booklet before using (for Indoor/Outdoor use).
The Complete Outdoor Home Theater is an all-in-one kit designed to turn your outdoor space into a Virtual
Drive In. included is a bright 1200 lumen projector, Bluetooth speaker, and a 90” wrinkle free screen all
bundled into a sturdy and easy to store carrying case. Set up is quick and easy. Simply remove the
components from the carrying case, assemble the screen, turn on the speaker and place the projector a
few feet away. Movies, TV shows or other videos can be played via the following ways:
• Wi-fi enabled Android operating system. Included are pre-loaded Netflix and Hulu apps (must have
existing accounts). Other apps available for download.
• Mirror from your smart device using Miracast (Android) or AirPin (IOS).
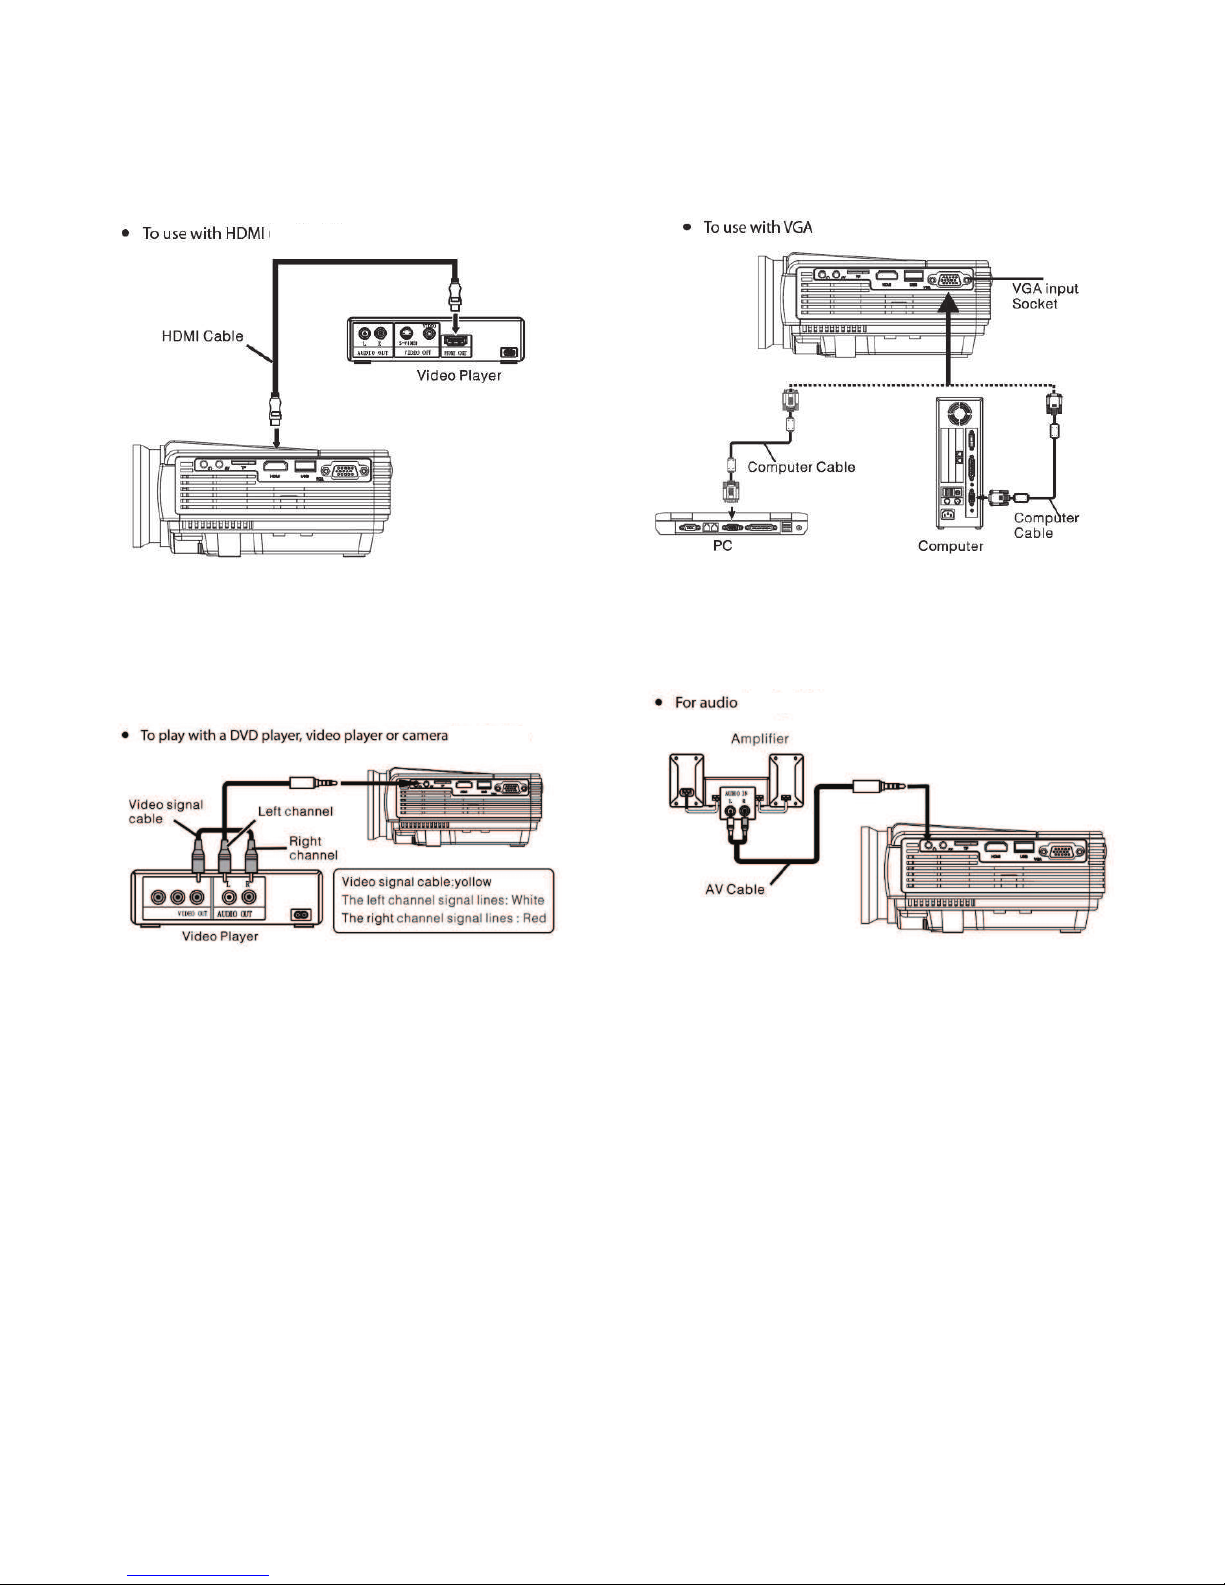
• Connect your DVD player or other devices to the HDMI port (HDMI cable not included).
1. Safety Instructions
READ AND FOLLOW ALL SAFETY INSTRUCTIONS.
WARNING: THIS IS NOT A TOY! THIS PRODUCT CONTAINS SMALL PARTS WHICH COULD
CAUSE CHOKING IF SWALLOWED.
DO NOT REMOVE COVER. NO USER SERVICEABLE PARTS INSIDE. IF SERVICING IS
NEEDED, SEND TO QUALIFIED SERVICE PERSONNEL. PLEASE ADHERE TO THE
FOLLOWING:
A. Read Instructions - All safety and operating instructions should be read before the item is
operated. Please adhere to the instructions and warnings for your safety.
B. Heat - The item should be situated away from heat sources such as radiators, hairdryers, heat
registers, stoves or other appliances that produce heat.
C. Power Sources - The item should be connected to a power supply only like the one that is
provided with the item.
1) Do not secure the wiring of the product with staples or nails, or place on sharp hooks or
nails.
2) Do not hang objects from cord.
3) Do not close doors or windows on the product or product cords as this may damage the wire
insulation.
4) Unplug the product when leaving the house, retiring at night or if left unattended.
D. Damage Requiring Service – Refer all servicing to a qualified service personnel. Have a
qualified service personnel service this item when:
1) The power-supply cord or plug has been damaged.
2) Objects are loose inside and the unit no longer works.
3) All troubleshooting techniques have been tried and the item will not work or has stopped
working.
4) The item has been dropped or the enclosure damaged.
5) Do not leave the product outside after use.
E. This product is intended for short term use throughout the year. It is not intended for permanent
installation or use.
F. To avoid risk of fire, burns, personal injury and electrical shock, this item should not be played
with or placed where small children can reach it.
Page 2 of 15
Page 3
G. Do not use this product for other than its intended use.
H. Do not cover the product with cloth, paper or any material not part of the product when in use.
SAVE THESE INSTRUCTIONS.
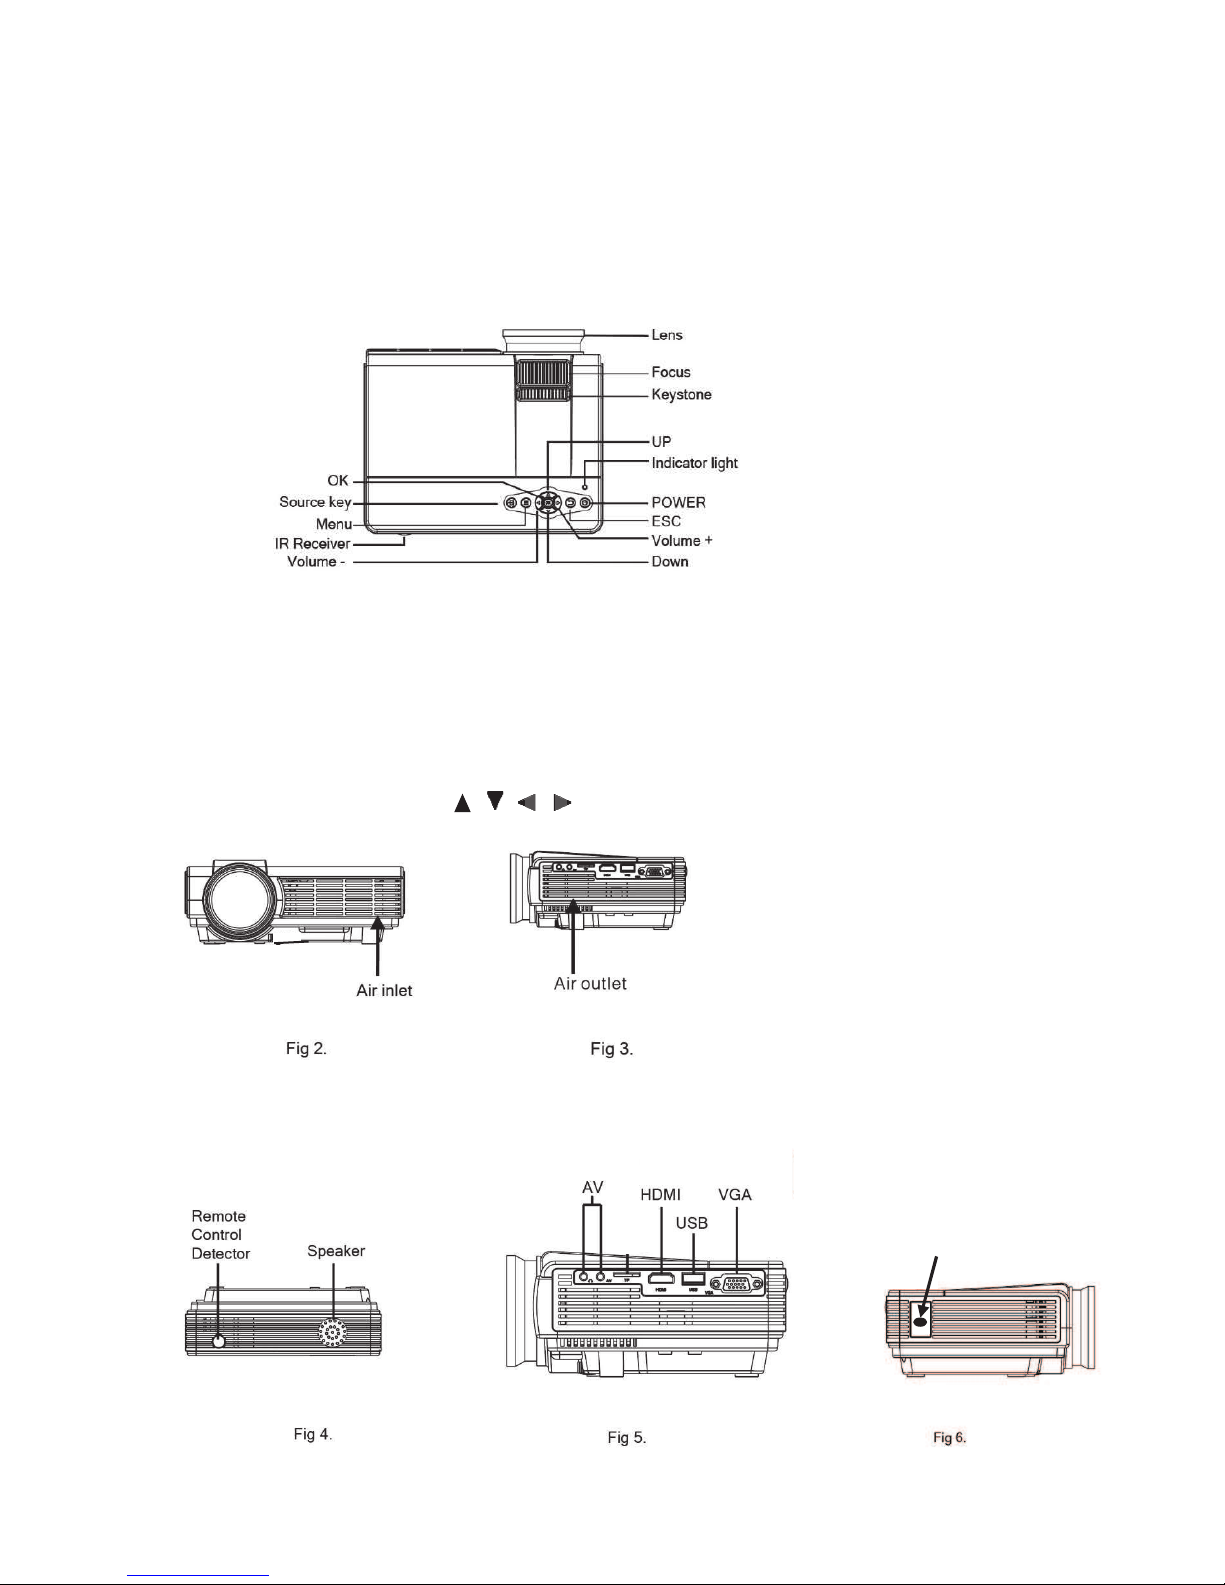
2. Projector Information – The projector is inside the outdoor housing. Open the housing from the
front to gain access to the projector. For easier opening, hold the bottom flat part of the front of
the housing under the clear opening, then lift from the curved part over the clear opening.
• Power Button: Turns the projector ON and OFF.
• Volume Button: Press the buttons indicated in the drawing as “Volume -” and “Volume +” to
adjust the volume.
• Menu: Press to bring up the main menu or to exit menu.
• Focus: Turn the focus dial to focus.
• Keystone: Turn the keystone dial to adjust the image up or down +/- 15 degrees.
• Source Button: Press to select the external video format.
• Use arrow buttons ( , , , ) to navigate screens.
• Air Inlet and Outlet: Do not block. Ventilation is needed in order for the projector to not
overheat.
Plug Adaptor
Wire here
Page 3 of 15
Page 4
• Attach the adaptor wire into the projector and the adaptor plug into a wall socket or
extension cord.
• To use with USB, plug your USB into the USB port (see fig. 5).
• Run the various cables underneath the housing and insert into the appropriate ports. Open
the projector housing for easier port access. Close the housing after the cable or USB are
inserted.
• The clearance from the ports to the projector housing is 2 inches or 5 centimeters. Please
make sure the head of the parts being plugged in are shorter than this.
• The maximum number of hours the projector can operate at one time is 24 hours.
Page 4 of 15
Page 5
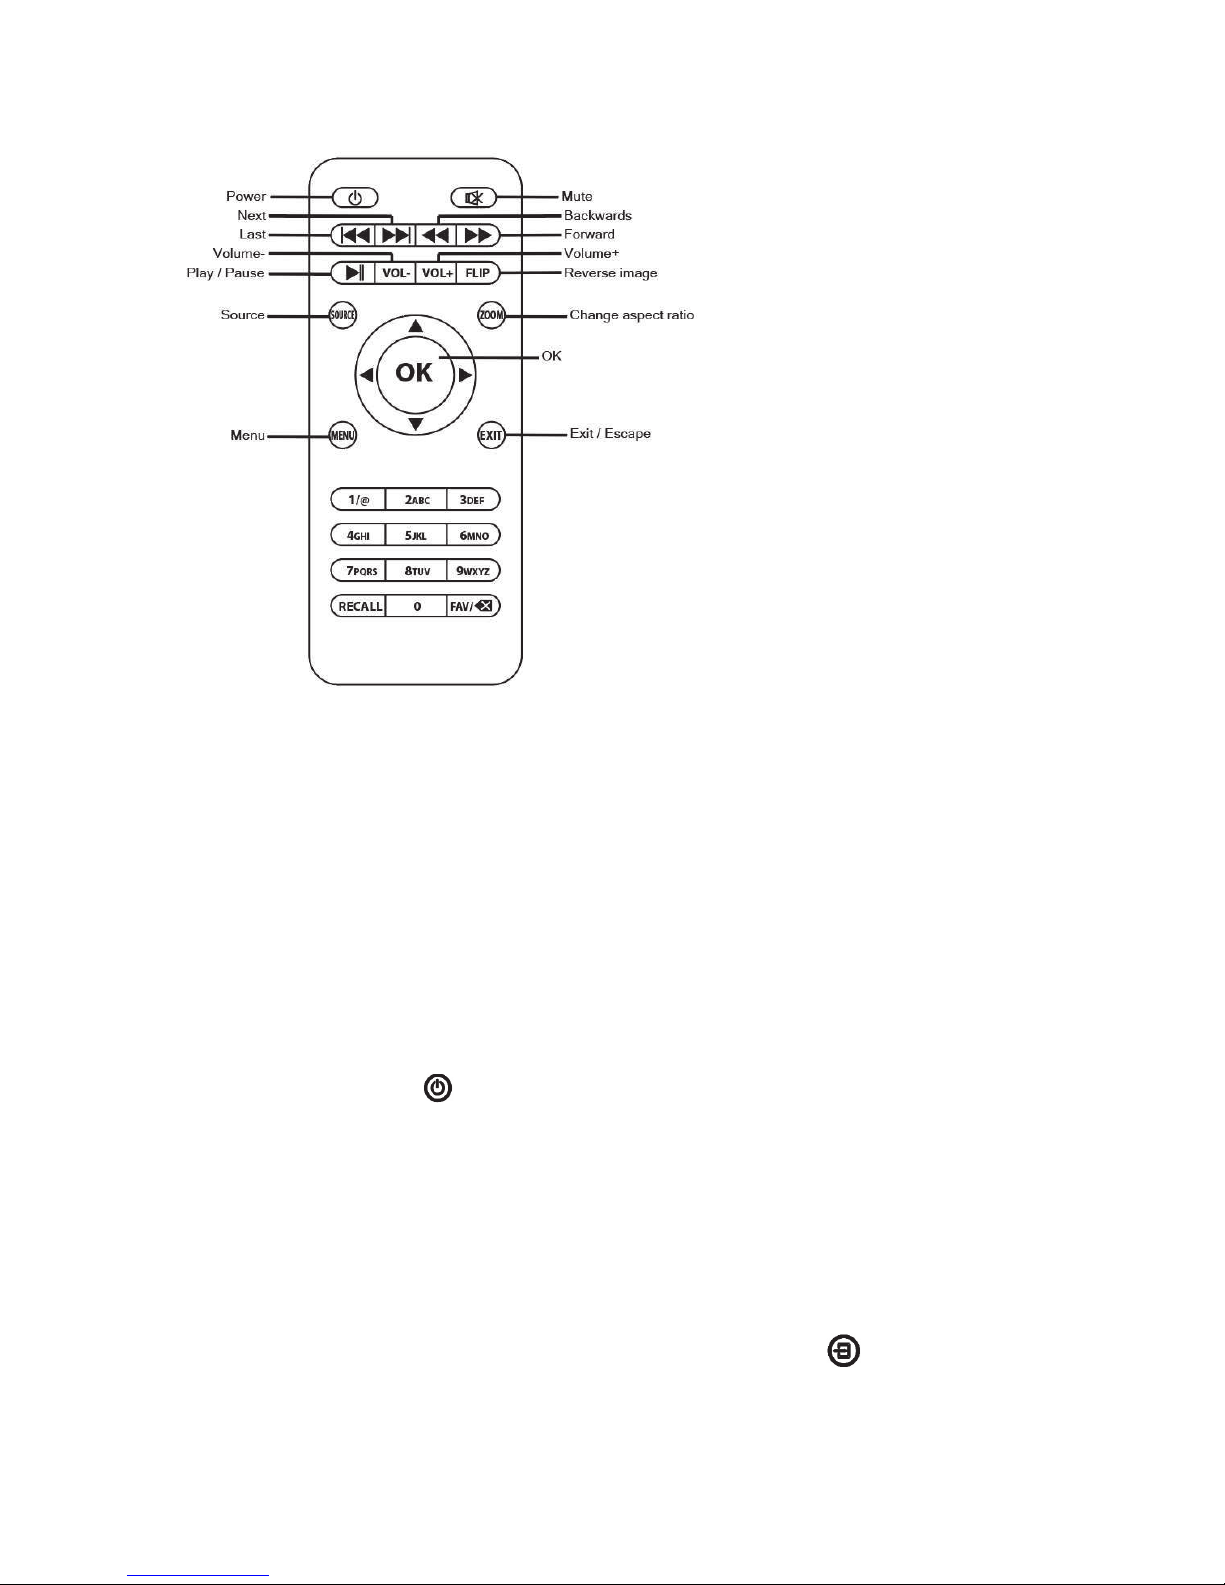
3. Remote Control Information
Fig. 11
• Always point the remote to the “Remote Control Detector” and the back of the projector
housing (see fig. 4) making sure there is nothing in between that and the projector.
• The remote works up to a distance of 4 meters or 13 feet.
• Remove the batteries if the projector will not be used for a long time.
• Replace with new batteries once current batteries are exhausted.
• Store the remote in a cool and dry environment.
4. Operation
• The projector is intended to be used in both Indoor/Outdoor areas.
• Insert the adaptor into the projector and the plug into a wall socket (see fig. 6).
• The projector should be placed 2.5 meters or 8 feet from the screen and at a height of 1.2
meters or 4 feet in order to fill up the screen.
• Press the power button on the remote or unit to turn on.
• Focus by turning the focus wheel at the front of the projector (see fig. 1).
• Turn the keystone wheel at the front of the projector to get the desired projected image
angle,
+/- 15 degree (see fig 1).
• Loosen the screw at the front of the projector housing to angle up.
• To select the desired input:
1. Please note: The external input, such as Media Browser (USB), VGA, HDMI etc.,
must be connected to the projector before the input on the projector can be selected.
2. Press the “Source” button on the remote control or
projector.
3. Using the arrow buttons on the remote or projector, scroll over the desired input.
4. Press the “OK” button to select.
button on the top of the
Page 5 of 15
Page 6

Source Screen
Operating the Android System (Version 4.4.4)
• Connect the mouse to operate the Android system.
1. Connect the mouse through the upper USB port.
2. Left click on the mouse for “OK” or for the soft keyboard when needing to type. Right click
on the mouse to exit.
• A Soft keyboard is needed to type log-in information, search queries, or anything else that
needs to be typed.
• Setting up the Android system language
1. Select “Setting” and left click on the mouse.
2. Select “Language and Input” and then select “Language”.
3. Scroll to the desired language and and left click on the mouse to select.
4. Right click on the mouse to exit.
Page 6 of 15
Page 7

Android system main screen
Wireless Connection
Wifi Connection on the projector
1. Select “Setting” and left click on the mouse.
2. Select “Wifi” and left click on the mouse.
3. Turn on the “Wifi” signal on the upper right hand corner of the page. It will automatically
search for Wifi devices nearby.
4. Choose the Wifi connection from the list and select the one you want to connect to.
5. Left click on the mouse for the soft keyboard and enter the password in the password
field, click to connect to the internet and wait for the connection.
Wifi/Bluetooth Setting Screen
TO CONNECT WITH THE INDOOR/OUTDOOR SPEAKER
1. TURN ON THE SPEAKER.
2. THE BLUE BLINKING LED MEANS IS ON.
3. THE SPEAKER IS NAMED “M9”. SEARCH AND SELECT “M9” ON THE
PROJECTOR NAME LIST, THEY WILL MATCH AUTOMATICALLY.
NOTE – THE SPEAKER (INCLUDED) CAN ALSO BE CONNECTED WITH THE
CONNECTION WIRE. PRESS THE ON/OFF BUTTON AGAIN SO THE BLUE LED IS
STEADY ON MEANING THE
IS TURNED OFF. CONNECT THE WIRE INTO
Page 7 of 15
Page 8

“HEADPHONE” PORT OF THE PROJECTOR. (SEE FIG. 5 THIS IS THE FAR LEFT AV
PORT).
Connection on the projector
1. Select “Setting” and left click on the mouse.
2. Select “
” and left click on the mouse.
3. Turn on the “ ” signal on the upper right hand corner of the page. It will
automatically search for Bluetooth devices nearby.
4. Choose the connection from the list and select. Pairing will be automatic.
5. Volume can be adjusted by using the volume buttons on the remote control, the device
(if paired), and the volume buttons on the speaker.
Smart Phone/Device Connection
A. AirPin – Use AirPin to connect to your IOS device.
• Select the AirPin app on the projector main screen and press “OK”.
• Make sure there is a ” ” next to Airplay.
• Select “Screen Mirroring” from your IOS device and select the projector
Airplay name. If there is more than one option, keep selecting until your device is paired.
Keep selecting if the first option does not work. If successfully paired, your IOS device
images will project through the projector.
NOTE – The projector and the IOS device must be connected to the same wireless
network. The wireless network must be strong enough to support Airpin, will not
work on a weak network. Connection time may vary. If initial connection does not
work, try again.
Airpin Screen
B. Miracast – Use Miracast to connect to your Android smart phone/device.
• Select the Miracast app on the main projector main screen and press “OK”.
• On your Android device, select “Setting”, then click “Wireless Display”. The device
will search for nearby Miracast peer devices and show on the name list.
Page 8 of 15
Page 9

• Select the projector Miracast name on your device and both devices will start to pair.
If there is more than one option, keep selecting until your device is paired.
NOTE – The projector and the Android smart phone/device must be connected to
the same wireless network. Different android phones/devices settings may be
different. Please refer to the manual that came with your device. Connection time
may vary. If initial connection does not work, try again.
After pairing, the projector may disconnect from the wifi network. This is normal,
the projector does not need wifi to work with miracast. When finished with
miracast, go to settings and reconnect the projector to the wifi network (see page
7, “Wireless Connection”).
IMPORTANT: PLEASE NOTE COPYRIGHT PROTECTED CONTENT CANNOT BE PLAYED
VIA AIRPIN OR MIRCAST.
Install and remove application software (App)
1. Download apps from PLAY STORE by clicking the PLAY STORE icon at the bottom
of the home screen, a Gmail account is needed to access PLAY STORE.
2. Select “Setting” and left click on the mouse. Then go to “Apps” and left click on the mouse
once. Select the app that you want to remove and click it. Than left click “un-install” to
remove the app.
NOTE: This projector has built-in Android 4.4.4 version. Some apps from PLAY STORE or
third-party source apps may not be applicable with this version.
Important Tips:
• Always operate in a dark location for best results.
• Always point the remote at the back of the projector.
• For best results, the angle of the projector and the intended surface should be taken into
consideration. Use the keystone dial and loosen the screw under the front of the projector
housing as needed.
• The projector should be placed 2.5m/8’ and at a height of 1.2m/4’ from the screen in order to fill
up the screen.
• If the movie or video has stopped after adjusting the brightness or contrast, use the mouse to
press PLAY on the screen. Do not press PLAY on the remote.
Page 9 of 15
Page 10

Warning: Changes or modifications to this unit not expressly approved by the party responsible
for compliance could void the user’s authority to operate the equipment.
NOTE: This equipment has been tested and found to comply with the limits for a Class B digital device,
pursuant to Part 15 of the FCC Rules. These limits are designed to provide reasonable protection against
harmful interference in a residential installation. This equipment generates, uses and can radiate radio
frequency energy and, if not installed and used in accordance with the instructions, may cause harmful
interference to radio communications.
However, there is no guarantee that interference will not occur in a particular installation. If this equipment
does cause harmful interference to radio or television reception, which can be determined by turning the
equipment off and on, the user is encouraged to try to correct the interference by one or more of the
following measures:
Reorient or relocate the receiving antenna.
Increase the separation between the equipment and receiver.
Connect the equipment into an outlet on a circuit different from that to which
the receiver is connected.
Consult the dealer or an experienced radio/TV technician for help
The device must not be co-located or operating in conjunction with any other antenna or transmitter.
FCC RF Radiation Exposure Statement Caution: To maintain compliance with the FCC’s RF exposure
guidelines, place the product at least 20cm from nearby persons.
Page 10 of 15
Page 11

To assemble the Screen Kit
Step 1
Place the Carrying Case on a flat surface with the nameplate facing upward.
Step 2
Open the carrying case and remove the foam packaging that holds all parts.
Step 3
Take out the two Bottom Poles which are hinged and permanently attached to the carrying case.
Step 4
Insert Pole (A) into both ends of the bottom poles.
Page 11 of 15
Page 12

Step 5
Insert Pole B into Pole A on each side.
Step 6
Insert Pole A into Pole B on each side.
Page 12 of 15
Page 13

Step 7
Insert Pole D into one Pole C.
Step 8
Slide the sleeve at the top of the Screen over Pole D and Pole C.
Step 9
Insert the other Pole C into the end of Pole D.
Step 10
Insert the ends of Pole C onto each Pole A.
Page 13 of 15
Page 14

Step 11
Use the Bungie Cords to secure the Screen to the Poles. Insert the cord through the grommet of the Screen,
wrap around the pole, and insert the plastic ball through the loop of the cord.
Insert the cord through the Wrap around the pole, Insert the plastic ball through
grommet of the Screen the loop of the cord.
Page 14 of 15
Page 15

Step 12
Use the Stakes and String to secure the Screen to the ground.
Attach the hook at one end of the string to the hole midway up poles B. It is recommended to attach to
the holes furthest up the pole. Attach the hook at the other end of the string to the ground stake. Repeat
until all four strings are attached to the poles and stakes. Step firmly on the stakes to insert into the
ground. Make sure the strings are taut and there is no slack.
Caution: Always take the weather into consideration when setting up. Take down under severe weather
conditions such as high winds or heavy rain. Take down and repack the unit when not in use. Do not
leave outside for an extended amount of time.
Page 15 of 15
 Loading...