

Page 1

Please read this manual carefully before installation and keep it for future reference.
Installation Manual
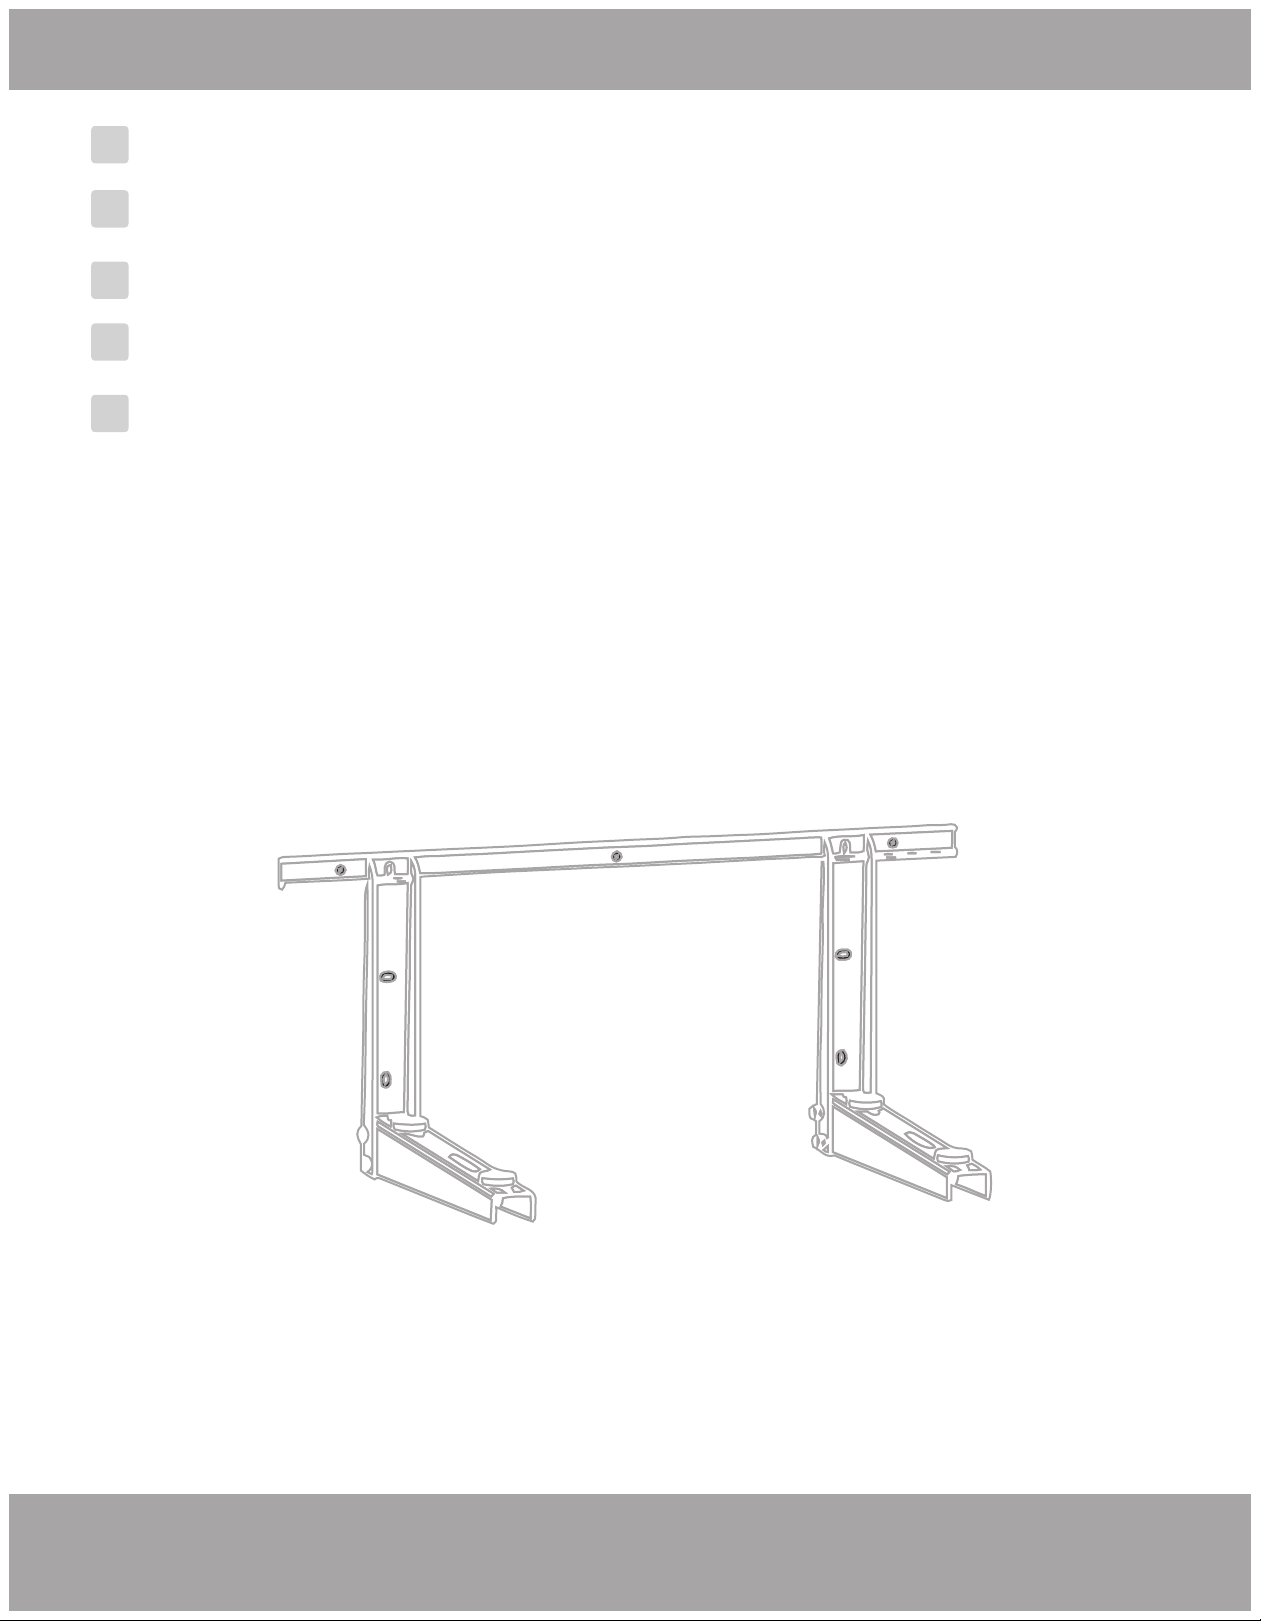
MB176 Mini-Split
Condenser Mounting Bracket
Caution: Do not exceed the weight limit below, serious injury or
property damage may occur. Weight Limit = 176 lbs
For more info visit www.mrcool.com
Page 2
Contents
Safety Precautions .....................................................................................................2
!
1
Component Checklist ............................................................................................3
Support Assembly ..................................................................................................... 4
2
3
Installation Of The Bracket ............................................................................... 5
4
Mounting the Air Conditioner ........................................................................ 7
Page 1 mrcool.com
Page 3
Safety Precautions
Safety Precautions
!
Read Before Using
Incorrect usage may cause serious damage or injury.
The seriousness of potential damage or injuries is classified as either a WARNING or CAUTION.
This symbol indicates that ignoring instructions may cause death or serious injury.
WARNING
This symbol indicates that ignoring instructions may cause moderate injury
to your person, damage to your unit, or other property.
CAUTION
This symbol indicates that you should NEVER perform the indicated action.
WARNING
• This bracket is rated for 176 lbs (80 kg). Do not exceed this limit. If the rated weight limit is exceeded,
serious property damage or personal injury may occur.
• This ductless mini-split condenser mounting bracket is intended only for use as specified. Improper usage
may result in property damage or physical injury.
• Read and comprehend all installation instructions before beginning product installation. If you have
questions about the installation, please contact your dealer or MRCOOL Support at 270-366-0457.
• The installation of this product requires basic mechanical skills and a full understanding of the installation
manual.
• Before connecting the condenser bracket to the supporting surface, ensure the surface will support the
combined weight of the bracket, the mini-split condenser. and attached components.
• To safely lift and position the bracket. an assistant or mechanical lifting equipment can be useful.
• When tightening screws, do not over tighten. Over tightening may cause long term damage to support
structures. and reduce their support capacity.
• The bracket Is not Intended for any use other than the support of a ductless mini-split condenser.
• Check the bracket every three months to ensure it remains secure and safe to use.
mrcool.com
Page 2
Page 4
Component Checklist
Before beginning installation, review all components to ensure the process can be
completed successfully, If any parts are missing or faulty, please contact your dealer or
MRCOOL Support at 270-366-0457.
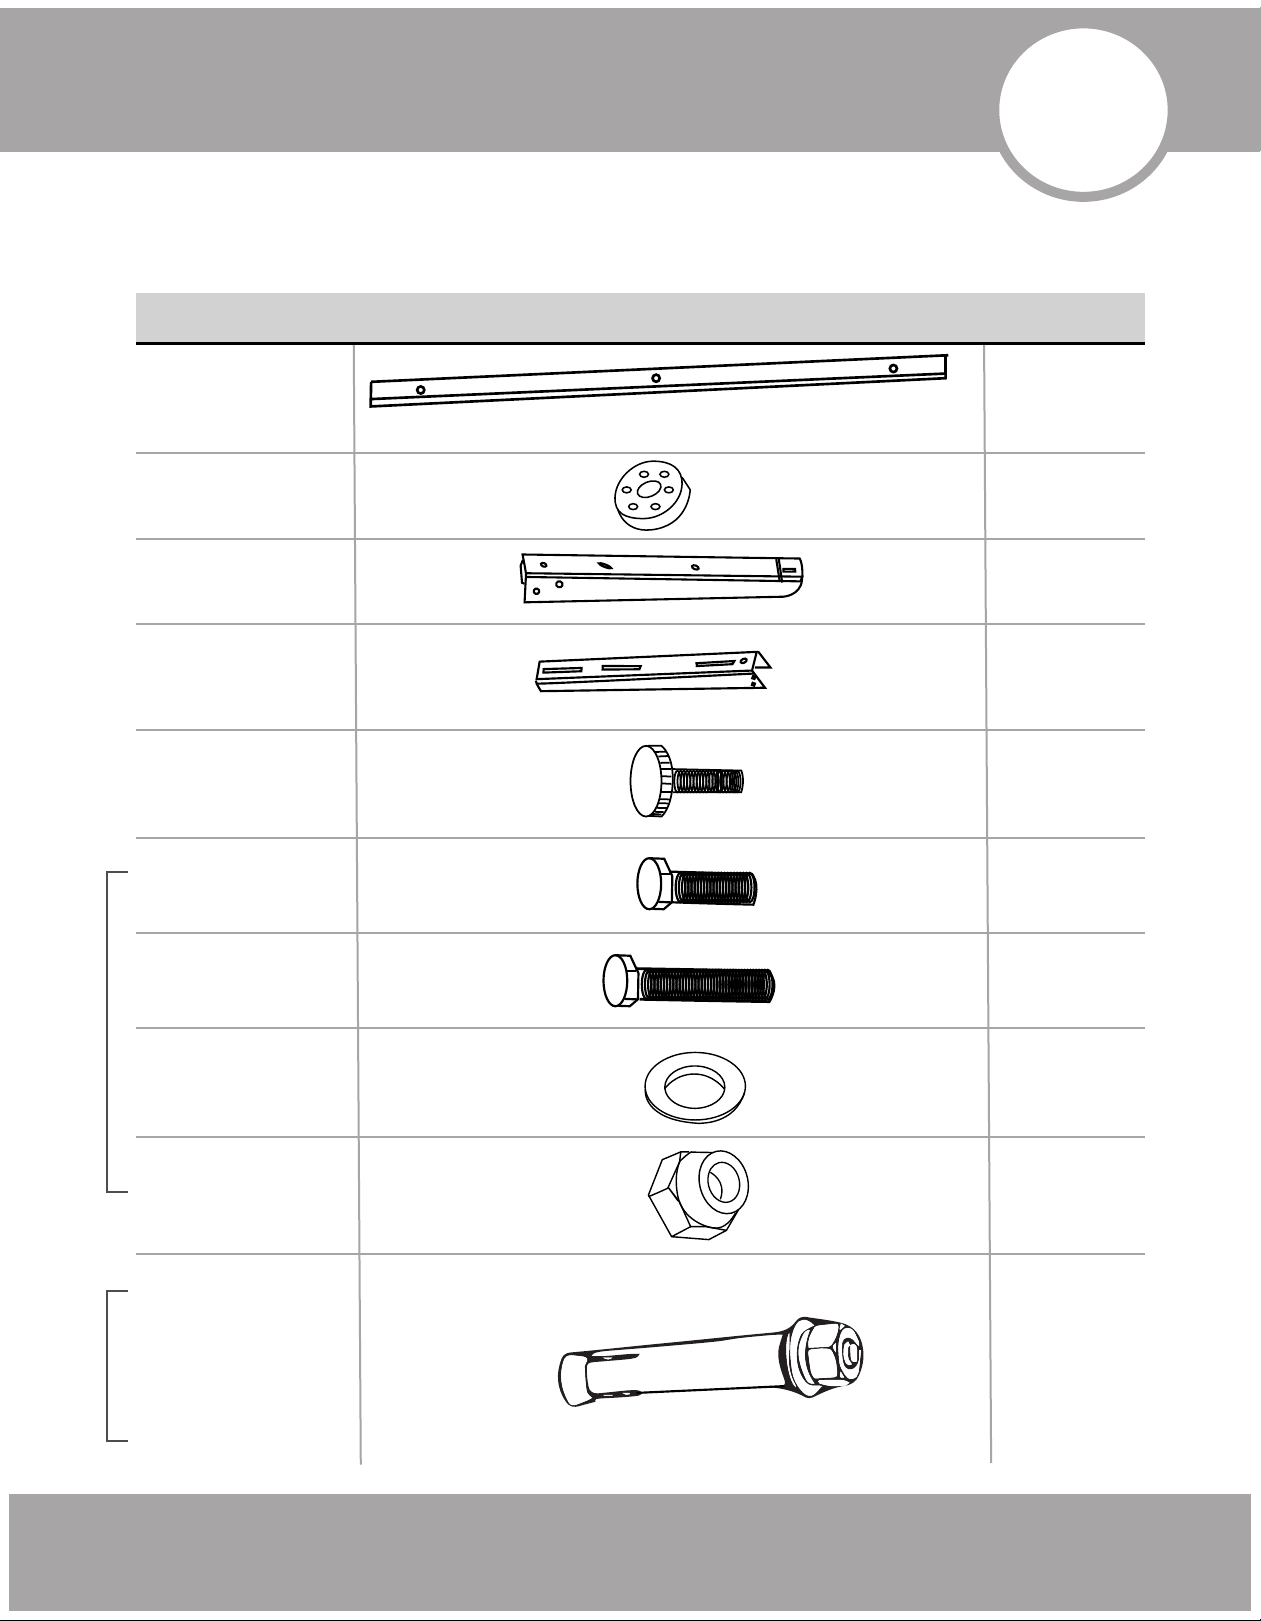
PART LOOKS LIKE... QUANTITY
1
Wall Plate A
Component B
Component C
Component D
Component E
Component
M8x25 M·A
PACKAGE M PACKAGE W
Component
M8X55 M-B
1
4
2
2
2
4
4
Component
D8 M-C
Component
M8 M-D
Component
W-A
Page 3 mrcool.com
4
8
5
Page 5
Support Assembly
2
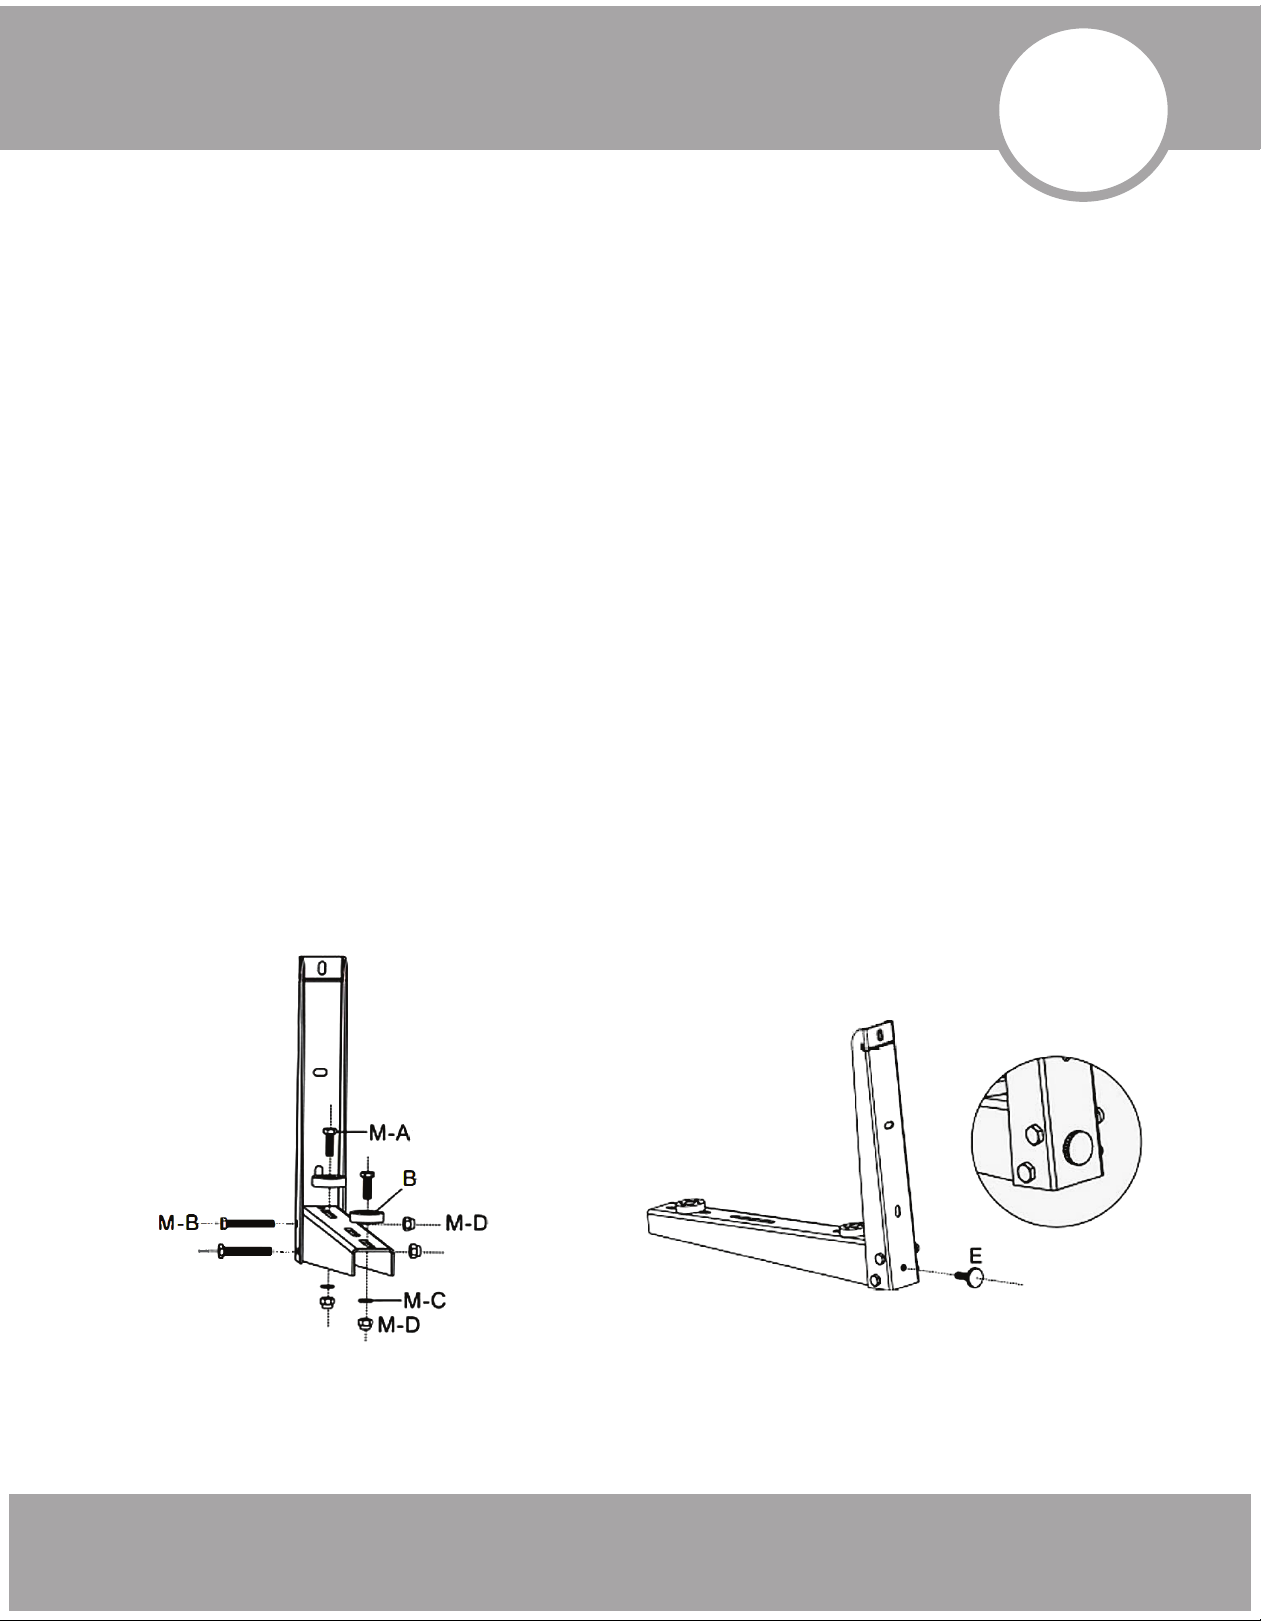
Begin the installation process by assembling the support mounts.
1. Position one Component C support and one Component D support in such a way that the Component C
support is standing upright on its rectangular base and the Component D support is lying perpendicular
with the square base of Component D intersecting Component C's interior.
2. The four bolt holes near the base of Component C should be properly aligned with the four bolt holes near
the square base of Component D.
3. Take two Component M8x55 M-B bolts and two Component M8 M-D nuts. With the Component C support
standing upright and the Component D support pointed toward you, insert one Component M8x55 M-B
bolt in the top bottom hole, then tighten one Component M8 M-D nut over the exposed end of the bolt
extending out of the opposite side of Component C. The bolt should also extend through the top hole of
Component D.
4. Take the second Component M8x55 M-B bolt and extend it through the lower hole on Component C.
Attach the Component M8 M-D nut to the end.
5. Do not overtighten the nuts.
6. Next, take one Component E and insert it into the singular hole at the base of the upright Component C
support.
7. Finally, assemble two Component M8-25 M-A bolts, two Component B washers, two Component D8 M-C
washers, and two Component M8 M-D nuts. Push the M-A bolt through the B washer, then insert it through
the innermost slide hole in Component D. Place the M-C washer on the base of the M-A bolt, then secure it
in place with an M-D nut. Do not overtighten.
8. Repeat this process for the second set of components and insert them in the outermost slide hole in
Component D.
9. This completes the assembly for one of the support mount.
10. Repeat the process to assemble the second support mount.
Fig. 2.1 Fig. 2.2
Page 4mrcool.com
Page 6
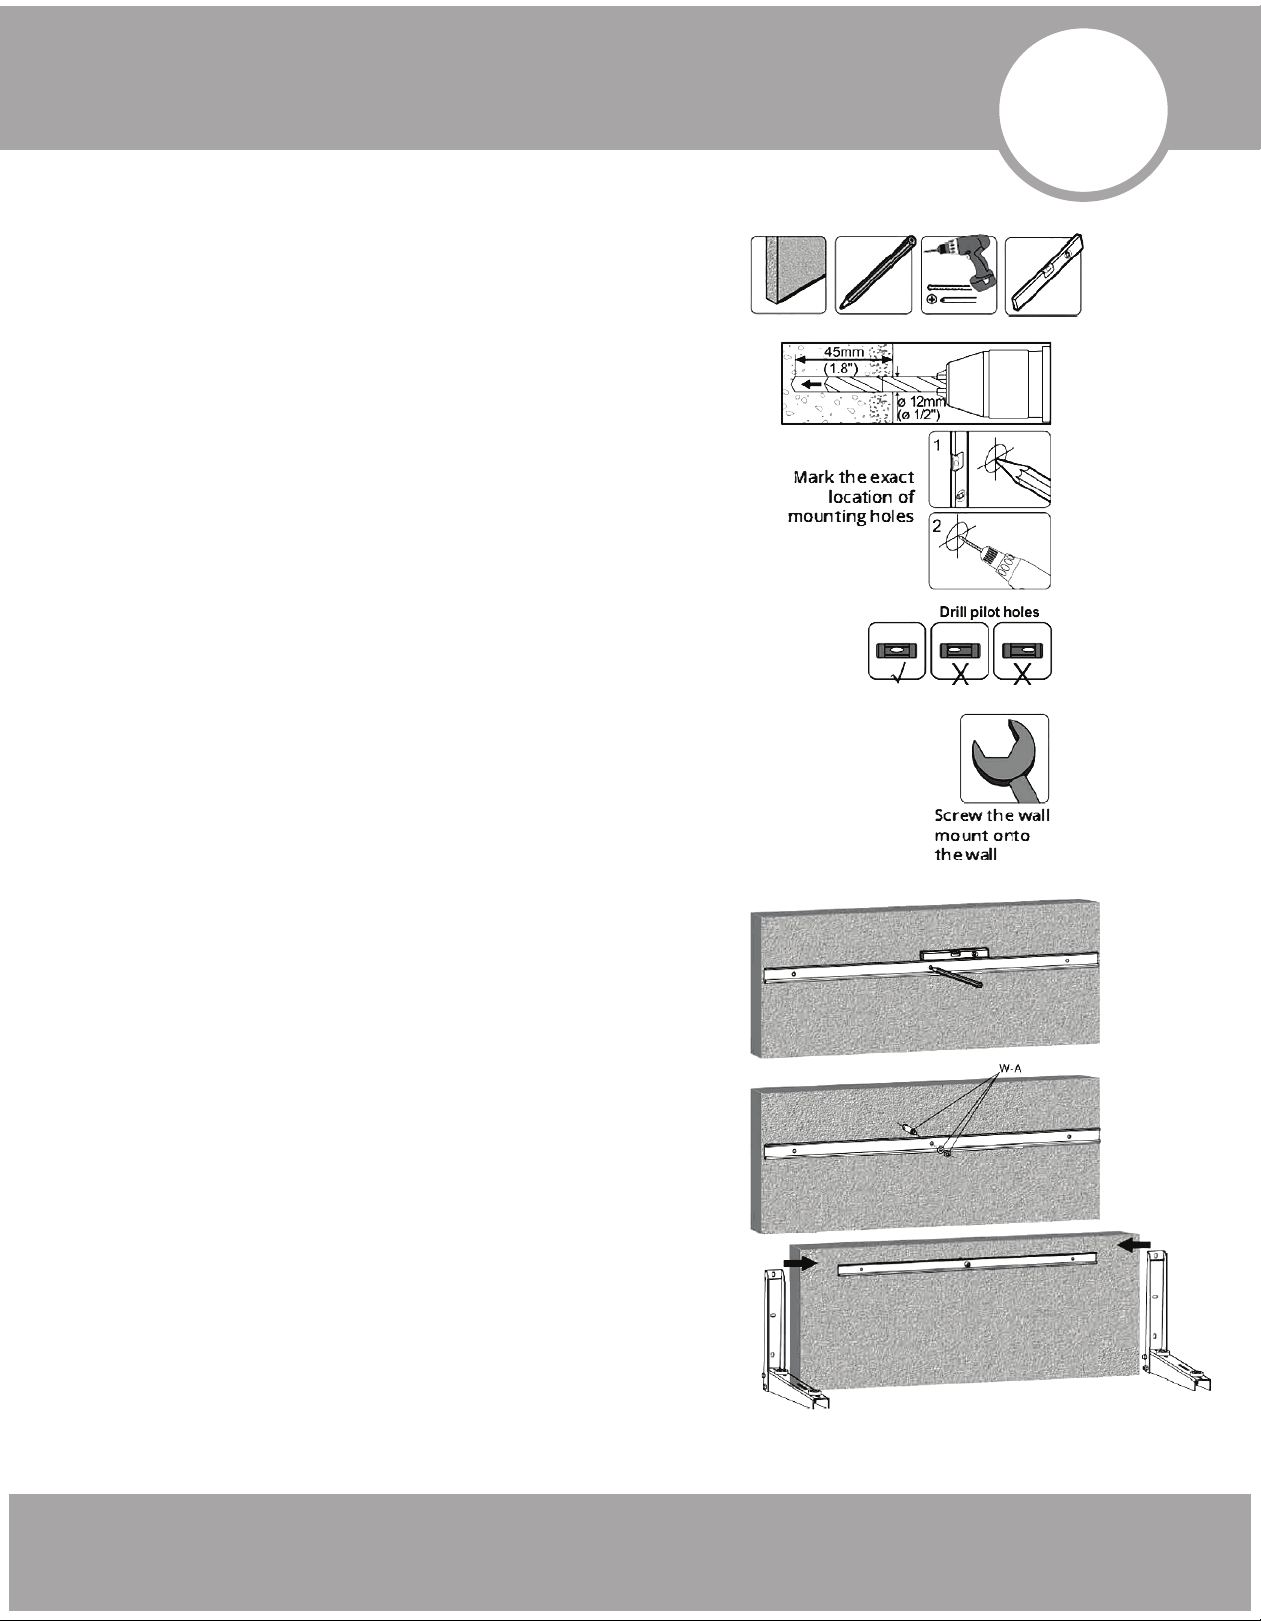
Installation Of The Bracket
To properly install the bracket on a brick and concrete
structure, you will need an install site with a structure
strong enough to support the bracket and the
condenser, a pencil to mark, a hand-held drill, and a
level.
1. Use Wall Plate A and a pencil to mark the location
of the mounting holes. Use a level to ensure the
mounting holes are properly aligned.
2. After the holes are marked and aligned, use a
hand held drill with a 0.5 inch (12mm) drill bit to
drill a hole approximately 1.8 inches (45mm)
deep.
3. Insert one Component W-A into the center
mounting hole. Align Wall Plate A with the insert
Component W-A and the other two mounting
holes. The thick side of Wall Plate A should be on
the bottom and parallel to the ground.
4. Attach a washer and a nut to Component W-A. Do
not overtighten the nut.
5. Slide one previously assembled support mount
onto the lip of Wall Plate A from the left.
6. Slide the other previously assembled support
mount onto the lip of Wall Plate A from the right.
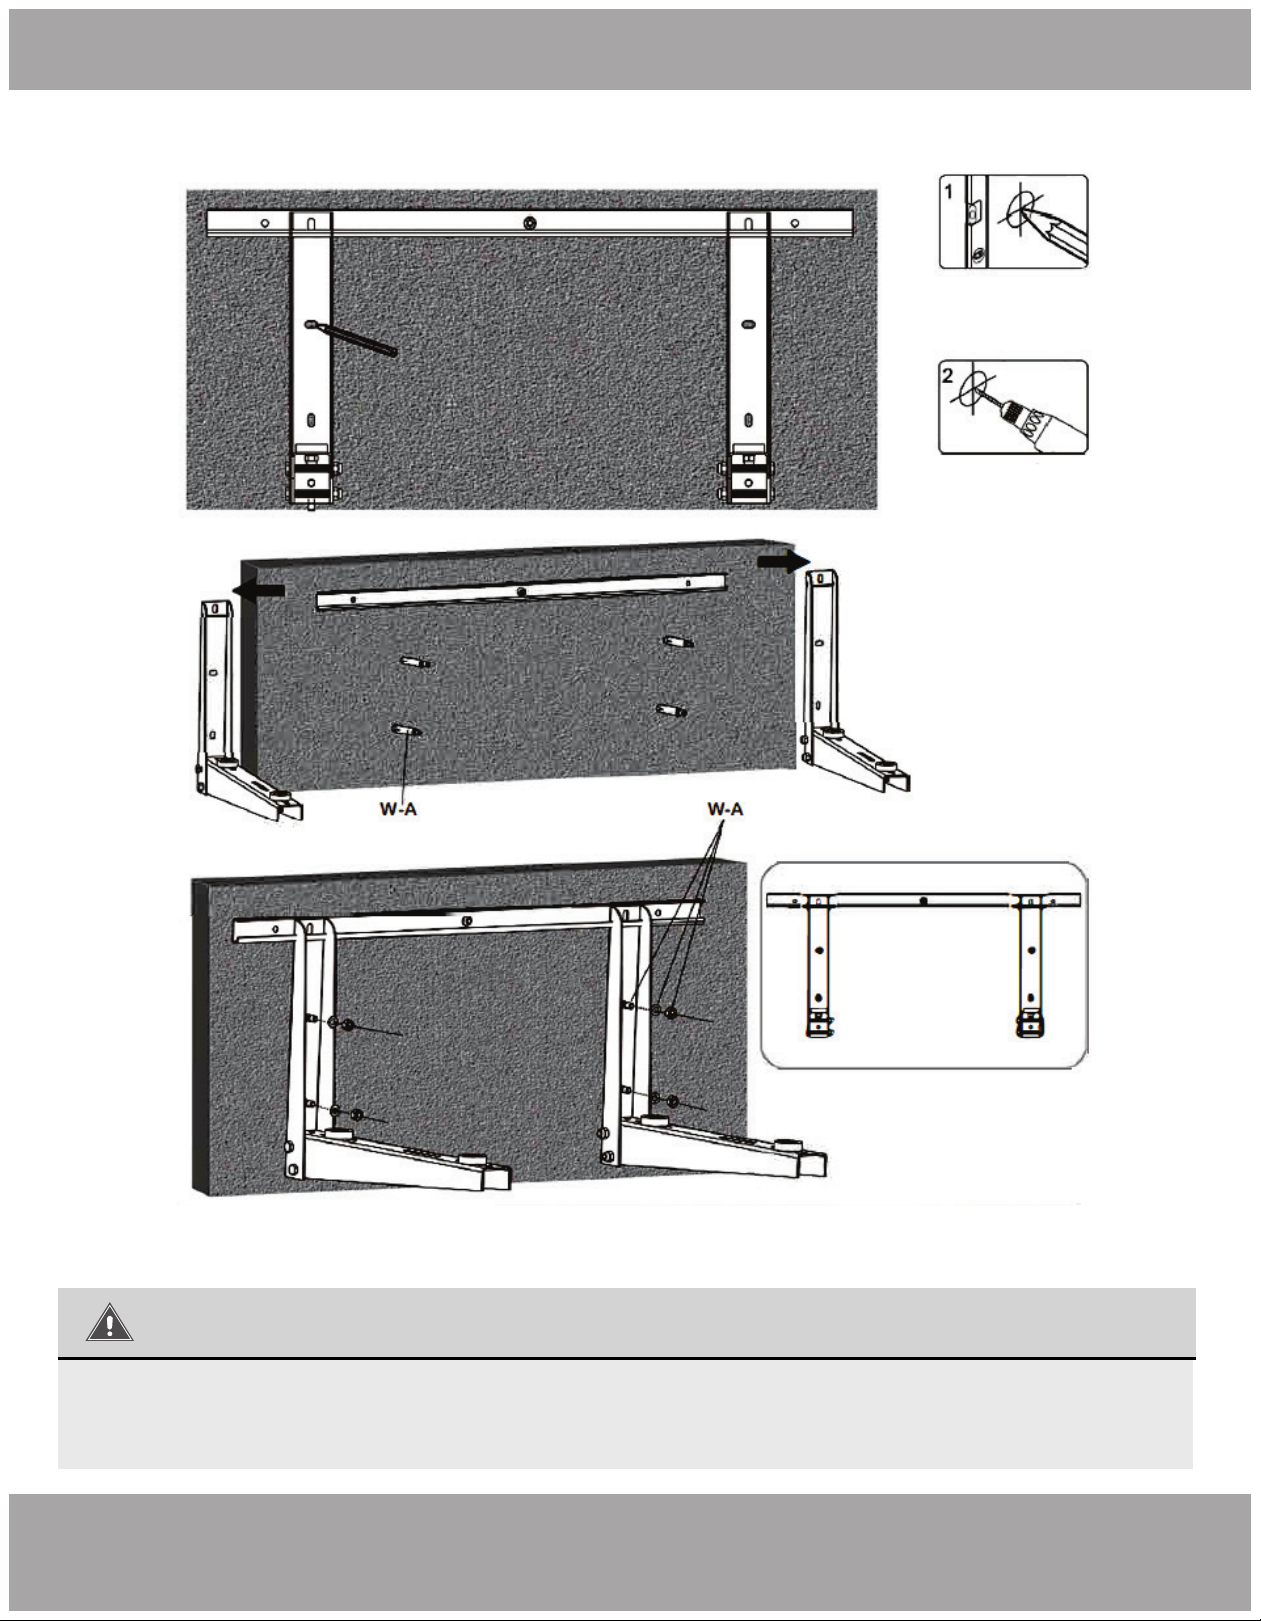
7. Mark four new mounting holes. Two mounting
holes should be marked for the left support
mount and two should be marked for the right
support mount.
8. Remove the support mounts.
9. Using the same drill bit and drill depth as before,
drill four mounting holes at the previously marked
locations.
10. Insert one Component W-A into each of the four
mounting holes.
11. Slide one previously assembled support mount
onto the lip of Wall Plate A from the left.
12. Slide the other previously assembled support
mount onto the lip of Wall Plate A from the right.
13. Align the support mounts with the mounting holes
and the inserted components. Attach a washer
and a nut to each Component W-A. Do not
overtighten the nuts.
3
Page 5 mrcool.com
Fig. 3.1
Page 7
Installation Of The Bracket
Mark the exact location
of mounting holes.
Drill Pilot Holes.
Fig. 3.2
CAUTION
Installers must verify that the supporting surface will safely support the combined weight of the
equipment and all attached hardware and components.
Page 6mrcool.com
Page 8
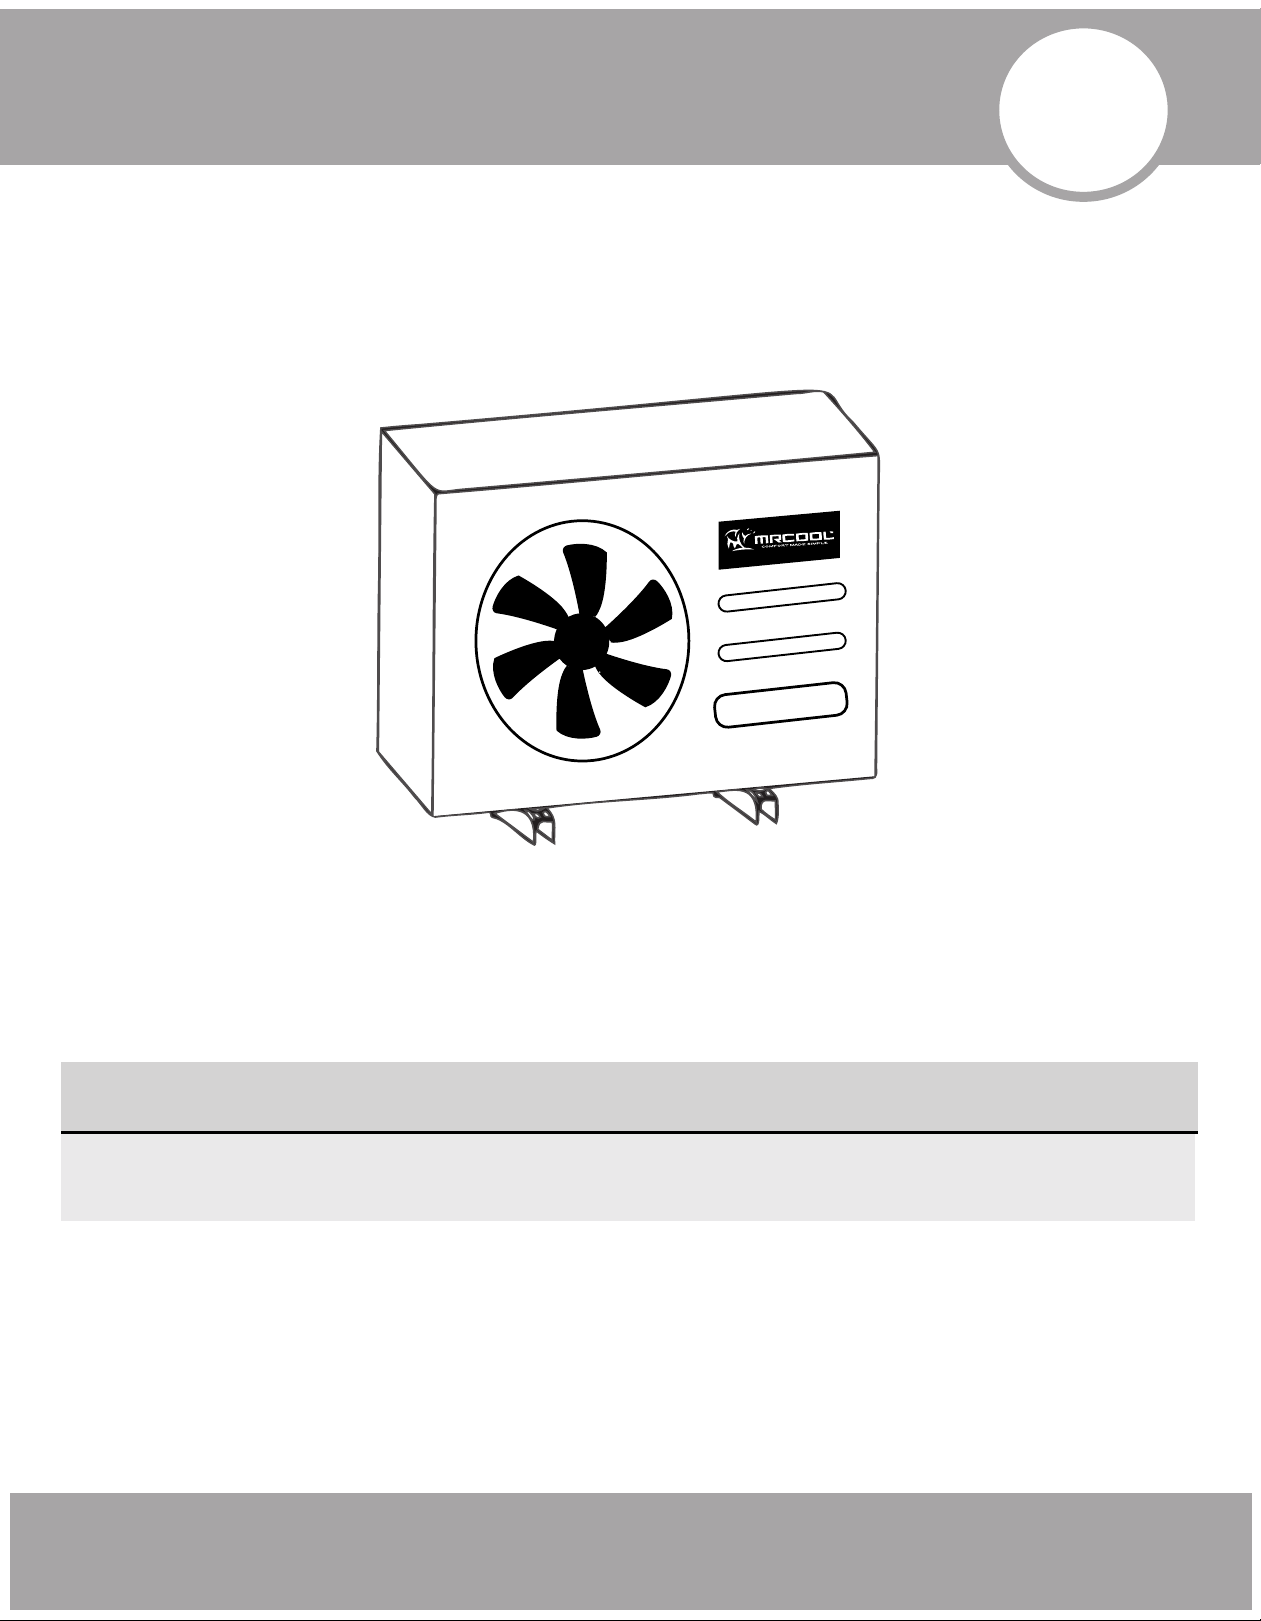
Mounting The Air Conditioner
4
Slowly put the air conditioner on the Installed mounting bracket and make sure the air conditioner Is
firmly supported by the mounting bracket.
Disclaimer: Air Conditioner not included with bracket.
Maintenance
• Check that the bracket Is secure and safe to use at regular Intervals.
• Please contact your distributor if you have any questions.
Page 7
mrcool.com
Page 9

MB176 Mini-Split
Condenser Mounting Bracket
The design and specifications of this product and/or manual are subject to change without prior notice.
Consult with the sales agency or manufacturer for details.
 Loading...