

Page 1
MR.
MR.
Instruction Manual
ICE
Page 2
When using electrical appliances, basic safety precautions should always be fallowed to reduce
the risk of fire, electric shock and/or injury to persons, including the following:
READ ALL INSTRUCTIONS BEFORE USING THE MACHINE.
2. Do not touch hot surfaces. Use handles or knobs
3. To protect against electric shock, do not immerse cord, plugs or machine in water
or other liquids.
4. Close adult supervision is necessary when this appliance is used by or near children
5. Unplug from outlet when the ICE
Allow to cool before putting on or taking off parts and before cleaning the appliance.
6. Do not operate any appliance with a damaged cord or plug or after the appliance malfunctions
or has been damaged in any manner. Return this appliance only to the nearest Authorized
Service Center for examination, repair or adjustment.
7. The use of accessory attachments not recommended by Sunbeam may cause hazards or injuries.
8. Do not use outdoors.
9. Do not let cord hang over edge of table or countertop or to touch hot surfaces.
10. Do not place this appliance on or near a hot gas or electric burner or in a heated oven.
11. To disconnect, remove plug from wall outlet.
12. Do not use appliance for other than its intended use.
13. Use on a hard, flat, level surface only, to avoid interruption of air flow underneath the appliance.
14. PITCHER USE AND CARE
Breakage may occur if the following instructions are not followed:
a.
This pitcher is designed for use with the MR. COFFEE” ICE CAFE”’ unit and therefore
must never be used on a
b. Do not use a cracked pitcher.
c.
Do not clean the pitcher with cleansers, steel wool pads or other abrasive materials.
d. Avoid sharp blows, scratches or rough handling.
e. Pitcher is not dishwasher safe.
unit is not in use and before cleaning.
or in any oven, INCLUDING A MICROWAVE.
15. WARNING: To reduce the risk of fire or electric shock, do not remove any service
covers. No user serviceable parts inside. Repair should be done by authorized
personnel only. Opening the bottom service cover will void the warranty.
USE ONLY
Page 3
SPECIAL CORD SET INSTRUCTIONS
1. A short power supply cord is provided to reduce the hazards resulting from becoming
entangled in or tripping over a longer cord.
2. An extension cord may be purchased and used if care is exercised in its use.
3. If an extension cord is used, the marked electrical rating of the extension cord must be
at least
it will not drape over the countertop or tabletop where it can be pulled on by children
or tripped over accidentally.
amps and 120 volts. The resulting extended cord must be arranged so that
*This appliance has a polarized plug (one blade is
To reduce the risk of electric shock, this plug will fit in a polarized outlet only
one way. If the plug does not fit fully in the outlet, reverse the plug. If it still
does not fit, contact a qualified electrician. Do not modify the plug in any way.
wider
For Service, call l-800 MR COFFEE (I-800-672-6333)
To
A
SSIST
Us
IN
S
ERVING
You,
(TM8
All repairs must be made by Sunbeam or by an Authorized MR. COFFEE”” Service Center.
Please call us for assistance or for the location of the nearest Authorized MR. COFFEE”” Service Center.
PLEASE Do NOT RETURN THIS APPLIANCE TO YOUR STORE.
We welcome your questions, comments or suggestions.
Please include your complete name, address and telephone number.
AND DATE OF PURCHASE AVAILABLE.
P
LEASE
H
AVE THE
M
ODEL
N
UMBER
Consumer Affairs Department
MR. COFFEE”
A Product of Sunbeam Corporation
P.O. Box 948389
Maitland, Florida 32794-8389
I-800 MR COFFEE (I-800-672-6333)
THESE
I
NSTRUCTIONS
Page 4
INTRODUCTION
C
ONGRATULATIONS
This unique appliance will enable you to prepare 3 quarts of delicious iced tea,
iced coffee and other great beverages in your very own home.
!
You are the owner of a MR. COFFEE” ICE
appliance.
Please read
this appliance. Proper care and maintenance will ensure the long life of this appliance
and its trouble-free operation. Save these instructions and refer to them often
for cleaning and care tips.
of the instructions in this manual carefully before you begin to use
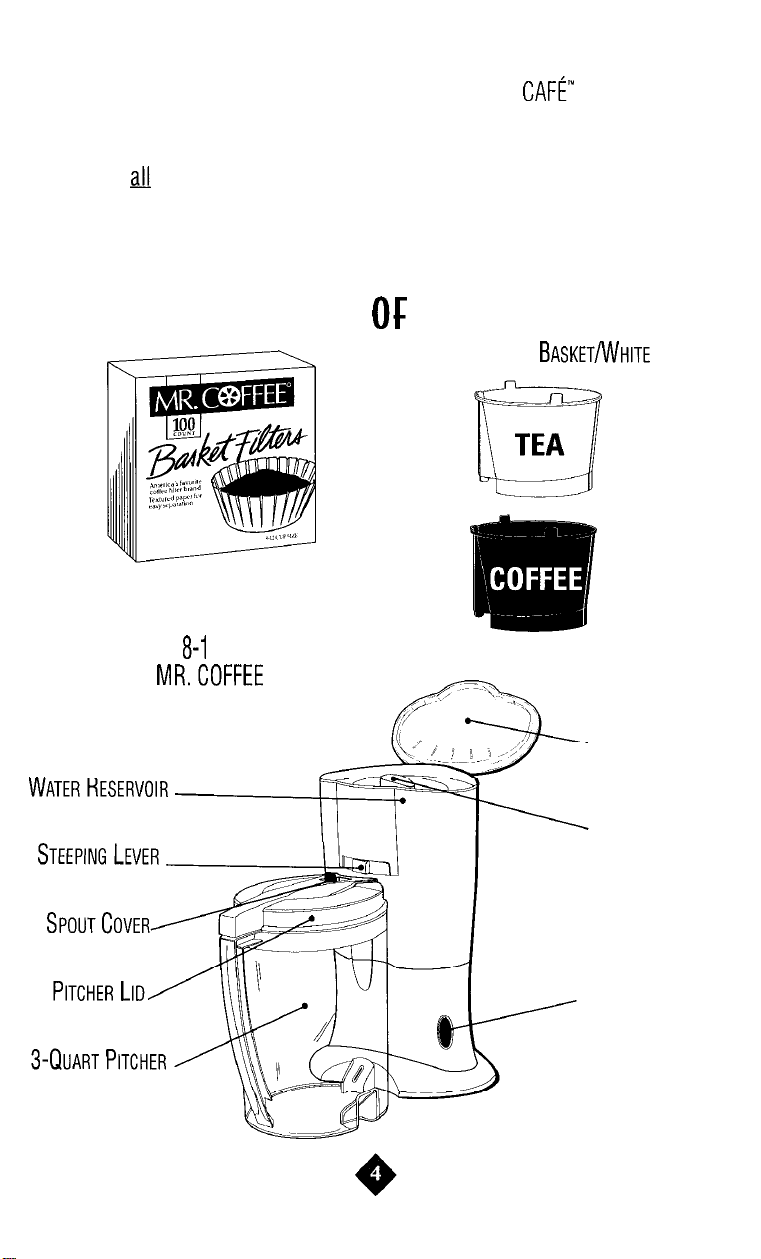
DIAGRAM
FOR BETTER TASTING
TEA AND COFFEE,
USE
2 C
UP
BRAND FILTERS.
PARTS
TEA STEEPING
COFFEE BREW BASKET/BLACK
WATER
R ESERVOIR LID
S HOWER HEAD
INDICATOR
LIGHT/ON BUTTON
Page 5

OPERATION AND USE
B EFORE FIRST USE
Before using the first time, follow these easy cleaning instructions.
W
ARNING
:
To prevent injury from steam, do not plug the unit in until water is in the
reservoir, lid is closed, and the pitcher is in place.
Wash pitcher/lid, tea steeping basket, coffee brew basket, using a mild, non-abrasive
detergent and water. Rinse each thoroughly.
2. Next fill pitcher with water to the top water level mark on the pitcher. Lift the reservoir lid,
remove the brew basket. Pour water into the reservoir. Replace brew basket. Do not overfill.
3. Rotate the shower head so that it is over the brew basket. Close lid.
4. Place the pitcher lid onto the pitcher. Open the spout cover. Slide the pitcher against
the machine
5. Plug cord into electrical outlet. Push “on” button. The indicator light will illuminate
to let you know the machine is on.*
6. When the cycle is complete, your machine will shut off automatically.
The indicator light will turn off.
7. Slide the pitcher away from the machine.
8. Discard the water in the pitcher.
*N
OTE
:
If light does not turn on, push the “on” button again firmly and release.
The first time the machine is used, it may not be necessary to depress the “on” button to
turn the machine on. Plugging the machine into an outlet may trigger the brewing cycle.
If the “on” button is depressed before the machine is plugged into an outlet, this would
trigger the brewing cycle.
(spout-first)
under the machine.
**N
OTE
:
If you wish to turn the machine off during the brew cycle, grasp the molded plug
and unplug the power cord.
PRECAUTIONS
DO. . .
l
Place the machine well back from the edge of the counter.
l
Unplug the unit when cleaning or not in use. Wipe with damp cloth.
l
To stop the brewing cycle before completed, grasp the molded plug and unplug.
Avoid jerking or straining the power cord.
l
Avoid areas which may become hot or emit steam while the machine is on,
especially the water reservoir and the brew basket.
Page 6
l
Reheat a beverage by passing it through the brewing system.
l
Move and/or store the machine until the unit has cooled.
l
Place a cloth or otherwise restrict airflow beneath the appliance.
l
Do not immerse the machine in water. This may cause permanent damage
and void the warranty.
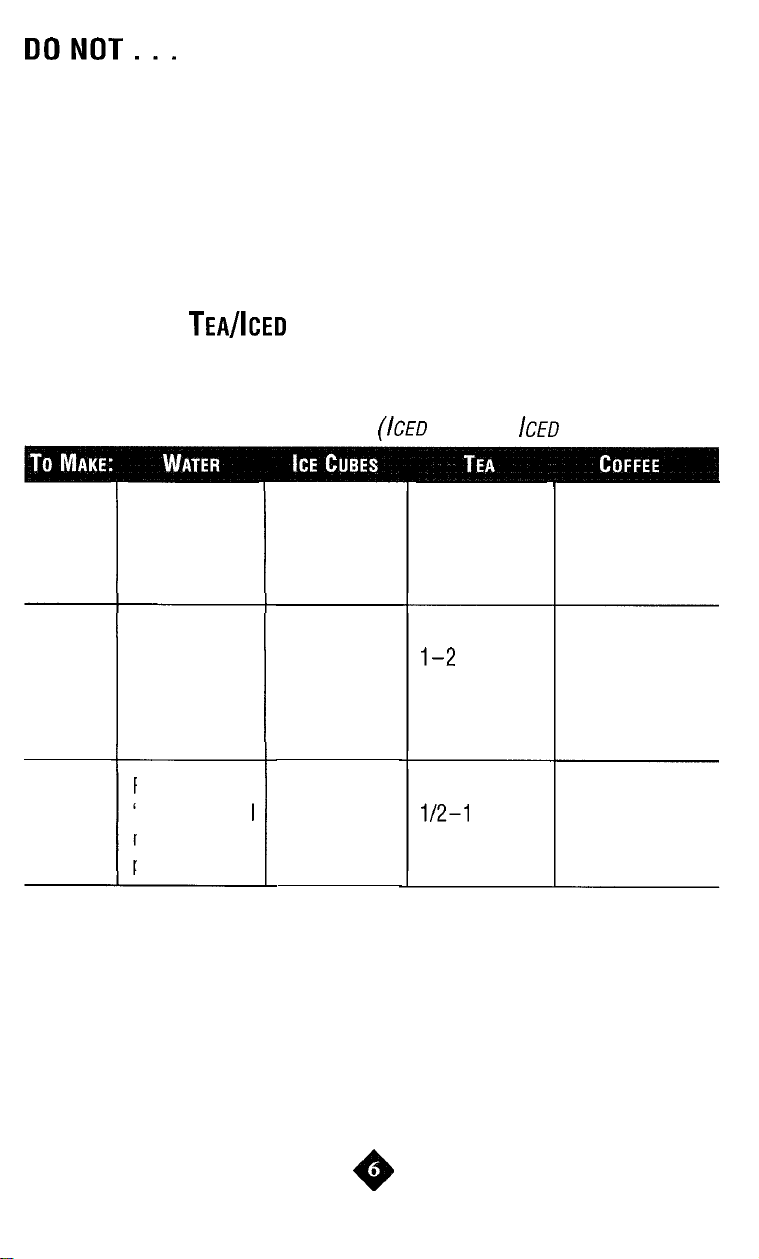
BREWING ICED
CDFFEE
Use the suggested amount of tea/coffee noted in the chart below.
3
Q
UARTS
2
Q
UARTS
1
Q
UART
MEASUREMENT CHART
Fill to
“WATER” level
marked on
pitcher
Fill to
“WATER” level
marked on
pitcher
Fill to
“WATER” level
marked on
pitcher
Fill to
“ICE” level
marked on
pitcher
Fill to
“ICE” level
marked on
pitcher
(2-3
trays/ice)
Fill to
“ICE” level
marked on
pitcher
TEA AND /CED COFFEE)
5-7
bags or
2-3 Tbsp. of
loose tea
3-5
bags or
Tbsp. of
loose tea
1-3
bags or
Tbsp. of
loose tea
7-11 level Tbsp.
or 4-6 coffee
scoops
4-7 level Tbsp.
or 2-4 coffee
scoops
2-4 level Tbsp.
or l-2 coffee
scoops
Page 7
BREWING
1.
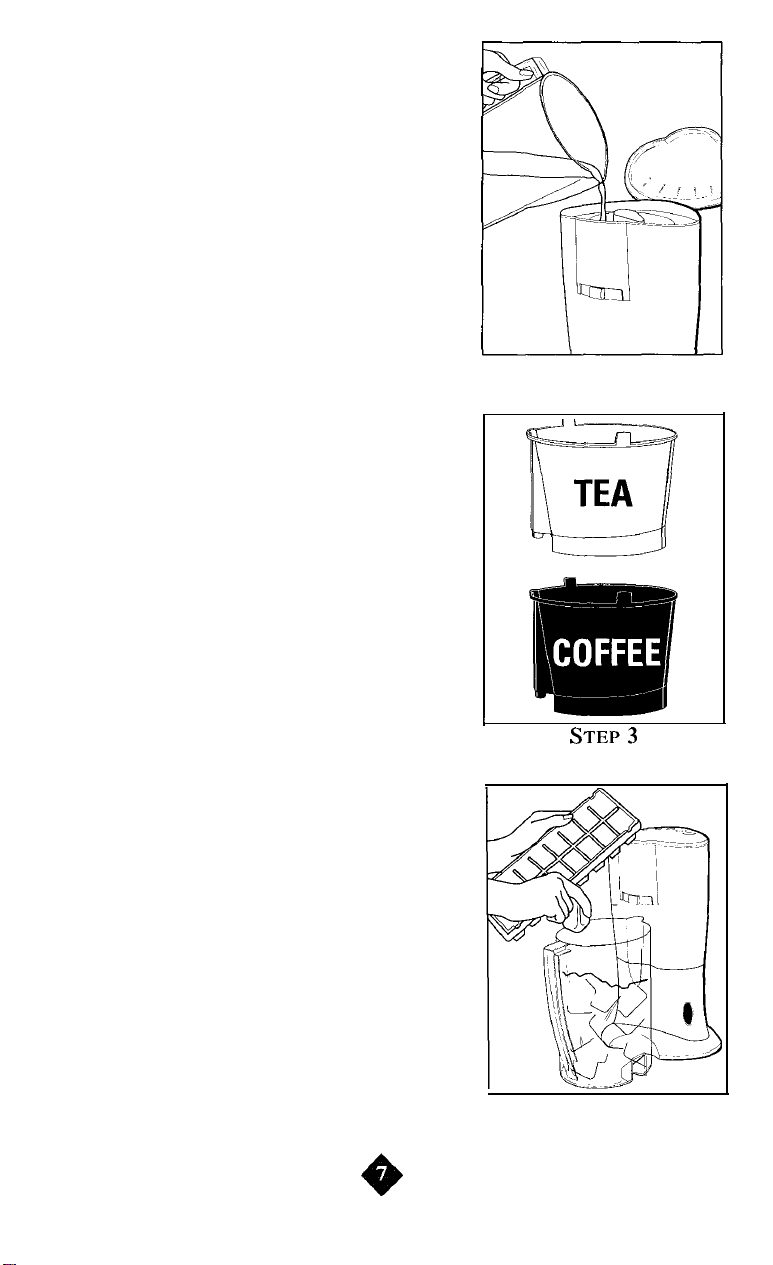
Fill the pitcher with tap water to the desired
“water” level capacity. Be careful not to overfill.
2. Lift the water reservoir lid, remove the basket.
Pour water into the reservoir. (See Illustration)
3. This machine includes 2 baskets. The white tea
steeping basket is for preparing iced tea.
The black coffee brew basket is for preparing
iced coffee. Place the appropriate basket into place.
(See Illustration)
4. Insert an 8-12 cup paper filter into the basket.
Add desired amount of tea/coffee. Refer to the
Measurement Chart. You may now add sugar,
lemon or other flavorings to suit your taste.
5. Rotate the shower head so it is over the basket.
Close the water reservoir lid.
6. Adjust the steeping lever. For iced coffee,
the steeping lever should be set to the left at the
coffee mark. For iced tea, you may adjust the lever.
The farther the lever is to the left, the stronger the tea.
S
TEP
2
7.
Fill pitcher with ice cubes to the desired ice level
marked on the pitcher. Replace the lid with the lid
spout cover in the open position (See Illustration)
S
TEP
7
Page 8
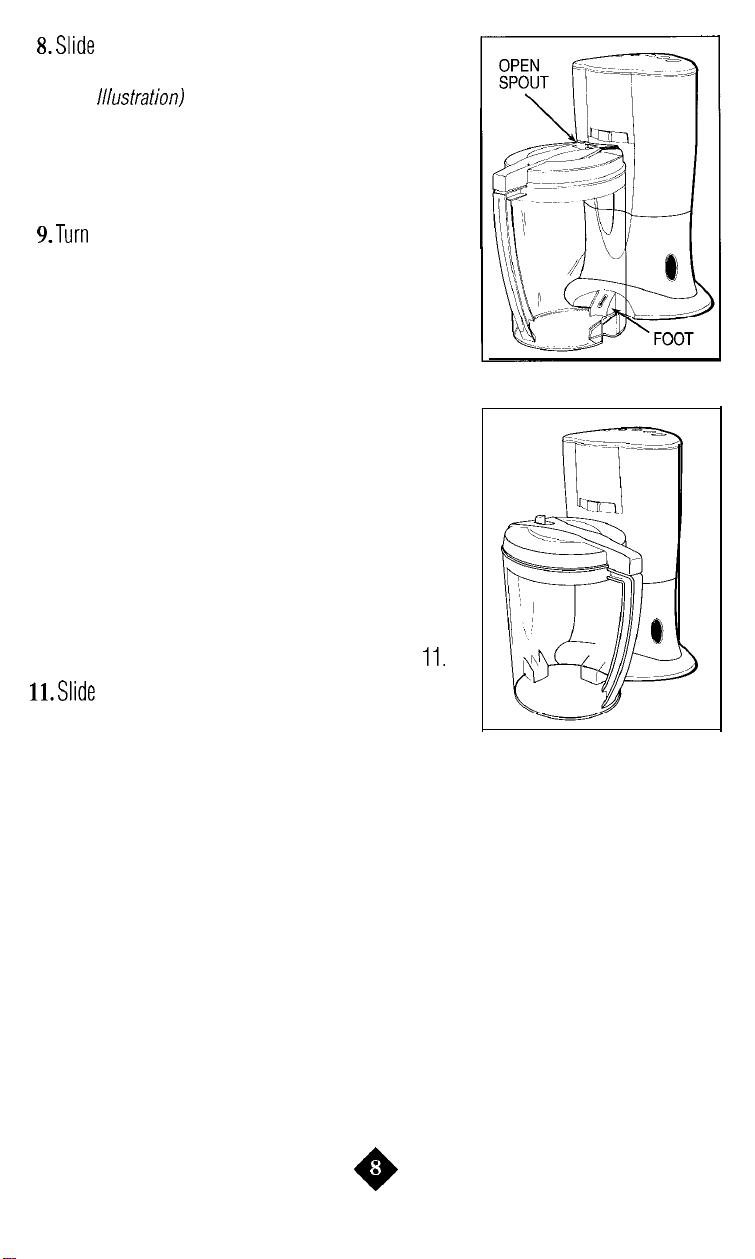
the pitcher with lid, in place, spout first
and in the open position, under the machine.
(See
CAUTION: Do not operate the machine unless
the pitcher and lid are pushed snugly against
the machine. Hot water and hot steam could
escape and cause injury.
electrical outlet. Push the “on” button firmly until a
click is heard. The indicator light will come on when
the button is released.
NOTE: If light does not turn on
the first time, push the “on” button again firmly and
release. The first time the machine is used, it may
not be necessary to depress the “on” button to turn
the machine on. Plugging the machine into an outlet
may trigger the brewing cycle. Also, if the “on” button
is depressed before the machine is plugged into
an outlet, this would trigger the brewing cycle.
NOTE: If you wish to turn the machine off during
the brew cycle, grasp the molded plug and unplug
the power cord.
10. When the brewing cycle is complete, the machine
will automatically shut off and indicator light will
go out. Allow 30 seconds, then proceed to Step
S
TEP
8
CAUTION: Some residual steam may escape
TEP
from the machine. For your safety, slide the pitcher
13
S
away from the machine before you continue.
12. Open reservoir lid, rotate shower head, discard contents of brew basket and rinse
with water.
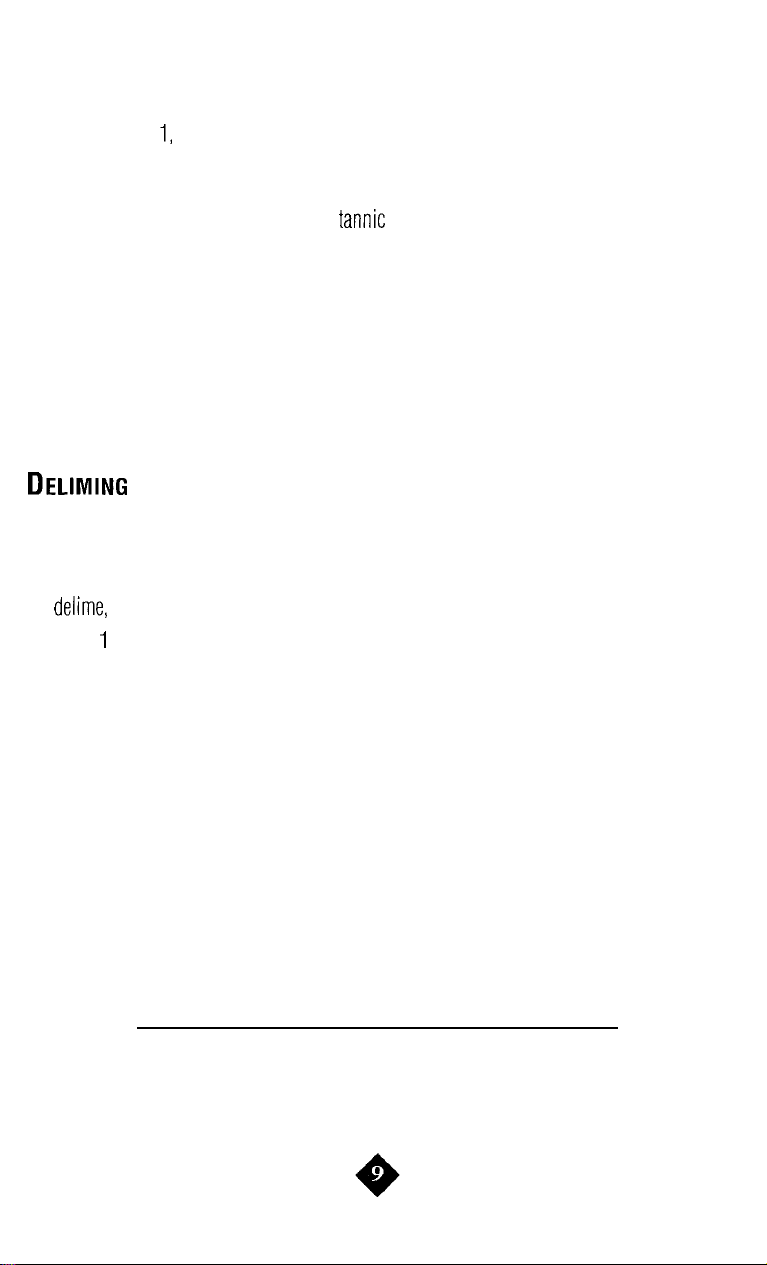
13. When not in use, the pitcher is designed to be stored sideways next to the machine.
(See Illustration)
H
ELPFUL
l Use only fresh, cold tap water in the machine.
l Use MR. COFFEE 8-12 cup basket filters for best brewing performance
l
The steeping lever may be moved to the left for stronger tea or the the right for weaker tea,
to suit your taste. Additional tea bags may be needed when using herbal tea.
l Decaffeinated coffee, particularly with the use of chemically softened water,
H
INTS
can cause slower filtration.
Page 9
l
Use more or less coffee or tea to suit your taste.
l
If your ice supply is low, you may substitute cold water. After filling the water reservoir
with the proper amount of water, refill the pitcher with cold tap water a second time
to the desired
2, 3 quart Water Level. NOTE: Do not fill to the Ice Level as this
will cause an overflow.
l For excellent iced coffee, try dark roast coffee or other flavored coffee.
l Tea may turn cloudy as it chills due to tannic acids found in tea.
CLEANING
l To maintain the quality of all the parts and minimize tea and coffee stains, we recommend
washing the pitcher/lid, baskets/lid, with warm water and mild detergent after each use.
l Hard water can leave mineral deposits inside the pitcher and brew basket. To remove,
fill the brew basket and pitcher with warm white vinegar. Let soak for 20 minutes. Rinse.
l Do not use harsh, abrasive cleaners. They will cause scratches which can lead
to breakage.
Your machine must be delimed when you begin to notice an increase in steaming or
if the pumping action stops before all the water has been pumped out of the machine.
The frequency of cleaning depends on the hardness of your water. Refer to chart.
To delime, follow these easy instructions.
1. Pour 1 quart (32 oz.) of undiluted white household vinegar into the water reservoir.
2. Place the pitcher lid on the pitcher. Slide the pitcher under the machine.
3. Push the “on” button to begin brewing cycle. After 1 cup of vinegar has pumped
into the pitcher, unplug appliance. Let stand 30 minutes.
4. Re-plug the cord. Your machine will automatically continue to pump out the
remaining vinegar.
5. When your machine shuts off, unplug the cord, remove the pitcher. Discard the vinegar.
6. Fill the pitcher with clear tap water to the water level marked on the pitcher.
Repeat Steps 1-5 without vinegar. Repeat if necessary.
SUGGESTED CLEANING INTERVAL
TYPE OF WATER CLEANING FREQUENCY
Soft Water
Hard Water
Every 80 Brew Cycles
Every 40 Brew Cycles
Page 10

Page 11

Page 12

LIMITED WARRANTY
Sunbeam warrants to the purchaser that this MR. COFFEE ICE CAFE product
(except for cord set and g/ass parts) is free from manufacturer’s defects in
material and workmanship for a period of one year from the date of original
purchase when used in compliance with directions as outlined in the
manufacturer’s instructions, which will constitute reasonable and
necessary maintenance by the purchaser.
In case of manufacturer defects in material or workmanship, Sunbeam agrees
to repair (remedy) a defective Coffee Maker without charge. The purchaser’s
exclusive remedy against Sunbeam shall be for the repair or replacement of
a defective MR. COFFEE product.
All repairs must be made at an Authorized MR. COFFEE Service Center.
To locate a MR. COFFEE Service Center, call l-800 MR COFFEE (i-800-672-6333).
Sunbeam shall not be responsible for any repairs performed at any facility
which is not an Authorized MR. COFFEE Service Center:
This warranty gives you specific legal rights, and you may have other rights
which vary from state to state. Any implied warranty is limited in duration
to the one year provided in this, the only, expressed warranty. Some states
do not allow limitations on how long an implied warranty lasts, so the above
limitation may not apply to you.
In no event shall Sunbeam be responsible for incidental or consequential
damages, nor damage due to misuse or the use of any unauthorized attachment;
nor damage caused by use of an electrical circuit not specified on the MR. COFFEE
product. Some states do not allow the exclusion or limitation of incidental or
consequential damages, so the above limitation or exclusion may not apply to you.
MR. COFFEE
A Product of Sunbeam Corporation
Boca Raton, Florida 33431
U.S. Patent No. RE 34,482
P. N. 7596
 Loading...