

Page 1
©
2003 Sunbeam Products, Inc. All rights reserved.
MR. COFFEE®and SPEEDBREW®are registered trademarks of Sunbeam Products, Inc.
Distributed by Sunbeam Products, Inc., Boca Raton, Florida 33431.
Visit us at www.mrcoffee.com.
You will find exciting entertaining tips
and ideas including great recipes!
User Manual /
Manual del Usuario
SPEEDBREW®Coffeemaker
Cafetera SPEEDBREW
SB Series / Serie SB
®
©2003 Sunbeam Products, Inc. Todos los derechos reservados.
MR. COFFEE®and SPEEDBREW®son marcas registradas de Sunbeam Products, Inc.
Distribuido por Sunbeam Products, Inc., Boca Ratón, Florida 33431.
Visítenos en www.mrcoffee.com.
Allí encontrará consejos e ideas excitantes
y entretenidos, ¡incluyendo excelentes recetas!
Printed in China / Impreso en China P. N. 113920
www.mrcoffee.com
Page 2

IMPORTANT SAFEGUARDS
When using electrical appliances, basic safety precautions should always be
followed to reduce the risk of fire, electric shock and/or injury to persons,
including the following:
•
Read all instructions before using the machine.
•
Do not touch hot surfaces. Use handles or knobs.
•
To protect against electric shock, do not immerse cord, plugs or machine in
water or other liquid.
•
Close adult supervision is necessary when this appliance is used by
or near children.
GARANTÍA LIMITADA DE 1 AÑO
Sunbeam Products, Inc., o en Canadá, Sunbeam Corporation (Canadá) Limited, (colectivamente “Sunbeam”)
garantiza que durante un período de un año, desde la fecha de la compra, este producto estará libre
de defectos en material y mano de obra. Sunbeam, a su opción, reparará o reemplazará este
o cualquier componente de este producto que se encuentre defectuoso durante el período
El reemplazo será efectuado por un producto o componente nuevo o remanufacturado.
está discontinuado, el reemplazo será efectuado por un producto similar de igual o mayor valor.
Esta es su garantía exclusiva.
Esta garantía es válida para el comprador original al por menor desde la fecha de la compra inicial al
por menor y no es transferible. Guarde el recibo de compra original. Se requiere prueba de compra
para obtener la ejecución de la garantía.
menor que vendan productos Sunbeam
términos y condiciones de esta garantía.
Esta garantía no cubre el desgaste normal de las piezas o daños como resultado de lo siguiente:
uso negligente o mal uso del producto, uso con voltaje o corriente inapropiados, uso contrario
a las instrucciones de operación, desarmado, reparación o alteración por una persona diferente
auncentro de servicio Sunbeam. Además, la garantía no cubre: Actos de fuerza mayor, tales como
incendios, inundaciones, huracanes o tornados.
Los agentes de Sunbeam, centros de servicio o tiendas al por
,
no tienen derecho para alterar, modificar o cambiar los
de garantía.
Si el producto
,
producto
•
Flip Reservoir Power Switch to OFF and unplug from outlet when
coffeemaker is not in use for extended periods of time and before cleaning.
Allow to cool before putting on or taking off parts and before cleaning the
appliance.
•
Do not operate any appliance with a damaged cord or plug or after the
appliance malfunctions, or has been damaged in any manner. Return this
appliance only to the nearest Authorized Service Center for examination,
repair or adjustment.
•
The use of accessory attachments not recommended by MR. COFFEE®may cause
hazards or injuries.
•
Do not use outdoors.
•
Do not let the cord hang over edge of a table or counter, or touch hot
surfaces.
•
Do not place this appliance on or near a hot gas or electric burner
or in a heated oven.
•
To disconnect, flip Reservoir Power Switch to OFF, then remove plug
from wall outlet.
•
Do not use appliance for other than its intended use.
•
Use on a hard, flat level surface only.
¿Cuáles Son los Límites de Responsabilidad Civil de Sunbeam?
Sunbeam no será responsable por ningún daño incidental o consecuente causado por incumplimiento
de una garantía legal o condición expresa o implícita.
Con excepción al grado prohibido por la ley, cualquier garantía o condición implícita de comerciabilidad
o aptitud para un propósito en particular están limitadas en duración a la duración de la garantía
mencionada arriba.
Sunbeam desconoce todas las demás garantías, condiciones o representaciones
legales o de cualquier otro tipo.
Sunbeam no será responsable por ningún daño de ningún tipo que resulte de la compra, uso o mal uso,
o de la inhabilidad para usar el producto, incluyendo daños incidentales, especiales, consecuentes,
daños similares, pérdida de lucro, o por cualquier incumplimiento de contrato, fundamental o de
cualquier otro tipo, o por cualquier reclamo contra el comprador por cualquier tercera persona.
Algunas provincias, estados o jurisdicciones no permiten la exclusión o la limitación de daños incidentales
o consecuentes, o limitaciones de cuánto
o exclusiones mencionadas arriba pueda que
Esta garantía le otorga derechos legales específicos, y pueda que usted tenga
los cuales varían de provincia a provincia, estado a estado o jurisdicción a jurisdicción.
dura una garantía implícita, de modo que las limitaciones
no le apliquen a usted.
, expresas o implícitas,
otros derechos,
Cómo Obtener Servicio Bajo Garantía
En los Estados Unidos:
Si usted tiene alguna pregunta sobre esta garantía o le gustaría obtener servicio bajo garantía,
por favor llame al 1-800conveniente para usted.
En Canadá:
Si usted tiene alguna pregunta sobre esta garantía o le gustaría obtener servicio bajo garantía, por favor llame
al 1-800-
667-8623
En los Estados Unidos, esta garantía es ofrecida por Sunbeam Products, Inc., ubicada en Boca Ratón,
Florida 33431. En Canadá, esta garantía es ofrecida por Sunbeam Corporation (Canadá) Limited, ubicada
en el 5975 Falbourne Street, Mississauga, Ontario L5R 3V8.
672-6333
para proporcionarle la dirección de un centro de servicio conveniente para usted.
para proporcionarle la dirección de un centro de servicio
POR FAVOR, NO RETORNE ESTE PRODUCTO A NINGUNA
DE ESTAS DIRECCIONES NI TAMPOCO A DONDE LO COMPRÓ.
2
27
Page 3
Servicio y Mantenimiento
Piezas de Repuesto
• Filtros
Para obtener café más sabroso, nosotros recomendamos que usted use filtros
de papel de estilo canasta de 8 a 12 tazas marca MR. COFFEE.
están disponibles en la mayoría de los supermercados.
• Jarras
Usted puede usualmente comprar una jarrra de repuesto en la tienda donde
compró su cafetera. Si usted no puede encontrar un repuesto, por favor llame
al 1-800 MR COFFEE (1-800-672-6333 en los Estados Unidos ó 1-800-667-8623
en Canadá) para obtener información de dónde puede encontrar una tienda
que venda jarrras de repuesto.
Reparaciones
Si su cafetera necesita servicio, no la retorne a la tienda donde la compró. Todas las
reparaciones son efectuadas por Sunbeam o por un Centro de Servicio autorizado
MR. COFFEE.
a los siguientes teléfonos gratis para obtener la ubicación del centro de servicio
autorizado más cercano.
®
Si usted vive en los Estados Unidos o en Canadá, por favor llámenos
®
Estos filtros
Decanter Use and Care
Breakage may occur if the following instructions are not followed:
•
This decanter is designed for use with your MR. COFFEE®Coffeemaker and
therefore
microwave oven.
• Do not set a hot decanter on a wet or cold surface.
• Do not use a cracked decanter or a decanter having a loose or weakened
handle.
• Do not clean the decanter with cleansers, steel wool pads,
or other abrasive materials.
• Discard decanter immediately if it is ever boiled dry.
•Avoid sharp blows, scratches, or rough handling.
must never be used on a rangetop or in any oven, including a
WARNING:
service covers. No user serviceable parts inside. Repair should be done
by authorized personnel only.
To avoid risk of scalding or other injury, do not move your coffeemaker
once you have filled the water reservoir.
To reduce the risk of fire or electric shock, do not remove any
EE.UU. 1-800 MR COFFEE (1-800-672-6333)
Canadá 1-800-667-8623
Para ayudarnos a servirle mejor, por favor tenga el número de modelo y la fecha
de compra listos cuando llame. El número de modelo está estampado en la placa
metálica inferior de la cafetera.
Visite nuestra página Web y descubra los secretos para preparar la taza de café
perfecta. Usted también encontrará una rica variedad de recetas, consejos para
entretener visitas y la última información sobre los productos MR. COFFEE.
®
www.mrcoffee.com
Special Cord Set Instructions
1. A short power supply cord is provided to reduce the hazards resulting from
becoming entangled in or tripping over a longer cord.
2. An extension cord may be purchased and used if care is exercised in its use.
3. If an extension cord is used, the marked electrical rating of the extension cord
must be at least 10 amps and 120 volts. The resulting extended cord must be
arranged so that it will not drape over the countertop or tabletop where it can
be pulled on by children or tripped over accidentally.
This appliance has a polarized plug
To reduce the risk of electric shock, this plug will fit in a polarized outlet
only one way. If the plug does not fit fully in the outlet, reverse the plug.
If it still does not fit, contact a qualified electrician. Do not modify the
plug in any way.
(one blade is wider than the other)
.
SAVE THESE INSTRUCTIONS
26
3
Page 4
Table of Contents
G
UÍA DEDIAGNÓSTICOCAFETERASPEEDBREW
®
MR. C
OFFEE
®
Important Safeguards . . . . . . . . . . . . . . . . . . . . . . . . . . . . . . . . . . . . 2
Decanter Use and Care . . . . . . . . . . . . . . . . . . . . . . . . . . . . . . . . . . . 3
Special Cord Set Instructions . . . . . . . . . . . . . . . . . . . . . . . . . . . . . . . 3
Diagram of Parts . . . . . . . . . . . . . . . . . . . . . . . . . . . . . . . . . . . . . . . . 5
Introduction . . . . . . . . . . . . . . . . . . . . . . . . . . . . . . . . . . . . . . . . . . 6
Important Things You Should Know . . . . . . . . . . . . . . . . . . . . . . . . . 6
Prepare Your Coffeemaker Before First Use . . . . . . . . . . . . . . . . . . . . 7
Brewing Coffee . . . . . . . . . . . . . . . . . . . . . . . . . . . . . . . . . . . . . . . . 8
To Get Hot Water Only . . . . . . . . . . . . . . . . . . . . . . . . . . . . . . . . . . 9
Draining the Water Reservoir . . . . . . . . . . . . . . . . . . . . . . . . . . . . . . . 10
Routine Cleaning/Decanter Cleaning . . . . . . . . . . . . . . . . . . . . . 10 – 11
Troubleshooting Guide . . . . . . . . . . . . . . . . . . . . . . . . . . . . . . . . . . 12
Service and Maintenance . . . . . . . . . . . . . . . . . . . . . . . . . . . . . . . . . 13
Warranty Information . . . . . . . . . . . . . . . . . . . . . . . . . . . . . . . . . . . . 14
PROBLEMA
El café preparado esta tibio
o frío inmediatamente después
de la preparación.
Usted ha preparado dos jarras
de café en un espacio de
10 minutos y la temperatura
del café de la segunda jarra
está fría o tibia.
El café preparado está caliente
inmediatamente después de
la preparación, pero se enfría
en la jarra.
®
La Cafetera SPEEDBREW
prepara una jarra completa
de café después de que se
ha vertido una jarra completa
de agua en el depósito.
La Cafetera SPEEDBREW
requiere más de cuatro minutos
para preparar café REGULAR.
no
®
SOLUCIÓN
• Asegúrese de que la Cafetera SPEEDBREW
esté enchufada en el tomacorriente.
• Asegúrese de que el Interruptor (ON/OFF)
(ENCENDIDO/APAGADO) de Energía del
Depósito esté PRENDIDO.
• Deje que el agua dentro de la cafetera tenga
suficiente tiempo para calentar a la temperatura
de preparación. Refiérase a la sección de
“Preparación de su Cafetera Antes del
Primer Uso” en la Página 20.
• Permita que el agua dentro de la Cafetera
SPEEDBREW
calentar a la temperatura de preparación.
Refiérase a la sección de “Preparando Café”
en la Página 21.
• Asegúrese de que el Interruptor del Plato
Calefactor esté PRENDIDO. (Sólo el SB11)
• Por causa de uso infrecuente, su Cafetera
SPEEDBREW
evaporación. Por favor siga estos pasos:
– Si su Cafetera SPEEDBREW
parcial de café, entonces el agua perdida fue
reemplazada, entonces se puede continuar
con la preparación normal.
Si su Cafetera SPEEDBREW®no preparó ningún
–
café, entonces el agua perdida no fue aún
reemplazada completamente. Desenchufe
rápidamente su Cafetera SPEEDBREW
los pasos de la sección titulada “Preparación
de Su Cafetera Antes del Primer Uso” en
la Página 20.
• Coloque el Indicador de Control de
Preparación en “Brew Regular.”
• Pueda que su Cafetera SPEEDBREW
necesite limpieza. Refiérase a la sección
de “Limpieza de Rutina” en la Página 23.
®
tenga el tiempo suficiente para
®
podrá haber perdido agua por
®
preparó una jarra
®
®
y siga
®
•
La Canasta de la Cafetera
SPEEDBREW
cuando prepara café
descafeinado.
®
se desborda
4
Coloque el Indicador de Control de Preparación
en “Brew Descafeinado.” Esto alargará el ciclo de
preparación y deberá evitar el desbordamiento.
25
Page 5
F
ull
Para Limpiar los Depósitos Minerales de Su Cafetera SPEEDBREW
Para mantener su cafetera libre de acumulamientos de minerales, se recomienda
que usted siga los pasos enumerados a continuación cada 40 ciclos de preparación
para agua dura y 80 ciclos de preparación para agua blanda o al menos cada tres
meses.
1. Gire el Indicador de Control de Preparación a “Fill” (Llenado).
2. Levante la tapa del tanque de agua ubicada encima de la cafetera.
3. Vierta una jarra (10 tazas ó 50 onzas líquidas) de vinagre doméstico blanco sin
diluir en el tanque de agua. NOTA: No llene el tanque de agua con ningún
líquido que no sea agua fría o vinagre blanco doméstico para limpieza.
4. Deslice la canasta de preparación a su posición y coloque la jarra vacía en su
lugar directamente debajo de la canasta de preparación.
5.
Gire el Indicador de Control de Preparación a “Brew Regular” (Preparación Regular).
6. Deje que la unidad llena repose por 2 horas. Esto proporcionará el tiempo para
que el vinagre deshaga la cal y los depósitos minerales.
7. Después de 2 horas, vacíe la jarra y enjuáguela con agua limpia.
8. Para enjuagar el vinagre del tanque interno, gire el Indicador de Control
de Preparación a “Fill” (Llenado).
9. Vierta una jarra (10 tazas ó 50 onzas líquidas) de agua limpia fría dentro
del depósito de agua.
10. Retorne la jarra a su lugar y colóquela directamente debajo de la canasta
de preparación.
11. Gire el Indicador de Control de Preparación a “Brew Regular” (Preparación
Regular). Vacíe la jarra cuando el ciclo de preparación termine
(aproximadamente tres minutos).
12. Repita los Pasos del 8 al 11 seis (6) veces adicionales
el olor a vinagre
interno.
13. Después de la limpieza, espere por lo menos 20 minutos antes de preparar
su próxima jarra de café. Esto permitirá que el agua del tanque interno se
caliente a la temperatura de preparación apropiada.
. Esto garantizará que todo el vinagre sea enjuagado del tanque
o hasta que se vaya
®
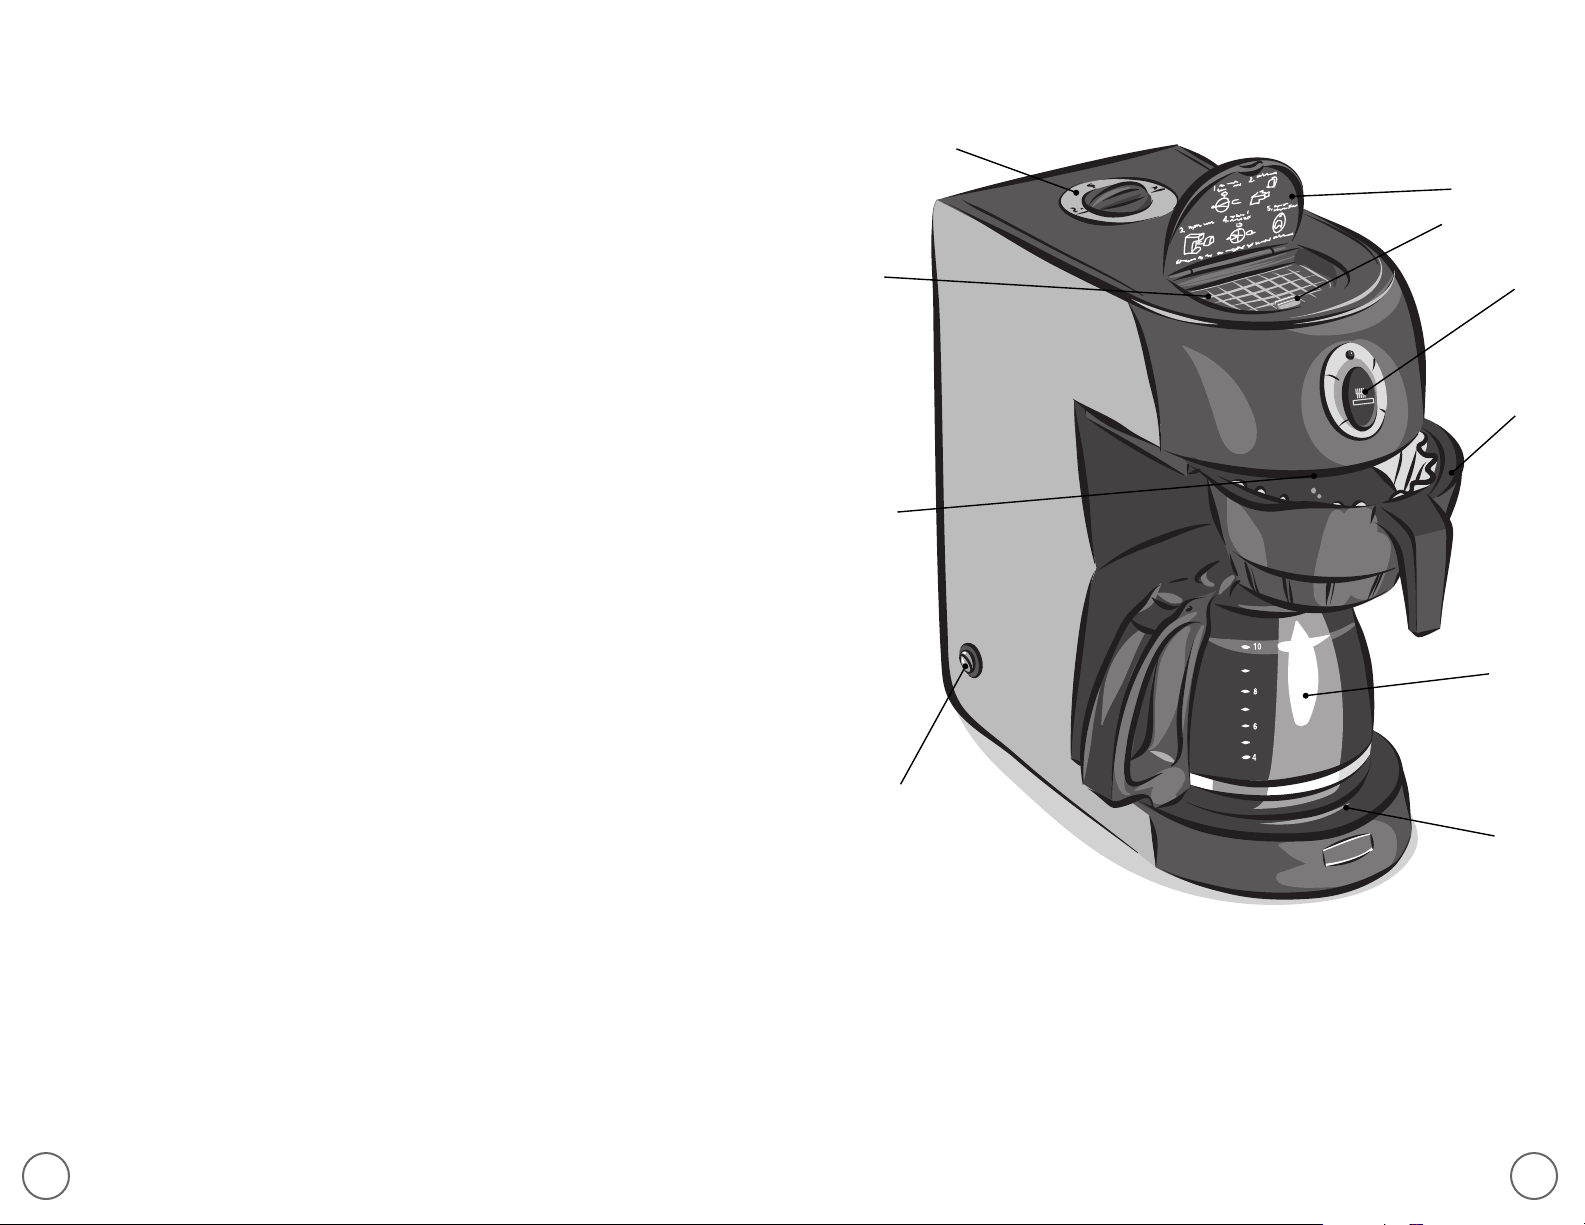
Diagram of Parts
A
E
J
B
C
D
F
G
H
I
NUNCA SUMERJA LA CAFETERA EN AGUA O EN OTROS LÍQUIDOS
Limpieza de la Jarra
El agua dura puede dejar un deposito mineral blancuzco dentro de la jarra.
puede descolorar estos depósitos, dejando algunas veces una mancha marrón.
remover esta mancha, siga estos pasos sencillos:
1. Use una solución de partes iguales de vinagre blanco y agua caliente.
2. Deje reposar la solución en la jarra durante 20 minutos y luego deséchela.
3. Lave y enjuague completamente la jarra usando un trapo suave.
No use limpiadores abrasivos fuertes. Éstos pueden causar rayazos que
pueden conducir a roturas.
El café
Para
24
A. Fill/Brew Regular/Brew Decaffeinated
Brew Control Dial
B. Water Reservoir
C. Shower Head
D. Reservoir Power Switch
(ON/OFF) Switch
E. Water Reservoir Lid
F. Warmer Plate Switch (SB11 only)
G. Brew Basket
H. 10 Cup Decanter
I. Warmer Plate (SB11 only)
J. Overfill Indicator
5
Page 6

Introduction
Congratulations on the purchase of your new MR. COFFEE®SPEEDBREW,®displacement
Coffeemaker! The SPEEDBREW®Coffeemaker is faster than conventional coffeemakers
and brews regular coffee in about 3 minutes (after initial setup). Decaffeinated coffee
will take longer. A convenient Brew Control Dial adjusts water flow so you can brew
regular or decaffeinated coffee simply by turning the dial.
Please read all of the instructions in this booklet carefully before you begin to use
this appliance. Proper care and maintenance will ensure the long life of this appliance
and its trouble-free operation. Save these instructions and refer to them often for
cleaning and care tips.
Important Things You Should Know
• The SPEEDBREW®Coffeemaker is designed to remain plugged in at all times
(except during draining and extended periods of non-use). Brewing begins
after water is poured into the water reservoir and the Brew Control Dial is
switched to “Brew Regular” or “Brew Decaffeinated.”
•A Reservoir Power Switch (ON/OFF Switch) is located on the lower left side to
completely shut off all electrical components when your plans take you away from
home for several days or when your coffeemaker will not be in use for an extended
period. Your SPEEDBREW®Coffeemaker has safety features which make the daily use
of this switch unnecessary.
It will take approximately 20 minutes after the Reservoir Power Switch has
been turned back on to heat the water in the reservoir to the proper
brewing temperature.
•Your SPEEDBREW®Coffeemaker unit has a specially designed water reservoir to keep
the water at the proper temperature. This constant supply of hot water allows you
to brew regular coffee in about 3 minutes.
•When a decanter of cold water is poured into the water reservoir, the cold water
enters the internal tank. When the Brew Control Dial is switched to “Brew Regular” or
“Brew Decaffeinated,” the cold water pushes out hot water to start the brewing
process. This cold water is then heated to the proper temperature and stored until the
next brew cycle is started. Make sure the decanter is centered directly under the brew
basket before turning the Brew Control Dial to “Brew Regular” or “Brew Decaffeinated.”
For SB11:
• Brewed coffee flows into the decanter where it is kept at serving temperature by
the warmer plate. The warmer plate is controlled by the ON/OFF switch located
above the brew basket. NOTE: The Warmer Plate Switch only controls the decanter
warmer. The Warmer Plate Switch should be turned off when the decanter is empty
or the coffeemaker is not in use. (For the Warmer Plate Switch to operate,
the Reservoir Power Switch must be on.)
For SBT85:
• Brewed coffee flows into the double-walled, stainless steel thermal carafe
where it is kept at serving temperature for up to four hours.
• The carafe lid reduces coffee evaporation and heat loss. Always place the lid on the
carafe when brewing coffee.
Drenaje del Tanque de Agua
®
El tanque de agua en su Cafetera MR. COFFEE
siempre que la cafetera sea movida, despachada o almacenada. Por favor siga estos
pasos:
1. Gire el Interruptor de Energía del Tanque a la posición “Off” (Apagado)
Desenchufe el cordón SPEEDBREW®y deje que el agua caliente se enfríe en el
tanque. Vierta una jarra completa de agua FRÍA en el depósito de agua.
2. Gire el Indicador de Control de Preparación a “Preparación Regular.” Cuando la
jarra esté llena, vacíela y repita el proceso. Esto enfriará el agua en el tanque de
agua.
3. Gire el Indicador de Control de
Preparación a “Fill” (Llenado) y
remueva la canasta de preparación.
4. Tome la parte trasera de la Cafetera
SPEEDBREW®e incline la unidad hacia
adelante sobre el fregadero en un ángulo
de 45°, hasta que el agua comience
a salir de la regadera.
Continúe inclinando la cafetera hasta que
deje de salir agua. Es normal que queden
residuos de agua en el tanque.
ADVERTENCIA: Para asegurarse de que su
cafetera funcione correctamente, no la
incline más de 45° al vaciar el tanque.
(Ver la Figura 3)
SPEEDBREW®deberá ser vaciado
FIGURA
Mantenimiento de la Cafetera
Limpieza de Rutina
La jarra y la canasta de preparación deberán ser enjuagadas después de cada uso.
La jarra de vidrio y la tapa (Modelo SB11), y la canasta de preparación se pueden
lavar en la rejilla superior del lavaplatos. NOTA: No coloque la jarra térmica en
el lavaplatos (Modelo SBT85).
®
Para limpiar su cafetera de acero inoxidable MR. COFFEE
use un trapo suave. NUNCA use ningún tipo de limpiadores abrasivos o esponjas
que pudieran rayar el metal. Simplemente jabón de lavar platos y agua removerán
huellas, grasa, mugre y hollín.
Ocasionalmente pueden usarse limpiadores de vidrio, soluciones de vinagre y agua,
líquidos estándar para limpieza de cocina no abrasivos, o productos de limpieza
comerciales para superficies de acero inoxidable. Después de la limpieza, use un
trapo suave seco y frote la superficie hasta obtener brillo.
SPEEDBREW,®SIEMPRE
3
6
23
Page 7

Medidas de Café Sugeridas
Para obtener mejores resultados, use café molido para uso en cafeteras de goteo
automáticas. Las cantidades indicadas abajo son cantidades sugeridas.
Número de Tazas Cucharadas Soperas
10 7.5
86
6 4.5
Una taza = Cinco onzas de café preparado
Use más o menos café de acuerdo a su gusto.
POR FAVOR NOTE: Puede que el café descafeinado requiera una cantidad
adicional de café.
Indicador de Control de Preparación – Café Descafeinado
Su Cafetera MR. COFFEE®SPEEDBREW®viene con un dispositivo especial que
le permite preparar una jarra ideal de café descafeinado. Simplemente gire
el Indicador de Control de Preparación a “Preparación de descafeinado.”
Este dispositivo toma en cuenta el tiempo adicional necesario para preparar
café descafeinado. Por favor note que sólo se deberá usar café descafeinado
cuando el Indicador de Control de Preparación esté en esta posición.
PRECAUCIÓN: para evitar desbordar la canasta de preparación, no use café
descafeinado a menos que el Indicador de Control de Preparación se encuentre
en la posición de “Preparación de descafeinado.”
Para Obtener Sólo Agua Caliente
Los mismos pasos listados en la Pagina 21 bajo “Preparando Café” pueden ser
usados para obtener agua caliente. Mantenga la canasta de preparación en su
lugar y omita el filtro y el café. NOTA: Esta agua es más caliente que el agua
de su grifo y deberá ser manipulada con cuidado.
IMPORTANT
Before Using Your SPEEDBREW®Coffeemaker for the First Time
Wash decanter, decanter lid and removable brew basket in mild detergent
and water. Rinse each thoroughly.
Prepare Your SPEEDBREW®Coffeemaker Before First Use
NOTE: To avoid damage to coffeemaker, do not plug your SPEEDBREW®Coffeemaker
into the wall outlet until you complete these steps. This procedure is only
necessary the first time the SPEEDBREW®
Coffeemaker is used or after the water reservoir
has been drained for moving or long-term
storage.
Prior to first use, the water reservoir must be filled with
water and the water given time to heat to proper
brewing temperature.
1. Make sure your coffeemaker is unplugged.
2. Set the Brew Control Dial to “Brew Regular.”
3. Make sure the brew basket and decanter are in
place on the coffeemaker. Raise the water reservoir
lid on the top of the coffeemaker
a separate pitcher to slowly pour 1 gallon (3.8 liters)
of cool water into the water reservoir opening. If the
red Overfill Indicator floats up, please allow the
water to drain into the reservoir before continuing to pour.
4. When the water reservoir is full, water will flow into the decanter. After the flow
of water into the decanter stops, empty the decanter and return it to the
coffeemaker.
5. Now you may plug your SPEEDBREW® Coffeemaker
into a working 120V, AC outlet.
6. Press the Reservoir Power Switch located on the
lower left side of the coffeemaker to “On”
Figure 2)
the water reservoir to reach the ideal brewing
temperature. To brew coffee, follow the “Brewing
Coffee” instructions on page 8.
NOTE: The Reservoir Power Switch should remain “On” at all
times to keep the water in the water reservoir at the
ideal brewing temperature. The Reservoir Power Switch
should be turned “Off” when your plans take you away
from home for several days or when your coffeemaker
will not be in use for an extended period.
7. Before brewing the first pot of coffee it is recommended that the system be
flushed clean. To do this, simply follow the “Brewing Coffee” instructions on page
8, but do not add any coffee grounds to the filter.
. Wait at least 20 minutes for the water in
(see Figure 1)
(see
. Use
FIGURE 1
FIGURE 2
ll
u
F
22
7
Page 8

Brewing Coffee
1. Turn the Brew Control Dial to “Fill.”
2. Remove the brew basket and insert a MR. COFFEE®8-12 cup paper basket filter
or another brand’s 8-12 cup SPEEDBREW®paper filter into the brew basket.
NOTE: To avoid overflow, do not use a permanent filter while brewing coffee on
the “Brew Regular” setting.
3. Add desired amount of coffee according to the coffee measurement chart
found on the next page. Shake lightly to level coffee.
4. Be sure the paper filter is properly centered before sliding the brew basket
back into place.
5. Raise the water reservoir lid. Fill the decanter with a maximum of 10 cups (50 fl. oz.)
of cold water. Pour the water from the decanter into the water reservoir. NOTE:
Do not fill the water reservoir with any liquid other than cold
household vinegar for cleaning – see “Routine Cleaning” on Page 10).
6. Close the water reservoir lid and return the decanter to its place directly under
the brew basket.
7. Turn the Warmer Plate Switch to “On” (SB11 only).
8. Turn the Brew Control Dial to “Brew Regular” when brewing regular coffee
or “Brew Decaffeinated” when brewing decaffeinated coffee.
9. After initial start up, you can brew 10 cups of regular coffee in about 3 minutes
(decaffeinated will take longer).
10. To insure proper brewing temperature, please wait at least 10 minutes before
brewing your next pot of coffee. This will allow the water to heat to proper brewing
temperature. NOTE: Attempting to brew faster than this may result in cold coffee.
WARNING
To avoid the risk of personal injury or damage to property, be sure that
the brew basket is securely in place and that the decanter is centered
under the brew basket before the brewing begins.
water (or white
Preparando Café
1. Gire el Indicador de Control de Preparación a “Fill” (Llenado).
2. Remueva la canasta de preparación e inserte un filtro de canasta de 8 a 12 tazas
marca MR. COFFEE®o un filtro de papel de 8 a 12 tazas SPEEDBREW®de otra
marca
en la canasta de preparación.
NOTA: Para evitar desbordamiento, no use un filtro permanente mientras
está preparando café en la posición de “Preparación Regular.”
3. Agregue la cantidad deseada de café de acuerdo con el cuadro de medidas
de café que se encuentra en la página siguiente. Sacúdalo ligeramente para
nivelar el café.
4. Asegúrese de que el filtro de papel quede centrado apropiadamente antes
de deslizar la canasta a su posición.
5. Levante la tapa del depósito de agua. Llene la jarra con un máximo de 10 tazas
(50 onzas líquidas) de agua fría. Vierta el agua de la jarra dentro del depósito
de agua.
sea agua fría (o vinagre blanco doméstico para limpieza – vea
“Limpieza de Rutina” en la Página 23).
6. Cierre la tapa del depósito de agua y coloque la jarra en su lugar debajo
de la canasta de preparación.
7.
Gire el Interruptor del Plato Calefactor a la posición “On” (Encendida).
(Sólo el SB11)
8.
Gire el Indicador de Control de Preparación a “Brew Regular” (Preparación Regular)
cuando prepare café regular o “Brew Decaffeinated” (Preparación Descafeinado)
cuando prepara café descafeinado.
9. Después de la preparación inicial, usted puede preparar 10 tazas de café
regular en cerca de 3 minutos (descafeinado tomará un poco más de tiempo).
10. Para garantizar la temperatura de preparación apropiada, por favor espere por
lo menos 10 minutos antes de preparar su próxima jarra de café. Esto permite
que el agua se caliente apropiadamente a la temperatura de preparación.
NOTA: Si trata de preparar café más rápido, podrá obtener café frío.
ADVERTENCIA:
Para evitar el riego de heridas corporales o daños a la propiedad, asegúrese
de que la canasta de preparación quede segura en su lugar y que la jarra
quede centrada debajo de la canasta antes de comenzar la preparación.
NOTA: No llene el tanque de agua con ningún líquido que no
WARNING
BREWED COFFEE AND GROUNDS, BOTH IN THE BREW BASKET AND DECANTER,
ARE VERY HOT! HANDLE WITH CARE TO AVOID SCALDING. IF THE BREW BASKET
OVERFLOWS, OR IF THE BREW BASKET FAILS TO DRAIN INTO THE DECANTER
DURING THE BREW CYCLE, DO NOT OPEN OR HANDLE THE BASKET. TURN
THE BREW CONTROL DIAL TO “FILL,” UNPLUG THE COFFEEMAKER AND WAIT
FOR THE CONTENTS TO COOL BEFORE HANDLING.
8
ADVERTENCIA:
EL CAFÉ COLADO Y EL MOLIDO, TANTO EN LA CANASTA DE PREPARACIÓN COMO
EN LA JARRA, ESTÁN AMBOS MUY CALIENTES. MANIPÚLELOS CON MUCHO
CUIDADO PARA EVITAR QUEMADURAS. SI LA CANASTA DE PREPARACIÓN DE
DESBORDA, O SI LA CANASTA DE PREPARACIÓN NO DRENA EN LA JARRA
DURANTE EL CICLO DE PREPARACIÓN, NO ABRA O MANIPULE LA CANASTA.
GIRE EL CONTROL DE PREPARACIÓN A “FILL” (LLENADO), DESENCHUFE LA
CAFETERA Y ESPERE QUE EL CONTENIDO SE ENFRÍE ANTES DE MANIPULARLO.
21
Page 9

IMPORTANTE:
Antes de usar su Cafetera SPEEDBREW®por primera vez, lave la
la tapa de la jarra y la canasta de preparación removible con detergente
jarra,
suave y agua. Enjuague cada uno completamente.
Suggested Coffee Measurement
For best results, use coffee ground for use with automatic drip coffeemakers.
The amounts shown below are suggested amounts.
Preparación de Su Cafetera SPEEDBREW®Antes del Primer Uso
NOTA: Para evitar daños a su cafetera, no enchufe su Cafetera SPEEDBREW®en la toma
de corriente hasta que no haya completado los siguientes pasos. Este
procedimiento es necesario sólo la primera vez que utilice la Cafetera
SPEEDBREW® o luego de que el tanque de agua se haya drenado para una
mudanza o almacenaje a largo plazo.
Antes de usar por primera vez, el tanque de agua debe
llenarse con agua y debe esperarse el tiempo suficiente
para que el agua se caliente a la temperatura adecuada
para el colado.
1. Asegúrese de que su cafetera esté desenchufada.
2. Programe el Indicador de Brew Control a “Brew
Regular.”
3. Asegúrese de que la canasta del filtro y la jarra se
encuentran en su lugar en la cafetera. Levante la tapa
del tanque de agua en la parte superior de la cafetera
(vea la Figura 1)
lentamente
apertura del tanque de agua. Si el Indicador de
Sobrellenado rojo flota hacia arriba, favor de permitir que el agua drene hacia el
tanque antes de continuar vertiendo.
4. Cuando el tanque de agua esté lleno, el agua fluirá hacia la jarra. Luego de
concluir el flujo de agua hacia la jarra, vacíela y vuelva a colocarla en la cafetera.
5. Ahora puede conectar su Cafetera SPEEDBREW® a un enchufe de 120V, AC.
6. Oprima el Interruptor de Encendido/Apagado localizado en la parte inferior
izquierda de la cafetera para ponerlo en la posición de “On”
Espere al menos 20 minutos fpara que le agua en el tanque de agua alcance la
temperatura idónea para el colado. Para colar café,
siga la instrucciones en “Preparando Café” en la
página 8.
NOTA: El Interruptor de Encendido/Apagado debe
permanecer en la posición de “On” en todo momento
para mantener el agua en el tanque de agua a la
temperatura idónea para el colado. El Interruptor de
Encendido/Apagado debe ponerse en la posición “Off”
cuando no vaya a estar en su hogar durante varios días
o cuando su cafetera no se vaya a utilizar durante largo
tiempo.
7. Antes de colar la primera jarra de café, se recomienda
que el sistema se lave completamente. Para hacer
esto, sólo siga la instrucciones en “Preparando Café”
en la página 8, pero no añada café molido al filtro.
. Utilice una jarra separada para verter
1 galón (3.8 litros) de agua fría en la
FIGURA 1
(vea la Figura 2)
FIGURE 2
ll
u
F
.
Number of Cups Tablespoons
10 7.5
86
6 4.5
One cup = Five ounces brewed coffee
Use more or less coffee to suit your taste.
PLEASE NOTE: Decaffeinated coffee may require additional amounts of coffee.
Brew Control Dial – Decaffeinated Coffee
Your MR. COFFEE®SPEEDBREW®Coffeemaker comes with a special feature that allows you
to brew an ideal decanter of decaffeinated coffee. Just turn the Brew Control Dial to
“Brew Decaffeinated.” This feature allows for the additional time needed when brewing
decaffeinated coffee. Please note that only decaffeinated coffee should be used when
your Brew Control Dial is in this position. CAUTION: To avoid overflowing the brew
basket do not use decaffeinated coffee unless the Brew Control Dial is on the
“Brew Decaffeinated” setting.
To Get Hot Water Only
The same steps listed on Page 8 under “Brewing Coffee” can be used to obtain hot water.
Keep the brew basket in place and omit the filter and coffee. NOTE: This water is hotter
than the water from your faucet and must be handled with care.
20
9
Page 10

Draining the Water Reservoir
The water reservoir in your MR. COFFEE®SPEEDBREW®Coffeemaker should be emptied
whenever the coffeemaker will be moved, shipped or stored. Please follow these steps:
1. Turn the Reservoir Power Switch to “Off.” Unplug the SPEEDBREW®power cord and
allow the hot water to cool in the tank. Pour a full decanter of COLD water into the
water reservoir. Close the lid and place the decanter back under the brew basket.
2. Turn the Brew Control Dial to “Brew Regular.”
When the decanter is full, empty it
and repeat this process. This will cool
the water in the water reservoir.
3. Turn the Brew Control Dial to “Fill” and
remove the brew basket.
4. Grasp the back of the SPEEDBREW
Coffeemaker and tip the unit forward
over a sink at a 45° angle until water
begins to flow out of the shower head.
(See Figure 3)
coffeemaker until the flow of water
stops. A residual amount of water
will remain in the water reservoir.
WARNING: To ensure your coffeemaker
will function properly in the future, do
not tip your coffeemaker beyond 45°
when emptying the water reservoir.
Continue tipping the
®
FIGURE 3
Maintaining Your Coffeemaker
Routine Cleaning
The decanter and brew basket should be rinsed after each use. The glass decanter
and lid (Model SB11), and the brew basket are top-rack dishwasher safe.
NOTE: Do not place thermal carafe in dishwasher (Model SBT85).
To clean your stainless steel MR. COFFEE®SPEEDBREW®Coffeemaker, ALWAYS use a soft
cloth. NEVER use any kind of abrasive cleanser or pad that could scratch the metal.
Simple dishwashing liquid and water will remove most fingerprints, grease, dirt and grime.
Occasionally, window cleaners, vinegar and water solutions, standard non-abrasive
kitchen cleaning fluids, or commercially available cleaning products for stainless steel
surfaces can be used. After cleaning, use a soft, dry cloth to dry and buff the surface
to a brilliant shine.
Introducción
¡Felicitaciones por la compra de su nueva Cafetera MR. COFFEE
de desplazamiento! La Cafetera SPEEDBREW®es más rápida que las cafeteras
convencionales y prepara café regular en 3 minutos (después de la configuración
inicial). El café descafeinado tomará más tiempo. Un Indicador de Control conveniente
ajusta el flujo de agua de modo que usted puede preparar café regular o descafeinado
simplemente girando el indicador.
Por favor lea cuidadosamente todas las instrucciones de este libro antes de
comenzar a usar este aparato electrodoméstico. El cuidado y mantenimiento
apropiados le garantizarán la larga vida de este artefacto electrodoméstico
ysuoperación sin problemas. Guarde estas instrucciones y refiérase a ellas
frecuentemente para la limpieza y consejos de cuidado.
®
SPEEDBREW
®
Cosas Importantes que Usted Debe Saber
• La Cafetera SPEEDBREW®fue diseñada para permanecer enchufada en todo
momento (excepto durante el drenaje y períodos extensos de tiempo sin uso).
La preparación comienza después de que el agua a sido puesta en el tanque y el
Indicador de Control a sido puesto en “Preparación Regular” o “Preparación de
Descafeinado.”
• Un interruptor de energía en el
APAGADO]) está ubicado en el lado inferior izquierdo para apagar completamente
todos los componentes eléctricos cuando sus planes lo alejan de su casa durante
varios días o cuando su cafetera no necesita ser usada durante un período de
tiempo extenso. Su Cafetera SPEEDBREW®tiene dispositivos de seguridad que
hacen innecesario el uso diario de este interruptor.
Se tomará aproximadamente 20 minutos después de que el Interruptor
de Energía del Tanque ha sido prendido de nuevo para calentar el agua
del tanque a la temperatura de preparación apropiada.
• Su Cafetera SPEEDBREW®tiene un tanque de agua especialmente diseñado para
mantener el agua a la temperatura apropiada. Este suministro constante de agua
permite que usted prepare café regular en cerca de 3 minutos.
• Cuando una jarra de agua fría es vertida en el tanque de agua, el agua fría entra
en el tanque interno. Cuando el Indicador de Control es puesto en “Preparación
Regular” o en “Preparación de Descafeinado,” el agua fría hace salir el agua
caliente para iniciar el proceso de preparación. Esta agua fría es entonces
calentada a la temperatura apropiada y es almacenada hasta que se inicie el
próximo ciclo de preparación. Asegúrese de que la jarrra esté sobre el plato
calefactor antes de girar el Indicador de Control de Preparación a “Preparación
Regular” o a “Preparación de Descafeinado.”
Para el SB11:
• El café preparado fluye a la jarra donde es mantenido a la temperatura de servir
mediante el plato calefactor. El plato calefactor es controlado por el interruptor
de ON/OFF (ENCENDIDO/APAGADO) ubicado encima de la canasta de
preparación. NOTA: El Interruptor del Plato Calefactor sólo controla el
calefactor de la jarra. El Interruptor del Plato Calefactor deberá ser apagado
cuando la jarra esté vacía o cuando la cafetera no se esté usando. (Para que el
Interruptor del Plato Calefactor opere, el Interruptor de Energía del Depósito
debe estar prendido).
Para el SBT85:
• El café preparado fluye a la jarra térmica de doble pared de acero inoxidable
donde es mantenido a la temperatura de servir hasta por cuatro horas.
• La tapa de la jarra reduce la evaporación del café y la pérdida de temperatura.
Siempre coloque la tapa en la jarra cuando prepare café.
tanque
(Interruptor de ON/OFF [ENCENDIDO/
10
19
Page 11

DIAGRAMA DE LAS PARTES
Full
A
E
J
B
C
F
G
H
To Clean Mineral Deposits from Your SPEEDBREW®Coffeemaker
To keep your coffeemaker free of mineral buildup, it is recommended that you
follow the steps listed below every 40 brew cycles for hard water, 80 brew cycles
for soft water or at least every three months.
1. Turn the Brew Control Dial to “Fill.”
2. Raise the water reservoir lid on top of the coffeemaker.
3. Pour one decanter (10 cups or 50 fluid ounces) of undiluted white household
vinegar into the water reservoir. NOTE: Do not fill the water reservoir with
any liquid other than cold water or white household vinegar for cleaning.
4. Slide the brew basket into position and return the empty decanter to its place
directly under the brew basket.
5. Turn the Brew Control Dial to “Brew Regular.”
6. Let the unit sit for 2 hours. This will allow time for the vinegar to break down
the lime and mineral deposits.
7. After 2 hours, empty the decanter and rinse with clean water.
8. To rinse the vinegar out of the internal tank, turn the Brew Control Dial to “Fill.”
9. Pour one decanter (10 cups or 50 fluid ounces) of clean, cold water into the
water reservoir.
10. Return the decanter to its place directly under the brew basket.
11. Turn the Brew Control Dial to “Brew Regular.” Empty decanter when the brew cycle
is complete (approximately 3 minutes).
12. Repeat Steps 8 – 11 an additional six (6) times or until the vinegar smell is gone.
This will ensure that all the vinegar is rinsed out of the internal tank.
13. After cleaning, wait at least 20 minutes before brewing your next pot of coffee. This
will allow the water in the internal tank to heat to the proper brewing temperature.
D
I
NEVER IMMERSE THE COFFEEMAKER IN WATER OR OTHER LIQUIDS
A. Indicador de Control Brew Llenar/
Brew Regular/Brew Descafeinado
B. Tanque de Agua
C. Regadera
D. Interruptor de Encendido/Apagado
ON/OFF
E. Tapa de Canasta de Preparación
18
F. Interruptor del Plato Calefactor
(sólo SB11)
G. Canasta del Filtro
H. Jarra de 10 Tazas
I. Plato Calefactor (sólo SB11)
J. Indicador de Sobrellenado
Cleaning the Decanter
Hard water can leave a whitish mineral deposit inside the decanter. Coffee can discolor
these deposits, sometimes leaving a brownish stain. To remove these stains, follow these
simple steps:
1. Use a solution of equal parts: white vinegar and hot water.
2. Let solution stand in decanter for about 20 minutes and then discard.
3. Wash and rinse the decanter thoroughly using a soft cloth. Do not use harsh
abrasive cleaners. These may cause scratches which can lead to breakage.
11
Page 12

MR. C
OFFEE
®
S
PEEDBREW
®
C
OFFEEMAKERTROUBLESHOOTINGGUIDE
Índice
P
ROBLEM
The brewed coffee is lukewarm
or cold immediately after
brewing.
You have brewed two decanters
of coffee within ten minutes
and the temperature of the
coffee in the second batch
is cold or lukewarm.
The brewed coffee is hot
immediately after brewing, but
becomes cold in the decanter.
SPEEDBREW®Coffeemaker
The
does not brew a full decanter
of coffee after a full decanter
of water has been poured into
the reservoir.
SPEEDBREW®Coffeemaker
The
requires more than four minutes
to brew REGULAR coffee.
S
OLUTION
• Make sure that the
is plugged into an outlet.
• Make sure that the Reservoir Power (ON/OFF)
Switch is ON.
• Allow the water inside the coffeemaker
proper time to rise to brewing temperature.
Refer to the “Prepare Your Coffeemaker
Before First Use” section on Page 7.
• Allow the water inside the
Coffeemaker proper time to heat to brewing
temperature. Refer to the “Brewing Coffee”
section on Page 8.
• Make sure the Warmer Plate Switch is ON.
(SB11 Only)
• Because of infrequent use, your
Coffeemaker may have lost water due to
evaporation. Please follow these steps:
– If your
– If your
• Set your Brew Control Dial to “Brew Regular.”
•Your
cleaning. Refer to “Routine Cleaning” section
on Page 10.
SPEEDBREW®Coffeemaker did brew
a partial batch of coffee then the lost
water has already been replenished
and you should be able to continue
with normal brewing.
SPEEDBREW®Coffeemaker did not
brew any coffee, then the lost water has
not yet been fully replenished. Promptly
unplug your
and follow the steps in the section titled,
“Prepare Your Coffeemaker Before First
Use” section on Page 7.
SPEEDBREW®Coffeemaker may require
SPEEDBREW®Coffeemaker
SPEEDBREW
SPEEDBREW
SPEEDBREW®Coffeemaker
®
®
Precauciones Importantes . . . . . . . . . . . . . . . . . . . . . . . . . . . . . . . . . 15
Uso y Cuidados de la Jarra . . . . . . . . . . . . . . . . . . . . . . . . . . . . . . . . 16
Instrucciones para el Cordón Especial . . . . . . . . . . . . . . . . . . . . . . . . 16
Diagrama de las Partes . . . . . . . . . . . . . . . . . . . . . . . . . . . . . . . . . . . 18
Introducción . . . . . . . . . . . . . . . . . . . . . . . . . . . . . . . . . . . . . . . . . . 19
Cosas Importantes que Usted debe Saber . . . . . . . . . . . . . . . . . . . . 19
Preparación de su Cafetera Antes del Primer Uso . . . . . . . . . . . . . . . 20
Preparando Café . . . . . . . . . . . . . . . . . . . . . . . . . . . . . . . . . . . . . . . 21
Para Obtener Sólo Agua Caliente . . . . . . . . . . . . . . . . . . . . . . . . . . . 22
Drenaje del Depósito de Agua . . . . . . . . . . . . . . . . . . . . . . . . . . . . . 23
Limpieza de Rutina/Limpieza de la Jarra . . . . . . . . . . . . . . . . . . 23 – 24
Guía de Diagnóstico . . . . . . . . . . . . . . . . . . . . . . . . . . . . . . . . . . . . . 25
Servicio y Mantenimiento . . . . . . . . . . . . . . . . . . . . . . . . . . . . . . . . . 26
Información de Garantía . . . . . . . . . . . . . . . . . . . . . . . . . . . . . . . . . 27
The brew basket of the
SPEEDBREW®Coffeemaker
overflows when you brew
with decaffeinated coffee.
12
• Set your Brew Control Dial to “Brew
Decaffeinated.” This will lengthen the brew
cycle and should prevent overflow.
17
Page 13

Uso y Cuidados de la Jarra
La jarra se podrá romper si no se siguen las siguientes instrucciones:
• Esta jarra fue diseñada para uso con su Cafetera MR. COFFEE
consiguiente, nunca deberá ser usada sobre una estufa o dentro de un
horno, incluyendo el horno microondas.
• No coloque una jarra caliente sobre una superficie mojada o fría.
• No use una jarra fisurada ni que tenga el mango flojo o debilitado.
• No limpie la jarra con limpiadores, almohadillas de estropajo metálicas u
otros materiales abrasivos.
• Deseche inmediatamente la jarra si alguna vez fue hervida en seco.
• Evite darle golpes fuertes, rayarla o manipularla descuidadamente.
ADVERTENCIA: Con el fin de reducir el riesgo de descargas eléctricas,
no le quite ninguna tapa de servicio. No tiene ninguna pieza por
dentro que pueda ser reparada por el usuario. La reparación deberá ser
efectuada únicamente por personal autorizado.
Para evitar el riesgo de quemaduras u otras heridas, no mueva su
cafetera una vez que haya llenado el depósito con agua.
®
, por
Instrucciones para el cordón especial
1. Un cordón de energía corto es suministrado con el fin de reducir los peligros de
enredo o tropezón con un cordón más largo.
2. Se podrá comprar y usar un cordón de extensión si se tiene bastante cuidado al
usarlo.
3. Si se usa un cordón de extensión, la capacidad eléctrica indicada en la
extensión deberá ser de por lo menos 10 amperios y 120 voltios. El cable de
extensión tendrá que ser colocado de forma que no cuelgue sobre el
mostrador o mesa donde pueda ser halado por un niño o cause que usted se
tropiece accidentalmente.
Este artefacto tiene un enchufe polarizado
la otra)
. Con el fin de reducir el riesgo de una descarga eléctrica, este
enchufe entra en una toma de corriente polarizada sólo de una
dirección. Si el enchufe no entra completamente en la toma de
corriente, invierta el enchufe. Si aún no entra, póngase en contacto
con un electricista calificado. No modifique de ninguna manera el
enchufe.
(una pala en más ancha que
Service and Maintenance
Replacement Parts
• Filters
For better tasting coffee, we recommend that you use MR. COFFEE®brand 8-12 cup
basket style paper filters. These filters are available at most grocery stores.
• Decanters
You can usually purchase a replacement decanter from the store where
you purchased your coffeemaker. If you are unable to find a replacement,
please call 1-800 MR COFFEE (1-800-672-6333) in the U.S. or 1-800-667-8623
in Canada for information on where you can find a store that carries replacement
decanters.
Repairs
If your coffeemaker requires service, do not return it to the store where you purchased
it. All repairs must be made by Sunbeam or by an authorized MR. COFFEE®Service
Center. If you live in the U.S. or Canada, please call us at the following toll-free
telephone numbers to find the location of the nearest authorized service center:
U.S. 1-800 MR COFFEE (1-800-672-6333)
Canada 1-800-667-8623
To assist us in serving you, please have the model number and date of purchase
available when you call. The model number is stamped on the bottom metal plate
of the coffeemaker.
Visit our website and discover the secret to brewing the perfect cup of coffee.
You’ll also find a rich blend of gourmet recipes, entertaining tips and the latest
information on MR. COFFEE®products.
www.mrcoffee.com
GUARDE ESTAS INSTRUCCIONES
16
13
Page 14

1-YEAR LIMITED WARRANTY
Sunbeam Products, Inc, or if in Canada, Sunbeam Corporation (Canada) Limited (collectively “Sunbeam”)
warrants that for a period of one year from the date of purchase, this product will be free from defects
in material and workmanship. Sunbeam, at its option, will repair or replace this product or any component
of the product found to be defective during the warranty period. Replacement will be made with a
new
or remanufactured product or component. If the product is no longer available, replacement may
be made
This warranty is valid for the original retail purchaser from the date of initial retail purchase and is not transferable.
Keep the original sales receipt. Proof of purchase is required to obtain warranty performance.
Sunbeam dealers, service centers, or retail stores selling Sunbeam products do not have the right
to alter, modify or any way change the terms and conditions of this warranty.
This warranty does not cover normal wear of parts or damage resulting from any of the following:
negligent
operating instructions,
Sunbeam service center. Further, the warranty does not cover: Acts of God, such as fire, flood,
hurricanes and tornadoes.
What Are the Limits on Sunbeam’s Liability?
Sunbeam shall not be liable for any incidental or consequential damages caused by the breach of any
express, implied or statutory warranty or condition.
Except to the extent prohibited by applicable law, any implied warranty or condition of merchantability
or fitness for a particular purpose is limited in duration to the duration of the above warranty.
Sunbeam disclaims all other warranties, conditions or representations, express, implied, statutory
or otherwise.
Sunbeam shall not be liable for any damages of any kind resulting from the purchase, use or misuse of,
or inability to use the product including incidental, special, consequential or similar damages or loss
of profits, or for any breach of contract, fundamental or otherwise, or for any claim brought against
purchaser by any other party.
Some provinces, states or jurisdictions do not allow the exclusion or limitation of incidental or
consequential damages or limitations on how long an implied warranty lasts, so the above limitations
or exclusion may not apply to you.
This warranty gives you specific legal rights, and you may also have other rights that vary from
province to province, state to state or jurisdiction to jurisdiction.
How To Obtain Warranty Service
In the U.S.A.
If you have any question regarding this warranty or would like to obtain warranty service,
please call 1 800 672-6333 and a convenient service center address will be provided to you.
In Canada
If you have any question regarding this warranty or would like to obtain warranty service,
please call 1 800 667-8623 and a convenient service center address will be provided to you.
In the U.S.A., this warranty is offered by Sunbeam Products, Inc located in Boca Raton, Florida 33431.
In Canada, this warranty is offered by Sunbeam Corporation (Canada) Limited, located at 5975
Falbourne Street, Mississauga, Ontario L5R 3V8.
PLEASE DO NOT RETURN THIS PRODUCT TO ANY OF
THESE ADDRESSES OR TO THE PLACE OF PURCHASE.
with a similar product of equal or greater value. This is your exclusive warranty.
use or misuse of the product, use on improper voltage or current, use contrary to the
disassembly, repair or alteration by anyone other than Sunbeam or an authorized
PRECAUCIONES IMPORTANTES
Se deberán observar las precauciones básicas de seguridad al usar
equipos electrodomésticos con el fin de reducir el riesgo de incendio,
descargas eléctricas y/o lesiones a personas, incluyendo lo siguiente:
• Lea cuidadosamente todas las instrucciones antes de usar
la máquina.
• No toque las superficies calientes. Use los mangos o botones.
•
Para protegerse contra descargas eléctricas, no sumerja el cordón,
enchufe o la máquina en agua o en ningún otro líquido.
• Es necesaria una supervisión cercana cuando este artefacto
electrodoméstico sea usado por niños o cerca de ellos.
• Gire el interruptor de energía del depósito a la posición OFF
(APAGADA) y desenchúfela de la toma de corriente cuando la
cafetera no esté siendo usada durante períodos extensos de
tiempo y antes de limpiarla. Deje que se enfríe antes de colocarle
o quitarle piezas y antes de limpiar el artefacto.
• No opere ningún artefacto electrodoméstico con el cordón o
el enchufe dañados, después de que el artefacto haya fallado
o sufrido algún daño. Retorne este artefacto únicamente al
Centro de Servicio Autorizado más cercano para ser examinado,
reparado o ajustado.
• El uso de accesorios no recomendados por MR. COFFEE®podrán
causar peligros o lesiones.
• No lo use al exterior.
• No permita que el cordón cuelgue por el borde de la mesa
o mostrador, o que toque superficies calientes.
• No coloque este artefacto sobre o cerca de un quemador de gas
o eléctrico ni tampoco dentro de un horno caliente.
• Para desconectarlo, gire el interruptor de energía del depósito
alaposición OFF (APAGADA), luego retire el enchufe de la toma
de la pared.
• No use el artefacto para un uso diferente al indicado.
• Úselo únicamente sobre una superficie dura, plana y nivelada.
14
15
 Loading...