

Page 1
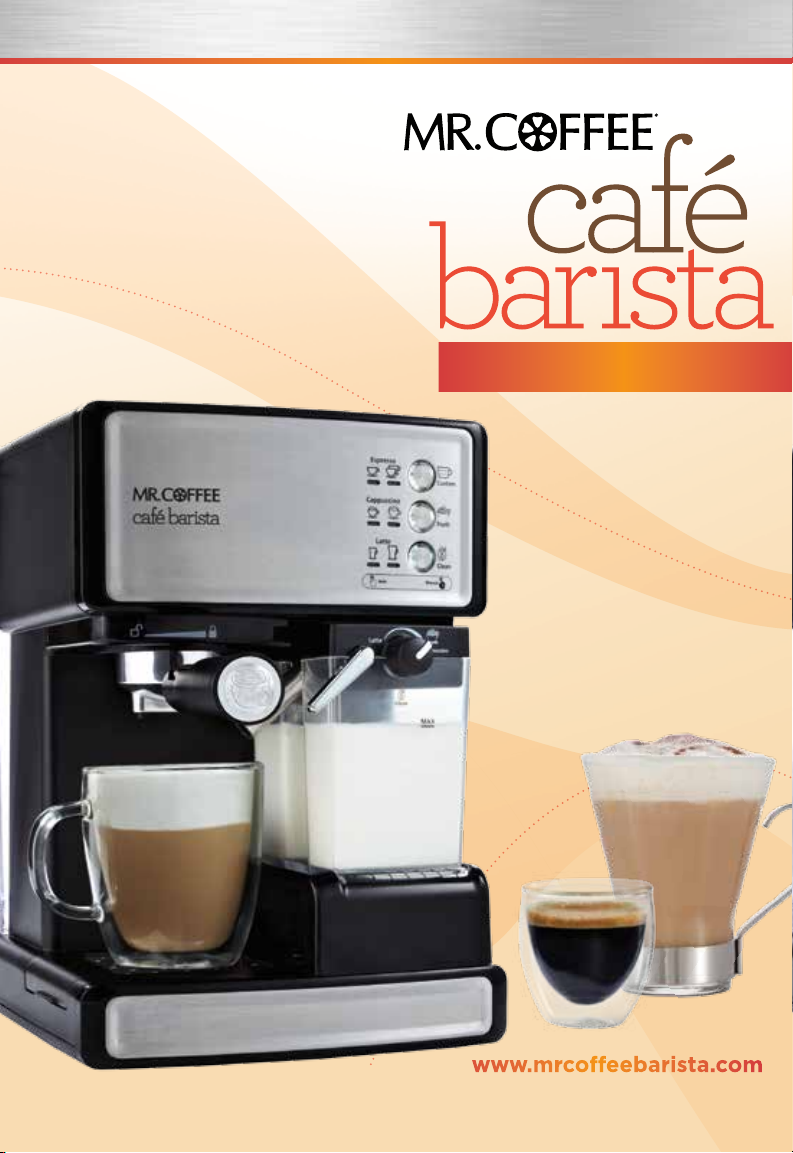
BVMC-ECMP1000 Series
QUICK START GUIDE
(
Flip book over for Recipe Guide
)
www.mrcoffeebarista.com
© 2013 Sun beam Pro duct s, Inc . doing bu sines s as
Jarden Consumer Solutions. All rights reserved.
P.N. 161928 Rev. C MRC31407 C SDL0927 13
Page 2
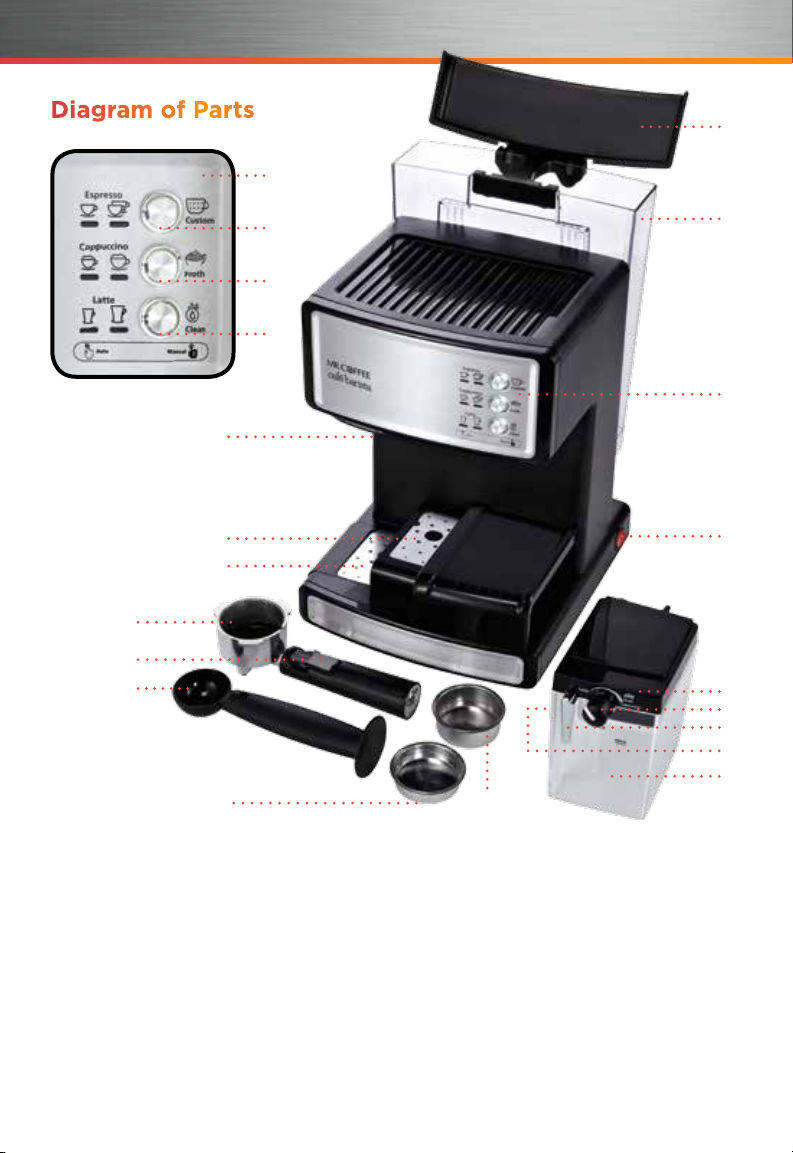
Diagram of Parts
8
1
a
b
c
2
3
4
5
6
7
16
17
9
1
10
11
12
13
14
15
1 Control Panel
a Espresso/Custom Button
b Cappuccino/Froth Button
c Latte/Clean Button
2 Brew Head
3 Cup Height Adjusting Tray
4 Removable Drip Tray and Lid
5 Porta-Filter
6 Porta-Filter Retention Clip
7 Measuring Scoop/Tamper
8 Water Reservoir Lid
9 Removable Water Reservoir
10 On/Off Switch “I/O”
11 Milk Reservoir Lid
12 Froth Control Knob
13 Frothing Tube Lever
14 Frothed Milk Dispensing Tube
15 Removable Milk Reservoir
16 Filter for Single Shot of Espresso (1 cup
17 Filter for Double Shot of Espresso (2 cup
)
)
Page 3
IMPORTANT — READ FIRST
1. Unit must be primed prior to first use. See instruction manual.
2. Remove Red Plug from bottom of water reservoir.
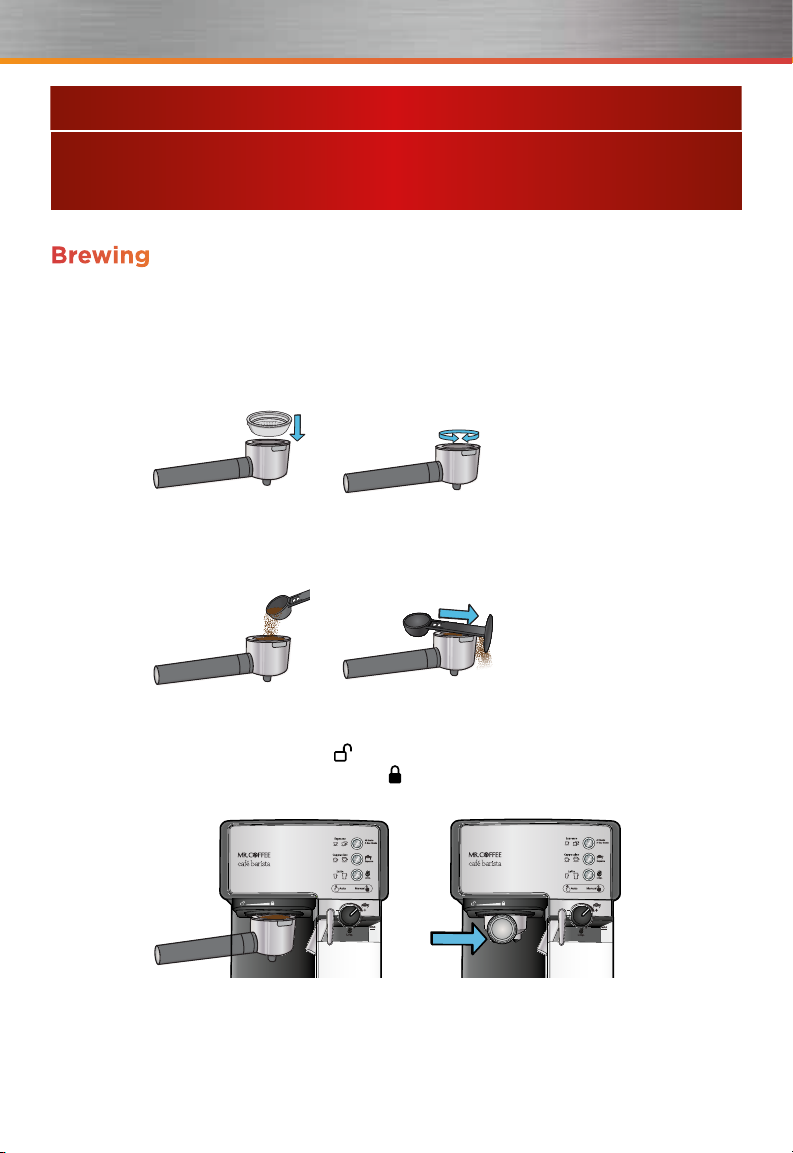
Brewing
1 Choose your filter (single or double shot). To insert filter,
make sure to align the notch on the filter with groove on
the porta-filter. Once inserted, turn filter to left or right
to secure in place.
2 Fill the filter with espresso grounds. Tamp firmly and
level. Clean excess grounds from rim of porta-filter.
3 Attach porta-filter to brew head of unit by aligning
the handle with the “
handle is aligned with the “
” icon and turn to the right until
” icon.
Page 4
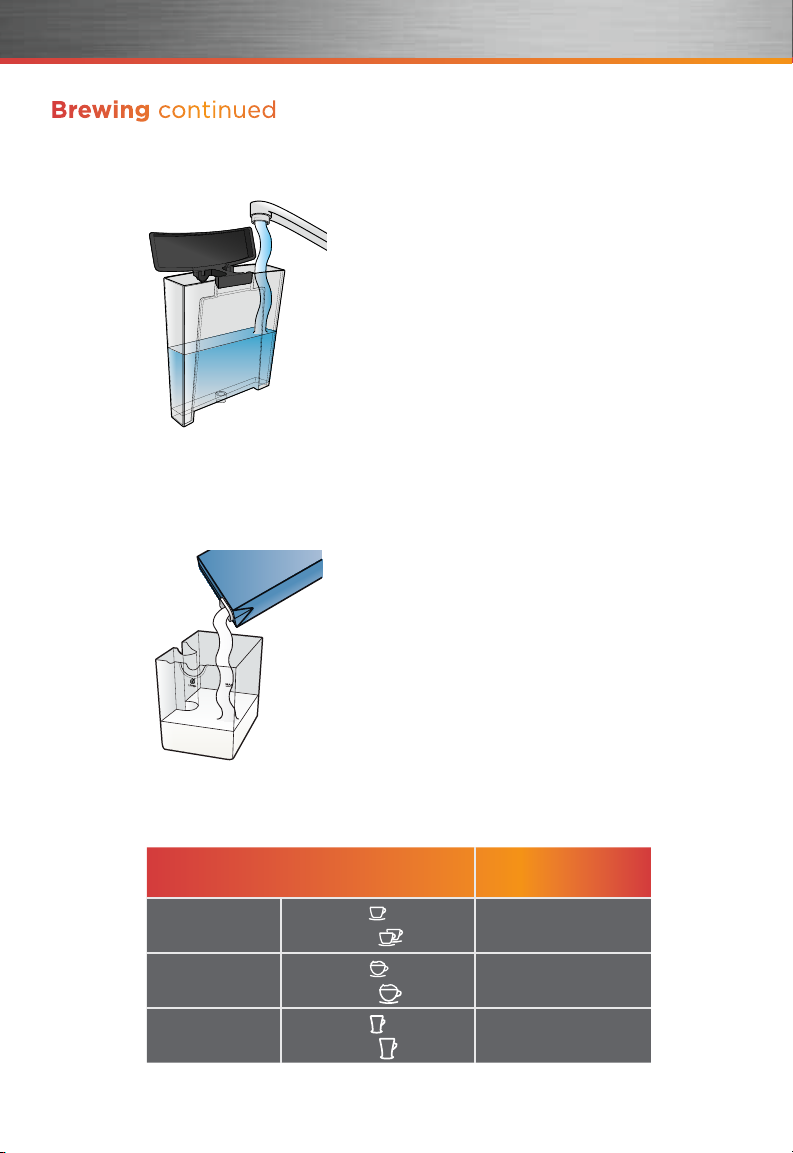
Brewing continued
4 Fill the removable water reservoir with water and place
on unit.
5 Fill the removable milk reservoir with your preferred milk
(whole, skim, soy, almond, etc) and place on unit.
NOTE: Be sure to firmly push Milk Reservoir into unit
until Cappuccino and Latte buttons light illuminate/pulse.
6 Please make sure to select the right cup size according
to the following table:
BEVERAGE AMOUNT
Espresso
Cappuccino
Latte
Single (
Double (
Single (
Double (
Single (
Double (
)
)
)
)
)
)
1.25 oz
2.5 oz
6 oz
10 oz
12 oz
15 oz
Page 5

Brew Espressos
a Place cup under porta-filter. Pull out the cup height adjusting tray
if you are using a small “demitasse” cup to brew espresso.
b Press the Espresso Button “ ” once to brew a single shot.
c Press the Espresso Button “ ” twice to brew a double shot.
d To customize the amount of espresso brewed, press and hold the
Espresso Button “ ” until pump starts. When desired amount is
reached, press the Espresso Button “ ” once again to stop brewing.
For safety, unit will automatically stop after brewing 5 ounces.
NOTE: For a single shot, use the single shot filter. For a double shot,
use the double shot filter.
Prepare Cappuccinos
a Place cup under porta-filter. Be sure to aim the frothed milk dispensing
tube towards the center of your cup by using the frothing tube lever.
c Adjust the amount of froth to your preference by turning the Froth
Control Knob to the right for more froth and to the left for less froth.
For Cappuccino, it is recommended that the Froth Control Knob be
turned to the Cappuccino setting.
c Press the Cappuccino Button “ ” once to brew a small cappuccino.
d Press the Cappuccino Button “ ” twice to brew a large cappuccino.
NOTE: For a small cup, use the single shot filter. For a large cup, use the
double shot filter.
Create Lattes
a Place cup under porta-filter. Be sure to aim the frothed milk dispensing
tube towards the center of your cup by using the frothing tube lever.
b Adjust the amount of froth to your preference by turning the Froth
Control Knob to the right for more froth and to the left for less froth.
For Latte, it is recommended that the Froth Control Knob be turned
to the Latte setting.
c Press the Latte Button “ ” once to brew a small latte.
d Press the Latte Button “ ” twice to brew a large latte.
NOTE: For a small cup, use the single shot filter. For a large cup, use the
double shot filter.
Page 6

Customizing / Preparing additional frothed milk
Adding more froth to your beverage is easy. Place your
beverage under the porta-filter, aim the frothed milk
dispensing tube towards the center of your cup and hold
the Cappuccino button “ ” until pump starts. The Café
Barista will begin dispensing more frothed milk. Press the
Cappuccino button again to stop. To make frothed milk
separately, follow the same instructions but place an empty
cup under the porta-filter.
Cleaning your Café Barista
Once you are done preparing your beverage with
milk, you can either store the unit’s milk reservoir
with leftover milk directly in the refrigerator (ready
to be used for the next time) or dispose of the
leftover milk.
a Clean the Frothed Milk Dispensing Tube after
each use. First, place an empty cup on the
unit’s drip tray. Aim the Frothed Milk Dispensing
Tube into the empty cup. Next, adjust the Froth
Control Knob to Clean “
the Latte/Clean button until pump starts. The
unit will run the clean cycle for 30 seconds. Once
completed, throw the contents in the cup away.
”. Then press and hold
b Once you have cleaned the Frothed Milk
Dispensing Tube, you may either store the
milk reservoir with milk in
your refrigerator or you can
dispose of the remaining milk
and completely clean the
milk reservoir.
NOTE: For more cleaning instructions,
refer to the instruction manual.
Porta-filter and water reservoir
are not dishwasher safe. All
other parts are Top Rack
dishwasher safe only.
Page 7

Small latte
Brew in the cup:
Stir to blend.
Small latte
Brew in the cup:
(chocolate hazelnut spread)
1 tablespoon Nutella
Place in a cup:
Nutell Lae
Stir to dissolve toffee bits.
Small latte
Brew in the cup:
1 to 2 teaspoons toffee bits
1 tablespoon caramel syrup
Place in a cup:
Toee Lae
cinnamon
Pinch of ground
2 teaspoons sugar
Place in a cup:
Sugar Lae
Cinnamo
Drop of vanilla extract
Add and stir until blended:
Small latte
Brew in the cup:
2 to 3 teaspoons honey
Place in a cup:
Hone-Vanill Lae
Stir to blend.
Small latte
Brew in the cup:
or other milk
1/2 cup whole
1 cup ice cubes
Stir in:
Large espresso
Brew in the cup:
1 tablespoon sugar
Place in a large cup:
Ice Lae
pie spice
Pinch of pumpkin
brown sugar
2 teaspoons
Place in a cup:
Pumpki Spice Lae
Lae
Page 8

if desired.
Top with additional foam
Stir to blend.
Small cappuccino
Brew in the cup:
Amaretto (almond liqueur)
Frangelico (hazelnut liqueur) or
1 ounce (2 tablespoons)
Place in a cup:
FOR ADULTS
Cappuccin Royale
if desired.
Top with additional foam
Stir to blend.
Small cappuccino
Brew in the cup:
if desired.
Top with additional foam
Stir to blend.
Small cappuccino
Brew in the cup:
(not coconut milk)
2 teaspoons cream of coconut
Place in a cup:
Coconu Cappuccin
Kahlúa (coffee liqueur)
1 ounce (2 tablespoons)
Place in a cup:
FOR ADULTS
Café Conquistad
Page 9

if desired.
Top with additional foam
Stir to blend.
Small cappuccino
Brew in the cup:
1/4 teaspoon sugar
1 tablespoon caramel syrup
Place in a cup:
if desired.
Top with additional foam
Stir to blend.
Small cappuccino
Brew in the cup:
1 tablespoon raspberry syrup
Place in a cup:
Raspbe Cappuccin
if desired.
Top with additional foam
Stir to dissolve sugar.
Small cappuccino
Brew in the cup:
1/2 teaspoon sugar
Place in a cup:
Carame Cappuccin
if desired.
Top with additional foam
Stir to blend.
Small cappuccino
Brew in the cup:
1/2 teaspoon sugar
2 teaspoons chocolate syrup
Place in a cup:
Café Moch
See Cappuccin
Cappuccin
Page 10

martini glass.
30 seconds; strain into a
Shake until foamy, about
1/4 teaspoon sugar
Kahlúa (coffee liqueur)
)
vodka
)
3 tablespoons
(
3 tablespoons
(
1-1/2 ounces
1-1/2 ounces
Brewed espresso
Add to the ice:
with a spoon.
Serve immediately
Hot brewed espresso
Top with:
FOR ADULTS
vanilla ice cream
1/2 cup (about 1 scoop)
Place in a dessert dish:
Small espresso
Brew:
Aogat a Café
if needed.
stopping to stir
until blended,
Cover and process
Cold brewed espresso
1/4 cup whole or other milk
cookies ’n cream ice cream
2 cups (about 4 scoops)
Place in a blender:
Ice cubes
Fill a cocktail shaker half full with:
Large espresso
Brew:
Espre Marni
Large espresso
Brew, then refrigerate until chilled:
Mu Pie Milkshake
Page 11

Sweetened whipped cream
then fill cup with:
Stir to dissolve sugar,
Small espresso
Brew in the cup:
1/2 teaspoon sugar
If desired, place in a cup:
Espre co Pann
just before drinking.
Serve with a spoon to stir
Small espresso
Brew in the glass:
condensed milk
1-1/2 to 2 tablespoons sweetened
Place in a small heavy glass:
Café Bombo
martini glass.
30 seconds; strain into a
Shake until foamy, about
1 tablespoon vanilla syrup
Brewed espresso
Add to the ice:
Ice cubes
Fill a cocktail shaker half full with:
Large espresso
Brew:
Café Sakerat
Stir to dissolve sugar.
Small espresso
Brew in the cup:
1/2 teaspoon sugar
Place in a small cup:
Café Cuban
Espre
Page 12

Flip book over for Quick Start Guide
)
(
www.mrcoffeebarista.com
Guide
Recipe
 Loading...