

Page 1
12
10
8
6
4
Auto-Off
Timer
Fine
Med
Coarse
G
r
i
n
d
C
u
p
s
User Manual /
Manual del Usuario
PRECISION™ COFFEE GRINDER
MOLEDORA DE CAFÉ PRECISION™
with/con el CHAMBER MAID™ CLEANING SYSTEM
MODELS
MODELOS
IDS75 / IDS77
©2004 Sunbeam Products, Inc. All rights reserved.
Mr. Coffee®is a registered trademark and Precision™ Coffee Grinder and Chamber Maid™
Distributed by Sunbeam Products, Inc., Boca Raton, Florida 33431.
©2004 Sunbeam Products, Inc. Todos los derechos reservados.
Mr. Coffee®es una marca registrada y Precision™ Coffee Grinder y Chamber Maid™
Printed in China/Impreso en China P.N. 114128
Distribuido por Sunbeam Products, Inc., Boca Ratón, Florida 33431.
Ahí encontrará consejos e ideas excitantes y entretenidos,
are trademarks of Sunbeam Products, Inc.
U.S. 1-800-MR COFFEE (1-800-672-6333)
You will find exciting and entertaining tips and ideas,
son marcas de Sunbeam Products, Inc.
Canada 1-800-667-8623
Visit us at mrcoffee.com
including great recipes!
Visítenos en mrcoffee.com
¡incluyendo excelentes recetas!
mrcoffee.com
FOR HOUSEHOLD USE ONLY. PLEASE READ ALL INSTRUCTIONS BEFORE USING THIS APPLIANCE
SÓLO PARA USO DOMÉSTICO. FAVOR DE LEER TODAS LAS INSTRUCCIONES ANTES DE UTILIZAR ESTE APARATO
Page 2

INTRODUCTION
Thank you for selecting the MR. COFFEE®IDS75/IDS77 Precision™ Coffee Grinder with
Chamber Maid™ Cleaning System, a highly innovative and ergonomically designed,
state-of-the-art coffee grinder. Your unit can grind whole coffee beans to brew up
to 12 cups of coffee.
It has setting indicator lights, an auto off timer, variable grind settings - from fine to
coarse, a dishwasher-safe, fully removable grinding chamber which includes a nospill, flip open lid for easy pouring and filling and a self-cleaning upper collar with
integrated Chamber Maid™ bowl scrapers, plus discreet cord storage.
Your new MR. COFFEE® Precision™ Coffee Grinder with Chamber Maid™ Cleaning
System lets you enjoy the freshest cup of coffee ever.
Please read ALL of the instructions in this manual carefully before you begin to use this
appliance. Proper care and maintenance will ensure a long life and a trouble-free
operation.
CLEANING AND CARE TIPS.
PLEASE SAVE THESE INSTRUCTIONS AND REFER TO THEM FOR
INFORMACIÓN SOBRE LA GARANTÍA
Garantía Limitada de 1 Año
Sunbeam Products Inc., o, en el Canadá, Sunbeam Corporation (Canada) Limited (“Sunbeam”
colectivamente) garantiza que, por un período de un año a partir de la fecha de compra, este producto
estará libre de defectos en el material y en la mano de obra. Sunbeam, a su criterio, reparará o
reemplazará este producto o cualquiera de los componentes del mismo que estén defectuosos durante
el período de garantía. El reemplazo será hecho con un producto o componente nuevo o reconstruido.
Si el producto ya no se encuentra disponible,
se reemplazará con un producto similar de igual o mayor valor. Esta es su garantía exclusiva.
Esta garantía es válida para el comprador original al detal a partir de la fecha inicial de compra al detal y
no es transferible. Conserve el recibo original de compra. La evidencia de compra es requerida para honrar
la garantía. Los concesionarios, centros de servicio de Sunbeam o tiendas al detal que vendan productos
Sunbeam, no tienen el derecho de alterar, modificar o cambiar de forma alguna los términos o condiciones
de esta garantía.
Esta garantía no cubre el desgaste por el uso normal de las piezas, o daños que resulten de cualesquiera
de las siguientes: uso negligente o incorrecto del producto, uso bajo un voltaje o corriente inadecuados,
uso contrario a las instrucciones de operación, desensamble, reparaciones o alteraciones que no sean
hechas por Sunbeam o por un centro de servicio autorizado Sunbeam. Además, la garantía no cubre:
factores de fuerza mayor tales como incendios, inundaciones, huracanes y tornados.
Table of Contents
INTRODUCTION ...........................................................................................2
TABLE OF CONTENTS ...................................................................................2
IMPORTANT SAFEGUARDS............................................................................3
SPECIAL CORD SET INSTRUCTIONS ...............................................................3
PARTS DIAGRAM..........................................................................................4
CLEANING AND PREPARING YOUR MR. COFFEE
PRECISION™ COFFEE GRINDER FOR USE.................................................5
USING YOUR MR. COFFEE®PRECISION™ COFFEE GRINDER ..........................6
COFFEE MEASUREMENT CHART....................................................................6
HELPFUL GRINDING HINTS ...........................................................................8
FOR BEST RESULTS.......................................................................................9
TROUBLESHOOTING YOUR MR. COFFEE®PRECISION™ COFFEE GRINDER ...10
IF SERVICE IS REQUIRED .............................................................................11
WARRANTY INFORMATION.........................................................................12
®
¿Cuáles son los límites de la responsabilidad de Sunbeam?
Sunbeam no será responsable de ningún daño incidental o consecuente causado por el incumplimiento de
cualquier garantía o condición expresa, implícita o estatutaria. Excepto hasta donde esté prohibido por el
derecho aplicable, cualquier garantía o condición implícita de comercialización o de aptitud para un
propósito en particular están limitadas en duración al período de la garantía antedicha. Sunbeam rechaza
cualesquiera otras garantías, condiciones o representaciones, expresas, implícitas, estatutarias o de otra
índole. Sunbeam no será responsable de cualesquiera daños de clase alguna que resulten de la
adquisición, uso o mal uso de, o incapacidad para utilizar el producto, incluyendo daños incidentales,
especiales, consecuentes o similares, o la pérdida de ganancias, o por cualquier incumplimiento de
contrato, fundamental o de otra índole, o por cualquier reclamación incoada contra el comprador por
cualquier tercero. Algunas provincias, estados o jurisdicciones no permiten la exclusión o limitación de
daños incidentales o consecuentes o limitar la duración de una garantía implícita, así que las limitaciones
o exclusiones antedichas pueden no ser aplicables a usted. Esta garantía le otorga derechos legales
específicos, y usted puede también tener otros derechos que varían de provincia en provincia, de estado
en estado y de jurisdicción en jurisdicción.
Cómo obtener el servicio de la garantía
En los EE.UU.
Si usted tiene cualquier pregunta con respecto a esta garantía o si desea obtener servicio, favor de llamar
al 1-800-672-6333 y se le proveerá una dirección de un centro de servicio de acceso conveniente para
usted.
En el Canadá
Si usted tiene cualquier pregunta con respecto a esta garantía o si desea obtener servicio, favor de llamar
al 1-800-667-8632 y se le proveerá una dirección de un centro de servicio de acceso conveniente para
usted.
FAVOR DE NO DEVOLVER ESTE PRODUCTO A CUALQUIERA DE ESTAS
DIRECCIONES O AL LUGAR DONDE LO ADQUIRIÓ.
232
Page 3

• La unidad está desenchufada • ENCHUFE LA
• Hay un apagón eléctrico • ESPERE A QUE SE
¿Aún tiene preguntas? Puede llamarnos libre de cargos al Departamento de Servicios al
Consumidor de MR. COFFEE®al 1-800-MR COFFEE (1-800-672-6333),
o puede visitarnos en mrcoffee.com.
UNIDAD
RESTAURE EL
SERVICIO
SI SE REQUIERE UNA REPARACIÓN
Si hace falta reparar su moledora, no la devuelva a la tienda donde la adquirió.
Todas las reparaciones deben ser efectuadas por Sunbeam o por un Centro de Servicio
Autorizado MR. COFFEE®. Si usted vive en los EE.UU. o en el Canadá, por favor llámenos
a los siguientes números de teléfono libres de cargo para encontrar la ubicación del
centro de servicio autorizado más cercano:
EE.UU. 1-800-MR COFFEE (1-800-672-6333)
En el Canadá llame al 1-800-667-8623
También puede visitar nuestro website en mrcoffee.com para ver una lista de centros
de servicio.
Para ayudarnos a servirle, por favor tenga a la mano el número de modelo de la
moledora de café y la fecha de la compra cuando nos llame. El número del modelo se
encuentra debajo de la moledora.
Agradecemos sus preguntas, comentarios o sugerencias. En todas sus comunicaciones,
favor de incluir su nombre, dirección y número telefónico completos y una descripción
del problema.
Visite nuestro website en mrcoffee.com y descubra el secreto de cómo colar la taza
perfecta de café. También encontrará una deliciosa variedad de recetas gourmet,
consejos para fiestas y actividades y la información más reciente sobre los productos
MR. COFFEE
®
.
IMPORTANT SAFEGUARDS
When using electrical appliances, basic safety precautions should always be
followed to reduce the risk of fire, electric shock and/or injury to persons
including the following:
1. READ ALL INSTRUCTIONS BEFORE USING THE APPLIANCE.
2. Do not touch hot surfaces. Use handles or knobs.
3. To protect against electric shock, do not put cord, plugs or motor base in
water or any other liquids.
4. Close adult supervision is necessary when this appliance is used by or around
children.
5. Unplug from outlet when Precision™ Coffee Grinder is not in use and before
cleaning. Allow to cool before putting on or taking off parts and before
cleaning the appliance.
6. The use of accessory attachments that are not MR. COFFEE®brand may cause
hazards or injuries.
7. Do not use outdoors.
8. Do not let cord hang over edge of table or counter, or touch hot surfaces.
9. Do not place this appliance on or near a hot gas or electric burner or in a
heated oven.
10. To disconnect, turn unit off, then remove plug from wall outlet.
11. Do not use appliance for other than its intended use.
12. Use on a hard, flat level surface only, to avoid interruption of air flow
underneath the appliance.
13. Do not operate any appliance with a damaged cord or plug or after the
appliance malfunctions, or has been damaged in any manner. Return this
appliance only to the nearest Authorized Service Center for examination,
repair or adjustment.
14. WARNING: To reduce the risk of fire or electric shock , do not remove any
service covers. No user serviceable parts inside. Repair should be done
by authorized personnel only. Opening the bottom service cover will void
the warranty.
SPECIAL CORD SET INSTRUCTIONS
A short power supply cord is provided to reduce the hazards resulting from a
person or pet becoming entangled in or tripping over a longer cord.
This appliance has a polarized plug (one blade is wider than the other). To
reduce the risk of electric shock, this plug will fit in a polarized outlet only one
way. If the plug does not fit fully in the outlet, reverse the plug. If it still does
not fit, contact a qualified electrician. Do not modify the plug in any way.
SAVE THESE INSTRUCTIONS
22 3
Page 4
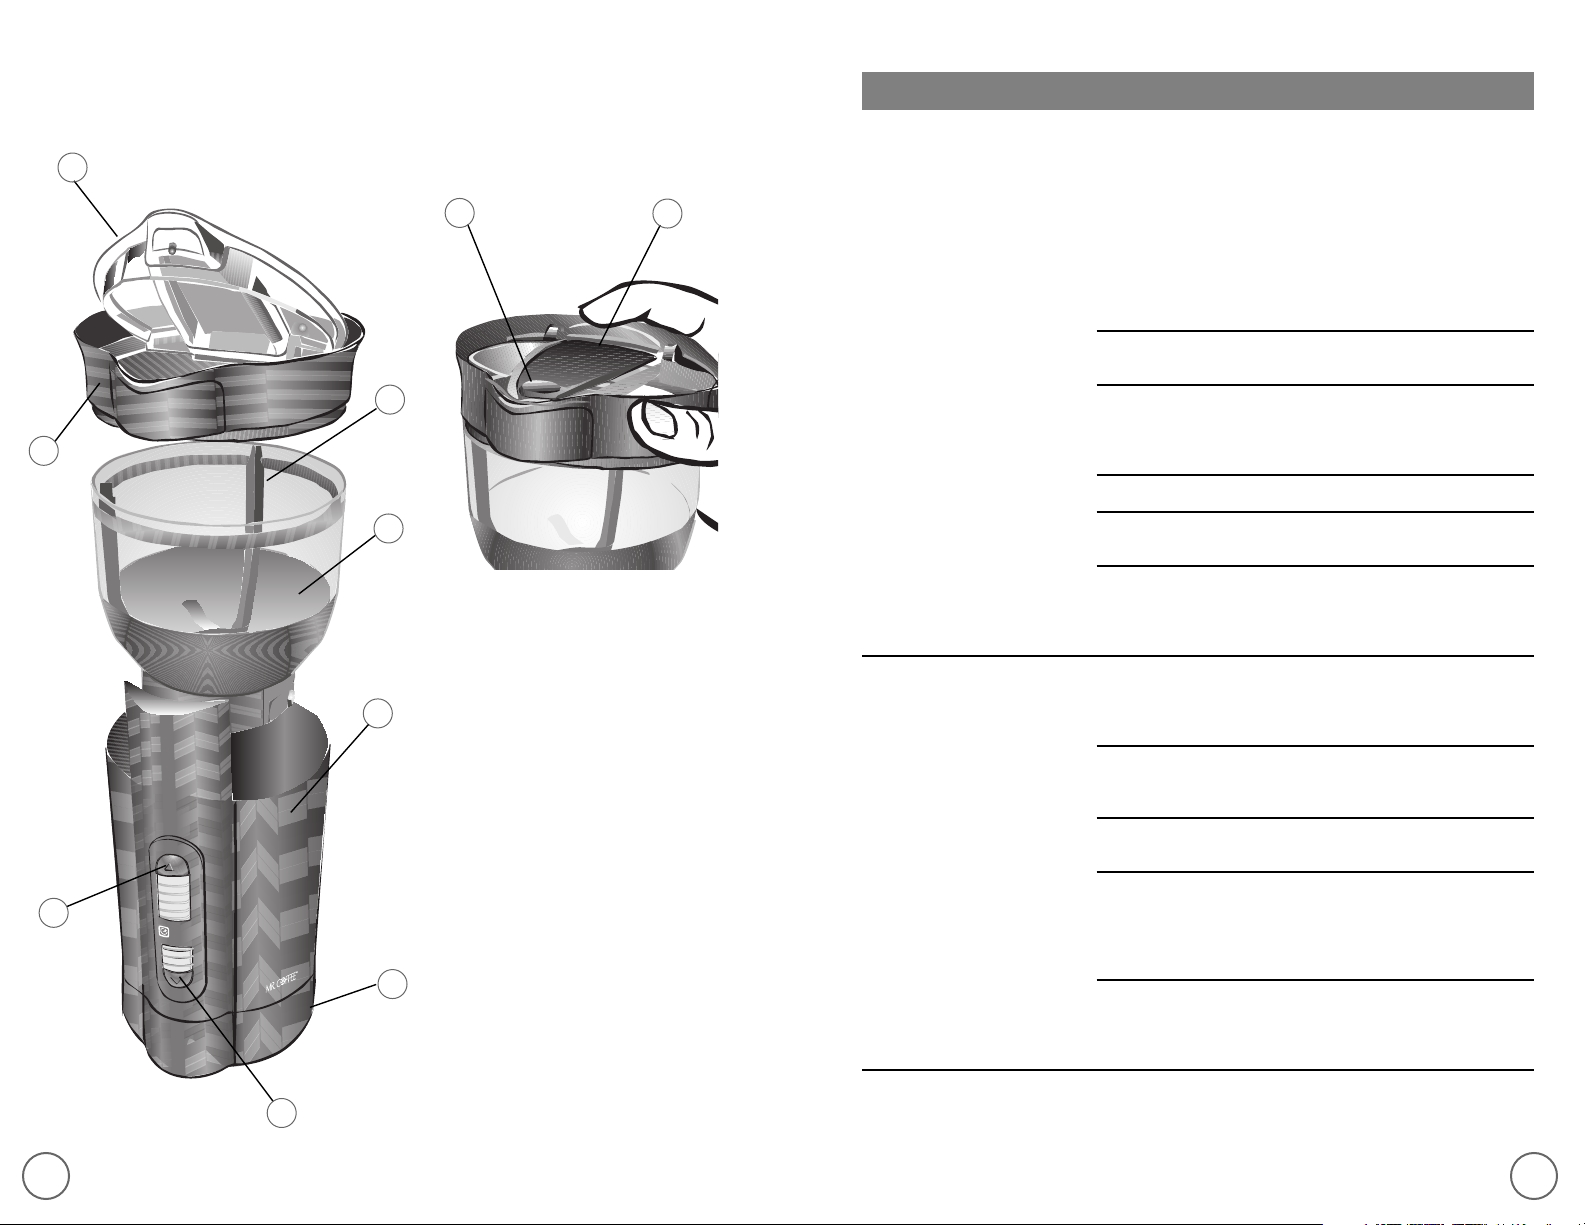
PARTS DIAGRAM
12
10
8
6
4
Auto-Off
Timer
Fine
Med
Coarse
G
r
i
n
d
C
u
p
s
RESOLVIENDO PROBLEMAS CON SU MOLEDORA MR. COFFEE
®
Su Moledora de Café Precision™ MR. COFFEE®con el Chamber Maid™ Cleaning System
9
ha sido diseñada con esmero para darle muchos años de servicio sin contratiempos. En
el caso improbable de que su nueva moledora de café no funcione adecuadamente,
favor de examinar los siguientes problemas potenciales y efectuar los pasos
1
10
recomendados ANTES de llamar a un Centro de Servicio Autorizado Sunbeam.
PROBLEMA CAUSA POSIBLE SOLUCIÓN
LA UNIDAD NO MUELE • La tapa de la cámara • CIERRE LA TAPA DE
moledora está abierta LA CÁMARA
MOLEDORA
• La cámara moledora • COLOQUE LA
no etá en su lugar CÁMARA EN EL
LUGAR APROPIADO
2
• El interruptor de activación • OPRIMA EL
no ha sido oprimido INTERRUPTOR
DE ACTIVACIÓN
8
Y MANTÉNGALO
OPRIMIDO
• La unidad está desenchufada • ENCHUFE LA
UNIDAD
3
• Hay un apagón eléctrico • ESPERE A QUE SE
RESTAURE EL
SERVICIO
• Si luego de probar todas las • LLAME A UN
anteriores la unidad aún no CENTRO DE SERVICIO
muele, el motor se ha AUTORIZADO
sobrecalentado y el fusible SUNBEAM
1. Start Button
2. Chamber Maid™ Cleaning System
3. Removable grinding chamber
4
EL CAFÉ MOLIDO • La textura del molido o la • INDIQUE LA
PRODUCIDO NO ESTÁ cantidad de tazas TEXTURA DEL
MOLIDO ADECUADAMENTE son incorrectas MOLIDO O LA
4. Grinder base
5. Cord Storage
6. Grind setting button and indicator light
7. Cup selector and indicator light
8. Cap assembly
9. Flip open lid
7
10. Finger tab
térmico se ha fundido
CANTIDAD DE TAZAS
CORRECTAMENTE
• Se utilizó una cantidad • AÑADA GRANOS
insuficiente de granos de café A LA CÁMARA
MOLEDORA
Por favor no rebase la cantidad máxima de 12 cdas.
• La tapa de la cámara se abrió • CIERRE LA TAPA DE
mientras la unidad estaba LA CÁMARA
funcionando MOLEDORA
• La unidad no está limpia • DESENCHUFE LA
UNIDAD, LÍMPIELA
SEGÚN LAS
INSTRUCCIONES Y
ENCHÚFELA DE
6
5
• Hay un cuerpo extraño • DESENCHUFE LA
obstruyendo las cuchillas UNIDAD Y DESALOJE
de la moledora EL CUERPO `
LA UNIDAD DEJA DE MOLER • Se ha abierto la tapa de la • CIERRE LA TAPA DE
cámara moledora LA CÁMARA
NUEVO
EXTRAÑO CON
PRECAUCIÓN
MOLEDORA
214
Page 5

C
u
p
s
PARA RESULTADOS ÓPTIMOS
1. Sólo utilice granos de café en esta unidad, no muela nueces o especias.
CLEANING AND PREPARING YOUR MR. COFFEE®PRECISION™
COFFEE GRINDER FOR USE
2. No almacene los granos de café en la cámara moledora.
3. No utilice la textura fina al colar café para su cafetera de goteo
automático. El café molido más fino podría hacer que la canasta del café
se desborde.
4. Para evitar sobrecalentar el motor, no muela más de 2 ciclos completos
para 12 tazas sin un receso. Permita que el motor se enfríe al menos 5
minutos entre cada ciclo.
5. Los granos de café con sabores añadidos pueden tupir las cuchillas dejar
un residuo aceitoso en éstas. Asegúrese de limpiar su moledora más
frecuentemente cuando muela granos de café con sabores añadidos y de
remover todas las partículas de café incrustadas en su moledora al efectuar
la limpieza.
6. Siempre limpie la unidad luego de utilizarla para un rendimiento óptimo.
Before using your coffee grinder for the first
time, clean it according to the following
instructions. Then, to ensure optimal grinder
function and durability, clean it regularly
following these simple steps.
1. Always make sure your grinder is
unplugged before cleaning and after use.
2. Remove the removable grinding chamber
from the base by rotating it
counterclockwise until it stops, then lift it
straight up. FIGURE 1
3. Now rotate the cap assembly
counterclockwise until it stops.
4. Lift the cap assembly straight up.
FIGURE 2
5. Wash grinding chamber components with
mild detergent and water. You may also
wash them in your dishwasher’s top
rack.
WARNING! Do not put grinder base in
dishwasher.
FIGURE 1
FIGURE 2
20
p
s
u
6. Once both components are clean, make
C
sure they are completely dry before
reinstalling them in the grinder.
FIGURE 3
7. Align the arrow on the cap spout with
the cap unlock symbol on the grinding
chamber and insert.
8. Rotate the cap assembly clockwise until
the cap stops. FIGURE 3
9. Reinsert the grinding chamber into the
grinder base and rotate clockwise until it
stops. Be sure the cap spout arrow is
aligned with the cap lock symbol in front
FIGURE 4
of the unit. FIGURE 4
5
Page 6

USING YOUR MR. COFFEE®PRECISION™ COFFEE GRINDER
CONSEJOS ÚTILES PARA MOLER EL CAFÉ
The MR. COFFEE®Precision™ Coffee Grinder
with Chamber Maid™ Cleaning System features
3 grind settings, from fine to coarse. The
coffee grinder uses specialized blades to
chop the whole beans to a uniform grind,
releasing the unique flavor and aroma of your
favorite coffee. To use:
1. Make sure the unit is clean as per the
instructions on page 5.
2. Open the Flip Open Lid and fill the
Grinding Chamber with fresh coffee beans,
according to the Coffee Measurement
Chart.
COFFEE MEASUREMENT CHART
CUPS OF COFFEE (5 OZ. EACH) BEAN QUANTITY/TABLESPOONS
12 CUPS 9 TBSP
10 CUPS 7.5 TBSP
8 CUPS 6 TBSP
6 CUPS 4.5 TBSP
4 CUPS 3 TBSP
For Automatic Drip coffeemakers, use the medium
grind setting, fine for espresso and coarse for
French Press coffeemakers. Use more or less
coffee to suit your taste.
For best results, do not grind more than 12 tbsp.
of coffee at a time.
FIGURE 5
Usted puede ajustar a su gusto las recomendaciones de las cantidades de
granos indicadas según se vaya familiarizando con su nueva Moledora de Café
Precision™ MR. COFFEE®, pero siempre tenga en mente lo siguiente:
1. Utilice una textura mediana para las cafeteras de goteo automático, fina
para espresso y gruesa para prensa francesa.
2. El utilizar un café molido de textura fina para colar café en cafeteras de
goteo automático podría causar un desbordamiento en el filtro de papel
y/o en la canasta del colado. Además, el sabor del café pudiera ser más
cargado que lo deseado.
3. El utilizar un café molido de textura gruesa para colar café en cafeteras de
goteo automático podría causar que el sabor del café sea menos cargado
que lo deseado.
4. Para colar espresso o cappuccino, muela la cantidad de café molido
recomendada por el fabricante de su producto.
a. Para productos Espresso Mr. Coffee®:
1) Seleccione molido fino y 4 tazas en la moledora de café.
2) Utilice la tabla en la página 17 para la cantidad recomendada de
café molido.
b. El utilizar una gradación de textura mediana o gruesa inapropiada podría
afectar el sabor del café espresso colado, ya que no se alcanza la
extraccion óptima del café.
5. Si se requiere una gradación más gruesa para colar café manualmente, en
un percolador o utilizando una prensa francesa, muela la cantidad de café
recomendada por el fabricante de su producto utilizando el nivel grueso
del molido.
6. Recuerde que usted puede personalizar las recomendaciones antedichas
según usted vaya descubriendo la configuración que mejor se adapta a sus
preferencias para colar café.
3. Close the lid.
4. Plug in the unit.
5. Press the Grind Setting Button until the
indicator light shows your preferred grind
setting. FIGURE 6.
u
p
C
s
12
10
8
6
4
Auto-Off
Timer
Fine
Med
Coarse
G
r
i
d
n
FIGURE 6
196
Page 7

6. Selecciones la cantidad de tazas de café
que usted colará con el Botón Indicador
de Tazas, desde 4 hasta 12 tazas. FIGURA
7. Para obtener la mejor taza de café o de
espresso, sólo muela la cantidad de granos
que utilizará de inmediato.
7. Oprima y mantenga oprimido el Interruptor
de Activación (FIGURA 8) hasta que
concluya el ciclo de molido fijo,
aproximadamente 15 segundos para 12
tazas.
8. Cuando concluya el molido, saque la
cámara moledora de la base gir ándola en
contra de las manecillas del reloj hasta que
no pueda girar más, y luego hálela hacia
arriba.
9. Utilice la función Chamber Maid™
torciendo la tapa hacia delante y hacia
atrás para raspar el café molido de los
lados de la cámara moledora. FIGURA 9
10. Levante la tapa de la cámara moledora con
cuidado utilizando la conveniente muesca
para el dedo.
11. Sacuda con cuidado el café molido para
verterlo en su unidad para colar café.
FIGURA 10
12. Reemplace la cámara moledora en su base.
ADVERTENCIA: Al desenchufarse, la moledora
reverti rá a su programación de fábrica,
moliendo los granos de café a una textura
mediana o “medium” para colar 12 tazas
de café.
u
p
C
s
12
10
8
6
4
Auto-Off
Timer
Fine
Med
Coarse
G
r
i
d
n
FIGURA 7
u
p
C
12
FIGURA 8
FIGURA 9
6. Select the number of cups of coffee you
will be brewing with the Cup Selector, from
4 to 12 cups. FIGURE 7. To obtain the best
cup of coffee or espresso, grind only the
amount of coffee beans you will use
immediately.
u
p
C
s
12
10
8
6
4
Auto-Off
Timer
Fine
Med
Coarse
G
r
i
d
n
7. Press and hold the Start Button (FIGURE 8)
until the timed grinding cycle is complete,
about 15 seconds for 12 cups.
FIGURE 7
8. When grinding is complete, remove the
grinding chamber from the base by rotating
it counterclockwise until it stops, then lift it
straight up.
u
p
C
s
9. Use the Chamber Maid™ feature by twisting
the cap back and forth to remove the
coffee grounds from the sides of the
FIGURE 8
s
12
grinding chamber. FIGURE 9
10. Gently lift the chamber lid using the
convenient finger tab.
11. Gently shake the coffee grounds into your
coffee brewer. FIGURE 10
12. Replace the grinding chamber in its base.
FIGURE 9
NOTE: When unplugged, the grinder will revert
to its default setting to grind coffee beans
for 12 cups of coffee using a medium
grind.
FIGURA 10
FIGURE 10
18 7
Page 8

HELPFUL GRINDING HINTS
You may customize the bean quantity recommendations presented as you
familiarize yourself with your new MR. COFFEE®Precision™ Coffee Grinder, but
always bear in mind the following:
1. Use medium grind for automatic drip coffee makers, fine for espresso and
coarse for French press.
2. Using fine grounds for brewing coffee in automatic drip coffee makers might
cause an overflow of the paper filter and/or the brew basket. Also, the
taste of the coffee to be stronger than desired.
3. Using coarse grounds for brewing coffee in an automatic drip coffee maker
might cause the taste of the coffee be weaker than desired.
4. To brew espresso or cappuccino, grind the amount of coffee grounds
recommended by your product manufacturer.
a. For Mr. Coffee®Espresso products:
1) Set the coffee grinder to Fine grind and 4 cups.
2) Use the chart on page 6 for recommended amount of coffee
grounds.
b. Using improper medium or coarse coffee grinding settings might affect
the taste of the brewed espresso coffee, because the optimum coffee
extraction is not achieved using the coarse grind setting.
5. If a coarser setting is required to brew coffee manually, in a percolator or
using a French press, grind the amount of coffee grounds recommended by
your product manufacturer using the coarse grind setting.
6. Remember, you can customize the recommendations above as you
discover which settings best meet your personal coffee-making preference.
UTILIZANDO SU MOLEDORA DE CAFÉ PRECISION™ MR.
COFFEE
La Moledora de Café Precision™ MR. COFFEE
Maid™ Cleaning System cuenta con un control para tres
gradaciones de molido, de fino hasta grueso. La moledora
utiliza cuchillas especializadas para picar los granos íntegros
de café hasta lograr un molido de partículas
uniformes, liberando el sabor y el aroma únicos de su
café favorito. Para utilizarla:
1. Asegúrese de que la unidad esté
2. Abra la tapa y llene la cámara
®
limpia según las instrucciones en la
página 16.
moledora con granos de café
fresco, según la Tabla de Medidas
del Café.
®
con el Chamber
FIGURA 5
TABLA DE MEDIDAS DEL CAFÉ
TAZAS DE CAFE (5 OZ. C/U) CANTIDAD DE GRANOS/CUCHARADAS
12 TAZAS 9 CDAS
10 TAZAS 7.5 CDAS
8 TAZAS 6 CDAS
6 TAZAS 4.5 CDAS
4 TAZAS 3 CDAS
Para cafeteras de goteo automático, use la textura de
moler mediana, textura fina para espresso y gruesa para
prensa francesa. Use más o menos café según prefiera.
Para un resultado óptimo, no muela más de 12 cdas. de
café de una vez.
3. Cierre la tapa.
4. Enchufe la unidad.
5. Oprima el Botón de Textura del
Molido hasta que la luz indicadora
le muestre su textura de molido
preferida. FIGURA 6.
u
p
C
s
12
10
8
6
4
Auto-Off
Timer
Fine
Med
Coarse
G
r
i
d
n
FIGURA 6
178
Page 9

C
u
p
s
LIMPIANDO Y PREPARANDO SU MOLEDORA DE CAFÉ PRECISION™
MR. COFFEE®PARA SU USO
FOR BEST RESULTS
1. Use only coffee beans in this unit, do not grind nuts or spices.
Antes de utilizar su moledora de café por primera
vez, límpiela según las instrucciones a
continuación. Luego, para asegurar un
funcionamiento y durabilidad óptimos de la
moledora, límpiela regularmente siguiendo estos
pasos sencillos.
1. Siempre asegúrese que que su moledora esté
desenchufada antes de limpiarla y luego de
utilizarla.
2. Saque la cámara moledora removible de la
base girándola en contra de las manecillas del
reloj hasta que no pueda girar más, y luego
hálela hacia arriba. FIGURA 1
3. Ahora gire el conjunto de la tapa en contra de
las manecillas del reloj hasta que no pueda
girar más.
4. Hale el conjunto de la tapa hacia arriba.
FIGURA 2
5. Lave los componentes de la cámara moledora
con agua y jabón detergente suave. También
puede lavarlos en el escurridor superior del
lavaplatos.
¡ADVERTENCIA! No ponga la base de la
moledora en el lavaplatos.
FIGURA 1
FIGURA 2
2. Do not store coffee beans in the grinding chamber.
3. Do not use the finest setting when grinding coffee for your automatic drip
coffeemaker. The finer grounds could cause the coffee basket to overflow.
4. To avoid overheating the motor, do not grind more than 2 full 12-cup cycles
without a break. Allow the motor to cool at least 5 minutes between
cycles.
5. Flavored coffee beans may gum up the blades and leave an oily residue on
them. Be sure to clean your grinder more frequently when using flavored
beans and to clean all caked-on coffee particles from your grinder during
cleaning.
6. Clean unit after every use for best performance.
6. Cuando ambos componentes estén limpios,
asegúrese de que estén completamente secos
p
s
u
C
antes de reinstalarlos en la moledora.
7. Asegúrese de que la flecha en la espita de la
tapa quede alineada con el símbolo de tapa
FIGURA 3
abierta en la cámara moledora e inserte ésta
última.
8. Gire el conjunto de la tapa a favor de las
manecillas del reloj hasta que la tapa no
pueda girar más. FIGURA 3
9. Reinserte la cámara moledora en la base de la
moledora y gírela a favor de las manecillas del
reloj hasta que no pueda girar más. Asegúrese
de que la flecha de la espita de la tapa quede
alineada con el símbolo de tapa cerrada al
frente de la unidad. FIGURA 4
16 9
FIGURA 4
Page 10

TROUBLESHOOTING YOUR MR. COFFEE®PRECISION™ COFFEE
12
10
8
6
4
Auto-Off
Timer
Fine
Med
Coarse
G
r
i
n
d
C
u
p
s
GRINDER
Your MR. COFFEE
been carefully designed to give you many years of trouble-free service. In the unlikely
event that your new coffee grinder does not operate satisfactorily, please review the
following potential problems and try the steps recommended BEFORE you call an
Authorized Sunbeam Service Center.
®
Precision™ Coffee Grinder with Chamber Maid™ Cleaning System has
PROBLEM POSSIBLE CAUSE SOLUTION
DIAGRAMA DE LAS PARTES
9
1
10
UNIT DOES NOT GRIND • Grinding chamber lid is open • CLOSE GRINDING
CHAMBER LID
• Grinding chamber • PLACE CHAMBER
is not in position IN PROPER POSITION
• Start Lever has not been • PRESS AND HOLD
pressed START LEVER
• Unit is unplugged • PLUG UNIT IN
• There’s a power outage • WAIT FOR POWER
TO BE RESTORED
• If after trying all of the above • CALL AUTHORIZED
the unit still does not grind, SUNBEAM SERVICE
the motor has overheated, CENTER
thermal fuse is broken
THE COFFEE GROUNDS • Grind setting or cups • SET GRIND SETTING
PRODUCED ARE NOT setting is incorrect or CUPS SETTING
PROPERLY GROUND CORRECTLY
• Insufficient amount of • ADD BEANS TO
whole beans used GRINDING CHAMBER
Please do not exceed maximum capacity of 12 tbsp.
• Chamber lid opened • CLOSE GRINDING
during operation CHAMBER LID
• Unit is not clean • UNPLUG UNIT,
CLEAN IT AS PER
INSTRUCTIONS AND
PLUG IT IN AGAIN
• Foreign object is obstructing • UNPLUG UNIT AND
the grinder blades CAREFULLY
DISLODGE FOREIGN
OBJECT
UNIT STOPS GRINDING • Grinding chamber lid • CLOSE GRINDING
has been opened CHAMBER LID
• Unit has been unplugged • PLUG UNIT IN
• There’s a power outage • WAIT FOR POWER
TO BE RESTORED
Do you still have questions? You can call us toll-free at the MR. COFFEE
Consumer Service Department, 1-800-MR COFFEE (1-800-672-6333) or you can visit us
at www.mrcoffee.com.
®
2
8
3
1. Interruptor de activación
2. Chamber Maid™ Cleaning System
3. Cámara moledora removible
4
4. Base de la moledora
5. Almacenaje del cordel
6. Botón de textura del molido y luz
indicadora
7. Botón indicador de tazas y luz
indicadora
8. Conjunto de la tapa
7
9. Tapa de fácil apertura
10. Muesca para el dedo
5
6
1510
Page 11

ADVERTENCIAS DE SEGURIDAD
Al utilizar enseres eléctricos siempre deben de seguirse las precauciones básicas de
seguridad para reducir el riesgo de incendios, descargas eléctricas y /o lesiones a las
personas, incluyendo las siguientes:
1. LEA TODAS LAS INSTRUCCIONES ANTES DE USAR LA UNIDAD.
2. No toque las superficies calientes. Use las asas o perillas.
3. Para protegerse contra una descarga eléctrica, no sumerja el cordón, el enchufe o la
base del motor en agua o en otros líquidos.
4. Se requiere supervisión adulta atenta cuando esta unidad es usada por o cerca de
niños.
5. Apague la Moledora de Café Precision™ y desconéctela del tomacorriente cuando
ésta no esté en uso y antes de limpiarla. Permita que se enfríe antes de poner o quitar
partes y antes de limpiar la unidad.
6. El uso de accesorios o aditamentos que no sean de la marca MR. COFFEE
causar lesiones o daños.
7. No use al aire libre o intemperie.
8. No permita que el cordón cuelgue sobre el borde de la mesa o del mostrador o toque
superficies calientes.
9. No coloque esta unidad sobre o cerca de quemadores de estufas de gas o eléctricas,
ni dentro de un horno caliente.
10. Para desconectar, apague la unidad y remueva el enchufe del tomacorriente.
11. No use esta unidad salvo para el fin que ha sido diseñada.
12. Coloque la moledora sobre una superficie dura, plana y nivelada para evitar la
interrupción del flujo de aire debajo la unidad.
13. No opere ninguna unidad con un cordón dañado o después de que la unidad ha
funcionado inadecuadamente o ha sido dañada de manera alguna. Devuelva esta
unidad a un centro de servicio autorizado para su revisión, reparación o ajuste.
14. ADVERTENCIA: Para reducir el riesgo de incendio o descarga eléctrica, no quite
ninguna cubierta para dar servicio a la unidad. En el interior de la moledora no
hay piezas reparables por el usuario. Solamente el personal autorizado debe
reparar la cafetera. El abrir la cubierta inferior de servicio anulará la garantía.
ESTA UNIDAD ES SÓLO PARA USO DOMÉSTICO
®
pueden
IF SERVICE IS REQUIRED
If your coffee grinder requires service, do not return it to the store where you
purchased it.
All repairs must be made by Sunbeam or by an authorized MR. COFFEE®Service Center.
If you live in the U.S. or Canada, please call us at the following toll-free telephone
numbers to find the location of the nearest authorized service center:
U.S. 1-800-MR COFFEE (1-800-672-6333)
In Canada call 1-800-667-8623
You may also visit our website at mrcoffee.com for a list of service centers.
To assist us in serving you, please have the coffee grinder model number and date of
purchase available when you call. The model number is found on the bottom of the
coffee grinder.
We welcome your questions, comments or suggestions. In all your communications,
please include your complete name, address and telephone number and a description
of the problem.
Visit our website at mrcoffee.com and discover the secret to brewing the perfect cup
of coffee. You will also find a rich blend of gourmet recipes, entertaining tips and the
latest information on MR. COFFEE
®
products.
INSTRUCCIONES ESPECIALES SOBRE EL CORDEL ELÉCTRICO
Se provee un cordel eléctrico corto para disminuir los riesgos de que una
persona o mascota se pudieran enredar o tropezar con un cordel más largo.
Esta unidad cuenta con un enchufe polarizado (uno de sus contactos es más
ancho que el otro). Para disminuir el riesgo de una descarga eléctrica, este
enchufe podrá penetrar en un tomacorriente polarizado de una sola manera. Si
el enchufe no penetra completamente en el tomacorriente, inviértalo. Si aún no
se puede enchufar, comuníquese con un electricista autorizado. No modifique
el enchufe de manera alguna.
CONSERVE ESTAS INSTRUCCIONES
14 11
Page 12

WARRANTY INFORMATION
INTRODUCCIÓN
1-YEAR LIMITED WARRANTY
Sunbeam Products, Inc, or if in Canada, Sunbeam Corporation (Canada) Limited (collectively “Sunbeam”)
warrants that for a period of one year from the date of purchase, this product will be free from defects in
material and workmanship. Sunbeam, at its option, will repair or replace this product or any component
of the product found to be defective during the warranty period. Replacement will be made with a new
or remanufactured product or component. If the product is no longer available, replacement may be
made with a similar product of equal or greater value. This is your exclusive warranty from Sunbeam.
This warranty is valid for the original retail purchaser from the date of initial retail purchase and is not
transferable. Keep the original sales receipt. Proof of purchase is required to obtain warranty
performance. Sunbeam dealers, service centers, or retail stores selling Sunbeam products do not have the
right to alter, modify or any way change the terms and conditions of this warranty.
This warranty does not cover normal wear of parts or damage resulting from any of the following: negligent
use or misuse of the product, use on improper voltage or current, use contrary to the operating
instructions, disassembly, repair or alteration by anyone other than Sunbeam or an authorized Sunbeam
service center. Further, the warranty does not cover: Acts of God, such as fire, flood, hurricanes and
tornadoes.
What are the Limits on Sunbeam’s Liability?
Sunbeam shall not be liable for any incidental or consequential damages caused by the breach of any
express, implied or statutory warranty or condition.
Except to the extent prohibited by applicable law, any implied warranty or condition of merchantability or
fitness for a particular purpose is limited in duration to the duration of the above warranty.
Sunbeam disclaims all other warranties, or conditions or representations, express, implied, statutory or
otherwise.
Sunbeam shall not be liable for any damages of any kind resulting from the purchase, use or misuse of, or
inability to use the product including incidental, special, consequential or similar damages or loss of profits,
or for damages arising from any tort, including negligence or gross negligence, or fault committed by
Sunbeam, its agents or employees or for any breach of contract, fundamental or otherwise, or for any claim
brought against purchaser by any other party.
Some provinces, states or jurisdictions do not allow the exclusion or limitation of incidental or
consequential damages or limitations on how long an implied warranty lasts, so the above limitations or
exclusions may not apply to you.
This warranty gives you specific legal rights, and you may also have other rights that vary from province to
province, state to state or jurisdiction to jurisdiction.
How to Obtain Warranty Service
In the U.S.A.
If you have any question regarding this warranty or would like to obtain warranty service, please call 1-800672-6333 and a convenient service center address will be provided to you.
In Canada
If you have any question regarding this warranty or would like to obtain warranty service, please call 1-800667-8632 and a convenient service center address will be provided to you.
In the U.S.A., this warranty is offered by Sunbeam Products, Inc., located in Boca Raton, Florida 33431. In
Canada, this warranty is offered by Sunbeam Corporation (Canada) Limited, located at 5975 Falbourne
Street, Mississagua, Ontario L5R 3V8.
PLEASE DO NOT RETURN THIS PRODUCT TO ANY OF THESE
ADDRESSES OR TO THE PLACE OF PURCHASE
Gracias por seleccionar la Moledora de Café Precision™ MR. COFFEE®IDS75/IDS77 con
el Chamber Maid™ Cleaning System, una moledora de café muy innovadora y de
diseño ergonómico y avanzado. Su unidad puede moler granos íntegros de café
para colar hasta 12 tazas de café.
La moledora cuenta con luces indicadoras de funciones, un cronómetro de apagado
automático, un control para un nivel variable del molido – desde fino hasta grueso,
una cámara moledora completamente removible con una tapa de fácil apertura y a
prueba de derrames para un llenado y vertido fácil, y un anillo superior que se
limpia solo, con raspadores Chamber Maid™ integrados, además de un almacenaje
discreto del cordel eléctrico.
Su nueva Moledora de Café Precision™ MR. COFFEE
System le permite disfrutar de la taza de café más recién colada que pueda
imaginar.
Favor de leer cuidadosamente TODAS las instrucciones en este manual antes de
comenzar a utilizar esta unidad. El cuidado y mantenimiento adecuados le
asegurarán un larga vida y una operación sin contratiempos. FAVOR DE CONSERVAR
ESTAS INSTRUCCIONES Y DE REFERIRSE A ELLAS PARA CONSEJOS DE LIMPIEZA Y
CUIDADO.
®
con el Chamber Maid™ Cleaning
Tabla de Contenido
INTRODUCCIÓN ..........................................................................................13
TABLA DE CONTENIDO ...............................................................................13
ADVERTENCIAS DE SEGURIDAD ...................................................................14
INSTRUCCIONES ESPECIALES SOBRE EL CORDEL ELÉCTRICO.........................14
DIAGRAMA DE LAS PARTES.........................................................................15
LIMPIANDO Y PREPARANDO SU MOLEDORA DE CAFÉ PRECISION™
MR. COFFEE®PARA SU USO ................................................................16
UTILIZANDO SU MOLEDORA DE CAFÉ PRECISION™ MR. COFFEE®.............17
TABLA DE MEDIDAS DEL CAFÉ.....................................................................17
CONSEJOS ÚTILES PARA MOLER EL CAFÉ....................................................19
PARA RESULTADOS ÓPTIMOS......................................................................20
RESOLVIENDO PROBLEMAS CON SU MOLEDORA DE CAFÉ
PRECISION™ MR. COFFEE®...................................................................21
SI SE REQUIERE UNA REPARACIÓN..............................................................22
INFORMACIÓN SOBRE LA GARANTÍA .........................................................23
1312
 Loading...