

Page 1
MODEL/MODELO
Instruction Manual with Recipes
ECM20
MR. COFFEE STEAM ESPRESSO /
CAPPUC C I NO MAKER
R
EADALLINSTRUCTIONSBEFOREUSINGTHISAPPLIANCE
Manual de Instrucciones con Recetas
M AQUINA P ARA PREPARAR CAFE
ESPRESSO /CAPUCH I NO MR. COFFEE.
LEA TODAS LAS INSTRUCCIONES ANTES USAR ESTE APARATO
Page 2

IMPORTANT SAFEGUARDS
When using electrical appliances, basic safety precautions should always be followed to
reduce the risk of fire, electric shock and/or injury to persons, including the following:
1.
READ ALL INSTRUCTIONS BEFORE USING THE MACHINE.
2. Do not touch hot surfaces. Use handles or knobs.
3. To protect against electric shock, do not immerse cord, plugs or machine in water
or otherliquids.
4. This product is not recommended for use by children.
5. Turn control knob to “OFF” and unplug from electrical outlet when not in use and
before cleaning. Allow to cool before putting on or taking off parts and before cleaning
the appliance.
6. Do not operate any appliance with a damaged cord or plug or after the appliance
malfunctions or has been damaged in any manner. Return this appliance only to the
nearest Authorized Service Center for examination, repair or adjustment.
7.
The use of accessory attachments not recommended for MR. COFFEE®products
may cause hazards or injuries.
8. Do not use outdoors.
9.
Do not let cord hang over edge of table or countertop or touch hot surfaces.
10. Do not place this appliance on or near a hot gas or electric burner or in a heated oven.
11. To disconnect, turn control knob to “OFF,” then remove plug from wall outlet.
12. Do not use appliance for anything other than its intended use.
13. Use on a hard, flat level surface only, to avoid interruption of air flow underneath the
appliance.
14. Always be sure water reservoir cap is tightened securely before turning appliance on.
15. DONOT remove reservoir cap or brew basket until pressure is completely relieved.
See Section
“C
AUTION:PRESSURE
”
on Pages 3 and 6.
Page 3

C
ARAFEUSE ANDCARE
16.
Breakage may occur if the following instructions are not followed:
a.
This carafe is designed for use with your
and therefore must never be used on a rangetop or in any oven, INCLUDING A
MICROWAVE.
b. Do not set a hot carafe on a wet or cold surface.
c. Do not use a cracked carafe or a carafe with a loose or weakened handle.
d. Do not clean the carafe with cleansers, steel wool pads or other abrasive materials.
e. Discard carafe immediately if it is ever boiled dry.
f. Avoid sharp blows, scratches or rough handling.
17. WARNING: To reduce the risk of fire or electric shock, do not remove any
service covers. No user serviceable parts inside. Repair should be done
by authorized personnel only. Opening the bottom service cover will void
the warranty.
MR. COFFEE®Espresso/Cappuccino Maker
THIS UNIT IS FOR HOUS EHOLD USE ONLY
SAVE THESE INSTRUCTIONS
SPECIAL CORD SET INSTRUCTIONS
1. A short power supply cord is provided to reduce the hazards resulting from becoming
entangled in or tripping over a longer cord.
2. An extension cord may be purchased and used if care is exercised in its use.
3. If an extension cord is used, the marked electrical rating of the extension cord must be
at least 10 amps and 120 volts. The resulting extended cord must be arranged so that
it will notdrape over the countertop or tabletop where it can be pulled on by children
or tripped over accidentally.
This appliance has a polarized plug (one blade is wider than the other).
To reduce the risk of electric shock, this plug will fit in a polarized outlet
only
one way. If the plug does not fit fully in the outlet, reverse the plug.
If it still
the plug in any way.
does not fit, contact a qualified electrician. Do not attempt to modify
CAUTION : PRE SSURE
In order to avoid possible burns to body parts and/or other injury from
hot steam and water, NEVER open the reser voir cap or brew basket
while your MR.
on or as long as there is pressure in the water reservoir. See Page 6
for more important details.
COFFEE®Steam Espresso/Cappuccino Maker is turned
32
Page 4
4
TABLE OF CONTENTS
PAGE
Important Safeguards . . . . . . . . . . . . . . . . . . . . . . . . . . . . . 2
Special Cord Instruction . . . . . . . . . . . . . . . . . . . . . . . . . . . 3
Diagram of Parts . . . . . . . . . . . . . . . . . . . . . . . . . . . . . . . . 5
Caution: Pressure . . . . . . . . . . . . . . . . . . . . . . . . . . . . . . . . 6
How To Prepare Espresso and Cappuccino at Home . . . . . 7
Before Using Your Espresso/Cappuccino Maker . . . . . . . . . 7
How To Brew Espresso . . . . . . . . . . . . . . . . . . . . . . . . . . . . 7
How To Make Cappuccino . . . . . . . . . . . . . . . . . . . . . . . . . 9
Cleaning Your Espresso/Cappuccino Maker . . . . . . . . . . . . 11
Deliming . . . . . . . . . . . . . . . . . . . . . . . . . . . . . . . . . . . . . . . 11–12
Problems and Causes . . . . . . . . . . . . . . . . . . . . . . . . . . . . 13
Recipes . . . . . . . . . . . . . . . . . . . . . . . . . . . . . . . . . . . . . . . 14
If Service Is Required . . . . . . . . . . . . . . . . . . . . . . . . . . . . . 15
Warranty Information . . . . . . . . . . . . . . . . . . . . . . . . . . . . . 16
4
INTR ODUC TION
Congratulations! You have selected a quality MR. COFFEE®Steam Espresso/Cappuccino Maker.
This unique appliance has been designed to provide you with delicious espresso/cappuccino
quickly and conveniently.
Espresso is a unique method of coffee brewing in which hot water is forced through finely ground
coffee. Popular in Europe, it is a far richer and more full-bodied brew than regular American coffee.
Because of its richness, espresso is usually served in 1.5- to 2-oz. portions, in demitasse cups.
Most espresso drinkers outside of Europe prefer cappuccino, a drink made with about one third
espresso, one third steamed milk, and one third frothed milk. Preparing espresso or cappuccino is
very different from brewing regular drip coffee in that this appliance operates under pressure
and requires special attention.
Please read ALL of the instructions, cautions, notes and attentions in this Instruction Manual
carefully before you begin to use this appliance. When this unit is used, it creates a vacuum
as it cools. It is very important for this unit to cool down approximately
15 minutes
after each brew cycle in order for the vacuum to be released and the cap
and
brew
basket to safely be removed.
Proper care and maintenance will ensure the
long life
of theMR. COFFEE®Steam Espresso/Cappuccino Maker and its trouble-free operation.
Save these Instructions and refer to them often for cleaning and care tips.
Page 5
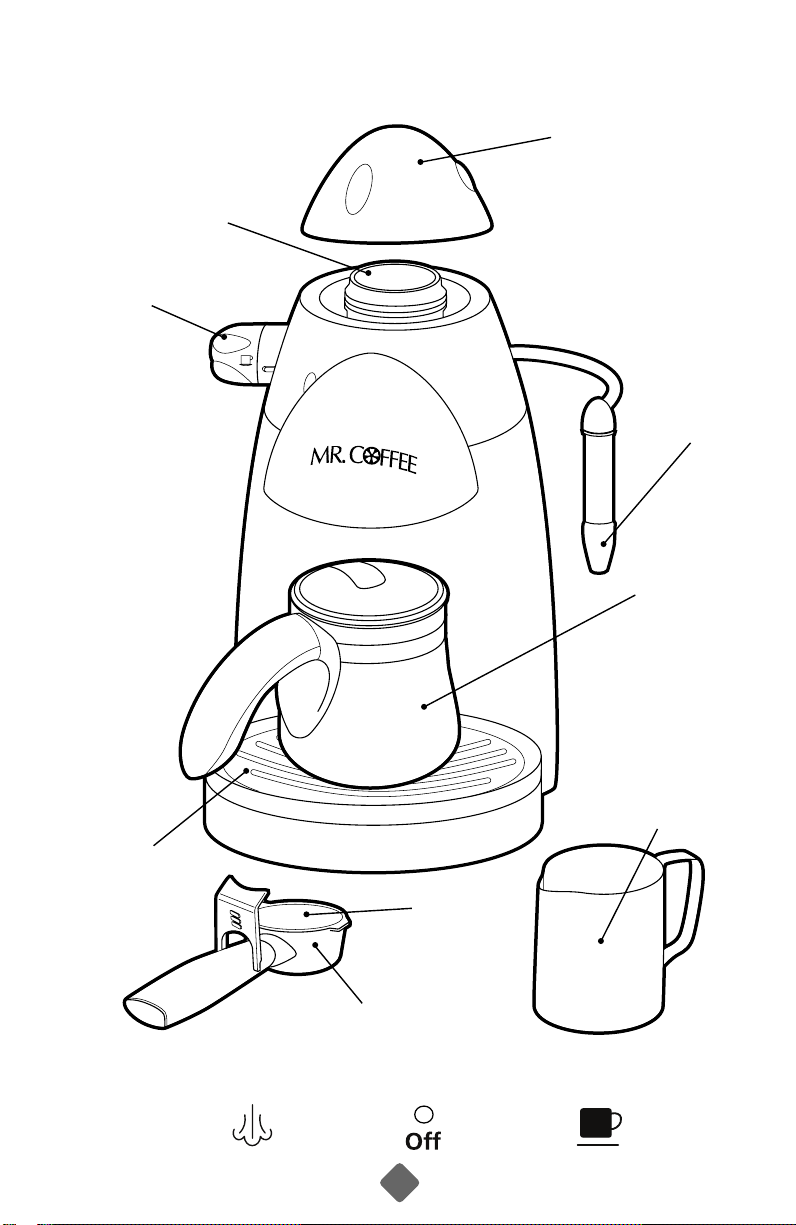
C
ONTROL
K
NOB
W
ATER
R
ESERVOIR
DIAGRAM OF PARTS
W
ATER
R
ESERVOIR
C
AP
FROTHING AID
GLASS
CARAFE
M
FROTHING
R
EMOVABLE
RIPTRAY
D
D
RIPGRID
AND
FILTER
REW
B
BASKET
CONTROL KNOB KEY: STEAM ON/OFF BREW
5
ETAL
CUP
Page 6
6
CAUTION
: PRESSURE
In order to check if the appliance is under pressure, follow these steps:
1. Turn the control knob to the “OFF” position and unplug the appliance.
2. Rotate the control knob to the position. If steam comes out
of the frothing tube, then the water reservoir is still under pressure.
Turn the control knob to the “OFF”position.
3. To release the pressure, hold a pitcher with water under the frothing
tube and immerse the frothing aid in the water.
S
LOWLY TURN THE
C
ONTROL KNOB TO THE
“STEAM” P
OSITION AND RELEASE THE STEAM
.
4. When the frothing tube stops releasing steam, turn to the
“OFF” position and slowly remove the cap.
5. Do not remove the brew basket at any time during the brewing
process or until pressure is relieved.
6. Use caution when removing the brew basket. The metal parts
may still be very hot. Also, there may be hot water floating
on the top of the filter.
7. If coffee does not drip from basket, the brew basket is blocked.
Allow the appliance to cool down, then release the steam with the
instructions above. The blockage may be caused by too finely ground
coffee. See
“P
ROBLEMS ANDCAUSES
”
on Page 13.
8.
W
HENCLEANING THEFROTHINGAID
:
Place a frothing pitcher or large
cup (with at least an 11 ounce capacity)half full of water under the
frothing aid. Make sure the tip of the frothing tube is submerged
in liquid before turning the control knob to the “STEAM” position.
Froth the water for approximately 15 seconds.
In order for your unit to work properly time after time,
clean the frother after each use.
Page 7

HOW TO PREPARE QUALITY ESPRESSO AND CAPPUC CINO AT HOME
COFFEE
THE
The coffee should be freshly ground, dark roasted variety. You may want to try a French or
Italian roast. Pre-ground coffee will only retain its flavor for 7 – 8 days, provided it is stored
in an air-tight container, in a cool, dark area. Do not store in a refrigerator or freezer.
Whole beans are recommended, to be ground just before use. Coffee beans stored in an air-tight
container will keep up to 4 weeks before they begin to lose their flavor.
THE G
This is a vital step in the espresso making process and takes practice. The coffee must be of
a fine grind.
Be sure to use a quality grinder or Burr Mill for uniform consistency in your espresso grind.
Oval shaped coffee grinders are not recommended because the grind is not consistent.
We recommend using a MR. COFFEE®Burr Mill. The burr method of grinding ensures
a more precise, even grind.
RIND
• The correct grind should look like salt.
• If the grind is too fine, the water will not flow through the coffee even under pressure.
This grind looks like powder and feels like flour when rubbed between fingers.
• If the grind is too coarse, the water flows through the coffee too fast, preventing
a full-flavored extraction.
BEFORE BREWING YOUR FIRST CARAFE OF ESPRESSO
Please refer to Page 5 for Diagram of Parts.
1. Turn the control knob to the “OFF” position and make sure that the appliance is unplugged
from the electrical outlet.
2. First remove and then wash the carafe, lid, filter and brew basket in a mixture of mild detergent
and water. Rinse each thoroughly and replace into the machine. See “How to Brew Espresso”
below for instructions on removal and replacement of filter and brew basket.
3. To clean the inside of the machine, follow steps for “How to Brew Espresso” below,
using water only. Do not immerse the appliance in water or attempt to reach any
internal parts ofthe machine.
HOW TO BREW ESPRESSO
1. Turn the control knob to the “OFF” position.
2. Fill the glass carafe with cold water to thedesignated marking for the desired number of
servings of espresso or cappuccino. Never use warm or hot waterto fill the water reservoir.
The following chart describes how much water to use for the desired amount of servings.
N
OTE
: One serving or shot of espresso equals 2 ounces.
76
Page 8

SERVINGS ESPRESSO CAPPUCCINO
2 2 cup marking on carafe Midpoint between 2 and 4 cup mark
on carafe
4 4 cup marking on carafe Top of metal band on carafe
(This symbol is on your unit)
LOCK
ROTATE
F
ILTER HOLDER
TO HERE
3. Remove the water reservoir cap and pour the water into the water reservoir. Be sure to accurately
measure the amount of water needed. Do not fillto the topof the reservoir or there will not
be enough area to generate steam.
CAUTION:
Do not pour water into the tank while the appliance is on. Check to make sure
the control knob is in the “OFF” position.
4. Screw the cap back on top of the water reservoir. Make sure it is on tight.
PREPARING THE
COFFEE
1. Place the filter in the brew basket.
2. Fill with fresh, fine ground espresso coffee to the 2 or4 cup mark of the filter. Donot fill above
the 4 cup markings. Clean any excesscoffee from the rim of the filter holder. This will assure
proper fit under the brew head.
ATTENTION:
Gently tamp or compress coffee. Do not overfill the filter basket.
This mightcause clogging or overflow.
3. Position brew basket underneath the brew head,
attach brew basket by first moving retainer clip back,
position handle to far left until it fits into the groove.
Then, slowly turn to right until brew basket is
located at lock position.
BREWING ESPRESSO
ATTENTION: IF YOU ARE PLANNING TO MAKE CAPPUCCINO,
PLEASE REFERTO THE NEXT SECTION “HOW TO MAKE CAPPUCCINO.”
1. Make sure the drip grid is in place on the drip tray.
2. Place the cover on the carafe so the lid opening faces the spout, and set it on the drip tray.
The handle of the brew basket and the handle of the decanter should be in alignment.
3. Make sure the control knob is in the “OFF” position.
4. Plug the power cord into an electrical outlet and rotate the control knob upward tothe
symbol, which begins the brewing process. The light will illuminate to letyou know
that the machine is on.
5. Espresso will begin to flow into the carafe in about three to five minutes.
Page 9

6. When the espresso has stopped flowing into the carafe, turn the control knob to the “OFF”
position. Unplug the power cord and allow the machine to cool. Do not remove reservoir cap
or brew basket until the pressure in the machine has been released. Follow procedures in
“C
AUTION
:PRESSURE”
: P
RESSURE
on Page 6.
”
on Page 6 to relieve the pressure
the section marked
CAUTION:Do not remove reservoir cap or brew basket at any time while the
appliance is under pressure or until the appliance has cooled down. Follow the
procedures marked
before removing the reservoir cap or brew basket.
7. After the machine has cooled down and all pressure has been relieved, remove the brew basket
from the brew head. Using the retainer clip to secure the filter in the filter holder, turn the brew
basket upside down to empty. Rinse the filter and brew basket with water.
“CAUTION
CAUTION:
to use the filter retainer clip when discarding the grounds. Cool theseparts
by running under cold water.
8. For cleaning instructions, refer to Page 11.
The metal parts of the brew basket might still be very hot. Make sure
HOW TO MAKE CAPPUC CINO
Cappuccino is espresso topped with steamed and frothed milk. Frothing milk for cappuccino takes
practice. Do not be discouraged if it is not perfect the first time. The milk should be half steamed
(bottom of pitcher) and half froth (top of pitcher). It may take a few times before you perfect this process.
For best results, we recommend frothing the milk in a separate pitcher and pouring the milk into
your coffee. The milk and pitcher should be cold. Do not use a pitcher which has just been washed
in warm water. We also recommend a stainless steel frothing pitcher and a beverage thermometer,
if you own one, for preparing the best froth and steamed milk.
1. The first step in making cappuccino is to make espresso. Therefore, fill the glass carafe with
cold water to the designated marking for the desired number of servings. Never use warm
or hot water to fill the water reservoir. (See Chart from “How to Brew Espresso” on Page 8)
2. Follow steps 1 – 5 in “Brewing Espresso” on Page 8.
3. Fill a small stainless steel or ceramic pitcher 1/2 full with cold milk and set next to machine.
Skim or 2% milk will be the easiest to froth.
98
Page 10

4. If making 2 servings, stop brewing espresso at the 2- and 4-cup mark. Turn the control knob
to the position. If making 4 servings, stop brewing espresso at the 4-cup mark.
Turn thecontrol knob to the position.
5. You are now ready to froth and steam your milk. Hold the pitcher under the frothing tube
so that the frothing aid isslightly immersed in the milk. Turn the control knob slowly to the
position. Gently move the pitcher in a circular
motion around the steam nozzle for about
45 seconds. R
EMEMBER
:
The milk and the pitcher should be very cold prior to frothing.
6. When the milk has doubled in volume, or, if you are using a beverage thermometer, when the
milk has reached 100°F, insert the frothing aid deeper into the milk to further heat the milk.
Do not heat milk above 150°F.
To avoid splattering of hot milk, do not let the frothing aid goabove the surface of the milk.
After frothing is completed, turn thecontrol knob back to the “OFF” position.
7. You are now ready to make cappuccino.
R
EMEMBER
:
It is 1/3 espresso, 1/3 steamed milk
and 1/3 frothed milk. Pour theespresso into a cup which has the capacity of at least 5 ounces.
Then add thesteamed milk to the espresso and spoon on the frothed milk.
8. Follow the instructions on Page 6 under section marked
“C
AUTION
: P
RESSURE
”
to flush out
any residual milk from the frothing tube.
It is important to properly clean your frothing tube after each use
to ensure it continues to work properly. (See Step 2 on the next page)
9.
Unplug the power cord and allow the machine to cool. Do not remove the reservoir
cap or brew basket until the pressure in the machine has been released.
Follow procedures in section marked
“C
AUTION: PRESSURE”
on Page 6
to relieve thepressure.
Page 11

CLEANING YOUR ESPRESSO / CAPPUC CINO MAKER
1. Turn the unit to “OFF”and unplug the power cord from the electrical outlet.
2. The frothing tube may still be hot, do not touch it with your hands until it has cooled.
Remove frothing aid and wipe frothing tube with a damp cloth. Using the wrench built into
the measuring spoon, unscrew the frothing aid and clean valve with a needle or toothpick.
3. The carafe, carafe lid, filter, brew basket and drip tray can be washed with soapy water
or placed on the top rack only of your dishwasher.
in water. Do not remove reservoir cap or brew basket while appliance is under pressure.
See Section
4. After the pressure has been released, remove reservoir cap.
through
over the sink. Always empty the water reservoir between uses.
in water. Screw the
5. Wipe housing with a soft wet cloth. Do not use abrasive cleaners or scouring pads
as they willscratch the finish.
6. Do not store the filter holder in the brew head.
between the brew head and the filter holder while brewing espresso
“CAUTION
the top opening of the water reser
:PRESSURE”
reservoir cap
on Page 6.
back in place.
DELIMING
Mineral deposits built-up in the Espresso Maker will affect the operation of the appliance.
YourEspresso Maker must be delimed when you begin to notice an increase in the time
to brew espresso, or when there is excessive steaming. Also, you may notice a build up
of white deposits on the surface of the brew head.
The frequency of cleaning depends upon the hardness of the water used. The following table
gives the suggested cleaning intervals.
C
AUTION
:
Do not immerse appliance
Discard the remaining water
voir by turning the
This can adversely affect the seal
applianc
e upside down
Do not immerse
applianc
e
.
S
UGGESTEDCLEANINGINTERVAL
Type of Water Cleaning Frequency
Soft Water (Filtered Water ) Every 80 Brew Cycles
Hard Water (Tap Water ) Every 40 Brew Cycles
YOUR ESPRESSO / CAPPUC CINO MAKER MAY BE DELIMED
USING WHITE HOUS EHOLD VINEGAR, AS FOLLOWS:
TO DELIME WATER RESERVOIR:
1.
Make sure the control knob is in the “OFF” position and that the power cord is disconnected
from the electrical outlet.
2.
If the appliance is cool and the pressure has been released, (See Section
PRESSURE”
undiluted white household vinegar.
on Page 6)
remove the reservoir cap and fill reservoir with fresh,
1110
11
“CAUTION:
Page 12

12
3. Allow appliance to sit overnight with the vinegar solution in the water reservoir.
4. Discard vinegar through the top opening of the Espresso Maker by turning the machine
upside down over the sink.
5. Rinse the water reservoir thoroughly with tap water by filling tank half full with water
and then pouring the water back out into the sink, repeating this step twice.
TO D
ELIME INTERNAL PARTS:
1. Make sure you delime the inside of the water reservoir first by following the “Deliming”steps
above.
2. Make sure all controls are “OFF,” the power cord is disconnected from the electrical outlet,
the appliance is cool and all pressure in the appliance has been released.
(See Section
“CAUTION:P
RESSURE”
on Page 6).
Fill carafe to the top of the metal band with vinegar
and pour into reservoir.
3. Screw the cap back on top of the water reservoir. Make sure the cap is on tight.
4. Insert the brew basket (with filter) and place the glass carafe with lid on the drip tray.
5. Plug the power cord into the electrical outlet.
6. Turn the control knob tothe position. When vinegar begins to flow into the carafe, place
a cup with cold water under the frothing aid. Insert the frothing tube into the water and slowly
turn the control knob to the position. After ten seconds turn the control knob to the “OFF”
position. This will cleanany residue left in the frothing tube from frothing milk.
7. Turn the control knob to the position. When all the vinegar has been pumped intothe carafe
and the flow has stopped, turn the control knob to “OFF” and allow the appliance to cool.
8. Repeat Steps 1 – 7 using only tap water to rinse any remaining traces of vinegar out of the
machine. Repeat this rinsing process, allowing the machine to cool and pressure to be released
before each rinsing.
CARAFE CLEANING
Hard water can leave a whitish mineral deposit inside the carafe. Coffee discolors these deposits,
sometimes leaving a brownish stain inside the carafe. To remove these stains, follow these
simple steps:
1. Use a solution of equal parts white vinegar and hot water.
2. Let solution stand in carafe for about 20 minutes and then discard.
3. Wash and rinse the carafe thoroughly using a soft cloth. Do not use harsh abrasive cleaners.
These may cause scratches which can lead to breakage.
Page 13

PROBLEM S AND CAUSES
PROBLEM C
Coffee does
not come out
Coffee comes
out around
the edge of the
filter holder
No steam is
generated
• No water in reservoir
• Coffee grind is too fine
• Too much coffee in the filter
• Cap is not secure, steamis escaping
• Appliance was not turned on
or plugged in
• Coffee has been tamped /
compressed too much
• Filter holder not rotated
to full lockposition
• Coffee grounds around thefilter
basket rim
• Too much coffee in the filter basket
• Water reservoir is empty
• Too much water in the reservoir –
no room for steam
• Appliance is not turned on
• Frothing tube is blocked
AUSES SOLUTIONS
• Add water
• Grind coffee medium ground
• Fill filter only to 4 cup mark
• Tighten cap
• Plug unit into electrical outlet.
Turn on
• Refill filter basket with coffee.
DO NOT TAMP
• Rotate filter holder to full lock
• Wipe off rim; fill only to 4 cup
mark
• Fill only to 4 cup mark
• Fill reservoir with correct amount
of water. See Page 7
• Empty some water from reservoir.
See Page 8
• Turn on unit with control knob
• Following frothing stage, operate
frothing function for 1– 2 seconds
to extract excess milk. Or, turn off
unit, allow unit to cool, unplug unit
and clean out frothing tube with
a needle or toothpick.
Milk is not
foamy after
frothing
Coffee comes
out too quickly
Coffee is
splattering out
of frothing tube
• Ran out of steam
• Milk is not cold enough
• Ground coffee is too coarse
• Not enough coffee in filter basket
• Water tank is empty or low,
not enough pressure
1312 13
• Pour in the required amount
of water to make cappuccino.
See Page 8
• Chill milk and frothing pitcher
prior to making cappuccino
• Use a finer grind
• Use more coffee
• Once unit has cooled, use more
water to brew espresso
Page 14

14
SANF
RANCISCOCAPPUCCINO
Espresso, hot steamed chocolate, Brandy,
topped with cream and cinnamon
C
AFÉIRISH
Espresso, Irish whiskey, topped with
whipped cream
C
AFÉTUACA
Espresso, Tuaca liqueur, topped with
whipped cream
C
AFÉVIENNA
Espresso, Brandy, topped with
whipped cream
C
AFÉ
T
IAMARIA
Espresso, Tia Maria liqueur, topped
with frothed milk
C
AFÉGRANDMARNIER
Espresso, Grand Marnier liqueur, topped
with whipped cream and grated orange peel
M
EXICANCAFÉ
Espresso, Kahlua, Tequila,
topped with whipped cream
C
AFÉROMANO
Espresso, Brandy and lemon twist
(FOR A
DULTS 21 YEARS AND
OLDER)
C
AFÉ
M
OCHA
One ounce of chocolate syrup, one shot
of espresso, 1 cup frothed milk
C
AFÉAMERICANO
1/2 espresso and 1/2 hot water
C
AFÉMACCHIATO
1/3 espresso and 2/3 steamed milk
C
AFÉ
L
ATTE
1/4 espresso and 3/4 steamed milk,
pour both in a mug at the same time
C
AFÉ AULAIT
1/2 espresso, 1/2 steamed milk
M
OCHAHOTCHOCOLATE
Add 2 oz. of espresso to one cup
of hotchocolate
RECIPE IDEAS THAT YOU WILL LOVE TOTRY!
Page 15

IF S
ERVICE IS REQUIRED
SERVICE, CALL 1-800 MR COFFEE (1-800-672-6333)
FOR
TOA
SSISTUSINSERVINGYOU
AND
D
P
LEASEDONOTRETURNTHISAPPLIANCE TOYOURSTORE
, DO N
ATE OFPURCHASEAVAILABLE
OT RETURN TOYOUR STORE
, P
LEASEHAVE THEMODELNUMBER
.
.
All repairs must be made by
Please call us for assistance or for the location of the nearest Authorized Sunbeam Service Center.
We welcome your questions, comments or suggestions.
Visit our website and discover the secret to brewing the perfect cup of coffee.
You will also find a rich blend of gourmet recipes, entertaining tips
and the latest information on MR. COFFEE
or e-mail: consumeraffairs@consumer.sunbeam.com
SUNBEAM
CONSUMER SERVICE DEPARTMENT
SUNBEAM PRODUCTS, INC.
Maitland, FL 32794-8389
or by an Authorized Sunbeam Service Center.
®
products.
www.mrcoffee.com
P.O. Box 948389
PLEASE DO NOT SEND ANY PRODUCT TO THE ADDRESS ABOVE
15
1514
Page 16

1-YEAR LIMITED WARRANTY
Sunbeam Products, Inc. (“Sunbeam”) warrants that for a period of ONE year from the
date of purchase,
this product will be free from defects in material and workmanship.
Sunbeam, at its option, will repair or
replace this product or any component of the
product found to be defective during this warranty period.
Replacement will be made
with a new or remanufactured product or component. If the product is no longer available,
replacement may be made with a similar product of equal or greater value. This is your
exclusive warranty.
This warranty is valid for the original retail purchaser from the date of initial retail purchase
and is not
transferable. Keep the original sales receipt. Proof of purchase is required to
obtain warranty performance.
Sunbeam dealers, service centers or retail stores selling
Sunbeam products do not have the right to alter, modify or any way change the terms
and conditions of this warranty.
This warranty does not cover normal wear of parts or damage resulting from any of the
following: negligent use or misuse of the product, use on improper voltage or current,
use contrary to the operating instructions, disassembly, repair or alteration by anyone
other than Sunbeam or an Authorized Service Center. Further, the warranty does not
cover acts of nature, such as fire, flood, hurricanes and tornadoes.
Sunbeam shall not be liable for any incidental or consequential damages caused by the
breach of any express or implied warranty. Except to the extent prohibited by applicable
law, any implied warranty of merchantability or fitness for a particular purpose is limited
in duration to the duration of the above warranty. Some states, provinces or jurisdictions
do not allow the exclusion or limitation of incidental or consequential damages or
limitations on how long an implied warranty lasts, so the above limitations or exclusion
may not apply to you. This warranty gives you specific legal rights, and you may also
have other rights that vary from state to state or province to province.
HOW TO OBTAIN WARRANTY SERVICE
Take the product to an Authorized Sunbeam Ser vice Center. You can find the nearest
Authorized
Sunbeam Service Center by calling
1-800-672-6333
.
DO NOT RETURN THIS PRODUCT TO THE PLACE OF PURCHASE.
If you have any questions regarding this warranty please call
1-800-672-6333.
16
Page 17

PREC AUCIONE S IMPOR TANTE S
Cuando use algún aparato eléctrico siempre deben de seguirse precauciones básicas
de seguridad incluyendo las siguientes para reducir el riesgo de incendio o descargas
eléctricas, y /o lesiones:
1. LEA TODAS LAS INSTRUCCIONES ANTES DE USAR EL APARATO.
2. No toque las superficies calientes. Use las asas o perillas.
3. Para protegerse contra una descarga eléctrica, no sumerja el cordón, el enchufe
o el aparato en agua o en otros líquidos.
4.
Supervisión cercana de un adulto es necesaria cuando el aparato es usado por
o cerca de niños.
5. Apague la cafetera y desconéctela de la toma de corriente cuando ésta no esté en uso
y antes de
el electrodoméstico.
6. No opere ningún aparato con un cordón dañado o después de que el aparato ha
funcionado inadecuadamente o ha sido dañado en cualquier manera. Devuelva
el aparato a un centro de servicio autorizado para su revisión, reparación o ajuste.
limpiarla. Permita que se enfríe antes de poner o quitar partes y antes de limpiar
7. El uso de accesorios o aditamentos que no sean recomendados para usarse con
®
los productos de la marca MR. COFFEE
pueden causar lesiones o daños.
8. No se use en exteriores.
9. No permita que el cordón cuelgue sobre la orilla de la mesa o del mostrador o toque
superficies calientes.
10. No coloque este aparato sobre o cerca de quemadores de estufas de gas o eléctricas,
ni dentro de un horno caliente.
11. Para desconectar, remueva el enchufe de la toma de corriente.
12. No use este aparato más que para lo que ha sido diseñado.
13. Coloque la cafetera sobre una superficie dura y nivelada para evitar la interrupción del
flujo de aire debajo del aparato.
14. Sea siempre seguro que la tapa está apretado con seguridad antes de usar la aparato.
15. No quite la tapa ni la canasta de preparación hasta que la presión se releva totalmente
de la máquina. Vea la Sección
16.
C
UIDADO YUSO DE LAJARRA
UIDADO
: P
RESIÓN
”
de las Páginas 18 y 21.
“C
Siga las siguientes instrucciones para reducir o eliminar el riesgo de romper la jarra:
a.Esta jarra está diseñada para ser utilizada con su cafetera MR. COFFEE,
por lo tanto nunca
debe ser usada sobre las hornillas de una estufa, horno ni
®
TAMPOCO EN UN HORNO MICROONDAS.
1716
Page 18

b.No coloque la jarra de vidrio caliente sobre una superficie fría o mojada.
c.No utilice una jarra quebrada o con un asa debilitada.
d.No limpie la jarra con polvos limpiadores, fibras metálicas o de lana o cualquier
otro material abrasivo.
e.Deseche la jarra inmediatamente si sus contenidos se evaporan al hervir.
f. Proteja la jarra de filos, raspaduras o un manejo brusco.
17.
A
DVERTENCIA
:
Para reducir el riesgo de incendio o descarga eléctrica,
no quite ninguna cubierta para dar servicio al aparto. En el interior de
la cafetera no se encuentra ninguna parte que pueda ser remplazada.
Solamente el personal autorizado debe reparar la cafetera. El que usted
la cubierta inferior para dar servicio al aparato, anulará la garantía.
ESTE APARATO ES PARA USO DOM S TICO SoLAMENTE
GUARDE ESTAS INSTRUC CIONE S
INSTRUCCIONES ESPECIALES DEL CORD ON ELEC TRICO
1. El aparato tiene un cordón eléctrico corto como medida de seguridad para prevenir el
riesgo de tropezar, tirar o enredarse con un cordón más largo.
2. Puede usar cables de extensión si se observan las precauciones adecuadas.
3. Si se usan los cables de extensión la capacidad nominal eléctrica del cable de
extensión debe ser de por lo menos 10 amperios y 120 voltios. Coloque el cordón
de extensión de manera que no cuelgue del borde del mostrador o mesa donde
pueda tirarlo un niño o pueda tropezar con él accidentalmente.
Este aparato cuenta con un enchufe polarizado (una cuchilla es más ancha
que la otra)
y una terminal de conexión a tierra de “tres puntas
.
”
Para reducir el riesgo de descarga eléctrica, esta clavija entra sólo de una
manera en un enchufe polarizado. Si la clavija no encaja en el enchufe
simplemente colóquela al revés. Si aún así no encaja llame a un electricista de
su confianza. De ninguna manera intente modificar esta medida de seguridad.
CUID ADO : LA PRESŒON
Para evitar quemaduras posibles NUNCA a elabore cerveza las piezas del cuerpo
y/o la otra lesión el vapor caliente y agua, abra el casquillo del depósito o
la cesta mientras que su Máquina para Preparar Café Espresso/Capuchino
MR. COFFEE
®
se da vuelta encendido o tan de largo como hay presión en
el voir del reser del agua. Vea la Página 21 para detalles más importantes.
Page 19

INTR ODUC CION
¡Felicidades! Usted ha seleccionado una Máquina para Preparar Café Espresso/Capuchino
MR. COFFEE
un café espresso o capuchino.
El método para preparar café espresso es un método único en el que el agua caliente pasa
con fuerza por los granos de café finamente molidos. Es muy popular en Europa, tiene
más cuerpo y sabor que el café Americano preparado de forma regular. Debido a su sabor
concentrado, el café espresso es generalmente servido en porciones de 1.5- a 2-oz. en
tasas pequeñas.
La mayoría de los que gustan del café espresso fuera de Europa, prefieren el café capuchino,
una bebida preparada con aproximadamente un tercio de café espresso, un tercio de leche
vaporizada o calentada por medio de vapor y un tercio de leche espumosa. La preparación
del café espresso o del capuchino es muy diferente de la preparación de café regular.
Este aparato opera bajo presión y requiere atención especial.
Por favor lea cuidadosamente TODAS las instrucciones, advertencias, notas y
cuidados en este Manual de Instrucciones antes de que inicie la operación de este
aparato.
se va enfriando. Es muy importante que esta unidad se enfríe aproximadamente
minutos después de cada ciclo de preparación, para que el vacío sea liberado
15
y la tapa y la canasta de preparación puedan removerse de forma segura.
y mantenimiento adecuado deben asegurar la larga duración y funcionamiento sin
problemas de la Máquina para Preparar Café Espresso /Capuchino Mr.
Conserve estas Instrucciones y consulte con frecuencia los consejos de cuidado y limpieza.
.®Este aparato único ha sido diseñado para ofrecerle rápida y convenientemente
Cuando se está usando esta unidad, se forma un vacío a medida que ésta
El cuidado
MR. COFFEE
®
.
NDICE
Í
Precauciones Importantes . . . . . . . . . . . . . . . . . . . . . . . . . . . . . . . . . . . 17
Instrucciones Especiales del Cordón Eléctrico . . . . . . . . . . . . . . . . . . . . 18
Diagrama de las Partes . . . . . . . . . . . . . . . . . . . . . . . . . . . . . . . . . . . . . . 20
Cuidado: Presión . . . . . . . . . . . . . . . . . . . . . . . . . . . . . . . . . . . . . . . . . . . 21
Cómo Preparar en Casa Café Espresso y Capuchino de Calidad . . . . . . 22
Antes de Preparar Su Primera Jarra de Café Espresso . . . . . . . . . . . . . 22
Cómo Preparar Café Espresso . . . . . . . . . . . . . . . . . . . . . . . . . . . . . . . . 22
Cómo Preparar Café Capuchino . . . . . . . . . . . . . . . . . . . . . . . . . . . . . . . 24
Limpiando Su Máquina para Prepara Café Espresso o Capuchino . . . . . 25
Descalcificando . . . . . . . . . . . . . . . . . . . . . . . . . . . . . . . . . . . . . . . . . . . . 26
Problemas y Causas . . . . . . . . . . . . . . . . . . . . . . . . . . . . . . . . . . . . . . . . 28
Recetas . . . . . . . . . . . . . . . . . . . . . . . . . . . . . . . . . . . . . . . . . . . . . . . . . . 29
Información de Servicio . . . . . . . . . . . . . . . . . . . . . . . . . . . . . . . . . . . . . 30
Información de la Garantía . . . . . . . . . . . . . . . . . . . . . . . . . . . . . . . . . . . 31
1918
PÁGINA
Page 20

DIAGR AMA DE LAS PARTES
TAZA PARA
ESPUMAR
FILTRO
B
ANDEJA DE G
OTEO Y
REJILLA DE GOTEO
DE
QUITA Y PON
T
APA
TUBO
PARA
ESPUMAR
VOIR DEL
RESER DEL
AGUA
PERILLA DE
CONTROL
CASQUILLO DEL
DEPÓSITO
JARRA DE
VIDRIO
PERILLA DE CONTROL : VAPOR
ENCENDIDO/ PREPARAR
APAGADO CAFÉ
Page 21

UIDADO: PRESIÓN
C
Para revisar si el aparato se encuentra bajo presión,
siga los siguientes pasos:
1. Gire la perilla de control a la posición de apagado “OFF” y desconecte
el aparato.
2. Gire la perilla de control a la posición de . Si sale vapor del tubo
para espumar, entonces el tanque de agua sigue bajo presión.
Gire la perilla de control a la posición de apagado “OFF”.
3. Para liberar la presión, sostenga la jarra con agua debajo del tubo
para espumar y sumerja el auxiliar para espumar en el agua.
Lentamente gire la perilla de control a la posición de vapor
“STEAM” y deje salir el vapor.
4. Cuando el tubo para espumar deje de liberar vapor, gire a la posición
de apagado “OFF” y remueva lentamente la tapa.
5. No quite la canasta de preparación en ningún momento durante
el proceso de preparación o hasta que se haya liberado la presión.
6. Tenga cuidado cuando remueva la canasta de preparación. Las
partes metálicas pueden estar muy calientes todavía. También
puede haber agua caliente flotando en la parte superior del filtro.
7. Si el café no gotea de la canasta, la canasta de preparación está
bloqueada. Permita que el aparato se enfríe, después deje salir el
vapor siguiendo las instrucciones que se indican arriba. El bloqueo
puede haber sido causado por café que esté molido demasiado fino.
Consulte “Problemas y Causas” en la Página 28.
8.
Cuando limpie el auxiliar para espumar: Coloque la jarra para espumar
o una taza grande (con capacidad de por lo menos 11 onzas) llene
con agua a la mita de la capacidad y coloque debajo del auxiliar
para espumar. Verifique que la punta del tubo para espumar
esté sumergida en el líquido antes de girar la perilla de control
a la posición de vapor “STEAM.” Espume el agua durante
aproximadamente 15 segundos.
Para que su unidad siempre trabaje de manera adecuada,
limpie el tubo para espumar después de cada uso.
2120
Page 22

CoMO PREPARAR EN CASA CAFE ESPRESSO Y CAPUCHINO DE CALIDAD
EL
CAFÉ
El café debe estar tostado y recién molido. Usted puede probar con una variedad tostada Italiana
o Francesa. El café previamente molido solamente retendrá su sabor durante 7 a 8 días, siempre
que éste sea almacenado en un contenedor cerrado, en un lugar frío y oscuro. No lo almacene
en el refrigerador o en el congelador.
Se recomienda que muela granos enteros justo antes de utilizarlos. Los granos de café almacenados
en un contenedor cerrado conservaran su sabor durante 4 semanas.
EL M
OLIDO
Este es un paso vital en el proceso de preparación de café espresso y requiere mucha práctica.
El café debe ser molido finamente.
•
El molido correcto debe tener la misma consistencia de la sal.
• Si se muele demasiado fino, el agua no fluirá a través del café, aun bajo presión. El molido
tiene la apariencia del polvo y se siente como harina cuando se frota entre los dedos.
• Si el café se muele demasiado áspero, el agua fluirá a través del café demasiado rápido,
y el sabor no se extraerá completamente.
Asegúrese de usar un molino de calidad para obtener una consistencia uniforme en el molido de
los granos de café que usará para preparar su espresso. Los molinos de café con forma ovalada no
se recomiendan ya que el molido que ofrecen no es consistente. Nosotros recomendamos utilizar
un Molino MR. COFFEE.®El método de moler café asegura un molido más preciso y uniforme.
A
NTES DE PREPARAR SU PRIMERA JARRA DE CAFÉ ESPRESSO
Por favor consulte el diagrama de partes en la Página 20.
1. Gire la perilla de control a la posición de apagado “OFF” y asegúrese de que el aparato esté
desconectado de la toma de corriente eléctrica.
2. Primero quite y después lave la jarra, tapa, filtro y canasta de preparación en una mezcla de
detergente suave y agua. Enjuague cada parte completamente y colóquelas nuevamente en la
máquina. Consulte las instrucciones de cómo quitar y poner el filtro y la canasta de preparación
en la siguiente sección “Cómo preparar café espresso”.
3. Para limpiar el interior de la máquina, siga los pasos en la siguiente sección “Cómo Preparar
Café Espresso,” utilizando solamente agua. No sumerja el aparato en agua ni tampoco toque
ninguna parte interna de la máquina.
CÓMO PREPARAR CAFÉ ESPRESSO
1. Gire la perilla de control a la posición de apagado “OFF.”
2. Llene la jarra de vidrio con agua fría hasta la marca del número deseado de porciones que va
a preparar de café espresso o capuchino. Nunca use agua tibia o caliente para llenar el tanque
de agua. El siguiente cuadro describe cuánta agua usar para la cantidad deseada de porciones.
NOTA: Una porción de espresso es igual a 2 onzas.
Page 23

PORCIONES ESPRESSO CAPUCHINO
2 2 Marca de tazas en el punto Medio entre la marca de 2 y 4 tazas
en la jarra
4 4 Marca de tazas en parte Superior de banda metálica de la jarra
3. Saque la tapa del tanque de agua y vierta el agua dentro del tanque. Asegúrese de medir
correctamente la cantidad de agua que es requerida. No llene el tanque completamente,
ya que no habrá espacio suficiente para la generación de vapor.
CUIDADO
miento
4. Atornille la tapa nuevamente en la parte superior del tanque. Verifique que
se encuentre correctamente colocada.
: No vierta agua dentro del tanque mientras el aparato se encuentre en funciona-
. Revise que la perilla de control se encuentre en la posición de apagado “OFF”.
PREPARANDO CAFÉ
1. Coloque el filtro en la canasta de preparación.
2.
Llene con café recién molido finamente hasta la marca de 2 ó 4 tazas indicadas en el filtro.
No llene más allá de la marca de 4 tazas. Limpie cualquier exceso de café de la orilla
del soporte del filtro. Esto asegurará un ajuste correcto bajo la cabeza de preparación.
ATENCIÓN:
Comprima suavemente el café. No llene
demasiado la canasta del filtro. Esto
puede causar obstrucciones o derrames.
3. Coloque la canasta de preparación debajo de la cabeza de preparación, coloque
la canasta de preparación moviendo primero el seguro hacia atrás, coloque el asa
a la izquierda hasta que se ajuste en la ranura. Después, lentamente gire a la derecha
hasta que la canasta de preparación se localice en la posición de cierre.
REPARANDO E
P
ATENCIÓN: SI USTED PLANEA PREPARAR CAFÉ CAPUCHINO, POR FAVOR
CONSULTE LAS SIGUIENTE SECCIÓN “CÓMO PREPARAR CAFÉ CAPUCHINO.”
CERRADURA
(Este símbolo está en su unidad)
SPRESSO
IRE EL SOPORTE DEL
G
ILTRO A ESTA POSICIÓN
F
1. Verifique que la rejilla de goteo se encuentre en su lugar, sobre la bandeja de goteo.
2. Coloque la tapa sobre la jarra, para que la abertura de la tapa esté hacia el pico,
y colóquela sobre la bandeja de goteo. El asa de la canasta de preparación
y el asa de la jarra deben estar alineadas.
3. Verifique que la perilla de control se encuentre en la posición de apagado “OFF”.
4. Conecte el cable eléctrico en una toma de corriente y gire la perilla de control hacia
arriba al símbolo , el cual inicia el proceso de preparación. La luz se encenderá
para indicarle que la máquina se encuentra en operación.
2322
Page 24

5. El café espresso comenzará a fluir dentro de la jarra en aproximadamente de tres
a cinco minutos.
6. Cuando el café espresso haya terminado de fluir dentro de la jarra, gire la perilla de
control a la posición de apagado “OFF”. Desconecte el cable eléctrico y permita que
la presión en la máquina sea liberada. Siga el procedimiento en la sección marcada
“C
UIDADO:PRESIÓN” en la Página 21.
C
UIDADO
: No quite la tapa del tanque o la canasta de preparación en ningún
momento
mientras el aparato se encuentre bajo presión o hasta que el aparato
se hayaenfriado. Siga el procedimiento marcado
“C
UIDADO
: P
RESIÓN
”
para
liberar la presión antes de quitar la tapa del tanque o el soporte del filtro.
7. Después de que la máquina se ha enfriado y que toda la presión ha sido liberada,
saque la canasta de preparación de la cabeza de preparación. Usando el seguro para
fijar el filtro en el soporte, gire la canasta de preparación hacia abajo para vaciarla.
Enjuague el filtro y la canasta de preparación con agua.
C
UIDADO
: Las partes metálicas de la canasta de preparación pueden estar muy
calientes. Asegúrese de usar el seguro del filtro cuando deseche el café molido.
Enfríe estas partes enjugándolas bajo el chorro de agua fría.
8. Para las instrucciones de limpieza, consulte la Página 25.
CoMO PREPARAR CAF e CAPUCHINO
El café capuchino es café espresso con leche vaporizada y espuma de leche en la parte
superior. El espumar la leche para el café capuchino requiere práctica. No se desanime
si no lo hace perfectamente a la primera vez. La leche debe ser, la mitad vaporizada
(la parte inferior de la jarra)y la mitad espumosa (la parte superior de la jarra).
Puede tomarse varios intentos antes de que perfeccione este proceso.
Para mejores resultados, recomendamos espumar la leche en una jarra diferente y verter la
leche en su taza de café. La leche y la jarra deben estar frías. No use una jarra que hay sido
recientemente lavada con agua tibia. También recomendamos una jarra de acero inoxidable
para espumar la leche y un termómetro para bebidas, si usted tiene uno, para así preparar
la mejor leche vaporizada y espumosa.
1. El primer paso en la preparación del capuchino es preparar el café espresso. Así que
llene la jarra de vidrio con agua fría hasta la marca designada para el número de
porciones deseadas. Nunca use agua tibia o caliente para llenar el tanque de agua.
(Consulte el cuadro de “Cómo Preparar Café Espresso” en la Página 23)
2. Siga los pasos del 1 al 5 en “Preparación de Café Espresso” en la Página 23 - 24.
3. Llene una jarra pequeña de acero inoxidable o de cerámica a la mitad con leche fría y
colóquela junto a la máquina. La leche descremada o del 2% es más fácil de espumar.
Page 25

4.
Si prepara 2 porciones, detenga la preparación de café espresso en la marca
de 2tazas.
Gire la perilla de control a la posición . Si prepara 4 porciones,
detenga la preparación de espresso en la marca de 4 tazas. Gire la perilla
de controla la posición .
5. Usted está ahora listo para espumar y vaporizar la leche. Sostenga la jarra debajo
del tubo para espumar, de manera que el auxiliar para espumar esté ligeramente
sumergido en la leche. Gire lentamente la perilla de control a la posición .
Mueva suavemente la jarra en forma circular alrededor de la punta de vaporización
durante aproximadamente 45 segundos.
R
ECUERDE
:
La leche y la jarra deben estar
muy frías antes de hacer la espuma.
6. Cuando la leche haya doblado el volumen, o si usted está usando un termómetros para
bebidas, cuando la leche haya alcanzado los 100°F, inserte el auxiliar para espumar
aun más adentro de la leche para calentarla más. No caliente la leche a más de 150°F.
Para evitar salpicar leche caliente, no permita que el auxiliar para espumar quede por
arriba de la superficie de la leche. Después de que haya terminado de hacer la espuma,
gire la perilla de control nuevamente a la posición de apagado “OFF”.
7. Usted está ahora listo para preparar el café capuchino. R
ECUERDE: Es 1/3 de café
espresso, 1/3 de leche vaporizada y 1/3 de espuma de leche. Vierta el espresso en
una taza con capacidad de por lo menos 5 onzas. Después añada la leche vaporizada
al espresso y utilizando una cuchara añada la espuma.
8.
Siga las instrucciones en la Página 21, en a sección marcada con
“C
UIDADO:PRESIÓN
para enjuagar cualquier residuo de leche que haya quedado en el tubo para espumar.
Es importante limpiar correctamente su tubo el espumejear después
de que cada uso de asegurarlo continúe trabajando correctamente.
(Vea el Paso No. 2)
9. Desconecte el cable eléctrico y permita que la máquina se enfríe por completo.
No saque la tapa del tanque o el soporte del filtro hasta que la presión
en la máquina haya sido liberada.
marcada con “C
L
IMPIANDO SU MaQUINA PARA PREPARA
UIDADO:P
RESIÓN” en la Página 21, para liberar la presión.
Siga los procedimientos en la sección
r C
AF
e E
SPRESSO O CAPUCHINO
1. Apague la unidad y desconecte el cable eléctrico de la toma de corriente.
2. El tubo para espumar puede estar muy caliente todavía, no lo toque con las manos
hasta que se haya enfriado. Saque el auxiliar para espumar y limpie el tubo para
espumar con un paño húmedo. Usando la llave que se encuentra en la cuchara
medidora, destornille el auxiliar para espumar y limpie la válvula con una aguja
o con un palillo de madera.
”
2524
Page 26

I
NTERVALOS DE
L
IMPIEZASUGERIDOS
T
IPO DEAGUA
F
RECUENCIA DELMPIEZA
Agua Suave (Agua Filtrada) Cada 80 ciclos de preparación
Agua Dura (Agua de Grifo) Cada 40 ciclos de preparación
3. La jarra, la tapa de la jarra, el filtro, la canasta de preparación y la bandeja para
esucrrimientos pueden lavarse con agua y jabón o colocarse solamente en la rejilla
superior de la lavadora de platos. C
UIDADO:No sumerja el aparato en agua. No quite
la tapa del tanque o la canasta de preparación mientras el aparato se encuentra bajo
presión. Consulte la sección marcada con “C
UIDADO:PRESIÓN” en la Página 21.
4. Después de que la presión se ha liberado, saque la tapa del tanque.
Deseche el agua
remanente a través de la abertura superior del tanque de agua, volteando el aparato
de cabeza sobre el lavabo.
Siempre vacíe el tanque de agua después de usarlo.
No sumerja el aparato en agua. Atornille la tapa del tanque nuevamente en su lugar.
5.
Limpie el exterior del aparato con un paño suave y húmedo. No utilice limpiadores
abrasivos o esponjas que puedan dañar el acabado del aparato.
6. No almacene el soporte del filtro dentro de la cabeza de preparación.
Esto puede
afectar el sello que se encuentra entre la cabeza de preparación
y el soporte del filtro mientras se prepara el café espresso.
DESCALCIFIC ANDO
Los depósitos minerales que se acumulan en su Máquina para preparar café espresso
pueden afectar la operación de su aparato. Su Máquina para preparar café espresso debe
ser descalificada cuando comience a notar un incremento en el tiempo de preparación
de café, o cuando el aparato genere vapor en exceso. También, usted puede notar
una acumulación de depósitos blancos en la superficie de la cabeza de preparación.
La frecuencia de limpieza depende de la dureza del agua que se utiliza. La siguiente tabla
le ofrece intervalos de limpieza sugeridos.
S
UM QUINA PA RAPREPARAR CAF ESPRESSOOCAPUCHINO PUEDE DESCA LCIFICARSE
UTILIZANDO VINAGRE BLANCODE USO CASERO, DELASIGUIENTE FORMA :
PARADESCA LCIFICAREL TANQUE DE AGUA :
1. Verifique que la perilla de control se encuentre en la posición de apagado “OFF”
y que el cable eléctrico esté desconectado de la toma de corriente.
2. Si el aparato está frío y la presión ha sido liberada, (Consulte la sección
“C
UIDADO
:
P
RESIÓN
”
en la Página 21) quite la tapa del tanque y llene el tanque con vinagre
blanco de uso casero, sin diluir.
Page 27

3.
Permita que la solución de vinagre repose en el tanque del aparato durante toda la noche.
4. Deseche el vinagre a través de la abertura superior de la Máquina para preparar café
espresso, volteando el aparato sobre un lavabo.
5. Enjuague completamente el tanque de agua, usando agua de grifo y llenando el tanque
la mitad. Después vierta el agua sobre el lavabo, repita este paso dos veces.
PARA D
ESCALCIFICAR LAS PARTES INTERNAS
1. Verifique que usted ha descalcificado el interior del tanque de agua primero, siguiendo
los pasos en la sección anterior “Descalcificando”.
2.
Verifique que todos los controles estén apagados, que el cable eléctrico esté desconectado
de la toma de corriente, que el aparato esté frío y que la presión en el aparato haya sido
liberada. (Consulte la Sección “C
UIDADO: PRESIÓN” en la Página 21). Llene la jarra
con vinagre hasta la parte superior de la banda metálica y viértalo dentro del tanque.
3. Atornille la tapa en la parte superior del tanque de agua. Verifique que la tapa esté
firmemente colocada.
4. Inserte la canasta de preparación (con el filtro) y coloque la jarra de vidrio con su tapa,
sobre la bandeja para goteo.
5. Conecte el cable eléctrico en la toma de corriente.
6. Gire la perilla de control a la posición de . Cuando el vinagre comience a fluir
dentro de la jarra. Coloque una taza de agua fría debajo del tubo para espumar .
Sumerja el tubo para espumar dentro del agua y lentamente gire la perilla de control
a la posición de . Esto limpiará cualquier residuo que haya quedado en el tubo
para espumar leche.
7. Gire la perilla de control a la posición de . Cuando todo el vinagre haya sido
bombeado dentro de la jarra y el flujo se haya detenido, gire la perilla de control
a la posición de apagado “OFF” y permita que el aparato se enfríe.
8. Repita los pasos del 1 al 7 utilizando solamente agua de grifo para enjuagar el vinagre
que haya quedado en la máquina. Repita este proceso de enjuague, permitiendo que
la máquina se enfríe y que la presión se libere antes de cada enjuague.
LIMPIEZA DE LA JARRA
El agua dura puede dejar depósitos de minerales color blanco dentro de la jarra.
El café decolora estos depósitos, algunas veces dejando unas manchas color café en
el interior de la jarra. Para remover estas manchas, siga los siguientes simples pasos:
1. Use una solución con partes iguales de agua caliente y vinagre blanco.
2. Deje que la solución repose en la jarra durante aproximadamente 20 minutos
y después deséchela.
3. Lave y enjuague la jarra completamente usando un paño suave. No use limpiadores
abrasivos. Estos pueden dañar el acabado de la jarra, rayándola y causando que
se pueda romper.
2726
Page 28

PROBLEMAS Y CAUSAS
PROBLEMA C
AUSA SOLUCCIONES
• Añada agua
• Muela los granos de café
a un termino medio
• Llene el filtro solamente hasta
la marca de 4 tazas
• Apriete la tapa
• Conecte la unidad en la toma
de corriente. Encienda
• Rellene la canasta para filtro
con café. NO COMPRIMA
• Gire el soporte del filtro completamente a su posición para asegurar
• Limpie el borde, llene solamente
hasta la marca de 4 tazas
• Llene solamente hasta la marca
de 4 tazas
• Llene el tanque de agua con la
cantidad correcta de agua.
Consulte la Página 22
• Vacíe un poco de agua del tanque.
Consulte la Página 22
• Encienda la unidad con la perilla
de control
• Después de la etapa para espumar,
opere la función para espumar
durante 1 ó 2 segundos y extraer el
exceso de leche. O bien, apague la
unidad, permita que se enfríe,
desconecte de la toma de corriente
y limpie el tubo para espumar con
una aguja o palillo de dientes.
• Vierta la cantidad requerida de
agua para preparar café capuchino.
Consulte la Página 24
• Enfríe la leche y la jarra para
espumar antes de la preparación
de café capuchino
El café no sale
El café sale
alrededor del
borde del
soporte para
filtro
No se genera
vapor
La leche no
queda espumosa
• No hay agua en el tanque
• El café está molido demasiado fino
• Hay demasiado café en el filter
• La tapa no está bien cerrada,
el vapor se escapa
• El aparato no fue encendido
o conectado
• El café se ha comprimido demasiado
• El soporte para filtro no ha rotado
completamente a “cerrado”.
• Hay granos de café alrededor del
borde de la canasta del filtro
• Hay demasiado café en la canasta
del filtro
• El tanque de agua está vacío
• Hay demasiada agua en el tanque –
no hay espacio para el vapor
• El aparato no está encendido
• El tubo para espumar está bloqueado
• Se terminó el vapor
• La leche no está lo suficientemente
fría
Page 29

PROBLEMA CAUSA SOLUCCIONES
El café sale
demasiado
rápido
El café salpica
fuera del tubo
para espumar
• El café está molido demasiado
áspero
• No hay suficiente café en la canasta
del filtro
• El tanque de agua está vacío o bajo,
no hay suficiente presión
• Use un café molido más finamente
• Use más café
• Una vez que la unidad se ha
enfriado, use más agua para
preparar café espresso
`IDEAS DE RECETAS QUE LE ENCANTARA PROBAR!
M
OCA
C
AFÉ
Una onza de jarabe de chocolate,
una parte de espresso, 1 taza de
espuma de leche
AFÉAMERICANO
C
1/2 espresso y 1/2 agua caliente
C
AFÉMACCHIATO
1/3 de espresso y 2/3 de leche
vaporizada
C
1/4 espresso y 3/4 leche vaporizada,
vierta ambos en una taza al mismo
tiempo
C
1/2 espresso, 1/2 leche vaporizada
M
Añada 2 onzas de espresso a una taza
de chocolate caliente
ATTE
AFÉ
L
AFÉ AULAIT
OCACALIENTE
ARA ADULTOS
(P
F
APUCHINOSAN
C
Espresso, chocolate caliente
vaporizado, Brandy, crema y canela
en la parte superior
C
AFÉIRLANDÉS
Espresso, whisky irlandés, crema batida
en la parte superior
C
AFÉTUACA
Espresso, licor de Tuaca, crema batida
en la parte superior
C
AFÉVIENA
Espresso, Brandy, crema batida
en laparte superior
RANCISCO
MAYORES DE 21 AÑOS)
M
AFÉTÍA
C
Espresso, licor Tía María, espuma
de leche en la parte superior
C
AFÉGRANDMARNIER
Espresso, licor Grand Marnier, crema
batida y ralladura de naranja en la
parte superior
C
AFÉMEXICANO
Espresso, Kahlua, Tequila, crema batida
en la parte superior
C
AFÉROMANO
Espresso, Brandy y unas gotitas
de limón
2928
ARÍA
Page 30

SI R
EQUIERE SERVICIO
,
NO D
EVUELVA ESTE APARATO A LA TIENDA DONDE LO COMPRO
PARA OBTENER SERVICIO,
LLAME AL 1-800 MR COFFEE (1-800-672-6333)
P
ARA AYUDARNOS A SERVIRLO MEJOR
, P
OR FAVOR TENGALA
a M
ANO El
Nu
MERO DE MODELO Y LA FECHA DE COMPRA
.
POR FAVOR NO DEVUELVA ESTE APARATO A LA TIENDA DONDE LO COMPRÓ.
Todas las reparaciones deben ser hechas por un Centro de Servicio Autorizado Sunbeam.
Agradecemos sus preguntas, comentarios y sugerencias.
Visítenos en nuestro sitio en el Internet y descubra el secreto de preparar
la taza de café perfecta. Usted también encontrará una sabrosa mezcla
de recetas gourmet, consejos para recibir a sus invitados y
la información más reciente acerca de los productos MR. COFFEE.
®
www.mrcoffee.com
CONSUMER SERVICE DEPARTMENT
SUNBEAM PRODUCTS, INC.
P.O. BOX 948389
MAITLAND, FL 32794-8389
O envíenos un correo electrónico a: consumeraffairs@consumer.sunbeam.com
POR FAVOR NO ENVÍE NINGÚN PRODUCTO A LA DIRECCIÓN
QUE SE INDICA ARRIBA
Page 31

GARANTi a LIMITADA DE 1 AnO
Sunbeam Products Inc. (“Sunbeam”) garantiza que, por un período de un año a partir
de la fecha de compra, este producto estará libre de defectos en el material y en la
mano de obra. Sunbeam a su criterio, reparará o remplazará este producto o
cualquiera de los componentes del mismo que estén defectuosos durante el período
de garantía. El remplazo será hecho con un producto o componente nuevo o
reconstruido. Si el producto ya no se encuentra disponible, se remplazará con un
producto similar de igual o mayor valor. Esta es su garantía exclusiva.
Esta garantía es válida para el comprador original a partir de la fecha inicial de compra
y no es transferible. Conserve el recibo original de compra. La prueba de compra es
requerida para obtener la garantía. Los vendedores, centros de servicio de Sunbeam o
tiendas donde se vendan productos Sunbeam, no tienen el derecho de alterar, modificar
o cambiar de ninguna otra forma los términos o condiciones de esta garantía.
Esta garantía no cubre el desgaste por el uso normal de las partes o daños que resulten
de cualquiera de lo siguiente: negligencia o uso incorrecto del producto, uso bajo un
voltaje o corrientes inadecuados, uso contrario a las instrucciones de operación,
desensamble, reparaciones o alteraciones hechas por una persona que no pertenezca
a Sunbeam o a un centro de servicio autorizado. Además, la garantía no cubre los actos
de la naturaleza, tales como incendios, inundaciones, huracanes y tornados.
Sunbeam no será responsable de ningún daño incidental o consecuente causado por
el incumplimiento de cualquier garantía expresa o implícita. Excepto al alcance
prohibido por la ley que aplique, cualquier garantía implícita de comercialización o
ajustes para un propósito en particular, está limitada en duración al periodo de la
garantía que arriba se indica. En algunos estados, provincias o jurisdicciones, no se
permite la exclusión o limitación de daños incidentales o consecuentes o limitaciones
en la duración de una garantía implícita, así que las limitaciones o exclusiones que se
indican anteriormente pueden no ser aplicables a usted. Esta garantía le da a usted
derechos legales específicos y usted puede también tener otros derechos que varían
de estado a estado y de provincia a provincia.
CÓMO OBTENER EL SERVICIO DE LA GARANTÍA
Lleve el producto a un centro de Servicio Autorizado Sunbeam. Usted puede obtener
una lista de los centros de servicio e instrucciones acerca de la reparación o
remplazo del producto llamando al
1-800-672-6333
.
NO ENVÍE ESTE PRODUCTO AL LUGAR DONDE FUE ADQUIRIDO.
Para preguntas relacionadas al garantía llama al
1-800-672-6333.
3130
Page 32

©
2001 Sunbeam Products, Inc. All rights reserved.
MR. C FFEE®is a registered trademark of Sunbeam Products, Inc.
Distributed by Sunbeam Products, Inc., Boca Raton, Florida 33431.
©
2001 Sunbeam Products, Inc. Todos los derechos reservados.
MR. C FFEE
®
es una marca registrada de Sunbeam Products, Inc.
Distribuido por Sunbeam Products, Inc., Boca Raton, Florida 33431.
Made in China / Hecho en China P. N. 108671
 Loading...