

Page 1
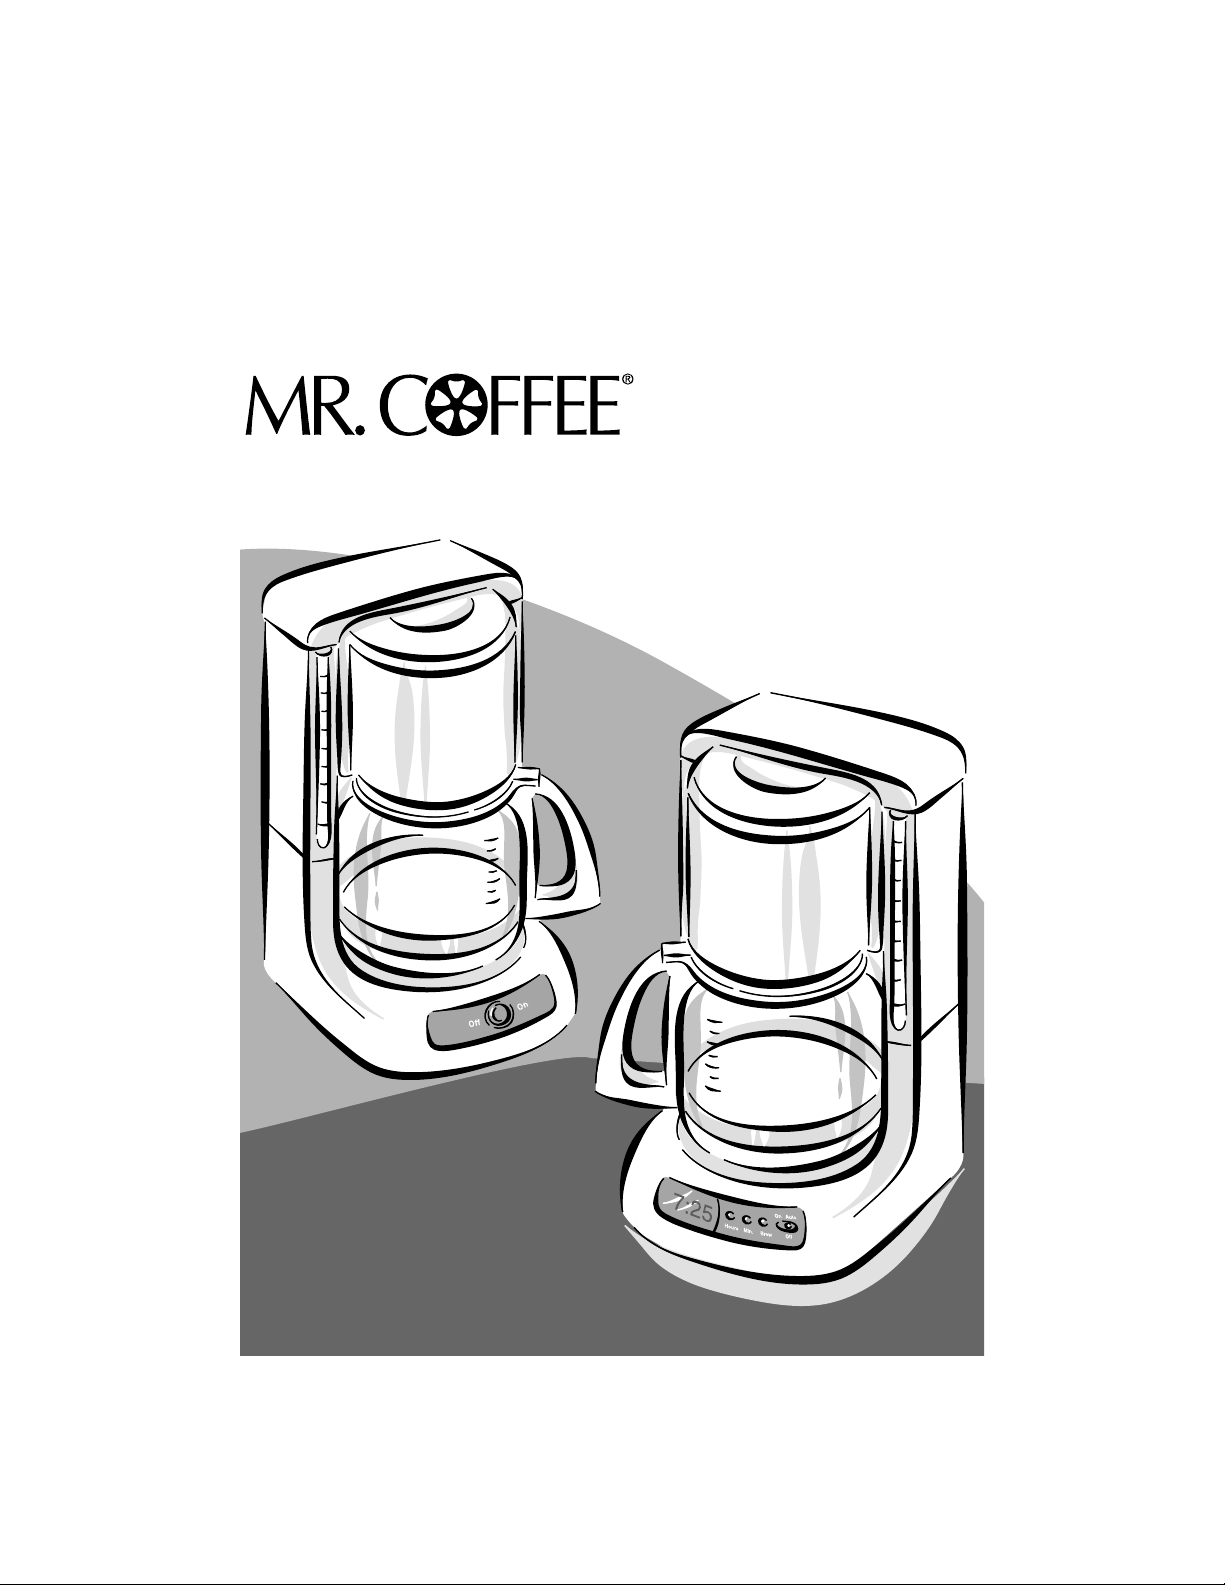
Coffeemaker / Cafetera
Models / Modelos
AR12, AR13, ARX20, ARX23
User Manual /
Manual de Usuario
Page 2

2
IMPORTANT SAFEGUARDS
When using electrical appliances, b asic safety p recautions should alw ays be
fo llow ed to reduce the risk of fire, electric shock and/or injury to persons,
includ ing the fo llo w ing:
• Read all instructio ns befo re using the coffeemaker.
• Do no t touch t he coffeemaker’s ho t surfaces.
• To pro tect against electric sho ck, d o not immerse the po w er cord,
po w er plug or coffeemaker in w ater o r o t her liquid .
• Clo se adult sup ervision is necessary w hen this app liance is used by
or near children.
• Turn the coffeemaker o ff and unp lug t he p o wer co rd fro m the pow er
source w hen the coffeemaker o r clo ck are not in use and before cleaning.
Allo w the co ffeemaker parts to co ol b efo re p utting o n o r taking o ff p arts
and befo re cleaning the appliance.
• Do no t op erat e any ap p liance w ith a d amaged co rd or plug o r o p erate
it after the app liance malfunctions or has been d amaged in any manner.
Return this appliance only to the nearest authorized service cent er for
examinat ion, rep air o r ad justment.
• The use o f accesso ry attachments other than MR. CO FFEE®brand may cause
hazard s or injuries.
• Do no t use o utd oors.
• Do no t let the po w er cord hang o ver the ed ge o f a t ab le or co unter
or allow it to co me in contact wit h ho t surfaces.
• Do not p lace this appliance on o r near a ho t gas o r electric burner o r
in a heated oven.
• To disco nnect, turn the coffeemaker OFF, then remove the p ow er plug
fro m w all o utlet.
• Do no t use t he coffeemaker fo r o ther reasons than its intended use.
• Place the co ffeemaker o n a hard, flat level surface to avo id interrup tion
of air flo w underneath the appliance.
• This co ffeemaker is designed for household use only.
Page 3
3
Decanter Use and Care
Fo llow the instruct ions below to red uce o r eliminate the chance o f breaking
the decanter:
–
This decant er is designed for use w ith yo ur MR. COFFEE®co ffeemaker and therefo re
must never b e used o n a rangetop o r in any oven, including a microw ave o ven.
– Do no t set a hot decanter on a w et o r cold surface.
– Do no t use a cracked decant er o r a d ecanter having a lo o se o r w eakened handle.
– Do no t clean the d ecanter w ith ab rasive cleansers, steel w o o l p ad s o r
other abrasive mat erials.
– Discard the d ecanter immed iately if it is ever b o iled d ry.
– Protect the d ecanter from sharp b lo ws, scratches o r ro ugh handling.
Warning:
To reduce the risk o f fire or electric shock, do not remove
any service covers. There are no user serviceable parts
inside t he coffeemaker. Only authorized p ersonnel
should rep air the coffeemaker.
Special Cord Set Inst ructions
1. A sho rt po w er supply cord is pro vid ed to reduce the hazards result ing from
beco ming entangled in o r tripping o ver a longer co rd.
2. An extension cord may b e p urchased and used if care is exercised in its use.
3. If an extension co rd is used, t he marked electrical rat ing o f the extension co rd
must be at least 10 amps and 120 volts. The resulting extend ed cord must be
arranged so that it w ill no t d rape over the co unt erto p or t ab let o p where it can
be pulled on by children or t ripp ed o ver accidentally.
*
This appliance has a polarized plug
(one blade is wider than t he other)
.
To reduce the risk of electric shock, this plug will fit in a polarized outlet only
one way. If the plug does not fit fully in the out let , reverse t he plug. If it still
does not fit, cont act a qualified electrician. Do not modify t he plug in any way.
SAVE THESE INSTRUCTIONS
Page 4
4
Table of Contents
Important Safeguards . . . . . . . . . . . . . . . . . . . . . . . . . . . . . . . . . . . . . . . . 2
Decanter Use and Care . . . . . . . . . . . . . . . . . . . . . . . . . . . . . . . . . . . . 3
Sp ecial Cord Set Instructio ns . . . . . . . . . . . . . . . . . . . . . . . . . . . . . . . . 3
Setting Up Your Coffeemaker . . . . . . . . . . . . . . . . . . . . . . . . . . . . . . . . . . 5
Co ffeemaker Features . . . . . . . . . . . . . . . . . . . . . . . . . . . . . . . . . . . . . 5
Ad just ing the Pow er Cord Lengt h . . . . . . . . . . . . . . . . . . . . . . . . . . . . . 7
Setting the Clo ck
(Mo d els AR12, AR13, ARX20 and ARX23 Only) . . . . . . . . . . . . . . . . . 7
Brewing Coffee . . . . . . . . . . . . . . . . . . . . . . . . . . . . . . . . . . . . . . . . . . . . . 8
Cleaning the Coffeemaker Befo re First Use . . . . . . . . . . . . . . . . . . . . . . 8
Selecting and Measuring Gro und Coffee . . . . . . . . . . . . . . . . . . . . . . . 8
Ad ding Water and Gro und Co ffee . . . . . . . . . . . . . . . . . . . . . . . . . . . . 8
Brew ing Co ffee Now . . . . . . . . . . . . . . . . . . . . . . . . . . . . . . . . . . . . . . 10
Brew ing Co ffee Later
(Using t he Delay Timer, Mod els ARX20 and ARX23 Only) . . . . . . . . . . . 11
Cleaning the Coffeemaker Between Brew Cycles . . . . . . . . . . . . . . . . . 12
Maint aining Your Coffeemaker . . . . . . . . . . . . . . . . . . . . . . . . . . . . . . . . . 13
Cleaning the Coffeemaker . . . . . . . . . . . . . . . . . . . . . . . . . . . . . . . . . . 13
Cleaning the Decanter . . . . . . . . . . . . . . . . . . . . . . . . . . . . . . . . . . . . . 15
Service and Maint enance . . . . . . . . . . . . . . . . . . . . . . . . . . . . . . . . . . . . . . 16
Rep lacement Part s . . . . . . . . . . . . . . . . . . . . . . . . . . . . . . . . . . . . . . . 16
Rep airs . . . . . . . . . . . . . . . . . . . . . . . . . . . . . . . . . . . . . . . . . . . . . . . . 16
Questio ns, Comments and Suggestions . . . . . . . . . . . . . . . . . . . . . . . . 16
Warranty Information . . . . . . . . . . . . . . . . . . . . . . . . . . . . . . . . . . . . . . . . 17
Page 5

5
Setting Up Your Coffeemaker
Co ngrat ulatio ns on the purchase o f your new MR. CO FFEE®co ffeemaker! Please read
these instruct io ns carefully before using yo ur new coffeemaker. Prop er use, care and
maintenance will ensure t roub le-free operatio n and the long life o f this app liance.
Save these instruct ions fo r cleaning and, if necessary, replacement parts information.
Coffeemaker Features
Your new MR. CO FFEE®co ffeemaker has the follo wing features:
•
12-Cup Brewing Capacity
•
Cord Storage
– Allo w s you to sto re extra co rd length for a tidy countertop.
•
Drip-Resist ant Decanter
– Designed to help p revent drip s after p o uring.
•
Ergonomically Designed Handle
– Provid es co mfort , co ntro l and co nfidence
when p o uring.
•
Lighted ON/OFF Switch
(Mod els AR12 and AR13 Only) – This safety feature
reminds you t hat yo ur coffeemaker is on.
•
No n-Stick Warming Plate
– This feature p revent s the d ecanter from st icking
to the surface of the w arming p lat e.
•
Pause ’n Serve
– Can’t wait for the co ffee t o finish b rew ing? The Pause ’n Serve
feature allow s you up to 30 seconds to pour a cup o f co ffee w hile the co ffee
is still brew ing.
•
Programmable Controls
(Mod els ARX20 and ARX23 Only)
– Clock: The LED clo ck serves as a handy kitchen clo ck, as well as allo w s you
to set the timer.
– Timer: Would you like t o wake up to a fresh p ot of co ffee? The t imer
allo w s you to p reset w hen you would like the co ffeemaker to b rew
your co ffee automat ically, up to 24 ho urs in ad vance.
– Tw o-Ho ur Auto Shut -Off: This safety feature keep s your coffee w arm
fo r 2 hours after you brew, t hen automatically t urns off.
•
Removable Filter Basket
– The filter basket w ill lift out of socket to allo w you
to remo ve a filter and gro und co ffee before returning b ack to it s socket.
•
Water Window
– The w ater w ind ow o n t he water reservo ir allow s you to quickly
and accurately see exactly ho w much w at er yo u have added to the reservo ir.
Page 6
6
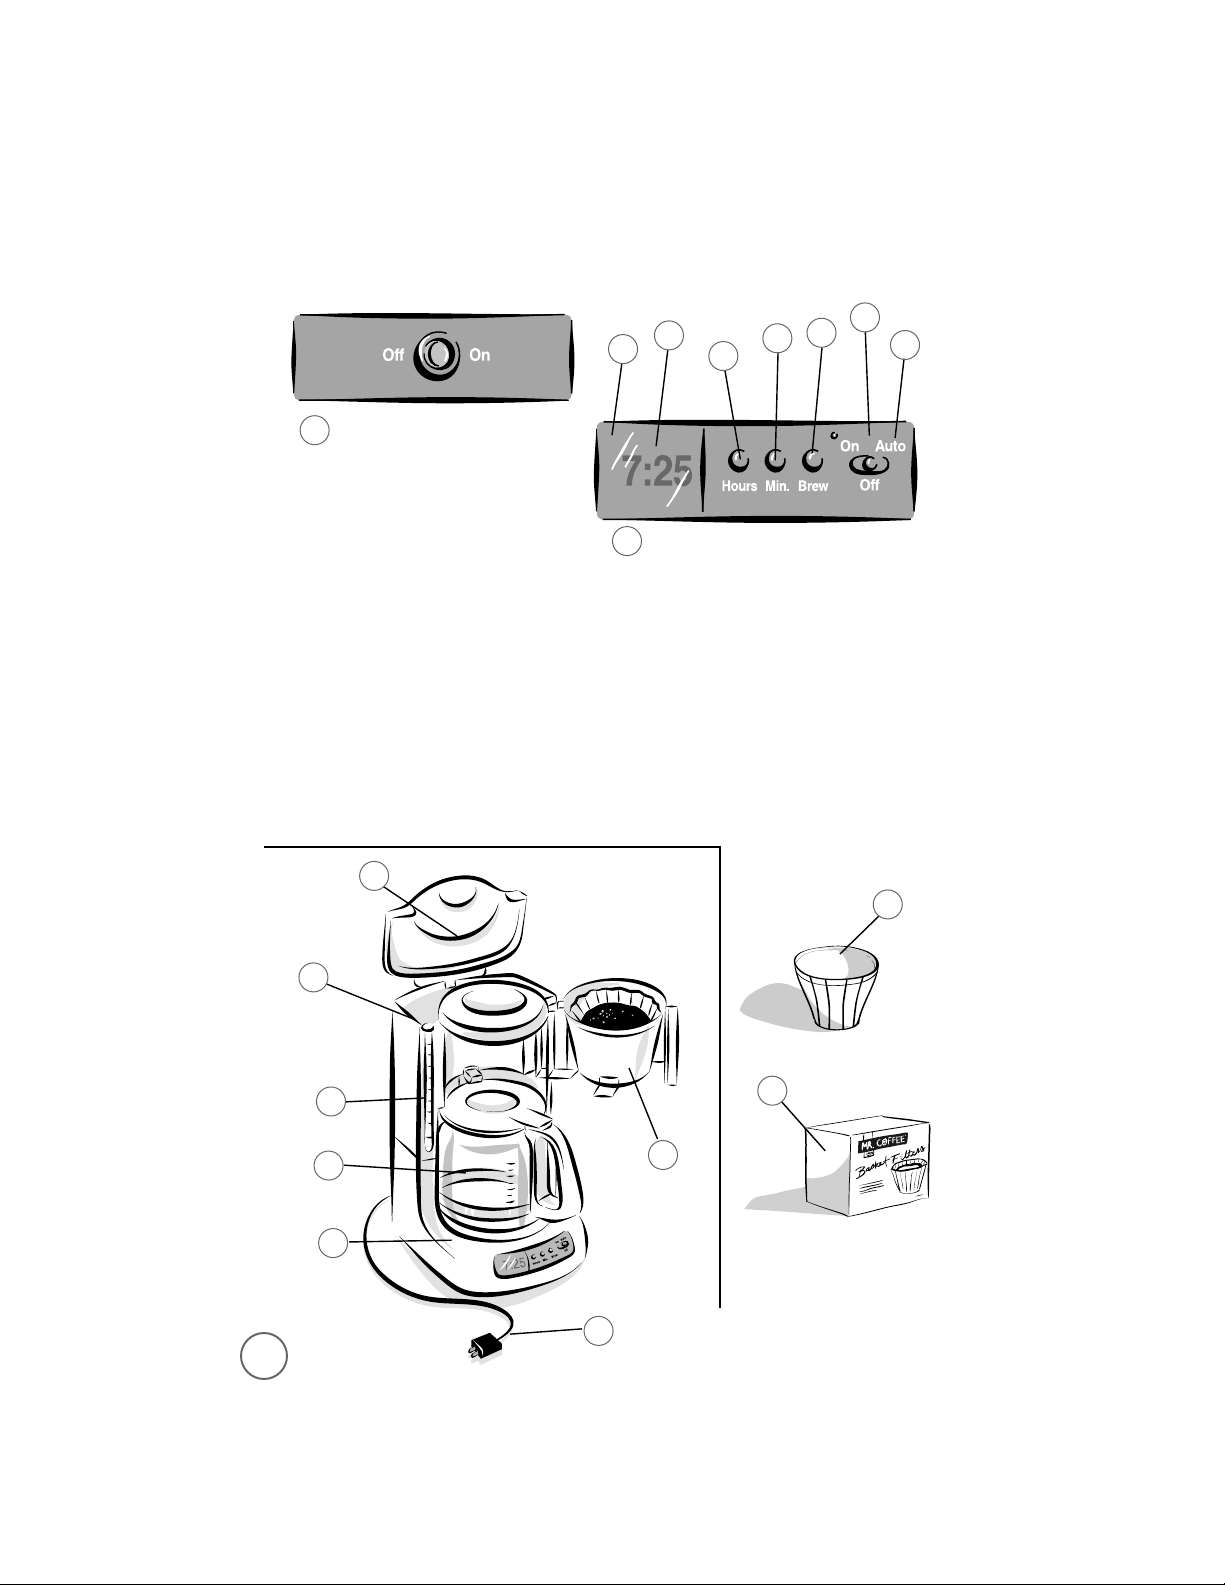
Coffeemaker Features
5
6
11
10
7
2
1
8
4
M
ODELS
AR12
AND
AR13
M
ODELS
ARX20
AND
ARX23
1.
ON/OFF Sw it ch
(Models AR12 and AR13 Only)
2.
Co ntro l Panel
(Models ARX20 and ARX23 Only)
a.
Hour Butto n
b.
Minut e Butt o n
c.
Brew Button
d.
On-O ff Ind icato r
e.
Auto Indicato r
f.
PM Ind icator
g.
Clock Display
3.
Removable Brew Basket
4.
Brew Basket Lid
5.
Water Reservoir
6.
Water Window
7.
Po w er Co rd
8.
MR. COFFEE®Brand
8-12 Cup Basket
St yle Coffee Filters
(not i ncluded)
9.
MR. COFFEE®Brand
Permanent Filter
(not i ncluded)
10.
Warming Plat e
11.
Decanter
9
3
a
c
f
g
d
e
b
Page 7
7
F
IGURE
A-1
F
IGURE
B-1
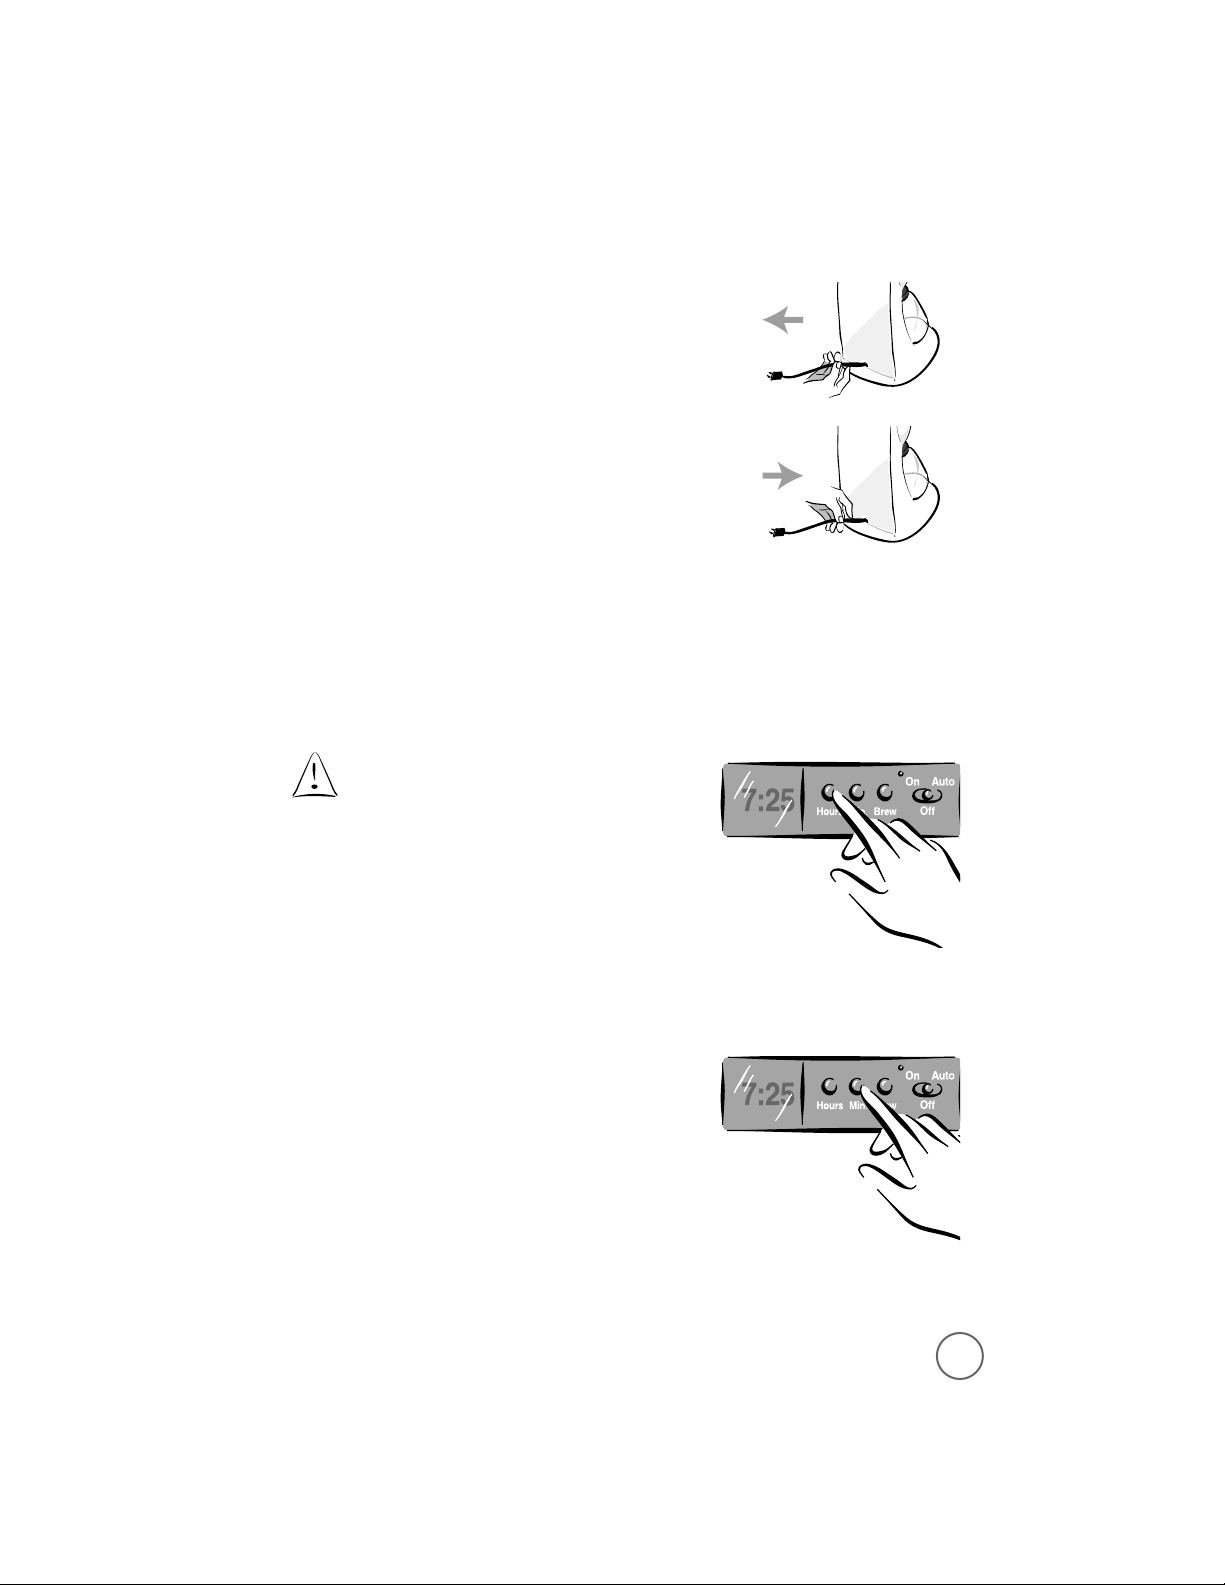
Adjusting the Power Cord Length
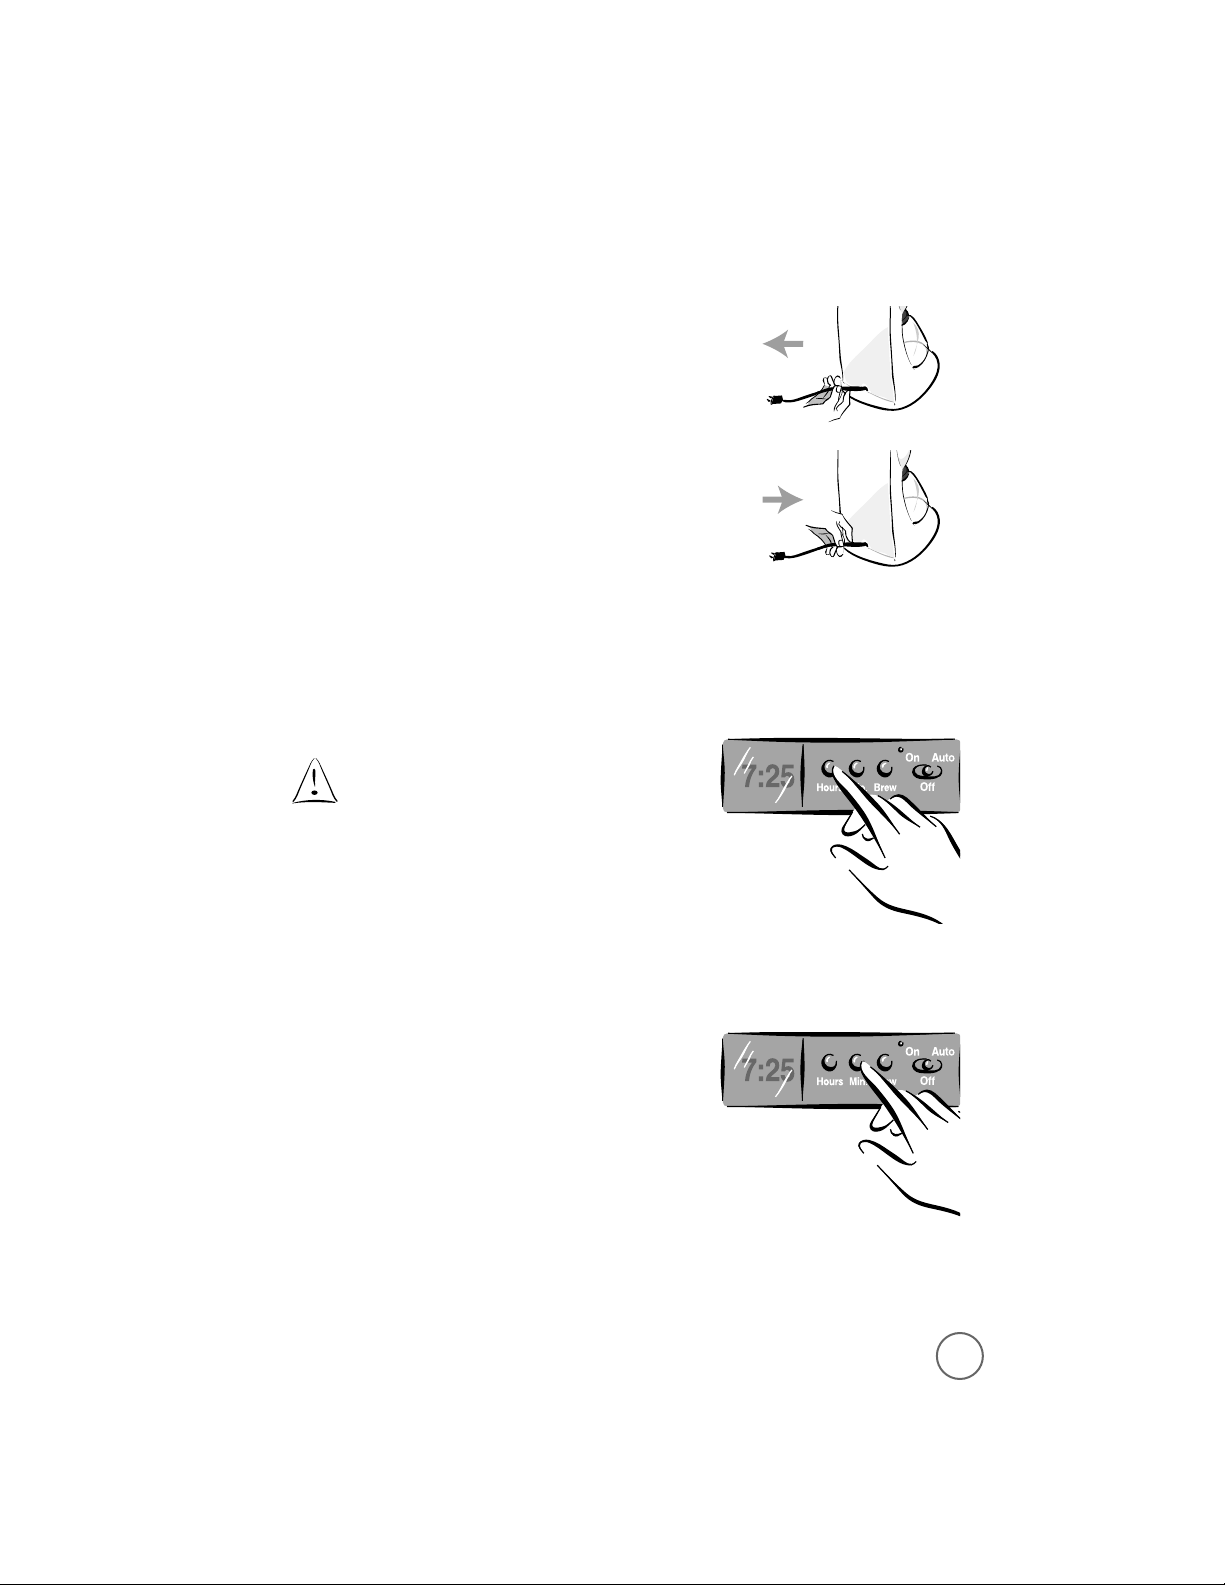
You can customize the lengt h o f the p o w er co rd
so t hat it is the exact length you desire.
To increase the length of t he pow er co rd:
Grasp the p o wer cord (no t the po w er plug)
and gently p ull it aw ay fro m the coffeemaker.
To decrease the length of t he pow er co rd:
Grasp the p o wer cord and feed
into the co ffeemaker.
Setting t he Clock
(Mod els ARX20 and ARX23 only)
The clo ck flashes on t he co ntro l panel to indicate
that it has no t b een set .
You must set t he clo ck if you want to use
the timer feat ure.
To set the clo ck:
1) Press and ho ld the HOUR b utton until the clock
displays the co rrect hour. See Figure A-1
(for Mod els ARX20 and ARX23).
The PM indicat o r w ill light to indicate a PM time;
if the PM indicato r is no t lit, the time is AM.
2) Press and ho ld the MIN. b utton until t he clock
displays the co rrect minute. See Figure B-1
(for Mod els ARX20 and ARX23).
The clo ck is no w set.
Page 8
8
Adding Water and Ground Coffee
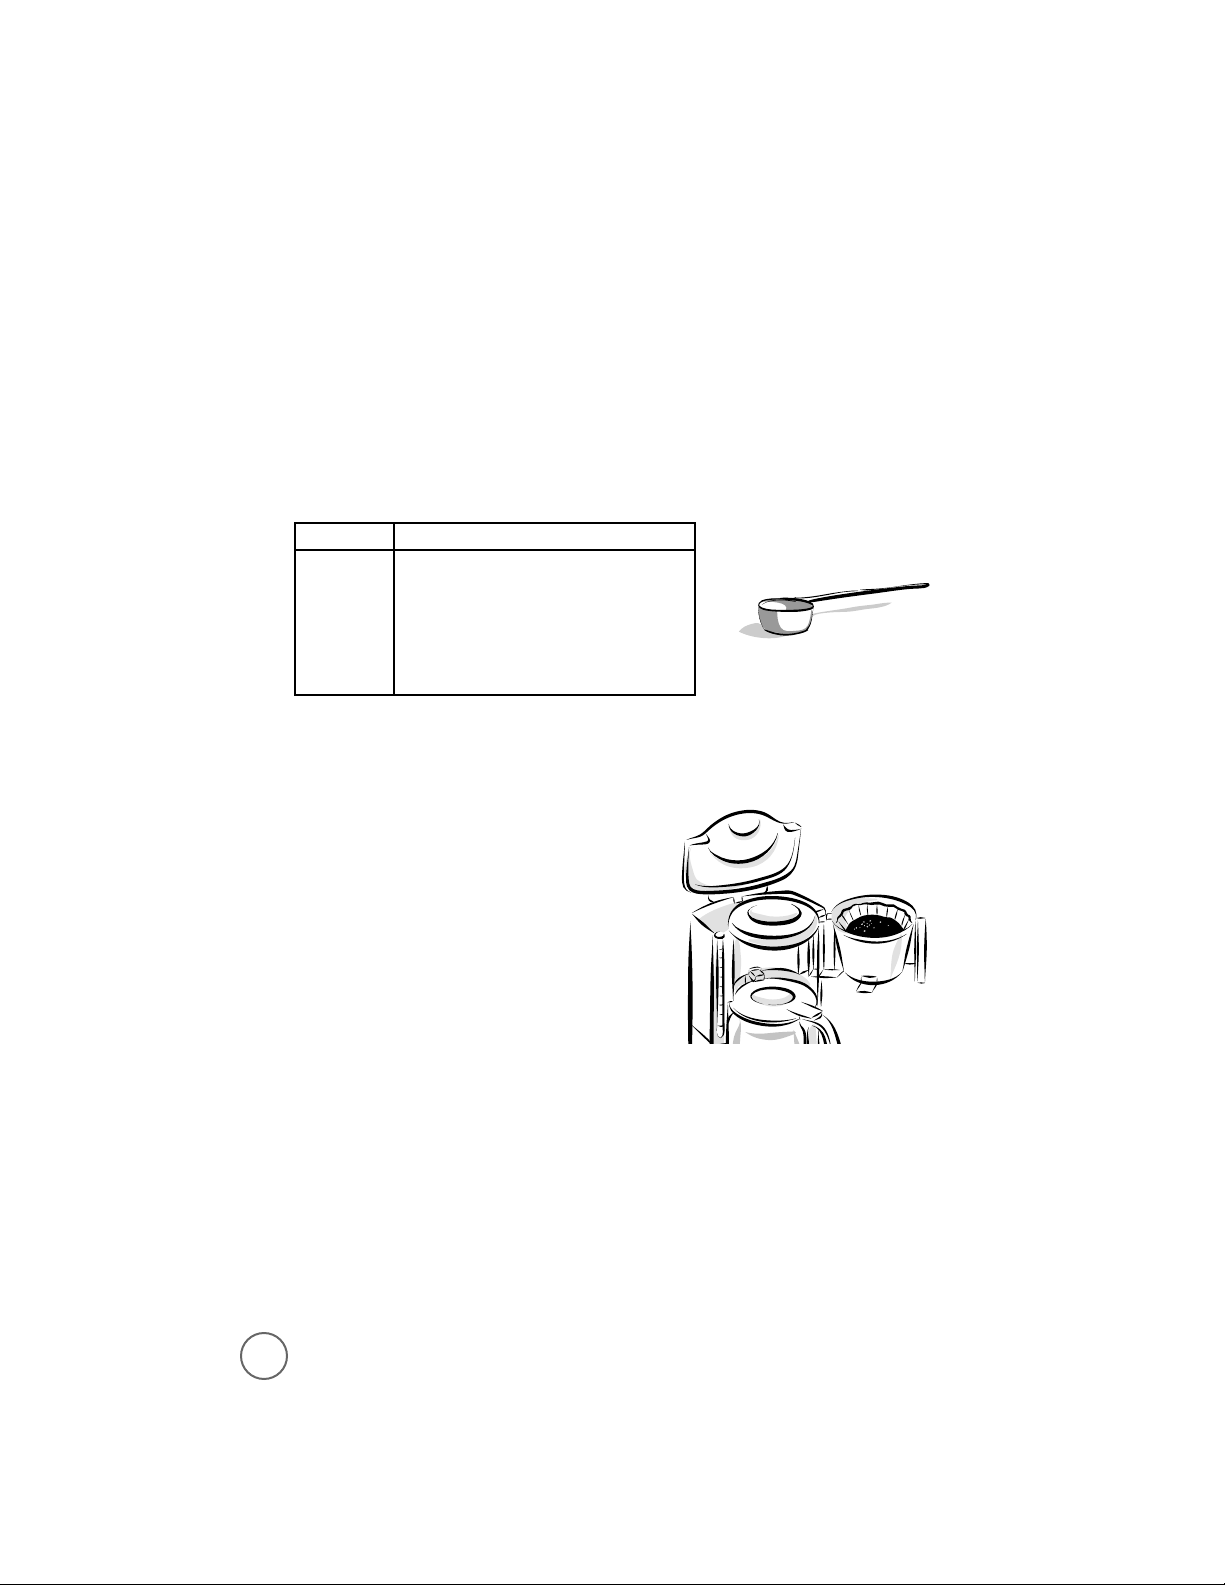
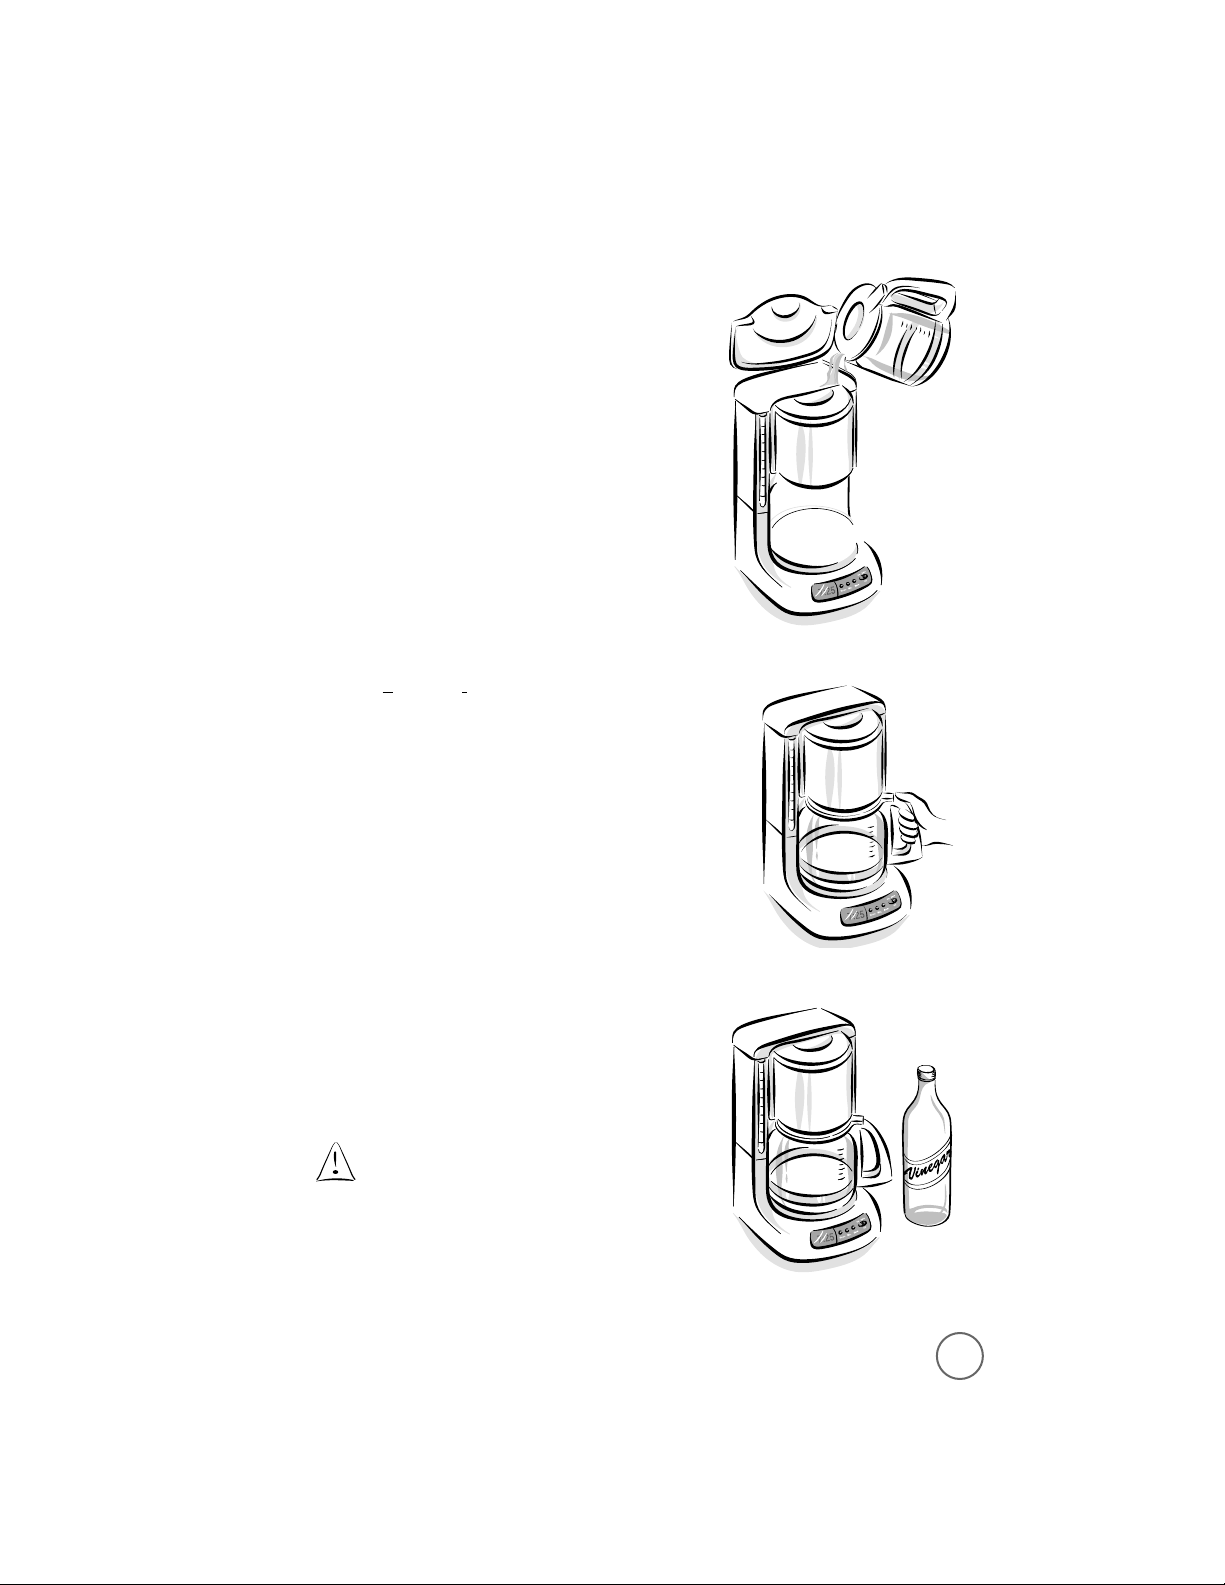
1) Sw ing open t he brew b asket and , if desired,
lift o ut t he removable filter basket .
2) Place a MR. COFFEE
®
brand 8-12 cup
paper filter o r a MR. COFFEE®permanent
gold -to ne filter in the filter basket .
3) Ad d the d esired amo unt of ground coffee
to the filter. Gently shake t he filt er b asket
to level the gro und coffee.
Brewing Coffee
Clean the Coffeemaker Before First Use
Fo llow the steps under “Adding Water and Gro und Co ffee” and “ Brew ing Co ffee Now,”
(Pages 4 – 7) b ut d o no t add coffee gro unds.
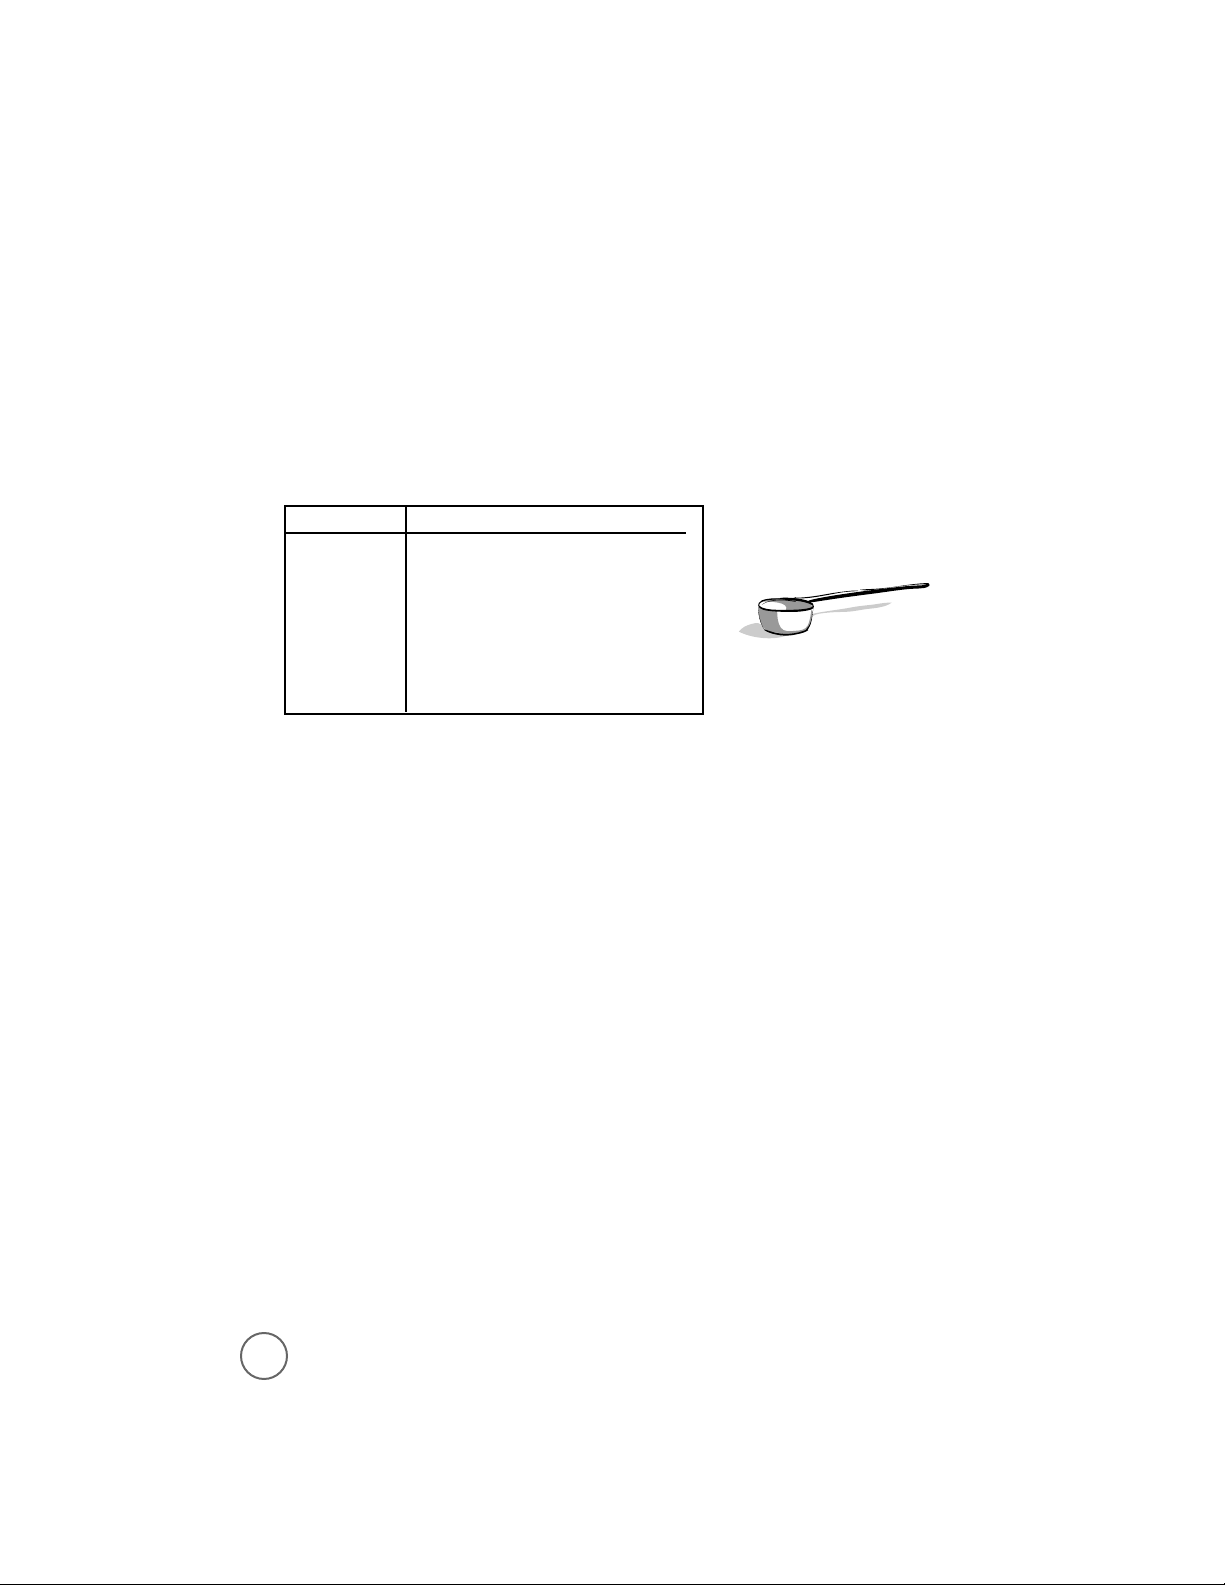
Selecting and Measuring Ground Coffee
Fo r b est result s, use co ffee ground for use w ith auto mat ic d rip co ffeemakers.
The amounts sho w n below are suggested amount s.
To Brew Use This Amount of Ground Coffee
12 cup s 11 tab lespo ons or 5-1/2 sco o ps
10 cup s 9 tab lespoo ns or 4-1/2 scoop s
8 cups 7 tab lespoo ns or 3-1/2 scoop s
6 cups 6 tab lespoo ns or 3 scoo p s
4 cups 5 tab lespoo ns or 2-1/2 scoop s
2 cups 3 tab lespoo ns or 1-1/2 scoop s
• two level t ab lespoons = o ne level scoop
• one cup = five o unces brew ed co ffee
Page 9
9
4) Be certain that the filter is centered in the
filt er basket. Close the b rew basket .
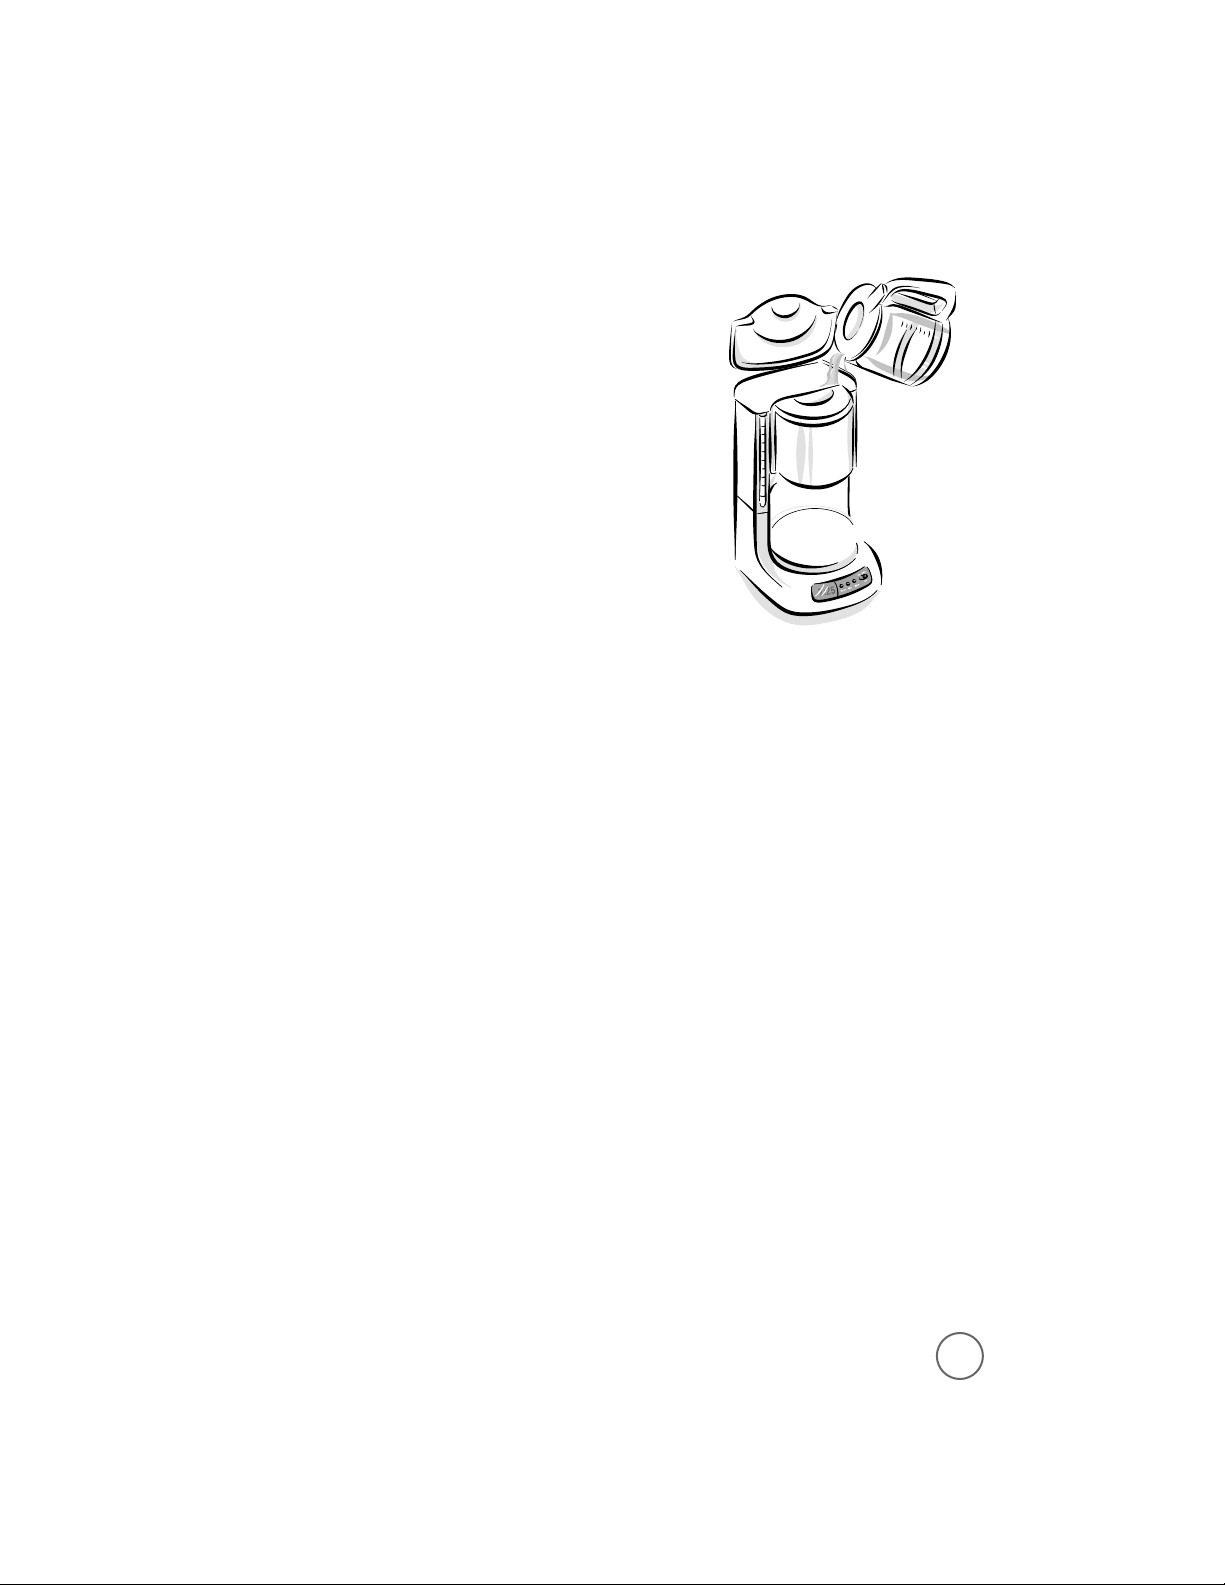
5) Fill the w ater reservoir w ith t he desired amount
of t ap w ater.
Use the w ater windo w marks to measure t he
water, no t the decanter marks. The decanter
marks measure b rew ed co ffee o nly.
Page 10
10
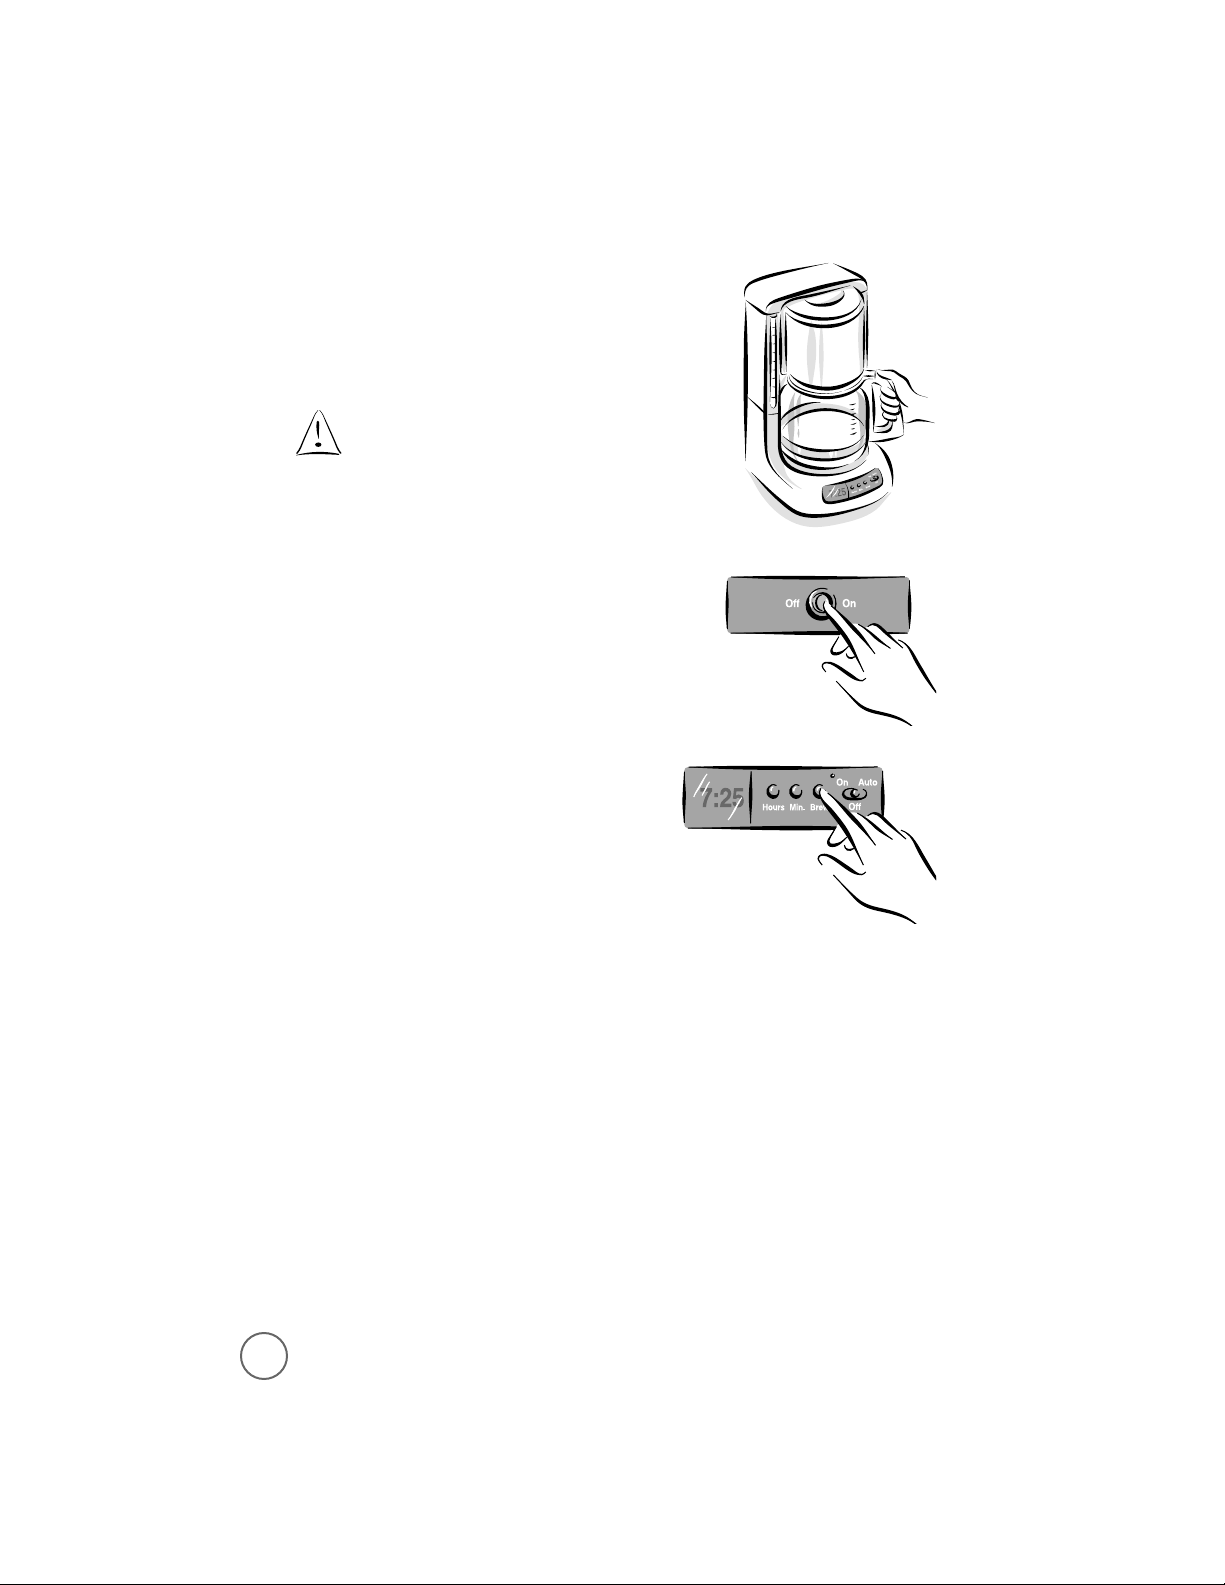
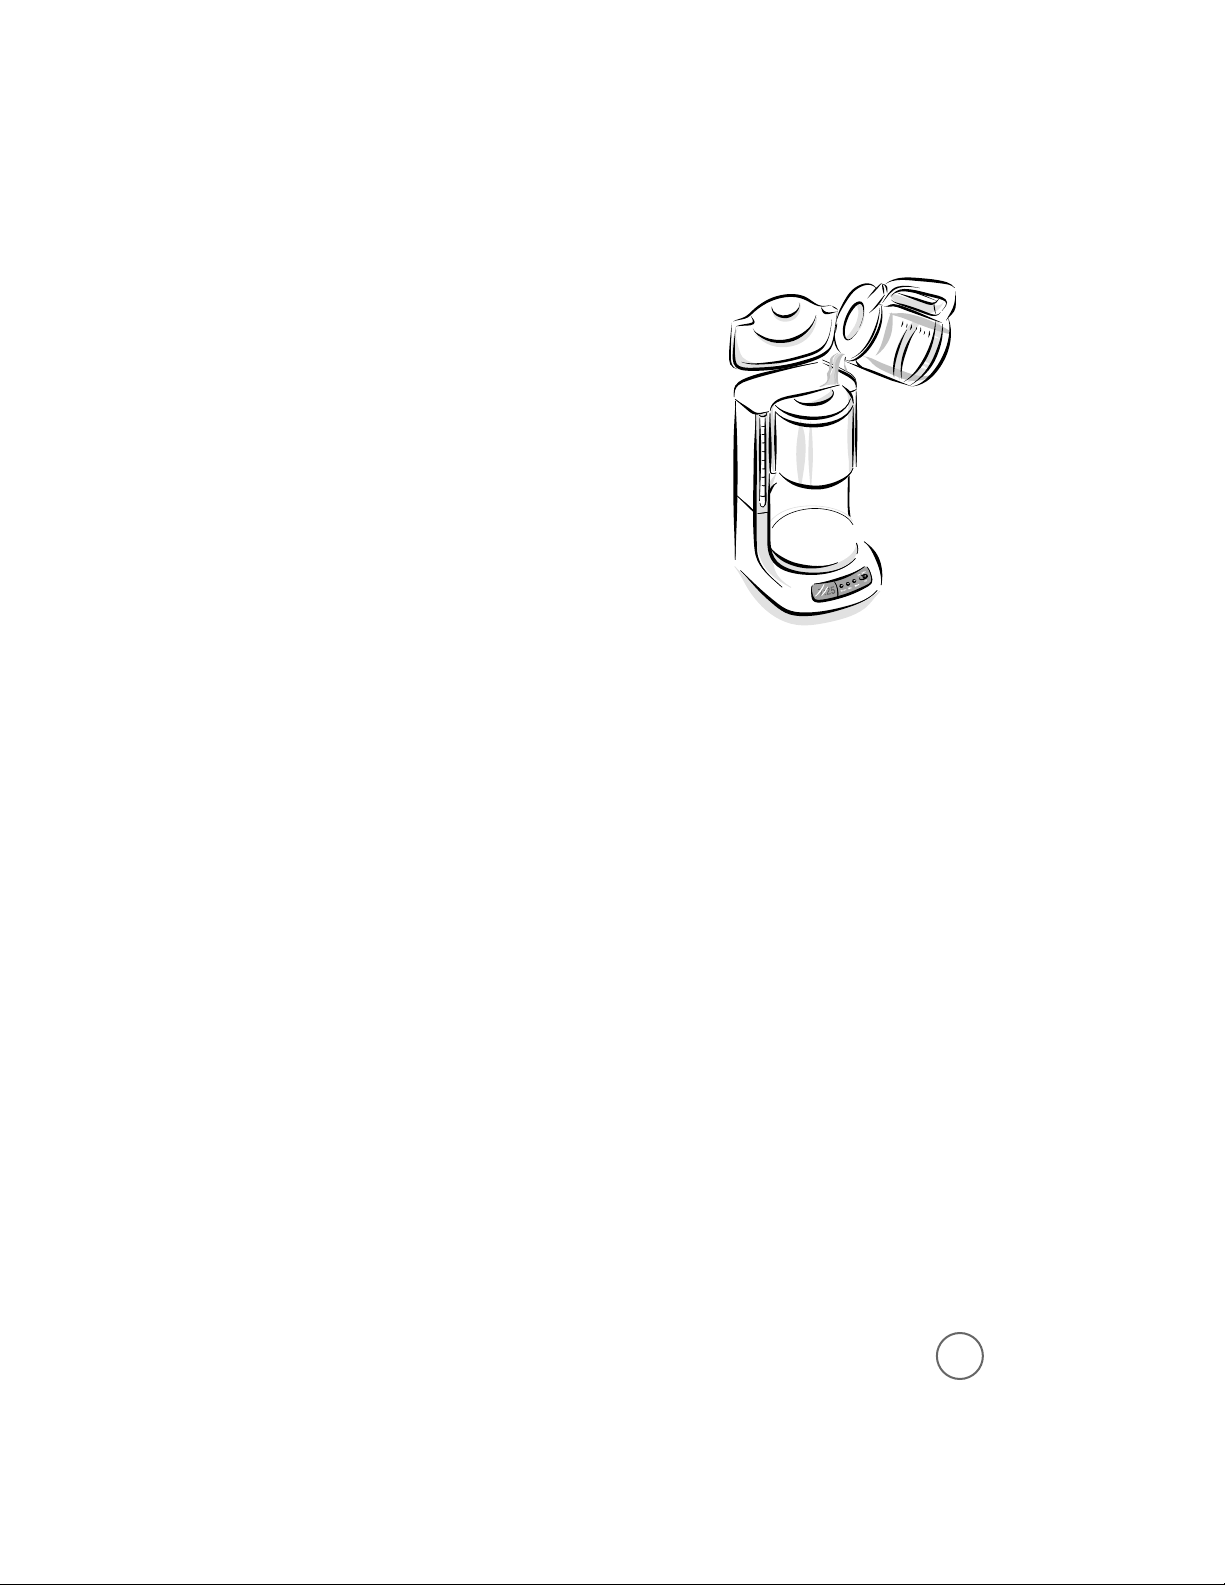
6) Place the d ecanter o n the w arming p late.
Make sure t he decanter is accurately
cent ered on t he warming plat e or the water
and ground s will overflow from t he brew
basket. An overflow may cause personal
injury or damage to property.
To reduce the risk o f damaging the decant er
and/or the risk of perso nal injury, do not
add cold water to the decanter if the
decanter is already hot . Allow t he decanter
to cool before using.
Do not brew coffee while the brew basket
lid is open.
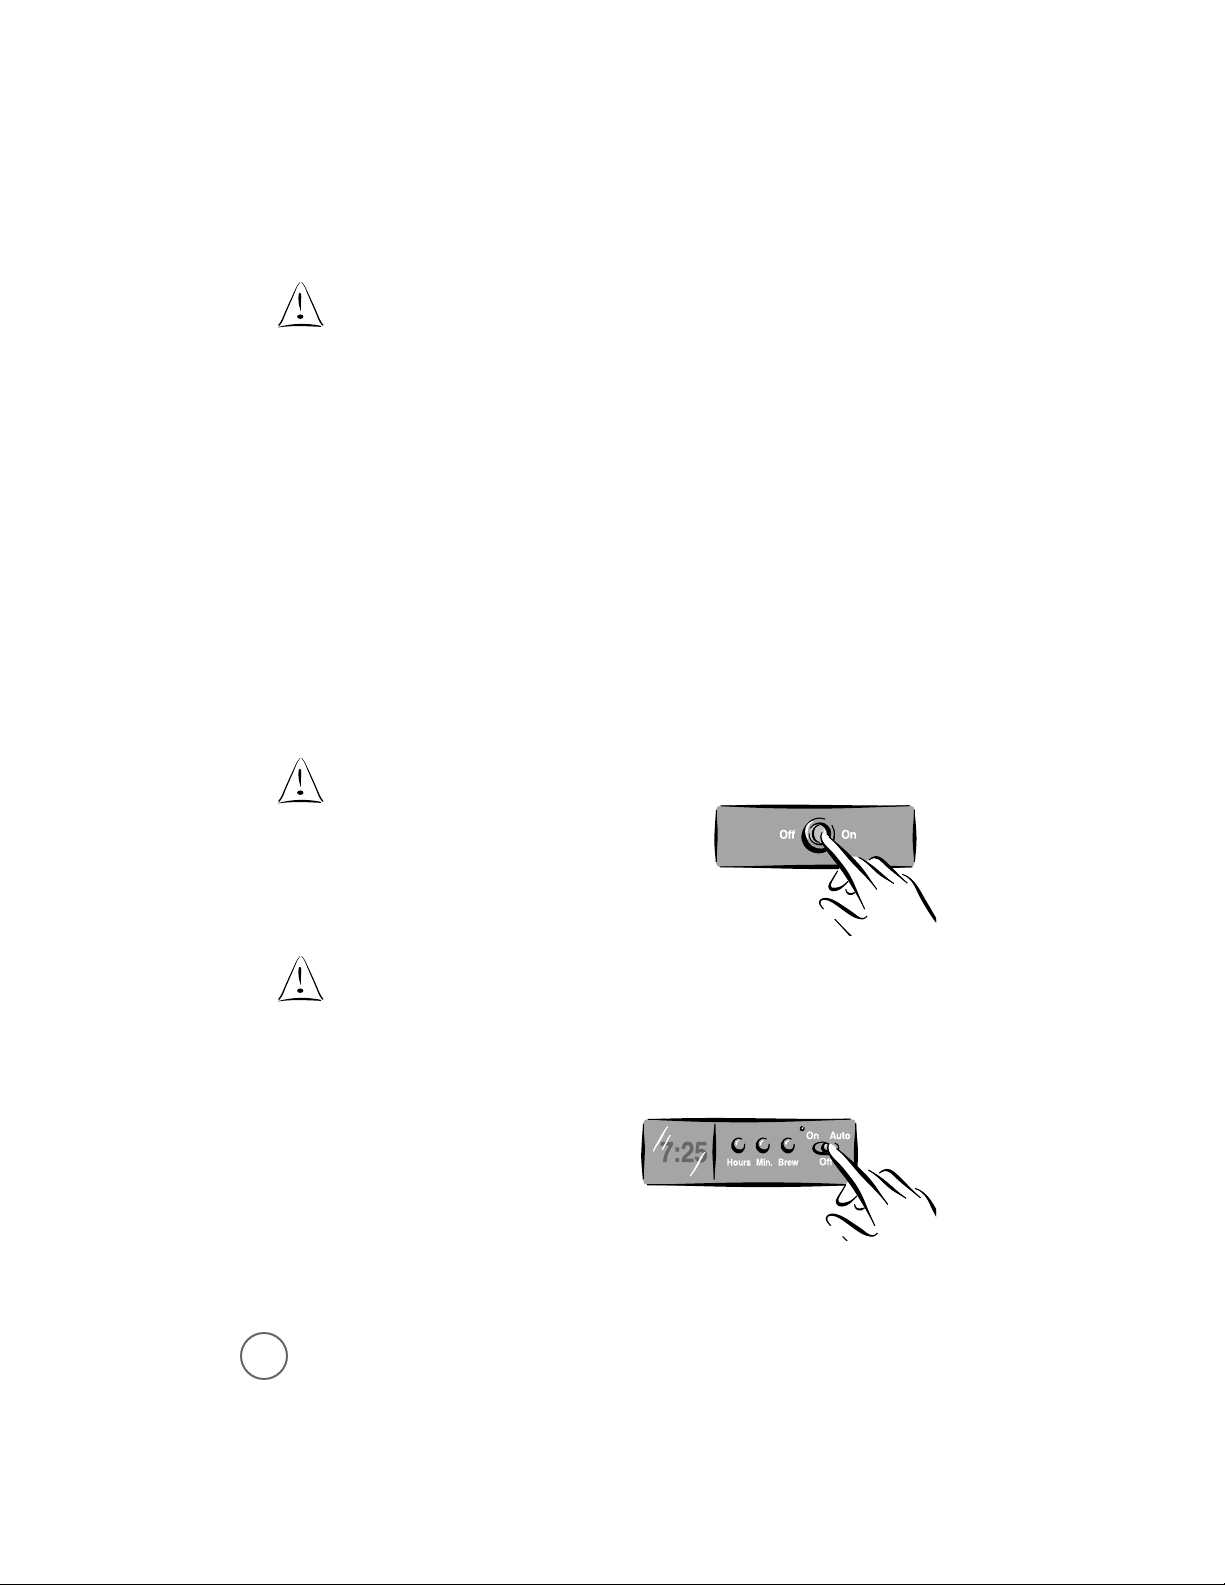
Brewing Coffee Now
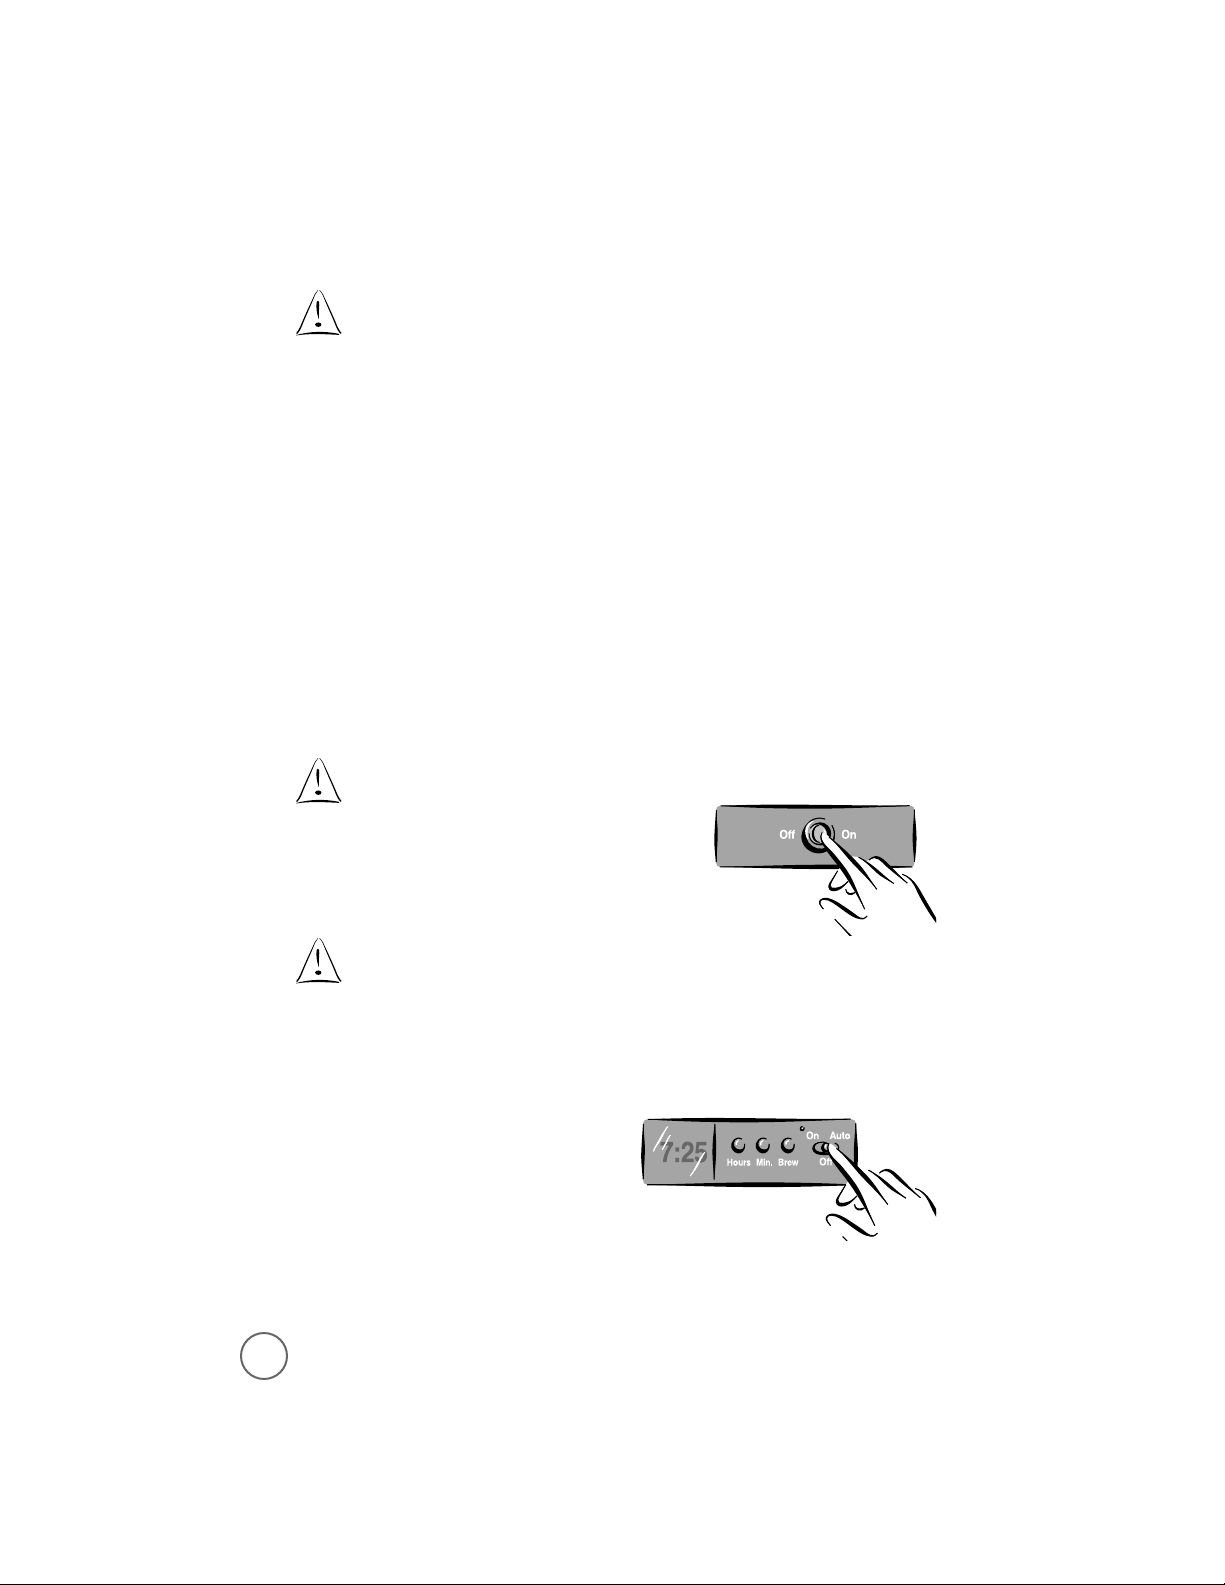
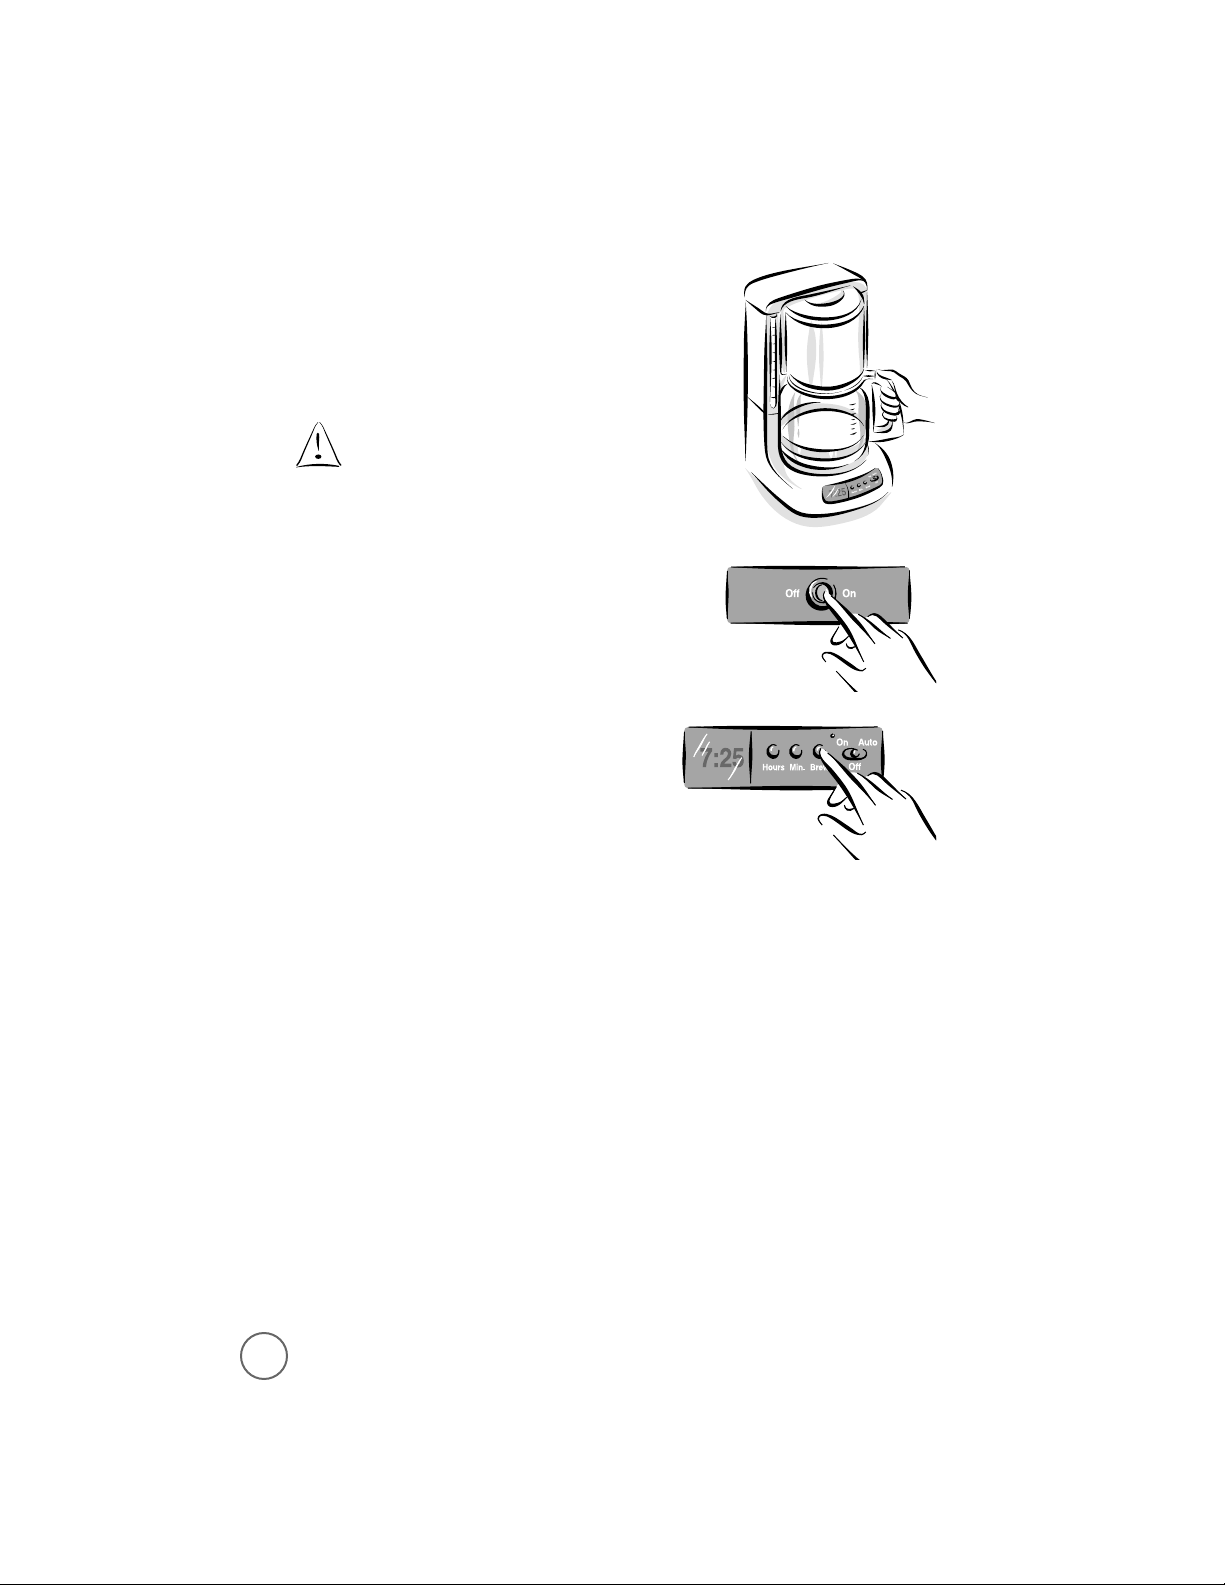
For Models AR12 and AR13:
Push the switch to ON.
The ON/OFF sw itch w ill light , indicating t hat the
co ffeemaker is On and the b rew cycle will b egin.
When t he co ffee stops flo w ing, the b rew cycle
is co mp let e.
While the coffee is brewing, the Pause ‘n
Serve feature allows you t o sneak a cup
of coffee from the decanter. REPLACE THE
DECANTER ON THE WARMIN G PLATE WITHIN
30 SECONDS TO PREVENT O VERFLO W AN D
POSSIBLE INJURY.
To turn Off the co ffeemaker, p ress the ON/OFF
switch to Off.
If the brew basket overflows or fails
to empty int o t he decant er, do not
open the brew basket . Unplug the
coffeemaker and wait for the content s
to cool before handling.
For Models ARX20 and ARX23:
Slide the switch t o On. Press the
brew b utton when ready to start b rew ing.
To turn the co ffeemaker Off,
slide the switch to Off.
Your Coffeemaker w ill keep your co ffee ho t
fo r 2 ho urs, then automatically shut off.
Page 11
11
Brewing Coffee Lat er
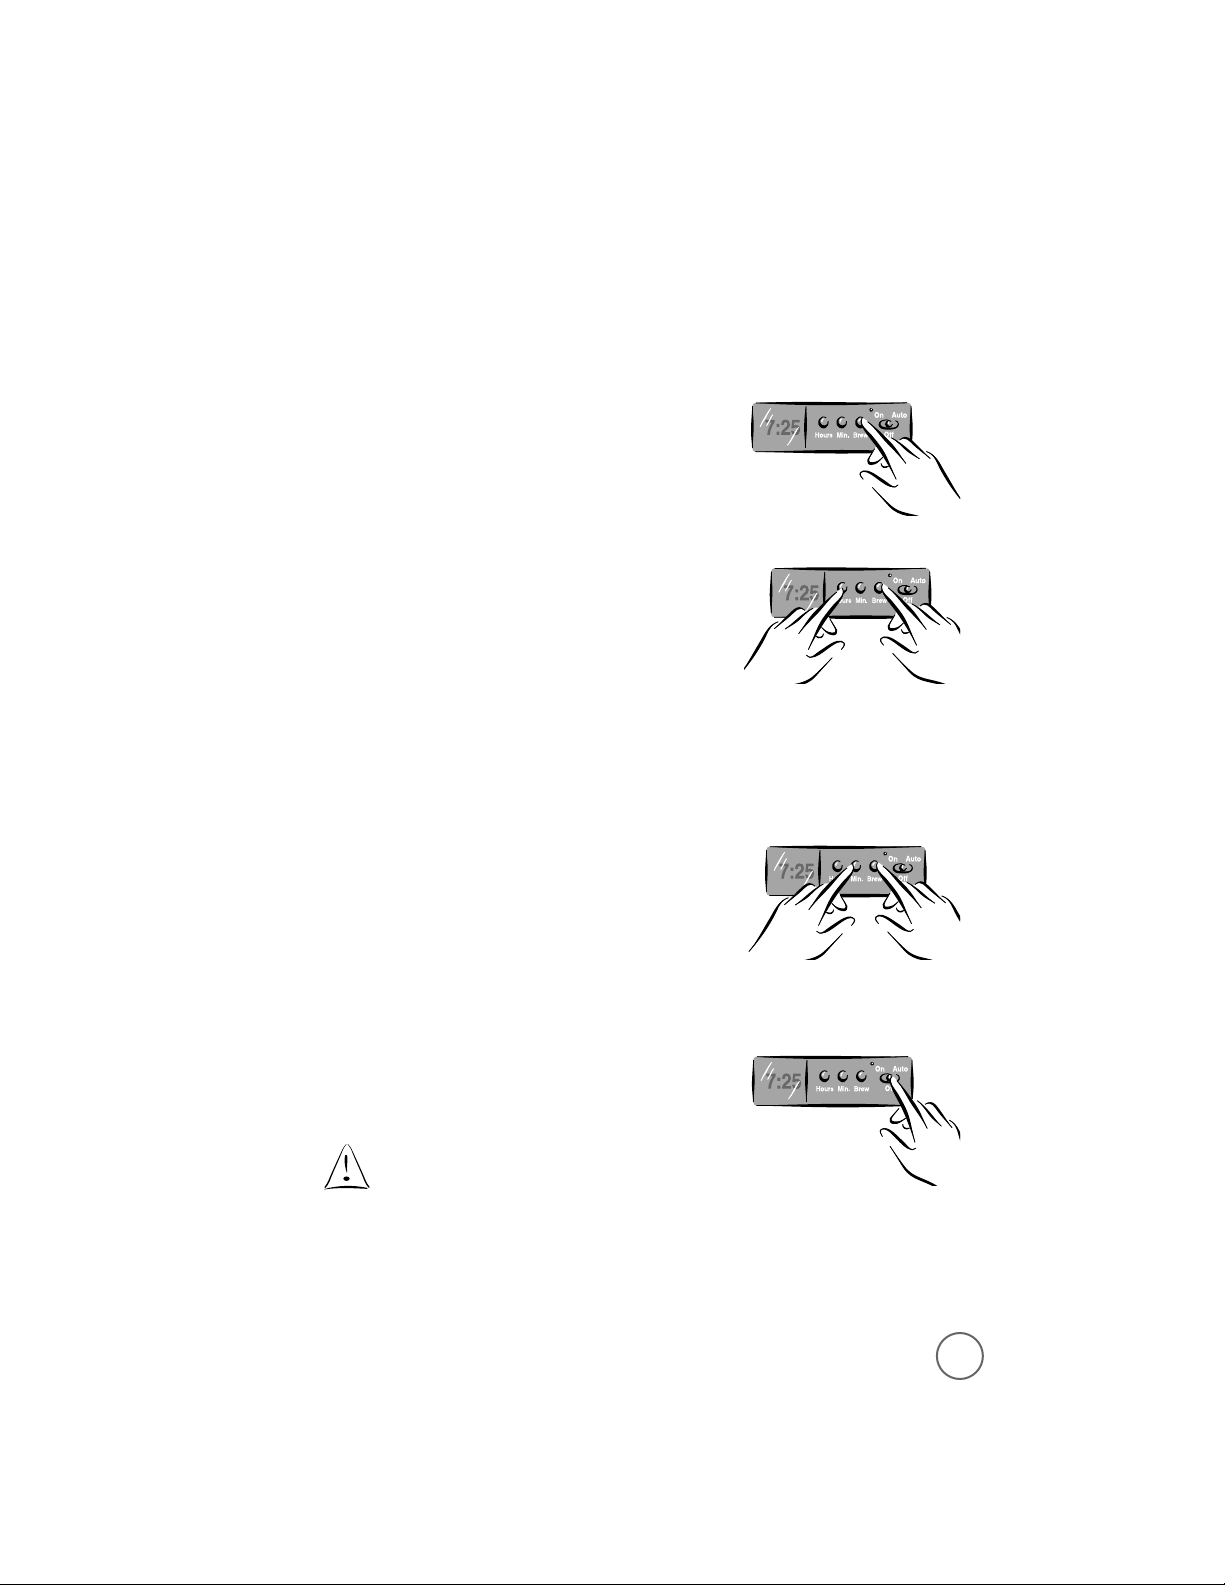
For Models ARX20 and ARX23:
You must set t he time fo r w hen yo u w ould like
the co ffeemaker to b egin b rew ing your co ffee.
1) While t he switch is in the Off po sition,
press and ho ld the BREW but to n.
2) While still pressing and hold ing t he brew b utton,
press and ho ld the HOUR butt o n unt il the clo ck
displays the ho ur you desire. The PM ind icato r
will light to ind icate a PM time; if the PM
indicat o r is not lit , the time is AM.
3) While still pressing and hold ing t he brew b utton,
press and ho ld the MIN. but t o n unt il the clo ck
displays the co rrect minute.
4) Release the brew b utton.
5) Push the switch to Auto.
The Delay Brew ind icato r w ill light. The delay
timer is set and the coffeemaker w ill b egin
brew ing the co ffee at t he time you selected.
If you w ant your coffee to b rew at the
same time t he fo llow ing d ay, simply
add the d esired amo unt of ground
co ffee, fill the w ater reservoir and
slide the but t o n t o AUTO .
Page 12

12
Cleaning t he Coffeemaker Bet ween Brew Cycles
To clean the used coffee gro unds and filter:
1) Discard the gro unds and p aper filter and , if necessary,
rinse the filter b asket. Yo u may also wash the filter b asket
in the dishw asher.
2) Rinse t he decanter with w arm w ater. Yo u may also w ash the
decanter in t he d ishwasher (top rack d ishw asher safe only).
Make sure t he coffeemaker is turned Off
when t he decanter is empt y.
Brewed coffee and grounds are bo t h very hot .
Handle them wit h care t o avoid scalding injuries.
Unplug t he coffeemaker’s p ower cord if you are
not using the coffeemaker or clock.
Page 13
13
Maintaining Your Coffeemaker
Maintaining yo ur co ffeemaker and it s part s will help ext end the life of t he appliance.
Cleaning t he Coffeemaker
Your coffeemaker must b e cleaned w hen yo u notice any o f the follo w co nd it ions:
• excessive steaming
• increased b rew cycle times
• t he pumping action stop s before all o f the w at er has been pumped
fro m the w at er reservoir
These co nditio ns are caused b y lime o r o t her mineral d ep o sits most commonly fo und
in tap w at er.
How frequently yo u clean yo ur co ffeemaker depend s up on t he hardness
of yo ur tap water. The follo wing table gives suggested cleaning int ervals.
Using MR. C FFEE®Cleaner
Please refer to MR. C FFEE®Cleaner bo x for instructio ns.
Read caution statement on side p anel of box b efo re use.
To clean your coffeemaker:
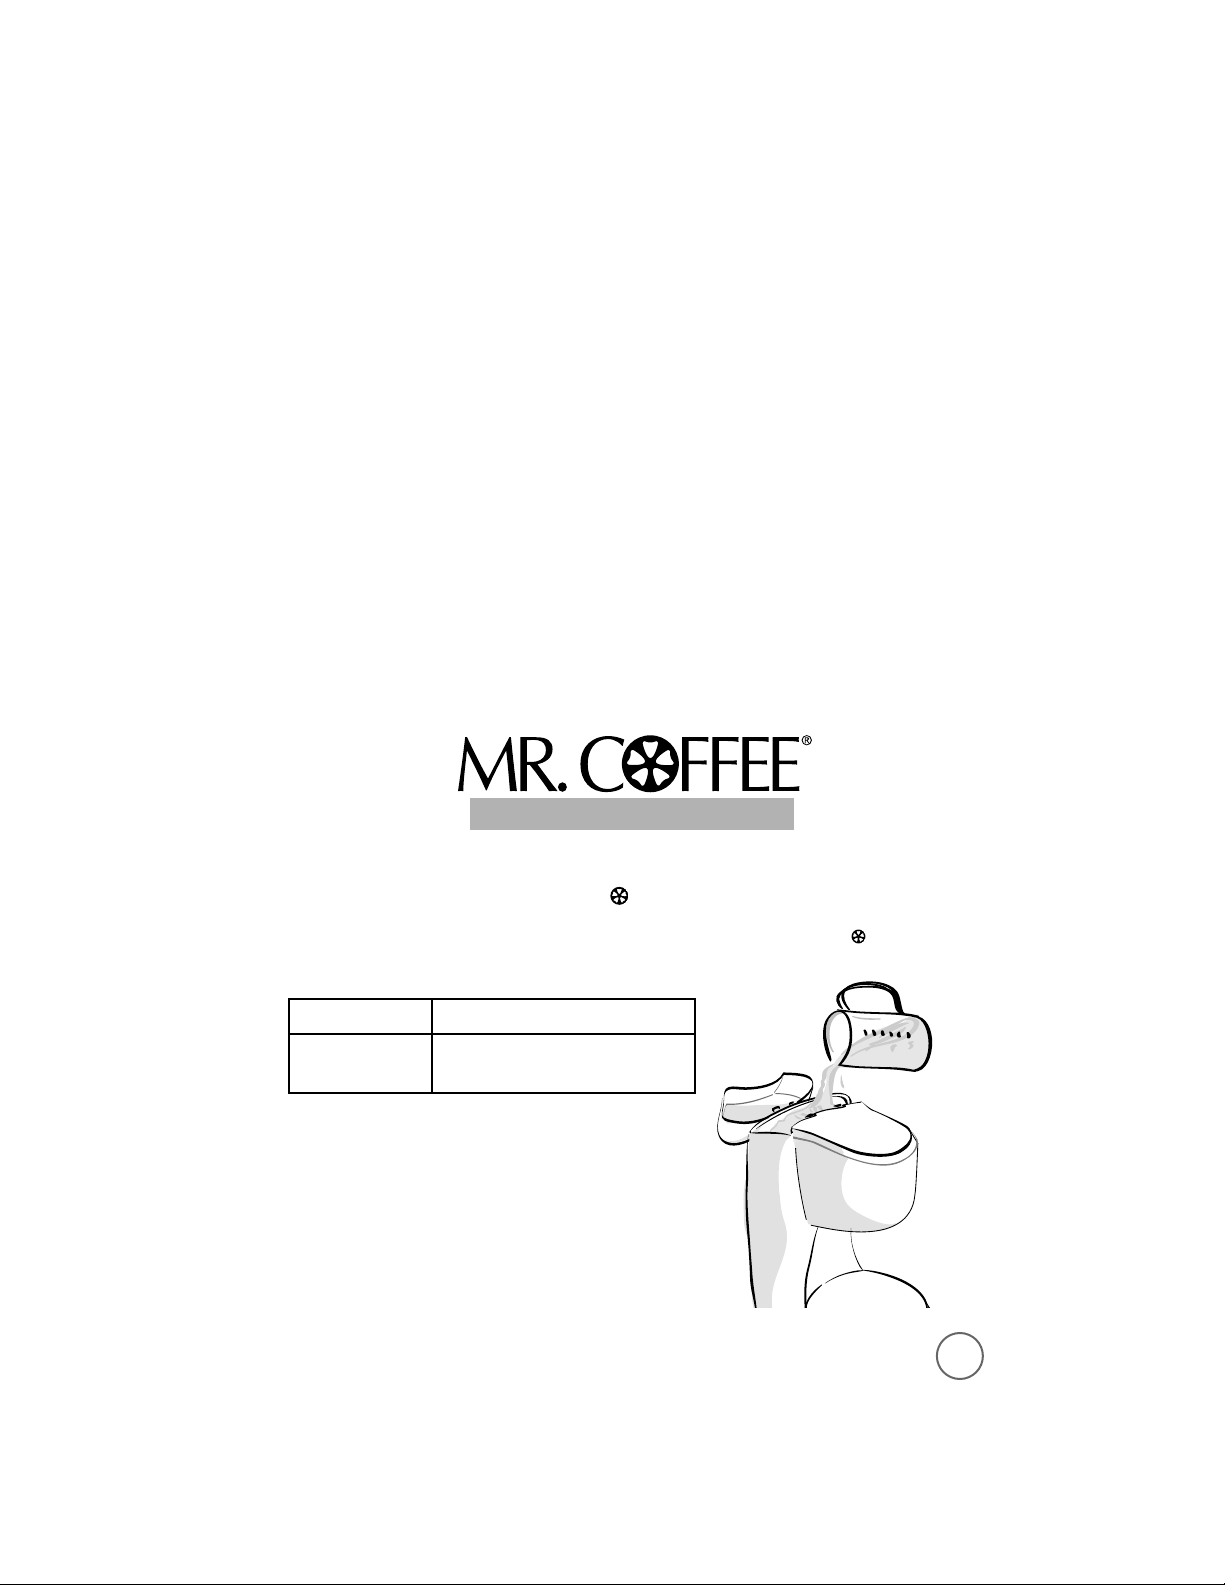
1) Po ur four cup s of undiluted white ho useho ld
vinegar int o the w at er reservoir.
Type of Water Cleaning Frequency
So ft w ater Every 80 brew cycles
Hard water Every 40 brew cycles
CO FFEEM AKER CLEAN ER
CO FFEEM AKER CLEAN ER
Page 14
2) Place a p ap er filt er int o the remo vab le filt er
basket and clo se the brew basket lid.
3) Place the emp ty d ecanter o n the
warming plate.
Make sure t o accurat ely p lace t he
decanter on the warming plate
to avoid the p ossibilit y of overflow.
4) St art the b rew cycle:
For Models:
• AR12 and AR13
a. Push the ON/OFF sw itch to ON
to begin the brew cycle.
• ARX20 and ARX23
a. Turn the switch t o On. Then, p ress the
brew b utton to b egin the b rew cycle.
b. When t he water has flow ed into t he
decanter, turn the coffeemaker Off
and let t he w ater stand for 30 minutes.
c. Rep eat Step s 1 – 4b.
14
Page 15
15
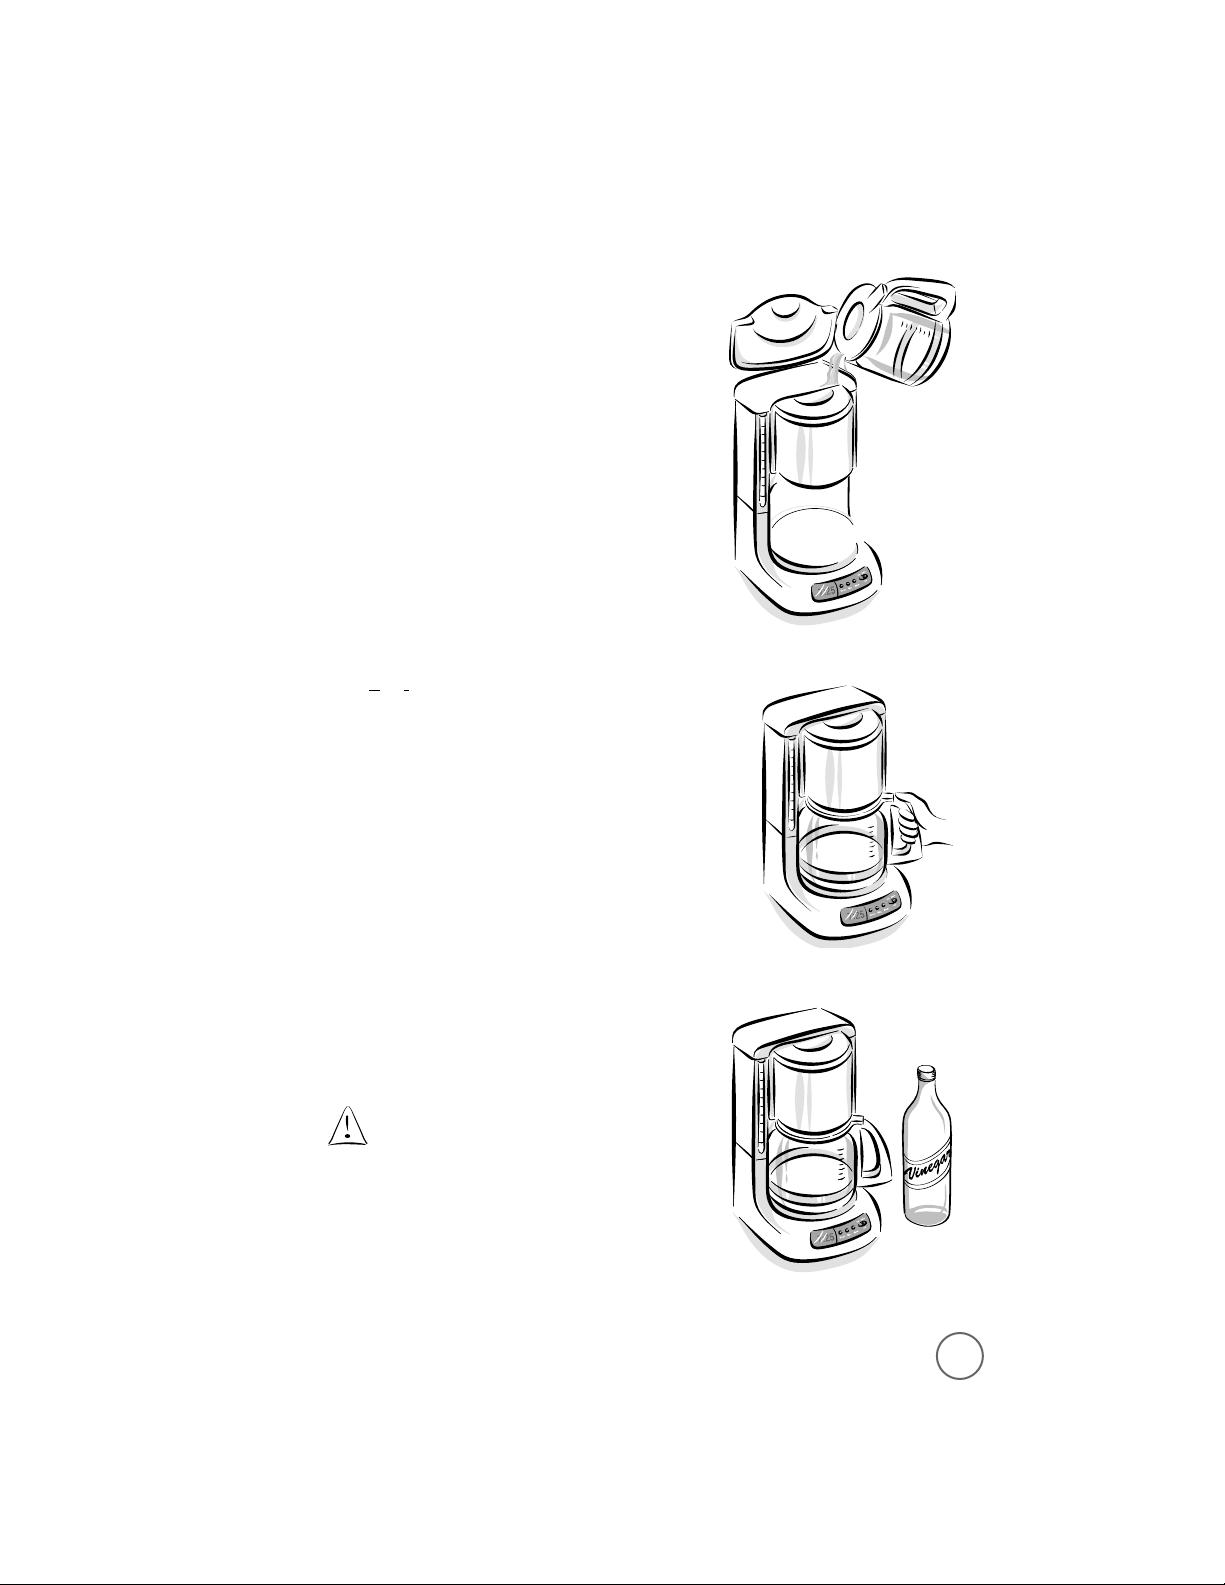
d. Discard both the vinegar and filter.
Fill the d ecanter w ith tap water and
pour it int o the w at er reservoir.
e. Place the d ecanter o n the w arming p late
and begin t he brew cycle.
f. Discard the w at er in the decanter and turn
the co ffeemaker Off. If necessary, repeat
step s d
through f to flush all traces of
vinegar fro m the coffeemaker.
Cleaning t he Decanter
Hard water can leave a w hit ish stain on the d ecanter.
Co ffee and tea may then turn t his stain bro w n.
To remo ve d ecanter stains:
1) Fill the d ecanter w ith a solutio n o f equal part s
tap w at er and vinegar and let t he solutio n stand
in the d ecanter fo r ap p roximat ely 20 minutes.
2) Discard the solut io n and w ash and rinse
the decanter.
Do not use harsh abrasive cleansers
that may scratch t he d ecanter;
scratches may cause t he decanter
to break.
Page 16
16
Service and Maintenance
Replacement Parts
• Filters
Fo r b etter tasting co ffee and t ea, w e reco mmend t hat you use MR. COFFEE
®
brand
8-12 cup paper filters or MR. COFFEE®brand p ermanent filters. These filters are
availab le at most grocery stores.
•
Decanters
You can usually p urchase a replacement decanter fro m the store w here
you purchased your coffeemaker. If yo u are unable to find a rep lacement,
please call 1-800 MR COFFEE (1-800-672-6333) in t he U.S. and Canada for
information on where yo u can find a store that carries rep lacement d ecanters.
Repairs
If your coffeemaker requires service, d o no t return it to the sto re where yo u p urchased
it. All repairs must b e made by Sunbeam o r by an autho rized MR. COFFEE®Service
Cent er. If yo u live in the U.S. or Canada, please call us at the fo llow ing t o ll-free
telep hone number to find the locat io n o f the nearest authorized service cent er:
1-800 MR COFFEE (1- 800-672-6333)
Mo nday through Friday, 9 A.M.– 6 P.M., Saturday 9 A.M.– 3 P.M. EST
To assist us in serving yo u, please have the mo d el numb er ( A R12 , A R13 , A RX20 o r ARX23)
and date of p urchase information when yo u call.
Questions, Comments and Suggestions
We w elcome your thoughts; please includ e yo ur comp lete name, add ress and telep hone
numb er when you w rite or e-mail us at:
co [email protected] m
You may also visit our w eb site and discover the secret to b rew ing the p erfect cup o f
co ffee. You’ll also find a rich b lend o f gourmet recipes, ent ert aining tip s and the lat est
information on MR. COFFEE®pro d ucts.
www.mrco ffee.com
Co n sumer Affairs Department
MR. CO FFEE
®
A Product of Sunb eam Corporatio n
P.O . Bo x 94838 9
Maitland, FL 32794-8389
Page 17

17
One-Year Limited Warranty
Sunb eam Products, Inc. (“Sunb e am” ) w arrant s that fo r a p erio d of o ne year fro m th e date o f
purchase, this p ro d uct w ill be free fro m defect s in material and w o rkmanship. Sunb eam, at
its op t io n , w ill repair o r replace t his product or an y compo ne nt of the p roduct fo un d t o b e
defect ive d uring the w arrant y p erio d . Replacement w ill b e mad e w ith a new or
remanufact ured pro d uct o r co mponent . If the p ro d uct is no lo nger availab le, rep lacement
may b e mad e w it h a similar pro d uct o f eq u al o r greater value. This is your exclusive w arranty.
This warranty is valid for t he o riginal retail p urchaser fro m the date o f initial retail p u rchase
and is no t t ransferab le. Keep t he original sales receip t. Proof o f purchase is req u ired t o
obtain warranty performan ce. Sunb eam d ealers, service centers, or retail sto res sellin g
Sunb eam p roducts do no t have t he right to alter mod ify or in any w ay change t he terms o r
co nditio ns of this warranty.
This warranty d o es not co ver normal w ear o f parts or d amage resulting fro m any o f the
fo llo w ing: negligent use or misuse o f the p ro d uct , use o n impro p er vo lt age or current,
use cont rary to the o p erating instructions, d isassemb ly, rep air or alteratio n b y anyone
other than Sunb eam o r an aut horized service cent er. Fu rt her, t he w arranty does no t cover
acts of nature, such as fire, flo o d , hurricanes and to rnad o es.
Sunb eam shall no t b e liable fo r any incidental or co nsequ en tial d amages caused b y the
breach of any exp ress or imp lied warranty. Exce p t to t he exte nt prohibited by applicable
law, any imp lied w arranty o f merchantabilit y o r fitness for a p articular p urp o se is limit ed in
duration t o t he durat io n o f the above warranty. Some stat es, provinces o r jurisdictio ns do
no t allow t he exclusio n or limit atio n of incidental o r co nsequent ial damages o r limit at io n o n
ho w lo ng an implied w arrant y lasts, so t he ab o ve limitations o r exclusion may not apply to
you. This warranty gives you specific legal rights, and yo u may also have o ther rights that
vary from stat e to state or p rovince to pro vince.
How t o Obtain Warranty Service
Take the p ro d uct t o an autho rized Sunbeam service center. You may ob tain a list of service
cent ers and o t her rep air/re p lacement instructions by calling 800 831-9678 or send an e-mail
to Co [email protected]. Please includ e name , address, te lepho ne
numb er, pro d uct mo d el number and descrip tio n o f the pro b lem.
DO NOT RETURN THIS PRO DUCT TO THE PLACE OF PURCHASE
Fo r p ro d uct q uestions:
Sunb eam Consumer Service
P. O. Bo x 94838 9
Do not send p roduct t o the abo ve address
© 20 01 Sunb eam Products, Inc. All rights reserved.
SUNBEAM®and MR. COFFEE®are registered trademarks of Sunb eam Products, Inc.
Made in China P. N. 1076 07
Page 18

18
PRECAUCIONES IMPORTANTES
Cuand o use algún aparato eléctrico siemp re deben de seguirse p recaucio nes
básicas de seguridad incluyend o las siguientes para reducir el riesgo d e
incend io o d escargas eléctricas, y /o daños a p ersonas:
• Lea tod as las instrucciones cuid adosamente ant es de usar la cafet era.
• No t o que las superficies calientes de la cafetera.
• Para pro tegerse co ntra una d escarga eléctrica, no sumerja el co rdó n,
el enchufe o la cafetera en agua o en o t ros líquido s.
• Supervisión cercana es necesaria cuando el aparato es usado por o cerca
de niños.
• Ap ague la cafetera y desconéctela de la toma de co rriente cuando ésta
o el relo j no estén en uso y antes de limp iarlo s. Permita que se enfríe
ant es de po ner o quitar part es y ant es de limpiar el electrodo méstico .
• No o pere ningún ap arato con un co rdó n d añad o o después de q ue el
aparato ha funcio nad o inadecuadamente o ha sido dañado en cualquier
manera. Regrese el ap arato a un centro de servicio autorizad o para su
examinació n, reparació n o ajuste.
• El uso d e accesorio s o ad itamento s que no sean de la marca MR. COFFEE
®
pued e causar lesiones o daño s.
• No se use en exteriores.
• No p ermita que el co rdó n cuelgue sobre la orilla de la mesa o d el
mo strado r o toq ue superficies calientes.
• No co loque este aparato sob re o cerca de q uemado res d e estufas de gas
o d entro de un ho rno caliente.
• Para desconectar, co loq ue el contro l en la p o sición d e APAGADO/OFF,
después remueva el enchufe d e la to ma de corrient e.
• No use esta cafetera más que para lo que ha sido diseñada.
• Co loq ue la cafetera sobre una superficie dura y nivelad a para evitar
la interrup ció n d el flujo de aire debajo del ap arato.
• Esta cafetera es para uso d o méstico únicamente.
Page 19
19
Cuidado y Uso de la Jarra
Siga las siguientes instruccio nes para red ucir o eliminar el riesgo de ro mper la jarra:
– Esta jarra est á diseñada p ara ser ut ilizada con su cafetera MR. CO FFEE
®
,
po r lo t anto nunca d eb e ser usada sobre las hornillas de una estufa,
ho rno ni tampo co en un ho rno microo nd as.
– No co loque la jarra de vid rio caliente en una sup erficie fría o mo jada.
– No utilice una jarra q uebrad a o co n un asa deb ilit ad a.
– No limp ie la jarra co n p olvo s limpiad ores, fib ras met álicas o de lana
o cualquier o tro material abrasivo.
– Deseche la jarra inmediatamente si sus co ntenidos se evaporan al hervir.
– Pro teja la jarra de filos, raspaduras o un manejo b rusco .
Advertencia: Para reducir el riesgo de incendio o descarga eléct rica,
no quit e ninguna cubierta para darle servicio al aparto.
En el interior de la cafetera no se encuentra ninguna parte
que pueda ser remplazada. Solamente el personal
autorizado debe reparar la cafetera.
Instrucciones Especiales del Cordón Eléctrico
1) El ap arato t iene un co rdó n eléct rico corto como medid a de segurid ad p ara
prevenir el riesgo d e t rop ezar, tirar o enred arse co n un cord ón más largo .
2) Pued e usar cab les d e extensión si se ob servan las precaucio nes adecuad as.
3) Si se usan los cables de extensión la capacidad no minal eléct rica del cable
de extensión deb e ser d e p or lo meno s 10 amperio s y 12 voltio s.
Co loq ue el cordón d e extensión de manera q ue no cuelgue sobre
el b o rde d el mo strad o r o mesa donde pued a tirarlo un niño o p ueda
tro p ezar co n él accident almente.
* Este aparato cuenta con una clavija polarizada
(una p ata es más ancha
que la otra)
. Para reducir el riesgo de descarga eléctrica, esta clavija
ent ra sólo de una manera en un enchufe polarizado. Si la clavija no
encaja en el enchufe simplemente colóquela al revés. Si aún así no
encaja llame a un electricista de su confianza. De ninguna manera
intente modificar esta medida de seguridad.
CONSERVE ESTAS INSTRUCCIONES
Page 20
20
Índice
Precauciones Importantes. . . . . . . . . . . . . . . . . . . . . . . . . . . . . . . . . . . . . 18
Cuid ad o y Uso de la Jarra . . . . . . . . . . . . . . . . . . . . . . . . . . . . . . . . . . 19
Instrucciones Especiales del Cordó n Eléct rico . . . . . . . . . . . . . . . . . . . 19
Preparando Su Cafetera. . . . . . . . . . . . . . . . . . . . . . . . . . . . . . . . . . . . . . . 21
Características de Su Cafet era . . . . . . . . . . . . . . . . . . . . . . . . . . . . . . . 21
Ad just and o la Longitud d el Cab le Eléct rico . . . . . . . . . . . . . . . . . . . . . 23
Ajustand o el Reloj
(Mo d elo s ARX20 y ARX23 Únicamente) . . . . . . . . . . . . . . . . . . . . . . 23
Preparando Café . . . . . . . . . . . . . . . . . . . . . . . . . . . . . . . . . . . . . . . . . . . . 24
Limpieza de la Cafetera Antes de Usar p o r Primera Vez . . . . . . . . . . . . 24
Seleccio nando y Mid iend o el Café Mo lid o . . . . . . . . . . . . . . . . . . . . . . 24
Añad iendo Agua y Cafee Mo lid o . . . . . . . . . . . . . . . . . . . . . . . . . . . . . 24
Prep arand o Café Ahora . . . . . . . . . . . . . . . . . . . . . . . . . . . . . . . . . . . 26
Prep arand o Café Más Tarde (Mo delos ARX20 y ARX23 Únicamente) . . . 27
Limpieza de la Cafetera Entre Ciclo s de Prep aració n . . . . . . . . . . . . . . 28
Mantenimiento para Su Cafetera . . . . . . . . . . . . . . . . . . . . . . . . . . . . . . . . 29
Limpieza de la Cafetera . . . . . . . . . . . . . . . . . . . . . . . . . . . . . . . . . . . . 29
Limpieza de la Jarra . . . . . . . . . . . . . . . . . . . . . . . . . . . . . . . . . . . . . . 31
Servicio y Mantenimiento . . . . . . . . . . . . . . . . . . . . . . . . . . . . . . . . . . . . . 32
Part es de Rep uesto . . . . . . . . . . . . . . . . . . . . . . . . . . . . . . . . . . . . . . . 32
Rep araciones . . . . . . . . . . . . . . . . . . . . . . . . . . . . . . . . . . . . . . . . . . . 32
Pregunt as, Comentarios y Sugerencias . . . . . . . . . . . . . . . . . . . . . . . . . 32
Información de la Garantía . . . . . . . . . . . . . . . . . . . . . . . . . . . . . . . . . . . . 33
Page 21

21
Preparando Su Cafetera
¡Felicitacio nes p o r la co mp ra d e su nueva cafetera MR. COFFEE®! Por favo r lea estas
inst rucciones cuidad o samente ant es de usar su nueva cafet era. El uso, cuidado y
mantenimient o adecuado asegurarán una operación sin pro blemas y una larga
duración de este ap arato. Guard e estas instrucciones para la info rmación de
limp ieza y si es necesario para la info rmación de partes d e rep uesto .
Características de Su Cafetera
Su nueva cafet era MR. COFFEE®tiene las siguientes caract erísticas:
• Capacidad de Preparación de 12 Tazas
• Almacenamiento del Cordó n – Le p ermite almacenar la longitud extra de co rdón
que no utilice para mant ener limp io su mostrad or o mesa.
• Jarra Resistente a Goteos – Diseñad a para ayudar a prevenir goteos después
de servir.
• Mango de la Jarra Diseñado Ergonómicamente – Prop orciona co modid ad,
co ntro l y segurid ad al servir el café
• Int errupt or Iluminado de Encendido / Apagado ON/OFF (Mo delos AR12 y AR13
únicamente) – Esta funció n d e segurid ad le recuerda q ue su cafet era está
encendida.
• Plato Calefactor Antiadherent e – Esta caract erística p reviene q ue la jarra se
adhiera a la sup erficie del plato calefacto r.
• Pause ’n Serve – ¿No puede esperar más a que el café termine de prepararse?
La función de pausa y sirva, Pause’n Serve le d a hasta 30 segund o s p ara servir
una taza de café mientras que el café continua p rep aránd o se.
• Controles Programables (Mo d elo s ARX20 y ARX23 únicamente)
–
Reloj: el reloj LED sirve co mo un útil relo j de co cina, así co mo tamb ién le
permit e p rogramar el cronómetro.
–
Cronó met ro: ¿Le gustaría despertar y tener una jarra de café fresco ?
El cro nó metro le permit e p rogramar cuándo le gustaría q ue la cafetera
inicie la preparación del café de una forma auto mát ica, hasta co n 24 ho ras
de anticip ación.
–
Ap agado auto mático en d o s horas: esta medid a de seguridad mantiene
su café caliente d urante dos ho ras después de q ue ha sido preparad o,
después aut o máticamente ap aga la cafet era.
• Canast a d e Filtro Removible – la canasta de filtro remo vible le p ermite levantar la
canasta d e la cavid ad do nde se coloca y sacar el filt ro y el café mo lido antes de
co locarla nuevamente en su lugar.
• Ventana de Visibilidad – la vent ana d e visibilidad en el tanq ue de agua le
permit e ver d e una forma ráp ida y p recisa cuant a agua contiene el tanq ue.
Page 22
22
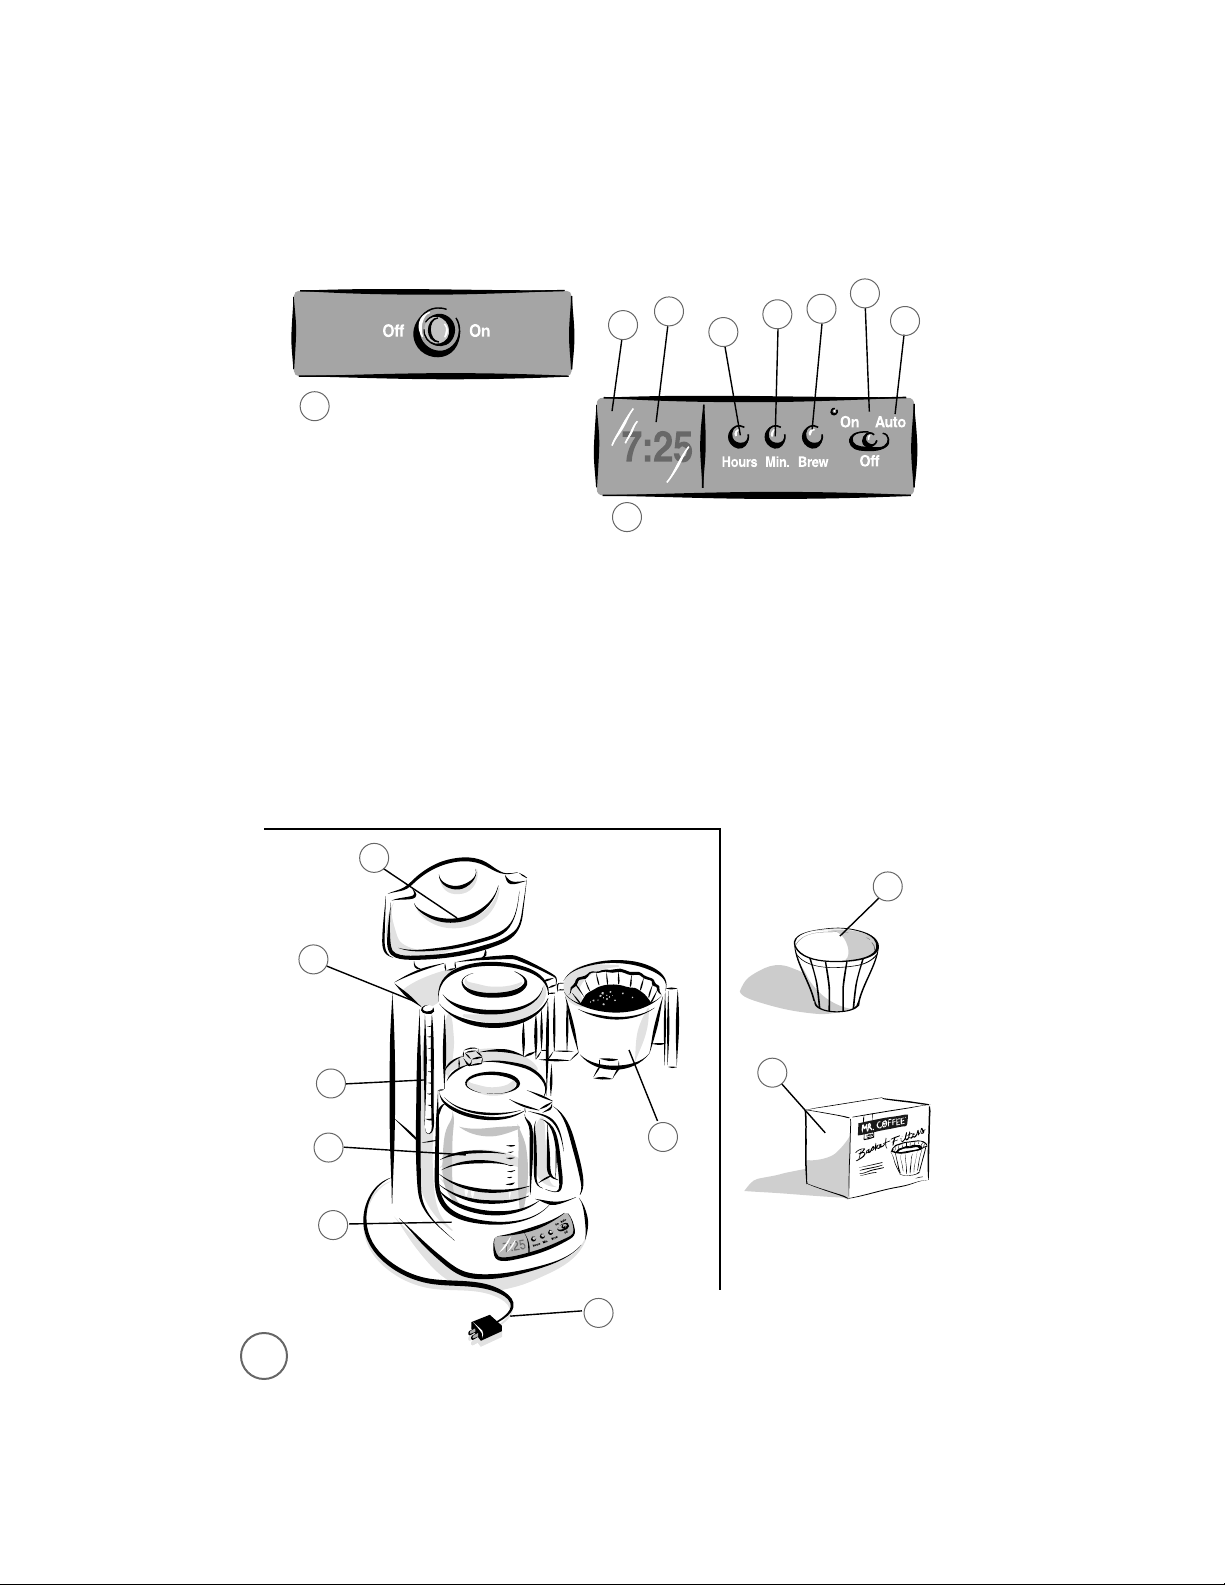
Características de Su Cafetera
2
1
M
ODELOS
AR12 YAR13
M
ODELOS
ARX20 YARX23
5
6
11
10
7
8
4
9
3
a
c
f
g
d
e
b
1. Int errup to r de
Encend ido / Apagado
ON/OFF
(Modelos AR12 y
AR13 únicamente)
2. Panel de Co ntro l (M odelos
ARX20 y ARX23 úni camente)
a. Botó n d e Ho ra
b. Bot ó n d e Minutos
c. Ind icad o r d e Retraso
de Prep aració n
d. Indicador de
Encend ido -A p agad o
ON-OFF
e. Indicador de
Automát ico
f. Ind icad o r PM
g. Cronó met ro
3. Canasta d e Filtro
Removible d e
Prep aració n
4. Tapa d e Canasta
de Prep aració n
5. Tanq ue de Agua
6. Vent ana de Visibilid ad
7. Cord ó n Eléctrico
8. Filtro s Marca MR.
COFFEE
®
Estilo Canasta,
para 8 – 12 Tazas
(no i ncluidos)
9. Filt ro Permanente
Marca MR. COFFEE
®
(no i ncluido)
10. Plato Calefactor
11. Jarra
Page 23
23
Ajustando la Longitud del
Cable Eléctrico
Usted p ued e ajustar la longitud del cab le eléct rico de
manera que t enga la lo ngit ud exacta q ue ust ed d esea:
Para aumentar la lo ngitud del cable eléctrico:
To me el cab le eléct rico (no el enchufe) y
jale suavemente alejando de la cafet era.
Para reducir la longitud d el cab le eléct rico :
To me el cab le eléct rico y lent amente aliment e
el cab le al interior de la cafet era.
Ajustando el Reloj
(Mod elo s ARX20 y ARX23 únicamente)
El reloj se ilumina intermit ent emente en el panel d e
co ntro l para ind icar que no ha sido ajustada la ho ra
co rrecta.
Usted d ebe ajustar el reloj si q uiere utilizar
la funció n d e cro nó metro .
Para ajustar la ho ra correcta en el relo j:
1) Presione y det enga el botón de hora HO UR
hasta que en la p antalla d el reloj ap arezca
la hora correcta. Consulte la Figura A-1
(para Modelos ARX20 y A RX23).
El indicad or PM se iluminará para ind icar
la hora PM si el ind icad o r PM no se ilumina,
entonces la ho ra es AM.
2) Presione y det enga el botón de minutos MIN.
hasta que en la p antalla d el reloj ap arezcan
los minut o s correcto s. Consulte la Figura B-1
(para Modelos ARX20 y A RX23).
Aho ra el relo j tiene la hora co rrecta.
F
IGURA
A-1
F
IGURA
B-1
Page 24
24
Añadiendo Agua y Café Molido
1) Abra la tap a d e la canasta d e p rep aració n y
saque la canasta d e filtro remo vib le.
2) Coloque un filtro d e p ap el de la marca MR. COFFEE
®
para p rep arar 8 – 12 tazas o b ien un filtro
permanente dorad o de la marca MR. COFFEE®,
dentro de la canasta para filt ro remo vib le.
3) Agregue la cantidad desead a de café molid o
al filtro . Suavemente agite el filt ro p ara nivelar
el café molid o .
Preparando Café
Limpieza de la cafet era antes de usar por primera vez
Siga los pasos indicados en la sección “Añadiend o Agua y Café Molid o ” y en
“Prep arand o Café Ahora” , (Páginas ?? – ??) p ero no agregue lo s granos de café.
Seleccionando y midiendo el café molido
Para mejores result ad o s, use grano s de café p ara cafet eras de goteo aut o mático .
Las cantidades q ue se muestran a co ntinuació n son cant idades sugerid as.
Para Preparar Use Est a Cantidad d e Café Molido
12 tazas 11 Cucharad as ó 5-1/2 Medid as
10 tazas 9 Cucharad as ó 4-1/2 Medid as
8 tazas 7 Cucharad as ó 3-1/2 Medid as
6 tazas 6 Cucharad as ó 3 Med id as
4 tazas 5 Cucharad as ó 2-1/2 Medid as
2 tazas 3 Cucharad as ó 1-1/2 Medid as
• 2 cucharad as a ras = 1 medid a a ras
• 1 taza = 5 o nzas de café p rep arado
Page 25
25
4) Asegúrese de q ue el filt ro esté cent rado
en la canast a para filtro y después cierre
la tap a d e la canasta d e p rep aració n.
5) Llene el t anque d e agua con la cant id ad
desead a de agua de grifo .
Use las marcas en la ventana d e visib ilidad
para med ir el agua, no las marcas d e la jarra.
Las marcas d e la jarra mid en la cant id ad
de café p rep arada únicamente.
Page 26
26
6) Co loque la jarra sobre el p lat o calefactor.
Asegúrese de que la jarra esté correctament e
colocada en el cent ro del plato calefactor o
el agua y el café se d esbordarán de la canasta
de preparación. Un desbo rdamient o puede
causar lesión personal o daños.
Para reducir el riesgo de dañar la jarra y/o
el riesgo de lesión personal, no agregue
agua fría a la jarra si ésta ya está calient e.
Permita que la jarra se enfríe antes de utilizar.
No p repare café mientras la tapa de la
canasta d e preparación esté abiert a.
Preparando Café Ahora
Para Mo d elo s AR12 y AR13:
Co loque el int errup t o r en la p o sición
de encend ido ON.
El interrup t o r d e encendid o / ap agado ON / OFF se
iluminará, ind icando q ue la cafetera está encendid a
y que el ciclo de preparación iniciará. Cuand o el
café d eje d e fluir en la cafet era, el ciclo de
preparació n se ha comp letado .
Mientras que el café está siendo preparado,
la función de pausa y servir Pause n’Serve
permite que puede servirse con la jarra una
taza de café. CO LOQUE LA JARRA SOBRE EL
PLATO CALEFACTOR EN UN PERIODO MENOR
A 30 SEGUNDO S PARA PREVENIR QUE EL CAFÉ
SE DERRAME Y UNA POSIBLE LESIÓN .
Para apagar la cafet era, presione el interruptor
de encend ido / apagad o ON / O FF.
Si la canasta de preparación derrama café
o no vacía el café a la jarra, no abra la canasta
de preparación. Desconecte la cafetera y
espere a que los contenidos se enfríen
antes de manejarlos.
Para Modelos ARX20 y ARX23:
Deslice el interruptor a la p o sició n
de Encend ido. Presione el b o tó n
de preparación cuando esté listo
para co menzar a prep arar café.
Para apagar la cafet era, deslice el interrup t o r
a la p osició n Off.
Su cafet era mant end rá su café caliente por 2 ho ras
y luego se apagará auto mát icament e.
Page 27
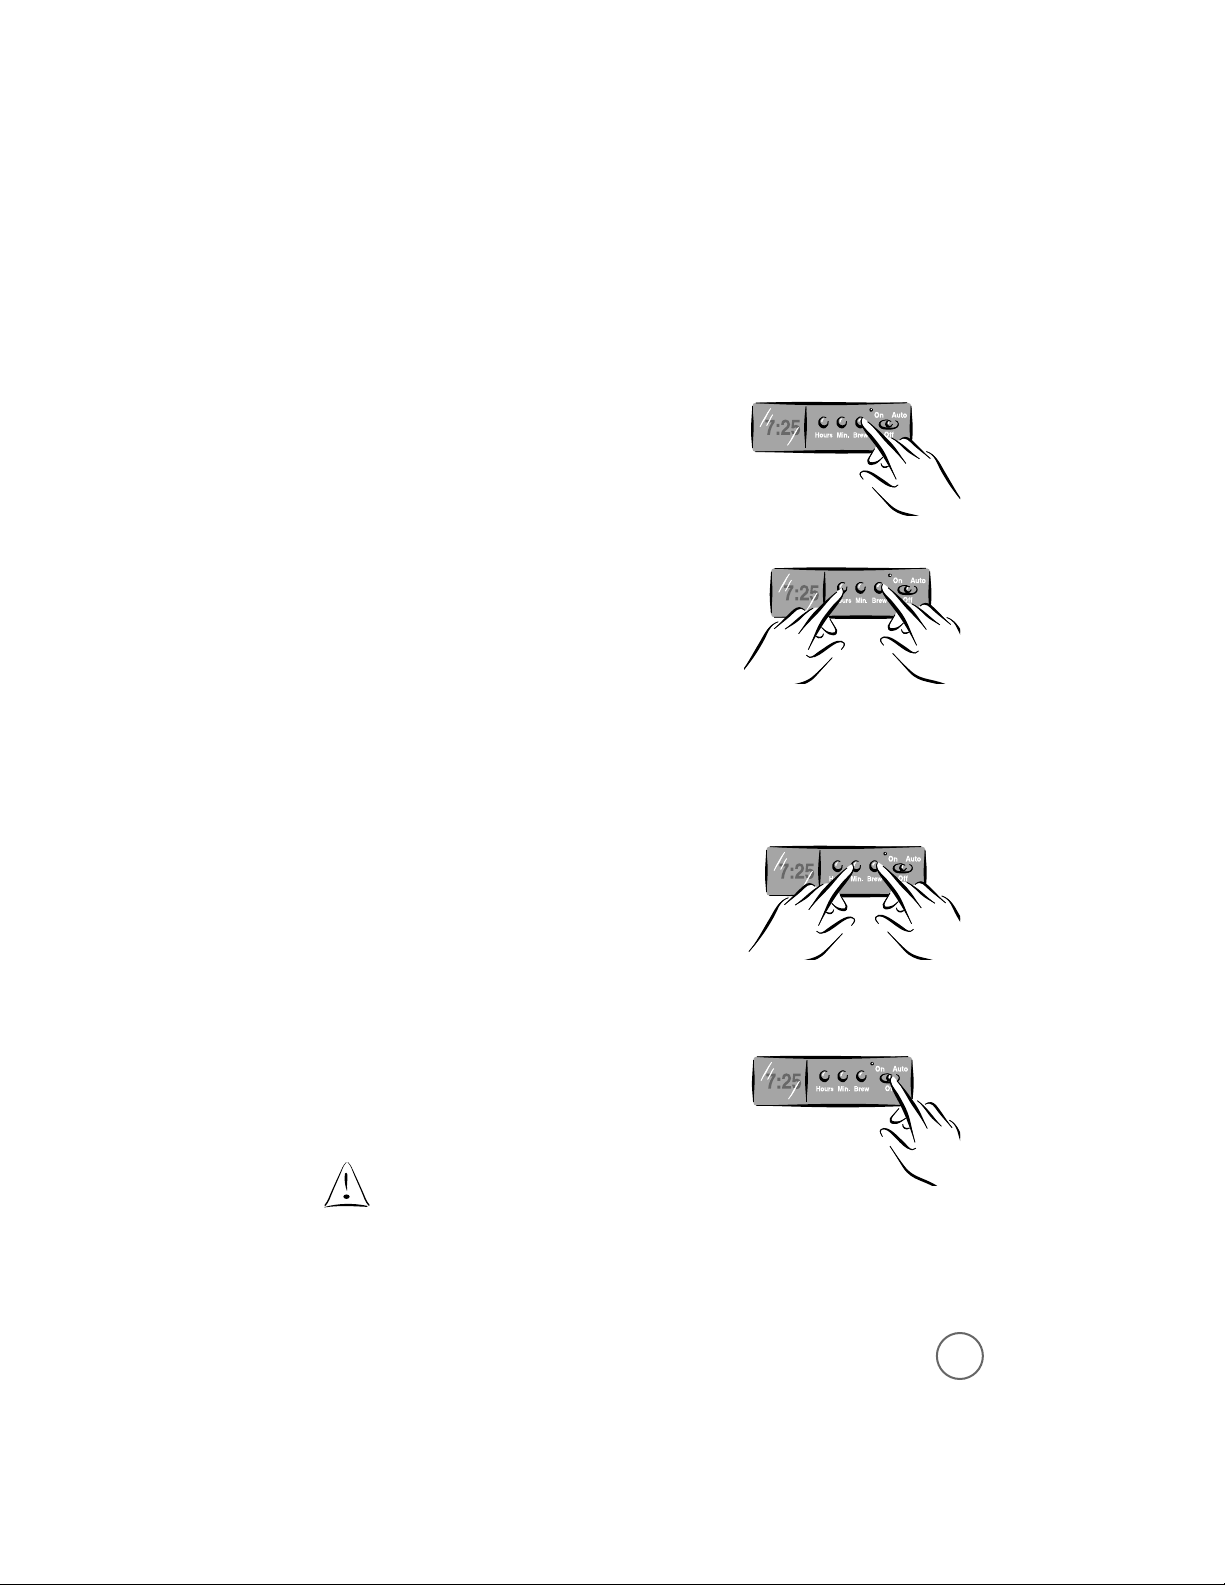
27
Preparando Café Más Tarde
Para Mo d elo s ARX20 y ARX23:
Usted d ebe p ro gramar el tiempo en el que le gustaría
que la cafetera inicie a p rep arar su café.
1) Mient ras q ue el interrup t o r se encuentra en
la p o sició n Off, p resione y det enga el bo tó n
para p rep arar café BREW.
2) Mient ras sigue presionando el botón de p rep aració n,
presione y d etenga el b o tó n d e hora HOUR hasta
que la pantalla en el reloj muestre la ho ra q ue usted
desea. El indicador PM se iluminará para ind icar un
tiempo PM, si el indicador PM no se ilumina, el
tiempo es AM.
3) Mient ras aun p resiona y d etiene el b o t ó n
de preparación,
presione y d etenga el b o tó n
de minuto s MIN. hasta que la pant alla en el reloj
muestre los minutos co rrecto s.
4) Deje de p resionar el b o t ó n d e p rep aració n.
5) Presione el int errup to r Auto .
El indicad or d e retrasar la preparació n Delay Brew,
se iluminará. El cronómetro d e retraso está
pro gramado y la cafetera co menzará la p rep aració n
de café a la hora q ue usted seleccionó .
Si usted desea q ue su cafetera prepare café
a la misma ho ra al d ía siguiente, simplemente
añad a la cantid ad desead a de café molid o ,
llene el t anque con agua y deslice el bo tó n
a la p osició n auto mática AUTO .
Page 28

28
Limpieza de la Cafetera Ent re Ciclos
de Preparación
Para limpiar los grano s de café utilizad o s y el filtro :
1) Deseche los granos y el filt ro d e p ap el que utilizó,
y si es necesario , enjuague la canasta d el filtro .
Usted p ued e tamb ién lavar la canasta del filtro
en la lavadora d e p latos.
2) Enjuague la jarra co n agua tib ia. Usted pued e tamb ién
lavar la jarra en la lavad o ra d e p lat o s (solamente en
la rejilla sup erior d e la lavado ra de plat o s p ara lavarla
de una fo rma segura).
Asegúrese de que la cafetera esté apagada cuando
la jarra esté vacía.
El café preparado y los granos de café están muy
calientes. Manéjelos con cuidado para evitar lesione s
y quemaduras.
Desconect e el cable eléctrico de la cafetera
si no la va a usar o si no va a usar el reloj.
Page 29
29
Mantenimiento para Su Cafetera
El mantenimient o para la cafet era y las partes de ésta le ayud arán a ext end er la vid a
del aparat o .
Limpieza de la Cafetera
Su cafet era deb e limp iarse cuando note cualq uiera d e las siguientes co ndicio nes:
• vapo r excesivo
• aumento en lo s tiempo s de preparació n d e café
• la acción de bo mb eo se detiene antes de q ue el agua haya sido comp letament e
bomb ead a d el tanq ue de agua
Estas cond icio nes so n causadas por los dep ó sitos minerales q ue co múnmente se
encuentran en el agua d e grifo .
La frecuencia co n la que d eb e limpiar su cafet era d ep end e d e la dureza d el agua
de grifo. La siguient e tab la le ofrece sugerencias de los intervalo s de limpieza.
Utilizando el Limpiador MR. C FFEE
®
Po r favo r consult e las instruccio nes en el emp aq ue del limpiad o r MR. C FFEE®.
Lea la no ta d e segurid ad en el p anel lat eral del empaque antes d e utilizarlo .
Para limpiar su cafetera:
1)
Viert a cuatro t azas de vinagre b lanco
sin d iluir en el tanq ue de agua.
Tipos de Agua Frecuencia de Limpieza
Auga Suave Cad a 80 Ciclo s de Prep aració n
Agua d ura Cada 40 Ciclo s de Prep aració n
CO FFEEM AKER CLEAN ER
CO FFEEM AKER CLEAN ER
Page 30
30
2)
Co loque un filtro d e p apel en la canasta d el
filt ro remo vible y cierre la t ap a de la canasta
de preparació n.
3)
Co loque la jarra vacía so bre el p lat o
calefactor.
Asegúrese d e q ue coloq ue
correctamente la jarra sobre
el plato calefactor, p ara evitar la
posibilidad d e d erramamiento s.
4)
Inicie el ciclo de preparació n:
Para Modelos:
• AR12 y AR13
a.
Co loque el int errup t o r d e encendid o /
apagado O N/OFF en la p o sición de
encendido ON para encend er la cafetera.
• ARX20 y ARX23
a.
Presione el int errup to r en encend ido
On. Después, p resio ne el botón d e
preparació n p ara encender la cafetera.
b.
Cuand o el agua hayan fluid o hacia la jarra,
apague la cafetera y d eje q ue el agua
repose d urante 30 minutos.
c.
Rep ita lo s Pasos 1 a 4b .
Page 31
31
d.
Deseche el agua (y la mezcla de vinagre) .
Llene la jarra co n agua d e grifo y vierta
en el tanque d e agua.
e.
Co loque la jarra sobre el p lato calefactor
y enciend a la cafetera y p ermita q ue
el ciclo se co mplete.
f.
Deseche el agua en la jarra y encienda
apague la cafetera. Rep it a los pasos
del d al f p ara enjuagar to dos los residuos
de vinagre de la cafet era.
Limpieza de la Jarra
El agua dura pued e d ejar manchas blancas en
la jarra. El café y el te p uede tornar estas manchas
co lor café.
Para remo ver las manchas de la jarra:
1)
Llene la jarra co n una solución de part es
iguales de agua y vinagre blanco y deje
que la so lució n rep o se en la jarra durant e
apro ximadament e 20 minuto s.
2)
Deseche la solució n, lave y enjuague la jarra.
No use limpiadores abrasivos que
puedan dejar marcas en la jarra;
las marcas pueden propiciar
que la jarra se rompa.
Page 32
32
Servicio y Mantenimiento
Part es de Repuesto
• Filters
Para un café o t e con mejor sabor, recomend amos que utilice los filt ros de p apel
para p rep arar d e 8 a 10 tazas, marca MR. COFFEE
®
o lo s filt ros permanentes marca
MR. COFFEE®. Esto s filt ros están d isponibles en casi to d o s lo s supermercad os.
• Jarras
Usted p ued e generalmente co mprar una jarra d e rep uesto d e la tienda d o nd e
co mpró su cafetera. Si usted no p uede enco ntrar un rep uesto, p or favor llame a 1800 MR COFFEE (1-800-672-6333) d entro d e los Estad o s Unid os y Canadá p ara
obtener info rmación acerca d e d ó nd e p ued e enco ntrar una tiend a que vend a las
jarras d e rep uesto .
Reparaciones
Si su cafet era req uiere servicio , no la envíe al lugar d o nde la comp ró. To das las
reparaciones deben ser hechas por Sunb eam o p o r un Cent ro d e Servicio
MR. COFFEE®. Si usted vive en lo s Estados Unido s o en Canadá, por favor llámeno s
al siguiente número sin cargo para enco ntrar el lugar d el centro de servicio
aut o rizad o más cercano :
1-800 MR COFFEE (1- 800-672-6333)
Lunes a Viernes, 9 A .M.– 6 P .M., Sábad o 9 A.M.– 3 P.M. EST.
Para ofrecerle un mejo r servicio cuand o llame, por favor tenga a la mano la info rmación
del número de mo d elo (AR12, AR13, ARX20 o ARX23) y la fecha d e comp ra.
Preguntas, Comentarios y Sugerencias
Agradecemos sus co mentario s, p or favor incluya su no mbre co mpleto, d irección
y número telefó nico cuando no s escriba o no s envíe un co rreo electró nico a:
co [email protected] m
Usted p ued e visitar nuestro w eb site y descubrir el secreto a elab o rar la taza
perfecta d e café. Usted tamb ién enco ntrará recetas gast róno mos y de la última
informació n d e nuestros prod uct o s d e MR. COFFEE.
®
www.mrco ffee.com
Co n sumer Affairs Department
MR. CO FFEE
®
A Product of Sunb eam Corporatio n
P.O . Bo x 94838 9
Maitland, FL 32794-8389
Page 33

33
Garantía Limitada de 1 Año
Sunb eam Products Inc. ( “ Sunb eam”) garantiza q ue, po r un períod o de un año a partir de la
fecha de co mp ra, este prod ucto estará libre de defect o s en el mat erial y en la mano de
obra. Sunb eam a su crite rio , reparará o remp lazará este pro d ucto o cualquiera d e lo s
co mp o nentes del mismo q ue estén defect uosos durante el períod o de garant ía. El remplazo
será hecho con un p ro d uct o o co mponent e nuevo o reco nstruido . Si el p ro d uct o ya no se
encuentra d isponib le, se remplazará con un pro d ucto similar d e igual o mayo r valo r. Est a es
su garantía exclusiva.
Esta garantía es válida p ara el c o mp rador o riginal a p art ir d e la fecha in icial d e compra y no
es transferib le. Con serve el recib o origin al d e comp ra. La prueba d e co mpra es req uerida
para o b t ener la garant ía. Los vend edo res, cent ro s d e servicio d e Sunb eam o t iend as d o nde
se vendan pro d uctos Sunb eam, n o t ienen el derecho d e alt erar, mo d ificar o cambiar de
ninguna o t ra forma los término s o cond icio nes de esta garant ía.
Esta garantía no cub re el d esgaste por el uso n o rmal d e las partes o d años qu e resulte n
de cualq uiera d e lo siguiente: negligencia o uso inco rrecto d el p roducto , uso b ajo un
voltaje o co rrient es inadecuad o s, uso co ntrario a las instruccio n es d e o p eració n,
desensamble, rep aracio nes o alteraciones hechas p o r una p ersona q ue no p ertenezca
a Sunb eam o a un cent ro de servicio auto rizad o . Ad emás, la garantía no cubre los actos
de la naturaleza, t ales como incendios, inu ndacio nes, huracanes y tornad o s.
Sunb eam no será respo nsable de ningún d año incid ent al o co nsecuente causado p o r el
incumplimiento de cualquier garant ía exp resa o implícit a. Excep t o al alcance p rohib ido p o r
la ley q ue ap lique, cualquier garantía imp lícita d e co me rcializació n o ajustes para un p ropósito
en p art icular, está limit ad a en duració n al p e rio do de la garantía que arriba se indica.
En algunos estad o s, p rovincias o jurisdicciones, no se permite la exclusión o limit ación
de daños incidentales o consecuentes o limitaciones en la d uración d e una garantía
imp lícita, así que las limit aciones o exclusio nes que se ind ican anteriorment e pue d en no ser
aplicables a usted . Esta garantía le d a a usted d erechos legales específico s y usted p ued e
también t ener o tro s d erecho s q ue varían d e estad o a estado y d e p ro vin cia a p ro vincia.
Có mo Ob tener el Servicio de la Garant ía
Lleve el producto a un centro d e Servicio Aut o rizad o Sunb e am. Ust ed p ued e ob tener
una lista de los cen tro s de servicio e instruccio nes acerca d e la rep aració n o re mp lazo
del producto llamando al 800 831-9678 o envíe un e-mail o co rreo elect ró nico a:
Co [email protected] m Po r favo r incluya su no mbre, d irecció n,
número telefónico , número d e mo d elo d el p roducto y d escripción d el p roblema.
NO ENVÍE ESTE PRO DUCTO AL LUGAR DONDE FUE ADQUIRIDO.
Para preguntas relacionad as al p roducto s póngase en co ntacto con:
Sunb eam Consumer Service
P. O. Bo x 94838 9
No envíe e l product o a esta d irección.
© 20 01 Sunb eam Products, Inc. Todos los derechos reservad o s.
SUNBEAM®y MR. COFFEE®son marcas co merciales registradas de Sunb eam Prod uct s, Inc.
Hecho en China P. N. 1076 07
Page 34

34
Notes
Page 35

35
Notes
Page 36
© 2001 Sunbeam Products, Inc. Al l rights reserved.
MR. C FFEE®is a registered trademark of Sunbeam Products, Inc.
Distributed by Sunbeam Products, Inc., Boca Raton, Flori da 33431.
© 2001 Sunbeam Products, Inc. Todos los derechos reservados.
MR. C FFEE®es una marca registrada de Sunbeam Products, Inc.
Distribui do por Sunbeam Products, Inc., Boca Raton, Flori da 33431.
Made in China / Hecho en China P. N. 107607
 Loading...