

Page 1
INE-PHB-4
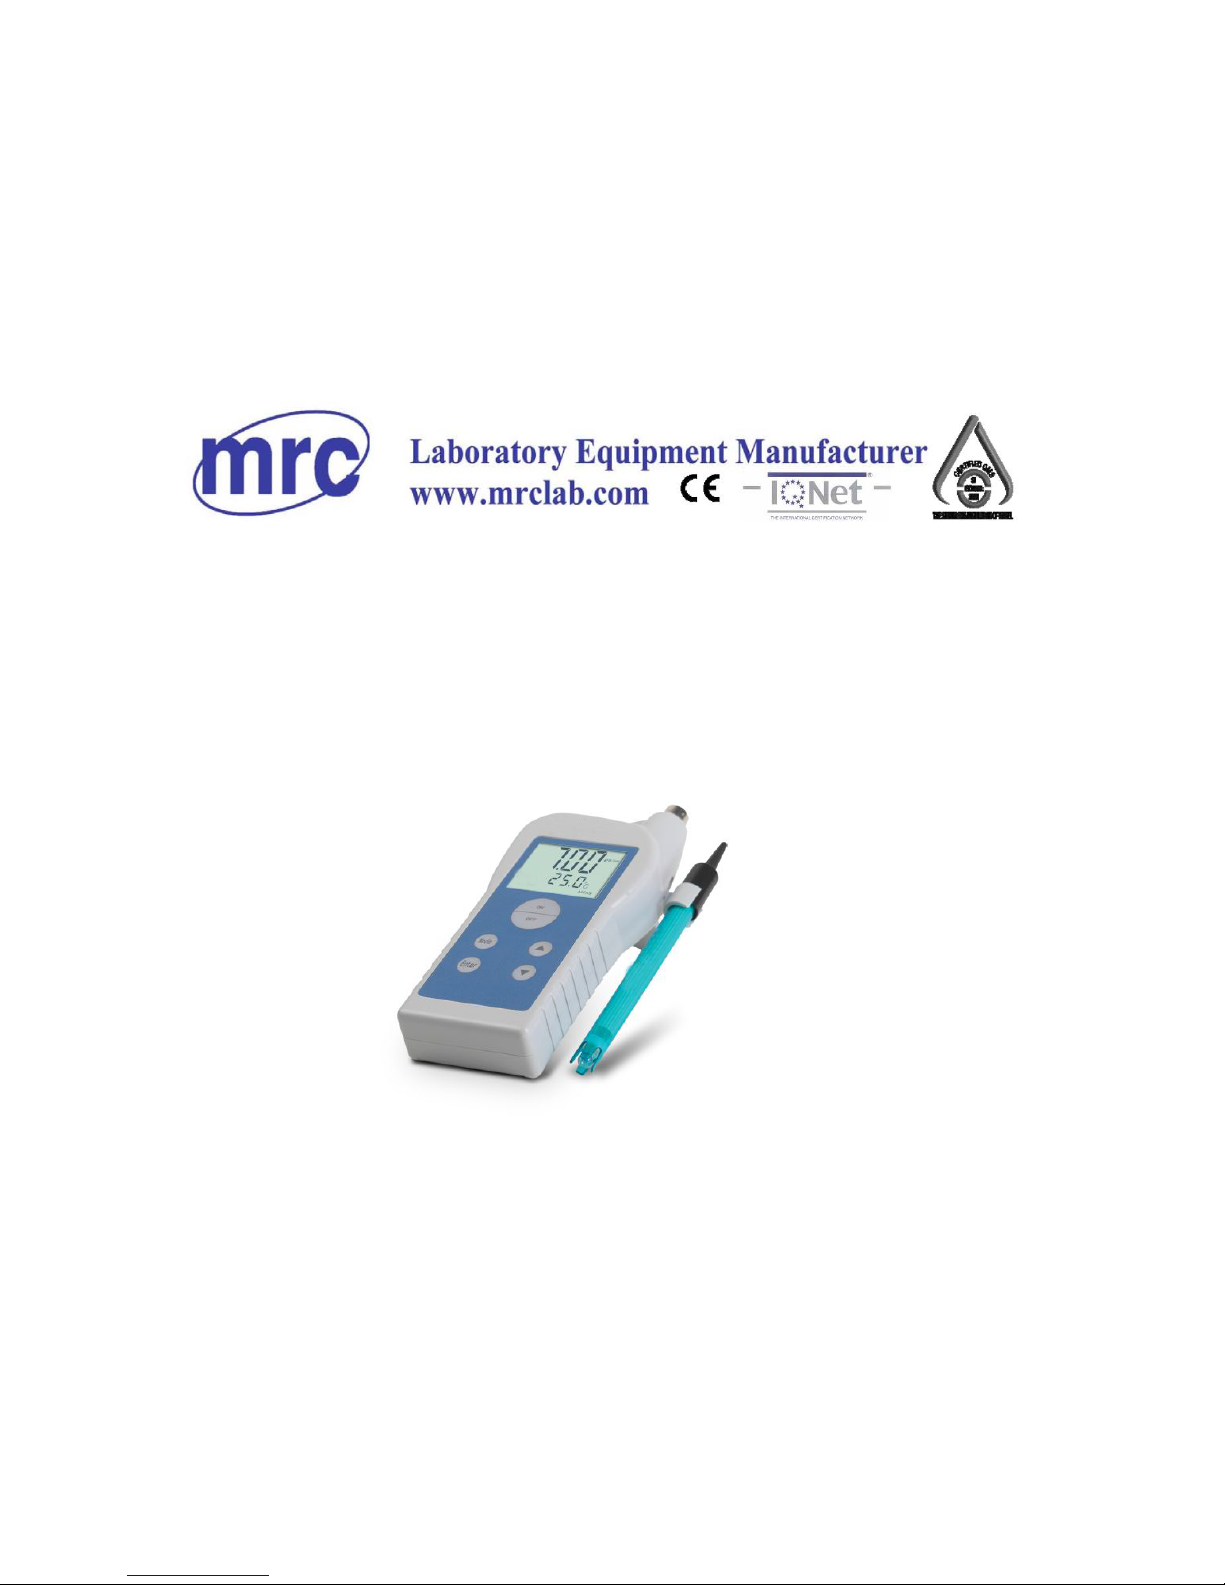
Portable pH Meter
Operation Manual
Page 2

1
Content
1. Specifications
2. Construction
3. Operation
4. Maintenance
1. General
Before you
begin using the meter, please read the instruction carefully to be sure
you get the best possible performance to avoid wrong operation, ensuring
accurate measuring and extend the working life of the meter.
Model INE-PHB-4 PH meter is a portable pH meter with 31/2 LCD
display, displaying temperature and pH value simultaneously,
distinguishing buffer solution automatically. It is suitable for
measuring the pH value and potential(mV) in the laboratories and
inspection offices. The compact size and portable design of the meter make
it specially suitable for being used in the remote site without power source.
2 Specifications
2.1 Main specifications and performance
(1) Measuring range : pH: 0~14pH mV: 0~±1400mV
(2) Accuracy of the electric unit: pH : ±0.03pH mV: ±0.2% FS
(3) Input impedance of the electric unit :5×10¹¹Ω
(4) Input current of the electric unit: 1x10
-11
A
(5) Stability of the electric unit: ±0.0pH±1 bit/3hr
(6) Temperature compensation: (0~60)℃
(7)Repeating of the meter: 0.03pH
(7) Outside dimensions: 170×75×30mm
(8) Weight: 0.5kg
Page 3

2
2.1 Normal operating conditions:
(1) Ambient temperature: 5℃~35℃
(2)Relative humidity: Not more than 80%
(3)Temperature of measured solution: 5℃~60℃
(4)Power supply: two pieces of 5V batteries
(5)No obvious vibration
(6) No strong electromagnetic interference except the geomagnetic field.
3. Construction
1- Electrode socket
2- Electrode rack
3- Screen
4- Power ON/OFF
5- Increase key
6- Reduce key
7 - Mode key
8 - Confirm key
9 - Background light
4. Operation
The meter works on two pieces of 5V battery. Open the battery cover on the
backboard of the meter and insert the battery.
Please calibrate before measuring pH value. No need to calibrate in each
operation. In general, calibration is needed once a day when the measuring
interval is comparatively short.
The meter has two points calibration. The procedure is as following:
4.1 Press “ON/OFF” button to switch on the battery supply. the meter enter
“mV” measuring state;
4.2 Press “MODE” button to enter temperature measuring state, the “℃ ”
indicating light flashes. The model circuit is as following:
mV measurement (displaying MEAS and mV)
temperature setting (the “℃” light is flashing)
pH calibration 1(displaying STD1)
pH calibration 2(displaying STD2)
pH measuring (displaying MEAS and pH)
4.3 Press “▲” or “▼” button to adjust temperature value when the displayed
temperature value is the same as the temperature value of calibrated
solution, press “ENTER” button to store it into the meter. The “℃ ”
indicating light stops flashing at this time.
4.4 Press “MODE” button, the meter display “STD1” to enter the first
calibration point (if you don’t need calibration, press “MODE” two times,
the meter display “MEAS” enter PH measurement directly);
Page 4

3
4.5 Clean the electrode with distilled water, then put electrode into one of the
three pH buffer solutions, the meter display mV value of the first point
buffer solution. When the value is stable, press “ENTER” button, the meter
display pH value of the first point buffer solution. The first point calibration
is now completed. Press “MODE” button again, the meter display “STD2”
to enter the second point calibration state.
4.6 Take electrode out of buffer solution, clean the electrode with distilled water.
Put the cleaned electrode into another buffer solution, the meter display mV
value of the second buffer solution. When the value is stable, press
“ENTER” button, the meter display pH value of the second point buffer
solution. Press “MODE” button again, the “STD2” light turn off and the
meter display “MEAS” to enter pH measuring state. The calibration is
completed.
The meter is ready to do pH value measuring after calibrated meter (the meter
can store the last calibration data when you don’t operate new calibration), but
the meter must be re-calibrated if following cases happen:
Ø Big difference between calibration temperature and temperature of
measured solution;
Ø The electrode is not in the solution for quite a long time;
Ø A new combination electrode is used;
Ø The meter has been used to measure strong acid (pH<2) or, strong alkali
(pH>12);
Ø The meter has been used to measure the liquid containing fluoride, or
solution with pH<7 or dense organic solutions.
When the temperature of the measured solution is much different from the
temperature of the buffering solution, the temperature of the meter must be
calibrated to make the indicated temperature same as the temperature of the
measured solution. The operation is same as step 2 and 3. Then press “MODE”
button three times, the meter display “MEAS pH” to enter measure pH value.
Measuring of potential of the electrode (mV value):
Ø
Press “ON/OFF” button , the meter enter “mV” measurement;
Ø
Put on suitable ion selective electrode.
Ø
Clean the electrode with distilled water, remove the remaining
moisture with absorbing paper.
Ø
Put the electrode into the measured solution, and the meter will
read out the potential of the ion selective electrode (mV value) to
display a “+” or “-” polarity automatically.
Note: Press the light button on the top left corner of the meter when you need to
measure at night. The background light of meter turn on. (Please do not press
the light if you do not use at night, because it will reduce to use the battery life
when you turn on the light.)
If measurement is not normal because of mistaken operation in the course of
calibration, users may switch off the meter, then hold "ENTER" button, switch
on the meter again, the meter will be in the state of beginning. Make calibration
once more.
Page 5

4
5. Maintenance
In addition to the good construction of the meter, proper maintenance is also an
essential factor effecting the performance of the meter, especially for this kind
of acid meter. With very high input impedance and frequently contact with
chemicals due to its working environment. Therefore, good maintenance is
necessary for this pH meter.
5.1.The input end of the meter (i.e. the socket of the combination electrode)
shall be kept clean. The plug of the electrode shall not be disengaged very
often, to prevent dust or moisture from entering the plug.
5.2 The tip end of the electrode is quite thin. Be sure not to hit the tip end on any
hard material to avoid damage.
5.3 Keep the tip end of the electrode away from dirts. In case it is found
contaminated, clean it with medical cotton or with 0.1mol/L diluted
hydrochloric acid.
5.4 If the end of the electrode is found to have cracks or become aged (stored for
over 2 years), it is necessary to change a new electrode. Or slow reaction
will happen, Or even results in big measuring error. Do remember the new
electrode shall be immersed in distilled water for at least 24 hours before
being mounted.
5.5 In calibrating the meter with buffering solution, it is important to ensure the
reliability of the solution, as low accuracy of the solution will surely results
in error in measuring result.
5.6 When a symbol “LOBAT” is shown on upper left corner of the display, it
means to replace the battery.
5.7 Be sure to avoid strong and direct sunshine on the display for obtaining
maximum life. Take care not to hit the display on any hard object, or touch
the screen glass to avoid scratching.
5.8 Please remove the batteries if they will not be used again for a long.
Page 6

5
Storing temperature(“℃”stops flashing)
Temperature Setting(“℃”is flashing)
Displaying STD1 the first point calibration
The first calibration is completed
Turn ON The Meter
Displaying STD2 to enter the second point calibration
The second calibration is completed
Model INE-PHB-4 operating flow diagram:
Press “MODE” button
Press “▲” or “▼” button
Press “ENTER:” button
Press “MODE” button Press “MODE” button
Press “ENTER” button
Press “MODE” button
Press “ENTER” button
Press “MODE” button Press “MODE” button
Press “MODE” button
Packing list
INE-PHB-4
Portable pH meter
NO.
Description Quant.
1
INE-PHB-
4 pH meter 1
2 PH combination electrode 1
3 Buffer pH4.7.9 5
4 Electrode holder for special purpose 1
5 Battery No.5. 4
6 Manual 1
Date: Inspector:
Displaying “MEAS” TO MV measurement
Setting temperature
Displaying “MEAS” to enter PH measurement
3, Hagavish st. Israel 58817
Tel: 972 3 5595252, Fax: 972 3 5594529 mrc@mrclab.com
MRC.
1.18
Page 7

pH Combination
Electrode
Instruction
Manual
Characteristics
One-in-two pH combination
electrode
INE-E-201 Serials:plastic
shell
(polycarbonate)
INE-65-1 Serials: Glass shell
INE-E-202 Serials:Glass shell
One-in-three pH combination electrode
Page 8

1
with pH and temperature.
INE-E-301 Serials: plastic shell
(polycarbonate),
INE-E-303 Serials:Glass shell,
Operation
1. Please keep the measuring side
downward, take the black
electrode cap and swing it gently
for several times. Besides, you
should check if there is air bubble
in the glass membrane and
reference salt-bridge. Glass
membrane and reference
salt-bridge should be filled with
solution without air bubble.
2. Please remove the plug from the
filling hole and connect electrode
with pH meter. Then you should
calibrate electrode slope with two
different buffers.
(Please refer to operational manual for
calibration.)
Maintenance
1. Please add 18mm KCl solution
(3.0mol/L) in the protective jacket
of electrode. Hold the protective
jacket gently and make it flat.
Then install it on the electrode
measuring side.
2. Insert the plug back into the filling
hole and put the electrode back to
box in ambient temperature.
Note
1. Immerse the electrode in the buffer
solution or measured solution,
please hold electrode to stir
solution several times quickly so
that glass membrane and
salt-bridge are filled with solution.
2. To obtain correct measuring result,
electrode calibration and
measurement should have same
conditions.
3. The liquid level of electrode
external reference liquid should be
kept at 10mm below filling hole.
The liquid level should be higher
than level of measured solution.
4. You should always keep electrode
plug clean and dry.
5. Please don’t immerse electrode in
sample solution for a long time.
6. After using the electrode, please
rinse it carefully.
7. The components which touch
sample solution include PC
(polycarbonate) shell, glass
accessories and silicon rubber.
Before measurement, you should
confirm that your sample solution
does no react to electrode material.
8. Please keep electrode serial
number(white casing on the cable )
in good condition. Don’t replace
electrode plug at will. Otherwise,
you can not enjoy after-sale
service of this product.
Troubleshooting
Why can’t I calibrate electrode
slope?
1. Please make sure the preserved
status of electrode is with
requirements of ‘Maintenance’
before using electrode. If the
electrode is not preserved correctly,
please immerse it into KCl
(3.0mol/L) solution for more than
2 hours.
2. Please check if the electrode is
qualified to measure: Please adjust
the meter to display mV mode.
Immerse the electrode in pH4.00
and pH9.18 Standard buffer
solution. Record value displayed
of the meter. The sum of absolute
value should exceed 292mV.
3. With regard to unqualified
electrode, you can rinse and clean
it (Please read ‘Troubleshooting’
for reference.)
Which kind of standard buffer
solution should I use to
calibrate electrode?
1. Generally, there are two groups of
buffer solution for electrode
calibration. They are pH4.00,
pH6.86 and pH9.18 or pH4.00,
pH7.00 and pH10.00. Please
choose fresh standard buffer
solution as soon as possible.
2. If your sample solution is acid,
please use standard buffer solution
of pH4.00 and pH6.86 or pH7.00
for calibration. If your sample
solution is alkaline, then you need
to use standard buffer solution of
pH6.86 and pH9.18 or pH10.00 for
calibration.
How to make external reference
solution of electrode?
1. In each electrode packing box,
Page 9

2
there is a plastic bottle which
contains KCl powder. Please add
appropriate deionized water in the
bottle until it reaches the tick mark
(20mL) of the bottle. Then shake it
up.
2. You can also weigh 55.9g KCl
powder and dissolve it in the
250ml deionized water.
How to prolong the service life of
the electrode?
1. The electrode can not be used to
measure oil sample, sticky sample
and sample full of tiny particles.
2. The electrode is not suitable for
non-aqueous titration.
Why must you control temp.
during measurement?
1. The pH value of solution is
affected by temperature.
2. The temperature of solution is 10
during measurement. At this
moment, pH displayed is the pH
value at 10. If you want to know
pH value at 25, you should raise
the solution temperature to 25.
PH meter has the temperature
compensation function which can
not calibrate pH value at 10 to
pH value at 25.
How often does electrode need
calibration?
1. You need to calibrate electrode
with standard buffer solution
before each performance.
2. You still need to calibrate
electrode after using it for two
hours.
Why is there white powder
adhering to electrode cap or
electrode shell surface?
This is caused by KCl salting out
and will not affect electrode
function. You can rinse it with
deionized water.
How to clean electrode?
1. Adhered with metal ion: please
immerse the electrode in HCl
solution(0.5mol/L) for 5 minutes.
You should stir the 0.5mol/L HCL
solution with electrode quickly
several times and take it out. Then
rinse it with deionized water and
immerse it in the KCl solution (3
mol/L) for 4 hours.
2. Adhered with organics: please
immerse the electrode in absolute
ethyl alcohol (or solution which
can dissolve this organics) for 15
minutes. Stir solution with
electrode before taking it out and
then rinse it with deionized water.
Finally immerse it in the KCl
solution (3mol/L) for 4 hours.
Note: Since the material of electrode
shell is PC (polycarbonate), sample
solution which contains organics
may corrode electrode outer shell.
3. Adhered with inorganics: please
immerse electrode in EDTA
solution (0.1mol/L) or HCl
solution (0.1mol/L) for 15 minutes.
Then stir solution with electrode
quickly for a while before take it
out and rinse it with deionized
water. Finally, immerse the
electrode in KCl solution
(3.0mol/L) for 4 hours.
4. Adhered with protein: please
immerse electrode in HCl solution
(0.1mol/L) which contains 1%
pepsin for 15 minutes. Then stir
solution with electrode quickly for
a while before take it out and rinse
it with deionized water. Finally,
immerse the electrode in KCl
solution (3.0mol/L) for 4 hours.
5. Adhered with greases: please
immerse it in weakly alkaline
detergent for 15 minutes and Then
stir solution with electrode quickly
for a while before take it out and
rinse it with deionized water.
Finally, immerse the electrode in
KCl solution (3.0mol/L) for 4
hours.
6. Regeneration of glass sensitive
membrane: please immerse the
electrode in 4%HF solution for 3-5
seconds. Then rinse it in 1:1 HCl
for 10 seconds. Then rinse it with
distilled water and immerse it in
KCl solution (3mol/L) for 24
hours.
Note: If glass sensitive membrane is
regenerated for many times, it will
be damaged eventually.
Remarks:
Within one year from the production
data, the product should meet with
technical specifications.
 Loading...