

MRC BPS-210-C1-V2, BPS-360-C1-V2, BPS-750-C1-V2, BPS-1000-C1-V2, BPS-1200-C1-V2 Operation Manual
...Page 1

PLEASE READ THIS MANUAL
CAREFULLY BEFORE OPERATION
3, Hagavish st. Israel 58817
Tel: 972 3 5595252, Fax: 972 3 5594529 mrc@mrclab.com
MRC.VER.01-12.13
O
Oppeerraattiioonn
M
Maannuuaall
B
B
P
P
S
S--
C
C
1
1--
V
V
2
2
S
S
e
e
r
rii
e
ess
LCD BALANCES
Page 2

- 3 -
1. TECHNICAL DATA .................................................................................7
1.1. Connection ports....................................................................................... 10
2. BASIC INFORMATION ........................................................................ 11
2.1. Intended use ............................................................................................. 11
2.2. Inappropriate use ...................................................................................... 11
2.3. Warranty ................................................................................................... 11
2.4. Monitoring the metrological parameters of the instrument ........................ 12
2.5. Data included in this user manual ............................................................. 12
2.6. Staff training ............................................................................................. 12
3. TRANSPORT AND STORAGE ........................................................... 12
3.1. Delivery check .......................................................................................... 12
3.2. Packaging ................................................................................................. 12
4. UNPACKING, ASSEMBLING AND START-UP .................................. 13
4.1. Assembling and place of use .................................................................... 13
4.2. Unpacking ................................................................................................. 14
4.3. Levelling ................................................................................................... 17
4.4. Cleaning ................................................................................................... 17
4.5. Plugging to mains ..................................................................................... 19
4.6. Connecting additional equipment.............................................................. 20
5. BASIC FUNCTIONS ............................................................................ 20
6. KEYBOARD ......................................................................................... 22
7. START-UP ........................................................................................... 23
7.1. Connecting peripheral devices ................................................................. 23
7.2. Balance temperature stabilisation period .................................................. 23
8. USER MENU ....................................................................................... 24
8.1. Moving through user menu ....................................................................... 24
9. LOGGING IN ....................................................................................... 27
10. WEIGHING .......................................................................................... 29
10.1. Required weighing procedures ................................................................. 29
10.2. Zeroing ..................................................................................................... 31
10.3. Taring ....................................................................................................... 31
10.4. Settings for mode <WEIGHING> .............................................................. 33
1.1.1 Setting level of filtering .................................................................... 33
1.1.2 Value release .................................................................................. 34
1.1.3 Autozero function ............................................................................ 35
1.1.4 Displaying the last digit ................................................................... 35
1.1.5 Balance ambient conditions ............................................................ 36
10.5. Printing mode ........................................................................................... 36
10.6. Temporary measuring unit ........................................................................ 38
10.7. Start-up measuring unit ............................................................................ 38
10.8. Availability of measuring units .................................................................. 39
10.9. User unit ................................................................................................... 40
10.10. Information ............................................................................................. 41
10.11. Non-standard information ....................................................................... 42
10.12. F button shortcuts .................................................................................. 43
10.13. Dual range balance (BPS-200/2000-C2) ................................................ 44
Page 3

- 4 -
11. OTHER PARAMETERS ....................................................................... 45
11.1. Available menu languages ........................................................................ 45
11.2. Access levels ............................................................................................ 45
11.3. ‘Beep’ sound – reaction on pressing function button ................................ 45
11.4. Backlight and adjusting display brightness ............................................... 46
11.5. Date .......................................................................................................... 46
11.6. Time .......................................................................................................... 46
11.7. Date format ............................................................................................... 46
11.8. Time format ............................................................................................... 47
11.9. GLP autotest ............................................................................................. 47
12. INFORMATION ABOUT THE BALANCE ............................................. 49
13. BALANCE ADJUSTMENT ................................................................... 50
13.1. Internal adjustment ................................................................................... 51
13.2. Menu adjustment settings ......................................................................... 53
13.3. Manual adjustment ................................................................................... 55
13.3.1. Internal adjustments ................................................................... 55
13.3.2. External adjustment .................................................................... 56
13.3.3. User adjustment ......................................................................... 56
13.4. Adjustment report printout......................................................................... 57
14. DETERMINING CONTENT OF A PRINOUT ....................................... 58
14.1. Adjustment report ..................................................................................... 58
14.2. Header printout ......................................................................................... 60
14.3. Measurement result printout – GLP PRINTOUT ....................................... 62
14.4. Footer printout .......................................................................................... 64
14.5. Non-standard printouts ............................................................................. 66
14.5.1. Inserting texts ............................................................................. 66
14.6. Variables ................................................................................................... 69
15. DATABASE .......................................................................................... 70
15.1. Users ........................................................................................................ 70
15.2. Products.................................................................................................... 73
15.3. Tares ........................................................................................................ 74
15.4. Weighments .............................................................................................. 75
15.5. ALIBI ......................................................................................................... 78
16. EXPORT AND IMPORT OF DATABASE ............................................. 80
16.1. Export database ........................................................................................ 81
16.2. Import database ........................................................................................ 82
16.3. Measurement data print-out ...................................................................... 82
17. BALANCE WORKING MODES ............................................................ 84
17.1. Setup for availability of working modes ..................................................... 85
17.2. Counting parts of the same mass ............................................................. 86
17.2.1. Setup for mode COUNTING PIECES ......................................... 87
17.2.2. Setting the reference mass by determining from the sample of
known quantity............................................................................ 88
17.2.3. Setting the reference mass by entering its mass ........................ 90
17.2.4. Returning to the weighing mode ................................................. 91
17.3. Checkweighing ......................................................................................... 92
17.3.1. Declaration of mass thresholds .................................................. 93
17.4. Dosing....................................................................................................... 95
Page 4

- 5 -
17.4.1. Setting a target weight by entering values .................................. 96
17.4.2. Returning to the weighing mode ................................................. 98
17.5. Deviations % against the mass of the standard ........................................ 98
17.5.1. Setup for reference mass determined by weighing .................... 99
17.5.2. Setup for reference mass by typing its mass ............................ 100
17.5.3. Returning to the weighing mode ............................................... 101
17.6. Animal weighing...................................................................................... 101
17.6.1. Additional setting for animal weighing mode ............................ 101
17.6.2. Method of operation to manually start the process ................... 103
17.6.3. Method of operation to automatically start the process ............ 105
17.7. Density of solids...................................................................................... 106
17.7.1. Density determination of solids ................................................. 108
17.8. Density of liquid ...................................................................................... 112
17.8.1. Density of liquids determination ................................................ 112
17.9. Statistics ................................................................................................. 115
17.9.1. Means of operation ................................................................... 116
17.9.2. Deleting statistics ..................................................................... 119
17.9.3. Returning to the weighing mode ............................................... 120
17.10. Totalising .............................................................................................. 121
17.10.1. Means of operation ................................................................... 122
17.10.2. Returning to the weighing mode ............................................... 124
17.11. Peak hold ............................................................................................. 125
17.11.1. Means of operation ................................................................... 126
17.11.2. Returning to the weighing mode ............................................... 127
18. COMMUNICATION ............................................................................ 128
18.1. RS 232 ports settings ............................................................................. 128
18.2. WIFI port settings.................................................................................... 129
19. PERIPHERALS .................................................................................. 131
19.1. Computer ................................................................................................ 131
19.2. Printer ..................................................................................................... 132
19.3. Bar code reader ...................................................................................... 132
19.4. Additional display .................................................................................... 133
19.5. External buttons ...................................................................................... 133
20. WORKING WITH EXTERNAL DEVICES SUCH AS PRINTER OR
COMPUTER ................................................................................ 135
20.1. Cable pinout diagram .............................................................................. 136
20.2. Format of data setting ............................................................................. 137
20.3. Format of data sent on pressing of PRINT button................................... 137
20.3.1. Format of data sent as response for commands generated from a
computer .................................................................................. 137
21. COMMUNICATION PROTOCOL ...................................................... 139
21.1. List of commands.................................................................................... 139
21.2. Responses format for commands sent from computer level ................... 140
21.3. Commands description ........................................................................... 140
22. ERROR MESSAGES ......................................................................... 145
23. UNDER HOOK WEIGHING ............................................................... 146
24. ADDITIONAL EQUIPMENT ............................................................... 147
24.1. Anti-vibration table .................................................................................. 147
Page 5

- 6 -
24.2. Rack for under hook weighing ................................................................ 147
24.3. Density determination kit (for solids and liquids) ..................................... 147
24.4. Additional display .................................................................................... 147
Page 6

- 7 -
1. TECHNICAL DATA
Balance ASB-C2-V2 series:
ASB-
60/220-C
2-V2
ASB-
160
-C2-V2
ASB-
220-C2-V2
ASB-
310-C2-V2
Max capacity 60/220g 160g 220g 310g
Min capacity 1mg 10 mg 10 mg 10 mg
Readability 0.01/0.1mg 0.1mg 0.1mg 0.1mg
Tare range -220g -160 g -220 g -310 g
Pan size Φ 85 mm
Sensitivity drift 1 ppm/°C in temperature +10 ° - +40 °C
Working
temperature
+10 ° - +40 °C
Power supply 12 ÷ 16 V DC / 2.1 A
Dimensions:
Page 7
- 8 -
Balance BPS-C2-V2 series with weighing pan 128 x 128 mm:
Dimensions:
Type balance
BPS-
200/2000-C1-V2
BPS-
210-C1-V2
BPS-
360-C1-V2
BPS-
600-C1-V2
BPS-
750-C1-V2
BPS-
1000-C1-V2
Max capacity
200/2000g 210g 360g 600g 750g 1000g
Tare range
-2000g -210g -360g -600g -750g -1000g
Min capacity
20mg 20mg 20mg 20mg 20mg 20mg
Readability
1/10mg 1mg 1mg 1mg 1mg 1mg
Working
temperature
+10°C - +40°C
Power supply
12 ÷ 16 V DC / 2,1 A
Sensitivity drift
2 ppm/°C in temperature +10°C -+ 40°C
Pan size
128x128 mm
Page 8
- 9 -
Balance BPS-C2-V2 series with weighing pan 195 x 195 mm:
Type balance
BPS-
1200-C1-V2
BPS-
2100-C1-V2
BPS-
3500-C1-V2
BPS-
4500-C1-V2
BPS-
6000-C1-V2
Max capacity 1200g 2100g 3500g 4500g 6000g
Tare range -1200g -2100g -3500g -4500g -6000g
Min capacity 500mg 500mg 500mg 500mg 500mg
Readability 10mg 10mg 10mg 10mg 10mg
Working
temperature
+10°C - +40°C
Power supply 12 ÷ 16 V DC / 2,1 A
Sensitivity drift 2 ppm/°C in temperature +10°C - +40°C
Pan size 195x195mm
Dimensions:
Page 9
- 10 -
Balance BPP-C2-V2 series:
BPP-
10-C2
-V2
BPP-
35-C2-V2
Max capacity 10 kg 35 kg
Tare range -10 kg -35 kg
Min capacity 2 g 2 g
Readability 0.01 g 0.1 g
Working temperature
+10 °C - +40 °C
Power supply 12 ÷ 16 V DC / 2,1 A
1.1. Connection ports
1
- power port
2
- COM 2 port (e.g. additional display)
3
- COM 1 port (e.g. printer)
4
- USB 2 port (e.g. computer)
5
- USB 1 port (e.g. computer keyboard)
Page 10

- 11 -
2. BASIC INFORMATION
2.1. Intended use
The purchased balanced serves to determine the weighing value of loads in
laboratory environment. It is intended for application as a non-automatic
weighing instrument only, i.e. the material to be weighed is manually and
carefully placed in the centre of the weighing pan. Weighing result should be
read only after stable reading has been obtained.
2.2. Inappropriate use
Do not use the balance as a dynamic weighing instrument. Even if small
quantities of weighed material are added or removed from the weighing pan of
the instrument, the reading should be taken only after stabilisation of the
measurement results. Do not place any magnetic materials on the weighing
pan, as this can cause damage to the measuring system of the instrument.
Be sure to avoid impact shock and overloading the balance in excess of the
prescribed maximum measuring range (max capacity), minus any possible tare
weight that has been applied.
Never use the balance in an environment where explosion is possible. This
balance has not been adjusted for operation in explosive areas.
There must not be any modification made to the balance.
2.3. Warranty
Warranty is invalid for the following:
• non- observation of the guidelines of this user manual,
• use of the balance other than specified in this manual,
• alteration to or opening of the device,
• mechanical damage and damage caused by media, water, wear and
tear,
• inappropriate assembling or defects of electric installation,
• overloading of the measuring instrument.
Page 11

- 12 -
2.4. Monitoring the metrological parameters of the instrument
Metrological characteristics of the balance require periodical inspection to be
carried out by its user. Inspection frequency is dependent on ambient
conditions in which the balance is used, types of performed processes and
accepted quality management system in organisation.
2.5. Data included in this user manual
Please read the user manual carefully before assembling and start-up, even if
the user is experienced with this type of weighing instruments.
2.6. Staff training
This balance should only be operated and maintained by personnel who is
trained and experienced in using this type of balances.
3. TRANSPORT AND STORAGE
3.1. Delivery check
Please check the packaging immediately upon delivery and the device during
unpacking for any visible signs of external damage.
3.2. Packaging
Please retain all parts of the original packaging should the balance be
transported in the future. Only the original packaging should be used for
shipping the balance. Before packing, disconnect all attached cables and
remove any loose/movable parts (weighing pan, anti-draft shield, etc.). Please
place balance and its components in their original packaging, and protect them
against damage during transport.
Page 12

- 13 -
4. UNPACKING, ASSEMBLING AND START-UP
4.1. Assembling and place of use
• The balance should be stored and used in locations free of vibrations and
shakes, free of air movement and dust,
• ambient air temperature should not exceed the range of: +10 °C ÷ +40 °C,
• ambient relative humidity should not exceed 80%,
• during balance operation, ambient temperature in the weighing room should
not change more than 3°C within one hour,
• the balance should be located on a stable wall console desk or a stable
working table which is not affected by vibrations and distant from heat
sources,
• take special precaution when weighing magnetic objects, as part of the
balance is a strong magnet. Should such loads be weighed, use under hook
weighing option, which removes the weighed load from area influenced by
the balance’s magnet. For assembling the hook for under hook weighing
option see the bottom section of balance’s housing,
• in order to avoid the influence of static electricity on the measurement
process, ground the balance’s housing. The grounding bolt is located at the
back of the balance’s housing.
Page 13

- 14 -
4.2. Unpacking
Balance ASB with weighing pan Φ 85 mm:
• open side doors of the weighing
chamber,
• inside the weighing chamber place lower
shield of the weighing chamber (1),
• put centering ring [framing facing
downwards] (2),
• in the centre of centering ring assembly
the weighing pan (3),
• put anti-draft shield in the chamber (4),
• close side doors of the weighing
chamber,
• plug the balance to mains,
pin of power adaptor should be
connected to socket in the back of
balance housing.
Page 14

- 15 -
Balance BPS
Remove the adhesive tape. Carefully remove the balance from its packaging.
Remove all the elements necessary for correct operation from the accessory
box. Carefully remove the plastic and foil transport protective elements and
gently place the balance in its intended place of use.
Assemble the weighing pan, and other elements according to below schema:
Assembling a balance with reading interval 10mg:
- remove the adhesive tape
protecting the mass spring on one
of the rubber bumpers (1),
- assemble the weighing pan (2) on
the rubber bumpers (1),
- after assembling the balance
components, check whether the
weighing pan is firmly placed on the
rubber bumpers.
Assembling a balance with reading interval 1mg:
- remove the adhesive tape protecting the
mass spring on on
e of the rubber bumpers
(1),
- assemble the weighing pan (2) on the
rubber bumpers (1),
- assemble the glass anti-draft shield (3)
- after assembling the balance components,
check whether the weighing pan is firmly
placed on the rubber bumpers.
Page 15

- 16 -
Balance BPP
• Remove the weighing pan and remove transport protective elements as
shown in the picture above (if these elements are attached).
• After the unpacking of the balance unscrew the bolt (1) which blocks the
calibration mechanism.
• Assemble the weighing pan.
• Make sure the weighing pan is placed properly on the shock absorbers:
the weighing pan cannot touch the housing and should be stable.
• After removing the protective elements and placing the weighing pan, plug
the indicator into the port which is on the back of the housing. Next, plug in
all the additional devices. Only then can the scales be connected to mains
(the power port is located at the back of the balance’s housing).
Page 16

- 17 -
• Place the balance at the workplace.
• Using the wrench (3), after adjusting the balance level (see below); tighten
the bolt (2) on the foot (1) to the balance’s footing until the point of
resistance.
4.3. Levelling
Before plugging to mains, level the balance by turning the
adjustable feet in a way that the air bubble of the level is in
its central ring. The balance should be placed at the
workplace firmly on all of its feet.
4.4. Cleaning
Balance should be cleaned with damp cloth by gentle wiping smudges of dirt.
Cleaning of the weighing pan when assembled may cause damage of the
measuring system of the balance. Hence, it is crucial to remove it from the
balance before cleaning.
Page 17

- 18 -
In order to clean the glass walls of the draft shield of the ASB-C2-V2 series balance,
it is acceptable to remove the walls of the draft shield following the below
instruction.
1. Twist off and remove the top glass wall safety frame, and slide the top
glass wall out of the slideway.
2. Remove the back glass wall.
3. Remove the side glass walls. The side glass walls are not replaceable, so
it is important to remember which one is left and right, and after cleaning
install them back properly in the draft shield.
Page 18

- 19 -
4. CAUTION: do not remove the front glass wall.
5. Remove the weighing pan, the weighing pan safety rings and the bottom
metal plates, so as not to damage the balance mechanism durin the
cleaning.
Thus prepared draft shield and glass walls can be properly cleaned. All the
operations should be done carefully. Pay special CAUTION to the place
where the weighing pan was installed: dirt and other small elements might
enter the balance construction through this openiing, which might
negatively influence the balance parametres.
4.5. Plugging to mains
Balance can be connected to mains only with a power adapter that
comes standard with the balance. Nominal power supply of the power
Page 19

- 20 -
adapter (specified on the data plate of the power adapter) should be
compatible to the power from mains.
Plug the balance to mains – the plugging socket is located at the back of
balance housing.
The test of the display unit takes place after connecting to the power (all the
elements and pictograms are backlit for a short time). Next, the name and the
program number appears consequently, the indication will reach ZERO level
(with reading unit depending on the balance). During the process of starting
the balance, the test of the internal mass adjustment mechanism occurs
(single location and elevation of the internal mass adjustment).
If the indication is different from zero, please press
button.
NOTE: If the balance is “verified”, automatic adjustment/calibration occurs right
after it has been switched on.
4.6. Connecting additional equipment
It is inevitable to plug the computer out of the main before connecting additional
equipment or changing it (printer, PC computer, additional display, computer
keypad, etc.).
Connect only the equipment recommended by the balance manufacturer.
When the devices are connected, plug the balance to the main.
5. BASIC FUNCTIONS
• functions related to measuring units
- weighing in grams [g],
- weighing in milligrams [mg] (in balances with d≤0.001g),
- weighing in kilograms [kg] (in balances with d≥0.01g,
- weighing in carats [ct],
- weighing in units from beyond SI (available only in non-verified
instruments):
[lb], [oz], [ozt], [dwt], [tlh], [tls], [tlt], [tlc], [mom], [gr], [ti], [N], [baht], [tola]
• functions related to working modes
- counting pieces,
- checkweighing (control +/-),
- dosing,
- percent setup,
- density determination of solids,
- density determination of liquids,
Page 20

- 21 -
- animal weighing,
- statistics
- totalising
- peak hold
• functions related to setting a balance to ambient conditions at a
workstation
- enabling and disabling autozero system,
- setting parameter of measurement result averaging,
- value release,
- display backlight,
- beep signal,
• functions related to use of communication ports (RS232, USB, WIFI)
- setting communication port,
- setting bound rate,
- continuous data transmission in basic measuring unit,
- continuous data transmission in current measuring unit,
- automatic operation mode.
Balance can be used to weigh loads under the weighing platform – i.e. under hook
weighing option. Balance software enables generating a report from adjustment
process in a form of a printout containing modifiable data (see CAL REPORT)
Page 21
- 22 -
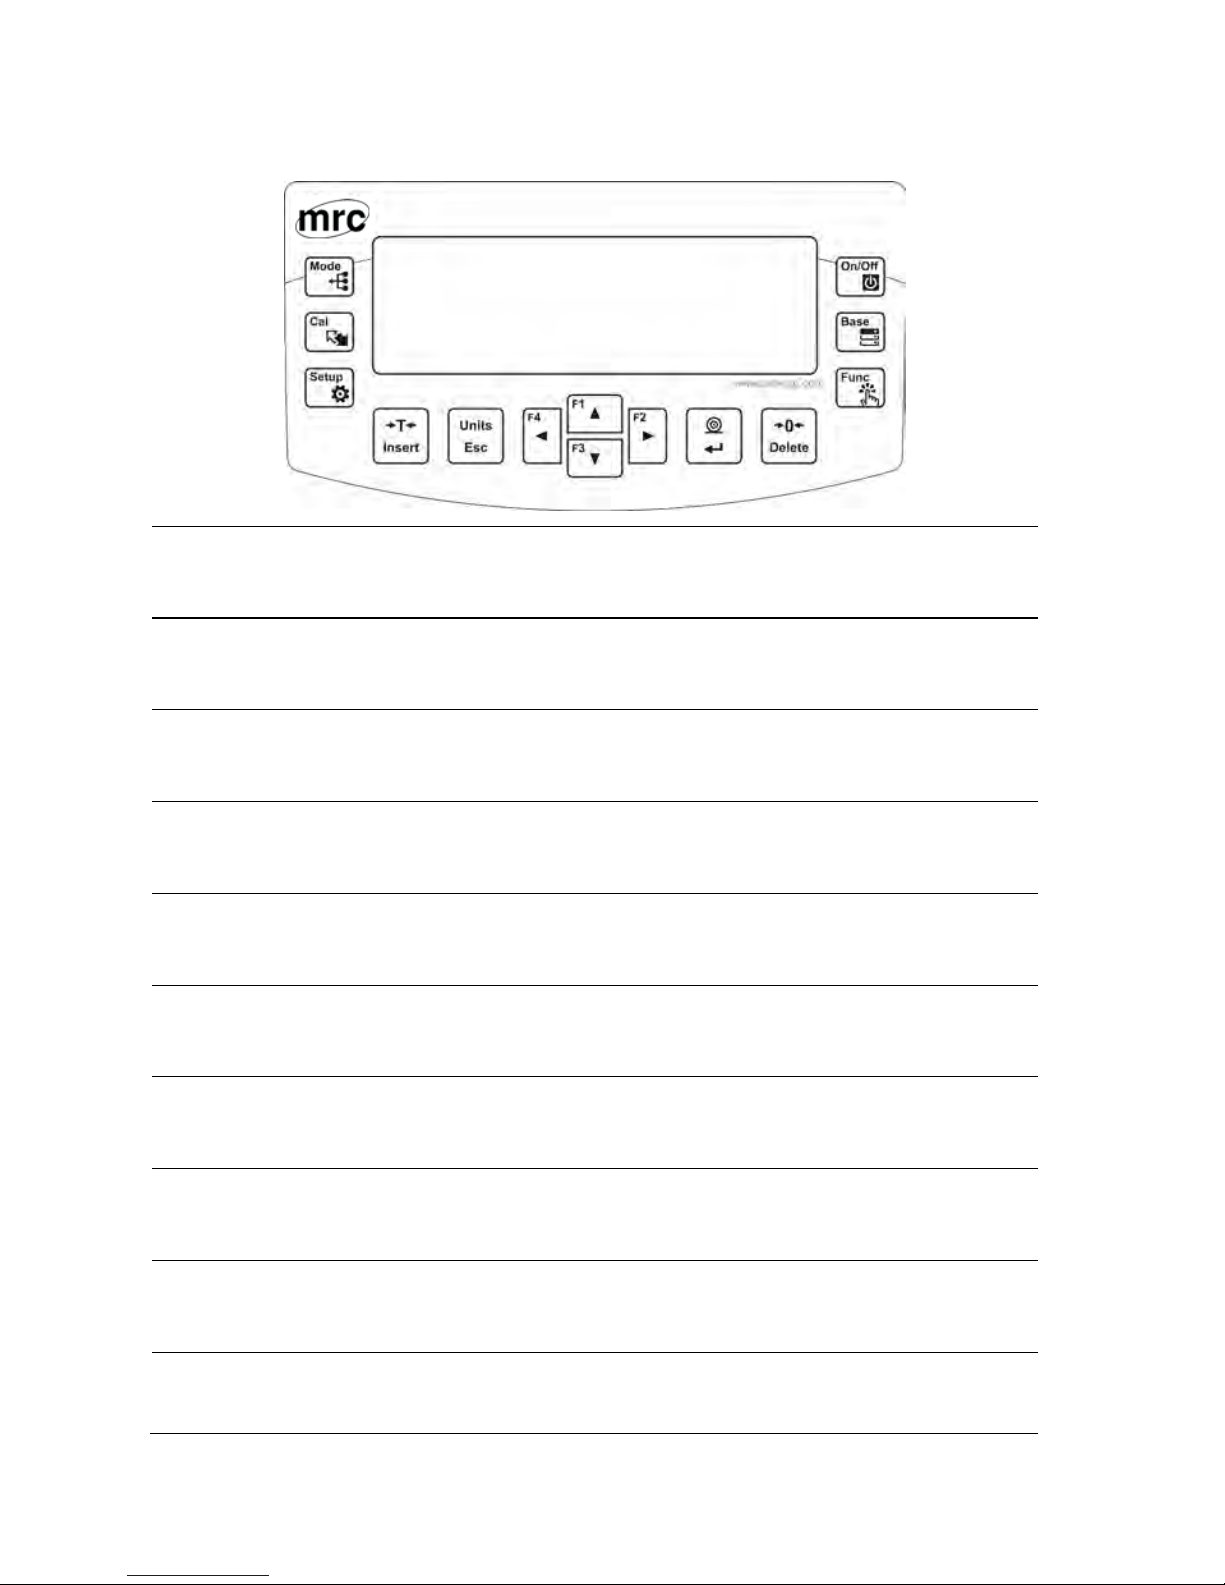
6. KEYBOARD
ON/OFF button enables switching on and of
f balance’s
display. If switched off balance components other than the
display are powered, and balance is in stand-by mode.
F button. Function button
, which enables quick entering
the settings of an active working mode.
MODE button for selecting balance’s working mode.
UNITS button changes measuring units.
PRINT/ENTER button-
sends current display status to a
peripheral device (PRINT) or accepts selected value of a
parameter or function (ENTER).
ZERO button– zeroing of balance’s indication.
TARE –taring of balance’s indication.
Adjustment –
function button of immediate initiating the
adjustment / calibration process.
Function button for entering the main menu of a balance.
Navigating arrows for moving in balance’s menu or
changing parameter value.
Page 22

- 23 -
7. START-UP
When plugged to mains, the balance displays name and number of software, and
afterwards proceeds to weighing mode.
7.1. Connecting peripheral devices
The balance must be unplugged from the mains before connecting or
disconnecting peripheral devices (printer or computer). Use only peripheral
devices recommended by the manufacturer with your balance. These have
been matched to your balance. After connecting a peripheral device, plug the
balance to mains.
7.2. Balance temperature stabilisation period
Before start of measuring processes, it is necessary to wait until the balance is
thermally stabilised.
For balances that were stored in much lower temperatures before plugging to
mains (e.g. during winter period) thermal stabilisation should last
approximately 4 hours for BPS balances, and 8 hours for ASB-C2 & BPP-C2
balances. During the thermal stabilization, the indications on the display panel
can change. Correct operation of a balance is possible within temperature
range specified in technical parameters, see point 1.
It is recommended that ambient temperature changes at balance’s place of
use are very small (slow to change).
Page 23

- 24 -
8. USER MENU
Balance menu is divided into 6 basic function groups. Each group has individual
name starting with capital letter P.
8.1. Moving through user menu
A user moves through balance menu using buttons on overlay’s keyboard:
Setup button. Entering balance’s main menu.
Selecting group of parameter one by one downwards or
changing parameter value by one value downwards.
Selecting group of parameters one by one upwards or changing
parameter value by one value upwards.
Selecting group of parameters for activating. On pressing the
button, the display indicates the first parameter in a selected
group
Exit to previous menu level, e.g. to main menu.
Abandon parameter changes.
Accept / confirm introduced changes.
Deleting a character while editing the text values of the menu,
e.g. user name.
Inserting a character while editing the text values of the menu,
e.g. user name
Page 24

- 25 -
Name of function groups and their content:
P1 ADJUSTMENT
P1.1 INT. CALIB. | [internal adjustment]
P1.2 EXT. CALIB. | [external adjustment]
P1.3 USER CALIBRATION | [user adjustment]
P1.4 CALIBRATION TEST | [adjustment test]
P1.5 AUTO. CALIB. |NONE [automatic adjustment]
P1.6 AUTO. CALIB. C. |1 [time of automatic adjustment]
P2 OPERATION MODE
P2.1 ACCESSIBILITY | [settings for the accessibility of individual
modes while working with the balance]
P2.2 WEIGHING | [setting for the function weighing]
P2.3 COUNTING PCS | [settings for the function counting pieces]
P2.4 CHECKWEIGHING | [settings for the function checkweighing]
P2.5 DOSING | [settings for the function dosing]
P2.6 DEVIATIONS | [settings for the function deviations % against
the mass of the standard]
P2.7 DENS. OF SOLIDS | [settings for determining density of solids]
P2.8 DENS OF LIQUIDS | [settings for determining density of liquids]
P2.9 ANIMAL WEIGHING | [settings for the function animal weighing]
P2.10 STATISTICS | [settings for the function statistics]
P2.11 TOTALISING | [settings for the function totalising]
P2.12 PEAK HOLD |[settings for the function peak hold]
P3 COMMUNICATION
P3.1 COM 1 | [transmission parameters port COM 1]
P3.2 COM 2 | [transmission parameters port COM 2]
P3.3 WIFI | [transmission parameters port WIFI]
Page 25

- 26 -
P4 DEVICES
P4.1 COMPUTER |COM 1/COM 2/USB/WIFI/NONE [PC connection port]
P4.2 PRINTER |COM 1/COM 2/USB/WIFI/PENDRIVE/USB PC/NONE
[printer connection port]
P4.3 BARCODE READER |COM 1/COM 2/NONE [barcode reader port]
P4.4 ADD. DISPLAY |COM 1/COM 2/NONE [additional display port]
P4.5 EXT. BUTTONS |TARE / PRINT
P5 PRINTOUT
P5.1 CAL. REPORT | [contents of the adjustment report]
P5.2 HEADER | [contents of the header print-out]
P5.3 GLP PRNT. | [contents of the weighment result prnt.]
P5.4 FOOTER | [contents of the footer print-out]
P5.5 NSD.PRN.1 | [project of non-standard print-out 1]
P5.6 NSD.PRN. 2 | [project of non-standard print-out 2]
P5.7 NSD.PRN. 3 | [project of non-standard print-out 3]
P5.8 NSD.PRN. 4 | [project of non-standard print-out 4]
P5.9 VARIABLE 1 | [project of variable 1]
P5.10 VARIABLE 2 | [project of variable 2]
P6 OTHER
P6.1 LANGUAGE |ENGLISH [menu language]
P6.2 ACCESS LEV. |ADMIN [access levels for editing menu]
P6.3 KEY SOUND |YES/NO [key sound]
P6.4 BACKLIGHT |70 [display backlight level]
P6.5 DATE |2013.05.27 [data settings]
P6.6 TIME |8:53:00 A [time settings]
P6.7 DATE FORM.|YYYY.MM.DD/YYYY.DD.MM/DD.MM.YYYY/MM.DD.YYYY
[date format]
P6.8 TIME FORM. |12H/24H [time format]
P6.9 GLP AUTOTEST | [carrying out autotest for the balance]
P7 INFO
P7.1 BALANCE ID |
P7.2 SCALETYPE. |
P7.3 PROG. VER. |
P7.4 TEMP. |
P7.5
SETUP PRNT. |
CAUTION
Changes introduced in balance memory will be saved, when
abandoning the menu (on return to weighing).
Press ESC button several times.
Page 26

- 27 -
9. LOGGING IN
In order to have full access to the user’s parameters and editing of database, the
person operating the balance, should log in as <ADMINISTRATOR> each time
they turn it on. The software enables the entry of 10 users with varying degrees of
authority.
The first login procedure
• While in the main window select <LOG IN>,available by pressing ,
or by pressing one of the function buttons to which the shortcut <LOG
IN> is assigned, or after pressing the button
, enter the users’
database and select the user <ADMIN>
• After selecting the < ADMIN> button and confirming the choice by
pressing
, the program asks you to enter the user’s password,
• You must enter „1111” and confirm by pressing ,
• The program returns to the main window,
• After the first login, you should first enter the users and assign the
appropriate access levels to them (procedures are described later in this
manual, see section 14).
The next time you log in, select a user from the list and enter the password.
After that the program starts working with the permissions for the selected
user.
If any user is logged in, the pictogram
is displayed.
Logout procedure
• In order to log out, select <NONE> from the list of available users
• The program returns to the main window, and the display shows no
logged-in user. (no logged-in user, no pictogram on the display).
Page 27

- 28 -
Access levels
The balance software features three access levels: ADMINISTRATOR,
ADVANCED, USER.
When you turn the balance on, the display is active all the time, which enables
carrying out mass measuring processes.
The table below shows the access to the edition of user parameters,
databases and software functions depending on the access level.
Access Access levels
USER
Access to parameters in the submenu: <Reading> and
setting in parameter group <Others> except for <Date
and Time>. All the weighing processes can be started
and carried out at this time. The user has the access to
the information preview in <Databases>, and can also
define universal variables.
ADV
Access to editing of parameters in the submenu:
<Reading>; <Working modes>; <Communication>;
<Devices>; <Others> except for <Date and Time>. All
the weighing processes can be started and carried out
at this time.
ADMIN
Access to all the user parameters, functions and
editing databases.
Page 28

- 29 -
10. WEIGHING
10.1. Required weighing procedures
In order to ensure long lasting use of a balance and reliable
measurement of weighed loads, follow below procedures:
Start the balance with no load on the weighing pan
(permissible value of load on the weighing pan on balance
start is ±10% of its maximal capacity).
Load balance’s weighing pan steadily with no shocks:
YES
NO
Place weighed loads centrally on the weighing pan:
YES
NO
Avoid side loading, in particular side shocks:
NO
NO
Page 29

- 30 -
Before the start of weighing process or in case of drastic change of ambient
conditions at a workstation (e.g. ambient temperature change at a workstation more
than 3°C) the balance requires adjusting. The procedure of balance adjustment is
described further in this user manual.
• Before the start of weighing procedure, it is recommended to load the
balance’s weighing pan a few times with mass close to balance max
capacity,
• Check if unloaded balance indicates “precise zero”
and whether
measurement is stable
, if not, press /Delete button,
• Press UNITS button, to set a measuring unit:
[g], [mg], [ct], and also if enabled in factory menu (non-verified balances)
[kg], [lb], [oz], [ozt], [dwt], [tlh], [tls], [tlt], [tlc] [mom], [gr], [ti], [N], [baht], [tola]
• Place weighed object on balance’s weighing pan and read result only on
stabilisation of measurement result,
• Mass indication of a load placed on balance’s weighing pan can be tarred
for multiple Times by pressing →T
←
/Insert (pay CAUTION not to exceed
maximal capacity of a balance by applying multiple tare function).
During times between carrying out the following measurement series do not unplug
the balance from mains. It is recommended to switch off the balance’s display by
pressing ON/OFF button. On repeated pressing of the ON/OFF button the balance
is ready for operation and carrying out the following measurements.
Page 30

- 31 -
10.2. Zeroing
In order to zero mass indication press button.
The mass indication on the display should equal zero, and precise zero
and stability marker
should appear.
Zeroing process is tantamount to determining new zero point
recognised by the balance as precise zero. Zeroing is possible only in
stable status of display indication.
Caution:
Zeroing the display indication is possible only within the ±2% range of
instrument’s maximal capacity If the zeroed value is above the ±2% of the
maximal capacity, then th e softw are ind ic ates an error mes sage Err2.
10.3. Taring
In order to determine the net weight of a weighed object, place object’s
container (packaging) on balance’s weighing pan, and on stabilisation of
measurement result press
button. The display should indicate mass
equal to zero and symbols: Net and
.
On taking off the weighed load and its packaging from instrument’s
weighing pan, the display indicates sum of total tarred mass with minus
sign.
The software also enables assigning tare value to a product from a
database. Then, on product selection from a database, the software
automatically uploads data on tare value for the specific product.
Caution:
Taring negative values is impossible. On tarring negative values the
balance responds with an error message Err3. In such c as e zero balance’s
indication and repeat tarring procedure.
Page 31

- 32 -
Manual tare determination
Procedure:
• While in optional mode press quick access button F, to which the
option <ENTER TARE> is assigned in <SHORTCUTS> settings
(description of the setting further in this user manual, point <F button
shortcuts>),
• which opens a window,
• use the arrow buttons to enter tare value and press
button,
• the balance returns to weighing mode, and the display indicates
entered tare value with minus „–" sign.
Selection of tare from TARE DATABASE
Procedure:
• while in any working mode, press F – quick access button, to which
option <SELECT TARE> is assigned in <SHORTCUTS>
(description of the setting further in this user manual, point <F button
shortcuts), or choose option <SELECT TARE> after pressing
button,
• which displays the first mass value of the mass packages that was
saved in tare database,
• use the arrow buttons to select the tare which is to be recalled and
press
button,
• the balance returns to the weighing mode, and the display indicates
entered tare value with minus „–" sign.
Or
• While in any working mode press
button,
• Enter b3 option <TARE>
• Which displays the first mass value of the mass packages that was
saved in tare database,
• Use the arrow buttons to select the tare which is to be recalled and
press
button,
• The balance returns to the weighing mode, and the display indicates
entered tare value with minus „–" sign.
Page 32

- 33 -
Deleting tare
Entered tare value can be deleted by pressing
button on the
balance’s overlay or by entering tare value of 0.000g (see description
above).
10.4. Settings for mode <WEIGHING>
The software allows the set-up of operating parameters (filters, value release
and autozero option, deleting the last digit and other settings) separately for
each working mode.
It enables customising the instrument and utilising properties depending on the
user’s needs and expectations or specific requirements for selected working
mode (e.g. DOSING); as a result the work is quick and easy.
Available settings
P2.2.1 – READOUT
P2.2.1.1 – FILTER [V.FAST/ FAST / NORMAL / SLOW / V. SLOW]
P2.2.1.2 – RESULT CONF. [REL. / FAST / FAST+REL.]
P2.2.1.3 – AUTOZERO [YES / NO]
P2.2.1.4 – LAST DIGIT [ALWAYS / NEVER / WHEN STAB.]
P2.2.1.5 – AMBIENT CONDITIONS (STABLE/UNSTABLE)
P2.2.2 – PRINT MODE
P2.2.2.1 – MODE [EACH / WHEN STAB. / AUTO]
P2.2.2.2 –AUTO. PROG
P2.2.3 – UNITS
P2.2.3.1 – AVAILABILITY
P2.2.3.2 –START UNIT [G]
P2.2.3.3 – USER UNIT1
P2.2.3.4 – USER UNIT2
P2.2.4 – INFORMATION [TARE / NETTO / GROSS / USER / PRODUCT /
/NSTD. INF. / NONE]
P2.2.5 – INF. NSTD. (non-standard information – any text, max 19 characters)
P2.2.6 – SHORTCUTS (available options depending on the working mode)
P2.2.6 1 – F1 [NONE / ENTER TARE/ …]
P2.2.6.2 – F2 [NONE / ENTER TARE / …]
P2.2.6.3 – F3 [NONE / ENTER TARE/ …]
P2.2.6.4 – F4 [NONE / ENTER TARE / …]
1.1.1 Setting level of filtering
Depending on the balance working conditions you should set the filter. In ideal
conditions you can set the filter to be very fast (parameter value P.2.2.1.1 Filter to
be V.FAST); however, if the working conditions are bad (shakes, drafts), the filter
Page 33

- 34 -
should be set to slow or very slow (parameter value P.2.2.1.1 to SLOW or V.
SLOW). The effectiveness of the filter is different for the weighing range. The filter
works slower when “approaching” the weighed mass, it works more intensively
when the weighed mass is placed within the set range of the filter (parameter filter
range is accessible only from the service menu – the user does not have an access
to it).
Depending on the adjusted filter, the weighing time will be shorter (V.FAST and
FAST) or longer (SLOW and V. SLOW)
CAUTION
The higher level of filtering, the longer the weighing time.
1.1.2 Value release
Due to various ambient conditions at workplaces, and in order to set balance to
present conditions, it is necessary to determine the value release parameter
as: FAST.+REL., FAST or RELIABLE. Depending on selected option,
weighing time is either shorter or longer.
Page 34

- 35 -
1.1.3 Autozero function
In order to ensure balance’s precise mass indication, autozero (Auto) software
parameter has been introduced. The application of this function is automatic
control and correction of zero indication. When the function is enabled, it
compares balance indications at declared time interval e.g. 1s, on condition
that weighing pan is unloaded and display indication is close to zero. If results
vary less than declared AUTOZERO range e.g. one division, balance will zero
automatically, marker of stable measurement result–
and precise zero
marker –
will be displayed.
If AUTOZERO function is enabled, then each weighing process starts from
precise zero point. There are, however, some case when this function can be a
disturbing factor in the measuring process; for instance very slow placing of
load on the weighing pan (e.g. load pouring) in such case zero indication
correction can also correct actual indication of loaded mass.
1.1.4 Displaying the last digit
Function enables displaying the last digit on the balance display.
Page 35

- 36 -
1.1.5 Balance ambient conditions
This parametre has two settings: STABLE and UNSTABLE. Setting on STABLE
mode makes the balance work much faster than on UNSBABLE mode. This
parametre relates to the ambient conditions in which the balance operates. If the
ambient conditions are unstable it is recommended to use UNSTABLE mode.
Normally the parametre is set on: STABLE.
10.5. Printing mode
This function enables setting the printing mode, i.e. button activity
.
A user has the possibility of selecting the following settings:
• <WHEN STAB> the stable measurement result, along with the settings
for parameter < GLP PRINTOUT> are sent to the printer port. Pressing
the button
, when the result is not stable (no sign on
display), the balance software will send the measurement result to the
port after reaching the stable condition of the measurement.
• <ANYONE> every single pressing of
button results in sending
the measurement result to the printer port along with the settings for
parameter <GLP PRINTOUT>. Every measurement result is sent
(stable and unstable). The <?> sign appears at the beginning of the
printing frame when the result is unstable.
This function applies only to non-verified balances.
• <AUTO> - select this option to enable automatic printing of
measurements. If this option has been selected, remember to select
<AUTO PROG > parameter to suit your needs.
Automatic operation proceeds as follows:
Press
button to zero the balance (marker of stable
measurement
and zero marker are shown on display)
Place the load, the balance sends the first stable measurement to
the printer port,
Remove the load from the balance,
Next measurement is possible when the reading on the display is
lower than the set value of < AUTO PROG. > parameter (next
measurement does not require zero value).
Page 36

- 37 -
This procedure applies to changing settings:
For automatic working mode adjust the threshold value.
Page 37

- 38 -
10.6. Temporary measuring unit
This function is only available in <WEIGHING> mode. In other modes
measurements are only possible in basic unit [g].
Function enables selecting a measuring unit which will be indicated next to
mass reading during the weighing process. Set measuring unit will be in use
from the moment of its activation until its change or switching off and on the
balance.
Each press of the
button causes change of the measuring unit.
Available settings:
• For verified balances, a user can select from the following: [g], [mg] or
[kg], [ct]
• For non-verified balances, a user can select from the following measuring
units: [g], [mg], [kg], [ct], [lb], [oz], [ozt], [dwt], [tlh], [tls], [tlt], [tlc], [mom],
[gr], [ti], [N]
10.7. Start-up measuring unit
This function is only available in <WEIGHING> mode. In other modes
measurements are only possible in basic unit [g].
After selecting the start-up unit, when switched on, the balance will work in
<WEIGHING> mode with this very unit.
The units which can be selected are determined by the balance’s status, i.e.
whether the balance is verified or non-verified.
Procedure:
Page 38

- 39 -
10.8. Availability of measuring units
This function is only available in <WEIGHING> mode. In other modes
measurements are only possible in basic unit [g].
The user can declare the weighing units which will be available when selecting
temporary unit by pressing
button. For these units the parameter
availability is set to <YES>. These parameters can be selected by the user.
Procedure:
Page 39

- 40 -
10.9. User unit
A user can declare two weighing units. User unit is the result of balance indication
multiplied by the factor that was introduced for user unit.
User units are marked as [u1] – user 1 unit and [u2] – user 2 unit.
The way of declaring factor for an individual user is shown below
User units are available only for non-verified balances.
Page 40

- 41 -
10.10. Information
Function enables displaying additional information in the bottom line.
Depending on the needs, a user can choose the following options, which are
shown while working in mode <WEIGHING>:
Page 41

- 42 -
10.11. Non-standard information
Function enables declaring non-standard information, which is to be displayed
in the bottom line of the display. A user can insert any text consisting of
maximum 19 characters.
It should be remembered though, that the declared non-standard information is
visible. Therefore, option P2.1.2 should be set to < NSTD. INF. >.
Page 42

- 43 -
10.12. F button shortcuts
Function enables assigning quick access option for weighing functions which
are accessible by choosing F1, F2, F3 or F4. A user can choose the following
options in <WEIGHING> mode, which can be assigned to any of the F
buttons< NONE / ENTER TARE / PRINT HEADER / PRINT FOOTER /
VARIABLE 1 / VARIABLE 2>. There are different options available in other
modes (see further on in this manual).
Page 43

- 44 -
10.13. Dual range balance (BPS-200/2000-C2-V2)
Balance BPS-200/2000-C2 series is a dual range weighing instrument. The
accuracy of the I weighing range is d
1
=0.001g, and of the II weighing range is
d
2
=0.01g.
Transfer from weighing with the accuracy of the I weighing range to weighing with
the accuracy of the II weighing range takes place automatically on exceeding
Max
1
200g (with no user activity needed). On switching to weighing with the
accuracy of the II weighing range, the display signals by indicating
symbol
on its left side, and an additional marker of last but one digit of the weighing result.
From now on the balance weighs mass with the accuracy of the II weighing range.
To return to weighing in the accuracy of the I weighing range:
• Take the weighed load off the weighing pan
• As the indication returns to zero and pictograms →0
←
and are lit,
press
button.
The balance returns to weighing with the accuracy of the I weighing range, and II
weighing range
pictogram and marker of the last but one digit are blanked.
Page 44

- 45 -
11. OTHER PARAMETERS
A user can set up parameters which have an influence on working with the balance.
These parameters are included in group P6 OTHER.
Changing settings for particular parameters is the same as described in the
previous paragraph of this user manual.
P6 OTHER
P6.1 LANGUAGE |ENGLISH [menu languages]
P6.2 ACCESS LEV. |ADMIN [access levels for editing menu]
P6.3 KEY SOUND. |YES/NO [key sound]
P6.4 BACKLIGHT |70 [display backlight level]
P6.5 DATE |2013.05.27 [date settings]
P6.6 TIME |8:53:00 A [time settings]
P6.7 DATE FORM. |YYYY.MM.DD / YYYY.DD.MM / DD.MM.YYYY /
MM.DD.YYYY [date format]
P6.8 TIME FORM. |12H / 24H [time format]
P6.9 GLP AUTOTEST | [carrying out autotest for the balance]
P6.10 SETUP PRNT. | [balance parameters print-out]
Enter group P6 OTHER menu.
11.1. Available menu languages
Enables selecting the balance menu descriptions.
Available languages: ENGLISH
11.2. Access levels
Enables choosing access levels when entering the balance menu.
Available access levels: ADMIN. / USER. / ADV.
Depending on the option selected, a user of a specific access level can access and
make changes to the settings in the balance.
11.3. ‘Beep’ sound – reaction on pressing function button
Enables switching on/ switching off the ‘beep’ sound, which informs a user about
pressing any button on balance’s overlay.
NO - ‘beep’ sound switched off
YES - ‘beep’ sound switched on.
Page 45

- 46 -
11.4. Backlight and adjusting display brightness
Enables setting the brightness of the backlight or switching off the display
brightness completely.
100 - maximum brightness of the backlight
10 - minimum brightness of the backlight
NONE - display brightness switched off
11.5. Date
Enables setting the current date.
As follows:
11.6. Time
Enables setting the current time.
As follows:
11.7. Date format
Enables altering the date format on the printout
[YYYY.MM.DD / YYYY.DD.MM / DD.MM.YYYY / MM.DD.YYYY]
Where:
YYYY – year
MM – month
DD - day
Page 46

- 47 -
11.8. Time format
Enables choosing the time format on the printout [12H / 24H].
For the set value [12H], in parameter P6.6 TIME letters <A> or <P> will be
displayed next to the time value.
Where:
A stands for hours before noon, P stands for hours after noon.
Letters AM or PM are printed out next to the time value.
11.9. GLP autotest
AUTOTEST function is designed to aid a user in assessing balance’s operation and
diagnosing the reasons for occurrence of errors in weighing which exceed the
maximum permissible values for a given balance model.
By means of a simple, repeatable and fully documented way the function enables
optimizing balance’s settings to maintain the best possible repeatability and
weighing time at workstation. The main purpose of the function is the possibility of
monitoring the above-mentioned parameters at optional moment and saving
records from the carried out tests in the form of printed reports of the tests that are
automatically generated at the end of examination.
The test controls repeatability of placing the interval weight and determining error of
indication with reference to balance’s maximum capacity.
Testing procedure:
• two times loading of the internal weight, followed by 10 times loading of
the internal weight
• balance internal adjustment
• calculating the value of standard deviation
• report printout
Test results:
*Deviation for Max.
*Value of repeatability of indication expressed as standard deviation
Page 47

- 48 -
Example of a report:
.....................................................
--------- Autotest GLP: Report ---------
Balance type %PS00&2
Balanc
e ID
400010
User Admin
Software rev. v.0.4.9
Date 2013.07.16
Time 09: 17:16
----------------------------------------
Number of measurements 10
Reading unit 0.001/0.01 g
Internal weight mass 1402.094 g
Filter Normal
Value release Fast &Reliable
----------------------------------------
Deviation for Max. -0.118 g
Repeatability 0.0088 g
Signature
........................................
PROCEDURE:
Parameter <P6.9 GLP AUTOTEST > is initiated by pressing
button.
The balance software starts the autotest GLP procedure and it is carried out
automatically from now on to the end.
A user can stop the procedure at any time by pressing
button in the window.
Once the procedure is finished, the value of standard deviation of all
measurements is shown in the main display, and message <RESULT> in the
bottom line, and the final report is printed out automatically (as shown above). It is
possible to print out the report again by pressing
button.
Report is not saved, therefore when abandoning this level, it is deleted from the
balance volatile memory.
To abandon the window press
button and the program returns to the main
menu. To return to weighing press button repeatedly.
Page 48

- 49 -
12. INFORMATION ABOUT THE BALANCE
This menu includes information about the balance and its installed software. The
parameters are strictly informative.
Once the parameter <PRINT. SET>> is chosen, the balance settings are sent to
the printer (all parameters). The parameters are transferred via port that was
chosen for <PRINTERS>.
Page 49

- 50 -
13. BALANCE ADJUSTMENT
In order to ensure the highest weighing accuracy, it is recommended to periodically
introduce to balance memory a corrective factor of indications in relation to a mass
standard – i.e. balance adjustment.
Adjustment should be carried out:
- Before the beginning of weighing procedure,
- If long breaks between following measuring series occur,
- If temperature inside the balance changes more than: 3°C.
Types of adjustment:
- Internal automatic adjustment
* triggered by temperature change
* triggered by elapsing time
- Manual internal adjustment
* initiated by pressing
- Adjustment with external weight
* with declared mass which cannot be modified
* of any weight, but not lower than 30% of maximum range.
CAUTION
In case of verified balances (with internal automatic adjustment system)
only the automatic internal adjustment and manual internal adjustment
system are available for a user. Remember to carry out the adjustm ent
process when there is no load on the pan! In case there is load on the
weighing pan, the display will indicate a command <RANGE EXCEEDED>
. In such a case the load should be removed from the weighing pan and
the process of the adjustment should be finished.
Adjustment process can be aborted if necessary by pressing Esc at any
time during the process.
Page 50

- 51 -
13.1. Internal adjustment
Adjustment process can be initiated automatically and manually.
Manual means of activating adjustment procedure is achieved by pressing
. System of automatic adjustment will carry out the process fully
automatically and will inform the user on successive process stages.
Cycle of automatic adjustment process:
- Balance software detects the necessity of carrying out adjustment and
signals it by displaying a thermometer pictogram and <Cal> at the top of
the display.
- During this time interval of about 2 minutes within which weighing
procedure can be completed
- As the 2 minute time elapses, balance display indicates message CAL_30
and starts counting down from 30..29..28 to 0 (indicated value is the
counter),
- Balance user has 30 seconds to make a decision
In order to start adjustment, do not take any actions
In order to complete weighing procedure, press Esc. When pressed,
balance returns to weighing procedure and displays last weighing
result. In about 5 minutes balance indicates CAL_30 message again.
- The adjustment process can be postponed for multiple times, but it needs
to be pointed out that postponing of adjustment for a long time may lead to
larger errors of weighing process. The errors are the effect of temperature
changes and as a consequence changes of balance sensitivity.
Page 51

- 52 -
Automatic adjustment process takes place in three different areas:
• Adjustment on plugging the balance to mains – verified balances.
• Adjustment triggered by temperature change inside the balance. The
balance is equipped with very precise system for monitoring
temperature. At each adjustment process, the temperature is saved
in the system. The next adjustment is automatically initiated if
temperature changes more than 3°C from the last saved
temperature.
• Adjustment triggered by elapsing time. It is possible to declare time
intervals which are criteria for balance adjustment. Accessible
settings are: adjustment after 1, 2, 3, 4, 5, 6, 7, 8, 9, 10, 11, 12 hours
since last carried out adjustment procedure,
CAUTION
Declaring time intervals for balance adjustment is available only in
non-verified balances. In case of verified balances the time interval
between the following adjustm ents is set for 3 hour s.
Page 52

- 53 -
13.2. Menu adjustment settings
P1 CALIBRATION
P1.1 INT.CALIB. | [internal adjustment]
P1.2 EXT.CALIB. | [external adjustment]
P1.3 USER CALIB. | [user adjustment]
P1.4 CALIB. TEST | [adjustment test]
P1.5 AUTO. CAL. T. | NONE/TIME/TEMP./BOTH [automatic
adjustment]
P1.6 AUTO CAL. C. | [time of automatic adjustment]
• P1.1 INT. CALIB. – Internal adjustment
Start of internal adjustment process. Adjustment is conducted automatically,
and no user assistance is required. If weighing pan of the balance is loaded,
balance will display a command to unload the weighing pan. If weighing pan is
loaded with a relatively small mass (up to 4% of balance max capacity) then
adjustment process will be carried out automatically, but measuring results
may differ by the amount that was present on balance weighing pan.
or
• P1.2 EXT. CALIB. – External adjustment (with an external weight)
Adjustment with external weight, which value is saved in factory menu of
balance, function unavailable in verified balances.
CAUTION
Function unavailable in verified balances.
Page 53

- 54 -
• P1.3 USER CALIB. – User adjustment (with an external weight)
Adjustment with external weight at any mass in the balance range, however,
not lower than 30% of max range.
CAUTION
Function unavailable in verified balances.
• P1.4 CALIB. TEST – Adjustment test
This fuction enables comparing the result of internal automatic adjustment
with the value of internal weight saved in balance’s factory parameters.
The process is conducted automatically and its result is shown on the
display (if the balance is connected via RS 232 port with a computer or
printer, the adjustement result will be printed out). Press ESC to go back to
the previous menu.
• P1.5 AUTO. CALIB. T. – Temperature of automatic adjustment
(balances with internal adjustment)
Determination of factor which signals start of automatic internal adjustment
NONE - no factor will cause start of adjustement
(adjustment automatically turned off)
TEMP. - adjustment triggered by change of temperature
TIME - adjustment triggered by time interval set in P1.6 AUTO CALIB.
C.
BOTH - adjustment triggered by time and temperature.
CAUTION
Function unavailable in non-verified balances.
Page 54

- 55 -
• P1.6 AUTO CALIB. C. - Time of automatic adjustment (balances
with internal adjustment system)
Determination of time interval, after which automatic adjustment process is
initiated.
CAUTION
Function unavailable in verified balances.
13.3. Manual adjustment
13.3.1. Internal adjustments
Press Cal button
or
The balance performs internal adjustment automatically. During
adjustment process do not load the weighing pan with any load. The
message is displayed <DO NOT TURN OFF CALIBRATION> in the
bottom line. Once adjustment process is completed, balance saves its
result in memory and returns to weighing mode.
CAUTION
- Press Esc button to abort adj ustm ent proc es s.
-If, during adjustment process, weighing pan of a balance is loaded, the
display will show an error message. Adjustment will be stopped. As
weighing pan is unloaded, the adjustment process will continue and be
completed.
Page 55

- 56 -
13.3.2. External adjustment
The external adjustment in balances BPS series should be carried out with
external mass standard / weigh class F
1
Start of external adjustment process,
Balance will display a command ordering unloading of weighing pan
<REMOVE MASS> (weighing pan must be empty). When weighing pan is
unloaded, press
button.
The balance determines mass of empty pan and message <CALIBRATION>
is displayed in the bottom line. It is followed by message message <PLACE
MASS> in the bottom bar, and in the main window the mass value to be
placed on the weighing pan e.g. 200.000g (depending on the type of
balance). Place an external adjustment weight with mass determined on
balance’s display and press
button. The balance determines the mass
and message <CALIBRATION> is displayed in the bottom line. On
completing adjustment process the balance returns to submenu P1.2
INT.CALIB.
If a balance is verified, it is not possible for a user to carry out
external adjustment process.
13.3.3. User adjustment
The external adjustment in balances BPS series should be carried out with
external mass standard / weigh class F
1
Start of external adjustment process,
Page 56

- 57 -
The first procedure of the process is to enter the mass of the weight that is to
be used for adjustment. The mass must be ≥ 30% Max capacity.
Once the mass of the weight is entered and confirmed, the message is
displayed which asks you to remove the weight from the pan <REMOVE
MASS> (weighing pan must be empty). After that, press button, the
balance determines the weight of unloaded pan and message
<CALIBRATION> is shown in the bottom line .
Next, message <PLACE MASS>is displayed in the bottom bar, and in the
main window the value of the mass to be placed e.g. 200.000g (depending
on balance type). Place the weight of the indicated mass and press
button. The balance determines the mass and message <CALIBRATION> is
displayed in the bottom line. After the adjustment process, the balance
returns to submenu P1.2 EXT.CALIB.
If a balance is verified, it is not possible for a user to carry out
external adjustment process.
13.4. Adjustment report printout
At the end of each adjustment process or adjustment test, an adjustment
report is generated automatically and sent to communication port COM 1. The
content of the report is declared in menu P5.0 GLP PRINTOUTS.
The description of how to declare the settings for this option is included
further in this manual, in the section on printouts.
The report can be printed out via the printer connected to the balance or it can
be sent to the computer and saved as a file for archiving.
Page 57

- 58 -
14. DETERMINING CONTENT OF A PRINOUT
14.1. Adjustment report
P5.1 CAL. REPORT, is a group of parameters which enable declaring data that is
on an adjustment printout.
P5.1 CAL. REPORT
P5.1.1 PROJECT |
P5.1.2 CALIB. TYPE | YES
P5.1.3 USER | YES
P5.1.4 PROJECT | YES
P5.1.5 DATE | YES
P5.1.6 TIME | YES
P5.1.7 BALANCE ID | YES
P5.1.8 CAL.DIFFER. | YES
P5.1.9 DASHES | YES
P5.1.10 SIGNATURE | YES
• P5.1.1 PROJECT
Option enables entering the name of the project (e.g. associated with a specific
type of weighment). The name can be up to 16 characters.
For instance, a project name entered into the balance in capital letters, looks
like the figure below:
• P5.1.2 CALIB. TYPE.
Enables printing out the type of the adjustment being carried out.
• P5.1.3 USER
Enables printing out the name of logged-in user.
Page 58

- 59 -
P5.1.4 PROJECT
Enables printing out the name of the project. (see parameter P5.0.1)
• P5.1.5 DATE
Enables printing out the date of the carried out adjustment.
• P5.1.6 TIME
Enables printing out the time of the carried out adjustment.
• P5.1.7 BALANCE ID
Enables printing out the balance ID number.
• P5.1.8 CAL. DIFFER.
Enables printing out the difference between the mass of adjustment weight
measured during the last adjustment and the current measured mass of this
weight.
• P5.1.9 DASHES
Enables printing out the dashes that separate the date of printout from the
signature
• P5.1.10 SIGNATURE
Enables printing out the signature of a user performing the adjustment.
Choose one of the options for the above-mentioned parameters.
NO - do not print on the report
YES - print on the report
Example of a report:
Page 59

- 60 -
14.2. Header printout
P5.2 HEADER, is a group of parameters which enable declaring data that is on the
header printout.
P5.3 HEADER
P5.2.1 DASHES | YES
P5.2.2 WORKING MODES | YES
P5.2.3 DATE | YES
P5.2.4 TIME | YES
P5.2.5 SCALE TYPE | YES
P5.2.6 BALANCE ID | YES
P5.2.7 USER | YES
P5.2.8 PRODUCT | YES
P5.2.9 VARIABLE 1 | YES
P5.2.10 VARIABLE 2 | YES
P5.2.11 EMPTY LINE | YES
P5.2.12 CAL.REPORT | YES
P5.2.13 NON-STANDART PRNT. | NONE / NSTD.PRN. 1 /
NSTD. PRN. 2 / NSTD.PRN.3
/ NSTD. PRN.4
• P5.2.1 DASHES
Enables printing out a line of separating dashes.
• P5.2.2 WORKING MODES
Enables printing out the name of balance’s working mode.
• P5.2.3 DATE
Enables printing out the date in the header.
• P5.2.4 TIME
Enables printing out the time in the header.
• P5.2.5 SCALE TYPE
Enables printing out the scale type.
Page 60

- 61 -
• P5.2.6 BALANCE ID
Enables printing out balance ID number.
• P5.2.7 USER
Enables printing out the name of a logged-in user.
• P5.2.8 PRODUCT
Enables printing out the name of a selected product.
• P5.2.9 VARIABLE 1
Enables printing out the value of VARIABLE 1.
• P5.2.10 VARIABLE 2
Enables printing out the value of VARIABLE 2.
• P5.22.11 EMPTY LINE.
Enables printing out an empty separating line.
• P5.2.12 CAL. REPORT
Enables printing out a report from the last adjustment, according to the
settings declared for the adjustment report printout (see sec. 12.1 in this
manual).
• P5.2.13 NSTD. PRINT.
Enables printing out one of the four non-standard printouts on the header
printout.
You can choose one from the following options: NONE / NSTD. PRN 1 /
NSTD.PRN.2/NSTD.PRN. 3 / NSTD. PRN.4
The way of entering non-standard printouts is described further in this manual.
For the parameters described above i.e. P5.2.1 to P5.2.12 you should choose
from:
NO - do not print in the header
YES - print in the header
For the parameter P5.2.13, you should choose one of the following options:
NONE / NSTD.PRN. 1 / NSTD. PRN 2 / NSTD.PRN 3 / NSTD. PRN.4
Page 61

- 62 -
Example of a header printout:
14.3. Measurement result printout – GLP PRINTOUT
P5.3 GLP PRINTOUT, is a group of parameters which enable declaring data that is
on the measurement result printout.
P5.3 GLP PRNT.
P5.3.1 DATE | YES
P5.3.2 TIME | YES
P5.3.3 USER | YES
P5.3.4 PRODUCT | YES
P5.3.5 VARIABLE 1 | YES
P5.3.6 VARIABLE 2 | YES
P5.3.7 TARE | YES
P5.3.8 GROSS | YES
P5.3.9 CURR.RES. | YES
P5.3.10 CAL. REPORT | YES
P5.3.11 NSTD.PRNT. | NONE / NSTD.PRN. 1 /NSTD.PRN. 2 /
NSTD. PRN.3 / NSTD.PRN. 4
• P5.3.1 DATE
Enables printing out the date of measurement.
• P5.3.2 TIME
Enables printing out the time of measurement.
• P5.3.3 USER
Enables printing out the name of a logged-in user.
Page 62

- 63 -
• P5.3.4 PRODUCT
Enables printing out the name of the product that was weighed.
• P5.3.5 VARIABLE 1
Enables printing out the value of VARIABLE 1.
• P5.3.6 VARIABLE 2
Enables printing out the value of VARIABLE 2.
• P5.3.7 TARE
Enables printing out the tare value.
• P5.3.8 GROSS
Enables printing out the gross mass value.
• P5.3.9 CURR. RES.
Enables printing out the current measurement result (NET mass) in the
current unit.
• P5.3.10 CAL. REPORT
Enables printing out a report from the last adjustment, according to the
settings declared for the adjustment report printout (see sec. 12.1 in this
manual).
• P5.3.11 NSTD. PRNT.
Enables printing out one of the four non-standard printouts on the header
printout.
You can choose one from the following options: NONE / NSTD. PRN 1 /
NSTD.PRN.2/NSTD.PRN. 3 / NSTD. PRN.4
The way of entering non-standard printouts is described further in this manual.
Example of a printout:
Page 63

- 64 -
14.4. Footer printout
P5.4 FOOTER, is a group of parameters which enable declaring the data that is on
the footer printout.
P5.4 FOOTER
P5.4.1 WORKING MODES | YES
P5.4.2 DATE | YES
P5.4.3 TIME | YES
P5.4.4 SCALE TYPE | YES
P5.4.5 BALANCE ID | YES
P5.4.6 USER | YES
P5.4.7 PRODUCT | YES
P5.4.8 VARIABLE 1 | YES
P5.4.9 VARIABLE 2 | YES
P5.4.10 DASHES | YES
P5.4.11 EMPTY LINE. | YES
P5.4.12 CAL.REPORT | YES
P5.4.13 SIGNATURE | YES
P5.4.14 NSTD. PRNT. | NONE / NSTD.PRN. 1 /
NSTD.PRN.2/NSTD.PRN.3 /
NSTD. PRN.4
• P5.4.1 WORKING MODES
Enables printing out of the name of balance’s working mode.
• P5.4.2 DATE
Enables printing out of the date in the footer.
• P5.4.3 TIME
Enables printing out the time in the footer.
• P5.4.4 SCALE TYPE
Enables printing out the scale type.
• P5.4.5 BALANCE ID
Enables printing out balance ID number.
Page 64

- 65 -
• P5.4.6 USER
Enables printing out the name of a logged-in user.
• P5.4.7 PRODUCT
Enables printing out the name of a selected product.
• P5.4.8 VARIABLE 1
Enables printing out the value of VARIABLE 1
• P5.4.9 VARAIBLE 2
Enables printing out the value of VARIABLE 2
• P5.4.10 DASHES
Enables printing out a line of separating dashes
• P5.4.11 EMPTY LINE
Enables printing out an empty separating line
• P5.4.12 CAL. REPORT
Enables printing out a report from the last adjustment, according to the
settings declared for the adjustment report printout (see sec. 12.1 in this
manual).
• P5.4.13 SIGNATURE
Enables printing out the signature of the user performing the weighments.
• P5.4.14 NSTD. PRNT.
Enables printing out one of the four non-standard printouts on the header
printout.
You can choose one from the following options: NONE / NSTD. PRN 1 /
NSTD.PRN.2/NSTD.PRN. 3 / NSTD. PRN.4
The way of entering non-standard printouts is described further in this manual.
For the parameters described above P5.4.1 to P5.4.13 you should choose from:
NO - do not print in the footer
YES - print in the footer
For the parameter P5.4.14, you should choose one of the following options:
NONE / NSTD.PRN. 1 / NSTD. PRN 2 / NSTD.PRN 3 / NSTD. PRN.4
Page 65

- 66 -
Example of a footer printout:
14.5. Non-standard printouts
The balance’s software enables entering 4 non-standard printouts. Each of them
can have approximately 160 characters.
Non-standard printout can include:
− Variables depending on the working mode and other user’s needs (mass,
date etc.)
− Permanent text in the user menu, it should be remembered
− Non-standard printout can have approximately 160 characters (typed as a
single line)
14.5.1. Inserting texts
Variables in all modes and with the same values
%% Print-out of a “%” character
%V Current NET mass in the current unit
%N Net mass in the current unit
%G Gross mass in the current unit
%T Tare mass in the current unit
%D
Current date
%M Current time
%I Balance number
%R Program number
%P Project number
%U User number
%F Name of current function – working mode
%C Date and time of the last adjustment
Page 66

- 67 -
%K Type of the last adjustment
%Y
Weighing deviation to the last adjustment
%1 Variable 1
%2 Variable 2
Variables depending on the currently used working mode
Variable Description Mode in which the variable is active
%W Standard mass 1 pcs COUNTING PIECES
%H
High threshold
CHECKWEIGHING
%L Low threshold
%A Target mass DOSING
%B Reference mass DEVIATIONS
Non-standard characters used in designing non-standard print-outs
\\ a single „\” character
\C CRLF
\R CR
\N LF
\T Tabulator
\F Form feed (for PCL printers)
Every single print-out can have max 160 characters (letters, numerals, nonstandard characters, spaces). A user can apply non-standard characters in order to
the variables depending on the needs.
Example:
“05&”
DATE: <current measurement date>
TIME: <current measurement time>
PRODUCT MASS: <current mass indicator>
*****SIGNATURE:.........
<current working mode>
Page 67

- 68 -
You should enter the printout of the content setting and design the printout using
appropriate variables and text format characters.
The way of inserting texts
− By the means of balance
Choice of the character to be changed. Moving the cursor or an
active character (blinking) to the right.
Choice of the character to be changed. Moving the cursor or an
active character (blinking) to the left.
Change of the character by one value down
Change of the character by one value up
Deleting a character
Inserting a character
− By the means of computer keyboard of the USB type
A computer keyboard of the USB type can be connected, which enables
easier and quicker editing of the print-outs.
In order to insert text, you should enter the appropriate option in the menu
and with help of the keyboard insert the text and confirm by pressing Enter
key.
NOTE:
It is important to type variables used for non-standard printouts in capital letters.
Page 68

- 69 -
14.6. Variables
Variables are alphanumeric inrormation which can be linked to the printouts,
products or other information related to weighing. For every variable enter its
contents. Variables can be used for entering e.g. serial number or batch number
during the products weighing. The program allows to enter two variables. Each can
contain max 32 characters.
In order to enter a variable, you need to enter the variable settings (parametre P5.9
– VARIABLE 1 or P5.10 – VARIABLE 2) and enter its contentents using direction
keys (arrows) on the balance keypad or a computer keyboard. Entering texts
procedure is the same as for non-standard printouts.
Page 69

- 70 -
15. DATABASE
The balance software has 3 databases that can be edited (USERS, PRODUCTS,
TARES) as well as 2 databases (WEIGHMENTS AND ALIBI), in which all the
measurements carried out on the balance are saved.
Data range that can be saved in particular databases:
USERS – 100 different users.
PRODUCTS – 1000 different products.
TARES – 100 different masses of the packages.
WEIGHMENTS – 10 000 consecutive measurements
ALIBI – 100 000 consecutive measurements
Operations on databases: USERS, PRODUCTS and TARES:
Deleting the selected item in the database
Inserting a new item in the database
The way of inserting and deleting an item is described below.
15.1. Users
USERS – 100 different users.
It is possible to introduce the following date for each user:
NAME (30 characters), CODE (6 characters),
PASSWORD (8 characters, just numbers),
ACCESS (USER, ADVANCED, ADMIN),
LANGUAGE (any from the available).
Access levels
The balance software has three access levels: USER, ADVANCED,
ADMINISTRATOR.
Once the balance is switched on, the display is active for the whole time, which
enables carrying out mass measurements even without a logged-in user.
The table below shows the access to the edition of user parameters,
databases and software functions depending on the access level.
Page 70

- 71 -
Access Access levels
USER
Access to parameters in the submenu: <Reading> and
setting in parameter group <Others> except for <Date
and Time>. All the weighing processes can be started
and carried out at this time. The user has the access to
the information preview in <Databases>, and can also
define universal variables.
ADV
Access to editing of parameters in the submenu:
<Reading>; <Working modes>; <Communication>;
<Devices>; <Others> except for <Date and Time>. All
the weighing processes can be started and carried out
at this time.
ADMIN
Access to all the user parameters, functions and
editing databases.
In order to add a user, follow the scheme shown below, add a user and assign a
name to them.
Page 71

- 72 -
Once the user’s name is added, follow the procedures shown below:
User’s code – Max 6 characters
User’s password – Max 8 numbers
Select the access level
Select the language
Once all of the data is inserted, you can return to the weighing mode.
In order to select a user, follow the logging-in procedure described in section 9 in
this manual.
In order to remove a user should follow this procedure:
• Enter the user database – as in the description above
Page 72

- 73 -
• Select the user that is to be removed from the list
• Press
button
• The software shows <DELETE?> in the bottom line
• Confirm by pressing
button
• When confirmed, the software removes the selected user from the list
• Return to the weighing mode
15.2. Products
PRODUCTS – 1000 different products. The following data can be inserted for each
product: NAME (30 characters), CODE (6 characters), EAN (16 characters), MASS
(with the accuracy of balance reading unit), TARE (mass of the packaging relating
to a particular product with the accuracy of balance reading unit), MIN (low
threshold for the mode WEIGHING>, should be inserted with the accuracy of
balance reading unit), MAX (high threshold for the mode <CHECKWEIGHING>,
should be inserted with the accuracy of balance reading unit), TOLERANCE
(tolerance thresholds to [±] in mode <DOSING> entered as a % of the target mass).
In order to add a product, you should enter in the products database and add the
name of the product (follow the procedure as in the section above).
Next, insert the details about the product.
Page 73

- 74 -
15.3. Tares
TARES – 100 different masses of the packaging. The following data can be
inserted for each packaging: NAME (30 characters), TARE (mass of the packaging,
enter the value with the accuracy of balance reading unit).
In order to add tare – mass of the packaging, enter the tare database and insert a
name for the tare (follow the procedure as in the section above).
Page 74

- 75 -
Next, insert the details about the packaging.
15.4. Weighments
Weighments database is non-editable i.e. the data relating to the weighments is
saved automatically. A user has a possibility of viewing this data and printing it out
or exporting to PENDRIVE; if such a need occurs (procedure is described further
on in this manual).
The balance software allows you to save and store up to 1000 measurements
carried out on the balance. This occurs automatically, after a single press of the
button <PRINT>, without a need of additional actions or settings change.
The additional data is saved along with the measurement.
• Date of the measurement
• Date of the measurement
• Measurement result (mass)
• Tare value
• Name of the product that has been weighed
• Person carrying out the measurement (logged-in user)
• Working mode in which the measurement has been carried out
• Value of variable 1 and 2
The software saves the measurements in a so called loop, i.e. when the
measurement 1001 is saved, the measurement 1 is automatically deleted from the
balance’s memory.
Page 75

- 76 -
The measurements saved in the balance’s memory cannot be deleted.
It is possible for a user to view and print out the data saved in the memory.
Procedure:
Each measurement is saved with its individual number. The format is: b4.4.n,
where <n> is the consecutive number of the saved measurement. In the bottom line
the date and time are displayed for every single measurement.
To move through the saved measurements database, use the arrow
buttons
or . To move to the next measurement either up or down the
list, press one of the buttons.
To view the remaining data relating to the measurement, press
after selecting
the measurement in question:
The software will automatically show the data relating to the measurement in the
bottom line of the balance display.
To move through the data relating to the measurement, press or
The data relating to the measurement can be printed out by selecting the option
<PRINT> and pressing
button.
Page 76

- 77 -
Example of a printout
Date 21.06.2013
Time 13:05:02
User
Product
Tare 0.000 g
Gross 0.000 g
0.000 g
--------------Cal. report.---------------
Cal. type Internal
User
Project 1234567890123459
Date 16.07.2013
Time 13:27:09
Balance ID 10353870
Cal. diff. -0.004 g
----------------------------------------
Signature
........................................
The data that is to be printed out, depends on the settings in parameter P5.3 GLP
PRINTOUT. Depending on what data is set in this parameter for the print-out (by
selecting <YES> the data is printed out also in WEIGHMENTS database
(see sec. 13.3.)
Page 77

- 78 -
15.5. ALIBI
The balance is equipped with “ALIBI”, a type of memory that allows you to save and
store up to 100 000 measurements carried out on the balance.
If the “ALIBI” memory is installed in the balance, the saving of the measurements
occurs automatically, by pressing <PRINT> button, without a need of additional
actions or settings change.
The additional data is saved along with the measurement.
• Date of the measurement
• Time of the measurement
• Measurement result (mass)
• Tare value
• Person carrying out the measurement (logged-in user)
• The name of the product that has been weighed
The software saves the measurements in a so called loop, i.e. when the
measurement 1001 is saved, the measurement 1 is automatically deleted from the
balance’s memory.
The measurements saved in the balance’s memory cannot be deleted.
It is possible for a user to view and print out the data saved in the “ALIBI” memory.
Procedure:
Each measurement is saved with its individual number. The format is: b4.5.n,
where <n> is the consecutive number of the saved measurement. In the bottom line
the date and time are displayed for every single measurement.
To move through the saved measurements database, use the arrow
or
. To move to the next measurement either up or down the list, press one of
the buttons.
Page 78

- 79 -
To view the remaining data relating to the measurement, press after selecting
the measurement in question:
The software will automatically show the data relating to the measurement in the
bottom line of the balance display.
To move through the data relating to the measurement, press
or
The data relating to the measurement can be printed out by selecting the option
<PRINT> and pressing
button.
Example of a print-out
Date 19.06.2013
Time 6:48:41
Result 199.90 g
Tare 0.000 g
User SMITH
Product PILL
To return to the weighing mode press
button repeatedly.
Page 79

- 80 -
16. EXPORT AND IMPORT OF DATABASE
This option allows you to:
• Archive the data relating to the weighments carried out– WEIGHMENT
database and ALIBI database
• Copy the products databases and tares databases between the balances
of this series
This can be accomplished by using external memory PENDRIVE.
Plug a PENDRIVE in USB 1 – TYPE A port if you want to use this option.
The balance automatically sees the external memory drive and the message
enabling operations relating to the export or import of the database is displayed.
The following options are available when entering this parameter:
• EXPORT database
• IMPORT database
Page 80

- 81 -
16.1. Export database
To export the database, enter the option EXPORT.
The following functions are available:
• Export of all the databases
• Export of users databases
• Export of product databases
• Export of tares databases
• Export of weighments
• Export of weighments saved in ALIBI memory
• Export of users parameters
After selecting the option <ALL DATABASES>, the balance software creates files
on the PENDRIVE. The files are of relevant names and are saved in individual
databases. The files have special extensions and the data saved in them is
encoded in a way that the files cannot be read or seen in standard computer
programs.
Special computer softwares manufactured by MRC company are used to read
the data from the database files: ALIBI and WEIGHMENTS. The data from the files,
in which the data from the PRODUCTS, USERS, and TARES databases is saved,
is read automatically by the balance software in the option <IMPORT>.
Page 81

- 82 -
16.2. Import database
The function <IMPORT> allows you, amongst others, to transfer the data saved in
the balance database. In this balance, the data to be entered in the new balance is
entered. This is a quick and reliable way to enter the data without any mistakes.
To import the database, plug a PENDRIVE in USB port and next select IMPORT
and choose one of the following options
The following options are available:
• Import of all databases
• Import of users databases
• Import of products databases
• Import of tares databases
• Import users parameters
The data from the ALIBI and WEIGHMENTS databases cannot be imported.
16.3. Measurement data print-out
The balance software allows you to save the data relating to the measurement on
the external memory - PENDRIVE.
The operation can be performed as follows:
• Plug a pendrive in USB port
• Abandon <IMPORT/EXPORT> option, which is automatically started by
pressing
button
• In the parameter P4.2.1 <DEVICES/PRINTER/PORT> set the option
<PENDRIVE>
• Return to the weighing mode
• From this moment on, every single pressing of the button
leads to
the saving the measurement data (compatible with the settings for GLP0
PRINTOUT) in a text file, which is automatically created by the balance
software. The file name is: printout.txt.
• Turn the balance off by pressing
button so that the data is saved in
the file. Only then can you remove the pendrive from the port and read the
data on a computer.
Page 82

- 83 -
The data can be printed out on any printer connected to the computer.
More data can be saved in the same file. The balance software will add the
date in the file that has already been created on the pendrive. Consequently, a
user can continue with saving the measurements in the same file once
created.
CAUTION:
When the balance software sees the PENDRIVE, the menu <P8
IMPORT/EXPORT> is accessible.
All the operations relating to export and impor t that ar e des cr ibed abo ve can be
performed using this menu.
Page 83

- 84 -
17. BALANCE WORKING MODES
- Weighments
- Counting pieces
- Checkweighing
- Dosing
- Deviations % against the mass of the standard
- Animal weighing
- Density determination of solids
- Density determination of liquids
- Statistics
- Totalising
- Peak hold
In order to initiate a particular mode press
button, and follow by
selecting the mode from the list.
Page 84

- 85 -
Once the button has been pressed, the name of the first available
function is shown.
or - select the working mode
- enter the selected working mode
The setup for the functions is described further in this manual.
17.1. Setup for availability of working modes
In this group of parameters, a user declares functions which are to be available
for the user after pressing
button.
It is possible for a user to switch off the functions that are not used during
working with the balance. This can be done by setting the availability
parameter to <NO>.
Follow the scheme shown below:
Page 85

- 86 -
17.2. Counting parts of the same mass
The balance, in the standard version, is equipped with the option of counting
small objects of the same mass.
• Start Counting Pieces function
When the function is initiated for the first time, the standard mass equals
0.0000g. If the sample mass is determined and has been used in the mode
<COUNTING PIECES> then the software accepts the mass of recently used
standard as the standard mass.
Page 86

- 87 -
17.2.1. Setup for mode COUNTING PIECES
The software allows entering settings for each working mode. Some the
settings are identical in all working modes. They are described in section
relating to the mode <WEIGHING>.
This section covers only the settings relating to the mode <COUNTING
PIECES>.
F button shortcuts
The function enables the option of quick access for weighing functions,
which are available when buttons F1, F2, F3 or F4 are pressed.
In the mode <COUNTING PIECES> the following options are available,
which a user can assign to each of the F buttons:
NONE – no function assigned to the button
ENTER SAMPLE – function initiates the option of entering the reference
mass of a single piece
DETERMINE SAMPLE – function initiates the option of automatic
determination of the mass of a single piece from a number of samples of
known quantity
SELECT PRODUCT – function initiates the option of selecting a product
from product database
LOG IN – function initiates the option of selecting and logging-in of a
balance’s user
ENTER TARE – function initiates the option of inserting packaging mass
SELECT TARE – function initiates the option of selecting packaging
mass from product database
PRINT HEADER – function initiates the print-out of a designed header
PRINT FOOTER – function initiates the print-out of a designed footer
VARIABLE 1 – function initiates the selection and editing of variable 1
VARIABLE 2 – function initiates the selection and editing of variable 2
The way of declaring the function is described in the section relating to
the weighing mode settings <F button shortcuts>.
Page 87

- 88 -
17.2.2. Setting the reference mass by determining from the sample
of known quantity
While determining the mass of a single piece the function ACAI (Automatic
Accuracy Correction) is in use.
Means of operation of ACAI function:
- Number of pieces ( on adding) on balance’s weighing pan has to be
greater than has been previously
- Number of pieces (on adding) on balance’s weighing pan must be less
than twice the amount of which was visible on the display before
adding parts
- Current quantity of parts must be within the ± 0,3 tolerance of the total
value,
- Measurement result has to be stabilised.
Procedure:
• Place the container on the pan and tare its mass,
• Press one of the F buttons, to which the function <ENTER SAMPLE>
is assigned, and the editing window <SAMPLE QUANTITY> is
displayed
• Use the navigating buttons or to select the correct
sample quantity.
• For the option: any quantity (displayed value <0000> enter a numer
using navigating buttons).
Page 88

- 89 -
• <PLACExx PCS>.
• Place the declared number of pieces in the container and when the
result is stable (the symbol
is displayed) and confirm their mass by
pressing button,
• The balance software automatically counts a single sample mass and
enters the mode <COUNTING PIECES> displaying the number of
pieces which are on the pan (pcs). In the bottom line, a single sample
mass value is shown (if the option for the function
<INFORMATION>has been selected).
CAUTION:
It should be remembered that:
Page 89

- 90 -
• The total mass of all the pieces put on the weighing pan must not be greater
than the balance’s maximum weighing range.
• The mass of a single piece cannot be lower than the 0,1 reading unit of the
balance. If this condition is not met, the balance displays the message: <Too
low sample mass>.
• While determining the number of piece s, wait for the stability pictogram ,
in order to confirm the quantity.
• Only after the stability pictogram is displayed can you confirm the declared
quantity by pressing
button. Otherwise, the balance will not accept the
measurement.
17.2.3. Setting the reference mass by entering its mass
Procedure:
• Press one of the F buttons, to which the function <ENTER SAMPLE>
is assigned, and the editing window <ENTER SAMPLE> is displayed
• Use the arrow buttons to insert the known a single sample mass value.
• Confirm the entered mass by pressing button,
Page 90

- 91 -
• The balance software automatically counts a single sample mass and
enters the mode <COUNTING PIECES> displaying the number of
pieces which are on the pan (pcs). In the bottom line, a single sample
mass value is shown (if the option for the function
<INFORMATION>has been selected).
17.2.4. Returning to the weighing mode
Page 91

- 92 -
17.3. Checkweighing
Checkweighing is a working mode that uses two thresholds (LOW and
HIGH) in order to check the mass of the samples. It is generally assumed
that the mass is correct if it is contained within the threshold values.
F button shortcuts
The function enables the option of quick access for weighing functions,
which are available when buttons F1, F2, F3 or F4 are pressed.
In the mode <CHECKWEIGHING> the following options are available,
which a user can assign to each of the F buttons:
NONE – no function assigned to the button
ASSIGN THRESHOLDS – function initiates the option of ascribing
thresholds for the checkweighing
SELECT PRODUCT – function initiates the option of selecting a product
from product database
LOG IN – function initiates the option of selecting and logging-in of a
balance’s user
ENTER TARE – function initiates the option of inserting packaging mass
SELECT TARE – function initiates the option of selecting packaging
mass from product database
PRINT HEADER – function initiates the print-out of a designed header
PRINT FOOTER – function initiates the print-out of a designed footer
VARIABLE 1 – function initiates the selection and editing of variable 1
VARIABLE 2 – function initiates the selection and editing of variable 2
The way of declaring the function is described in the section relating to
the weighing mode settings <F button shortcuts>.
Page 92

- 93 -
17.3.1. Declaration of mass thresholds
Procedure:
• Press one of the F buttons, to which the function <ASSIGN
THRESHOLDS>is assigned, the editing window is displayed and the
value of MIN low threshold can be ascribed.
• Use the arrow buttons to ascribe the value of the low threshold
• Confirm the inserted value by pressing button,
• The software automatically proceeds to the edit of MAX high threshold
Page 93

- 94 -
• Confirm the inserted mass by pressing button,
• The balance software proceeds to the mode <CHECKWEIGHING>
and states the values of declared thresholds in the bottom line (if such
an option for the function <INFORMATION> has been selected).
• At the top of the display the message <Min> is shown, which indicates the
value of the mass on the weighing pan is below the low threshold mass
value.
<Min>: mass lower than the value
of the low threshold
<Ok>: mass contained within
thresholds
<Max>: mass higher than the value
of the high threshold
Page 94

- 95 -
17.4. Dosing
The dosing is the mode which consits in the process of sample weighing
until target mass is reached. The target mass is defined along with dosing
tolerance. Tolerance value is set as a percentage of the target mass,
entering the value percentage.
Example:
Target weight = 100.000g
Tolerance = 2,5% (2,5% of 100g, which amounts to 2,5g)
i.e.: the software accepts correctly dosed value within the following
thresholds: from 97,500g to 102,500g.
F button shortcuts
The function enables the option of quick access for weighing functions,
which are available when buttons F1, F2, F3 or F4 are pressed.
In the mode <DOSING> the following options are available, which a user
can assign to each of the F buttons:
NONE – no function assigned to the button
ENTER SAMPLE– function initiates the option of entering the reference
mass along with tolerance (one procedure)
SELECT PRODUCT – function initiates the option of selecting a product
from product database
LOG IN – function initiates the option of selecting and logging-in of a
balance’s user
ENTER TARE – function initiates the option of inserting packaging mass
SELECT TARE – function initiates the option of selecting packaging
mass from product database
PRINT HEADER – function initiates the print-out of a designed header
PRINT FOOTER – function initiates the print-out of a designed footer
VARIABLE 1 – function initiates the selection and editing of variable 1
VARIABLE 2 – function initiates the selection and editing of variable 2
The way of declaring the function is described in the section relating to
the weighing mode settings <F button shortcuts>.
Page 95

- 96 -
17.4.1. Setting a target weight by entering values
Procedure:
• Press one of the F buttons, to which the function <ENTER SAMPLE>
is assigned,
and the editing window <ENTER SAMPLE> is displayed
• Use the arrow buttons to enter the target weight
• Confirm the inserted target weight by pressing button,
• The software automatically sets tolerance of target mass dosing.
Page 96

- 97 -
•
Use the arrow buttons to set the tolerance value
• Confirm the entered tolerance by pressing button,
• The balance software automatically enters the mode <DOSING> and
displays the target mass value with a minus sign, and in the bottom
line standard mass value – target mass (if such option for the function
<INFORMATION> was selected).
• The sign <Min> is shown at the top of the display. It indicates the status of
the mass on the pan with relations to the target mass, below the value
<TARGET MASS – TOLERANCE>
<Min>: mass lower than the
Target Value - Tolerance
<Ok>: mass contained within
tolerance
Target Value +/- Tolerance
<Max>: mass higher than the
Target Value + Tolerance
Page 97

- 98 -
17.4.2. Returning to the weighing mode
17.5. Deviations % against the mass of the standard
The balance software has the option of deviation control (in percentage)
between weighed loads mass samples and the reference mass standard. The
mass of the standard can be determined by its weighment or by typing into the
balance’s memory by its user.
F button shortcuts
The function enables the option of quick access for weighing functions,
which are available when buttons F1, F2, F3 or F4 are pressed.
In the mode <DEVIATIONS> the following options are available, which a
user can assign to each of the F buttons:
NONE – no function assigned to the button
ENTER SAMPLE– function initiates the option of entering reference
mass to control mass deviation
DETERMINE SAMPLE – function initiates the option of entering
reference mass to control mass deviation
SELECT PRODUCT – function initiates the option of selecting a product
from product database
LOG IN – function initiates the option of selecting and logging-in of a
balance’s user
ENTER TARE – function initiates the option of inserting packaging mass
SELECT TARE – function initiates the option of selecting packaging
mass from product database
PRINT HEADER – function initiates the print-out of a designed header
PRINT FOOTER – function initiates the print-out of a designed footer
Page 98

- 99 -
VARIABLE 1 – function initiates the selection and editing of variable 1
VARIABLE 2 – function initiates the selection and editing of variable 2
The way of declaring the function is described in the section relating to
the weighing mode settings <F button shortcuts>.
17.5.1. Setup for reference mass determined by weighing
Procedure:
• Press one of the F buttons, to which the function <DETERMINE
SAMPLE> is assigned and the editing window will be displayed
<PLACE 100%>
• Place the standard (as 100%) on the pan, and when the result is stable
(
symbol is displayed) confirm the mass by pressing
• The balance program automatically enters the load value to be
measured as a standard and enters the mode <DEVIATIONS>
displaying the value of 100.000%, and the bottom line displays
standard mass value (if the option for function <INFORMATION> is
selected).
Page 99

- 100 -
17.5.2. Setup for reference mass by typing its mass
Procedure:
• Press one of the F buttons to which the function <ENTER SAMPLE> is
assigned and the editing window will be displayed <ENTER SAMPLE>
• Using the arrow buttons enter the known reference mass.
• Confirm by pressing button,
• The balance software automatically proceeds to the mode
<DEVIATIONS> displaying the value of 0.000%, and the bottom line
displays the entered value of the standard mass (if the option for
function <INFORMATION> is selected).
Page 100

- 101 -
17.5.3. Returning to the weighing mode
17.6. Animal weighing
Working mode <Animal weighing> enables reliable determining mass of
objects in motion. In principle, these types of objects generate unstable
measurement, thus it requires using a different filtering method of
measurement signal.
17.6.1. Additional setting for animal weighing mode
Apart from the standard settings for this mode (described in the weighing
mode), additional settings have been introduced which describe the operation
of the mode.
Available options:
• AVERAGING TIME – Amount of time during which measurement records
of weighed sample are analysed. Obtained data is used to determine
measurement result
• THRESHOLD - It is a value expressed in mass measuring units. In order
to start measurement, the indication has to exceed value set in the
threshold.
• AUTOSTART - Determines start criterion for measurements: whether they
are initiated manually / on pressing a button or selecting START/ or
automatically.
When set on <YES> a measurement starts automatically if indication on
balance’s display exceeds the value of set threshold. The following
measurement can start on unloading the weighed object from balance’s
pan (the indication has to return below the value set in threshold) loading
a new object on the pan and exceeding the threshold’s value by the
indication.
It should be remembered, however, that before the start of the animal weighing
the above-mentioned options should be set on the appropriate values to meet
the expectations and the needs of the working conditions.
 Loading...