

Page 1

OPERATION MANUAL
MODEL DCA6SPX4F
PORTABLE GENERATOR
(KUBOTA D1105-E4B-BGDE-1-S1 DIESEL ENGINE)
Revision #2 (03/12/21)
To find the latest revision of this publication or
associated parts manual, visit our website at:
www.mqpower.com
THIS MANUAL MUST ACCOMPANY THE EQUIPMENT AT ALL TIMES.
2
Page 2

PROPOSITION 65 WARNING
PAGE 2 — DCA6SPX4F GENERATOR • OPERATION MANUAL — REV. #2 (03/12/21)
Page 3

REPORTING SAFETY DEFECTS
If you believe that your vehicle has a defect that could cause a crash or could cause
injury or death, you should immediately inform the National Highway Traffic Safety
Administration (NHTSA) in addition to notifying Multiquip at 1-800-421-1244.
If NHTSA receives similar complaints, it may open an investigation, and if it finds
that a safety defect exists in a group of vehicles, it may order a recall and remedy
campaign. However, NHTSA cannot become involved in individual problems
between you, your dealer, or Multiquip.
To contact NHTSA, you may either call the Vehicle Safety Hotline toll-free at 1-888327-4236 (TTY: 1-800-424-9153), go to http://www.nhtsa.dot.gov; or write to:
Administrator
NHTSA
1200 New Jersey Avenue S.E.
Washington, DC 20590
You can also obtain information about motor vehicle safety from
http://www.safecar.gov.
DCA6SPX4F GENERATOR • OPERATION MANUAL — REV. #2 (03/12/21) — PAGE 3
Page 4

DCA6SPX4F
60 Hz Generator
Proposition 65 Warning ........................................... 2
Reporting Safety Defects ......................................... 3
Table of Contents ..................................................... 4
Nameplate/Safety Information ................................. 5
Safety Information ............................................. 6–11
Specifications (Generator) ..................................... 12
Specifications (Engine) .......................................... 13
Dimensions ............................................................ 14
Installation ....................................................... 16–17
General Information ............................................... 18
Components (Generator) ....................................... 19
Components Control Panel ................................... 20
Components (Engine) ............................................ 21
Load Applications .................................................. 22
Inspection/Setup .............................................. 23–26
Operation ......................................................... 27–28
Operation/Shutdown .............................................. 29
Maintenance .................................................... 30–35
Troubleshooting (Generator) .................................. 36
Troubleshooting (Generator/Engine) ..................... 37
Troubleshooting (Engine) ................................. 38–39
Generator Wiring Diagram ..................................... 40
Engine Wiring Diagram .......................................... 41
TABLE OF CONTENTS
NOTICE
Specifications are subject to change without notice.
PAGE 4 — DCA6SPX4F GENERATOR • OPERATION MANUAL — REV. #2 (03/12/21)
Page 5
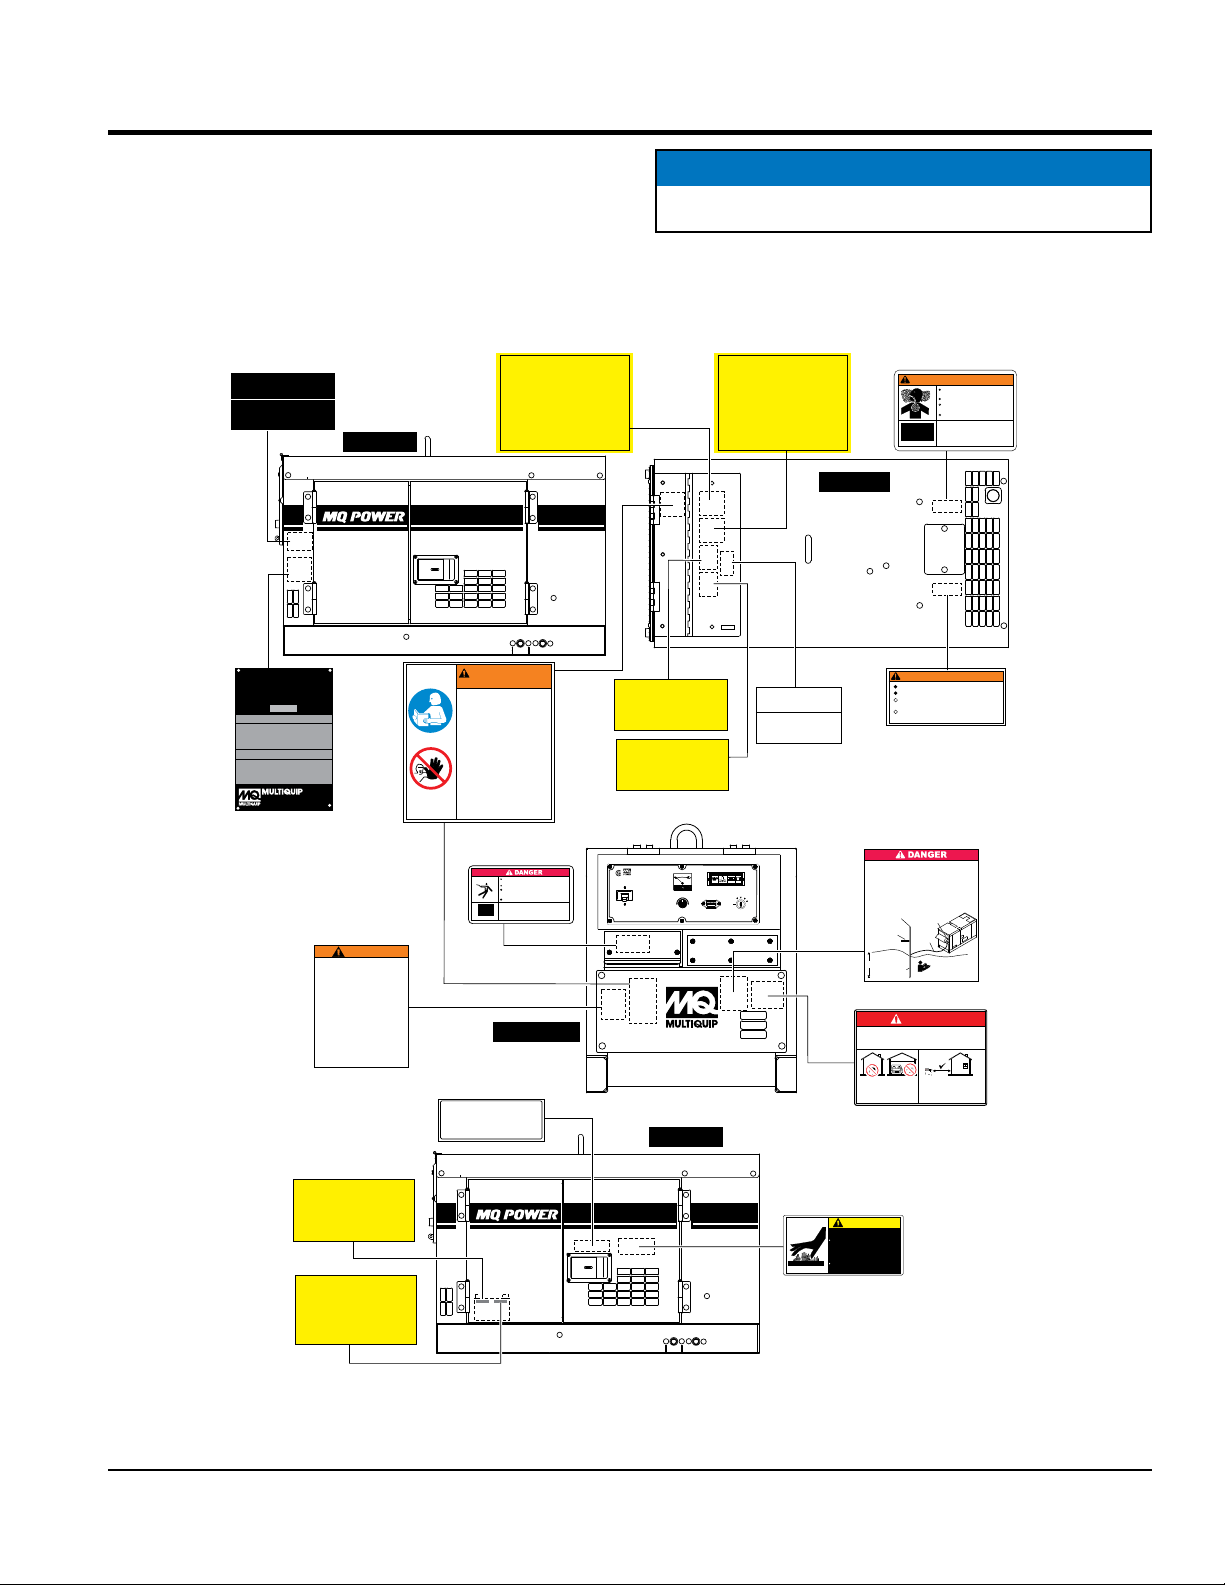
SAFETY DECALS
B90400040
WARNING
MOVING PARTS can cause
severe injury.
DO NOT operate with doors
open.
Stop engine before servicing.
Safety decals are attached to the generator as shown in
Figure 1. Keep these safety decals clean at all times. When
the safety decals become worn or damaged, contact your
nearest dealer or the Multiquip Parts Department.
CAUTION! ATTENTION!
READ OWNER’S SERVICE MANUAL BEFORE OPERATING OR
EMISSION CONTROL INFORMATION
SUPPLEMENTAL LABEL
KUBOTA Corporation
KUBOTA
XXXXX
XXXXXX
XXXX
XXXXX
XXXXXXX
XXXX
WHISPERWATT
DIESEL POWERED AC GENERATOR
MODEL: DAC-6SPX4F
SERIAL No.
AC GENERATOR/ GENERATRICE CA
XXXXXXX
XXXXXXX
XXXXXXX
XXXXXXX
XXXXXXX
XXXXXXX
XXXXXXX
XXXXXXX
XXXXXXX
XXXXXXX
XXXXXXX
XXXXXXX
DIESEL ENGINE/ MOTEUR DIESEL
XXXXXXX
XXXXXXX
XXXXXXX
XXXXXXX
XXXXXXX
XXXXXXX
XXXXXXX
XXXXXXX
XXXXXXX
XXXXXXX
XXXXXXX
XXXXXXX
XXXXX
XXXXXX
XXXX
XXXXX
XXXXXXX
XXXX
GENERTRICE CA DIESEL
XXXXXXX
XXXXX
XXXXXX
XXXX
XXXXX
XXXXXXX
XXXX
XXXXX
XXXXXX
XXXX
XXXXX
XXXXXXX
XXXX
XXXXX
XXXXXX
XXXX
XXXXX
XXXXXXX
XXXX
INC.
SIDE VIEW
A55100100
SERVICING THIS MACHINE.
ALWAYS KEEP UNAUTHORIZED INEXPERICENCED
UNTRAINED PEOPLE AWAY FROM THIS MACHINE.
MAKE SURE ALL SAFETY DEVICES ARE OPERATIONAL
BEFORE THIS MACHINE IS STARTED. MAKE SURE ENGINE
IS TURNED OFF AND SPARK PLUG WIRE DISCONNECTED
BEFORE SERVICING THE MACHINE OR COMING IN
CONTACT WITH ANY MOVING PART. IF EQUIPMENT IS
POWERED BY AN ELECTRIC MOTOR DISCONNECT
ELECTRICAL PLUG.
NEVER LEAVE MACHINE UNATTENDED WHEN OPERATING
ALWAYS STOP ENGINE AND ALLOW ENGINE TO COOL
BEFORE ADDING FUEL OR OIL.
6
WARNING /
AVERTISSEMENT
To avoid injury, you MUST
read and understand
operator’s manual before
using this machine.
This machine to be operated
by qualified personnel only.
Pour éviter toute blessure,
vous devez llre et comprendre
le manuel de l’ utilisateur
avant d’utiliser cette manuel.
Cette machine doit étre
opérer par un personnel
qualifié.
Demandez une formation si
nécessaire.
NOTICE
For safety decals part numbers, reference parts manual.
A55200070A
WARNING!
Before connecting this generator to any building’s
electrical system, a licensed electrician must install
an isolation (transfer) switch.
Serious injury or death may result without this
transfer switch.
ATTENTION!
Avant de brancher unité à un bâtiment, un
cette
interrupteur d’isolation doit être installé par
un technicien diplômé.
Utiliser cet appareil sans I’interrupteur d’isolation
peut entraîner des blessures graves voires mortelles.
II est impératif de lire le manuel d’utilisation
avant d’utiliser ou de réparer cet équipement.
II est impératif degarder tout personnel non
authorisé ou non qualifié à distance de cet equipement.
Assurez vous que tout equipement de sécurité est
fonctionnel avant d’engager l’equipement. Assurez vous
que le moteur est éteint et que le fil de la bougie
est d’econnecté avant de réparer la machine ou vant
tout contact avec toute pièce en mouvement.
Si l’equipement est alimenté par un moteur électrique
débranchez l’appareil.
Ne laissez jamis l’appareil sans supervision quand
il est en marche, II est impératif d’arrêter le
motour et de la laisser refroidir avant d’ajouter
de l’huile ou du carburant.
Do not use in rain or snow.
A35200030A
Ne pas utiliser en cas de
pluie ou neige.
A35200050
CAUTION!
ATTENTION!
A5520080
TOP VIEW
A3520000A
WARNING/ATTENTION
Only operate machine in well
ventilated areas.
Do not inhale exhaust gases.
N’utilizez l’equipment que dans
des endroits bien aérés.
Ne respirez paz les gas d’échappement.
Only qualified personnel should install, use,
Dangerous
or service this equipment.
Gas/Gas
Seul un personnel qualifié devrait avoir
dangereux
l’authorisation d’installer d’utilisier ou
de réparer cet équipement.
A63210090A
WARNING/ATTENTION
HOT COOLANT can cause severe burns.
Do not remove cap if radiator is hot.
Liquide réfrigérant chaud peut causer
des brûlures graves.
N’ôtez pas le capuchon si le radiateur
est chaud.
A55200180
WARNING
Operation of this equipment may create
sparks that can start fires around dry
vegetation.
A spark arrestor may be required.
The operator should contact local fire
agencies for laws or regulation relating
to fire prevention requirements.
Des étincelles pouvant enflammer la
végétation séche environnante peuvent être
produites pendant le fonctionnement de cet
équipement.
Un pare–étincelles peut être requis.
L’opérateur doit contacter les agences
anti–incendie locales pour s’ informer
des lois ou feglementations concernant les
exigences de prévention–incendie
DANGER
Cigarettes, ames or sparks could cause battery to explode.Always
shield eyes and face from battery
or adjust post connections without proper instruction and training.
KEEP VENT CAPSTIGHT AND LEVEL
POISON
Contains sulfuric acid.Avoid contact with skin, eyes or clothing. In
event of accident ush with water and call a physician immediately.
KEEP OUT OF REACH OF CHILDREN
DANGER
Cigarettes, flammes ou étincelles peuvent causer I’explosion de la
batterìe. Protégez toujours le visage et les yeux quand à proximité de la
batterìe. Ne chargez pas la batterìe, n’utilisez pas les cablesde démarrage
ou n’ajustez pas les poteaux de la batterìe sans instructions or pratique
Gardez le bouchon ventilateur au niveau et bien serré
POISON
Contient de l’acide sulfurique. Evitez tout contact avec la peau, les
yeux ou vêtements. En cas d’accident rincez avec de l’eau et appelez un
médecin immédiatement.
Gardez les enfants à distance
A90400020
EXPLOSIVE GASES
. Do not charge or use booster cables
CAUSES SEVERE BURNS
A63210110A
Gas explosifs
peut causer des brûlures sévères
A63210140
Do not touch output terminals or internal
wiring while unit is operating.
Turn off power before servicing.
Ne touchez ni les terminaux externes ou le
cablage electrique interne lorsque que
l’équipement est en operation.
Eteindre avant de réparer.
Only qualified personnel should install, use,
Electrical
or service this equipment.
shock hazard
Possibilité
Seul un personnel qualifié devrait avoir
de choc
electrique
l’authorisation d’installer d’utilisier ou
A63210100A
de réparer cet équipement.
FRONT VIEW
CAUTION/ ATTENTION
Do not operate with open doors.
N’ utilisez pas l’unité quand
les portes sont ouvertes.
Figure 1. Safety Decals
WHISPERWATT
6kW AC GENERATOR
211052
MAIN AC CIRCUIT BREAKER
DISJONCTEUR PRINCIPALE
DE COURANT CA
A55200120
240
120V120
V
AC VOLTMETER
VOLTOMETRE CA
DECREASE
INCREASE
DIMINUTION
AUGMENTATION
VOLTAGE REGULATOR
COMPTEUR D’ HEURE
REGULATEUR DE TENSION
SIDE VIEW
RUN
MARCHE
HEAT
STOP
PRECHAUFFAGE
ARRET
START
DEMARRAGE
HOURS
HOUR METER
STARTER SWITCH
COMMTATEUR
DE DEMARRAGE
6
THE POSSIBILITY EXISTS OF ELECTROCUTION IF
GENERATOR/WELDER IS NOT PROPERLY GROUNDED.
ALWAYS CONNECT EARTH GROUND (GROUND ROD) TO
GENERATOR G.F.C.I. GROUND TERMINAL.
IL Y AURAIT UN RISQUE D’ÉLECTROCUTION À MOINS
QUE LA GÉNÉRATRICE/SOUDEUSE NE SOIT PROPREMENT
MISE À LA TERRE. S’ASSURER DE RELIER À LA MASSE
(BARRE DE MASSE) LA BORNE DE MISE À LA TERRE
G.F.C.I. DE L’APPAREIL.
GROUND ROD FOR
EARTH GROUND
BARRE DE MASSE
CONNECT TO BUILDING
GROUND IF REQUIRED
ARELIER À LA MASSE
D’OUVRAGE EVENTUELLEMENT
8 FT. MINIMUM
8 PIEDS MINIMUM
REFERENCE NEC 250-52 (C)
RÉFERÉNCE NEC 250-52 (C)
DANGER
Using a generator indoors CAN KILL YOU IN MINUTES.
Utilser un générateur à l’ intérieur VOUS TUERA EN QUELQÙES MINUTES.
Exhaust contains carbon monoxide, a poison gas you cannot see or smell.
Les gaz d’ échappement contiennent du monoxyde de carbon, un gaz toxique
invisible et inodore.
NEUTRAL BONDED TO FRAME
120V
120
V
GAC-2.2H
NEUTRE MIS A LA MASSE A
15A
LA CARCASSE DU MOTEUR
POWERED by
Honda Engines
211052
AC CIRCUIT BREAKER
INTERRUPTEUR DE
OFF
GR PRISE DE
COURANT PRINCIPAL
TERRE
NEVER use in enclosed or partially
enclosed areas.
Utilisation INTERDITE dans un
espace clos ou partiellement clos.
CAUTION/ATTENTION
HOT PARTS can burn skin.
DO NOT touch until the machine
has sufficiently cooled.
Danger de brûlure, pièces chaudes.
Ne touchez pas avant que l’appareil
ne soit suffisamment refroidi.
A65200040A
GROUND TERMINAL
PRISE DE TERRE
GROUND CABLE
#8 MINIMUM
CÂBLE DE MASSE
#8 MINIMUM
FOR FURTHER GROUNDING
INSTRUCTIONS READ MANUAL
POUR PLUS DE DÉTAILS
CONCERNANT LA MISE Á LA
TERRE, LIRE LE MANUEL
NEUTRAL BONDED TO FRAME
120V
120
V
GAC-2.2H
NEUTRE MIS A LA MASSE A
15A
LA CARCASSE DU MOTEUR
POWERED by
Honda Engines
211052
AC CIRCUIT BREAKER
INTERRUPTEUR DE
OFF
GR PRISE DE
COURANT PRINCIPAL
TERRE
NEUTRAL BONDED TO FRAME
120V
120
V
GAC-2.2H
NEUTRE MIS A LA MASSE A
15A
LA CARCASSE DU MOTEUR
POWERED by
Honda Engines
211052
AC CIRCUIT BREAKER
INTERRUPTEUR DE
OFF
GR PRISE DE
COURANT PRINCIPAL
TERRE
ONLY use outdoors and away from
open windows, doors, and vents.
Utilisation UNIQUEMENT à l’ extér leur
portes et trous d’ aération
A91110030
A90400010
DCA6SPX4F GENERATOR • OPERATION MANUAL — REV. #2 (03/12/21) — PAGE 5
Page 6
SAFETY INFORMATION
Do not operate or service the generator before reading the
entire manual. Safety precautions should be followed at all
times when operating this generator. Failure to read and
understand the safety messages and operating instructions
could result in injury to yourself and others.
SAFETY MESSAGES
The four safety messages shown below will inform you
about potential hazards that could injure you or others. The
safety messages specifi cally address the level of exposure
to the operator and are preceded by one of four words:
DANGER, WARNING, CAUTION
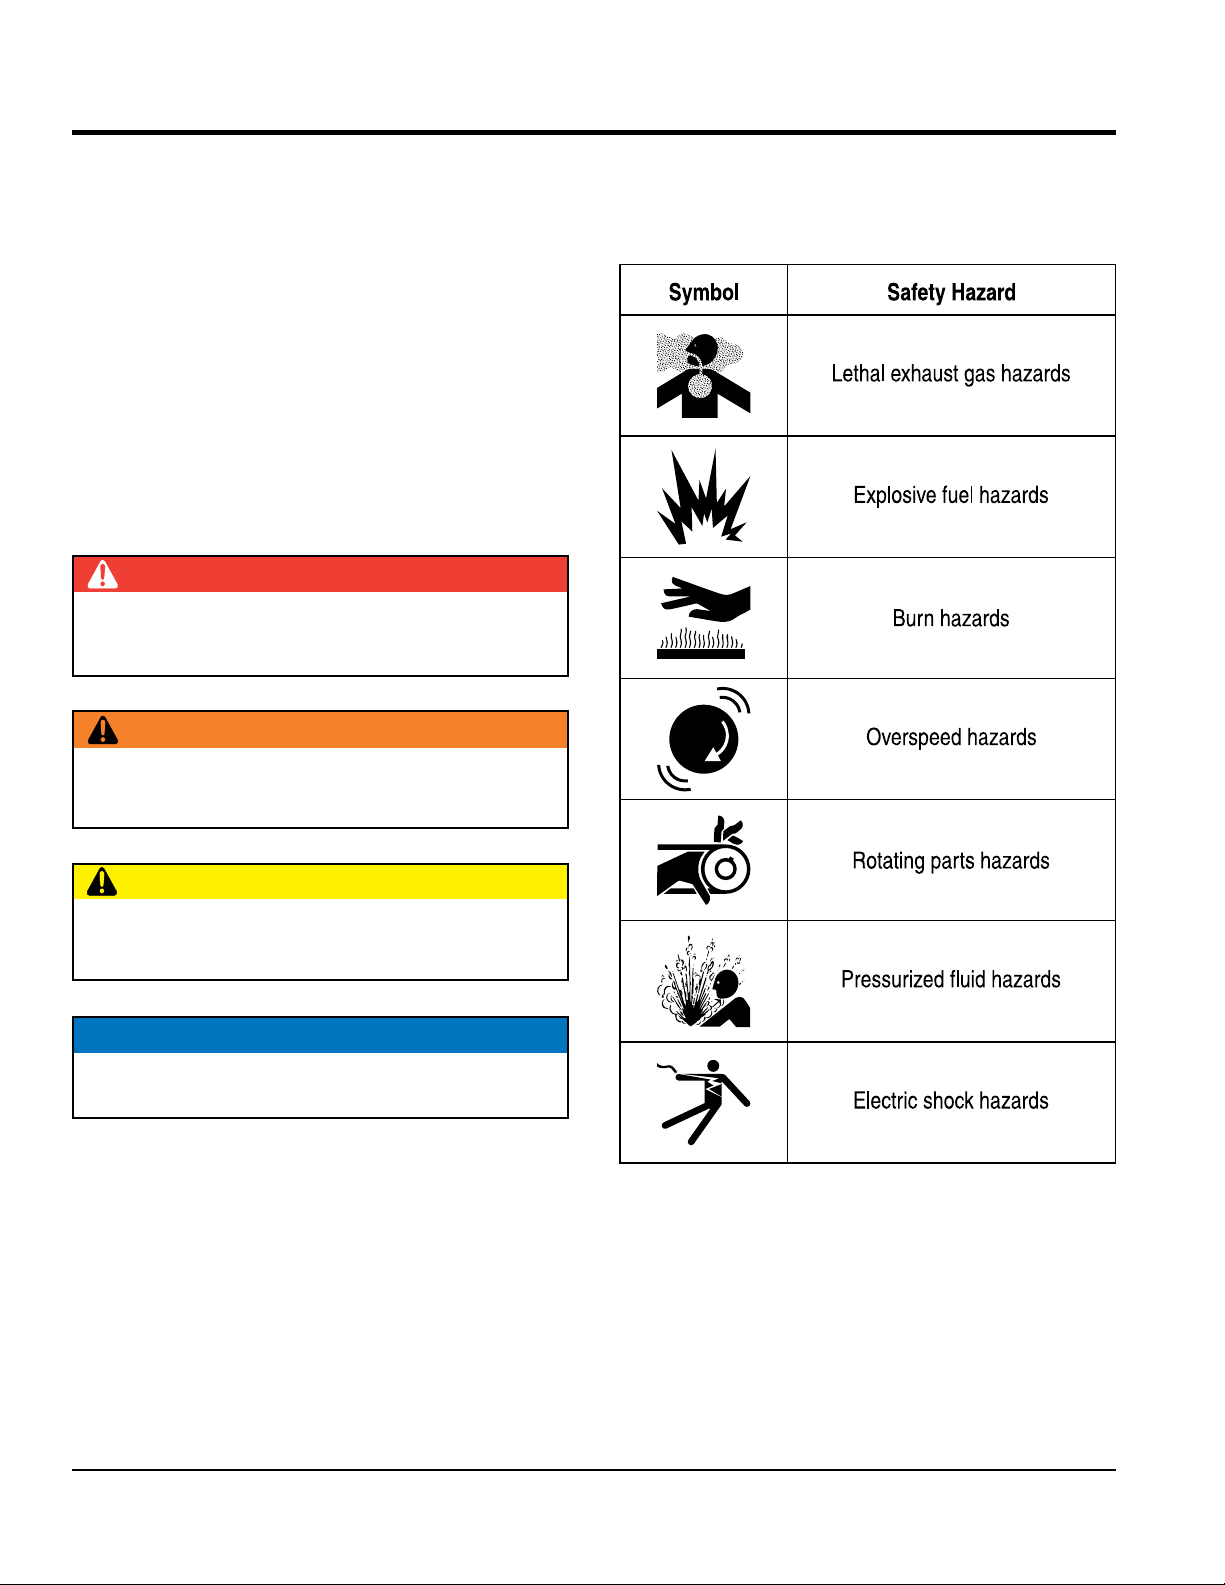
SAFETY SYMBOLS
Potential hazards associated with the operation of this
generator will be referenced with hazard symbols which
may appear throughout this manual in conjunction with
safety messages.
DANGER
Indicates a hazardous situation which, if not avoided,
WILL result in DEATH or SERIOUS INJURY.
WARNING
Indicates a hazardous situation which, if not avoided,
COULD result in DEATH or SERIOUS INJURY.
or NOTICE.
CAUTION
Indicates a hazardous situation which, if not avoided,
COULD result in MINOR or MODERATE INJURY.
NOTICE
Addresses practices not related to personal injury.
PAGE 6 — DCA6SPX4F GENERATOR • OPERATION MANUAL — REV. #2 (03/12/21)
Page 7
GENERAL SAFETY
CAUTION
ALWAYS know the location of the nearest phone or keep
Also, know the phone numbers
fi re department.
This information will be invaluable in the case of an
.
These devices are intended for operator safety.
severe injury,
. Disconnection of any of
lubricate components or attempt service on a
ensure the generator is on level ground
keep the generator in proper running condition.
Fix damage to the generator and replace any broken
store the generator properly when it is not
being used. The generator should be stored in a clean,
dry location out of the reach of children and unauthorized
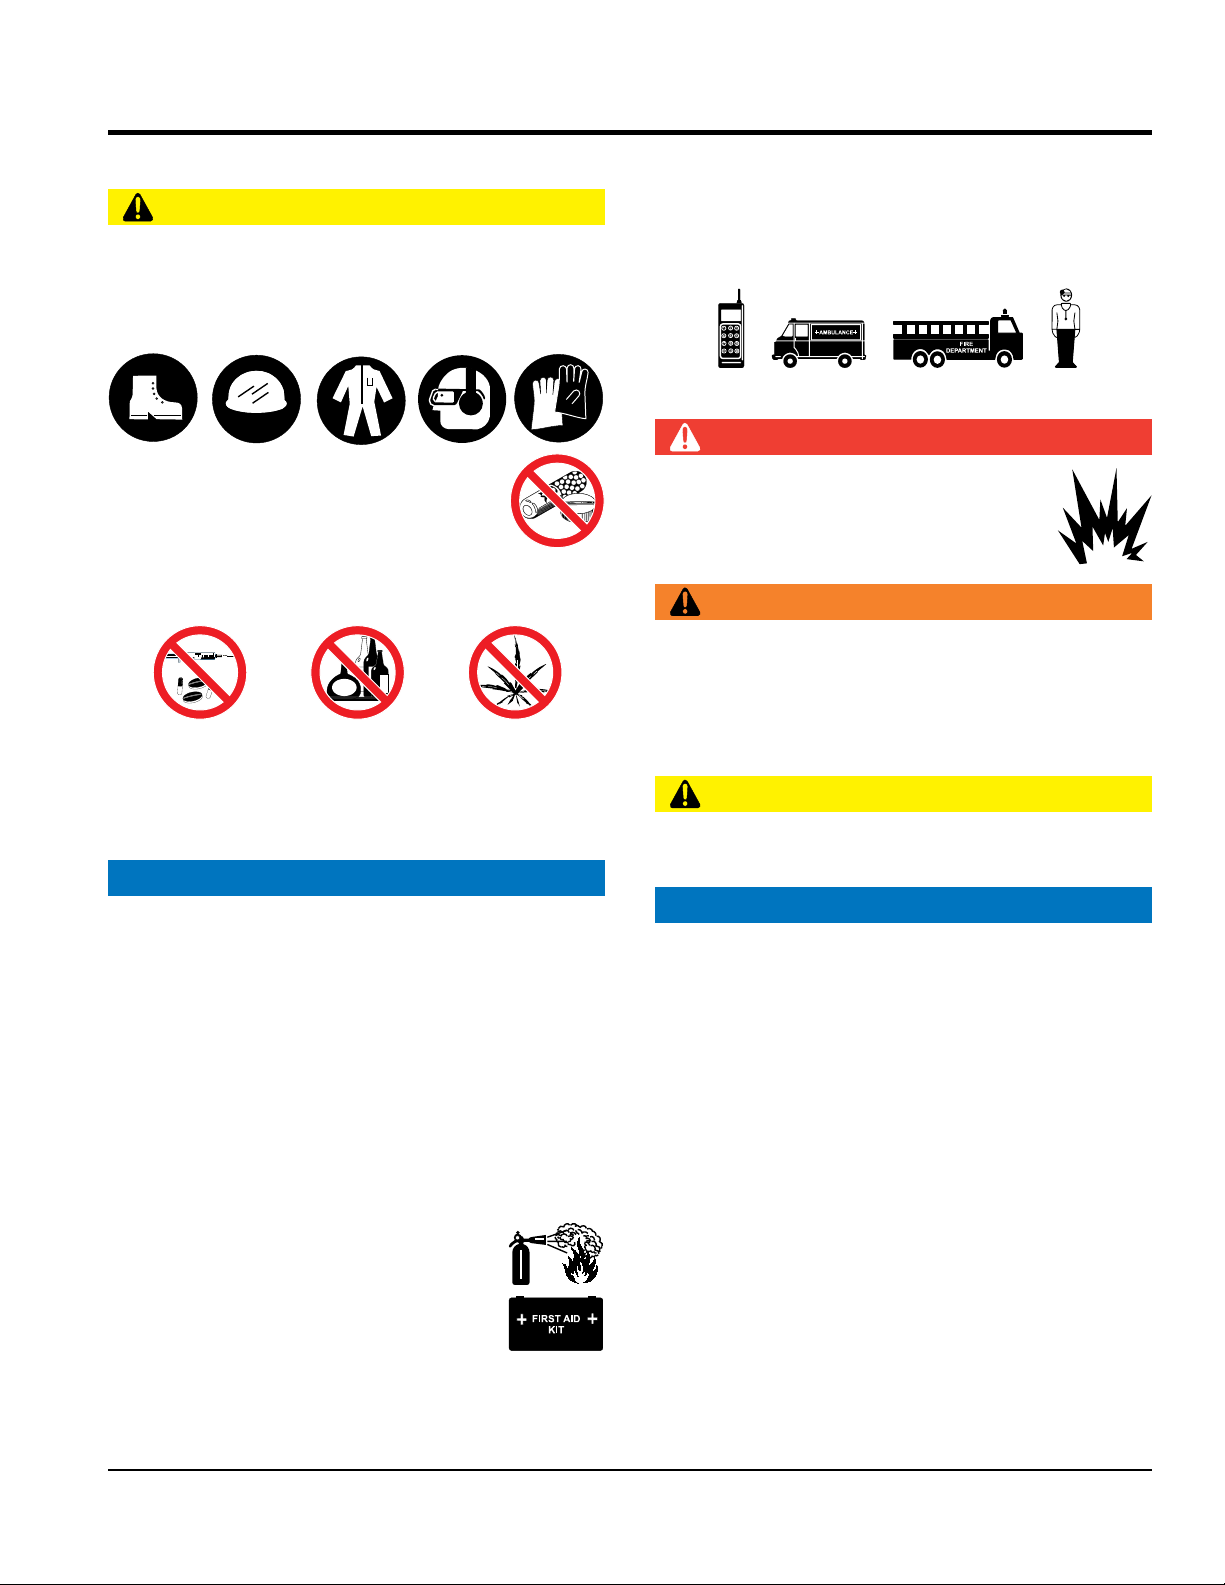
NEVER operate this generator without proper protective
clothing, shatterproof glasses, respiratory protection,
hearing protection, steel-toed boots and other protective
devices required by the job or city and state regulations.
NEVER operate this generator when not
feeling well due to fatigue or illness, or when
on medication.
NEVER operate this generator under the infl uence of
drugs or alcohol.
SAFETY INFORMATION
a phone on the job site.
of the nearest ambulance, doctor, and
emergency.
GENERATOR SAFETY
DANGER
NEVER operate the generator in an
explosive atmosphere or near combustible
materials. An explosion or fi re could result
causing severe bodily harm or even death.
WARNING
NEVER disconnect any emergency or safety devices
ALWAYS check the generator for loosened threads or
bolts before starting.
NEVER use the generator for any purpose other than
its intended purposes or applications.
NOTICE
This generator should only be operated by trained and
qualifi ed personnel 18 years of age and older.
Whenever necessary, replace nameplate, operation and
safety decals when they become diffi cult to read.
Manufacturer does not assume responsibility for any
accident due to equipment modifi cations. Unauthorized
modifi cation of the generator will void all warranties.
NEVER use accessories or attachments that are not
recommended by MQ Power for this generator. Damage
to the generator and/or injury to the user may result.
ALWAYS know the location of the nearest
fi re extinguisher.
ALWAYS know the location of the nearest
fi rst aid kit.
Disconnection of these devices can cause
bodily harm or even death
these devices will void all warranties.
CAUTION
NEVER
running generator.
NOTICE
ALWAYS
before use.
ALWAYS
parts immediately.
ALWAYS
personnel.
DCA6SPX4F GENERATOR • OPERATION MANUAL — REV. #2 (03/12/21) — PAGE 7
Page 8
ENGINE SAFETY
DANGER
Operation of the generator may create sparks that
can start fi res around dry vegetation. A spark arrestor
may be required. The operator should contact local fi re
agencies for laws or regulations relating to fi re prevention
run the engine without an air fi lter or with a dirty
air fi lter. Severe engine damage may occur. Service the
Wet stacking is a common problem with diesel engines
which are operated for extended periods with light or
no load applied. When a diesel engine operates without
suffi cient load (less than 30-35% of the rated output),
it will not operate at its optimum temperature. This will
allow unburned fuel to accumulate in the exhaust system,
which can foul the fuel injectors, engine valves and
exhaust system, including turbochargers, and reduce
it must be able to provide fuel and air in the proper ratio
and at a high enough engine temperature for the engine
Wet stacking does not usually cause any permanent
damage and can be alleviated if additional load is
applied to relieve the condition. It can reduce the system
performance and increase maintenance. Applying an
increasing load over a period of time until the excess
fuel is burned off and the system capacity is reached
usually can repair the condition. This can take several
The engine fuel exhaust gases contain poisonous carbon
monoxide. This gas is colorless and odorless, and can
cause death if inhaled.
The engine of this generator
requires an adequate, free
fl ow of cooling air. NEVER
operate this equipment in
any enclosed or narrow area
where free fl ow of the air is
restricted. If the air fl ow is
restricted it will cause injury to people and property and
serious damage to the equipment or engine.
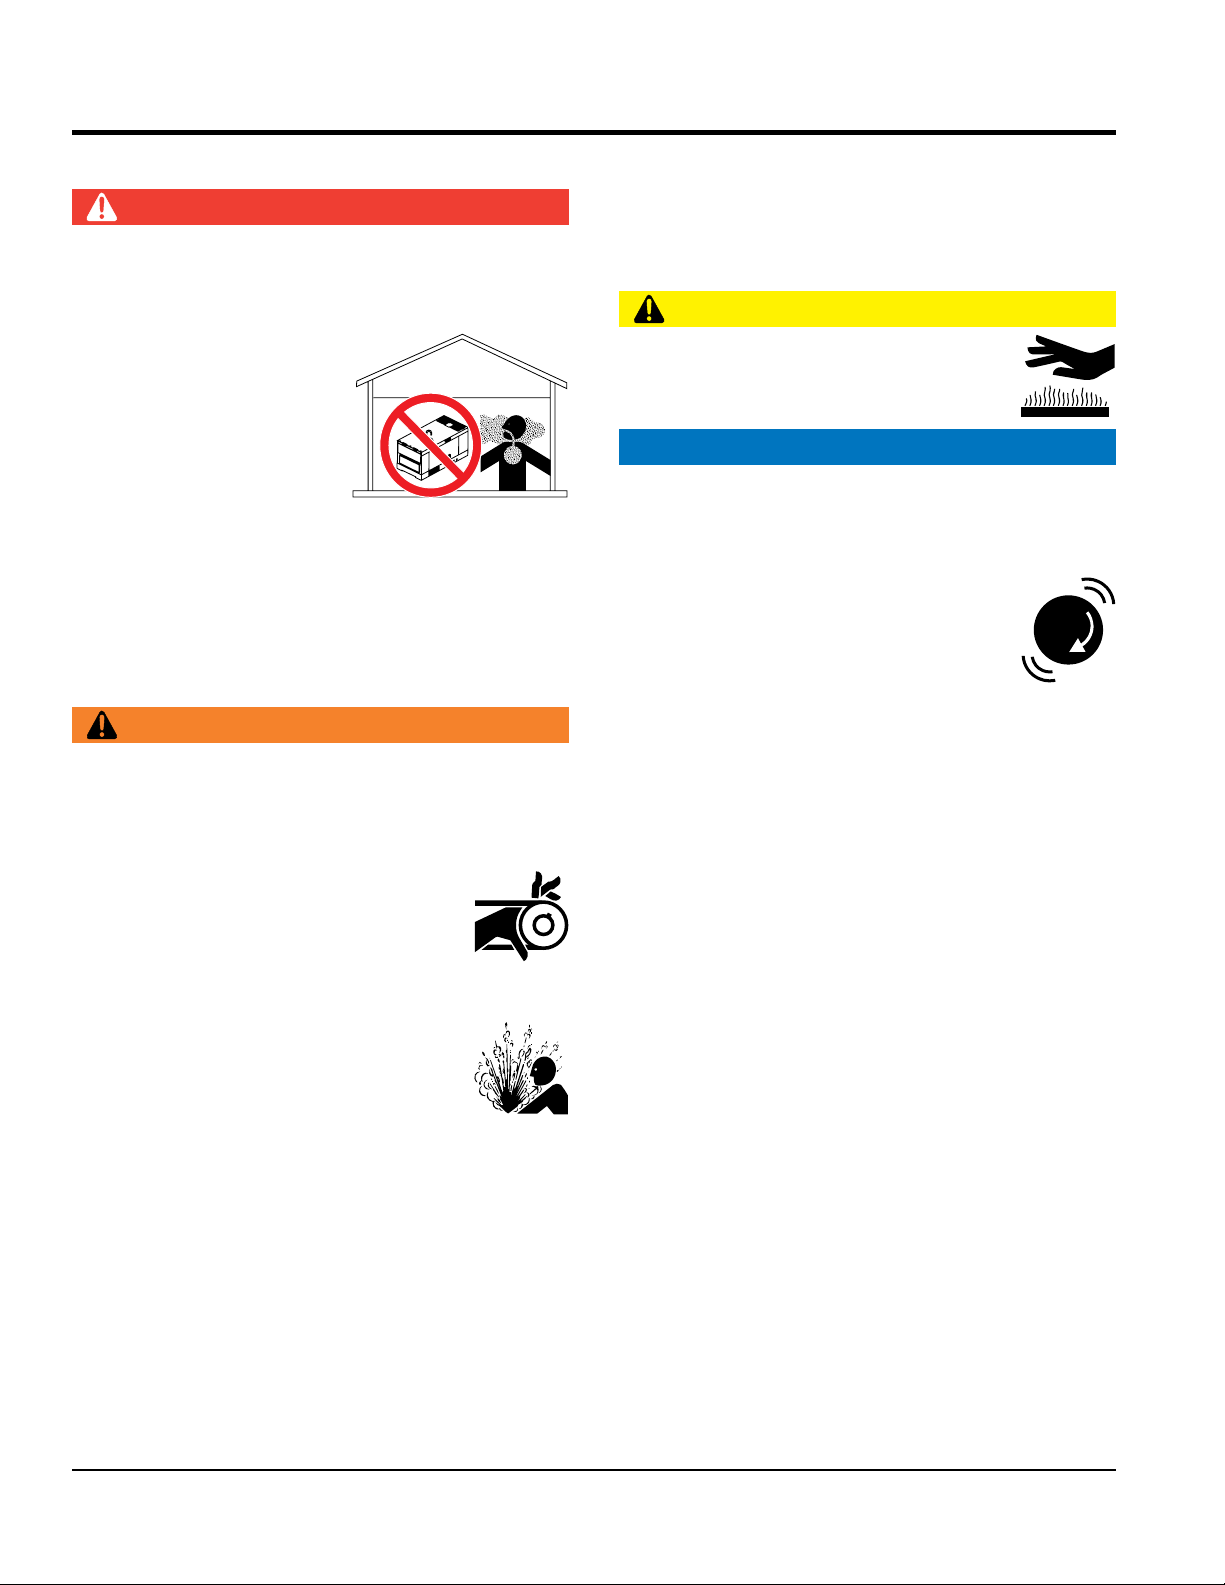
When operating the generator outdoors, DO NOT place
the generator near doors, windows or vents that could
allow carbon monoxide to enter and build up in occupied
spaces.
WARNING
NEVER place hands or fingers inside the engine
compartment when the engine is running.
SAFETY INFORMATION
requirements.
CAUTION
NEVER touch the hot exhaust manifold,
muffl er or cylinder. Allow these parts to cool
before servicing the generator.
NOTICE
NEVER
air fi lter frequently to prevent engine malfunction.
NEVER tamper with the factory settings
of the engine or engine governor. Damage
to the engine or generator can result if
operating in speed ranges above the
maximum allowable.
NEVER operate the engine with heat shields or
guards removed.
Keep fi ngers, hands, hair and clothing away
from all moving parts to prevent injury.
NEVER operate the generator with the
doors open. Stop the engine before servicing.
DO NOT remove the radiator cap while the
engine is hot. High pressure boiling water
will gush out of the radiator and severely
scald any persons in the general area of
the generator.
DO NOT remove the coolant drain plug while the engine
is hot. Hot coolant will gush out of the coolant tank and
severely scald any persons in the general area of the
generator.
DO NOT drain the engine oil while the engine is hot. Hot
oil will gush out and severely scald any persons near
the generator.
the operating performance.
In order for a diesel engine to operate at peak effi ciency,
to completely burn all of the fuel.
hours to burn off the accumulated unburned fuel.
PAGE 8 — DCA6SPX4F GENERATOR • OPERATION MANUAL — REV. #2 (03/12/21)
Page 9
SAFETY INFORMATION
State Health Safety Codes and Public Resources
FUEL SAFETY
TOWING SAFETY
Refer to the MQ Power trailer manual for additional safety
In order to reduce the possibility of an accident
while transporting the generator on public roads,
make sure that the trailer that supports the
generator and the towing vehicle are both mechanically
Make sure the hitch and coupling of the towing
vehicle are rated equal to or greater than the trailer
inspect the hitch and coupling for wear.
tow a trailer with defective hitches, couplings,
Check the tire air pressure on both the towing vehicle and
Infl ate trailer tires as indicated on side wall
Also check the tire tread wear on both vehicles.
make sure the trailer is equipped with
attach the trailer’s safety chains to
make sure the vehicle and trailer directional,
backup, brake, and trailer lights are connected and
• Secure portable power cables in cable tray with
55 MPH
unless posted otherwise. Recommended off-road towing
or less depending on the type
Avoid sudden stops and starts. These can cause skidding
or jackknifi ng. Smooth, gradual starts and stops will
The trailer should be adjusted to a level position at all
Codes specify that in certain locations, spark arresters
must be used on internal combustion engines that use
hydrocarbon fuels. A spark arrester is a device designed
to prevent accidental discharge of sparks or fl ames
from the engine exhaust. Spark arresters are qualifi ed
and rated by the United States Forest Service for this
purpose. In order to comply with local laws regarding
spark arresters, consult the engine distributor or the
local Health and Safety Administrator.
DANGER
NEVER start the engine near spilled fuel or combustible
fl uids. Diesel fuel is extremely fl ammable and its vapors
can cause an explosion if ignited.
ALWAYS refuel in a well-ventilated area, away from
sparks and open fl ames.
ALWAYS use extreme caution when working with
fl ammable liquids.
NEVER fill the fuel tank while the engine is
running or hot.
NEVER overfi ll the fuel tank. Spilled fuel can ignite if it
comes into contact with hot engine parts or sparks from
the ignition system.
Store fuel in appropriate containers, in well-ventilated
areas and away from sparks and fl ames.
NEVER use fuel as a cleaning agent.
NEVER smoke around or near the
equipment. Fire or explosion could result
from fuel vapors or if fuel is spilled on a
hot engine.
information.
ALWAYS
sound and in good operating condition.
ALWAYS shut down the engine before transporting.
gross vehicle weight rating.
ALWAYS
NEVER
chains, etc.
the trailer.
of tire.
ALWAYS
safety chains.
ALWAYS properly
the towing vehicle.
ALWAYS
working properly.
DOT requirements include the following:
• Connect and test electric brake operation.
tie wraps.
The maximum speed for highway towing is
is not to exceed 15 MPH
of terrain.
CAUTION
Check with your local county or state safety
towing regulations, in addition to meeting
Department of Transportation (DOT)
Safety Towing Regulations, before towing
your generator.
DCA6SPX4F GENERATOR • OPERATION MANUAL — REV. #2 (03/12/21) — PAGE 9
improve towing.
Avoid sharp turns to prevent rolling.
times when towing.
Page 10
Raise and lock the trailer wheel stand in the upright
position when towing.
ELECTRICAL SAFETY
Power Cord/Cable Safety
NEVER use damaged or worn cables or cords when
connecting equipment to the generator. Inspect the
connected to the generator’s output receptacles.
Incorrect connections may cause electrical shock and
make certain that the proper power or
extension cord has been selected for the job. See the
make sure that electrical circuits are properly
grounded to a suitable earth ground (ground rod) per
the National Electrical Code (NEC) and local codes
Severe injury or
can result from operating an
drop the battery. There is a possibility that the
Place chock blocks underneath the wheels to prevent
rolling while parked.
Place support blocks underneath the trailer’s bumper
to prevent tipping while parked.
Use the trailer’s swivel jack to adjust the trailer height to
a level position while parked.
DANGER
NEVER touch the output terminals
during operation. Contact with the
output terminals during operation can
cause electrocution, electrical shock,
or burn.
The electrical voltage required to
operate the generator can cause severe injury or even
death through physical contact with live circuits. Turn the
generator and all circuit breakers OFF before performing
maintenance on the generator or making contact with
the output terminals.
NEVER insert any objects into the output
receptacles during operation. This is
extremely dangerous. The possibility exists
of electrical shock, electrocution or death.
Backfeed to a utility system can cause
electrocution and/or property damage.
NEVER connect the generator to a
building’s electrical system without
a transfer switch or other approved
device. All installations should be
performed by a licensed electrician in accordance
with all applicable laws and electrical codes. Failure to
do so could result in electrical shock or burn, causing
serious injury or even death.
SAFETY INFORMATION
insulation for cuts.
NEVER grab or touch a live power
cord or cable with wet hands. The
possibility exists of electrical shock,
electrocution or death.
Make sure power cables are securely
damage to the generator.
NOTICE
ALWAYS
Cable Selection Chart in this manual.
Grounding Safety
DANGER
ALWAYS
before operating the generator.
death by electrocution
ungrounded generator.
NEVER use gas piping as an electrical ground.
BATTERY SAFETY
DANGER
DO NOT
battery will explode.
NEVER expose the battery to open fl ames,
sparks, cigarettes, etc. The battery contains
combustible gases and liquids. If these
gases and liquids come into contact with a
fl ame or spark, an explosion could occur.
DANGER
NEVER let power cords or cables lay in water.
NEVER stand in water while AC power from the
generator is being transferred to a load.
PAGE 10 — DCA6SPX4F GENERATOR • OPERATION MANUAL — REV. #2 (03/12/21)
WARNING
ALWAYS wear safety glasses when
handling the battery to avoid eye irritation.
The battery contains acids that can cause
injury to the eyes and skin.
Use well-insulated gloves when picking up the battery.
Page 11
ALWAYS keep the battery charged. If the battery is not
charged, combustible gas will build up.
ENVIRONMENTAL SAFETY/DECOMMISSIONING
Decommissioning is a controlled process used to safely
retire a piece of equipment that is no longer serviceable.
If the equipment poses an unacceptable and unrepairable
safety risk due to wear or damage or is no longer cost
effective to maintain (beyond life-cycle reliability) and is to
be decommissioned (demolition and dismantlement), be
sure to follow the rules below:
Metal recycling involves the collection of metal from
discarded products and its transformation into raw
Recyclers and manufacturers alike promote the process
of recycling metal. Using a metal recycling center
The diesel engine used in this equipment has been
designed to reduce harmful levels of carbon monoxide
(CO), hydrocarbons (HC), and nitrogen oxides (NOx)
This engine has been certifi ed to meet US EPA evaporative
Attempting to modify or make adjustments to the engine
emission system by unauthorized personnel without proper
training could damage the equipment or create an unsafe
Additionally, modifying the fuel system may adversely affect
evaporative emissions, resulting in fi nes or other penalties.
The emission control label is an integral part of the emission
If a replacement emission label is needed, please contact
ALWAYS recharge the battery in a well-ventilated
environment to avoid the risk of a dangerous concentration
of combustible gases.
If the battery liquid (dilute sulfuric acid) comes into
contact with clothing or skin, rinse skin or clothing
immediately with plenty of water.
If the battery liquid (dilute sulfuric acid) comes into
contact with eyes, rinse eyes immediately with plenty
of water and contact the nearest doctor or hospital to
seek medical attention.
CAUTION
ALWAYS disconnect the NEGATIVE battery terminal
before performing service on the generator.
ALWAYS keep battery cables in good working condition.
Repair or replace all worn cables.
SAFETY INFORMATION
materials to use in manufacturing a new product.
promotes energy cost savings.
EMISSIONS INFORMATION
NOTICE
contained in diesel exhaust emissions.
emissions requirements in the installed confi guration.
condition.
NOTICE
NEVER pour waste or oil directly onto the ground, down
a drain, or into any water source.
Contact your country’s Department of Public
Works or recycling agency in your area and
arrange for proper disposal of any electrical
components, waste or oil associated with
this equipment.
When the life cycle of this equipment is over, remove
the battery and bring it to an appropriate facility for lead
reclamation. Use safety precautions when handling
batteries that contain sulfuric acid.
Emission Control Label
system and is strictly controlled by regulations.
The label must remain with the engine for its entire life.
your authorized engine distributor.
When the life cycle of this equipment is over, it is
recommended that the frame and all other metal parts
be sent to a recycling center.
DCA6SPX4F GENERATOR • OPERATION MANUAL — REV. #2 (03/12/21) — PAGE 11
Page 12
AC Generator
60 Hz AC Power Source
SPECIFICATIONS (GENERATOR)
Table 1. Specifications (Generator)
Model DCA6SPX4F
Type 4-pole, brushless, revolving-field type
Excitation Solid-state, statically excited system
Speed 1,800 rpm
Cooling System Self-ventilation
Maximum Power Output 7 kW
Continuous Power Output 6 kW
Rated Voltage 120/240V
Current Max./Continuous (120V) 58.3/50 amps
Current Max./Continuous (240V) 29.2/25 amps
Phase Single phase (4 wire)
Frequency 60 Hz
Power Factor 1
Battery
Generator Enclosure Color
Dimensions
(L × W × H)
Dry Net Weight
Wet Weight
12-36Ah × 1
White
25.6 × 48.4 × 33.3 in.
(650 × 1,230 × 845 mm)
831 lb. (377 kg)
860 lb. (390 kg)
PAGE 12 — DCA6SPX4F GENERATOR • OPERATION MANUAL — REV. #2 (03/12/21)
Page 13
SPECIFICATIONS (ENGINE)
Table 2. Specifications (Engine)
Kubota Engine Model D1105-E4B-BGDE-1-S1
Tier 4
Type Vertical, water-cooled, 4-cycle diesel engine
Engine
Bore × Stroke
Displacement 68.53 cu. in. (1,123 cm³)
Number of Cylinders 3
Rated Output 14.1 hp / 1,800 rpm
Fuel #2 diesel fuel
Fuel Capacity No internal fuel tank
Fuel Consumption 0.70 gal. (2.65 liters)/hr.
Coolant Capacity 4.23 quarts (4.0 liters)
Lube Oil Capacity 5.39 quarts (5.1 liters)
Oil Alert System Ye s
Starting Method Electric start
Battery 12 volts @ 36 Ah
3.07 in. × 3.09 in.
(78 mm × 78.4 mm)
Effects of Altitude and Heat
The maximum output of the engines listed above are applicable to supplying electrical power for continuous service at
ambient conditions in accordance with SAE test cord J607. The above ambient conditions are at standard sea level, with
a barometric reading of 29.92 inches and a temperature of 60°F (15.5°C).
Generally, the engine’s output power will decrease 3-1/2% for each 1,000 feet (305 meters) of altitude above sea level,
and 1% for each 10°F (–12.2°C) above the standard temperature of 60°F (15.5°C).
DCA6SPX4F GENERATOR • OPERATION MANUAL — REV. #2 (03/12/21) — PAGE 13
Page 14

DIMENSIONS
E
F
Figure 2. Dimensions
G
D
6
B C
A
I H
Table 3. Dimensions
A B C D
48.4 in.
(1,230 mm)
E F G H
L
Housing
J
37.2 in.
(945 mm)
I J K L
15.4 in.
(390 mm)
44.5 in.
(1,130 mm)
33.3 in.
(845 mm)
24.0 in.
(610 mm)
2.0 in.
(50 mm)
29.9 in.
(760 mm)
25.6 in.
(650 mm)
K
PAGE 14 — DCA6SPX4F GENERATOR • OPERATION MANUAL — REV. #2 (03/12/21)
7.3 in.
(185 mm)
17.9 in.
(455 mm)
13.8 in.
(350 mm)
Page 15

NOTES
DCA6SPX4F GENERATOR • OPERATION MANUAL — REV. #2 (03/12/21) — PAGE 15
Page 16

INSTALLATION
CONNECTING THE GROUND
Consult with local electrical and safety codes for proper
connection based on condition of use.
EXAMPLE of how to ground the unit if the condition
of use requires such a device:
The ground terminal on the generator should always be
used to connect the generator to a suitable ground when
required.
Either copper or aluminum wire can be used as the ground
cable. Cable size is determined by the maximum amperage
of the generator. Reference Conductor Grounding Table,
Article 250 of the NEC handbook.
Connect one end of the ground cable terminal to the
generator ground point (Figure 3). Connect the other end
of the ground cable to a suitable earth ground (ground rod).
Figure 3. Generator Grounding
NOTICE
Trailer mounted generators are the sole responsibility
of MQ Power.
PAGE 16 — DCA6SPX4F GENERATOR • OPERATION MANUAL — REV. #2 (03/12/21)
Page 17

INSTALLATION
OUTDOOR INSTALLATION
Install the generator in an area that is free of debris,
bystanders, and overhead obstructions. Make sure the
generator is on secure, level ground so that it cannot slide
or shift around. Also, install the generator in a manner so
that the exhaust will not be discharged in the direction of
nearby homes.
The installation site must be relatively free from moisture
and dust. All electrical equipment should be protected
from excessive moisture. Failure to do so will result in
deterioration of the insulation, short circuits, and grounding.
Foreign materials such as dust, sand, lint, and abrasive
materials have a tendency to cause excessive wear to
engine and alternator parts.
CAUTION
Pay close attention to ventilation when operating the
generator inside tunnels and caves. The engine exhaust
contains noxious elements. Engine exhaust must be
routed to a ventilated area.
INDOOR INSTALLATION
Exhaust gases from diesel engines are extremely
poisonous. Whenever an engine is installed indoors the
exhaust fumes must be vented to the outside. The engine
should be installed at least two feet from any outside wall.
Using an exhaust pipe which is too long or too small can
cause excessive back pressure which will cause the engine
to heat excessively and possibly burn the valves.
MOUNTING
The generator must be mounted on a solid foundation
(such as concrete) and set firmly on the foundation to
isolate vibration of the generator when it is running. The
generator must be mounted at least 6 inches above the floor
or grade level as referenced in the National Fire Protection
Association handbook (NFPA 110, Chapter 7, section 7.4).
GENERATOR GROUNDING
NOTICE
The Occupational Safety and Health Administration
(OSHA) and the National Electrical Code (NEC)
recommend that if the generator is providing electrical
power to a structure (home, office shop, trailer, or
similar) it must be connected to a grounding electrode
system, such a driven ground rod (Figure 3).
If applicable, to guard against electrical shock and possible
damage to the equipment, it is important to provide a good
EARTH ground (Figure 3).
NOTICE
ALWAYS check with state, province, district and
municipalities for electrical grounding requirements
before using generator.
Article 250 (Grounding) of the NEC handbook provides
guidelines for proper grounding and specifies that the cable
ground shall be connected to the grounding system of the
building as close to the point of cable entry as practical.
1. Use one of the following wire types to connect the
generator to earth ground.
a. Copper
b. Aluminum
NOTICE
Reference Conductor Grounding Table, Article 250
of the NEC handbook for proper conductor wire size.
Wire size is determined by the maximum amperage of
the generator.
2. When grounding of the generator (Figure 3) is required,
connect one end of the ground cable to the ground lug
on the generator. Connect the other end of the ground
cable to the ground rod (earth ground).
DO NOT remove the metal skids on the bottom of the
generator. They are to resist damage to the bottom of the
generator and to maintain alignment.
DCA6SPX4F GENERATOR • OPERATION MANUAL — REV. #2 (03/12/21) — PAGE 17
3. NEC Article 250 specifies that the earth ground rod
should be buried a minimum of 8 feet into the ground.
NOTICE
When connecting the generator to any building’s
electrical system, ALWAYS consult with a licensed
electrician.
Page 18

GENERAL INFORMATION
Generator
The Multiquip DCA6SPX4F is a 6.0 kW (continuous output),
7.0 kW (max. output) AC generator designed as a portable,
dual-purpose power source for 60 Hz (single phase),
120/240V for lighting facilities, power tools, submersible
pumps and other industrial and construction machinery.
Control Panel
The control panel is provided with the following:
Single Phase 3-Wire Output Terminal
AC Voltmeter
Circuit Breaker @25 Amps
Starter Switch
Warning Lamp Unit
Hour Meter
Ground Terminal
Voltage Regulator
Engine Protection System
Engine protection fail-safe features are provided in the event
of low oil pressure, high coolant temperature, or failure of
the battery to charge. If any of the above conditions occur
while operating the generator it will cause a complete unit
shutdown.
Excitation System
The DCA6SPX4F generator uses a brushless exciter to
create rated-output electricity. This system will use the
mechanical energy generated by the 1,800 rpm engine
to spin the rotor (or armature) inside the generator (or
alternator end).
Excitation current is sourced from the battery to the
excitation winding in the stator. Current applied to this coil
creates a magnetic field. The rotating armature within the
stator is then induced with AC current.
Engine
The DCA6SPX4F generator is powered by a water-cooled,
4-cycle, Kubota D1105 diesel engine. This engine is
designed to meet every performance requirement of the
generator. Reference Table 2, engine specifications.
In keeping with Multiquip’s policy of constantly improving
its products, the specifications quoted herein are subject
to change without prior notice.
Power Tools (Grounding)
When using power tools or electrical equipment requiring
AC power from the generator, make sure power tool cord
has a ground pin or is double insulated as shown in Figure 4.
Battery Charge Alarm
This unit is equipped with a protective shutdown device
that signals the emergency relay and automatically stops
the engine when loss of charge from the engine alternator
occurs. An indicator lamp will be displayed on the control
panel.
Water Temperature Alarm
This unit is equipped with a temperature switch that signals
the emergency relay and automatically stops the engine
when the temperature of the engine coolant becomes
abnormally high.The coolant temperature switch will not
function properly if the machine is operated with less than
the proper amount of coolant.
Oil Pressure Warning Alarm
This unit is equipped with an oil pressure switch that detects
low oil pressure. If the lubricating oil pressure of this unit
should become abnormally low, the oil pressure switch
signals the emergency relay to shut down the engine. If
this condition should occur, please refer to the engine
troubleshooting table in this manual.
Figure 4. Ground Pin
NOTICE
Double-insulated power tools and small appliances
have specially insulated housings that eliminate the
need for a ground. These types of double-insulated
power cords are designed so that no part of the device
will be electrically live even if the internal insulation fails.
PAGE 18 — DCA6SPX4F GENERATOR • OPERATION MANUAL — REV. #2 (03/12/21)
Page 19

COMPONENTS (GENERATOR)
2
13
15
1
3
4
11
14
10
9
12
Figure 5. Generator Components
5
6
7
8
1. Lifting Hook — Use this hook to lift the generator.
Maximum weight is 827 lb. (375 kg).
2. Air Outlet Exhaust — Allows engine exhaust to exit
the generator into the open air. NEVER block this
opening.
3. Radiator Cap Access Cover— Remove this cover to
gain access to radiator cap.
4. Air Filter — Prevents dirt and other debris from
entering the air intake system.
5. Radiator — Provides coolant to engine block.
6. Engine Oil Filler Port — Remove this cap to add
engine oil. Use only the recommended oil type. See
Table 6.
7. Expansion Bottle — Supplies coolant to the radiator
when radiator coolant level is low. Fill to indicated level
as shown on expansion bottle.
8. Coolant Drain Plug — Remove this plug to drain
coolant from the radiator.
10. Oil Filter — Provides filtering for the engine oil. Change
oil filter as recommended in the maintenance section
of this manual.
11. Dipstick — Remove to check amount and condition
of oil in crankcase.
12. Fuel Filter — Provides filtering for the engine fuel.
Change fuel filter as recommended in the maintenance
section of this manual.
13. Battery Terminals — Connect cables to the terminals
on the battery. Always pay close attention to the polarity
of the terminals when connecting to the battery, RED
(positive), and BLACK (negative).
14. Battery — Provides +12 VDC power for the generator.
When replacing battery (12V, 35 Ah) use only
recommended type battery.
15. Air Inlet Vent — Allows outside air to enter the
generator. NEVER block this opening.
9. Oil Drain Plug — Remove this plug to drain oil from
the engine.
DCA6SPX4F GENERATOR • OPERATION MANUAL — REV. #2 (03/12/21) — PAGE 19
Page 20

211052
COMPONENTS CONTROL PANEL
WHISPERWATT
6kW AC GENERATOR
2
240
3
120V120
V
1
MAIN AC CIRCUIT BREAKER
DISJONCTEUR PRINCIPALE
DE COURANT CA
Figure 6. Control Panel
U O V
7 8
1. Main Breaker — 2-pole, 25-amp circuit breaker
protects the generator from short circuiting or
overloading. When starting the generator, always place
this circuit breaker in the OFF position.
2. AC Voltmeter — This voltmeter indicates (with a
mark) the rated 60 Hz (single-phase) output voltage.
The voltmeter can also be used as a diagnostic tool.
If the voltmeter indicator (needle) is below the rated
voltage, engine problems may exist (low/high RPM).
To prevent damage to the generator or power tools,
turn the generator OFF and consult your authorized
Multiquip service dealer.
3. Engine Warning Lamps — There are four engine
warning lamps, they are defined as follows:
a. Low Oil Pressure Alarm Lamp — During normal
operation of the generator this lamp
will remain OFF. When the ignition
switch is placed in the RUN position
to start the engine, the lamp will be
ON. When the oil pressure rises
after start-up the lamp will go OFF.
If this lamp is ever lit (ON) during normal operation
of the generator, the emergency shutdown system
will stop the engine automatically.
b. Water Temperature Alarm Lamp — This lamp
goes ON when the cooling water
temperature rises abnormally. If
the lamp goes ON during normal
operation of the generator, the
emergency shutdown system will
stop the engine automatically.
AC VOLTMETER
VOLTOMETRE CA
4
DECREASE
DIMINUTION
VOLTAGE REGULATOR
REGULATEUR DE TENSION
INCREASE
AUGMENTATION
5
HOURS
HOUR METER
COMPTEUR D’ HEURE
STOP
ARRET
6
STARTER SWITCH
DE DEMARRAGE
RUN
MARCHE
COMMTATEUR
HEAT
PRECHAUFFAGE
START
DEMARRAGE
c. Battery Charge Alarm Lamp — This lamp is ON
when the output voltage of the
alternator drops below a set value.
If this lamp is ON during normal
operation, the emergency
shutdown system will immediately
stop the engine.
d. Pre-Heat Lamp — The pre-heat lamp will be
ON during the pre-heating cycle
(cold weather conditions). When
the pre-heat cycle is completed the
lamp will turn OFF and the engine
can be started.
4. Voltage Regulator Knob — Allows ± 5% manual
adjustment of the generator output voltage.
5. Hour Meter — Indicates number of hours machine has
been in use or hours engine was run.
6. Starter Switch — With key inserted, turn clockwise
to start engine.
7. 120/240V, 1-Phase, 3-Wire Output Terminal —
Provides 240V, 60 Hz output at 25 amps or 120V,
60 Hz at 25 amps × 2.
8. Ground Terminal — This ground connection terminal
must be used at all times. Connect a ground cable
between this terminal and a ground rod. Reference
grounding section (Figure 3) in this manual for more
detailed information.
PAGE 20 — DCA6SPX4F GENERATOR • OPERATION MANUAL — REV. #2 (03/12/21)
Page 21

COMPONENTS (ENGINE)
1
2
8
A
4
3
7
6
Figure 7. Kubota D1105 Diesel Engine
INITIAL SERVICING
The engine (Figure 7) must be checked for proper
lubrication and filled with fuel prior to operation. Refer to the
manufacturer’s engine manual for instructions and details
of operation and servicing.
1. Muffler — Reduces noise and emissions. NEVER
touch muffler when the generator is in use. Always
allow time for engine to cool before servicing.
9
A
10
5
14
13
11
12
7. V-Belt — ALWAYS make sure V-belt is properly
tensioned. A loose or defective V-belt can adversely
affect the performance of the generator.
8. Alternator — Provides power to the +12 VDC
electrical system. Replace only with manufacturer’s
recommended type alternator.
9. Injector Pump — Provides fuel under pressure to the
injector nozzles.
2. Cooling Fan Blades — Make sure cooling fan blades
are not bent or broken. A damaged fan blade can cause
the engine to run hot and overheat.
3. Oil Filler Cap — Remove this cap to add oil. Fill with
recommended type oil as listed in Table 6.
4. Air Filter — Prevents dirt and other debris from
entering the air intake system. Loosen clips on side
of air filter canister to gain access to filter element.
Replace with manufacturer’s recommended type air
cleaner only.
5. Starter Solenoid — Starts engine when ignition key
is rotated clockwise to the ON position.
6. Oil Pressure Switch — Monitors engine oil pressure.
In the event of low oil pressure engine will shut down.
DCA6SPX4F GENERATOR • OPERATION MANUAL — REV. #2 (03/12/21) — PAGE 21
10. Fuel Feed Pump — Pumps fuel to the injection system.
11. Speed Control Lever — Controls engine speed. This
lever is factory set at 1,800 rpm to maintain proper
voltage and frequency. DO NOT adjust this lever out
of factory range.
12. Oil Filter — Spin-on type, filters oil contaminants.
Replace filter as recommended in the maintenance
section of this manual.
13. Oil Dipstick/Gauge — Remove to check amount and
condition of oil in crankcase. Refill or replace with
recommended type oil as listed in Table 6.
14. Oil Drain Plug — Remove to drain crankcase oil.
Fill with recommended type oil as listed in Table 6.
Crankcase holds a maximum of 2.64 quarts (2.5 liters)
of motor oil.
Page 22

LOAD APPLICATIONS
SINGLE-PHASE LOAD — 60 HZ
Always be sure to check the nameplate on the generator
and equipment to ensure the wattage, amperage and
frequency requirements are satisfactorily supplied by the
generator for operating the equipment.
Generally, the wattage listed on the nameplate of the
equipment is its rated output. Equipment may require
130–150% more wattage than the rating on the nameplate,
as the wattage is influenced by the efficiency, power factor
and starting system of the equipment.
NOTICE
If wattage is not given on the equipment’s nameplate,
approximate wattage may be determined by multiplying
nameplate voltage by the nameplate amperage.
WATTS = VOLTAGE × AMPERAGE
The power factor of this generator is 1.0. See Table 4 below
when connecting loads.
Table 4. Power Factor by Load
Type of Load Power Factor
Single-phase induction motors 0.4–0.75
Electric heaters,
incandescent lamps
Fluorescent lamps,
mercury lamps
Electronic devices,
communication equipment
Common power tools 0.8
Table 5. Cable Selection (60 Hz, Single-Phase Operation)
Current
in
Amperes
2.5 300 600 1,000 ft. 600 ft. 375 ft. 250 ft.
5 600 1,200 500 ft. 300 ft. 200 ft. 125 ft.
7.5 900 1,800 350 ft. 200 ft. 125 ft. 100 ft.
10 1,200 2,400 250 ft. 150 ft. 100 ft.
15 1,800 3,600 150 ft. 100 ft. 65 ft.
20 2,400 4,800 125 ft. 75 ft. 50 ft.
Load in Watts Maximum Allowable Cable Length
At 100
Volts
CAUTION: Equipment damage can result from low voltage.
At 200
Volts
#10 Wire #12 Wire #14 Wire #16 Wire
1.0
0.4–0.9
1.0
NOTICE
When connecting power tools or equipment, pay close
attention to the required starting current capacity.
To determine the running wattage for your load, multiply
the running wattage as indicated by steps 1, 2 and 3 below:
1. INCANDESCENT LOADS
Lights, heaters and similar appliances.
Total the running wattage and multiply by 1.
Example:
29 light bulbs @ 100W each = 2.9 kW
Use a 3 kW generator.
2. SMALL MOTORS
Drills and other small power tools.
Total the running wattage and multiply by 2.
Example:
A 1-inch drill runs at 1 kW.
Use a 2 kW generator.
3. LARGE MOTORS
Submersible pumps, table saws etc.
Total the running wattage and multiply by 3.
Example:
A conveyor belt runs at 8 kW.
Use a 24 kW generator.
NOTICE
Motors and motor-driven equipment draw much greater
current for starting than during operation. Always use
an adequately sized extension cable which can carry
the required load.
DANGER
Before connecting this generator to any building’s
electrical system, a licensed electrician must install
an isolation (transfer) switch. Serious damage to
the building’s electrical system may occur without this
transfer switch.
EXTENSION CABLES
When electric power is to be provided to various tools or
loads at some distance from the generator, extension cords
are normally used. Cables should be sized to allow for
distance in length and amperage so that the voltage drop
between the generator and point of use (load) is held
to a minimum. Use the cable selection chart (Table 5) as a
guide for selecting proper cable size.
PAGE 22 — DCA6SPX4F GENERATOR • OPERATION MANUAL — REV. #2 (03/12/21)
Page 23

BEFORE STARTING
1. Read safety instructions at the beginning of manual.
2. Clean the generator, removing dirt and dust, particularly
the engine cooling air inlet. Caution must be taken to
ensure generator is 100% dry before use.
3. Check the air filter for dirt and dust. If air filter is dirty,
replace air filter with a new one as required.
4. Check fastening nuts and bolts for tightness.
ENGINE OIL CHECK
NOTICE
This Kubota engine is equipped with a low oil shutdown
capability. A built-in sensor will automatically turn off the
engine should the oil level fall below a safe operating
condition. Make sure the generator is placed on level
ground. Placing the generator on level ground will
ensure that the low oil sensor will function properly.
INSPECTION/SETUP
Figure 9. Engine Oil Dipstick
4. Verify that the engine oil level is maintained between
the H and L markings on the dipstick as referenced in
Figure 9A.
5. If the engine oil level is low (Figure 9C), remove the oil
filler cap (Figure 10) and fill to a safe operating level
(max.) as indicated by the dipstick (Figure 9A).
NOTICE
When adding engine oil, DO NOT overfill (Figure 9B).
1. To check the engine oil level, place the generator on
secure, level ground with the engine stopped.
2. Remove the dipstick from its holder (Figure 8) and wipe
clean.
DIPSTICK
6. Fill with recommended type oil as listed in Table 6.
Maximum oil capacity is 5.39 quarts (5.1 liters).
Figure 8. Engine Oil Dipstick Removal
3. Reinsert dipstick, then remove dipstick from its holder.
Check the oil level shown on the dipstick (Figure 9).
DCA6SPX4F GENERATOR • OPERATION MANUAL — REV. #2 (03/12/21) — PAGE 23
Figure 10. Engine Oil Filler Port
Page 24

INSPECTION/SETUP
Table 6. Oil Type
Temperature Oil Type
Above 77°F (25°C)
32°–77°F
(0°–25°C)
Below 32°F (0°C)
SAE 30 or SAE 10W-30
SAE 15W-40
SAE 20 or SAE 10W-30
SAE 15W-40
SAE 10 or SAE 10W-30
SAE 15W-40
FUEL TANK CONNECTION
NOTICE
This generator does not have an internal fuel tank. An
external fuel tank needs to be connected.
Make sure the external fuel tank is positioned higher
than the engine, or pump the fuel to the engine using
a fuel pump.
1. Set the fuel cock to the OFF position.
2. Connect the suction hose to the fuel filter. Use a suction
hose with an inner diameter of 7 mm and attach a hose
clamp so that there is no leak in the connection.
3. Connect the return hose to the engine. Use a return
hose with an inner diameter of 4 mm and attach it with
a hose clamp so there is no leak in the connection.
4. Set the fuel cock to the ON position and make sure
there is no fuel leaking at the joints.
COOLANT (ANTIFREEZE)
Kubota recommends antifreeze/summer coolant for use in
their engines, which can be purchased in concentrate (and
mixed with 50% demineralized water) or pre-diluted. See
the Kubota Engine Owner’s Manual for further details.
WARNING
When adding coolant/antifreeze mix to the
radiator, DO NOT remove the radiator cap
until the unit has completely cooled. The
possibility of hot coolant exists which can
cause severe burns.
Day-to-day addition of coolant is done from the recovery
tank (Figure 11). When adding coolant to the radiator,
DO NOT remove the radiator cap until the unit has
completely cooled. See Table 7 for engine, radiator, and
recovery tank coolant capacities.
NOTICE
Normally, only the coolant level in the recovery tank
needs to be checked. However, the radiator cap should
be opened once a week to verify that coolant is visible
(full) in the radiator.
1. Verify that the coolant level in the coolant recovery tank
is between the FULL and LOW markings as shown in
Figure 11.
5. Loosen the bolt at the inlet of the injection pump and
remove the air inside the piping.
6. Tighten the bolt when all of the air has come out and
the fuel starts to overflow.
DANGER
Motor fuels are highly flammable and can
be dangerous if mishandled. DO NOT
smoke while refueling. DO NOT attempt
to refuel if the engine is hot!, running or
in the dark.
PAGE 24 — DCA6SPX4F GENERATOR • OPERATION MANUAL — REV. #2 (03/12/21)
Figure 11. Coolant Recovery Tank
Table 7. Coolant Capacity
Engine and Radiator 4.23 quarts (4.0 liters)
Reserve Tank (Full) 0.95 quarts (0.9 liters)
Page 25

INSPECTION/SETUP
Operation in Freezing Weather
When operating in freezing weather, be certain the proper
amount of antifreeze (Table 8) has been added.
Table 8. Antifreeze Operating
Temperatures
Vol. %
Antifreeze
Freezing Point
°C °F
50 –37 –34
NOTICE
When the antifreeze is mixed with water, the antifreeze
mixing ratio must be less than 50%.
CLEANING THE RADIATOR
The engine may overheat if the radiator fins become
overloaded with dust or debris. Periodically clean the
radiator fins with compressed air. Cleaning inside the
machine is dangerous, so clean only with the engine turned
off and the negative battery terminal disconnected.
The fan belt tension is proper if the fan belt bends
10 to 15 mm when depressed with the thumb as shown
in Figure 12.
Figure 12. Fan Belt Tension
CAUTION
NEVER place hands near the belts or fan
while the generator set is running.
AIR CLEANER
Periodic cleaning/replacement is necessary. Inspect it in
accordance with the Kubota Engine Owner’s Manual.
FAN BELT TENSION
A slack fan belt may contribute to overheating, or to
insufficient charging of the battery. Inspect the fan belt for
damage and wear and adjust it in accordance with the
Kubota Engine Owner’s Manual.
BATTERY
This unit is of negative ground. DO NOT connect in reverse.
Always maintain battery fluid level between the specified
marks. Battery life will be shortened if the fluid level is
not properly maintained. Add only distilled water when
replenishment is necessary.
DO NOT overfill. Check to see whether the battery
cables are loose. Poor contact may result in poor starting
or malfunctions. ALWAYS keep the terminals firmly
tightened. Coat the terminals with an approved battery
terminal treatment compound. Replace battery with only
recommended type battery.
The battery is sufficiently charged if the specific gravity
of the battery fluid is 1.28 (at 68°F). If the specific gravity
should fall to 1.245 or lower, it indicates that the battery is
dead and needs to be recharged or replaced.
Before charging the battery with an external electric source,
be sure to disconnect the battery cables.
DCA6SPX4F GENERATOR • OPERATION MANUAL — REV. #2 (03/12/21) — PAGE 25
Page 26

INSPECTION/SETUP
BATTERY CABLE INSTALLATION
ALWAYS be sure the battery cables (Figure 13) are
properly connected to the battery terminals as shown below.
The red cable is connected to the positive terminal of the
battery, and the black cable is connected to the negative
terminal of the battery.
CAUTION
ALWAYS disconnect the negative terminal FIRST and
reconnect negative terminal LAST.
NEGATIVE
POSITIVE
ALTERNATOR
The polarity of the alternator is negative grounding type.
When an inverted circuit connection takes place, the circuit
will be in short circuit instantaneously resulting in alternator
failure.
DO NOT put water directly on the alternator. Entry of water
into the alternator can cause corrosion and damage the
alternator.
WIRING
Inspect the entire generator for bad or worn electrical wiring
or connections. If any wiring or connections are exposed
(insulation missing), replace wiring immediately.
PIPING AND HOSE CONNECTION
Inspect all piping, oil hose, and fuel hose connections for
wear and tightness. Tighten all hose clamps and check
hoses for leaks.
If any hose (fuel or oil) lines are defective replace them
immediately.
Figure 13. Battery Connections
When connecting battery do the following:
1. NEVER connect the battery cables to the battery
terminals when the Ignition Switch is in the START
position. ALWAYS make sure that the Ignition Switch
is in the OFF position when connecting the battery.
2. Place a small amount of battery terminal treatment
compound around both battery terminals. This will
ensure a good connection and will help prevent
corrosion around the battery terminals.
NOTICE
If the battery cable is connected incorrectly, electrical
damage to the generator will occur. Pay close attention
to the polarity of the battery when connecting the battery.
CAUTION
Inadequate battery connections may cause poor
starting of the generator, and create other malfunctions.
PAGE 26 — DCA6SPX4F GENERATOR • OPERATION MANUAL — REV. #2 (03/12/21)
Page 27

OPERATION
BEFORE STARTING THE ENGINE
CAUTION
The engine’s exhaust contains harmful emissions.
ALWAYS have adequate ventilation when operating.
Direct exhaust away from nearby personnel.
1. Place the external fuel valve lever in the ON position.
2. NEVER operate the generator with the doors open
(Figure 14). Operation with the doors open may cause
insufficient cooling of the unit, and engine damage may
result. Close the doors for normal operation.
STARTING THE ENGINE
1. Insert the key into the starter switch (Figure 16) and
turn it to the RUN position.
Figure 16. Starter Switch (RUN)
2. Verify that the oil pressure, temperature, charge and
glow plug lamps on the “Engine Warning Lamp Unit
Display” are lit. If either lamp is not lit, check the system
and wiring (refer to the Engine Operation Manual).
Figure 14. Generator Doors
3. NEVER start the engine with the main circuit breaker
in the ON position. Always place circuit breaker
(Figure 15) in the OFF position before starting.
Figure 15. Main Circuit Breaker (OFF)
Figure 17. Engine Warning Lamp Unit (ON)
3. Turn the ignition key to the HEAT position (Figure 18).
When the preheat light goes off, turn the key to the
START position to start the engine. As soon as the
engine starts, release the key. The key will automatically
return to the RUN position.
Figure 18. Starter Switch (HEAT/RUN)
DCA6SPX4F GENERATOR • OPERATION MANUAL — REV. #2 (03/12/21) — PAGE 27
Page 28

OPERATION
INCREASE
DECREASE
NOTICE
In cold weather conditions, it may be required to
extend the duration of the HEAT position for proper
starting.
4. If the engine does not start within 10 seconds after
the key is turned to the START position, wait for about
30 seconds and repeat the procedure as described in
steps 1–3.
5. When the engine starts, the oil pressure light and
charge light should go out. If these lights stay on,
immediately stop the engine and check the system and
wiring (refer to the Engine Operation Manual).
UNV OUTPUT TERMINAL VOLTAGES
The single-phase, 3-wire output terminal has dual voltage
(120/240V) capability. Using an external voltmeter as shown
in Figure 21, verify that 120 VAC is present at the output
terminals.
1Ø-120 Output Terminal Voltage
The voltage regulator (VR), allows the user to increase or
decrease the selected voltage. Turn the voltage regulator
knob clockwise to increase the voltage output, turn
counterclockwise to decrease the voltage output. Use the
voltage regulator adjustment knob whenever fine tuning of
the output voltage is required.
2. Measure the voltage at the output terminals. The
reading across terminals U and N (Figure 21A) should
be 120 VAC and the voltage across terminals U and V
(Figure 21B) should also read 120 VAC.
BLACK
U
N
GREEN
V
RED
WHITE
A
GROUND CONNECTION
120 VAC
OFF
V~
V
240
120
V
300 mV
A~
A
V
COM
WHITE
BLACK
U
N
MUST BE USED
AT ALL TIMES
RED
GREEN
V
B
GROUND CONNECTION
120 VAC
OFF
V~
V
240
120
V
300 mV
A~
A
V
COM
Figure 21. Output Terminal VoltageVerification
(120 VAC)
1Ø-240 VAC Output Voltage Verification
MUST BE USED
AT ALL TIMES
1Ø-120 VAC Output Voltage Verification
1. Place main circuit breaker (Figure 20) in the ON
Figure 19. Voltage Regulator Knob
position.
Figure 20. Main Circuit Breaker (ON)
PAGE 28 — DCA6SPX4F GENERATOR • OPERATION MANUAL — REV. #2 (03/12/21)
1. Measure the voltage at the output terminals. The
reading across terminals U and V (Figure 22) should
be 240 VAC.
RED
WHITE
BLACK
N
U
240 VAC
OFF
V~
V
240
120
V
300 mV
A~
A
V
COM
Figure 22. Output Terminal Voltage Verification
(240 VAC)
GREEN
V
GROUND CONNECTION
MUST BE USED
AT ALL TIMES
Page 29

OPERATION/SHUTDOWN
2. Once the correct voltage (240 VAC) has been verfied,
place the main circuit breaker (Figure 23) on the OFF
position.
Figure 23. Main Circuit Breaker (OFF)
3. Loads (power tools, lighting, etc.) can now be
connected to the generator output terminals.
Stopping the Engine (Normal Shutdown)
1. Place main circuit breaker (Figure 24) in the OFF
position.
Emergency Shutdown
1. Place starter switch key (Figure 25) in STOP position.
Remove key.
2. Place the external fuel valve lever in the OFF position.
Generator Storage
For storage of the generator for more than 30 days, the
following is required:
Run the engine until all the fuel is completely consumed.
Completely drain the oil from the crankcase and refill
with fresh oil.
Disconnect the negative battery cable from the battery.
Clean all external parts of the generator with a cloth.
If generator is mounted on a trailer, jack trailer up and
place on blocks so tires do not touch the ground or block
and completely remove the tires.
Cover the generator and store in a clean, dry place.
Figure 24. Main Circuit Breaker (OFF)
2. Let engine run at idle with no load for 3–5 minutes.
3. Place the starter switch key (Figure 25) in the STOP
position and remove the key.
Figure 25. Starter Switch (Stop Position)
4. Place the external fuel valve in the OFF position.
5. Remove all load connections from the generator.
DCA6SPX4F GENERATOR • OPERATION MANUAL — REV. #2 (03/12/21) — PAGE 29
Page 30

MAINTENANCE
Use Table 9 as a general maintenance guideline
when servicing your engine. For more detailed engine
maintenance information, refer to the engine owner’s
manual supplied with your engine.
Table 9. Engine Maintenance Schedule
First
Every 3
Description (3) Operation Daily
Month
or
50 Hours
Engine Oil
Oil Filter
Cartridge
Air Cleaner
Element
All Nuts & Bolts
Cooling Fins Check X
Fuel Tank Clean X
Fuel Filter Clean X X X
Fuel Filter
Element
Fuel Lines Change Every 2 years, replace if necessary (2)
Battery Change X
Radiator Hoses/
Clamps
Radiator
Coolant
Idle Speed Check-Adjust X (2)
Valve Clearance Check-Adjust X (2)
Fan Belt Check tightness
Water Separator Drain
(1) Service more frequently when used in DUSTY areas.
(2) These items should be serviced by your service dealer, unless you have the proper tools and are mechanically proficient.
Refer to the Kubota Shop Manual for service procedures.
(3) For commercial use, log hours of operation to determine proper maintenance intervals.
(4) When using engine oil of CF, CG-4, CH-4, CI-4 in API classification.
(5) When this machine is used as the power supply exclusively for the ground heater using the engine oil of CK-4
according to API classification.
Check X
Change X X(4) X(5)
Change X X(4) X(5)
Check X X
Change X (1) X
Retighten if
necessary
Change X X
Change Every 2 years, replace if necessary (2)
Change X
X
Months
25 Hours
or
Every 6
Months
50 Hours
or
Every
Year or
100
Hours
X
X
Every 2
Years or
200
Hours
Every 8
Years or
800
Hours
Every
Year or
750
Hours
NOTICE
Thoroughly remove dirt and oil from the engine and
control area. Clean or replace the air cleaner elements
as necessary. Check and retighten all fasteners as
necessary.
PAGE 30 — DCA6SPX4F GENERATOR • OPERATION MANUAL — REV. #2 (03/12/21)
Page 31

MAINTENANCE
AIR CLEANER
This is a dry type filter. NEVER apply oil to it. If
generator is used in severe dusty areas service air
cleaner element more frequently.
NOTICE
If the engine is operating in very dusty or dry grass
conditions, a clogged air cleaner will result. This can
lead to a loss of power, excessive carbon buildup in
the combustion chamber and high fuel consumption.
Change air cleaner more frequently if these conditions
exist.
Every 50 hours: Remove air filter element (Figure 26) and
clean the heavy-duty paper element with light spray of
compressed air. Replace the air cleaner as needed.
This Kubota diesel engine is equipped with a replaceable,
high-density paper air filter element.
Primary Air Cleaner Elements
CAUTION
Wear protective equipment such as
approved safety glasses or face shields
and dust masks or respirators when
cleaning air filters with compressed air.
1. Release the latches (Figure 26) that secure the cover
to the air filter body.
2. Remove the air filter cover and set aside.
3. Remove the air filter element.
4. Check the air filter daily or before starting the engine.
6. To clean the air filter element (paper air filter) as
referenced in Figure 26, tap the filter element
several times on a hard surface to remove dirt, or
blow compressed air, not to exceed 30 psi (207 kPa,
2.1 kgf/cm2), through the filter element from the inside
out.
BODY
AIR FILTER
ELEMENT
LATCH
BLOW COMPRESSED
AIR FROM THE
INSIDE OUT
EVACUATOR
VALV E
Figure 26. Air Filter
7. Replace air filter element if it is damaged or excessively
dirty.
8. Clean the inside of the air filter body.
9. Reinstall the air filter element back into air filter body.
10. Reinstall the air filter cover, and secure with latches.
NOTICE
DO NOT run the engine with the air filter removed or
without an element.
5. Check for and correct heavy buildup of dirt and debris
along with loose or damaged components.
NOTICE
Operating the engine with loose or damaged air filter
components could allow unfiltered air into the engine
causing premature wear and failure.
DCA6SPX4F GENERATOR • OPERATION MANUAL — REV. #2 (03/12/21) — PAGE 31
Page 32

ENGINE OIL
Every 100 hours: Change engine oil after the first 50 hours
of operation and every 100/750 hours thereafter. Always
check the crankcase oil level prior to each use, or when the
fuel tank is filled. Insufficient oil may cause severe engine
damage. Make sure generator is level when checking oil
level. The oil level must be between the two notches on the
dipstick as shown in Figure 9.
1. Remove engine oil drain plug located at the bottom
of the generator enclosure (Figure 27) and drain oil
from crankcase.For best results drain oil while engine
is warm. Reinstall oil drain plug, and add engine oil
as specified in Table 6. Crankcase oil capacity is 5.39
quarts (5.1 liters).
OIL FILTER
WRENCH
MAINTENANCE
RUBBER
SEAL
ENGINE
OIL FILTER
CARTRIDGE
Figure 28. Oil Filter Cartridge
LAYER OF OIL
OIL
COAT SEAL
WITH THIN
OIL DRAIN BOLT
AND O-RING
Figure 27. Engine Oil Drain Plug
Oil Filter Cartridge
Every 200/750 hours: Replace the engine oil filter cartridge
after every 200/750 hours of operation.
1. Clean the area around the lubricating oil filter head.
2. Coat oil filter seal (Figure 28) with clean engine oil.
3. Install new oil filter first by hand until it makes contact
with the filter head surface. Tighten it another 3/4 turn
using a filter wrench.
4. Install drain bolt with sealing washer and tighten.
NOTICE
When installing the oil filter, coat rubber seal with
a small amount of lubricant (motor oil). DO NOT
overtighten cartridge. Hand tighten only.
5. Replace engine oil with recommended type oil as listed
in Table 6. For engine oil capacity, see Table 2 (engine
specifications). Fill to upper limit as shown in Figure 9.
6. Run the engine for several minutes. Watch for oil
leakage. Shut the engine down and allow it to sit for
several minutes. Top off the oil to the upper limit on
the dipstick.
PAGE 32 — DCA6SPX4F GENERATOR • OPERATION MANUAL — REV. #2 (03/12/21)
Page 33

MAINTENANCE
CLEANING THE FUEL FILTER
Every 100 hours: Clean fuel filter every 100 hours of
operation or once a month to remove dust or water.
1. Place fuel cock lever (Figure 29) in the OFF (close)
position.
2. Disconnect fuel lines from fuel filter.
Figure 29. Fuel Cock Lever (OFF)
3. Unscrew the filter bowl (Figure 30) from the fuel filter
head.
4. Wipe the inside of the fuel filter bowl with a clean cloth
to remove any foreign matter or debris that may have
accumulated. Rinse with diesel fuel.
5. Remove fuel filter paper element, and rinse with diesel
fuel.
6. Reinstall filter bowl and paper element back onto the
filter head. Hand tighten retaining ring.
7. Inspect all fuel lines every 50 hours.
REPLACING FUEL FILTER ELEMENT
First 50 and then every 200 hours: Replace fuel filter
element.
1. Unscrew the filter bowl from the fuel filter
head (Figure 30).
2. Remove fuel filter paper element and replace with a
new one.
3. Replace O-ring and coat with a small amount of clean
15W-40 engine oil.
4. Insert the new fuel filter element into the filter bowl.
5. Reinstall filter bowl first by hand until it makes contact
with the fuel filter head surface. Hand tighten only.
Figure 30. Fuel Filter Disassembly
6. Remove the air from the fuel system. Reference the
Kubota Operation and Maintenance Manual, “Bleeding
the Fuel System.”
AUTOMATIC AIR BLEEDING DEVICE
When the engine stops due to running out of fuel, take
off the fuel filter or fuel piping and restart the machine in
accordance with the following instructions:
1. Refill the fuel tank and place the fuel cock lever in the
OPEN position.
2. Place the starter switch key in the START position.
When the engine starter engages, the automatic air
vent device will expel the air inside the fuel system.
3. After 10 to 20 seconds of turning the engine over, the
automatic air vent device would have expelled all the
air out of the fuel system. At this point, the engine will
be able to start.
DCA6SPX4F GENERATOR • OPERATION MANUAL — REV. #2 (03/12/21) — PAGE 33
Page 34

MAINTENANCE
NOTICE
If air enters the fuel injection system of a diesel engine,
starting becomes impossible. After running out of
fuel, or after disassembling the fuel system, bleed
the system. Reference the Kubota Operation and
Maintenance Manual for details.
STOPPING ENGINE (STARTER SWITCH FAILURE)
In the event the engine continues to run even after the
starter switch has been placed in the STOP position,
perform the following procedure to turn off the engine.
1. Place fuel cock lever (Figure 29) in the CLOSED
position.
2. Place engine stop lever (Figure 31) in the STOP
position. Continue pushing stop lever until the engine
has completely stopped.
1. Remove the radiator pressure cap (Figure 32) only if
the coolant temperature is below 120°F (50°C).
CORRECT
180
140
220
°F
100
PRESSURE
CAP
260
WATER TEMP
Figure 32. Radiator Pressure Cap Removal
140
100
WATER TEMP
180
220
°F
260
2. Remove the coolant drain bolt and O-ring (Figure 33),
then allow the coolant to drain into a suitable container.
PUSH
STOP
POSITION
Figure 31. Engine Stop Lever
DRAINING ENGINE COOLANT
WARNING
DO NOT remove the pressure cap from the radiator
when the engine is hot! Wait until the coolant
temperature is below 120°F (50°C) before removing
pressure cap.
Heated coolant spray or steam can cause severe
scalding and personal injury.
COOLANT
DRAIN BOLT
AND O-RING
Figure 33. Coolant Drain Bolt
3. Flush the radiator by running clean tap water through
radiator unit until signs of rust and dirt are removed.
DO NOT clean radiator core with any object, such as
a screwdriver.
4. Check hoses for wear and kinks. Check clamps for
signs of leakage and replace as needed.
5. Tighten the drain plug and reinstall the overflow tank.
6. Fill with coolant as recommended by the engine
manufacturer.
PAGE 34 — DCA6SPX4F GENERATOR • OPERATION MANUAL — REV. #2 (03/12/21)
Page 35

V-BELT
Visually examine the V-belt (Figure 34) and determine if it
is full of tiny cracks, frayed, has pieces of rubber missing,
is peeling or otherwise damaged.
Also, examine the belt and determine if it is oil soaked
or “glazed” (a hard shiny appearance on the sides of the
belt). Either of these two conditions can cause the belt to
run hot, which can weaken it and increase the danger of
it breaking.
If the V-belt exhibits any of the above wear conditions
replace the V-belt immediately.
OIL SOAKED
MAINTENANCE
GLAZED
CRACKS
SIDEWALL
WEAR
CORD FAILURE
WORN BACK
BROKEN
MISSING RUBBER
Figure 34. V-Belt Inspection
COVER
DCA6SPX4F GENERATOR • OPERATION MANUAL — REV. #2 (03/12/21) — PAGE 35
Page 36

TROUBLESHOOTING (GENERATOR)
Table 10. Generator Troubleshooting
Symptom Possible Problem Solution
AC Voltmeter defective? Check output voltage using a voltmeter.
Is wiring connection loose? Check wiring and repair.
No Voltage Output
Low Voltage Output
High Voltage Output
Circuit Breaker Tripped
Is AVR defective? Replace if necessary.
Defective Rotating Rectifier? Check and replace.
Defective Exciter Field? Contact MQ Technical Support
Is engine speed correct? Adjust to 1,800 rpm
Is wiring connection loose? Check wiring and repair.
Defective AVR? Replace if necessary.
Is wiring connection loose? Check wiring and repair.
Defective AVR? Replace if necessary.
Short Circuit in load? Check load and repair.
Over current? Confirm load requirement and reduce.
Defective circuit breaker? Check and replace.
Overcurrent Relay actuated? Confirm load requirement and replace.
PAGE 36 — DCA6SPX4F GENERATOR • OPERATION MANUAL — REV. #2 (03/12/21)
Page 37

TROUBLESHOOTING (ENGINE/GENERATOR)
Table 11. Engine/Generator Troubleshooting
SYMPTOM POSSIBLE PROBLEM SOLUTION
Dead battery? Replace battery.
Engine fails to start and
starter does not rotate.
Engine fails to start and
starter rotates.
Engine starts, Idle Control
Switch is in OFF position and
engine remains at low speed.
Engine starts and Idle Control
Switch is in OFF position.
Engine speed rises and
battery discharges too soon.
Defective starter switch? Replace starter switch.
Defective starter? Replace starter.
Fuse F5 burned out? Replace fuse.
Broken pre-heat circuit? Check pre-heat circuit.
No fuel? Add fuel.
Defective wiring? Check wiring.
Defective idle control switch? Replace switch.
Clogged fuel strainer? Clean or replace.
Clogged air cleaner? Clean or replace.
Defective idle control device? Replace.
Disconnected wiring? Check and repair wiring.
Defective engine regulator? Replace regulator.
Defective wiring? Repair or replace wiring.
Engine starts and Idle Control
Switch is in OFF position.
Engine speed rises and
engine seems overloaded.
Engine starts and Idle
Control Switch is in OFF
position. Engine speed rises
and engine makes abnormal
noise.
Engine starts and Idle Control
Switch is in OFF position.
Engine speed rises and
remains at high speed when
Idle Control Switch is placed
in the ON position.
Defective alternator? Repair or replace alternator.
Damaged alternator bearing? Replace alternator bearings.
Loose engine parts? Check all engine parts for tightness.
Defective alternator?
Defective idle control device? Repair or replace idle control device.
Defective idle control switch? Replace idle control switch.
Defective solenoid? Replace solenoid.
Defective relay? Replace relay.
Check alternator for damaged bearing or
loose clamping bolts.
DCA6SPX4F GENERATOR • OPERATION MANUAL — REV. #2 (03/12/21) — PAGE 37
Page 38

TROUBLESHOOTING (ENGINE)
Table 12. Engine Troubleshooting
SYMPTOM POSSIBLE PROBLEM SOLUTION
No fuel? Replenish fuel.
Air in the fuel system? Bleed system.
Water in the fuel system? Remove water from fuel tank.
Fuel pipe clogged? Clean fuel pipe.
Fuel filter clogged? Clean or change fuel filter.
Engine does not start.
Starter does not run.
Excessively high viscosity of fuel or
engine oil at low temperature?
Fuel with low cetane number? Use the specified fuel.
Fuel leak due to loose injection pipe
retaining nut?
Incorrect injection timing? Adjust.
Fuel cam shaft worn? Replace.
Injection nozzle clogged? Clean injection nozzle.
Injection pump malfunctioning? Repair or replace.
Seizure of crankshaft, camshaft, piston,
cylinder liner or bearing?
Compression leak from cylinder?
Improper valve timing? Correct or replace timing gear.
Piston ring and liner worn? Replace.
Excessive valve clearance? Adjust.
Battery discharged? Charge battery.
Starter malfunctioning? Repair or replace.
Key switch malfunctioning? Repair or replace.
Use the specified fuel or engine oil.
Tighten nut.
Repair or replace.
Replace head gasket, tighten cylinder
head bolt, glow plug and nozzle holder.
Wiring disconnected? Connect wiring.
PAGE 38 — DCA6SPX4F GENERATOR • OPERATION MANUAL — REV. #2 (03/12/21)
Page 39

TROUBLESHOOTING (ENGINE)
Table 13. Engine Troubleshooting (Continued)
SYMPTOM POSSIBLE PROBLEM SOLUTION
Fuel filter clogged or dirty? Clean or change.
Air cleaner clogged? Clean or change.
Fuel leak due to loose injection pipe retaining nut? Tighten nut.
Engine revolution is not
smooth.
Either white or
blue exhaust gas is
observed.
Either black or dark
gray exhaust gas is
observed.
Injection pump malfunctioning? Repair or replace.
Incorrect nozzle opening pressure? Adjust.
Injection nozzle stuck or clogged? Repair or replace.
Fuel overflow pipe clogged? Clean.
Governor malfunctioning? Repair.
Excessive engine oil? Reduce to the specified level.
Piston ring and liner worn or stuck? Repair or replace.
Incorrect injection timing? Adjust.
Deficient compression? Adjust top clearance.
Overload? Lessen the load.
Low-grade fuel used? Use the specified fuel.
Fuel filter clogged? Clean or change.
Air cleaner clogged? Clean or change.
Deficient nozzle injection? Repair or replace the nozzle.
Incorrect injection timing? Adjust.
Engine’s moving parts seem to be seizing? Repair or replace.
Deficient output.
DCA6SPX4F GENERATOR • OPERATION MANUAL — REV. #2 (03/12/21) — PAGE 39
Uneven fuel injection? Repair or replace the injection pump.
Deficient nozzle injection? Repair or replace the nozzle.
Compression leak?
Replace head gasket, tighten cylinder
head bolt, glow plug and nozzle holder.
Page 40

GENERATOR WIRING DIAGRAM
Note
:
No designation lead size : 1.25
WIRING COLOR CODE
SYMBOL
COLOR SYMBOL COLOR
BLACK
B
BLUE
L
BROWN
BR
GREEN
G
GRAY
GR
VIOLET
V
PINK
P
R
W
Y
LB
LG
O
D
B
K
C J
A
CN 1
RED
WHITE
YELLOW
LIGHT BLUE
LIGHT GREEN
ORANGE
3
CN 2
TB1
TB2
2
X
X
2 1
1
4
CN 3
CONNECTOR
View at Wiring Side
U N
V
J K
AC
Terminal Board
SYMBOL
Ar
Fg
A
B
Y
19 30
O
CN 4
C D
W GR
3
50
Ex Ar
Ex Fg
U.N.V
GR
CB
V
~
VR
Re
R
TB1
TB1
TB2
DESIGNATION
ARMATURE WINDING
FIELD WINDING
EXCITATION ARMATURE WINDING
EXCITATION FIELD WINDING
SINGLE-PHASE OUTPUT TERMINALS
GROUND TERMINAL
CIRCUIT BREAKER 25A
AC.VOLTMETER
VOLTAGE REGULATOR
RECTIFIER
RESISTOR
TERMINAL BOARD
TERMINAL BOARD
AUTOMATIC VOLTAGE REGULATOR
PAGE 40 — DCA6SPX4F GENERATOR • OPERATION MANUAL — REV. #2 (03/12/21)
Page 41

ENGINE WIRING DIAGRAM
Connector (view from inserting wire side)
STARTER SWITCH
WIRING COLOR CODE
COLOR SYMBOL COLOR
SYMBOL
BLACK
B
BLUE
L
BROWN
BR
GREEN
G
GRAY
GR
VIOLET
V
PINK
P
R
W
Y
LB
LG
O
RED
WHITE
YELLOW
LIGHT BLUE
LIGHT GREEN
ORANGE
TB2
CONNECTIONS
X
J K
TERMINAL BOARD
AC
DCA6SPX4F GENERATOR • OPERATION MANUAL — REV. #2 (03/12/21) — PAGE 41
50
19 30
Page 42

HERE’S HOW TO GET HELP
UNITED STATES
© COPYRIGHT 2021, MULTIQUIP INC.
Multiquip Inc
are registered trademarks of Multiquip Inc. and may not be used, reproduced, or altered without written permission. All other
trademarks are the property of their respective owners and used with permission.
This manual
The information and specifi cations included in this publication were in effect at the time of approval for printing. Illustrations, descriptions, references and technical data contained in
this manual are for guidance only and may not be considered as binding. Multiquip Inc. reserves the right to discontinue or change specifi cations, design or the information published
in this publication at any time without notice and without incurring any obligations.
DENYO MANUFACTURING CO.
Multiquip Inc.
(310) 537- 3700
6141 Katella Avenue Suite 200
Cypress, CA 90630
E-MAIL: mq@multiquip.com
WEBSITE: www.multiquip.com
OPERATION MANUAL
PLEASE HAVE THE MODEL AND SERIAL
NUMBER ON-HAND WHEN CALLING
CANADA
Multiquip Multiquip (UK) Limited Head Offi ce
(450) 625-2244
4110 Industriel Boul.
Laval, Quebec, Canada H7L 6V3
E-MAIL : infocanada@multiquip.com
, the MQ logo and the MQ Power logo
UNITED KINGDOM
0161 339 2223
Unit 2, Northpoint Industrial Estate,
Globe Lane,
Dukinfi eld, Cheshire SK16 4UJ
E-MAIL : sales@multiquip.co.uk
MUST accompany the equipment at all times. This manual is considered a permanent part of the equipment and should remain with the unit if resold.
Manufactured for
MQ Power Inc.
by
 Loading...