

Page 1

MQ 6151L
Instrukcja obsługi / User Manual
MQ 6151L
Instrukcja obsługi / User Manual
Page 2

MQ 6151L
Instrukcja obsługi / User Manual
1
POLSKI
Spis treści
Bezpieczeństwo użytkowania ................................................................................................ 2
Konserwacja .......................................................................................................................... 2
Budowa .................................................................................................................................. 3
Obsługa ................................................................................................................................. 4
Lista tonów ............................................................................................................................ 6
Lista rytmów .......................................................................................................................... 7
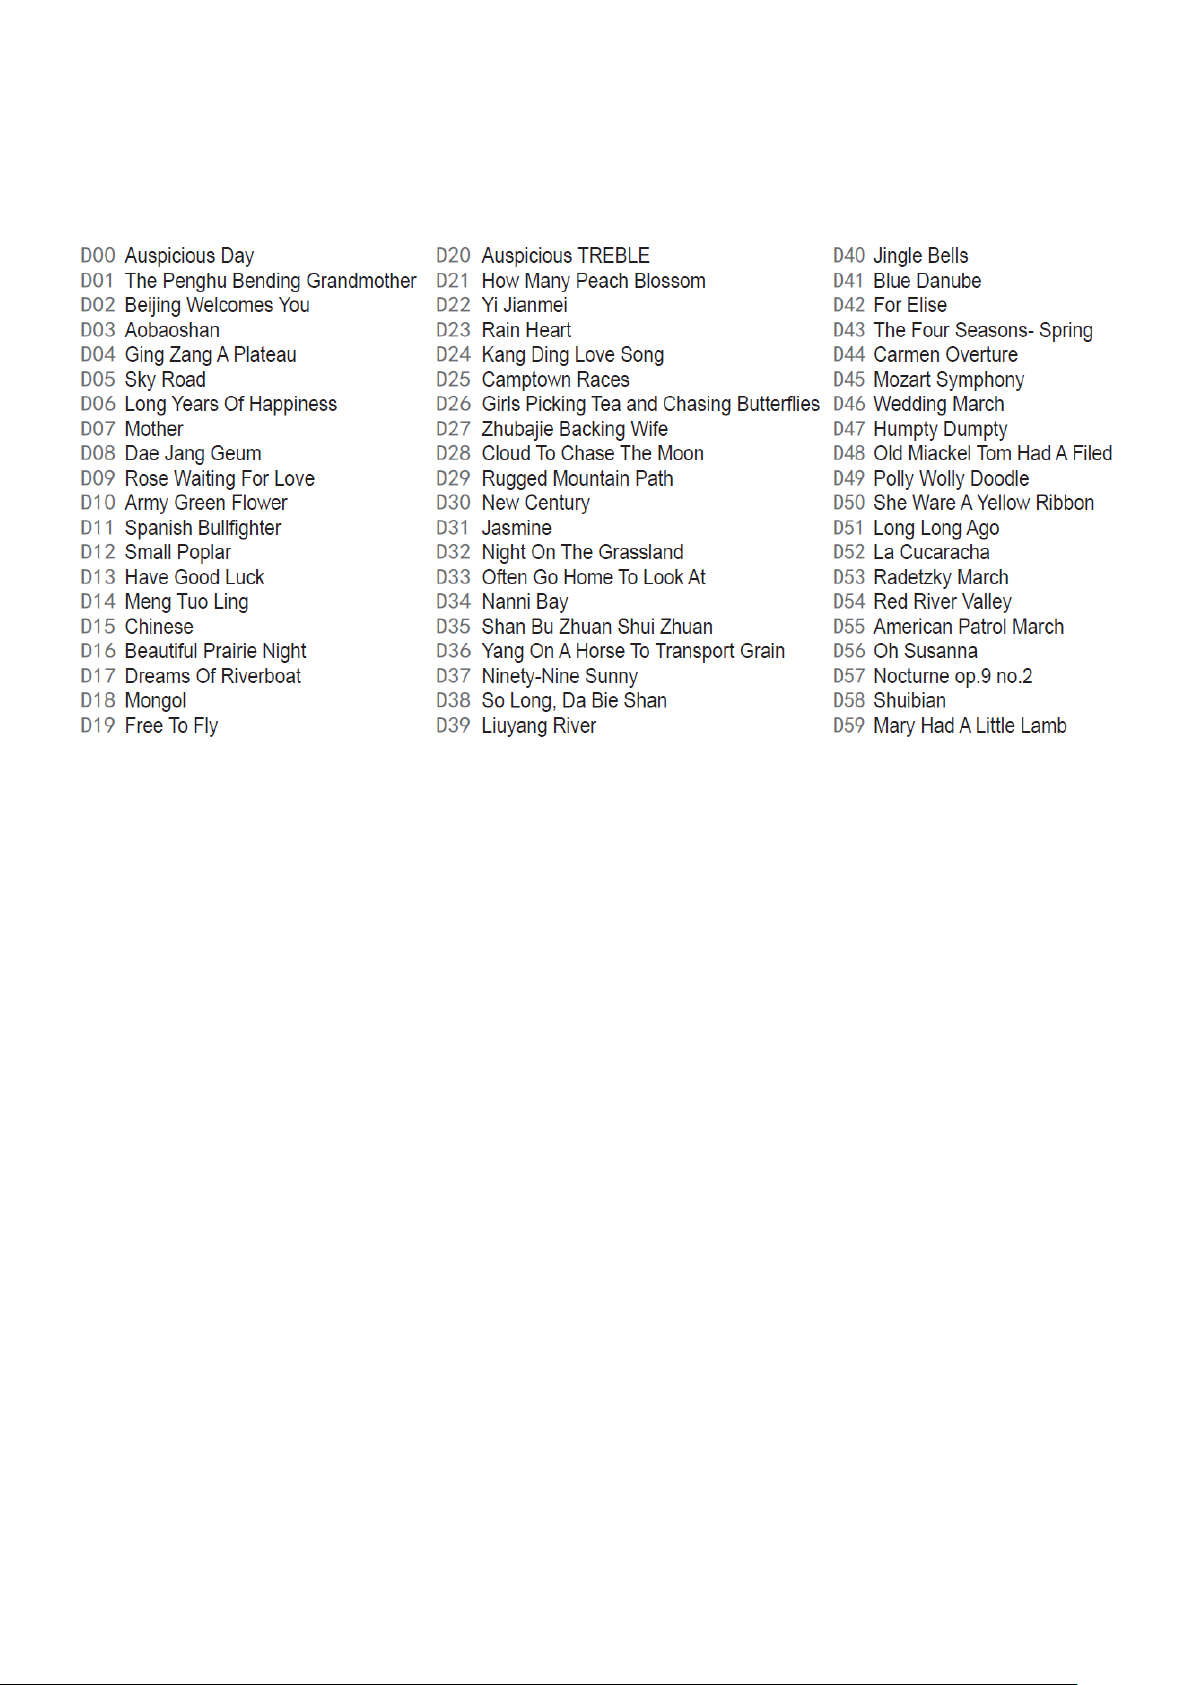
Lista demo ............................................................................................................................. 8
Informacja o zużytym sprzęcie elektrycznym i elektronicznym .............................................. 8
Page 3
MQ 6151L
Instrukcja obsługi / User Manual
2
Bezpieczeństwo użytkowania
Przed użyciem prosimy o szczegółowe zapoznanie się z instrukcją obsługi. Prosimy również
o zachowanie jej na przyszłość. Instrukcja zawiera zasady bezpiecznego korzystania z urządzenia.
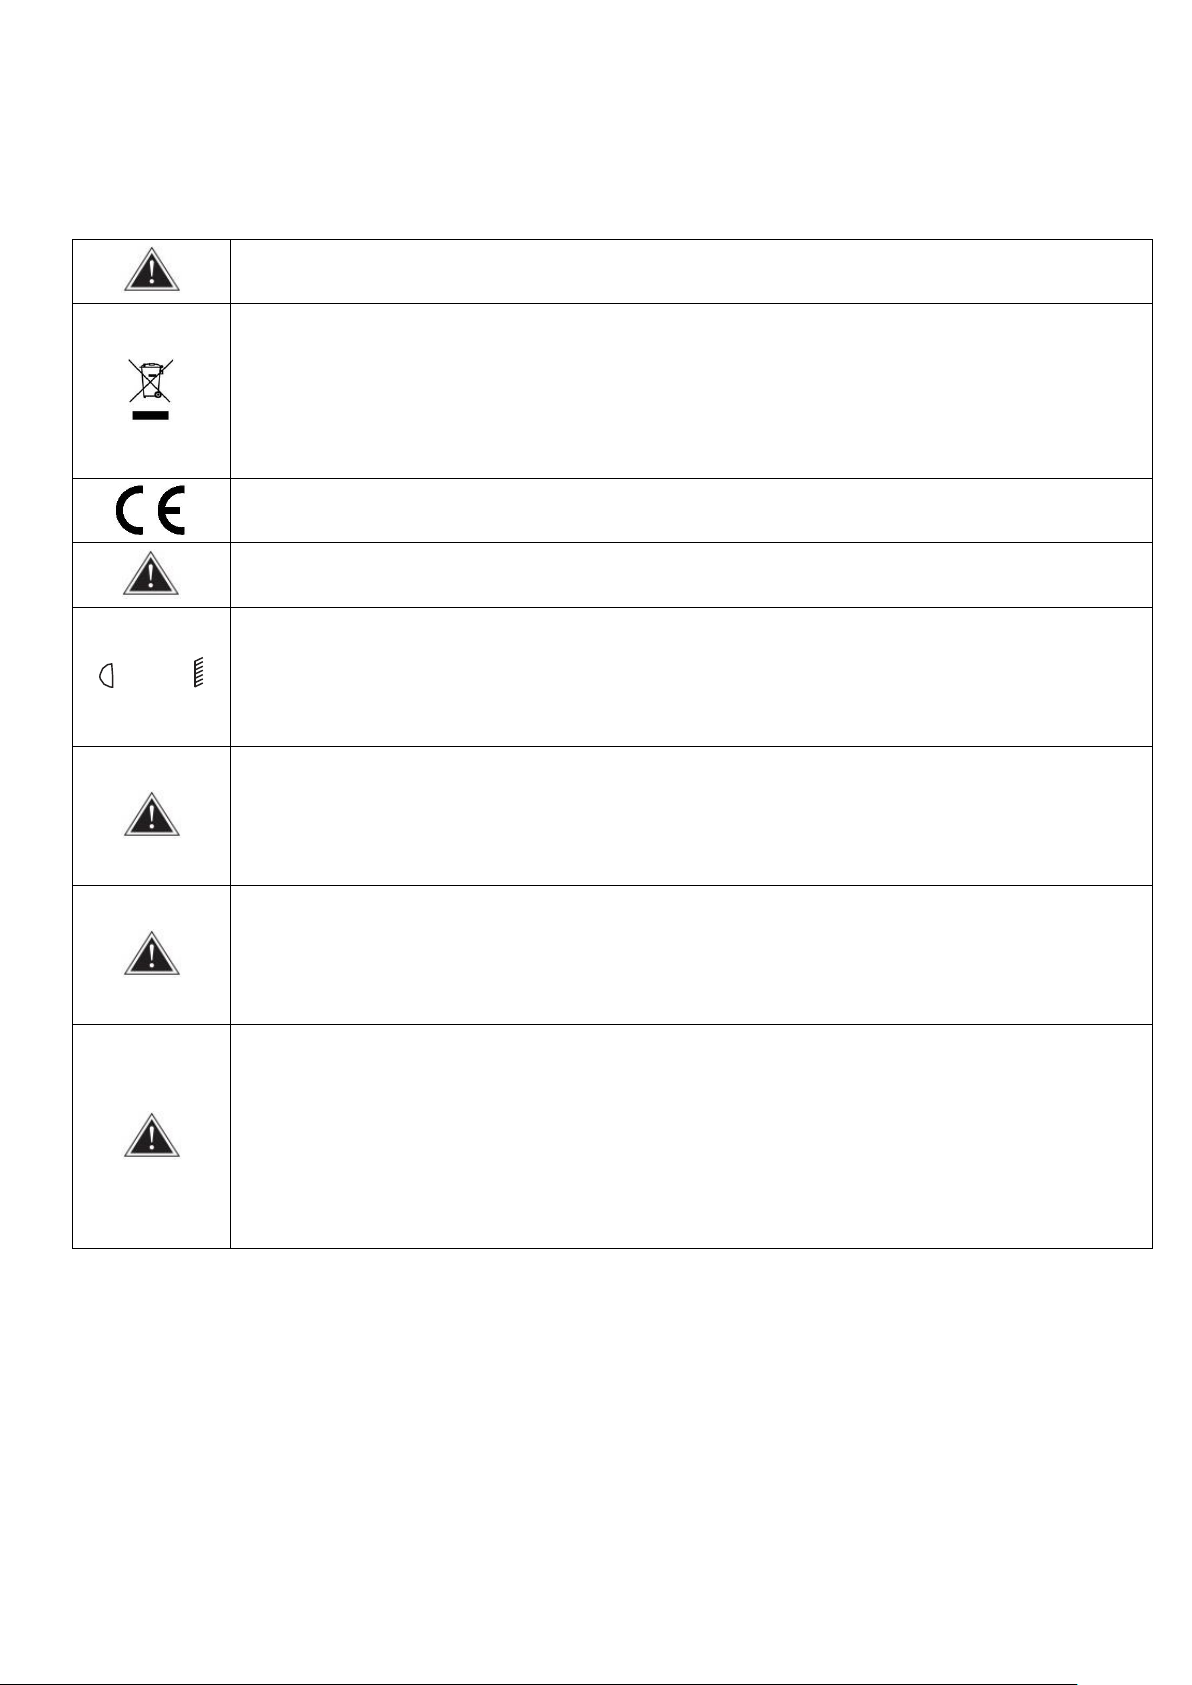
UWAGA! URZĄDZENIA NIE WOLNO WYRZUCAĆ DO ODPADÓW DOMOWYCH.
To oznaczenie oznacza, że produkt nie może być wyrzucany razem z odpadami domowymi w całej
UE. W celu zapobiegnięcia potencjalnym szkodom dla środowiska lub zdrowia, zużyty produkt należy
poddać recyklingowi. Zgodnie z obowiązującym prawem, nie nadający się do użycia sprzęt
elektryczny i elektroniczny należy zbierać osobno, w specjalnie do tego celu wyznaczonych punktach
zbierania zużytego sprzętu, celem ich przetworzenia i ponownego wykorzystania na podstawie
obowiązujących norm ochrony środowiska.
Produkt opisany w tej instrukcji jest zgodny z dyrektywami europejskimi, dlatego jest oznaczony
znakiem CE.
Przed użyciem upewnij się, że obudowa nie jest uszkodzona.
‐‐1 m
Zapewnij minimum 1 m dystansu pomiędzy urządzeniem a materiałami łatwopalnymi.
Urządzenie do użytku zewnętrznego i wewnętrznego, nie narażać na długotrwałe działanie wilgoci.
Nie należy narażać produktu na bezpośrednie działanie słońca lub innych urządzeń oświetleniowych.
Nie otwieraj obudowy urządzenia i nie demontuj go! Jeśli podczas użytkowania urządzenie zacznie
działać nieprawidłowo, należy natychmiast przerwać użytkowanie i odesłać je do naprawy przez
autoryzowany punkt serwisowy. Nie korzystaj z urządzenia na najwyższym poziomie głośności przez
dłuższy czas!
Nie należy korzystać z urządzenia ani przechowywać go w środowisku zakurzonym, narażonym
na wibracje, niską lub wysoką temperaturę! Nie korzystaj z urządzenia w miejscu o niskim poziomie
stabilności, nie umieszczaj ciężkich przedmiotów na urządzeniu! Nie dopuszczaj do kontaktu
urządzenia z wilgocią, nie umieszczaj na urządzeniu żadnych naczyń z płynami! Przed czyszczeniem
urządzenia należy najpierw odłączyć zasilanie, ciągnąć za wtyczkę przewodu zasilającego!
Regularnie sprawdzaj wtyczkę zasilania i czyść zanieczyszczenia na jej powierzchni!
Konserwacja
1. Urządzenie może użytkować tylko wykwalifikowany personel, szkody spowodowane użytkowa-
niem niezgodnym z przeznaczeniem lub próbą samodzielnej naprawy nie podlegają gwarancji.
Wewnątrz opakowania nie ma żadnych części serwisowych, naprawy mogą być wykonywane
wyłącznie przez autoryzowany punkt serwisowy.
2. Nie pozwól, aby urządzenie weszło w kontakt z olejem, tłuszczem lub jakimkolwiek podobnym
płynem.
3. Regularne czyszczenie umożliwia długotrwałe użytkowanie oraz pozwala na zachowanie odpowiednio wysokiej jakości pracy urządzenia. Do czyszczenia urządzenia używaj miękkiej szmatki.
Page 4
MQ 6151L
Instrukcja obsługi / User Manual
3
Budowa
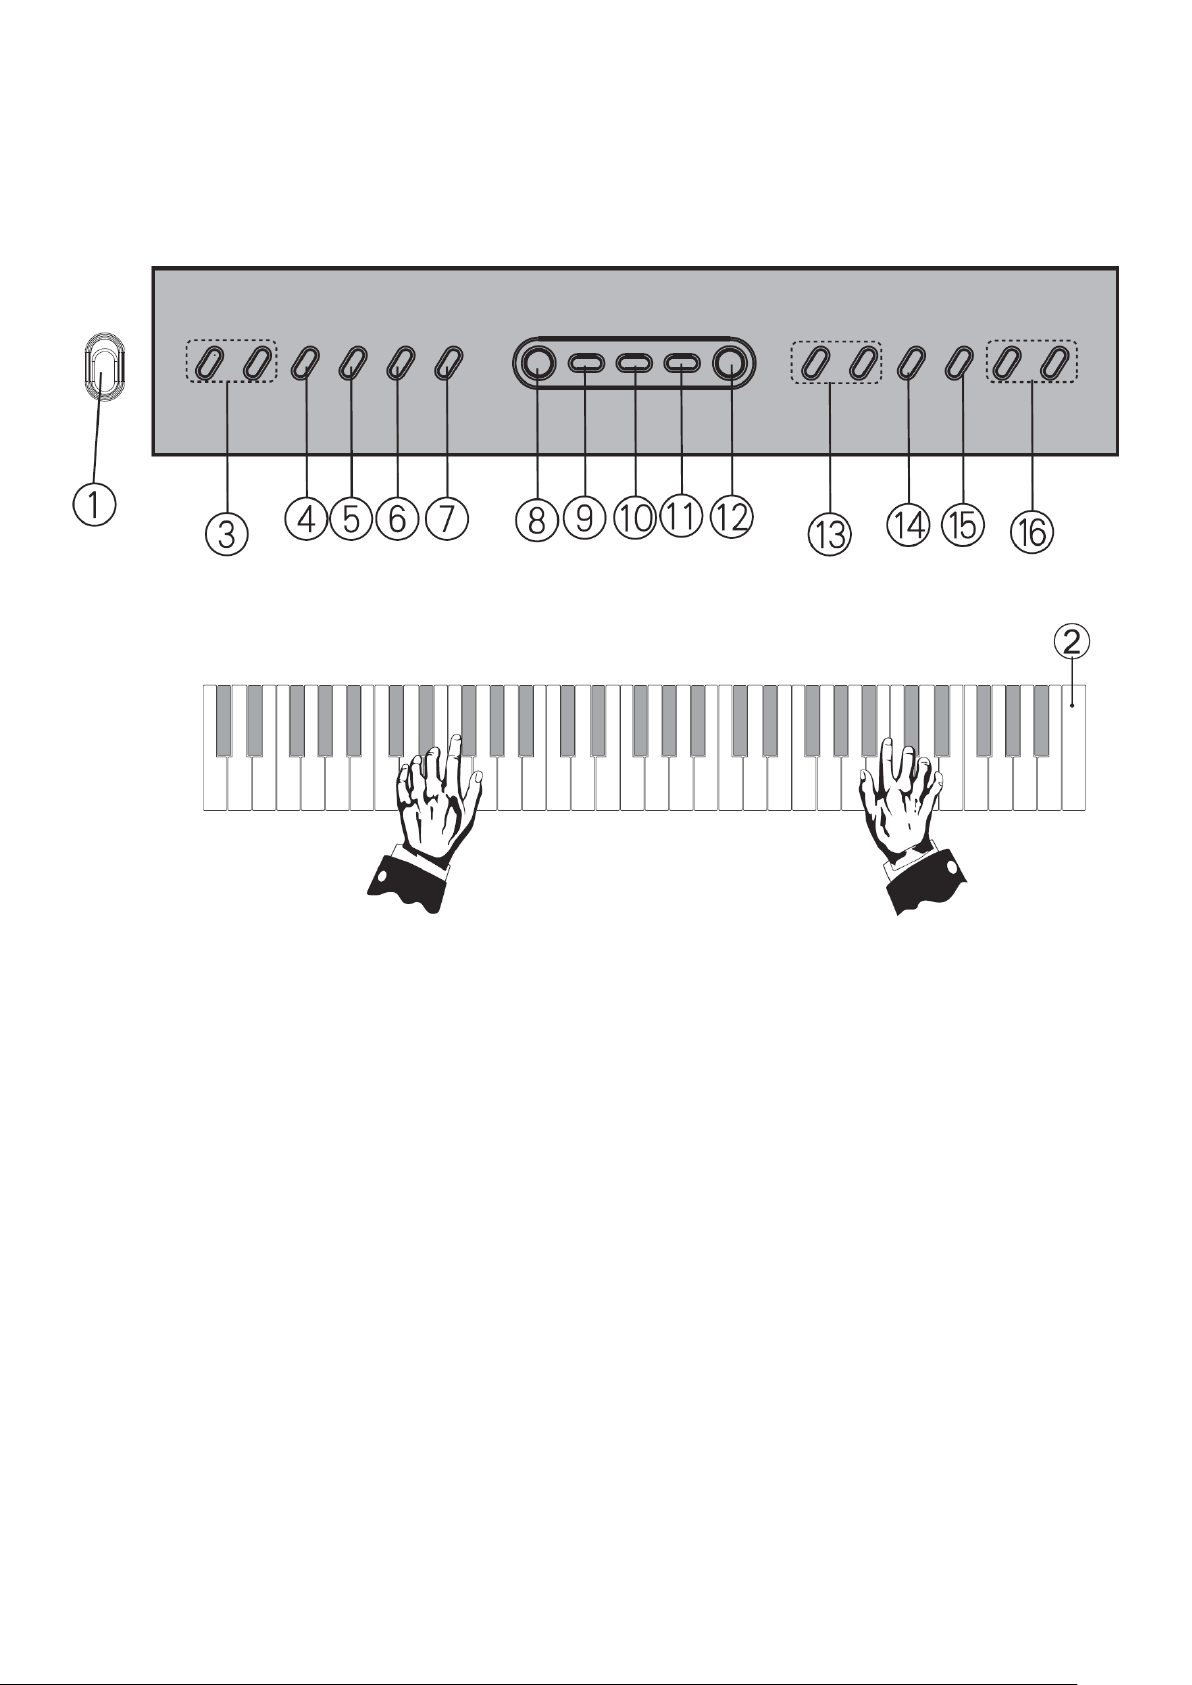
1. Zasilanie.
9. Single.
2. Klawiatura.
10. Finger.
3. Volume +/- (głośność).
11. Tone (ton).
4. Demo.
12. Rhythm (rytm).
5. Rec (nagrywanie).
13. Number +/- (numer).
6. Play (odtwarzanie nagrania).
14. Drum (klawiatura perkusyjna).
7. Prog (programowanie).
15. Light (podświetlenie klawiatury).
8. Start/stop.
16. Lesson – Ensemble / Follow (tryby nauki).
Page 5

MQ 6151L
Instrukcja obsługi / User Manual
4
Obsługa
Zasilanie
Po podłączeniu zasilacza AC/DC lub prawidłowym zainstalowaniu baterii, naciśnij przycisk zasilania, aby włączyć zasilanie. Naciśnij ponownie przycisk zasilania, aby wyłączyć zasilanie instru-
mentu.
Głośność
1. Naciśnij „Volume +/-”, aby zwiększyć lub zmniejszyć głośność. Wyświetlacz LED zasygnalizuje
zmianę głośności.
2. Instrument jest wyposażony w 17-stopniową zmianę głośność od 00 do 16. Domyślna głośność
to 12.
3. Naciśnij przycisk „Volume +/-” przez 2 sekundy, aby stale zwiększyć/zmniejszyć głośność.
4. Naciśnij jednocześnie przyciski głośności, aby przywrócić domyślną wartość głośności.
5. W międzyczasie głośność akordów zostanie odpowiednio zmieniona.
Przyciski wyboru numeru
1. Naciśnij Number „+” lub „-” przez 2 sekundy, aby wybrać numer w górę/w dół.
2. Dostępny jest tryb wyboru tonu, tryb wyboru rytmu i tryb wyboru demo. Wartość domyślna to tryb
wyboru tonu.
3. Kiedy wybrany numer tonu, rytmu lub demo przekracza dozwolone maksimum, numer maksy-
malny zostaje zachowany.
Wybór tonu
1. Naciśnij „Tone”, aby przejść do trybu wyboru tonu.
2. Za pomocą przycisków „Number +/-” wybierz ton.
3. Wyświetlacz LED pokaże odpowiedni kod tonu.
Wybór rytmu
1. Jeżeli jesteś w trybie nauki, nagrywania, programowania, odtwarzania lub demo wyłącz go za
pomocą przycisku „Start/stop”.
2. Naciśnij przycisk „Rhythm”, aby wejść w tryb wyboru rytmu.
3. Za pomocą przycisków „Number +/-” wybierz rytm – gdy numer wybranego rytmu przekracza
dozwolone maksimum, zachowany zostaje maksymalny numer.
4. Wyświetlacz LED pokaże odpowiedni kod rytmu.
Wybór demo
1. Naciśnij „Demo”, aby przejść do trybu wyboru demo.
2. Za pomocą przycisków „Number +/-” wybierz demo.
3. Wyświetlacz LED pokaże odpowiedni kod demo.
Page 6

MQ 6151L
Instrukcja obsługi / User Manual
5
Programowanie i nagrywanie
1. Naciśnij „Prog”, aby wejść lub wyjść z trybu programowania. Domyślna wartość to 120. Wyświe-
tlacz LED zaświeci się i pokaże „PR”.
2. W trybie programowania można nagrywać dźwięki perkusji. W takim przypadku wyłącznie
dźwięku perkusji zostaną nagrane – inne dźwięki nie zostaną nagrane.
3. Maksymalna wartość nagranych dźwięków perkusji wynosi 32. Gdy liczba nagranych dźwięków
perkusji osiągnie wartość maksymalną, wyświetlacz LED pokaże „FU”, a tryb programowania za-
kończy się automatycznie. Aby rozpocząć odtwarzanie, naciśnij przycisk „PLAY”.
4. Za każdym razem, gdy naciśniesz „Prog”, ostatni zapamiętany stan nagrania zostanie wyczyszczony i ponownie przejdziesz do trybu programowania. Jeśli wyjdziesz z funkcji programowania,
ostatni zapamiętany stan nagrania również zostanie wyczyszczony.
5. Po wejściu w tryb programowania brzmienie klawiszy automatycznie zmienia się na dźwięki per-
kusji. Po wyjściu z trybu programowania brzmienie klawiszy automatycznie zmienia się na dźwięki
pianina.
6. Naciśnij „Rec”, aby wejść w tryb nagrywania. Teraz możesz nagrywać utwory wykonywane na in-
strumencie. Wyświetlacz LED pokaż „RE”.
7. Maksymalna liczba nagranych dźwięków wynosi 85. Możesz nacisnąć przycisk „PLAY”, aby od-
tworzyć nagranie w dowolnym momencie. Jeśli nagrywanie się zakończy, naciśnij dowolny klawisz,
aby kontynuować nagrywanie. Kiedy liczba nagranych dźwięków osiągnie maksymalną wartość,
wyświetlacz LED wyświetli „FU” i nagrywanie zostanie zakończone.
8. Za każdym razem, gdy naciśniesz „Rec”, ostatni zapamiętany stan nagrania zostanie wyczyszczony i ponownie przejdziesz do trybu nagrywania.
9. Jeśli wyjdziesz z trybu nagrywania, ostatni zapamiętany stan nagrania zostanie wyczyszczony.
Akompaniament akordów
1. Single (akord jednopalcowy).
w trybie rytmu naciśnij „Single”, aby włączyć funkcję akordów jednopalcowych – wyświetlacz
LED pokaże „C1”;
naciśnij „Single” w trybie odtwarzania rytmu, aby przejść do trybu akompaniamentu akordów
jednopalcowych – naciśnij inny akord jednopalcowy (klawisze C3-C4), a usłyszysz odpo-
wiedni akompaniament akordowy.
opcja „Single” wykorzystuje synchronizację rytmu/akordu.
2. Finger (akord wielopalcowy).
w trybie rytmu naciśnij „Finger”, aby włączyć funkcję akordów wielopalcowych – wyświetlacz
LED pokaże „C2”;
naciśnij „Finger” w trybie odtwarzania rytmu, aby przejść do trybu akompaniamentu akordów
wielopalcowych – naciśnij inny akord wielopalcowy (klawisze C3-C4), a usłyszysz odpo-
wiedni akompaniament akordowy.
opcja „Finger” wykorzystuje synchronizację rytmu/akordu.
Klawiatura dźwięków perkusji
Naciśnij „Drum”, aby zmienić klawiaturę dźwięków pianina na klawiaturę dźwięków perkusji. Naciśnij
jeszcze raz, aby cofnąć zmianę.
Page 7
MQ 6151L
Instrukcja obsługi / User Manual
6
Podświetlenie klawiszy
Naciśnij przycisk „Light”, aby włączyć/wyłączyć podświetlenie klawiszy. Gdy klawiatura jest włą-
czona, automatycznie włącza się podświetlenie klawiszy.
Tryb nauki
1. Naciśnij przycisk „Ensemble”, aby uruchomić tryb nauki Ensemble. Rozpocznij naukę poprzez
naciśnięcie dowolnego białego klawisza. Naciśnij przycisk „Start/stop”, aby zakończyć naukę.
2. Naciśnij przycisk „Follow”, aby uruchomić tryb nauki Follow. Rozpocznij naukę poprzez naciśnię-
cie dowolnego białego klawisza. Naciśnij przycisk „Start/stop”, aby zakończyć naukę.
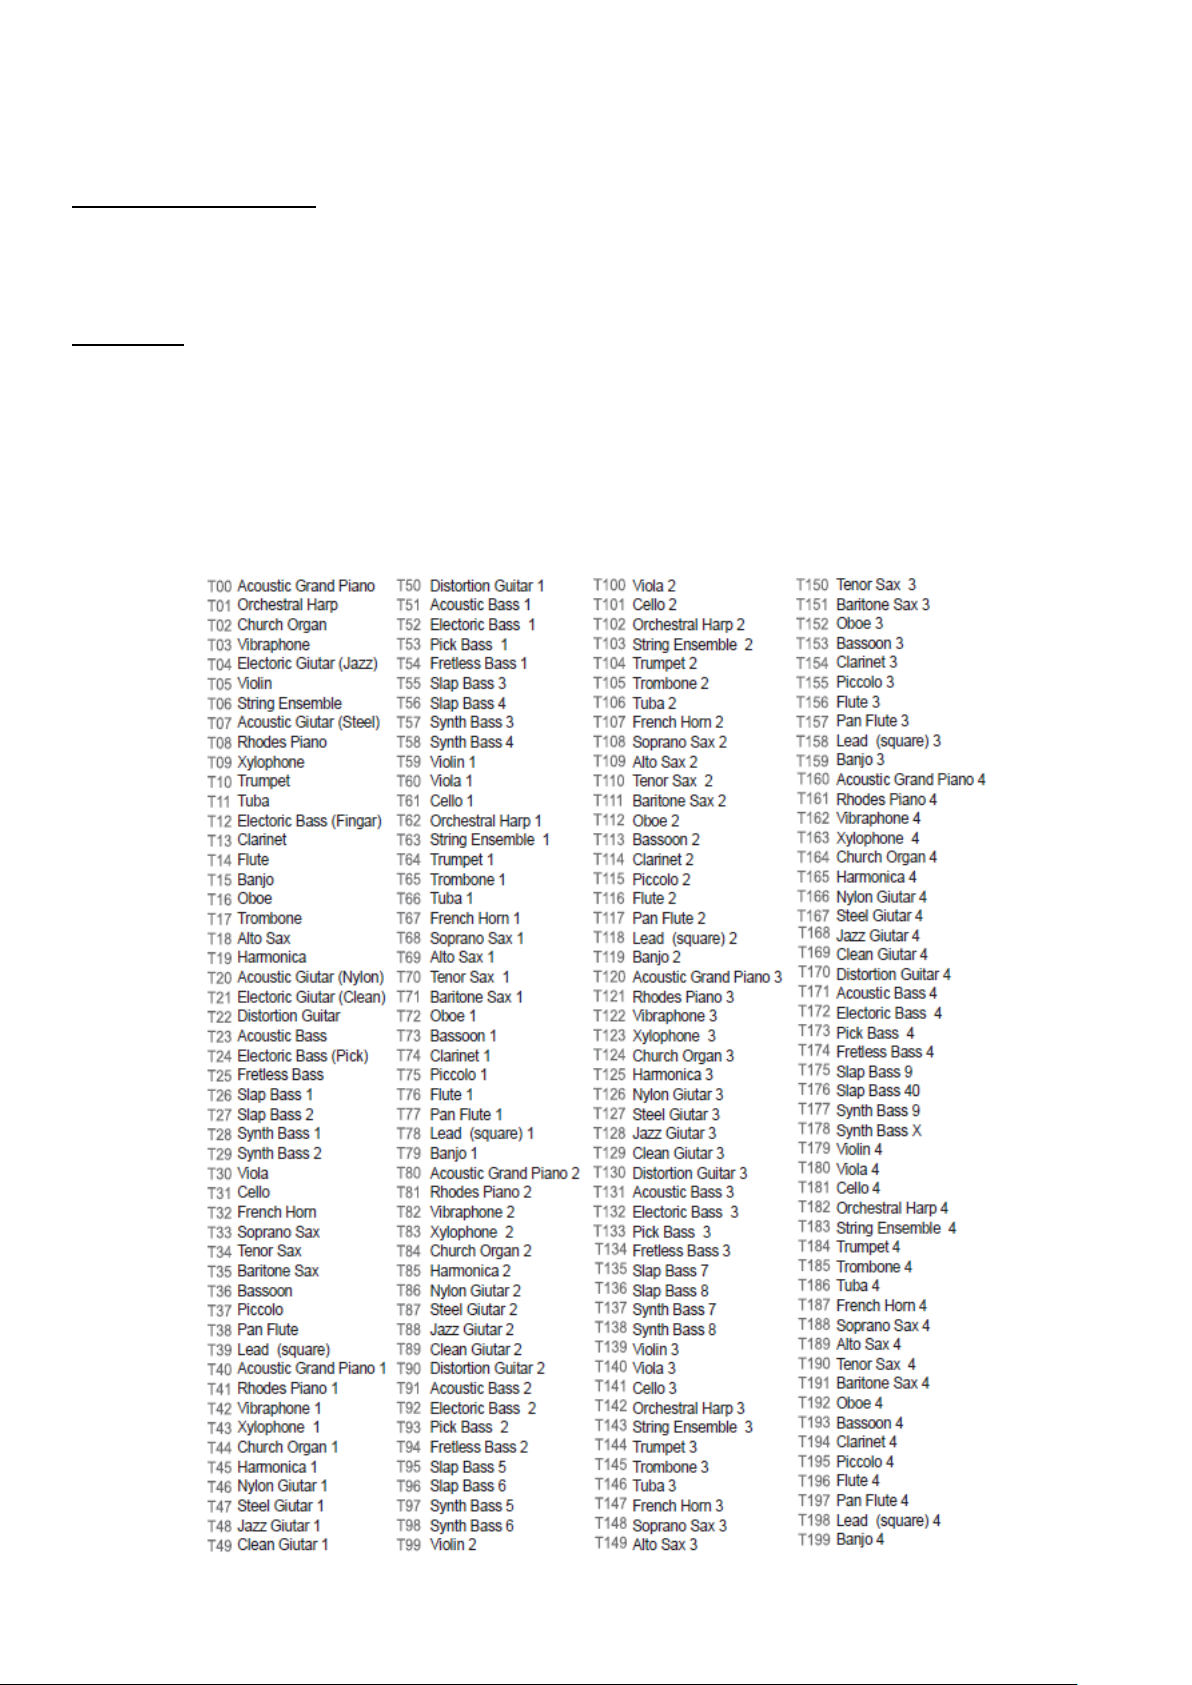
Lista tonów
Page 8
MQ 6151L
Instrukcja obsługi / User Manual
7
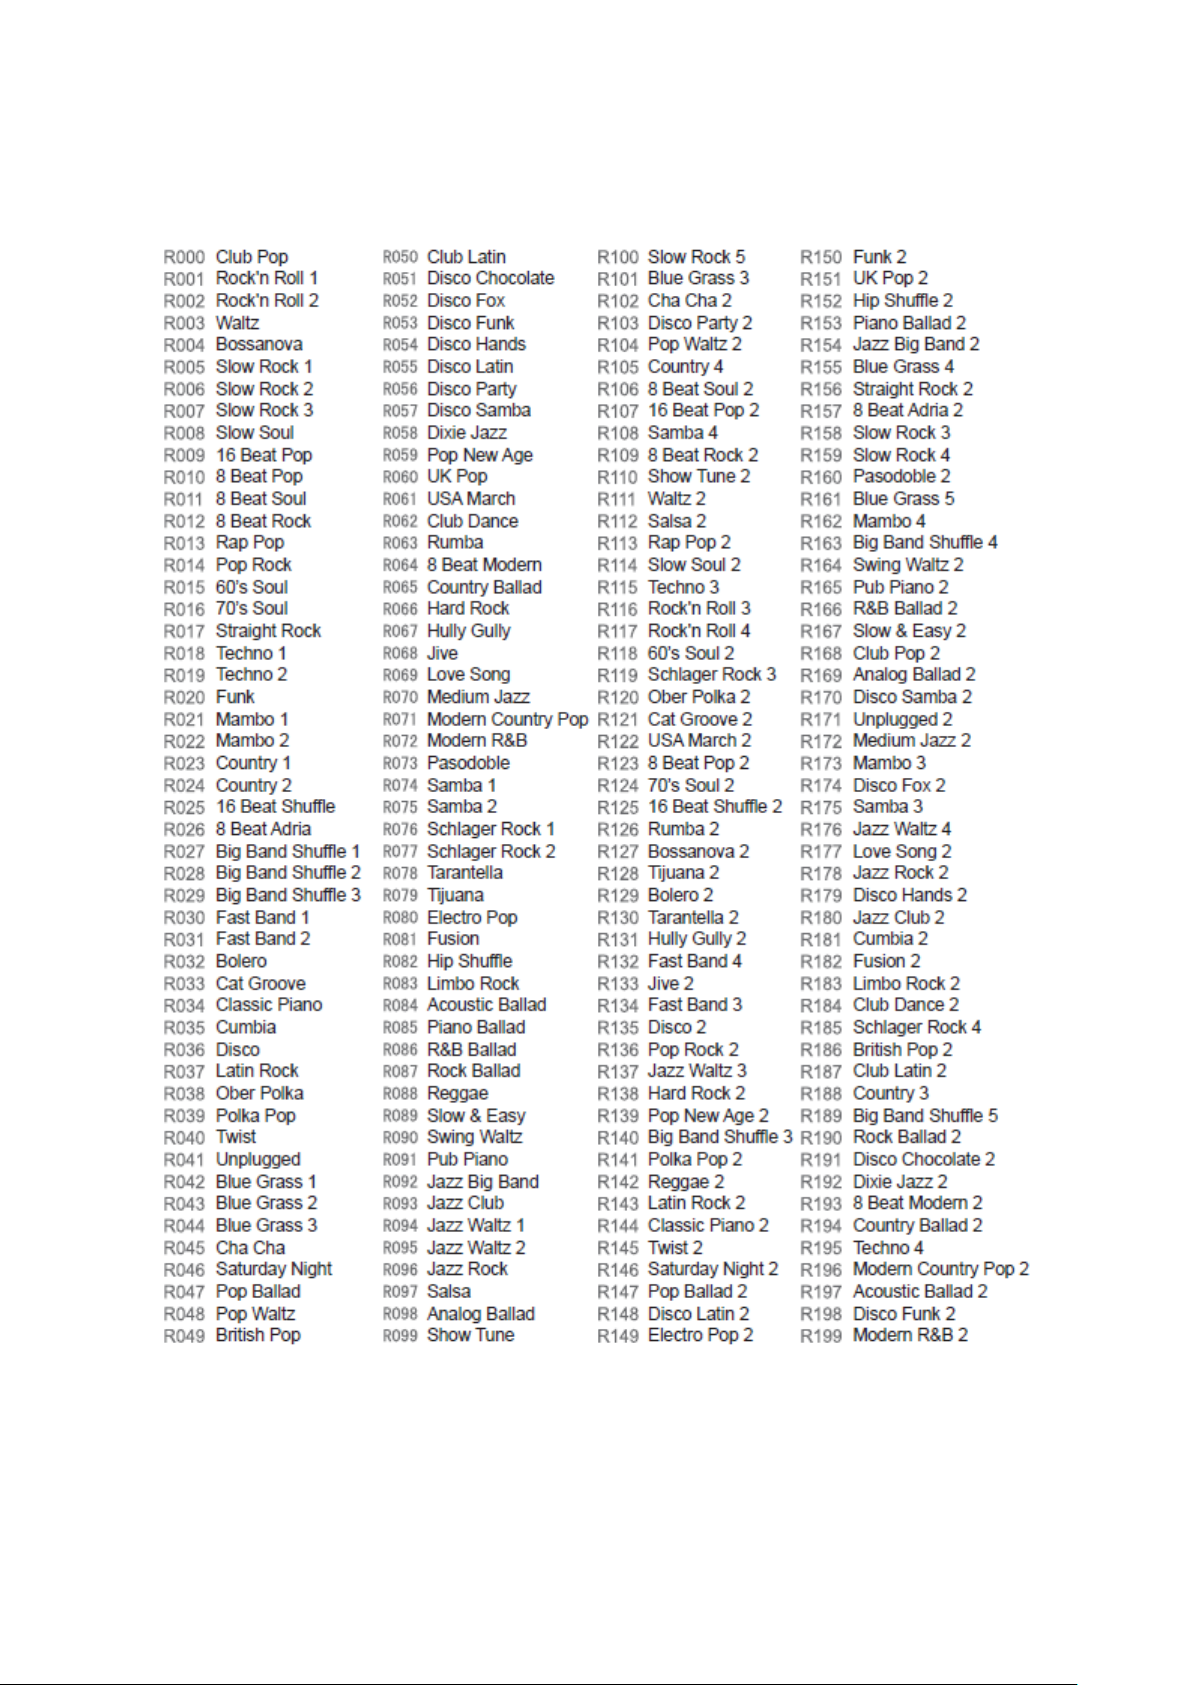
Lista rytmów
Page 9
MQ 6151L
Instrukcja obsługi / User Manual
8
Lista demo
Informacja o zużytym sprzęcie elektrycznym i elektronicznym
Głównym celem regulacji europejskich oraz krajowych jest ograniczenie ilości odpadów powstałych
ze zużytego sprzętu elektrycznego i elektronicznego, zapewnienie odpowiedniego poziomu jego
zbierania, odzysku i recyklingu oraz zwiększenie świadomości społecznej o jego szkodliwości
dla środowiska naturalnego, na każdym etapie użytkowania sprzętu elektrycznego i elektronicznego. W związku z powyższym należy wskazać, iż gospodarstwa domowe spełniają kluczową rolę
w przyczynianiu się do ponownego użycia i odzysku, w tym recyklingu zużytego sprzętu. Użytkownik
sprzętu przeznaczonego dla gospodarstw domowych jest zobowiązany po jego zużyciu do oddania
zbierającemu zużyty sprzęt elektryczny i elektroniczny. Należy jednak pamiętać, aby produkty należące do grupy sprzętu elektrycznego lub elektronicznego utylizowane były w uprawnionych do tego
punktach zbiórki.
Page 10

MQ 6151L
Instrukcja obsługi / User Manual
9
ENGLISH
Table of contents
Safety rules .......................................................................................................................... 10
Maintenance ........................................................................................................................ 10
Structure .............................................................................................................................. 11
Operation ............................................................................................................................. 11
Tone list ................................ ................................ ................................ ............................... 14
Rhythm list ........................................................................................................................... 15
Demo list .............................................................................................................................. 16
Information about used electrical and electronic equipment ................................................ 16
Page 11
MQ 6151L
Instrukcja obsługi / User Manual
10
Safety rules
Please read the user manual in detail before use. Please also keep it for future reference. The user
manual contains rules for the safe use of the device.
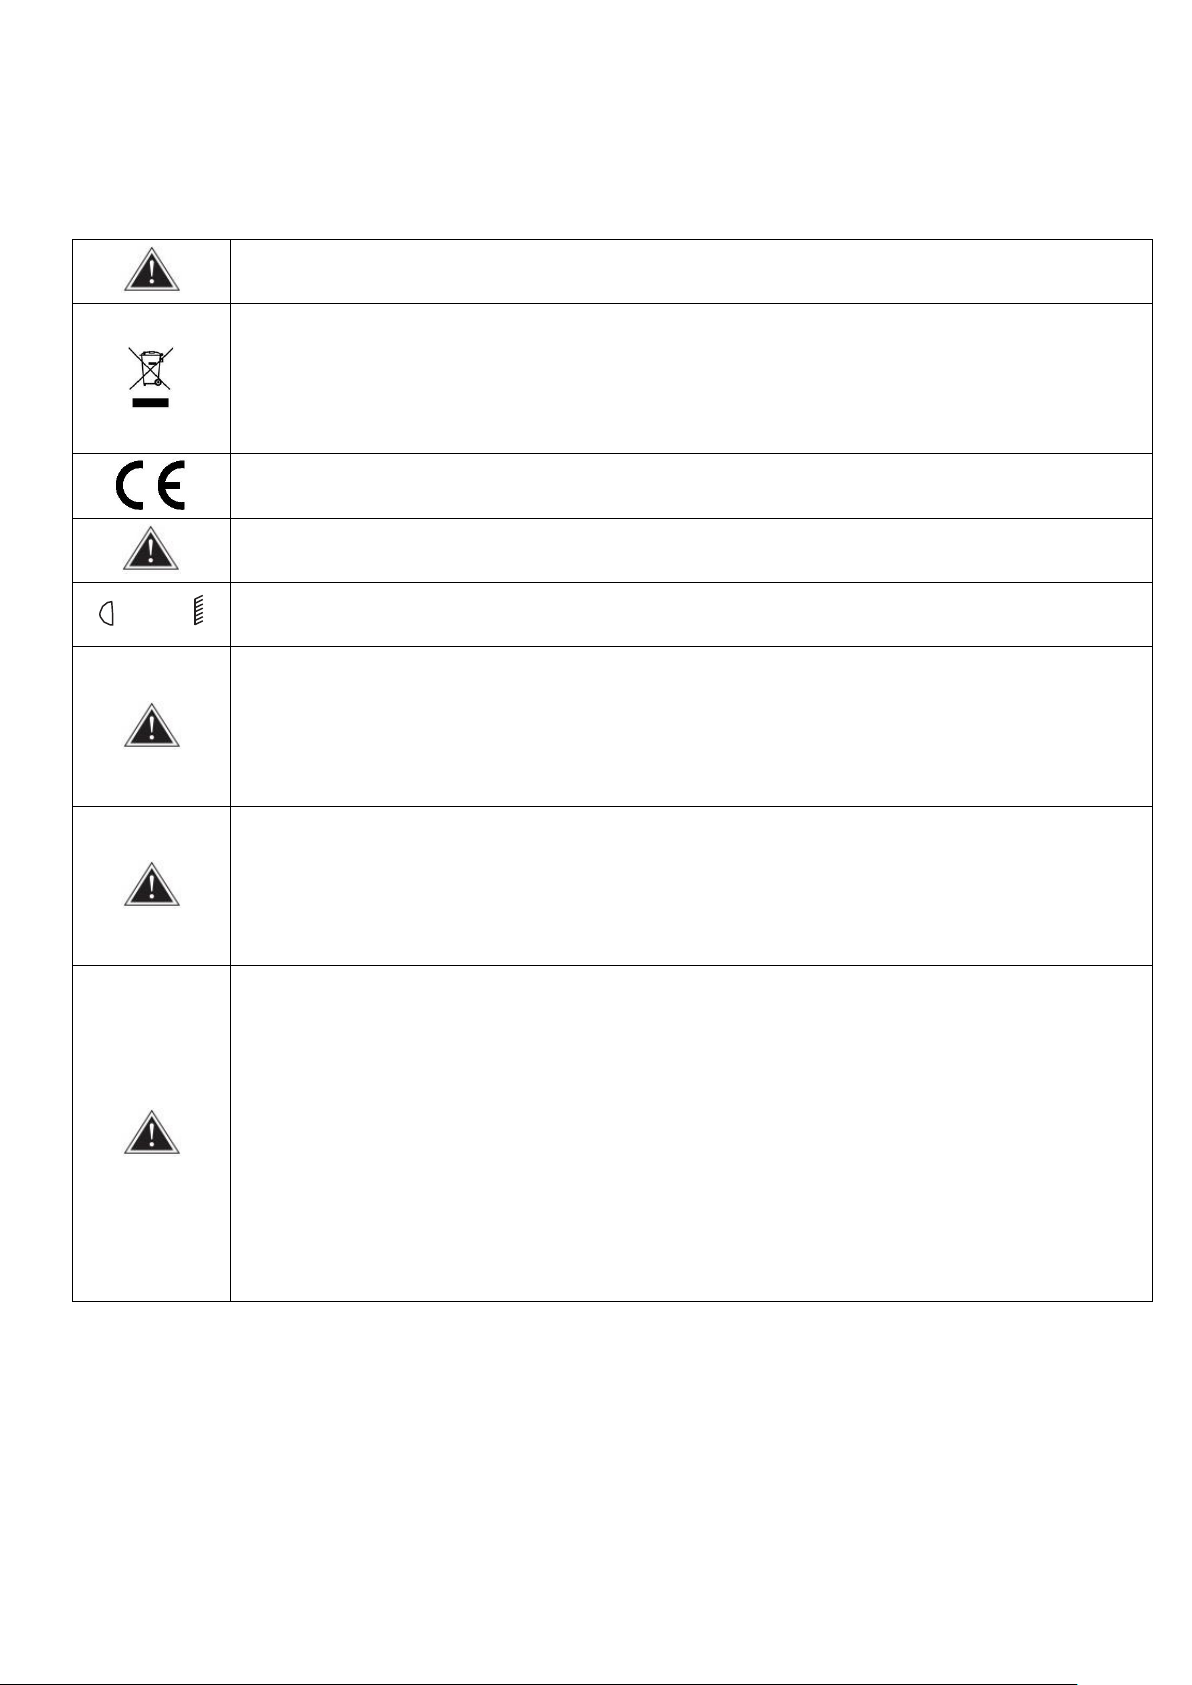
WARNING! THE DEVICE MUST NOT BE DISPOSED OF WITH HOUSEHOLD WASTE. This symbol
indicates that this product must not be disposed of with household waste, according to the EU and
your national law. In order to prevent potential damage to the environment or health, the used product
must be recycled. In accordance with current legislation, unusable electrical and electronic devices
must be collected separately at the designated facilities for recycling, acting on the basis of applicable
environmental standards.
The product described in this manual comply with European directives and it is therefore CE marked.
Before use, make sure the housing is not damaged.
‐‐1 m
Ensure a minimum distance of 1 m between the device and flammable materials.
The device for outdoor and indoor use, do not expose to prolonged moisture. Do not expose
the product to direct sunlight or other lighting devices.
Do not open the housing of the device and do not disassemble it! If the device starts malfunctioning
during use, stop using it immediately and send it back for repair by an authorized service center.
Do not use the device at the highest volume level for a long time!
Do not use the device or store it in a dusty environment, do not expose to vibration, low or high
temperature! Do not use the device in a place with low stability, do not place heavy objects on the
device! Do not allow the device to come into contact with moisture, do not place any vessels with
liquids on the device! Before cleaning the device, first disconnect the power supply, pull the power
cable plug! Regularly check the power plug and clean the dirt on its surface!
Maintenance
1. The device can only be used by qualified personnel, damage caused by misuse or attempted
repair is not subject to warranty. There are no service parts inside the packaging, repairs can only
be performed by an authorized service center.
2. Do not let the device come into contact with oil, grease or any similar liquid.
3. Regular cleaning allows for long-lasting use and maintains the device's high performance. Use a
soft cloth to clean the device.
Page 12
MQ 6151L
Instrukcja obsługi / User Manual
11
Structure
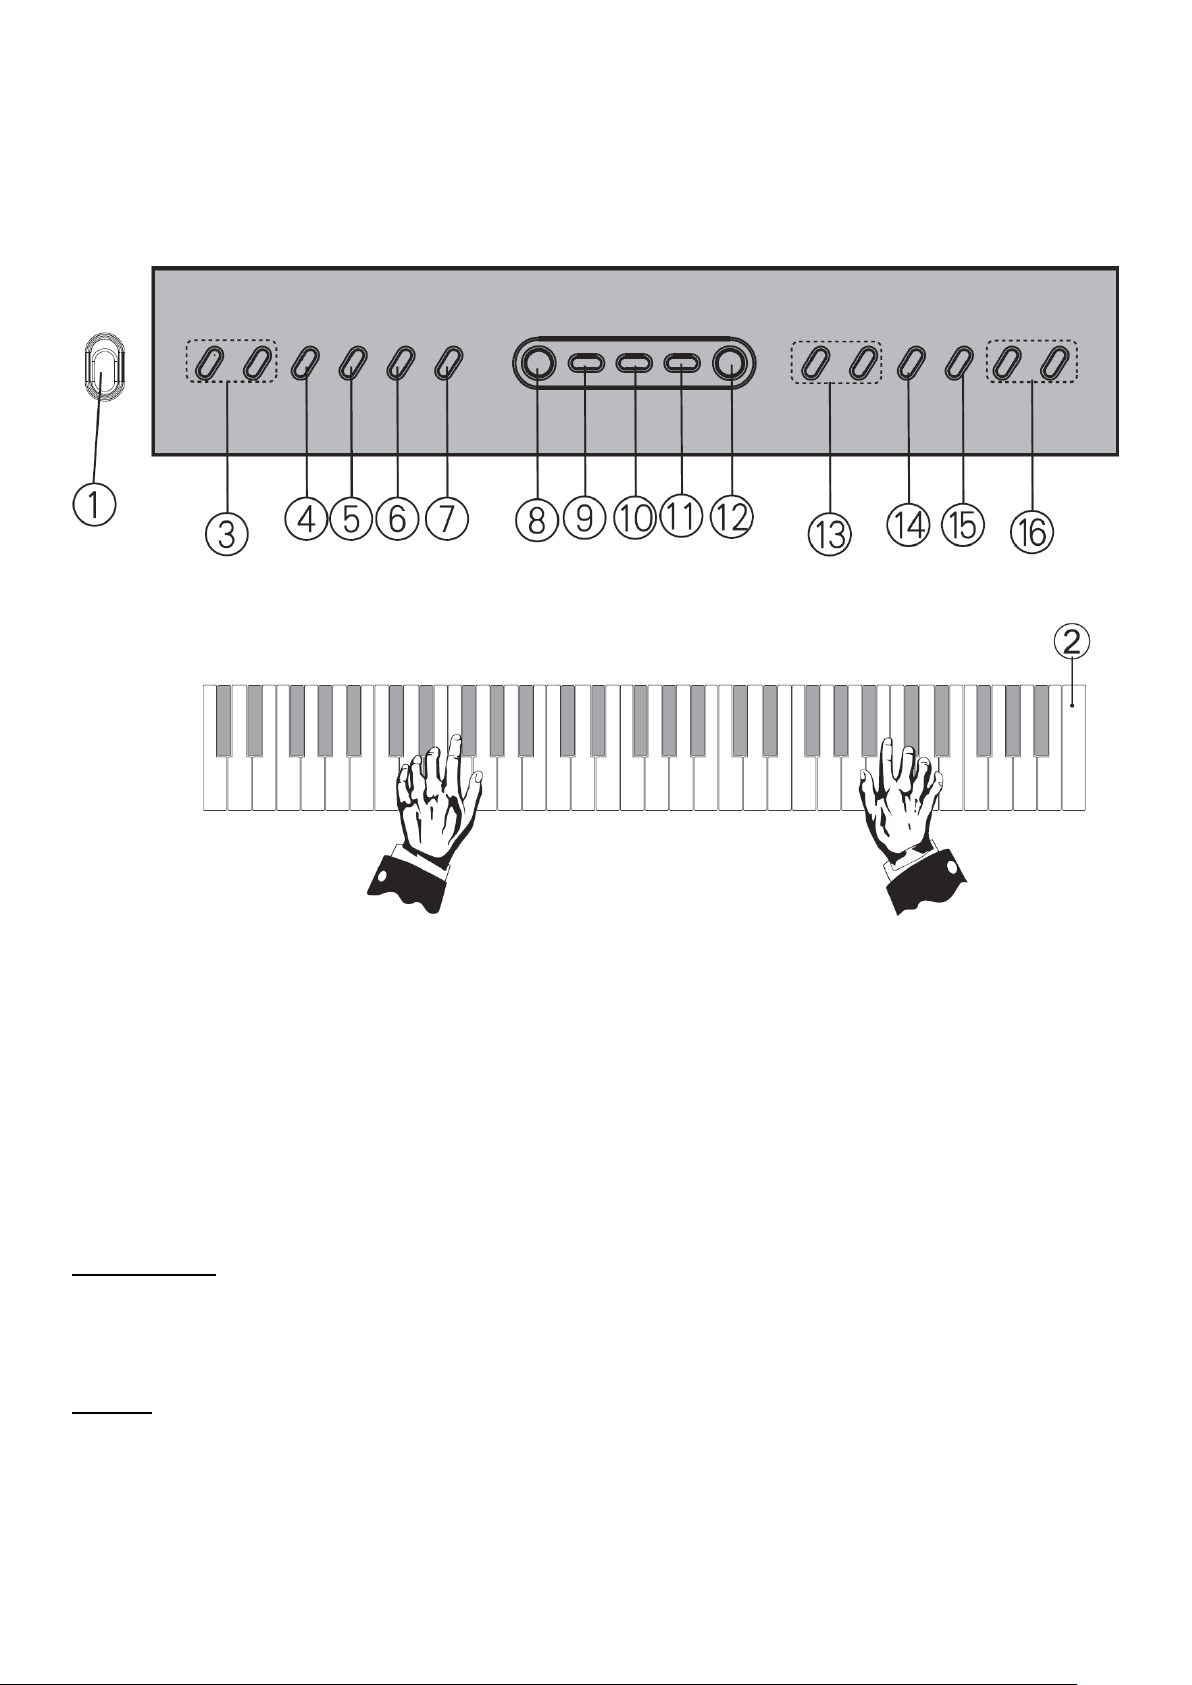
1. Power.
9. Single.
2. Keyboard.
10. Finger.
3. Volume +/-.
11. Tone.
4. Demo.
12. Rhythm .
5. Rec.
13. Number +/-.
6. Play.
14. Drum.
7. Prog.
15. Light.
8. Start/stop.
16. Lesson – Ensemble / Follow.
Operation
Power supply
After connecting the AC/DC adapter or properly installing the batteries, press the power button
to turn on the power. Press the power button again to turn off the instrument power.
Volume
1. Press "Volume +/-" to increase or decrease the volume. The LED display will indicate the volume
change.
2. The instrument is equipped with a 17-level volume change from 00 to 16. The default volume
is 12.
Page 13

MQ 6151L
Instrukcja obsługi / User Manual
12
3. Press the "Volume +/-" button for 2 seconds to continuously increase/decrease the volume.
4. Press the volume buttons simultaneously to restore the default volume value.
5. In the meantime, the volume of the chords will be changed accordingly..
Number selection buttons
1. Press Number "+" or "-" for 2 seconds to select the number up/down.
2. Tone selection mode, rhythm selection mode and demo selection mode are available. The default
value is tone selection mode.
3. When the selected tone, rhythm or demo number exceeds the allowed maximum, the maximum
number is retained.
Tone selection
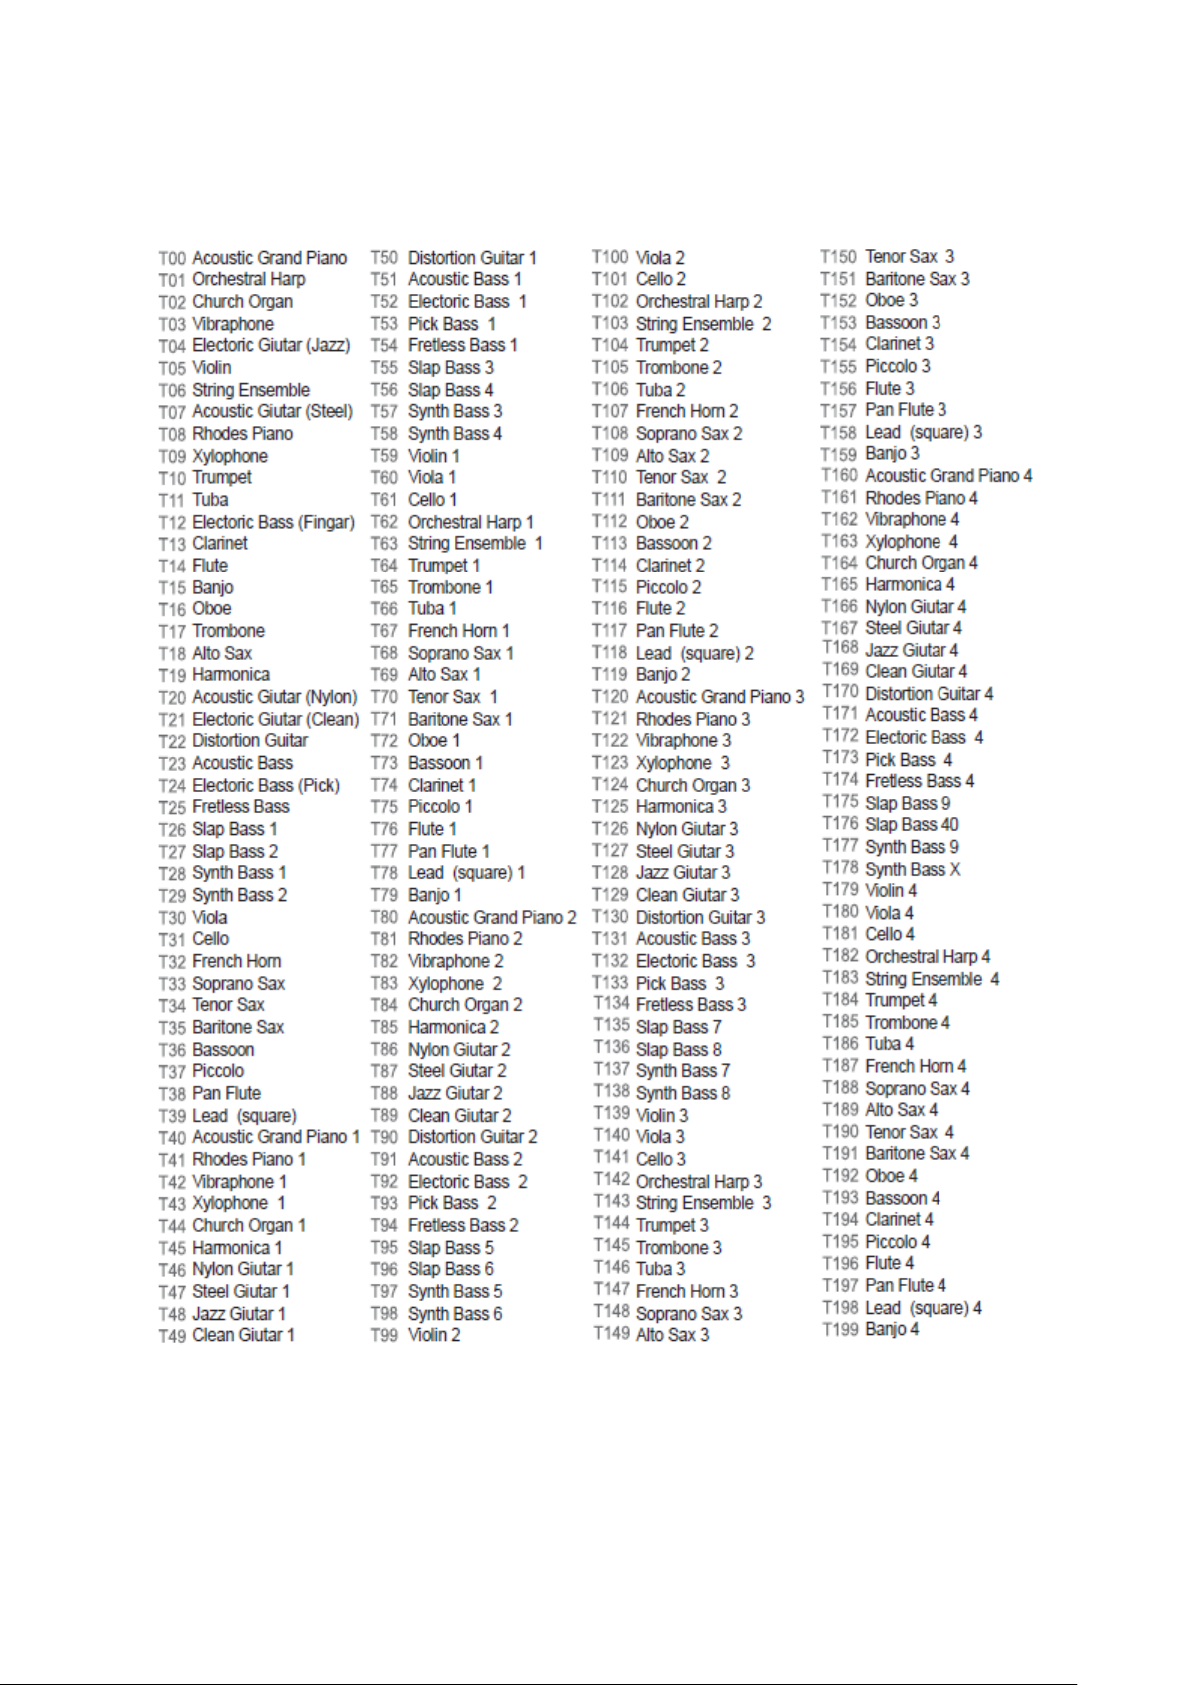
1. Press "Tone" to enter the tone selection mode.
2. Use the "Number +/-" buttons to select the tone.
3. The LED display will show the corresponding tone code.
Rhythm selection
1. If you are in lesson, recording, programming, playback or demo mode, turn it off with the
"Start/stop" button.
2. Press the "Rhythm" button to enter the rhythm selection mode.
3. Use the "Number +/-" buttons to select a rhythm – when the number of the selected rhythm ex-
ceeds the allowed maximum, the maximum number is retained.
4. The LED display will show the corresponding rhythm code.
Demo selection
1. Press "Demo" to enter the demo selection mode.
2. Use the "Number +/-" buttons to select the demo.
3. The LED display will show the corresponding demo code.
Programming and recording
1. Press "Prog" to enter or exit the programming mode. The default value is 120. The LED display
will light up and show "PR".
2. In the programming mode, you can record drum sounds. In this case, only the drum sounds will
be recorded – other sounds will not be recorded.
3. The maximum value of recorded drum sounds is 32. When the number of recorded drum sounds
reaches the maximum value, the LED display will show "FU" and the programming mode will end
automatically. To start playback, press the "PLAY" button.
4. Each time you press "Prog", the last memory of recording will be cleared and you will enter pro-
gramming mode again. If you exit the programming function, the last memory of recording will also
be cleared.
5. When you enter the programming mode, the sound of the keys automatically changes to drum
sounds. When you exit the programming mode, the key sound automatically changes to piano
sounds.
6. Press "Rec" to enter the recording mode. Now you can record songs performed on the instrument.
Page 14

MQ 6151L
Instrukcja obsługi / User Manual
13
LED display will show "RE."
7. The maximum number of recorded sounds is 85. You can press the "PLAY" button to play the
recording at any time. If the recording ends, press any key to continue recording. When the number
of recorded sounds reaches the maximum value, the LED display will show "FU" and the recording
will stop.
8. Each time you press "Rec", the last memorized recording state will be cleared and you will enter
the recording mode again.
9. If you exit the recording mode, the last memory of recording will be cleared.
Chord accompaniment
1. Single (single-finger chord):
in rhythm mode, press "Single" to enable the single-finger chord function – the LED display
will show "C1";
press "Single" in the rhythm mode to enter the single-finger chord accompaniment mode –
press another single-finger chord (keys C3-C4) and you will hear the corresponding chord
accompaniment;
the "Single" option uses rhythm/chord synchronization.
2. Finger (multi-finger chord):
in rhythm mode, press "Finger" to activate the multi-finger chord function – the LED display
will show "C2";
press "Finger" in the rhythm mode to enter the multi-finger chord accompaniment mode –
press another multi-finger chord (keys C3-C4), and you will hear the corresponding chord
accompaniment;
the "Finger" option uses rhythm/chord synchronization.
Drum sound keyboard
Press "Drum" to change the piano sound keyboard to a drum sound keyboard. Press again to undo
the change.
Keys backlighting
Press the "Light" button to turn the keys backlighting on/off. When the keyboard is turned on,
the keys backlighting is automatically turned on.
Lesson mode
1. Press the "Ensemble" button to start the Ensemble lesson mode. Start learning by pressing any
white key. Press the "Start/stop" button to stop learning.
2. Press the "Follow" button to start the Follow lesson mode. Start learning by pressing any white
key. Press the "Start/stop" button to finish learning.
Page 15
MQ 6151L
Instrukcja obsługi / User Manual
14
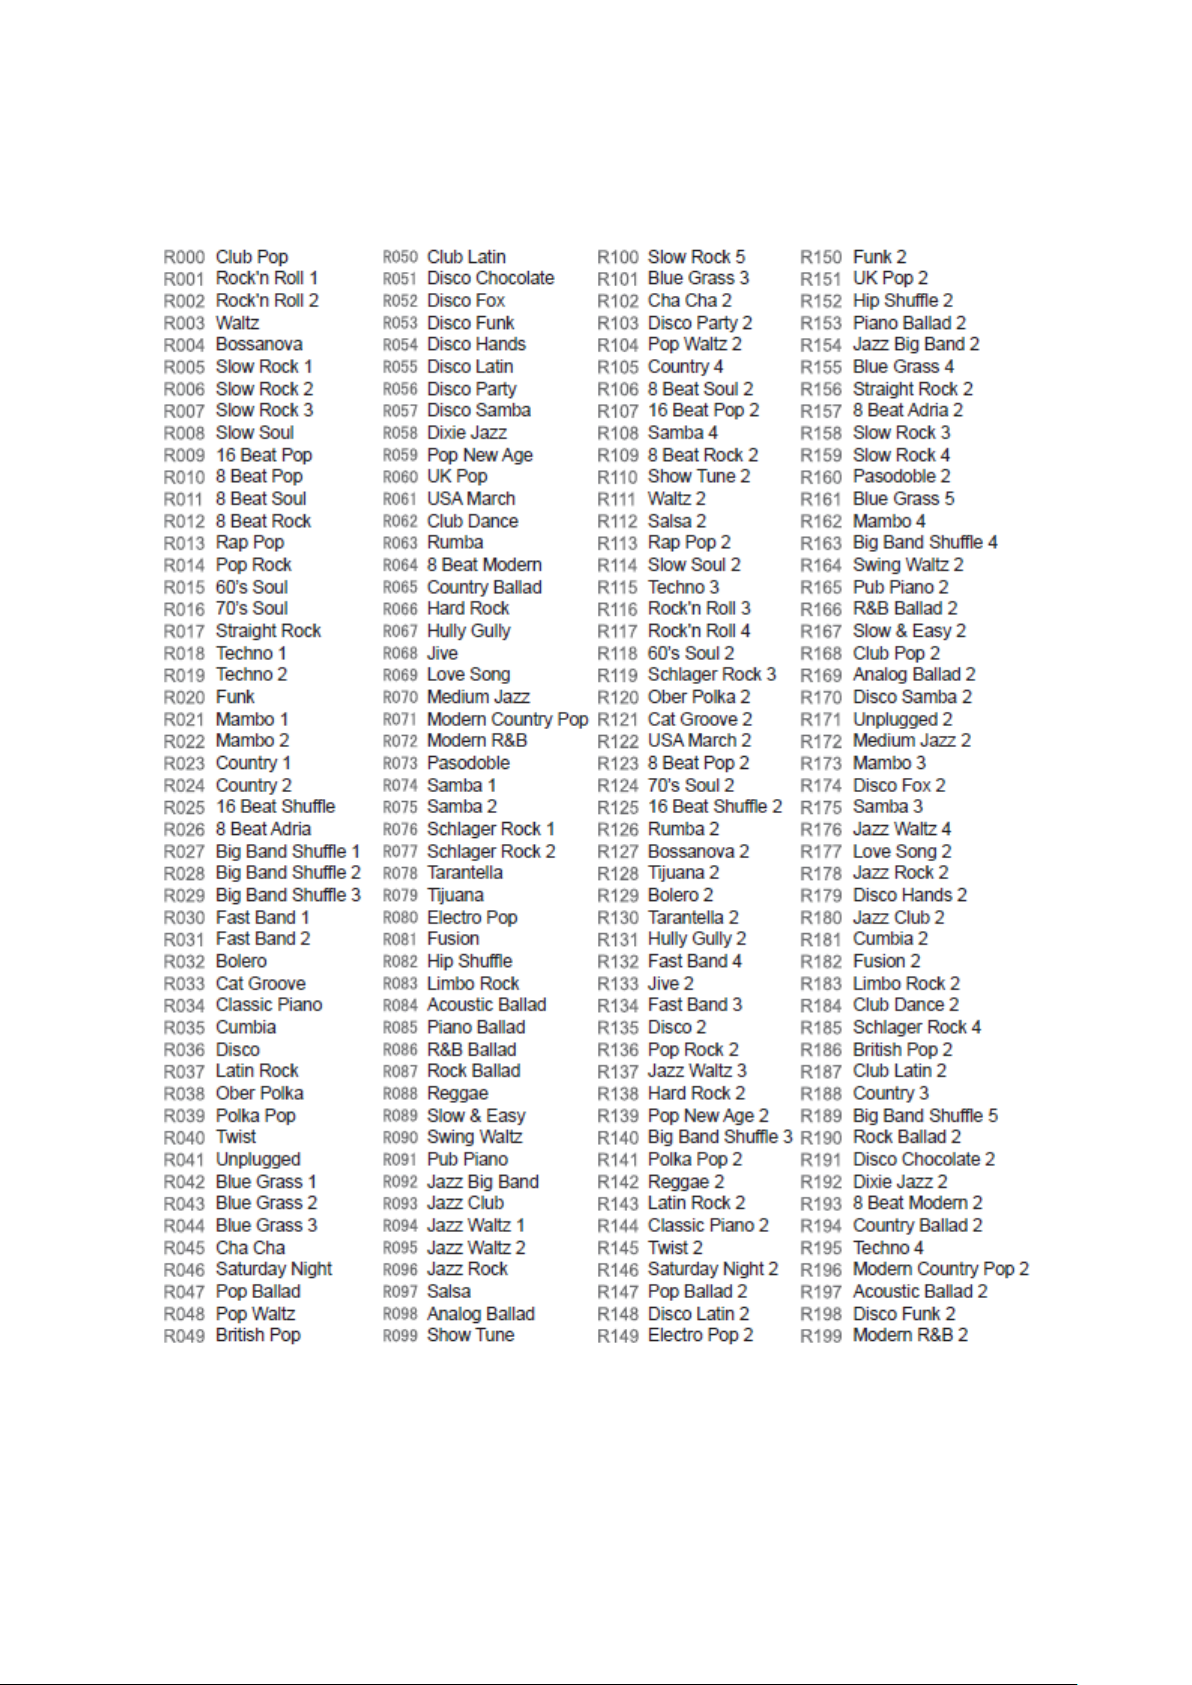
Tone list
Page 16
MQ 6151L
Instrukcja obsługi / User Manual
15
Rhythm list
Page 17
MQ 6151L
Instrukcja obsługi / User Manual
16
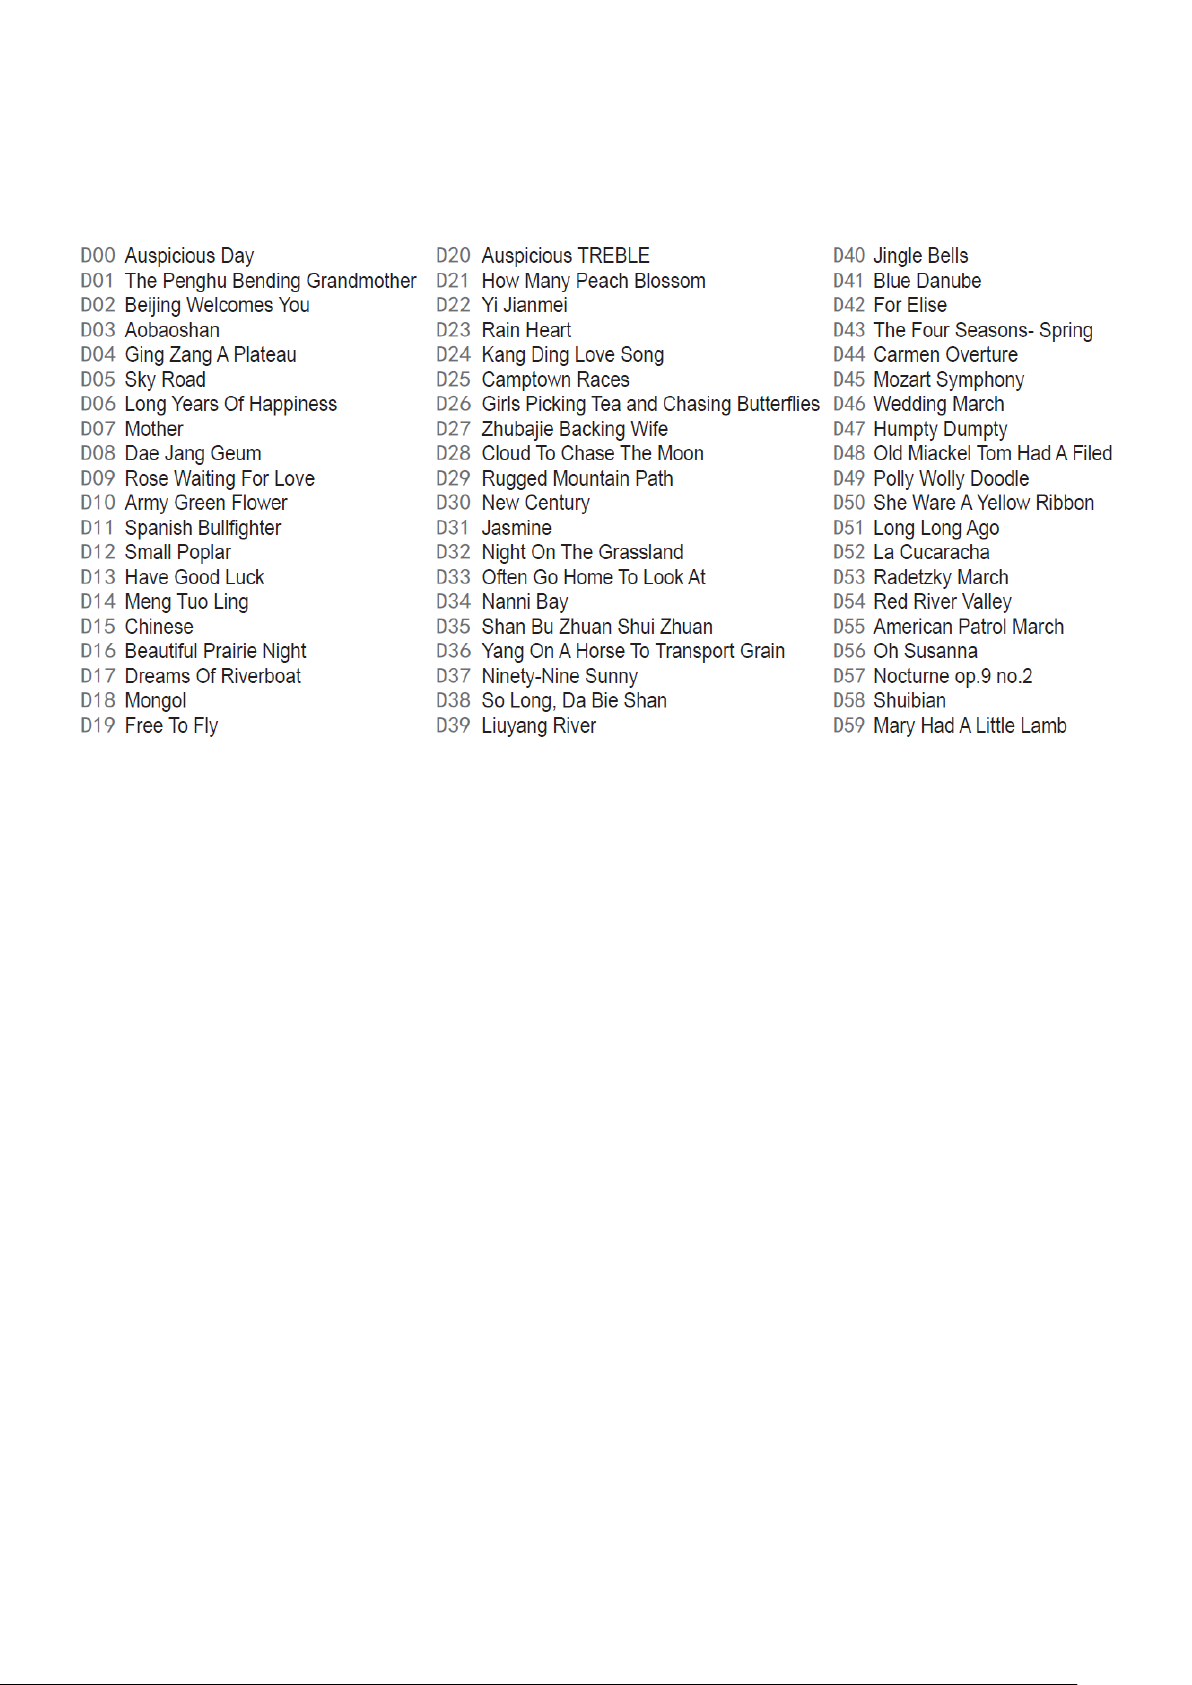
Demo list
Information about used electrical and electronic equipment
The main goal of European and national law regulations is to reduce the amount of waste produced
from used electrical and electronic equipment, to ensure an appropriate level of collection, recovery
and recycling of used equipment, and to increase public awareness of its harmfulness to the environment, at each stage of use of electrical and electronic equipment. Therefore, it should be pointed
out that households play a key role in contributing to reuse and recovery, including recycling of used
equipment. The user of electrical and electronic equipment – intended for households – is obliged
to return it to authorized collector after its use. However, it should be remembered that products
classified as electrical or electronic equipment should be disposed of at authorized collection points.
 Loading...