

Page 1
VeriTape Cartridge Memory Analyzer
Tape Cartridge Memory Analyzer
User Manual
© 2009 MP Tapes - 1 -
Page 2

VeriTape Cartridge Memory Analyzer
Table of Contents:
1. Overview
2. Quick Start
3. Options
4. Exporting Data
5. Details
6. Summary of Menu Commands
7. Specifications
© 2009 MP Tapes - 2 -
Page 3
VeriTape Cartridge Memory Analyzer
Overview
All LTO Cartridges have an internal memory chip called Cartridge Memory (CM). This chip
contains vital information about the cartridge. VeriTape™ extracts the information from the CM
and displays it in a concise way. VeriTape also calculates the VeriScore,™ a single quality number based on all available information.
The CM data for all scanned cartridges is saved in a history database, as is information for all
drives mentioned in the CM. This allows VeriTape to analyze both cartridge and tape drive
quality.
© 2009 MP Tapes - 3 -
Page 4
VeriTape Cartridge Memory Analyzer
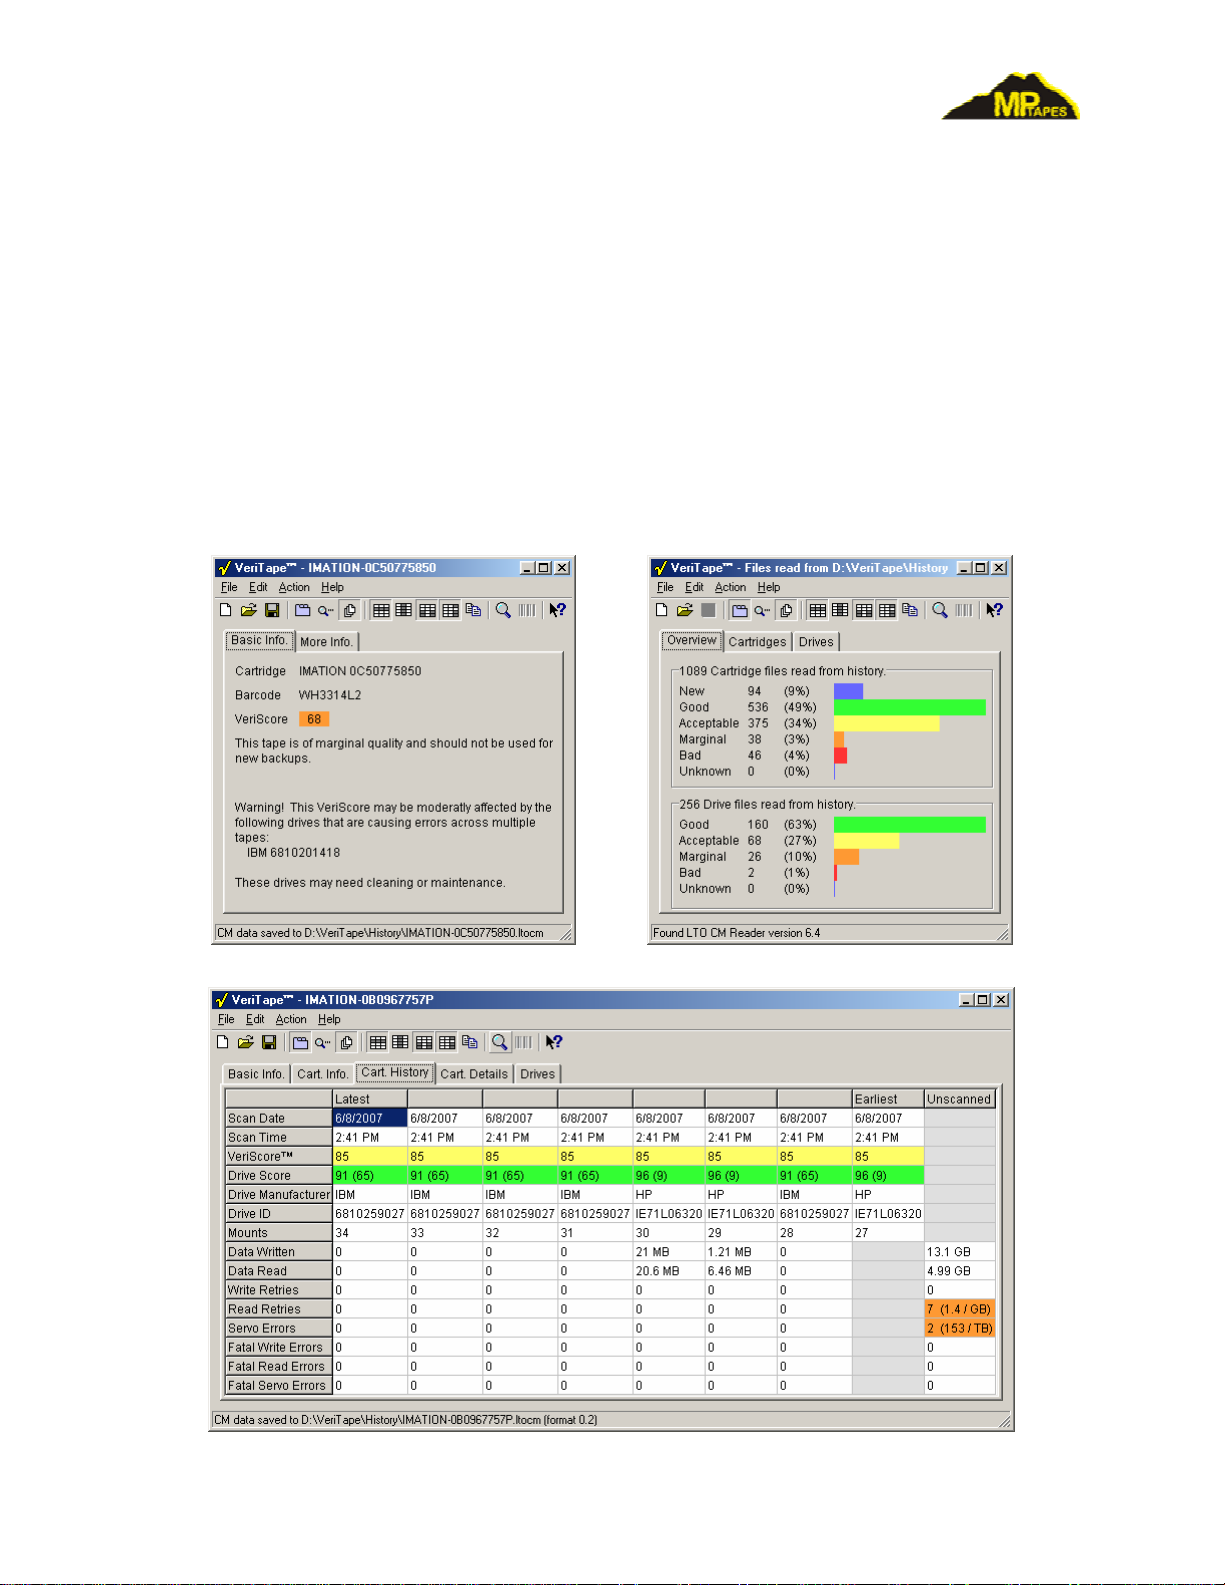
Typical VeriTape Displays
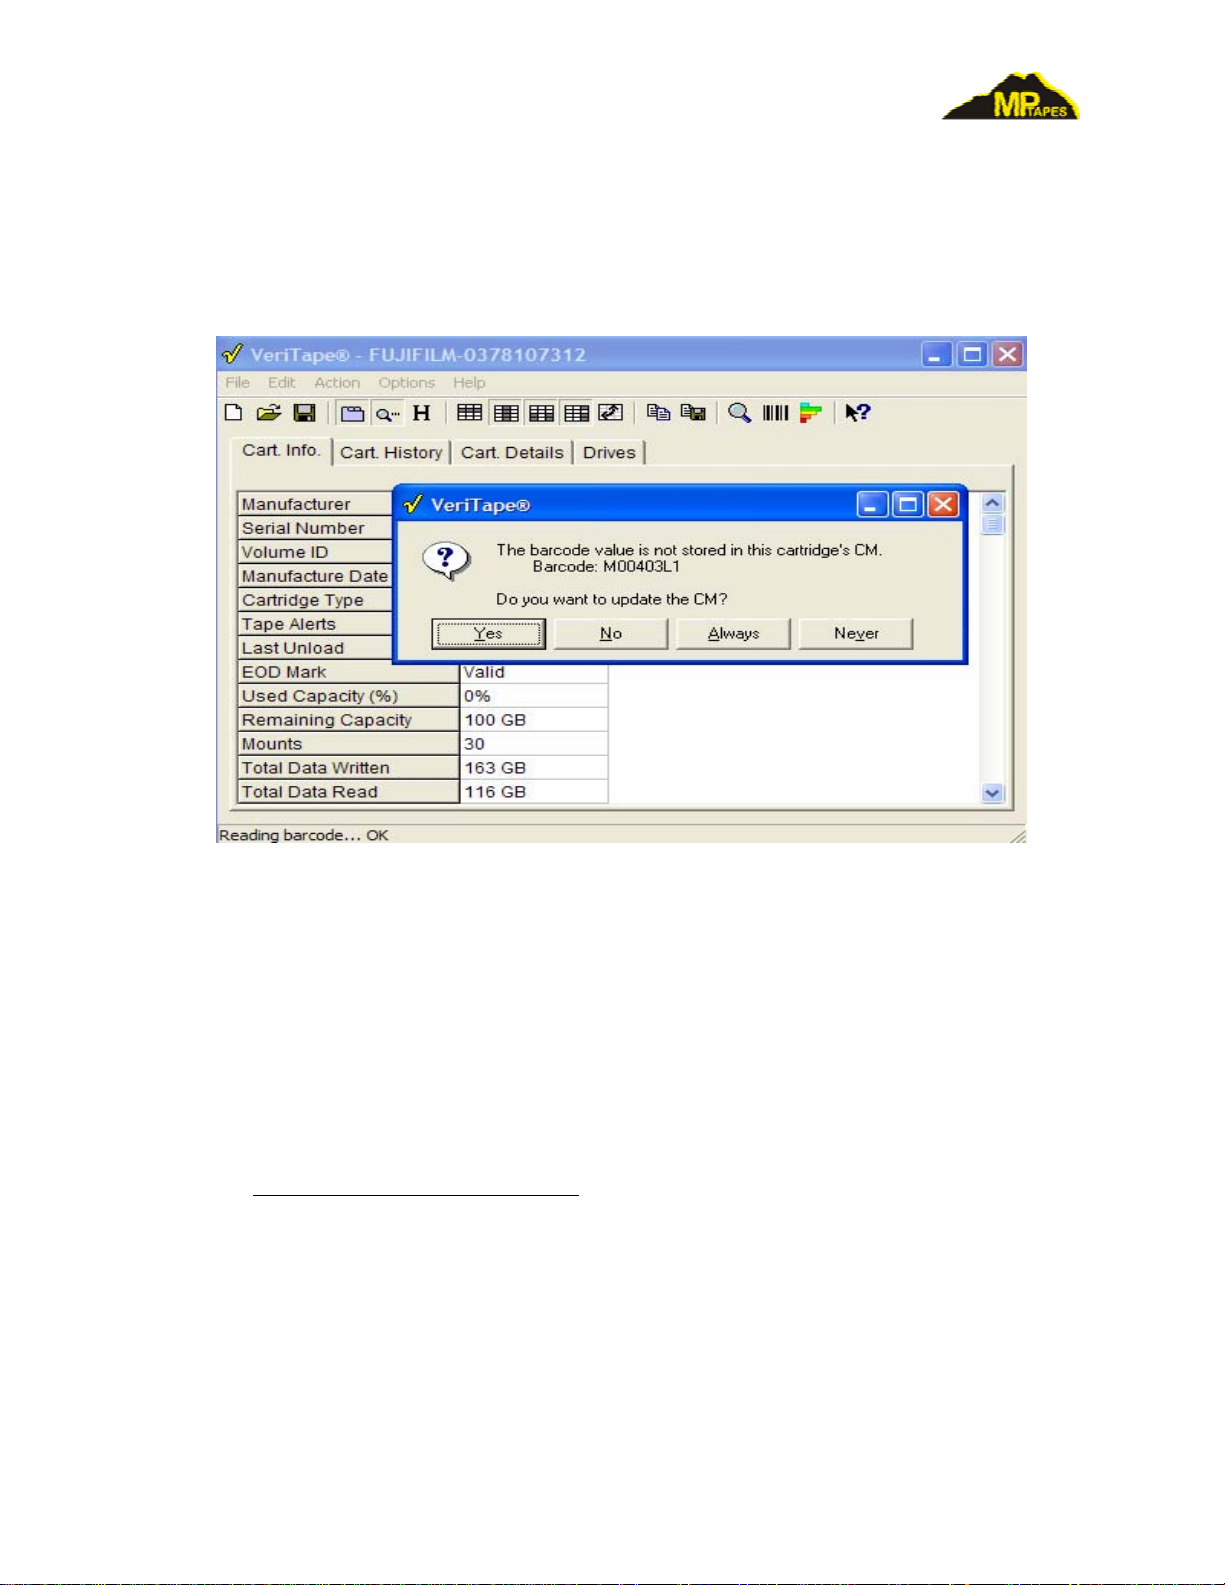
Barcode Reader option
The Tape CM Analyzer comes with an optional barcode reader.
VeriTape Display with barcode reader
Quick Start
Get the Latest Software and Documentation
The latest version of the VeriTape software and documentation is available on the MP Tapes
web site at
Connecting and Configuring the VeriTape Reader
The VeriTape Reader is connected to the PC using the USB/Serial converter included with the
product. The first time the USB/Serial converter is plugged into your PC Windows will identify
it as new device. Use the supplied CD-ROM to install the driver.
Run the VeriTape.exe program. The first time you run the program you may get an error message, “Error accessing serial port”. This is OK, it just means that the default configuration is trying to use a serial port that does not exist on your computer. Hit OK and the “Configure Serial
http://www.mptapes.com/veritape.
© 2009 MP Tapes - 4 -
Page 5

VeriTape Cartridge Memory Analyzer
Port” dialog will open. Select the serial port connected to the VeriTape Reader. If you don’t
know which serial port is connected to the VeriTape Reader, select the first one.
The VeriTape program will start looking for the VeriTape Reader. The status bar will show
“LTO CM Reader not found -- still looking…”. When the program successfully communicates
with the reader the status message will change to “Found LTO CM Reader version 5.0”. If the
“found” message never occurs, there is a cabling or configuration problem. Use the “File | Configure Serial Port” menu command and choose different serial ports until the VeriTape Reader is
found. (You must close the “Configure Serial Port” dialog each time you change the settings.)
Reading the CM
To read the CM from a cartridge, place the cartridge on the VeriTape Reader and press the
button or use the “Action | Read CM” menu command. The VeriTape program will read and display the cartridge data.
The serial number recorded in the CM does not in general match any markings on the cartridge
case. It is a good idea at this point to write the serial number on the cartridge for later identifica-
tion.
Basic information about a cartridge and its usage are displayed under the “Cartridge” tab. More
detailed information can be seen under the “Usage” and “Details” tabs.
Saving the CM to a File
The CM from a cartridge can be saved to a file for later analysis and comparison with other cartridges. Press the
button or use the “File | Save” menu command. The suggested file name is
the cartridge’s manufacturer and serial number. The “Save” command takes about 20 seconds
since it saves the entire CM memory1. (Only about 15% was read to get the information displayed by the “Read” command.)
Reading a Saved CM File
Press the
button or use the “File | Open” menu command and select a single CM file to dis-
play its contents.
Comparing Multiple Saved CM Files
Press the
button or use the “File | Open” menu command and select multiple CM files to simultaneously display their contents. The CM files’ basic information will be displayed in a table
under the “Summary” tab. Cartridges may not all have the same data fields present. Missing data
fields are indicated by an empty gray cell. A data field that is present but whose value is empty
will be an empty white cell.
Clicking on a row header will sort the columns by that rows’ values in ascending order. Clicking
again on the same row header will sort by descending values.
1
The VeriTape program saves the entire CM contents so that future versions of the program will be able to ex amine
other data in the CM that may be of use.
© 2009 MP Tapes - 5 -
Page 6

VeriTape Cartridge Memory Analyzer
Clicking on a column header will reread the file so that it’s “Cartridge,” “Usage” and “Details”
pages can be seen.
VeriTape Summary Display
Click on a row header to sort the columns by that row’s values.
Click on a column header to display the “Cartridge,” “Usage” and “Details” tabs for the selected
cartridge.
Options
Automatic Cartridge Detection
button or “File | Options > Autodetect Cartridge” menu item:
Setting the Autodetect option will cause the VeriTape program to continuously poll the VeriTape
Reader to detect the presence of a cartridge.
When a new cartridge is detected it is automatically read and displayed.
Automatic Cartridge Detection is temporarily disabled when a CM file is read. Use the
or the “File | New” menu command to re-enable automatic detection.
button
Automatic File Save
button or “File | Options > Autosave” menu item:
© 2009 MP Tapes - 6 -
Page 7

VeriTape Cartridge Memory Analyzer
Setting the Autosave option will cause the VeriTape program to automatically save the CM data
after it is read. When this option is turned on you need to select a directory into which the files
will be saved. Autosave does not overwrite files; if a file exists with the same name the File Save
as dialog is displayed.
QuickSave
button or “File | Options > QuickSave” menu item:
Setting the QuickSave option will cause the VeriTape program to only save that portion of the
CM data that was needed to be read to decode the information that is currently displayed. This
makes save nearly instantaneous at the cost of future compatibility; future versions of VeriTape
may be limited in what additional information they can display.
Exporting data
VeriTape can export data to the Windows Clipboard so that it may be pasted into a word processor or spreadsheet program. The data can then be formatted as desired and printed.
Table Tabs
Select the cells in the table that you want to export. If no cells are selected the entire table will be
exported.
To automatically extend selection to include entire rows or columns, select Edit | Select by Rows
or Edit | Select by Columns. The program default is to select by columns.
Normally the row and column headers are copied as well as the selected cells. This can be controlled by checking/unchecking the Edit | Include Row Headers and Edit | Include Column Head-
ers menu items.
Click the
button or the Edit | Copy menu item to copy the selected portion of the table to the
Clipboard.
Paste the Clipboard into your word processor or spreadsheet program.
Some word processors have trouble with wide tables; you may want to limit the number of columns you select when copying data to them. You can also use your word processor’s Paste Spe-
cial command and select Unformatted Text to paste the data as tab-separated text.
Most spreadsheet programs do not automatically set column widths based on pasted data. You
will need to do this after pasting the data. For Excel,
2
the pasted data remains selected so you can
immediately use the Format | Column > AutoFit Selection command.
2
Excel is a trademark of Microsoft, Inc.
© 2009 MP Tapes - 7 -
Page 8

VeriTape Cartridge Memory Analyzer
Sample Data Pasted into Excel™
Text Tabs
Select the text that you want to export.
Click the
Clipboard.
If no text is selected the Copy command will be disabled.
Paste the Clipboard into your word processor.
button or the Edit | Copy menu item to copy the selected portion of the table to the
© 2009 MP Tapes - 8 -
Page 9

VeriTape Cartridge Memory Analyzer
Details
Cartridge Tab
Manufacturer
Cartridge manufacturer as recorded in
CM. This may be different than the label
on the cartridge because some vendors
OEM their cartridges.
Serial Number
Cartridge serial number as recorded in
CM. Some vendors print a different serial
number on the cartridge, usually if they
OEM their cartridges.
VeriScore
Composite score computed from informa-
tion stored in CM. The score ranges from
0 to 100 and is interpreted and colored as:
90-100 Good Green
70-89 Fair Yellow
50-69 Poor Orange
0-49 Bad Red
Media Manufacturer
Some cartridge manufacturers OEM their tape. If the Cartridge Manufacturer and Media
Manufacturer do not match, the Media Manufacturer is also displayed.
Manufacture Date
The date the cartridge was manufactured. Older cartridges are given slightly lower
VeriScores.
Cartridge Type
LTO 1, LTO 2, LTO 3 and LTO 4. Cleaning cartridges are also identified here. Cleaning
cartridges are not scored but you can see any usage information that may be stored on
them.
Last Unload
This indicates how the cartridge was last removed from the tape drive. The possible val-
ues are:
Normal The cartridge was unloaded normally.
Abnormal - not writing The cartridge was not unloaded normally, but the drive was
not writing at the time. This usually indicates a power failure while the cartridge was loaded in the drive.
© 2009 MP Tapes - 9 -
Page 10

VeriTape Cartridge Memory Analyzer
Abnormal - during write The cartridge was not unloaded normally and the drive was
writing at the time. This usually indicates a power failure
while the cartridge was loaded in the drive.
Abnormal – unknown An out-of-spec value in this field of the CM; assume the
worst…
Thread Count
This is the number of times the cartridge has been loaded into a tape drive.
CM Corrected Count (LTO 3 only)
This is the number of times a tape drive has found the CM to contain invalid data and has
attempted to correct the bad data.
For all of the following, two values are displayed: Total and Recent. The Total value is exactly
that, the total number of the named event that has ever occurred on the cartridge. The Recent
value is number of such events that have occurred in the last 3 times the cartridge has been
loaded.
Data Written
This is the amount of data that has been written to the tape.
Data Read
This is the amount of data that has been read from the tape.
Write Retries
This is the number of recovered write errors. Write retries occur when a tape drive detects
that a dataset
3
it just wrote failed read-while-write verification. The dataset will be rewritten further along the tape. A small number of write retries are expected due to media
dropouts and dust on the media. The number in parentheses is the error rate in errors per
dataset. The rate, not the gross number, is used in computing the VeriScore.
Read Retries
This is the number of recovered read errors. Read retries occur when a tape drive reads a
dataset that fails read verification. The tape must be repositioned and the data reread. A
small number of read retries are expected due to dust on the media. The number in parentheses is the error rate in errors per dataset. The rate, not the gross number, is used in
computing the VeriScore.
Servo Errors
This is the number of servo tracking errors. Servo errors occur when a tape drive loses
lock on the tape’s servo tracks. This can be caused by media dropouts, but is less likely to
be caused by dust on the tape since there are multiple servo tracks that are read simultaneously. The number in parentheses is the error rate in errors per dataset. The rate, not the
gross number, is used in computing the VeriScore.
3
A dataset is the smallest unit of data that can be written to the tape. You can think of it as the physical record size.
The dataset size is 403,884 bytes for LTO 1 and LTO 2, and 1,616,940 bytes for LTO 3.
© 2009 MP Tapes - 10 -
Page 11

VeriTape Cartridge Memory Analyzer
Fatal Write Errors
This is the number of fatal write errors. Fatal write errors cause a backup operation to
fail. They occur when a tape drive cannot successfully rewrite a dataset after multiple
read-while-write verification failures. Fatal write errors can be caused by damaged media, excessive dropouts, and rarely by dust on the media. The number in parentheses is
the error rate in errors per dataset. The gross number of fatal errors is used in computing
the VeriScore.
Fatal Read Errors
This is the number of fatal read errors. Fatal read errors cause a restore operation to fail.
They occur when a tape drive cannot successfully reread a dataset after multiple attempts.
Fatal read errors can be caused by damaged media, excessive dropouts, and rarely by dust
on the media . The number in parentheses is the error rate in errors per dataset. The gross
number of fatal errors is used in computing the VeriScore.
Fatal Servo Errors
This is the number of fatal servo errors. Fatal servo errors cause a backup operation to
fail. They occur when a tape drive loses lock on the tape’s servo tracks and cannot reacquire lock. Fatal servo errors can be caused by damaged media or excessive dropouts.
The number in parentheses is the error rate in errors per dataset. The gross number of fatal errors is used in computing the VeriScore.
© 2009 MP Tapes - 11 -
Page 12

VeriTape Cartridge Memory Analyzer
Last Usage Tab
The Last Usage Tab shows the usage information for the last three times the cartridge was
loaded. For LTO 3 cartridges it also shows the usage information for the last fatal read and write
errors.
Drive Manufacturer
The manufacturer of the tape drive in which the cartridge was loaded.
Drive ID
The ID string of the tape drive in which the cartridge was loaded. This may or may not be
the drive’s serial number.
For other items, see descriptions in the Cartridge Tab section. The values displayed are the numbers of that item that occurred during the indicated threading. The values for fatal errors may be
lower than the values for the threading if further activity occurred after the fatal error.
© 2009 MP Tapes - 12 -
Page 13

VeriTape Cartridge Memory Analyzer
Details Tab
The Details Tab shows all the information that is available in the portion of CM that was read to
get the information displayed in the Cartridge and Last Usage Tabs. This may be useful for debugging cartridge interchange problems. The CM is documented in ECMA-319 Standard, Annex D.
Errors Tab
If there are any communications errors between The VeriTape program and the VeriTape Reader
The Errors Tab that lists the errors will be displayed.
© 2009 MP Tapes - 13 -
Page 14

VeriTape Cartridge Memory Analyzer
Summary of Menu Commands
File | New
Clears the currently displayed data. If Automatic Cartridge Detection is enabled, starts looking
for a cartridge on the VeriTape Reader.
File | Open
Open a saved CM File and display its contents.
File | Save
Save the currently displayed cartridge to a CM File.
File | Save As
Save the currently displayed cartridge to a CM File with a different name.
File | Options > Autodetect Cartridge
When checked, the VeriTape program periodically polls the VeriTape Reader to see if the cartridge has been changed. If it has, the new cartridge’s data is automatically read and displayed.
File | Options > Autosave
When checked, the VeriTape program automatically saves the cartridge’s data to a CM File after
reading it. When Autosave is first checked, a directory must be selected into which the CM Files
will be saved.
File | Options > QuickSave
When checked, the VeriTape program will only save that portion of the CM data that was needed
to be read to decode the information that is currently displayed. This makes save nearly instantaneous at the cost of future compatibility; future versions of VeriTape may be limited in what additional information they can display.
File | Configure Serial Port
Opens the “Configure Serial Port” dialog which is used to select the serial port connected to the
VeriTape Reader. The “change settings” checkbox is a debugging relic; do not use it. The set-
tings must be 4800 / none / 8 / 1 / none.
File | Show Serial Data
Opens a window that displays the serial data sent between the VeriTape Reader and the
VeriTape program. This is only useful for debugging connection problems. It slows things down
a bit when it is displayed.
File | Exit
Closes the VeriTape program.
© 2009 MP Tapes - 14 -
Page 15

VeriTape Cartridge Memory Analyzer
Edit | Copy
Copies the currently displayed table to the clipboard so that it can be pasted into another application. If only a portion of the table’s cells are selected, only those cells and their row and column
headers will be copied.
Edit | Select by Rows
When checked, table cell selection will automatically be extended to include the entire row if any
cells in that row are selected.
Edit | Select by Columns
When checked, table cell selection will automatically be extended to include the entire column if
any cells in that column are selected.
Edit | Include Row Headers
When checked, row header cells are included in tables copied to the clipboard.
Edit | Include Column Headers
When checked, column header cells are included in tables copied to the clipboard.
Action | Read CM
Reads the information from the cartridge currently on the VeriTape Reader. If there is no cartridge present, displays an error message.
Action | Hex Dump
Technical information used for diagnostic purposes.
© 2009 MP Tapes - 15 -
Page 16

VeriTape Cartridge Memory Analyzer
Specifications
Operating Conditions
Temperature: 0 - 120 degrees F
Relative Humidity: 0-95%,Non-condensing
Storage Conditions
Temperature: -40 - 140 degrees F
Relative Humidity: 0-95%, Non-condensing
This equipment has been tested and found to comply with the limits for a Class A digital
device, pursuant to part 15 of the FCC Rules. These limits are designed to provide
reasonable protection against harmful interference when the equipment is operated in a
commercial environment. This equipment generates, uses, and can radiate radio frequency
energy and, if not installed and used in accordance with the instruction manual, may cause
harmful interference to radio comm unicat i ons. O p eration of this equipment in a residential
area is likely to cause harmful interference in which case the user will be required to correct
the interference at his own expense.
© 2009 MP Tapes - 16 -
 Loading...