

Page 1
• Digital Camera Charger
™
MPS4G
User Guide
Page 2

Contents
1. What you get with your purchase..........2
2. MPS4G Adaptor Cradle Features..........3
3. Using the MPS4G Adaptor Cradle......4-6
4. MPS4G Features..............................7-8
5. Using the MPS4G ............................9-10
6. How to contact us...............................11
™
™
™
™
1
Page 3
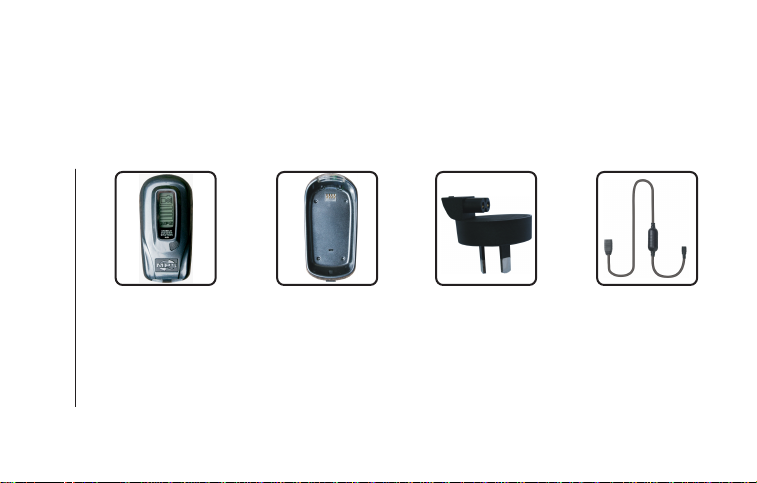
1. What you get with your purchase
1.1
™
MPS4G Unit Adaptor Cradle Detachable Mains
Number of Connectors for digital cameras (not shown) are also included
(depending on the country of purchase).
Carry Case may also be included (depending on the country of purchase).
1.2
1.3
Power Plug
Adaptor
2
1.4
Power Cable
Page 4
2.1
2.2
2.4
2.5
2.3
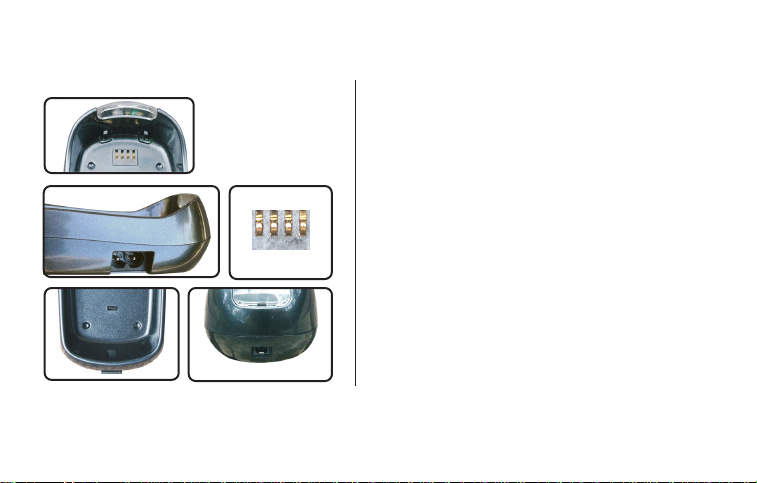
2. MPS4G Adaptor Cradle Features
2.1 illuminating indicator window flashes alternate colors
to indicate the MPS4G is recharging and will
display a solid green light to indicate the recharge
cycle is complete.
2.2 Input socket for Detachable Mains Power Plug
Adaptor(1.3).
™
™
2.3 Contact pins.
2.4 Adaptor Cradle release latch, slide downward to
release the MPS4G unit from the Adaptor Cradle.
2.5 Charging socket. Use your Power Cable to charge
your digital camera from the Adaptor Cradle.
™
3
Page 5
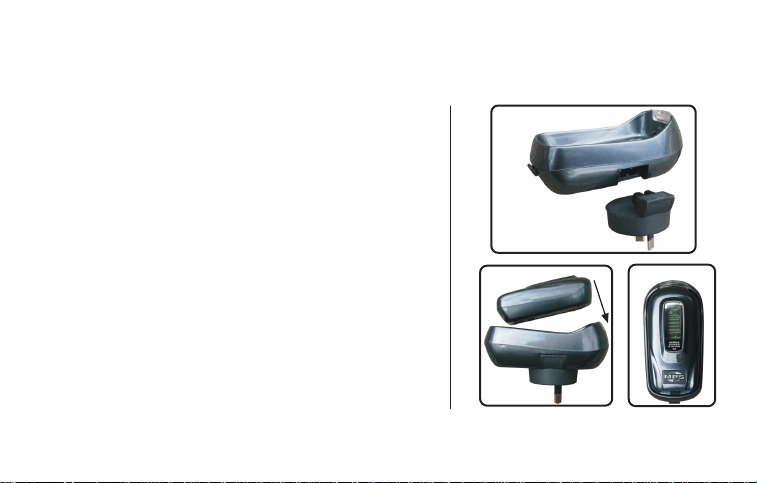
3. Using the MPS4G Adaptor Cradle
3.1 Connect the Mains Power Plug Adaptor (1.3) onto the
MPS4G Adaptor Cradle by sliding the Mains Power
Plug Adaptor into the Adoptor Cradle (3.1.1).
™
™
3.1.1
3.2 To charge the MPS4G , insert it into the Adaptor Cradle
and ensure it is locked into position securely. Press the
MPS4G firmly into the Adaptor Cradle until it clicks into
the locked position (3.2.1). The MPS4G is now ‘docked’
with the Adaptor Cradle (3.2.2).
3.3 To reach full performance capacity, please ensure the
unit is fully charged and discharged 4 times.
3.4 Ensure the mains power socket that you will plug the
docked MPS4G into is swithched “Off”. Plug the
docked MPS4G and Adaptor Cradle into the mains
power socket. Switch the mains power to the “On”
position.
™
™
™
™
™
4
3.2.1
3.2.2
Page 6
3.5
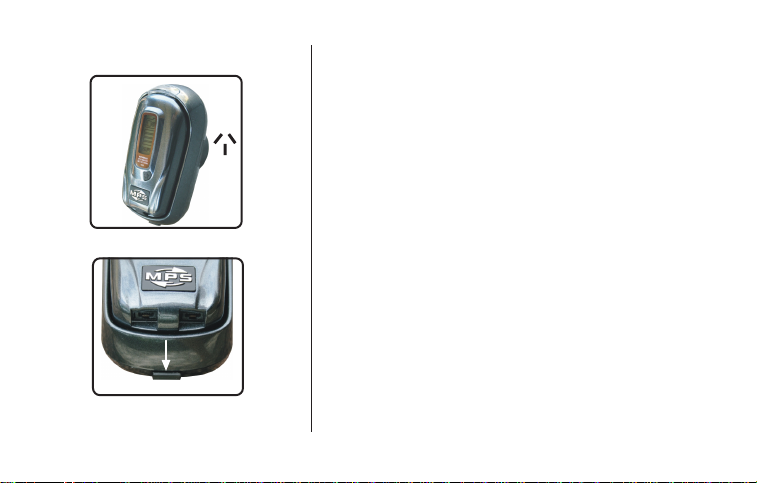
3.5 As soon as the docked MPS4G is plugged into the
mains power and the mains power socket is switched
“On”, the MPS4G will begin to recharge. The
indicator window on the Adaptor Cradle will flash
alternate colors to indicate the MPS4G is charging.
Ensure the indicator window continues to flash
alternate colors. If not, the charging cycle may not
occure. Once the MPS4G is fully recharged, the
indicator window will cease flashing alternate colors
and will display a solid green color to indicate the
recharge cycle is complete.
™
™
™
™
3.6
3.6 To release the MPS4G from the Adaptor Cradle, simply
push the release latch downwards to pop the MPS4G
out of the Adaptor Cradle.
IMPORTANT! Do not store the MPS4G in the Adaptor
Cradle when not in use, it may shorten the functional
life of the MPS4G unit.
Only use the Adaptor Cradle to recharge the MPS4G
and once fully recharged (indicated by a solid green
light on the indicator window) promptly remove the
MPS4G from the Adaptor Cradle.
™
™
™
™
™
™
5
Page 7
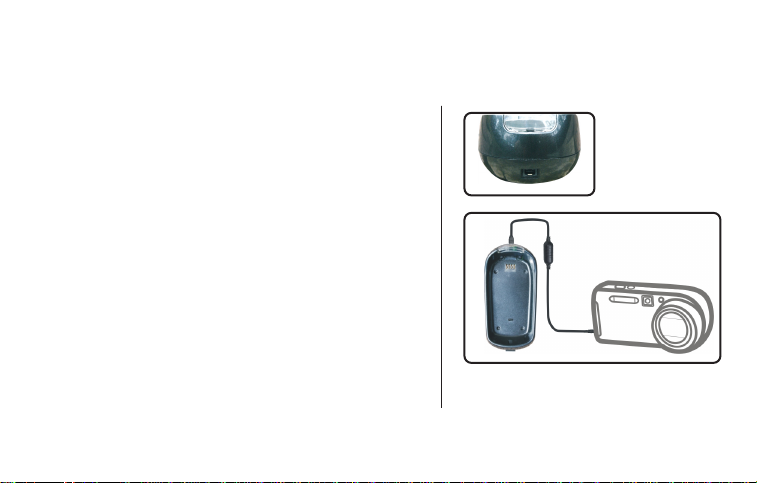
3.7 The Adaptor Cradle includes a charging socket on
the top face (3.7.1). This charging socket can be
used to recharge your digital camera.
3.8 You can use this function while the Adaptor Cradle
is plugged into the mains power socket or while the
MPS4G is docked into the Adaptor Cradle.
3.9 It is possible to charge 3 devices at the same time.
Recharge 2 devices by using the two charging
sockets on the MPS4G and recharge 1 device
from the Adaptor Cradle.
™
™
6
3.7.1
3.8
Page 8
4. MPS4G Features
™
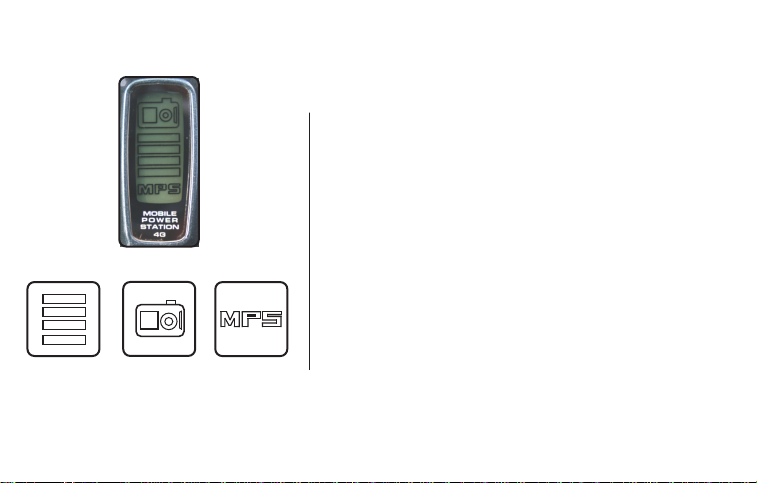
4.1 LCD Indicator Screen.
4.1.1
4.1
4.1.2 4.1.3
4.1.1 Four bar charge indicator, shows the amount of
power stored in the MPS4G .
4.1.2 Digital camera indicator, blinks to indicate
the MPS4G is recharging your digital camera.
4.1.3 M P S letters blink to indicate the MPS4G is low
on power and needs to be recharged.
™
™
™
7
Page 9
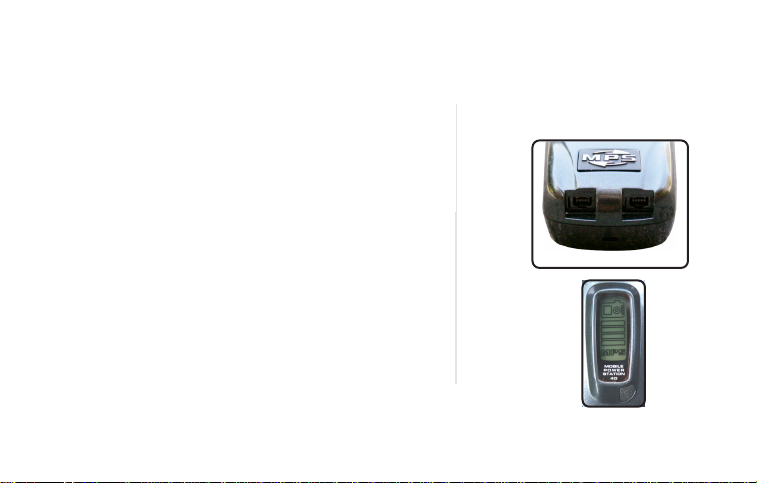
4.2 Recharge Sockets.
4.2.1 Either socket can be used to recharge your digital
camera. You can recharge 2 digital camera’s at
the same time (additional Power Cable sold
seperately).
4.3 Backlight.
4.3.1 Press down on the backlight switch to illunimate
the MPS4G indicator screen in low light conditions.
4.3.2 By pressing down on the backlight switch the amount
of power stored in the MPS4G will be displayed.
The solid black bars indicate the remaining power.
™
™
8
4.2
4.3
Page 10
WARNING!!!
Before connecting the MPS4G to your digital camera,
ensure the Power Cable (1.4) voltage is suitable to your
digital camera’s ‘DC in’ voltage.
There are three different Power Cable’s (sold seperately).
[1] 3.5V Power Cable, suitable for digital camera’s
operating between 3V to 3.5V.
[2] 4.2V Power Cable, suitable for digital camera’s
operating between 4.2V to 4.5V.
[3] 9V Power Cable, suitable for digital camera’s
operating at 7.2V to 9V.
WARNING!!!
Before connecting the MPS4G to your digital camera,
ensure that your digital camera battery is rechargeable
Li-ion (Lithium ion) type. MPS4G will recharge a
rechargeable Li-ion type digital camera battery.
You MUST remove batteries that are NOT rechargeable
Li-ion type, from your digital camera, before connecting
™
to MPS4G . The MPS4G can operate your digital camera
directly without the camera battery installed.
™
™
™
™
5. Using the MPS4G
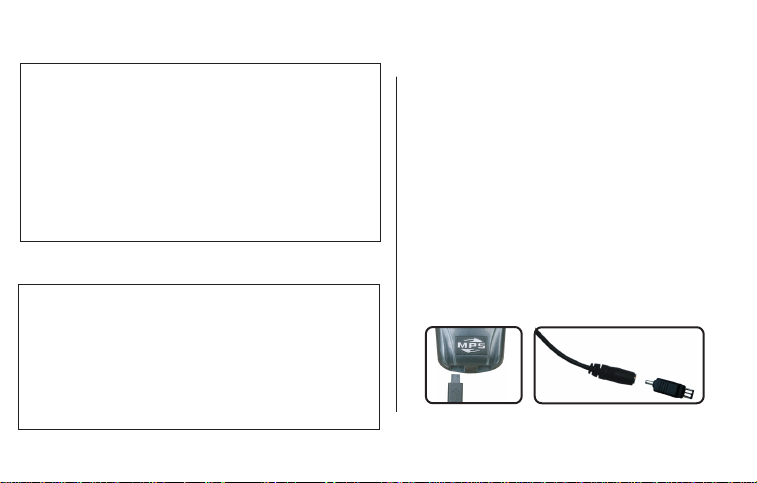
5.1 Connect the compatible end of the Power
Cable (1.4) supplied into either of the charging
sockets on the MPS4G (5.1.1).
5.2 Select the connector that is compatible to your
digital camera and insert it into the appropriate
end of the Power Cable (5.2.1).
IMPORTANT! Ensure you use the correct connector
for your digital camera as you may damage your
digital camera by using an incorrect connector.
5.1.1 5.2.1
™
™
9
Page 11
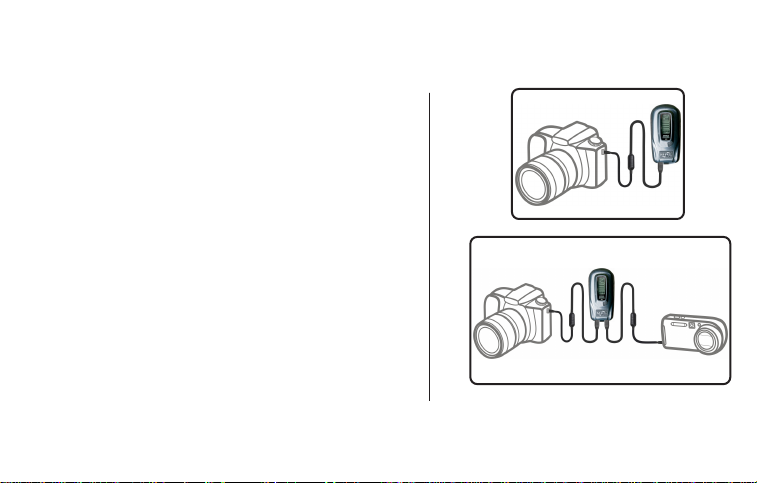
5.3 Connect the MPS4G Power Cable with the compatible
connector to your digital camera (5.3.1) ‘DC in’ socket.
The MPS4G will automatically begin recharging /
operating your digital camera.
™
™
5.4 Your digital camera will operate normally when
connected to the MPS4G .
5.5 IMPORTANT! Only use the correct Power Cable to recharge
/ operate your digital camera. Promptly remove the
Power Cable from the MPS4G unit, once you have
completed recharging / operating your digital camera.
Leaving the power cable attached to the MPS4G unit
will shorten the funtional life of the MPS4G unit.
5.6 You can recharge 2 digital camera’s at the same
time (5.6.1). Simply plug an additional Power Cable
(sold seperately) into the second charging socket and
into your second digital camera.
™
™
™
™
10
5.3.1
5.6.1
Page 12

6. How to contact us
2007 Mobile Power Station Pty. Ltd.
www.mobilepowerstation.com
Website
E-mail Address
11
Page 13

Product Warranty
This product carries a 12 month warranty on defective workmanship and materials from date of purchase.
Defects will be replaced at our discression.
Proof of purchase must be supplied and returned to place of purchase to obtain warranty.
Please note our warranty does not cover products that have suffered misuse or improper / incorrect
installation, physical damage or accidents.
WARNING!!!
™
MPS4G contains lithium-ion batteries and may get hot, explode or ignite and cause serious injury if exposed
to abuse conditions. Be sure to follow the warnings listed below.
The MPS4G Adaptor Cradle is to be used ONLY to charge the MPS4G unit, no other devices.
The MPS4G unit is to be used ONLY to charge digital camera’s that contain rechargeable Li-ion type batteries,
please follow the warning instructions on page 9 for cameras NOT containing rechargeable Li-ion batteries and
by using the correct power cable with the correct voltage and with the correct connector connection.
Remove batteries NOT Li-ion type from digital camera before connecting MPS4G to the camera. You may cause
damage to your digital camera if you do not follow this procedure.
When the MPS4G unit is empty please recharge the unit. Leaving the MPS4G unit empty for long periods
of time may reduce the life of the unit or damage the battery.
WARNING!!!
Do not place the MPS4G unit in fire or in exessivly hot conditions or environments.
Do not place the MPS4G unit on necklaces, hairpins or other metal objects.
Do not disassemble or experiment with the MPS4G unit or the Adaptor Cradle.
The unit has safety and protection devices that may ignite or explode if damaged.
Do not allow the MPS4G unit to be exposed to excessive cooling.
Do not allow the MPS4G unit to be subjected to shocks or drops.
Keep out of reach of children.
This product is able to be recycled. Please return your unwanted unit to place of purchase for proper disposal.
Do not dispose of in the rubbish bin.
Failure to follow these warnings will void your warranty.
To ensure user safety, please follow the user guide instructions or contact us at [email protected]
™
™
™
™
™
™
™
™
™
™
™
12
 Loading...