

MPower GSG Getting Started Manual

CONGRATULATIONS ON YOUR GREAT
PURCHASE!
To start using your Mpower muscle activation monitor
1. Download the Mpower app from Google Play.
2. After installation open the app from the application grid.
3. The app will guide you through a process of creating a
Mpower account and connecting (pairing) your Mpower
pod(s) with your mobile device. Power-on the pods and
connect them one at a time until all the pods are connected.
4. Charge your pod(s) fully before the first use.
GET TO KNOW YOUR MPOWER
MUSCLE ACTIVATION MONITOR
Getting Started Guide / English
After setup you are ready to start measuring and exercising.
TRAINING WITH YOUR MPOWER
For measurements during the training the pod(s) always require
the mobile device with the app to be present and connected to the
pods as the pods constantly transfer measurement data to the app.
START TRAINING
Power on the pod(s). Open your app.
Putting on your pod(s)
Mpower pods need to be in skin contact on top of the muscle
to be measured. The skin does not need to be prepared in any
way, but it is important the skin contact is maintained during the
measurement at all times.
IMPORTANT: Do not move the pods when the measurement is
on as this may cause undesired signal spikes and distort the
measurement. Always turn o the measurement first before
adjusting or moving pods.
You can attach the pod(s) to your muscle(s) either by using the
adjustable straps or double-side adhesive tape.
www.mpower.com/support
support@fibrux.com
Designed and manufactured
by Fibrux Oy, Finland
Power
on/o
Micro USB
connector
Right LED lit
- power on
Left LED lit
- connected to
Mpower app
Both LEDs lit
- measurement ongoing
1. Take one pod and one adhesive sheet.
Remove the white cover paper.
2. Focus adhesive sheet onto the
bottom of the pod around the metal
ring. Make sure the adhesive does
not overlap with metal ring.
Press finger on the circular part of
the adhesive to secure the tape on
the pod.
3. Remove the transparent liner from
the adhesive from the corner.
The circular adhesive stays attached
on the pod.
Pod is now ready to be attached on
the skin.
4. Make sure the skin is dry before the
attachment. Attach the pod on top of
the muscle to be measured. Press the
pod tightly for few seconds on top of
the skin.
After training detach the pod by pulling
from the corner of the pod.
Using double-sided adhesive tape.
Mpower_haitari_taitettu.indd 1 17.6.2016 12.47
You may now choose the first measurement setup by selecting the
muscles to be measured from the main screen: Pods & Muscles.
Important: the measurement always requires first the muscle
selection which needs to be confirmed by the pod selection from
the bottom bar.
You can start measuring and training either with Instant
Measurement or by Workout Plans.
DURING TRAINING
See your muscle activation and fatigue in real-time.
Choose what’s shown on the UI
• If you are measuring with more than two pods you can see more
information by tapping the activation power monitor on the screen.
• You can see activation power curve by swiping the screen
sideways.
• You can modify the load and the number of repetitions
information between sets, after set or in the training summary.
• In the Routine Results you can see the activation power curve
showing each repetition by clicking the cumulative Activation
Volume bar.
AFTER TRAINING
Get instant summary of your muscle activation and fatigue. You
can also compare dierent muscles and exercises with each
other.
KEY FEATURES
When you start your first measurements for a new muscle you
will get a lot of ”new max”-indications, as Mpower records the
maximum activation values for each measured muscle. Mpower
uses these maximum values to calibrate the activation power
monitor and shows each repetition as a percentage of your muscle
specific maximum.
Activation Power
• Total Activation Power-indicator shows you activation power of
each repetition produced by your muscle during the training.
• Fast Activation Power-indicator shows you activation power of
each repetition produced by your muscle fast-twitch fibers during
the training.
• Activation Power Curve shows the absolute (not relative)
activation levels over time.
Activation Volume
• For each set Mpower calculates your muscle specific cumulative
activation power as Activation Volume. This makes it easy for you
to see activation produced by each muscle in each exercise and
to be able to compare the training eciency between sets of the
same exercise and between exercises. By clicking on the Activation
Volume bar you can see the activation curve of individual
repetitions.
Fatigue Index
• See how your muscle fatigue develops. You can use Fatigue
Index -indicator for speed strength training to monitor when your
muscle fast-twitch fibers start getting tired. You can also use it
for eective endurance strength training to stress the muscle
appropriately and strive to desired muscle fatigue level.
TECHNICAL SPECIFICATIONS
MPOWER POD
BATTERY TYPE
300 MAH LI-POL (LITHIUM-POLYMER) RECHARGEABLE BATTERY
CHARGING
THROUGH MICRO-USB CONNECTOR (WITH CABLE INCLUDED)
OPERATING TIME
UP TO 4 HOURS OF MEASUREMENT TIME
WATER RESISTANCE
SPLASH PROOF. NOT SUITABLE FOR SHOWERING AND SWIMMING.
DEVICE MATERIAL
DEVICE MATERIAL ABS (ACRYLONITILE BUTADIENE STYRENE) PLASTIC,
TPU (THERMOPLASTIC POLYURETHANE), STAINLESS STEEL (WIDELY USED
IN MEDICAL GRADE APPLICATIONS).
STRAP AND BUCKLE MATERIALS
POLYAMIDE, POLYURETHANE, ELASTANE, POLYESTER, LATEX. THIS
PRODUCT CONTAINS NATURAL RUBBER LATEX WHICH MAY CAUSE
ALLERGIC REACTIONS.
ADHESIVE MATERIALS
MEDICAL GRADE SKIN ADHESIVE (3M 1522)
MPOWER APP
COMPATIBILITY
ANDROID OS 4.4 OR LATER. IN THE CASE OF ANDROID SMARTPHONES AND
TABLETS THERE MAY BE SOME COMPATIBILITY ISSUES AS BLUETOOTH
TECHNOLOGY VARIES BETWEEN DIFFERENT MODELS OF ANDROID
DEVICES.
LANGUAGES
ENGLISH
UNITS OF MEASURE
METRIC OR IMPERIAL
CUSTOMIZE WITH ACCESSORIES
Straps
Attach Mpower pod to your arms or legs. Two sizes available, Small and
Medium.
Adhesives
Attach Mpower pod to any individual surface muscle, eg yout glutes or lats,
with the double-sided adhesive.
Availability information at mpower-bestrong.com/support
MPOWER SUPPORT
Find all below support material from mpower-bestrong.com/support
HELP
You can find troubleshooting and assistance for your Mpower.
LEARN MORE ABOUT YOUR MPOWER POD AND APP
You can download the full-length user manual and the latest version of this
guide.
RETURN POLICY AND WARRANTY
You can find Warranty information and Return Policy.
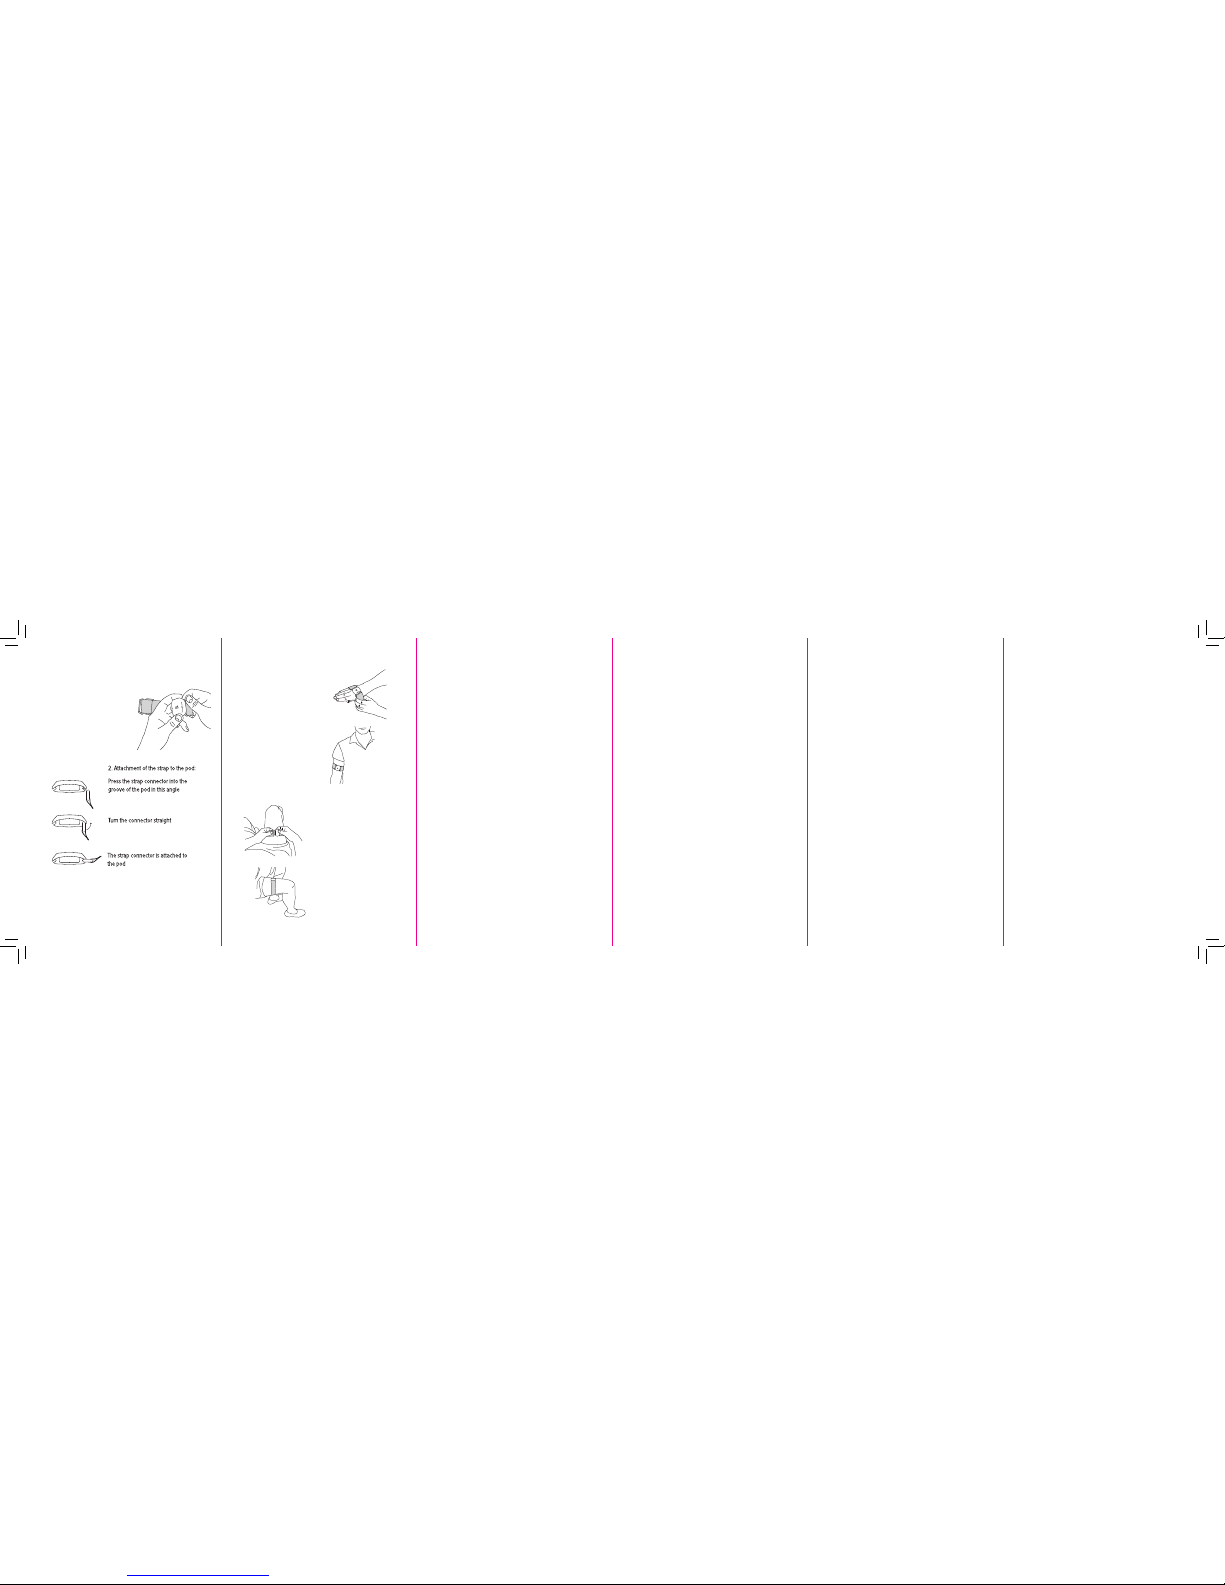
5. Attachment of the strap to the leg:
Tie the strap around the leg and attach
the connector to the other end of the
pod as in step two. Use buckle to adjust
the appropriate length of the strap.
6. Focus the pod on top of the muscle to
be measured.
Using the adjustable straps
1. Take one pod and one strap. There
are two sizes of the strap. Select
the short strap for the arm and long
strap for the leg.
Attach the other end of the strap to
the pod. Make sure the buckle stays
on the outside of the strap.
4. Attachment to the arm:
Attach the other connector to the
pod as in previous picture. Pull the
strap around the arm. Use buckle to
adjust the appropriate length of the
strap. Focus the pod on top of the
muscle to be measured.
3. Make sure the skin is dry before the attachment.
Pod needs to be in skin contact.
Mpower_haitari_taitettu.indd 2 17.6.2016 12.47
 Loading...