

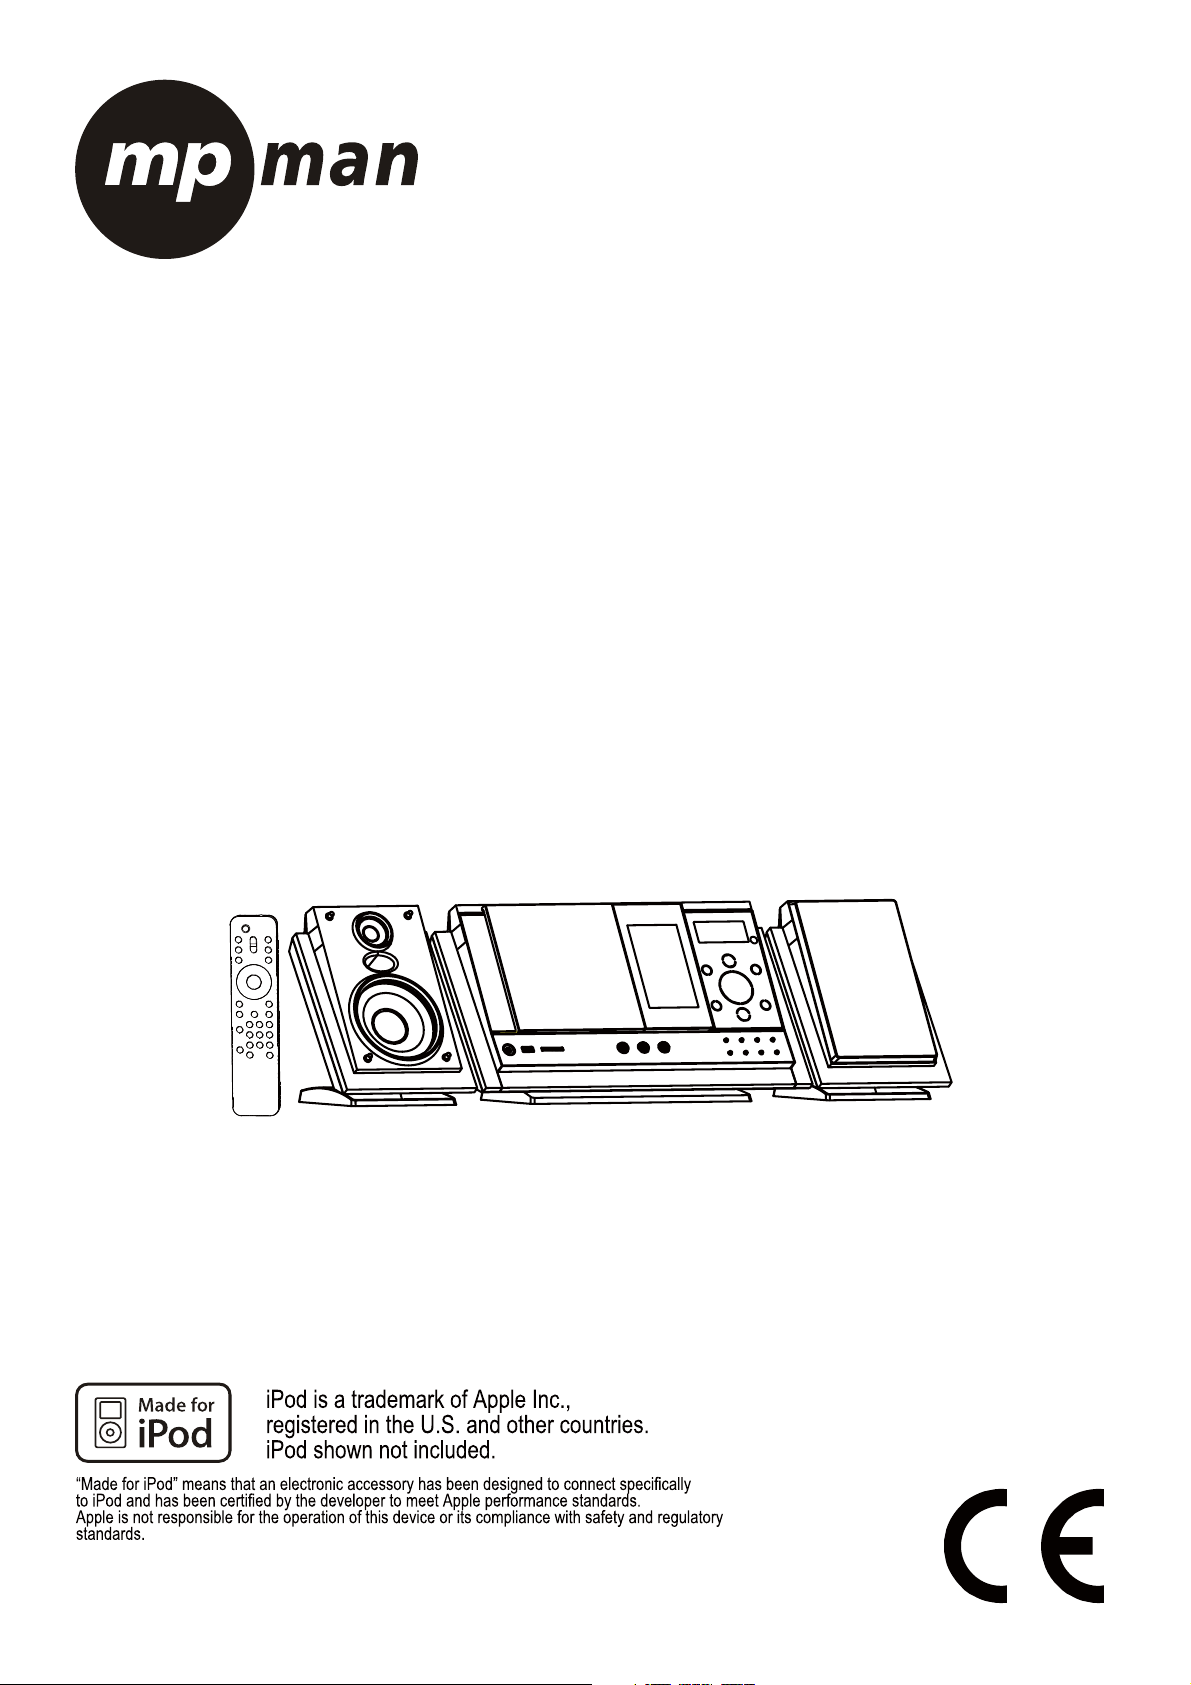
Page 1
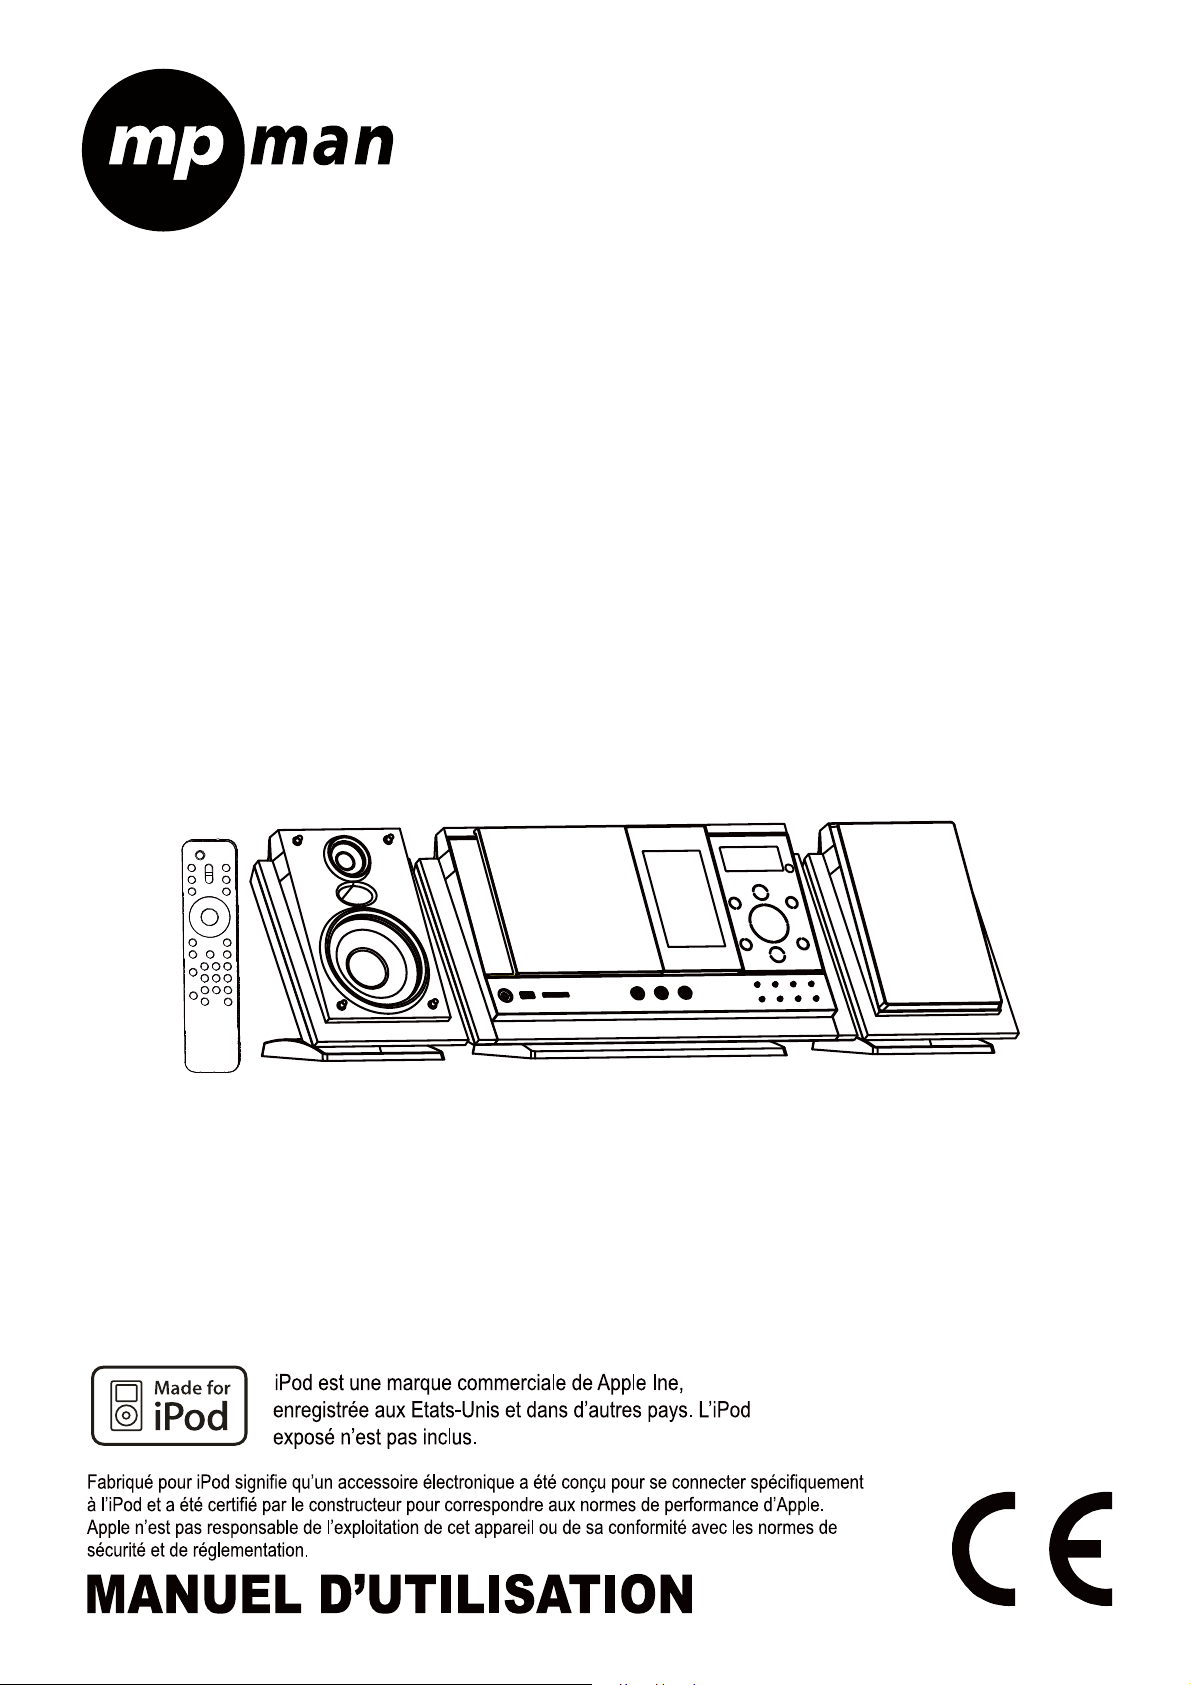
Station d'accueil avec CD/MP3/USB/ Carte lecteur SD,
radio et iPod
RM62i
Page 2
Pour optimiser l’utilisation et la performance, veuillez lire attentivement ce manuel avant de tenter de faire fonctionner l'appareil afin de vous familiariser
avec ses caractéristiques, et de vous assurer des années de plaisir d'écoute et bonne performance sans problèmes.
Notes Importantes
* Gardez les instructions pour le fonctionnement et pour la sécurité pour vous y référer à l’avenir.
* Eviter l’installation de l’unité dans les lieux suivants : Lieux exposés au soleil ou à des sources de chaleur comme un radiateur électrique, ou
au-dessus d’autres équipements stéréo qui exhalent une chaleur excessive. Lieux manquant de ventilation ou poussiéreux.
* Lieux sujets à vibrations constantes, lieux humides ou mouillés.
* Assurez-vous de ne pas obstruer les ouvertures pour la ventilation
* Avant d’allumer pour la première fois, assurez-vous que le câble d’alimentation est installé correctement.
* La prise de l’alimentation est utilisée comme dispositif de déconnexion et elle doit être toujours facilement accessible.
* Le produit ne doit pas être éclaboussé avec un liquide et des objets comme des vases remplis de liquide, ne doivent pas être placés sur le produit.
* Pour débrancher complètement l'alimentation électrique, la fiche de l'appareil doit être débranchée du réseau.
* Lorsque le LED stand-by n’est pas lumineux, l'appareil est complètement hors tension.
* Minimum de distances :10 cm autour l'appareil pour un maximum de ventilation.
* L'attention devrait être attirée sur les aspects environnementaux de l'élimination de la batterie.
* L'utilisation des appareils dans des climats modérés.
* La prise secteur ne doit pas être obstruée ou doit être facilement accessible pendant l'utilisation.
* La ventilation ne doit pas être gênée en recouvrant les ouvertures de ventilation avec des articles comme du papier journal, une nappe, des
rideaux, etc.
* Aucune source de flammes libres telle qu’une bougie allumée devrait être placée sur l'appareil.
* La batterie ne doit pas être exposée à une chaleur excessive comme le soleil, le feu, etc.
Pour des raisons de sécurité, ne pas retirer les couvercles ou tenter d'accéder à la l'intérieur du produit. Reportez-vous pour tout entretien à un
personnel qualifié. Ne pas tenter de retirer les vis, ou d’ouvrir le boîtier de l'unité, il n’est pas réparable par l'utilisateur, reportez-vous à du personnel
qualifié.
ATTENTION
Risque de choc
électrique Ne pas ouvrir
ATTENTION: POUR RÉDUIRE LE RISQUE DE CHOC ÉLECTRIQUE NE PAS Enlever le couvercle (ou arrière), demandez à une personne qualifiée
CONDUCTEUR SOUS TENSION
dangereuse, qui peut être d’ampleur suffisante pour constituer un risque de choc électrique pour les personnes présentes dans le
voisinage du produit.
ATTENTION
Le manuel d’emploi contient des informations importantes pour le fonctionnement et l'entretien. Pour votre sécurité, il est nécessaire de se
référer au manuel.
AVERTISSEMENT : Pour éviter un incendie ou un choc électrique, NE PAS exposer cet appareil aux éclaboussures.
Note :
- Cette unité sera chauffée lorsqu'elle est utilisée pendant une longue période de temps. Ceci est normal et n'indique pas un problème avec l'appareil.
- Le lecteur de CD contient des micro-processeurs, qui peuvent présenter des dysfonctionnements en raison des interférences électriques extrêmes ou
de bruit Si le lecteur de CD ne fonctionne pas correctement, débranchez la source d'alimentation, puis rebranchez-la.
- Une pression sonore excessive sur les écouteurs et le casque peut entraîner une perte auditive
- Si une des conditions inhabituelles se produit dans la fenêtre d'affichage ou le bouton poussoir, éteindre l'appareil, puis rallumer l'appareil de nouveau.
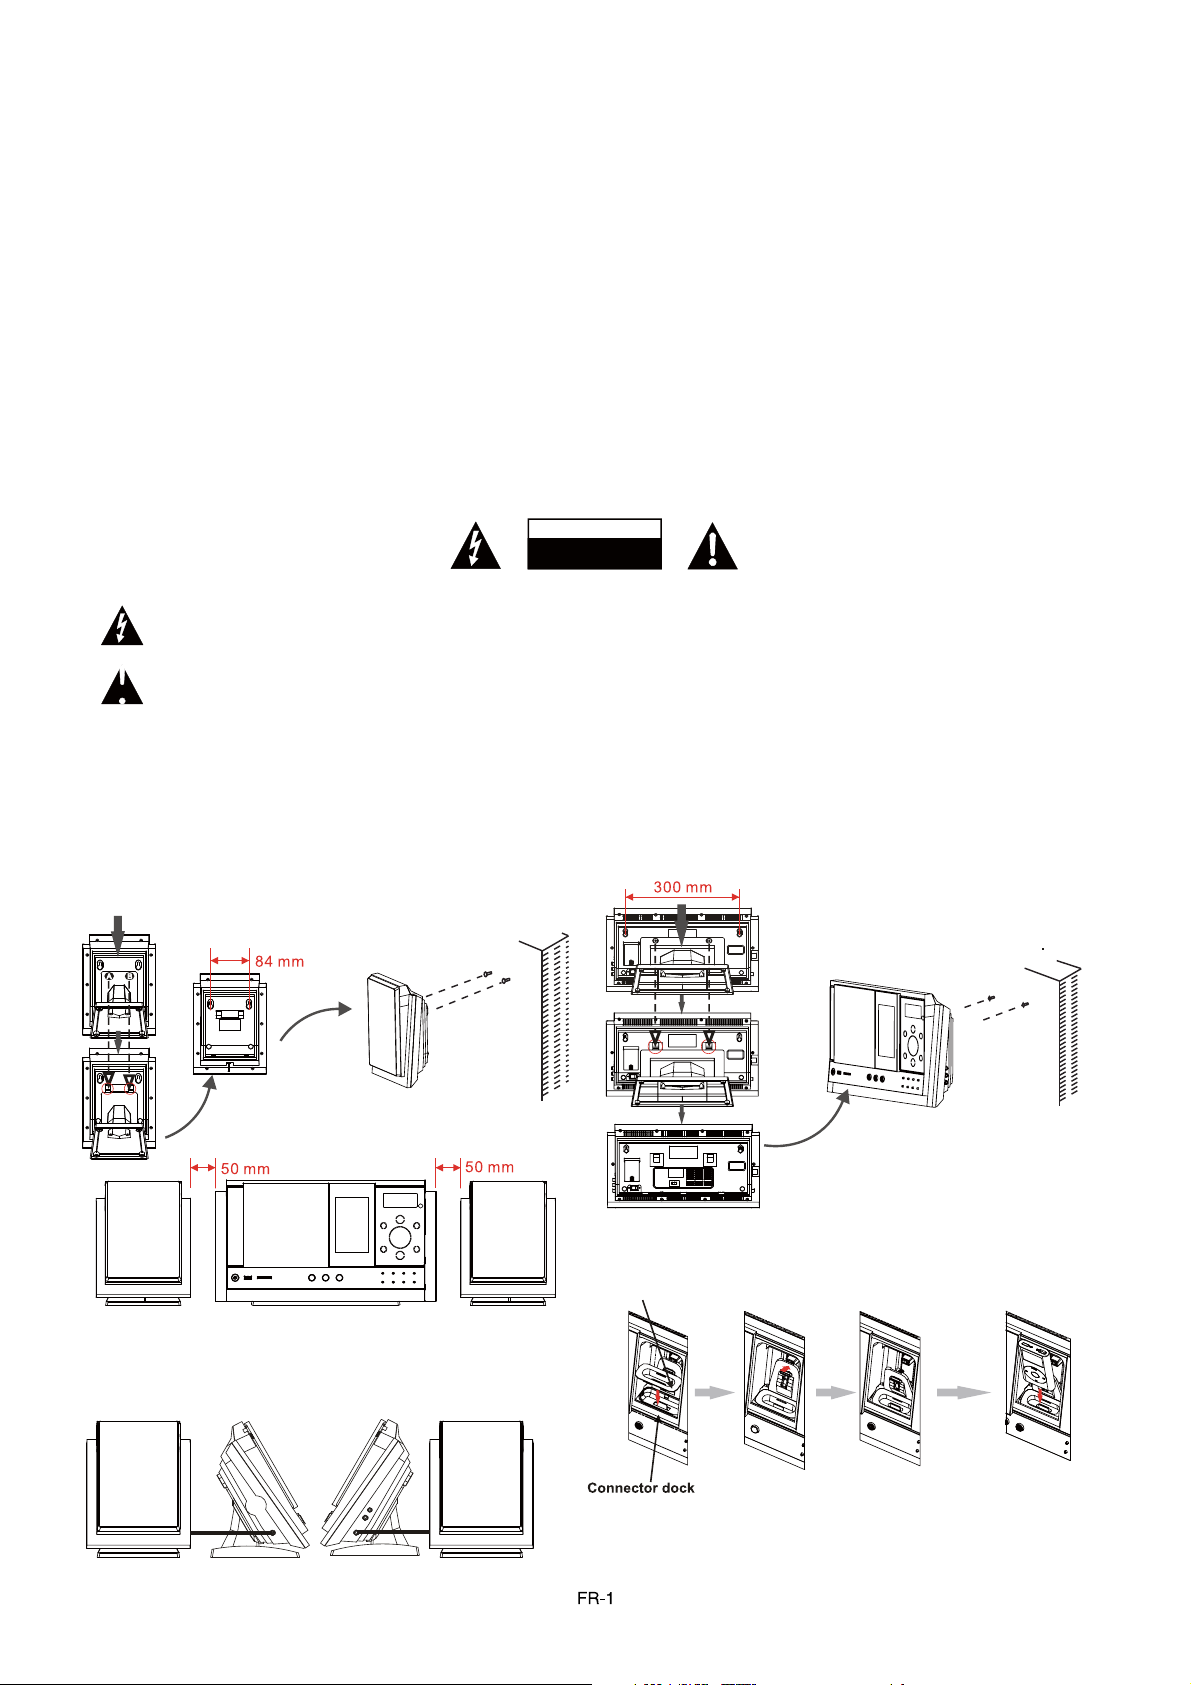
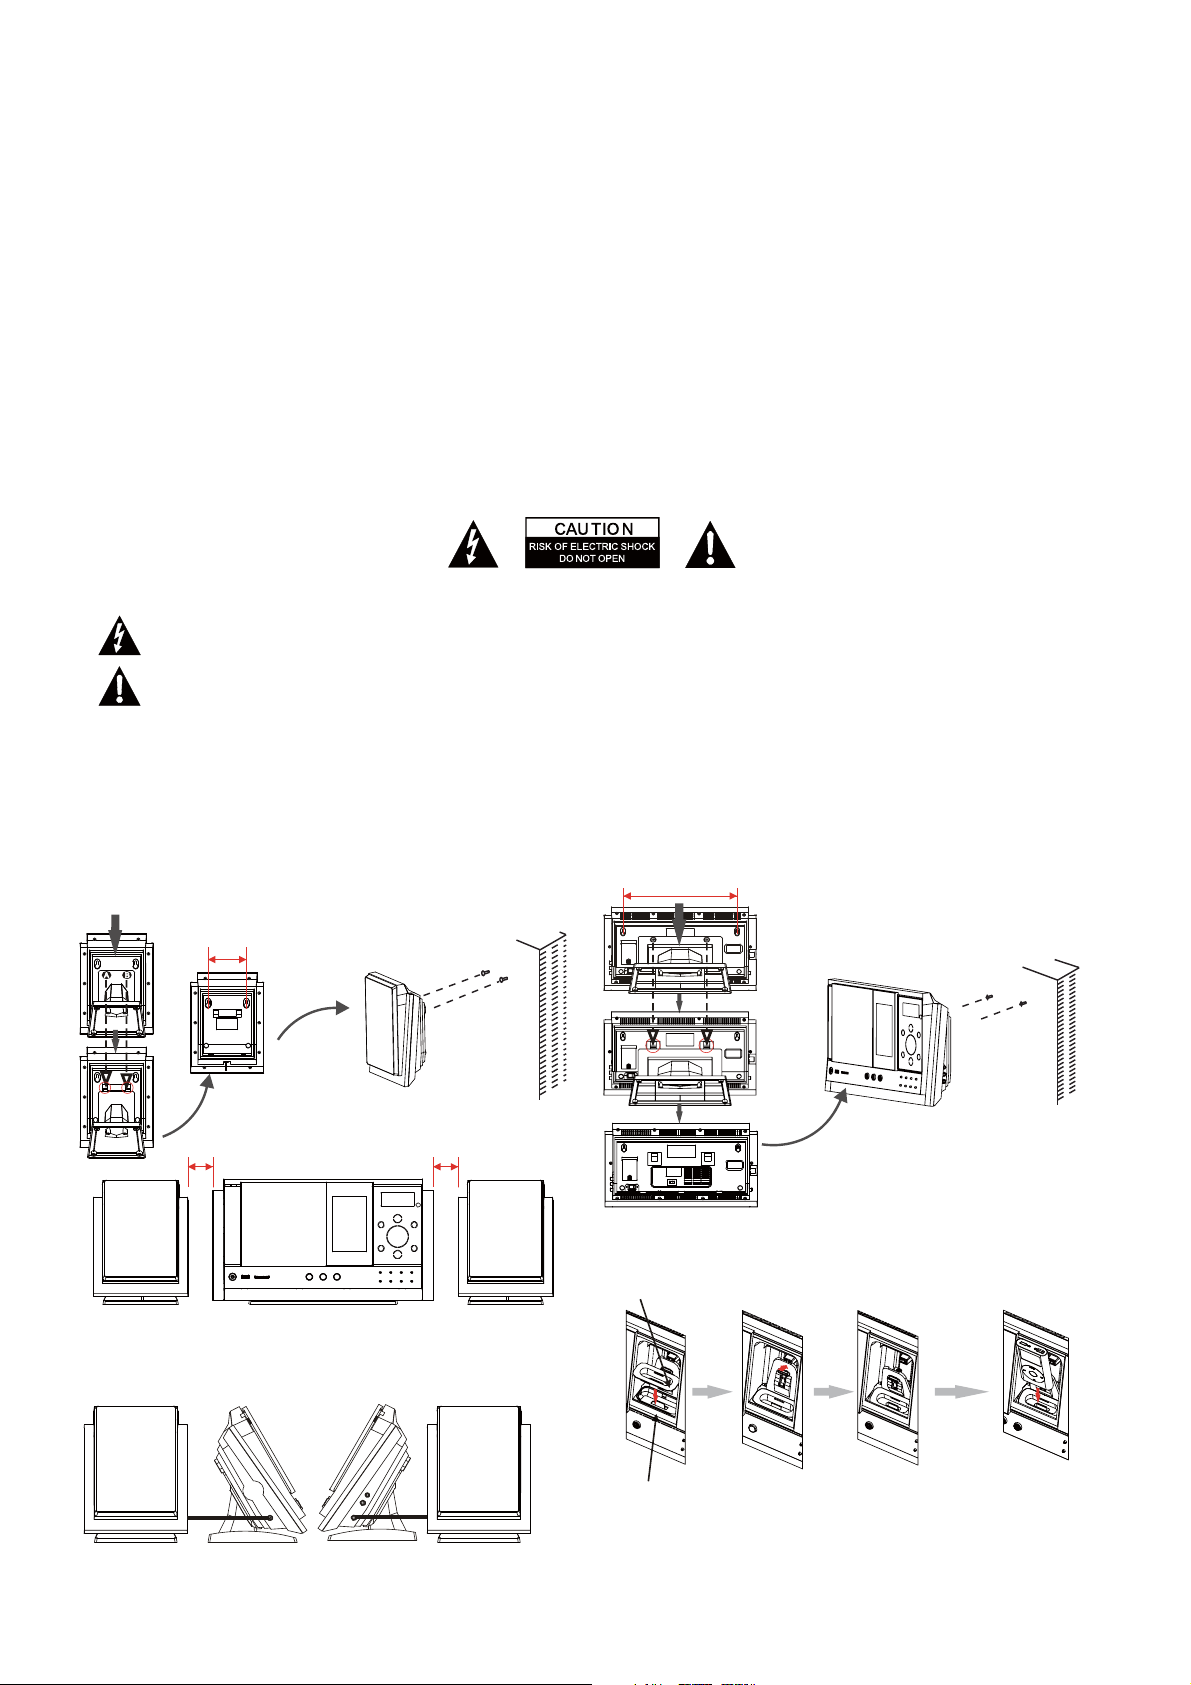
Assembler le tableau de l'unité et le haut-parleur
1. Fixation de l'ensemble de l'unité sur le mur
Mettez en parallèle les deux clous qui fixent au mur, la distance
entre eux devrait être de 84 mm. Note : La taille du clou: 3,5 * 25BA.
Parallel the two nails that fix info the wall,
La distance entre eux doit être de 300 mm.
Note : la taille du clou doit être de 3,4 * 25BA
Appuyer et pousser le panneau stand de la boucle A
et B à l'arrière de chaque enceinte, et ensuite chaque
position du haut-parleur afin de leur effacer.
Note : Lorsque vous montez la série de produits muraux de la ligne, nous
vous suggérons de maintenir au moins 50 mm de distance entre l'unité
principale et les haut-parleurs pour obtenir un meilleur effet stéréo et
mieux s'assurer que la porte du CD glisse avec le mouvement adéquat.
2. Connexion des enceintes
Appuyez et poussez le panneau de support de la
boucle C et D puis le support de l'unité principale
s'en éloignera.
3. Station d'accueil iPod et réglage du panneau de protection
Support Universel (en utilisant les adaptateurs supports pour utiliser
tous les types de lecteurs iPod.)
Réglage du panneau de
protection de l'iPod
(Appuyez sur le panneau
de protection iPod
légèrement à partir de
verrouillage.)
Réglage de l'iPod (Insérer
le lecteur iPod facilement
dans le connecteur et
fixez-le, puis appuyez
dessus et pousser vers
la porte de verrouillage
jusqu'à ce qu'il
s'enclenche.)
Page 3
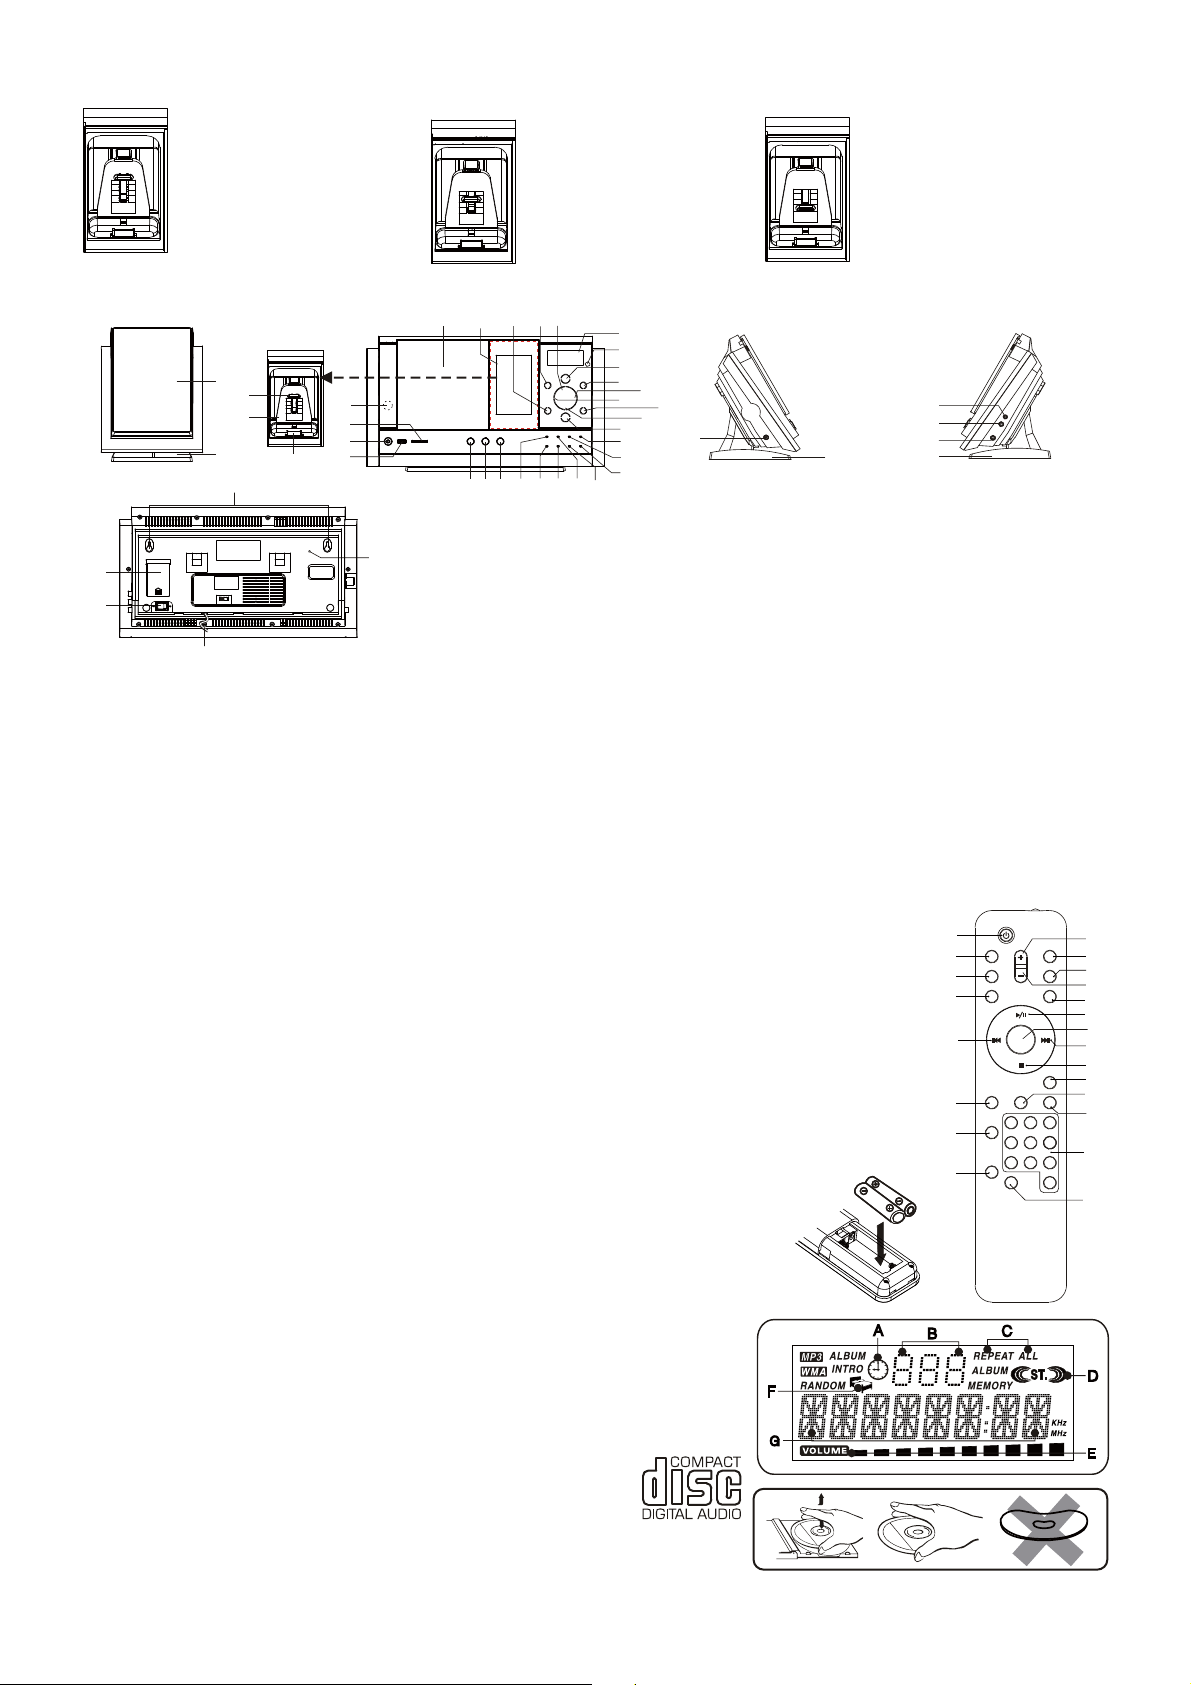
4. Réglage du bouton de réglage de la protection
Régler le bouton de réglage de la
protection au niveau 1 pour protéger
ce lecteur iPod comme suit:
Fabriqué pour iPod avec affichage
en couleur (4ème génération)
40GB, 60GB
seulement iPod
(5ème génération) 30GB
Seulement, iPod classique 80GB,
iPod classique 2ème génération
120GB
Caractéristiques et Commandes
Réglage du bouton de réglage
au niveau 2 pour Protéger ces
lecteurs iPod comme suit :
Fabriqué pour iPod mini (1ère
génération) 4GB, 6GB seulement
(4ème génération) 20GB seulement,
U2 Spécial Edition, iPod avec
affichage en couleur
(4ème génération) 20GB, 30GB
seulement, U2 Spécial Edition iPod
(5ème génération) 60GB, 80GB,
avec vidéo
iPOd classique 160 GB
Régler le bouton de réglage au
niveau 3 pour protéger ces
lecteurs iPod comme suit :
Fabriqué pour iPod nano
(1ère génération) 1GB, 2GB, 4GB
seulement iPod touch
8GB/16GB/32GB
iPod touch 2nd generation
8GB/16GB/32GB
1. SPEAKER
2. SPEAKER STAND
3. STANDBY LED INDICATOR
4. SD/MMC CARD IN SLOT
5. HEADPHONES JACK
6. USB DEVICE IN PORT
7. iPod OPEN/CLOSE BUTTON
8. STANDBY/ON BUTTON
9. CD OPEN/CLOSE BUTTON
11. BOUTON ID3/MONO/ST.
12. iPod BOUTON /MEM/CLOCK-ADJ.
13. BOUTON TIMER
14. BOUTON ALEATOIRE
15. BOUTON LECTURE MUETTE
16. BOUTON PRESET/FOLDER DOWN
17. BOUTON PRESET/FOLDER UP
18. TOUCHE PLATE EQ
19. TOUCHE PLATE STOP/MENU
10. SLEEP BUTTON
20. TOUCHE PLATE VOLUME DOWN
21. TOUCHE PLATE SKIP/TUNE
SEARCH DOWN
22. TOUCHE PLATE VOLUME UP
23. TOUCHE PLATE FUNCTION
24. CAPTEUR IR
25. ECRAN AFFICHAGE LCD
26. PORTE CD
27. TOUCHE PLATE REPEAT
TELECOMMANDE
1. BOUTON DE VEILLE
2. BOUTON LECTURE MUETTE
3. BOUTON PRESET/FOLDERUP
4. BOUTON PRESET/FOLDER DOWN
5. BOUTON SKIP/TUNE SEARCH DOWN
6. BOUTON INTRO
7. BOUTON ID3/MONO/ST.
8. BOUTON RANDOM
9. VOLUME UP BUTTON
10. BOUTON FUNCTION
11. BOUTON CD OPEN/CLOSE
28. TOUCHE PLATE INTRO
29. TOUCHE PLATE PLAY/PAUSE/ENTER
30. ANTENNE FM
31. HAUT-PARLEUR OUT “L”
32. SUPPORT UNITE PRINCIPALE
33. ACCUEIL SUPPORT
34. REGLAGE BOUTON DE
PROTECTION iPod
35. CONNECTEUR IPod
12. BOUTON VOLUME DOWN
13. BOUTON iPod OPEN/CLOSE
14. BOUTON PLAY/PAUSE/ENTER
15. BOUTON. EQ
16. BOUTON SKIP/TUNE SEARCH UP
17. STOP/MENU BUTTON
18. BOUTON SLEEP
19. BOUTON iPod/MEM/CLOCK-ADJ.
20. BOUTON TIMER
21. BOUTON NUMBER SEARCH
22. BOUTON REPEAT
36. SPEAKER OUT “R”
37. PRISE VIDEO OUT
38. PRISE DU CABLE IN
39. HITCHING HOLE
40. PORTE DE BATTERIE DE SAUVEGARDE DE LA
MEMOIRE
41. BOUTON TENSION AC
42. TIRETTE TENSION AC
43. PORTE DU LECTEUR iPod
44. TOUCHE PLATE SKIP/TUNE SEARCH UP
METTRE LES PILES DANS LA TELECOMMANDE
Appuyez sur le cache du compartiment et faites-le glisser pour le sortir et ouvrir
le compartiment. Mettez les 2 piles (UM4) 5AAA) R03) dans la télécommande
conformément aux polarités (+ et -) inscrites dans le compartiment et sur les piles.
Replacez le cache sur le compartiment, appuyez dessus légèrement et poussez-le
vers le haut jusqu’à ce qu’il s’enclenche.
Note : Déplacer les piles de la télécommande si elles n’ont pas été utilisées
longtemps. Ne mélangez pas les piles normales avec les batteries rechargeables.
Quand les piles deviennent faibles, la télécommande ne va plus fonctionner.
Remplacer avec des piles neuves.
ECRAN D’AFFICHAGE LCD
A. Indicateur de minuterie
B. Indicateur du numéro de l’album
C. Indicateur Répéter 1 et Tout
D. Indicateur Stéréo
E. Indicateur Volume HAUT/BAS
F. Indicateur veille
G. Indicateur piste/nombre/temps
INDICATOR
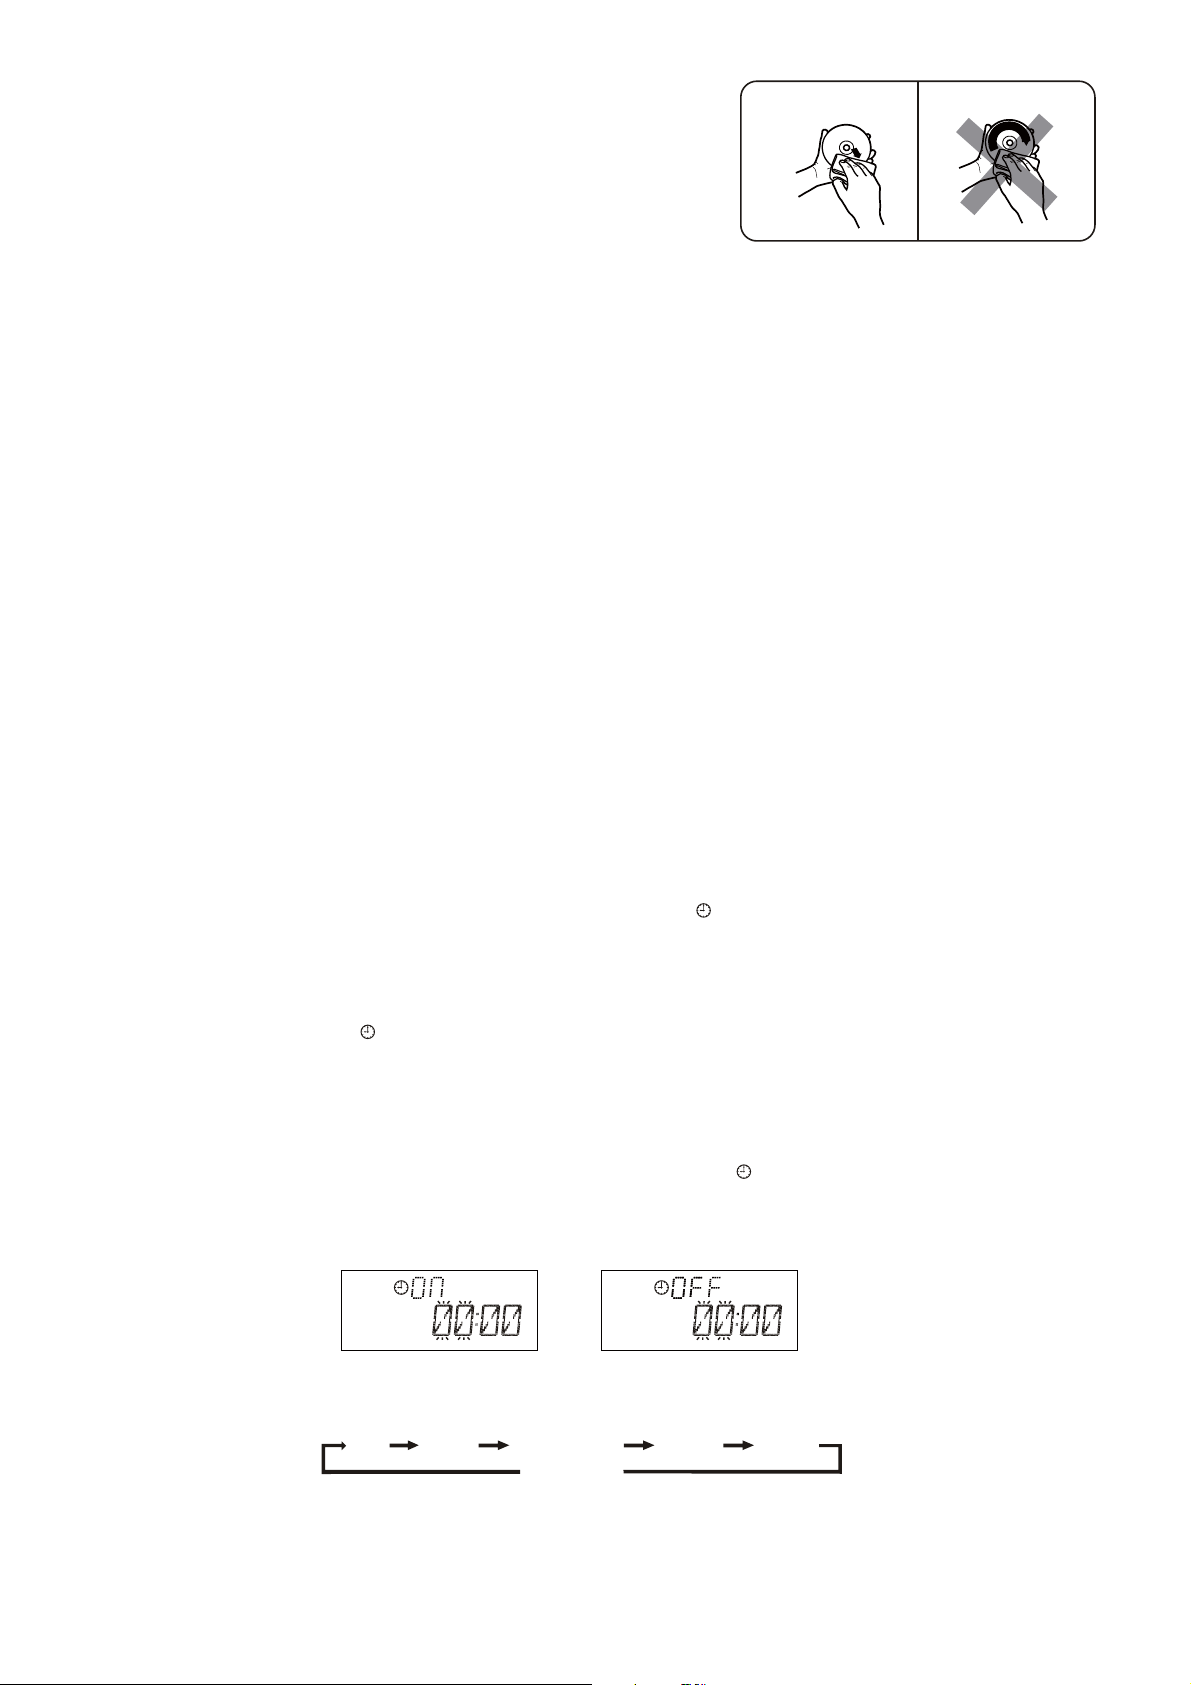
COMPACT DISC
1. Utilisez toujours l’étiquette des disques compacts pour
écouter comme indiqué
2. Notes sur la manipulation des disques
Quand vous déplacez le disque depuis son étui et le chargez :
* Ne touchez pas la surface brillante
* Ne collez pas de papier sur la surface et n’écrivez rien dessus
* Ne pliez pas le disque.
Page 4
3. Stockage
* Stocker le disque dans son boîtier.
* Ne pas exposer les disques directement au soleil ou à des températures
élevées, à une humidité élevée ou dans des endroits poussiéreux.
4. Nettoyage d'un disque
* Si le disque est sale, enlever la poussière, la saleté et les empreintes digitales
avec un chiffon doux.
* Le disque doit être nettoyé du centre vers le bord.
* N'utilisez jamais de benzène, de diluants, nettoyants liquides ou aérosols anti statiques.
* Veiller à bien fermer la porte du CD pour que la lentille ne soit pas exposée à la poussière.
* Ne touchez pas la lentille.
DU CENTRE AU
BORD
Travailler avec l'appareil
Lorsque vous branchez l'appareil sur la prise secteur, puis appuyez sur l'interrupteur d'alimentation à l'arrière de l'unité, l'unité sera en
mode veille, la lumière noire indiquant le mode veille est rouge. Vous pouvez maintenant appuyer sur la touche STANDBY / ON sur
l'appareil ou sur la télécommande pour allumer l’unité. Le voyant deviendra bleu. Tirer la fiche secteur de la prise murale si vous
souhaitez éteindre complètement
POWER/STANDBY
1. Appuyer sur le bouton STANDBY / ON sur l'appareil ou sur la télécommande pour allumer l’appareil.
2. Appuyer sur la fonction sur la télécommande. L'affichage correspondant s'allume.
3. Régler le volume avec le volume (haut ou bas) sur l'appareil ou la télécommande.
4. Appuyer sur le bouton STANDBY / ON sur l'appareil ou sur la télécommande pour éteindre l’appareil.
Note :
1. S'il n'y a pas de signal dans le cadre du CD / périphériques USB / SD et MMC CARD / mode iPod, l'unité principale sera éteinte
automatiquement dans les 15 minutes.
2. En mode iPod, il est impossible d'insérer le lecteur iPod sur le support d'accueil pour iPod. L'unité principale sera également
désactivée jusqu’à15 minute automatiquement.
3. En mode veille, appuyer sur n'importe quel bouton peut faire l'éclairage de l'écran pendant 10 secondes.
4. Veuillez activer l'interrupteur principal pour économiser l'énergie lorsque vous n'utilisez pas l'unité.
RÉGLAGE DE L’HORLOGE
En mode VEILLE.
1. Maintenir le bouton iPod / MEM / C-ADJ jusqu'à ce que l'affichage du temps change à 24 heures (ou 12-heures), le chiffre clignote
2. Appuyez sur la touche SKIP / TUNE RECHERCHE (haut ou bas) sur l'appareil ou appuyer sur le bouton SKIP / TUNE RECHERCHE
(haut ou bas) sur le bouton de la télécommande pour le régler.
3. Appuyer sur lla touche iPod / MEM / C-ADJ. de nouveau, le chiffre des heures clignote sur l'écran, appuyez sur la touche SKIP / TUNE
RECHERCHE (haut ou bas) pour régler l’heure.
4. Appuyer sur le bouton iPod / MEM / C-ADJ. une fois de plus, le chiffre des minutes clignote à l'écran, appuyer sur la touche SKIP /
TUNE RECHERCHE (haut ou bas) pour régler les minutes.
5. Appuyer sur le bouton iPod / MEM / C-ADJ. pour confirmer l'heure.
6. Chaque mode possible comme indiqué ci-dessus sera effacé si la touche n'est pas comprimée dans les 10 secondes.
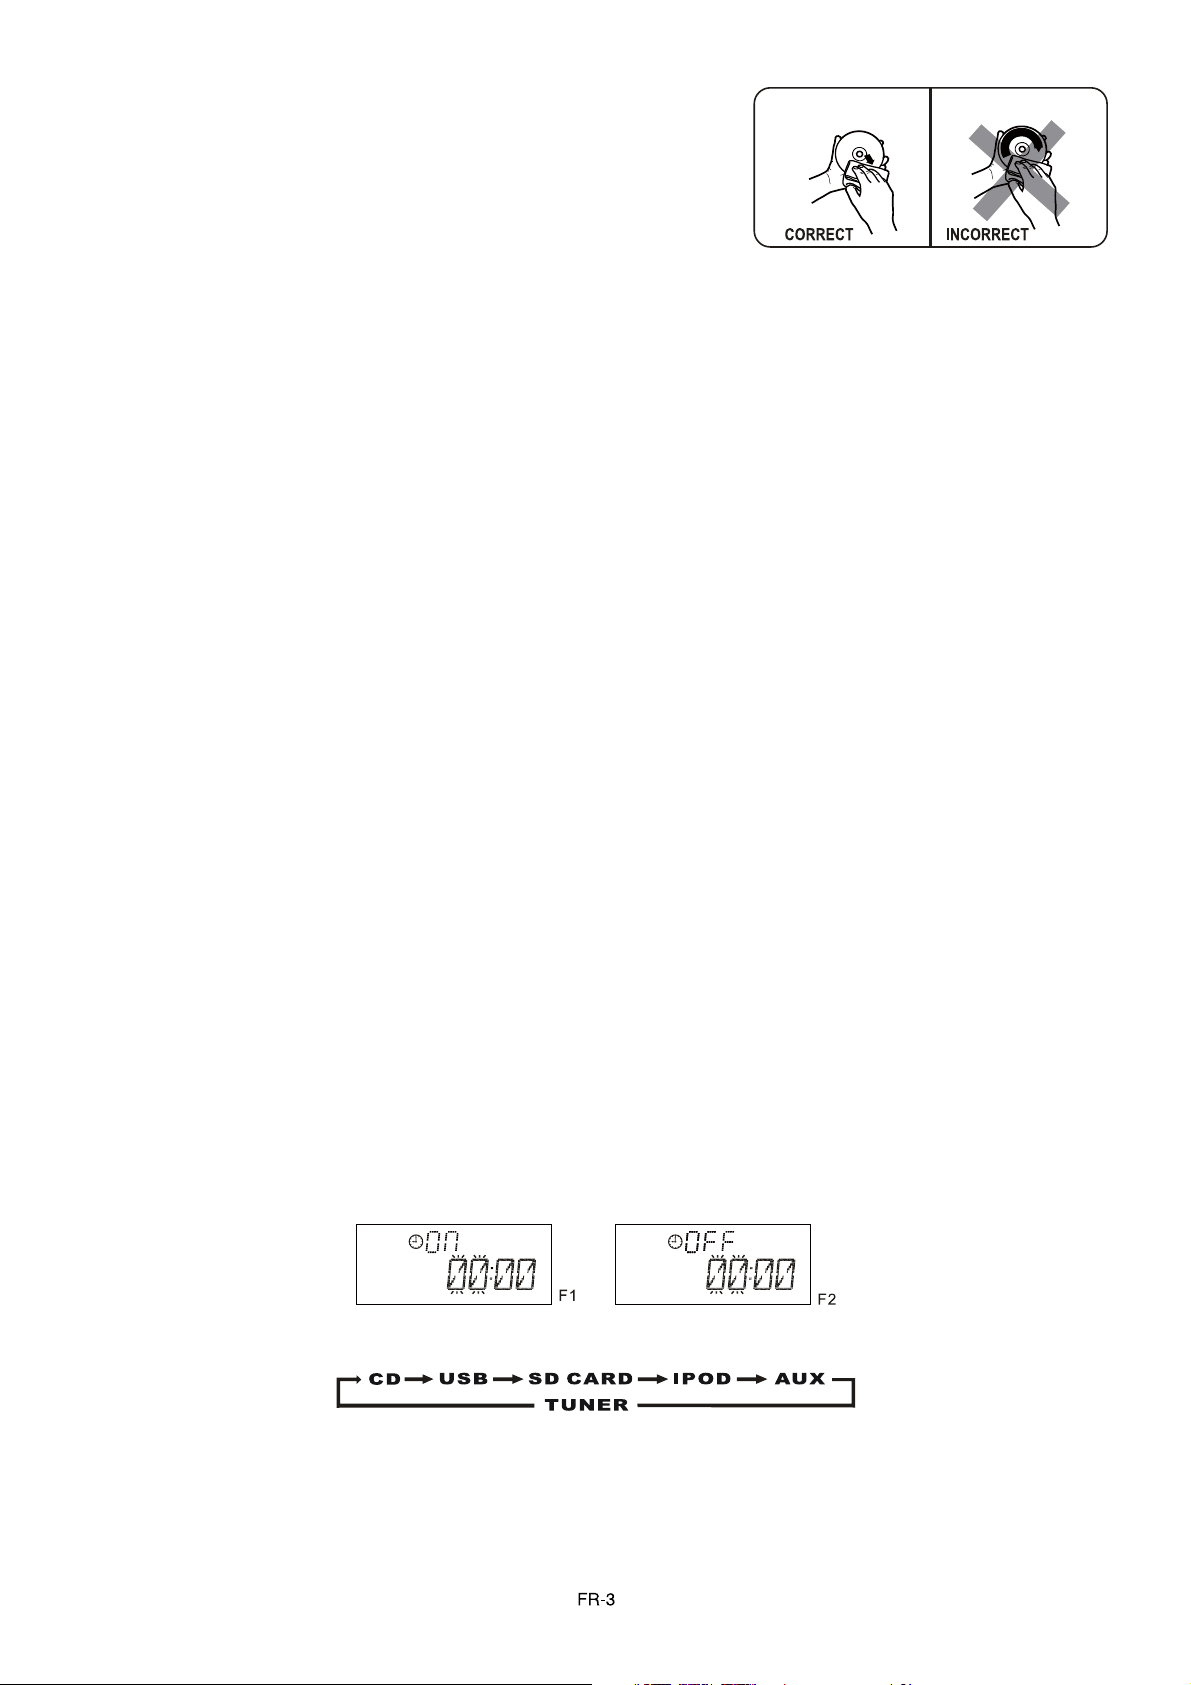
RÉGLAGE HEURES
1. Après avoir réglé l'horloge, appuyer sur le bouton "ON du TIMER pendant quelques secondes " et "00:00" s'affiche à l'écran et le
chiffre de l’heure clignote. (F1)
2. Appuyer sur le bouton SKIP / TUNE DE RECHERCHE (haut ou bas) ou appuyez sur la touche SKIP / TUNE DE RECHERCHE (haut
ou bas) sur le bouton de la télécommande afin de l'ajuster.
3. Appuyer sur le bouton TIMER, le chiffre des minutes se met à clignoter, le régler en touchant SKIP / TUNE RECHERCHE (haut ou
bas) sur l'appareil ou sur la télécommande.
4. Appuyer sur le bouton TIMER encore une fois pour confirmer et réglez le temps sur TIMER ON .
5. Après ajustement "TIMER ON", "OFF" s'affiche à l'écran et le chiffre de l’heure clignote. (F2)
6. Répéter les étapes ci-dessus 2 à 3, puis appuyer sur le bouton TIMER pour confirmer et pour réglet le temps pour TIMER OFF
7. Maintenant, le "TUNER" apparaît sur l'écran qui clignote, sélectionner le mode d'alarme de "TUNER, CD, USB, SD Card" en touchant
le bouton SKIP / TUNE RECHERCHE (haut ou bas).
8. Appuyer sur le bouton TIMER, la minuterie "VOL" apparaît sur l'afficheur et clignote, régler le volume minuterie haute ou basse en
touchant le SKIP / TUNE SEARCH (haut ou bas) ou appuyer sur le bouton SKIP / TUNE SEARCH (Haut ou bas) sur la télécommande.
9. Chaque mode possible, comme indiqué ci-dessus sera effacé si le bouton n'est pas comprimé dans les 10 secondes.
10. Après le réglage de "TIMER ON" et "TIMER OFF", appuyer sur le bouton TIMER, "" apparaît sur l'écran.
11. L'unité principale se met en marche automatiquement avec "TIMER ON" et commence à jouer, l'unité principale sera éteinte
automatiquement avec "TIMER OFF".
Note : Si l'affichage indique "ERROR" tandis que vous réglez la minuterie sur "ON", cela signifie que "TIMER ON" et "TIMER OFF" sont
les mêmes. Dans ce cas, veuillez aller à "TIMER OFF" pour régler l'heure en premier.
Ecran d'affichage
Sélectionner la fonction :la fonction c’est quand on touche le bouton FUNCTION de l'appareil ou le bouton FUNCTION sur la
télécommande pour changer le mode de chaque fonction. L’affichage change comme ci-dessous:
UTILISATION DE LA RADIO
1. Appuyer sur la plaque du bouton FUNCTION de l'unité principale ou appuyer sur le bouton FUNCTION sur la télécommande pour que
TUNER sélectionne la FM.
2. Appuyer sur le bouton SKIP / TUNE RECHERCHE (haut ou bas) sur l'appareil ou appuyer sur le bouton SKIP / TUNE RECHERCHE
(haut ou bas) de la télécommande pour syntoniser la bande des ondes avec intervalle désiré de fréquence.
Page 5
Mise au point manuelle
Pour accorder des stations de faible fréquence, utilisez le réglage manuel en appuyant sur le bouton SKIP / TUNE RECHERCHE (haut ou
bas) en permanence jusqu'à ce que vous lisiez la bonne fréquence et que la réception est au mieux.
Mise au point automatique
1. Appuyer sur le bouton SKIP / TUNE RECHERCHE (haut ou bas) sur l'appareil ou appuyer sur le bouton SKIP / TUNE RECHERCHE
(haut ou bas) de la télécommande pendant une seconde ou plus, puis relâchez le bouton. Le tuner recherche automatiquement la
première station de signal suffisamment fort.
2. Répéter la même procédure pour chercher d’autres stations.
Choisir le mode Mono/stéréo
Vous pouvez sélectionner le MONO / STEREO uniquement en mode FM.
1. Lorsque vous souhaitez sélectionner la station FM stéréo, appuyez sur le bouton ID3/MONO/STEREO. Lorsque vous recevez une
station FM stéréo, l'indicateur " " apparaît sur l'écran, vous pouvez recevoir la transmission FM stéréo.
2. Lorsque vous appuyez sur le bouton ID3/MONO/STEREO encore, l'indicateur STEREO FM s'éteint et passe à l'état FM mono.
Programmation des stations préréglées
Vous pouvez prérégler les stations de votre choix aussi et stocker jusqu'à 30 stations FM dans sa mémoire. Pour mémoriser vos stations
de radiodiffusion sélectionnées :
1. Syntonisez la station désirée.
2. Appuyez sur le bouton iPod / MEM / CLOCK-ADJ.
3. Appuyez sur le bouton PRESET / FOLDER (haut ou bas) quand votre numéro de station désirée s’affiche.
4. Appuyez sur le bouton iPod / MEM / CLOCK-ADJ. pour confirmer votre sélection.
5. Pour programmer plus de stations dans la mémoire, répéter les étapes ci-dessus 2 à 4.
6. Pour modifier le préréglage des stations enregistrées, répéter les étapes ci-dessus 2 à 4.
Note : 1. Stockage d'une nouvelle station dans un emplacement prédéfini entraîne l'effacement de la station précédemment stockée à cet
endroit.
2. Eteindre n'efface pas la mémoire des stations préréglées. Effectuer procédures pour le préréglage et la mémorisation des stations.
Sélection des stations préréglées
1. Appuyer sur le bouton PRESET / FOLDER (haut ou bas) pour sélectionner le numéro de station présélectionnée souhaitée.
2. L'emplacement numérique de la station préréglée est affiché avec la fréquence correspondante.
Antenne FM
Le fil d'antenne FM pour la réception est de meilleure qualité.
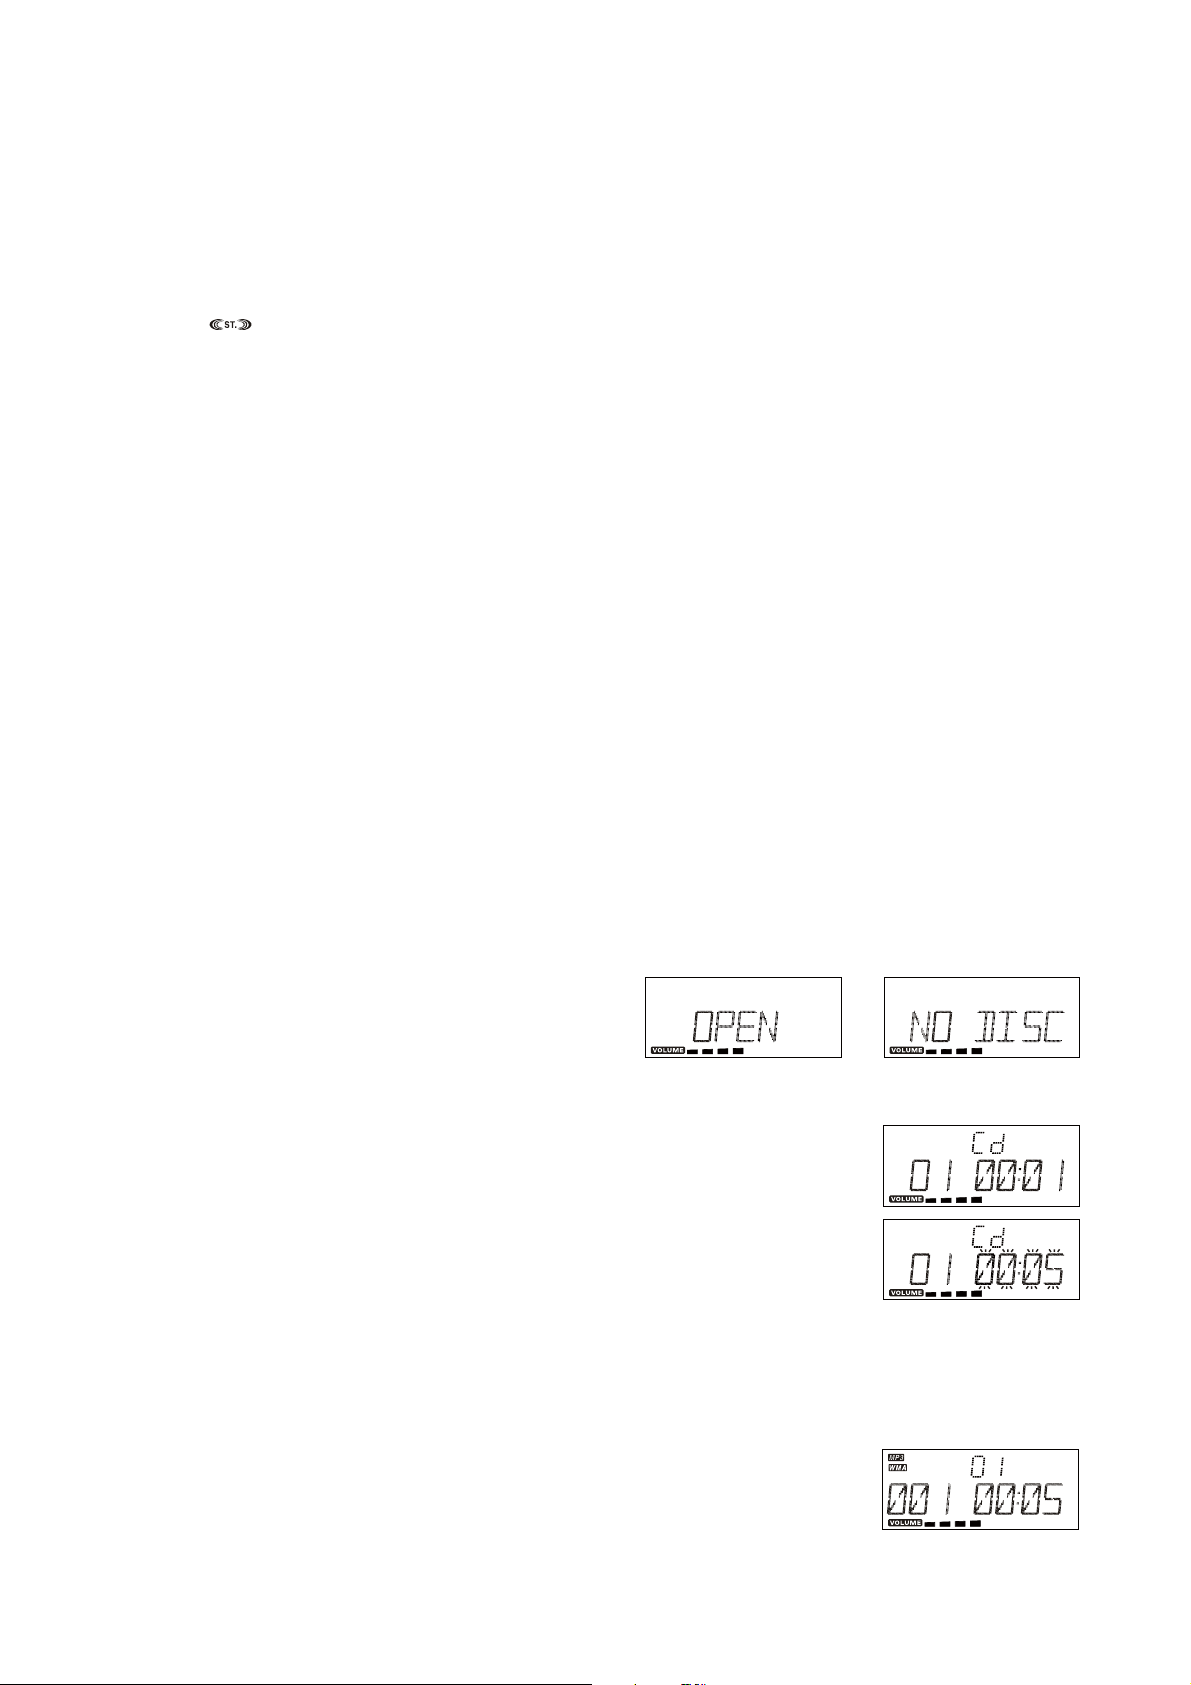
CD/MP3/WMA OPERATION
Écouter sur le disque compact (CD/MP3/WMA)
1. Si vous voulez profiter de CD/MP3, appuyer sur le bouton OPEN CD / CLOSE une fois sur la première unité, et la porte de CD s'ouvre
automatiquement. (F3)
2. Insérer le disque CD-MP3 dans le compartiment CD, appuyer sur le bouton OPEN CD, et la porte se fermera automatiquement.
3. Appuyer sur la plaque de la touche FUNCTION de l'appareil ou appuyer sur le bouton FUNCTION de la télécommande et sélectionner
le mode CD/MP3. L'appareil lira automatiquement le disque CD/MP3/WMA.
Note: (1) Cet appareil peut lire les CD, CD-R, CD-RW, WMA et les disques MP3.
(2) Il peut lire "8 cm" et « Multi Section » de disque MP3.
(3) Le «taux de transfert de lecture" en MP3 et WMA.
a. En MP3, le débit de transfert:8 à 256 kbps.
b. En WMA, le débit de transfert: 8 à 192 kbps.
(4) Le "Max lisibles 99 dossiers et 999 pistes".
(5) Si aucun disque ou ne peux pas lire le TOC,
Ecouter le CD/MP3/WMA
- CD
1. Insérer le CD dans le compartiment de CD, l'unité principale lira automatiquement le nombre total des
2. Appuyer sur le PLAY / PAUSE / plaque de touche ENTRER sur l'appareil ou appuyer sur la touche
3. Appuyer sur le plaque de touche PLAY / PAUSE / ENTRER sur l'appareil ou appuyer sur la touche
4. Appuyer sur la touche SKIP / TUNE RECHERCHE (haut ou bas) plaque de touche une fois pour
5. Pour reprendre la lecture, appuyer sur la touche PLAY / PAUSE /ENTRER sur l'appareil ou appuyer
6. Pour arrêter la lecture, appuyer sur la touche STOP / MENU sur l'appareil ou appuyer sur la touche
le NO DISC s'affiche. (F4)
dossiers et des pistes en même temps.
PLAY / PAUSE / touche ENTRER sur la télécommande, l'appareil va jouer la première piste de F5 du
CD automatiquement. (F5)
PLAY / PAUSE / ENTRER sur la télécommande une fois de plus, le temps écoulé clignote et la lecture
du CD est en pause. (F6)
changer de piste NO., F6 et maintenir la touche SKIP / TUNE RECHERCHE (haut ou bas) sur l'appareil
une fois ou (sur la télécommande) pour passer en avance rapide ou en arrière de chaque chanson.
sur la touche PLAY / PAUSE ENTRER sur la télécommande une fois de plus.
STOP / MENU de la télécommande
- MP3/WMA
1. Insérez le disque MP3/WMA dans le compartiment de CD, l'unité principale lira automatiquement le nombre total des dossiers et des
pistes en même temps.
2. Appuyer sur le plaque de touche PLAY/PAUSE/ENTER dans l’unité ou appuyer PLAY/PAUSE/ ENTRER
sur la télécommande et l'appareil va lire la première piste du disque CD F7 automatiquement. (F7)
3. Appuyer sur le / plaque de touche PLAY / PAUSE ENTRER sur l'appareil ou appuyer sur la touche
PLAY / PAUSE / ENTRER sur la télécommande une fois de plus, le temps écoulé clignote et la lecture
du CD est en pause.(F8)
Page 6
4. Pour changer le numéro de piste., appuyez sur SKIP/TUNE SEARCH(UP oouDOWN) sur l’unité ou
appuyez sur le bouton PLAY/PAUSE/ENTER sur la télécommande une fois. Maintenez appuyé sur
la touche SKIP/TUNE SEARCH (UP ou DOWN) sur l’unité une fois ou (sur la télécommande) pour aller
rapidement en avant ou en arrière de chaque chanson.
5. Pour recommencer la lecture, apputez sur la touche PLAY/PAUSE/ENTER sur l’unité ou sur la
télécommande encore une fois.
6. Pour changer le numéro de l’album, appuyez sur PRESET/FOLDER UP ou PRESET/FOLDER ON une fois.
7. Pour arrêter la lecture, appuyez sur la touche STOP/MENU une fois sur l’unité ou sur la télécommande.
Note : Si l’unité principale ne fonctionne pas bien, déconnectez la source d’alimentation et reconnectez-la de nouveau.
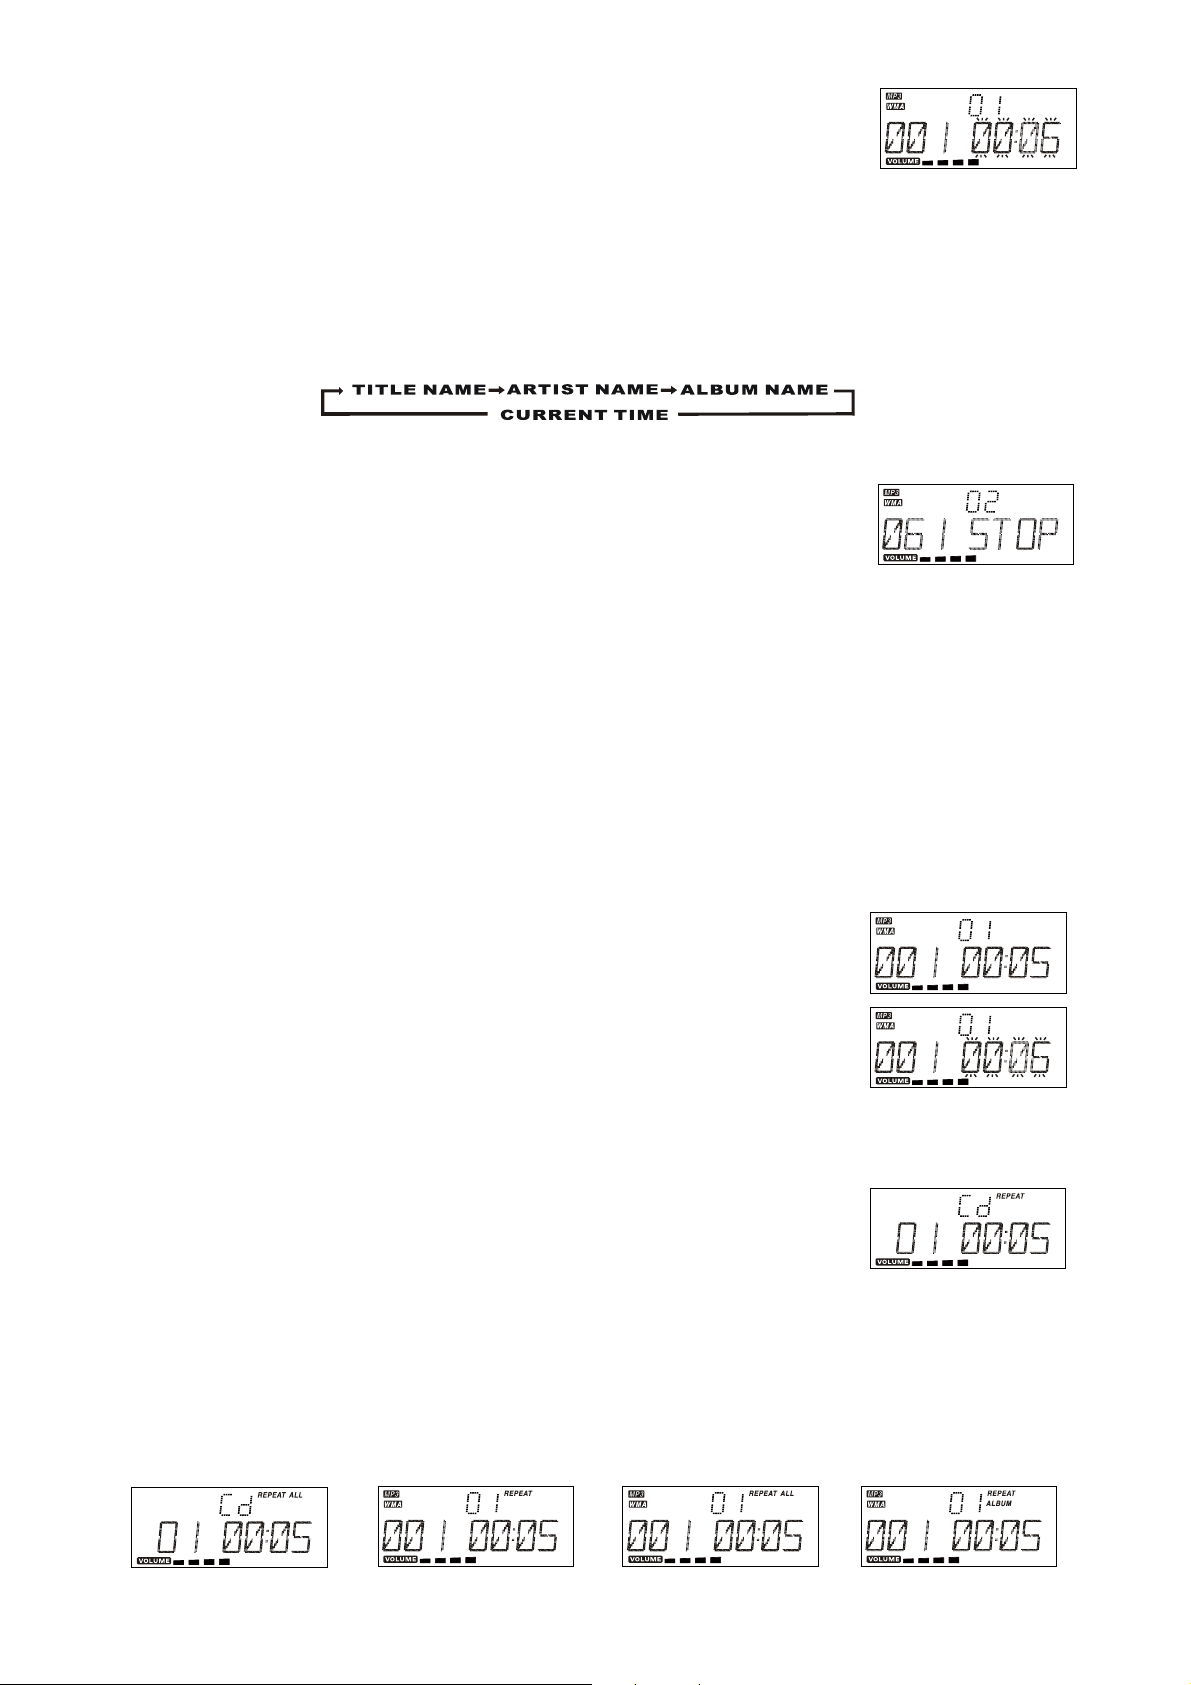
FONCTIONNEMENT ID3
Mode MP3/WMA
1. Appuyez sur le bouton ID3/MONO/STEREO sur l'unité e (ou la télécommande) pour ouvrir la fonction ID3.
2. Si le fichier MP3/WMA est indiqué par "ID3" il cherchera automatiquement les informations de "TITRE NOM", "artiste nom» et «Nom
de l'album", indiqués à l'écran.
3. Appuyez sur le bouton ID3/MONO/STEREO sur l'unité (ou sur la télécommande). L’appareil se remettra à fonctionner normalement.
TEMPS COURANT
FONCTIONNEMENT de l’USB /CARTE SD
Pendant le mode veille
1. Insérez le périphérique USB ou carte SD / MMC, puis appuyez sur la touche STANDBY sur l'unité
principale (ou la télécommande) pour allumer l'unité.
2. Appuyez sur la touche FUNCTION de l'unité principale (ou la télécommande) pour sélectionner le port
USB ou mode SD / MMC .L'unité principale va automatiquement lire le nombre total des dossiers et
des pistes en même temps. (F9)
3. Si le dispositif de mémoire USB contient plus d'un dossier.
a. Appuyez sur la touche PRESET / FOLDER (haut ou bas) pour sélectionner chaque dossier.
b. Appuyez sur la touche SKIP / TUNE RECHERCHE (haut ou bas) pour sélectionner la piste en cours dans le dossier désiré.
4. Si le MP3 et WMA sont indiqués par "ID3".
a. Pendant que l’unité joue dans le MP3 ou WMA. Appuyez sur le bouton ID3/MONO/STEREO une fois. L'écran va afficher I
« D3 ON », et puis il va automatiquement chercher plus de 64 lettres de "TITRE ", "Nom de l’artiste» ou «Nom de l'album" qui se
déplacent de droite à la gauche sur l'écran en continu.
b. Appuyez sur le bouton ID3/MONO/STEREO une fois de plus. L’écran affiche « ID3 OFF », puis l'unité principale jouera
normalement.
Note : 1. L'unité principale peut lire MP3 et WMA uniquement dans ce mode.
2. Cet appareil peut prendre en charge la plupart des périphériques USB et SD / MMC / SDHC. Sa capacité va jusqu'à 32 Go de
3. Il peut prendre en charge la version USB 1.1 et 2.0.
4. Il ne prend pas en charge toutes sortes de «double voltage-MMC carte", ni "MMC-Plus" de la carte.
5. L'unité principale ne prend pas en charge les fichiers WMA qui sont protégés "DRM FILE"
mémoire-. Il ne peut pas accéder (ou accéder à un temps plus long) à une capacité de mémoire au-dessus de 32 Go. Sinon,
en faire d’autres pour y accéder.
Pour sélectionner chaque lecture du disque flash entier
1. La lecture commence par toucher la touche PLAY / PAUSE / ENTRER sur l'appareil ou appuyez sur
la touche PLAY / PAUSE / ENTRER sur la télécommande. La lecture commence avec la première
piste. L'écran affiche le numéro de la piste en cours et le temps écoulé. (F10)
2. Pour interrompre la lecture, appuyez sur la touche PLAY / PAUSE / ENTRER sur l'appareil ou sur la
télécommande. L’indicateur du temps écoulé clignote (F11)
3. Pour reprendre la lecture, appuyez sur la touche PLAY / PAUSE / ENTRER sur l'appareil ou appuyez
sur la touche PLAY / PAUSE / ENTRER sur la télécommande.
4. Pour arrêter la lecture, appuyez sur la touche STOP / MENU.
Note : A tout moment, le périphérique USB ou carte SD doit être bien mis en mode de veille pour éviter
d’endommager l'unité principale, l’USB ou la carte SD.
La fonction répétition
– CD
1. Appuyez sur la touche REPEAT sur l'appareil ou appuyez sur la touche REPEAT sur la télécommande
une fois, « REPEAT » est affiché. Le CD va répéter lecture de la piste en cours . (F12)
2. Appuyez sur la touche REPEAT sur l'appareil ou appuyez sur la touche REPEAT sur la télécommande
à deux reprises, « REPEAT ALL » est affiché. Le CD va jouer toutes les pistes de manière répétitive. (F13)
3. Appuyez sur la touche REPEAT sur l'appareil ou appuyez sur la touche REPEAT sur la télécommande
encore une fois, la fonction REPEAT sera éteinte.
MP3/WMA/USB/CARTE SD
1. Appuyez sur la touche REPEAT sur l'appareil ou appuyez sur la touche REPEAT sur la télécommande, puis « REPEAT » est affiché.
Il jouera le morceau en cours à plusieurs reprises. (F14)
2. Appuyez sur la touche REPEAT sur l'appareil ou appuyez sur REPEAT sur la télécommande à deux reprises, « REPEAT ALL » est
affiché. Il jouera tous les morceaux à plusieurs reprises. (F15)
3. Appuyez sur la touche REPEAT sur l'appareil ou appuyez sur la touche REPEAT sur la télécommande trois fois, « REPEAT ALBUM »
est affiché. Il jouera tous les morceaux du répertoire courant de façon répétitive. (F16)
4. Appuyez sur la touche REPEAT de l'unité ou appuyez sur la touche REPEAT sur la télécommande une fois de plus encore,
et la fonction REPEAT sera éteinte.
Page 7
FONCTION PROGRAMME
L’utilisateur peut utiliser le programme jusqu’à 32 pistes en mode CD ou 64 pistes en mode MP3/WMA/USB/Carte SD dans n’importe
quel ordre.
1. Comment utiliser le programme
- CD
1) Appuyez sur le bouton iPod/MEM/C-ADJ., déplacer en mode MEMOIRE. (F17)
2) Appuyez sur la touche SKIP/TUNE SEARCH (UP ou DOWN) sur l’unité ou sur le bouton équivalent
sur la télé, le numéro de la piste sera changé.
3) Appuyez sur le bouton iPod/MEM/C-ADJ pour confirmer le numéro de la piste.
- MP3/WMA
1) Appuyez sur le bouton iPod/MEM/C-ADJ., passez en mode mémoire. Le numéro de l’album clignote.
(F18)
2) Appuyez sur le bouton PRESET/ FOLDER sur l’unité ou sur la télécommande, le numéro de l’album
sera changé.
3) Appuyez sur le bouton iPod/MEM/C-ADJ., le premier numéro de piste sera affiché (F19).
4) Appuyez sur la touche SKIP/TUNE SEARCH(UP ou DOWN) sur l’unité ou sur la télécommande,
le numéro de piste sera changé.
5) Appuyez sur le bouton iPod/MEM/C-ADJ. pour confirmer le numéro de piste favori.
2. PROGRAMME EN MARCHE
Appuyez sur la touche PLAY/PAUSE/ENTER sur l’unité ou sur la télécommande. L’unité va lire la première piste du programme. Quand
toutes les pistes ont été lues, l’affichage de l’unité va montrer le numéro des pistes et le temps de lecture des chansons du CD/MP3.
3. ANNULER LE PROGRAMME
1. Appuyez sur la touche STOP/MENU sur l’unité ou sur la télécommande une fois, ou ouvrez le compartiment CD et refermez-le, la
mémoire sera effacée.
2. Installez un nouveau programme, celui qui existe sera enlevé.
Note : Au cours du mode programme.
1. Appuyez sur la touche REPEAT sur l’unité ou sur la télécommande une fois, l’indicateur "REPEAT" va s’allumer sur l’écran. Et l’unité
va répéter la piste en cours.
2. Appuyez sur la touche REPEAT sur l’unité ou sur la télécommande deux fois, "REPEAT ALL" va s’allumer sur l’écran. Et l’unité va
répéter le nombre total de pistes.
3. Appuyez sur la touche REPEAT sur l’unité ou sur la télécommande encore une fois. L’unité se remettra à jouer le programme
normalement.
LECTURE ALEATOIRE
1. Appuyez sur la touche RANDOM de l'appareil (ou de la télécommande), puis RANDOM est affiché.
(F20)
2. Appuyez sur la touche RANDOM de nouveau, puis l'unité périphérique audio se remettra à jouer
normalement.
INTRO LECTURE (sur la télécommande)
1. Appuyez sur le bouton INTRO sur la télécommande, INTRO est affiché. INTRO jouera les
10 premières secondes de chaque piste. (F21)
2. Appuyez sur le bouton INTRO deux fois, et l'unité périphérique audio se remettra à jouer normalement. ''•''' -
IPOD OPERATIONS
Note : Pour éviter d'endommager l'iPod, veuillez vous assurer que l'iPod est en mode veille pour l’insérer et le retirer.
L'appareil en mode veille :
1. Appuyez une fois sur le bouton OPEN iPod / CLOSE sur la première unité avant d’ouvrir la porte de
l’ iPod.
2. Insérez le lecteur iPod dans le support d'accueil pour iPod sur le front de l'unité principale fixement.
3. Allumez l'unité principale, puis appuyez sur la plaque de touche FUNCTION de l'appareil ou appuyez
sur la touche FUNCTION sur la télécommande pour le mode iPod, l'indicateur iPod s'affiche sur l'écran
de l’unité principale. (F22)
L'appareil en mode iPod:
1. Appuyez sur le volume (ou bas) pour arrêter la lecture en cours, appuyez sur la touche STOP / MENU (seulement en iPod) une fois.
2. Appuyez sur le PLAY / PAUSE / ENTRER (seulement en iPod) une fois pour mettre en pause le morceau en cours. Pour reprendre la
lecture, appuyez sur la touche PLAY / PAUSE / ENTRER (seulement en iPod) une fois de plus.
3. Pour sauter en avant ou en arrière, toucher le SKIP / TUNE RECHERCHE (haut ou bas) pour sélectionner la piste désirée.
4. Appuyez sur la plaque de touche REPEAT ou appuyez sur la touche RANDOM de l'appareil (ou sur la télécommande).
Note : la version iPod touch 1.1.4 ou supérieur peuvent effectuer REPEAT ou fonction aléatoire.
L'appareil en mode iPod MENU :
1. Quand l'appareil est en mode iPod, appuyez sur le bouton iPod / MEM / CLOCK-ADJ. 1 fois,
l'appareil passe au menu du mode iPod. L'indicateur de menu iPod apparaît sur l'affichage
de l'unité. (F23)
Page 8
2. Appuyer sur le bouton STOP / MENU (uniquement dans l'iPod) et retour au menu de l'iPod..
a. Pour sélectionner le menu actuel au dessous :
Music>Extra>Photo Import (sans la fonction écran sur le IPOD Mini)>Settings>Shuffle Songs>Backlight>Now Playing vous
montrera l’écran du lecteur IPod
b. Appuyer sur le bouton SKIP/TUNE SEARCH (UP ou DOWN) dans l’unité (ou la télécommande) pour chercher le menu actuel.
3. Appuyer sur le bouton PLAY/PAUSE/ENTER (uniquement dans l’IPod) dans l’unité (lélécommande)
a. Appuyer le bouton SKIP/TUNE SEARCH (UP ou DOWN) dans l’unité (ou télécommande) pour chercher le teneur actuel dans le
menu du dossier désiré.
b. Si vous voulez retourner au menu de l’IPod, appuyer le STOP/MENU (uniquement dans l’IPod) encore.
4. Pour reprendre la lecture, appuyer sur le bouton IPod/MEM/CLOCK_ADJ une fois de plus, l’unité retournera dans le mode IPod.
Charger la batterie du lecteur IPod avec l'unité principale
1. Le lecteur IPod possède une batterie interne non amovible, la batterie peut avoir besoin de charge si elle n'est pas utilisée pendant un
certain temps.
2. Vous pouvez charger l’IPod Player par l’unité principale automatiquement en mode STANDBY (veille) ou En marche.
Note : 1. 80% de la batterie se recharge en une heure, et la recharge complète se fait en quelques heures. Si vous rechargez quand
vous écoutez de la musique, la recharge est très longue.
2. Recharger en mode TUNER peut interférer avec la réception.
Note :
1. A tout moment, vous pouvez contrôler l'iPod sur l'unité principale, une télécommande ou l’iPod lecteur lui-même pendant que l'unité
est en mode « IPod » ou « IPod MENU ».
2. A tout moment, l'iPod doit être bien mis bien en mode STANDBY pour éviter que l'unité et l’iPod soient endommagés.
3. Quand l'unité est en mode iPod, la fonction vidéo de l'iPod fonctionne normalement. Mise à jour de la dernière version de la fonction
iPod vidéo depuis le site Apple.
REGLAGE DE LA VIDEO
1. Quand l'unité est en mode STANDBY (veille): Connecter le téléviseur avec un câble vidéo (câbles de type RCA) à la prise VIDEO OUT
à l'arrière de l'appareil.
2. Quand l'appareil est en mode iPod: Appuyer sur le bouton "MENU" sur la molette de l'IPod pour activer la fonction vidéo.
3. Pour configurer l'iPod pour afficher les vidéos sur la TV :
(a) Choisir Videos > Video Setting, et installer la télévision sur « OUT to Ask » (Demander) ou « On ».
(b) Si vous réglez la TV sur « Demander », l’iPod vous offre la possibilité d'afficher des vidéos sur téléviseur ou sur votre iPod chaque
fois que vous mettez une vidéo.
Note : 1. Le mode vidéo fonctionne seulement quand les lecteurs IPod ont une fonction vidéo.
2. L’IPod classique 80/160 GB, l’IPod nano troisième génération (Video) 4/8 GB et l’IPod Touch 8/16 GB doivent être bien mis en
mode STANDBY avant de commencer le fonction Video.
3. Le câble Vidéo (câble type RCA) n’est pas inclus.
« AUX » EN MODE LECTURE
1. Appuyer sur la touche FUNCTION de l'appareil ou appuyer sur le bouton FUNCTION de la télécommande, jusqu'à ce que l'indicateur
"AUX " s’allume sur l'écran. Cette unité d'entrée audio analogique peut être utilisée par le biais AUX (LINE) IN sur le côté droit de l'appareil.
2. Utilisez un câble avec prise RCA pour connecter une source externe audio.
Note : Le câble Aux n’est pas inclus.
POUR RÉGLER LA FONCTION SOMMEIL
1. Si vous souhaitez vous endormir avec de la musique, appuyez sur le bouton SLEEP sur l'appareil ou sur la télécommande.
2. Vous pouvez sélectionner le Tuner, CD/MP3, USB, SD / MMC, iPod ou le mode AUX en fonction sommeil pour écouter à partir de 90 ,
80,70 jusqu’à 10 minutes de musique avant que ça s’éteigne automatiquement.
CONTROLE EQ
EQ montre la tonalité du son en cours. Lorsque vous touchez la touche EQ ou appuyez sur le bouton EQ sur la télécommande, le
changement de tonalité du son comme ci-dessous:
REGLAGE DE LA LECTURE MUETTE
1. Lorsque vous appuyez sur le bouton MUTE de l'appareil ou sur la télécommande, le niveau du volume
clignote et la sortie audio sera temporairement arrêtée (F24).
2. Appuyer sur le bouton MUTE de l'appareil ou la télécommande une fois de plus, le niveau de volume
et la sortie audio retournera à la normale.
ÉCOUTER LA MUSIQUE AVEC LE CASQUE
Une prise casque stéréo est fournie pour une écoute privée. Pour écouter l'unité avec des écouteurs (non fournis), insérer la mini prise
stéréo de 3,5 mm du casque dans la prise PHONES sur le panneau avant. Les haut-parleurs externes sont automatiquement
déconnectés lorsque le casque est utilisé.
MEMOIRE DE SAUVEGARDE
Pour insérer 105Vx3, UM-4, AAA ou des piles équivalentes dans les compartiments pour la batterie de l'appareil. Elles sont utilisées pour
sauvegarder la mémoire du processeur principal.
SPECIFICATION
ALIMENTATION COURANT :
COURANT DE SORTIE :
DIMENSION DE L’UNITE :
DIMENSION BOITE
HAUT-PARLEUR : N.W. :
La spécification peut être changée sans préavis.
Avertissement Ventilation : « La ventilation normale du produit ne doit pas être entravée pour l'usage prévu. »
230V-50HZ
10Watts x 2
400(W)x154(D)x211 (H)mm
160(W)x154(D)x211 (H) mm
5.1 kg
SECTION RADIO
GAMME DE FREQUENCES :
SECTION DISQUE COMPACT
CAPTEUR OPTIQUE :
FREQUENCE RESPONSE :
FM 87.5-108 MHz
3-BEAMLASER
100 Hz-16 kHz
www.mpmaneurope.com
Page 9
Docking Station with CD/MP3/USB/SD CARD
Player, Radio and iPod
XRM62i
INSTRUCTION MANUAL
Page 10
To achieve the utmost in enjoyment and performance, please read this manual carefully before attempting to operate the unit in order to
became familiar with its features, and assure you years of faithful, trouble free performance and listening pleasure.
I
* Keep instructions the safety and operating instructions should be retained for future reference.
* Avoid installing the unit in locations described below:
Places exposed to direct sunlight or close to heat radiating appliances such as electric heaters.
On top of other stereo equipment that radiate too much heat. Places lacking ventilation or dusty
places. Places subject to constant vibration. Humid or moist places.
* Make sure not to obstruct the ventilation openings.
* Before turning on the power for the first time, make sure the power cord is properly installed.
* Mains plug is used as the disconnect device and it shall remain readily operable completely
* The product shall not be exposed to dripping or splashing and that no objects filled with liquids, such as vases, shall be placed on the
product.
* The apparatus shall not be exposed to dripping or splashing and that no objects filled with liquids, such as vases, shall be placed on
apparatus.
* To be completely disconnect the power input, the mains plug of apparatus shall be disconnected from the mains.
* When the stand-by LED gives no color
* Minimum distances10cm around the apparatus for sufficient ventilations.
* Attention should be drawn to the environmental aspects of battery disposal.
* The use of apparatus in moderate climates.
* The mains plug should not be obstructed or should be easily accessed during intended use.
* The ventilation should not be impeded by covering the ventilation openings with items such as newspaper
* No naked flame sources such as lighted candles should be placed on the apparatus.
* Battery shall not be exposed to excessive heat such as sunshine, fire or the like.
For safety reasons, do not remove any covers or attempt to gain access to the inside of the product. Refer any servicing to qualified
personnel.
Do not attempt to remove any screws, or open the casing of the unit; there are no user serviceable parts inside, refer all servicing to
qualified service personnel.
, the apparatus is completely disconnected from mains.
mportant Notes
.
, table-clothes, curtains etc.
CAUTION : TO REDUCE TH
E RISK OF ELECTRIC SHOCK DO NOT REMOVE COVER (OR BACK),NO USER SERVICEABLE PARTS
INSIDE, REFER SERVICING TO QUALIFIED SERVICE PERSONNEL.
DANGEROUS V
Conductor dangerous voltage, that may be of sufficient magnitude to constitute a risk of electric shock to persons is present
within this products enclosure.
ATTENTION
The owners manual contains important operating and maintenance instructions, for your safety, it is necessary to refer to the
manual.
W
ARNING : TO PREVENT FIRE OR SHOCK HAZARD, DO NOT EXPOSE THIS APPLIANCE TO DRIPPING OR SPLASHING.
Note:
- This unit will become warm when used for a long period of time. This is normal and does not indicate a problem with the unit.
- The CD player includes micro-processors which may malfunction as a result of external electrical interference or noise. If the CD
player is not working properly
- Excessive sound pressure from earphones and headphones can cause hearing loss.
- If an unusual conditions occurs in the display window or key button, switch the unit of
OLTAG E
, disconnect the power source and then reconnect it.
f, then turn on the unit again.
Assembly Drawing of Unit and speaker
1. Fixing the whole set of the unit on the wall
Parallel the two nails that fix into the wall, the distance of them
should keep in 84mm.Note : The size of the nail : 3.5*25BA.
84 mm
Press down and push the stand panel of the buckle A
and B on the rear of the each speaker, and then each
stand of the speaker will remove from them.
50 mm
50 mm
300 mm
Parallel the two nails that fix into the wall, the
distance of them should keep in 300mm.
Note : The size of the nail : 3.5*25BA.
Press down and push the stand panel of the
buckle C and D on the rear of the main unit, and
then the stand of the main unit will remove from it.
Note: When wall-mounting the set of product in line, suggest keeping at
least 50mm distance from the main unit to the speakers to achieve better
stereo effect and to ensure the slide CD door with prefect movement.
2. Speakers connection
3. Docking bracket and iPod Adjusting pad panel
Universal Dock adapter (Using the Dock Adapters to support all type
of the iPod players.)
Connector dock
UK-1
iPod Adjusting Pad
Panel(Press the iPod
Adjusting pad panel
lightly out from the
lock holder.)
iPod Adjusting Pad
Panel (Let theiPod
Players easy to
insert into the connector
fixedly, and then press
and push them toward
the lock holder until it
snaps on.)
Page 11
4. Adjust the adjusting pad knob
Adjust the Adjusting pad Knob at the
level 1 to support these iPod
Players as belows:
Made for iPod with
1
(4th generation)40GB, 60GB only
iPod classic 2nd generation 120GB
color display
iPod(4th generation)40GB only
iPod with video
(5th generation)30GB only
iPod classic 80GB
FEATURES AND CONTROLS
1
35
3
4
5
6
33
2
39
40
41
42
20. VOLUME DOWN TOUCH PLATE
21. SKIP/TUNE SEARCH DOWN
OUCH PLATE
T
22. VOLUME UP TOUCH PLATE
23. FUNCTION TOUCH PLATE
24. IR SENSOR
25. LCD DISPLAY WINDOW
26. CD DOOR
27. REPEAT TOUCH PLATE
Adjust the Adjusting pad Knob at the
level 2 to support these iPod
Players as belows:
Made for iPod mini
(1st generation)4GB, 6GB only
2
879
(4th generation)20GB only
U2 Special Edition
(4th generation)20GB, 30GB only
(5th generation)60GB,80GB only
28263443
27 29
1011121314
color display
U2 Special Edition
iPod with video
iPod classic 160GB
1. SPEAKER
2. SPEAKER STAND
3. STANDBY LED INDICATOR
30
4. SD/MMC CARD IN SLOT
5. HEADPHONES JACK
6. USB DEVICE IN PORT
7. iPod OPEN/CLOSE BUTTON
8. STANDBY/ON BUTTON
9. CD OPEN/CLOSE BUTTON
10. SLEEP BUTTON
28. INTRO TOUCH PLATE
29. PLAY/PAUSE/ENTER TOUCH
PLATE
30. FM ANTENNA
31. SPEAKER OUT “L”
32. MAIN UNIT STAND
33. DOCKING BRACKET
34. iPod ADJUSTING PA
D KNOB
35. IPod CONNECTOR
iPod with
25
24
23
22
44
21
19
18
17
16
15
20
31
Adjust the Adjusting pad Knob at the
level 3 to support these iPod
Players as belows:
Made for iPod nano
(1st generation)1GB, 2GB, 4GB only
3
32
iPod touch
8GB/16GB/32GB
iPod touch 2nd generation
8GB/16GB/32GB
38
37
36
32
11. ID3/MONO/ST. BUTTON
12. iPod/MEM/CLOCK-ADJ. BUTTON
13. TIMER BUTTON
14. RANDOM BUTTON
15. MUTE BUTTON
16. PRESET/FOLDER DOWN BUTTON
17. PRESET/FOLDER UP BUTTON
18. EQ TOUCH PLATE
19. STOP/MENU TOUCH PLATE
36.SPEAKER OUT “R”
37.VIDEO OUT JACK
38.LINE IN JACK
39.HITCHING HOLE
40.MEMORY BACK-UP BA
TTERY DOOR
41.AC POWER SWITCH
42.AC POWER CORD
43.iPod PLAYER DOOR
44.SKIP/TUNE SEARCH UP TOUCH PLATE
REMOTE CONTROL
1. STANDBY BUTTON
2. MUTE BUTTON
3. PRESET/FOLDER UP BUTTON
4. PRESET/FOLDER DOWN BUTTON
5. SKIP/TUNE SEARCH DOWN BUTTON
6. INTRO BUTTON
7. ID3/MONO/ST. BUTTON
8. RANDOM BUTTON
9. VOLUME UP BUTTON
10.FUNCTION BUTTON
11.C D OPEN/CLOSE BUTTON
12.VOLUME DOWN BUTTON
13.iPod OPEN/CLOSE BUTT
ON
14.PLAY/PAUSE/ENTER BUTTON
15.EQ BUTTON
16.SKIP/TUNE SEARCH UP BUTTON
17.STOP/MENU BUTTON
18.SLEEP BUTTON
19.iPod/MEM/CLOCK-ADJ. BUTTON
20.TIMER BUTTON
21.NUMBER SEARCH BUTTON
22.REPEAT BUTTON
PUTTING THE BATTERIES INTO THE REMOTE CONTROL UNIT
Press down the compartment cover, and slide the cover off to open the
compartment.Place the two (UM4), (AAA), (R03) batteries in the remote control
according to the polarity markings ("+" and " - ") inside the compartment and on
the batteries. Place the cover over the compartment, press down lightly
, and push
it upward until it snaps on.
Note: Remove the batteries from the remote control if not in use for long period of
the time. Do not mix normal batteries with rechargeable batteries, when the batteries
become weak, remote control will not function and replace with new batteries.
LCD DISPLAY WINDOW
A. TIMER INDICATOR
B. ALBUM NUMBER INDICATOR
C. REPEAT 1 & ALL INDICATOR
E. VOLUME HIGH/LOW INDICATOR
F. SLEEP INDICATOR
G. TRACK/NUMBER/TIME INDICATOR
D. STEREO INDICATOR
COMPACT DISC
1. Always use a compact discs bearing the mark as shown.
2. Notes on handling discs
Removing the disc from its storage case and loading it.
* Do not touch the reflective recorded surface.
* Do not stick paper or write anything on the surface.
* Do not bend the disc.
**BATTERIES NOT
INCLUDED**
1
2
3
4
5
9
10
11
12
13
14
15
16
17
18
6
19
20
7
21
8
22
UK-2
Page 12
3. Storage
* Store the disc in its case.
* Do not expose discs to direct sunlight or high temperatures, high
humidity or dusty places.
4. Cleaning a disc
* Should the disc become soiled, wipe of
f dust, dirt and fingerprints
with a soft cloth.
* The disc should be cleaned from the center to the edge.
* Never use benzene, thinners, record cleaner fluid or anti static spray.
* Be sure to close the CD door so the lens is not contaminated by dust.
* Do not touch the lens.
FROM THE CENTRE
TO THE EDGE
CORRECT INCORRECT
OPERA
TING THE UNIT
When you first plug the unit into the AC outlet, then press the power switch on the rear of the unit, the unit will be in
standby mode, the black light of standby is red. Yo
u can now press the STANDBY/ON button on the unit or press the
STANDBY on remote control to switch the unit ON. The black light of the standby and multi function touch plate will
light on blue. Pull the AC plug out of the wall socket if you want to switch of
f completely.
POWER/STANDBY
1. Press the STANDBY/ON button on the unit or or press the STANDBY on remote control to switch the unit on.
2. Select the sound source (CD, USB, SD CARD, iPod, AUX or TUNER) by touch the FUNCTION touch plate or
press the FUNCTION on remote control. The corresponding display will light up.
3. Adjust the volume with the VOLUME (UP or DOWN) touch plate on the unit or the remote control.
4. Press the ST
ANDBY/ON button on the unit or press the STANDBY button on the remote control again to turn of
f the
unit.
Note:
1. If there is no signal under the CD/USB DEVICES/ SD & MMC CARD/ mode, the main unit will be switched off
iPod
within 15 minutes automatically.
2. During in the iPod mode, there is not insert the iPod Player on the iPod docking bracket. The main unit will also turn
f within15 minute automatically.
of
3. During in standby mode, press any button/key can make the display light for 10 seconds.
4. Please turn the main switch off to save energy, when you do not use the unit.
CLOCK SETTING
During in the STANDBY mode.
1. Press and hold the iPod/MEM/C-ADJ. button until the time displays will change to 24-hour(or 12-hour) digit and flash.
2. To u ch the SKIP/TUNE SEARCH(UP or DOWN) touch plate on the unit or press the SKIP/TUNE SEARCH(UP or
DOWN) button on the remote control to adjust 12-hour or 24-hour digit.
3. Press the iPod/MEM/C-ADJ. button again, the HOUR digit will flash on the display
, touch the SKIP/TUNE
SEARCH(UP or DOWN) touch plate to adjust HOUR digit.
4. Press the iPod/MEM/C-ADJ. button once more, the MINUTE digit will flash on the display
, touch the SKIP/TUNE
SEARCH(UP or DOWN) touch plate to adjust MINUTE digit.
5. Press the iPod/MEM/C-ADJ. button again to confirm the time.
6. Each enable state as shown above will be cleared if the key is not pushed in10 seconds.
TIMER SETTING
1. After adjusting the clock, press the TIMER button for a few seconds, " ON" and "00:00" appears on the display
and the HOUR digit flashes.(F1)
uc h the SKIP/TUNE SEARCH (UP or DOWN) touch plate or press the SKIP/TUNE SEARCH
2. To
(UP or DOWN) button on the remote control to adjust it.
3. Press the TIMER button again, the MINUTE digit will start flashing, adjust it by touching the SKIP/TUNE SEARCH
(UP or DOWN) touch plate on the unit or press the SKIP/TUNE SEARCH(UP or DOWN) button on the remote control.
4. Press the TIMER button once more to confirm and order TIMER ON time.
5. After adjusting "TIMER ON", “ OFF" appears on the display and the HOUR digit flashes.(F2)
6. Repeat the above steps 2 to 3, and then press the TIMER button once more to confirm and order TIMER OFF time.
7. Now the "TUNER" appears on the display with flashing, and then select the alarm mode of the “TUNER, CD, USB,
SD CARD " by touching the SKIP/TUNE SEARCH (UP or DOWN) touch plate.
8. Press the TIMER button again, the timer "VOL" indicator appears on the display and flashes, adjust the timer
volume high or low by touching the SKIP/TUNE SEARCH (UP or DOWN) touch plate or press the SKIP/TUNE
SEARCH (UP or DOWN) button on the remote control.
9. Each enable state as shown above will be cleared if the button is not pushed in 10 seconds.
10.After adjusting "TIMER ON" and "TIMER OFF" ,press the TIMER button, " " appears on the display
.
11.The main unit will be switched on automatically at "TIMER ON" order and start playing, the main unit will be
switched of
f automatically at "TIMER OFF" order.
Note: If the display shows "ERROR" while you set the “TIMER ON” it means both “TIMER ON” and “TIMER OFF” is the
same. In
this case, please go to “TIMER OFF” to set the off time first.
F1
F2
FUNCTION SELECT
The function is that when it touches the FUNCTION touch plate on the unit or press the FUNCTION button on the
remote control to change the mode of each function. Display changes as below:
CD
USB
IPODSD CARD
TUNER
AUX
RADIO OPERATION
1. the FUNCTION on the main unit to TUNER mode
Touch touch plate or press the FUNCTION button on remote control
that to select the FM operation.
2. Touch the SKIP/TUNE SEARCH(UP or DOWN) touch plate on the unit or press the SKIP/TUNE SEARCH(UP or
DOWN) button on the remote control to tune the desired wave band range of frequency
UK-3
.
Page 13
Manual Tuning
To tune for weak stations, use manual tuning by touching the SKIP/TUNE SEARCH(UP or DOWN) touch plate
continuously until you read the correct frequency or the reception is at its best.
Automatic Tuning
1. Touch the SKIP/TUNE SEARCH(UP or DOWN) touch plate on the unit or press the SKIP/TUNE SEARCH(UP or
DOWN) button on the remote control for a second or more, then release the button. The tuner will automatically
search the first station of suf
ficient signal strength.
2. Repeat above procedure if you wish to select another station.
Mono/stereo select
You can select the MONO/STEREO only in FM mode.
1. When you want to select FM stereo station, press the ID3/MONO/STEREO button. When you receive a FM stereo
station the " " indicator will appear on the display
2. When you press the ID3/MONO/STEREO button again, the FM STEREO indicator will turn of
, you can receive FM stereo transmission .
f and switch to
MONO FM status.
Programming preset stations
You can also preset stations of your choice and store up to 30 FM stations in its memory. To store your selected
broadcasting stations:
1. Tune to the required station.
2. Press the /MEM/CLOCK-ADJ. button.
3. Press the PRESET/FOLDER (Up or DOWN) button for your desired station number
4. Press the /MEM/CLOCK-ADJ. button again to confirm your selection.
iPod
.
iPod
5. To program more stations into memory, repeat the above steps 2 to 4.
6. To change the stored preset stations, repeat the above steps 2 to 4.
Note: 1. Storing a new station into a preset location will erase the previously stored station in that location.
2. Power of
f will not erase the memory of preset stations. Perform the stations presetting procedures again to
store the stations.
Selecting the Preset Stations
1. Press the PRESET/FOLDER (UP or DOWN) button to select the desired preset station number
.
2. The numeric location of that preset station is displayed along with the corresponding frequency.
FM Antenna
FM antenna wire is for better FM reception.
CD/MP3/WMA OPERATION
Listening To Compact Disc (CD/MP3/WMA)
1. If you want to enjoy CD/MP3, press the CD OPEN/CLOSE button once on the unit first, and then the CD door will
open automatically
.(F3)
2. Insert the CD/MP3 disc into the CD compartment, press the CD OPEN/CLOSE button again, and then the CD door
will close automatically
.
3. Touch the FUNCTION touch plate on the unit or press the FUNCTION button on the remote control is select to
CD/MP3 mode. The unit will read the CD/MP3/WMA disc automatically.
Note: (1) This unit can play CD, CD-R, CD-R
W, MP3 and WMA discs.
(2) It can read " 8 cm " and " Multi Section " of MP3 DISC.
(3) The "Playback Transfer Rate" in MP3 and WMA.
a. In MP3, transfer bit rate : 8 - 256 kbps.
b. In WMA, transfer bit rate : 8 - 192 kbps.
(4) The "Max Readable 99 folders and 999 tracks".
(5) If no disc or can`t read TO
C, NO DISC will be
F3
F4
displayed.(F4)
Playing The Entire CD/MP3/WMA
- CD
1. Insert the CD disc into the CD compartment, the main unit will automatically read the
total number of the folders and tracks at the same time.
2. T
ouch the PLAY/PAUSE/ENTER touch plate on the unit or press the
PLAY/PAUSE/ENTER button on the remote control, the unit will play the first track of
the CD disc automatically
.(F5)
F5
3. Touch the PLAY/PAUSE/ENTER touch plate on the unit or press the
PLAY/PAUSE/ENTER button on the remote control once again, the time elapsed
indicator will flash and pause CD playback.(F6)
4. Touch the SKIP/TUNE SEARCH(UP or DOWN) touch plate once to change T
rack NO.,
F6
Touch and hold the SKIP/TUNE SEARCH (UP or DOWN) touch plate on the unit once
or (on the remote control) to skip fast forward or backward of each song.
5. To resume playback, touch the PLAY/PAUSE/ENTER touch plate on the unit or press the PLA
Y/PAUSE/ENTER
button on the remote control once more again.
6. To stop playback, touch the STOP/MENU touch plate on the unit or press the STOP /MENU button on the remote
control once.
- MP3/WMA
1. Insert the MP3/WMA disc into the CD compartment, the main unit will automatically
read the total number of the folders and tracks at the same time.
ouch the PLAY/PAUSE/ENTER touch plate on the unit or press the PLAY/PAUSE
2. T
/ENTER button on the remote control, the unit will play the first track of the CD disc
automatically
.(F7)
F7
3. Touch the PLAY/PAUSE/ENTER touch plate on the unit or press the PLAY/PAUSE
/ENTER button on the remote control once again, the time elapsed indicator will flash and pause CD playback.(F8)
UK-4
Page 14
Note:
4. To change Track NO., touch SKIP/TUNE SEARCH(UP or DOWN) touch plate on the
unit or press the PLAY/PAUSE/ENTER button on the remote control once. And touch
and hold the SKIP/TUNE SEARCH (UP or DOWN) touch plate on the unit once or (on
the remote control) to skip fast forward or backward of each song
5. To resume playback, touch the PLA
the PLA
Y/PAUSE/ENTER button on the remote control once more again.
Y/PAUSE/ENTER touch plate on the unit or press
F8
6. To change the ALBUM NO., press the PRESET/FOLDER UP or PRESET/FOLDER ON once.
7. To stop playback, touch the STOP/MENU touch plate once on the unit (or remote control).
Note: If the main unit is not working properly
, disconnect the power source and then reconnect it again.
ID3 OPERATION
During in the MP3/WMA mode
1. Press the ID3/MONO/STEREO button on th unit (or remote control) once to open the ID3 function.
2. If the MP3/WMA file is write in “ID3” it will automatically to search the information of “TITLE NAME”, “ARTIST
NAME”and “ALBUM NAME” indicated on the display
.
3. Press the ID3/MONO/STEREO button on the on th unit (or remote control) again. Then the unit will resume to play
normally.
USB/SD CARD OPERATION
During in the STANDBY mode
1. Insert the USB DEVICE or SD/MMC CARD, and then press the STANDBY button on
the main unit (or remote control) to power"ON" the unit.
2. Touch the FUNCTION touch plate on the main unit (or remote control) to select the
USB or SD/MMC
folders and tracks at the same time. (F9)
mode. The main unit will tomatically read the total number of the
F9
3. If the USB memory device more than one folder.
a. Press the PRESET/FOLDER (UP or DOWN) button to select each folder.
b. T
ouch the SKIP/TUNE SEARCH(UP or DOWN) touch plate to select current track in desired folder.
4. If the MP3 and WMA are written in "ID3".
a. During the unit in the MP3 or WMA playing. Press the ID3/MONO/STEREO button once. The display will shows
a "ID3 ON", and then it will automatically to search more than 64 letters of "TITLE NAME", "AR
TIST NAME" or "
ALBUM NAME" which move from the right corner to the left corner on the display continuously.
b. Press the ID3/MONO/STEREO button once again. The display will shows a "ID3 OFF", and then the main unit
will play normally
.
Note: 1. The main unit can play MP3 and WMA only in this mode.
2. This unit can support most of USB devices and SD/MMC/SDHC cards. The memory capacity up-to 32GB. It can
not access (or access a longer time) the memory capacity over 32GB. Otherwise, make an others to access it.
3. It can support USB version 1.1 and 2.0.
4. Not support all kinds of “ dual voltage-MMC” card nor “MMC-Plus” card.
5. The main unit does not support the WMA file which is protected “DRM FILE”.
Playing The Entire flash disc
1. Playback will start by touching the PLA
press the PLA
the first track. The display shows the current track number and its elapsed time.(F10)
Y/PAUSE/ENTER button on the remote control . Playback starts with
Y/PAUSE/ENTER touch plate on the unit or
2. To interrupt playback, touch the PLAY/PAUSE/ENTER touch plate on the unit or
press the PLAY/PAUSE/ENTER button on the remote control. The time elapsed
indicator
will flash.(F11)
F10
3. To resume playback, touch the PLAY/PAUSE/ENTER touch plate on the unit or
press the PLAY/PAUSE/ENTER button on the remote control again.
4. To stop playback, touch the STOP/MENU button.
In any time, the USB DEVICE or SD CARD must be fixed well under in the
Note :
REPEA
ST
ANDBY mode to avoid the main unit and USB DEVICE or SD CARD were
damaged.
T PLAY FUNCTION
F11
- CD
1. Touch the REPEAT touch plate on the unit or press the REPEAT button on the remote
control once, “REPEAT" is displayed. CD will play the current track repeatedly.(F12)
2. T
ouch the REPEAT touch plate on the unit or press the REPEAT button on the remote
control twice, "REPEAT ALL" is displayed. CD will play all tracks repeatedly.(F13)
3. Touch the REPEAT touch plate on the unit or press the REPEAT button on the remote
control once more again, REPEAT function will be of
f.
F12
- MP3/WMA/USB/SD CARD
1. Touch the REPEAT touch plate on the unit or press the REPEAT button on the remote control once, then"REPEAT”
is displayed. It will play the current track repeatedly.(F14)
2. To u ch the REPEAT touch plate on the unit or press the REPEA
is displayed. It will play all tracks repeatedly.(F15)
T button on the remote control twice, "REPEAT ALL"
3. Touch the REPEAT touch plate on the unit or press the REPEAT button on the remote control thrice, “REPEAT
ALBUM" is displayed. It will play all tracks in the current folder repeatedly .(F16)
4. T
ouch the REPEAT touch plate on the unit or press the REPEAT button on the remote control once more again,
then REPEAT function will be off.
F13
F14
UK-5
F15
F16
Page 15
PROGRAM FUNCTION
User can make the program up to 32 tracks in CD mode or 64 tracks in MP3/WMA/USB/SD CARD mode in any
desired order
. Program mode is activated while in stop mode.
1. How to play the program
- CD
1) Press the iPod/MEM/C-ADJ. button, shift to MEMORY mode.(F17)
2) Touch the SKIP/TUNE SEARCH (UP or DOWN) touch plate on the unit or press the
SKIP/TUNE SEARCH(UP or DOWN) button on remote control, the track number will
be changed.
3) Press the iPod/MEM/C-ADJ. button to confirm the track number
.
- MP3/WMA
1) Press the iPod/MEM/C-ADJ. button, shift to MEMORY mode. The album number is
flashing. (F18)
2) Press the PRESET/FOLDER button on the unit or on the remote control , the album
number will be changed.
3) Press the iPod/MEM/C-ADJ. button, the first track number will be displayed.(F19)
ouch the SKIP/TUNE SEARCH(UP or DOWN) touch plate on the unit or press the
4) T
SKIP/TUNE SEARCH(UP or
DOWN) button on remote control , the track number will be changed.
5) Press the iPod/MEM/C-ADJ. button to confirm the favorite track number
.
2. PROGRAM PLAY
Touch the PLA
Y/PAUSE/ENTER touch plate on the unit or press the PLAY/PAUSE/ENTER button on remote control.
The unit will play the first track of the program. When all tracks have been played, the unit display will be shows the
number of tracks and the playing time of the CD/MP3 songs.
3. CANCEL PROGRAM
ouch the STOP/MENU touch plate on the unit or press the STOP/MENU button on remote control once, or open
1. T
the CD tray door and close it again that the memory will be erased.
2. Set a new program, the existing one will be cleared.
F17
F18
F19
Note : During in the program mode.
ouch the REPEAT touch plate on the unit or press the REPEAT button on the remote control once, the "REPEAT"
1. T
indicator will light on the display. Then the unit will repeat the current track.
2. Touch the REPEAT touch plate on the unit or press the REPEA
T button on the remote control twice, the "REPEAT
ALL" will light on the display. Then the unit will repeat all the total number of tracks.
3. Touch the REPEAT touch plate on the unit or press the REPEAT button on the remote control once more again.
The unit will return to play the program in normally
.
RANDOM PLAY
1. Press the RANDOM button on the unit (or remote control), then RANDOM is
displayed.(F20)
2. Press the RANDOM button again, then the audio device unit will resume to normally
play.
F20
INTRO PLAY(on the remote control)
1. Press the INTRO button on the remote control, INTRO is displayed. INTRO will play
the first 10 seconds of each track.(F21)
2. Press the INTRO button twice, then the audio device unit will resume to normally play
.
F21
Note: To avoid damage the iPod, please make sure the iPod in standby mode to insert and take out.
During the unit in STANDBY mode:
ress the iPod OPEN/CLOSE button once on the unit first to open the iPod door.
1. P
2. Insert the iPod players in the iPod docking bracket on the front of the main unit fixedly.
3. Power on the main unit, and then
the FUNCTION button on remote control
on the main unit display
. (F22)
Touch the FUNCTION touch plate on the unit or press
to the iPod mode, the iPod indicator will appear
F22
During the unit in iPod mode:
ouch in touch plate or press the button on the remote
T
1. the PLAY/PAUSE/ENTER (only ) PLAY/PAUSE/ENTER
control VOLUME (UP or DOWN) button or
once to start the iPod playing. Adjust the volume control by touch the
press the VOLUME (UP or DOWN) button t ouch touch
plate
2. the PLAY/PAUSE/ENTER (only in iPod) once to pause the current track. To resume the playback,
t the PLAY/PAUSE/ENTER (only in iPod) once again.
3. To skip forwards or backwards, t the (UP or DOWN) to select the desired
once.
Touch touch plate
ouch touch plate
ouch SKIP/TUNE SEARCH touch plate
iPod
o stop the current playing, t the ST
OP/MENU(only in iPod )
track.
ouch the REPEAT touch plate or press the RANDOM button on the unit (or on the remote control).
4. T
Note:
iPod touch version 1.1.4 or above can support REPEAT or RANDOM function.
During the unit in iPod MENU mode:
1. During the unit in iPod mode, press the iPod/MEM/CLOCK-ADJ. button once, the unit
will enter to the iPod MENU mode. The iPod MENU indicator will appear on the unit
display
Touch
2. the ST
. (F23)
OP/MENU (only in iPod) touch plate return to the iPod menu.
F23
a. To select the current menu as belows :
Music > Extras > Photo Import (without this function display on the iPod Mini) > Settings > Shuf
fle Songs > Backlight
> Now Playing will shows on the iPod Player display.
b. the (UP or DOWN) touch plate on the unit (or remote control) to search the current menu.
Touch SKIP/TUNE SEARCH
UK-6
Page 16

Tou c h
3. th
a. the (UP or DOWN) touch plate on the unit (or remote control) to search the current
e PLAY/PAUSE/ENTER (only in iPod) touch plate enter to the desired menu folder.
Touch SKIP/TUNE SEARCH
content in the each desired menu folder.
b. If you want return to the iP
od menu, t the STOP/MENU (only in iPod) touch plate again.
ouch
4. To resume playback, press the iPod/MEM/CLOCK-ADJ. button once again, the unit will return to iPod mode.
Charging the iPod Player battery through the main unit:
1. iPod Player has a internal nonremovable battery, the battery may need to be ch
arged that is not used for a while.
2. You can charge the iPod Player through the main unit automatically under the STANDBY or POWER ON mode.
Note : 1. The iPod Player battery is 80-percent char ged in about an hour, and fully charged in about a few hours. If yo
u
charge it while playing music, it may take longer.
2. It is not better to charge under the TUNER mode. It may interfere the reception.
Note:
1. In any time, you can control the iPod player on th
e main unit, remote control or iPod player itself while the unit in the
"iPod" or "iPod MENU" mode.
2. In any time, the iPod player must be fixed well under in the STANDBY mode to avoid the unit and iPod player were
damaged.
ring the unit in iPod mode. The video function of the iPod with ahnormal working normally. Update the latest
3. Du
version of the iPod video function from the apple web-site.
VIDEO OUT SETTING (for i-Pod Video only)
1. During the unit in the STANDBY mode : Co
nnect the TV set with a vi deos cable (RCA-type cables) to the VIDEO
out jack on the rear of the unit.
2. During the unit in the iPod mode : Press the "MENU" button on the iPod Click Wheel to set the video function.
3. To set iP
od to display videos on a TV :
(a) Choose Videos > Video Settings, and then set TV Out to Ask or On.
(b) If you set TV Out to Ask, iPod gives you the option of showing videos on TV or on iPod wh ile ev
ery time you
play a video.
Note :1. The Vedio mode only support that the iPod players have a vedio function.
2. iPod classic 80/160GB, iPod nano 3rd generation(Video) 4/8GB and iPod touch 8/16GB should be fixed well
un
der in the STANDBY mode before operation of the Vedio function.
3. Ved io cable (RCA-type cable) not in cluded.
AUX IN PLAY
1. Tou c h the FUNCTION touch plate on the unit or press the FUNCTION button on the re
mote control, until the"AUX”
indicator light on the display. This unit can input analog audio through the AUX(LINE) IN jack on the right of the unit.
2. Use a cable with RCA jack to connect external audio source.
Note: Aux in cable not included.
TO SET SLEEP FUNCTION
1. If yo
u want to fall asleep to music, press the SLEEP button on the unit or on the remote control.
2. You may select the TUNER, CD/MP3, USB, SD/MMC, iPod or AUX mode in sleep function to play from 90, 80, 70
up to10 minutes of mu
sic before shutting itself off automatically.
EQ CONTROL
EQ shows the present sound tone.
When you touch the EQ touch plate or press the EQ button on the remote control, the sound tone changes as below:
MUTE SETTING
1. When you press the MUTE button on the unit or on the remote control once, the
volume level will flash and the audio output will be temporarily terminated.(F24)
2. Press the MUTE button on the unit or on the remote control again, the volume level
and the audio output will return to normal.
F24
LISTEN TO THE MUSIC BY USING HEADPHONE
A stereo headphone jack is provided for private listening. To listen to the unit with headphones (not included ) insert
the 3.5mm mini-stereo plug from the headphones into the PHONES jack on the front panel. The external speakers
are automatically disconnected when headphones are using.
MEMORY BAC K-U P
To insert 1.5V x 3, UM-4, AAA or equivalent batteries in the battery compartment of the unit. It is used to back-up the
memory of the main CPU.
SPECIFICA
POWER SUPPLY : 230V~50Hz
OUTPUT POWER : 10 Watts x 2
UNIT DIMENSION : 400 (W) x 154 (D) x 21
SPEAKER BOX DIMENSION : 160 (W) x 154 (D) x 211 (H) mm
N. W. : 5.1 kg
SPECIFICATION SUBJECT TO CHANGE WITHOUT FUR
TION
1 (H) mm
THER NOTICE.
RADIO SECTION
FREQUENCY RANGE : FM 87.5 - 108 Mhz
COMPACT DISC SECTION
OPTICAL PICKUP : 3 - BEAM LASER
FREQUENCY RESPONSE : 100Hz - 16kHz
Ventilation warning : " The normal ventilation of the product shall not be impeded for intended use."
www.mpmaneurope.com
UK-7
Page 17

XRM62i
Docking-Station mit CD/MP3/USB/SD-CARD-Player,
Radio und iPod
iPod ist ein Markenzeichen von Apple Inc.,
eingetragen in den USA und anderen Ländern.
Der dargestellte iPod wird nicht mitgeliefert.
"Made for iPod" bedeutet, dass das elektronische Zubehör speziell für die Verbindung mit dem iPod entwickelt
und vom Hersteller die Einhaltung der Leistungskriterien von Apple bestätigt wurde.
Apple ist nicht verantwortlich für den Betrieb dieses Geräts oder die Einhaltung der Sicherheits- und
Gesetzesstandards.
BEDIENUNGSANLEITUNG
Page 18

Um Ihr Gerät bestmöglich mit höchster Leistung zu nutzen, lesen Sie bitte dieses Handbuch sorgfältig, bevor Sie das Gerät
in Betrieb nehmen, um sich mit seinen Funktionen vertraut zu machen und von einer verlässlichen und fehlerfreien Leistung
und bestem Hörgenuss zu profitieren.
Wichtige Hinweise
* Heben Sie die Anleitung auf. Die Sicherheits-und Bedienungsanweisungen sollten zur Information für die Zukunft
aufbewahrt werden.
* Installieren Sie das Gerät nicht an den folgend beschriebenen Orten:
Orte, die direktem Sonnenlicht ausgesetzt sind oder sich in der Nähe von wärmeabstrahlenden Geräten wie elektrische
Heizungen befinden.
Auf anderen Stereoanlagen, die zu viel Wärme abstrahlen. Orte ohne Belüftung oder staubige Orten. Orte, die ständigen
Vibrationen unterliegen. Feuchte oder nasse Orte.
* Achten Sie darauf, die Lüftungsschlitze nicht zu bedecken.
* Vor dem ersten Einschalten des Gerätes überprüfen Sie bitte, ob das Netzkabel richtig angesteckt ist.
* Der Hauptstecker wird zum Trennen des Geräts vom Strom verwendet und sollte immer betriebsbereit sein.
* Das Produkt darf keinen Wassertropfen oder Spritzwasser ausgesetzt werden, und es sollten keine mit Flüssigkeiten
gefüllten Objekte wie Vasen auf das Produkt gestellt werden.
* Das Gerät darf keinen Wassertropfen oder Spritzwasser ausgesetzt werden, und es sollten keine mit Flüssigkeiten
gefüllten Objekte wie Vasen auf das Gerät gestellt werden.
* Um das Gerät vollständig vom Stromnetz zu trennen, ist der Hauptstecker komplett vom Netz zu trennen.
* Wenn die Standby-LED nicht leuchtet, ist das Gerät vollständig vom Netz getrennt.
* Der Mindestabstand um das Gerät herum sollte 10cm betragen und für eine ausreichende Belüftung sorgen.
* Beac hten Sie die ökologischen Aspekte der Entsorgung von Akkus.
* Das Gerät sollte in gemäßigten Klimazonen genutzt werden.
* Der Hauptstecker sollte nicht verdeckt und stattdessen für die beabsichtigte Verwendung frei zugänglich sein.
* Die Belüftung sollte nicht durch Verdeckung der Lüftungsöffnungen mit Gegenständen wie Zeitungen, Tischdecken,
Vorhängen usw. behindert werden.
* Stellen Sie keine offenen Flammen wie brennende Kerzen auf das Gerät.
* Der Akku darf keiner starken Hitze ausgesetzt werden wie Sonneneinstrahlung, Feuer oder dergleichen.
Aus Gründen der Sicherheit dürfen Sie keine Abdeckungen entfernen oder versuchen, Zugang zum Geräteinneren
zu erlangen. Überlassen Sie sämtliche Wartungsarbeiten qualifiziertem Fachpersonal.
Versuchen Sie nicht, Schrauben zu lösen oder das Gehäuse des Geräts zu öffnen, Es gibt keine vom Benutzer zu
wartenden Teile im Inneren; überlassen Sie sämtliche Wartungsarbeiten qualifiziertem Fachpersonal.
VORSICHT: UM DIE GEF AHR EINES ELEKTRISCHEN S CHLAGS ZU VERMEIDEN, ENTFERNEN SIE NICHT D AS
GEHÄUSE (ODER DIE RUCKSEITE); ES BEFINDEN SICH KEINE VOM BENUTZER ZU WARTENDEN TEILE IM INNEREN;
ÜBERLASSEN SIE WARTUNGSARBEITEN QUALIFIZIERTEM FACHPERSONAL.
GEFÄHRLICHE SPANNUNG
Innerhalb des Gehäuses dieses Gerätes besteht eine gefährliche leitende Spannung, die stark
genug sein kann, um eine Gefahr durch elektrischen Schlag für Personen darzustellen.
ACHTUNG
Die Bedienungsanleitung enthält wichtige Bedienungs-und Wartungshinweise für Ihre Sicherheit;
bitte lesen Sie diese Anleitung unbedingt durch.
WARNUNG:
UM FEUER ODER STROMSCHLAG ZU VERMEIDEN, SETZEN SIE DIESES GERÄT NIEMALS
WASSERTROPFEN ODER SPRITZWASSER AUS.
Hinweis:
- Dieses Gerät wird bei Verwendung über einen längeren Zeitraum warm. Das ist normal und kein
Anzeichen für ein Problem mit dem Gerät.
- Der CD-Player enthält Mikroprozessoren, die infolge von äußeren elektrischen Interferenzen oder
Rauschen Fehlfunktionen aufweisen können. Wenn der CD-Player nicht ordnungsgemäß funktioniert,
ziehen Sie das Stromkabel vom Netz und schließen Sie es dann erneut an.
- Extreme Lautstärken bei Ohr- und Kopfhörern können zu Gehörschäden führen.
- Wenn das Gerät in der Anzeige oder beim Drücken der Tasten ungewöhnlich reagiert, schalten Sie das
Gerät aus und dann erneut an.
DE-1
Page 19

Montagezeichnung des Geräts und der Lautsprecher
1. Zur Befestigung des gesamten Geräts an der Wand:
Schlagen Sie parallel zwei Nägel zur Befestigung in die Wand;
der Abstand zwischen ihnen sollte 84mm betragen. Hinweis
zur Größe der Nägel: 3,5 * 25BA.
Drücken Sie die Standhalterung der Verschlüsse A und B auf der Rückseite der einzelnen Lautsprecher
nach unten, um sie von den Lautsprechern zu lösen.
Hinweis: Bei der Wandmontage d er Gerätekomponenten neb eneinander sollte n Sie mindestens 50 mm Abstand
zwischen de r Hauptei nheit und den Laut sprechern lassen, um bessere S tereo-Effekte zu erzi elen und das
problemlose Öffnen und Schließen des CD-Fachs zu gewährleisten.
2. Laut sprecher-Anschluss
Schlagen Sie parallel zwei Nägel zur Befestigung in die Wand; der Abstand zwischen ihnen sollte 300mm
betragen. Hinweis zur Größe der Nägel: 3,5 * 25BA.
.
Drücken Sie die Standhalterung der Verschlüsse C und D auf der Rückseite der Haupteinheit nach unten,
um sie von der Haupteinheit zu lösen.
3. Docking-Halterung und iPod-Anschlusspanel
Universal-Dockingadapter (Nutzen Sie den Docking-Adapter für alle Arten von iPods.)
Docking-Anschluss
iPod-Anschlusspanel (Drücken Sie das iPod-Anschlusspanel leicht aus der Verschlusshalterung nach außen.)
iPod-Anschlusspanel (Lassen Sie den iPod leicht in die Halterung gleiten und drücken Sie sie dann nach oben, bis
die Verschlusshalterung einrastet.)
DE-1
Page 20

4. Anpassen des Anschlussreglers
Stellen Sie den Anschlussregler auf Stufe 1 zur Unterstützung der folgenden iPods:
„Made for iPod“ mit Farbdisplay
(4. Generation) nur mit 40GB, 60GB
iPod (4. Generation) nur mit 40GB
iPod mit Video (5. Generation) nur mit 30GB
iPod Classic 80GB
iPod Classic 2. Generation 120GB
Stellen Sie den Anschlussregler auf Stufe 2 zur Unterstützung der folgenden iPods:
„Made für iPod“ mini
(1. Generation) nur mit 4GB, 6GB
(4. Generation) nur mit 20GB
U2-Sonderedition
iPod mit Farbdisplay
(4. Generation) nur mit 20GB, 30GB U2-Sonderedition
iPod mit Video (5. Generation) nur mit 60GB, 80GB
iPod Classic 160 GB
Stellen Sie den Anschlussregler auf Stufe 2 zur Unterstützung der folgenden iPods:
„Made für iPod“ nano
(1. Generation) nur mit 1GB, 2GB, 4GB
iPod touch
8GB/16GB/32GB
iPod touch 2. Generation
8GB/16GB/32GB
Funktionen und Bedienelemente
11. ID3/Mono/Stereo-Taste
1. Lautsprecher
2. Lautsprecherständer
3. Standby-LED-Anzeige
4. SD/MMC-Karten-Steckplatz
5. Kopfhöreranschluss
6. USB-Geräte-Anschluss
7. iPod-Öffnen/Schließen-Taste
8. Standby/An-Taste
9. CD-Öffnen/Schließen-Taste
10. Schlafmodus-Taste
12. iPod/Speicher/Uhreinst.-Taste
13. Timer-Taste
14. Zufallsmodus-Taste
15. Stumm-Taste
16. Voreinst./Ordner-nach-unten-Taste
17. Voreinst./Ordner-nach-oben-Taste
18. EQ-Bedienfeld
19. Stop/Menü-Bedienfeld
20. Leiser-Bedienfeld
21. Überspringen/Suche-nach-
unten-Bedienfeld
22. Lauter-Bedienfeld
23. Funktions-Bedienfeld
24. IR-Sensor
25. LCD-Anzeigefenster
26. CD-Fach
27. Wiederholen-Bedienfeld
DE-2
Page 21

28. Intro-Bedienfeld
29. Wiedergabe/Pause/ Enter-Bedienfeld
30. UKW-Antenne
31. Lautsprecher-Ausgang "L"
32. Hauptgerätständer
33. Docking-Halterung
34. iPod-Anschlussregler
35. iPod-Anschluss
36. Lautsprecher-Ausgang "R"
37. Videoausgang
38. Line-In-Anschluss
39. Befestigungsloch
40. Speicher-Backup/Batteriedeckel
41. AC-Netzschalter
42. AC-Netzkabel
43. iPod-Deckel
44. Überspringen/Suche-nach-oben-Bedienfeld
Fernbedienung
1. Standby-Taste
2. Stumm-Taste
3. Voreinst./Ordner-nach-oben-Taste
4. Voreinst./Ordner-nach-unten-Taste
5. Überspringen/Suche-nach-unten
-Taste
6. Intro-Taste
7. ID3/Mono/Stereo-Taste
8. Zufallsmodus-Taste
9. Lauter-Taste
10. Funktions-Taste
11. CD-Öffnen/Schließen-Taste
12. Leiser-Taste
13. iPod-Öffnen/Schließen-Taste
14. Wiedergabe/Pause/Enter-Taste
15. EQ-Taste
16. Überspringen/Suche-nach-oben
-Taste
17. Stop/Menü-Taste
18. Schlafmodus-Taste
19. iPod/Speicher/Uhreinst.-Taste
20. Timer-Taste
21. Nummernsuchtaste
22. Wiederholen-Taste
Einlegen der Batterien in die Fernbedienung
Drücken Sie die Abdeckung des Gehäuses nach unten und
schieben Sie die Abdeckung weg, um das Gehäuse zu öffnen.
Setzen Sie die beiden (UM4), (AAA), (R03)-Batterien
entsprechend der Polarisierungskennzeichnung
(„+“ und „-“) in dem Batteriefach und auf den Batterien
ein. Setzen Sie den Deckel des Fachs wieder auf und
drücken Sie ihn leicht, bis er einrastet.
Hinweis: Entfernen Sie die Batterien aus der
Fernbedienung, wenn Sie sie für längere Zeit nicht in
Gebrauch nehmen. Mischen Sie keine normalen Batterien
mit wiederaufladbaren Batterien, wenn die Batterien
schwach werden; dann wird die Fernbedienung nicht
ordnungsgemäß funktionieren; ersetzen Sie sie
stattdessen mit neuen Batterien.
** BATTERIEN NICHT ENTHALTEN**
LCD-Anzeigefenster
A. Timer-Anzeige
B. Albumnummer-Anzeige
C. Einzeln-&-Alle-Wiederholen-Anzeige
D. Stereo-Anzeige
E. Laut/Leise-Anzeige
F. Schlafmodus-Anzeige
G. Titel/Nummer/Zeit-Anzeige
COMPACT DISC
1. Verwenden Sie immer nur Compact Discs
mit der gezeigten Kennzeichnung.
2. Hinweise zum Umgang mit CDs
Entfernen Sie die CD aus ihrer Hülle und legen Sie sie ein.
* Berühren Sie nicht die reflektierende bespielte Oberfläche.
* Kleben Sie kein Papier auf die Oberfläche und schreiben
Sie nichts auf ihr.
* Biegen Sie die CD nicht.
3. Lagerung
* Bewahren Sie die CD in ihrer Hülle auf.
* Setzen Sie CDs keine r direkten Sonneneinstrahlung ode r
hohen T emperaturen, ho her Luf tfeuchtigkeit ode r S taub
aus.
4. Reinigung einer CD
* Sollte die CD verschmutzt sein, wischen Sie Staub, Schmutz und Fingerabdrücke mit einem
weichen Tuch ab.
DE-3
Page 22

* Die CD sollte von der Mitte zum Rand hin gereinigt werden.
* Verwenden Sie niemals Benzole, Verdünner, Plattenreinigungsflüssigkeiten oder antistatische Sprays.
* Achten Sie darauf, das CD-Fach zu schließen, damit die Linse nicht durch Staub verunreinigt wird.
* Berühren Sie die Linse nicht.
Inbetriebnahme des Geräts
Wenn Sie das Gerät zum ersten Mal mit der Steckdose verbinden, drücken Sie den Netzschalter an der Rückseite
des Gerätes; das Gerät befindet sich im Standby-Modus und die schwarze Standby-Leuchte ist rot. Sie können nun
die Standby/An-Taste am Gerät ode r auf der Fernbedienung drücken, um das Gerät einzuschalten. Die schwarze
Standby- und Multi-Funktions-Anzeige leuchtet blau auf. Ziehen Sie den Netzstecker aus der Steckdose, wenn Sie
das Gerät komplett ausschalten wollen.
ANSCHALTEN/STANDBY
1. Drücken Sie die Standby/An-Taste am Gerät oder auf der Fernbedienung, um das Gerät einzuschalten.
2. Wählen Sie die Tonquelle (CD, USB, SD-Card, iPod, AUX oder TUNER) durch Berührung der Funktion auf der
Touchscreen-Anzeige oder drücken Sie die Funktionstaste auf der Fernbedienung. Die entsprechende Anzeige
leuchtet auf.
3. Passen Sie die Lautstärke mit dem Lautstärke-Bedienfeld (nach oben oder unten) auf dem Gerät oder der
Fernbedienung an.
4. Drücken Sie die Standby/An-Taste am Gerät oder auf der Fernbedienung erneut, um das Gerät
auszuschalten.
Note:
1. Wenn es im CD/USB-Geräte/SD&MMC-CARD/iPod-Modus kein Signal empfängt, schaltet sich das Hauptgerät
innerhalb von 15 Minuten automatisch aus.
2. Wenn innerhalb des iPod-Modus kein iPod mit der Docking-Halterung verbunden wird, schaltet sich das
Hauptgerät ebenfalls nach 15 Minuten automatisch aus.
3. Im Standby-Modus können Sie durch Drücken einer beliebigen Taste das Display für 10 Sekunden zum
Leuchten bringen.
4. Bitte schalten Sie den Hauptschalter bei Nichtbenutzung des Geräts ab, um Energie zu sparen.
Uhreinstellung
Während sich das Gerät im Standby-Modus befindet:
1. Halten Sie die iPod/Speicher/Uhreinst.-Taste gedrückt, bis die Zeitanzeige auf die 24-Stunden-Anzeige (oder auf
12-Stunden-Anzeige) springt und blinkt.
2. Berühren Sie das Überspringen/Suche-Bedienfeld (nach oben oder unten) am Gerät oder drücken Sie die
Überspringen/Suche-Taste (nach oben oder unten) auf der Fernbedienung, um die 12-Stunden- oder
24-Stunden-Anzeige einzustellen.
3. Drücken Sie die iPod/Speicher/Uhreinst.-Taste erneut und die STUNDEN-Anzeige blinkt auf dem Display; nutzen
Sie das Überspringen/Suche-Bedienfeld (nach oben oder unten), um die STUNDEN-Anzeige anzupassen.
4. Drücken Sie die iPod/Speicher/Uhreinst.-Taste noch einmal und die MINUTEN-Anzeige blinkt auf dem Display;
nutzen Sie das Überspringen/Suche-Bedienfeld (nach oben oder unten) zur Anpassung der MINUTEN-Anzeige.
5. Drücken Sie die iPod/Speicher/Uhreinst.-Taste erneut, um die Uhrzeit zu bestätigen.
6. Jede oben gezeigte Einstellungsmöglichkeit wird rückgängig gemacht, wenn nicht innerhalb von 10 Sekunden die
Taste gedrückt wird.
TIMER EINSTELLEN
1. Nach der Uhreinstellung drücken Sie bitte die Timer-Taste für einige Sekunden, bis „ ON" und „00:00" auf dem
Display erscheint und die STUNDEN-Anzeige blinkt. (F1)
2. Berühren Sie das Überspringen/Suche-Bedienfeld (nach oben oder unten) oder drücken Sie die
Überspringen/Suche-Taste (nach oben oder unten) auf der Fernbedienung, um sie anzupassen.
3. Drücken Sie die Timer-Taste erneut und die MINUTEN-Anzeige blinkt; passen Sie sie durch Berühren des
Überspringen/Suche-Bedienfelds (nach oben oder unten) auf dem Gerät oder durch Drücken der
Überspringen/Suche-Taste (nach oben oder unten) auf der Fernbedienung an.
4. Drücken Sie die Timer-Taste noch einmal, um die Timer-An-Zeit zu bestätigen.
5. Nach der Anpassung von „TIMER ON" erscheint „
(F2)
6. Wiederholen Sie die obigen Schritte 2 bis 3 und drücken Sie dann die Timer-Taste noch einmal, um die
Timer-Aus-Zeit zu bestätigen.
7. Nun erscheint „TUNER" blinkend auf dem Display; wählen Sie dann den Alarm-Modus für „TUNER, CD, USB,
SD-CARD", indem Sie das Überspringen/Suche-Bedienfeld (nach oben oder unten) berühren.
8. Drücken Sie die Timer-Taste erneut und die „VOL"-Anzeige erscheint blinkend auf dem Display; stellen Sie die
Timer-Lautstärke durch Berühren des Überspringen/Suche-Bedienfelds (nach oben oder unten) laut oder leise ein
oder drücken Sie die Überspringen/Suche-Taste (nach oben oder unten) auf der Fernbedienung.
9. Jede oben gezeigte Einstellungsmöglichkeit wird rückgängig gemacht, wenn nicht innerhalb von 10 Sekunden die
Taste gedrückt wird.
10. Nach der Anpassung von „TIMER ON" und „TIMER OFF“ drücken Sie die Timer-Taste; "
Display.
OFF" auf dem Display und die STUNDEN-Anzeige blinkt.
" erscheint auf dem
DE-4
Page 23

11. Das Hauptgerät schaltet sich automatisch zur „TIMER ON“-Zeit ein und beginnt die Wiedergabe; das Hauptgerät
schaltet sich automatisch zur „TIMER OFF"-Zeit ab.
Hinweis: Wenn das Display "ERROR" anzeigt, während Sie den „TIMER ON" setzen, bedeutet dies, dass
sowohl „TIMER ON" als auch „TIMER OFF" die gleiche Zeit haben. In diesem Fall gehen Sie bitte auf „TIMER
OFF" und stellen die Ausschaltzeit zuerst ein.
.
Funktionsauswahl
Mit der Funktionsauswahl können Sie d urch Berührung des Funktions-Bedienfelds am Gerät oder du rch Drücken
der Funktions-Taste auf der Fernbedienung den Modus einer jeden Funktion ändern. Das Display ändert sich wie
folgt:
RADIOBETRIEB
1. Berühren Sie das Funktions-Bedienfeld am Hauptgerät oder drücken Sie die Funktions-Taste auf der
Fernbedienung und wählen Sie den Tuner-Modus, um den UKW-Betrieb zu aktivieren.
2. Berühren Sie das Überspringen/Suche-Bedienfeld (nach oben oder unten) am Gerät oder drücken Sie die
Überspringen/Suche-Taste (nach oben oder unten) auf der Fernbedienung, um den gewünschten
Frequenzbereich abzustimmen.
Manueller Suchlauf
Um schwache Sender abzustimmen, nutzen Sie den manuellen Suchlauf, indem Sie das
Überspringen/Suche-Bedienfeld (nach oben oder unten) kontinuierlich berühren, bis Sie die richtige Frequenz lesen
können oder der Empfang am besten ist.
Automatischer Sendersuchlauf
1. Berühren Sie das Überspringen/Suche-Bedienfeld (nach oben oder unten) am Gerät oder drücken Sie die
Überspringen/Suche-Taste (nach oben oder unten) auf der Fernbedienung für eine Sekunde oder länger und
lassen Sie dann los. Der Tuner wird automatisch nach der ersten Station mit ausreichender Signalstärke suchen.
2. Wiederholen Sie diesen Vorgang, wenn Sie einen anderen Sender auswählen möchten.
Mono/Stereo-Auswahl
Sie können MONO/STEREO nur im UKW-Modus auswählen.
1. Wenn Sie UKW-Stereo-Sender auswählen möchten, drücken Sie die Taste ID3/MONO/STEREO. Wenn Sie einen
UKW-Stereo-Sender empfangen, erscheint die „
UKW-Stereo-Übertragung empfangen.
2. Wenn Sie die ID3/MONO/STEREO-Taste erneut drücken, schaltet sich die UKW-STEREO-Anzeige aus und
wechselt in den MONO-UKW-Status.
Programmierung voreingestellter Sender
Sie können auch Sender Ihrer Wahl voreinstellen und bis zu 30 UKW-Sender im Speicher merken. So speichern Sie
Ihre ausgewählten Sender:
1. Stellen Sie den gewünschten Sender ein.
2. Drücken Sie die iPod/Speicher/Uhreinst.-Taste.
3. Drücken Sie die Voreinst./Ordner-Taste (nach oben oder unten) für Ihre gewünschte
Sendern ummer.
4. Drücken Sie die iPod/Speicher/Uhreinst.-Taste erneut, um Ihre Auswahl zu bestätigen.
5. Um weitere Stationen in den Speicher zu programmieren, wiederholen Sie die obigen Schritte 2 bis 4.
6. Um die gespeicherten voreingestellten Sender zu ändern, wiederholen Sie die obigen Schritte 2 bis 4.
Hinweis: 1. Wenn Sie einen neuen Sender auf einen voreingestellten Speicherplatz setzen, wird der vorher an
2. Beim Ausschalten des Geräts werden die gespeicherten voreingestellten Sender
nicht gelöscht. Führen Sie die Schritte für voreingestellte Sender erneut durch, um Sender zu
speichern.
Voreingestellte Sender auswählen
1. Drücken Sie die Voreinst./Ordner-Taste (nach oben oder unten) für die gewünschte Speichernummer.
2. Die numerische Position des gespeicherten Senders wird zusammen mit der entsprechenden
Freque nz angezeigt.
UKW-Antenne
Das UKW-Antennenkabel dient dem besseren UKW-Empfang.
"-Anzeige auf dem Display und Sie können die
dieser Stelle gespeicherte Sender gelöscht.
DE-5
Page 24

CD/MP3/WMA-BETRIEB
CDs anhören (CD/MP3/WMA)
1. Wenn Sie CD/MP3s genießen möchten, drücken Sie zuerst die CD-Öffnen/Schließen-Taste am Gerät und dann
öffnet sich das CD-Fach automatisch. (F3)
2. Legen Sie die CD/MP3-Disc in das CD-Fach, drücken Sie die CD-Öffnen/Schließen-Taste wieder und das
CD-Fach wird automatisch geschlossen.
3. Berühren Sie das Funktions-Bedienfeld am Gerät oder drücken Sie die Funktions-Taste auf der Fernbedienung,
um den CD/MP3-Modus auszuwählen. Das Gerät liest automatisch CD/MP3/WMA-Discs ein.
Hinweis:
(1) Dieses Gerät kann Discs vom Typ CD, CD-R, CD-RW, MP3 und WMA abspielen.
(2) Es kann „8 cm" und „Multi-Section" von MP3-Discs lesen.
(3) Die „Wiedergabeübertragungsrate" für MP3 und WMA:
a. für MP3: Übertragungs-Bitrate: 8 bis 256 kbps,
b. für WMA: Übertragungs-Bitrate: 8 - 192 kbps.
(4) Es können maximal 99 Ordner und 999 Titel gelesen werden.
(5) Wenn keine Disc eingelegt ist oder der TOC-Bereich nicht gelesen werden kann, erscheint „NO DISC“ im
Display. (F4)
Wiedergabe der gesamten CD/MP3/WMA
-CD
1. Legen Sie die CD in das CD-Fach; das Hauptgerät liest automatisch gleichzeitig die Gesamtzahl der Ordner und
Titel.
2. Berühren Sie das Wiedergabe/Pause/Enter-Bedienfeld am Gerät oder drücken Sie die
Wiedergabe/Pause/Enter-Taste auf der Fernbedienung; das Gerät spielt den ersten Titel
der CD automatisch ab. (F5)
3. Berühren Sie das Wiedergabe/Pause/Enter-Bedienfeld am Gerät oder drücken Sie die
Wiedergabe/Pause/Enter-Taste auf der Fernbedienung erneut; die verstrichene Zeit blinkt
und die CD-Wiedergabe wird unterbrochen. (F6)
4. Berühren Sie das Überspringen/Suche-Bedienfeld (nach oben oder unten) einmal, um
die Titelnummer zu ändern. Berühren Sie das Überspringen/Suche-Bedienfeld (nach
oben oder unten) am Gerät oder auf der Fernbedienung einmal und halten sie es
gedrückt, um bei einem Lied schnell vorwärts oder rückwärts zu spulen.
5. Um die Wiedergabe fortzusetzen, berühren Sie das Wiedergabe/Pause/Enter-Bedienfeld am Gerät oder drücken
Sie die Wiedergabe/Pause/Enter-Taste auf der Fernbedienung noch einmal mehr.
6. Um die Wiedergabe zu beenden, berühren Sie das Stop/Menü-Bedienfeld am Gerät oder drücken Sie einmal die
Stop/Menü-Taste auf der Fernbedienung.
- MP3/WMA
1. Legen Sie die MP3-/WMA-CD in das CD-Fach; das Hauptgerät liest automatisch
gleichzeitig Sie die Gesamtzahl der Ordner und Titel ein.
2. Berühren Sie das Wiedergabe/Pause/Enter-Bedienfeld am Gerät oder drücken Sie die
Wiedergabe/Pause/Enter-Taste auf der Fernbedienung; das Gerät spielt den ersten Titel
der CD automatisch ab. (F7)
3. Berühren Sie das Wiedergabe/Pause/Enter-Bedienfeld am Gerät oder drücken Sie die
Wiedergabe/Pause/Enter-Taste auf der Fernbedienung erneut; die verstrichene Zeit blinkt
und die CD-Wiedergabe wird unterbrochen. (F8)
4.Um die Titelnummer zu ändern, berühren Sie das Überspringen/Suche-Bedienfeld (nach
oben oder unten) am Gerät oder drücken Sie die Wiedergabe/Pause/Enter-Taste auf der Fernbedienung einmal.
Und berühren und halten Sie das Überspringen/Suche-Bedienfeld (nach oben oder unten) am Gerät (oder auf der
Fernbedienung) einmal, um bei einem Lied schnell vorwärts oder rückwärts zu spulen.
5. Um die Wiedergabe fortzusetzen, berühren Sie das Wiedergabe/Pause/Enter-Bedienfeld am Gerät oder drücken
Sie die Wiedergabe/Pause/Enter-Taste auf der Fernbedienung erneut.
6. Um die Albumnummer zu ändern, drücken Sie Taste Voreinst./Ordner-nach-oben oder
oreinst./Ordner-nach-unten einmal.
7. Um die Wiedergabe zu beenden, berühren Sie einmal das Stop/Menü-Bedienfeld am Gerät (oder auf der
Fernbedienung).
Hinweis: Wenn das Hauptgerät nicht ordnungsgemäß funktioniert, trennen Sie es von der Stromquelle und
schließen Sie es erneut an.
DE-6
Page 25

ID3-BETRIEB
Im MP3/WMA-Modus
1. Drücken Sie die Taste ID3/MONO/STEREO am Gerät (oder auf der Fernbedienung) einmal, um die ID3-Funktion
zu öffnen.
2. Wenn die MP3/WMA-Datei im Format „ID3" geschrieben ist, sucht das Gerät automatisch die Informationen zu
„Titelname“, „Künstlername“ und „Albumname" im Display.
3. Drücken Sie die Taste ID3/MONO/STEREO am Gerät (oder auf der Fernbedienung) erneut. Das Gerät nimmt die
Wiedergabe wieder normal auf.
USB/SD-KARTEN-BETRIEB
Im Standby-Modus
1. Legen Sie das USB-Gerät oder die SD/MMC-Karte ein und drücken Sie die Standby-Taste am Hauptgerät (oder
auf der Fernbedienung), um das Hauptgerät anzuschalten.
2. Berühren Sie das Funktions-Bedienfeld am Hauptgerät (oder auf der Fernbedienung),
um den USB- oder SD/MMC-Modus auszuwählen. Das Hauptgerät liest automatisch
gleichzeitig die Gesamtzahl der Ordner und Titel. (F9)
3. Wenn das USB-Speichergerät mehr als einen Ordner hat:
a. Drücken Sie die Voreinst./Ordner-Taste (nach oben oder unten), um jeden Ordner
anzuwählen.
b. Berühren Sie das Überspringen/Suche-Bedienfeld (nach oben oder unten), um den aktuellen
T itel im gewünschten Ordner auszuwählen.
4. Wenn die MP3s und WMAs im Format „ID3" geschrieben sind:
a. Während das Gerät MP3s oder WMAs wiedergibt, drücken Sie die ID3/MONO/STEREO-Taste einmal. Das
Dispaly zeigt „ID3 ON" und sucht dann automatisch nach mehr als 64 Buchstaben des „Titelnamen",
„Künstlernamen" oder „Albumnamen", die kontinuierlich von der rechten oberen Ecke zur linken unteren laufen.
b. Drücken Sie die Taste ID3/MONO/STEREO erneut. Das Display zeigt „ID3 OFF" und das Hauptgerät setzt die
normale Wiedergabe fort.
Hinweis: 1. Das Hauptgerät kann MP3 und WMA nur in diesem Modus wiedergeben.
2. Dieses Gerät unterstützt die meisten USB-Geräte und SD/MMC/SDHC-Karten. Die Speicherkapazität ist
bis zu 32GB. Speichergrößen über 32GB sind nicht zugänglich(oder nicht für längere Zeit). Nutzen Sie
andere Geräte zum Zugriff.
3. Es unterstützt USB Version 1.1 und 2.0.
4. Nicht alle Arten von „Dual-Voltage-MMC-Karten" oder
„MMC-Plus"-Karten werden unterstützt.
5. Das Hauptgerät unterstützt keine WMA-Dateien, die als geschützte
„DRM-Datei" vorliegen.
Wiedergabe einer gesamten Flash-Disc
1. Die Wiedergabe startet durch Berühren des
Wiedergabe/Pause/Enter-Bedienfelds am Gerät oder durch Drücken der
Wiedergabe/Pause/Enter-Taste auf der Fernbedienung. Die Wiedergabe
beginnt mit dem ersten Titel. Das Display zeigt die aktuelle Titelnummer und
die verstrichene Zeit an. (F10)
2. Um die Wiedergabe zu unterbrechen, berühren Sie das
Wiedergabe/Pause/Enter-Bedienfeld am Gerät oder drücken Sie die
Wiedergabe/Pause/Enter-Taste auf der Fernbedienung. Die verstrichene Zeit blinkt. (F11)
3. Um die Wiedergabe fortzusetzen, berühren Sie das ‚
Wiedergabe/Pause/Enter-Bedienfeld am Gerät oder drücken Sie die
Wiedergabe/Pause/Enter-Taste auf der Fernbedienung erneut.
4. Um die Wiedergabe zu beenden, berühren Sie die Stop/Menü-Taste.
Hinweis: Das USB-Gerät oder die SD-Karte müssen zu jeder Zeit ordentlich im Standby-Modus eingesteckt werden,
um Schäden am Hauptgerät und USB-Gerät oder an der SD-Karte zu vermeiden.
Wiederholte Wiedergabe
- CD
1. Berühren Sie das Wiederholen-Bedienfeld am Gerät oder drücken Sie die
Wiederholen-Taste auf der Fernbedienung einmal; „WIEDERHOLEN" wird angezeigt. Der
aktuelle Titel der CD wird wiederholt abgespielt. (F12)
2. Berühren Sie das Wiederholen-Bedienfeld am Gerät oder drücken Sie die
Wiederholen-Taste auf der Fernbedienung zweimal; „ALLE
WIEDERHOLEN" wird angezeigt. Alle Titel der CD werden wiederholt. (F13)
DE-7
Page 26

3. Berühren Sie das Wiederholen-Bedienfeld am Gerät oder drücken Sie die Wiederholen-Taste auf der
Fernbedienung noch einmal, um die Wiederholen-Funktion auszuschalten.
- MP3/WMA/USB/S D-KARTE
1. Berühren Sie das Wiederholen-Bedienfeld am Gerät oder drücken Sie die Wiederholen-Taste auf der
Fernbedienung einmal; „WIEDERHOLEN" wird angezeigt. Der aktuelle Titel wird wiederholt abgespielt. (F14)
2. Berühren Sie das Wiederholen-Bedienfeld am Gerät oder drücken Sie die Wiederholen-Taste auf der
Fernbedienung zweimal; „ALLE WIEDERHOLEN" wird angezeigt. Es werden alle Titel wiederholt abgespielt. (F15)
3. Berühren Sie das Wiederholen-Bedienfeld am Gerät oder drücken Sie die Wiederholen-Taste auf der
Fernbedienung dreimal; „ALBUM WIEDERHOLEN" wird angezeigt. Es werden alle Titel im aktuellen Ordner
wiederholt abgespielt. (F16)
4. Berühren Sie das Wiederholen-Bedienfeld am Gerät oder drücken Sie die Wiederholen-Taste auf der
Fernbedienung noch einmal, um die Wiederholen-Funktion auszuschalten.
PROGRAMM-FUNKTION
Der Ben utzer kann bis zu 32 T itel im CD-Mod us oder 6 4 Titel im MP3/WMA/USB/SD-CARD-Modus in
beliebiger Reihenfolge programmieren. Der Programm-Modus wird im Stop-Modus aktiviert.
1. So spielen Sie das Programm
- CD
1) Drücken Sie die iPod/Speicher/Uhreinst.-Taste und wechseln Sie in den Speicher-Modus. (F17)
2) Berühren Sie das Überspringen/Suche-Bedienfeld (nach oben oder unten) am Gerät oder drücken Sie die
Überspringen/Suche-Taste (nach oben oder unten) auf der Fernbedienung, um die Titelnummer zu ändern.
3) Drücken Sie die iPod/Speicher/Uhreinst.-Taste, um die Titelnummer zu
bestätigen.
- MP3/WMA
1) Drücken Sie die iPod/Speicher/Uhreinst.-Taste und wechseln Sie in den
Speicher-Modus. Die Albumnummer blinkt. (F18)
2) Drücken Sie die Voreinst./Ordner-Taste am Gerät oder auf der Fernbedienung, um
die Albumnummer zu ändern.
3) Drücken Sie die iPod/Speicher/Uhreinst.-Taste; die erste Titelnummer wird
angezeigt.(F19)
4) Berühren Sie das Überspringen/Suche-Bedienfeld (nach oben oder unten) auf dem
Gerät oder drücken Sie die Überspringen/Suche-Taste (nach oben oder unten) auf
der Fernbedienung; die Titelnummer wird geändert.
5) Drücken Sie die iPod/Speicher/Uhreinst.-Taste zur Bestätigung der
Lieblingstitelnummer.
2. PROGRAMM-WIEDERGABE
Berühren Sie das Wiedergabe/Pause/Enter-Bedienfeld am Gerät oder drücken Sie die
Wiedergabe/Pause/Enter-Taste auf der Fernbedienung. Das Gerät spielt den ersten Titel des Programms.
Wenn alle Titel gespielt wurden, zeigt das Display des Geräts die Anzahl der Titel und die Spielzeit der
CD/MP3-Lieder.
3. Programmabbruch
1. Berühren Sie das Stop/Menü-Bedienfeld am Gerät oder drücken Sie die Stop/Menü-Taste auf der
Fernbedienung einmal, oder öffnen Sie das CD-Fach und schließen Sie es wieder, damit der Speicher
gelöscht wird.
2. Legen Sie ein neues Programm fest; das bestehende wird gelöscht.
Hinweis: Während Sie sich im Programm-Modus befinden:
1. Berühren Sie das Wiederholen-Bedienfeld am Gerät oder drücken Sie die
Wiederholen-Taste auf der Fernbedienung einmal; die „WIEDERHOLEN"-Anzeige leuchtet im Display.
Das Gerät wiederholt dann den aktuellen Titel.
2. Berühren Sie das Wiederholen-Bedienfeld am Gerät oder drücken Sie die Wiederholen-Taste auf der
Fernbedienung zweimal; die „ALLE WIEDERHOLEN"-Anzeige leuchtet im Display. Das Gerät
wiederholt dann alle Titel.
3. Berühren Sie das Wiederholen-Bedienfeld am Gerät oder drücken Sie die Wiederholen-Taste auf der
Fernbedienung erneut. Das Gerät wechselt zurück zur normalen Wiedergabe.
DE-8
Page 27

Zufallswiedergabe
1. Drücken Sie die Zufallsmodus-Taste am Gerät (oder auf der Fernbedienung) und
ZUFALLSMODUS wird angezeigt. (F20)
2. Drücken Sie die Zufallsmodus-Taste erneut, damit das Audio-Gerät zur
normalen Wiedergabe zurück wechselt
INTRO-WIEDERGABE (auf der Fernbedienung)
1. Drücken Sie die INTRO-Taste auf der Fernbedienung; INTRO wird angezeigt. Bei
INTRO werden die ersten 10 Sekunden von jedem Titel abgespielt. (F21)
2. Drücken Sie die INTRO-Taste zweimal, damit das Audio-Gerät zur normalen
Wiedergabe zurück wechselt
.
iPod-Betrieb
Hinweis: Um Schäden am iPod zu vermeiden, verbinden und trennen Sie den iPod nur im Standby-Modus.
Während das Gerät im Standby-Modus ist:
1. Drücken Sie die iPod-Öffnen/Schließen-Taste zuerst einmal am Gerät, um den iPod-Deckel zu öffnen.
2. Setzen Sie den iPod in der iPod-Docking-Halterung an der Vorderseite des
Hauptgeräts fest ein.
3. Schalten Sie das Hauptgerät ein und berühren Sie das Funktions-Bedienelement
am Gerät oder drücken Sie die Funktions-Taste auf der Fernbedienung in den
iPod-Modus; die iPod-Anzeige erscheint auf dem Hauptgerät. (F22)
Während das Gerät im iPod-Modus ist:
1. Berühren Sie das Wiedergabe/Pause/Enter-Bedienfeld (nur iPod) oder drücken Sie die
Wiedergabe/Pause/Enter-Taste auf der Fernbedienung zum Starten der Wiedergabe des iPod. Passen Sie die
Lautstärke durch Berührung der Lautstärke-Taste (nach oben oder unten) an; um die aktuelle Wiedergabe zu
beenden, berühren Sie das Stop/Menü-Bedienfeld (nur iPod) einmal.
2. Berühren Sie das Wiedergabe/Pause/Enter-Bedienfeld (nur iPod) einmal, um den aktuellen Titel anzuhalten. Um
die Wiedergabe fortzusetzen, berühren Sie das Wiedergabe/Pause/Enter-Bedienfeld (nur iPod) erneut.
3. Um Titel vorwärts oder rückwärts zu überspringen, berühren Sie das Überspringen/Suche-Bedienfeld (nach oben
oder unten), um den gewünschten Titel auszuwählen.
4. Berühren Sie das Wiederholen-Bedienfeld oder drücken Sie die Zufallsmodus-Taste am Gerät (oder auf der
Fernbedienung).
Hinweis: Der iPod Touch Version 1.1.4 oder höher unterstützt die Wiederholen- oder Zufallsmodus-Funktion.
Während das Gerät im iPod-Menü-Modus ist:
1. Während das Gerät im iPod-Modus ist, drücken Sie die iPod/Speicher/Uhreinst.-Taste
einmal, damit das Gerät in den iPod-Menü-Modus wechselt. Die iPod-Menü-Anzeige
erscheint auf dem Display des Geräts. (F23)
2.Berühren Sie das Stop/Menü-Bedienfeld (nur iPod) und kehren Sie ins iPod-Menü
zurück.
a. Die folgenden Menüs können Sie wählen:
Musik > Extras > Foto importieren (ohne diese Funktionsanzeige auf dem iPod mini) > Einstellungen > Zufällige
Wiedergabe > Beleuchtung > Aktueller Titel; diese werden auf dem iPod-Display angezeigt.
b. Berühren Sie das Überspringen/Suche-Bedienfeld (nach oben oder unten) am Gerät (oder auf der
Fernbedienung), um das aktuelle Menü zu durchsuchen.
3. Berühren Sie das Wiedergabe/Pause/Enter-Bedienfeld (nur iPod) und gehen Sie zum gewünschten Menü-Ordner.
a. Berühren Sie das Überspringen/Suche-Bedienfeld (nach oben oder unten) am Gerät (oder auf der
Fernbedienung), um die aktuellen Inhalte in jedem gewünschten Ordner zu durchsuchen.
b. Wenn Sie zurück in das iPod-Menü möchten, berühren Sie erneut das Stop/Menü-Bedienfeld (nur iPod)..
4. Um die Wiedergabe fortzusetzen, drücken Sie die iPod/Speicher/Uhreinst.-Taste erneut; das Gerät kehrt in den
iPod-Modus zurück.
Aufladen des iPod-Akkus durch das Hauptgerät:
1. Der iPod verfügt über einen internen Akku, der nicht herausgenommen werden kann; der Akku muss
eventuell nach längerer Nichtbenutzung aufgeladen werden.
2. Sie können den iPod über das Hauptgerät automatisch im Standby- oder eingeschalteten Modus aufladen.
Hinweis: 1. Der iPod-Akku wird in etwa einer Stunde zu 80% und in mehreren Stunden vollständig geladen.
Wenn Sie ihn während des Musikhörens aufladen, kann es länger dauern.
2. Es ist nicht besser, im Tuner-Modus aufzuladen; dies kann unter Umständen den Empfang stören.
Hinweis:
1. Sie können den iPod zu jeder Zeit über das Hauptgerät, die Fernbedienung oder den iPod selbst steuern,
während das Gerät im „iPod"- oder „iPod-Menü"-Modus ist.
2. Der iPod muss immer im Standby-Modus angeschlossen werden, um Schäden am Gerät und iPod zu
vermeiden.
DE-9
Page 28

3. W enn die V ideo-Funktion des iPod unnormales Verhalten zeigt, währen d das Gerät im iPod-Modus ist,
aktualisieren Sie es bitte mit der neuesten Version der iPod-Video-Funktion von der Apple-Webseite.
Video-Out-Einstellung (nur für iPod Video)
1. Während das Gerät im Standby-Modus ist: Verbinden Sie den Fernseher über ein Videokabel (Cinch-Kabel)
mit dem VIDEO-OUT-Anschluss an der Rückseite des Geräts.
2. Während das Gerät im iPod-Modus ist: Drücken Sie die Menü-Taste auf dem iPod-Klickrad, um die
Video-Funktion einzustellen.
3. Den iPod für die Wiedergabe von Videos auf einem Fernseher einstellen:
(a) Wählen Sie Videos > Video-Einstellungen; dann legen Sie den TV-Ausgang auf „Nachfragen“ oder „An“.
(b) Wenn Sie den TV-Ausgang auf „Nachfragen“ gesetzt haben, fragt Sie der iPod jedes Mal, wenn Sie ein
Video abspielen, ob er dies auf dem Fernseher oder dem iPod anzeigen soll.
Hinweis: 1. Der Video-Modus unterstützt nur iPods mit Video-Funktion.
2. iPod classic 80/160GB, iPod nano der 3. Generation (Video) 4/8GB und iPod touch 8/16GB sollten
vor Benutzung der Video-Funktion nur im Standby-Modus angeschlossen werden.
3. Das Video-Kabel (Cinch-Kabel) ist nicht inbegriffen.
AUX-IN-WIEDERGABE
1. Berühren Sie das Funktions-Bedienfeld am Gerät oder drücken Sie die Funktions-Taste auf der
Fernbedienung, bis die „AUX"-Anzeige auf dem D isplay leuchtet. Dieses Ge rät kann ei ngehende analoge
Audiosignale über den AUX(LINE)-IN-Anschluss auf der rechten Seite des Geräts verarbeiten.
2. Verwenden Sie zur Verbindung ein Kabel mit Cinch-Anschluss für externe Audio-Quellen.
Hinweis: AUX-IN-Kabel ist nicht inbegriffen.
SCHLAFMODUS-FUNKTION EINSTELLEN
1. Möchten Sie zur Musik einschlafen, drücken Sie die Schlafmodus-Taste am Gerät oder auf der
Fernbedienung.
2. Sie können den Modus TUNER, CD/MP3, USB, SD/MMC, iPod oder AUX für den Schlafmodus wählen und
von 90, 80, 70 bis hin zu 10 Minuten Musik vor der selbständigen automatischen Abschaltung des Geräts
abspielen lassen.
EQ-REGLER
EQ zeigt die aktuelle Klangeinstellung an.
Wenn Sie das EQ-Bedienfeld berüh ren oder die EQ-T aste auf der Fernbe dienung drücken, können Sie die
Klangeinstellung wie folgt verändern:
STUMMSCHALTUNG
1. Wenn Sie die Stumm-Taste am Gerät oder auf der Fernbedienung einmal
drücken, blinkt die Lautstärkeanzeige auf und die Audio-Ausgabe wird
vorübergehend auf stumm gesetzt. (F24)
2. Drücken Sie die Stumm-Taste am Gerät oder auf der Fernbedienung
erneut, um die Lautstärke und Audio-Ausgabe zurück auf normal zu
setzen.
Musikhören mit Kopfhörern
Am Gerät befindet sich ein Stereo-Kopfhöreranschluss für privates Hörvergnügen. Um das Gerät mit
Kopfhörern zu betreiben (nicht im Lieferumfang enthalten), stecken Sie den 3,5-mm-Stereo-Stecker der
Kopfhörer in den Kopfhöreranschluss auf der Vorderseite. Die externen Lautsprecher werden automatisch
abgeschaltet, sobald Kopfhörer verwendet werden.
Memory Back-up
Die 3 x 1,5 V, UM-4, AAA- oder gl eichwertige Batterien sind in das Batteriefach des Geräts einzusetzen und
dienen zur Sicherung der Haupt-CPU.
DE-10
Page 29

SPEZIFIKATION
Stromversorgung: 230V ~ 50Hz
Ausgangsleistung: 10 W x 2
Geräteausmaße: 400 (B) x 154 (T) x 211 (H) mm
Lautsprecherausmaß: 160 (B) x 154 (T) x 211 (H) mm
Nettogewicht: 5,1 kg
Radio-Funktionalität
Frequenzbereich: UKW 87,5 - 108 MHz
CD-Funktionalität
Optische Abtastung: 3fach-Laser
Frequenzbereich: 100 Hz - 16 kHz
Die Spezifikation kann ohne weitere Ankündigung geändert werden.
Belüftungswarnung: „Die normale Belüf tung des Produkts darf für die zweckmäßige Nutzung nicht b ehindert
werden."
www.mpmaneurope.com
DE-11
Page 30

XRM62i
Docking Station con Lettore CD/MP3/USB/ Scheda SD,
Radio e iPod
iPod è un marchio di fabbrica di Apple INC.,
registrato negli Stati Uniti e in altri paesi.
iPod dimostrato non incluso.
“"Fatta per iPod" significa che un accessorio elettronico è stato progettato per essere collegato specificamente ad
un iPod ed è stato certificato dallo sviluppatore per soddisfare gli standard di prestazione di Apple.
Apple non è responsabile per il funzionamento di tale dispositivo e la sua conformità con le norme di sicurezza e di
regolamentazione.
MANUALE DI ISTRUZIONI
Page 31

Per raggiungere il massimo divertimento e rendimento, si prega di leggere attentamente questo manuale prima
di tentare di utilizzare l'apparecchio in modo da prendere familiarità con le sue caratteristiche, e assicurarsi anni
di divertimento fedele, senza problemi di prestazioni e di ascolto.
Note importanti
* Conservare le istruzioni di sicurezza e di funzionamento devono per una consultazione futura.
* Evitate di installare l'unità nei luoghi descritti di seguito:
Luoghi esposti alla luce diretta del sole o vicino ad apparecchi radianti come i riscaldatori elettrici.
Sopra altri appa recchi stere o che i rradiano tr oppo cal ore. I luoghi co n poca vent ilazione o luoghi
polverosi. Luoghi soggetti a vibrazioni costanti. Luoghi umidi o con umidità.
* Attenzione a non ostruire le aperture di ventilazione.
* Prima di accendere l’apparecchio per la prima volta, assicurarsi che il cavo di alimentazione sia
installato correttamente.
* Il cavo di alimentazione viene utilizzato come dispositivo di disconnessione e deve essere
completamente pronto all’uso.
* Il prodotto non deve essere esposto a perdite o spruzzi e agli oggetti pieni di liquidi, come i vasi, possono
essere posizionati sul prodotto.
* Il prodotto non deve essere esposto a perdite o spruzzi e agli oggetti pieni di liquidi, come i vasi,
possono essere posizionati sul prodotto.
* Per scollegare l’alimentazione completamente, la spina dell’apparecchio deve essere scollegata dalla rete
elettrica.
* Quando il LED stand-by non è acceso, l'apparecchio è completamente scollegato dalla rete elettrica.
* la distanza minima intorno all’apparecchio per una sufficiente ventilazione è di 10 cm.
* Deve essere prestata attenzione agli aspetti ambientali dello smaltimento delle batterie.
* L'uso dell’ apparecchio in climi temperati.
* Le spine di alimentazi one non dev ono essere ostrui te o d evono essere facilmente accessibili dura nte
l'uso previsto.
* La ventilazione non deve essere ostacolata coprendo le aperture di ventilazione con oggetti come giornali,
tovaglie, tende, ecc
* Nessuna fonte di fiamme vive, come le candele accese deve essere posta sullo apparecchio.
* La batteria non deve essere esposta ad un calore eccessivo come il sole, il fuoco o simili.
Per motivi di si curezza, non rim uovere i coperchi o tenta re di a ccedere all 'interno del p rodotto.
Rivolgersi a personale qualificato.
Non tentare di rimuovere le viti, o aprire l'involucro dell'unità, no n ci s ono parti riparabili d all'utente, per l a
manutenzione rivolgersi a personale qualificato.
ATTENZIONE: PER RIDURRE IL RISCHIO DI SCOSSE ELETTRICHE, NON RIMUOVERE IL COPERCHIO (O IL
RETRO), NON CI SONO PARTI ALL’INTERNO UTILIZZABILI DALL’ UTENTE, RIVOLGERSI PER LA
MANUTENZIONE A PERSONALE QUALIFICATO.
TENSIONE PERICOLOSA
Conduttori di elettricità pericolosi, che possono essere di intensità sufficiente a costituire un
rischio di shock elettrico per le persone è presente all'interno di questo tipo di prodotti.
ATTENZIONE
Il manuale contiene importanti istruzioni di uso e manutenzione, per la vostra sicurezza, è
necessario fare riferimento al manuale.
ATTENZIONE : PER EVITARE INCENDI O PERICOLO DI SHOCK. NON ESPORRE QUESTO
APPARECCHIO A GOCCE O SCHIZZI
Nota:
- Questa unità diventerà calda, quando si utilizzano per un lungo periodo di tempo. Questo è normale
e non indica un problema con l'unità.
- Il lettore CD comprende micro processori che potrebbero non funzionare correttamente a causa di interferenze
elettriche o disturbi. Se il lettore CD non funziona correttamente, scollegare la fonte di alimentazione e
ricollegarlo.
- Un’eccessiva pressione del suono da auricolari e cuffie può causare la perdita dell'udito.
- Se condizioni insolite si verificano nella finestra di visualizzazione o sul pulsante, spegnere
l'apparecchio e quindi accendere l'unità di nuovo.
IT-1
Page 32

Schema di montaggio dell’unità e dell’altoparlante
1. Fissaggio dell’unità al muro
Porre parallelamente i due chiodi fissanti nella parete,
la distanza tra di loro deve essere di 84 millimetri.
Nota: Le dimensioni del chiodo: 3.5 * 25BA.
Premere verso il basso e premere il pannello dello stand della fibbia A e B sul retro di ogni altoparlante
e poi rimuovere ogni stand degli altoparlanti.
Nota: Quando si mont a alla p arete il prodotto in linea, vi suggeriamo di m antenere almeno 50 millimetri
distanza dall'unità centrale agli altop arlanti per ottenere un effetto stereo migliore e per garantire la porta CD
scorra con un movimento prefetto.
2. Connessione altoparlanti
Disporre parallelamente i due chiodi che fissano alla parete, la distanza tra di loro deve essere di 300mm.
Nota: Le dimensioni del chiodo: 3.5 * 25BA.
Premere verso il basso e premere il p annello dello stand della fibbia C e D sul retro d ell'unità principale e
quindi rimuoverne lo stand.
3. Supporto e pannello di regolazione a tappeto dell’ iPod.
Adattatore supporto universale (utilizzare gli adattatori di supporto
per supportare tutti i tipi di lettori iPod.)
Connettore supporto
Pannello di regolazione a Tappeto iPod
(Premere Pannello di regolazione a Tappeto leggermente verso l’esterno dal punto di blocco).
Pannello di regolazione a Tappeto iPod (Inserite facilmente nel connettore di fissaggio, e quindi premere e
spingerli verso il punto di blocco fino a che non scatta.)
IT-2
Page 33

4. Regolare la manopola di regolazione del tappeto
Regolare la Regolazion e del t appeto Manopo la a livello 1 per supportare questi lettori
iPod come segue:
Creato per iPod con display a colori (4° generazione) solo da 40GB, 60GB
iPod (4° generazione) solo da 40GB
iPod con video (5° generazione) solo da 30GB
iPod classico da 80GB
iPod classico di 2° generazione da 120GB
Regolare la Manopola di Regolazione del t appeto al livello 2 per s upportare questi
lettori iPod come segue:
Creato per iPod mini
(1 ª generazione) solo da 4GB, 6GB
(4° generazione) solo da 20GB U2 edizione speciale
iPod con display a colori (4a generazione) da 20GB, 30GB solo Edizione speciale U2
iPod con video (5° generazione), solo da 60GB, 80GB
iPod classico da 160GB
Regolare la manopo la di Regolazione del t appeto al livello 3 per su pportare questi
lettori iPod come segue:
Creato per iPod nano
(1° generazione) solo da 1GB, 2GB, 4GB
iPod touch da 8GB/16GB/32GB
iPod touch si 2° generazione da 8GB/16GB/32GB
CARATTERISTICHE E COMANDI
1. Altoparlante
2. Stand Altoparlante
3. Indicatore LED Standby
4. Porta scheda SD / MMC
5. Porta per cuffie
6. Porta Dispositivo USB
7. Pulsante Apri/Chiudi iPod
8. Pulsante STANDBY / ON
9.Pulsante Apri/Chiudi CD
10.Pulsante Sleep
11. Pulsante ID3/mono/standby
12 Pulsante di regolazione iPod / memoria /orologio
13.Pulsante Timer
14. Pulsante Casuale
15. Tasto Muto
16. Pulsante Preselezione/Cartella in basso
17. Pulsante Preselezione/Cartella in alto
18. Pulsante superficie touch EQ
19. Pulsante Menu /stop
20. Abbassare il volume della superficie touch
21. Salta / Abbassare la superficie touch
22. Aumento del volume della superficie touch
23. Funzione superficie touch
24. Sensore IR
25. Finestra schermo LCD
26. Porta CD
27. Ripeti superficie touch
IT-3
Page 34

12
ù
28. Introduzione superficie touch
28. Introduzione superficie touch
29. Pausa / play / entra nella superficie touch
29. Pausa / play / entra nella superficie touch
30. Antenna FM
30. Antenna FM
31. Altoparlante esterno "S"
31. Altoparlante esterno "S"
32. Stand unità principale
32. Stand unità principale
33. Supporto
33. Supporto
34. manopola di regolazione tappeto iPod
34. manopola di regolazione tappeto iPod
35. Connettore iPod
35. Connettore iPod
36. Altoparlante esterno "D"
36. Altoparlante esterno "D"
37. Porta Video out
38. Porta Line in
39. Foro di settaggio
40.Porta della batteria della memoria di
ripristino
41. interruttore di alimentazione AC
42. Cavo di alimentazione AC
43. Porta Lettore iPod
44. Salta / Alzare la superficie
TELECOMANDO
1. Tasto STANDBY
2. Tasto Muto
3. Pulsante di selezione /Cartella su
4. Pulsante di selezione / cartella giù
5. Ignorare / ricerca giù
6. Pulsante Intro
7. Pulsante ID3/mono/standby
8. Tasto Casuale
9. Pulsante Volume su
10. Pulsante funzione
11.Pulsante Apri/Chiudi CD
. Volume gi
13. Pulsante Apri/Chiudi iPod
14. Pausa / Play/ Invio
15. Pulsante EQ
16. Pulsante Salta / Cerca
sintonizzazione
17. Pulsante menu / stop
18. Pulsante sleep
19. Pulsante iPod/ memoria / regolare
pulsante
20. Pulsante Timer
21. Pulsante numero di ricerca
22. Tasto Ripeti
,16(5,0(172'(//(%$77(5,(1(/7(/(&20$1'281,7$
Premere il coperchio del vano, e far scorre re il
coperchio per aprire il vano. Inserire le due batterie
(UM4), (AAA ), (R03 ) nel telecom ando in ba se ai
segni di pol arità ( "+" e "-") all'interno del vano
batterie. Posizionare il cop erchio sul vano, premere
leggermente verso il b asso e spi ngerlo verso l' alto
fino a quando non si chiude.
Nota: Rimuovere le batterie dal telecomando, se non
sono in uso per un lung o perio do di tempo. Non
mescolare batterie normali con batterie ricaricabili,
quando le batterie divent ano deboli, il telecoman do
non funzionerà e si sostituiranno con batterie nuove.
** BATTERIE NON INCLUSE **
FINESTRA SCHERMO LCD
A. Indicatore Timer
B. Indicatore numero di album
C. Indicatore Ripeti 1 & tutti
D. Indicatore Stereo
E. indicatore di Volume alto / basso
F. Indicatore Sleep
G. indicatore Brano / numero /tempo
COMPACT DISC
1. Usare sempre un compact disc
recante il marchio, come mostrato.
2. Note sulla gestione dei dischi
Rimozione del disco dalla sua
custodia e caricarlo.
* Non toccare la superficie riflettente registrata.
* Non attaccare carta o scrivere nulla sulla superficie.
* Non piegare il disco.
3.Conservazione
* Conservare il disco nella sua custodia.
* Non esporre i dischi alla luce solare diretta o a
temperature elevate, umidità elevata o luoghi
polverosi.
4. Pulizia del disco
* Se Il disco dovesse sporcarsi, togliere la polvere,
sporcizia e le impronte digitali con un panno
morbido.
* Il disco deve essere ripulito dal centro verso il bordo.
IT-4
Page 35

* Non utilizzare benzene, diluenti, detergenti fluidi per dischi o spray antistatici.
* Assicurarsi di chiudere la porta CD così la lente non è contaminata da polvere.
* Non toccare la lente.
METTERE IN FUNZIONE L’ UNITA’
Quando collegate l’unità per la prima volta alla presa di corrente, premere il tasto di accensione sul retro
dell'unità, l'unità sarà in modalità standby, la luce nera di attesa è di colore rosso. È ora possibile premere il
tasto STANDBY / ON sull'unità o premere la luce blu. Per spegnere completamente estrarre la spina AC dalla
presa a muro.
ACCENSIONE/STANDBY
1.Premere il t asto STANDBY sull’l'unità oppure prem ere il t asto STANDBY sul teleco mando per accendere
l'unità.
2. Selezionare la fonte del suono(CD, USB, SD CARD, iPod, AUX o STEREO) sulla superficie touch o
premere il tasto FUNZIONE sul telecomando. Il display corrispondente si accenderà.
3. Regolare il volume con la superficie touch (VOLUME SU o GIU’) sull'unità o sul telecomando.
4. Premere il tasto STANDBY sull'unità o premere il tasto STANDBY sul telecomando per spegnere l'unità.
Nota: 1. Se non vi è alcun segnale in modalità CD / DISPOSITIVI USB / SD e MMC / iPod, l'unità principale
sarà disattivata automaticamente entro 15 minuti.
2. Durante modalità iPod, non si può inserire il lettore iPod sulla supporto per iPod. L'unità principale
sarà anche disattivata automaticamente entro 15 minuti.
3. Durante in modalità standby, premere un pulsante / tasto può far illuminare il display per 10 secondi.
4. Spegnere per risparmiare energia quando non si utilizza l'unità.
IMPOSTAZIONE OROLOGIO
In modalità standby
1. Premere e tenere premuto il pulsante l'iPod / MEM / C-ADJ. fino a quando viene visualizzato il tempo
cambierà in cifre per 24 ore (o 12 ore) e lampeggerà.
2. Toccare la superficie touch Salta / Cerca STAZIONE (su o giù) o premere il tasto SALTA / CERCA
STAZIONE(su o giù) sul telecomando per regolarlo con due cifre per 12 ore o 24 ore.
3. Premere di nuovo il pulsante iPod / MEM / C-ADJ., la cifre dell’ ORA lampeggerà sul display, toccare la
superficie touch SALTA / CERCA STAZIONE (su o giù) per regolare la cifra dell’ORA.
4. Premere il pulsante l'iPod / MEM / C-ADJ. una volta ancora, la cifra dei minuti lampeggerà sul display,
toccare la superficie touch Salta / Cerca STAZIONE(su o giù) per regolare la cifra dei MINUTI.
5. Premere nuovamente il pulsante iPod / MEM / C-ADJ. per confermare l'ora.
6. Ogni abilitazione come sopra indicato verrà cancellata se il tasto non viene premuto in 10 secondi.
Impostazione Timer
1. Dopo aver regolato l'orologio, premere il tasto TIMER per pochi secondi, " ON" e "00:00" appare sul
display e lampeggia la cifra delle ORE. (F1)
2. Toccare il Salta / Cerca STAZIONE (su o giù) sulla superficie touch o premere il tasto Salta / Cerca
STAZIONE (su o giù) sul telecomando per regolarlo.
3. Premere il tasto TIMER più volte, la cifra Minute inizierà a lampeggiare, regolarlo toccando Salta / Cerca
STAZIONE (SU o GIU’) sulla superficie touch o premere il tasto Salta / Cerca STAZIONE (su o giù) sul
telecomando
4. Premere il pulsante TIMER una volta ancora per confermare l’ora TIMER ON
5. Dopo aver regolato "TIMER ON", " OFF" appare sul display e la cifra ORA lampeggia. (F2)
6. Ripetere i passaggi 2 e 3, e per ordinare l’ora quindi premere il tasto TIMER ancora una volta per
confermare l’ora TIMER OFF.
7. Ora la appare "SINTONIZZATORE" sul display lampeggiante, quindi selezionare la modalità sveglia del
“SINTONIZZATORE ", CD, USB, SCHEDA SD " toccando la superficie touch Salta / Cerca STAZIONE (su o
giù).
8. Premere il pulsante TIMER ancora una volta, l’indicatore del timer "VOL" appare sul display e lampeggia,
regolare il volume del timer alto o basso toccando la superficie touch Salta / Cerca STAZIONE (su o giù) o
premere il tasto Salta / Cerca STAZIONE (su o giù') sul telecomando
9.Ogni abilitazione come sopra indicato verrà cancellata se il pulsante non viene premuto in 10 secondi.
10.Dopo aver regolato "TIMER ON" e "TIMER OFF", premere il tasto TIMER " " appare sul display.
11.L'unità principale si accenderà automaticamente e l’ordine "TIMER ON" inizia a riprodurre, l'unità principale
si spegnerà automaticamente con l’ordine "TIMER OFF".
Nota: Se il display visualizza "ERRORE", quando si imposta "TIMER ON" significa sia "TIMER ON" che
"TIMER OFF" è lo stesso. In questo caso, andate su "TIMER OFF" per impostare prima l’ora.
IT-5
Page 36

SELEZIONARE UNA FUNZIONE
La funzione si quando to cca la superficie di con tatto FUNZIONE sull'unità o si preme il tasto FUNZIONE sul
telecomando per cambiare la modalità di ogni funzione. Il display cambia come segue:
FUNZIONAMENTO DELLA RADIO
1. Toccare la superficie touch FUNZIONE sull'unità pr incipale o premere il tasto FUNZIONE sul telecomando
verso la modalità SINTONIZZAZIONE per selezionare l'operazione FM.
2. Toccare la superficie tou ch Salt a / C erca STAZIONE (su o g iù) sull'unità o preme re il t asto Salt a / Cerca
STAZIONE ( su o giù) sul telecomando per regolare l’intervallo desiderato delle onde di frequenza della
banda.
Sintonizzazione Manuale
Per sintonizzare le st azioni deboli, utilizzare la si ntonizzazione manuale toc cando la superficie Salt a / Cerca
STAZIONE (su o giù) continuamente fino a leggere la frequenza corretta o fino a che si ottiene una migliore
ricezione.
Sintonizzazione Automatica
1. Toccare la superficie touch Salt a / Cerca ST AZIONE (su o giù) sull'unit à o prem ere il t asto Salta / Cerca
STAZIONE (su o giù) sul telecomando per un secondo o pi ù, quindi rilasciare il puls ante. Il sintonizzatore
cerca automaticamente la prima stazione dalla potenza di segnale sufficiente.
2. Ripetere il procedimento di cui sopra, se si desidera selezionare un'altra stazione.
Selezionare mono/stereo
È possibile selezionare il MONO / STEREO solo in modalità FM.
1. Quando si desidera selezionare la stazione stereo FM, premere il pulsante ID3/MONO / STEREO. Quando
si riceve una st azione stereo FM e l'indicatore "
trasmissione stereo FM.
2. Quando si preme il pulsante ID3/MONO/STEREO di nuovo, l'indicatore STEREO FM si spegne per passare
alla modalità FM MONO.
Programmazione di stazioni predefinite
Puoi anche predefinire le stazioni a vostra scelta e memorizzare fino a 30 stazioni FM nella sua memoria. Per
memorizzare le stazioni di radiodiffusione selezionate:
1. Sintonizzare la stazione richiesta.
2. Premere il pulsante iPod / MEM / REG. Orologio
3. Premere il pulsante PREDEFINITA / CARTELLA (su o giù) al numero di stazione desiderato.
4. Premere nuovamente il pulsante iPod / MEM / REG. Orologio per confermare la selezione.
5. Per programmare più stazioni in memoria, ripetere la procedura da 2 a 4.
6. Per cambiare le stazioni predefinite memorizzate, ripetere la procedura da 2 a 4.
Nota: 1.Per memorizzare una nuova stazione in una posizione predefinita cancella la stazione
precedentemente memorizzata in quella posizione.
2. Lo spegnimento non cancellerà il ricordo delle stazioni predefinite. Eseguire la procedura di
predefinizione di nuovo per memorizzare le stazioni.
Selezionare le stazioni predefinite
1. Premere il tasto PREDEFINITA / CARTELLA (su o giù) per selezionare il numero dell a stazione predefinita
desiderata.
2. La posizione numerica di tale stazione predefinita viene visualizzata con la frequenza corrispondente.
Antenna FM
Filo antenna FM c’è per una migliore ricezione FM.
" app arirà sul display , si può ricevere la
FUNZIONAMENTO CD/MP3/WMA
Ascoltare un Compact Disc (CD/MP3/WMA)
- CD
1. Se si vuole ascoltare un CD/MP3, premere il pulsante APRI / CHIUDI CD una volta dell’unità principale, poi
la porta del CD si apre automaticamente. (F3)
2. Inserire il disco CD/MP3 nel vano CD, premere il pulsante APRI / CHIUDI CD di nuovo, poi la porta del CD
si chiude automaticamente.
3.Toccare la superficie touch FUNZIONE sull'uni tà o premer e il t asto FUNZIONE sul telecomando è
selezionata la modalità di CD/MP3. L'unità di leggere il disco CD/MP3/WMA automaticamente.
Nota: (1) Questa unità può riprodurre CD, CD-R, CD-RW, MP3 e dischi WMA.
(2) Si può leggere "8 cm" e "Multi Sezione" di DISCHI MP3.
IT-6
Page 37

(3)"tasso di trasferimento di riproduzione" in formato MP3 e WMA.
a. In formato MP3, bit rate di trasferimento: 8 - 256 kbps.
b. In formato WMA, bit rate di trasferimento: 8 - 192 kbps.
(4) Il "Max leggibili 99 cartelle e 999 tracce".
(5) Se nessun disco si riesce a leggere il TOC, sarà visualizzato NO DISC. (F4)
Riprodurre l’intero CD/MP3/WMA
- CD
1. Inserire il CD nel vano CD, l'unità principale leggerà automaticamente il numero
totale delle cartelle e dei brani contemporaneamente.
2. Toccare la superficie touch RIPRODUCI/ PAUSA / ENTER l'unità o premere il tasto
RIPRODUCI/ PAUSA / ENTER sul telecomando, l'unità riprodurrà la prima traccia del
disco CD automaticamente. (F5)
3. Toccare la superficie touch RIPRODURRE / PAUSA / ENTER sull'unità o premere il
pulsante RIPRODURRE / PAUSA / ENTER sul telecomando ancora una volta, il
tempo trascorso lampeggia e metterà in pausa la riproduzione del CD. (F6)
4. Toccare la superficie touch Salta / Cerca STAZIONE (su o giù) una volta per
cambiare numero di
traccia .Toccare la superficie touch Salta / Cerca STAZIONE (su o giù) o tenere premuto il pulsante sul
telecomando una volta per saltare avanti veloce o indietro ciascun brano.
5. Per riprendere la riproduzione, toccare la superficie touch RIPRODURRE / PAUSA / ENTER sull'unità o
premere il tasto RIPRODURRE / PAUSA/ ENTER sul telecomando ancora una volta.
6. Per interrompere la riproduzione, toccare Stop / Menu sulla superficie touch dell'unità o premere il tasto
STOP / MENU del telecomando una volta.
- MP3/WMA
1. Inserire il disco MP3/WMA nel vano CD, l'unità principale legge automaticamente il numero totale delle
cartelle e dei brani contemporaneamente.
2. Toccare la superficie RIPRODURRE/ PAUSA / ENTER sull'unità o premere il tasto
RIPRODURRE / PAUSA /ENTER sul telecomando, l'unità svolgerà la prima traccia
del CD automaticamente. (F7)
3. Toccare la superficie touch RIPRODURRE / PAUSA / ENTER sull'unità o premere il
tasto RIPRODURRE / PAUSA /ENTER sul telecomando ancora una volta, il tempo
trascorso lampeggerà e metterà in pausa la
riproduzione del CD. (F8)
4. Per cambiare numero di traccia: toccare la superficie touch SALTA / RICERCA
STAZIONE (su o giù) sull'unità o premere il tasto RIPRODURRE / PAUSA/ ENTER
sul telecomando una volta. Toccare e tenere premuto la superficie touch Salta /
Cerca STAZIONE (su o giù) sull'unità a o sul telecomando di una volta per saltare velocemente in avanti o
all'indietro di ogni canzone
5. Per riprendere la riproduzione, premere la superficie touch RIPRODURRERE / PAUSA /ENTER sull'unità o
premere il tasto RIPRODURRE / PAUSA /ENTER sul telecomando ancora una volta.
6. Per cambiare il NUMERO DI ALBUM, premere il tasto PREDEFINITO / PREDEFINITO SU o
PREDEFINITO/CARTELLA SU una sola volta.
7. Per interrompere la riproduzione, Stop / piastra touch MENU l'unità (o premere il tasto sul telecomando una
volta).
Nota: Se l'unità principale non funziona correttamente, scollegare la fonte di alimentazione e ricollegarla
nuovamente.
FUNZIONAMENTO ID3
Durante la modalità MP3/WMA
1. Premere il pulsante ID3/MONO/STEREO sull’ unità (o sul telecomando), una volta per aprire la funzione
ID3.
2. Se il file MP3/WMA è scritto in "ID3" ricercherà automaticamente le informazioni "Nome titolo", "NOME
ARTISTA "e" NOME ALBUM "indicate sul display.
3. Premere il pulsante ID3/MONO/STEREO sul sull'unità (o sul telecomando) di nuovo. Allora l'unità
riprenderà la riproduzione normalmente.
IT-7
Page 38

FUNZIONAMENTO SCHEDA USB / SD
Durante la modalità STANDBY
1. Inserire il dispositivo USB o una scheda SD / MMC, e quindi premere il
pulsante STANDBY sull'unità principale (o sul telecomando), per “ACCENDERE” l'unità.
2. Toccare la superficie touch FUNZIONE sull'unità principale (o sul
telecomando) per selezionare la porta USB o la modalità SD / MMC.
L'unità principale leggerà automaticamente il numero totale delle cartelle
e dei brani contemporaneamente. (F9)
3. Se il dispositivo di memoria USB ha più di una cartella.
a. Premere il tasto PREDEFINITO/ CARTELLA (su o giù) per selezionare
ogni cartella.
b. Toccare la superficie touch Salta / Cerca STAZIONE (su o giù) per selezionare il brano corrente nella
cartella desiderata.
4. Se l'MP3 e WMA sono scritti in "ID3":
a. Durante la riproduzione di MP3 o WMA nell’unità. Premere il pulsante ID3/MONO/STEREO una volta. Il
display mostra "ID3 ON", e allora ricercherà automaticamente più di 64 lettere di "NOME TITOLO ",
"NOME ARTISTA" o "NOME ALBUM ", che si muovono continuamente da destra verso l'angolo sinistro
del display.
b. Premere il pulsante ID3/MONO/STEREO ancora una volta. Il display mostra "ID3 OFF", quindi l'unità
principale funzionerà normalmente.
Nota: 1. L'unità principale può riprodurre file MP3 e WMA solo in questa modalità.
2. Questa unità è in grado di supportare la maggior parte dei dispositivi USB e SD / MMC / SDHC. La
capacità di memoria è fino a 32GB. Essa non può accedere (o accedere a un tempo più lungo) ad una
capacità di memoria maggiore di 32 GB. In caso contrario, crearne altre per accedervi.
3. E 'in grado di supportare la versione USB 1.1 e 2.0.
4. Non supporta tutti i tipi di scheda "doppia tensione - MMC" né la scheda "MMC - Plus".
5. L'unità principale non supporta il file WMA, che è "DRM FILE" protetto.
La riproduzione dell’intero disco flash
1. La riproduzione si avvia premendo la superficie touch RIPRODURRE / PAUSA /
ENTER sull'unità o premere il tasto RIPRODUZIONE / PAUSA /ENTER sul
telecomando. La riproduzione viene avviata con la prima traccia. Il display mostra il
numero della traccia corrente e il suo tempo trascorso. (F10)
2. Per interrompere la riproduzione, premere la superficie touch RIPRODURRE /
PAUSA / ENTER l'unità o premere il pulsante RIPRODURRE/ PAUSA/ ENTER sul
telecomando. L'indicatore di tempo trascorso lampeggerà. (F11)
3. Per riprendere la riproduzione, premere sulla superficie touch RIPRODURRE/
PAUSA / ENTER sull'unità o premere il tasto RIPRODURRE / PAUSA/ ENTER sul
telecomando.
4. Per interrompere la riproduzione, toccare il tasto STOP / MENU.
Nota: In qualsiasi momento, la periferica USB o la Scheda SD deve essere fissato ben al di sotto in modalità
standby per evitare che l'unità principale e
IL DISPOSITIVO USB o la scheda SD sono state danneggiate.
RIPETERE LA FUNZIONE RIPRODUCI
- CD
1. Toccare la superficie touch RIPETI sull'unità o premere il tasto RIPETI sul
telecomando una volta, " RIPETI" sarà visualizzato. Il CD riprodurrà il brano
corrente più volte. (F12)
2. Toccare la superficie RIPETI sull'unità o premere il tasto RIPETI sul telecomando
due volte, " RIPETI Tutto" sarà visualizzato. Il CD riprodurrà tutti i brani più volte.
(F13)
3. Toccare la superficie touch RIPETI l'unità o premere il tasto RIPETI sul
elecomando ancora una volta, la funzione RIPETI sarà spenta.
- MP3/WMA/USB/SCHEDA SD
1. Toccare la superficie touch RIPETI sull'unità o premere il tasto RIPETI sul telecomando una volta, poi
"RIPETI " sarà visualizzato. Essa riprodurrà il brano corrente più volte. (F14)
2. Toccare la superficie touch RIPETI sull'unità o premere il tasto RIPETI sul telecomando due volte, "RIPETI
Tutto" sarà visualizzato. Tutti i brani saranno riprodotti più volte. (F15)
3. Toccare la superficie touch RIPETI sull'unità o premere il tasto RIPETI sul telecomando tre volte, " RIPETI
ALBUM" sarà visualizzato. L’unità riprodurrà tutti i brani nella cartella corrente più volte. (F16)
4. Toccare la superficie touch RIPETI sull'unità o premere il tasto RIPETI sul telecomando ancora una volta,
poi la funzione RIPETI sarà spenta.
IT-8
Page 39

FUNZIONE PROGRAMMA
L'utente può programmare la riproduzione fino a 32 brani in modalità CD o 64 brani in modalità
MP3/WMA/USB/SCHEDA SD in qualunque ordine desiderato. La modalità di programmazione è attivata in
modalità di arresto.
1. Come si riproduce la programmazione
- CD
1) Premere il pulsante iPod / MEM / C-ADJ., passare alla modalità MEMORIA. (F17)
2) Toccare la superficie touch Salta / CERCA STAZIONE (su o giù) sull'unità o premere
il tasto Salta / CERCA STAZIONE (su o giù) sul telecomando, il numero di traccia
verrà cambiato.
3) Premere l'iPod / MEM / C-ADJ. per confermare il numero di traccia.
- MP3/WMA
1) Premere il pulsante iPod / MEM / C-ADJ., passare alla modalità MEMORIA. Il
numero di album lampeggia. (F18)
2) Premere il tasto PREDEFINITO / CARTELLA sull'unità o sul telecomando, il
numero di album sarà cambiato.
3) Premere l'iPod / MEM / C-ADJ. pulsante, il primo numero completo verrà
visualizzato. (F19)
4) Toccare la superficie touch Salta / CERCA STAZIONE (su o giù) sull'unità o premere il tasto Salta / CERCA
STAZIONE (su o giù) sul telecomando, il numero di traccia verrà cambiato.
5) Premere il pulsante 'iPod / MEM / C-ADJ. per confermare il numero dei brani preferiti.
2. PROGRAMMA PLAY
Toccare il PLAY / PAUSE / piastra toccare ENTER l'unità o premere il tasto PLAY / PAUSE ENTER sul
telecomando. L'unità svolgerà la prima traccia del programma. Quando tutte le tracce sono state giocate, il
display unità sarà indicato il numero di brani e il tempo di riproduzione delle canzoni CD/MP3.
3. CANCELLARE LA PROGRAMMAZIONE
1. Toccare la superficie STOP / Menu per l'unità o premere il tasto STOP / MENU del telecomando, una volta,
o aprire la porta del vano CD e chiudere di nuovo che la memoria verrà cancellata.
2. Impostare una nuova programmazione, quella esistente verrà cancellata.
Nota: Durante la modalità programmazione:
1. Toccare la superficie touch RIPETI sull'unità o premere il tasto RIPETI sul telecomando una volta,
l’indicatore "RIPETI" si illuminerà sul display. Quindi l'unità ripete il brano corrente.
2. Toccare la superficie touch RIPETI sull'unità o premere il tasto RIPETI sul telecomando due volte, la scritta "
RIPETI Tutto" si illuminerà sul display. Quindi l'unità ripeterà tutti i brani.
3. Toccare la superficie touch RIPETI sull'unità o premere il tasto RIPETI sul
telecomando ancora una volta.
L'unità tornerà a riprodurre la programmazione normalmente
Casuale
1. Premere il pulsante RANDOM sull'unità (o telecomando), poi RANDOM verrà
visualizzato. (F20)
2. Premere il pulsante RANDOM ancora una volta, allora l'unità periferica audio
INTRO PLAY (sul telecomando) riprenderà a riprodurre
normalmente
1. Premere il pulsante INTRO del telecomando, INTRO verrà visualizzato. INTRO
riprodurrà i primi 10 secondi di ogni brano. (F21)
2. Premere il pulsante INTRO due volte, poi l'unità periferica audio riprenderà a
riprodurre normalmente.
IT-9
Page 40

Funzionamento iPod
Nota: Per evitare di danneggiare l'iPod, si prega di assicurarsi che l'iPod sia in modalità di attesa per
accendere o spegnere.
Durante l'unità in modalità standby:
1. Premere il tasto iPod APRI / CHIUDI una volta il pulsante per l’unità principale per aprire la porta iPod.
2. Inserire i giocatori iPod nella fascia di iPod sulla parte anteriore dell'unità
principale fissa.
3. Alimentare l'unità principale, e quindi toccare la superficie touch FUNZIONE
sull'unità o premere il tasto FUNZIONE sul telecomando per la modalità iPod,
l'indicatore iPod verrà visualizzato sul display dell'unità principale. (F22)
Durante l'unità in modalità iPod:
1. Toccare la superficie touch RIPRODURRE / PAUSA / ENTER (solo in iPod) o premere il tasto
RiPRODURRE / PAUSA/ ENTER sul telecomando una volta per avviare la riproduzione da iPod. Regolare
il controllo del volume con il volume touch (su o giù) o premere il pulsante VOLUME (su o giù) per fermare
la riproduzione in corso, premere il tasto sulla superficie touch Stop / MENU (solo in iPod) e toccare una
sola volta.
2. Toccare la superficie touch RIPRODURRE/ PAUSA / ENTER (solo in iPod) una volta per mettere in pausa il
brano corrente. Per riprendere la riproduzione, premere sulla superficie touch RIPRODURRE / PAUSA /
ENTER (solo in iPod) ancora una volta.
3. Per saltare avanti o indietro, toccare la superficie touch Salta / Cerca STAZIONE (su o giù) per selezionare
il brano desiderato.
4. Toccare la superficie touch RIPETI o premere il tasto a caso sull'unità (o sul telecomando).
Nota: la versione iPod touch 1.1.4 o superiore in grado di supportare RIPETI o funzione RANDOM.
Durante l'unità in modalità menu iPod:
1. Durante l'unità in modalità di iPod, premere il tasto l'iPod / MEM / Orologio -ADJ.
una volta, l'unità entrerà nella modalità menu dell'iPod. L'indicatore MENU iPod
apparirà sul display dell'unità. (F23)
2. Toccare il tasto Stop / MENU (solo in iPod) per toccare al menu iPod.
a. Per selezionare il menu corrente come segue:
Musica> Extra> Import a foto (senza quest a funzi one di visua lizzazione su iPod Mini)> Impost azioni>
Mescola canzoni> Retroilluminazione> Riproduci ora apparirà sul display de lettore iPod.
b. Toccare la superficie touch Salta / Cerca STAZIONE (su o g iù) sull'unità (o telecomando) pe r cercare il
menu corrente.
3. Toccare la superficie touch RIPRODURRE/ PAUSA/ENTER (solo in iPod) entra fino alla cartella desiderata
del menu.
a. Toccare il Salta / Cerca TUNE (su o giù) piastra di toccare l'unità (o telecomando) per cercare il
contenuto corrente della cartella di ogni menu desiderata.
b. Se si vuole tornare al menu iPod, toccare il tasto Stop / MENU (solo in iPod) touch, piastra di nuovo.
3. Per riprendere la riprod uzione, premere il t asto iPod / MEM / Orologio -A DJ. ancora una volt a il t asto,
l'unità tornerà alla modalità iPod.
La ricarica della batteria lettore iPod tramite l'unità principale:
1. iPod ha una batteria interna non rimovibile, la batteria può essere necessaria se non viene caricato per
un po '.
2. È possibile ricaricare il lettore iPod tramite l'unità principale automaticamente sotto la modalità standby o
ON.
Nota: 1. La batteria di iPod Player 80 per cento a carico di circa un'ora, e una carica completa in circa un paio
d'ore. Se si carica durante la riproduzione di musica, che può richiedere più tempo.
2. E 'meglio non far pagare alle modalità di sintonizzazione. Essa può interferire la ricezione.
Nota:
1. In qualsiasi momento è possibile controllare il lettore iPod dell'unità principale, telecomando o lettore iPod
stesso, mentre l'unità in modalità "iPod" o "iPod MENU".
2. In qualsiasi momento, l'iPod deve essere fissato ben al di sotto in modalità standby per evitare che l'unità e il
lettore iPod siano stati danneggiati.
3. Durante l'unità in modalità iPod. La funzione di video di iPod con un lavoro anormale. Aggiornare la versione
più recente della funzione iPod video dal sito web di Apple.
IT-10
Page 41

VIDEO OUT impostazione (per i-Pod video)
1. Durante l'unità in modalità di attesa: Collegare il televisore con un cavo video (RCA cavi tipo) per l'uscita
video jack sul retro dell'unità.
2. Durante l'unità in modalità iPod: Premere il pulsante "MENU" per l'iPod con ghiera cliccabile per attivare la
funzione video.
3. Impostare iPod per visualizzare i video su un televisore:
(a) Scegli Video> Impostazioni video, e quindi impostare Uscita TV su Chiedi o On.
(b) Se si imposta Uscita TV su Chiedi, iPod vi offre la possibilità di mostrare video in TV o su iPod, mentre
ogni volta che si riproduce un video.
Nota: 1. La modalità Video supporta solo i giocatori iPod hanno una funzione video.
2. iPod classico da 80/160GB, iPod nano 3° generazione (video) e iPod touch da 4/8GB e 8/16GB
dovrebbe essere fissato ben al di sotto in modalità standby prima di tale funzione di Video.
3. Cavo video (cavo tipo RCA) non incluso.
AUX IN GIOCARE
1. Toccare la piastra touch FUNZIONE sull'unità o premere il tasto FUNZIONE sul telecomando, fino a quando
il "AUX" spia sul display. Questa unità è in grado di ingresso audio analogico attraverso il AUX (line) nella
porta sul lato destro dell'unità.
2. Utilizzare un cavo con jack RCA per collegare sorgenti audio esterne.
Nota: Cavo Aux in non incluso.
FUNZIONAMENTO SLEEP
1. Se si desidera addormentarsi alla musica, premere il tasto SLEEP sull'unità o sul telecomando.
2. È possibile selezionare il sintonizzatore, CD/MP3, USB, SD / MMC, iPod o la modalità AUX in funzione
sleep per riprodurre da 90, 80, 70 fino a 10 minuti di musica prima di spegnere si spegne automaticamente.
CONTROLLO EQ
EQ dimostra il tono presenti suono.
Quando si tocca la superficie touch EQ o si preme il pulsante EQ sul telecomando, il suono cambia tono, come
di seguito:
IMPOSTAZIONE MUTO
1. Quando si preme il pulsante MUTE sull'unità o sul telecomando una volta, il
livello del volume lampeggia e l'uscita audio sarà temporaneamente chiusa.
(F24)
2. Premere il pulsante MUTE sull'unità o sul telecomando ancora una volta, il
livello del volume e l'uscita audio tornerà alla normalità.
ASCOLTARE MUSICA UTILIZZANDO LE CUFFIE
Una presa per cuffie stereo è previsto per un ascolto priv ato. Per ascoltare l'unità con le cuffie (non incluse)
inserire una mini spina da 3.5mm stereo dalle cuffie nella presa PHONES sul pannello frontale. Gli altoparlanti
esterni vengono automaticamente disconnessi quando le cuffie sono in uso.
MEMORIA DI BACK-UP
Inserire 4 batterie AAA 1.5V x 3, UM o equivalente nel vano batterie dell'unità. S ono utilizzate per il back-up
della memoria della CPU principale.
SPECIFICHE
Alimentazione: 230V ~ 50Hz
POTENZA D'USCITA: 10 Watt x 2
DIMENSIONI UNITA ': 400 (La) x 154 (Lu) x 211 (H) mm
DIMENSIONI ALTOPARLANTI: 160 (Lu) x 154 (La) x 211 (H) mm
PESO NETTO.: 5,1 kg
SEZIONE RADIO
GAMMA DI FREQUENZA: 87.5 FM - 108 MHz
SEZIONE COMPACT DISC
Dispositivo ottico: 3 - fascio laser
RISPOSTA IN FREQUENZA: 100Hz - 16kHz
CARATTERISTICHE formano oggetto di MODIFICA SENZA ULTERIORE AVVISO.
www.mpmaneurope.com
IT-11
Page 42

XRM62i
Docking Station met CD/MP3/USB/SD KAART-speler,
Radio en iPod
iPod is a trademak of Apple INC.,
Geregistreerd in de VS en andere landen.
“"Gemaakt voor ipod" betekent dat een elektronisch accessoire is speciaal ontworpen om verbinding te maken met
de iPod en is gecertificeerd door de ontwikkelaar naar Apple prestatie-normen te voldoen.Apple is niet responside
voor de werking van dit apparaat of de naleving van de veiligheid en de wettelijke normen
iPod afgebeeld niet inbegrepen
INSTRUCTIE MANUEEL
Page 43

TOm de grootste in genot en prestaties, kunt u deze handleiding aandachtig te lezen voordat u het apparaat
werken om op raakte vertrouwd met de functies, en verzekeren u jaren van trouwe, probleemloos prestaties en
luisterplezier.
Belangrijke opmerkingen
* Instructies Houd de veiligheids-en bedieningsinstructies moeten worden bewaard voor toekomstig
gebruik.
* Vermijd het installeren van de eenheid op locaties hieronder beschreven:
Plaatsen blootgesteld aan direct zonlicht of in de buurt van warmte uitstraalt apparaten zoals elektrische
kachels.Op de top van andere stereo-apparatuur die te veel warmte uitstralen. Plaatsen ontbreekt
ventilatie of stoffige plaatsen. Plaatsen onderworpen aan constante trillingen. Vochtige of vochtige
plaatsen.
* Zorg ervoor dat niet aan de ventilatie-openingen belemmeren.
* Vóór het inschakelen van de stroom voor de eerste keer, controleert u of het netsnoer correct is
geïnstalleerd.
* Stekker wordt gebruikt als het apparaat loskoppelen en het moet gemakkelijk bereikbaar blijven
volledig.
* Het product mag niet worden blootgesteld aan druppels of spatten en dat er geen met vloeistof gevulde
voorwerpen, zoals vazen, worden geplaatst op het product.
* Het apparaat mag niet worden blootgesteld aan druppels of spatten en dat er geen met vloeistof gevulde
voorwerpen, zoals vazen, worden geplaatst op apparaat.
* Om volledig loskoppelen van de stroomtoevoer, de stekker van het apparaat wordt losgekoppeld van het
lichtnet.
* Wanneer de stand-by LED geen kleur geeft, wordt de apparatuur volledig losgekoppeld van de
netvoeding.
* Minimale distances10cm rond het toestel voor voldoende beademing.
* Er moet aandacht worden besteed aan de milieuaspecten van de batterij verwijderen.
* Het gebruik van apparaten in gematigde klimaten.
* De stekker mag niet worden belemmerd of moet gemakkelijk toegankelijk tijdens het beoogde gebruik.
* De ventilatie mag niet worden belemmerd door voor de ventilatieopeningen met voorwerpen zoals
kranten, tafel-kleding, gordijnen enz.* Geen open vuur, zoals brandende kaarsen moet worden gelegd
op het apparaat.
* Batterij mag niet worden blootgesteld aan extreme hitte, zoals zonlicht, vuur of dergelijke.
Om redenen van veiligheid, niet verwijder alle kleppen of poging tot toegang tot de binnenkant van het product
te krijgen. Zie alle onderhoud over aan gekwalificeerd personeel.
Probeer niet op te heffen die schroeven, of open de behuizing van de eenheid; er zijn geen te
onderhouden onderdelen, verwijzen alle onderhoud over aan gekwalificeerd personeel.
Voorzichtigheid : Om het risico van een elektrische schok Verwijder in geen dekking (of achterkant), geen gebruiker
dienst staat onderdelen. reparaties aan gekwalificeerd personeel
GEVAARLIJKE SPANNING
Dirigent gevaarlijke spanning die kan worden van voldoende omvang om een risico van een
elektrische
schok aan personen vormen aanwezig is binnen deze producten behuizing.
ATTENTIE
De eigenaren handleiding bevat belangrijke bedienings-en onderhoudsvoorschriften, voor uw
veiligheid is het noodzakelijk te verwijzen naar de handleiding.
waarschuwing : Om te voorkomen dat brand of een elektrische schok. Stel dit apparaat niet aan druppels of
spatten
Opmerking:
- Dit apparaat wordt warm bij gebruik voor een lange periode van tijd. Dit is normaal en duidt niet op een
probleem met het apparaat.
- De CD-speler bevat micro-processors die storing als gevolg van externeelektrische interferentie of ruis.
Als de CD-speler niet goed werkt, koppelt u de stroombron en sluit deze opnieuw aan.
- Overmatig geluidsdruk van oordopjes en koptelefoon kan leiden tot gehoorverlies.
- Als een ongewone omstandigheden plaatsvindt in het tonen of toets drukt, schakelt het apparaat uit en
schakel het toestel weer.
DU-1
Page 44

Montage tekening van de eenheid en luidspreker
1.Vaststelling van het geheel van de eenheid op de muur
Parallel dat de twee spijkers in de muur vast te stellen,
moet de afstand van hen te houden 84mm.Opmerking:
De grootte van de nagel: 3,5 * 25BA.
Druk naar beneden en duw de stand paneel van de sluiting A en B op de achterzijde van de elke luidspreker
en vervolgens na elke stand van de spreker zal verwijderen van hen.
Opmerking: Als wand-montage van de set van het product in de lijn, suggereren daarbij ten minste 50 mm afstand
van het apparaat naar de luidsprekers tot een betere stereo-effect te bereiken en om de dia-CD deur te verzekeren
met prefect beweging.
2. Luidspre kers aansluiting
Parallel dat de twee spijkers in de muur vast te stellen, moet de afstand van hen te houden 300mm.
Opmerking: De grootte van de nagel: 3,5 * 25BA.
Druk naar beneden en duw de stand paneel van de sluiting C en D aan de achterkant van het apparaat, en
vervolgens de stand van het apparaat zal er uit te halen.
3. Docking beugel en iPod aanpassen pad panel
Universal Dock-adapter (met behulp van de dock adapters voor ondersteuning van alle type van de iPod-speler)
Dock connector
iPod aanpassen Pad Panel
(Druk op de iPod aanpassen pad paneel lichtjes uit de sluis houder.)
iPod aanpassen PadPanel (Laat theiPod Spelers gemakkelijk in te voegen in de connector strak en druk vervolgens
op en duw ze naar de sluis houder totdat deze klikt op.)
DU-2
Page 45

4. Stel de aanpassing pad knop
Stel het a anpassen p ad Knob o p het niv eau 1 tot en met onde rsteuning v an deze
iPod-spelers als belows:
Gemaakt voor iPod met kleurentonen(4e generatie) 40GB, 60GB enige iPod (4 e generatie) 40GB
alleen
iPod met video(5e generatie) 30GB alleen
iPod klassiek 80GB
2e generatie iPod klassiek 120GB
Stel het aa npassen p ad Knob op het niv eau 2 tot en met onders teuning v an deze
iPod-spelers als belows:
Gemaakt voor iPod mini
(1e generatie) 4GB, 6GB alleen
(4e generatie) 20GB alleen U2 Bijzondere Uitgave
iPod met kleurendisplay
(4e generatie) 20GB, 30GB alleen U2 Bijzondere Uitgave
iPod met video (5e generatie) 60GB, 80GB alleen
iPod klassiek 160GB
Stel het aa npassen p ad Knob op het niveau 3 tot en met ondersteuning van deze
iPod-spelers als belows:
Gemaakt voor iPod nano
(1e generatie) 1GB, 2GB, 4GB alleen
iPod touch 8GB/16GB/32GB
iPod touch 2nd generatie 8GB/16GB/32GB
FUNCTIES EN CONTROLES
1. Spreker
2. Luidsprekerstandaard
3. Standby-LED-indicator
4. SD / MMC-kaart in sleuf
5. Hoofdtelefoonaansluiting
6. USB-apparaat in de haven
7. iPod openen / sluiten-knop
8. STANDBY / ON toets
9. CD openen / sluiten-knop
10. Sluimerfunctie
11. ID3 / mono / standby-knop
12. iPod / geheugen / klok-knop aanpassen
13. Timer knop
14. Willekeurige knop
15. Mute knop
16. Preset / map omlaag
17. Preset / folder-up knop
18. EQ touch plaat
19. Stop / menu touch
20. Volume omlaag touch plaat
21. Overslaan / tune omlaag
zoeken touch plaat
22. Volume omhoog touch plaat
23. Functie touch plaat
24. IR sensor
25. LCD- tonen
26. CD deur
27. herhalen touch plaat
DU-3
Page 46

28. intro touch plaat
29. afspelen / pauzeren / ENTER touch plaat
30. FM-antenne
31. luidspreker uit "L"
32. hoofdtoestel stand
33. docking beugel
34. iPod aanpassing PAD knop
35. IPod-connector
36. Luidspreker uit "R"
37. Video uitgang
38. Line in aansluiting
39. Balk gat
40. Geheugen back-up batterij deur
41. AC / uit-schakelaar
42. Netsnoer
43. iPod-speler deur
44. Overslaan / tune-up touch plaat zoeken
AFSTANDSBEDIENING
1. Standby-knop
2. Mute knop
3. Preset / foler up knop
4. Preset / map omlaag
5. Overslaan / tune zoeken omlaag
6. intro knop
7. ID3/mono/standby knop
8. willekeurige knop
9. volume-omhoog-toets
10. functietoets
11.CD openen / sluiten-knop
12. Volume omlaag-toets
13.iPod openen / sluiten-knop
14. Afspelen / pauze / ENTER toets
15.EQ knop
16. Overslaan / tune-up knop zoeken
17. stop / menu knop
18. Sluimerfunctie
19.iPod/memory / klok-passen. knop
20.Timer knop
21. Aantal zoekknop
22. Herhaal knop
AANBRENGEN VAN DE BATTE RIJ EN I N DE
AFSTANDSBEDIENING
Duw het deksel en schuif de cover van de ** BATTERIJEN NIET INBEGREPEN **
compartment.Place openen de twee (UM4),
(AAA), (R03) batterijen in de afstandsbediening volgens
de markeringen polariteit ( "+" en "-") binnen het
compartiment en op de batterijen. Plaats het deksel over
het compartiment, drukt licht, en naar boven duwen
totdat deze klikt op.
Opmerking: Verwijder de batterijen uit de
afstandsbediening indien niet in gebruik voor lange
periode van de tijd. Gebruik geen normale batterijen met
oplaadbare batterijen, wanneer de batterijen zwak
worden, zal afstandsbediening niet werken en te
vervangen met nieuwe batterijen.
LCD –TONEN WINDOW
A. Timerindicator
B. Album nummer indicator
C. Herhaal 1 & all-indicator
D. Stereo-indicator
E. Volume hoog / laag-indicator
F. Slaap-indicator
G.Tack / nummer / tijd-indicator
COMPACT DISC
1. Gebruik altijd een compact schijven met het
merk zoals afgebeeld.
2. Opmerkingen over de behandeling schijven
Het verwijderen van de schijven uit de opslag
zaak en laden.
* Raak de reflecterende oppervlak opgenomen.
* Plak geen papier of schrijf iets op het oppervlak.
* Buig de schijven.
3. Opslag
* Bewaar de schijf in haar geval.
* Geen schijven bloot aan direct zonlicht of hoge temperaturen,
hoge vochtigheid of stoffige plaatsen.
4. Schoonmaken van een disc
* Indien de disc vuil, vegen stof, vuil en vingerafdrukken met
een zachte colth.
* De schijf moet worden gereinigd van het centrum naar de rand.
* Gebruik nooit benzeen, verdunners, record schonere vloeistof of anti statische spray.
* Zorg ervoor dat de CD deur dicht, zodat de lens is niet verontreinigd door stof.
* Raak de lens.
DU-4
Page 47

Bediening van de eenheid
Wanneer u voor het eerst het apparaat stekker in het AC stopcontact, druk op de schakelaar aan de achterkant
van het apparaat, zal het toestel in standby-modus, is de zwarte licht van de standby-rood. U kunt nu op de
STANDBY / ON toets op het toestel of druk op de STANDBY op de afstandsbediening om het apparaat in te
schakelen. De zwarte licht van de stand-by en multifunctionele touch plaat licht op blauw. Trek de stekker van
AC uit het stopcontact als u wilt volledig uitschakelen.
MACHT/STANDBY
1. Druk op de STANDBY / ON toets op het toestel of op de STANDBY of druk op de afstandsbediening om het
apparaat in te schakelen.
2. Selecteer de geluidsbron (CD, USB, SD Kaart, iPod, AUX of TUNER) door aanraking de FUNCTIE touch
plaat of druk op de FUNCTIE op de afstandsbediening. De bijbehorende tonen licht op.
3. Regel het volume met de VOLUME (Omhoog of Omlaag) raken plaat op het apparaat of de
afstandsbediening.
4. Druk op de STANDBY / ON toets op het toestel of druk op de STANDBY toets op de afstandsbediening weer
uit te schakelen het toestel.
Opmerking:
1. Als er geen signaal onder de CD / USB devices / SD & MMC-kaart / iPod-modus, het apparaat zal
automatisch worden uitgeschakeld binnen 15 minuten.
2. Tijdens het in de iPod-modus, is er niet de iPod-speler invoegen op de iPod docking beugel. De
belangrijkste eenheid zal ook uitschakelen uiterlijk 15 minuten automatisch.
3. Tijdens de standby-modus, drukt u op een knop / toets kan het tonen licht te maken voor 10 seconden.
4. Aangeraden de belangrijkste uitschakelen om energie te besparen, wanneer u geen gebruik maken van de
eenheid.
KLOK INSTELLING
Dur Tijdens het in de standby-modus.
1. Houd de iPod / MEM / C-INS. knop tot de tijd weergegeven zal veranderen in 24-uur (of 12-uurs) cijfers en
flitser.
2. Druk op de OVERSLAAN / ZOEKEN TUNE (omhoog of omlaag) raken plaat op het toestel of druk op de
OVERSLAAN / ZOEKEN TUNE (omhoog of omlaag) toets op de afstandsbediening om 12-uurs of 24-uurs
cijfers aan te passen.
3. Druk op de iPod / MEM / C-INS. toets, het uur cijfer knipperen op het tonen, raakt de SKIP / TUNE ZOEKEN
(omhoog of omlaag) aanraken plaat HOUR cijfer aan te passen.
4. Druk op de iPod / MEM / C-INS. knop meer, de MINUTE cijfer knipperen op het tonen, raakt de SKIP / TUNE
ZOEKEN (omhoog of omlaag) aanraken plaat aan te passen MINUTE cijfer.
5. Druk op de iPod / MEM / C-INS. knop om te bevestigen de tijd.
6. Elke staat stellen zoals hierboven getoond wordt gewist als de sleutel niet wordt IN10 seconden ingedrukt.
TIMER INSTELLING
1. Na het aanpassen van de klok, de TIMER-knop voor een paar seconden, " ON" en "00:00" verschijnt op
het tonen en de UUR cijfer knippert. (F1)
2. Druk op de SKIP / ZOEKEN TUNE (omhoog of omlaag) aanraken plaat of druk op de SKIP / ZOEKEN
TUNE (omhoog of omlaag) toets op de afstandsbediening aan te passen.
3. Druk op de knop Tijd weer de Minute cijfer zal knipperen, aanpassen door het aanraken van de SKIP /
TUNE zoeken (Upor DOWN) raken plaat op het toestel of druk op de SKIP / ZOEKEN TUNE (omhoog of
omlaag) toets op de afstandsbediening
4. Druk op de TIMER toets nogmaals om te bevestigen en om TIMER ON-tijd.
5. Na aanpassing "TIMER ON", "
6. Herhaal de bovenstaande stappen 2 tot 3, en druk op de TIMER toets nogmaals om te bevestigen en om
TIMER OFF-tijd.
7. Nu is het "TUNER" verschijnt op het tonen met knipperen en selecteer vervolgens het alarm modus van de
"TUNER, CD, USB, SD kaart" door het aanraken van de SKIP / ZOEKEN TUNE (omhoog of omlaag)
aanraken plaat.
8. Druk op de TIMER toets, de timer "VOL" indicator verschijnt op de tonen en knippert, past u de timer volume
hoog of laag door het aanraken van de SKIP / ZOEKEN TUNE (omhoog of omlaag) plaat aanraken of druk
op de SKIP / TUNE ZOEKEN (UP-of OMLAAG) toets op de afstandsbediening
9. Elke staat stellen zoals hierboven getoond wordt gewist als de knop niet is ingedrukt in 10 seconden.
10. Na aanpassing "TIMER ON" en "TIMER OFF", druk op de TIMER toets "
11. De belangrijkste eenheid zal automatisch worden ingeschakeld om "TIMER ON" orde en beginnen te
spelen, het apparaat zal automatisch worden uitgeschakeld bij "TIMER OFF" volgorde.
Opmerking: Als het tonen verschijnt "FOUT" terw ijl u de "TIMER ON" betekent zowel "TIMER ON " en
"TIMER OFF" is hetzelfde. In dit geval, ga dan naar "TIMER OFF" om de off tijd eerste.
OFF" verschijnt op het tonen en de UUR cijfer knippert. (F2)
" appearson het tonen.
DU-5
Page 48

FUNCTIE SELECTEREN
De functie is dat wanne er het in a anraking kom t de FUNCT I Eraken pla at op het to estel of dru k op de
FUNCTIE-toets op de afst andsbediening om de wijze van elke functie vera nderen. Tonent vera ndert zoals
hieronder.
RADIO OPERATIE
1. Druk op de FUNCTIE raken plaat op het apparaat of druk op de FUNCTIE -toets op de afstandsbediening naar de
tuner-modus die op de FM-operatie te selecteren.
2. Druk op de Overslaan / ZOEKEN TUNE (omhoog of omlaag) raken plaat op het toestel of druk op de Overslaan
/ ZOEKEN TUNE (omhoog of omlaag) toets op de afstandsbediening om het gewenste wave band bereik van de
frequentie af te stemmen.
Handmatig afstemmen
Om af te ste mmen voor zwa kke zenders, geb ruik handmatig afst emmen door het aanrake n van de Oversl aan /
ZOEKEN TUNE (omhoog of omlaag) aanraken plaat voortdurend totdat u de juiste frequentie te lezen of de receptie
is op zijn beste.
Automatische afstemming
1. Druk op de Overslaan / ZOEKEN TUNE (omhoog of omlaag) raken plaat op het toestel of druk op de Overslaan /
ZOEKEN TUNE (omhoog of omlaag) t oets op de afstandsbediening voor een tweede of meer, dan de knop los.
De tuner zal automatisch naar het eerste station van voldoende signaalsterkte.
2. Herhaal bovenstaande procedure als u een ander station te selecteren.
Mono/stereo selecteer
U kunt de MONO / STEREO alleen in de FM-modus
1. Als u wilt selecteren FM-stereo zender, druk op de knop ID3/MONO/STEREO. Wanneer u een stereo
FM-station de "
2. Wanneer u de ID3/MONO/STEREO toets nogmaals indrukt, zal de FM STEREO indicator uit te schakelen
en over te schakelen op MONO FM-status.
" indicator verschijnt op het tonen, kunt u FM-stereo-transmissie.
Programmering voorkeurszenders
U kunt ook vooraf ingestelde stations van uw keuze en maak maximaal 30 FM zenders in het geheugen. Voor
het opslaan van uw gekozen zenders:
1. Stem af op de gewenste zender.
2. Druk op de iPod / MEM / CLOCK-ADJ. knop.
3. Druk op de PRESET / FOLDER (omhoog of omlaag) toets voor uw gewenste zender nummer.
4. Druk op de iPod / MEM / KLOK -ADJ. knop om uw keuze te bevestigen.
5. Voor het programmeren van meer stations in het geheugen, herhaal de bovenstaande stappen 2 tot 4.
6. Als u de opgeslagen preset stations, herhaal de bovenstaande stappen 2 tot 4.
Opmerking:
1. Het opslaan van een nieuw station in een vooraf ingestelde locatie zal wissen de eerder opgeslagen zender
op die locatie.
2. Uitschakelen zal niet wist het geheugen van voorkeurzenders. Voer de stations voorinstelling procedures
opnieuw naar de stations op te slaan.
Het selecteren van de voorkeurszenders
1. Pers de PRESET / MAP (omhoog of omlaag) toets om de gewenste voorkeurzender nummer.
2. Het numerieke locatie van die zender wordt weergegeven samen met de bijbehorende frequentie.
FM Antenne
FM-antenne draad is voor een betere FM-ontvangst.
CD/MP3/WMA OPERATIE
Luisteren naar compact disc (CD/MP3/WMA)
1. Als u wilt genieten van CD/MP3, drukt u op de CD OPEN / SLUITEN toets op het toestel, en dan de CD deur gaat
automatisch open. (F3)
2. Plaats de CD/MP3 schijf in het cd-vak, drukt u op de CD OPEN / SLUITEN toets, en vervolgens de CD deur wordt
automatisch gesloten.
DU-6
Page 49

3. Dru k op de FUNCTIE rake n plaat o p het toestel of druk op d e FUNCTI ON-toets o p de afst andsbediening te
selecteren CD/MP3 modus. Het apparaat leest de CD / MP3 / WMA-schijf automatisch.
Opmerking:
(1) Dit toestel kan afspelen CD, CD-R, CD-RW, MP3-en WMA-discs.
(2) Er kan lezen "8 cm" en "Multi afdeling" van MP3 DISC.
(3) De "Playback Transfer Rate" in MP3 en WMA.
a. In MP3-, transfer bit rate: 8 - 256 kbps.
b. In WMA, overdracht bit rate: 8 - 192 kbps.
(4) De "Max Readable 99 mappen en 999 tracks".
(5) Als er geen schijf of kan `t lezen TOC, zal NO DISC worden weergegeven. (F4)
Het afspelen van de hele CD / MP3 / WMA
- CD
1. Plaats de cd-schijf in het cd-vak, de belangrijkste eenheid
automatisch gelezen het totale aantal van de mappen en tracks op hetzelfde moment.
2. Druk op de SPELEN / PAUZE / ENTER aanraken plaat op het toestel of druk op de PLAY
/ PAUSE / ENTER-toets op de afst andsbediening, zal het toestel speelt de ee rste track
van de cd-schijf automatisch. (F5)
3. Druk op de SPELEN / PAUZE / EN TER aanraken plaat op het toestel of druk op de
SPELEN / PAUZE / ENTER-toets op de afs tandsbediening weer, de tijd die verstreken
indicator knippert en pauze CD-weergave. (F6)
4. Druk op de Overslaan / ZOEKEN TUNE (o mhoog of omlaag) aanraken plaat eens naar
track G een v erandering., Touch en h oud de Overslaan / ZOEK EN TUNE (o mhoog of
omlaag) ra ken plaat op h et app araat of een keer (op de af standsbediening) om sn el
vooruit overslaan of achteruit van elke song.
5. Het afs pelen te hervatten, raak t de SPELEN / P AUZE / ENTER aanrak en plaat op het toes tel of druk op de
SPELEN / PAUZE / ENTER-toets op de afstandsbediening weer opnieuw.
6. Om het af spelen te sto ppen, raken de ST OP / MENU aanraken plaat op het toestel of dru k op de ST OP /
MENU-knop op de afstandsbediening.
- MP3/WMA
1. Plaats de MP3/WMA schijf in het CD-vak, zal het apparaat automatisch gelezen het totale
aantal van de mappen en tracks op hetzelfde moment.
2. Druk op de SPELEN / PAUSE / ENTER aanrak en plaat op het toes tel of druk op de
Spelen / Pau ze / ENTE R-toets op de af standsbediening, sp eelt het apparaat d e eerste
track van de cd discautomatically. (F7)
3. Dru k o p d e S pelen / P AUZE / ENT ER aan raken plaat op h et toestel of d ruk o p de
SPELEN / P AUZE / ENTER toet s op de afstandsbediening weer, de tijd die verstreken
indicator knippert en pauze CD-weergave. (F8)
4. Om te veranderen Track NR. Raak Overslaan / TUNE ZOEKEN (omhoog of
omlaag) raken plaat op het toestel of druk op de SPELEN / PAUSE / ENTER-toets
op de afstandsbediening. En raken en houd de Overslaan / ZOEKEN TUNE
(omhoog of omlaag) raken plaat op het apparaat of een keer (op de
afstandsbediening) om snel vooruit of achteruit van elke song overslaan
5. Het afspelen te hervatten, raakt de SPELEN / PAUZE / ENTER aanraken plaat op het toestel of druk op de
SPELEN / PAUZE / ENTER-toets op de afstandsbediening weer opnieuw.
6. Als u het album No. Druk op de PRESET / MAP OMHOOG of PRESET / map op keer.
7. Om het afspelen te stoppen, raken de STOP / MENU aanraken plaat eenmaal op de eenheid (of de
afstandsbediening).
Opmerking: Als het apparaat niet goed werkt, koppelt u de stroombron en daarna weer opnieuw aan.
ID3 OPERATIE
Tijdens de MP3 / WMA-modus
1. Druk op d e knop op ID3/MO NO/STEREO th eenhei d (of afstandsbediening) een kee r om de ID3-functie te
openen.
2. Als de MP3/WMA bestand schrijven in "ID3" het zal automatisch de informatie van "TITEL om te zoeken", "Artist
Naam" en "albumnaam" aangegeven op het tonen.
3. Druk op de ID3 / MONO / STEREO toets op de on th eenheid (of afstandsbediening) weer. Dan is de eenheid zal
worden hervat om normaal te spelen.
DU-7
Page 50

USB/SD KAART OPERATIE
Tijdens de standby-modus
1. S teek de USB-stick of SD / MMC-kaa rt, en dru k vervolgens op de ST ANDBY toet s op het hoof dtoestel (of
afstandsbediening) aan de macht "ON" de eenheid.
2. Druk op de FUNCTIE rake n plaat op het hoof dtoestel (of de a fstandsbediening) om de
USB-of SD / MMC-modus. De belangrijkste eenheid zal matisch lees het totale aantal van
de mappen en tracks op hetzelfde moment. (F9)
3. Als het USB-opslagapparaat meer dan een map.
a. Druk op de PRESET / Map (omhoog of omlaag) toets om elke map.
b. Druk op de Overslaan / ZOEKEN TUNE (omhoog of omlaag) aanraken plaat te selecteren huidige track in de
gewenste map.
4. Als de MP3-en WMA zijn geschreven in "ID3".
a.Tijdens de eenheid in de MP3-of WMA afspelen. Druk op de
ID3/MONO/STEREO knop. Het tonen toont een "ID3 ON", en dan
automatisch te zoeken in meer dan 64 letters van 'Title Naam "," Artist Naam
"of" Album Naam "die de overgang van de juiste hoek voortdurend naar de linkerbovenhoek van het scherm .
b. Druk op de knop ID3/MONO/STEREO nogmaals. Het tonen toont een "ID3 OFF", en vervolgens het apparaat
normaal zal spelen.
Opmerking:
1. De hoofdunit kan spelen MP3-en WMA alleen in deze modus.
2. Dit toestel kan steunen de meeste USB-apparaten en SD / M MC / SDHC-kaarten. Het geheugen capaciteit tot
32GB. Het kan geen toegang (of toegang tot een lan gere tijd) het geheugen capaciteit van meer dan 32GB. Zo
niet, maak dan een anderen te openen.
3. Het kan ondersteunen USB versie 1.1 en 2.0.4. Geen ondersteuning voor alle soorten "dual voltage-MMC" kaart,
noch "MMC-Plus"-kaa rt.5. De bela ngrijkste a pparaat biedt ge en onde rsteuning voor h et WMA-b estand dat
beveiligd is "DRM-bestand".
Het afspelen van de Gehele flash-disc
1. Het afspelen zal beginnen met het aanraken van de SPELEN / PAUZE / ENTER aanraken plaat op het toestel of
druk op de SPELEN / P AUZE / ENTE R-toets op de afs tandsbediening. Het afspelen
begint met de eerste tra ck. Het tonen toont het huidige tracknummer en de verstreken
tijd. (F10)
2. Het afspelen onderbreken, raakt u de SPELEN / PAUZE / ENTER aanraken plaat op het
apparaat orpress de SPELEN / PAUZE / ENTER-toets op de afstandsbediening. De tijd
die verstreken indicator knippert. (F11)
3. Het afspelen te hervatten, raakt de SPELEN / PAUZE / ENTER aanraken plaat op
het toestel of druk op de SPELEN / PAUZE / ENTER-toets op de afstandsbediening
weer.
4. Om het afspelen te stoppen, raakt de STOP / MENU-knop.
Opmerking:
In elk moment, moet de USB-stick of SD-KAAR T goed worden vastgesteld in het kader van de ST ANDBY modus
om het apparaat en de USB-stick of SD-kaart te vermijden werden beschadigd.
HERHALEN FUNCTIE
- CD
1. Druk op de HERHALEN raken plaat op het toestel of druk op de HERHAL EN knop op
de afst andsbediening, "HERHALE N" wo rdt getoo nd. CD sp eelt de huidige nummer
herhaald. (F12)
2. Druk op de HERHALEN raken plaat op het toestel of druk op de HERHAL EN knop op
de afst andsbediening twe emaal, "HERHALE N Alles " word t weerge geven. CD zal
spelen alle tracks herhaaldelijk. (F13)
3. Druk op de HERHALEN raken plaat op het toestel of druk op de HERHAL EN knop op
de afstandsbediening weer opnieuw zal herhalen functie worden uitgeschakeld.
- MP3/WMA /USB/SD KAART
1. Druk op de HERHALEN raken plaat op het toestel of druk op de HERHALEN knop op de afstandsbediening, dan "
HERHALEN " wordt weergegeven. Zij speelt de huidige nummer herhaaldelijk. (F14)
2. Druk op de REPEAT raken plaat op het toestel of druk op de HERHALEN knop op de afstandsbediening
tweemaal, " HERHALEN Alles" wordt weergegeven. Het zal spelen alle tracks herhaaldelijk. (F15)
3. Druk op de HERHALEN raken plaat op het toestel of druk op de HERHALEN knop op de afstandsbediening
driemaal, " HERHALEN ALBUM" wordt weergegeven. Het zal alle tracks spelen in de huidige map herhaaldelijk.
(F16)
4. Druk op de HERHALEN raken plaat op het toestel of druk op de HERHALEN knop op de afstandsbediening weer
opnieuw, herhaal dan de functie wordt uitgeschakeld.
DU-8
Page 51

PROGRAMMA FUNCTIE
De ge bruiker kan het p rogramma max imaal 32 tra cks in cd-m odus of 64 tracks in MP3 / WMA / USB / SD
KAART-modus in elke gewenste volgorde. Programma modus wordt geactiveerd, terwijl in de stopstand.
1. Hoe spelen het programma
- CD
1) Druk op de iPod / MEM / C-INS. knop, verschuiving naar Geheugen-modus. (F17)
2) Druk op de Overslaan / ZOEKEN TUNE (omhoog of omlaag) raken plaat op het
toestel of druk op de Overslaan / ZOEKEN TUNE (omhoog of omlaag) toets op de
afstandsbediening, zal de track nummer worden gewijzigd.
3) Druk op de iPod / MEM / C-ADJ. knop om te bevestigen de track nummer.
- MP3/WMA
1) Druk op de iPod / MEM / C-INS. knop, verschuiving naar Geheugen -modus. Het
album nummer knippert. (F18)
2) Druk op de PRESET / MAP-knop op het apparaat of op de afstandsbediening, zal
het album nummer worden gewijzigd.
3) Druk op de iPod / MEM / C-ADJ. knop, zal de eerste track nummer worden
weergegeven. (F19)
4) Druk op de Overslaan / ZOEKEN TUNE (omhoog of omlaag) raken plaat op het toestel of
druk op de Overslaan / ZOEKEN TUNE (omhoog of omlaag) toets op de
afstandsbediening, zal de track nummer worden gewijzigd.
5) Druk op de iPod / MEM / C-ADJ. knop om te bevestigen de favoriete track nummer.
2. Programma Spelen
Druk op de SPELEN / PAUZE / ENTER aanraken plaat op het toestel of druk op de SPELEN / PAUZE /
ENTER-toets op de afstandsbediening.
Het toestel speelt de eerste track van het programma. Als alle nummers zijn gespeeld, zal het toestel worden
weergegeven toont het aantal tracks en de speelduur van de CD/MP3 liedjes.
3. Annuleren programma
1. Druk op de STOP / MENU aanraken plaat op het toestel of druk op de STOP / MENU-knop op de
afstandsbediening een keer, of open de deur CD-lade en sluit deze opnieuw aan dat het geheugen wordt gewist.
2. Stel een nieuw programma, zal de bestaande worden gewist.
Opmerking:
Tijdens het programma-modus.
1. Druk op de HERHALEN raken plaat op het toestel of druk op de HERHALEN knop op de afstandsbediening, de "
HERHALEN " indicator licht op het tonen. Dan is de eenheid zal herhalen de huidige track.
2. Druk op de HERHALEN raken plaat op het toestel of druk op de HERHALEN knop op de afstandsbediening
tweemaal, de " HERHALEN Alles"licht op het tonen. Dan is de eenheid zal herhalen het totale aantal tracks.
3. Druk op de HERHALEN raken plaat op het toestel of druk op de HERHALEN knop op de afstandsbediening weer
opnieuw. De eenheid zal terugkeren naar het programma te spelen in normaal.
Willekeurig afspelen
1. Druk op de RANDOM toets op het toestel (of de afstandsbediening), dan RANDOM
wordt weergegeven. (F20)
2.Druk op de RANDOM toets, dan is de audio-apparaat eenheid zal worden hervat om
normaal te spelen
Introduceren Spelen (op de afstandsbediening)
1. Druk op d e INTRO-kn op op de afstandsbediening, is INTRO weergegeven. INTRO
speelt de eerste 10 seconden van elke track. (F21)
2. Druk op d e INTRO-kn op t weemaal, da n is d e au dio-apparaat e enheid zal worde n
hervat om normaal te spelen.
iPod Operatie
Opmerking: Om te voorkomen dat schade van de iPod, kunt u ervoor zorgen dat de iPod in de standby-modus in te
voegen en eruit te halen.
Tijdens het apparaat in standby-modus:
1. Druk op de iPod OPEN / SlUITEN toets op het toestel eerst de iPod deur te openen.
2.Plaats de iPod-spelers in de iPod docking beugel aan de voorzijde van het hoofdtoestel
strak.
DU-9
Page 52

3. Power op het apparaat, en raak vervolgens de FUNCTIE raken plaat op het toestel of
druk op de FUNCTIE-toets op de afstandsbediening om de iPod-modus, wordt de
iPod-indicator verschijnt op het hoofdtoestel spelen. (F22)
Tijdens de eenheid in iPod-modus:
1. Druk op de SPELEN / PAUZE / ENTER (alleen in iPod) touch plaat of druk op de Spelen / Pauze / ENTER-toets
op de afstandsbediening om te beginnen met de iPod te spelen. Stel het volume op de tast de VOLUME (omhoog
of omlaag) toets of druk o p de VOLUME (omhoog of omlaag) toets om de huidige stoppe n met spelen, raakt de
STOP / MENU (alleen in iPod) touch plaat eenmaal.
2. Druk op de Spelen / PAUZE / ENTER (alleen in iPod) touch plaat een keer om te pauzeren het huidige nummer.
Het afspelen te hervatten, raakt u de SPELEN / PAUZE / ENTER (alleen in iPod) touch plaat opnieuw.
3. Om vooruit of achteruit over te slaan, raak de SKIP / ZOEKEN TUNE (omhoog of omlaag) aanraken plaat om de
gewenste track.
4. Druk op de Herhaal touch plaat of druk op de RANDOM toets op het toestel (of op de afstandsbediening).
Opmerking: iPod touch versie 1.1.4 of hoger kan steunen of Herhaal RANDOM functie.
Tijdens de eenheid in iPod-menu-modus:
1. Tijdens de eenheid in iPod-modus, drukt u op de iPod / MEM / KLOK -ADJ. toets,
zal het apparaat in te voeren om de iPod MENU-modus. De iPod-menu-indicator
verschijnt op het toestel weergegeven. (F23)
2. Druk op de STOP / MENU (alleen in iPod) touch plaat terug te keren naar het
iPod-menu.
a. Als u de huidige menu als belows:
Muziek> Extra> 'Impo rteer foto (zond er deze functi e weerg ave op de iPod Mini)> Inste llingen>' Shu ffle
nummers> Backlight> nu blijkt zal spelen op de iPod-speler.
b.Druk op de Overslaan / TUNE ZOEKEN (omhoog of omlaag) raken plaat op het toestel (of de afstandsbediening)
te zoeken in de huidige menu.
3. Druk op de Spelen / PAUZE / ENTER (alleen in iPod) touch plaat in te voeren om het gewenste menu map.
a. Raak de Overslaan / TUNE ZOEKEN (omhoog of omlaag) raken plaat op het toestel (of de afstandsbediening)
te zoeken in de huidige inhoud in het menu elke gewenste map.
b. Als u wilt terugkeren naar het iPod-menu, raakt u de STOP / MENU (alleen in iPod) touch, plaat weer.
4. Het afspelen te hervatten, drukt u op de iPod / MEM / KLOK-ADJ. knop nogmaals, zal het toestel terugkeren naar
de iPod-modus.
Opladen van de iPod-speler accu door middel van het hoofdtoestel:
1. iPod-speler heeft een intern niet-ve rwijderbare ba tterij, kan de batterij moet worden op geladen, dat nie t wordt
gebruikt voor een tijdje.
2. U kunt de iPod-speler via het apparaat automatisch in de stand-by of INSCHAKELEN -modus.
Opmerking:
1. De iPod-speler batterij is 80 procent opgeladen in ongeveer een uur, en volledig opgeladen in ongeveer een paar
uur. Als je het hotel, tijdens het afspelen van muziek, kan het langer duren.
2. Het is niet beter in rekening te brengen onder de TUNER-modus. Het kan interfereren met de receptie.
Opmerking:
1. In elk moment kunt u de controle van de iPod-speler op het hoofdtoestel, afstandsbediening of iPod-speler zelf,
terwijl de eenheid in de "iPod" of "iPod-menu" modus.
2. In elk moment moet de iPod-speler goed vast onder in de STANDBY-modus om het apparaat te voorkomen en de
iPod-speler werden beschadigd.
3. Tijdens de eenhei d in i Pod-modus. De video -functie van de i Pod met ahn ormal normaal. Update de nieuwste
versie van de iPod video functie van de Apple website
Video Out instelling (voor iPod Video)
1. Tijdens de eenheid in de standby-modus: Verbind de TV met een video-kabel (RCA-type kabels) om de VIDEO
out-aansluiting aan de achterkant van het apparaat.
2. Tijdens de eenheid in de iPod-modus: Druk op de "MENU" knop op de iPod Click Wheel om de video functie
3. Als u de iPod op video's weergeven opeen TV:
(a) Video Kies> Video-instellingen en stel TV-out te vragen of On.
(b) Als u TV-out ingesteld op Vragen, iPod geeft u de mogelijkheid van het tonen van video's op TV of op de iPod
terwijl elke keer dat je speelt een video.
Opmerking:
1. De Vedio modus ondersteunen Alleen Dat de iPod-spelers hebben een vedio functie.
2. iPod classic 80/16 0GB, iPod nano 3 rd gen eration(Video) 4/8G B and iPod touch 8/16GB should be fixed well
under in the STANDBY mode before operation of the Vedio function.
3. Vedio kabel (RCA-type kabel) niet inbegrepen.
DU-10
Page 53

AUX IN SPELEN(Aux in kabel niet meegeleverd)
1. Druk op de FUNCTION raken plaat op het toestel of druk op de FUNCTIE knop op de afstandsbediening, totdat
de "AUX" indicator licht op het Tonen. Dit toestel kan analoge audio-ingang via de AUX (lijn) in aansluiting aan de
rechterzijde van het toestel.
2. Gebruik een kabel met RCA-aansluiting voor aansluiting externe audiobron.
Instelling Slaap Functie
1. Als u in slaap valt aan muziek, drukt u op de SLAAP knop op het toestel of op de afstandsbediening.
2. U kunt selecteren op de TUNER, CD/MP3, USB, SD / MMC, iPod of AUX-modus in slaap functie te spelen vanaf
90, 80, 70 maximaal 10 minuten muziek voor zichzelf uit te sluiten automatisch.
EQ CONTROLE
EQ toont de huidige geluid toon.
Wanneer u cont act met de EQ-tou ch plaat of druk op de EQ-toet s o p de afst andsbediening, het g eluid too n
verandert als volgt:
MUTE INSTELLING
1. Wanneer u de MUTE-toets op het toestel of op de afstandsbediening drukt
ueenmaal, zal het volumeniveau flitser en de audio-uitgang zal tijdelijk
worden stopgezet. (F24)
2. Druk op de MUTE-toets op het toestel of op de afstandsbediening weer, het
volume en de audio-uitgang zal terugkeren naar normaal.
LUISTER NAAR DE MUZIEK MET HOOFDTELEFOON
Een stereo hoofdtelefoon-aansluiting is voorzien voor individuele beluistering. Om te luisteren naar de eenheid
met een hoo fdtelefoon (niet meegeleverd) S teek de 3,5 mm mini-stereo stekker van de hoofdtelefoon in de
TELEFOONS aansluiting op het voorpaneel. De externe luidsprekers worden automatisch verbroken wanneer
hoofdtelefoon gebruikt.
Geheugen BACK-UP
Als u invoegen 1.5V x 3, UM-4, gelijkwaar dig of AAA batterijen in het batter ijvak van de eenh eid. Het word t
gebruikt om de back-up van het geheugen van de hoofd CPU.
SPECIFICATIE
MACHT LEVEREN : 230V~50Hz
VERMOGEN : 10 Watts x 2
UNIT DIMENSIE : 40 0 (W) x 154 (D) x 211 (H) mm
SPEAKER DOOS DIMENSIE: 160 (W) x 154 (D) x 211 (H) mm
NETTOGEWICHT: 5.1 kg
RADIO SECTION
FREQUENTIE BEREIKk : FM 87.5 - 108 MHz
COMPACT DISC SECTIE
OPTISCHE PICK : 3 - BEAM LASER
FREQUENTIE REACTIE : 100Hz - 16kHz
Specificatie Behoudens veranderen zonder nadere aankondiging.
Ventilatie waarschuwing: "De normale ventilatie van het product mag niet worden belemmerd voor
het beoogde gebruik."
www.mpmaneurope.com
DU-11
 Loading...