

Thank you
For purchasing this Mini component Electronic audio system. Thi s un iq ue ly d es ig ne d pr od uc t
R
has a USB/ SD / MP 3/ CD / A UX / RA DI O pl ay er w it h pr og ra mm ab le m em or y an d re pe at p la yb ac k.
It also features a great sounding AM/FM stereo radio.
We ar e su re t ha t th is M in i co mp on en t El ec tr on ic a ud io s ys te m wi ll p ro vi de y ou w it h ma ny y ea rs o f
exceptional performance with a minimum of care and maintenance. Please review the contents of this
instruction manual completely and carefully before operating your unit, to make sure that you
understand all functions and operations and get the maximum benefit out of all the great features
included in this product.
CAUT ION
RIS K OF ELEC TRIC SH OCK
DO NO T OPE N
LASER SAFETY: Th is u ni t em pl oy s a la se r. On ly
qualified serv ic e per so nn el sh ou ld atte mp t to
service this de vi ce du e to pos si ble eye inj ur y.
CA U T IO N: USE OF CON TRO L S,
WAR NIN G : TO RED UCE THE RISK OF ELECT RIC
SHO CK, D O N OT R EMOVE COVER (OR B AC K). NO
USE R - SERVI CEABL E PARTS I NSIDE . REFE R
SER VI CIN G TO QUAL IFI ED SERV IC E PER SONNE L.
R
DAN GEROU S VOLTAGE
The li ghtn ing fla sh with a rrowh ead sym bol, wit hin an e quila teral tri ang le is inte nded to alert th e user
to th e prese nce of un insula ted da ngero us volt age wit hin the p roduc t s enclo sure th at may be o f
sufficie nt ma gnitu de to con stitu te a risk o f electri c sho ck to pers ons.
ATTE NT ION
The e xclam ation p oint wi thin an e quila teral Tr iangl e is inte nded to a lert th e used to t he Pres ence of
imp ortan t opera ting an d maint enanc e (serv icing ) instr uctio ns in the l itera ture ac compa nying t he
app lianc e.
R
Dan ger:
Inv isibl e and haz ardou s laser r adiat ion whe n Open an d inter lock fa iled or d efeat ed. Or de feate d.
Avo id d ire ct expo sure to b eam.
Dripping warning:
Ventilation warning
use .
The product shall not be exposed to dripping or splashing and that no
objects filled with liquids, such as vases, shall be placed on the product.
The normal ventilation of the product shall not be impeded for intended
ADJUST ME NT S OR PERFORMANCE ,
P R O C E D U R E HE RE I N M AY RE S U LT IN
H A ZA R D OU S R AD IAT I O N E X PO S U R E.
,
STER EO RA DIO
WITH M P3/ CD/CD -R/US B/S D PLAYE R
-1-
PREPARATION FOR USE
Unpacking and Setup
* Carefully remove the unit from the display carton and remove all packing material from the unit itself.
* Remove any descriptive labels that may be found on either the front or top cabinet of the unit. Do not
remove any labels located on either the back or button cabinet of the unit.
* Press the CD door OPEN Button to open the CD compartment door. The re i s a wh it e ca rd i n th e CD
compartment which is intended to prevent the CD pickup from moving during shipment of the product,
Remove this card from the CD compartment before use.
Power Sources
Using AC Po we r
Connect the AC power into Standard household wall outlet. For dual voltage version.
Make sure that the AC VOLTAG E SE LE CTOR is switched to your local voltage.
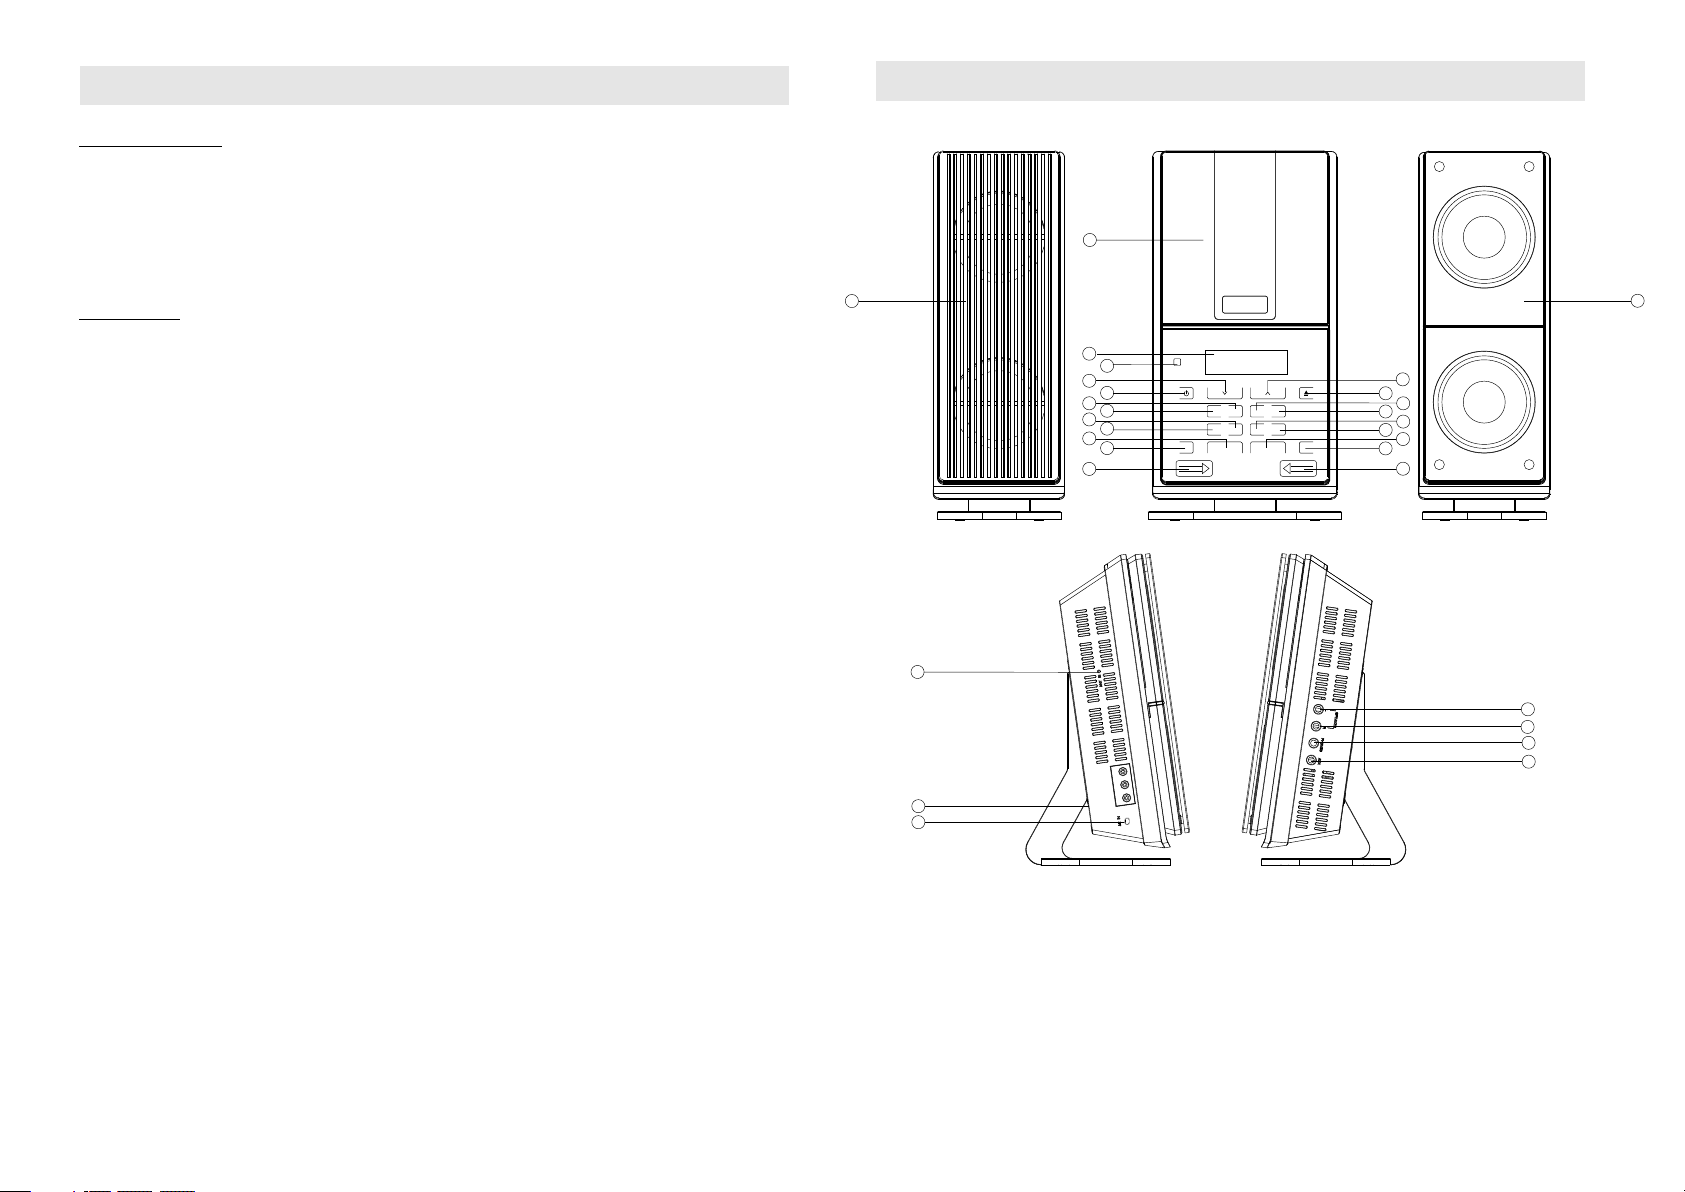
LOCATIONS OF CONTROLS
1
22
2
3
4
5
6
7
8
9
10
11
12
13
14
15
16
17
18
19
20
21
22
23
24
25
1.CD D OO R
2.LC D DI SP LAY
3.RE MO TE S EN SOR
4.VO LU ME - CO NTROL
5.PO WE R
6.RE PE AT BUTTON
7.NE XT / TU - UP B UT TO N
8.PR OG RA M BU TT ON
9.BA CK / TU - DN B UT TO N
10.P LAY/PAUSE BUTTON
11.B AND BUTTON
12.S D JA CK
13.V OL UM E+ C ONTROL
14.O PE N/ C LO SE B UTTO N
15.E Q BU TTON
16.P RE - UP B UT TO N
17.M UT E BU TT ON
18.P RE - DN B UT TO N
19.S TOP/ USB / SD /
ST/MO BUT TON
-2- -3-
26
27
28
29
20.F UN CT IO N BU TTON
21.U SB J AC K
22.L EF T/ R IG HT S PEAKER BO X
23.F M AN TE NN A
24.V OLTAG E SELECTOR
25.A C MA IN S
26.L EF T SP EA KE R JACK
27.R IG HT SPE AK ER J AC K
28.P HO NE S JA CK
29.A UX I N JA CK

Remote C ontrol
1
2
3
4
5
6
7
8
9
10
11
12
13
14
15
16
17
18
19
20
21
1. BAND BUTTO N
2. FUNCTION BU TTON
3. POWER BUTTON
4. NUMBER KEY
5. BACK BUTTO N
6. MO/ S T BUTTON
7. VOL- BUTTO N
8. P DOWN BU TTO N
-
9. MEMORY BUT TON
10. RANDOM BUT TON
11. MUTE BUTTON
12. OPEN/ CLOSE B UTTON
13. STOP/ USB/ SD BUTTON
14. PLAY PAUSE B UTTON
/
15. EQ BUTTON
16. BBS BUTTO N
17. NEXT BUTTON
18. INTRO BUTTON
19. VOL BUTTON
20. P- UP BUTTON
++
-
21. REPEAT BUT TON
BASI C FUN CTION
Electronic Power On/off
Press POWER button on unit or POWER button on the remote control to switch the system on.
Volu me C on tr ol
Touch" " for volume down & to uc h " " fo r vo lu me u p.
To swi tc h of f th e vo lu me t em po ra ri ly
Press MUTE button on the remote control , the playback will continue without sound.
To rest or e th e vo lu me , pr es s MU TE b ut to n on t he r em ot e co nt ro l ag ai n.
EQ CONTROL
When you press the EQ button on unit or on the remote control, the sound tone changes as below
POP ,JA ZZ , PAS S, C LA SS IC , RO CK
BBS CONTROL
When you press the BBS button on the remote control, the sound change to base boost.
AUX CONTROL(connections see 1 )
Press FUNC button , select AUX mode. play 、 、
SD/MM C CARD
To listen to your SD/M MC card with Mp3 music files,Press FUNCTION switch on main unit or on the
remot e unit then LCD displa y will show"CARD- USB" ,Insert SD/MMC card and will automatic ally
start playing your SD/ MMC card.
USB SLOT
To listen to your USB flash memory stick with Mp3 music files, Press FUNCTION switch on main unit
or on the remote then LCD display will show" CARD-USB".in sert Mp3 stick and will start playing your
USB flash memo ry Stick.
-Press and hold STOP/USB/SD button more than 2 sec at STOP mode, system will chang to USB/MMC/SD mode .
NOTE: The unit don't suppor t the portion USB with mp3 player。
MP3 DISC MA N WAL KM AN AU X i ns er t
* Plea se pu ll out th e plast ic pa per fro m the b atter y door be for e use the r emo te cont rol
* When t he re mote co ntrol o per ation b eco mes uns table o r the d istan ce fr om whic h the r emote c ontro l
work s is sh orter . repla ce th e batte rie s with ne w ones.
* Usin g the r emote c ontro l uni t
To use the r emo te unit , point a t the R EMOTE S ENS OR and pr ess the b utt ons gen tly a nd firm ly.
Remo te co ntrol o perat ion i s possi ble w ithin a ppr oxima te 18ft ( 6m) .Ho wever , sin ce the re mot e contr ol
rang e is es s when th e unit is u sed a t an angl e, us e direc tly i n front o f the REM OTE S ENSOR , for
maxi mum d istan ce. Do no t exp ose the R EMO TE SENS OR to str ong l ight( dire ct su nligh t or arti fic ial
ligh tin g)an d make su re hat th ere a re no obs tac les bet ween th e REM OTE SEN SOR a nd the re mote
cont rol u nit.
-4-
-5-

RADI O /CD /MP3 OP ERATION
USIN G TH E RA DI O
1.Press FUNC button. Select TUN ER m od e or p ress BAND b ut to n on C D/A UX / US B mo de .
2.Press BAND to select the desired wave band: AM, FM
3.Tun e to r eq ui re d st at io n by p re ss B AC K/ TU NE- D N or N EXT /TUN E- UP
Manual Tun in g: P re ss B AC K/ TU NE -D N or NEXT /TUN E- UP and th en r el ea se w it hi n 1 se c.
Auto Tun in g: H ol d BA CK /T UNE- DN o r NEX T/TU NE-U P ov er 1 se c .A nd t he n re le as e it a t an y ti me . Aft er k ey r el ea se ,
the auto-tuning operation will start until find a station.
Preset Channel:(FM 30 Pr es et memo ries, A M 10 p res et m emori es )
(1) Press BAC K/TU NE -D N or NEXT /TUN E- UP S el ec t de si re d st at io n.
(2) Press PRO GRAM bu tt on o nc e , Th e ME MO RY nu mb er i nd ic at or b eg ins stea dy in th e display.
(3) Press PRESET-UP OR P RE SE T DO WN b ut to ns t o se le ct t he d es ir ed n um be r
(4) Press PRO GRAM bu tt on t o sa ve t ha t st at io n.
(5) Repeat steps (1) to (4) procedures for other stations.
4.After end of program. press PRESET-UP or P RE SE T-D N to s ta rt p la y th e fr eq ue nc y th at y ou s el ec te d or
Press number key on the remote control
5.Adjust VOLUME button to desired volume level
Note: The F M ST ER EO i nd ic at or w il l be o n wh en y ou a re r ec ei vi ng F M st er eo p ro gr am ma bl e.
6.Tur n off the radio by press FUNC button select other mode or press power button to off t he u ni t.
7. Sw it ch o n ag ai n af te r sh ut d ow n, t he m em or y fr eq ue nc y st il l ex is ts .
MONO/ STEREO
Press MO/ST but to n on ce , M ON O is d is pl ay ed
Press MO/ST but to n tw ic e , ST ER EO i s di sp la ye d
Notice:t he m on o/ s te re o ca n' t be d on e on A M.
PLAYIN G CD /MP3
1.Pr es s FU NC b utton sel ec t CD m od e
2.Op en t he d is c compart me nt d oo r.
3.Pl ac e a CD /M P3 disc int o th e tr ay w ith the l ab el s id e facing up .
4.Cl os e th e di sc compar tm en t do or( aut o pl ay ) or W hen other m od e, i t wi ll play ba ck a ut omatica ll y.
5.To int er ru pt p layback , pr es s PL AY/ PAU SE b ut ton. The track nu mb er w il l be flas he d ev er y 0.5s.
Paus e fu nc ti on will be ke pt a ft er B ACK or NE XT.
To resu me play ba ck , pr ess PLAY/PAU SE b utton a ga in t o co ntinue.
6.CD P LAY, LCD d ispla y sh ow s ES P wo rd , E SP fun ct ion beg in w or ki ng,
ESP time is 2 se co nd s in t he CD mode, E SP t im e is 5 s econds in t he M p3 m ode.
NOTE:I t ca n' t c an ce l th e ES P fu nc ti on u nd er t he C D/ M P3 m od e.
7.To sto p pl ay ba ck, press S TOP button t o st op p la y and the n to ta l ti me and tota l nu mb er w ill sho w
on the d is pl ay.
SELE CT IN G A DES IR ED T RACK/PASSAGE
Duri ng p la yb ack you can u se B AC K/ T UNE-DN or NE XT / TU NE - UP to se lect a part ic ul ar t rack.
1.If y ou h av e se lect a trac k nu mb er i n the sto p or p au se p osition , pr es s PL AY/ PAU SE t o st art playb ac k.
2.Pr es s NE XT / TU NE- UP once bri ef ly f or t he next tra ck ,
3.Pr es s BA CK / TU NE- DN th an o nc e br iefly for a p re vi ou s track .
To sear ch for a pa rt ic ul ar passag e du ri ng p layba ck (t ra ck scanni ng a t hi gh s peed)
Pres s an d ho ld B ACK/TUNE - DN o r NE XT / TU NE- UP- but to n to s can the cur re nt p la ying trac k at h ig h speed
unti l de si re d point(p as sa ge ),the n re le as e the butto n. P la yback wil l st ar t ag ain from th is p oi nt.
To remov e th e CD , pr ess OPEN to o pe n Co mp artme nt l id , gr asp the CD by i ts e dg es . And care fu ll y ta ke it out.
Note :
To ensu re good s ys te m pe rforman ce ; wa it u ntil th e di sc t ra y complet el y re ad s the dis c be fo re p roceedi ng .
If no di sc l oa de d into the co mp ar tm ent, or t he d is c is p laced ups id e do wn o r unrea da bl e, a D ISC displ ay
will b e in di ct ed.
USIN G THE R EPEAT FUNCTI ON
CD REP EAT
You ca n pl ay o ne trac k or a ll t ra cks on the di sc r ep ea tedly.
To Rep eat a sin gl e Tra ck
1.Pr es s RE PE AT butt on o nc e in play, CD R EPEAT ind ic ator on the d is pl ay will be st ea dy o n in t he disp la y.
The c urren t tr ac k wi ll be playe d ov er a nd o ver aga in t il l yo u press STOP button.
2.To can ce l re pe at 1 pla y, pr es s RE PE AT bu tt on t wi ce , REPEAT 1 ind icator go es o ff .
To Rep eat Al l th e Tra cks
1.Pr es s RE PE AT butt on t wi ce i n play, REPEAT ALL indi ca to r on t he displa y wi ll b e st eady on i n th e di sp lay,
all tr ac ks o n th e disc will b e pl ay ed o ver and o ve r ag ai n till you pr es s ST OP but to n.
2.To can ce l re pe at all pl ay, p re ss R EP EAT but to n three t imes, R EPEAT ALL ind ic at or goes off.
Note : Re pe at f unction c an ' t be d on e in stop mod e.
MP3 RE PE AT
You ca n pl ay o ne trac k or a ll t ra cks on the di sc r ep ea tedly.
To Rep eat a sin gl e Tra ck
1.Pr es s RE PE AT butt on o nc e in play, RE PEAT in di ca tor on the di sp la y will be ste ad y on i n th e displ ay.
The c urren t tr ac k wi ll be playe d ov er a nd o ver aga in t il l yo u press STOP button.
2.To can ce l re pe at 1 play, press REP EAT bu tton th re e ti me s , REPEAT 1 in di cator goe s off.
To Rep eat Al l th e Tra cks
1.Pr es s RE PE AT butt on t wi ce i n play, REPEAT ALL i nd icator on t he d is play will b e st ea dy o n in the
disp la y, al l tr ac ks o n the disc wi ll b e pl ay ed over a nd o ve r ag ain till yo u pr es s ST OP b ut to n.
2.To can ce l re pe at all play, press R EP EAT butto n tw ic e, R EPEAT ALL indica to r go es o ff .
To Rep eat AL BU M th e Tracks
1.Pr es s RE PE AT butt on t hr ee t imes, t he n RE PE AT ALB 2 is d is pl ayed. Rep ea t th e cu rrent p la y al bu m.
2.To can ce l re pe at album pl ay. pre ss R EP EAT but to n on ce . REPEAT ALB2 indi ca to r go es off .
Note : Re pe at f unction c an ' t be d on e in stop mod e.
USING THE PROGRAM FUNCTION
The CD Player in this unit has a 65 tracks programmable memory which allows you
to program up to 65 tracks on any disc for playback in any desired order. To pro gr am
tracks for play back the player must be in the Stop mode. If the disc is playing, press
the stop button to stop playback and then proceed as follow.
1.In the During stop mode.
2.Press PROGRAM button once .The MEMORY I nd ic at or b eg in s ap pe ar
3.Press BACK or NXET for your desired track or Press number key on the remote control.
4.When your chosen track number appears, press PROGRAM once to store the track.
5.Repeat steps 1 to 4 to select and store all desired tracks in this way.
6.After end of program. press PLAY to st ar t pl ay t he t ra ck s in t he o rd er t ha t yo u se le ct ed
MP3 Programmed Playback
The mp3 Player in this unit has a 65 tracks programmable memory which allows you
to program up to 65 tracks on any disc for playback in any desired order. To pro gr am
tracks for play back the player must be in the Stop mode. If the disc is playing, press
the stop button to stop playback and then proceed as follow.
1.In the During stop mode.
2.Press PROGRAM button once .The ALBUM NO. is flashing
3.Press BACK or NEXT fo r yo ur d es ir ed a lb um .
4.Press MEMORY bu tt on o nc e. t ra ck N O. i s fl as hi ng
5.Press BACK or NEXT chosen track number appears or Press number key on the remote control,
press PROGRAM once to store the track.
6.Repeat steps 1 to 5 to select and store all desired tracks in this way.
7.After end of program. press PLAY to st ar t pl ay t he t ra ck s in t he o rd er t ha t yo u se le ct ed
NOTICE : After the 65 tracks of program is full, program don't b e co nt in ue .
ESP
MEMORY
VOLUME
MEMORY
VOLUME
-6-
-7-

Reviewing your program
In the STOP m od e, p re ss B AC K or N EX T the display shows your stored track numbers in sequence.
program play
After programming songs. press the PLAY but to n an d it w il l pl ay t he s on gs a s yo u pr og ra mm ed .
Erasing a program
You ca n er as e th e co nt en t of t he m em or y by :
- While playing, press STOP b ut to n twice
- Opening the CD door
- Press FUNC button select other mode
- press BAND button to sele ct tuner
RANDOM PLAY
-Press RANDOM button on the remote control , then RANDOM is displayed.
-Press RANDOM button twice, the NORMAL pl ay.
INTRO PLAY
-Press INTRO button on the remote control. the INTRO is displayed. INTRO plays the first 10 seconds
of each track, fr om t he f ir st b eg in ni ng e ve ry t im e.
-Press INTRO button twice, then NORMAL pl ay.
.
CARE AND MAINTENANCE
Caring for Compact Discs
* Treat the disc carefully. Han dl e th e di sc o nl y by i ts e dg es .
Never allow your fingers to come in contact with the shiny,
unprinted side of the disc.
* Do not attach adhesive tape, stickers, etc. To the di sc l ab el .
* Clean the disc periodically with a soft , lint-free, dry cloth.
Never use detergents or abrasive cleaners to clean the disc.
If necessary, us e a CD c le an in g ki t.
* If a disc skips or gets stuck on a section of the disc, it is probably dirty or damaged(scratched).
When cleaning the disc, wipe in straight lines from the center of the center of the center of the disc to the outer
edge of the disc. Never wipe in circular motions.
TROUBLESHOOTING GUIDE
Should this unit exhibit a problem, check the following before seeking s er vi ce .
Symptom
Radio
Noise or sound
distorted on radio
broadcasts.
FM STEREO Indicator
dose not appear
AM or FM, no sound.
Compact Disc Player
CD/MP3 Player
will not play.
CD/MP3 skip
while playing.
Possible Cause
Station not tuned properly for AM or FM
FM: Teles co pi c an te nn a is n ot p ro pe rl y
adjusted.
AM: Unit is not positioned correctly.
Poor FM signal being received
Station is not broadcasting in the stereo.
FUNCTION select is not set to the
TUNER mode..
Volume at minimum.
FUNCTION select is not set to the CD
CD is not installed or installed upsidedown.
Disc is dirty or scratched.
Solution
Pre ss BACK /TUN E- DN o r NEXT/ T UNE -UP
Reorient FM telescopic antenna.
Rotate unit until best reception is
obtained.
1.Retune station, try another station .
2.change to FM STEREO mode
Change stations.
Select TU NE R mo de .
Increase Volume.
Select CD mode.
Insert CD with label side up.
Wipe disc with cloth or use another disc.
* Thi s un it i s de si gn ed t o pl ay o nl y co mp ac t di sc s be ar in g th e id en ti fi ca ti on l og o as s ho wn h er e.
Other discs may not conform to the CD standard and may not play properly.
* Compact Disc should be stored in their cases after each use to avoid damage.
* Do not expose compact disc to direct sunlight, high humidity, hi gh t em pe ra tu re s, o r du st , et c. P ro lo ng ed
exposure or extreme temperatures can warp the disc.
* Do not stick or write anything on either side of the disc. Sharp writing instruments, or the ink may
damage the surface.
-8-
General
No sound.
Headphones connected into the
Headphones jack.
Remove the Headphones from the
Headphones jack.
For more i nformation please visit our we bsite www.mp maneurope.com
-9-
 Loading...