

Page 1

PORTABLE DVD / CD / MP3 PLAYER
7” Twin Screen Portable LCD DVD Player , USB Port and Card Slot
TWIN700
Instruction Manual
Please read this manual carefully before operation.
Page 2
2
PRECAUTIONS
CAUTION
RISK OF ELECTRIC SHOCK
DO NOT OPEN
CAUTION : TO REDUCE THE RISK OF FIRE AND ELECTRIC SHOCK , DO NOT REMOVE THE COVER (OR BACK)
OF THE UNIT. REFER SERVICING ONLY TO QUALIFIED
SERVICE PERSONNEL.
For Customer Use:
Enter below the serial number that is located on the
bottom of the unit. Retain this information for future
reference.
Model No. TWIN700
Serial No.
The lightning flash with arrowhead symbol within an equilateral triangle is intended to alert
the user to the presence of uninsulated “dangerous voltage” within the product’s enclosure
that may be of sufficient magnitude to constitute a risk of electric shock.
The exclamation point within an equilateral triangle is intended to alert the user to the presence of important operation and servicing instructions in the literature accompanyin
g the
appliance.
WARNING:
To prevent fire or shock hazard, do not expose this device to rain or moisture. Dangerous high voltage is present inside the
enclosure. Do not open the cabinet.
Handling the cords on this product will expose you to lead, a chemical known to the State of California to cause cancer, and
birth defects or other reproductive harm. Wash hands after handling.
CAUTIO N:
This Digital Video Disc player employs a laser system. To prevent direct exposure to the laser beam, do not try to o
enclosure or defeat the safety interlock s. When open and the interlocks are defeated, visible laser radiation is present.
To prevent electric shock, match wide blade of plug to wide slot of outlet and fully inser t.
Use of controls, adjustments, or performance of procedures other than those specified herein may result in hazardous radiation
exposure. DO NOT STAR E INTO THE BE AM.
NOTICE:
This product incorporates copyright protection technology that is protected by U.S. patents an
rights. Use of this copyright protection technology must be authorized by Macrovision, and is intended for home and other
limited viewing uses only unless otherwise authorized by Macrovision. Reverse engineering or disassembly is prohibited.
FCC Notice:
d other intellectual property
pen the
FCC Statement:this device complies with Part 15 of the FCC Rules. Operation is subject to the following two conditions:
(1) This device may not cause harmful interference, and(2) This device must accept any interference
received, including interference that may cause undesired operation.
Note: This equipment has been tested and found to comply with the limits for Class B digital devices, pursuant to Part 15 of the FCC rules. These limits are designed to provide reasonable protection
against harmful interference in a residential installation. This equipment generates, uses and can radiate radio frequency energy and, if not installed and used in accordance with the instructions, may cause
harmful interference to radio communications. However, there is no guarantee that interference will not
occur in a particular installation. If this equipment
does cause harmful interference to radio or television
reception, which can be determined by turning the equipment off and on, the user is encouraged to try
to correct the interference by one or more of the following measures:
- Reorient or relocate the receiving antenna.- Increase the separation between the equipment and
receiver.- Connect the equipment into an outlet on a circuit different from that to which the receiver i
s
connected.- Consult the dealer or an experienced radio/TV technician for help.
Use of shielded cable is required to comply with Class B limits in Subpart B of Part 15 of the FCC
rules.
Page 3
3
PRECAUTIONS
Do not make any changes o r modifications to the equipment unless otherwise specified in
the manual. If such changes or modifications should be made, you could be requi red to stop
operation of the equipment.
For recycling or disposal information about this product, please
contact your local authorities or the Electronics Industries Alliance:
www.eiae.org.
Page 4
4
IMPORTANT SAFETY INSTRUCTIONS
Read Instructions: All the safety and operating instructions should be read before the product 1.
is operated.
Retain Instructions: The safety and operating instructions should be retained for future refer-2.
ence.
Heed Warnings: All warnings on the product and in the operating instructions should be 3.
adhered to.
Follow Instructions: All operating and usage instructions should be followed.4.
Cleaning: Unplug this product from the wall outlet before cleaning. Do not use liquid cleaners 5.
or aerosol cleaners. Use a damp cloth for cleaning.
Attachments: Use only attachments recommended by the manufacturer. Use of other attach-6.
ments may be hazardous.
Water and Moisture: Do not use this product near water (e.g., near a bath tub, washbowl, 7.
kitchen sink, laundry tub, in wet basements, or near a swimming pool and the like).
Heat: The product should be situated away from heat sources such as radiators, heat regis-8.
ters, stoves, or other products (including ampliers) that produce heat.
Accessories: Do not place this product on an unstable cart, stand, tri-9.
pod, bracket, or table. Use only with carts, stands, tripods, brackets,
or tables recommended by the manufacturer or sold with the product. Any mounting of the product should follow the manufacturer’s
instructions and should use a mounting accessory recommended
by the manufacturer.
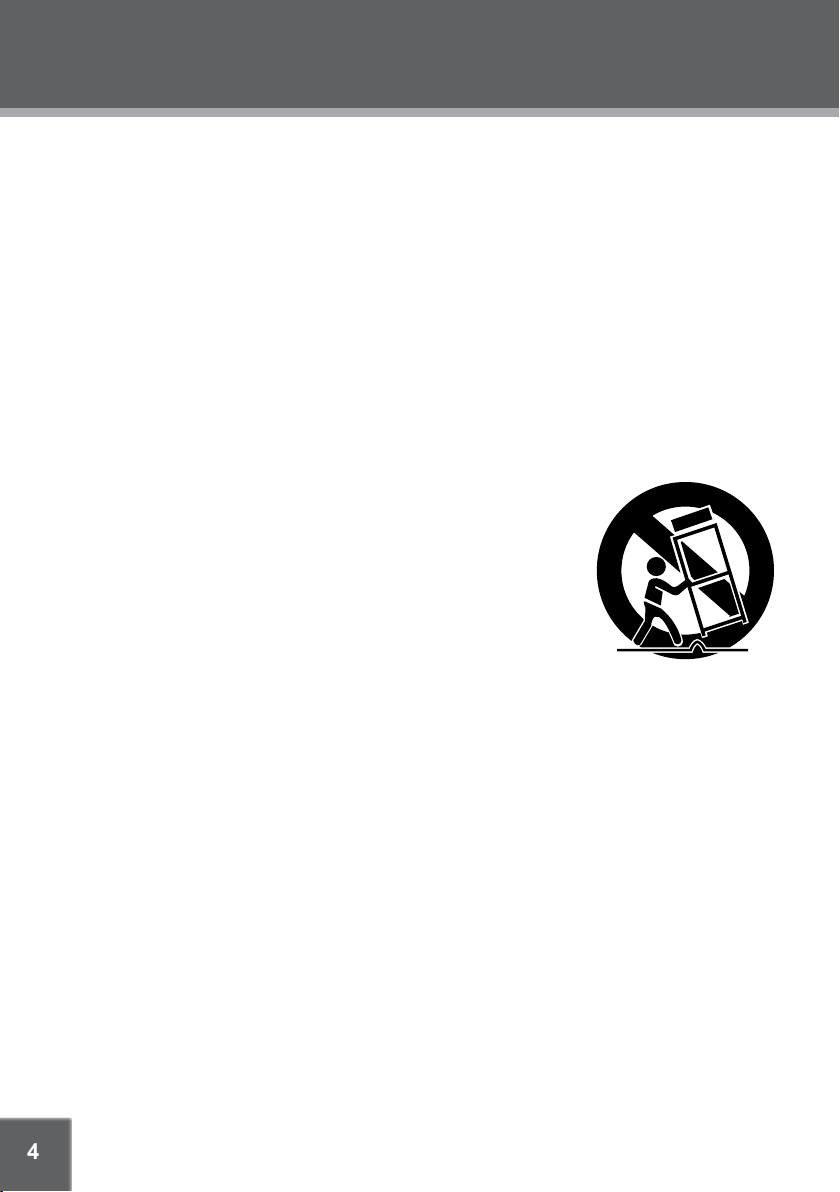
A product and cart combination should be moved with care. Quick 10.
stops, excessive force, and uneven surfaces may cause the product
and cart combination to overturn.
Ventilation: Slots and openings in the cabinet are provided for ventilation 11.
to ensure reliable operation of the product and to protect it from overheating. These openings
should never be blocked by placing the product on a bed, sofa, rug, or other similar surface.
This product should not be placed in a built-in installation such as a bookcase or rack unless
proper ventilation is provided or the manufacturer instructions have been adhered to.
Power Sources: This product should be operated only from the type of power source indi-12.
cated on the rating label. If you are not sure of the type of power supply to your home, consult
your product dealer or local power company. For products intended to operate from battery
power or other sources, refer to the operating instructions.
Power Sources: 13. Do not connect the power plug to a power outlet other than that which is
indicated here and on the label as this may result in the risk of re or electric shock. Do not
handle the power plug with wet hands. Doing so may cause electric shock.
Power Lines: An outside antenna system should not be located in the vicinity of overhead 14.
power lines or other electric light or power circuits, or where it can fall into such power lines
or circuits. When installing an outside antenna system, extreme care should be taken to keep
from touching such power lines or circuits, as contact with them might be fatal.
Battery: Danger of explosion if battery is incorrectly replaced. Replace only with the same or 15.
equivalent type. Battery pack or batteries installed shall not be exposed to excessive heat
such as sunshine, re or the like.
12V Car Power Adaptor: 16. Disconnect this car power adaptor when not in use. Not for use in
24V vehicles.
Using the unit in a Vehicle 17. : On no account should this unit be used by the driver of a moving
Page 5
5
IMPORTANT SAFETY INSTRUCTIONS
motor vehicle, or left unsecured in the vehicle whilst driving. If this unit is being used by a
passenger in your vehicle, be sure that it is secured or held safely, and does not obstruct any
safety device (i.e. airbag, seat belt etc.) that is tted. All passengers should wear seat belts
when using this unit in a moving vehicle. If in doubt, please contact your vehicle manufacturer
for further advice. Using other car power adaptors could damage the unit.
Using 18. Headphones or Earphones: Hearing experts advise against the constant use of personal stereos played at high volume. Constant high volume use can lead to hearing loss.
If you experience ringing in the ears or hearing loss, discontinue use and seek medical
advise.
Grounding or Polarization: This product may be equipped with a polarized alternating-current 19.
line plug that has one blade wider than the other. This plug will only t into the power outlet in
one direction. This is a safety feature. If you are unable to insert the plug fully into the outlet,
try reversing the direction of the plug. If the plug should still fail to t, contact an electrician to
replace the obsolete outlet. Do not defeat the safety purpose of the polarized plug.
Power-Cord Protection: Power supply cords should be routed so that they are not likely to 20.
be walked on or pinched by items placed upon or against them, paying particular attention to
cords at plugs, convenience receptacles, and at the point which they exit from the product.
Protective Attachment Plug: The product may be equipped with an attachment plug with 21.
overload protection. This is a safety feature. See the operating instructions for replacement
or directions to reset the protective device. If replacement of the plug is required, be sure the
service technician has used a replacement plug that has the same overload protection as the
original plug as specied by the manufacturer.
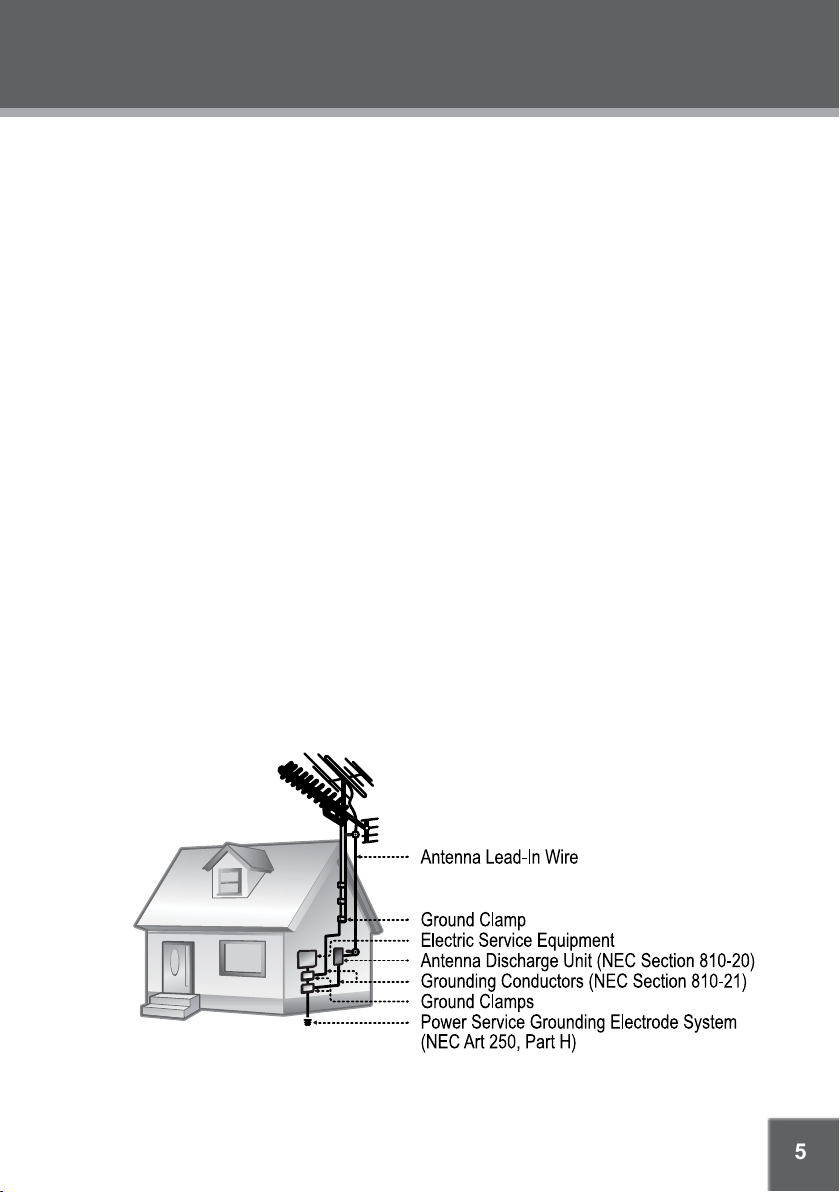
Outdoor Antenna Grounding: If an outside antenna is connected to the product, be sure the 22.
antenna system is grounded so as to provide some protection against voltage surges and
built-up static charges. Article 810 of the National Electrical Code, ANS/NFPA 70 provides
information with regard to proper grounding of the mast and supporting structure, grounding of the lead-in wire to an antenna-discharge unit, size of grounding conductors, location
of antenna-discharge unit, connection to grounding electrodes, and requirements for the
grounding electrode (see gure).
Lightning: For added protection for this product, unplug it from the wall outlet and disconnect 23.
the antenna or cable system during a lightning storm or when it is left unattended and unused
Page 6

6
IMPORTANT SAFETY INSTRUCTIONS
for long periods of time. This will prevent damage to the product due to lightning or power-line
surges.
If at any time in the future you should need to dispose of this product please note24.
that Waste electrical products should not be disposed of with household waste.
Please recycle where facilities exist. Check with your Local Authority or retailer for
recycling advice.(Waste Electrical and Electronic Equipment Directive)
Overloading: Do not overload wall outlets, extension cords, or integral convenience 25.
receptacles as this can result in a risk of re or electric shock.
Object and Liquid Entr y: Never push objects of any kind into this product through openings 26.
as they may touch dangerous voltage points or shout-out parts that could result in a re or
electric shock. Never spill liquid of any kind on the product.
Servicing: Do not attempt to service this product yourself as opening or removing covers may 27.
expose you to dangerous voltage or other hazards. Refer all servicing to qualied service
personnel.
Damage Requiring Service: Unplug this product from the wall outlet and refer servicing to 28.
qualied service personnel under the following conditions: a) when the power-supply or plug
is damaged; b) if liquid has been spilled or if objects have fallen into the product; c) if the
product has been exposed to rain or water; d) if the product does not operate normally by following the operating instructions. Adjust only those controls that are covered by the operating
instructions as improper adjustment of other controls may result in damage and will often
require extensive work by a qualied technician to restore the product to its normal operation;
e) if the product has been dropped or damaged in any way; f) when the product exhibits a
distinct change in performance—this indicates a need for service.
Replacement Parts: When replacement parts are required, be sure that your ser vice techni-29.
cian has used replacement parts specied by the manufacturer or have the same characteristics as the original par t. Unauthorized substitutions may result in re, electric shock, or
other hazards.
Safety Check: Upon completion of any service or repairs to this product, ask the service tech-30.
nician to perform safety checks to ensure that the product is in proper operating condition.
Wall or Ceiling Mounting: The product should be mounted to a wall or ceiling only as recom-31.
mended by the manufacturer.
Page 7

7
TABLE OF CONTENTS
PRECAUTIONS ...............................................................................................................................2
IMPORTANT SAFETY INSTRUCTIONS ........................................................................................4
TABLE OF CONTENTS ...................................................................................................................7
PACKAGE CONTENTS ...................................................................................................................9
ABOUT OPTICAL DISCS ..............................................................................................................10
Disc Requirements.................................................................................................................10
Disc Care and Maintenance ..................................................................................................10
Handling a Disc ..............................................................................................................10
Cleaning a Disc ..............................................................................................................10
LOCATION OF CONTROLS ..........................................................................................................11
Unit View ................................................................................................................................11
Remote Control ......................................................................................................................13
Power Supply .........................................................................................................................14
CONNECTIONS ............................................................................................................................15
Monitor Connection ...............................................................................................................15
Audio & Video Signal Input/Output ........................................................................................16
Battery Pack ...........................................................................................................................17
USB/SD/MMC Card Connection ...........................................................................................18
Phone Connection .................................................................................................................19
BASIC OPERATIONS ....................................................................................................................20
Basic Playback .......................................................................................................................20
Play/Pause/Stop ............................................................................................................20
Previous /Next (Skip) .....................................................................................................20
Forward/Reverse (Search) ............................................................................................20
Slow/Step .......................................................................................................................20
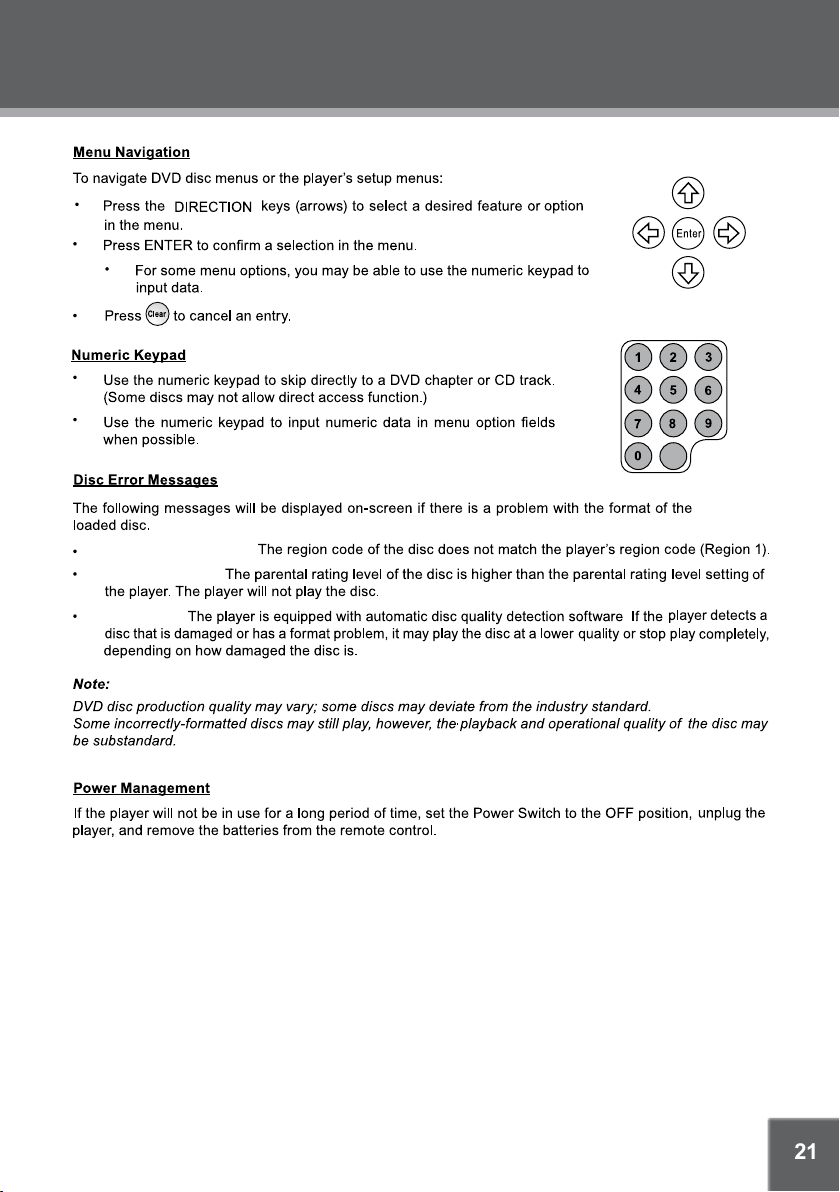
Menu Navigation ....................................................................................................................21
Numeric Keypad ....................................................................................................................21
Disc Error Messages .............................................................................................................21
Power Management ...............................................................................................................21
Page 8

8
TABLE OF CONTENTS
PLAYER FUNCTIONS ...................................................................................................................22
Menu/Title ..............................................................................................................................22
Setup ......................................................................................................................................22
Display ...................................................................................................................................22
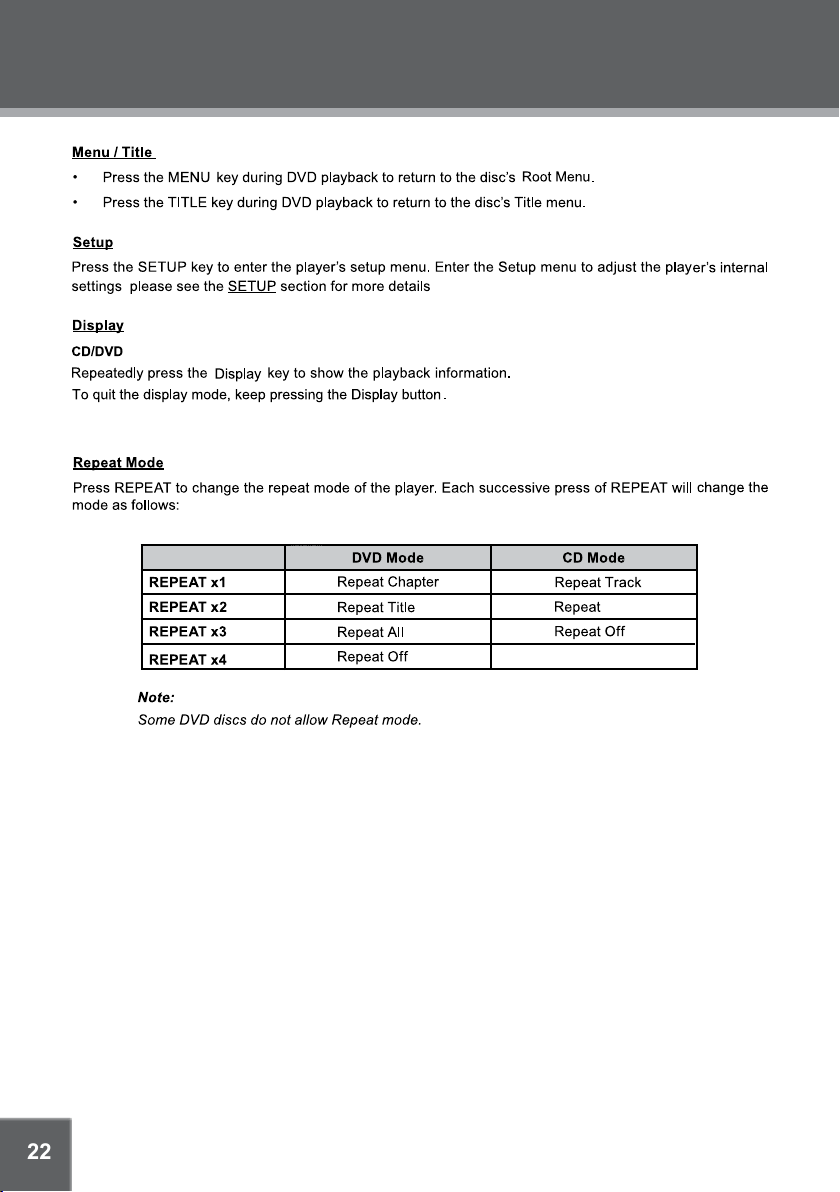
Repeat Mode..........................................................................................................................22
Repeat A-B Mode ..................................................................................................................23
Multi-Angle/Subtitle/Audio .....................................................................................................23
Zoom ......................................................................................................................................23
Clear .......................................................................................................................................23
Search ....................................................................................................................................23
DVD Mode......................................................................................................................23
CD Mode ........................................................................................................................23
LCD Menu ..............................................................................................................................24
Program Function ..................................................................................................................24
SETUP ...........................................................................................................................................26
Language Setup .....................................................................................................................26
Screen Setup .........................................................................................................................26
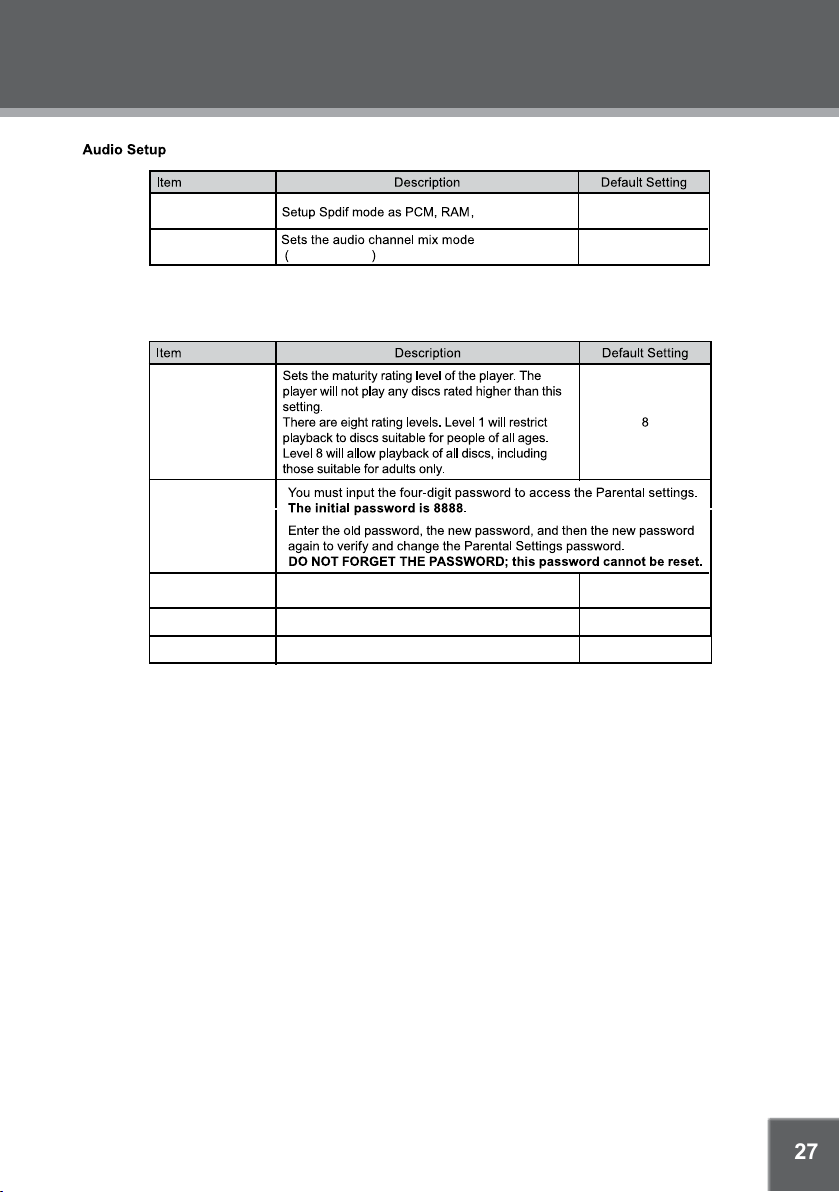
Audio Setup ............................................................................................................................27
Custom Setup ........................................................................................................................27
SPECIFICATIONS .........................................................................................................................28
MOUNTING BAG ..........................................................................................................................29
TROUBLESHOOTING ...................................................................................................................30
Page 9
9
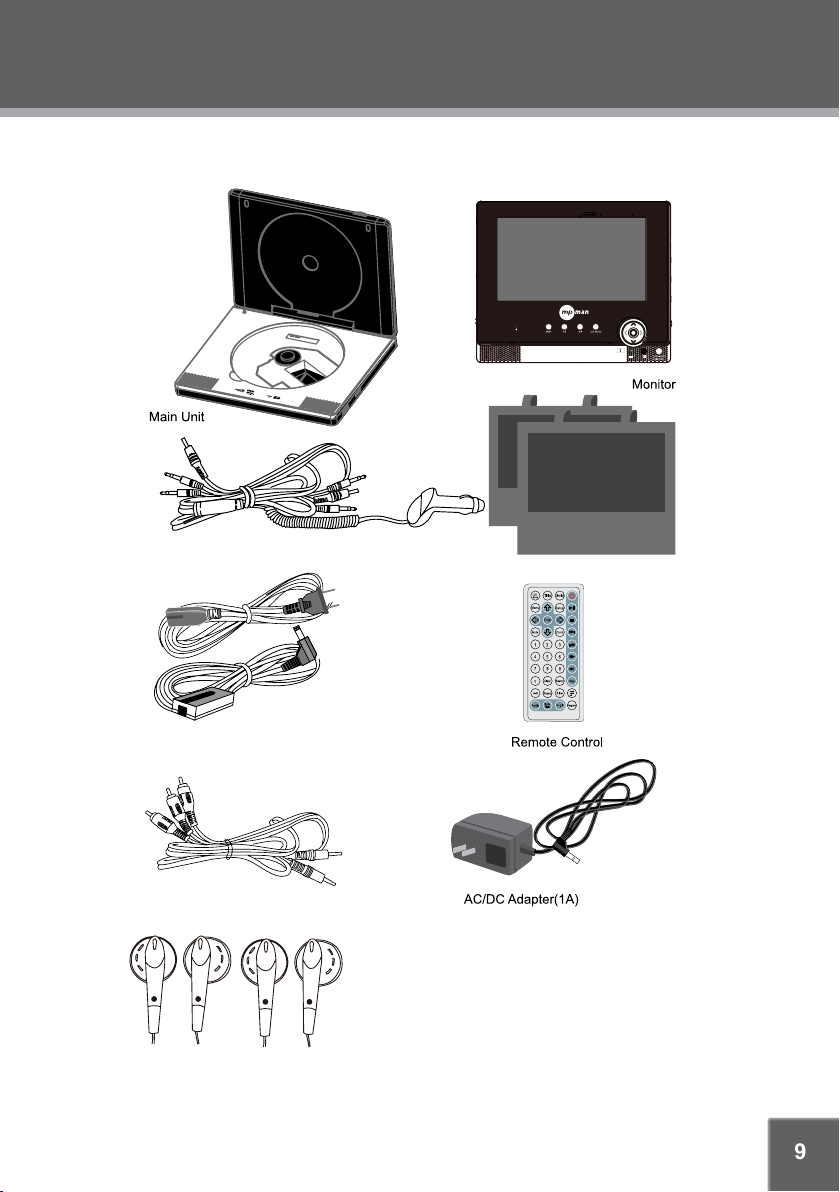
PACKAGE CONTENTS
Please make sure the following items are included in the package. If any item is missing, contact
your dealer.
Car Adaptor
Adaptor & Power Cord
AV Cable
L
R
2 Earphones
Mounting Bags
L
R
Page 10
10
ABOUT OPTICAL DISCS
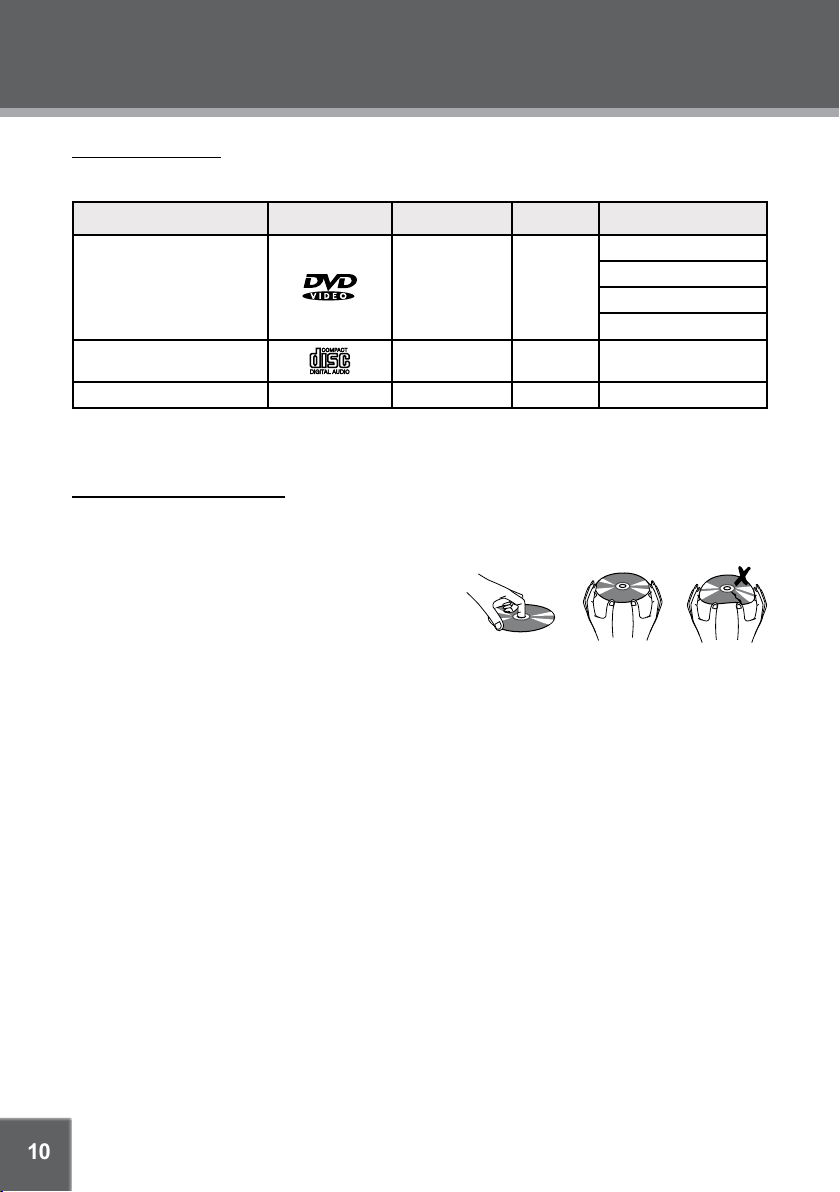
Disc Requirements
This player supports the following discs.
Typ e Disc Mar k Content Type Disc Size Max. Playback Time
133 min (SS-SL)
DVD-Video Discs
Audio + Video
(moving picture)
12 cm
242 min (SS-DL)
266 min (DS-SL)
484 min (DS-DL)
Audio Compact Discs (CDs)
JPEG CDs -- Still Picture 12 cm --
This unit can play back CD-R and CD -RW discs that contain JPEG picture les. Discs not listed
above are not supported by this unit (eg, PC CD-ROM, CD-Extra, CD-G, CD-I, etc.)
Disc Care and Maintenance
Optical discs (DVDs, CDs) contain high-density compressed data and need proper handling.
Handling a Disc
Hold a DVD/CD by its edges. Avoid touch-•
ing the recorded side of the disc. To remove
a DVD/CD from its storage case, press down
on the center retention mechanism of the case
and lift the disc out.
Do not subject discs to prolonged exposure to direct sunlight, high humidity, or high tem-•
peratures.
Do not bend or press discs. •
To reduce the risk of scratches, always put discs back in their case after use. Store discs •
vertically in a cabinet.
Do not place stickers or labels on either side of a disc.•
Cleaning a Disc
Use a dry, soft cloth to wipe off any ngerprints and dusts from the playing surface of the disc.
Wipe in a straight line radially from the center to the outside edge of the disc. Small dust particles
and light stains will not affect playback quality.
Never use chemicals such as record sprays, anti-static sprays, benzene, or thinners to clean •
a disc. Doing so will damage the surface of the disc permanently.
Audio 12 cm 74 min
Note: Do not attempt to remove a disc until it completely stopped.
Page 11
11
LOCATION OF CONTROLS
5
1
2
3
4
6 7 8 9 10 11 12 13
14
15
16
17
18
19
20
21
22
23
24
25
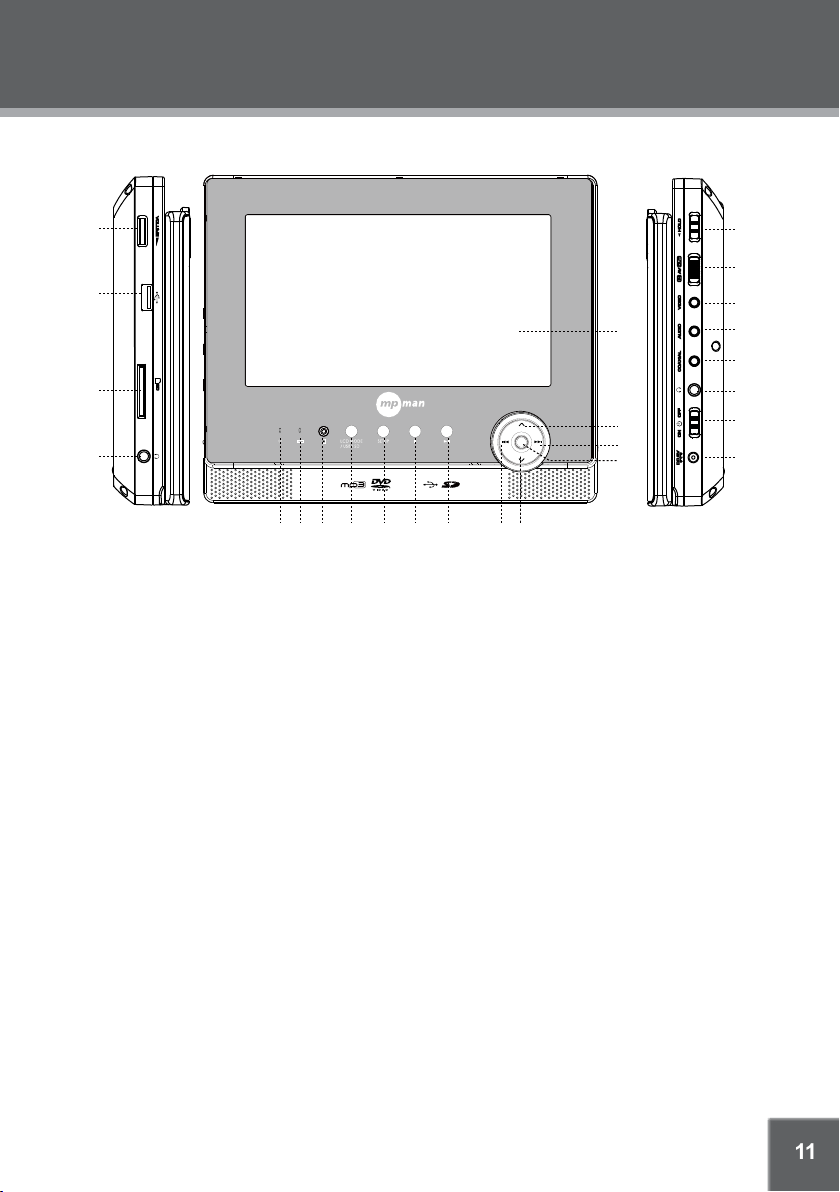
Vo1. lume Control
USB Port2.
SD Slot3.
Phone Jack4.
Power Indicator - lights red in the standby 5.
mode, and turns green after the unit is set On.
Charge Indicator - lights red under charge, and 6.
turns green after it is fully charged.
Remote Sensor - Sense the remote signal.7.
LCD MODE8.
Press this button briefly to access the LCD
menu.
Press and hold LCD MODE to access the
source menu.
SETUP9.
Press SETUP to display the system setup
menu.
0.
STOP1
Press STOP to stop playback.
Play/Pause11.
Press Play/Pause to start/hold playback.
PREV/F.BWD12.
Briefly press this button to skip backward
through a disc, press and hold this button to
search fast backward through a disc.
Down Direction 13.
Use this button to move the cursor down in the
menu.
TFT Screen14.
Up Direction 15.
Use this button to move the cursor up in
the menu.
NEXT/F.FWD16.
Briefly press this button to skip forwa
rd
through a disc, press and hold this button
to search fast forward through a disc.
Enter17.
Press this button to confirm an option.
Hold Switch18.
Set the switch to On to pretect the unit
against any unexpected operations.
AV Switch19.
Switch to AV IN/AV OUT when input/output
AV signal.
Video20.
Input/output video signals.
Audio 21.
Input/output audio signals.
Coaxial22.
Output the audio signals.
Phone23.
Connect to ear/head phones
Power Switch 24.
Switch the player on/of f.
Power Jack 25.
Connect to the power outlet.
Page 12
12
LOCATION OF CONTROLS
1
7
8
9
10
11
2
3
4
5
6
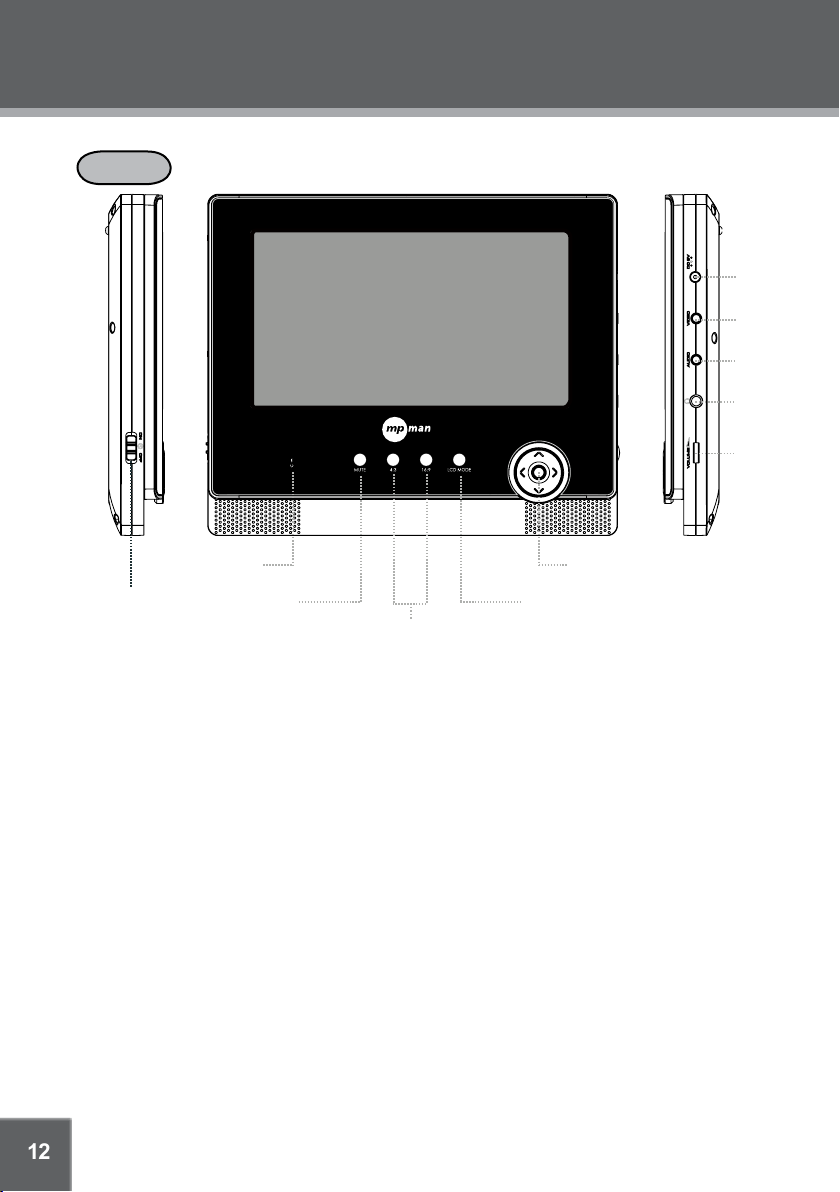
Monitor
Power Switch1.
Switch on/off the unit.
DC 9V In Jack2.
Connect to the supplied Adaptor or the DC Car Cord for power supply.
Vi3. deo Jack
Input the video signal.
Audio Jack4.
Input the audio signal.
Headphone Jack5.
Before headphone connection, make sure the unit volume is set at a low level.
Volume Control6.
Adjust the volume .
Power On Indicator7.
Mute Button8.
Turn off / restore the audio output.
Screen Ratio Button9.
Set the screen aspect ratio as 4:3 or 16:9.
LCD Mode But ton10.
Display the LCD menu.
Direction and Enter button11.
Select and confirm menu options.
Page 13
13
Remote Control
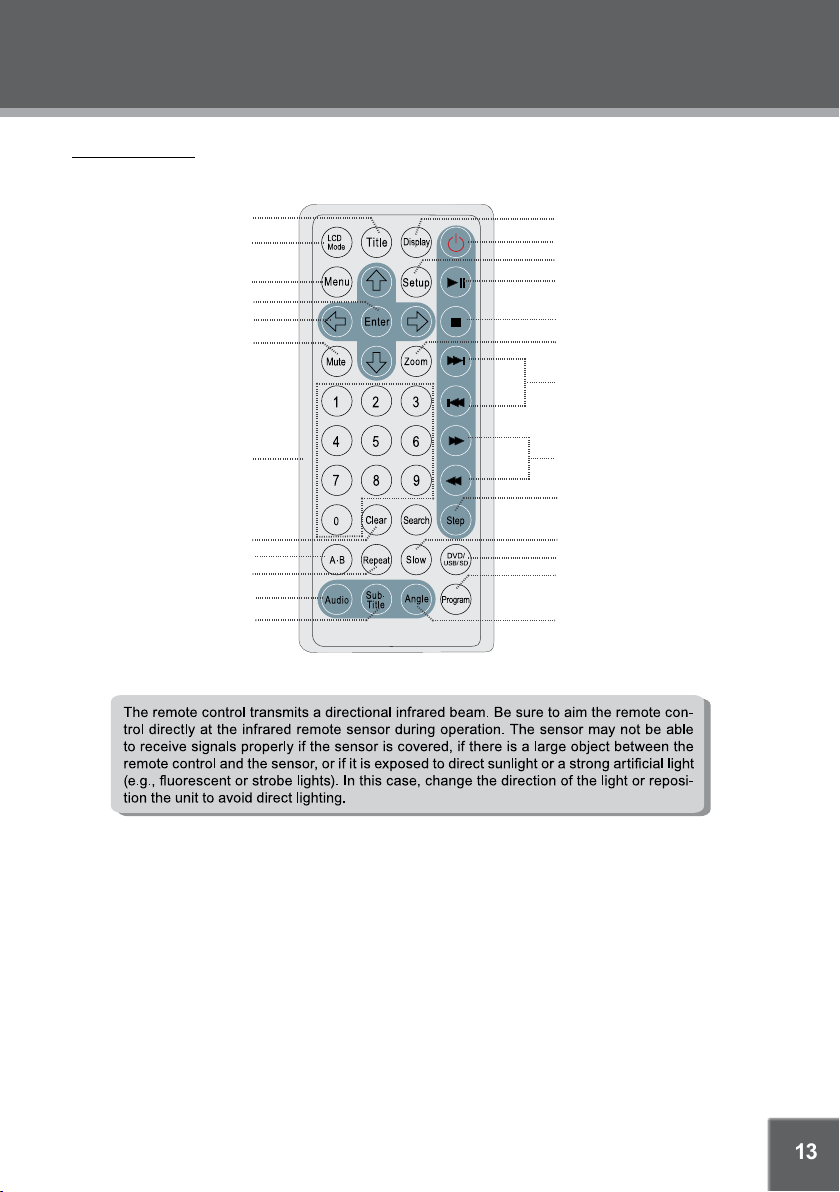
REMOTE CONTROL
Title
LCD Mode
Menu
Enter
Direction buttons
Mute
Numeric buttons
Clear
Repeat A-B
Repeat
Audio
Subtitle
Dispaly
Power
Setup
Play/Pause
Stop
Zoom
Prev./ Nex/Skip
Fast Forward/Reverse
Step
Slow
DVD/USB/SD
Program
Angle
Page 14
14
REMOTE CONTROL
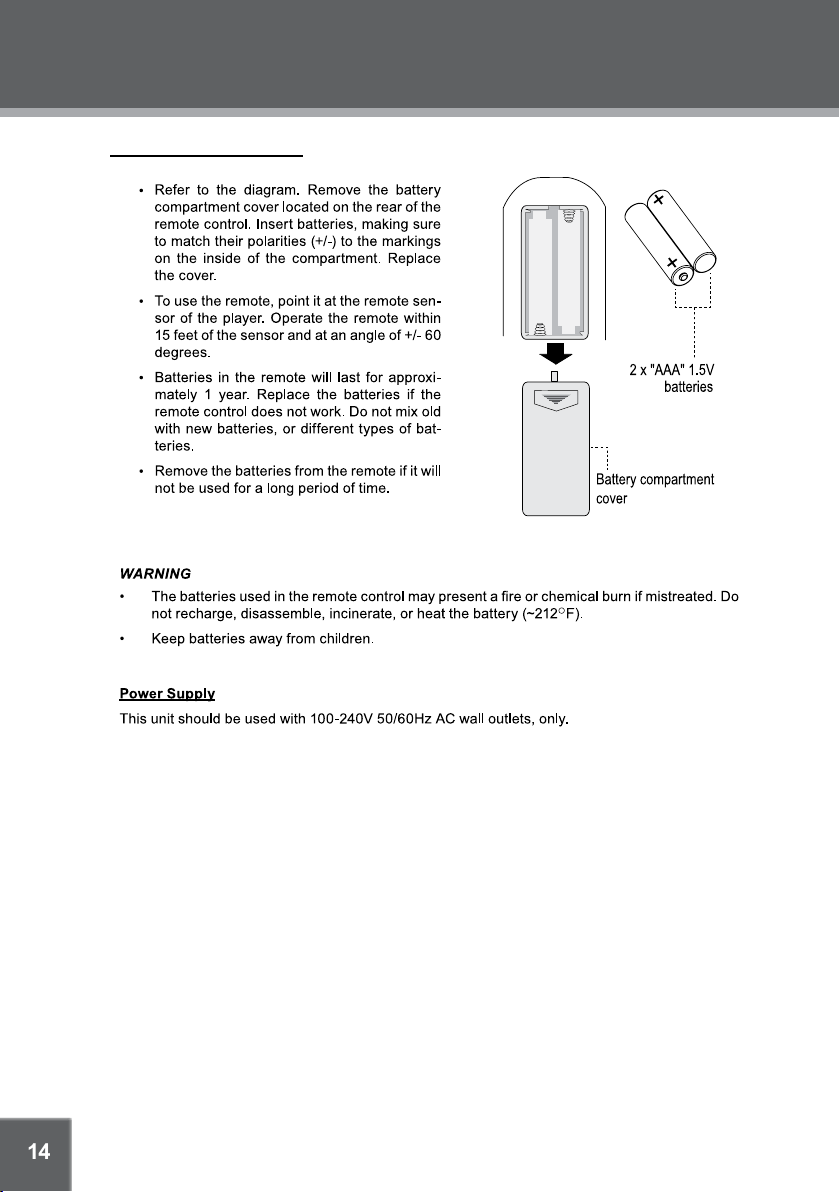
Remote Battery Installation
The main unit works on either the AC/DC adaptor or the built-in battery, when it is connected with an
adaptor, it will not consume the battery power.
aa
Caution:
Do not connect the power plug to a power outlet other than that indicated here as such attempt •
might result in the risk of re or electric shock.
Do not handle the power plug with wet hands. Doing so may cause electric shock.•
Always use AC adaptors of the type specied here. Failure to do so may cause re or damages •
to the player.
Page 15
15
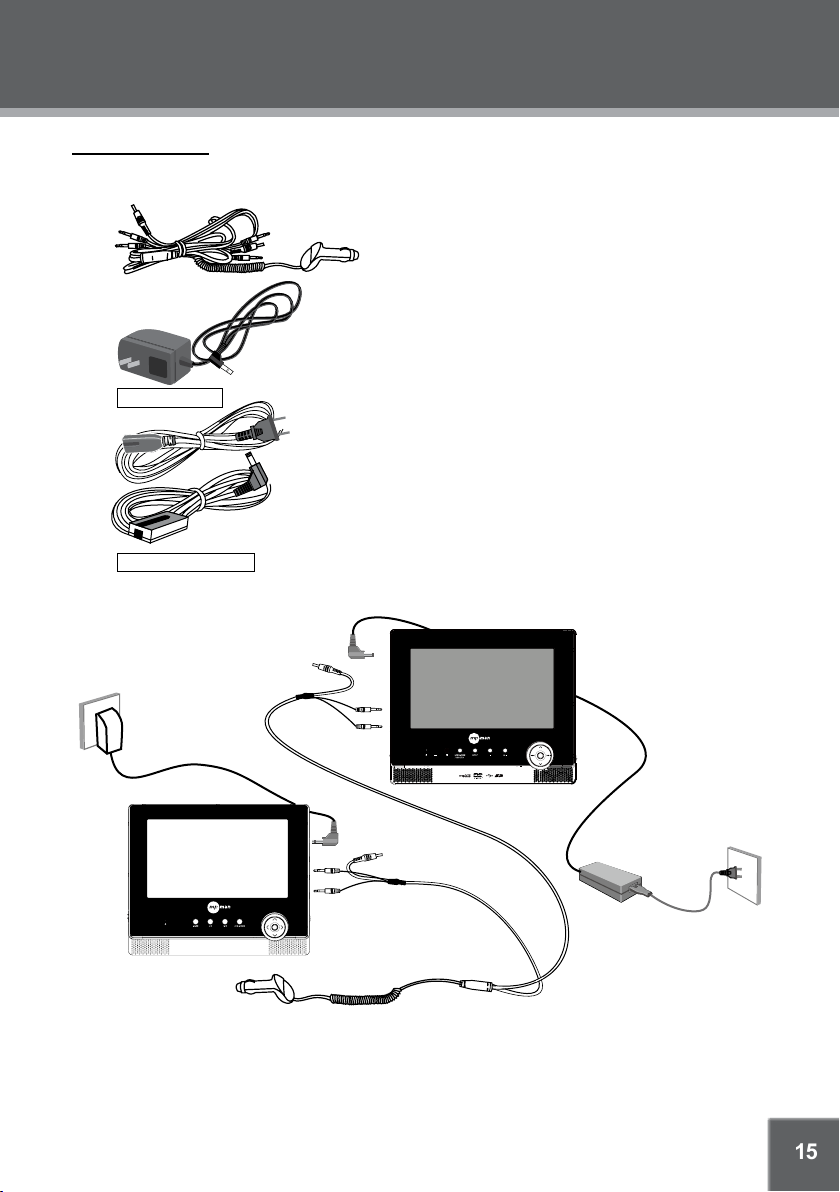
Monitor Connection
Wall Outlet
100-240V,50/60Hz
Left unused
Wall Outlet
100-240V,50/60Hz
Audio
Audio
Video
Video
- Prepare Cables
Monitor Adaptor
CONNECTIONS
Car adaptor provides the only means for connections
between the main unit and the monitor for both the indoor
use and the in-car use.
Monitor Adaptor
100-240V~50/60Hz 0.5A Max AC wall outlets.
DC Out: DC 9V, DC Current: 1A.
This AC/DC adaptor supplies power to the monitor.
Main Unit Adaptor
Main Unit Adaptor
100-240V~50/60Hz 0.6A MAX AC
DC Out: 9V , DC Current: 2.0A
This AC/DC adaptor supplies power to the main unit. Combine the
power cord and the adaptor before use. The main unit has a built-in
batter y pack, when the unit is powered by the adaptor, it will not
consume the built-in batter y.
wall outlets.
- Indoor Use - Make sure all the necessary connections have been properly made before connect the
power.
Match the color of plugs to the colo• r of connectors when use AV/Car cables. Green is for audio
connections, Yellow is for video connections.
The car adaptor serves as the AV cabel to connect the main unit and the monitor when used •
indoor.
Page 16
16
CONNECTIONS
DC9V
To car cigarette lighter socket
Video
Audio
DC9V
Video
Audio
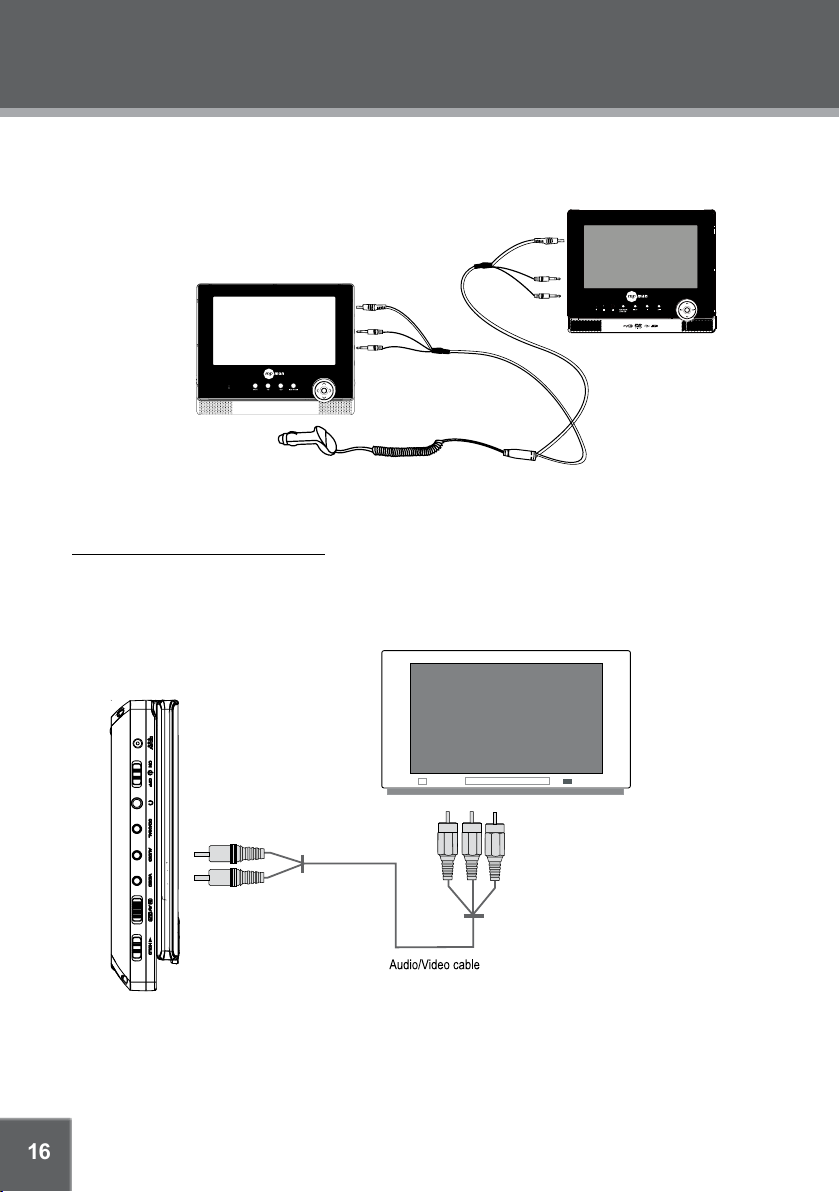
- In-Car Use
Match the color of plugs to the colo• r of connectors when use AV/Car cables. Green is for audio
connection, Yellow is for video connection.
WARNING: Disconnect this car power adaptor when it is not in use. Not for use with the 24V vehicles.
Audio and Video Signal Input/Output
Through the player’s AV function, you may enjoy the programs from outer signal sources as well as transmit
the player’s AV signal to the external receiver.
When input the signal, slide the AV switch to IN, when output signal, slide the AV swith to OUT .
External Device with AV input / output.
Refer to the owner’s manual of the external device as well.1.
Make sure all necessary connections have been properly made before connect the power.2.
If the player will not be use
the remote control.
To Video Jack
To Audio Jack
Match the color of plugs to the colo• r of connectors when use AV/Car cables.
d for a long period of time, disconnect the power and remove the battery from 3.
Page 17
17
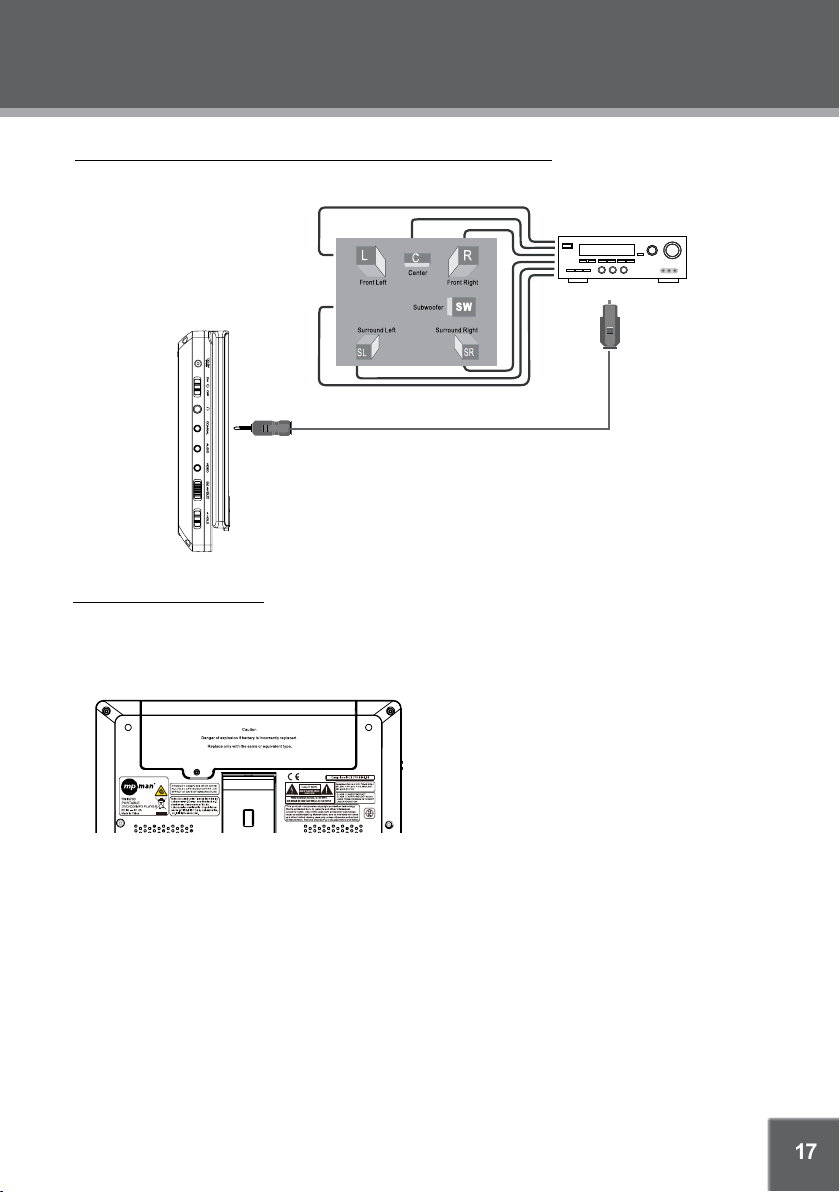
CONNECTIONS
Connecting to an amplifier equipped with a Dolby Pro Logic Surround
Amplifier equipped with a
DolbyPro Logic Surround
To Coaxial Input
To Coaxial Out
See the user’s manual of the external device.•
Rechargeable Battery Pack
For new or exhausted rechargeable batter y pack, we recommend it be recharged for 4 hours.•
To charge the battery, just connect the AC adaptor. •
If the battery does not work to your expectation, please consult the MPMAN service center.Do not attempt to •
replace or repair the battery by yourself unless you are a qualified service personnel.
(2000mAh.7.4V Liion Rechargeable Battery Pack)
The battery can be recharged about 300 times without obvious performance drop. •
Note:
Use the special charger. •
Never dispose of in fire or heat up. •
Do not use in high temperature or near heat sources. •
Do not open the cover. Refer servicing only to qualified service personnel. •
Do not charge up the battery pack while the DVD player is working with the battery pack. •
Danger of explosion if battery is incorrectly replaced. Replace only
type.
Coaxial cable (not supplied)
with the same or equivalent •
Low Battery Detection
The unit will access to STANDBY mode automatically when the battery is low.•
Page 18

18
CONNECTIONS
USB/SD Card Connection
Insert a USB or card into the corresponding slot.
Press the DVD/USB/SD button on the remote or use the LCD Mode button on the main unit to 1.
display the source option menu, use the up/down direction button to select USB/Card Reader and
press the ENTER button to access.
DVD-ROM Drive
USB
Card Reader
It takes a short while for the systems’s reading data, 2. once the device is recognized by the player,
a working menu would appear on the screen, it usually starts playback automatically or use the
direction buttons to select a le in the menu, press ENTER or PLAY/PAUSE to star t playback.
During photo or video playback, press the MENU button to return to the Main Menu screen ( e.g.
Card Reader Mode).
To exit USB /Card , select DVD-ROM Drive in the source menu and press the ENTER button. Or just 3.
unplug it from the port when it is not in work.
Page 19
19
CONNECTIONS
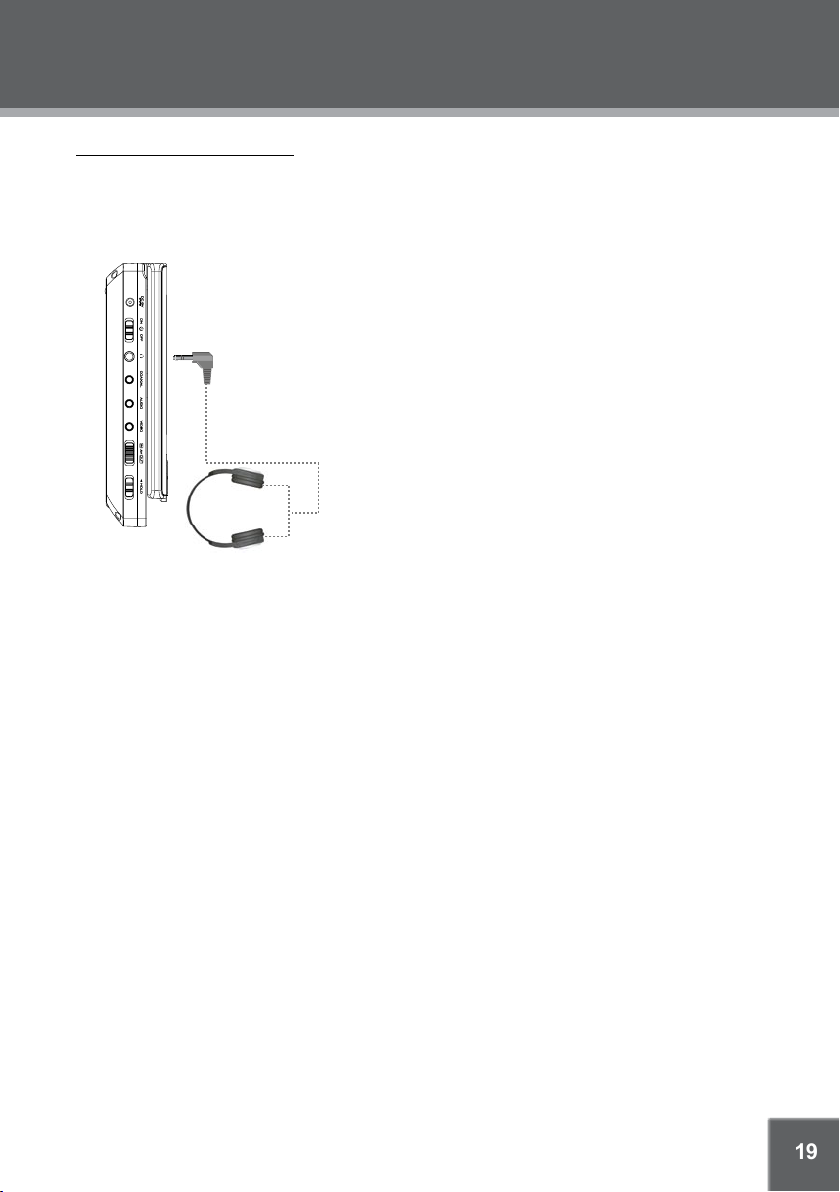
To Headphone jack
Headphone
Using Headphones / Earphones
Maximum output voltage ≤ 150mV
Be sure that your unit is set at a low volume level before connecting the headphone.
Increase the volume gradually for your comfortable listening.
CAUTION:
Hearing experts advise against the constant use of personal stereos played at high volume. Constant high
volume use can lead to hearing loss. If you experience ringing in the ears or hearing loss, discontinue use
and seek medical advise.
Page 20
20
BASIC OPERATIONS
Lift up the LCD lid and inser a disc with the label side facing up, close the door by hand.
“Invalid Disc”.
Slow/Step
Page 21
21
Wrong Regional Disc
Wrong Password
Wrong Disc
BASIC OPERATIONS
Clear
Page 22
22
PLAYER FUNCTIONS
,
All
Page 23

23
In JPEG Mode
PLAYER FUNCTIONS
100%
Clear
Search
Curren t Title
In DVD mode, p
5.
by
display the search bar shown below:
02/12 03/06
Total Titl es Curren t Chapte r
_:__:__
numeric
Play/Pause and playback.
exit
Total Chapt ers
Page 24
24
PLAYER FUNCTIONS
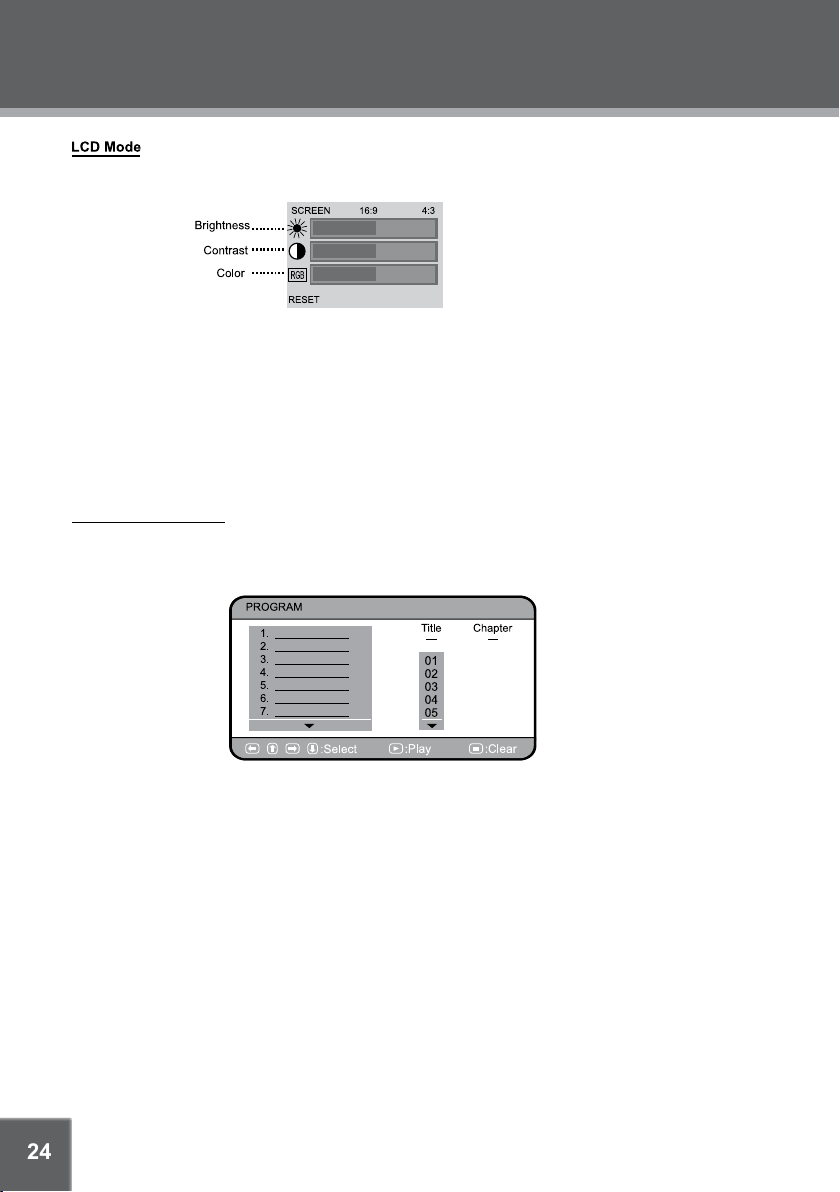
Press the LCD Mode button once to show the picture below:
Press the Up/Down direction button to select the desired item, press the Left/Right direction button to •
adjust.
When the SCREEN is selected, press the Left/Right direction button to change the screen dimension as •
16:9 or 4:3.
When RESET is selected, press the ENTER button to revert the settings to the factory default.•
PROGRAM FUNCTION
DVD Progr am Mode
Load a DVD and press the PROGRAM button.1.
Press the DIRECTION buttons to select the Title and press the ENTER button to conrm.2.
Press the 3. DIRECTION buttons to select the desired chapter and press the ENTER button to conr m.
The programmed selection will be listed in the left column.4.
Repeat steps 1-3 until you have nished programming your selections or when you have programmed 5.
the maximum 20 tracks.
Press the CLEAR /STOP button to delete. 6.
Press the Play/Pause button to start playback. 7. Press PROGRAM to cancel.
Page 25
25
PLAYER FUNCTIONS
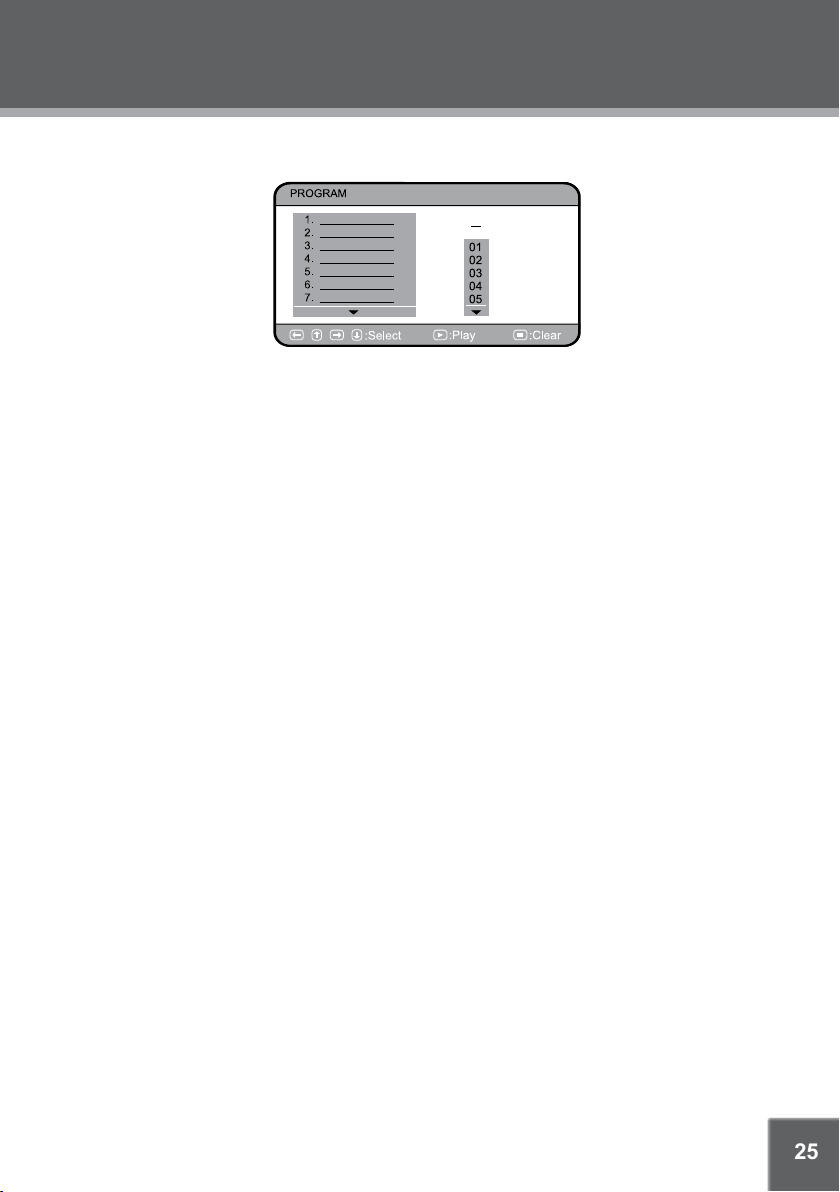
CD Program Mode
Tra ck
Load a CD and press the PROGRAM button.1.
Press the DIRECTION buttons to select the Track and press the ENTER but ton to conrm.2.
The programmed track will be listed in the left column.3.
Repeat steps 1-2 until you have nished programming your selections or when you have programmed 4.
the maximum 20 tracks.
Press the CLEAR /STOP button to delete. 5.
Press the Play/Pause button to start playback. 6. Press the PROGRAM button to cancel.
Page 26
26
SETUP
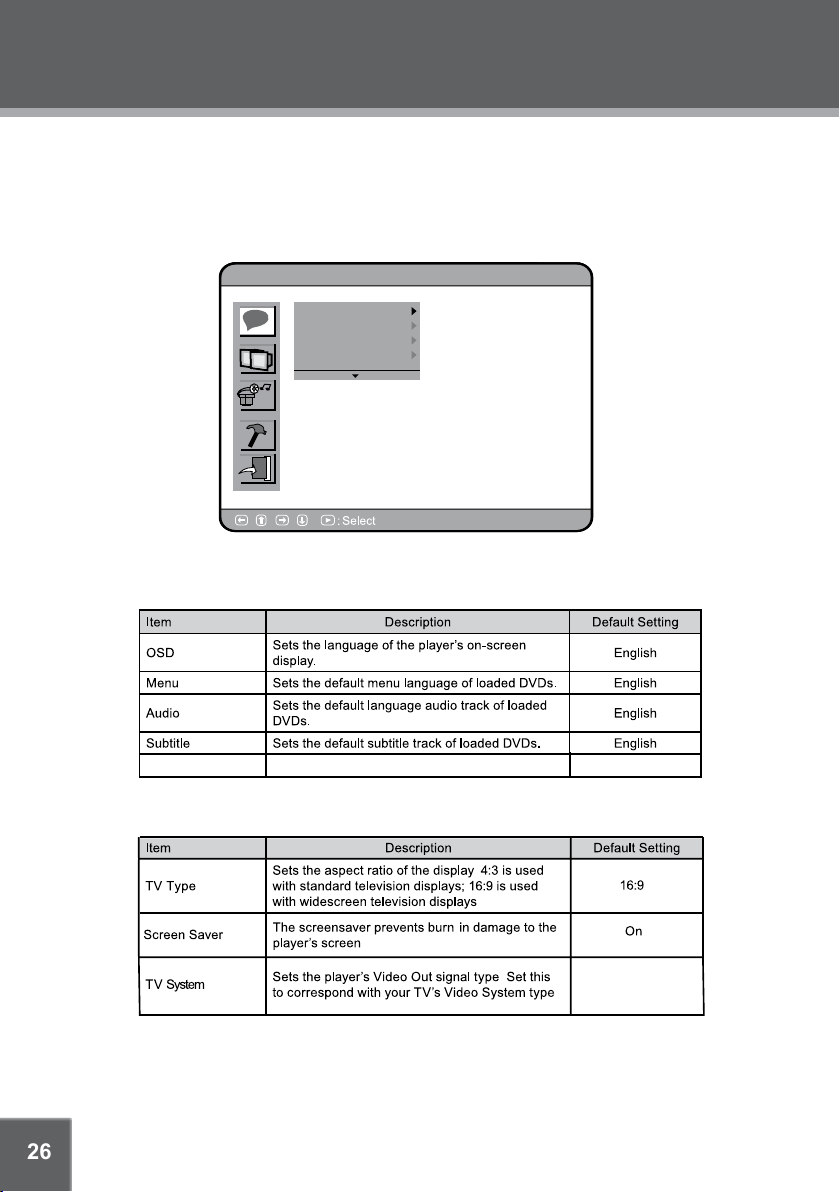
Various features of the player can be adjusted in the SETUP menu
1. Press the SETUP button to show the setup menu.
2. Press the direction buttons to select the desired item.
3. Press ENTER to confirm.
Custom Setup
B
A
C
A
Language Setup
OSD
B
C
Menu
Audio
Subtitle
Encoding Sets the Encoding Mode
Screen Setup
Western European
PAL
Page 27
27
SETUP
SETUP
Digital Out
Downmix
Custom Setup
Parental Control
Password
Style
Angle Mark
Default
Off
Lo/Ro,Lt/Rt
Sets the style of the menus of the player.
Sets the Angle Mark on/off
Sets all settings to factory default state
SPDIF/R AW
Lo/Ro
Style1
ON
Read
Page 28
28
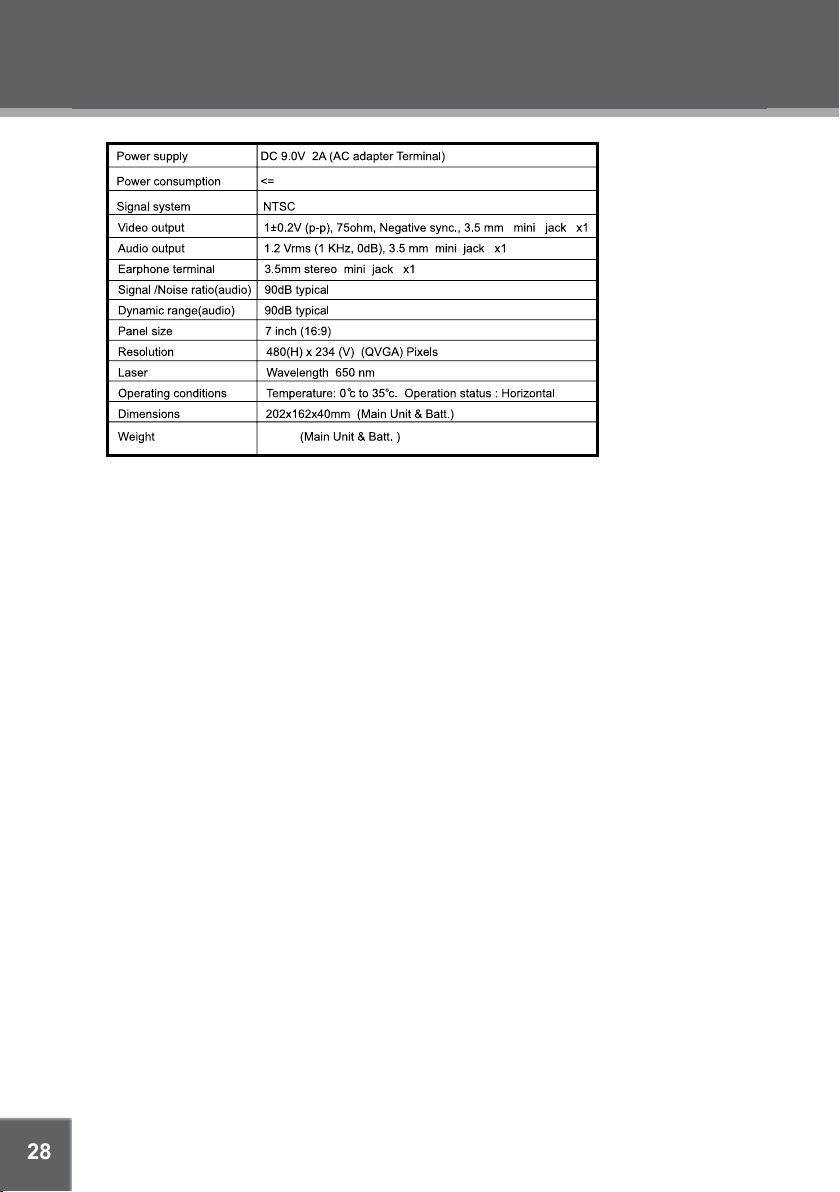
SPECIFICATIONS
SPECIFICATIONS
15W
/ PAL
868g
Specifications and manual are subject to change without prior notice.
Page 29
29
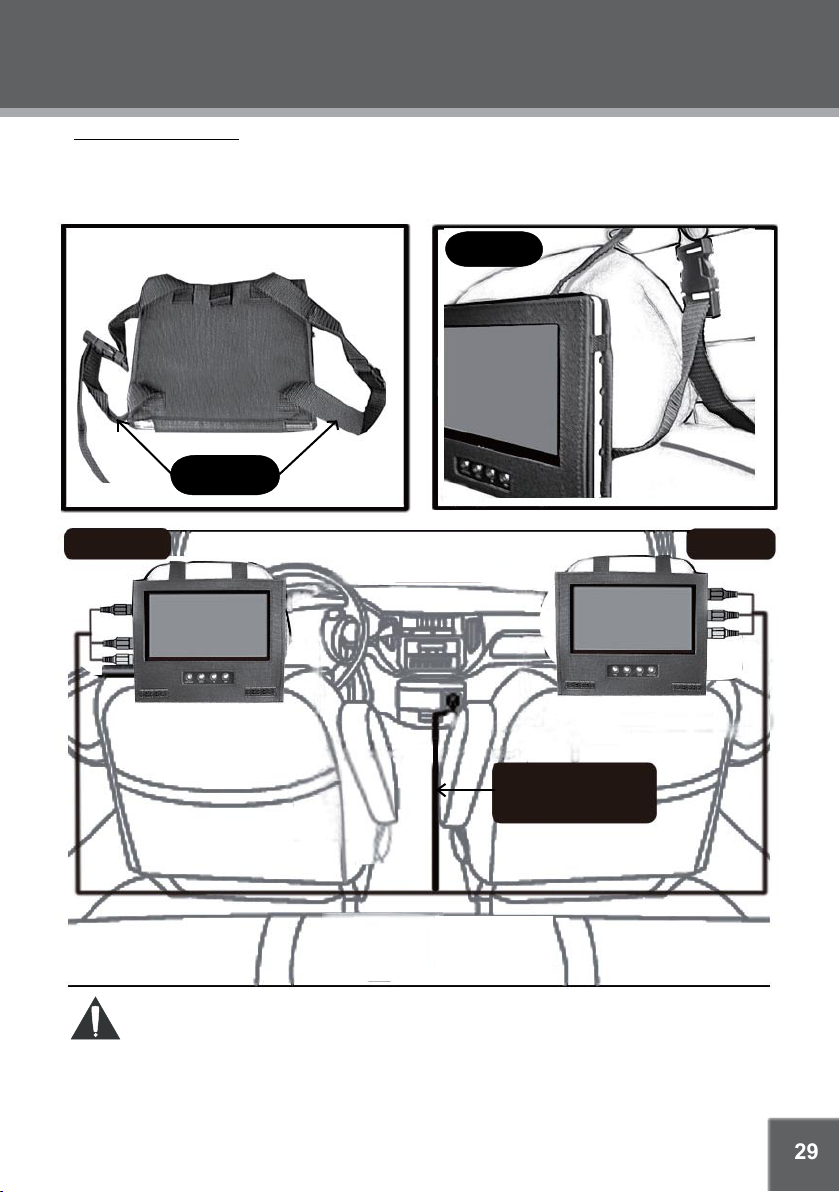
Using the Mounting Bag
The mounting bag is to be used to to hold the player in a viewing position when drive a vehicle.•
The bag has lock straps that could wrap around the headrest tightly with the player securely rest inside.•
Mounting
Straps
Mounting Bag
Mounting
Main Unit
SAFET Y WARNI NG!
Mounting
Straps
12V Car Power Ad aptor
With AV Cable
On no account should this unit be used by the driver of a moving motor vehicle, or left unsecured •
in the vehicle whilst driving.
If this unit is being used by a passenger in your vehicle, be sure that it is secured or held safely, •
and does not obstruct any safety device (i.e. airbag, seat belt etc.) that is t ted.
All passengers should wear seat belts when using this unit in a moving vehicle.•
If in doubt, please contact your vehicle manufacturer for further advice.•
Using other car power adaptors could damage the unit.•
Monitor
Page 30

30
TROUBLESHOOTING
Main Unit Troubleshooting
There is no power to the device.
Ensure that the Power Switch on the main unit is physically set to the ON position.•
Ensure that the AC adapter cord is securely connected to the player and the proper wall outlet.•
The device will not play the disc.
Ensure that a supported disc is loaded in the player label-side up.•
Ensure that the disc’s rating level does not exceed the player’s parental rating level.•
Ensure that the disc is not damaged or too dirty. •
Clean the disc or try another d
leave the player on for 1-2 hours and then try again.
There is no picture.
Ensure that the T V set has been powered on and is set to the correct AV mode. •
Ensure that the connections between the player and the TV are secure and correct.•
Check if the connection cables are damaged.•
The picture is noisy or distort ed.
The disc may be damaged or dirty. Clean the disc or try another one.•
Reset your TV’s color system.•
re that the player is connected directly to the TV (and not through a VCR, cable box, satellite re -•
Ensu
ceiver, etc.)
isc.Moisture may have condensed inside the player. Remove the disc and •
The picture is not full-screen.
Change the aspect ratio setting of your player from the Setup menu.•
Select a different aspect ratio option from the DVD disc menu.•
There is no sound or distorted sound.
Ensure that the TV and amplifier have been turned on and properly set up.•
Page 31

31
TROUBLESHOOTING
Ensure that the TV and amplifier connections are secure and correct.•
Try a different Audio track of the DVD by pressing AUDIO.•
Ensure that the MUTE function of the TV, Amplifier, or Player is not engaged.•
The remote control doesn’t work.
Ensure that the Power Switch has been physically set to the ON position.•
Ensure that there are no obstacles between the remote and the player.•
Point the remote at the remote sensor on the main unit.•
Ensure that the batteries in the remote retain a charge
Try replacing the remote’s batteries.•
The player has malfunctioned.
Unplug the player. After 30 minutes, plug in and power on the player -- the restore function should reset •
the player.
Monitor troubleshooting
There is no power to the device.
Ensure that the Power Switch on the monitor is physically set to the ON position.•
Ensure that the AC adaptor cord is securely connected to the player and the proper wall outlet.•
and have been installed correctly.•
There is n
The picture is noisy or distort ed.
o sound or distor ted sound.
Ensure that the AV cable connections are secure and correct.•
Ensure that the MUTE function of the monitor is not engaged.•
Reset the monitor’s color system.•
Ensure that the AV cable connections are secure and correct.•
For more information please visit our website
www.mpmaneurope.com
Page 32

Page 33

TWIN700
LECTEUR DVD / CD / MP3 PORTABLE
Lecteur DVD portable écran LCD jumeau 7’’ avec port USB et fente pour carte
Mode d’emploi
Veuillez lire attentivement ce livret avant utilisation.
Page 34

2
PRECAUTIONS
ATTENTION
RISQUE DE CHOC ELECTRIQUE.
NE PAS OUVRIR.
MISE EN GARDE : POUR REDUIRE LES RISQUES
D’INCENDIE OU DE CHOCS ELECTRIQUES. NE PAS
ENLEVER LE COUVERCLE (OU L’ARRIERE) DE L’APPAREIL.
FAITES APPEL À UN TECHNICIEN SPECIALISE POUR LE
MISE EN GARDE :
POUR REDUIRE LE RISQUE D’INCENDIE ET DE CHOC ELECTRIQUE, NE PAS EXPOSER
CET APPAREIL A LA PLUIE OU A L’HUMIDITE. Haut voltage dangereux à l’intérieur du boîtier. Ne pas ouvrir le
boîtier. Manipuler les cordons de ce produit vous expose au plomb, un produit chimique connu dans l’Etat de
Californie pour être la cause de cancer, d’anomalies congénitales et d’autres problèmes de fertilité. Lavez-vous
les mains après avoir manipuler les cordons.
Ce lecteur de DVD utilise un système laser. Pour éviter une exposition directe au rayon laser, ne
ATTENTION:
pas essayer d’ouvrir le boîtier ou de forcer le système d’emboîtage de sécurité. Si vous ouvrez et que le système
d’ouverture et de verrouillage est forcé, des radiations laser visibles sont présentes.
L’utilisation des commandes ou les réglages ou les procédures autres que ceux mentionnés ici peuvent entraîner
une exposition dangereuse aux radiations. NE PAS FIXER LE RAYON.
Note : Ce produit comporte une technologie protégée par copyright qui est protégée par un brevet américain et
autres droits intellectuels. L’utilisation de cette technologie sous copyright doit être approuvée par Macrovision, et
est seulement destinée à un visionnage privé et autre visionnage restreint sauf autorisation de Macrovision. Il est
interdit de changer la mécanique ou de la démonter.
Réglementation FCC:
Cet appareil se conforme au paragraphe 15 de la règlementation FCC. Le fonctionnement est sujet aux deux
conditions suivantes :
1. Cet appareil ne peut causer d’interférences gênantes, et
2. Cet appareil doit accepter toute interférence reçue, y compris des interférences pouvant entraîner
un fonctionnement non désiré.
NOTE: Cet équipement a été testé et est en conformité avec les limites des appareils digitaux de Classe B.
Conformément à la règlementation FCC, paragraphe 15. Ces limites ont été établies pour assurer une
protection raisonnable contre des interférences gênantes dans une installation résidentielle.
Cet équipement génère, utilise et peut émettre une énergie de fréquence radio et s’il n’est pas installé et utilisé
conformément aux instructions, peut causer des interférences gênantes pour la communication radio.
Cependant, il n’existe aucune garantie que des interférences surviennent dans une installation particulière. Si
cet appareil cause des interférences gênantes à la réception de la radio et de la télévision, ce qui peut se
vérifier en éteignant l’appareil et en le rallumant, l’utilisateur est encouragé à essayer de remédier aux
interférences en suivant une ou plus des conseils suivants :
• Réorientez et déplacez l’antenne de réception.
• Augmentez la séparation entre l’appareil et le récepteur.
• Branchez l’appareil sur une prise d’un circuit différent de celui où le récepteur est branché.
• Demandez conseil au revendeur ou à un technicien spécialisé radio/TV pour vous aider.
Vous devez utiliser un câble blindé pour vous conformer au sous paragraphe B du paragraphe 15 concernant
les limites de la classe B de la règlementation FCC.
DEPANNAGE
L’éclair avec la pointe en forme de flèche, à l’intérieur d’un triangle est un signal d’avertissement
pour vous signaler un « voltage dangereux » non isolé à l’intérieur du boîtier de ce produit, qui
peut être d’une amplitude suffisante pour représenter un risque de choc électrique dangereux
pour l’utilisateur.
Le point d’exclamation à l’intérieur d’un triangle est un signal d’avertissement vous signalant qu’il
y a d’importantes instructions pour l’utilisation et l’entretien (la réparation) dans le livret
accompagnant ce produit.
A l’usage du client :
Inscrivez ci-dessous le numéro de série qui est situé sous
l’appareil. Gardez ces informations comme références
futures.
Modèle No. TWIN700
No. De série
Page 35

3
PRECAUTIONS
Ne faites aucun changement ou aucune modification sur cet équipement autres que ceux indiqués dans ce
livret. Si vous effectuez des changements ou des modifications, on peut vous demander d’arrêter de faire
fonctionner cet appareil.
Ce lecteur possède une technologie
Fabriqué sous licence de Dolby Laboratories. Les symboles
Dolby et double D sont les marques déposées de Dolby
Laboratories.
Travaux confidentiels non publiés.
1992-1997 Dolby Laboratories. Tous droits réservés
intégrée protégeant les copyrights,
qui empêche la copie d’un disque
DVD sur un tout autre média.
Si un appareil enregistreur est branché
au lecteur, l’image de sortie vidéo sera
distordue pendant l’enregistrement.
Concernant les informations sur le recyclage ou la mise au rebut de ce produit,
veuillez contacter les autorités locales ou l’Alliance des Industries Electroniques :
www.eiae.org.
Page 36

4
IMPORTANTES INSTRUCTIONS DE SECURITE
Veuillez lire ces instructions. Toutes les instructions concernant la sécurité et le fonctionnement doivent
1.
être lues avant de faire fonctionner ce produit.
Gardez ces instructions. Les instructions concernant la sécurité et le fonctionnement doivent être
2.
conservées comme référence ultérieure.
Faites attention à tous les avertissements. Toutes les mises en garde et toutes les instructions de
3.
fonctionnement doivent être suivies.
Suivez les instructions. Toutes les instructions de fonctionnement et d’utilisation doivent être suivies.
4.
Nettoyage : Débranchez ce produit de la prise murale avant de le nettoyer. Ne pas utiliser de nettoyant
5.
liquide ou d’aérosol. Utilisez un chiffon humide pour le nettoyage.
6. Accessoires : N’utilisez que des accessoires recommandés par le fabricant. L’utilisation d’autres
6.
accessoires peut présenter un risque.
Eau et humidité : Ne pas utiliser ce produit près de l’eau, comme par exemple une baignoire, un bac de
7.
lavage, un évier ou un bac de lessive, dans un endroit mouillé ou à proximité d’une piscine ou similaire.
Chaleur : L’appareil doit être placé loin de sources de chaleur comme les radiateurs, les diffuseurs de
8.
chaleur, les fours ou tout autre produit (y compris les amplificateurs) qui dégage de la chaleur.
Accessoires : Ne pas mettre ce produit sur un chariot instable, un plateau,
9.
un trépied, une console de support ou une table. N’utilisez cet appareil
qu’avec un chariot, un plateau, un trépied ou une table recommandés
par le fabricant ou vendu avec le produit. Tout montage de ce produit
doit suivre les instructions du fabricant et n’utilisez que des
accessoires de montage recommandés par le fabricant.
10.
Le produit sur un chariot doit être déplacé avec précautions.
Des arrêts brusques, une pression excessive et un sol accidenté
peuvent entraîner la chute du produit et du chariot.
Ventilation : Les fentes et les ouvertures dans le boîtier sont destinées à la ventilation afin d’assurer un
11.
fonctionnement sûr de l’appareil et pour l’empêcher de chauffer. Ces ouvertures ne doivent pas être
obstruées ou bouchées. Les ouvertures ne doivent jamais être obstruées en plaçant l’appareil sur un lit,
un sofa, un tapis ou d’autres surfaces similaires. Ce produit ne doit pas être installé dans une installation
intégrée comme une bibliothèque ou des étagères, à moins qu’une ventilation adéquate ne soit possible
ou si les instructions du fabricant du produit vidéo aient été suivies.
12.
Alimentation : Ce produit ne doit fonctionner qu’avec le type d’alimentation indiqué sur l’étiquette
mentionnant les caractéristiques nominales. Si vous n’êtes pas sûr du type d’alimentation dans la
maison, contactez le revendeur ou la compagnie d’électricité locale. Pour les produits fonctionnant à
piles ou grâce à d’autres sources, veuillez vous reporter aux instructions de fonctionnement.
Alimentation : Ne pas brancher la prise de courant sur une prise électrique autre que celle indiquée ici ou
13.
sur l’étiquette car cela pourrait entraîner un risque d’incendie ou de choc électrique. Ne pas manipuler la
prise de courant avec les mains mouillées. Cela risque de causer un choc électrique.
Lignes de courant : Le système d’antenne ne doit pas être installé à proximité des lignes électriques
14.
aériennes ou autre éclairage électrique ou circuits électriques, ou dans un endort où il pourrait tomber
sur ces lignes électriques ou ces circuits. Quand vous installez un système d’antenne externe, vous
devez faire très attention de ne pas toucher ces lignes électriques ou ces circuits, car le contact pourrait
être fatal.
Pile : Il existe un risque d’explosion si la pile est mal changée. Changez uniquement avec des piles
15.
identiques ou équivalentes. Le jeu de piles ou les piles installées ne doivent pas être exposées à une
température excessive comme à la chaleur du soleil, un feu ou autre.
Page 37

5
IMPORTANTES INSTRUCTIONS DE SECURITE
Adaptateur de voiture 12V : Débranchez l’adaptateur de voiture quand vous ne l’utilisez pas. Ne doit
16.
pas être utilisé dans des véhicules 24V.
Utiliser l’appareil à bord d’un véhicule : En aucun cas cet appareil doit être utilisé par le chauffeur
17.
d’un véhicule en mouvement, ou laissé sans sécurité dans le véhicule pendant la conduite. Si cet
appareil est utilisé par un passager de votre véhicule, assure-vous qu’il est bien fixé et maintenu en
toute sécurité, et qu’il ne gène aucun accessoire de sécurité (comme un airbag ou une ceinture de
sécurité par exemple) qui est installé. Tous les passagers doivent mettre leur ceinture de sécurité
quand ils utilisent cet appareil à bord d’un véhicule en mouvement. Si vous avez un doute, veuillez
contacter le fabricant de votre véhicule pour plus de conseils. L’utilisation d’autre adaptateur de
voiture pourrait endommager l’appareil.
Utiliser un casque ou des écouteurs : Les spécialistes de l’audition mettent en garde contre une
18.
utilisation constante d’écouteurs stéréo à fort volume. Une utilisation constante à fort volume peut
entraîner une perte de l’audition. Si vous avez des sifflements dans les oreilles ou si vous entendez
moins bien, arrêtez l’utilisation et demandez conseil à un médecin.
Prise de terre et polarisation : Ce produit est équipé d’une ligne de courant alternative polarisée, qui a
19.
une fiche plus large que l’autre. Cette prise ne rentre dans la prise d’alimentation que dans un sens.
Ceci est une mesure de sécurité. Si vous n’arrivez pas à enfoncer la prise complètement dans
l’alimentation, essayez de changer le sens de la prise. Si la prise ne rentre toujours pas, contactez un
électricien pour changer votre prise de sortie obsolète. Ne pas démonter les sécurités de la prise
polarisée.
Protection du cordon d’alimentation : Les cordons d’alimentation doivent être installés de manière à
20.
éviter qu’ils ne soient piétinés ou pincés par des objets placés au dessus ou contre, en faisant tout
particulièrement attention aux prises, aux réceptacles et à l’endroit ou les fils sortent de l’appareil.
Prise accessoire de protection : Ce produit est équipé d’une prise accessoire qui possède une
21.
protection contre la surtension. C’est une mesure de sécurité. Reportez-vous au livret pour le
changement ou le réglage de cet appareil de protection. Si vous devez changer la prise, vérifiez que
le technicien de maintenance utilise une prise de rechange conseillée par le fabricant, et qui a la
même protection de surtension que la prise originale.
Fil d’entrée de l’antenne
Collier de mise à la terre
Equipement de service électrique
Unité de débit de l’antenne (NEC Section 810-20)
Conducteurs de terre (NEC Section 810-21)
Colliers de mise à la terre
Système de conducteur de terre du service
d’alimentation électrique
(NEC Art 250, Part H)
22.
Antenne extérieure : Si une antenne extérieure est branché sur l’appareil, assurez-vous que
l’antenne a une prise à la terre afin d’assurer une protection contre la surtension et
l’électricité statique de l’installation.
Page 38

6
IMPORTANT SAFETY INSTRUCTIONS
L’article 810 du Code National pour l’Electricité, l’ANS/NFPA no 70 fournit des informations sur
le respect d’une bonne prise de terre des pylônes et des structures de maintien, sur le fil de
terre du fil d’antenne à l’appareil de décharge, sur la taille des conducteurs à la terre, sur
l’emplacement de l’appareil antenne décharge, sur le branchement aux électrodes de terre, et
ce qui est nécessaire pour les électrodes de terre. (Voir schéma)
Foudre : Pour une meilleure protection de cet appareil, débranchez-le de la prise mural et
23.
débranchez l’antenne ou le système de câble pendant un orage ou si vous ne l’utilisez pas
pendant un certain temps. Cela permet d’éviter d’endommager votre appareil à cause de la
foudre ou de changements de tension.
Si vous devez vous débarrassez de ce produit, veuillez noter que les déchets de produits
24.
électriques ne doivent pas être mis avec les ordures ménagères. Veuillez recycler quand ce
service est disponible. Vérifiez auprès des autorités locales ou du revendeur pour des conseils
de recyclage. (Directive sur les déchets des équipements électriques et électroniques).
Surcharge : Ne pas surcharger les prises de sorties murales, les rallonges ou les installations
25.
incorporées car cela pourrait représenter un risque d’incendie ou de choc électrique.
Intrusion d’objet ou de liquide : Ne jamais introduire d’objet quel qu’il soit à l’intérieur de ce
26.
produit par les ouvertures car il pourrait toucher un point de voltage dangereux ou des pièces,
ce qui pourrait entraîner un incendie ou un choc électrique. Ne jamais verser de liquide quel
qu’il soit sur le produit.
Révision : N’essayez pas de réviser ce produit par vous-même, car ouvrir et enlever le
27.
couvercle vous exposerait à un voltage dangereux ou à d’autres risques. Faites effectuer toutes
les révisions par un technicien qualifié.
Les conditions nécessitant une réparation : Débranchez l’appareil de la prise de sortie murale,
28.
et faites faire les réparations par un technicien qualifié selon les conditions suivantes :
a) Si le fil d’alimentation ou la prise sont endommagés.
b) Si un liquide a été renversé, ou si un objet est tombé à l’intérieur du produit.
c) Si l’appareil a été exposé à la pluie ou à l’humidité.
d) Si l’appareil ne fonctionne pas normalement en suivant les instructions du livret. Ne régler
que les commandes qui sont dans les instructions de fonctionnement. Un réglage malvenu
d’autres commandes pourrait entraîner des dommages qui nécessiteront un travail de réparation long par un technicien qualifié afin de faire fonctionner le produit normalement.
e) Si l’appareil est tombé ou a été endommagé d’une manière ou d’une autre.
f) Si l’appareil montre des changements distincts dans ses performances, cela indique qu’il a
besoin d’une révision.
Changement des pièces : Si vous avez besoin de changer des pièces, assurez-vous que le
29.
technicien utilise des pièces détachées recommandées par le fabricant, ou des pièces ayant les
mêmes caractéristiques que les pièces d’origine. L’utilisation de pièces détachées non
recommandées peut entraîner des risques d’incendie, de choc électrique ou tout autre danger.
Contrôle de sécurité : Une fois les travaux de réparations terminés, demandez au technicien de
30.
réaliser un contrôle de sécurité pour vérifier que l’appareil est en parfait état de marche.
Montage au mur ou au plafond : Cet appareil ne peut être monté au mur ou au plafond qu’en
31.
suivant les recommandations du fabricant.
Page 39

7
TABLE DES MATIERES
PRECAUTIONS ...............................................................................................................................2
CONSIGNES IMPORTANTES DE SECURITE .............................................................................4
TABLE DES MATIERES .....................................................................................................................7
CONTENU DE L’EMBALLAGE ...........................................................................................................9
A PROPOS DES DISQUES OPTIQUES .....................................................................................10
Disques appropriés.................................................................................................................10
Entretien des disques et maintenance .................................................................................10
Manipuler un disque ......................................................................................................10
Nettoyer un disque ........................................................................................................10
LOCALISATION DES COMMANDES ..............................................................................................11
Vue de l’appareil .................................................................................................................. 11
Télécommande ......................................................................................................................13
Alimentation .........................................................................................................................14
BRANCHEMENTS ........................................................................................................................ 15
Branchements du moniteur ..................................................................................................15
Entrée/sortie du signal audio &vidéo .................................................................................. 16
Pack de piles rechargeable .................................................................................................. 17
Branchement de carte SD/MMC et USB .............................................................................. 18
Brancher un casque / des écouteurs .....................................................................................19
FONCTIONNEMENT GENERAL ..................................................................................................20
Lecture d’un disque ...............................................................................................................20
Lecture/Pause/Stop ...................................................................................................... 20
Précédent/Suivant (Avance) ..........................................................................................20
Avance/retour (Recherche) ............................................................................................20
Ralenti/ Image par image ............................................................................................. 20
Menu navigation ....................................................................................................................21
Clavier numérique .................................................................................................................21
Messages d’erreur du disque ............................................................................................... 21
Gestion de l’alimentation ....................................................................................................... 21
Page 40

8
TABLE DES MATIERES
FONCTIONS DU LECTEUR ..........................................................................................................22
Menu/ Titre ..............................................................................................................................22
Réglage ..................................................................................................................................22
Affichage à l’écran ............................................................................................................... 22
Mode Répéter.........................................................................................................................22
Mode Répéter A-B ..................................................................................................................23
Multi angles/ Sous-titres/Audio ............................................................................................ 23
Zoom ......................................................................................................................................23
Effacer ....................................................................................................................................23
Rechercher ............................................................................................................................ 23
Mode DVD......................................................................................................................23
Mode CD ........................................................................................................................23
Menu LCD ..............................................................................................................................24
Programmation ......................................................................................................................24
REGLAGES ................................................................................................................................... 26
Réglage de la langue .......................................................................................................... 26
Réglage de l’écran .................................................................................................................26
Réglage audio ....................................................................................................................... 27
Réglage personnalisé ............................................................................................................ 27
CARACTERISTIQUES .................................................................................................................. 28
METTRE LES SACS APPUI-TETE ..............................................................................................29
PANNES ........................................................................................................................................30
Page 41

9
CONTENU DE L’EMBALLAGE
L
R
2 Ecouteurs
Veuillez vérifier que les éléments suivants sont bien dans la boite. Si un élément venait à manquer, veuillez contacter
votre revendeur local.
Moniteur
Appareil principal
Adaptateur de voiture
Adaptateur & cordon d’alimentation
Cordon audio & vidéo
L
R
Sacs appui-tête
Adaptateur AC/DC (1A)
Sacs appui-tête
Page 42

10
A PROPOS DES DISQUES OPTIQUES
Disques compatibles
Le lecteur DVD peut passer les disques suivants.
Type
Disques vidéo DVD
Disques compacts audio CD
CD JPEG -- Photo 12 cm --
Marque du
disque
Contenu
Audio +Vidéo
(film)
Audio 12 cm 74 min
Taille du
disque
12 cm
Temps d’écoute
maximal
133 min (SS-SL)
242 min (SS-DL)
266 min (DS-SL)
484 min (DS-DL)
Cet appareil peut lire les CD-R et les CD-RW qui contiennent des dossiers photo JPEG. Vous ne
pouvez pas passer de disques autres que ceux listés ci-dessus. (Les CD-ROM pour PC, CD Extra,
CD-G et CD-I, etc.)
Entretien des disques et maintenance
Les disques optiques (DVD, CD) contiennent des données compressées de haute densité qui
nécessitent une manipulation adéquate.
Manipuler un disque
•
Prenez le DVD/CD par les bords. Evitez de toucher
la surface enregistrée du disque. Pour enlever un
DVD/CD de son boîtier, appuyez au centre sur le
mécanisme de rétention du boîtier et soulevez le disque.
Ne pas exposer le disque à la lumière directe du soleil, à une forte humidité, ou à de hautes
•
températures.
Ne pas plier ou presser le disque.
•
Pour réduire les risques d’éraflures, remettez toujours le disque dans son boîtier après utilisation.
•
Rangez les disques verticalement dans un meuble.
•
Ne pas mettre d’autocollant ou d’étiquette sur l’une ou l’autre des faces du disque.
Nettoyer un disque
Utilisez un chiffon doux et sec pour essuyer les empreintes de doigt et la poussière de la surface enregistrée
du disque. Essuyez en ligne droite, du centre vers le bord du disque. Les petites particules de poussière ou les
taches de lumière n’affectent pas la qualité de la lecture.
•
Ne pas appliquer de diluant, de solvant chimique à base d’alcool, de spray anti-statique ou de benzène
pour le nettoyer. Cela endommagerait définitivement la surface du disque.
Note: en mode stop, ne pas toucher le disque avant qu’il ne soit complètement arrêté.
Page 43

11
LOCALISATION DES COMMANDES
5
1
2
3
4
6 7 8 9 10 11 12 13
14
15
16
17
18
19
20
21
22
23
24
25
Commande du volume
1.
Port USB2.
Fente SD3.
Jack des écouteurs4.
Voyant de marche – s’allume en rouge en mode veille
5.
et passe au vert quand l’appareil est mis sur ON.
Voyant de charge – s’allume en rouge en charge et
6.
passe au vert quand il est rechargé complètement.
Capteur de la télécommande – capte le signal
7.
télécommandé.
MODE LCD8.
Appuyez brièvement sur cette touche pour accéder au
menu LCD.
Appuyez et maintenez MODE LCD pour accéder au
menu source.
SETUP9.
Appuyez sur SETUP pour afficher le menu de réglage
du système
STOP10.
Appuyez sur STOP pour arrêter la lecture.
Play/Pause11.
Appuyez sur Play/Pause pour démarrer ou mettre en
pause la lecture.
PREV/F.BWD12.
Appuyez brièvement sur cette touche pour faire un
retour dans le disque ; appuyez et maintenez cette
touche pour faire une recherche en retour rapide dans
le disque.
Touche de direction Bas13.
Utilisez cette touche pour déplacer le curseur vers le
bas dans le menu.
Ecran TFT14.
Touche de direction Haut15.
Utilisez cette touche pour déplacer le curseur
vers le haut dans le menu.
NEXT/F.FWD16.
Appuyez brièvement sur cette touche pour faire
une avance dans le disque ; appuyez et
maintenez cette touche pour faire une recherche
en avance rapide dans le disque.
Enter17.
Touche Verrou18.
Mettez cette touche sur ON pour protéger
l’appareil contre les manipulations accidentelles.
Touche AV19.
Mettez sur AV IN/AV OUT quand vous entrez ou
sortez un signal AV.
Vidéo20.
Entrée/sortie du signal vidéo.
Audio 21.
Entrée/sortie du signal audio.
Coaxial22.
Sortie du signal audio.
Ecouteurs23.
Branchez des écouteurs ou un casque
Touche Marche24.
Allume ou éteint le lecteur.
Jack d’alimentation25.
Branchez sur une prise électrique.
Page 44

12
LOCALISATION DES COMMANDES
1
7
8
9
10
11
2
3
4
5
6
Moniteur
Bouton de marche1.
Pour allumer/éteindre l’appareil.
Jack d’entrée DC 9V2.
Pour brancher l’adaptateur AC ou DC de voiture pour l’alimentation.
Jack vidéo
3.
Pour entrer le signal vidéo.
Jack audio4.
Pour entrer le signal audio.
Jack des écouteurs5.
Avant de brancher, vérifiez que le volume est à un niveau assez bas.
Molette de volume6.
Pour régler le niveau de son.
Voyant de marche7.
Touche Mute8.
Pour éteindre/remettre le son.
Touche taille de l’image9.
Pour changer la taille de l’image entre 4 :3 et 16 :9.
Touche mode LCD10.
Affiche le menu LCD.
Touches de direction et touche ENTER11.
Pour sélectionner et confirmer les choix dans le menu.
Page 45

13
LOCALISATION DES COMMANDES
Télécommande
Titre
Mode LCD
Menu
Enter
Touches de directions
Silence
Touches numériques
Effacer
Répéter A-B
Répéter
Audio
Sous-titres
La télécommande transmet un faisceau infrarouge directionnel. Assurez-vous de bien diriger
la télécommande vers le capteur infrarouge de la télécommande quand vous l’utilisez. Le
capteur ne pourra recevoir de signaux correctement s’il est couvert, s’il y a un large objet entre
la télécommande et le capteur, ou s’il est exposé directement à la lumière du soleil ou à une
lumière artificielle forte (ex. lumière fluorescente ou stroboscope). Dans ce cas, changez la
direction de la lumière ou déplacez l’appareil afin d’éviter la lumière directe.
Affichage
Marche
Réglage
Lecture/Pause
Stop
Zoom
Précédent/Suivant
Avance/retour rapide
Image par image
Ralenti
DVD/USB/SD
Programmer
Angle
Page 46

14
LOCALISATION DES COMMANDES
Installation des piles
Reportez-vous au schéma. Ouvrez le compartiment
des piles situé à l’arrière de la télécommande. Mettez
les piles en vous assurant de bien respecter les
polarités indiquées à l’intérieur du compartiment.
Refermez le compartiment.
Pour utiliser la télécommande, dirigez-la vers le
détecteur de la télécommande de l’appareil et faites
fonctionner dans un rayon de 5 mètres et selon un
angle de 60 degrés.
Les piles de la télécommande durent à peu près un
an. Changez les piles si la télécommande ne marche
pas. Ne pas mélanger des piles neuves et des
vieilles ou différents types de pile.
Enlevez les piles si la télécommande n’est pas
utilisée pendant une longue période.
MISE EN GARDE :
Les piles utilisées dans cet appareil présentent un danger d’incendie ou de brûlure chimique
si elles sont malmenées. Ne pas recharger, démonter, incinérer ou chauffer les piles à 100°C.
Gardez les piles hors de portée des enfants.
2 x piles AAA de 1.5V
Couvercle du compartiment
de piles
Alimentation
Cet appareil doit être utilisé uniquement avec des prises de courant 100-240V 50/60Hz.
L’appareil principal fonctionne soit sur adaptateur AC/DC soit sur la pile intégrée, s’il est branché sur
un adaptateur, il ne consommera pas l’énergie des piles.
aa
Attention :
Ne pas brancher la prise électrique sur une prise de courant autre que celle indiquée ici et sur
•
l’étiquette car cela entraînerait un risque d’incendie ou de choc électrique.
Ne pas manipuler la prise de courant avec les mains mouillées. Cela causerait un choc électrique.
•
Utilisez toujours un adaptateur AC du modèle précisé ici. Si vous ne le faites pas, il existe un
•
risque d’incendie et vous pouvez endommager le lecteur.
Page 47

15
BRANCHEMENTS
Sur une prise murale
100-240V,50/60Hz
Non utilisé
Sur une prise murale
100-240V,50/60Hz
Audio
Audio
Vidéo
Vidéo
Branchements du moniteur
- Préparer les câbles
L’adaptateur de voiture est le seul moyen de branchement
entre l’appareil principal et le moniteur pour un usage à la fois
en intérieur et dans la voiture.
Adaptateur pour le moniteur
Prises de courants murales AC de 100-240V~50/60Hz 0.5A
MAX. Courant DC : 1A
Cet adaptateur AC/DC fournit l’alimentation électrique du
Monitor Adaptor
Main Unit Adaptor
- Utilisation en intérieur – Vérifiez que tous les branchements ont été correctement faits avant de brancher sur
l’alimentation.
moniteur.
Adaptateur pour l’appareil principal
Prises de courants murales AC de 100-240V~50/60Hz 0.6A
MAX.
Sortie DC : 9V, Courant DC : 2.0A
Cet adaptateur AC/DC fournit l’alimentation électrique de
l’appareil principal. Installez le cordon d’alimentation et
l’adaptateur avant utilisation. L’appareil principal possède un
pack de batterie intégré ; si l’appareil est branché sur
l’adaptateur, il ne consommera pas les piles intégrées.
Faites correspondre les couleurs des prises avec les couleurs des connecteurs quand vous utilisez les câbles AV/de
•
voiture. Le vert est pour le branchement audio et le jaune est pour le branchement vidéo.
L’adaptateur de voiture sert de câble AV pour brancher l’appareil principal et le moniteur quand vous utilisez en
•
intérieur.
Page 48

16
BRANCHEMENTS
DC9V
Sur l’allume-cigare
Audio
Vidéo
DC9V
vidéo
audio
- Utilisation en voiture
•
Faites correspondre les couleurs des prises avec les couleurs des connecteurs quand vous
utilisez les câbles AV/de voiture. Le vert est pour le branchement audio et le jaune est pour le
branchement vidéo.
MISE EN GARDE : Débranchez cet adaptateur de voiture quand il n’est pas utilisé.
Entrée/sortie du signal audio et vidéo
Grâce à la fonction AV du lecteur, vous pouvez profiter de sources externes de signal aussi
bien que transmettre le signal AV du lecteur à un récepteur externe.
Quand vous entrez un signal, mettez le bouton AV sur IN ; quand vous sortez un signal,
mettez le bouton AV sur OUT.
Reportez-vous également au livret de l’utilisateur de l’appareil externe.
1.
Avant de brancher sur l’alimentation, vérifiez que tous les branchements sont correctement faits.
2.
Si vous n’utilisez pas le lecteur pendant longtemps, débranchez de la prise de courant et enlevez les piles de
3.
la télécommande.
Ne doit pas être utilisé dans des véhicules 24V.
Appareil externe avec entrée/sortie AV
Sur le jack vidéo
Sur le jack audio
Cordon audio/vidéo
•
Faites correspondre les couleurs des prises avec les couleurs des
connecteurs quand vous utilisez les câbles AV/de voiture.
Page 49

17
BRANCHEMENTS
Brancher à un amplificateur équipé d’un Dolby Pro Logic Surround
Amplificateur équipé d’un
Dolby Pro Logic Surround
Sur l’entrée coaxiale
Sur la sortie coaxiale
Reportez-vous au livret de l’utilisateur de l’appareil externe.•
Bloc de piles rechargeables
•
Pour des piles neuves ou vides, nous recommandons de recharger la pile environ 4 heures.
•
Pour recharger la pile, il suffit de brancher l’adaptateur AC.
•
Si la pile ne fonctionne pas aussi bien que vous le voulez, veuillez contacter le service clientèle de
MPMAN. Ne pas essayer de changer ou de réparer la pile par vous-même, à moins que vous ne soyez
technicien qualifié.
(Pack de piles rechargeable Li-ion 7.4V 2000mAh.)
La pile intégrée peut être rechargée environ 300 fois sans baisse de fonctionnement notable.•
Note:
•
Utilisez le chargeur spécial.
•
Ne jamais jeter les piles au feu ou les faire chauffer.
•
Ne pas utiliser à forte température ou à proximité d’une source de chaleur.
•
Ne pas ouvrir le couvercle. Faites réparer par un technicien qualifié uniquement.
•
Ne pas recharger le bloc de piles quand le lecteur DVD fonctionne sur le bloc de piles.
•
Il existe un danger d’explosion si les piles sont mal placées. Changez uniquement par des piles
du même type ou équivalent.
Câble coaxial (non fourni)
Détection de piles usées
L’appareil se mettra automatiquement en mode VEILLE quand les piles sont trop faibles.
•
Page 50

18
BRANCHEMENTS
Branchement USB et carte SD
Mettez l’USB ou la carte dans la fente correspondante.
Appuyez sur la touche DVD/USB/SD de la télécommande pu utilisez la touche Mode LCD
1.
sur l’appareil principal pour afficher le menu des options de la source. Appuyez sur les
touches de direction haut/bas pour sélectionner USB / Carte, appuyez sur la touche ENTER
pour entrer.
DVD-ROM Drive
USB
Card Reader
Cela prend quelques instants pour que l’appareil lise les données, une fois que la source est détectée
2.
par le lecteur ; l’écran affichera le menu de fonctionnement, normalement la lecture démarre
automatiquement ou appuyez sur les touches de direction pour sélectionner le fichier désiré dans le
menu et appuyez sur ENTER ou sur Play/Pause pour démarrer la lecture. Pendant la lecture de photo
ou de vidéo, appuyez sur la touche MENU pour revenir à l’écran du menu principal (ex. mode lecture
de carte).
3.
Pour sortir de l’USB/la carte, sélectionnez le lecteur de DVD-ROM dans le menu source et appuyez sur
la touche ENTER, ou il suffit de le débrancher du port quand il n’est pas en fonctionnement.
Page 51

19
BRANCHEMENTS
Utiliser un casque / des écouteurs
Voltage de sortie maximum ≤ 150 mV
Vérifiez que votre appareil est réglé à bas volume avant de brancher les écouteurs. Montez graduellement le
niveau sonore pour une écoute confortable.
Sur le jack des écouteurs
Ecouteurs
ATTENTION :
Les spécialistes de l’audition mettent en garde contre une utilisation constante des écouteurs
à fort volume. Un fort volume constant peut entraîner une perte d’audition. Si vous avez les
oreilles qui sifflent ou si vous entendez mal, arrêtez l’écoute et consultez un médecin.
Page 52

20
FONCTIONNEMENT GENERAL
Lecture d’un disque
1. Préparez les branchements et branchez sur l’alimentation électrique.
2. Mettez un disque
Ouvrez le couvercle LCD et mettez un disque avec l’étiquette vers le haut, fermez le couvercle manuellement.
• Si vous mettez le disque une face à l’envers, « BAD DISC » apparaîtra à l’écran.
3. Commencez la lecture.
Appuyez sur la touche PLAY pour commencer la lecture (certains disques commencent automatiquement).
Lecture/Pause/ Stop
• Appuyez sur ►pour lire le disque la première fois.
• Appuyez sur ► pendant la lecture pour faire une pause. Appuyez à nouveau sur ► pour reprendre la
lecture.
• Appuyez ■ pendant la lecture pour arrêter le disque (pré stop). Appuyez sur la touche ► pour reprendre
la lecture.
• Appuyez sur ■ quand le disque est en pré stop pour arrêter la lecture complètement (si vous appuyez sur
la touche ►, le disque recommencera la
Précédent/suivant (sauter)
• Appuyez sur >>I pour avancer au prochain morceau (DVD, CD, etc.)
• Appuyez sur I<< pour revenir au morceau précédent (DVD, CD, etc.)
Avance/ retour (Rechercher)
Appuyez plusieurs fois sur >> pour faire une avance rapide dans le disque.
lecture au début).
Lecture
Appuyez sur << pour faire un retour rapide dans le disque.
Lecture
Ralenti/ Image par image
Appuyez sur la touche SLOW pour une lecture au ralenti. Chaque pression successive de la touche
SLOW changera la vitesse du ralenti. Appuyez sur ► pour reprendre une lecture normale.
Lecture
Appuyez sur STEP pour commencer une lecture image par image. Chaque pression successive de STEP
avancera la vidéo d’une image. Appuyez sur ► pour reprendre une lectur
Note :
Le son ne fonctionne pas en avance rapide, en retour rapide et en lecture au ralenti.
e normale.
Page 53

21
FONCTIONNEMENT GENERAL
Navigation dans le menu
Pour naviguer dans les menus du disque DVD ou dans les menus de réglage du lecteur :
Utilisez les touches de DIRECTION (flèches) pour sélectionner la fonction désirée ou
l’option dans le menu.
Appuyez sur la touche ENTER pour confirmer une sélection dans le menu.
Pour certaines options du menu, vous pouvez utiliser aussi les touches numériques
pour entrer les données.
Appuyez sur CLEAR pour annuler une entrée.
Clavier numérique
• Utilisez les touches numériques pour passer directement au chapitre
d’un DVD ou au morceau d’un CD. (Certains disques ne permettent
pas un accès direct).
• Utilisez les touches numériques pour entrer des données numériques
dans le menu options quand c’est possible.
Messages d’erreur du disque
Les messages suivants s’afficheront à l’écran s’il y a un problème de format avec le disque en
chargement :
WRONG REGIONAL DISC. Le code région du disque ne correspond pas au code région du
lecteur (région 1).
WRONG PASSWORD. Le mot de passe que vous avez entré est incorrect.
WRONG DISC. Le lecteur est équipé d’un logiciel de détection automatique de qualité du
disque. Si le lecteur détecte un problème sur le disque ou un disque endommagé, le lecteur
peut continuer à passer le disque avec une moindre qualité ou arrêter le disque, selon le niveau
d’endommagement du disque.
Clear
La qualité de production des disques DVD varie. Certains disques DVD s’écartent du standard de l’industrie.
Certains disques incorrectement formatés peuvent quand même passer. Cependant, l’écoute et la qualité de
fonctionnement peuvent être en dessous de la norme.
Gestion de l’alimentation électrique
Si vous n’utilisez pas le lecteur pendant longtemps, mettez le bouton de marche sur OFF, débranchez le
lecteur et enlevez les piles de la télécommande.
Page 54

22
FONCTIONS DU LECTEUR
Menu/ Titre
• Appuyez sur la touche MENU pendant la lecture du DVD pour revenir au menu principal du disque.
• Appuyez sur la touche TITLE pendant la lecture du DVD pour revenir au menu Titre du disque.
Réglage
Appuyez sur la touche SETUP pour entrer dans le menu de réglage du lecteur. Entrez dans le menu réglage pour
ajuster les réglages internes du lecteur, veuillez vous reporter à la section REGLAGE pour plus de détails.
Affichage
CD/DVD
Appuyez plusieurs fois sur la touche DISPLAY pour afficher les informations de lecture.
Pour sortir du mode affichage, maintenez la touche DISPLAY appuyée.
Mode Répéter
Appuyez sur REPEAT pour changer le mode de répétition du lecteur. Chaque pression successive sur REPEAT
changera le mode du lecteur comme suit :
Mode DVD
Répète le chapitre Répète le morceau
Répète le titre Répète tout
Répète tout Eteint
Eteint
Certains disques DVD ne permettent pas la fonction REPEAT.
Mode DVD
Page 55

23
PLAYER FUNCTIONS
Mode Répéter A – B
Pour répéter une section spécifique du disque (en boucle).
1. Appuyez sur la touche A-B pour sélectionner le début de la section désirée (« A »).
2. Appuyez à nouveau sur la touche A-B pour sélectionner la fin de la section désirée (« B »).
3. Le lecteur lira en boucle la sélection désirée de A à B. Appuyez à nouveau sur la touche A-B pour revenir à
une lecture normale.
Multi angle/Sous-titres /Audio
Pendant la lecture du disque DVD qui a été masterisé avec des sous-titres, appuyez sur SUBTITLE pour
sélectionner la langue des sous-titres (un disque DVD peut contenir jusqu’à 32 sous-titres au choix).
Pendant la lecture d’un disque DVD qui a été masterisé avec plusieurs langues audio, appuyez sur
AUDIO pour entendre les différentes langue de la bande audio (un disque DVD peut contenir jusqu’à 8
bandes son au choix).
Pendant la lecture d’un disque DVD qui a été masterisé avec multi angles, appuyez sur ANGLE pour
sélectionner les différents angles de caméra (un DVD peut contenir jusqu’à 9 angles de caméra au
choix).
Appuyez sur ZOOM pour changer le grossissement de l’image.
Pendant la lecture d’un DVD, chaque pression successive sur ZOOM
changera le grossissement comme suit :
Pendant la lecture d’un CD JPEG, chaque pression successive sur
ZOOM changera le grossissement comme suit :
En mode JPEG
Quand le grossissement est plus grand que la normale 100%, appuyez sur les touches de navigation pour
faire un panoramique.
Quand le grossissement est égal à 100%, utilisez les touches de navigation pour faire tourner l’image.
Note: La qualité de l’image se dégrade à mesure que l’image grossit.
100%
Annuler
Appuyez sur la touche CLEAR pour annuler une mauvaise entrée.
Rechercher
Aller à la section désirée en utilisant la fonction Rechercher.
Appuyez sur la touche Search pour afficher la barre ci-dessous :
Mode DVD
02/12 03/06
Titre en cours
1. En mode DVD, appuyez sur les touches de direction pour naviguer entre les entrées.
2. Appuyez sur les touches numériques pour entrer une donnée.
3. Appuyez sur la touche CLEAR pour annuler une mauvaise entrée.
4. Appuyez sur ENTER ou sur Play/pause pour démarrer la recherche et la lecture.
5. Appuyez sur la touche Search pour sortir.
Nbr total de titres Chapitre en cours
Mode CD
_:__:__
Nbr total de chapitres
Page 56

24
FONCTIONS DU LECTEUR
Mode LCD
Appuyez une fois sur la touche mode LCD pour afficher l’écran ci-dessous :
Luminosité
Contraste
Couleur
Appuyez sur les touches de navigation HAUT/BAS pour sélectionner le réglage désiré,
•
appuyez sur les touches de navigation GAUCHE/DROITE pour faire le réglage.
•
Quand vous sélectionnez SCREEN, appuyez sur les touches de navigation Gauche/droite pour
changer la dimension de l’écran en 16 :9 ou 4 :3.
•
Quand vous sélectionnez RESET, appuyez sur ENTER pour remettre les réglages par défaut
comme à la sortie de l’usine.
Fonction programmation
Mode de programmation DVD
Mettez un DVD et appuyez sur la touche PROGRAM.
1.
Appuyez sur les touches de direction pour sélectionner un titre et appuyez sur ENTER pour confirmer.
2.
Appuyez sur les touches de direction pour sélectionner le chapitre désiré et appuyez sur ENTER pour confirmer.
3.
La sélection programmée sera listée dans la colonne de gauche.
4.
5.
Recommencez les étapes 1 à 3 jusqu’à ce que vous ayez fini de programmer votre sélection ou quand vous avez
programmé un maximum de 20 morceaux.
Appuyez sur la touche CLEAR /STOP pour effacer.
6.
Appuyez sur Play/Pause pour démarrer la lecture. Appuyez sur PROGRAM pour annuler.
7.
Page 57

25
FONCTIONS DU LECTEUR
Mode de programmation CD
Track
1. Mettez un CD et appuyez sur la touche PROGRAM.
2. Appuyez sur les touches de direction pour sélectionner un morceau et appuyez sur
ENTER pour confirmer.
3. La sélection programmée sera listée dans la colonne de gauche.
4. Recommencez les étapes 1 et 2 jusqu’à ce que vous ayez fini de programmer votre
sélection ou quand vous avez programmé un maximum de 20 morceaux.
5. Appuyez sur la touche CLEAR /STOP pour effacer.
6. Appuyez sur Play/Pause pour démarrer la lecture. Appuyez sur PROGRAM pour annuler.
Page 58

26
REGLAGES
Plusieurs options du lecteur peuvent être réglées dans le menu SETUP :
1. Appuyez sur la touche SETUP et le menu réglage apparaît.
2. Appuyez sur la touche de direction pour sélectionner l’option désirée.
3. Appuyez sur la touche ENTER pour confirmer.
Custom Setup
B
A
C
OSD
B
C
Menu
Audio
Subtitle
Pour sélectionner la langue d’affichage à
l’écran du lecteur
Pour choisir la langue du menu
Pour sélectionner la langue audio du DVD
chargé.
Pour sélectionner la langue des sous-titres du
DVD chargé.
Pour régler le mode d’encodage
Pour régler les dimensions de l’affichage.
4 :3 est utilisé avec un téléviseur standard, 16
:9 est utilisé avec un téléviseur à écran large.
L’économiseur d’écran évite d’endommager
l’écran du lecteur
Pour régler le type de signal sortie vidéo du
lecteur. Réglez en fonction du système de
vidéo de votre téléviseur. NTSC est la norme
en Amérique du Nord.
Réglage de la langue
Article Description Réglage par défaut
Langue à l’écran
(OSD)
Menu
Audio
Sous-titres
Encodage
Réglage de l’image
Article Description Réglage par défaut
Type de télé
Economiseur
d’écran
Système télé
A
Anglais
Anglais
Anglais
Anglais
Europe de
l’ouest
Allumé
PAL
Page 59

27
Réglage parental
Article Description Réglage par défaut
Sortie digitale
Réglage parental
Article Description Réglage par défaut
Contrôle parental
Mot de passe
Style
Downmix
REGLAGES
SETUP
Pour régler le mode Spdif en PCM, RAM ou
éteint
Pour régler le mode mix des canaux audio
(Lo/Ro, Lt/Rt)
Règle le niveau de classification du lecteur. Le
lecteur ne lira aucun disque dont le niveau de
classification est supérieur à celui du réglage.
Il y a 8 niveaux de classification. Le niveau 1
permet la lecture de disques convenant à des
personnes de tous les ages. Le niveau 8
restreint la lecture du disque à des adultes
seulement.
Vous devez entrer le mot de passe à 4 chiffres pour accéder au réglage
parental. Le mot de passe initial est 8888.
Entrez l’ancien mot de passe, le nouveau mot de passe, puis à nouveau le
nouveau mot de passe pour vérifier et changez le mot de passe du contrôle
parental. Remettre les réglages par défaut du lecteur ne peut remettre le mot de
passe initial.
NE PAS OUBLIER LE MOT DE PASSE ; ce mot de passe ne peut être redéfini.
Pour régler le style des menus du lecteur.
SPDIF/RAW
Lo/Ro
Style1
Marque d’angle
Par défaut
Pour allumer ou éteindre la marque d’angle.
Pour remettre tous les réglages par défaut.
Allumé
Lire
Page 60

28
SPECIFICATIONS
CARACTERISTIQUES
Alimentation électrique
Consommation électrique
Système de signaux
Sortie Vidéo
Sortie Audio
Terminal des écouteurs
Signal / Taux de bruit (audio)
Portée dynamique (audio)
Dimension du panneau
Résolution
Laser
Conditions de fonctionnement
Dimensions
Poids
DC 9.0V 2A (TERMINAL Adaptateur AC)
< =15W
NTSC/PAL
1±0.2V (p-p), 75 ohms, Sync. négative
3.5mm mini jack X 1
1.2Vrms (1 KHz, 0dB) 3.5 mm mini jack X 1
3.5mm stéréo mini jack X 1
90dB typique
90dB typique
7 pouces (16:9)
480 X 234 (QVGA) pixels
Longueur d’onde 650 nm
Températures : 0°c à 35°c. Position de fonctionnement : Horizontale
202X 162 X 40mm (appareil principal & pile)
868g (appareil principal & pile)
Les caractéristiques et le livret sont sujets à changement sans notification préalable.
Page 61

29
SACS APPUI-TETE
Monter dans un véhicule
Les sacs de montage appui-tête pour accueillir l’appareil principal et le moniteur sur les appuis-tête.•
Le sac a deux bretelles qui entourent solidement l’appui-tête et l’appareil principal ou le moniteur se •
glisse facilement à l’intérieur ou en dehors du sac.
Bretelles de
montage
Montage
Appar eil
principal
MISE EN GARDE DE SECURITE!
En aucun cas cet appareil ne doit être utilisé par le chauffeur d’un véhicule en mouvement, ou laissé •
sans sécurité dans le véhicule pendant la conduite.
Si cet appareil est utilisé par un passager de votre véhicule, assurez-vous qu’il est bien fi xé et maintenu •
en toute sécurité, et qu’il ne gène aucun accessoire de sécurité (comme un airbag ou une ceinture de
sécurité par exemple) qui est installé.
Tous les passagers doivent mettre leur ceinture de sécurité quand ils utilisent cet appareil à bord d’un •
véhicule en mouvement.
Si vous avez un doute, veuillez contacter le fabricant de votre véhicule pour plus de conseils. •
L’utilisation d’autre adaptateur de voiture pourrait endommager l’appareil.•
Bretelles de
montage
Moniteur
Adaptateur de
voiture 12V
avec cordon AV
Page 62

30
PANNES
Panne de l’appareil principal
Il n’y a pas d’alimentation dans l’appareil
• Assurez-vous que l’appareil a bien été branché et sur ON.
• Vérifiez que le cordon de l’adaptateur est bien branché au lecteur et à la prise de courant murale.
L’appareil ne lit pas les disques
• Assurez-vous qu’il y a un disque lisible avec l’étiquette vers le haut dans le lecteur.
• Assurez-vous que le niveau d’indice du disque ne dépasse pas le niveau d’indice du lecteur.
• Assurez-vous que le disque n’est pas endommagé ou sale.
• Nettoyez le disque ou essayez un autre disque. De l’humidité peut s’être condensée à l’intérieur du lecteur.
Enlevez le disque et laissez reposer l’appareil éteint pendant une heure ou deux et réessayez.
Il n’y a pas d’image
• Vérifiez que le téléviseur est alimenté, et que vous avez sélectionné le model AV.
• Vérifiez que le système de branchement entre le téléviseur et le lecteur est approprié et est bien branché.
• Vérifiez si les cordons d’alimentation ne sont pas endommagés.
L’image est distordue ou bruyante
• Le disque est sale ou endommagé. Nettoyez le disque ou essayez en un autre.
• Redémarrez le système couleur du téléviseur.
• Assurez-vous que le lecteur DVD est branché directement sur le téléviseur (pas avec un VCR, un câble ou
une antenne parabolique satellite, etc.)
L’image n’est pas plein écran
• Changez le réglage de dimension de votre lecteur dans le menu réglage.
• Sélectionnez une option de dimension différente dans le menu disque DVD.
Il n’y a pas de son ou le son est distordu
• Vérifiez que la télé et l’amplificateur sont allumés et correctement réglés.
• Vérifiez que le système de branchement de la télé et de l’amplificateur est sécurisé.
• Appuyez sur la touche AUDIO pour sélectionner un autre morceau audio du disque.
• Vérifiez que la fonction MUTE du téléviseur ou de l’amplificateur ne soit pas activée.
La télécommande ne fonctionne pas
• Vérifiez que la touche POWER (marche) de l’appareil a bien été allumée (ON) manuellement.
• Retirez les obstacles entre la télécommande et le lecteur.
• Dirigez la télécommande vers le détecteur de télécommande sur le lecteur.
• Vérifiez que les piles de la télécommande sont chargées et bien installées.
• Changez les piles de la télécommande.
Page 63

31
TROUBLESHOOTING
Le lecteur fonctionne mal
• Débranchez-le pendant 30 minutes. Après cela, rebranchez et allumez le lecteur - la fonction restaurer
devrait redémarrer le lecteur.
Panne du moniteur
Il n’y a pas d’alimentation dans l’appareil
• Assurez-vous que l’appareil a bien été branché et sur ON.
• Vérifiez que le cordon de l’adaptateur est bien branché au lecteur et à la prise de courant murale.
Il n’y a pas de son ou le son est distordu
• Vérifiez que les branchements du cordon AV sont corrects et bien branchés.
• Vérifiez que la fonction MUTE du moniteur n’est pas activée.
L’image est distordue ou bruyante
• Réinitialisez le système couleur du moniteur.
• Vérifiez que les branchements du cordon AV sont corrects et bien branchés.
Pour plus d’informations veuillez visiter notre site Internet
www.mpmaneurope.com
Page 64

Page 65

TWIN700
Portabler DVD/CD/MP3 Player 7“ Zweifachbildschirm,
Portabler LCD DVD Player, USB Port und Kartenzugang
Benutzerhandbuch
Bitte lesen Sie dieses Handbuch sorgfältig bevor Sie
das Gerät benutzen.
Page 66

2
VORSICHTSMASSNAHMEN
ACHTUNG
RISIKO EINES ELEKTRISCHEN
SCHOCKS
NICHT ÖFFNEN
ACHTUNG: UM DAS RISIKO EINES FEUERS ODER
ELEKTRISCHEN SCHOCKS ZU REDUZIEREN, ENTFERNEN
SIE NICHT DAS GEHÄUSE (ODER RUECKSEITE) DES
GERÄTES. ÜBERLASSEN SIE SERVICE AM GERÄT NUR
DAZU QUALIFIZIERTEM SERVICE PERSONAL.
Für den Benutzer:
Tragen Sie unten die Seriennummer des Gerätes ein,
welche sich am Boden des Gerätes befindet. Bewahren
Sie diese Informationen zur zukünftigen Nutzung auf
Modell Nr. TWIN700
Serien Nr.
Das Blitzsymbol im gleichseitigen Dreieck weist den Benutzer auf das Vorhandensein nicht
isolierter „gefährlicher Stromspannungen“ innerhalb des Gehäuses in diesem Gerätes hin,
welche in ihrer Stärke elektrischen Schock bei einer Person zur Folge haben können.
Das Ausrufungszeichen innerhalb eines gleichseitigen Dreiecks weist den Benutzer auf
wichtige Nutzungs- und Wartungshinweise hin, die in der dem Gerät beigefügten Literatur
erläutert werden.
WARNUNG:
Um Feuer oder elektrischen Schock zu vermeiden, setzen Sie das Gerät auf keinen Fall Feuchtigkeit aus. Es herrschen gefährliche
Stromspannungen im Innern des Gerätes. Öffnen Sie das Gehäuse nicht.
In den Kabeln des Gerätes befindet sich Blei. Blei ist eine Chemikalie, die im Staate Kalifornien dafür bekannt ist, Krebs,
Geburtsfehler oder andere Fortpflanzungsprobleme verursachen zu können.
ACHTUNG:
Dieser Digitale Video Disk Player ist mit einem Lasersystem ausgestattet. Um direkten Kontakt mit dem Laserstrahl zu
vermeiden, öffnen Sie das Gehäuse nicht und missachten Sie nicht die Sicherungssperren. Wenn das Gerät geöffnet ist
und die Sicherungssperren außer Kraft gesetzt sind, ist visuelle Laser Abstrahlung vorhanden.
Um elektrischen Schock zu vermeiden, achten Sie darauf, dass Sie die Stecker richtig in die Steckdose stecken.
Die Verwendung anderer Bedienelemente, Einstellungen, Performance oder Prozeduren als hierin spezifiziert, kann
Freisetzung gefährlicher Abstrahlung zur Folge haben. SCHAUEN SIE NIE DIREKT IN DEN LASERSTRAHL.
HINWEIS:
Dieses Produkt enthält urheberrechtlich geschützte Technologie, die durch bestimmte US-Patentansprüche und andere
intellektuelle Eigentumsrechte geschützt ist. Die Verwendung dieser urheberrechtlich geschützten Technologie muss
durch die Macrovision Corporation genehmigt werden und ist für den Heimgebrauch und andere eingeschränkte
Nutzungen vorgesehen, sofern keine anderen Genehmigungen durch Macrovision Corporation vorliegen. Rückentwicklung
und Demontage sind verboten.
FCC-Erklärung
Dieses Gerät entspricht dem Teil 15 der FCC-Regeln. Die Bedienung basiert auf den folgenden Konditionen:
1. Dieses Gerät verursacht keine gefährlichen Interferenzen und
2. dieses Gerät muss andere Interferenzen akzeptieren, auch Interferenzen, die unerwünschte Bedienung
hervorrufen.
Hinweis:
Dieses Gerät wurde getestet und bestand die Prüfung für Klasse B für digitale Geräte im Einklang mit Teil 15
der FCC-Regeln. Diese Regeln wurden aufgestellt, um einen entsprechenden Schutz gegen gefährliche
Interferenzen bei der heimischen Installation zu bieten. Dieses Gerät generiert und nutzt RadiofrequenzEnergie und kann diese ausstrahlen, wenn es nicht nach der Bedienanleitung installiert und benutzt wird.
Es können ebenso gefährliche Interferenzen mit anderen Radio-Kommunikationsgeräten entstehen. Ebenso
gibt es aber auch keine Garantie, dass bei genauer Installation keine Interferenzen entstehen können. Sollte
das Gerät gefährliche Interferenzen mit Radio oder Fernsehgerät auslösen, die durch Ein- bzw. Ausschalten
des Radiogeräts entstehen, sollte der Benutzer versuchen, die Interferenzen durch eine oder mehrere der
folgenden Maßnahmen zu reduzieren:
- Stellen Sie die Antenne anders ein.
- Vergrößern Sie den Abstand zwischen dem Gerät und dem Receiver.
- Schließen Sie das Gerät an einen anderen Stromkreis als den des Receivers.
- Kontaktieren Sie einen Spezialisten auf diesem Gebiet.
Die Verwendung isolierter Kabel ist Voraussetzung für Geräte der Klasse B und dem Unterkapitel B Teil 15
der FCC-Regeln.
Page 67

3
VORSICHTSMASSNAHME
Führen Sie keine Änderungen am Gerät durch, sofern nicht anders in der
Bedienungsanleitung angegeben. Sollten Sie derartige Veränderungen vornehmen, werden
Sie möglicherweise dazu aufgefordert, die Verwendung des Gerätes zu unterlassen.
Dieser Spieler ist mit
Hergestellt unter Lizenz von Dolby Laboratories. Dolby und das
doppelte D-Symbol sind geschützte Markenzeichen von Dolby
Laboratories.
Vertrauliche unveröffentlichte Arbeiten.
1992-1997 Dolby Laboratorie. Alle Rechte vorbehalten.
Für Hinweise zum Recyceln oder Entsorgen dieses Produktes kontaktieren
Sie bitte Ihre lokalen Behörden oder elektronischen Industrieverband:
www.eiae.org
eingebautem Kopierschutz
ausgestattet, welcher das
Kopieren von DVDs auf jegliche
Medien verhindert.
Wenn ein Video Rekorder an den
Spieler angeschlossen ist, ist das
Video Ausgangsbild während der
Aufnahme verzerrt.
Page 68

4
WICHTIGE SICHERHEITSHINWEISE
1. Lesen Sie die Anweisungen: Lesen Sie zunächst alle Sicherheits- und Funktionshinweise
bevor Sie das Gerät benutzen.
2. Heben Sie die Anweisungen auf: Heben Sie die Sicherheits- und Funktionshinweise zur
zukünftigen Nutzung auf.
3. Beachten Sie Warnungen: Halten Sie sich an alle Warnungen, die auf dem Produkt und im
Benutzerhandbuch vermerkt sind.
4. Befolgen Sie Anweisungen: Befolgen Sie alle Funktions- und Nutzungsanweisungen.
5. Reinigen: Ziehen Sie vor Reinigung des Gerätes den Stecker aus der Steckdose.
Verwenden Sie keine flüssigen oder aerosolhaltigen Reinigungsmittel. Verwenden Sie ein
feuchtes Tuch zur Reinigung.
6. Zubehörteile: Verwenden Sie ausschließlich vom Hersteller empfohlene Zubehörteile. Die
Verwendung von anderem Zubehör kann gefährlich sein.
7. Wasser und Feuchtigkeit: Verwenden Sie dieses Produkt nicht in der Nähe von Wasser
(z.B. in der Nähe der Badewanne, Spülbecken oder Waschbecken, Waschmaschine, in
feuchten Kellern, in der Nähe von Swimmingpools usw.).
8. Hitze: Das Gerät sollte von Heizquellen, wie Radiatoren, Wärmemessern, Öfen oder
anderen Produkten, die Hitze entwickeln (inklusive Amplifiern), ferngehalten werden.
9. Zubehör: Stellen Sie dieses Gerät nicht auf einen instabilen Wagen, Ständer,
Stativ, Auslegerarm oder Tisch. Verwenden Sie nur Wagen, Ständer,
Stative, Auslegerarme oder Tische, die vom Hersteller empfohlen oder
zusammen mit dem Produkt verkauft wurden. Jegliches Montieren des
Produktes sollte entsprechend der Hinweise im Benutzerhandbuch
erfolgen und sollte Montagezubehör, welches vom Hersteller empfohlen
wurde, verwenden.
10.Eine Wagen und Produkt Kombination sollte immer vorsichtig bewegt
werden. Schnelles Stoppen, extreme Krafteinwirkung und unebene
Oberflächen, können ein Umkippen dieser Kombination zur Folge haben.
11.Ventilation: Schlitze und Öffnungen am Gerät sind zur Erzielung ausreichender Ventilation
angebracht, um eine zuverlässige Funktion des Produktes zu gewährleisten und es vor dem
Überhitzen zu schützen. Diese Öffnungen sollten niemals blockiert werden, indem Sie das
Gerät auf ein Bett, Sofa, Teppich oder ähnliche Oberflächen stellen. Dieses Gerät sollte
nicht in Bücherregalen oder anderen Gestellen platziert werden, außer eine ausreichende
Ventilation kann gewährleistet werden und die Benutzeranweisungen werden genau eingehalten.
12.Stromquellen: Dieses Produkt sollte nur mit der Stromquelle verbunden werden, die auf dem
Bemessungsschild angegeben ist. Sollten Sie sich nicht sicher sein, welche Art Stromversorgung
Sie in Ihrem Haus haben, kontaktieren Sie Ihren Einzelhändler oder lokalen Stromversorger.
Für Produkte, für welche Batterie- oder andere Art von Stromquelle vorgesehen ist, beziehen Sie
sich bitte auf das Benutzerhandbuch.
13.Stromquellen: Verbinden Sie den Stromstecker mit keiner anderen Stromquelle als hier und auf
dem Bemessungsschild angegeben, da dies ansonsten zu Ausbruch eines Feuers oder
elektrischem Schlag führen kann. Fassen Sie den Stromstecker nicht mit nassen Händen an. Dies
kann elektrischen Schlag zur Folge haben.
14.Stromleitungen: Eine Außenantenne sollte nicht in der Nähe von Oberleitungen oder Stromkreisen
angebracht werden. Beim Anbringen von Antennen Außensystemen sollten Sie besonders
vorsichtig sein und auf keinen Fall Oberleitungen oder Stromkreisläufe berühren, da dies fatale
Folgen haben kann.
15.Batterie: Es besteht die Gefahr von Explosion, wenn Sie die Batterie nicht korrekt einlegen.
Ersetzen Sie die alte Batterie nur mit einer gleichartigen oder äquivalentem Typ. Batteriepackungen
oder bereits eingelegte Batterien sollten möglichst keiner großen Hitze, wie Sonneneinstrahlung,
Feuer o.ä. ausgesetzt werden.
Page 69

5
WICHTIGE SICHERHEITSHINWEISE
16. 12V Auto Stromadapter: Entfernen Sie den Auto Stromadapter, wenn Sie das Gerät nicht
benutzen. Nicht geeignet für die Verwendung in 24V Fahrzeuge.
17. Benutzen des Gerätes in einem Fahrzeug: Dieses Gerät soll auf gar keinen Fall vom Autofahrer
während der Fahrt benutzt werden oder sich ungesichert im Fahrzeug befinden, während sich
dieses bewegt. Sollte dieses Gerät von einem Mitfahrer benutzt werden, achten Sie darauf, dass
das Gerät gesichert ist oder gut festgehalten wird und keine für die Sicherheit im Auto
verantwortlichen Geräte (wie Airbag, Sicherheitsgurte usw.) behindert. Alle Mitfahrer sollten sich
anschnallen, wenn Sie dieses Gerät in einem sich bewegenden Fahrzeug benutzen. Wenn Sie
unsicher sind, kontaktieren Sie Ihren Fahrzeughersteller für weitere Hinweise. Die Verwendung
anderer als für das Gerät vorgesehene Adapter kann Schaden am Spieler zur Folge haben.
18. Verwendung von Ohrhörern oder Kopfhörern: Ohrenärzte raten von der dauerhaften Benutzung
von Ohrhörern oder Kopfhörern mit hoher Lautstärke ab. Dies kann zu Hörverlust führen. Wenn
Sie ein Klingeln im Ohr oder Hörverlust bei sich bemerken, verwenden Sie kein Ohr- oder
Kopfhörer mehr und suchen Sie einen Arzt auf.
19. Erdung und Polarisierung: Dieses Gerät ist möglicherweise mit einem polarisierten Stromstecker
ausgestattet, bei dem ein Pol breiter ist als der andere. Dieser Stecker kann aus
Sicherheitsgründen nur in eine Richtung in die Steckdose gesteckt werden. Sollten Sie nicht in
der Lage sein, den Stecker komplett in die Steckdose zu stecken, versuchen Sie, ihn
umgekehrter Richtung einzustecken. Sollte der Stecker noch immer nicht passen, kontaktieren
Sie einen Elektriker, um die veraltete Steckdose auszutauschen. Umgehen Sie nicht die
Sicherheitsbestimmung des Polarisierungssteckers.
20. Stromkabel Schutz: Stromkabel sollten verlegt werden, so dass man nicht darauf tritt, das
Stromkabel nicht durch z.B. darauf stehende Objekte eingeklemmt wird. Achten Sie besonders
auf Kabel an Steckdosen, Buchsen und an Stellen an denen Sie aus dem Gerät kommen.
21. Zusätzlicher Schutzstecker; Dieses Produkt ist möglicherweise mit einem Zusatzstecker zum
Schutz vor Überlastung ausgestattet. Hierbei handelt es sich um eine Sicherheitsfunktion.
Lesen Sie im Benutzerhandbuch über den Austausch des Steckers oder Anweisungen zum
Zurücksetzen der Schutzfunktion nach. Wenn ein Ersetzen des Steckers erforderlich ist, stellen
Sie sicher, dass der Servicetechniker einen Ersatzstecker mit gleicher Schutzfunktion wie der
Originalstecker und wie vom Hersteller vorgegeben, verwendet.
22. Erdung der Außenantenne: Sollte eine Außenantenne mit dem Produkt verbunden werden,
stellen Sie sicher, dass das Antennensystem geerdet ist, um gewissen Schutz gegen
Überspannung und statischer Entladungen zu gewährleisten. Artikel 810 des Nationalen
Elektrischen Codes, ANS/NFPA 70 liefert Informationen zur
ordnungsgemäßen Erdung von Masten und Stützpfeilern, Erdung von
Antennenzuleitungen, Größe von Erdungsleitungen, Ort der Anbringung des
Antennenableitungsgerätes, Verbindung zu Erdungselektroden und Anforderungen
an die Erdungselektronen (siehe Zeichnung).
Cavo entrante dell’antenna
Antennen Zuleitungsdraht
Erdungsklammer
elektrische Serviceanlage
Antennen Auslass (NEC Sektion 810-20)
Erdungsleiter (NEC Sektion 810-21)
Erdungsklammer
Strom Erdungs-Elektroden System
(NEC Art. 250, Abschnitt H)
23. Blitz: Zur zusätzlichen Sicherheit ziehen Sie während Gewitter, oder wenn Sie den Player für
längere Zeit nicht nutzen, den Stecker aus der Steckdose und trennen Sie ihn von der Antenne
oder Kabelsystem.
Page 70

6
WICHTIGE SICHERHEITSHINWEISEI
Dies beugt Beschädigung des Produktes durch Blitzeinschlag oder Stromüberspannung vor.
24. Sollten Sie jemals dieses Produkt entsorgen müssen, achten Sie bitte darauf, dass
elektronische Abfallprodukte nicht im Hausmüll entsorgt werden sollen. Bitte
recyceln Sie, wenn entsprechende Möglichkeiten gegeben sind. Informieren Sie sich
bei lokalen Behörden oder Einzelhändlern über Recyclemöglichkeiten. (Anweisung
elektrische und elektronische Abfallprodukte).
25. Überlastung: Überlasten Sie Steckdosen, Verlängerungskabel oder integrierte Buchsen nicht,
da dies zum Ausbruch eines Feuers oder elektrischem Schock führen kann.
26. Objekte und Flüssigkeiten: Stecken Sie niemals Fremdobjekte in die Öffnungen dieses
Produktes, da diese gefährliche Strompunkte berühren können oder Teile freisetzen, die zum
Ausbruch eines Feuers oder elektrischem Schock führen können. Verschütten Sie niemals
Flüssigkeit über dem Produkt.
27. Service: Führen Sie auf keinen Fall selbst Service am Gerät durch, da Sie durch das Öffnen
des Gehäuses gefährlichen Stromspannungen oder anderen Gefahren ausgesetzt sind.
Überlassen Sie jeglichen Service qualifiziertem Service Personal.
28. Schaden am Gerät der Reparatur erfordert: Ziehen Sie den Stecker des Players aus der
Steckdose und überlassen Sie Reparaturen qualifiziertem Service Personal unter folgenden
Voraussetzungen: a) wenn Stromversorgung oder Stecker beschädigt sind, b) wenn Flüssigkeit
über dem Gerät verschüttet wurde oder Fremdobjekte in den Player gelangt sind, c) wenn das
Gerät Wasser oder Regen ausgesetzt war, d) wenn das Gerät trotz Beachtung aller Hinweise im
Benutzerhandbuch nicht richtig funktioniert. Stellen Sie nur die Steuerungselemente ein, die im
Benutzerhandbuch erklärt sind. Unsachgemäßes Einstellen kann zu Schaden am Gerät führen,
und häufig ist eine intensive Reparatur des Players durch einen qualifizierten Service Techniker
erforderlich, um den Spieler wieder in normale Funktionsfähigkeit zurück zu setzen. e) wenn der
Player heruntergefallen oder in sonstiger Weise beschädigt wurde, f) wenn der Player eine
erhebliche Veränderung in seiner Performance aufweist – dies erfordert meist Service.
29. Ersatzteile: Wenn Sie Ersatzteile für den Spieler benötigen, stellen Sie sicher, dass der
Servicetechniker nur Ersatzteile, die vom Hersteller spezifiziert wurden oder die selben
Charakteristiken wie die Originalteile aufweisen, verwendet. Nicht autorisierte Ersatzteile können
Ausbruch eines Feuers, elektrischen Schock oder andere Gefahren zur Folge haben.
30. Sicherheitscheck: Nach Beendigung eines Services oder Reparatur an Ihrem Player, bitten Sie
den Service Techniker, einen Sicherheitscheck auszuführen, um sicher zu stellen, dass das
Gerät normale Funktionsfähigkeit aufweist.
31. Wand- oder Deckenmontage: Das Gerät sollte nur wie durch den Hersteller empfohlen an Wand
oder Decke montiert werden.
Page 71

7
INHALTSVERZEICHNIS
VORSICHTSMASSNAHMEN ............................................................................................................2
WICHTIGE SICHERHEITSHINWEISE .............................................................................................4
INHALTSVERZEICHNIS ...................................................................................................................7
PACKUNGSINHALT .........................................................................................................................9
ÜBER OPTISCHE DISKS ...............................................................................................................10
Disk Anforderungen.................................................................................................................10
CD Pflege und Wartung .........................................................................................................10
Handhabung einer CD ....................................................................................................10
Säubern einer CD ............................................................................................................10
LAGE DER BEDIENELEMENTE ....................................................................................................11
Geräteansicht ..........................................................................................................................11
Fernbedienung ........................................................................................................................13
Stromversorgung .....................................................................................................................14
VERBINDUNGEN ............................................................................................................................15
Monitor Anschluss ...................................................................................................................15
Audio und Video Signal Eingang/Augang ...............................................................................16
Batterie Packung ....................................................................................................................17
USB/SD/MMC Kartenverbindung ...........................................................................................18
Kopfhoereranschluss ...............................................................................................................19
GRUNDFUNKTIONEN ...................................................................................................................20
Einfache Wiedergabe .............................................................................................................20
Play/Pause/Stopp .......................................................................................................... 20
Vorherige /Nächste (Skip) ..............................................................................................20
Vorwärts/Rückwärts (Suche) ......................................................................................... 20
Langsam/Schritt ............................................................................................................ 20
Menü Navigation . .................................................................................................................... 21
Numerische Tastatur .............................................................................................................. 21
Disk Fehlermeldungen ........................................................................................................... 21
Strom Management ............................................................................................................... 21
Page 72

8
INHALTSVERZEICHNIS
PLAYER FUNKTIONEN ................................................................................................................ 22
Menü/Titel ..............................................................................................................................22
Einstellen ................................................................................................................................22
Bildschirm ...............................................................................................................................22
Wiederholen Modus ...............................................................................................................22
Wiederholen A-B Modus ........................................................................................................23
Multi-Winkel/Untertitel/Audio ................................................................................................. 23
Zoom ......................................................................................................................................23
Leeren .....................................................................................................................................23
Suchen ...................................................................................................................................23
DVD Modus....................................................................................................................23
CD Modus ......................................................................................................................23
LCD Menü .............................................................................................................................. 24
Programm-Funktion ................................................................................................................24
EINSTELLUNGEN ......................................................................................................................... 26
Spracheinstellung ...................................................................................................................26
Bildschirmeinstellungen .......................................................................................................... 26
Audio Einstellungen ............................................................................................................... 27
Spezialeinstellungen ...............................................................................................................27
SPEZIFIKATIONEN ....................................................................................................................... 28
KOPFSTÜTZENANBRINGUNG .................................................................................................... 29
FEHLERBEHEBUNG .....................................................................................................................30
Page 73

9
PACKUNGSINHALT
Bitte stellen Sie sicher, dass die folgenden Teile im Karton enthalten sind. Sollte etwas fehlen,
kontaktieren Sie bitte Ihren Einzelhändler.
Monitor
Hauptgerät
Auto Adapter mit AV Kabel
Adapter&Stromkabel
AC Kabel
L
R
2 Ohrhorer
L
Kopfstützen Befestigungstaschen
Fernbedienung
AC/DC Adapter (1A)
R
Page 74

10
ÜBER OPTISCHE DISKS
Disk Anforderungen
Dieser DVD Player unterstützt die Wiedergabe folgender Disks.
CD Typ Disk Aufdruck Inhalt Disk Größe
DVD-Video Disks
Audio Kompakt Disks (CDs)
JPEG CDs -- Standbild 12 cm --
Audio&Video
(bewegtes Bild)
Audio
12 cm
12 cm 74 min
Max. Wiedergabezeit
133 min (SS-SL)
242 min (SS-DL)
266 min (DS-SL)
484 min (DS-DL)
Dieses Gerät ist in der Lage CD-R und CD-RW Disks abzuspielen, die JPEG Bilddateien enthalten.
Disks, die oben nicht aufgeführt sind, werden durch dieses Gerät nicht unterstützt (z.B. PC CD-ROM,
CD-Extra, CD-G, CD-I usw.).
CD Pflege und Wartung
Optische Disks (DVDs, CDs) enthalten mit einer hohen Dichte komprimierte Daten und müssen
entsprechend behandelt werden.
Handhabung einer CD
Halten Sie eine DVD/CD an den Rändern fest.
•
Vermeiden Sie es, die beschriebene Seite der
CD zu berühren. Um eine DVD/CD aus seiner
Hülle zu entnehmen, drücken Sie den mittleren
Retentionsmechanismus nach unten und nehmen Sie die CD heraus.
Setzen Sie CDs nicht für längere Zeit direkter Sonneneinstrahlung, hoher Feuchtigkeit oder
•
hohen Temperaturen aus.
Verbiegen Sie CDs nicht.•
Um Kratzer zu vermeiden, legen Sie die CD nach Benutzen immer wieder in deren Hülle
•
zurück. Lagern Sie CDs aufrecht im Schrank.
Kleben Sie keine Sticker oder Schilder auf CDs.•
Säubern einer CD
Verwenden Sie ein weiches Tuch, um Fingerabdrücke und Staub von der bespielten Seite der CD
zu entfernen. Wischen Sie in gerader Linie von der Mitte nach außen Kleine Staubpartikel und
leichte Schmutzspuren beeinträchtigen die Abspielqualität nicht.
Verwenden Sie niemals Chemikalien wie Record Sprays, anti-statische Sprays, Benzol oder
•
Verdünner zum Reinigen der CDs, da dies die Oberfläche der CD permanent zerstören würde.
Hinweis: Fassen Sie die CD im Stopp Modus nicht an, bevor sie komplett zum Stillstand
gekommen ist.
Page 75

11
LAGE DER BEDIENELEMENTE
5
1
2
3
4
6 7 8 9 10 11 12 13
14
15
16
17
18
19
20
21
22
23
24
25
1. Lautstärkeeinstellung
2. USB Anschluss
3. SD Schlitz
4. Kopfhörer Buchse
5. Stromanzeige-leuchtet rot im Standby Modus und
leuchtet grün, nachdem das Gerät angestellt wurde
6. Ladeanzeige-leuchtet rot während des Ladens und
leuchtet grün, wenn vollständig aufgeladen
7. Fernbedienungssensor- empfängt das Signal der
Fernbedienung
8. LCD MODUS-Drücken Sie diese Taste kurz, um das
LCD Menü aufzurufen.
- Halten Sie die LCD Modus Taste gedrückt, um das
Source Menü aufzurufen
9. EINSTELLEN-Drücken Sie EINSTELLEN um das
System Einstellen Menü aufzurufen.
10. STOP-Drücken Sie STOP um die Wiedergabe
anzuhalten.
11. Play/Pause-Drücken Sie Play/Pause um die
Wiedergabe zu starten/anzuhalten.
12. Vorherige/Schnell Rückwärts-Drücken Sie die Taste
kurz, um in einer CD rückwärts zu springen, halten
Sie die Taste gedrückt, um in einer CD schnell
rückwärts zu spulen.
13. Nach Unten Richtungstaste-Drücken Sie diese Taste,
um den Cursor im Menü nach unten zu bewegen.
14. TFT Bildschirm
15. Nach Oben Richtungstaste-Verwenden Sie diese
Taste, um den Cursor im Menü nach oben zu
bewegen.
16. Nächste/Vorwärts-Drücken Sie diese Taste kurz,
um innerhalb einer CD vorwärts zu springen,
halten Sie diese Taste gedrückt, um in einer CD
schnell vorwärts zu spulen.
17. Enter-Drücken Sie diese Taste, um eine Option zu
bestätigen.
18. Tastensperre-Setzen Sie diesen Schalter in die
EIN Position, um das Gerät gegen
nichtgewünschtes Tasten drücken zu schützen.
19. AV Schalter-Stellen Sie in AV EIN/AV AUS bei
Eingang/Ausgang des AV Signals
20. Video-Eingang/Ausgang des Video Signals
21. Audio-Eingang/Ausgang des Audio Signals
22. Koaxial-Ausgang des Audio Signals
23. Kopfhörer-Verbindung mit Kopfhörern/Ohrhörern
24. Stromschalter-Schaltet den Spieler Ein/Aus
25. Strombuchse-Anschluss an der Steckdose
Page 76

12
LAGE DER BEDIENELEMENTE
1
7
8
9
10
11
2
3
4
5
6
Monitor
1. Stromschalter
Um das Gerät Ein/Aus zu schalten.
2. DC 9V IN Buchse
Um den mitgelieferten AC Adapter oder DC Autokabel zur Stromversorgung anzuschließen.
3. Video Buchse
Eingang für Video Signal.
4. Audio Buchse
Eingang für Audio Signal.
5. Kopfhörer Buchse
Bevor Sie die Kopfhörer anschließen, achten Sie darauf, dass die Lautstärke niedrig eingestellt ist.
6. Lautstärkeeinstellung
Zur Einstellung der Lautstärke.
7. Strom Ein Anzeige
8. Mute Taste
Um Audio auszustellen/wieder anzustellen.
9. Bildschirm Ratio Taste
Um die Bildschirm Größe auf 4:3 oder 16:9 einzustellen.
10. LCD Modus Taste
Zeigt den LCD Modus an.
11. Navigationstasten und Enter Taste
Auswahl und Bestaetigung von Menue Optionen.
Page 77

13
Fernbedienung
FERNBEDIENUNG
Titel
LCD Modus
Menü
Enter
Richtungstasten
Mute
Numerisches Tastenfeld
Entfernen
Wiederholen A-B
Wiederholen
Audio
Untertitel
Die Fernbedienung überträgt über einen Richtstrahl. Achten Sie darauf, dass Sie mit der
Fernbedienung während Sie damit arbeiten direkt auf den Fernbedienungssensor am Gerät
zeigen. Der Sensor kann Signale möglicherweise nicht richtig empfangen, wenn der Sensor
bedeckt ist, z.B. durch ein größeres Objekt, dass sich zwischen Fernbedienung und Sensor
am Gerät befindet, direkte Sonneneinstrahlung auf den Sensor oder starkes künstliches
Licht (z.B. fluoreszierend oder Blitzlicht.
In diesem Fall verändern Sie die Position des Lichtes oder stellen Sie das Gerät an einen
anderen Ort, wo Sie direkte Lichteinstrahlung vermeiden können.
Display
Strom
Einstellen
Play/Pause
Stopp
Zoom
Vorh./Naech./Ueberspr.
Schnell Vorwärts/Rückwärts
Schritt
Langsam
DVD/USB/SD
Programmieren
Winkel
Page 78

14
FERNBEDIENUNG
Batterie einlegen
Beziehen Sie sich auf nebenstehendes Bild. Nehmen
Sie den Deckel der Batterieabdeckung ab, welche sich
an der Rückseite der Fernbedienung befindet. Legen
Sie die Batterien mit der richtigen Polarität (+/-),
entsprechend der Kennzeichnung im Batteriefach,
ein. Schließen Sie den Deckel.
Zeigen Sie mit der Fernbedienung auf den Sensor
am Player. Verwenden Sie die Fernbedienung in
einem Abstand innerhalb 15 Fuß (4,5m) und einem
Winkel von +/- 60 Grad.
Die Batterien in der Fernbedienung haben eine
durchschnittliche Lebensdauer von 1 Jahr. Wechseln
Sie die Batterien aus sollte die Fernbedienung nicht
funktionieren. Vermischen Sie alte und neue Batterien
nicht oder unterschiedliche Batterie Typen.
Sollten Sie die Fernbedienung für längere Zeit nicht
benutzen, entnehmen Sie die Batterien.
WARNUNG:
Die Batterien, die in diesem Gerät verwendet werden, können bei unsachgemäßer Behandlung ein
Feuer oder chemischen Brand verursachen. Laden Sie die Batterien nicht wieder auf, bauen Sie sie
nicht auseinander, verbrennen Sie keine Batterien und erhitzen Sie sie nicht (~212°F) (100°C).
Bewahren Sie Batterien vor Kindern geschützt auf.
2x“AAA“ 1,5V Batterien
Deckel des Batteriefach
Stromversorgung
Dieses Gerät sollte nur an 100-240V 50/60Hz Steckdosen angeschlossen werden.
Achtung:
Stecken Sie das Gerät in keine andere als hier und auf dem Label angegebene Steckdose, da dies
•
ansonsten zu Ausbruch eines Feuers oder elektrischen Schock führen kann.
Fassen Sie den Stecker nicht mit nassen Händen an. Dies kann zu elektrischem Schock führen.•
Verwenden Sie bitte nur AC Adapter wie Sie hier spezifiert wurden. Sollten Sie dies nicht beachten,
•
kann das Schaden am Player zur Folge haben.
Page 79

15
VERBINDUNGEN
Steckdose
100-240V, 50/60Hz
ungenutzt
Steckdose
100-240V,50/60Hz
Audio
Audio
Video
Video
Monitor Anschluss
- bereiten Sie die Kabel vor
Der Autoadapter stellt die einzige Stromverbindung zwischen dem
Hauptgerät und Monitor dar sowohl für die Nutzung im Haus als
auch im Auto
Monitor Adapter
100-240V~50-60Hz 0.5A Max AC Steckdose
DC AUS:DC 9V DC Current: 1A
Dieser AC/DC Adapter versorgt den Monitor mit Strom
Monitor Adapter
Adapter für das Hauptgerät
100-240V~50-60Hz 0.6A Max AC Steckdose
DC AUS:DC 9V DC Current: 2.0 A
Dieser Adapter stellt die Stromversorgung für das Hauptgerät dar.
Verbinden Sie das
Stromkabel und den Adapter vor Benutzung. Das Hauptgerät ist mit
einer eingebauten
Batterie ausgestattet. Wenn das Gerät mit dem Adapter betrieben
Adapter für das Hauptgerät
- Verwendung im Haus: Stellen Sie sicher, dass alle Verbindungen ordnungsgemäß hergestellt wurden, bevor Sie
das Gerät am Strom anschließen
wird, wird die Batterie nicht genutzt.
•
•
Stimmen Sie die Farben der Stecker mit denen der Anschlüsse ab, wenn Sie das AV/Auto Kabel benutzen.
Grün ist für Audio Anschlüsse, Gelb ist für Video Anschlüsse.
Der Autoadapter dient als AV Kabel, um das Hauptgerät und den Monitor zu verbinden, während Sie das
Gerät im Haus verwenden.
Page 80

16
VERBINDUNGEN
DC9V
in den Zigarettenanzünder
Video
Audio
DC9V
Video
Audio
- Nutzung im Auto
Stimmen Sie die Farben der Stecker mit denen der Anschlüsse ab, wenn Sie das AV/Auto Kabel benutzen.
•
Grün ist für Audio Anschlüsse, Gelb ist für Video Anschlüsse.
WARNUNG: Ziehen Sie den Auto Stromadapter aus dem Zigarettenanzünder, wenn Sie den Player nicht benutzen.
Audio und Video Signal Eingang/Ausgang
Mit Hilfe der AV Funktion des Spielers können Sie Programmsignale von außen ebenso nutzen wie Sie das AV Signal
des Players an einen externen Empfänger senden können.
Bei Signaleingang schieben Sie den Schalter in EIN, bei Signalausgang schieben Sie den Schalter in AUS.
Lesen Sie auch in der Bedienungsanleitung des externen Gerätes nach.1.
Bevor Sie an den Strom anschließen, stellen Sie sicher, dass alle Verbindungen ordnungsgemäß
2.
hergestellt wurden.
Sollten Sie den Player für lange Zeit nicht benutzen, ziehen Sie den Stecker aus der Steckdose und entfernen
3.
Sie die Batterien aus der Fernbedienung.
Nicht geeignet zur Verwendung in 24V Fahrzeugen.
Externes Gerät mit AV Eingang/Ausgang
in Video Buchse
in Audio Buchse
Audio/Video Kabel
Stimmen Sie die Farben der Stecker mit denen der Anschlüsse ab, wenn Sie das AV/Auto
•
Kabel benutzen
Page 81

17
VERBINDUNGEN
Anschluss an Amplifier ausgestattet mit Dolby Pro Logic Surround
Amplifier ausgestattet mit
Dolby Pro Logic Surround
in Koaxial Eingang
in Koaxial Aus
Lesen Sie bitte im Benutzerhandbuch zum Anschluss der Apparatur an
•
einen Receiver mit Dolby Digital nach.
Wiederaufladbare Batterie
Wir empfehlen eine Aufladezeit von 4 Stunden für neue oder aufgebrauchte wiederaufladbare Batterien.•
Um die Batterie auf zu laden, genügt ein Anschluss an die Steckdose.•
Sollte die Batterie nicht Ihren Erwartungen gemäß arbeiten, kontaktieren Sie bitte unser MPMAN Service
•
Center. Wechseln Sie die Batterien nicht selbst aus und reparieren Sie sie nicht selbst, außer Sie sind eine
dazu qualifizierte Service Person.
(2000mAh.7.4V Liion wiederaufladbare Batterie)
Die Batterie kann ca. 300 Mal wieder aufgeladen werden, ohne eine Verminderung ihrer Arbeitsleistung
•
aufzuzeigen.
Hinweis::
Verwenden Sie ein spezielles Aufladegerät.•
Erhitzen oder verbrennen Sie die Batterie nicht.•
Verwenden Sie die Batterie nicht bei hohen Temperaturen oder in der Nähe von Heizquellen.•
Öffnen Sie das Gehäuse nicht. Überlassen Sie jeglichen Service dazu qualifiziertem Service Personal.•
Laden Sie die Batterie nicht auf, während der Player arbeitet.•
Es besteht Explosionsgefahr, wenn die Batterie nicht korrekt eingelegt wurde. Tauschen Sie die Batterie
•
nur mit dem selben oder äquivalenten Typ aus.
Koaxial Kabel (nicht mitgeliefert)
Schwache Batterie
Das Gerät schaltet sich automatisch in Standby, wenn die Batterie zu schwach ist.•
Page 82

18
VERBINDUNGEN
USB/SD Kartenverbindung
Stecken Sie ein USB oder Karte in den entsprechenden Eingang
Drücken Sie die DVD/USB/SD/ Taste an der Fernbedienung oder verwenden Sie die LCD Modus
1.
Taste am Hauptgerät, um das Source Auswahl Menü zu öffnen. Verwenden Sie die oben/unten
Richtungstasten, um USB Kartenleser auszuwählen und drücken Sie ENTER um in die Option zu
gelangen.
DVD-ROM Drive
USB
Card Reader
Es dauert einen Moment, bis das Gerät die Daten gelesen hat. Nachdem das Bauteil erkannt wurde,
2.
wird auf dem Bildschirm das Arbeitsmenü angezeigt. Normalerweise startet es die Wiedergabe
automatisch oder verwenden Sie die Richtungstasten um eine Datei im Menü auszuwählen. Drücken
Sie ENTER oder Play/Pause, um die Wiedergabe zu starten. Während Foto oder Video Wiedergabe
drücken Sie die MENUE Taste, um zum Hauptmenü Bildschirm zurück zu gelangen (z.B. Kartenleser
Modus).
Um USB/Karte zu verlassen, wählen Sie DVD-ROM Drive im Source Menü und drücken Sie die
3.
ENTER Taste. Oder ziehen Sie es aus der Buchse, wenn nicht im Arbeitsmodus.
Page 83

19
VERBINDUNGEN
In Kopfhörer Buchse
Kopfhörer
Verwendung von Kopfhörern/Ohrhörern
Maximale Ausgangsleistung ≤ 150mV
Wenn Sie die Kopfhörer einstecken achten Sie darauf, dass die Lautstärke niedrig eingestellt ist und erhöhen
Sie sie allmählich wenn gewünscht.
ACHTUNG:
Ärzte raten von der dauerhaften Benutzung von Kopfhörern in voller Lautstärke ab, da es Hörverlust zur
Folge haben kann. Sollten Sie unter Klingeln im Ohr oder Hörverlust leiden, verwenden Sie keine
Kopfhörer mehr und suchen Sie ärztlichen Rat.
Page 84

20
GRUNDFUNKTIONEN
Einfache Wiedergabe
Stellen Sie alle Verbindungen und Stromanschluss her.
Laden Sie eine CD
Drücken Sie die Öffnen Taste, um das CD Fach zu öffnen. Legen Sie eine CD ein, mit dem Aufdruck
nach oben zeigend. Schließen Sie die Tür manuell.
Wenn eine einseitig bespielte CD falsch herum eingelegt wird, zeigt der Spieler „Keine CD“ oder
„Ungültige CD“ an.
Starten Sie die Wiedergabe
Drücken Sie Play, um die Wiedergabe zu starten (einige CDs starten automatisch).
Play/Pause/Stopp
Drücken Sie um die CD abzuspielen.
Drücken Sie während des Abspielen um zu pausieren. Drücken Sie erneut, um mit der Wiedergabe
fortzufahren.
Drücken Sie während der Wiedergabe um die CD zu stoppen („Vor-Stopp). Drücken Sie um mit der
Wiedergabe fortzufahren.
Drücken Sie wenn die CD „Vor-gestoppt“ ist, um die Wiedergabe komplett zu stoppen (Wenn Sie
drücken, beginnt die CD mit der Wiedergabe vom Anfang).
Vorherige /Nächste (Skip)
Drücken Sie um zum nächsten Titel (DVD,CD usw) zu gelangen.
Drücken Sie I um zum vorherigen Titel (DVD, CD usw) zu gelangen.
Vorwärts/Rückwärts (Suche)
Drücken Sie wiederholt die Taste, um in einer CD schnell vorwärts zu suchen.
Play
Drücken Sie wiederholt die Taste, um in einer CD schnell rückwärts zu suchen.
Play
Langsam/Schritt
Drücken Sie LANGSAM für eine Wiedergabe in Zeitlupe. Jedes erfolgreiche Drücken der LANGSAM Taste,
ändert die Geschwindigkeit der Zeitlupen Wiedergabe. Drücken Sie , um zur normalen Wiedergabe
zurück zu kehren.
Play
Drücken Sie SCHRITT um die Wiedergabe Schritt für Schritt zu starten. Jedes erfolgreiche Drücken der
SCHRITT Taste, verschnellert die Viedeo Wiedergabe um einen Schritt. Drücken Sie , um zur normalen
Wiedergabe zurück zu kehren.
Hinweis:
Audio wird während schnellem Vorspulen, schnellem Zurück spulen und Zeitlupen Wiedergabe ausgeschaltet.
Page 85

21
GRUNDFUNKTIONEN
Menü Navigation
Um DVD Menüs oder das Einstellen Menü des Players zu navigieren:
Drücken Sie die Richtungstasten (Pfeile) um die gewünschte Eigenschaft oder
Option im Menü auszuwählen
Drücken Sie ENTER um Ihre Auswahl im Menü zu bestätigen
In einigen Menü Optionen können Sie mit Hilfe des numerischen Tastenfeldes
Daten eingeben.
Drücken Sie um Eingaben abzubrechen.
Numerisches Tastenfeld
Verwenden Sie diese Tasten, um direkt zu einem Abschnitt auf einer DVD oder
einem Titel auf einer CD zu gelangen.
(Einige CDs erlauben diese Funktion möglicherweise nicht)
Verwenden Sie das numerische Tastenfeld, um numerische Daten in Menü
Optionen einzutragen, wenn dies möglich ist.
Disk Fehlermeldungen
Die folgenden Meldungen erscheinen auf dem Bildschirm, sollte es ein Problem mit dem Format einer
geladenen Disk geben:
Disk mit falscher Region Der Regionscode der Disk stimmt nicht mit dem Regionscode des
Players überein.
Falsches Passwort Der Altersbegrenzungslevel der Disk ist höher als die Einstellung des
Altersbegrenzungslevels des Players. Der Spieler spielt diese Disk nicht ab.
Falsche Disk Dieser Player ist mit einer automatischen Qualitätserkennungssoftware ausgestattet.
Erkennt der Spieler, dass eine Disk beschädigt ist oder ein Formatierungsproblem aufweist, spielt
er die Disk eventuell in niedrigerer Qualität ab oder stoppt die Wiedergabe komplett, je nachdem wie
schwerwiegend der Schaden an der Disk ist.
Clear
Hinweis:
DVD Produktionsqualität kann unterschiedlich sein. Einige Disks können von den industriellen Standards
abweichen. Einige nicht korrekt formatierte Disks können möglicherweise noch abgespielt werden, trotzdem
kann die Abspielqualität und Funktion dieser Disks minderwertig sein.
Strom Management
Wenn Sie das Gerät für längere Zeit nicht benutzen, stellen Sie den Stromschalter in AUS Position, ziehen Sie
den Stecker aus der Steckdose und entfernen Sie die Batterien aus der Fernbedienung.
Page 86

22
PLAYER FUNKTIONEN
Menü/Titel
Drücken Sie während der DVD Wiedergabe die MENUE Taste, um zum Hauptmenü der Disk zurück
zu kehren.
Drücken Sie während der DVD Wiedergabe die TITEL Taste, um zum Titel Menü der Disk zurück zu
kehren.
Einstellen
Drücken Sie die SETUP Taste um in das Einstellen Untermenü des Players zu gelangen. Öffnen Sie das
Einstellen Menü, um die internen Player Einstellungen anzupassen. Bitte lesen Sie dazu in der Sektion
EINSTELLEN detailliert nach.
Bildschirm
CD/DVD
Drücken Sie wiederholt die Display Taste, um Wiedergabeinformationen aufzurufen.
Um den Bildschirm Modus zu verlassen, drücken Sie die Display Taste wiederholt, bis Sie am Ende angelangt sind.
Wiederholen Modus
Mit jedem erfolgreichen Drücken der WIEDERHOLEN Taste verändert sich der Wiederholen Modus des Players
wie folgend aufgeführt:
DVD Modus CD Modus
WIEDERHOLEN X1
WIEDERHOLEN X2
WIEDERHOLEN X3
WIEDERHOLEN X4
Abschnitt wiederholen Titel wiederholen
Titel wiederholen
Alles wiederholen
Wiederholen Aus
Alles wiederholen
Wiederholen Aus
Hinweis:
Einige DVD erlauben Wiederholen Modus nicht.
Page 87

23
PLAYER FUNKTIONEN
Wiederholen A-B Modus
Um einen bestimmten Abschnitt auf einer Disk zu wiederholen (im Kreislauf abspielen):
1. Drücken Sie A-B um den gewünschten Anfangspunkt („A“) des Abschnittes festzulegen.
2. Drücken Sie A-B noch einmal um den gewünschten Endpunkt („B“) des zu wiederholenden Abschnittes
festzulegen.
3. Der Abschnitt „A-B“ wird nun wiederholt immer wieder abgespielt. Drücken Sie A-B erneut, um zur normalen
Wiedergabe zurück zu kehren.
Multi-Winkel/Untertitel/Audio
Während der Wiedergabe einer DVD, die mit Multi Winkel ausgestattet ist, drücken Sie WINKEL um die zur
Verfügung stehenden alternativen Kamerawinkel aufzurufen (Eine DVD kann bis zu 9 wählbare Winkel
enthalten).
Während der Wiedergabe einer DVD, die Untertitel zur Verfügung stellt, drücken Sie UNTERTITEL um die zur
Verfügung stehenden Untertitel aufzurufen (Eine DVD kann bis zu 32 Untertitel enthalten).
Während der Wiedergabe einer DVD, die mit alternativen Sprach/Audio Titeln ausgestattet ist, drücken Sie
AUDIO um die alternativen Titel zu hören (Eine DVD kann bis zu 8 auswählbare Audio Titel enthalten).
Drücken Sie ZOOM um den Vergrößerungsradius eines Bildes zu verändern.
Während der DVD Wiedergabe verändert jedes erfolgreiche Drücken der ZOOM Taste den
Vergrößerungslevel in:
Während JPEG CD Wiedergabe verändert jedes erfolgreiche Drücken der ZOOM Taste den
Vergrößerungslevel in:
100%
Im JPEG Modus
Wenn die Vergrößerung mehr als Normal/100% ist, verwenden Sie die NAVIGATIONS Tasten, um sich auf dem
Bild zu bewegen.
Wenn die Vergrößerung 100% entspricht, verwenden Sie die NAVIGATIONS Tasten, um das Bild zu drehen oder
umzukehren.
Hinweis: Die Bildqualität nimmt mit zunehmender Vergrößerung ab.
Leeren
Verwenden Sie die Leeren Taste um Falscheingaben zu löschen.
Suchen
Wählen Sie mit Hilfe der SUCHEN Funktion einen bestimmten Abschnitt aus.
Drücken Sie die Suchen Taste, um den unten aufgeführten Suchbalken aufzurufen:
DVD Modus
02/12 03/06
aktueller Titel
CD Modus
1. Drücken Sie die Richtungstasten, um sich zwischen den Optionen hin und her zu bewegen.
2. Drücken Sie die numerischen Tasten, um Dateien einzugeben.
3. Drücken Sie die Leeren Taste, um Falscheingaben zu löschen.
4. Drücken Sie ENTER oder die Play/Pause Taste, um die Suche und Wiedergabe zu starten.
5. Drücken Sie die Suchen Taste, um zu beenden.
alle Titel aktueller Abschnitt
_:__:__
alle Abschnitte
Page 88

24
PLAYER FUNKTIONEN
LCD Modus
Drücken Sie die LCD Modus Taste einmal um das LCD Menü aufzurufen.
Helligkeit
Kontrast
Farbe
Drücken Sie die Oben/Unten Richtungstasten um eine Auswahl zu treffen. Drücken Sie die
•
Links/Rechts Richtungstasten, um einzustellen.
Drücken Sie die Links/Rechts Richtungstasten um die Bildschirmmaße zu verändern: 16:9 oder 4:3.•
Wenn Sie RESET auswählen, drücken Sie die ENTER Taste um Helligkeit, Kontrast und
•
Farbeinstellungen in die Werkseinstellungen zu bestätigen.
PROGRAMM FUNKTION
DVD Programmierfunktion
Programmieren
Titel Abschnitt
Auswahl Play Entfernen
1. Laden Sie eine DVD und drücken Sie die Programmieren Taste.
2. Drücken Sie die Richtungstasten, um den Titel auszuwählen und drücken Sie ENTER um zu bestätigen.
3. Drücken Sie die Richtungstasten, um einen bestimmten Abschnitt auszuwählen und drücken Sie ENTER
um zu bestätigen.
4. Die programmierte Auswahl wird in der linken Tabelle angezeigt.
5. Wiederholen Sie Schritte 1-3 bis Sie Ihr Auswahl beendet haben oder maximal 20 Titel programmiert haben.
6. Drücken Sie die ENTFERNEN/STOP Taste, um zu löschen.
7. Drücken Sie die Play/Pause Taste, um die Wiedergabe zu starten. Drücken Sie PROGRAMMIEREN um
abzubrechen.
Page 89

25
PLAYER FUNKTIONEN
CD Programmierfunktion
Programmieren
Titel
Auswahl Play Entfernen
1. Laden Sie eine CD und drücken Sie die Programmieren Taste.
2. Drücken Sie die Richtungstasten, um den Titel auszuwählen und drücken Sie ENTER um zu bestätigen.
3. Die programmierte Auswahl wird in der linken Tabelle angezeigt.
4. Wiederholen Sie Schritte 1-2 bis Sie Ihr Auswahl beendet haben oder maximal 20 Titel programmiert haben.
5. Drücken Sie die ENTFERNEN/STOP Taste, um zu löschen.
6. Drücken Sie die Play/Pause Taste, um die Wiedergabe zu starten. Drücken Sie PROGRAMMIEREN
um abzubrechen.
Page 90

26
EINSTELLUNGEN
Verschiedene Eigenschaften dieses Players können im EINSTELLUNGEN Menü abgestimmt werden.
1.Drücken Sie die EINSTELLUNGEN Taste, um das Einstellungen Menü aufzurufen.
2.Verwenden Sie die Richtungstasten, um die gewünschte Auswahl zu treffen.
3.Drücken Sie ENTER um zu bestätigen.
Spezialeinstellungen
B
A
C
A
Spracheinstellung
Auswahl Beschreibung Standard Einstellung
OSD Sprache
Menü
Audio
Untertitel
Verschlüsselung Stellt den Verschlüsselungsmodus ein.
OSD
B
C
Menü
Audio
Untertitel
Auswahl
Spracheinstellung für Bildschirm.
Einstellung der Menü Sprache für eine
geladene DVD
Einstellung der Audio Sprache einer
geladenen DVD
Spracheinstellung für Untertitel einer
geladenen DVD
Englisch
Englisch
Englisch
Englisch
Westeuropäisch
Bildschirmeinstellungen
Auswahl Beschreibung Standard Einstellung
TV Typ
Einstellung des Bildformats; 4:3 wird als
Standardeinstellung verwendet; 16:9 wird bei
16:9
Breitbild Aufnahmen verwendet
Bildschirmschoner
TV System
Der Bildschirmschoner verhindert
Beschädigung am Bildschirm durch Einbrennen
Stellt das Video Aus Signal des Players ein.
Stellen Sie dieses entsprechend Ihrem TV
Video System ein.
An
PAL
Page 91

27
Audio Einstellungen
Auswahl Beschreibung Standard Einstellung
Digital Aus
Downmix
Spezialeinstellungen
Auswahl Beschreibung Standard Einstellung
Altersbeschränkung/
Kindersicherung
Passwort
Stil
EINSTELLUNGEN
Einstellung des Spdif Modus als PCM, RAM,
AUS
Stellt den Audio Kanal Mix Modus ein
(Lo/Ro,Lt/Rt)
Stellen Sie die Altersbeschränkung für Ihren
Spieler ein. Der Spieler wird dann keine Disks
mit einer höherer Altersbegrenzung als Ihrer
Einstellung entsprechend abspielen.
Es stehen Ihnen 8 Beurteilungslevel zur
Verfügung: Level 1
beschränkt die Zulassung nur auf Disks die für
alle Altersgruppen zugelassen sind. Level 8
erlaubt die Wiedergabe aller Disks, inklusive
derer die nur für Erwachsene zugelassen sind.
Um Einstellungen bei der Kindersicherung vorzunehmen, müssen Sie
zunächst ein 4-stelliges
Passwort eintragen. Das Anfangspasswort ist 8888.
Geben Sie, um das Passwort für die Kindersicherung zu ändern, das alte
Passwort ein, dann das neue Passwort und anschließend noch einmal
das neue Passwort zur Bestätigung. Beim Zurücksetzen des Players wird
das Passwort nicht zurückgesetzt. VERGESSEN SIE IHR PASSWORT
NICHT; dieses Passwort kann nicht zurückgesetzt werden.
Stellt die Stilart des Player Menüs ein
SETUP
SPDIF/RAW
Lo/Ro
Stil 1
Winkel Markierung
Standard
Stellt die Winkelmarkierung Ein/Aus
Setzt alle Einstellungen in die Werkseinstellung
zurück
AN
Lesen
Page 92

28
SPECIFICATIONS
SPEZIFIKATIONEN
Hauptgerät
Stromversorgung
Stromverbrauch
Signal System
Video Ausgang
Audio Ausgang
Kopfhörer Anschluss
Signal/Lärmpegel (Audio)
Dynamik Reichweite (Audio)
Panel Größe
Auflösung
Laser
Funktionskonditionen
Abmessungen
Gewicht
Spezifikationen und Benutzerhandbuch unterliegen Änderungen ohne vorherige Benachrichtigung.
DC 9.0V 2A (AC Adapter Terminal)
15W
/ PAL
Negativ sync., 3.5mm mini jack x1
1.2Vrms (1KHz, 0dB), 3.5mm mini jack x1
3.5 mm Stereo mini jack x1
90dB typisch
90dB typisch
7 inch (16:9)
480(H)x234(V) (QVGA Pixel)
Wellenlänge 650 mm
Temperatur: 0°C bis 35°C, Operations Status: horizontal
202x162x40mm (Hauptgerät & Batterie)
868g (Hauptgerät & Batterie)
Page 93

29
KOPFSTUETZENANBRINGUNG
Montage im Fahrzeug
Die Kopfstützen Befestigungstaschen sind zum Anbringen des Hauptgerätes und Monitors an den Kopfstützen
•
Ihres Autos vorgesehen.
Die Tasche hat Riemen, die fest um die Kopfstütze herum angebracht werden und der Player kann sicher
•
darin aufbewahrt werden.
Befestigung
Befestigungsriemen
Hauptgerät
SICHERHEITSWARNUNG!
Dieses Gerät sollte auf gar keinen Fall vom Fahrer eines fahrenden Fahrzeuges benutzt werden
•
oder ungesichert während der Fahrt im Auto herum liegen.
Sollte dieses Gerät von einem Mitfahrer benutzt werden, achten Sie darauf, dass das Gerät gesichert
•
ist oder gut festgehalten wird und keine für die Sicherheit im Auto verantwortlichen Geräte (wie Airbag,
Sicherheitsgurte usw.) behindert.
Alle Mitfahrer sollten sich anschnallen, wenn Sie dieses Gerät in einem sich bewegenden
•
Fahrzeug benutzen.
Wenn Sie unsicher sind, kontaktieren Sie Ihren Fahrzeughersteller für weitere Hinweise. •
Die Verwendung anderer als für das Gerät vorgesehene Adapter kann Schaden am Spieler zur
•
Folge haben.
Straps
12V Auto Strom
Adapter mit AV Kabel
Monitor
Page 94

30
FEHLERBEHEBUNG
Fehlerbehebung Hauptgerät
Kein Strom
Stellen Sie sicher, dass der Stromschalter am Hauptgerät in die AN Position gestellt wurde.•
Stellen Sie sicher, dass das Stromkabel richtig mit dem Player und der Steckdose verbunden ist.•
Das Gerät spielt die Disk nicht ab.
Stellen Sie sicher, dass eine unterstützte Disk mit dem Aufdruck nach oben zeigend eingelegt wurde.•
Überprüfen Sie, dass die Altersbeschränkung der Disk nicht höher ist als die auf dem Player hinterlegte.•
Stellen Sie sicher, dass die Disk nicht beschädigt oder zu schmutzig ist.•
Säubern Sie die Disk oder probieren Sie eine andere CD aus. Feuchtigkeit kann im Player kondensiert
•
sein. Entnehmen Sie die Disk und lassen Sie den Player für 1-2 Stunden eingeschaltet. Versuchen Sie
es dann noch einmal.
Kein Bild
Stellen Sie sicher, dass das TV Set angestellt ist und der der korrekte AV Modus eingestellt wurde.•
Stellen Sie sicher, dass die Verbindungen zwischen dem Player und TV ordnungsgemäß sind.•
Überprüfen Sie, ob eventuell die Verbindungskabel beschädigt sind.•
Das Bild macht Geräusche oder ist verzerrt
Die Disk könnte beschädigt oder schmutzig sein. Säubern Sie die Disk oder probieren Sie eine
•
andere aus.
Setzen Sie Ihr TV Farbsystem zurück.•
Stellen Sie sicher, dass der Player direkt mit dem TV verbunden ist (nicht durch VCR, Kabelbox,
•
Satellitenreceiver usw.)
Das Bild ist kein Vollbild
Verändern Sie die Einstellungen für das Bildformat Ihres Players im Einstellungen Menü.•
Wählen Sie eine anderes Bildformat aus dem DVD Disk Menü.•
Kein Ton oder verzerrter Ton
Stellen Sie sicher, dass der TV und Amplifier angeschaltet und richtig eingestellt wurden.•
Page 95

31
FEHLERBEHEBUNG
•
Stellen Sie sicher, dass die TV und Amplifier richtig angeschlossen sind.
Probieren Sie durch Drücken von AUDIO aus, ob ein anderer Audio Titel auf der Disk funktioniert.
•
Stellen Sie sicher, dass sich der TV, Amplifier oder Player nicht in MUTE Funktion befinden.
•
Die Fernbedienung funktioniert nicht
•
Überprüfen Sie, ob der Strom Schalter auf EIN gestellt ist.
•
Stellen Sie sicher, dass sich zwischen Fernbedienung und dem Player keine Objekte befinden.
•
Zeigen Sie mit der Fernbedienung auf den Fernbedienungssensor am Hauptgerät.
•
Stellen Sie sicher, dass die Batterien in der Fernbedienung nicht leer sind und korrekt eingelegt wurden.
•
Tauschen Sie die Batterien aus.
Der Player funktioniert nicht
Ziehen Sie den Stecker aus der Steckdose. Stecken Sie nach 30 Minuten den Stecker wieder in die
•
Steckdose und stellen Sie den Player an. Die Wiederherstellen Funktion sollte den Player zurück setzen.
Fehlerbehebung Monitor
Kein Strom
Stellen Sie sicher, dass der Stromschalter des Monitors in die AN Position gestellt wurde.•
Stellen Sie sicher, dass der AC Adapter richtig mit dem Player und der Steckdose verbunden ist.•
Kein Ton oder verzerrter Ton
Stellen Sie sicher, dass die AV Kabelanschlüsse ordnungsgemäß sind.•
Stellen Sie sicher, dass sich der Monitor nicht in MUTE Funktion befindet.•
Das Bild macht Geräusche oder ist verzerrt
Setzen Sie das Farbsystem des Monitor zurück.•
Stellen Sie sicher, dass die AV Kabelanschlüsse ordnungsgemäß sind.•
Für weitere Informationen besuchen Sie bitte unsere Webseite
www.mpmaneurope.com
Page 96

Page 97

Lettore LCD DVD Portatile a Schermo
7” Gemello con Porta USB e Card Slot
TWIN700
Manuale d’uso
Leggere attentamente questo manuale prima dell’uso.
Page 98

2
PRECAUZIONI
ATTENZIONE
RISCHIO DI SHOCK ELETTRICO
NON APRIRE
ATTENZIONE :
PER RIDURRE IL RISCHIO DI INCENDIO E
DI SHOCK ELETTRICO NON RIMUOVERE MAI LA SCOCCA
SUPERIORE (O POSTERIORE) DELL’APPARECCHIO.
RICHIEDERE L’ASSISTENZA DI PERSONALE QUALIFICATO.
Per il cliente:
Inserire qui di seguito il numero di serie che si trova
sul fondo dell’apparecchio. Conservare questa
informazione per utilizzi successivi.
Modello No. TWIN700
No.di serire
Il simbolo di un lampo con la punta a freccia all’interno di un triangolo equilatero avverte
l’utilizzatore della presenza di un “voltaggio pericoloso” non isolato all’interno
dell’apparecchio di sufficiente entità da poter costituire un rischio di shock elettrico.
Il punto esclamatico all’interno di un triangolo equilatero avverte l’utilizzatore della presenza
di importanti istruzioni operative e di servizio all’interno del manuale che accompagna
l’apparecchio.
ATTENZIONE:
Per evitare pericoli di incendio o shock, non esporre l’apparecchio a pioggia o umidità. Pericolo dovuto all’alto voltaggio è presente
all’interno della scocca.
Non aprire
Toccare i cavi di questo apparecchio vi esporrà al contatto con piombo, un elemento chimico noto nello Stato della California per
provocare cancro difetti fetali e danni all’apparato riproduttivo. Lavarsi le mani dopo aver maneggiato i cavi.
ATTENZIONE:
Questo lettore DVD impiega un sistema di lettura al laser. Per evitare l’esposizione diretta ai raggi non provate ad aprire la
scocca o danneggiare le chiusure di sicurezza. Quando la scocca viene aperta e le chiusure danneggiate saranno vsibili i
raggi laser.
Per evitare shock elettrico, utilizzare prese elettriche adeguate alla spina ed inserire la spina completamente.
L’utilizzo di funzioni, riparazioni, procedimenti diversi da quelli qui specificati potrebbe risultare in pericolosa esposizione a
radiazioni.NON FISSARE I RAGGI
NOTA:
Questo prodotto include tecnologia protetta da copyright da patente statunitense e da altri diritti intellettuali. L’utilizzo di
questa tecnolgia deve essere autorizzato da Macrovision, ed è intesa per il solo uso domestico salvo differentemente
autorizzato da Macrovision. Il disassemblaggio dell’apparecchio è proibito.
FCC AVVERTENZA:
Questo apparecchio è stato testato ed è risultato essere conforme alle FFC Rules, Part 15, le operazioni
sono soggette alle seguenti condizioni:
(1) Questo apparecchio non causa particolari interferenze e (2) deve accettare ogni interferenza ricevuta
incluse quelle che possono provocare reazioni indesiderate.
Nota: Questo apparecchio è stato testato ed è risultato essere conforme ai limiti di classe B per i dispositivi
digitali. In conformità con le FFC Rules, Part 15, questi limiti sono designati per fornire protezione contro
pericolose interferenze in impianti residenziali. Questo apparecchio genera, fa uso e può emanare
frequenze radio e quindi se non installato ed utilizzato in conformità con le istruzioni può causare
interferenze con altre comunicazioni radio.
Non è comunque possibile garantire che interferenze non si verificheranno in particolari situazioni. Nel caso
si evidenzino interferenze a radio o TV, verificabili spegnendo e accendendo l’apparecchio, si consiglia di
prendere i seguenti provvedimenti:
– ricollocare o riorientare l’antenna di ricezione.
– connettere l’apparecchio ad una presa diversa da quella a cui è connesso l’apparecchio ricevente.
– consultare il rivenditore o un tecnico televisivo esperto.
L’utilizzo di un cavo schermato è necessario per ottenere la conformità con i limiti di Classe B nella
sottoparte B della parte 15 delle FCC Rules.
Page 99

3
PRECAUZIONI
Non apportare alcun cmbiamento o modificare l’apparechio a meno che non sia richiesto
dal manual. Se fossero necessary cambiamenti o modifiche, potrebbe essere richiesto lo
spegnimento dell’apparecchio.
Questo lettore ha inclusa una
Prodotto sotto licenza dai Laboratori Dolby.
Dolby e il simbolo doppia-D sono marchi registrati dei
Laboratori Dolby.
Lavori Confidenziali Non pubblicati.
1992-1997 Laboratori Dolby. Diritti riservati.
Per informazioni sul riciclo e la disposizione di questo articolo contattate le
autorità locali o Electronics Industries Alliance www.eiae.org
tecnologia di protezione del
copyright che impedisce di
copiare un DVD su qualunque
altro mezzo di comunicazione.
Se si connette un registratore di
immagini al lettore, le immagini
risulteranno distorte durante la
registrazione.
Page 100

4
IMPORTANTI ISTRUZIONI DI SICUREZZA
1. Leggere le istruzioni: tutte le istruzioni di sicurezza e di utilizzo devono essere lette con
attenzione prima dell’uso.
2. Conservare le istruzioni: tutte le istruzioni di sicurezza e di utilizzo devono essere
conservate per eventuale necessità successiva.
3. Attenersi alle indicazioni di sicurezza: tutte le precauzioni relative al prodotto e alle
procedure d’uso devono essere rispettate.
4. Seguire le istruzioni: seguire attentamente tutte le istruzioni per l’uso.
5. Pulizia: Staccare l’apparecchio dalla corrente prima di pulirlo. Non utilizzare detergenti
liquidi o al vapore.Utilizzare un panno umido.
6. Componenti: Usare solo componenti raccomandati dal produttore. L’utilizzo di accessori
diversi può rivelarsi pericoloso.
7. Acqua e umidità: Non utilizzare il prodotto vicino ad acqua (es. Vasca da bagno, lavandino,
lavabo, cantine umide, piscine e simili).
8. Calore: l’apparecchio deve essere tenuto lontano da fonti di calore come radiatori, stufe ed
altri impianti (inclusi amplificatori) che producono calore.
9. Accessori: Non appoggiare questo apparecchio su piani, basi, mensole
o tavoli instabili. Utilizzare solo piani, basi, tripodi, mensole e tavoli
raccomandati dal produttore o venduti unitamente al prodotto.
Il montaggio del prodotto deve seguire le istruzioni del produttore e
servirsi di accessori raccomandati dal produttore stesso.
10. Il prodotto posto su un carrello deve essere spostato con cautela.
Brusche frenate, forza eccessiva e pavimenti irregolari possono
causare ribaltamento.
11. Ventilazione: Fessure e aperture nella scocca hanno scopo di permettere la ventilazione del
prodotto e di proteggerlo da surriscaldamento Queste aperture non devono mai essere bloccate
appoggiando l’apparecchio su letti, sofà, tappeti o altre superfici simili. Questo apparecchio non
deve essere posto all’interno di strutture chiuse come librerie a meno che non ci si assicuri della
presenza di una corretta ventilazione e che non si seguano le istruzioni del produttore.
12. Alimentazione: Quest’apparecchio deve essere alimentato solo con le fonti segnalate sulla
relativa etichetta. Se non siete sicuri della portata elettrica di casa vostra, consultate il venditore
dell’apparecchio o la compagnia elettrica locale. Riferitevi al manuale di istruzioni per le parti che
si alimentano a pile, corrente o altre fonti.
13. Fonti di energia: non connettere la spina dell’apparecchio a fonti di energia che non siano indicate
qui o sull’etichetta perchè potrebbe risultarne un incendio o rischio di elettroshock. Non
maneggiate la spina elettrica con mani bagnate per evitare rischi di shock elettrico.
14. Linee elettriche: Un eventuale sistema di antenne esterne non deve mai essere collocato nella
vicinanza di linee elettriche o altri circuiti elettrici o in posizioni in cui possa cadere su simili linee e
circuiti. Quando si s’intalla un sistema di antenne esterne deve essere fatta particolare attenzione
a non toccare linee elettriche e circuiti perchè un eventuale contatto potrebbe risultare fatale.
15. Batteria: Pericolo di esplosione se la batteria non sarà inserita nel modo corretto. Sostituire
esclusivamente con batterie dello stesso tipo o equivalenti. Le batterie inserite non devono
essere esposte a fonti di calore eccessive come luce solare diretta, fuoco o simili.
16. Riduttore Auto 12V: Disconnettere il riduttore auto quanto non utilizzato. Non utilizzare in
veicoli 24V.
 Loading...