

Page 1
TS430 Multimedia Player
User Guide
Page 2

TableofContents
Safety Instructions.......................................................................................................... 1
Getting Started................................................................................................................ 2
Components............................................................................................................... 2
Locating the Controls ................................................................................................. 2
Turning the Product On/Off........................................................................................ 3
Selecting Mode .......................................................................................................... 3
Using the Hold Switch................................................................................................ 4
Using the Reset Opening........................................................................................... 4
Installing Micro SD Card ............................................................................................ 4
Connecting the Product ................................................................................................. 5
Connecting Earphones .............................................................................................. 5
Charging the Product ................................................................................................. 5
Via the PC........................................................................................................................5
Via AC Adapter................................................................................................................6
Connecting to TV ....................................................................................................... 6
Connecting to the PC................................................................................................. 6
Disconnecting the Product from the PC ..................................................................... 7
Copying Files/Folders to the Product ......................................................................... 7
Using the Product...........................................................................................................8
Music ......................................................................................................................... 8
Selecting Music...............................................................................................................8
Screen Display While Playing Music ...........................................................................9
Deleting a Music File......................................................................................................9
Video........................................................................................................................ 10
Selecting Video.............................................................................................................10
Screen Display While Playing Video .........................................................................11
Deleting a Video File....................................................................................................11
Photo ....................................................................................................................... 12
Selecting a Photo .........................................................................................................12
Screen Display While Viewing a Picture...................................................................12
Additional Features ......................................................................................................12
Record ..................................................................................................................... 13
Recording ......................................................................................................................13
Screen Display While Recording ...............................................................................13
Listening to Recorded Files ........................................................................................13
Deleting Recorded Files ..............................................................................................14
Radio ....................................................................................................................... 14
Turning on FM Radio ...................................................................................................14
Listening to FM Radio..................................................................................................14
Ebook....................................................................................................................... 15
Selecting Text................................................................................................................15
Screen Display While Viewing Text ...........................................................................15
Page 3

Additional Features ......................................................................................................16
Deleting a Text File.......................................................................................................16
Time......................................................................................................................... 16
Selecting Time ..............................................................................................................16
Additional Features ......................................................................................................16
Setting up the Unit ................................................................................................... 17
Selecting Setting...........................................................................................................17
Date & Time...................................................................................................................17
Display ...........................................................................................................................17
Timer ..............................................................................................................................18
Advanced.......................................................................................................................18
Language.......................................................................................................................18
System Information ......................................................................................................18
Video Conversion.......................................................................................................... 19
Troubleshooting............................................................................................................ 19
Technical Specifications...............................................................................................20
Page 4

Safety Instructions
y Keep away from harsh environments including hot, humid, and dusty areas. This may
cause malfunction.
y Do not drop or subject the device to violent shock or impact.
y Do not place objects such as coins or hair pins inside the product, or expose the player
to sources of moisture such as water, beverages, chemicals, cosmetics, and so on.
y Do not clean the product and its accessories with chemicals, detergents or wet cloths.
y Do not dispose of the product in fire, otherwise, the battery may explode.
y Never dismantle, repair, or rebuild your player without authorization.
y Do not disconnect USB cable or power cable while data reading or writing, otherwise, it
may cause data loss or damage to the product.
y Do not touch the screen with sharp tools.
y At your initial use, fully charge and discharge the battery for two to three times for best
performance of battery.
1
Page 5
Getting Started
Components
Make sure you have following items included with your unit.
The number in parenthesis indicates the number of that item supplied.
y Product (1)
y USB cable (1)
y Earphone (1)
y Quick start guide (1)
y Manual CD (1)
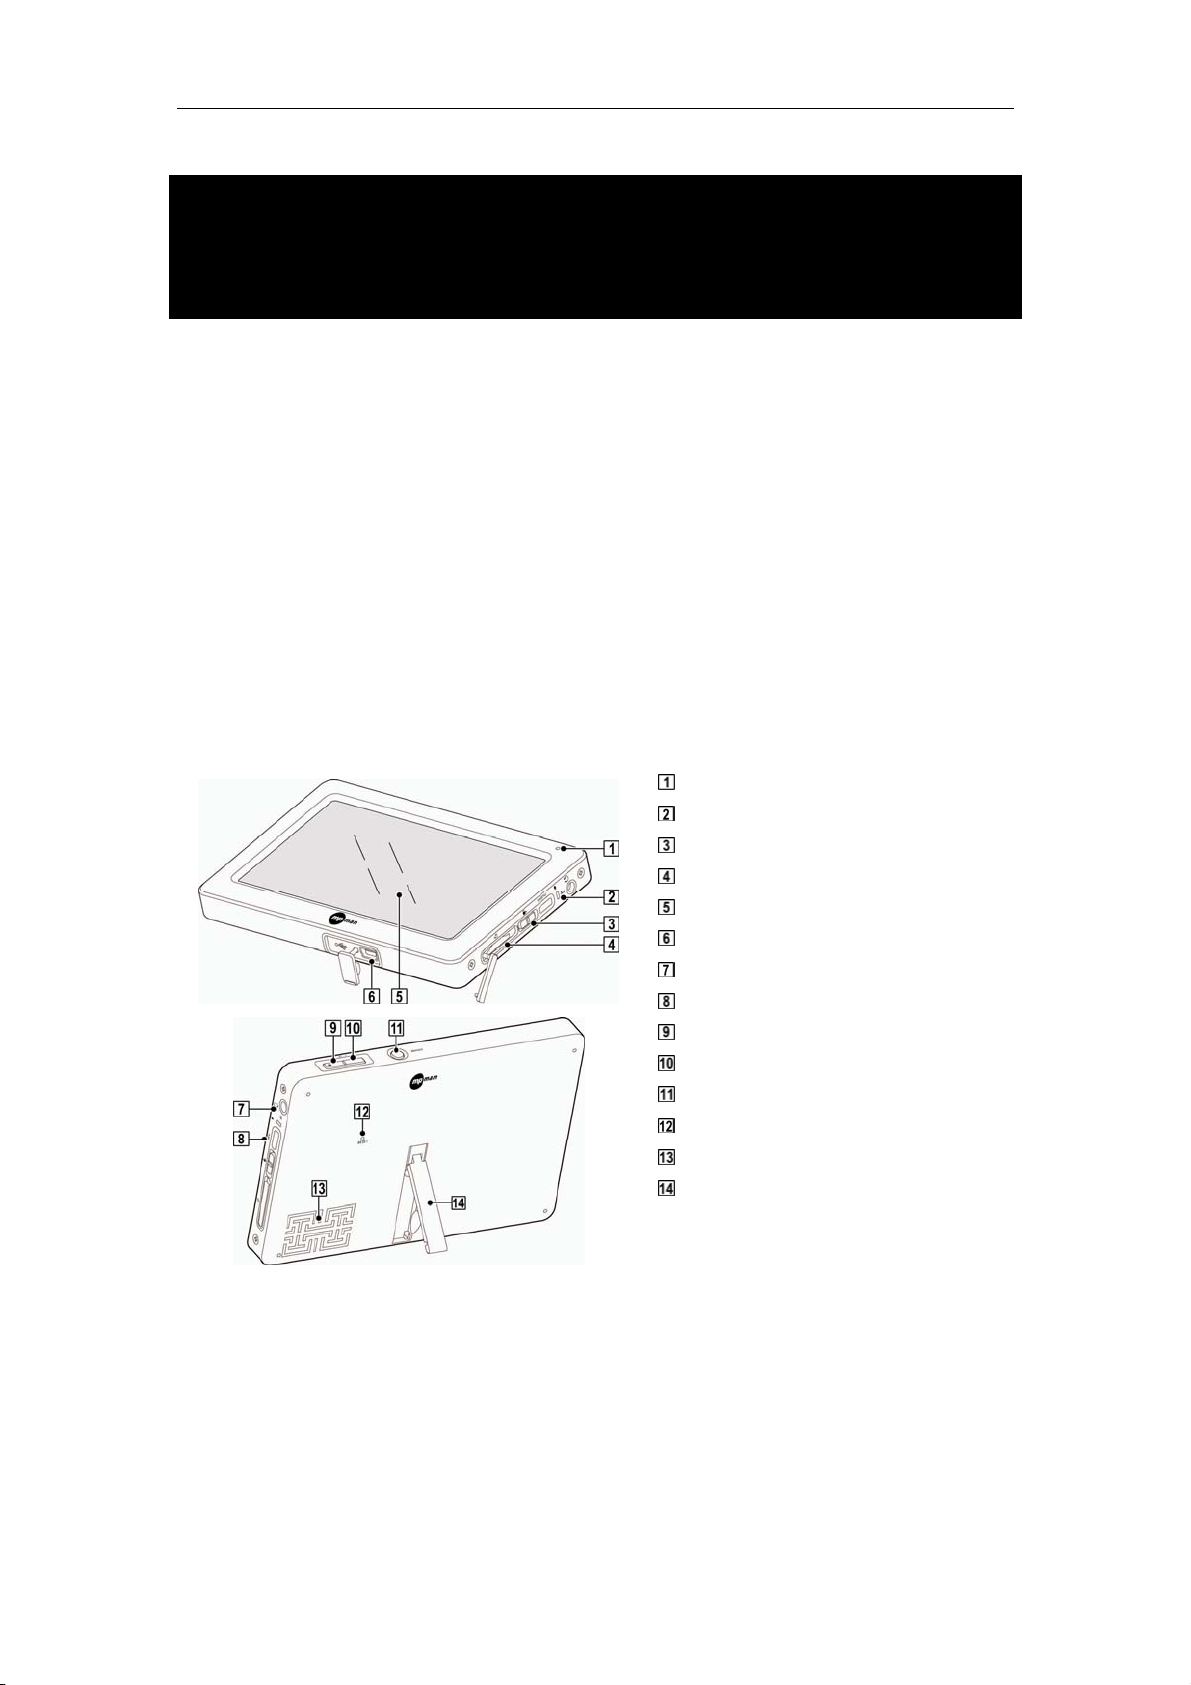
Locating the Controls
Battery Charge Indicator
Microphone
Hold Switch
Micro SD Card Slot
Touch Screen
USB Port
Headphone Ports/AV Cable Socket
Menu Button
Vol+ Button
Vol- Button
Power Button
Reset Opening
Speaker
Stand Holder
2
Page 6

Turning the Product On/Off
Power-on: Press and hold the Power button
to turn on the product.
Power-off: press and hold the Power button
to turn off the product.
This product has an automatic power saving
function to save battery power. Based on the
settings in power save mode, the product will be
automatically turned off after a pre-determined
period without operation. For details on setting this
mode, refer to [Setting > Timer > AutoShut Time].
Selecting Mode
1. Turn on the product to display the menu screen.
2. Touch the respective part for Radio, Setting, Video, Time, Music, Record, Ebook or
Photo to enter the respective mode.
3. While operating any mode, touch [Menu] or press the Menu button to return to the
menu screen; and touch the
icon to return to the previous screen.
3
Page 7
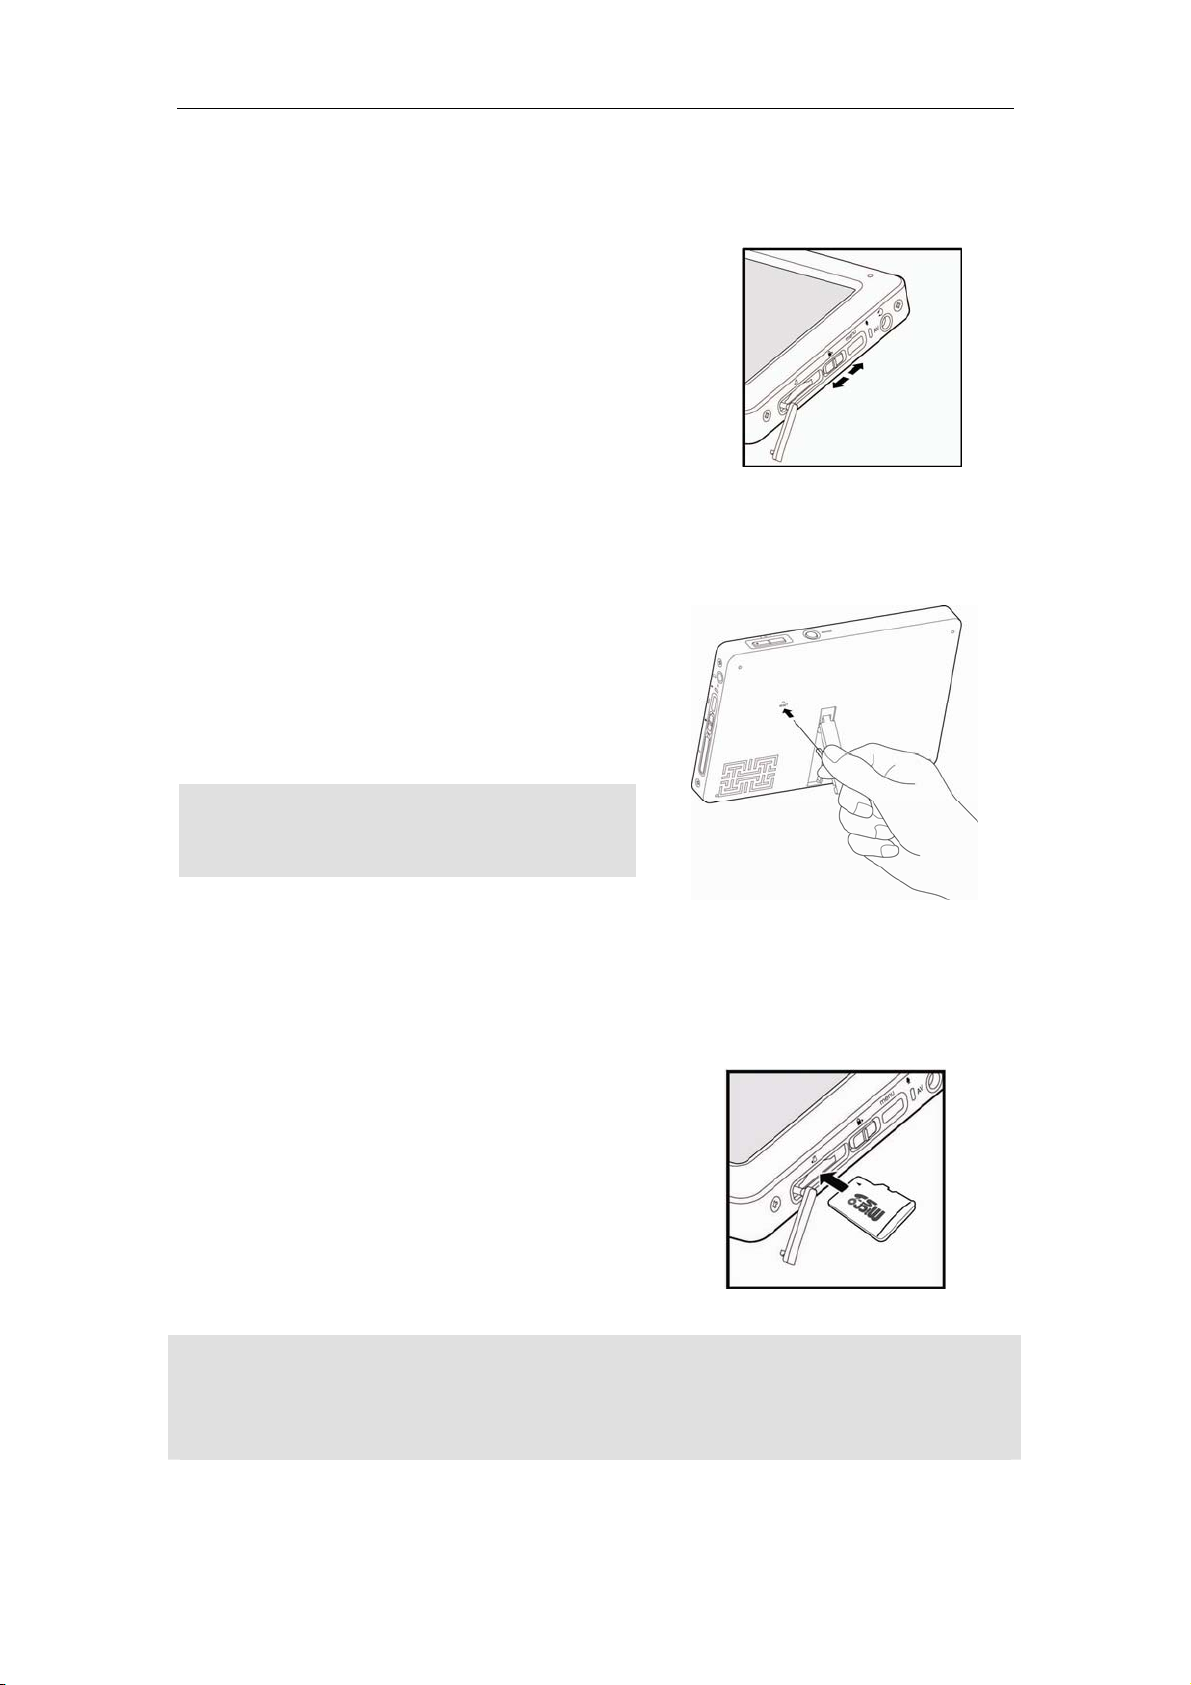
Using the Hold Switch
1. Slide the hold switch in the direction of the
Menu button to lock the product.
2. Slide the hold switch in the direction of the
Micro SD card slot to unlock the product.
Using the Reset Opening
If the product stop working or does not respond to
any operation, depress the reset opening at the
back of the product with a paper clip. Press and
hold the Power button to turn on the product
again.
Performing RESET does not remove the date/time
setting and data in your device.
The product turns off when you reset it.
Lock
Unlock
Installing Micro SD Card
You can expand the product’s memory with a
Micro SD card.
1. Remove the Micro SD card slot cover.
2. Insert the card as indicated by the indicator at
the slot. Push the card into the slot till it
clicks. The card is locked in the slot.
3. Turn on the product and it will automatically
read data from the card.
Never force the card into the card slot as this could damage the card and/or the product.
Never remove the card out of the card slot when operating the player. Otherwise, it may cause data
loss or damage to the device or the memory card. Turn off the product prior to card removal.
Never touch or dirt the contact of the memory card.
4
Page 8

To remove the card:
1. Turn off the product and remove the card slot cover.
2. Gently use your finger to push the card inwards and release it for its bouncing out of
the card slot.
Connecting the Product
Connecting Earphones
Connecting earphones to the Headphone port.
Charging the Product
Via the PC
1. Turn on the PC. Connect the product to the PC via the supplied USB cable.
2. The internal battery will charge automatically.
The battery charge indicator lights red while charging and turns white after the battery
is fully charged.
PC in the stand-by mode cannot charge the product.
Charge the product at room temperature. Charge may fails at the extreme temperatures.
5
Page 9

Rechargeable battery life shortens after a period of usage.
It takes longer time to finish charge if you operate the product while charging.
Via AC Adapter
1. Connect the USB plug of the AC adapter to
the USB port on the product.
2. AC adapter plugs to the household power outlet.
3. The internal battery will charge
automatically.
The battery charge indicator lights red while
charging and turns white after the battery is
fully charged.
Connecting to TV
TV serves as the external display equipment for the product. Connect the product with TV
via the supplied AV cable and watch movies at the TV.
1. Turn on the TV.
2. Turn on the product and play a movie.
3. Connect the product to the TV via the supplied AV cable.
Connect the connector on the AV cable to the headphone/AV cable socket on the
product. Connect the yellow, white and red connectors respectively to the Video, L and
R sockets on the TV. (Note: Make sure colors all match up properly.)
4. Press the Menu button and the product prompts [Switch to TV]. Click [Yes]. While
watching movies on TV, control the volume level with Vol+/Vol- buttons. Press the
Menu button to switch the movie playback to the product.
Connecting to the PC
1. Turn on the product.
2. Turn on the PC and connect the product to it using the USB cable provided.
3. The USB Connected message appears on the screen: [Power & Data], [Power & Play],
[Power only]. [Power & Data] is the choice by default.
- Power & Data: The charging process starts and you can transfer data.
6
Page 10

- Power & Play: The charging process starts and you can use the product.
- Power only: Charges the battery only.
Note: Stop all operations before connecting the product to the PC for best performance.
Disconnecting the Product from the PC
1. Click the icon on the taskbar to disconnect the product using the Safely Remove
Hardware menu.
2. Click the Stop button to confirm disconnection.
The icon on the taskbar may be hidden in some operating systems.
Click Show hidden icons to display the hidden icon.
The Safely Remove Hardware function may not be available while using some
applications such as Windows Explorer or Windows Media Player. Close all
applications first before performing the Safely Remove Hardware.
If the Safely Remove Hardware is not performed properly, try again after a few minutes.
If the product is removed without observing the above process, data in the product
might be damaged.
Copying Files/Folders to the Product
Select the desired files/folders in your PC and drag & drop to the drive which appears as
the product.
Always properly connect the product and PC.
When you transfer data, never disconnect it or turn off the power to protect your data from damage.
Transfer speed may vary depending on your computer and/or OS environments.
Deleting Files/Folders from the Product
1. Connect the product to your PC and open the drive which appears as the product.
2. After selecting the desired file/folder, right-click with your mouse and select [Delete].
3. Click [Yes] in the [Confirm File Delete/Confirm Folder Delete] popup window to delete
the file/folder.
7
Page 11

Using the Product
Music
Selecting Music
1. In the menu, touch the music part to display the music list.
2. Touch the
/ icon to scroll through the list and touch a music to play it.
While playback, press the Vol+/Vol- button to control the volume level.
Touch a folder to enter it, and touch the icon to move to the upper folder.
Supporting file formats:
Audio Codec Format Range of Sampling Rate Range of Data Rate Extension
MPEG1/2/2.5 Audio Layer 3 8-48KHz 96-320Kbps, CBR/VBR .MP3
WMA9 8-48KHz 80-192Kbps .WMA
MS-ADPCM, IMA-ADPCM, PCM 8-48KHz / .WAV
V3.99 8-48KHz / .APE
Q-1- Q10 8-48KHz / .OGG
FLAC 8-48KHz / .FLAC
MPEG-4 AAC-AUDIO 8-48KHz 64-384Kbps .AAC
The browsed result will be changed based on the setting in [Setting > Advance > Music Browser Type]
- DB Type: Browses files by Current Play, All Music, Artist, Album, Genres, My Favorite and Record.
- Folder Type: Browse music file by folder.
8
Page 12

Screen Display While Playing Music
Return to the menu.
Return to previous screen.
Play mode: Touch to display the play mode list
(All, Repeat, All Repeat, Shuffle, All Shuffle); touch
a setting to apply to music playback.
Equalizer setting: Touch to display the EQ mode
(Normal, Rock, Pop, Classic, Bass, Jazz); touch a
setting to apply to music playback.
Title of the track (file name).
Total length of the track.
Display the bookmark menu bar.
Make a bookmark.
A-B Repeat: Activate/deactivate loop repeat.
Next track/fast forward: Touch to play the next
music, or touch and hold to fast forward the current
playback.
Playback progress bar.
Play/pause music.
Previous track/rewind: Touch to play the
previous music, or touch and hold to fast rewind
the current playback.
Elapsed time.
Close the bookmark menu and return to the
music playback menu.
Delete all bookmarks.
Delete the current bookmark.
Move to the next bookmark.
Temporal location of the current bookmark in
the music playback.
Touch the bookmark to play music from the
bookmarked point.
Move to the previous bookmark.
Deleting a Music File
1. Touch the / icon to scroll through the music list and select a file you want to delete.
2. Touch and hold the file name and the screen prompts [Delete File?].
3. Touch [YES] to delete the selected file; select [NO] to cancel the operation.
9
Page 13

Video
Selecting Video
1. Touch the video area on the main menu to display the list of video files.
2. Touch the
Press the Vol+/Vol- button to control the volume level during playback.
Touch a folder to enter it, and touch the icon to move to the upper folder.
Supporting file formats:
Video Codec Format Highest Data Rate Frame Rate Max. Resolution Extension
Xvid, Divx3/4/5, MS MPEG-4 V3 ≤1.2Mbps ≤25fps 720x480 .AVI
Real Video Codec 8/9/10 ≤1Mbps ≤25fps 720x480 .RM, .RMVB
WMV7/8/9 ≤1Mbps ≤25fps 720x480 .WMV
Sorenson H.263 ≤800Kbps ≤25fps 640x480 .FLV
MPEG-I ≤1Mbps ≤25fps 640x480 .DAT, .MPG
/ icon to scroll through the list and select a video file to play.
10
Page 14

Screen Display While Playing Video
Return to the menu.
Return to the previous screen.
Total length of the video file.
Display the bookmark menu bar.
Make a bookmark at a specification position.
Playback progress bar.
Next video/fast forward: Touch to play the next
video, or touch and hold to fast forward the current
video playback.
Start/pause playback.
Previous video/rewind: Touch to play the previous
music, or touch and hold to fast rewind the current
playback.
The product supports the soft subtitle only.
Deleting a Video File
Elapsed time.
Close the bookmark menu and return to the video
playback menu.
Delete all bookmarks.
Delete the current bookmark.
Move to the next bookmark.
Temporal location of the current bookmark in
the music playback.
Touch the bookmark to play video from the
bookmarked point.
Move to the previous bookmark.
1. Touch the / icon to scroll through the video list and select a file you want to delete.
2. Touch and hold the file name and the screen prompts [Delete File?].
3. Touch [YES] to delete the selected file; select [NO] to cancel the operation.
11
Page 15

Photo
Selecting a Photo
1. Touch the photo area on the main menu to display the list of thumbnail photo files.
2. Select a picture file to display in full screen.
3. Slide rightward on the screen with a finger or a stylus to view the next picture; slide
leftward to view the previous picture.
Touch a folder to enter it, and touch the icon to move to the upper folder.
Supporting file formats:
Picture Codec Format Max. Resolution Extension
JPEG 3264x2448 .JPG
Bitmap 3264x2448 .BMP
GIF 999x999 .GIF
Picture file cannot be deleted from the product directly. You need to connect the product to your PC
and delete the picture file on the computer (Refer to “Deleting Files/Folders From the Product” of
Section “Connecting the Product”.)
Screen Display While Viewing a Picture
Display additional features.
Return to the main menu.
Return to the previous screen.
Picture file name.
Rotate the picture.
Start/pause the slideshow.
Additional Features
1. While a picture is displayed, touch the icon on the screen to display additional
features.
2. Touch the additional feature to display the sub items.
3. Touch the item to run it and hide additional features.
Image Delay Set the duration to perform slideshow.
Option: 3 Sec, 5 Sec, 7 Sec, 9 Sec
Slide Transition Set an effect of slideshow.
Option: Turn, Circle Shrink, Gather Leave, Spread out/in, Mix
Screen Fit Zoom in or out a picture to fit best within the border of display.
Option: On, Off
12
Page 16

Record
Recording
1. Touch the record area on the main menu to show recording ready screen.
2. Touch the
Touch [Save] to stop recording and save the record file.
You cannot control the volume while recording.
If the remaining memory space or power is insufficient, recording will automatically stop.
The recorded file will be saved in the RECORD folder as following format.
VRECXXX.WAV (VREC: voice record; XXX: sequential number)
The file size per one minute varies by the recording quality.
Low: Approx. 67 kbps / Middle: Approx. 92 kbps / High: Approx. 128 kbps
Screen Display While Recording
icon on the screen to start recording.
Display the list of recorded files.
Return to the main menu.
Return to the previous screen.
Recorded file name.
Available time remaining.
Start/stop recording.
Recording quality: select the quality of
recording.
- Option: High, Medium, Low.
Elapsed time of recording.
Record file list.
Touch the [-] icon to delete the file.
Elapsed time of voice playback.
Start/pause playback.
Progress bar.
Total length of voice file.
Listening to Recorded Files
1. Touch the icon on the screen to display the list of recorded files.
2. Select a file and touch the
icon to play it.
13
Page 17

Deleting Recorded Files
1. Touch the icon on the screen to display the list of recorded files.
2. Select a file and touch the minus (-) icon at the right of the file name. The screen
prompts [Delete File?].
3. Touch [YES] to delete the selected file; touch [NO] to cancel the operation.
Radio
Turning on FM Radio
1. Touch the radio area on the main menu to enter the radio mode.
2. Touch the </> icon to select the preset channel.
Listening to FM Radio
Display/hide the CH (preset channel) and REC
(radio recorded file) lists.
Return to the main menu.
Return to the previous screen.
Make the radio silent.
Move to the next preset channel or the next
frequency.
Currently listening frequency.
Record the radio program you are listening to.
Activate/deactivate the preset channel.
Recording quality: Set the quality of recording.
- Options: High, Medium, Low.
Receive area: Set the frequency range based
on the local standard.
- Option: USA, China, Europe.
Auto search: Automatically scan and store the
available frequencies as the preset channels.
- Up to 30 channels can be stored.
Move to the previous preset channel or the
previous frequency.
The preset number of the currently listening
frequency.
Recorded file list:
- Touch a recorded file to listen to it.
- Touch the [-] icon to delete the file.
List of preset channels:
- In the list, touch a preset number to listen to the
preset channel.
- Touch the [+] icon to save the currently
listening frequency as a preset channel.
- Touch the [-] icon to delete the preset
channel.
14
Page 18

Ebook
Selecting Text
1. In the menu, touch the Ebook part to display the text file list.
2. Touch the
Touch a folder to enter it and touch the icon to move to the parent folder.
If texts are not displayed properly, check the language setting.
Supporting file formats
Text Codec Format Support Language Extension
ANSI English, Spanish, French, German, Italian, Dutch, Czech. .TXT
Screen Display While Viewing Text
/ icon to scroll through the list and touch a text file to view it.
Display/hide additional features.
Return to the menu.
Move to the previous screen.
Scroll the text up.
Scroll the text down.
Total number of pages in the text.
Display the bookmark list.
- Touch the
through the bookmark list.
- Touch a bookmark to view the text
from the marked position.
- Touch the [-] icon to delete the
bookmark.
/ icon to scroll
Make a bookmark.
Start/pause the automatic scroll.
Touch a specific position on the progress
bar to view the text from that point.
Display the number of the currently
viewed page.
15
Page 19

Additional Features
1. Touch the icon on the screen to display additional features while viewing the text
file.
2. Touch the additional feature to display the sub items.
3. Touch the item to run it and hide additional features.
Set Font Select the size of characters.
- Option: Font Small, Font Mid, Font Big.
Auto scroll speed Set the duration for which a text page is displayed in the automatic scroll.
- Option: 10 Sec, 15 Sec, 20 Sec, 25 Sec, 30 Sec.
Deleting a Text File
1. Touch the / icon to scroll through the text file list and select a file.
2. Touch and hold the selected file with a finger or the stylus. The screen prompts [Delete
File?].
3. Touch [YES] to delete the selected file. Touch [NO] to cancel the operation.
Time
Selecting Time
In the menu, touch the Time part to enter the clock mode.
Additional Features
1. Touch the icon on the screen to display additional features.
2. Touch the additional feature to run it and hid the feature list.
Clock Check time.
Calendar Check the calendar.
Calculator Use the calculator.
16
Page 20

Setting up the Unit
Selecting Setting
For example: How to adjust the brightness.
1. In the menu, touch the Setting part to display the setting list.
2. Touch the
items.
For example: Touch [Display].
/ icon to scroll through the list and touch the setting to display the sub
3. Set the details for sub items. The unit will automatically save the setting.
For example: touch [Medium] in [Brightness].
Date & Time
Set the current date and time.
- Touch the field and it becomes highlighted.
- Touch the
/ icon to set the value of each field.
Display
Brightness
Select the brightness of the screen.
Option: Low, Medium, High*
* Factory default setting.
Touch Sound
Turn the touch sound on/off.
Option: On, Off*
17
Page 21

* Factory default setting.
Touch Calibration
Perform calibration to align the touch screen’s coordinates with those on the display.
Timer
Auto Shut Time
Automatically turn off the power after the specified time without operation.
Option: Off, 1 Minute*, 3 Minutes, 5 Minutes, 10 Minutes, 15 Minutes.
* Factory default setting.
Backlight
Automatically turn off the backlight after the specified time without operation.
Option: Off, 30 Second*, 1 Minute, 3 Minutes, 5 Minutes, 10 Minutes, 30 Minutes.
* Factory default setting.
Advanced
Music Browser Type
Select the type for browsing music files.
- DB Type*: Browse music files by [Current Play], [All Music], [Artist], [Album], [Genres],
[My Favorite] and [Record].
- Folder Type: Browse music files transferred by Windows Explorer.
* Factory default setting.
Rebuild DB
Manually update the data library of all files after deleting the music, text or video file in the unit.
Language
Select the language for on-screen display.
Option: English*, Spanish, French, German, Italian, Dutch, Czech.
* Factory default setting.
System Information
Version
Display the version number of the current firmware.
Reset All Setting
Reset the unit to the factory setting.
This feature return the auto shut time, backlight and other setting to factory default and
does not delete any files or data in the unit.
Local Memory Size
Display the used and total memory space.
18
Page 22

Card Memory Size
If a Micro SD card is inserted, the used and total memory space of the memory card will
appear.
Video Conversion
For movie and music synchronisation and conversion, please use MPMANAGER
software supplied in the CD ROM. This software can be used also for UPDATE of your
player MPMANAGER manual is included in your CDROM.
Troubleshooting
Can not turn on the unit!
- Check whether the battery is exhausted. Charge the unit and turn it on again.
- Reset the device by briefly depressing the reset opening with a paper clip. Press and hold the power
button to turn on the unit.
The unit cannot be charged after connecting power.
- Check whether the unit and your PC are firmly connected.
The unit cannot be connected properly via USB cable.
- Check whether the USB cable is firmly connected on your PC USB port.
The screen turns off frequently.
- To save power consumption, the screen is designed to be turned off after designated time. Set up the
duration in Setting > Timer > Backlight
The screen is not clear.
- Check whether the screen is dirty.
Poor radio reception with heavy interference!
- Check whether the headphone port is dirty.
- Check whether the earphones are connected.
- Adjust the position of the player and earphones.
- Turn off any nearby electronic equipment to avoid potential interference.
19
Page 23

Technical Specifications
Storage Memory*
Size
Weight
Connector
Power Supply
Display
Supporting Formats**
Signal Noise Ratio
Frequency Response
Headphone Output
Firmware
Compatible OS
Supported File Format
* Nominal capacity is defined by physical storage capacity and the actual capacity may be smaller
than the nominal one because of the occupation by formatting and other functions.
** Damage to files, variation of compress coding software versions and copyright p rot ection ma y
cause some formats listed above to fail in playback.
- Internal: 4GB/8GB NAND Flash
- External: Micro SD card (not supplied) (up to 16GB)
L 119 mm x W 78.5 mm x H 14.3 mm
147.5 g
- Headphone: 3.5 mm
- Mini-USB 2.0
Built-in 1950 mAh rechargeable battery.
4.3” TFT LCD (WQVGA) touch screen.
- Video: RM, RMVB, AVI, FLV, WMV
- Audio: MP3, WMA
- Picture: JPG, BMP, GIF
- Text: TXT
≥90 dB
20 Hz ~ 20 KHz
≤4.4 mW (each channel)
Upgradeable based on flash.
®
Windows
FAT/FAT32
2000/XP/Vista
For more information please check our website
www.mpmaneurope.com
20
 Loading...