

Page 1

Page 2

1
Gentile cliente
Grazie per aver scelto questo televisore Led .E’ importante leggere attentamente le
Avvertenze di sicurezza e di utilizzo prima di accendere e utilizzare l’apparecchio.
E’necessario osservare tutte le istruzioni e le avvertenze contenute nel presente manuale
o riportate sull’ apparecchio.
INDICE
Funzioni Teletext
22
Importanti Avvertenze di Sicurezza
2
Contenuto della confezione
4
Comandi di controllo e connettori
Pannello Frontale
Pannello posteriore
Telecomando
5
5
6
7
Installazione Telecomando
Installazione delle batterie
9
9
Funzionamento di Base
10
10
10
10
10
10
Regolazione dell'immagine
12
12
12
13
15
18
Modalita’ di funzionamento supportate
23
24
Specifiche tecniche
25
19
10
Per accendere o spegnere la TV
Per regolare il volume
Tasto Mute
Selezionare ingresso
Selezione di un canale TV
Scelta del suono
Utilizzo del Menu
Regolazione del suono
Sintonizzazione dei canali
Funzioni Porta Usb
Risoluzione dei problemi
Guida all'installazione della base
26
Regolazione delle impostazioni
Regolazione delle opzioni
11
Accendere il TV per la prima volta
Page 3
2
IMPORTANTI AVVERTENZE DI SICUREZZA
L'apparecchio non deve essere esposto a sgocciolamenti o spruzzi, e nessun oggetto contenente
liquidi, come vaso, deve essere posto su di esso.
Non coprite la TV LED.
Non collocate I'apparecchio in mobili incassati (come ad esempio armadi chiusi), che non garantiscono
una ventilazione sufficiente .
Evitate gli ambienti troppo caldi.
II calore potrebbe danneggiare la TV LED e causare una deformazione del corpo dell'apparecchio o un
incendio
Leggere questo manuale
Leggere attentamente questo manuale prima di adoperare il prodotto.
Conservare questo manuale
Conservare questo manuale per un'eventuale futura consultazione.
Osservare tutte le avvertenze
Osservare attentamente tutte le avvertenze sul prodotto e nel manuale.
Non inserire liquidi o oggetti
Al fine di prevenire incendi o shock elettrico, non inserire alcun oggetto nelle aperture del televisore.
Usare particolare cautela nei luoghi in cui sono presenti bambini. Nel caso in cui liquidi o oggetti entrino
in contatto con il televisore, togliere immediatamente la corrente, staccare la spina e contattare il
personale qualificato.
Non posizionare il TV LED vicino a vasca da bagno, bagno, lavandino, superfici umide o piscine.
Non esporre il TV LED a pioggia o umidità.
Non posizionare vasi di fiori, tazze, cosmetici, liquidi come acqua ecc. sopra o nelle vicinanze del televisore.
Non posizionare metalli, combustibili, ecc. nelle vicinanze del televisore.
Non bagnare o esporre il televisore a sgocciolamento di liquidi.
Evitare urti al televisore
Se il televisore è stato sottoposto ad urti o risulta danneggiato, continuare ad utilizzarlo può causare shock
elettrico o fuoco.
Se il pannello è danneggiato, staccare la spina dalla rete elettrica e consultare il personale tecnico
qualificato.
Prevenire la caduta dell'apparecchio
Per fissare il televisore ad una parete è assolutamente necessario utilizzare un supporto,
in grado di sostenerne il peso. Qualora successivamente si decidesse di rimuovere
l'apparecchio dalla parete, si consiglia di rimuovere innanzitutto il supporto.
Non consentire ai bambini di salire sul TV LED.
Non collocare il TV LED su letto, divano, coperte, o superfici simili. Non collocare il TV LED su carrelli,
tavoli o superfici instabili. Il TV LED potrebbe cadere, danneggiandosi ed arrecando danni alla persona.
Quando il prodotto è utilizzato su un carrello, si deve fare attenzione per evitare arresti rapidi, forza
eccessiva e superfici irregolari che potrebbero causare un capovolgimento del prodotto e del carrello.
Questo simbolo indica all'utente
la presenza all'interno
dell'apparecchio di una corrente
pericolosa non isolata, di valore
sufficiente a costituire un rischio
di scossa elettrica per le persone.
Questo simbolo avverte
utente della presenza
di importanti istruzioni nel
manuale che accompagna
l'apparecchio.
l'
RISCHIO DI SCOSSA
ELETTRICA.
NON APRIRE.
ATTENZIONE
PER EVITARE IL RlSCHlO Dl SCOSSA
ELETTRICA NON APRITE IL CORPO
IN PLASTICA. ALL’INTERNO NON Vl
SONO COMPONENTI RlPARABlLl
DALL'UTENTE.
RIVOLGETEVI AD UN TECNICO
QUALIFICATO PER QUALSlASl
OPERAZIONE Dl MANUTENZIONE.
Page 4

3
IMPORTANTI AVVERTENZE DI SICUREZZA
Non esponente la TV o il telecomando alla luce diretta del sole o in prossimitá di un oggetto che
emette calore, ad esempio un radiatore.
Non collocate la TV in un luogo soggetto a grandi variazioni di temperatura.
Non collocate la TV in prossimità di un piano di cottura o di un apparecchio per la cottura.
Non collocate la TV LED in una stanza vicino al piano di cottura. E possibile che della polvere
impregnata di olio penetri nell'apparecchio, danneggiandolo.
Protezione del cavo di alimentazione
Un collegamento scorretto del cavo di alimentazione può provocare incendio o scossa elettrica.
L'apparecchio deve essere collegato ad una presa di corrente con la messa a terra.
Collocate la vostra TV LED vicino ad una presa di corrente facilmente accessibile.
Non sovraccaricate la presa di corrente per evitare il rischio di incendio o scossa elettrica.
Prima di utilizzarla, verificate che la spina del cavo di alimentazione sia pulita (che non ci sia polvere).
Utilizzate un panno morbido e asciutto per pulirla.
Posizionate il cavo di alimentazione in modo che non possa essere calpestato, o danneggiato
da altri oggetti. Non collocate mai oggetti pesanti sul cavo di alimentazione.
Non toccate mai il cavo di alimentazione con le mani umide.
Scollegate il cavo di alimentazione tirando la presa (e non il cavo stesso).
lnserite correttamente la spina in una presa di corrente. Non utilizzate una presa mal fissata,
danneggiata o difettosa.
Non piegate troppo il cavo di alimentazione. La parte interiore del cavo rischia di rompersi o di
scoprirsi causando così cortocircuito, incendio o scossa elettrica.
Per la vostra sicurezza, non toccate nessuna parte dell'apparecchio, del cavo di alimentazione o
del cavo dell'antenna durante un temporale.
Non eseguite nessun tipo di intervento sul cavo di alimentazione.
Scollegate I'apparecchio dalla presa di corrente in caso di temporale o di un prolungato periodo di
non utilizzo.
Mettete I'apparecchio fuori tensione e scollegate I'apparecchio dalla corrente prima di effettuare o di
modificare i collegamenti.
Manutenzione e pulizia dello schermo
Per evitare di danneggiare lo scherrno, rispettate i seguenti punti:
Non toccate lo schermo, non graffiatelo con oggetti duri e non gettate nessun oggetto contro di esso;
Rischia di danneggiarsi.
Scollegate il cavo di alimentazione dalla presa di corrente prima di ogni operazione di pulizia.
Non toccate lo schermo se è rimasto acceso per un lungo periodo, poichè si scalda.
È consigliabile toccare lo schermo il meno possibile.
Per spolverare lo schermo, usate un panno pulito, morbido e asciutto (non di cotone).
Non utilizzate nessun panno abrasivo, detergenti alcalini acidi o potenti solventi come alcool, acetone
o benzene, in quanto queste sostanze possono danneggiare la superficie dello schermo.
Pulizia del corpo esterno
Scollegate sempre il cavo di alimentazione dalla presa di corrente prima di ogni operazione di pulizia.
Pulite il corpo esterno dell'apparecchio con un panno morbido.
Un deterioramento materiale o del rivestimento protettivo è possibile nel caso in cui I'apparecchio sia
esposto a solventi volatili, come alcool, acetone, benzene o insetticida, o in caso di contatto
prolungato con della gomma o materiali in vinile.
Trasporto e spostamenti
Per essere trasportata, la TV LED deve essere presa da due persone che devono entrambe porre
una mano su ogni lato dell'apparecchio. Se procedete in altro modo, la TV potrebbe cadere
causando un incidente.
Durante il trasporto, non tenete mai la TV LED per gli altoparlanti, perche potrebbero staccarsi e la
TV LED potrebbe cadere, ferire qualcuno e rompersi.
Riparazioni
Non aprite il corpo in plastica e non rimuovete il pannello posteriore dell'apparecchio. Scollegate il cavo
di alimentazione e affidate I'apparecchio ad un servizio di assistenza qualificato nei casi seguenti:
il cavo o la presa di alimentazione sono danneggiati;
Page 5

4
IMPORTANTI AVVERTENZE DI SICUREZZA
CONTEN UTO DELLA CONFEZIO NE
La confezione del TV LED contiene:
1. TV LED
2. Telecomando
3. Manuale di istruzioni
4. Pile
5.Cavo di alimentazione
6.Adattatore
lo schermo LED danneggiato;
degli oggetti sono penetrati nell'apparecchio o del liquido e stato rovesciato sopra;
I'apparecchio stato esposto alla pioggia o all'umidità;
I'apparecchio ha subito una caduta o è stato danneggiato in altro modo;
I'apparecchio non funziona correttamente anche dopo aver consultato la sezione
"RICERCA E RlPARAZlONE GUASTI".
Pezzi di ricambio
Nel caso sia necessario cambiare dei pezzi, assicuratevi che il tecnico addetto alla manutenzione
utilizzi pezzi di ricambio conformi a quelli specificati dal produttore o che abbiano le stesse
caratteristiche dell'originale. Una sostituzione con ricambi non autorizzati può comportare il rischio
di incendio, di scossa elettrica, o causare altri danni.
Dopo ogni riparazione o revisione, chiedete al tecnico di eseguire dei controlli di sicurezza allo scopo
di verificare il corretto funzionamento dell'apparecchio.
Altre osservazioni
L'immagine presenta a volte puntini rossi, verdi, blu, bianchi o neri. Si tratta di un fenomeno normale
che non interferisce con il buon funzionamento della TV LED.
I televisori LED utilizzano una tecnologia avanzata e vi offrono immagini molto dettagliate. È tuttavia
possibile che alcuni pixel non attivi compaiano sullo schermo sotto forma di un punto fisso blu, verde
o rosso. Questo non interferisce in alcun modo con le prestazioni del vostro apparecchio.
Se I'apparecchio viene utilizzato in una stanza fredda. È possibile che sullo schermo compaia una
macchia o che I'immagine diventi più scura. Questo fenomeno non è sintomo di alcun malfunzionamento.
Sparirá progressivamente da solo, mano a mano che aumenta la temperatura ambiente.
Talvolta delle immagini residuali possono persistere dopo la visualizzazione di immagini fisse. Queste
immagini scompaiono dopo qualche minuto e lo schermo torna allo stato normale. Tuttavia, in presenza
di temperature elevate, I'immagine può restare visualizzata per qualche decina di minuti. Non si tratta
di un malfunzionamento.
Gli schermi LED sono prodotti a partire da vetro finemente lavorato. Evitate dunque di toccare lo
schermo con le dita o con le mani o di colpirlo. Questo potrebbe rovinare le celle dello schermo
e il vetro potrebbe rompersi.
Non utilizzate la TV subito dopo averla spostata da un ambiente freddo ad un ambiente caldo, in
quanto si potrebbe formare condensa con il rischio di provocare un incendio, scosse elettriche
o altri pericoli.
è
è
Per le apparecchiature collegate alla rete elettrica che producono tensioni interne superiori a 35V
( di picco) ac o cc , non avendo alcuna protezione contro gli spruzzi d'acqua secondo l'allegato A ,
nelle istruzioni deve essere dichiarato che l'apparecchio non deve essere esposto a spruzzi ,
sgocciolamenti e nessun oggetto contenente liquido . Nessun oggetto ( esempio : vasi ) deve
essere posto sopra l'apparecchio .
Istruzioni per garantire un'istallazione corretta e sicura e per le connessioni di apparecchi multimediali
Quando è usato un interruttore per scollegare il dispositivo dalla corrente elettrica la funzione e la
posizione dell'interruttore deve essere descritta e deve essere facilmente accessibile .
Page 6
HDMI, i loghi HDMI e High-Definition Multimedia Interface sono i marchi registrati per la licenza
HDMI LLC.
5
Nota:
Quando il televisore non riceve segnale di input per oltre 5 Minuti passera’ automaticamente in
modalita’ Stanby. L’ indicatore di tensione passera’ automaticamente al colore Rosso.
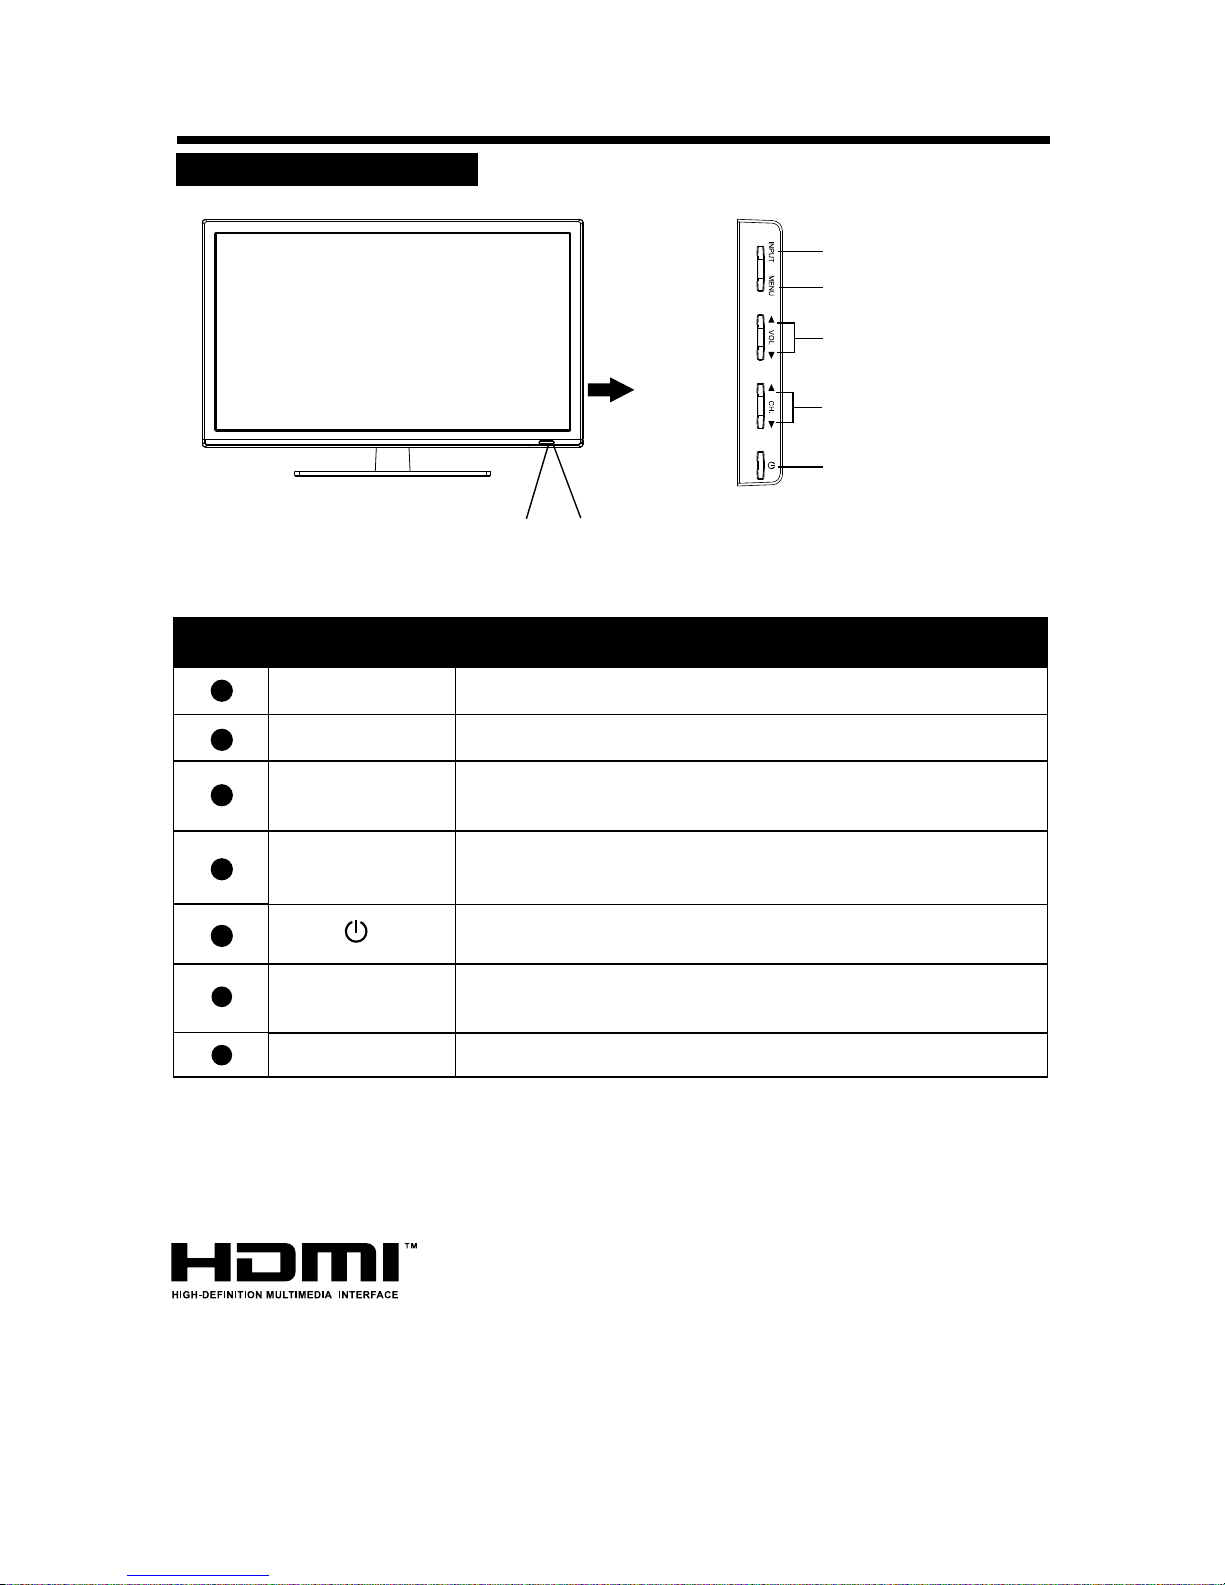
PANNELLO FRONTALE
COMANDI DI C O N T ROLLO E CO N N E T TORI
Power Indicator
Remote Sensor
Se illuminato di colore Rosso indica che il TV in Standby .
Se illuminato di colore Verde Blu indica che il TV Acceso.
è
è
Sensore Infrarosso Telecomando.
Premere per accendere o spegnere il Tv quando e’ in Stanby.
Premere per incrementare o diminuire il N. del canale
Dal Menu principale premere per selezionare il sottomenu.
CH +/-
Per entrare o uscire dal Menu.
MENU
Sorgente Segnale.
INPUT
VOL +/-
Aumentare o diminuire il volume
Regolazione dei livelli dei volumi nel Menu.
1
5
4
7
3
2
6
Nome Tasto
Descrizione
Numero
z
{
u
v
w
x
y
Page 7
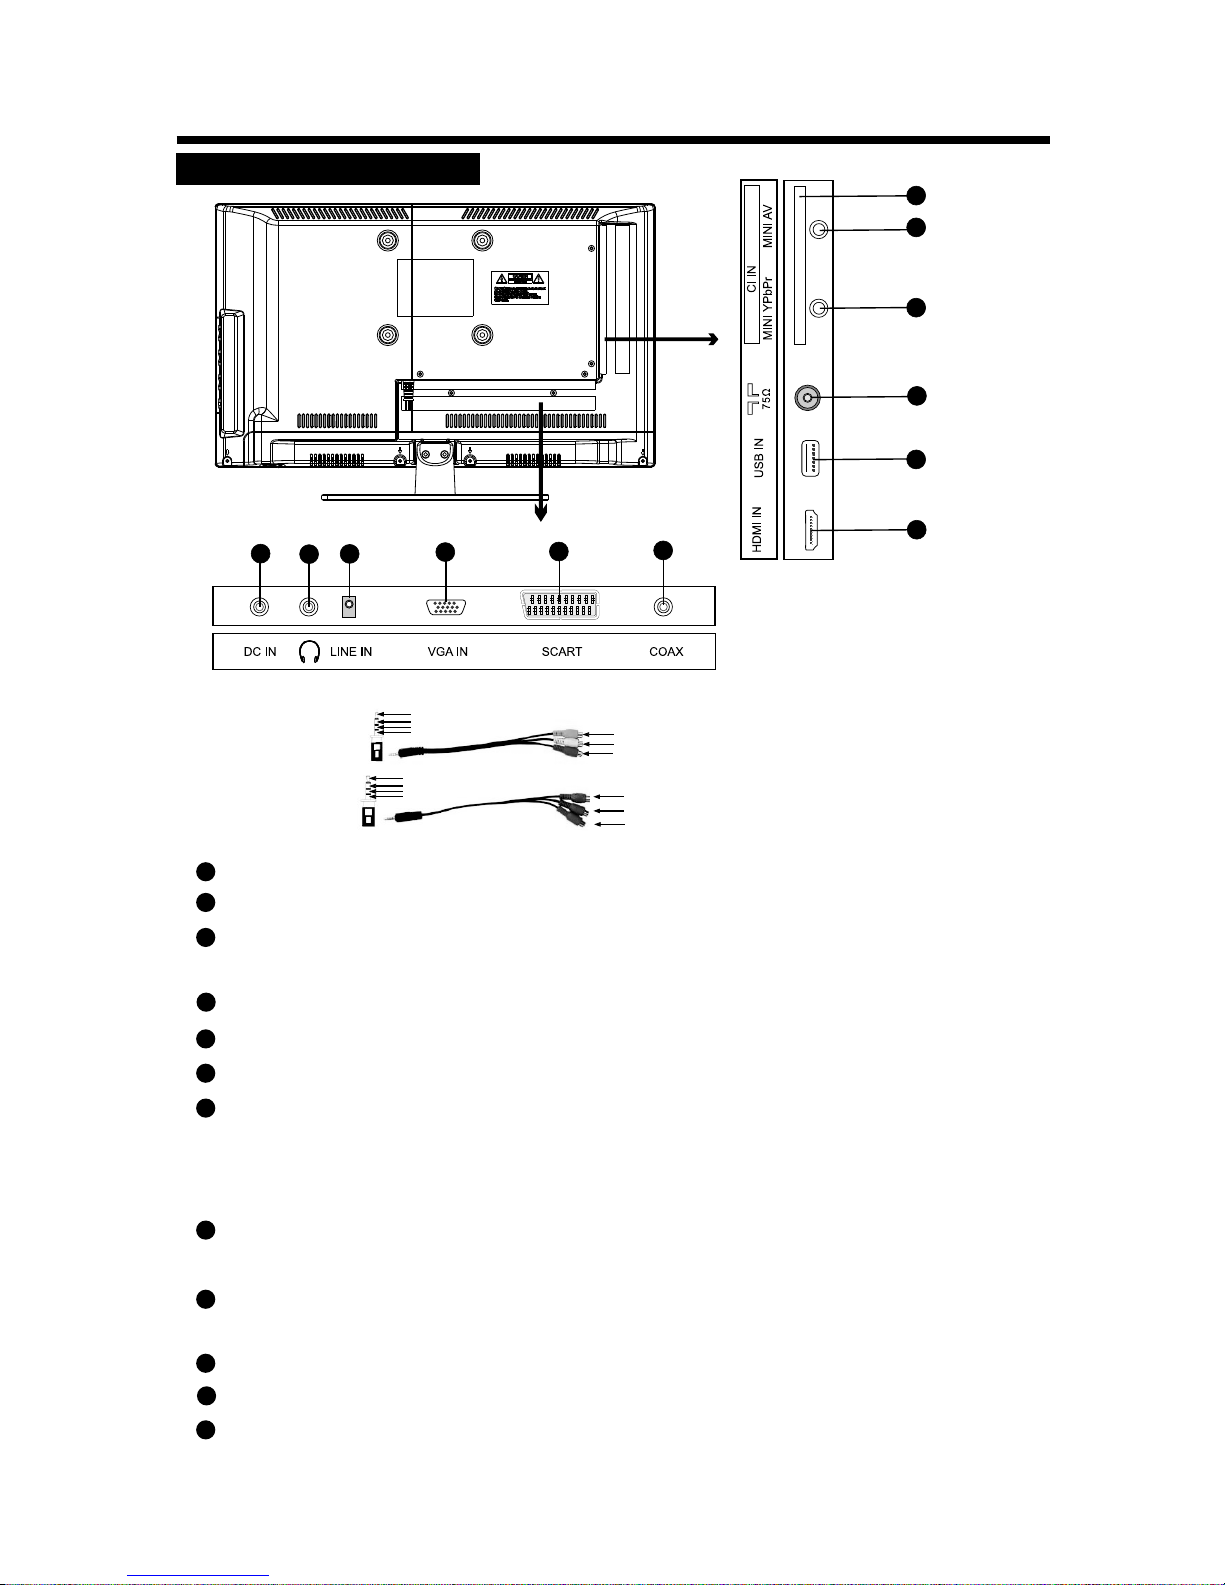
COMANDI DI C O N T ROLLO E CO N N E T TORI
PANNELLO POSTERI ORE
Necessita di cavo (non incluso)
AV IN
YPbPr IN
CVBS
Audio L
Audio R
GND
Y
Pb/Cb
Pr/Cr
GND
CVBS (Yellow)
Audio L(White)
Audio R (Red)
6
1
11
12
8
10
9
7
6
5
4
3
2
Y (Green)
Pb/Cb (Blue)
Pr/Cr (Red)
9
10
8
11
7
12
1
6
4
5
2
3
connettore cuffie : collegamento cuffie
connettore HDMI: collegamento HDMI
connettore scart : collegamento scart
connettore antenna : collegamento antenna per ricevere il segnale TV
connettore USB : collegamento USB
connettore LINE IN ( VGA audio) :ingresso audio da collegare ad uscita
audio del pc ( per sentire l'audio dal PC se collegato in VGA )
connettore VGA IN : da collegare ad uscita VGA del PC
SLOT PCMCIA: Slot per l'installazione della CAM necessaria per la
visione della TV a pagamento . La CAM non è inclusa nel Tv contatta
il tuo rivenditore per acquistarla .Evitare di rimuovere e inserire il modulo
CAM ripetutamente . Funzione disponibile a seconda del Paese
MINI connettore YPbPr : da collegare con uscita Video di una periferica
( esempio lettore DVD )
MINI connettore AV : da collegare con uscita Video di una periferica
( esempio lettore DVD )
connettore coassiale ( collegamento audio digitale )
Terminale d' ingresso CD/Corrente Diretta a 12V: per collegare l'adattatore.
Page 8
7
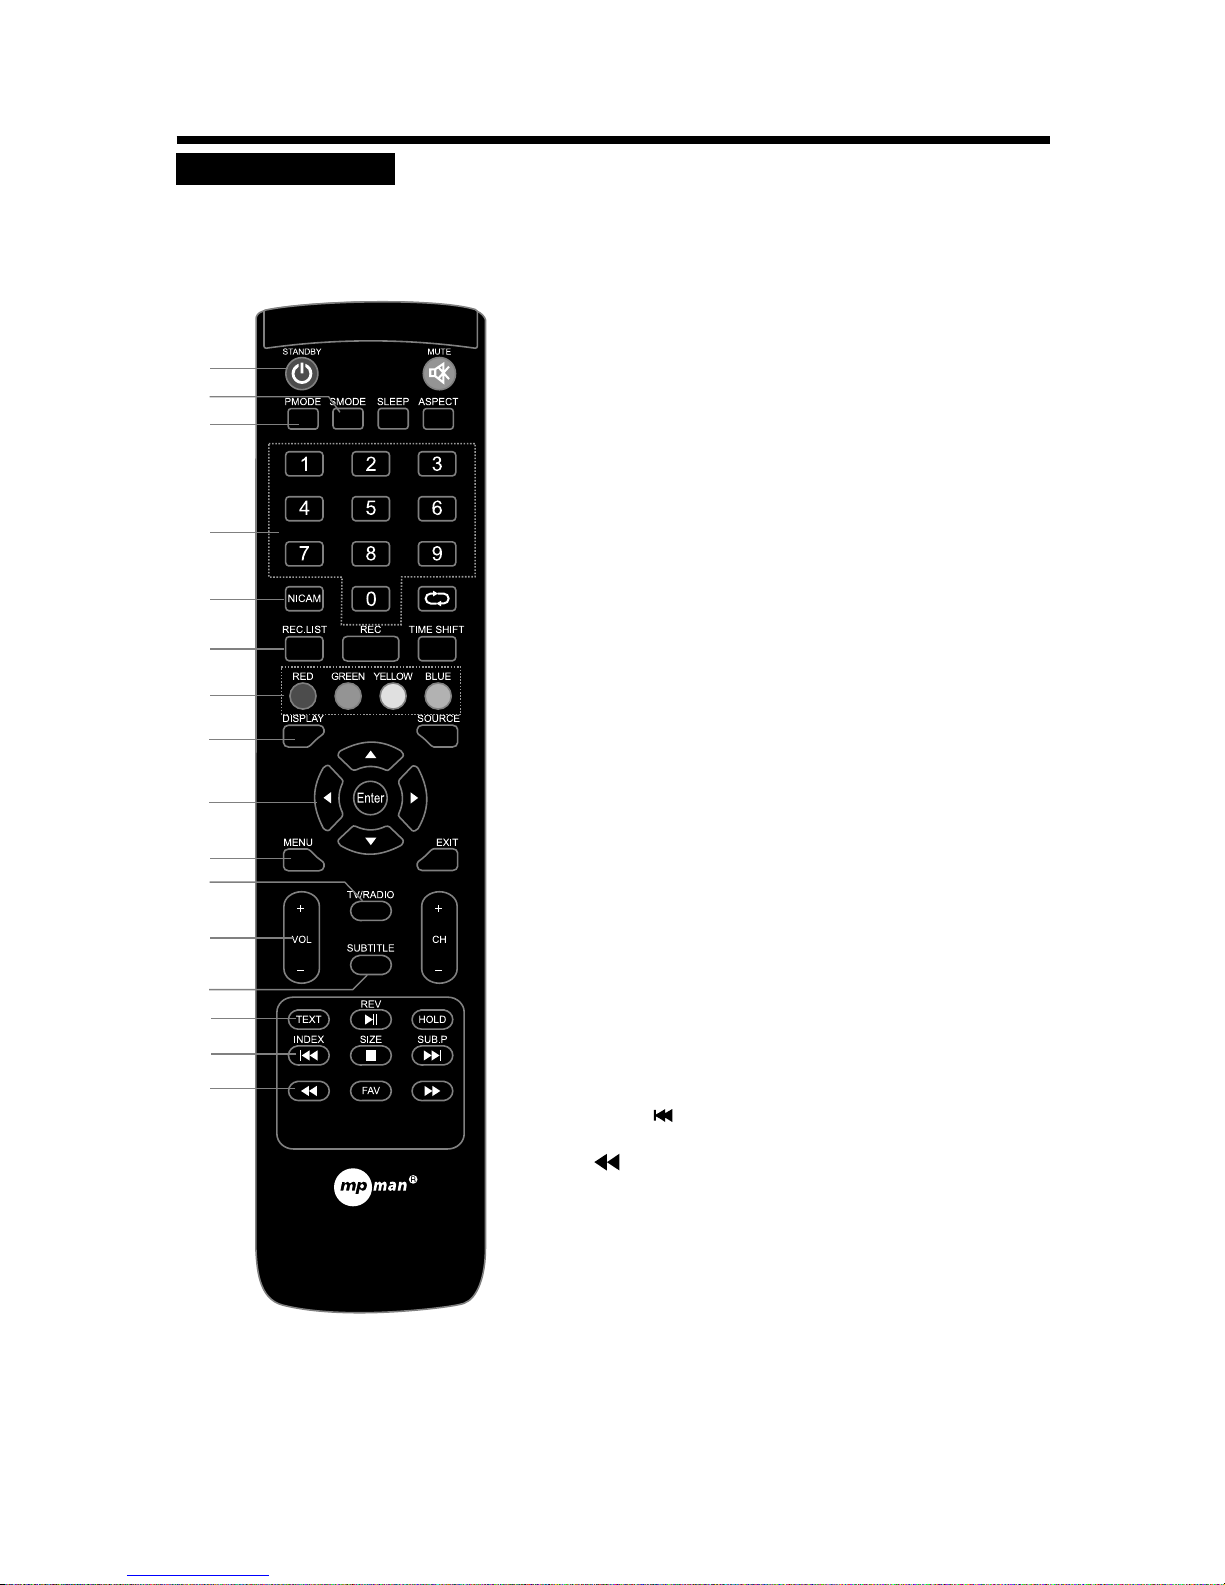
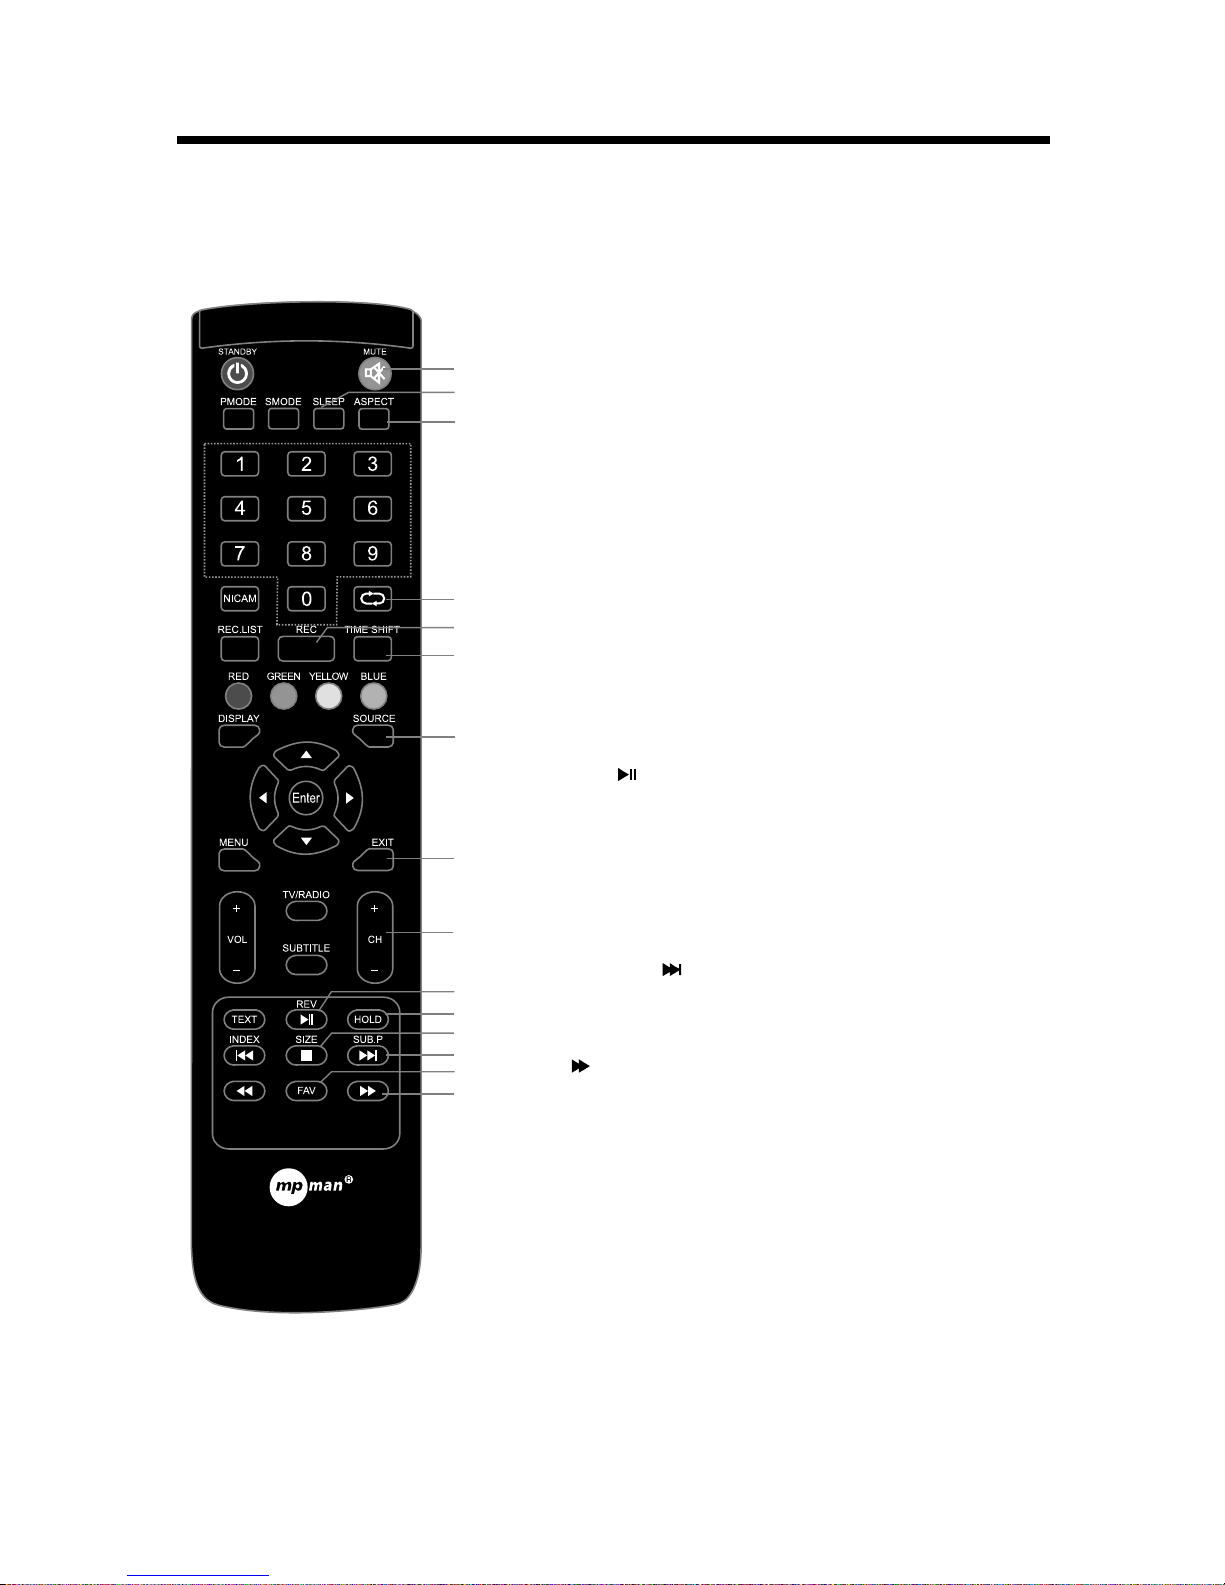
TELECOMANDO
COMANDI DI C O N T ROLLO E CO N N E T TORI
2
3
4
6
9
11
13
12
15
16
1
14
8
5
7
10
1. STANDBY
Per accendere o spegnere il Televisore.
2. SMODE
Per selezionare una modalit sonora.
3. PMODE
Per selezionare una modalit immagine.
à
à
4. TASTI NUMERICI
Per scegliere il canale.
5. NICAM
Per selezionare la modalit Nicam.
In modalità DTV, premere il pulsante per selezionare Lingua.
à
6. REC.LIST (FUNZIONE NON DISPONIBILE)
8. DISPLAY
Per visualizzare le informazioni canale.
9. Tastiera di controllo pqtu
Per muoversi all’ interno dei menu.
ENTER
Per confermare la scelta.
10. MENU
Per entrare o uscire dal Menu TV.
11. TV/RADIO
In modalit DTV premere per selezionare la
funzione TV o Radio.
à
12. VOL-/+(VOLUME SU/GIU)
Per incrementare o decrementare il volume.
13. SUBTITLE
In modalit DTV premere per sottotitoli.à vedere i
14. TEXT
Selettore per modalit Teletext/TV.à
15. INDEX/
Indice del Teletex.
16.
In modalità USB, per tornare indietro rapidamente.
7. TASTI COLORATI
In modalità ATV/DTV, si usano per programmare.
Page 9
8
COMANDI DI C O N T ROLLO E CO N N E T TORI
31.
In modalit USB per avanzare velocemente.à
29. SUBPAGE/
In modalita' Teletex per andare alla pagina successiva.
26. REV /
Nel Teletext per mostrare o nascondere il Testo.
In modalit USB, premere per iniziare o fermare la à riproduzione.
30. FAV
Per mostrare la lista dei preferiti in modalita' DTV/ATV.
17. MUTE
Per Attivare o Disattivare L’Audio.
18. SLEEP
Tasto Autospegnimento.
19. ASPECT
Selettore formato immagine.
20. RETURN
Per ritomare al canale precedente.
22. TIME SHIFT (FUNZIONE NON DISPONIBILE)
23. SOURCE
Per selezionare la Fonte del Segnale.
24. EXIT
Per uscire dai Menu.
21. REC ( FUNZIONE NON DISPONIBILE)
25.CH-/+(PROGRAM UPDOWN)
Per avanzare o indietreggiare nei canali TV.
27.HOLD
Per Tenere in linea il Teletex.
28. SIZE/¢
Per selezionare la grandezza del Teletex o fermare la
riproduzione USB.
25
20
21
23
24
30
26
27
28
31
29
18
19
17
22
Page 10
9
INSERIMENTO DELLE PILE
Inserire le pile osservando la corrispondenza delle polarità.
Informazioni sulle pile
Nel caso il telecomando non funzioni, anche se utilizzato nelle immediate vicinanze del televisore,
sostituire le pile.
Utilizzare pile AAA (UM-4).
Nota:
Non utilizzare pile ricaricabili (Ni-Cd).
Non tentare di ricaricare, smontare, riscaldare o gettare le pile nel fuoco.
Non bagnare il telecomando ed evitare di riporlo in luoghi umidi.
Evitare di colpire o far cadere il telecomando per evitare di danneggiarlo e provocarne un cattivo
funzionamento.
Non unire pile cariche a pile scariche.
Se non si utilizza il telecomando per un lungo periodo di tempo, rimuovere le pile.
Una lunga esposizione del telecomando ai raggi solari può causare un malfunzionamento.
Tenere il telecomando lontano dai raggi diretti del sole.
Precauzioni
Tenere le pile fuori dalla portata dei bambini. In caso se dovessero venire ingoiate,
contattare immediatamente un medico.
INSTALLAZIONE TELECOMANDO
Page 11
10
Premere il tasto VOL+/- per aumentare o decrementare il livello del volume.
PER ACCENDERE O SPEGNERE LA TV
PER REGOLARE IL VOLUME
TASTO MUTE
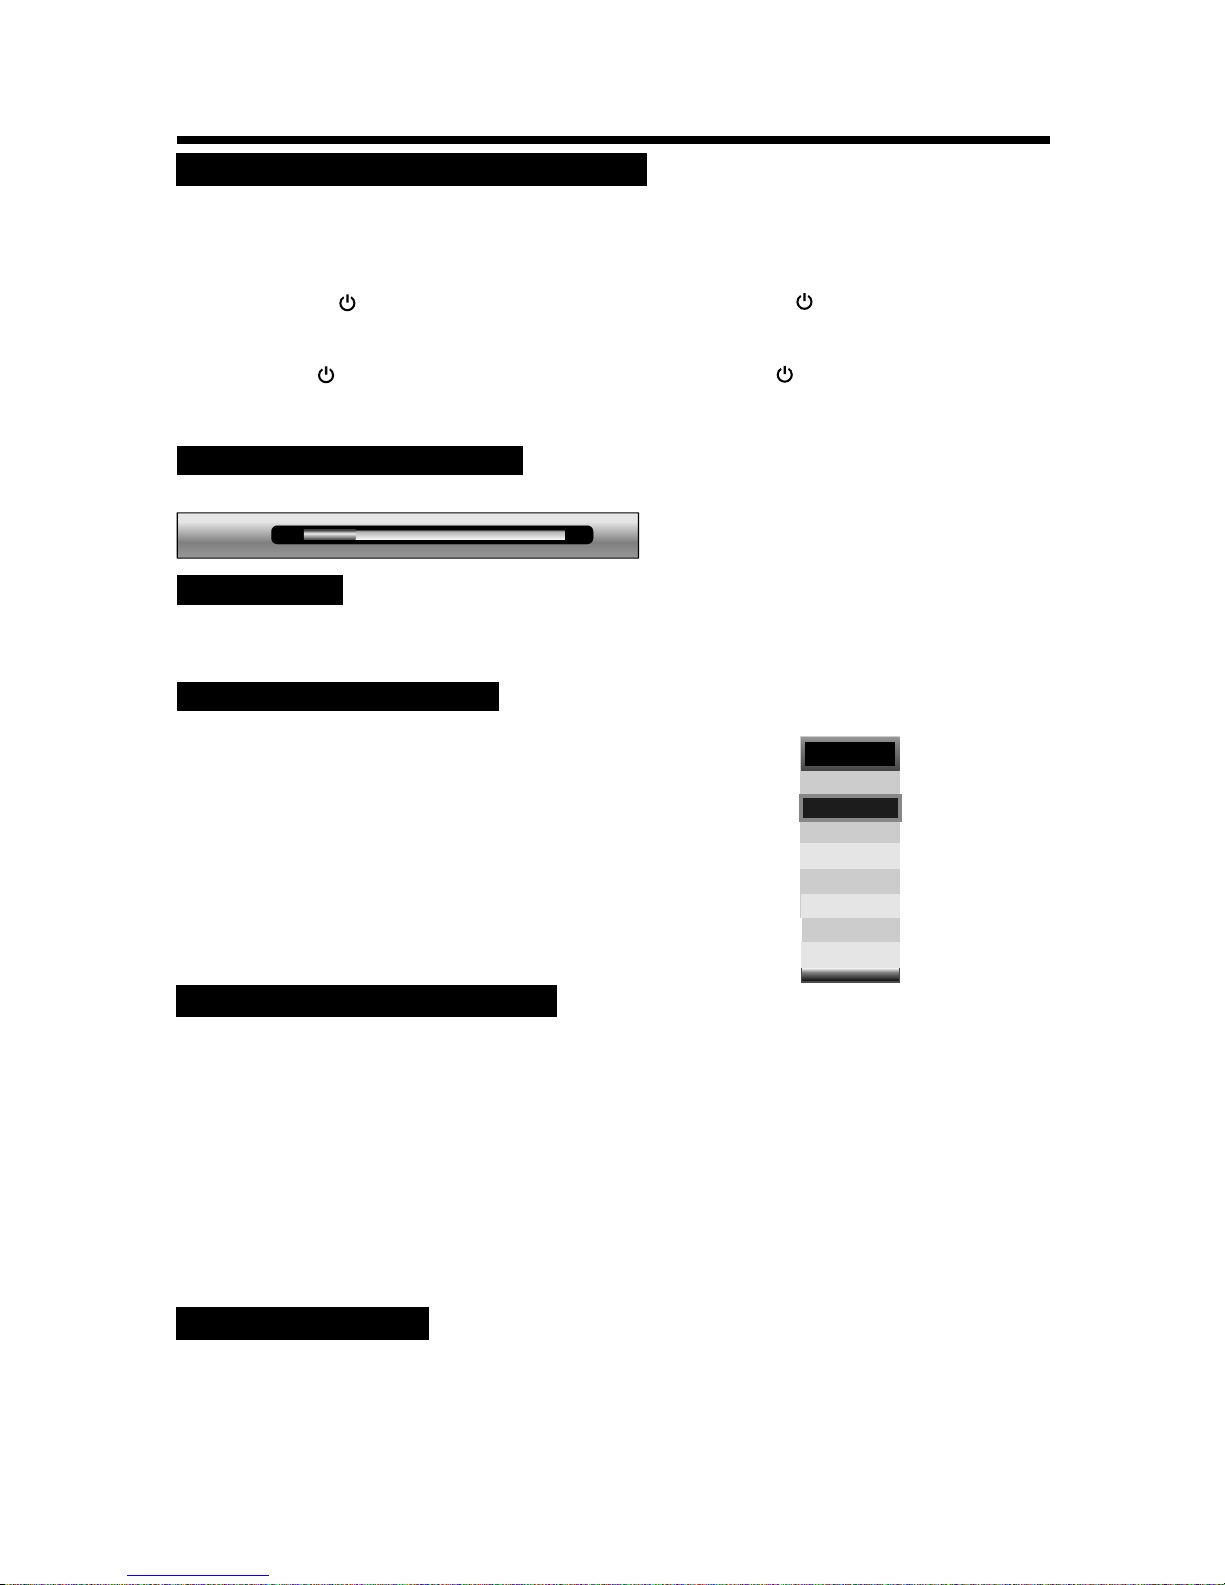
SELEZIONARE INGRESSO
È possibile
Premere
Premere CH.t/CH.uper selezionare una fonte video
Poi Premere VOLu per confermare la selezione.
Uso del tasto SOURCE del Telecomando
1. Premere il tasto SOURCE del Telecomando e il
Menu SOURCE apparirà sullo schermo.
2. Premere i tasti SU a GIU per selezionare la fonte video
e Premere iI tasto ENTER per confermare la selezione.
selezionare l’ingresso Video in diversi modi.
Usando il tasto Input del Pannello Frontale:
1. il tasto INPUT del pannello frontale, Menu
SOURCE apparirà sullo schermo.
2.
AVVIO DELLA TV LED:
1. Collegate il cavo di alimentazione alla TV
l’indicatore di alimentazione situato nella parte anteriore della TV si illuminerà di rosso
2. Per accendere la TV quando è in stand-by:
Premete il tasto del pannello laterale della TV o il tasto STANDBY del telecomando.
La TV si accende e la spia di alimentazione si illumina di verde.
Spegnimento della TV LED:
Premete il tasto del pannello laterale della TV o il tasto STANDBY del telecomando.
La TV passa in modalità stand-by e la spia di alimentazione si illumina di rosso.
Per spegnere del tutto la TV, premete l'interruttore dell'alimentazione della TV.
;la TV passerà automaticamente in modalità Stand-by e
FUNZIONAMENTO DI BASE
S-Video
Ingresso
DTV
ATV
AV
YPBPR
SCART
HDMI
PC
Media
36
-
+
volume
SELEZIONE DI UN CANALE TV
Usa i tasti CH.t e CH.u del pannello frontale oppure i tasti CH+ o CH- del Telecomando
Premere i tasti CH.t oppure CH+ per incrementare il numero del Canale
Premere i tasti CH.u oppure CH- per decrementare il numero del Canale
Tramite la tastiera numerica:
Digitate direttamente il numero del canale servendovi della tastiera numerica.
Esempi:
Per digitare il numero di un canale ad una cifra (es.: canale 5):
● Premere il tasto 5.
Per digitare il numero di un canale a 2 cifre (es.: canale 20):
● Premere il tasto 2, poi il tasto 0.
Per digitare il numero di un canale a 3 cifre (es.: canale 103):
● Premere il tasto 1, poi il tasto 0, poi il tasto 3.
SCELTA DEL SUONO
In ogni momento è possibile togliere l’ audio mediante il tasto MUTE.
1. Premere il Tasto MUTE e il suono sarà eliminato.
2.
ancora il tasto MUTE il tasto volume+ per riprodurre di nuovo il suono
Premere
In MODALITA' TV, a seconda del tipo di segnale audio, usa il tasto NICAM per selezionare In
modo appropriato la modalita sonora tra: MONO, STEREO, Lingua
● Quando un programma è trasmesso in modalita mono puoi selezionare solo: MONO,
● Quando un programma è trasmesso in stereo puoi selezionare sia STEREO che MONO
●
Quando un programma trasmesso in modalità multilingua, possibile scegliere la lingua desiderata.è è
Page 12
11
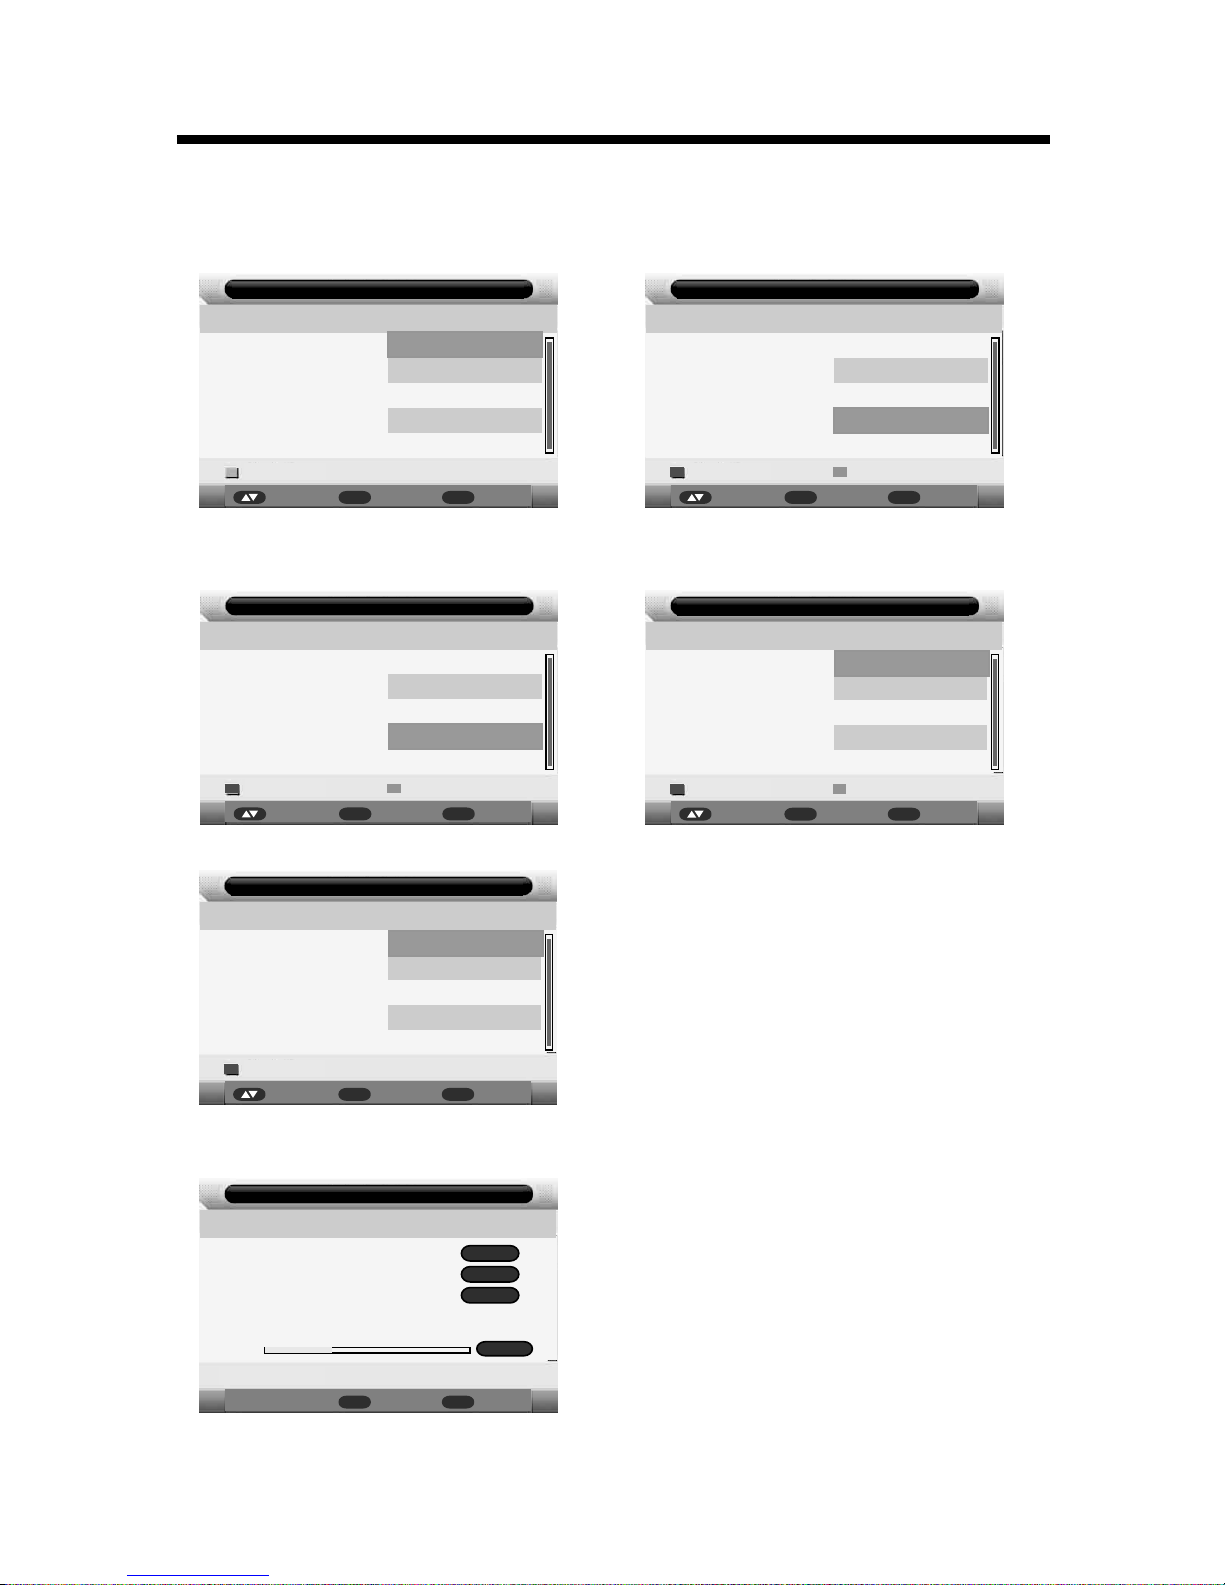
Lingua:
Enter
Enter
Exi t
Esci
Tedesco
English
- Passa ggio 3 di 5 -
Prima I nstal laz ione
Pagina Preceden
Sposta
Francese
Italiano
Spagnolo
Pagina Successiva
Paese :
Enter
Enter
Exi t
Esci
Germania
Inghilterra
- Passa ggio 2 di 5 -
Prima I nstal laz ione
Pagina Preceden
Sposta
Francia
Italia
Polonia
Pagina Successiva
Modalità Consumo :
Enter
Enter
Exi t
Esci
Casa
Modalità Negozio
- Passa ggio 1 di 5 -
Prima I nstal laz ione
Pagina Succ
Sposta
Ricerca Automatica :
Enter
Exi t
Esci
ATV
- Passa ggio 5 di 5 -
Prima I nstal laz ione
Pagina Preceden
Sposta
DTV
Tutti
Ent er
Spegnimento Auto :
Enter
Exi t
Esci
1 ora
- Passa ggio 4 di 5 -
Prima I nstal laz ione
Pagina Preceden
Sposta
2 ora
4 ora
Pagina Successiva
Off
selezion are i l tem po ch e si
desidera , f ini to il t emp o
selezion ato i l tel evi sor e si
spegnerà i n aut oma tio co ( se
non intera git e con i l tv)
Ent er
saita
Exi t
Esci
Prima I nst allaz ione
Menu
Canal i Analog ici Tr ovati :
Canal i Digit ali Tr ovati
Canal i Radio Tr ova ti:
723.5 5 Mhz
Ricer ca:
4
1
3
30%
ACCENDERE IL TV PER LA PRIMA VOLTA
1. La prima volta che il Tv viene acceso non ha canali in memoria , apparirà un Menù
diviso in 5 passi :
Passo 1: Selezionare la modalità
Passo 2: Selezionare il paese
Passo 3: Selezionare la lingua
Passo 4 : Selezionare l'impostazione
desiderata dell'auto spegnimento
Passo 5 : Selezionare i canali da scansionare
2. Assicurarsi che il cavo antenna sia collegato , quindi premere ENTER
Page 13
UTILIZZO DEL MENU
12
Immagine
Canali
Impostazioni
Opz ioni
Modalità sonora
Bassi
Alti
Bilanciamento
SPDIF
Suono
Utente
50
0
50
Enter
Enter
Menu
Ritorna
Exit
Esci
Sposta
Suono
Surround
Off
PCM
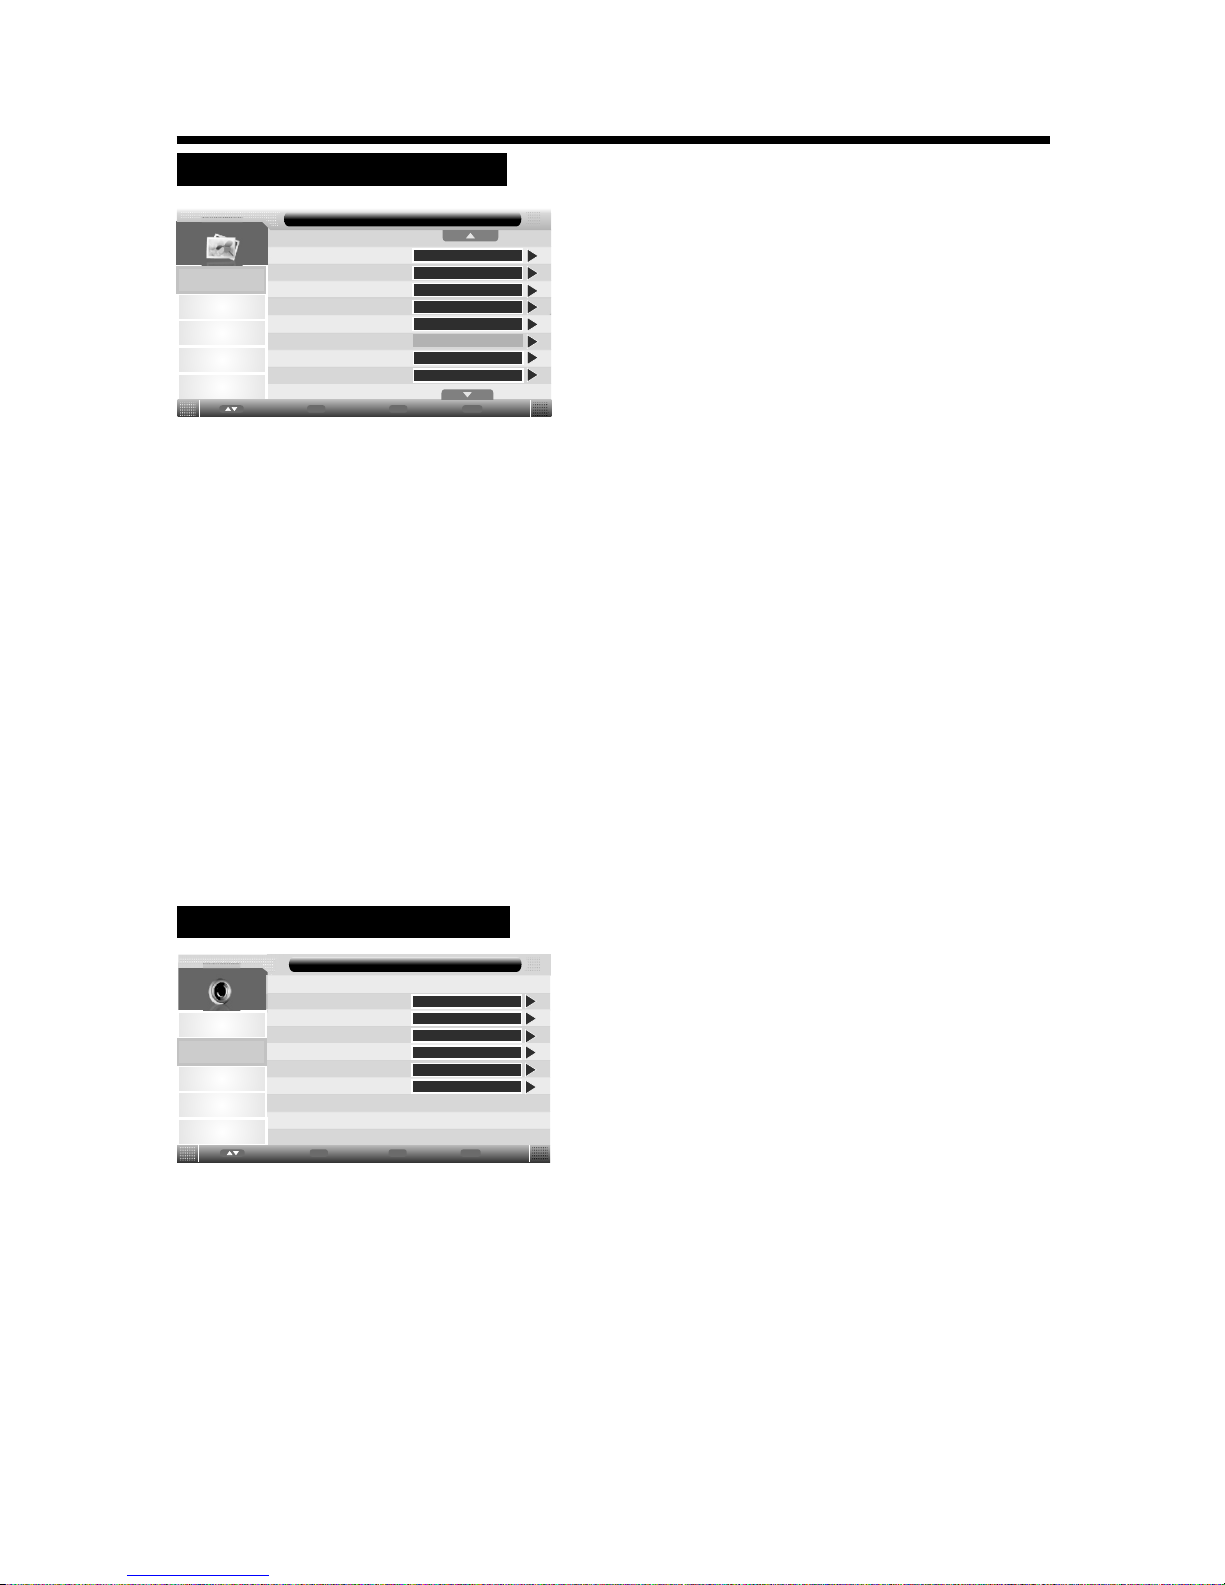
REGOLAZIONE DEL SUONO
1. Premere il tasto TV-Menu del Telecomando per entrare nel
menu principale.
2. Premere i tasti freccia t/uper selezionare il menu SUONO.
3. Premere Enter per confermare ed entrare nel sotto menu,
poi usare i tasti freccia p/q per scegliere l opzione
desiderata.
4. Usare i tasti freccia t/u per effettuare le regolazioni.
5. Premere il tasto TV-Menu oppure EXIT per uscire dal Menu.
'
Modalità sonora : possibilità di scelta tra Standard , Film , Musica , Parlato , Utente
Annotazione : Gli Alti e Bassi possono essere regolati a piacimento solo in modalità
Utente
Bassi : per regolare i bassi
Alti : per regolari i suoni alti
Bilanciamento : possibilità di regolare il suono più intenso a destra o a sinistra
Surround : abilita o disabilita l'effetto surround dell'audio
SPDIF : scegliere tra Off , On e auto PCM ( settaggio per l'uscita coassiale )
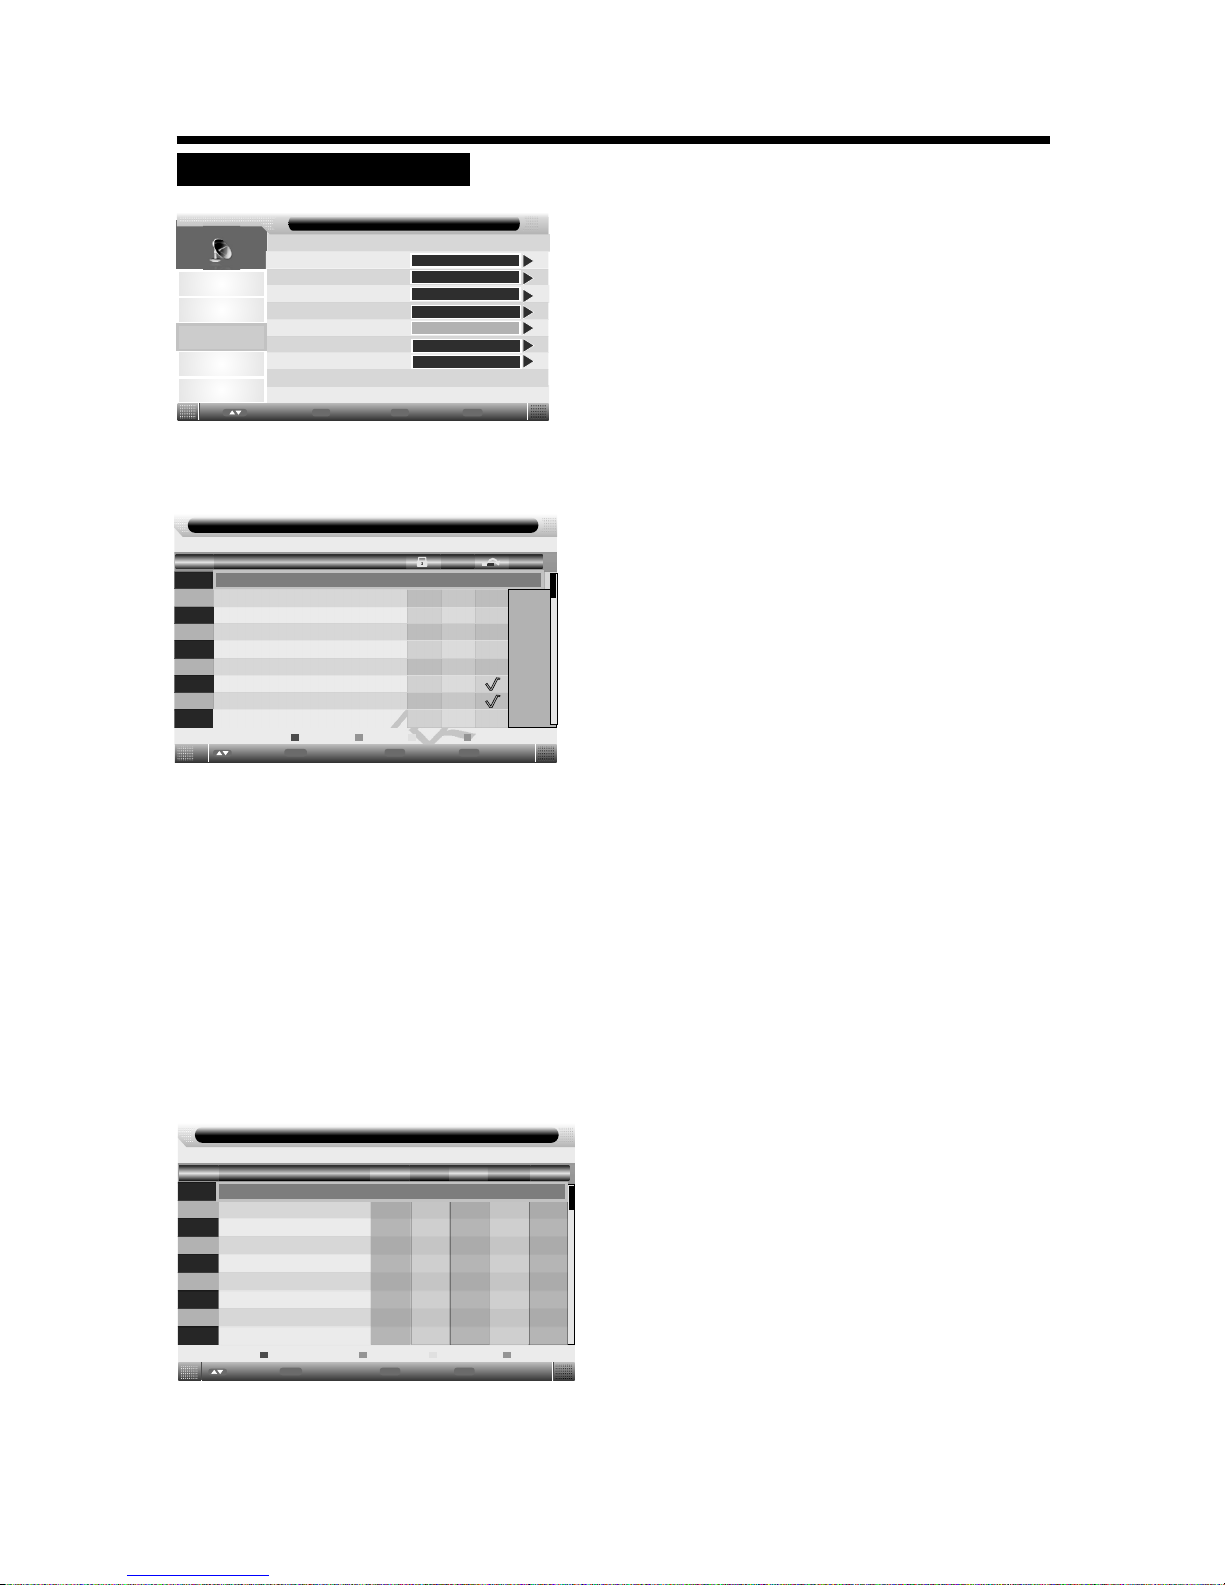
1. Premere il tasto TV-Menu del Telecomando per entrare nel
menu principale.
2. Premere i tasti freccia t/u per selezionare il menu IMMAGINE.
3. Premere Enter per confermare ed entrare nel sotto menu, poi
usare i tasti freccia p/q per scegliere l'opzione desiderata.
4. Usare i tasti freccia t/u per effettuare le regolazioni.
5. Premere il tasto TV-Menu oppure EXIT per uscire dal Menu.
Immagine
Suono
Canali
Impostazioni
Mod .Imma gine
Lum inosi tà
Con trast o
Nit idezz a
Colore
Tinta
Tempe ratur a del col ore
For mato Im magin e
Immagine
50
50
60
50
Standard
Enter
Enter
Menu
Ritorna
Exit
Esci
Sposta
Utente
50
16:9
IMPOSTAZIONI IMMAGINE
Mod.Immagine : Selezionare il tipo di immagine desiderato Standard , Debole ,
Dinamica , Utente
Attenzione: luminosità , contrasto colore e nitidezza possono essere modificate
solamente selezionando modalità immagine Utente
Luminosità: regola la luminosità dell'immagine
Contrasto : regola il contrasto dell'immagine
Nitidezza : regola la definizione dell'immagine
Colore : regola la tonalità dei colori
Tinta: regola la tonalità dei colori (solo in modalità NTSC).
Temperatura del colore : possibilità dei scegliere tra Caldo , Freddo , Standard.
Formato immagine : possibilità di scelta tra Auto,4:3 , 16:9, Zoom 1 , Zoom 2 , Intero
oppure Panorama
Riduzione del disturbo : se il segnale che si riceve è debole c'è la possibilità di ridurre
il disturbo scegliendo tra Off ,Basso , Medio , Alto .
Opz ioni
Page 14
13
Gestione Canali
Imp ostaz ioni Fa vorit i
Paese
Ricerca Automatica
Canali
Enter
Enter
Menu
Ritorna
Exit
Esci
Sposta
Ricerca Manuale DTV
Ricerca Manuale ATV
ENTER
ENTER
ENTER
ENTER
ENTER
Italia
Immagine
Canali
Impostazioni
Suono
UTILIZZO DEL MENU
Canale - Gestione canali
No.
Nome Programma
0001
0002
0003
0004
0005
0006
0007
0008
0009
Scamb.Salta
BloccaElim
×
Exit
Esci
Sposta
Pagina+/-
C32
Menu
Ritorn...
Tipo
atv
atv
atv
atv
atv
atv
atv
atv
atv
CH+-
Canale - Impostazioni Favoriti
No.
Nome Programma
0002
0003
0004
0005
0006
0007
0008
0009
Favorite 4Favorite 3
Favorite 2Favorite 1
0001
Fav1 Fav2
Fav3
Fav4
atv
atv
atv
atv
atv
atv
atv
atv
atv
Exit
Esci
Sposta
Pagina+/-
Menu
Ritorn...
CH+-
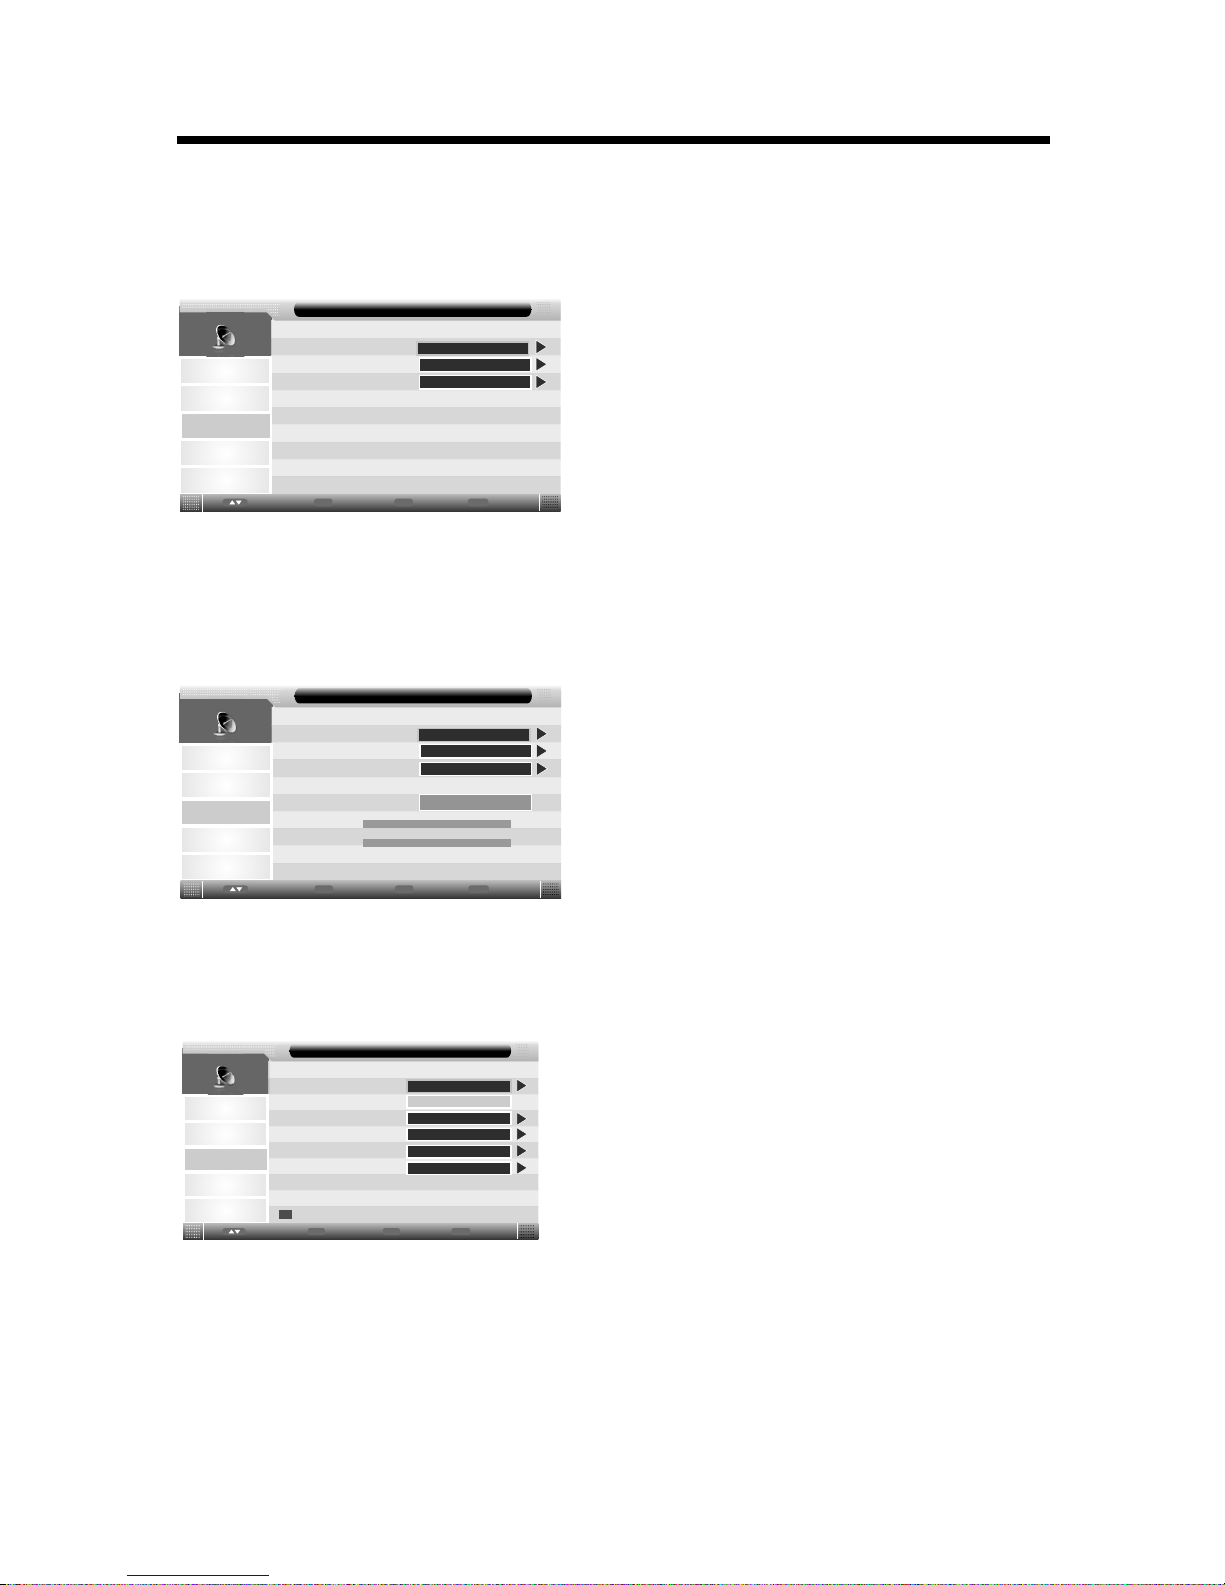
IMPOSTAZIONI CANALI
Gestione canali :
selezionare con i tasti / Gestione canali , premere enter o la freccia per entrare nel
sotto menù della Gestione dei canali
Elim: premere il tasto rosso del telecomando per cancellare il canale selezionato
Blocca : premere il tasto verde del telecomando per bloccare il canale desiderato
Salta : premere il tasto giallo del telecomando per saltare il canale selezionato
comparirà il simbolo ü e il canale verrà saltato ( quando fate zapping verrà saltato
in automatico )
Scamb. : Premere il tasto blu del telecomando per spostare il canale selezionato
quindi usare le frecce del telecomando per spostare il canale dove si desidera .
Premere nuovamente il tasto blu per confermare la nuova posizione del canale ,
premere Enter per confermare
Impostazioni favoriti
Selezionare con i tasti /gestione favoriti premere enter o la freccia per entrare nel
sotto menù della Gestione dei canali favoriti
Premere i tasti/per selezionare il canale , premere
il tasto rosso del telecomando per aggiungere il canale
alla lista favoriti 1
Premere i tasti/per selezionare il canale , premere
il tasto verde del telecomando per aggiungere il canale
alla lista favoriti 2
Premere i tasti/per selezionare il canale , premere
il tasto giallo del telecomando per aggiungere il canale
alla lista favoriti 3
Premere i tasti/per selezionare il canale , premere
il tasto blu del telecomando per aggiungere il canale
alla lista favoriti 4
Se un canale è già sulla lista dei favoriti premere il tasto
( rosso , verde ,giallo , blu ) della relativa lista in cui è
salvato per toglierlo dalla lista favoriti
Premere il tasto menu o Exit e l'elenco verrà salvato
1. Premere il tasto TV-Menu del Telecomando per entrare nel
menu principale.
2. Premere i tasti freccia t/uper selezionare il menu CANALI.
3. Premere Enter per confermare ed entrare nel sotto menu,
poi usare i tasti freccia p/q per scegliere l opzione
desiderata.
4. Usare i tasti freccia t/u per effettuare le regolazioni.
5. Premere il tasto TV-Menu oppure EXIT per uscire dal Menu.
'
Opz ioni
Tipo
LCN On/Off
On
Page 15
14
UTILIZZO DEL MENU
Tutti
Canale - Ricerca Automatica
ENTER
DTV
ENTER
ATV
ENTER
Enter
Enter
Menu
Ritorna
Exit
Esci
Sposta
Immagine
Suono
Canali
Impostazioni
Canali
Canale - Ricerca Manuale DTV
D
Frequenza(KHz):
53000
Larg. Banda(MHz):
7
Enter
Enter
Menu
Ritorna
Exit
Esci
Sposta
Avvio
Forza
Qualità
0%
0%
Immagine
Suono
Canali
Impostazioni
Canale Corrente
001
Ricrtca
Fine scansione
Sistema colore
Sistema audio
DK
PAL
Canale - Ricerca Manuale ATV
48.25MHz
Frequenza
ENTER
ENTER
Enter
Enter
Menu
Ritorna
Exit
Esci
Sposta
Risparmiare
BBC1
Immagine
Suono
Canali
Impostazioni
Paese :
Premere il tasto Enter o la freccia ►per entrare nel sotto menù , premete i tasti per
selezionare il Paese desiderato .
p/q
Ricerca automatica :
Premere il Enter o la freccia ►per entrare in ricerca automatica
( se viene richiesta la password di fabbrica è 0000).
tasto
Premere/e selezionare ''Tutti '' per eseguire scansione di tutti i canali che si
possono ricevere.
Premere/e selezionare ''DTV'' per eseguire scansione di tutti i canali digitali.
Premere/e selezionare ''ATV'' per eseguire scansione di tutti i canali analogici.
Ricerca manuale DTV
Premere per selezionare scansione manuale DTV poi Enter o freccia destra per
entrare nel menù Ricerca manuale DTV
:
.
/
Premere/per selezionare : canale / frequenza / larghezza di banda.
Premere/ e andare su start per comiciare la ricerca.
Ricerca manuale ATV :
Premere per selezionare ricerca manuale ATV poi enter o freccia destra
per entrare nel sotto menù Ricerca manuale ATV.
/
Canale Corrente: selezionare il canale che si vuole scansionare.
Frequenza : visualizza la frequenza del canale .
Ricerca : premere ENTER per entrare nel menù di ricerca , poi premere/per
cominciare la scansione.
Fine scansione : Premere ENTER per entrare nel menu fine scansione , poi
premere/per finire la scansione.
Sistema colore : Premere /per selezionare il sistema colore.
Sistema audio : Premere/per selezionare il sistema audio.
Annotazione : Premere il tasto rosso per salvare le impostazioni.
Opz ioni
Opz ioni
Opz ioni
LCN On/Off: Impostare LCN su on oppure off
Se si modifica la password , assicuratevi di ricordare
quella nuova ! Se si dimentica la nuova password
usare la password principale : 8899
Page 16
15
Blo cco Can ali
Con troll o genit ori
Cam bia la Pa sswor d
Hotel Mode
Impostazioni - Sistema Blocco
ENTER
Off
Enter
Enter
Menu
Ritorna
Exit
Esci
Sposta
Immagine
Suono
Canali
ENTER
Off
UTILIZZO DEL MENU
Blo cca
Lingua
Oro logio
Impostazioni
Enter
Enter
Menu
Ritorna
Exit
Esci
Sposta
ENTER
ENTER
ENTER
Immagine
Canali
Suono
ENTER
Off
Nuova password
Vecchia password
Confermare la nuova password
Menu
Ritorna
Exit
Esci
____
____
____
Impostazioni - Cambia pin codice
Immagine
Suono
Canali
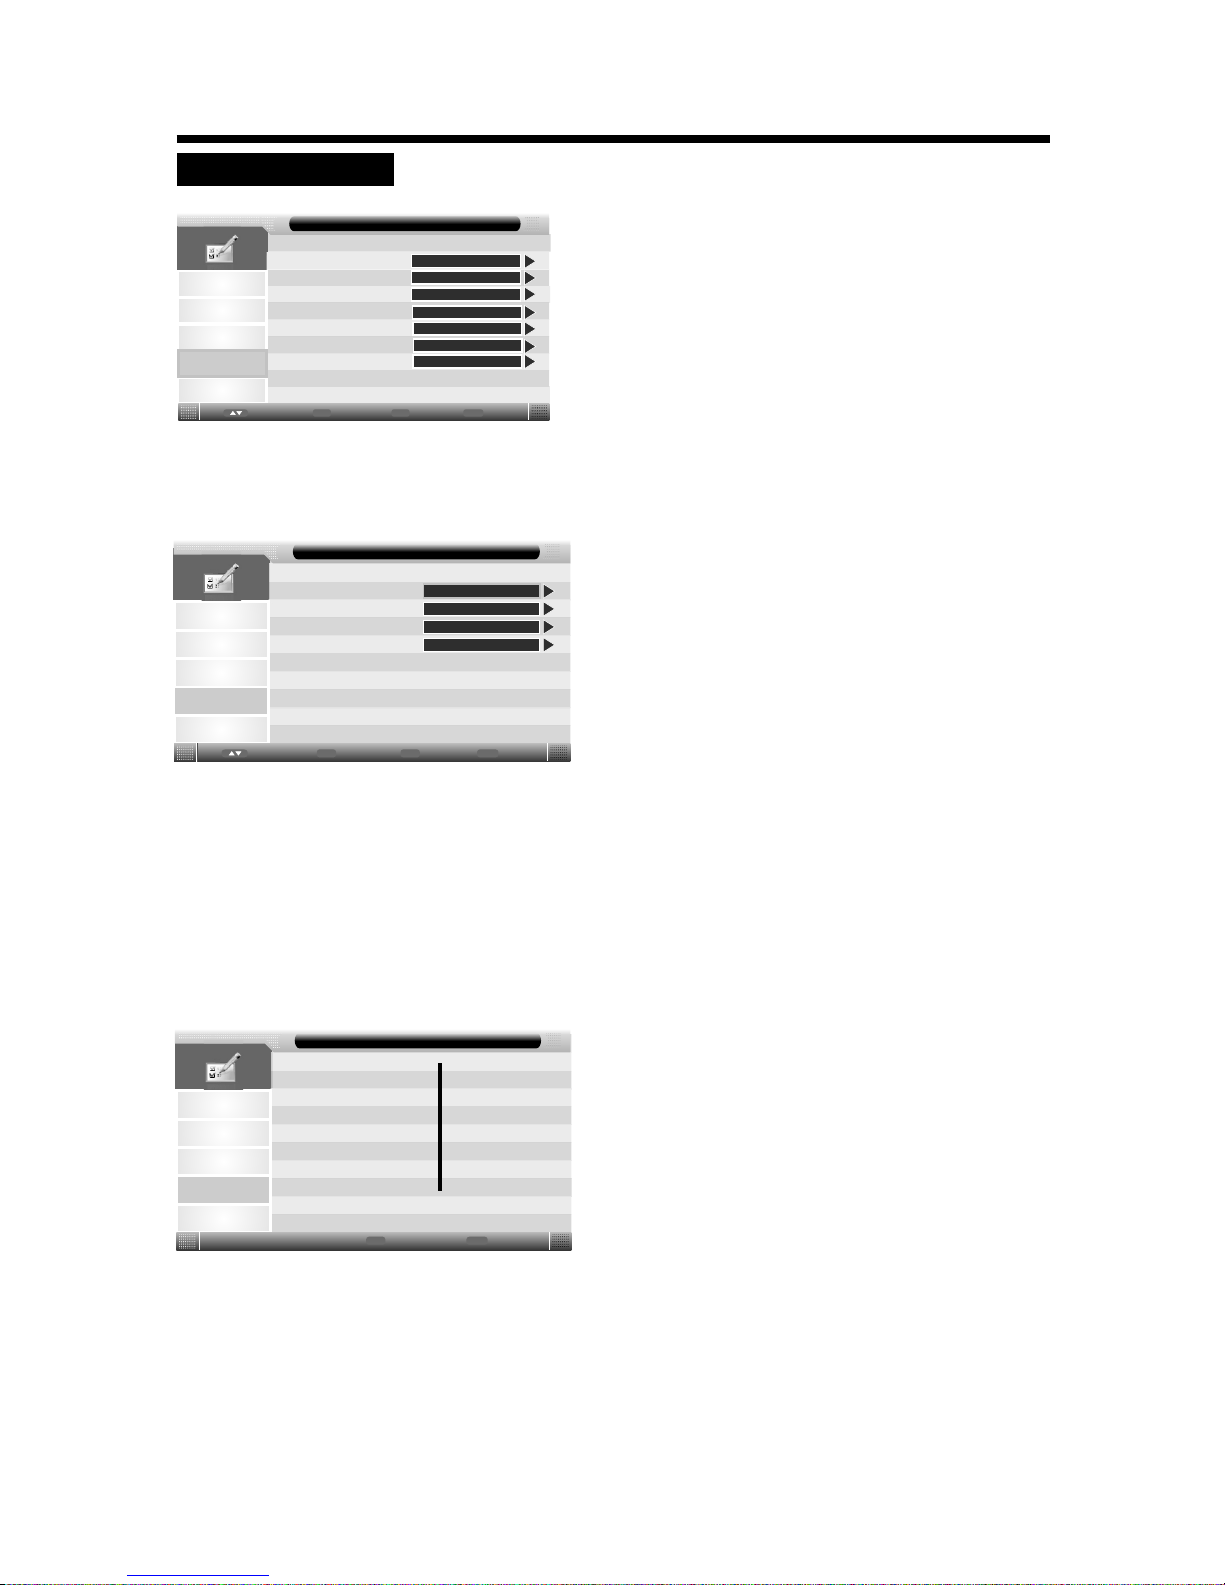
IMPOSTAZIONI
BLOCCA :
Selezionare blocca e poi premere il tasto Enter ,vi verrà chiesto di inserire una password.
Digitare la password di fabbrica che è 0000 per entrare nel sotto menu :
BLOCCO CANALI :
Premere /per attivare o disattivare la funzione blocco
Se il blocco è impostato su ON quando si cerca di modificare un programma o delle
impostazioni verrà richiesta la password
Controllo Genitori ( solo per modalità DTV):
Premere/per selezionare il livello di blocco o selezionare Off per ignorare questa
funzione . Esempio : livello 18 anni ,
trasmissioni adatte ad un pubblico di età uguale o superiore ai 18 anni
Cambia la password :
Usare questa funzione per cambiare la password usata nel menù “ IMPOSTAZIONI"
1. Premere il tasto TV-Menu del Telecomando per entrare nel
menu principale.
3. Premere Enter per confermare ed entrare nel sotto menu,
poi usare i tasti freccia p/q per scegliere l opzione
desiderata.
4. Usare i tasti freccia t/u per effettuare le regolazioni.
5. Premere il tasto TV-Menu oppure EXIT per uscire dal Menu.
'
2. Premere i tasti freccia t/uper selezionare il menu IMPOSTAZIONI.
1.Inserire la vecchia password (quella di fabbrica
è 0000)
2.Inserire una nuova password ( 4 numeri ) usando
la tastiera del telecomando
3.Inserire gli stessi 4 numeri per confermare
Hotel Mode:
Selezionare Hotel Mode, premere il tasto enter per entrare nel sotto menù delle
impostazioni Hotel
Tim er Spe gnime nto
Aut o Spegn iment o
Non U denti
CI In fo
Opz ioni
Opz ioni
Opz ioni
Imp ostaz ioni
Imp ostaz ioni
Imp ostaz ioni
Off
Off
Page 17
16
UTILIZZO DEL MENU
Impostazione Hotel
On
Off
100
–
30
Off
0
–
–
–
–
–
Blocco hotel: impostare su on oppure off , se impostato su on potete fare quanto sotto riportato :
Blocco canali : per consentire o bloccare la ricerca , se impostato su on tutte le del
menù riguardanti i canali saranno bloccate
Blocco immagine :per consentire o bloccare le impostazioni delle immagini . Se impostato su on
tutte le impostazioni delle immagini verranno bloccate
Blocco audio: per consentire o bloccare le impostazioni audio , se impostato su on tutte le
impostazioni dell'audio verranno bloccate
Blocco impostazione :per consentire o bloccare il menù impostazioni . Se impostato su on il
menù impostazioni verrà bloccato
Blocco opzioni : per consentire o bloccare le Opzioni , se impostato su on il menù Opzioni verrà
bloccato
Blocco tasti : se impostato su on non sarà più possibile usare i tasti
Blocco sorgente : se impostato su on verrà bloccata la sorgente selezionata
Seleziona sorgente :questa funzione permette di selezionare la sorgente di ingresso sulla quale
si accendera il TV
Numero canale : Selezionare il numero del canale (Radio/ DTV o ATV ) sul quale si vuole che il
televisore si accenda
Volume massimo : consente di impostare il livello del volume massimo
Volume di accensione : consente di impostare il volume di accensione
Cancella : cancella tutte le vostre impostazioni dell' Hotel Mode
ESPORTAZIONE DATI :inserire una chiavetta USB; tutte le impostazioni che avete salvato sul
televisore verranno esportate sula chiavetta USB ( creando un file “ DATABASE.bin “ )
IMPORTAZIONE DATI : inserire chiavetta USB e importare il file “DATABASE.bin “ precedentemente
creato .Quando l'importazione è finita il televisore andrà in Stand –By da solo
In questo modo si possono clonare le impostazioni desiderate su altri televisori in modo da non
impostarli uno ad uno
ATTENZIONE : la funzione clone si può utilizzare solo ed esclusivamente su televisori che montano
la stessa versione di Scheda Madre e lo stesso Pannello
operazioni
Blocco Hotel
Blocco canali
Blocco immagine
Blocco Impostazione
Blocco Opzioni
Blocco Tasti
Blocco sorgente
Seleziona Sorgente
Numero Canale
Volume Massimo
Volume di Accensione
Cancella
Blocco Audio
Pagina Precedente
Pagina Successiva
Impostazione Hotel
Off
Off
Off
Off
Off
Importazione Dati
Esportazione Dati
Page 18

17
Lin gua del m enù
Sot totit oli pre f.
Aud io pref erito
Dig ital te letex t langu age
Impostazioni - Lingua
Italiano
Ovest
Enter
Enter
Menu
Ritorna
Exit
Esci
Sposta
Immagine
Suono
Canali
Impostazioni
Italiano
Italiano
Italiano
UTILIZZO DEL MENU
Data
Orario
Fuso orario
DST
Impostazioni - Orologio
19/06/20/2012
Enter
Enter
Menu
Ritorna
Exit
Esci
Sposta
Immagine
Suono
Canali
Impostazioni
19:06
Auto
On
SCELTA DELLA LINGUA:
Premere per selezionare il menu lingua , poi premere il tasto enter oper entrare nel
menù della scelta lingua
p/q
Lingua del menù:
Premere per selezionare la lingua desiderata
Sottotitoli pref. :
Premere per selezionare la lingua dei sottotitoli che si desidera
Audio preferito:
Premere per selezionare la lingua audio che si desidera
Digital teletext language :
Premere per selezionare la lingua del televideo digitale che si desidera
Lingua teletext analogico :
Premere per selezionare la lingua del televideo analogico che si desidera
t/u
t/u
t/u
t/u
t/u
Orologio (solo per DTV):
selezionare con i tasti le impostazioni orologio , poi premere enter o il tasto per
entrare nel sotto menù orologio
p/q
Premere i tasti per regolare l'orologiot/u
Timer spegnimento :
Per regolare l'auto spegnimento le regolazioni possibili sono :10mins, 20mins, 30mins, 60mins, 90mins,
120mins, 180mins, 240mins and Off ( sempre acceso )
Auto spegnimento : quando il tempo impostato è finito il TV si spegne
Non udenti : selezionare on oppure off per attivare o disattivare la funzione non udenti
CI info: Informazioni sulla Cam
Opz ioni
Opz ioni
Lin gua tel etext a nalog ico
Page 19

UTILIZZO DEL MENU
Opzioni
Tim er OSD
Auto SCART
PC Se tup
Schermo Blu
Opzioni
Enter
Enter
Menu
Ritorna
Exit
Esci
Sposta
Aggiorna Software TV
On
ENTER
Immagine
Canali
Impostazioni
Suono
Resetta impostazioni.TV
Mai
ENTER
spento
ENTER
Aut o Adj ust
Posizione O
Posizione V
Phase
Impostazione - PC Setup
Enter
Enter
Menu
Ritorna
Exit
Esci
Sposta
ENTER
Immagine
Canali
Impostazioni
Suono
Orologio
0
0
95
0
1. Premere il tasto TV-Menu del Telecomando per entrare nel
menu principale.
3. Premere Enter per confermare ed entrare nel sotto menu,
poi usare i tasti freccia p/q per scegliere l opzione
desiderata.
4. Usare i tasti freccia t/u per effettuare le regolazioni.
5. Premere il tasto TV-Menu oppure EXIT per uscire dal Menu.
'
2. Premere i tasti freccia t/uper selezionare il menu .Opzioni
Timer OSD:
Seleziona la durata dell' OSD ( per quanti secondi compare il menu prima
che scompaia in automatico )
Auto SCART:
Seleziona on oppure off ( se impostato su on quando si collega una periferica via scart
il TV và in automatico in scart )
PC Setup:
Premere i tasti p/qper selezionare PC Setup, poi premere enter o il tasto per entrare
nel sotto menù setup pc ( funziona solo con PC collegato )
Auto Adjust: aggiusta in automatico la posizione
dello schermo
Posizione orizzontale : aggiusta la posizione
orizzontale dello schermo
Posizione verticale : aggiusta la posizione verticale
dello schermo
Phase : per eliminare le possibili interferenze
orizzontali ( allarga in orizzontale )
Orologio: per eliminare le interferenze verticali
( allarga in verticale )
Schermo blu :
Selezionare On/Off per avere lo schermo blu in sottofondo
( se su off lo schermo sarà nero )
Resetta impostazioni tv :
Per resettare tutte le impostazioni
Aggiorna software tv :
Per aggiornare il software del televisore
( deve essere inserita una chiavetta USB contenete il software di aggiornamento )
18
Opz ioni
Opz ioni
Modalità consumo
Casa
Utilizzare questa funzione solo dietro autorizzazione del centro assistenza. Un utilizzo errato
potrebbe compromettere il corretto funzionamento del televisore
Modalità Consumo:
Consente di impostare il televisore in modalità risparmio
energetico o Shopmode (alte prestazioni)
Page 20

USB
FUNZIONI PORTA USB
Spo...
Enter Esci
Cancel la
Premere il tasto SOURCE del telecomando per visualizzare l'elenco degli ingressi del tv ,
selezionare Media con i tasti e premere ENTER per entrare nel menù multimediale .
Premere il tasti per selezionare il formato che si vuole visualizzare
(foto/musica/video/ e-book )
Premere i tasti per selezionare il file desiderato e poi ENTER per aprire il file o la cartella.
Premere il tasto PLAY per visualizzare a schermo intero .
Quando siete a schermo intero usare il tasto ■ o il tasto EXIT per ritornare all'elenco dei file
p/q
p/q
p/q
1.Foto
Visualizzare le foto
Premere il tasto rosso per cancellare il file o la cartella
Premere il tasto verde per aggiungere o togliere tutte le
foto dalla Play List
Premere il tasto play per cominciare la riproduzione
: per cominciare la riproduzione delle foto in modalità proiezione
: per mettere in pausa
: per fermare e tornare al menù
: per andare al precedente o successivo file
: per ruotare l'immagine
: per ingrandire ( zoom ) l'immagine
: per avere informazioni sul file che si sta visualizzando
: per entrare nelle impostazioni delle foto tra cui “ modalità ripetizione “
“ musica di sottofondo,“ durata proiezione “ ,“effetto “ ……
: per entrare nella playlist ( la playlist è la lista dei file che volete riprodurre / ascoltare /vedere )
2.Musica
Ascoltare la musica
19
FOTO
Pagina ...
Sistemi di file USB supportati: FAT, FAT32. USB versione 2.0 è supportato, la capacità massima è
di 320 Gb; max. Carico: DC5V, 500mA.
Page 21

20
FUNZIONI PORTA USB
Spo...
Enter Esci
Cancel la
Spo...
Enter
Esci
Spo...
Enter Esci
Cancel la
Premere il tasto rosso per eliminare il file o la cartella
selezionati
Premere il tasto verde per aggiungere o rimuovere tutti i
file dalla Play List
Premere il tasto “PLAY” per cominciare la riproduzione
: per cominciare la riproduzione o riprenderla dopo la pausa
: per mettere in pausa
: per mettere in stop
: per andare indietro o avanti velocemente
: per andare al precedente o successivo file
:per impostare la modalità ripetizione ( ripete il file in automatico )
: per aprire la finestra informazioni della Play List
: per spegnere lo schermo ( sentirete la musica con lo schermo del Tv spento ) premere qualsiasi
tasto del telecomando per far riaccendere lo schermo . funzione disponibile solo in modalità musica.
3. Film
Vedere un film
Premere il tasto rosso per eliminare il file o la cartella
selezionati
Premere il tasto verde per aggiungere o rimuovere tutti i
file dalla Play List
Premere il tasto “PLAY” per cominciare la riproduzione
Pagina ...
Pagina ...
Film
Close pa nel
: per entrare nella funzione “vai” selezione a quanti minuti ( del video che stai guardando )
vuoi andare.
a:
a
Page 22

FUNZIONI PORTA USB
Esci
: per cominciare la riproduzione dei file della Play List.
: per mettere in pausa.
: per mettere in stop e tornare all'elenco dei file.
: per andare indietro e avanti velocemente.
: per andare al file precedente o successivo.
: modalità rallentata (premendo più volte rallenta la visualizzazione sempre di più ).
: modalità step ( passo ) premere per federe il filmato un “passo “ alla volta.
: per impostare la ripetizione. si può abilitare e disabilitare la ripetizione automatica di
un file ( cioè una volta finito il filmato ricomincia in automatico ).
: per entrare nella playlist.
: per avere informazioni sul file che si sta guardando.
: per entrare nelle impostazioni dei video tra cui “audio “ “ sottotitoli “ “ modalità ripetizione “
: consente una rapida selezione per visualizzare un filmato da un punto preciso .
4.e-Book
Premere il tasto rosso per eliminare il file o la
cartella selezionati.
Premere il tasto verde per aggiungere o rimuovere
tutti i file dalla Play List.
Premere il tasto “PLAY” per visualizzare il file.
Premere il tasto rosso per aggiungere / rimuovere dalla Bookmark
( si può' creare lista di pagine preferite ).
Premere il tasto verde ( comparirà un numero da inserire )
per andare alla pagina desiderata.
Premere il tasto giallo per entrare nella “Bookmark list” ( lista pagine preferite ) .
Premere il tasto blu per entrare nella playlist.
21
Pagina -
Pagina +
Spo...
Enter Esci
Cancel la
Pagina ...
Page 23

22
FUNZIONI TELETEXT
II televideo èuna funzione opzionale, per questo solo alcuni modelli possono ricevere Ie
trasmissioni televideo,
Si tratta di un servizio gratuito di trasmissione offerto dalla maggior parte delle emittenti televisive.
II televideo fornisce regolarmente informazioni aggiornate riguardanti I'attualita, Ie previsioni meteo,
i programmi TV, I'andamento della Borsa e altri argomenti.
Le caratteristiche del televideo dipendono dalle emittenti televisive. La funzione è disponibile solo
se iI canale selezionato trasmette il televideo. Premendo iI tasto PMODE in modalit televideo,
I'apparecchio torna in modalitá TV. In modalit televideo è sempre possibile regolare il volume al
Iivello desiderato,
Visualizzazione del televideo.
1, Selezionate un canale televisivo che dispone del segnale televideo.
2. Premere il tasto TEXT per visualizzare il televideo.
3. Premere il tasto TEXT per visualizzare simultaneamente il televideo ed iI programma TV.
4. Premere nuovamente il tasto TEXT per tornare in modalita normale (TV).
Selezione di una pagina
1. Digitate il numero della pagina (3 cifre) con la tastiera numerica. Se immettete una cifra
sbagliata, completate ugualmente iI numero a tre cifre e successivamente ridigitate iI numero
di pagina corretto,
2. Premete i tasti per passare alla pagina successiva/precedente.
HOLD (mantieni)
Potete premere iI tasto HOLD per visualizzare in modo permanente una pagina sullo schermo.
Premere di nuovo questa tasto per annullare la funzione.
INDEX
Premere il tasto INDEX per visualizzare direttamente la pagina iniziale.
Potete inoltre digitare direttamente il numero della pagina iniziale con la tastiera numerica.
Ingrandimento del testo
Potete aumentare Ie dimensioni del testo della pagina visualizzata per facilitarne la lettura.
1. Premere il tasto SIZE per ingrandire la metà superiore della pagina.
2. Premere nuovamente il tasto SIZE per ingrandire la metà inferiore della pagina.
3. Premere nuovamente questo tasto per ripristinare la visualizzazione in modalitá normale.
Visualizzazione di informazioni nascoste
Potete visualizzare eventuali informazioni nascoste del televideo (ad esempio Ie risposte a
enigmi indovinelli, ecc.), premendo il tasto REVEAL.
Premere una seconda volta questo tasto per nascondere nuovamente queste informazioni.
SUBPAGE (sottopagina)
Alcune pagine del televideo contengono numerose sottopagine che vengono visualizzate
automaticamente in sequenza a intervalli regolari.
1. Potete accedere ad una sottopagina precisa premendo il tasto SUBPAGE e digitando il numero
di sottopagina tramite la tastiera numerica.
2. Premere di nuovo il tasto SUBPAGE per uscire dalla modalit di accesso diretto alle sottopagine.
3. Premere nuovamente il tasto TEXT per tornare in modalitá normale (TV).
á
á
p/q
á
Page 24

23
MODALITA' DI FUNZIONAMENTO SUPPORTATE
576p
1080i/50
1080i/60
720p/60
640x480
800x600
1024x768
60
60
60
31.5
37.9
48.4
1360X768
47.7
720X576
1920X1080
1920X1080
1280X720
31.25
28.13
33.75
45.00
50.00
50.00
60.00
60.00
60
DOS
VESA
VESA
VESA
720X576
640X480
720X576
640X480
1920X1080
1920X1080
1280X720
15.63
15.73
31.25
31.47
28.13
33.75
45.00
576i/50
480i/60
576p/50
480p/60
1080i/50
1080i/60
720p/60
50.00
60.00
50.00
60.00
50.00
60.00
60.00
1080p/50
1080p/60
1920X1080
1920X1080
56.25
67.50
50.00
60.00
1920X1080
1920X1080
56.25
67.50
1080p/50
1080p/60
50.00
60.00
● Le m
●
●
●
odalità, non incluse nelle tabelle in alto, non sono supportate. Per un' immagine
ottimale, si raccomanda di scegliere una modalità enunciata sulle tabelle.
Le modalità compatibili con WINDOWS sono elencate nelle tabelle sopra.
In qualche caso l' immagine potrà essere spezzata a causa delle frequenze standard provenienti
dalla scheda VGA. Ma questo non è un errore. La situazione può essere migliorata attivando la
regolazione automatica oppure regolando manualmente nel menù la faccia e le impostazioni della
funzione Clock (rimuovendo le interferenze verticali).
Per estendere la durata di funzionamento del prodotto, raccomandiamo di utilizzare le funzioni di
risparmio energetico del proprio computer.
INGRESSO VIDEO COMPONENTE (YPbPr)
Modalità
Risoluzione
Frequenza orizzontale
(Khz)
Frequenza verticale
(Hz)
INGRESSO RGB
Osservazione
INGRESSO HDMI
Modalità
Risoluzione
Frequenza orizzontale
(Khz)
Frequenza verticale
(Hz)
Risoluzione
Frequenza orizzontale
(Khz)
Frequenza verticale
(Hz)
1600X900
60
60 VESA
Page 25

24
Prima di rivolgersi al servizio di assistenza tecnica, eseguire i seguenti semplici controlli. Se il
problema sussiste, scollegare il televisore e consultare il personale tecnico qualificato.
RISOLUZIONE DEI PROBLEMI
●
●
Controllare il livello del volume.
Verificare che per sbaglio non sia stato premuto il tasto MUTE sul
telecomando.
●
●
Regolare le impostazioni del colore.
Controllare che il sistema di trasmissione selezionato sia corretto.
● Provare ad identificare l' applicazione elettrica che influisce sulla
qualità del suono e dell' immagine dell' apparecchio, quindi rimuoverla.
●
●
Assicurarsi che il cavo di segnale sia correttamente collegato al
PC o alle fonti video.
Assicurarsi che il PC o le fonti video siano accesi.
●
●
Controllare il livello del volume.
Se anche dopo aver aumentato il volume fino al massimo, l' audio è
troppo basso, verificare la funzione di controllo del volume sulla scheda
audio del computer o sul software.
● Assicurarsi che il cavo di alimentazione sia collegato correttamente.
● Regolare il contrasto e la luminosità.
●
●
●
●
Verificare che il cavo di alimentazione sia correttamente collegato
alla presa.
Controllare di aver premuto il pulsante di accensione posto
sull' apparecchio.
Controllare le impostazioni di contrasto e luminosità dell' immagine.
Controllare il livello del volume.
● Controllare ed eventualmente modificare la direzione, la postazione e le
connessioni dell' antenna.
●
●
●
●
Le pile potrebbero essere esaurite.
Le pile potrebbero essere state installate in maniera non corretta.
Controllare che non vi siano ostacoli tra il sensore a raggi infrarossi del
telecomando e il sensore di ricezione del segnale posto sul televisore.
Assicurarsi che non vi sia una forte luce puntata sul sensore ad
infrarossi del telecomando.
Problema
Possibile soluzione
Assenza di suono o
immagine
Interferenze nel suono
e nell' immagine
Immagine sfocata o
annebbiata, suono distorto
Il telecomando non
funziona
Il televisore non si accende
Immagine troppo luminosa
o troppo scura
●Regolare la Fase.
● Regolare la funzione Clock.
● Regolare la posizione orizzontale e verticale.
●
●
30~75KHz
~
Controllare che la risoluzione e la frequenza di visualizzazione del
PC o della scheda video siano adatti al televisore.
Control Panel (Pannello di Controllo)Z Display (Schermo) Z
Settings (Impostazioni)
Se l' impostazione non è corretta, utilizzare il programma di utilità
del PC per visualizzare le impostazioni.
Il monitor del computer supporta una funzione di multi scansione
dello schermo con all'interno i seguenti domini:
Frequenza orizzontale:
Frequenza verticale: 56 60Hz
In modalità PC, presenza di
barre verticali che rendono
l'immagine tremolante o vibrante
In modalità PC, presenza
di barre orizzontali che
rendono l' immagine
tremolante o vibrante
In modalità PC, l'immagine
è instabile e può apparire
vibrante
In modalità PC, l'immagine
è decentrata.
Messaggio “Assenza di
segnale”
Assenza di immagine o
immagini in bianco e nero
Livello audio troppo basso
Immagine normale, ma
assenza di suono
Page 26

25
ATV: PAL, SECAM
DTV: MPEG 2 MP@ML,H.264
SPECIFICHE TECNICHE
Pannello LED
Misura
Fonte di ingresso
Sync
Segnale Video
Segnale RGB
TV
Sistema del colore
Video
Sistema del colore
Formato del video
Alimentazione
In ingresso
Consumo di energia
In funzione
In modalità di attesa STANDBY
Condizioni Ambientali
Temperatura di operatività
Umidità di operatività
Dimensioni (WXDXH)
Peso (kg)
Peso netto
Peso lordo
Caratteristiche Audio
Ingresso Audio
Ingresso Audio
Frequenza Risposta
Note:
Senza supporto
Con supporto
H/V separate, TTL, P. or N.
1Vp-p @ 75 ohm
0.7 Vp-p @ 75 ohm
10 ~ 40 (50°F ~ 104°F)℃ ℃
10% ~ 80%
RCA Jack (L, R), 0.5Vrms (-9dB)
RF: 100Hz~10KHz (at ± 3dB)
A/V: 100Hz~12KHz (at ± 3dB)
Ø3.5 Stereo, 0.5Vrms (-9dB)
PAL/SECAM/NTSC
CVBS, RGB
20" Diagonal
Sistema del suono
●
● II peso e Ie dimensioni sono dati solo approssimativi.
II design e Ie specifiche tecniche variare senza preavviso o menzione nel manuale.potrebbero
Contrasto Dinamico
Altoparlante
2W+2W
ATV: BG, DK, I
DTV: MPEG 1 layer 1,2,DD,DD+
DC 12V 2.2A
ATV
DTV e Radio
120
1000
≈ 2.6 kg
3.8 kg≈
466x42x279
466x150x314
2000000:1
<26.4W
≤0.5W
Page 27

Guida All'installazione Della Base
26
A B
1 2
1 Pcs
A
B
C
2 Pcs(4x10PM)
3
D
4
C
D
1 Pcs
1 Pcs(4x10BT)
E
3 Pcs(4x10PWA)
E
Page 28

Gentile Cliente,
La ringraziamo per aver acquistato questo televisore LED. Il presente manuale è
stato concepito per aiutarLa ad installare e utilizzare questo prodotto. Le consigliamo vivamente di leggerlo fino in fondo prima di iniziare qualsiasi operazione di
installazione e di seguire tutte le istruzioni in esso contenute. Ci auguriamo che
la nostra tecnologia La soddisfi pienamente.
INFORMAZIONE AGLI UTENTI DI APPARECCHIATURE DOMESTICHE
Ai sensi dell’art. 13 del Decreto Legislativo 25 luglio
2005, n. 151 "Attuazione delle Direttive 2002/95/CE,
2002/96/CE e 2003/108/CE, relative alla riduzione
dell'uso di sostanze pericolose nelle apparecchiature
elettriche ed elettroniche, nonché allo smaltimento
dei rifiuti" e del Decreto Legislativo 188 del 20
novembre 2008 “Attuazione della direttiva 2006/66/CE
concernente pile, accumulatori e relativi rifiuti”
Importato da Cominter Spa - Via San Giacomo, 17 27029 Vigevano Pavia Italia
Il simbolo del cassonetto barrato riportato sull’apparecchiatura o sulla sua confezione
indica che il prodotto alla fine della propria vita utile, inclusivo della batteria non
rimovibile e di eventuali pile, deve essere raccolto separatamente dagli altri rifiuti. L’utente
dovrà, pertanto, conferire il prodotto giunto a fine vita agli idonei centri di raccolta
differenziata dei rifiuti elettronici, oppure riconsegnarla al rivenditore al momento
dell’acquisto di una nuova apparecchiatura di tipo equivalente, in ragione di uno a uno.
L’adeguata raccolta differenziata per l’avvio successivo dell’apparecchiatura dismessa al
riciclaggio, al trattamento e allo smaltimento, ambientalmente compatibile, contribuisce ad
evitare possibili effetti negativi sull’ambiente e sulla salute e favorisce il reimpiego e/o riciclo
dei materiali di cui è composta l’apparecchiatura.
Le pile eventualmente raccolte insieme ai rifiuti di apparecchiature elettriche ed elettroniche
devono essere rimosse dai rifiuti delle apparecchiature stesse.
Lo smaltimento abusivo di apparecchiature, pile ed accumulatori da parte dell’utente
comporta l’applicazione delle sanzioni di cui alla corrente normativa di legge di cui al D.Lgs n.
152/2006 (parte 4 art. 255)
Si declina ogni responsabilità per eventuali omissioni o errori tipografici contenuti in questo
manuale e nei suoi eventuali allegati. L'utente è responsabile dei rischi derivanti dall'utilizzo
di queste informazioni.
Si declina ogni responsabilità per danni diretti, consequenziali, accidentali, particolari, morali
o di altro tipo collegati alla mancata osservanza delle informazioni presenti in questo manuale.
Le informazioni contenute in questo manuale possono essere soggette a modifiche senza
preavviso.
Page 29

Page 30

1
Dear Customers,
May we take this opportunity to thank you for purchasing this LED TV. We strongly recommend
that you read the safety and operation instructions throughly before operating your LED TV.
FOLLOW ALL INSTRUCTIONS AND WARNINGS on your LED TV and in this manual.
TABLE OF CONTENTS
TELETEXT FUNCTION
22
IMPORTANT SAFETY INSTRUCTIONS
2
PACKAGE CONTENTS
4
CONTROL BUTTONS AND TERMINALS
FRONT PANEL
REAR PANEL
REMOTE CONTROLLER
5
5
6
7
BASIC CONNECTIONS
BATTERY INSTALLATION
9
9
BASIC OPERATION
SWITCHING THE LED TV ON/OFF
ADJUSTING THE VOLUME
USING MUTE
SELECTING INPUT SOURCE
CHOOSING A TV CHANNEL
10
10
10
10
10
10
USING THE MENU
PICTURE SETTING
SOUND SETTING
CHANNEL SETTING
FEATURE SETTING
SETUP SETTING
12
12
12
13
15
18
SUPPORTED OPERATING MODES
23
TROUBLESHOOTING
24
SPECIFICATIONS
25
USB FUNCTION
19
SELECTING TV SOUND
10
STAND INSTALLATION GUIDE
26
11
TURNING THE TV ON FOR THE FIRST TIME
Page 31

IMPORTANT SAFETY INSTRUCTIONS
Read this manual
Read this manual thoroughly before you use the LED TV.
Keep this manual
Keep this manual in case you need to refer to it in the future.
Follow all warnings
Make sure you closely follow all warnings on the LED TV and in the manual.
Follow all instructions
You must follow all the instructions in the manual.
Avoid getting liquids or objects inside the LED TV
If liquids or objects get inside the LED TV, they could cause a fire or electric shock. Take special care
if there are children in your household. If liquids or objects do get inside the TV, immediately turn off
the power, disconnect the plug from the mains socket and contact a qualified engineer.
Do not place the TV near a bath or sink, in a wet basement, near a swimming pool or anywhere
else it could become wet (including from rain or moisture).
Do not place vases, pots, cups, cosmetics or liquids on or around the LED TV.
Do not place metals, or any materials that burn (e.g. candles) or could catch fire easily, on or around
the LED TV.
The apparatus shall not be exposed to dripping or splashing and that no objects filled with liquids,
such as vases, shall be placed on the apparatus.
2
This symbol shows that
there is a 'dangerous
voltage' inside the TV that
could cause an electric
shock or personal injury.
This symbol shows that the
TV comes with important
instructions.
RISK OF ELECTRIC
SHOCK DO NOT
OPEN
CAUTION
To reduce the risk of receiving an electric
shock, do not remove the rear cover of
the TV. Do not try to repair or replace any
of the parts inside the TV. Make sure
any maintenance or repairs are carried
out by a qualified engineer.
Avoid dropping the LED TV or hitting it with other objects
If the LED TV breaks as a result of being dropped or hit with other objects, it could cause an injury, and
continuing to use the LED TV in this condition could lead to a fire or electric shock.
If the screen is broken or damaged, immediately turn off the power, disconnect the plug from the mains
socket and contact a qualified engineer.
Prevent the unit from falling
● Make sure children do not climb on the TV.
● Do not place the TV on a bed, sofa, rug or similar surface, or on an unstable trolley, stand or
table. If you do, the TV may fall and be seriously damaged, and may even injure of kill someone.
● If you place the TV on a trolley, take care, when moving the trolley, to avoid stopping quickly,
pushing with too much force, or running over uneven surfaces that may cause the LED TV and trolley
to overturn.
Do not block any of the vents or openings on the LED TV
● The vents and other openings on the LED TV are designed to let hot air escape. Do not cover or block
these vents and openings, as this could cause the LED TV to overheat. Do not place the LED TV on
a bed, sofa, rug or other similar surface, as this can block the vents and other openings.
● Do not cover the LED TV with cloth (such as curtains), newspaper or other similar material.
● Do not place the TV in an enclosed place such as a bookcase or rack, unless there is enough
space for hot air to escape from the vents and openings. Always follow the manufacturer's
instructions.
Page 32

IMPORTANT SAFETY INSTRUCTIONS
3
Avoid high temperatures
If you use the TV in a hot environment, the heat could damage the LED TV and its other parts, or cause
it to overheat.
● Do not place the LED TV, the remote control and other parts in direct sunlight or near a hot object
such as a heater or radiator.
● Do not put the LED TV in a place where the temperature often rises and falls.
Avoid oil
Do not use the LED TV in a place where oil is used, as oily dust may get into the LED TV and damage it.
Protect the power cord
Not connecting the power cord correctly could lead to a fire or electric shock.
● Do not connect too many appliances to the same mains socket, as this could cause a fire or electric
shock hazard.
● Make sure you only connect the LED TV to a properly fitted mains socket.
● Place your LED TV near a mains socket which you can get to easily if you need to disconnect it.
● Check that the part of the power cord that connects to the LED TV is clean (with no dust) before you
plug it in. Also use a soft and dry cloth to clean the power plug.
● Run the power cord away from places where it could be stepped on or 'pinched' by items placed on
or against it. Do not put anything heavy on top of the power cord.
● Do not touch the power cord with wet hands.
● Pull out the power cord by the plug, not by the cord itself.
● Make sure the plug is firmly inserted into the mains socket. Avoid using loose sockets or sockets with
faulty connections.
● Try not to pinch, bend, or twist the cable, as this may expose or snap the lines inside it and cause it to
fail or lead to a fire or electric shock hazard.
● For your own safety, do not touch any part of the LED TV, power cord or aerial lead during lightning
storms.
● Do not tamper with the power cord in any way.
● Unplug the LED TV during lightning storms or if you will not be using it for an extended period of time.
● Switch off and disconnect the power plug before you make or change connections.
Handling and cleaning the screen
To prevent the screen from being damaged, follow the points mentioned below. Do not push on the
screen, scratch it with hard objects, or throw things at it.
● Unplug the power cord before you clean the screen.
● Do not touch the screen if the LED TV has been switched on for a long period, as it may have become
hot.
● We recommend touching the screen as little as possible.
● To remove dust from the screen, wipe it gently with a clean, soft, dry cloth.
● Do not use any type of abrasive pad, alkaline or acid cleaner or strong solvent such as alcohol,
thinner or benzene, as this may damage the surface of the screen.
Cleaning the cabinet
● Unplug the power cord before you clean the cabinet.
● Clean the cabinet with a soft cloth.
● Do not use cleaning products which contain solvents such as alcohol, thinner, benzene or insecticide,
or materials such as rubber or vinyl.
Carrying and moving the LED TV
● Always carry the LED TV with two people holding it with two hands, one hand on each side of the LED
TV. If you carry the unit any other way, you may drop it damaging the TV and possibly be seriously
injured.
● When you move the LED TV, never carry it by holding onto the speakers. The speakers may break
free and the LED TV may fall. This could cause serious damage to the TV and may seriously injure
you.
Servicing
Do not open the cabinet or remove the cover from the back of the LED TV. If any of the following things
happen, unplug the power cord from the mains socket and contact a qualified engineer.
The power cord or plug is damaged.
The screen is damaged.
Page 33

Contents of the package
4
IMPORTANT SAFETY INSTRUCTIONS
Your LED TV package includes the following:
1. LED TV
2. Remote control
3. Instruction manual
4. Batteries
Note: Your package may also include other accessories, depending on where you bought it.
● Liquids or objects have got inside the LED TV, or the LED TV has become wet.
● The TV has been dropped or the cabinet has been damaged.
● The TV does not work properly, even after you have referred to the 'Problem-solving' section of
this manual.
Replacement parts
● If parts of the TV need to be replaced, make sure the engineer uses parts recommended by the
manufacturer, or parts with the same characteristics and performance as the original ones. Using
other parts could lead to a fire, an electric shock or another hazard.
● When the engineer has completed the service or repair work, ask them to carry out safety checks to
make sure that the LED TV is in proper working order.
Other things to consider
● Sometimes, the image may have some tiny red, green, blue, white or black spots. This is normal and
does not affect the performance of the LED TV.
● Due to advanced technology of the LED TV, giving you fine picture details. Occasionally, a few non active pixels may appear on the screen as a fixed point of blue, green, or red. Please note that this
does not affect the performance of your LED TV.
● If you use the LED TV in a cold place, a smear may appear on the picture or the picture may become
dark. This does not mean the LED TV is faulty, and the problem will correct itself as the temperature
rises.
● In some cases, outlines of images may stay on the screen after they have been displayed. However,
these images will disappear in a few minutes, and the display will return to normal. However, it may
take longer for the display to return to normal if you are using the TV in a hot environment. This does
not mean the LED TV is faulty.
● The screen is made of finely processed glass, so please do not push it with your fingers or hands.
Doing this may damage the screen or cause the glass to break.
● Do not use the TV immediately after moving from a cold to a hot environment, as this creates
condensation which could cause a fire, an electric shock or another hazard.
● A warning that an apparatus with CLASS 1 construction shall be connected to A MAINS socket
outlet with a protective earthing connection.
● To ensure correct and safe installation and interconnection of the apparatus in multimedia systems.
● Where the MAINS plug or appliance coupler is used as the disconnect device, the disconnect
device shall remain readily operable.
● “To prevent possible hearing damage, do not listen at high volume levels for long periods.”
For MAINS powered apparatus and for apparatus producing internal voltages greater than
35 V(peak) a.c. or d.c., having no protection against splashing water the apparatus shall not be
exposed to dripping or splashing and no objects filled with liquids, such as vases, shall be placed
on the apparatus.
5. Power cord
6. Adaptor
Page 34

HDMI, the HDMI logo and High-Definition Multimedia Interface are trademarks or registered
trademarks of HDMI licensing LLC.
5
CONTROL BUTTONS AND TERMINALS
FRONT PANEL
Note:
If there is no signal input for 5 minutes , it will switch to standby mode automatically.
z
{
u
v
w
x
y
Description
Button Name
Power Indicator
Illuminates red in standby mode.
Illuminates blue when the LED TV is switched on.
Infrared sensor for the remote control.
Switch on the LED TV when at standby mode and vice versa.
Enter or exit from the menu.
MENU
Select the input signal.
INPUT
NO.
When you are watching the TV programme, press these buttons
to select channel in ascending or descending order. Select the
Adjust the volumes of the selected menu item in the OSD menu.
VOL +/-
Increase or decrease the volume.
upper or lower menu item in the OSD menu.
CH+/-
u
v
w
x
y
z
Remote Sensor
{
Page 35

CONTROL BUTTONS AND TERMINALS
REAR PANEL
REAR PANEL
CONTROL BUTTONS AND TERMINALS
REAR PANEL
REQUIREMENT OF WIRE HARNESS(cable not supplied)
AV IN
YPbPr IN
CVBS
Audio L
Audio R
GND
Y
Pb/Cb
Pr/Cr
GND
CVBS (Yellow)
Audio L(White)
Audio R (Red)
Y (Green)
Pb/Cb (Blue)
Pr/Cr (Red)
9
10
8
11
7
12
1
6
4
5
66
11
1
2
3
4
5
6
7
8
9
10
12
2
3
MINI AV Input Connector: Connect it to the AV output of a DVD player or other equipment.
MINI YPbPr Input Terminal: Connect to the video output terminal of DVD.
USB Input Connector: Connect it to the USB.
LINE IN (VGA Audio) Terminal: Connect it to the audio output terminal of PC.
VGA IN: Connect to 15-pin analog output connector of the PC using a VGA cable.
Coaxial Output Terminal: Connect to the coaxial input terminal of DVD or other external
equipment.
PCMCIA CARD SLOT: This function allows you to watch some pay services. If you remove
the CI (common interface) module, you can't watch the pay services. When you insert the
module into the card slot, you can access the module menu. To buy a module and smart
card, contact your dealer. Avoid regularly removing and inserting the CI module. When the
LED TV is turned on after inserting the CI module, you often won't be able to hear the sound
and there may be problems with the picture. This function may not be available, depending
on the country you are in. Contact your dealer for further advice.
Headphone Out Terminal: Connect the headphone.
HDMI Input Connectors: Connect it to the HDMI of DVD or other external equipment.
SCART Connector: Connect your AV system using a SCART lead.
RF Input Socket: Connect antenna or cable 75 ohm coaxial to receive TV signal.
DC Input Connector: Connect it to the adaptor 12V.
Page 36

7
REMOTE CONTROLLER
CONTROL BUTTONS AND TERMINALS
2
3
4
6
9
11
13
12
15
16
1
14
8
5
1. STANDBY
To switch on the LED TV/monitor when at standby
mode and vice versa.
2. SMODE
To select a sound mode.
3. PMODE
To select the picture mode.
4. NUMBER BUTTONS
To directly select program number.
8. DISPLAY
To display setup information of channel.
9. t/u
To adjust menu settings.
p/q
To select a menu item.
ENTER
Confirm the selection.
10. MENU
To enter the TV menu, or exit from the TV menu .
11. TV/RADIO
In DTV mode, press to select TV or Radio mode.
12. VOL-/+ (VOLUME UP/DOWN)
To increase or decrease the volume.
13. SUBTITLE
In DTV mode, press to display the caption.
14. TEXT
Teletext text. TV/Teletext select.
In USB mode, press to select backwards play.
16.
5. NICAM
To select nicam mode.
In DTV mode, press button to select Language.
6. REC.LIST (FEATURE NOT AVAILABLE)
15. INDEX /
Teletext index button. Go to index.
In USB mode, press to select the anterior chapter or song.
7
10
7. COLOUR BUTTONS
In ATV/DTV mode, used for program edit.
Page 37

8
17. MUTE
To switch the sound on or off.
18. SLEEP
To set the sleep timer.
19. ASPECT
To select a display mode.
21. REC (FEATURE NOT AVAILABLE)
22. TIME SHIFT (FEATURE NOT AVAILABLE)
23. SOURCE
To select a input signal.
24. EXIT
To exit the current menu.
25. CH-/+ (PROGRAM UP/DOWN)
To select the program in ascending or descending order.
27. HOLD
Teletext hold. Hold or carry on.
28. SIZE /¢
Teletext size selection, Double height rendering.
In USB mode, press to stop the play.
26. REV/
Teletext reveal button. Reveal any hidden text.
In USB mode, press to play or pause movies and music.
29. SUBPAGE /
Teletext sub page. Come into subpage, and again to cancel.
In USB mode, for select the next chapter.
30. FAV
This is a hot button for displaying the favourite list
defined by yourself in ATV/DTV mode.
31.
In USB mode, press to select forwarding play.
20. RETURN
To return to previously selected program number in TV mode.
CONTROL BUTTONS AND TERMINALS
25
20
21
23
24
30
26
27
28
31
29
18
19
17
22
Page 38

BATTERY INSTALLATION
Insert the batteries while observing the correct (+) and (-) polarities.
About the batteries
● If the remote control unit fails to work even when it is operated near the LED TV, please replace
the batteries.
● Use size UM-4 (AAA) batteries.
Note:
● Do not use rechargeable (Ni-Cd) batteries.
● Do not attempt to recharge, short circuit, disassemble, heat or throw the batteries into fire.
● Do not splash the remote control with water or put it on a wet object .
● Do not drop, step on or cause any impact to the remote control unit. This may damage it, resulting
in malfunction.
● Do not mix old and new batteries.
● If the remote control unit is not going to be used for a long time, remove the batteries.
● Strong light such as direct sunlight falling on the remote sensor can cause operational failure.
Avoid placing the remote control in direct sunlight.
Caution
Keep batteries out of children’s reach.
BASIC CONNECTION
9
Page 39

BASIC OPERATION
Press the VOL+/- button to increase or decrease the volume.
SELECTING INPUT SOURCE
1. Press the SOURCE button on the remote control or
press INPUT button on the rear panel of the LED TV
to display the “ Input ” menu.
2. Press the p/qbutton to select the input signal.
3. Press Enter button on the remote control or press
VOL+ button on the rear panel to confirm your
selection.
At any time, you can temporarily cut off the sound using the MUTE button.
1. Press the MUTE button and the sound cuts off.
2. Press the MUTE button again or press VOL+button to turn mute off.
USING MUTE
10
SWITCHING THE LED TV ON/OFF
ADJUSTING THE VOLUME
Input
DTV
ATV
AV
YPBPR
SCART
HDMI
PC
Media
To switch the LED TV on:
1. Connect the power cord to the LED TV, then the LED TV switches
power indicator on the front of the LED TV lights up in red.
2. To switch on the LED TV from standby:
Press the STANDBY button on the remote control or the POWER button on the front panel of the LED
TV, the LED TV switches on and the power indicator lights up in green.
To switch the LED TV off:
Press the STANDBY button on the remote control or the POWER button on the front of the unit again, the
LED TV switches to standby mode and the power indicator lights up in red.
itself to standby mode and the
CHOOSING A TV CHANNEL
Use the CH+/- button on the front panel, or the
Press the CH+ button to increase channel number.
Press the CH- button to decrease channel number.
Using 0-9 digital buttons
You can select the channel number directly by
Example:
To select 1-digit channel (e.g. Channel 5):
● Press the 5 button.
To select 2-digit channel (e.g. Channel 20):
● Press the 2 button, follow by 0.
To select 3-digit channel (e.g. Channel 100):
● Press the 1 button, follow by 0 and 0.
CH+/- button on the remote control.
pressing 0 to 9 buttons.
In TV mode, according to the type of signal being received, use the NICAM/EJECT button to select an
appropriate mode from the following: Mono, Stereo, Dual I and Dual II.
● When a mono program is received, you can only choose Mono.
● When a stereo program is received, you can switch between Stereo and Mono.
● When a bilingual program is received,you can switch among DualI, DualII and Mono.
DualI sends the primary broadcast language to loudspeakers.
DualII sends the secondary broadcast language to the loudspeakers.
SELECTING TV SOUND
36
-
+
volume
Page 40

TURNING THE TV ON FOR THE FIRST TIME
11
1. If this is the first time you are turning on the TV and there are no
programs in the TV memory, the menu will appear on the screen.
There are 5 setups as follow:
- Setup 2 -
Country :
- Setup 2 -
Enter
Exi t
ExitMove
Germany
UK
France
Italy
Poland
Setup 1:Select your mode.
Setup 2:Select your Country.
Setup 4:Select your Auto Power off preference.
Setup 5:Select your TV service.
Auto Installation
Home Mode :
- Setup 1 -
Enter
Exi t
ExitMove
Home
StoreMode
Auto Installation
Ent er
Ent er
Language :
- Setup 3 -
Enter
Enter
Exi t
ExitMove
German
English
French
Italian
Spanish
Auto Installation
Auto Power Off :
- Setup 4 -
Enter
Enter
Exi t
ExitMove
Off
1 Hour
2 Hour
4 Hour
Auto Installation
Hou rs can be chos en fo r a
con tinuous vi ewi ng, a nd
aft er th at th e TV wi ll be
powere d off ,“o ff” means
the v iewing is ti mel ess
Auto Search
- Setup 5 -
Enter
Move
Auto Installation
Enter
Exi t
Exit
All
ATV
DTV
Setup 3:Select your .language
2. Ensure your aerial plugged in to the TV and then press ENTER.
Menu
Auto Installation
Skip
Exi t
Exit
ATV ch annel s fou nd:
DTV cha nne ls fo und:
Radio c han nel s found :
723.5 5 Mhz
Proce ss:
0
0
0
30%
Page 41

USING THE MENU
SOUND SETTING
1. Press the TV-MENU button on the remote
controller to display the OSD main menu.
2. Press p/q button to select the Sound menu.
3. Press the ENTER button to enter the menu, then you
can use p/qbuttons to select the sub menu options.
4. Press t/ubutton to adjust.
5. Press the TV-MENU or EXIT button to exit from
the menu.
Picture
Channel
Feature
Setup
Sound Mode
Bass
Treble
Balance
SPDIF
Sound
User
50
0
50
Enter
Enter
Menu
Return
Exit
Exit
Move
Sound
Surround
Off
PCM
Note: Treble and Bass can only be adjusted when set in User mode.
Bass: Controls the relative intensity of lower pitched sounds.
Treble: Controls the relative intensity of higher pitched sounds.
Balance: Controls the volume between the left and right speaker.
Surround : Turn on/off the surround sound function by selecting “On” or “Off”.
SPDIF : Allow you to select among Off, PCM and Auto.
Sound Mode: Allows you to select Standard, Movie, Music, Speech or User.
12
PICTURE SETTING
1. Press the TV-MENU button on the remote
controller to display the OSD main menu.
2. Press p/q button to select the Picture menu.
3. Press the ENTER button to enter the menu, then you
can use p/qbuttons to select the sub menu options.
4. Press t/ubutton to adjust.
5. Press the TV-MENU or EXIT button to exit from
the menu.
Picture
Sound
Channel
Feature
Setup
Picture Mode
Brightness
Contrast
Sharpness
Colour
Tint
Colour Temperature
Aspect Ratio
Picture
50
50
5
50
Standard
Enter
Enter
Menu
Return
Exit
Exit
Move
User
50
Picture Mode: Choose from Dynamic, Standard, Mild and User.
Note: Brightness, Contrast, sharpness and Colour are only available for adjustment in the
Personal mode option in the Picture Mode Settings.
Brightness: Controls the overall brightness of the picture.
Contrast: Controls the difference between the brightest and darkest regions of the picture.
Sharpness: Increase this setting to see crisp edges in the picture; decrease it for soft edges.
Colour:Controls the color.
Tint: Controls the tint ( NTSC mode only).
Colour Temperature: Choose from Cool, Warm and Standard.
Aspect Ratio: Choose from 4:3, 16:9, Full, Zoom1, Zoom2, Panorama and Auto.
Noise Reduction: Choose interference noise modes from Off, Low, Middle and High.
Auto
Page 42

USING THE MENU
CHANNEL SETTING
1. Press the TV-MENU button on the remote
controller to display the OSD main menu.
2. Press p/q button to select the Channel menu.
3. Press the ENTER button to enter the menu, then you
can use p/qbuttons to select the sub menu options.
4. Press t/ubutton to adjust.
5. Press the TV-MENU or EXIT button to exit from
the menu.
Picture
Sound
Channel
Feature
Setup
Channel
Enter
Enter
Menu
Return
Exit
Exit
Move
ENTER
ENTER
ENTER
ENTER
ENTER
Italy
Channel Management:
Press button to select Channel Management, then press ENTER button or button to enter.p/q u
Channel - Channel Manager
No.
Program Name
0001
0002
0003
0004
0005
0006
0007
0008
0009
SwapSkip
LockDel
×
Exit
Exit
Move
Page + -
C32
Menu
Return
Type
atv
atv
atv
atv
atv
atv
atv
atv
atv
CH+-
Delete:
Press red button again will cancel delete.
Lock: Press green button to set the current channel to lock. if the current channel already lock, press green
button again will unlock.
Skip: Press yellow button to skip the current channel. Use the cursor buttons to select the channel you wish
to skip. Press yellow button and will be shown at the channel selected. To remove the skip function,
press the yellow button again.
Swap: If one of the stations has been incorrectly placed in the station listing, you may swap it to the correct
position, Using the cursor select the channel to be swaped, press blue button, swap the station to the
new location and press ENTER button, it will swap the station to the new location.
Press red button to set the current channel to delete. if the current channel already delete,
Press TV-MENU button or EXIT button, the successfully updated menu will appear.
Channel - Favorite Manager
No.
Program Name
0002
0003
0004
0005
0006
0007
0008
0009
Favorite1
0001
Fav1 Fav2
Fav3
Fav4
Favorite Management:
Press button to select Favorite Management, then press ENTER button or button to enter.p/q
u
atv
atv
atv
atv
atv
atv
atv
atv
atv
Exit
Exit
Move
Page + -
Menu
Return
CH+-
Press p/qbutton to select channel, press red button to
set to Favorite 1.
Press p/qbutton to select channel, press green button
to set to 2.Favorite
Press p/qbutton to select channel, press yellow button
to set to 3.Favorite
Press p/qbutton to select channel, press blue button to
set to 4.Favorite
If the current channel already be one of your favorite channel,
press red/green/yellow/blue button again will set it to a normal
channel.
13
Channel Management
Favorite Management
Country
Auto Search
DTV Manual Search
ATV Manual Search
LCN On/Off
On
Type
Favorite2
Favorite3 Favorite4
Page 43

USING THE MENU
Country:
Press ENTER or ►button to enter, then press p/qbutton to select appropriate country.
Auto Search:
Press p/qbutton to select Auto Search, then press ENTER button or ubutton to enter.
(When the System Lock is on, please input the default password“0000”).
Picture
Sound
Channel
Feature
Setup
All
Channel - Auto Search
ENTER
DTV
ENTER
ATV
ENTER
Enter
Enter
Menu
Return
Exit
Exit
Move
Press
Press p/qbutton to select ‘‘DTV’’ to tune digital channels that can be received automatically.
Press p/qbutton to select ‘‘ATV’’ to tune analogue channels that can be received automatically.
p/qbutton to select ‘‘All’’ to tune all channels that can be received automatically.
DTV Manual Search:
Press p/qbutton to select DTV Manusl Search, then press ENTER button or ubutton to enter(for DTV
mode only.)(When the System Lock is on, please input the default password“0000”).
Picture
Sound
Channel
Feature
Setup
Channel
Channel - DTV manual Search
B
Frequency(KHz):
53000
BandWidth(MHz):
7
Enter
Enter
Menu
Return
Exit
Exit
Move
Start
Strength
Quality
0%
0%
Press t/ubutton to set the channel/frequency/bandwidth.
Press p/qbutton to select ‘‘Start’’ to start searching.
ATV Manual Search:
Press p/qbutton to select ATV Manusl Search, then press ENTER button or ubutton to enter. (for ATV
mode only.)(When the System Lock is on, please input the default password“0000”).
Picture
Sound
Channel
Feature
Setup
Current Channel
001
Search
Fine Tune
Color System
Sound System
DK
PAL
Channel - ATV manual Search
48.25MHz
Frequency
ENTER
ENTER
Enter
Enter
Menu
Return
Exit
Exit
Move
Save
14
Current Channel: Select the channel you want to manual tuning.
Frequency: Display the current frequency.
Search: Press ENTER to enter search menu, then press t/ubutton to start search.
Fine Tune: Press ENTER to enter fine tune menu, then press t/ubutton to fine tune.
Color System: Press p/qbutton to select color system.
Sound System: Press p/qbutton to select sound system.
Note: Press RED button to save your settings.
LCN On/Off: Set LCN on or off
If you change the password, be sure to remember
the new password! If you forget the new password,
press the master password“8899”
Page 44

USING THE MENU
FEATURE SETTING
1. Press the TV-MENU button on the remote
controller to display the OSD main menu.
2. Press p/q button to select the Feature menu.
3. Press the ENTER button to enter the menu, then you
can use p/qbuttons to select the sub menu options.
4. Press t/ubutton to adjust.
5. Press the TV-MENU or EXIT button to exit from
the menu.
Picture
Sound
Channel
Setup
Lock
Language
Clock
Sleep Timer
Auto Power Off
Hearing Impaired
CI Info
Feature
Feature
ENTER
ENTER
ENTER
Off
Off
Off
ENTER
Enter
Enter
Menu
Return
Exit
Exit
Move
Lock:
Select the Lock, then press ENTER button, you will be prompted to input the password if you have already
set your password. If not, enter the factory initial password “0000”.
Picture
Sound
Channel
Setup
Lock Channel
Parental Guidance
Hotel Mode
Feature - Lock
Feature
On
Off
Change Pin Code
Enter
Enter
Enter
Menu
Return
Exit
Exit
Move
Enter
Lock Channel:
Press the p/q button to turn this function on or off.
: If the Lock is set to “On”, you will be prompted to input the password when you edit the
program or tune the programme or turn on the LED TV(The default password is 0000.)
Parental Guidance( for DTV mode only):
Press p/q button to select the different block rating or select Off to ignore this function.
For example: the 18 age option, this rating is intended for viewers 18 years and older.
Change Pin Code:
Use this option to change the password you use for the Feature menu.
Note
Picture
Sound
Channel
Setup
New Password
Old Password
Confirm New Password
Menu
Return
Exit
Exit
Feature
____
____
____
Feature - Change Pin Code
1. Enter the password(The default password is 0000.)
2. Enter a new 4-digit number using the number buttons.
3. Enter the same 4-digit number to confirm.
Hotel Mode:
Select the Hotel Mode, then press ENTER button to enter the Hotel Setting menu:
15
Page 45

USING THE MENU
Hotel Setting
Hotel Lock
Channel Lock
Source Lock
Picture Lock
Key Lock
Channel Number
Sound Lock
Set Source
On
Off
Off
Off
Off
100
Feature Lock
Setup Lock
Max Volume
Default Volume
Off
Off
–
30
Off
0
Next Page
–
Hotel Setting
Clear Lock
DataBase Export
DataBase Import
Previous Page
–
–
–
–
Hotel Lock: Set the it on or off, when you set it “On”, you can operation following.
Channel Lock: To allow or prohibit the search program . If “On” is set, all operations of channel menu
will be prohibited.
Picture Lock: To allow or prohibit the picture items . If “On” is set, all operations of picture menu will
be prohibited.
Sound Lock: To allow or prohibit the sound items . If “On” is set, all operations of picture menu will
be prohibited.
Feature Lock: To allow or prohibit the feature items . If “On” is set, all operations of picture menu will
be prohibited.
Setup Lock: To allow or prohibit the setup items . If “On” is set, all operations of picture menu will
be prohibited.
Key Lock: You can not operate the key when you set on.
Source Lock: To lock the source which you do not like.
Set Source: This option allows you to set the input source which you desire to be displayed when the
TV is turned on .
Channel Number: Set the turn on Channel which you like in ATV/DTV.
Max Volume: Allows you to set the maximum volume level.
Default Volume: Set the turn on volume.
Clear Lock: Clears all settings in the Hotel Menu.
DataBase Export: Export the data which you set in menu and the channel to USB .Export successfully
will create a file name DATABASE.bin.
DataBase Import: Import the data from USB which name “DATABASE.bin”, when import successed the
TV will become standy by. It mean you can clone the setting to another.
Note: The clone function only use for the same main board and same panel.
16
Page 46

USING THE MENU
Language:
Press p/qbutton to select Language, then press ENTER button or ubutton to enter.
R
Picture
Sound
Channel
Setup
OSD Language
Preferred Subtitle
Preferred Audio
Feature - Language
Feature
English
Italian
DTV Teletext Language
Italian
Italian
ATV Teletext Language
West
Enter
Enter
Menu
Return
Exit
Exit
Move
OSD Language:
Press p/qbutton to select OSD Language, then press t/ubutton to select.
Preferred Subtitle:
Press p/qbutton to select Preferred Subtitle, then press t/ubutton to select.
Preferred Audio:
Press p/qbutton to select Preferred Audio, then press t/ubutton to select.
DTV Teletext Language:
Press p/qbutton to select DTV Teletext Language, then press t/ubutton to select.
ATV Teletext Language:
Press p/qbutton to select ATV Teletext Language, then press t/ubutton to select.
Clock (for DTV mode only):
Press p/qbutton to select Clock, then press ENTER button or ubutton to enter.
Picture
Sound
Channel
Setup
Date
Time
Time Zone
DST
Feature - Clock
Feature
06/11/2012
11:02
+8:00
Off
Enter
Enter
Menu
Return
Exit
Exit
Move
Press p/qbutton to select item, and press
t/ubutton to adjust.
Sleep Timer:
Allows you to setup the sleep timer among 10min, 20min, 30min, 60min, 90min, 120min, 180min, 240min
and Off.
Auto Power Off:
Set the TV to standby after the set time has elapsed.
Hearing Impaired:
Select On or Off to turn on or off the hearing impaired function.
CI Info:
Display the CI information.
17
Page 47

USING THE MENU
SETUP SETTING
1. Press the TV-MENU button on the remote
controller to display the OSD main menu.
2. Press p/q button to select the Setup menu.
3. Press the ENTER button to enter the menu, then you
can use p/qbuttons to select the sub menu options.
4. Press t/ubutton to adjust.
5. Press the TV-MENU or EXIT button to exit from
the menu.
OSD Timer:
Set the OSD display time.
Auto SCART:
Select On or Off.
PC Setup:
Press p/qbutton to select PC Setup, then press ENTER button or ubutton to enter. (for PC mode only)
Auto Adjust:
Adjust screen settings automatically for optimized
picture position.
H Position:
Adjust the screen horizontal position.
V Position:
Adjust the screen vertical position.
Phase:
Remove any horizontal interference.
Clock:
Remove any vertical interference.
Picture
Sound
Channel
Feature
Setup - PC Setup
Setup
Enter
Enter
Menu
Return
Exit
Exit
Move
H Position
V Position
Phase
Clock
0
Auto Adjust
0
3
0
ENTER
18
Picture
Sound
Channel
Feature
PC Setup
Blue Screen
Reset TV Setting
Setup
30 Seconds
ENTER
Setup
OSD Timer
Off
Auto SCART
On
Enter
Enter
Menu
Return
Exit
Exit
Move
ENTER
Software Upgrade
ENTER
Hom e Mode
Home
Blue Screen:
Select the On/Off option to show blue screen.
Reset TV Setting:
To reset the database to the original factory settings.
Software Upgrade:
Update the software.
Home Mode:
Allows you to select among:Home,StoreMode.
Page 48

USB FUNCTION
19
Press the SOURCE button on the remote control to display the input source menu, select the Media source
with the buttons and press the ENTER button to enter the multimedia menu.p/q
1. Photo
Photo viewing
Press button to select the files on the USB device (photo/Music/Movie/e-Book) to view or play.
Press p/qbutton to select and the ENTER button to activate the file or open folder. Press the
PLAY button to play the files in full screen mode. When in full screen mode press the stop button or
EXIT button to return to files.
t/u
Press red button to delete the focused folder/file.
Press green button to add/Del all photo files to play list.
Press “PLAY” button to start playback.
: to play the previous or next file directly.
: to start playing picture in slide show mode.
: to pause the playing file.
: to stop sliding show, and return to the file browser.
: to rotate the playing picture.
: to zoom the playing picture.
: to display the information of the current file.
: to enter “Photo Setup” menu, including “Repeat Mode”, “Background Music”, “Music Source”,
”Slide Time”, “Effect”..
: to enter the play list menu.
2. Music
Listen to music
USB file systems supported: FAT, FAT32. 2.0 USB version is supported, maximum capacity is 320
Gb; max. load: DC5V, 500 mA.
Page 49

20
Press red button to delete the focused folder/file.
Press green button to add/Del all photo files to play list.
Press “PLAY” button to start playback.
: to start playing file, or resume the paused file.
: to pause the playing file.
: to stop the playing file.
: to play fast backward or forward.
: to play the previous or next file directly.
: to switch the repeat mode.
: to switch the window between “Information” and “Play List”.
: to close the panel only in “Music” mode, and then it can be opened by every key on remote.
3. Movie
Watch a film
Press red button to delete the focused folder/file.
Press green button to add/Del all photo files to play list.
Press “PLAY” button to start playback.
Close Panel
: to enter “GO TO” function, user can input the time he want to start directly.
Page 50

: to start playing file, or resume the paused file.
: to pause the playing file.
: to the playing file, and return to the file browser interface.
: to play the previous or next file directly.
: to enter slow mode.
: to enter step mode.
: to set AB repeat, the first press sets A point, and the second press sets B point, and then play
between A and B repeatedly.
: to play fast backward or forward.
: to enter the play list menu.
: to display the information of the current file.
: to enter “Movie Setup” menu, including “Program”, “Subtitle”, “Audio”, ”Repeat Mode”.
: to enter “GO TO” function, user can input the time he want to start directly.
4. e-Book
View text file
Press red button to delete the focused folder/file.
Press green button to add/Del all photo files to play list.
Press “PLAY” button to start playback.
Press red button to add/del bookmark.
Press green button to input the page number directly.
Press yellow button to enter the “Bookmark list” page.
Press blue button to enter the “Play list” page.
21
Page 51

22
Page 52

23
SUPPORTED OPERATING MODES
● It is possible that modes which are not listed in the above table above may not be supported.
For an optimal picture, it is recommended to choose a mode listed in the table.
● The incoming display modes that are compatible with WINDOWS are shown in the table above.
● Sometimes, the image may be disrupted due to the frequency standard from the VGA card.
However, this is not an error. You may improve this situation by activating the automatic
adjustment or by manually changing the phase and the clock settings in the menu.
● To extend the service life of the product, we recommend that you use your computer’s power
management function.
1080i/60
1920X1080
33.75
60.00
60.00
576p
720X576
31.25
50.00
50.00
1080i/50
1920X1080
28.13
Mode Resolution
Horizontal Frequency (K Hz) Vertical Frequency (Hz)
1280X720
720p/60
45.00
HDMI INPUT
1080p/60
1920X1080
67.50
60.00
50.00
1080p/50
1920X1080
56.25
COMPONENT VIDEO (YPbPr) INPUT
RGB INPUT
720p/60
720 44.96
60.00
576i 576
15.63
50.00
480i 480
15.73
60.00
576p
576
31.26
50.00
480p
480
31.47
60.00
1080i/50
1080
28.13
50.00
1080i/60
1080
33.75
60.00
Mode Resolution
Horizontal Frequency (K Hz) Vertical Frequency (Hz)
640X480
VGA
31.5
60
800X600
SVGA
37.9
60
XGA
48.4 601024X768
Mode Resolution
Horizontal Frequency (K Hz) Vertical Frequency (Hz)
1080p/50
1080
56.25
50.00
1080p/60
1080
67.50
60.00
WXGA
47.7
60
1360X768
WXGA++
60
60
1600X900
Page 53

TROUBLESHOOTING
24
Before contacting a service technician, perform the following simple checks. If any problem still
persists, unplug the LED TV and call for serving.
● Check the volume.
● Check whether then MUTE button has been pressed on the remote
control.
● Adjust the color settings.
● Check that the broadcasting system selected is correct.
● Check the volume.
● If the volume is still too low after setting the volume level to
maximum, check the volume control on computer sound card or
software program, but also check the volume of the DVD.
● Check that the main plug has been connected to a wall inlet.
● Check that you have pressed the button on the front of the TV.
● Check the volume.
Problem
Possible Solution
No sound
● Try to identify the electrical appliance that is affecting the set and
move it further away.
● Make sure that the signal cable is firmly connected to the PC or the
video sources.
● Make sure that the PC or video sources are switched on.
● Be sure the power cord is plugged in.
● Adjust the brightness and Contrast.
● Check the direction, location and connections of your aerial.
● The battery in the remote control may be exhausted.
● The battery may be improperly installed.
● Check that there is no obstruction between the remote control and
the remote (infrared) sensor.
● Ensure that there is no strong light shining on the remote control’s
infrared sensor.
Sound and picture
interference
Blurred or snowy picture,
distorted sound
Remote control does not
work
The LED TV does not turn on
The image is too light or too
dark
● Adjust the Phase.
● Adjust the Manual Clock .
● Check that the display resolution and frequency from your PC or
video board is a valid mode for your LED TV.
Control PanelgDisplaygSettings.
● If the setting is not correct, use your computer utility program to
change the display settings.
Your monitor supports multiscan display function within the follow ing frequency domain:
Horizontal frequency:30KHz~75KHz
Vertical frequency: 56Hz~60Hz
On PC mode, vertical bars
appear to flicker, jitter or
shimmer on the image
On PC mode, horizontal bars
appear to flicker, jitter or
shimmer on the image
On PC mode, image is not
stable and may appear to
vibrate
“No signal” message
No picture or black and white
picture
Sound is too low
Normal picture but no sound
● Check the contrast and brightness of the image.
● Check the video source connected to the TV.
● Adjust the horizontal and vertical position.
On PC mode, image is not
centred on the screen.
Page 54

25
SPECIFICATIONS
Input Source
Sync.
Video Signal
Video
Color System
Video Format
Power Supply
Input
RGB Signal
Power Consumption
Working
Standby
Environmental Considerations
Operating Temperature
Operating Humidity
Audio Characteristics
Audio Input
Frequency
Response
Audio Input (PC)
TV
Color System
Sound System
H/V separate, TTL, P. or N.
1Vp-p @ 75 ohm
0.7 Vp-p @ 75 ohm
DC 12V 2.2A
10 ~ 40 (50°F ~ 104°F)℃ ℃
10% ~ 80%
RCA Jack (L, R), 0.5Vrms (-9dB)
RF: 100Hz~10KHz (at ± 3dB)
A/V: 100Hz~12KHz (at ± 3dB)
Ø3.5 Stereo Jack, 0.5Vrms (-9dB)
PAL/SECAM/NTSC
CVBS, RGB
<26.4W
≤0.5W
LED Panel
Size
20" Diagonal
Dimension (WXDXH)mm
Weight (Kg)
Net Weight
Note:
The unit may be submitted to changes in specifications, characteristics and/or operation without prior notice to
the user, in order to continue improving and developing its technology.
Gross Weight
Without Stand
With Stand
≈ 2.6 kg
3.8 kg≈
Speaker
2W+2W
Dynamic Contrast
2000000:1
ATV: PAL, SECAM
DTV: MPEG 2 MP@ML,H.264
ATV: BG, DK, I
DTV: MPEG 1 layer 1,2,DD,DD+
466x42x279
466x150x314
Technical Specification
ATV Channel
DTV channel and Radio channel under DTV mode
120 (The maximum can be saved)
1000 (The maximum can be saved)
Page 55

STAND INSTALLATION GUIDE
26
A B
1 2
1 Pcs
A
B
C
2 Pcs(4x1 0PM)
3
D
4
C
D
1 Pcs
1 Pcs(4x1 0BT)
E
3 Pcs(4x1 0PWA)
E
 Loading...